 Managing Role Definitions Using CSV File Packages
 Before You Begin
This hour long tutorial shows you how to add function and aggregate privileges to roles using CSV file packages.
Background
In order to enable the new HCM Redesigned Cloud User Experience, there are a number of steps you must perform. One of these steps is to add function and aggregate privileges to your custom roles.
This tutorial will show you, the security manager, how to add privileges in bulk to a custom role, using CSV file packages.
What Do You Need?
- A user with the IT Security Manager role
- The HCM Responsive User Experience Setup Information White Paper (Doc ID 2399671.1)
Research
Before you start modifying roles, you need to research the changes you need to make.
The privileges that are used by the Redesigned User Experience UIs are documented in the following sections of the HCM Responsive User Experience Setup Information White Paper (Doc ID 2399671.1)
- Privileges Required for the Redesigned User Experience
- Privileges Securing Lists of Values in the Redesigned User Experience
For this tutorial we are going to add privileges for Career and Succession Management, using the 20A version of the white paper.
Open the HCM Responsive User Experience Setup Whitepaper in MOS Doc 2399671.1.
View Privileges Securing Lists of Values in the Redesigned User Experience to find the privilege granting access to the Succession Management LOV.
There is an aggregate privilege for Succession Management : ORA_HRM_REST_SERVICE_ACCESS_SUCCESSION_MANAGEMENT_LOVS. The aggregate privilege already exists in my roles, but if needed, it can be added in the same manner as the other aggregate privileges in the table below.
View Priviliges Reqiured for the Redesigned User Experience > Career and Succession.

Using this information, we have determined we have roles for Human Resource Specialist, Line Manager, Employee, and Contingent Worker. Since the Employee and Contingent Worker roles require just one new privilege, it can be added using the Security Console. Adding a privilege to a role using the Security Console is not covered by this tutorial.
Existing Role Privilege Type Privilege Line Manager Function Security Privilege HRM_MANAGE_TALENT_POOL_PRIV Line Manager Function Security Privilege HRT_VIEW_CAREER_OVERVIEW_BY_MANAGER_PRIV Human Resource Specialist Function Security Privilege HRM_CREATE_TALENT_POOL_PRIV Human Resource Specialist Function Security Privilege HRM_MANAGE_TALENT_POOL_PRIV Human Resource Specialist Function Security Privilege HRM_IDENTIFY_TALENT_POOL_MEMBERS_AND_ASSIGN_GOALS_PRIV Human Resource Specialist Function Security Privilege HRT_MANAGE_BEST_FIT_BATCH_PROCESS_PRIV Human Resource Specialist Function Security Privilege HRT_MANAGE_PROFILE_UPGRADE_MAPPING_PRIV Human Resource Specialist Function Security Privilege HRT_SEARCH_TALENT_PROFILE_PRIV Human Resource Specialist Function Security Privilege HRT_ACCESS_MY_CAREER_AND_PERFORMANCE_PRIV Human Resource Specialist Aggregate Privilege ORA_HRT_WORKFORCE_PROFILE_ADMINISTRATION_DUTY Human Resource Specialist Aggregate Privilege ORA_HRT_WORKFORCE_PROFILE_SPECIALIST_DUTY Now that we know what roles we are updating with what privileges we are ready to proceed in the UI.
 Exporting Custom Role Definitions to a CSV File Package
- Log on as a user with the IT Security Manager role.
Navigate to the Setup and Maintenance work area:
Navigator > [Others] Setup and Maintenance
Select the Workforce Deployment offering.

Select the functional area Users and Security.
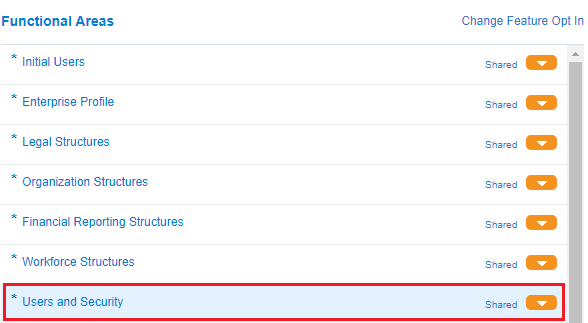
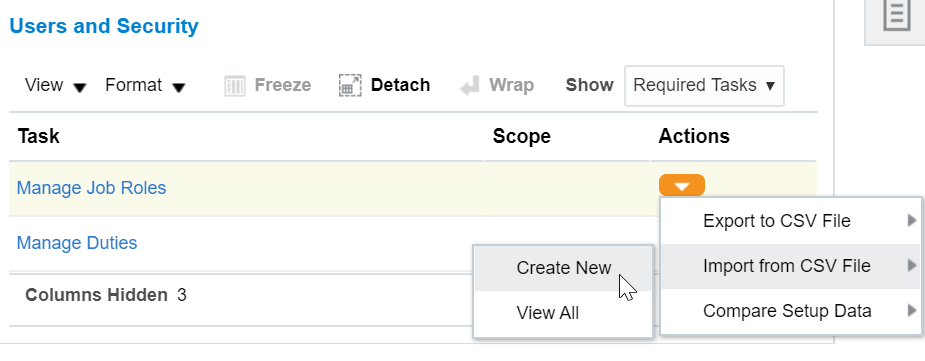
Add the Actions menu if it is not visible in the task list region.

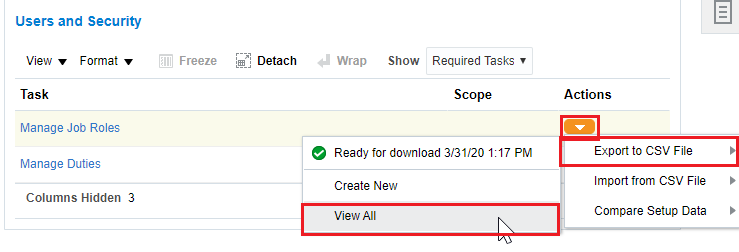
In the Manage Job Roles: Actions menu choose Export to CSV File > Create New.

The Export Setup Data to CSV File page has been launched.
Click Add to add your custom Line Manager and Human Resource Specialist roles to the set of roles that will be exported.
If you do not do this, all roles will be exported.

As you find your roles select them and click apply. Once all your roles have been added click Save and close.

An Export process name will be defaulted. You can change this if you want to. In this tutorial we will change it to "Roles Responsive Update 20A Demo".
Click Submit to initiate the Export.

A confirmation that the process has been initiated will be generated. Click OK.

In the Manage Job Roles: Actions menu choose Export to CSV File > View All.
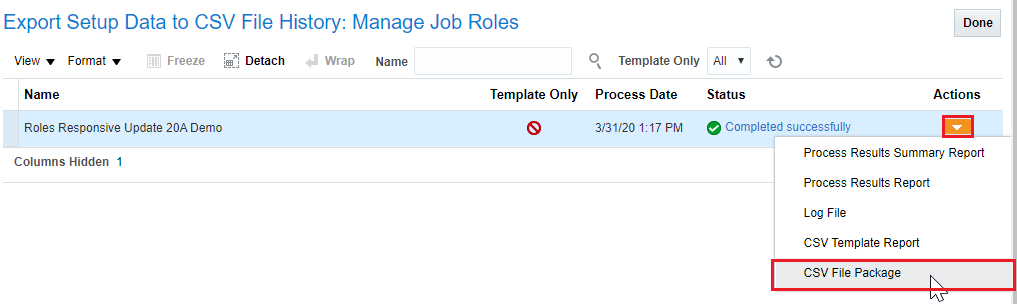
Monitor the progress of the export process. Press the refresh button to refresh the page. When it has completed, select "Download > CSV File Package" from the actions menu.
This will download a zip file to your desktop.
 Modify the CSV File Package
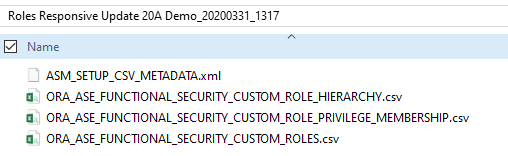
Unzip the CSV File Package and view the contents. There will be four files.
- ASM_SETUP_CSV_METADATA.xml defines the structure of the csv files.
- ORA_ASE_FUNCTIONAL_SECURITY_CUSTOM_ROLES.csv contains basic information about each of the exported roles.
- ORA_ASE_FUNCTIONAL_SECURITY_CUSTOM_ROLE_HIERARCHY.csv contains the role hierarchy memberships for the exported roles.
- ORA_ASE_FUNCTIONAL_SECURITY_CUSTOM_ROLE_PRIVILEGE_MEMBERSHIP.csv contains the function security privilege grants for the exported roles.
You do not need to make any changes to ASM_SETUP_CSV_METADATA.xml and ORA_ASE_FUNCTIONAL_SECURITY_CUSTOM_ROLES.csv.
We will be modifying the role hierarchy file to add the aggregate privileges and the role privilege membership file to add the function security privileges to our roles. You may use any editor you choose to edit the .csv files. By default the files will open in MS Excel for editing.
My role hierarchy file currently contains the following:
"ParentRole","MemberRole","AddOrRemoveRoleMembership"
"RFM_HUMAN_RESOURCE_SPECIALIST","ORA_PER_REST_SERVICE_ACCESS_WORKER_AS_HR","ADD"
"RFM_HUMAN_RESOURCE_SPECIALIST","ORA_HRM_REST_SERVICE_ACCESS_SUCCESSION_MANAGEMENT_LOVS","ADD"
"RFM_LINE_MANAGER","ORA_PER_REST_SERVICE_ACCESS_WORKER_AS_MANAGER","ADD"
"RFM_LINE_MANAGER","ORA_HRM_REST_SERVICE_ACCESS_SUCCESSION_MANAGEMENT_LOVS","ADD"
To modify the file I need to add the following lines:
"RFM_HUMAN_RESOURCE_SPECIALIST","ORA_HRT_WORKFORCE_PROFILE_ADMINISTRATION_DUTY","ADD"
"RFM_HUMAN_RESOURCE_SPECIALIST","ORA_HRT_WORKFORCE_PROFILE_SPECIALIST_DUTY","ADD"
Note: you may keep only the headers and add new roles, I choose to keep the file contents that already existed.
My role hierarchy file now contains:
"ParentRole","MemberRole","AddOrRemoveRoleMembership"
"RFM_HUMAN_RESOURCE_SPECIALIST","ORA_PER_REST_SERVICE_ACCESS_WORKER_AS_HR","ADD"
"RFM_HUMAN_RESOURCE_SPECIALIST","ORA_HRM_REST_SERVICE_ACCESS_SUCCESSION_MANAGEMENT_LOVS","ADD"
"RFM_LINE_MANAGER","ORA_PER_REST_SERVICE_ACCESS_WORKER_AS_MANAGER","ADD"
"RFM_LINE_MANAGER","ORA_HRM_REST_SERVICE_ACCESS_SUCCESSION_MANAGEMENT_LOVS","ADD"
"RFM_HUMAN_RESOURCE_SPECIALIST","ORA_HRT_WORKFORCE_PROFILE_ADMINISTRATION_DUTY","ADD"
"RFM_HUMAN_RESOURCE_SPECIALIST","ORA_HRT_WORKFORCE_PROFILE_SPECIALIST_DUTY","ADD"
Modify your role hierarchy file in a similar manner, using your parent role names. The final file will look like this.

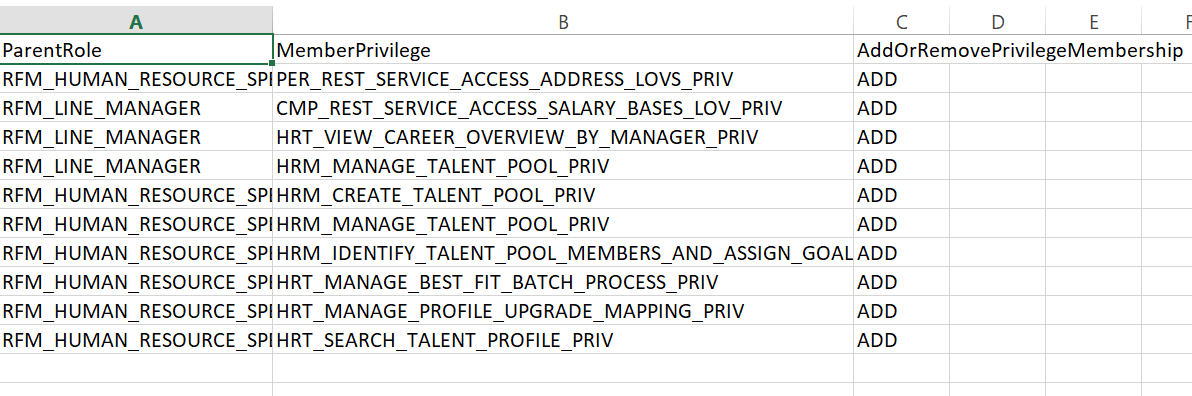
My role privilege membership file currently contains the following:
"ParentRole","MemberPrivilege","AddOrRemovePrivilegeMembership"
"RFM_HUMAN_RESOURCE_SPECIALIST","PER_REST_SERVICE_ACCESS_ADDRESS_LOVS_PRIV","ADD"
"RFM_LINE_MANAGER","CMP_REST_SERVICE_ACCESS_SALARY_BASES_LOV_PRIV","ADD"
To modify the file I need to add the following lines:
"RFM_LINE_MANAGER","HRT_VIEW_CAREER_OVERVIEW_BY_MANAGER_PRIV","ADD"
"RFM_LINE_MANAGER","HRM_MANAGE_TALENT_POOL_PRIV","ADD"
"RFM_HUMAN_RESOURCE_SPECIALIST","HRM_CREATE_TALENT_POOL_PRIV","ADD"
"RFM_HUMAN_RESOURCE_SPECIALIST","HRM_MANAGE_TALENT_POOL_PRIV","ADD"
"RFM_HUMAN_RESOURCE_SPECIALIST","HRM_IDENTIFY_TALENT_POOL_MEMBERS_AND_ASSIGN_GOALS_PRIV","ADD"
"RFM_HUMAN_RESOURCE_SPECIALIST","HRT_MANAGE_BEST_FIT_BATCH_PROCESS_PRIV","ADD"
"RFM_HUMAN_RESOURCE_SPECIALIST","HRT_MANAGE_PROFILE_UPGRADE_MAPPING_PRIV","ADD"
"RFM_HUMAN_RESOURCE_SPECIALIST","HRT_SEARCH_TALENT_PROFILE_PRIV","ADD"
Note: you may keep only the headers and add new privileges, I choose to keep the file contents that already existed.
My role privilege membership file now contains:
"ParentRole","MemberPrivilege","AddOrRemovePrivilegeMembership"
"RFM_HUMAN_RESOURCE_SPECIALIST","PER_REST_SERVICE_ACCESS_ADDRESS_LOVS_PRIV","ADD"
"RFM_LINE_MANAGER","CMP_REST_SERVICE_ACCESS_SALARY_BASES_LOV_PRIV","ADD"
"RFM_LINE_MANAGER","HRT_VIEW_CAREER_OVERVIEW_BY_MANAGER_PRIV","ADD"
"RFM_LINE_MANAGER","HRM_MANAGE_TALENT_POOL_PRIV","ADD"
"RFM_HUMAN_RESOURCE_SPECIALIST","HRM_CREATE_TALENT_POOL_PRIV","ADD"
"RFM_HUMAN_RESOURCE_SPECIALIST","HRM_MANAGE_TALENT_POOL_PRIV","ADD"
"RFM_HUMAN_RESOURCE_SPECIALIST","HRM_IDENTIFY_TALENT_POOL_MEMBERS_AND_ASSIGN_GOALS_PRIV","ADD"
"RFM_HUMAN_RESOURCE_SPECIALIST","HRT_MANAGE_BEST_FIT_BATCH_PROCESS_PRIV","ADD"
"RFM_HUMAN_RESOURCE_SPECIALIST","HRT_MANAGE_PROFILE_UPGRADE_MAPPING_PRIV","ADD"
"RFM_HUMAN_RESOURCE_SPECIALIST","HRT_SEARCH_TALENT_PROFILE_PRIV","ADD"
Modify your role privilege membership file in a similar manner, using your parent role names. The final file will look like this.
- Save your modified files.
- If the original zip file is still in your folder, delete it. Then compress the four remaining files into a zip file. This is the CSV file package that you will import in the next step.
 Importing the CSV File Package to Upload the Changes to the Custom Role Definitions
Navigate to the Setup and Maintenance work area:
Navigator > [Others] Setup and Maintenance
Select the Workforce Deployment offering.
Select the functional area Users and Security.
Select Manage Job Roles: Actions > Import from CSV Files > Create New.
The Import Setup Data from CSV File page will launch.
Choose the zip file you created.
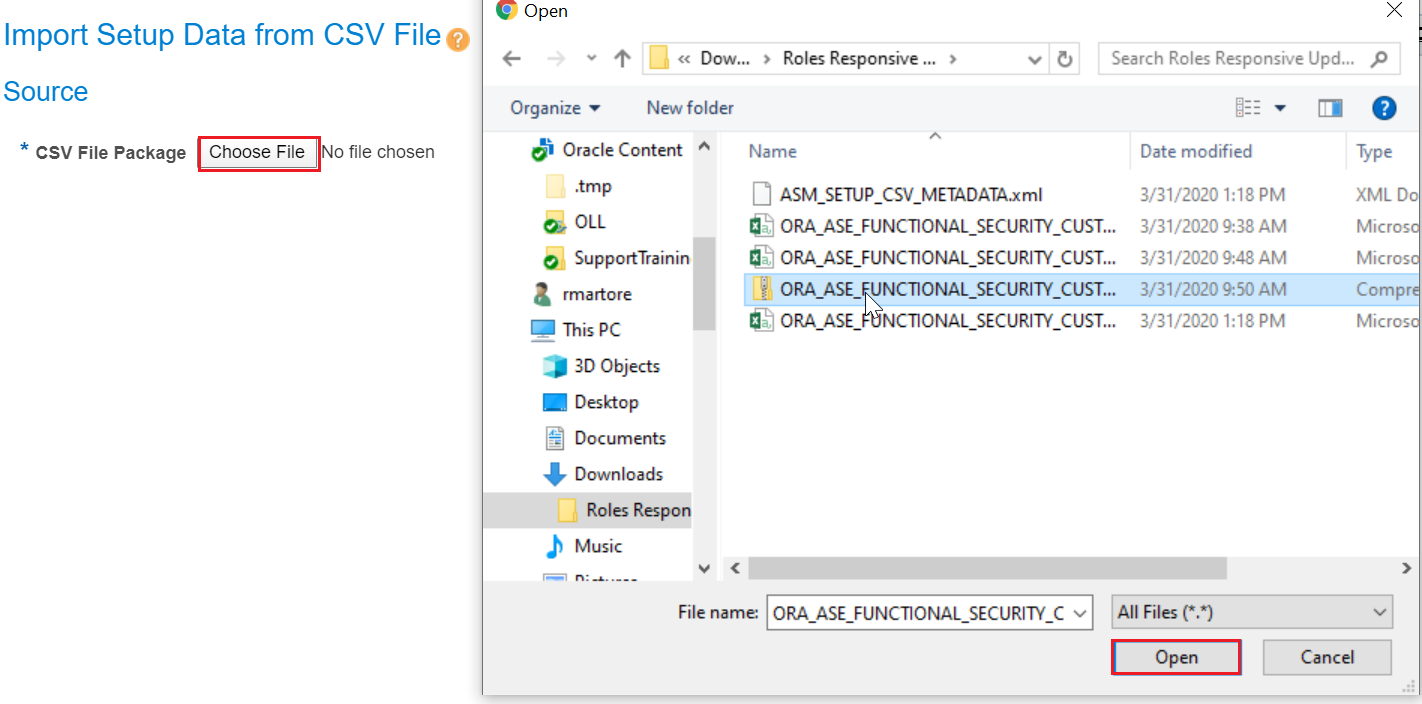
Click Submit.

A confirmation that the process has been submitted will display. Click OK.

Click Manage Job Roles: Actions > Import from CSV Files > View All to view the status of your import process.
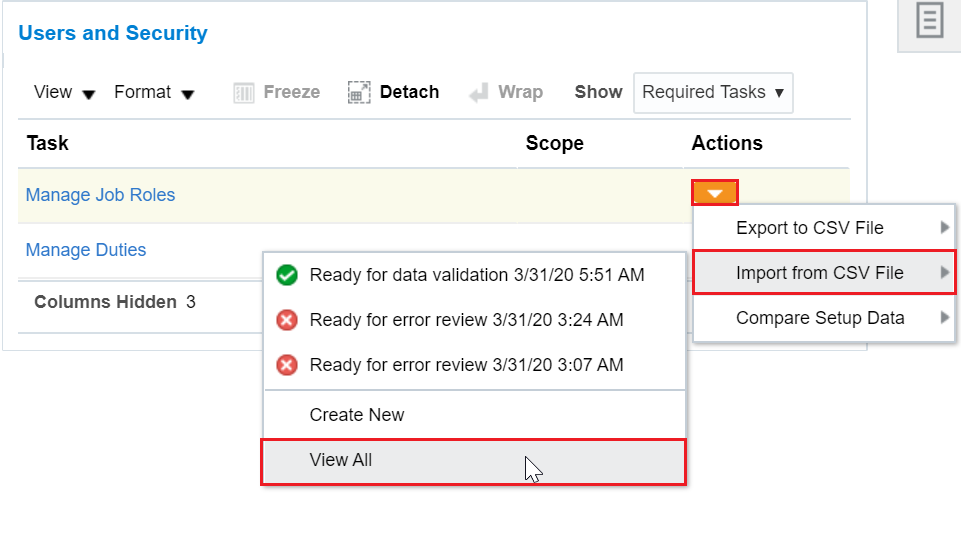
When the job is completed successfully, click done. If the job has errors download the logs from the actions menu to troubleshoot the errors.

You can now view the roles in the security console and see the changes reflected in the roles.
- After you have successfully added the privileges to your custom roles you should regenerate your data roles.