Before You Begin
Purpose
The purpose of this training is to create an extract which will allow you to become familiar with the HCM Extract features and user interface.
Time to Complete
Creating this extract should take three hours for a beginner.
Scenario
Fast Bark is a global organization with
subsidiaries all over the world. It requires a
headcount report with department
and employee details. The employee information
needs to be grouped at each
department level. To generate this report,
Fast Bark must define an extract and run it using
the HCM Extract tool within
Fusion HCM.
Context
This Extract consists of 2 data groups (i.e. Departments, Employees), which consists of few records in each block and different type of data elements.

What Do You Need?
Oracle BI Publisher MS Word plug-in is required. The plug-in can be downloaded at the Oracle BI Publisher download page (http://www.oracle.com/technetwork/middleware/bi-publisher/downloads/index.html ).
Creating a Fast Formula
Fast Formula Creation is outside of the scope of extract creation, but is necessary to create our FastBark Extract.
-
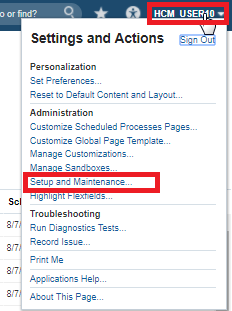
In the Settings and Actions Menu, click Setup and Maintenance:
-
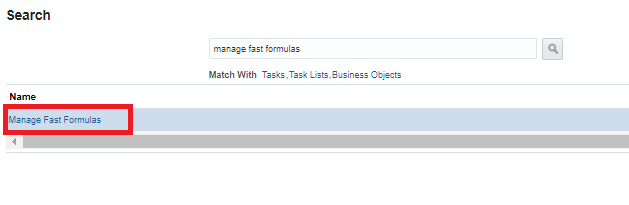
Search for manage fast formulas:

-
Click Manage Fast Formulas:
-
On the Manage Fast Formulas Page, click Create:

-
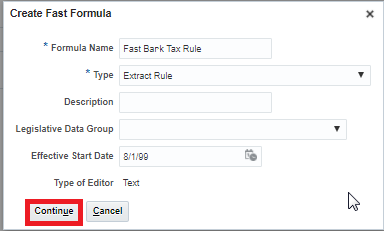
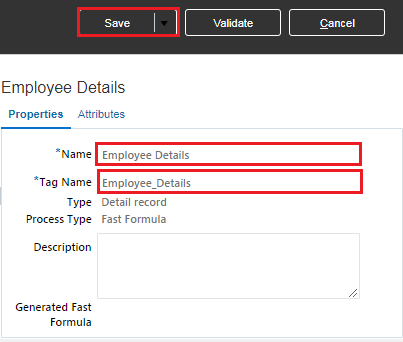
In the Create Fast Formula dialog box enter the following properties:
Fast Formula Properties
Property Value Formula Name Fast Bark Tax Rule Type Extract Rule Effective Start Date 8/1/1999 Click Continue
-
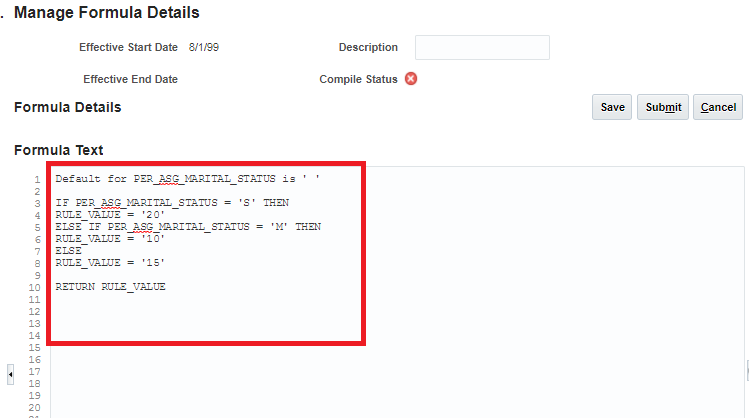
Add the follwing formula text:
Default for PER_ASG_MARITAL_STATUS is ' '
IF PER_ASG_MARITAL_STATUS = 'S' THEN
RULE_VALUE = '20'
ELSE IF PER_ASG_MARITAL_STATUS = 'M' THEN
RULE_VALUE = '10'
ELSE
RULE_VALUE = '15'
RETURN RULE_VALUE
-
Click Save:

-
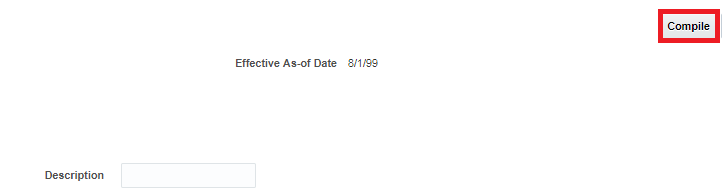
Click Compile:
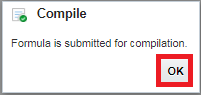
-
click OK:
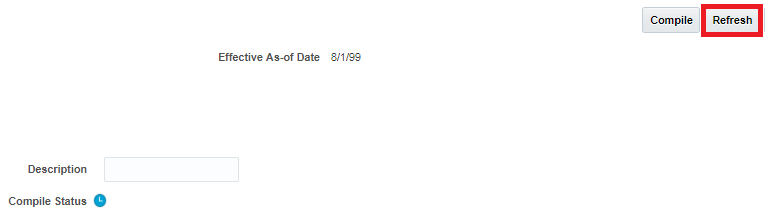
-
Click Refresh to update the Compile Status:
-
When the compilation has finished successfully click Done:

Creating a Value Set
Value Set Creation is outside of the scope of extract creation, but is necessary to create our FastBark Extract.
-
In the Settings and Actions Menu, click Setup and Maintenance:
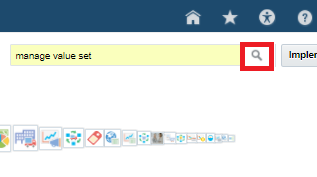
-
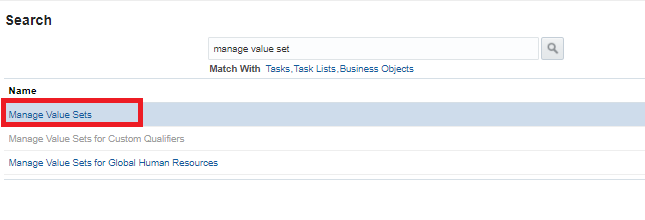
Search for manage value set:
-
Click on Manage Value Sets:
-
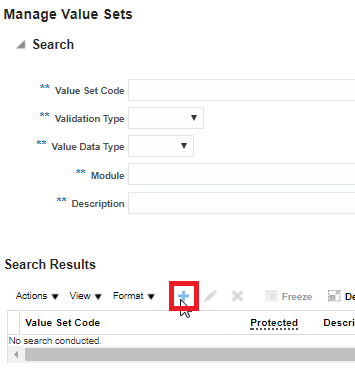
Click create to create a new value set:
-
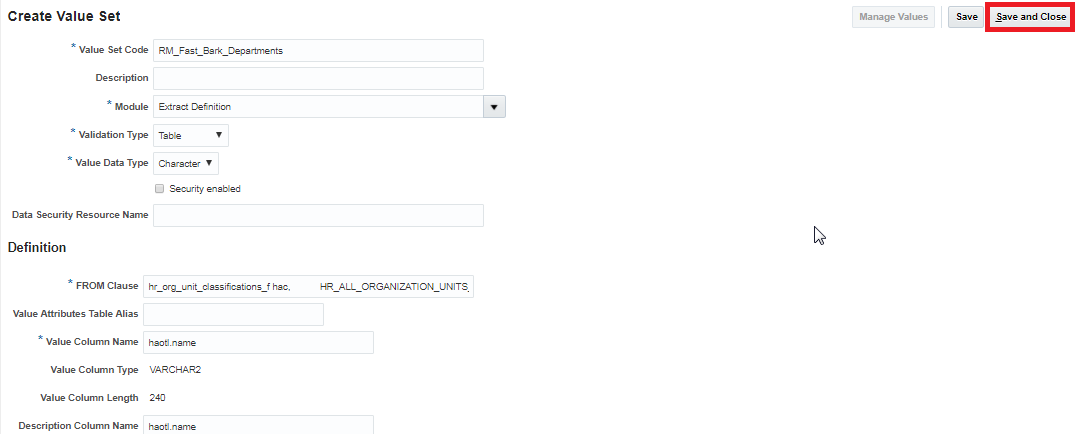
Enter the following properties:
Value Set Properties
Property Value Value Set Code XX_Fast_Bark_Departments Module Extract Definition Validation Type Table Value Data Type Character From Clause hr_org_unit_classifications_f hac, HR_ALL_ORGANIZATION_UNITS_F org, hr_organization_units_f_tl haotl Value Column Name haotl.name Description Column Name haotl.name ID Column Name haotl.name Where Clause org.organization_id = hac.organization_id
AND org.organization_id = haotl.organization_id
AND haotl.language = USERENV('LANG')
AND hac.classification_code = 'DEPARTMENT'Order By Clause haotl.name Click Save and Close:
Creating an Extract
-
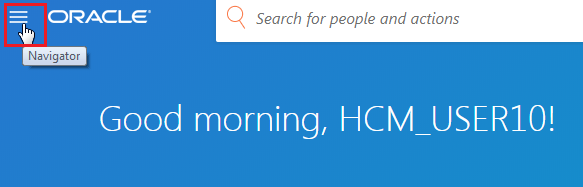
Click the navigator:
-
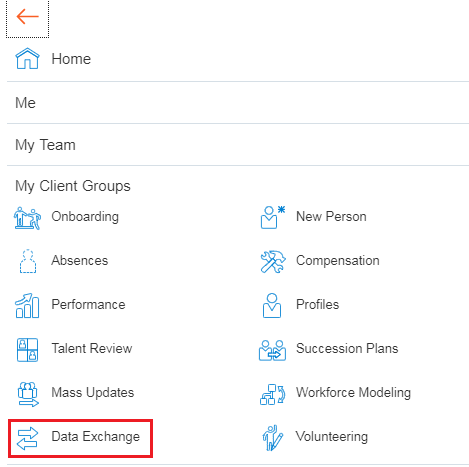
1) Click on the [My Client Groups] Data Exchange workarea:
-
Click HCM Extracts:

-
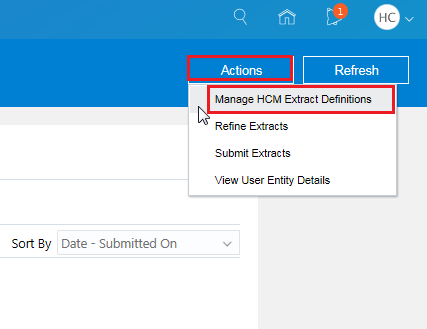
In the Actions menu, click Manage Extract Definitions:
-
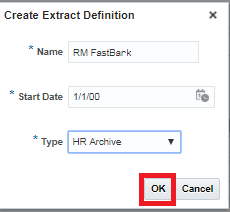
On the Manage Extract Definitions screen, click Create:

-
Provide a name for the extract definition, and select the type of extract and click OK:
Name: XX FastBark
Type: HR Archive
-
The extract has been created:

Creating a Parameter
-
On the Extract Define page, click Add to add a new parameter:

-
Add the following properties:
Parameter Properties
Property Value Name Department Tag Name Department Data Type Text Display Format Value Set Lookup XX_Fast_Bark_Departments Display Yes 
Click Save
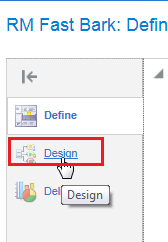
Design Extract
Create Extract Data Groups
Data groups are defined with a user entity which is like a table. You make records with user entity information called attributes which are like table columns.
-
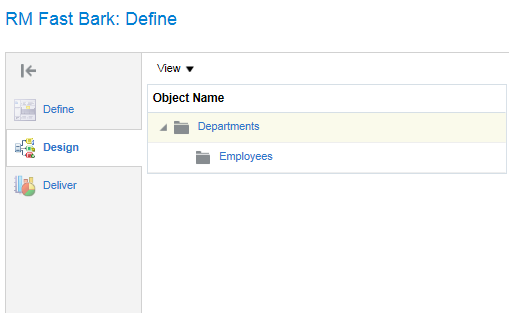
Navigate to the design page:
-
The data group editor is automatically opened and this is where you create the Root Data Group:
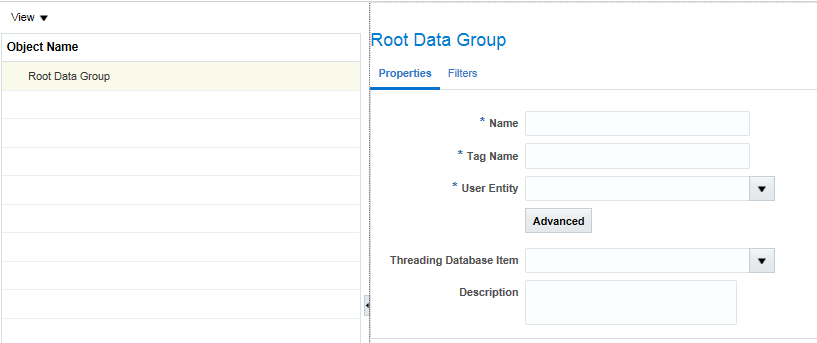
-
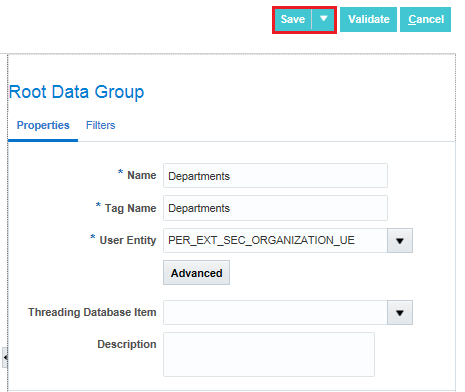
The root data group we will create will be the Departments data group.
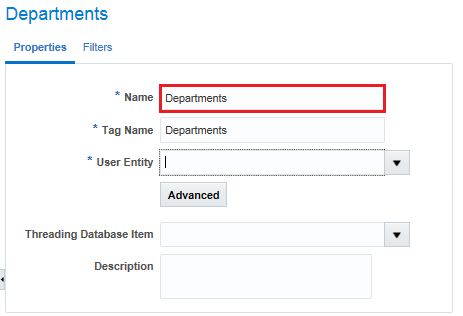
Name the data group Departments.
-
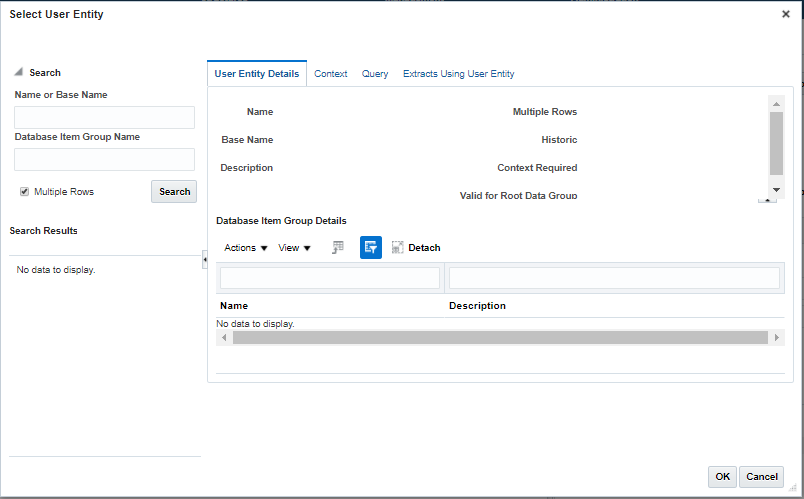
Click Advanced to search for the appropriate User Entity:

The Select User Entity dialog will open.
-
Search for Organizations and Click OK:
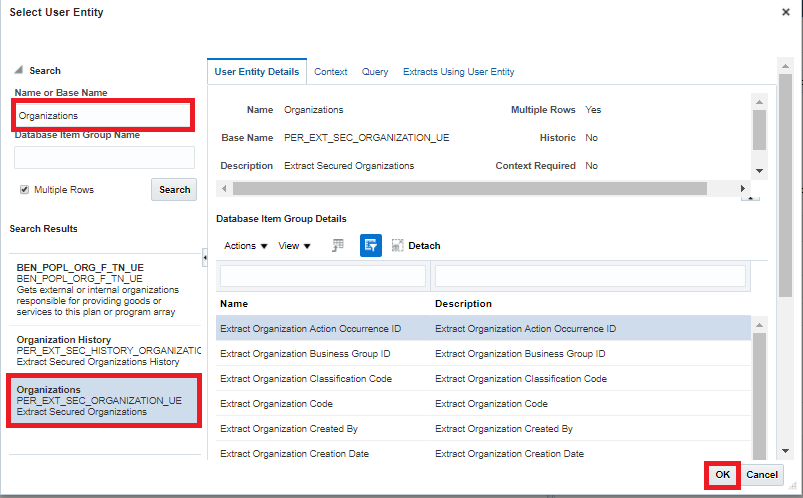
-
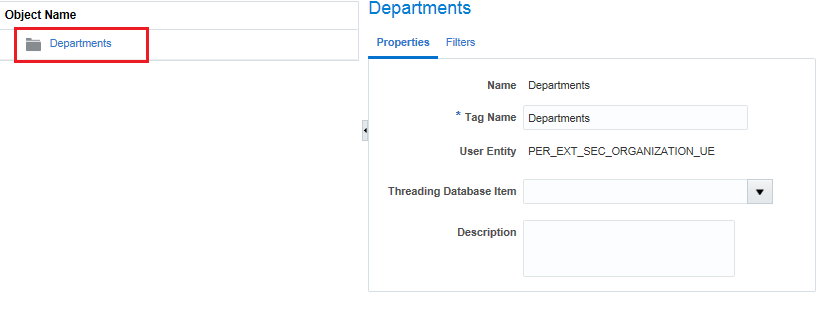
The user entity PER_EXT_SEC_ORGANIZATION_UE is now present for the Departments Data Group. Click Save:
The Departments data group will appear in the object list, replacing the generic root data group placeholder.
-
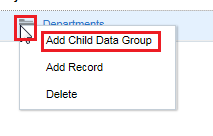
Right click the folder next to the Departments data group to get the action menu and click Add Child Data Group:
-
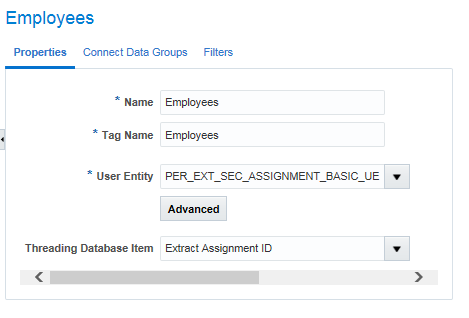
Create a second data group with the following properties:
Data Group Properties
Property Value Name Employees User Entity PER_EXT_SEC_ASSIGNMENT_BASIC_UE Threading Database Item Extract Assignment ID Click Save:
Click Save
The extract data groups have been created successfully.
Create Data Group Connections
Data group connections allow you to define the parent-child relationship between the data groups.
-
On the Employees data group block click Connect Data Groups:
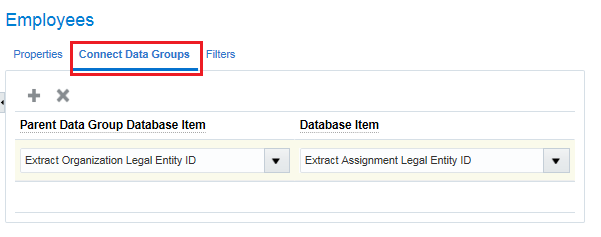
Note: There is a recommended connection DBI, but we will be using different DBIs. Ensure your connection DBI is accurate for your user entities.
-
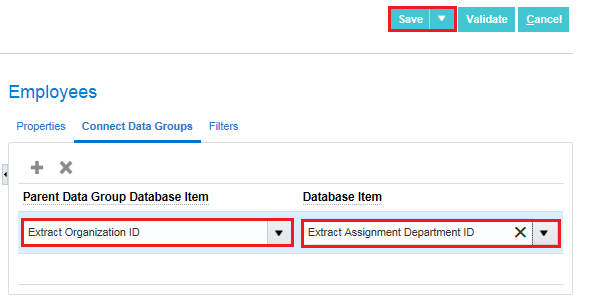
Insert the follwing properties:
Data Group Properties
Property Value Parent Data Group Database Item Extract Organization ID Database Item Extract Assignment Department ID Click Save:
Adding Data Group Filter Criteria
Extract data group filters filter data extracted in the data group. You can specify to filter data group as an expression or as fast formula, and you can choose one or both. You can build criteria using the available database items, parameters and operators (conditional and logical). The filter criteria will be more efficient as it gets appended to the User Entity SQL at the time of execution. If you can't specify the criteria as an expression, then you can place logic inside a fast formula which will not be as efficient. Fast formulas return values of Y or N to indicate if you must extract the record or not. If both criteria and formula are specified, then both the conditions are applied.
-
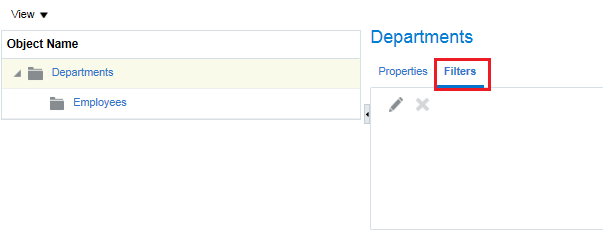
Click Data Group Filter Criteria in the Departments data group:
-
Click Edit:

-
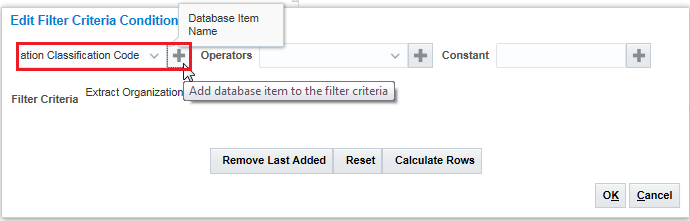
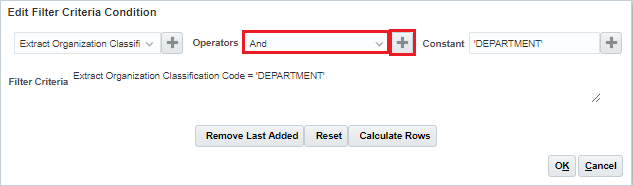
Select Extract Organization Classification Code from the Database Item Name selection and click add to add it to the filter criteria:
-
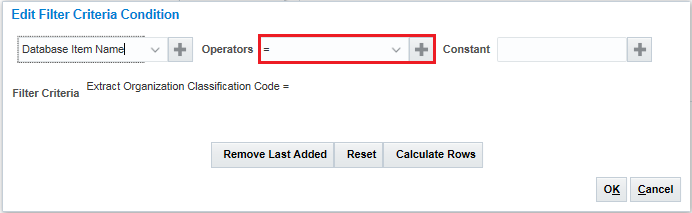
Select the equals symbol (=) from the operators selection and click add to add it to the filter criteria:
-
Type or paste 'DEPARTMENT' into the constant field and click Add Constant:

-
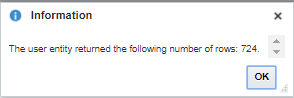
Click Calculate Rows:
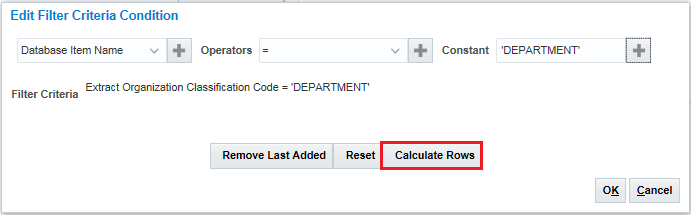
This step is not required, but it is a good way to test for syntax errors. If your formula is correct you should see a positive result. If your formula is incorrect you should see a -1.
-
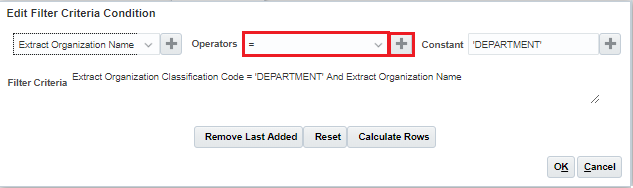
Click the And operator and add it to the criteria:
-
Click Extract Organization Name from the list of database items and add it to the criteria:

-
Click = from the operators and add it to the criteria:
-
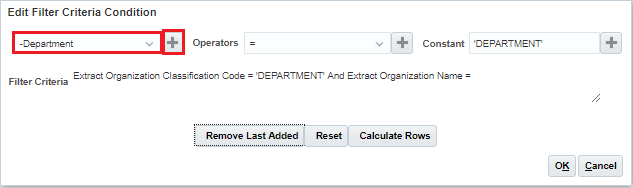
Click Department from the list of parameters in the database item list and add it to the criteria:
-
Click OK:
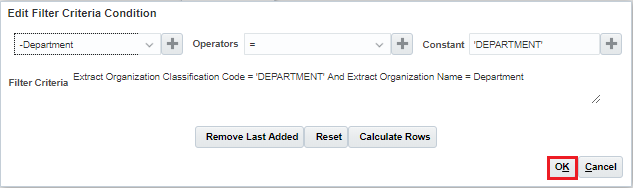
Click Save.
-
Repeat the process to create an additional filter criteria (Extract Assignment Type = 'E') in the Employees data group:
Filter Objects
Object Value Database Item Extract Assignment Type Operator = Constant 'E' 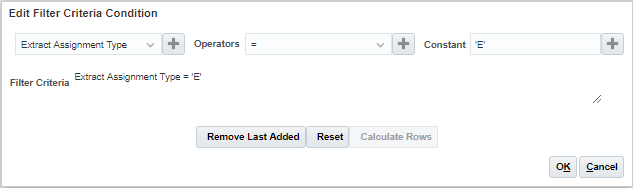
Create Records
Records can be logical groupings of attributes into separate entities. For instance, you may need a detail and summary record for a single data group.
It is a best practice to have one record per data group, so if you require multiple records per data group addtional records will have to be added in the Desktop UI.
Records created in the simplified UI are all Detail Records. Traversal records are created automatically in the simplified UI.
We are going to modify our original design to combine Department Details and Department Summary into one data group as there is no value in having these records split out.
The hierarchy traversal record is unlike other record types because it is not meant to have attributes; its simple purpose is to define an execution sequence for the data groups. Data group connections must be defined before the hierarchy traversal records can be created so these records will generally be created after all other data groups/records/attributes are fully defined.
Record Types
| Record Type | Description |
|---|---|
| Detail record | The detail record contains the attributes or data that will be output by the extract. Detail Records can have one of three process types:
Fast formula is the most commonly used process types. For more information about using balance groups see: Oracle Human Resources Cloud Implementing Global Payroll Interface: Extract Definition Customization |
| Group record | Group records can be used for summarization of the data. For example, count of employees grouped by department. |
| Header record | The header record can be used to put metadata such as details about the report usage, recipients, date extract was run / generated, or number of records extracted, into the report. The process type of a header record is Fast Formula. |
| Hierarchy Traversal only | The hierarchy Traversal only record defines navigation to child data groups and is also used to specify the output sequence of the data groups. A connection must be created before a data group can be defined in a hierarchy traversal record. |
| Trailer Record | The trailer record can be used put metadata such as details about the report usage, recipients, date extract was run / generated, or number of records extracted, into the report. The process type of a trailer record is Fast Formula. |
-
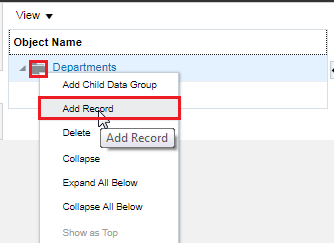
Select Add Record from the Departments data group menu by right clicking the Departments folder:
-
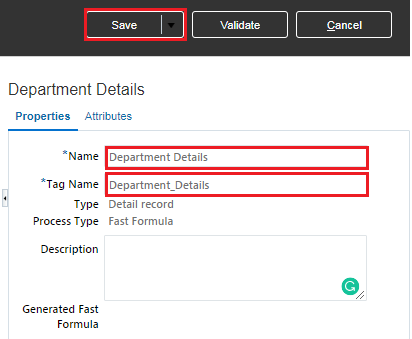
Add the following properties into the properties panel:
Record Properties
Property Value Name Department Details Tag Name Department_Details Click Save
-
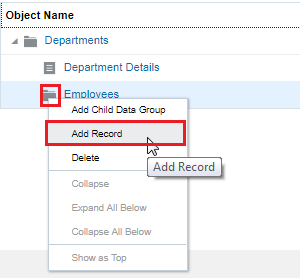
Select Add Record from the Employees data group menu by right clicking the Employees folder:
-
Add the following properties into the properties panel:
Record Properties
Property Value Name Employee Details Tag Name Employee_Details Click Save
-
Your extract design should look like this:

Create Attributes
An attribute is a single data point or output column. There are seven types of attributes.
Attribute Types
| Attribute Type | Description |
|---|---|
| Database item group | The database item group is the most commonly used attribute type. It is a database item from the user entity defined in the data group. The database item will be defined in an additional property called Database Item Group. |
| Decoded database item group | The decoded database item allows you to modify a database item group for instance you may want to decode the gender so in lieu of Male and Female the extract shows M and F. In this example the decoded string would be 'M','Male','F','Female' The decoded string expression generally includes key and value pairs. The database item will be defined in an additional property called Database Item Group. |
| Parameter element | Include the value of a parameter defined in the extract definition in the record. |
| Record calculation | Allows for a calculation to be made on a database item group attribute. For example to calculate overtime for an hourly worker you could use the calculation Hourly rate * 1.5 |
| Rule | Rules are fast formula defined extract rules. |
| String | A static string in the extract record. |
| Summary Element | The summary element can be used to provide an aggregate for an attribute in a record. The aggregates rules available are:
|
-
In the Employee Details record click the attributes tab:

-
Click add and select Database Items:
Note:The attributes will be listed in the order they are selected.

-
Search for and check off the following attributes:
- Person Full Name
- Assignment Salary Amount
- Person Date of Birth

-
Add an additional attribute of type Decoded Database Items:

-
Search the available extract attributes for %Gender% and drag and drop Person Gender into the Employee Details Record:

-
Populate the attribute with the following properties:
Attribute Properties
Property Value Name Gender Short Code Gender Data Type Text Output Column 5 Database Item Group Person Gender Decoded Value 'M','1','F','0',' ','*' Click OK.

-
Click Add Attribute and select Record Calculation:

-
Populate the attribute with the following properties:
Attribute Properties
Property Value Name Bonus Short Code Bonus Data Type Number Output Label Bonus Output Column 6 
-
Select Assignment Salary Amount from the attribute list and add it into the calculation criteria:

-
Click the multiplication symbol (*) to add it to the calculation criteria:
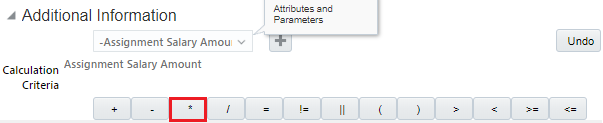
-
Add the constant .05 and click Add Constant:

-
Click OK:

-
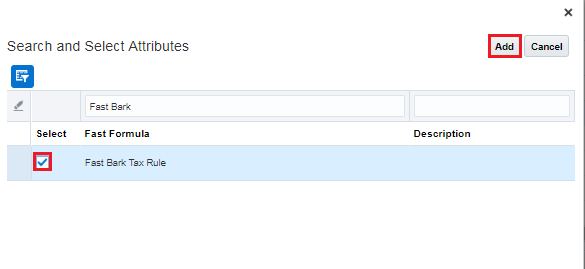
Add an additional attribute of type rule:
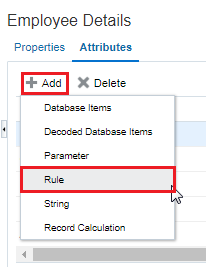
-
Select Fast Bark Tax Rule and click Add.
-
Click Save and Close

-
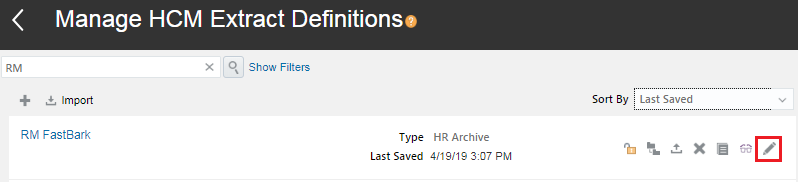
We will create the attributes for the Department Details Record in the Desktop UI.
Locate your extract and click the pencil icon for advanced edit.
-
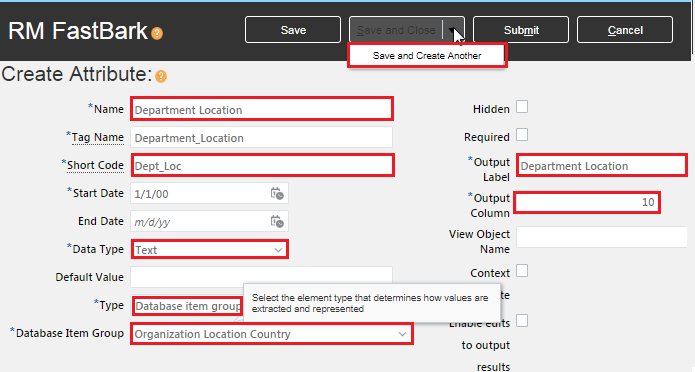
In the hierarchy select Department Details.

-
Create an Attribute.

-
Give the new attribute the following properties:
Attribute Properties
Property Value Name Department Name Short Code Dept_Name Data Type Text Type Database Item Group Database Item Group Organization Name Output Label Department Name Output Column 5 Click Save and Create Another:

-
Give the new attribute the following properties:
Attribute Properties
Property Value Name Department Location Short Code Dept_Loc Data Type Text Type Database Item Group Database Item Group Organization Location Country Output Label Department Location Output Column 10 Click Save and Create Another:
-
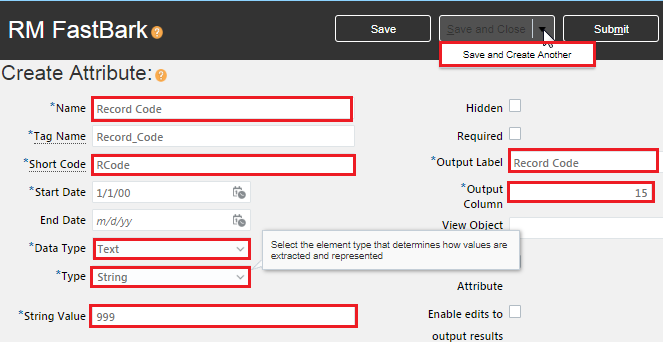
Give the new attribute the following properties:
Attribute Properties
Property Value Name Record Code Short Code RCode Data Type Text Type String String Value 999 Output Label Record Code Output Column 15 Click Save and Create Another:
-
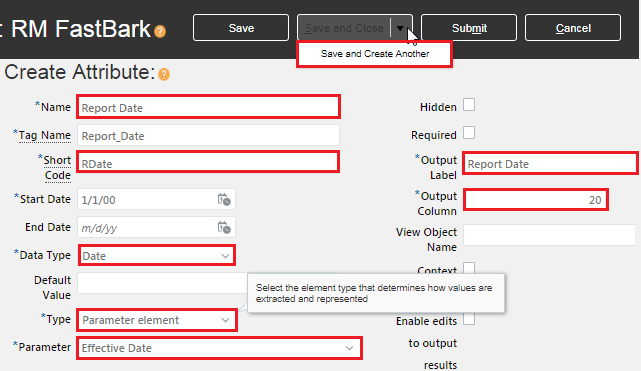
Populate the attribute with the following properties:
Attribute Properties
Property Value Name Report Date Short Code RDate Data Type Date Type Parameter Element Output Label Report Date Output Column 20 Parameter Effective Date Click Save:
-
Populate the attribute with the following properties:
Attribute Properties
Property Value Name Employee Count Short Code ECount Data Type Number Type Summary Element Output Label Employee Count Output Column 15 Aggregate Function Count Aggregate Record Name Employees Employee Details Aggregate Attribute Person Full Name Click Save:

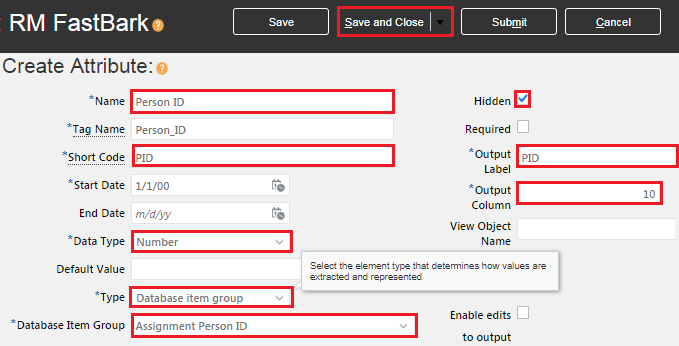
An additional attribute, Person ID, is needed in the Employee Record for the Employee Count aggregate to work correctly. We will hide the Person ID since it is not needed in the output.
-
In the Employees Record Configure Menu, click Create Attribute:

-
Populate the attribute with the following properties:
Attribute Properties
Property Value Name Person ID Short Code PID Data Type Number Type Database item group Database Item Group Assignment Person ID Output Label PID Output Column 10 Hidden Checked Click Save and Close:
-
Click Save and Close to Exit the Desktop UI:
The calculation will result in a bonus that is 5% of the Assignment Salary Amount.
Validating the Extract
-
Re-enter the extract by clicking the name link.
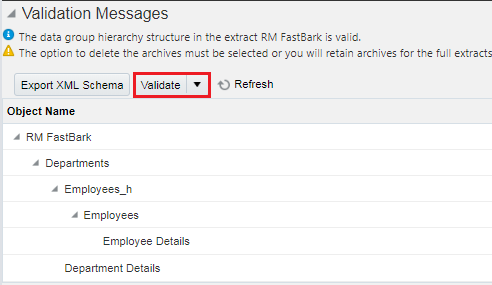
Click Validate to navigate to the validate page:

-
Click Validate:
If your fast formulas need to be compiled you will get a message that your fast formulas have been submitted for compiling.
-
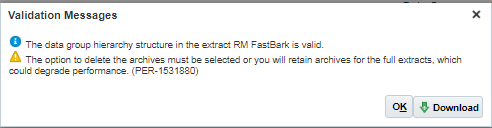
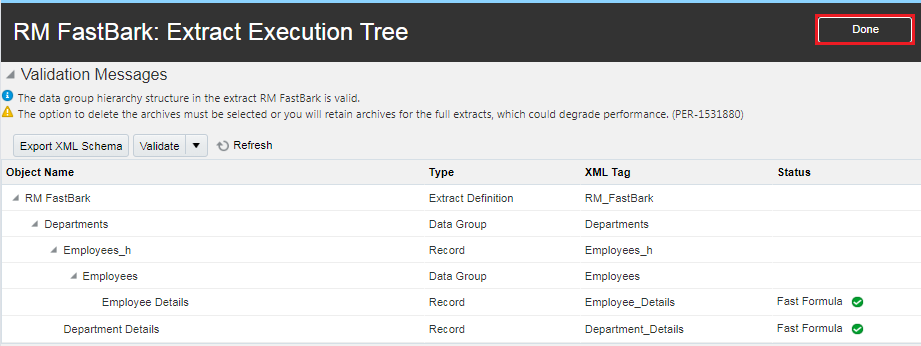
If Necessary, click Refresh until all fast formula are compiled as annotated by a green checkmark:

-
Click OK:
-
Click Done:
Testing the Extract
-
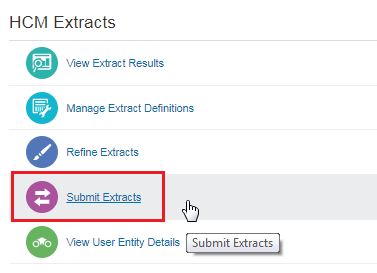
In the tasks menu, click Submit Extracts:
-
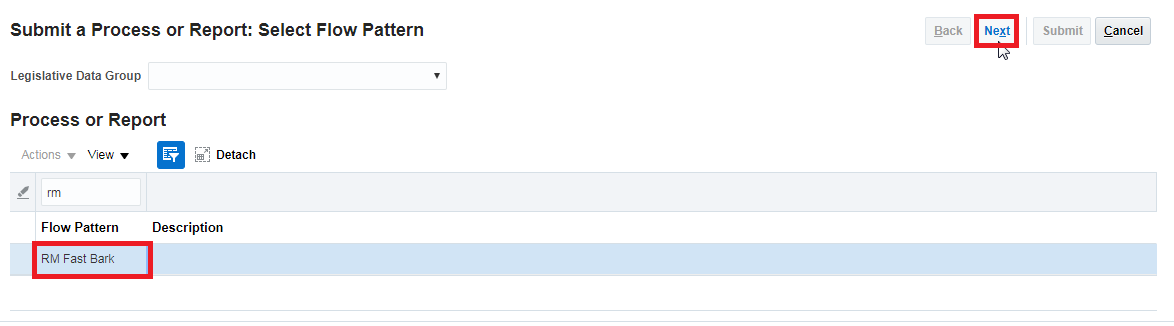
Select your extract from the list and click next:
-
Enter XX Test Flow as the flow name, 09/29/2017 as the effective date, and a department from your organization and click Submit:

-
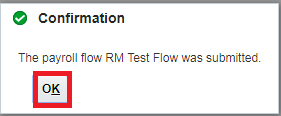
Click OK:
-
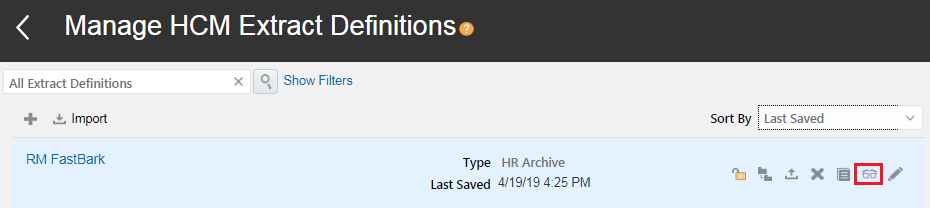
In the Manage Extract Definition page, Click View Extract Run Details:
Check to ensure your extract has run successfully. If there are issues check the logs on the process details tab and refine the extract until it runs successfully.

Creating a BI Publisher Template
-
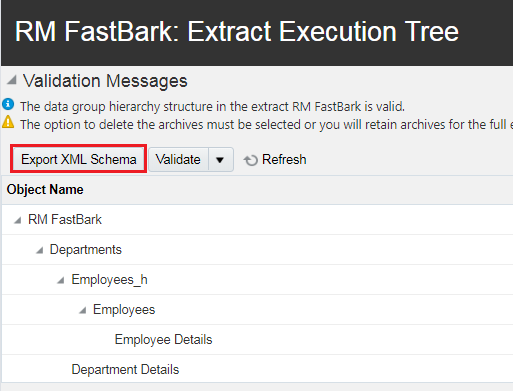
On the validate page, click Export XML Schema:
-
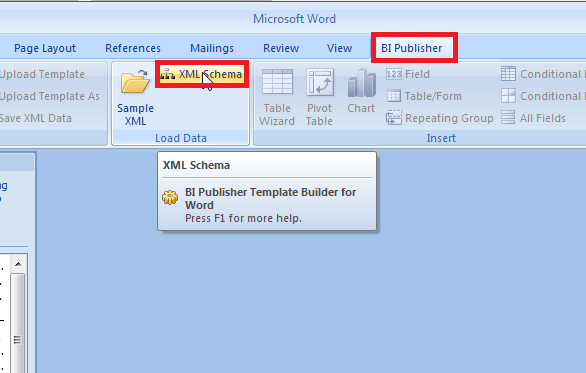
In the BI Publisher Tab in MS Word, import the XML Schema you downloaded:
You will recieve a confirmation that the schema was loaded successfully.
-
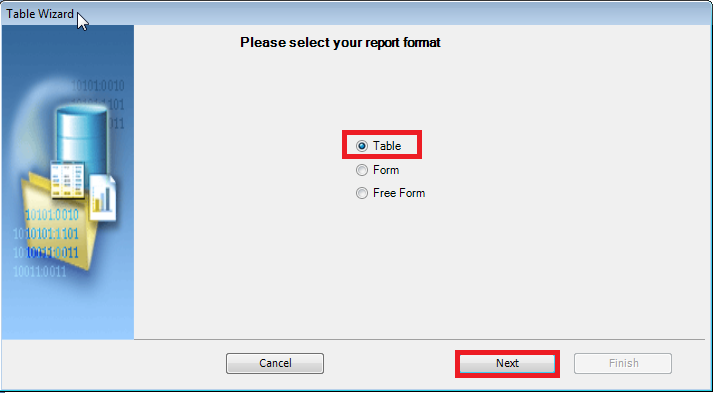
Use the Table Wizard to create a quick template:

-
Table is the default selection, click Next:
-
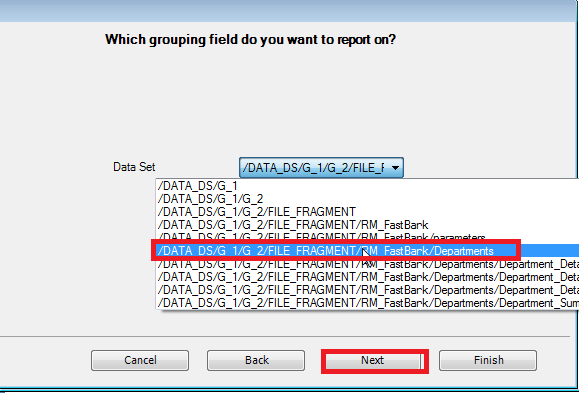
Choose Departments for the group and click Next:
-
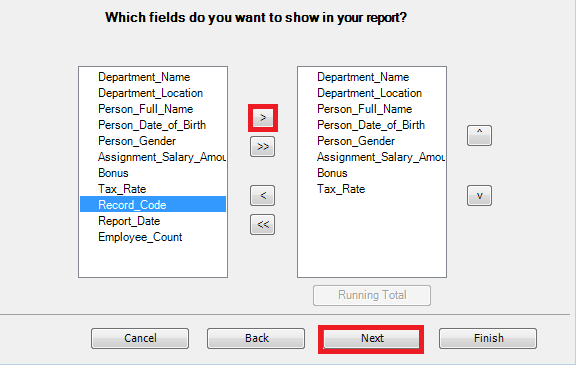
Use the shuttle to add the following fields to your table:
- Department_Name
- Department_Location
- Person_Full_Name
- Person_Date_of_Birth
- Gender
- Assignment_Salary_Amount
- Bonus
- Fast_Bark_Tax_Rule
Click Next:
-
Group by Department_Name and click Next:

-
Sort by Person_Full_Name and click Finish:

-
Add the text Employee Count: and use the field browser to add Employee_Count between the Department_Name and the Table:

-
Save the template as XXFastBarkTemplate.rtf.
Add the Template to BI Publisher
Introduction (Optional)
-
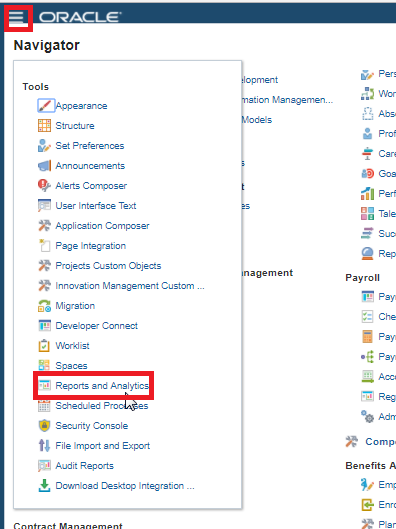
Use the navigator to access Reports and Analytics:
-
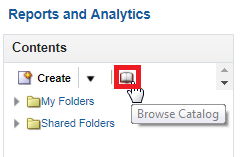
Click Browse Catalog:
-
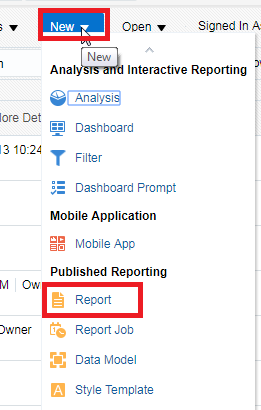
Create a New Report:
-
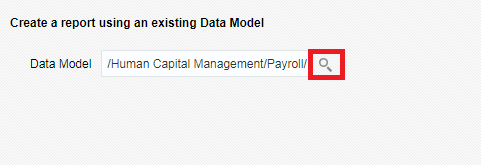
Choose the data model /Human Capital Management/Payroll/Data Models/globalReportsDataModel.xdm:
-
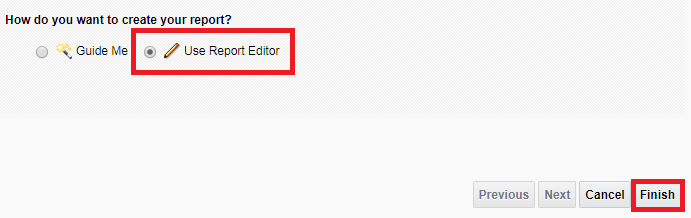
Select Use Report Editor and click Finish.:
-
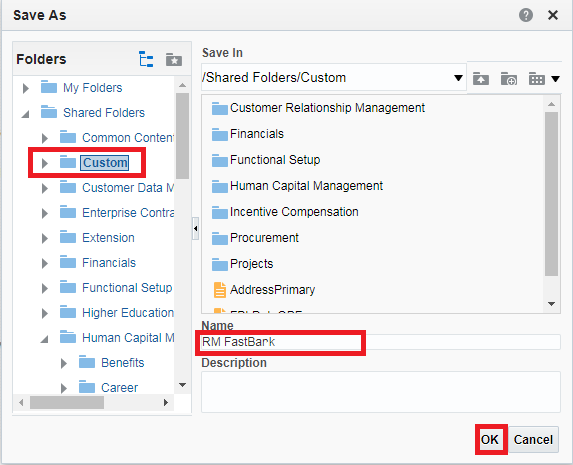
Name your report XX FastBark and save it in the Custom folder.
Click OK:
-
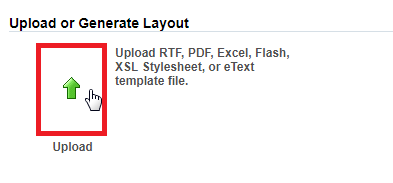
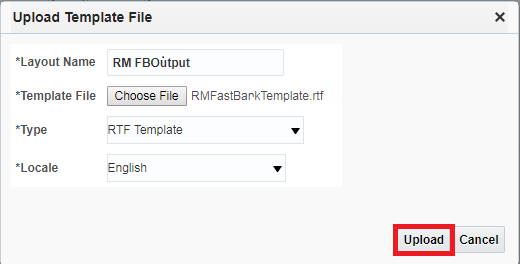
Click Upload to upload your template:
-
Enter the following properties:
Template Properties
Property Value Layout Name XX FBOutput Template Name XXFastBarkTemplate.rtf Type RTF Template Locale English Click Upload:
-
Click View Report:

-
Enter the flowInstanceName XX Test Flow or whatever the flow name of your last successful run and click Apply to test the template:
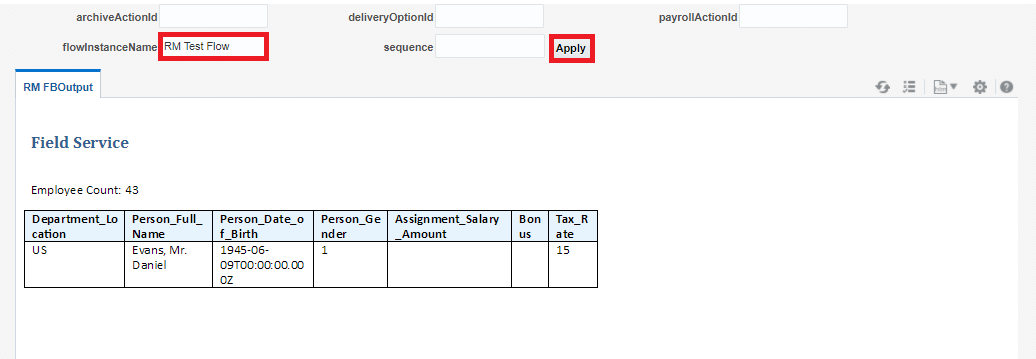
You will notice that not all employees are displaying in the results so the template will have to be altered to show all employees.
Replace the template to see all the employees. Download the new template here.
Defining Delivery Options
-
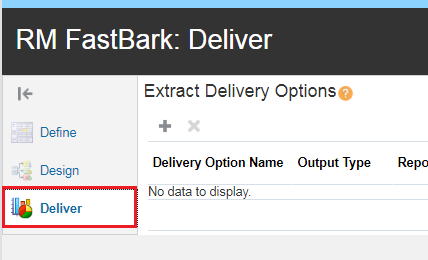
Navigate back to the Extract XX FastBark and click Deliver:
-
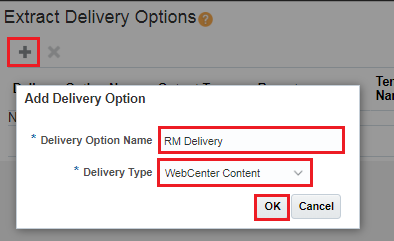
Click Add to add a delivery option with the:name XX Delivery of type WebCenterContent
Click OK.
-
Define the delivery option with the following properties:
Delivery Option Properties
Property Value Output Type RTF Report Custom/XX FastBark.xdo Template Name XX FBOutput Output Name XXFastBark Integration Name XX FB Int Encryption Mode None Click OK

-
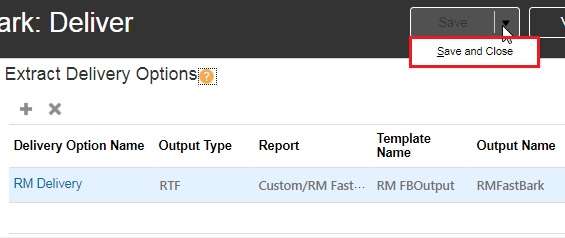
Click Save and Close:
Run Extract and View Results
-
In the Data Exchange tasks list choose Submit Extracts:
-
Select your extract XX FastBark and click Next:
-
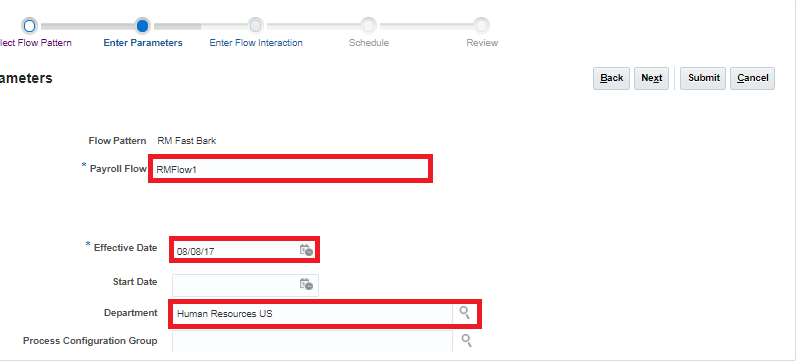
Call the payroll flow XXFlow, choose the current date as the Effective Date, and select a department from the department list with employees for your company:
-
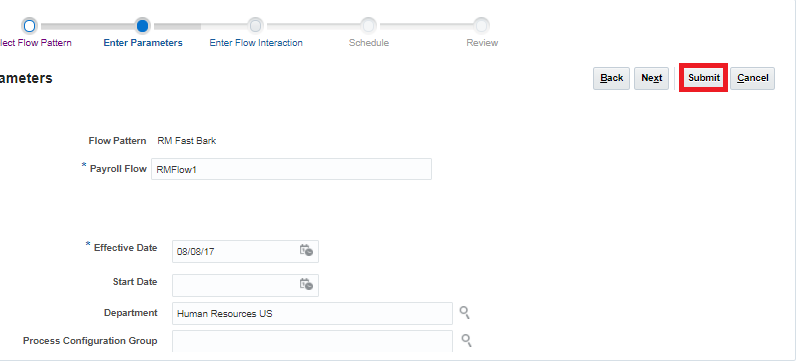
Click Submit:
-
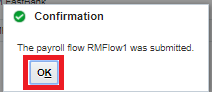
Click OK:
-
In the Manage HCM Extract Definitions Page choose View Extract Run Details for XXFastBark:
-
In the Details section view the Extract Delivery Options and you can download the output:
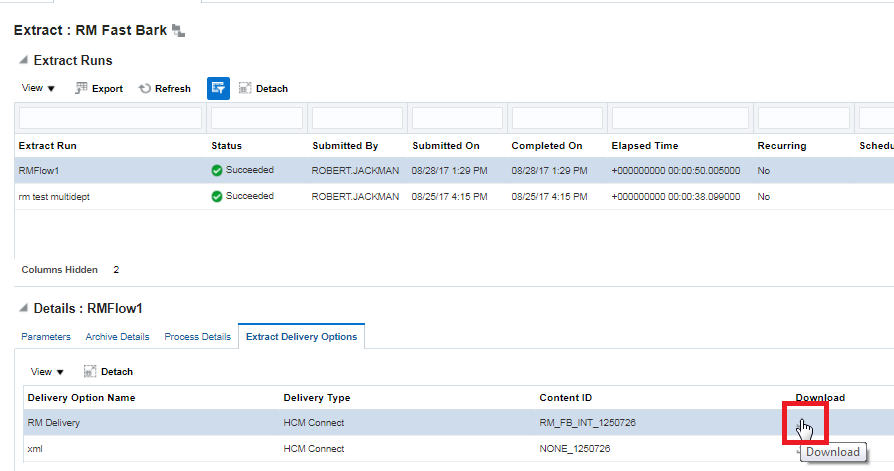
Only the delivery option HCM Connect (WebCenter Content), can be downloaded from the Extract Run Details.
If the extract failed, you can view the logs in the Process Details pane.