Building a Change Request Workflow Model
Overview
Purpose
This tutorial demonstrates how to configure metadata and security for governance workflows in Oracle Data Relationship Management.
Time to Complete
Approximately 30 minutes.
Introduction
In this tutorial, you add a governance user and assign the user to a new workflow node access group. Next, you create a workflow task and workflow model for a new type of change request. During the creation of the workflow model, you define workflow stages to control how the request gets submitted, approved, and committed. You also define filters for the workflow model to restrict requests to a specific version, hierarchy, and node types. After the workflow model is created, you assign workflow node access groups to hierarchies used by the workflow model and extract the workflow metadata for lifecycle management purposes.
Prerequisites
Before starting this tutorial, you should:
- Have access to or have installed Oracle Data Relationship Management 11.1.2.3.301.
- Have access to or have installed the COAMGT Data Relationship Management application. You can download the application here and use these instructions to install and configure the application.
Adding a Governance User
-
Launch Data Relationship Management Web Client.

The logon page for Oracle Data Relationship Management is displayed.
-
Log on to the COAMGMT application as user admin with a password of Welcome!.
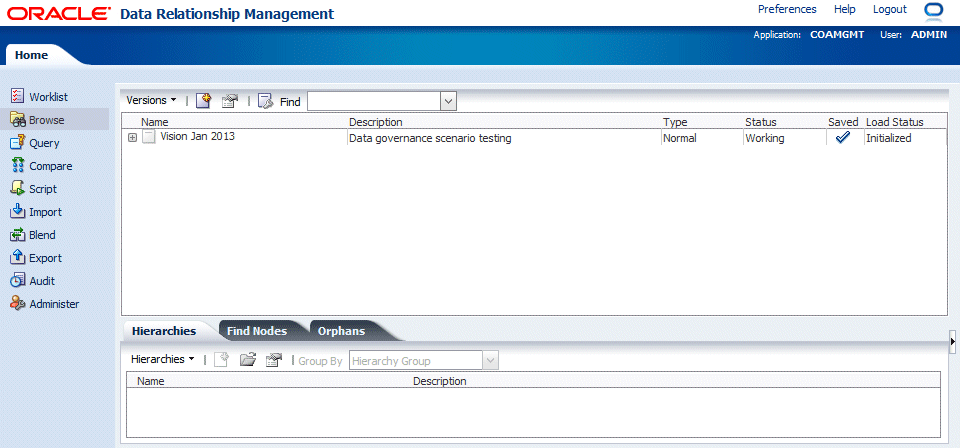
Click Administer .

The Administer Task Group page is displayed.
-
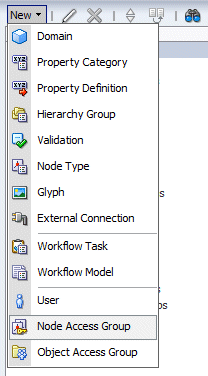
Select New and then User.
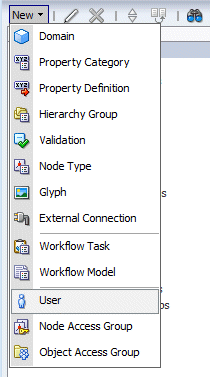
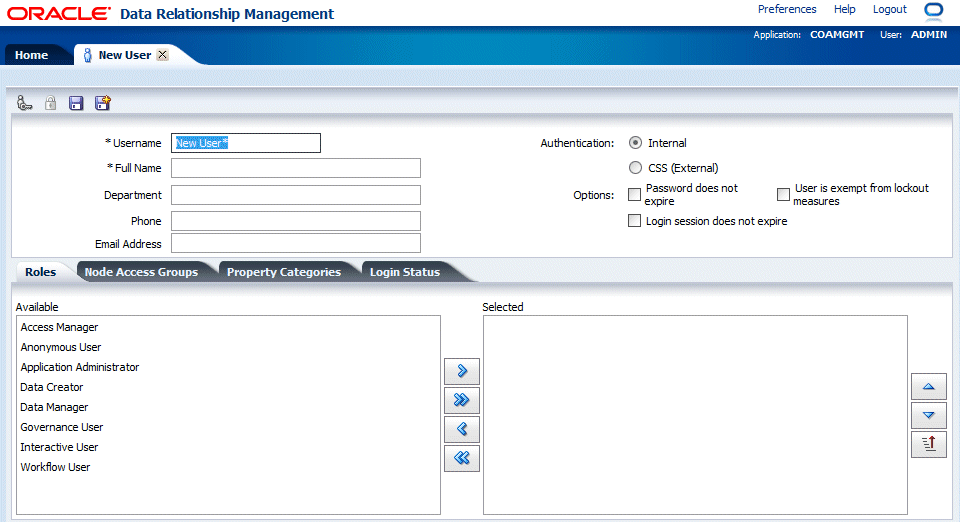
The New User tab is displayed.
-
Perform the following actions:
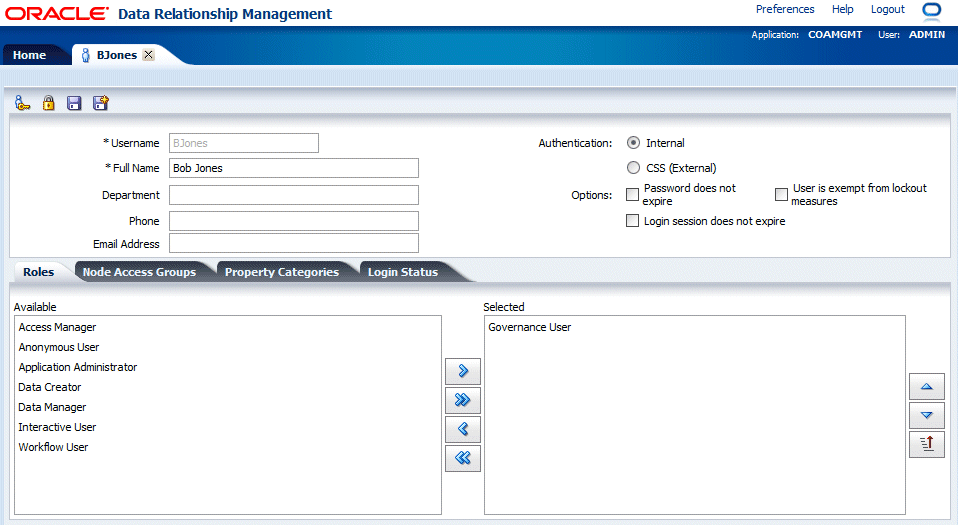
- Define the following values for the new user:
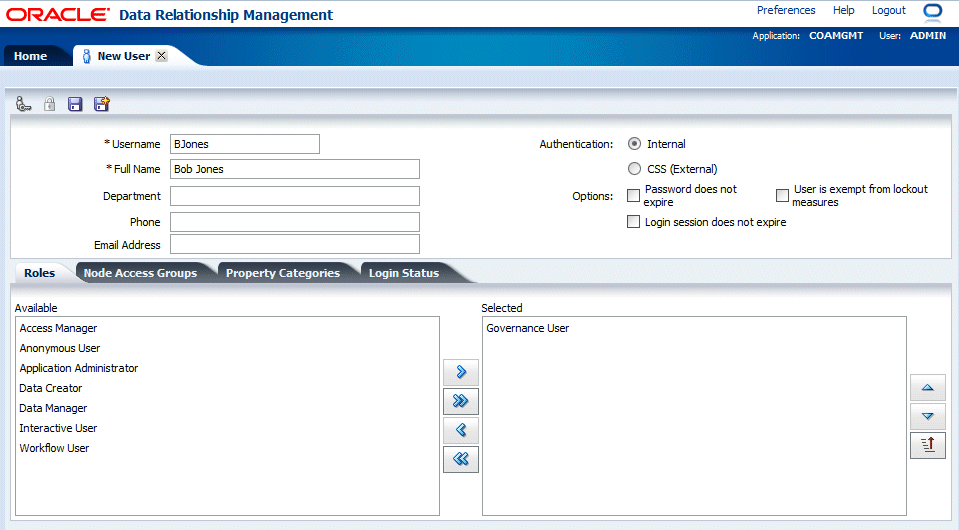
- Name = BJones
- Full Name = Bob Jones
- On the Roles tab, select the Governance User role and click the Select button (
 ) to select the role.
- Define the following values for the new user:
-
Click the Save button (
 ).
).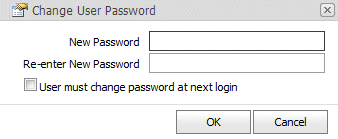
The Change User Password dialog box is displayed.
-
In the New Password text box and in the Re-enter New Password text box, type Welcome! and click OK.
The New Request tab is changed to BJones.
- Close the BJones tab. You are navigated back to the Administer page.
Creating a Workflow Node Access Group
-
Select New and then Node Access Group.

The New Node Access Group tab is displayed.
-
Perform the following actions:
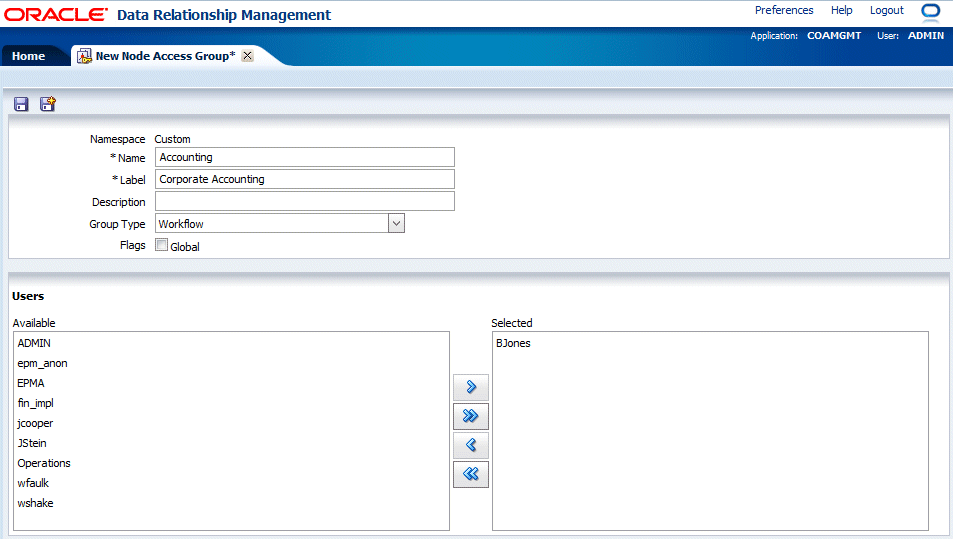
- Define the following values for the new node access group:
- Name = Accounting
- Label = Corporate Accounting
- Group Type = Workflow
- On the Users section, select BJones and click the Select button () to select the user.
- Define the following values for the new node access group:
-
Click the Save button (
).
The New Node Access Group tab is changed to Corporate Accounting.
- Close the Corporate Accounting tab. You are navigated back to the Administer page.
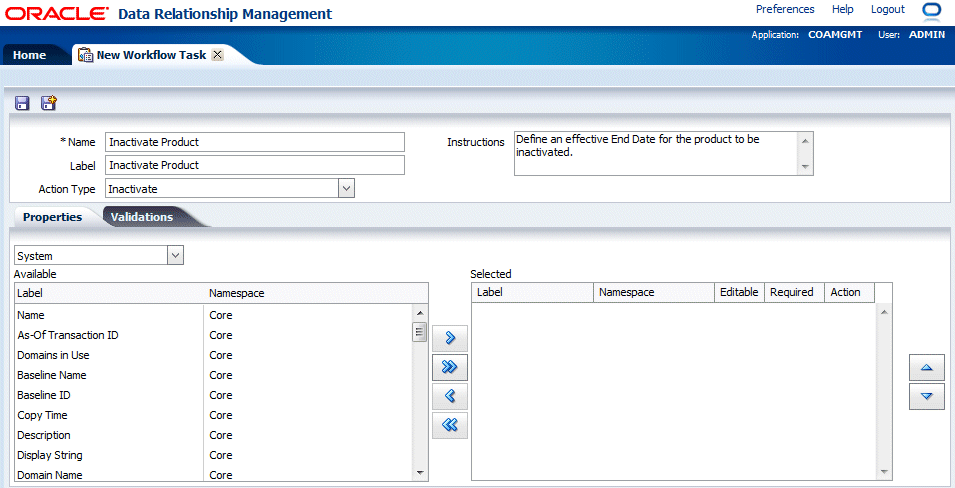
Creating a Workflow Task
-
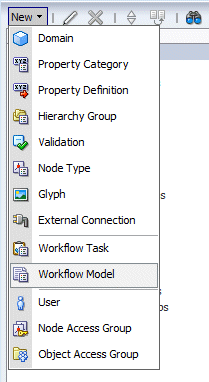
Select New and then Workflow Task.
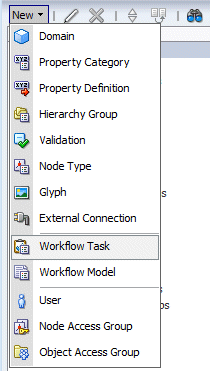
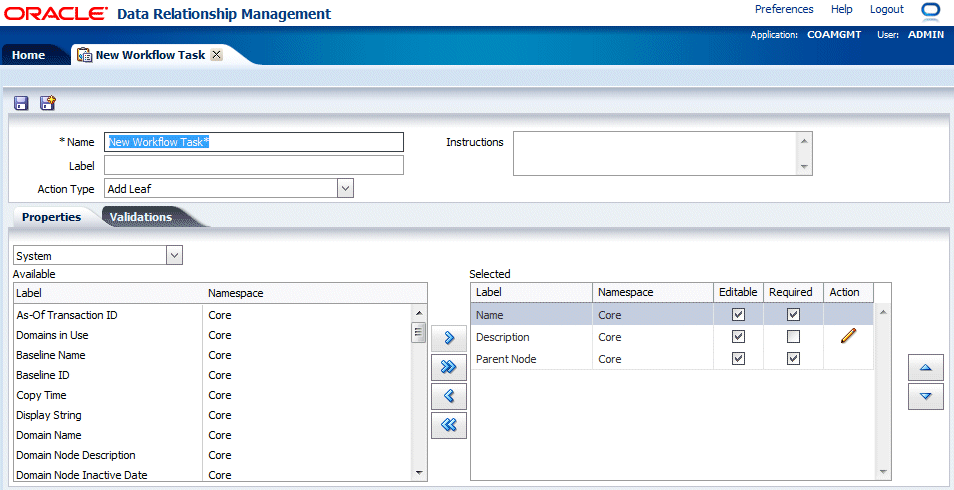
The New Workflow Task tab is displayed.
-
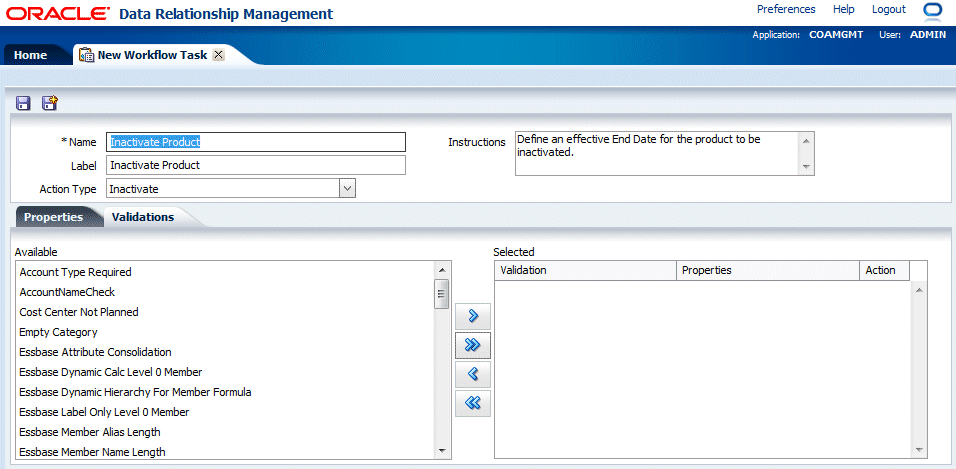
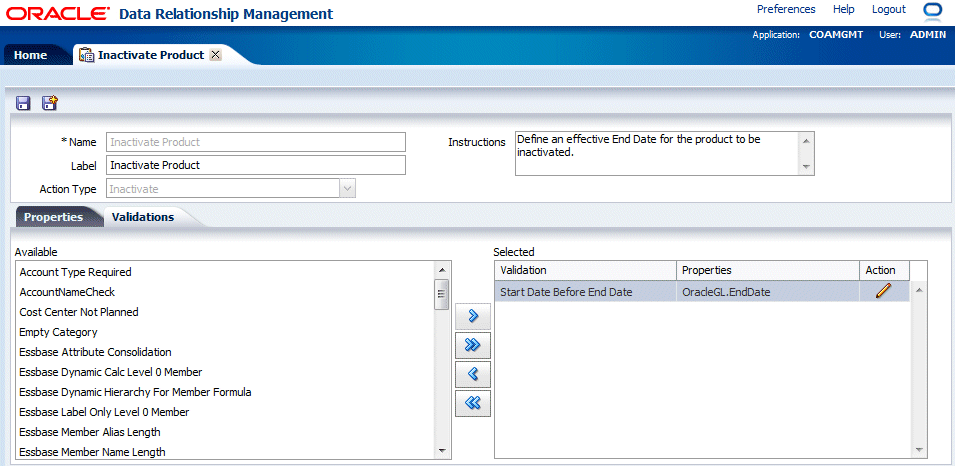
Define the following values for the new workflow task:
- Name = Inactivate Product
- Label = Inactivate Product (this is the default value)
- Instructions = Define an effective End Date for the product to be inactivated.
- Action Type = Inactivate
Note that there are no default properties selected for the Inactivate task.
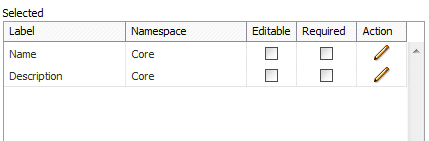
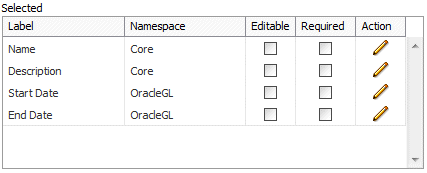
- On the Properties tab, verify that System is selected in the Property Category drop-down list, select the Name and Description properties, and then click the Select button () to select the properties.
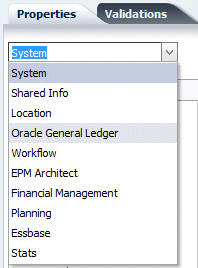
- On the Properties tab, from the Property Category drop-down list select Oracle General Ledger.
- In the Available list of properties, select the Start Date and End Date properties and click the Select button () to select the properties.
- In the Action column for the End Date property, click the Edit button (
 ).
).
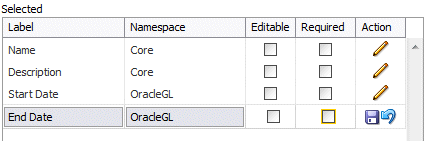
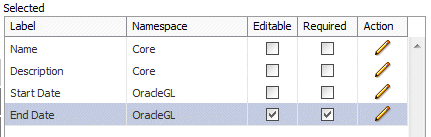
- Select the Editable and Required options and click the Update button ().
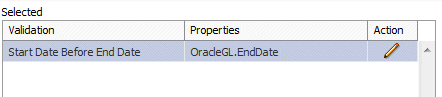
- Select the Validations tab.
- From the Available list, scroll to the bottom and select theStart Date Before End Date validation.
Click the Select button () to select the validation.

- In the Action column for the validation, click the Edit button ().

- In the Properties drop-down list, select the End Date property.
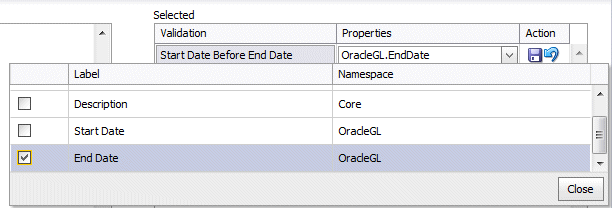
- Click Close and then click the Update button () to save the changes.
Click the Save button (
).
-
Close the Inactivate Product tab. You are navigated back to the Administer page.
Creating a Workflow Model
-
Select New and then Workflow Model.
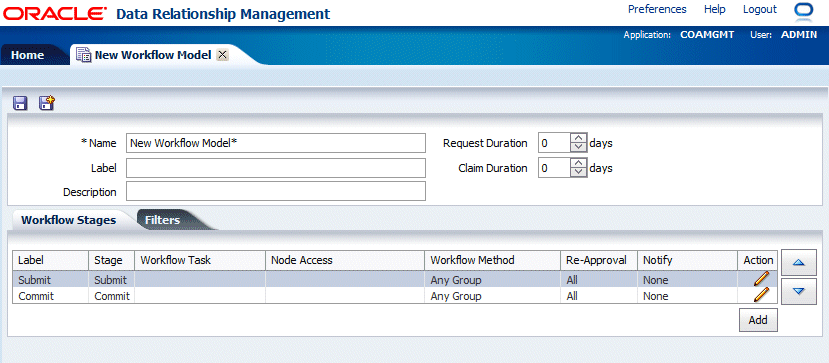
The New Workflow Model tab is displayed. On the Workflow Stages tab, note that there are two default stages (Submit and Commit) that are required in every workflow model.
-
Define the following values for the new workflow model:
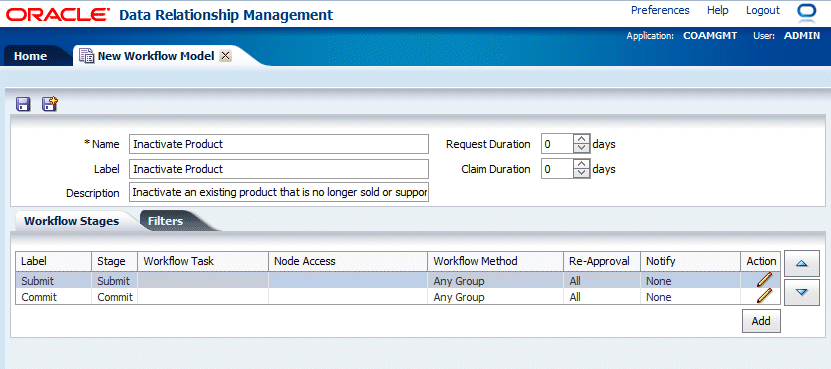
- Name = Inactivate Product
- Label = Inactivate Product (this is the default value)
- Description = Inactivate an existing product that is no longer sold or supported
Defining Workflow Stages for a Model
-
For the Submit stage in the Action column, click the Edit button (
).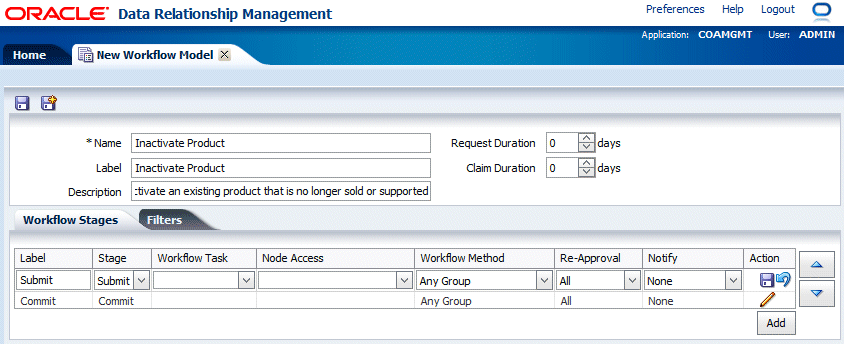
The Submit stage row is enabled for editing.
-
Define the details of the Submit workflow stage using the following values:
- Label = Inactivate Request
- Stage = Submit
- Workflow Task = Inactivate Product
- Node Access = VisionWorkflow
- Workflow Method = Any Group (any group assigned can approve, only one approval required)
- Re-Approval = All (a pushed back request must be approved by all stages after it)
- Notify = Assignees (users assigned to the stage are notified of activity in that stage)

-
Click the Update button (
) to save the changes.
-
Click the Add button below the workflow stages grid to add a new workflow stage.

-
Define the details of the new workflow stage using the following values:
- Label = Approve Inactivate
- Stage = Enrich (users can approve or reject the request as well as edit it)
- Workflow Task = Update Product
- Node Access = Accounting and PlanningWorkflow (the Accounting group must approve and the PlanningWorkflow group only be notified)
- Workflow Method = All Groups (all assigned groups with stage access must approve)
- Re-Approval = All
- Notify = Assignees and Participants (assignees and previous participants are notified)

-
Click the Update button (
) to save the changes.
-
For the Commit stage in the Action column, click the Edit button (
).
The Commit stage row is enabled for editing.
-
Define the details of the Commit workflow stage using the following values:
- Label = Commit Inactivate
- Stage = Commit
- Workflow Task is not selectable.
- Node Access = COAMgrWorkflow
- Workflow Method = Any group
- Re-Approval = All
- Notify = Participants (Previous participants of the request are notified)

-
Click the Update button (
) to save the changes.
-
Click the Save button (
) at the top of the workflow model page to save the workflow model.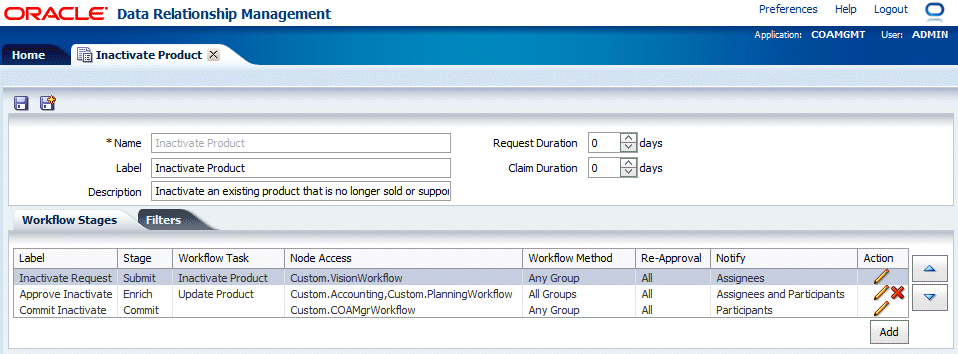
The New Workflow Model tab is changed to Inactivate Product.
Defining Filters for a Model
-
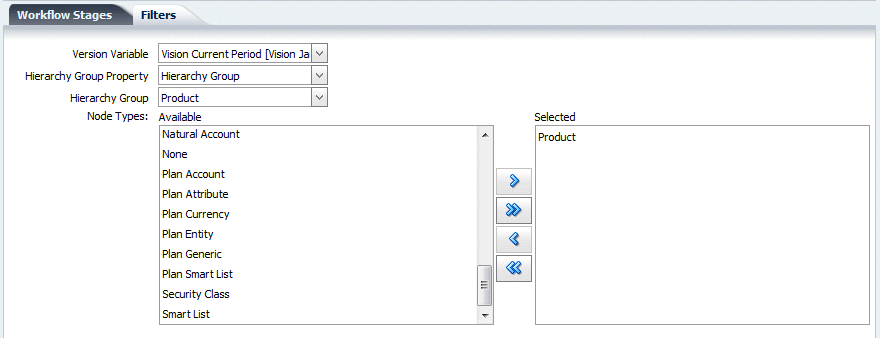
Select the Filters tab and perform the following actions:
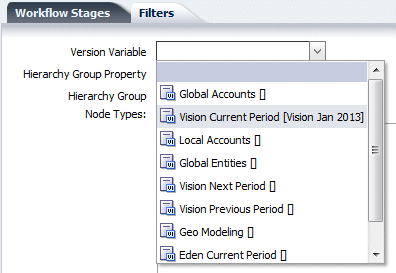
- From the Version Variable drop-down list, select Version Current Period [Vision Jan 2013] variable.
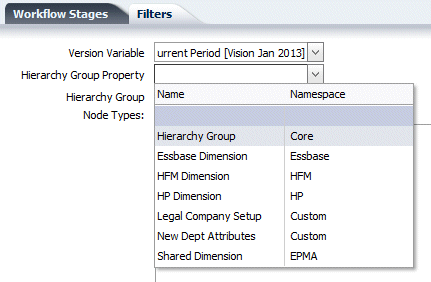
- From the Hierarchy Group Property drop-down list, select Hierarchy Group.
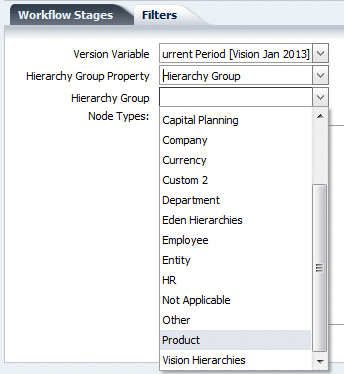
- From the Hierarchy Group drop-down list, select Product.
- In the Node Types section, in the Available list, select Product and click the Select button () to select the node type.
- From the Version Variable drop-down list, select Version Current Period [Vision Jan 2013] variable.
-
Click the Save button (
) at the top of the workflow model page to save the workflow model.
Defining the Request Duration and the Claim Duration Options
-
View the Request Duration and Claim Duration options for the workflow model.
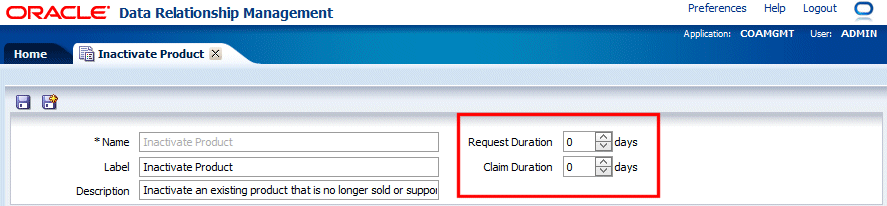
Both options are set to zero by default.
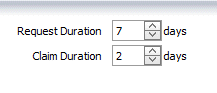
-
In the Request Duration box, type 7. This setting enables a request to be marked as Overdue after it is over 7 days old. This setting can be overriden at the request level using the Due Date workflow tag.
-
In the Claim Duration box, type 2. This setting enables a request to be claimed by a user for a maximum of 2 days before it gets automatically unclaimed to allow other users to get involved to keep the request moving.
-
Click the Save button (
) at the top of the workflow model page to save the workflow model. -
Close the Inactivate Product tab. You are navigated back to the Administer page.
Assigning Workflow Access Groups to Hierarchies
-
In the navigation menu on the Home tab, click Browse.
-
From the Find dropdown list, select the Vision Current Period [Vision Jan 2013] variable.

The Vision Jan 2013 hierarchies are displayed.
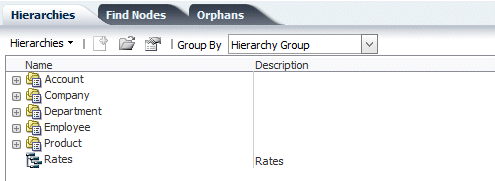
On the Hierarchies tab, expand the Product hierarchy group.
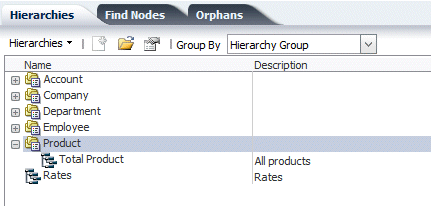
Double click Total Product to open the hierarchy.
Note: Load the version if prompted.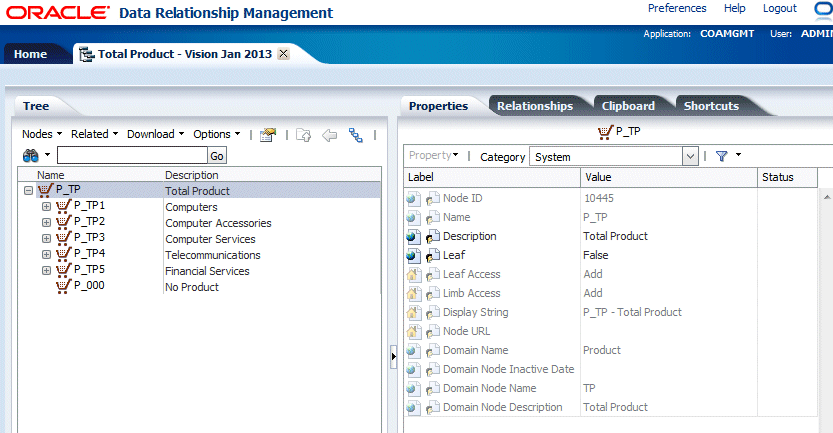
The Total Product - Vision Jan 2013 tab is displayed.
-
Right click on the top node of the hierarchy, select Assign, and then select Node Access from the drop-down menu.

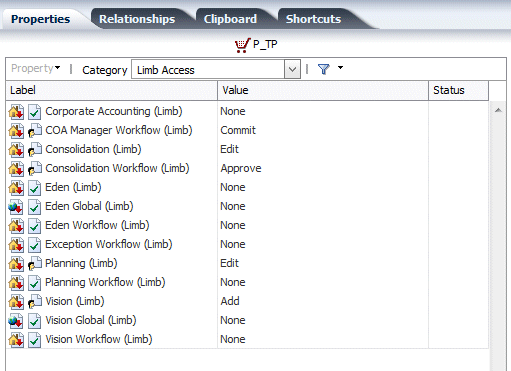
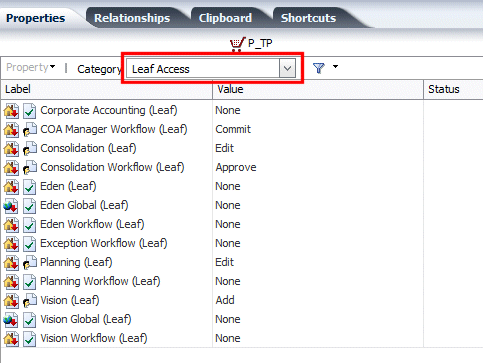
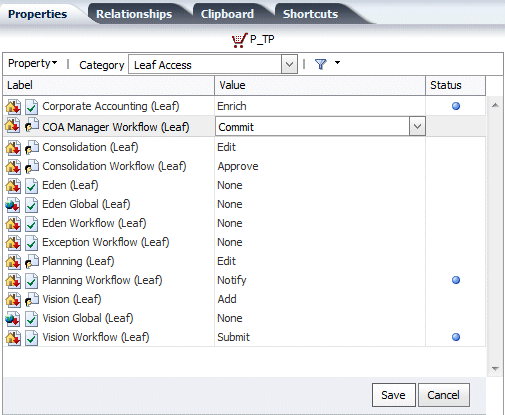
- On the Properties tab, from the Category drop-down list, select Leaf Access.
-
Perform the following actions:
- Select Vision Workflow (Leaf), and then from the Value drop-down list select Submit. This selection enables the workflow access groups assigned to the Submit stage of the workflow model to submit requests for leaf nodes under the top node in the Total Product hierarchy.
- Select Corporate Accounting (Leaf), and then from the Value drop-down list select Enrich. This selection enables the workflow access group assigned to the Enrich stage of the workflow model to approve and edit requests for leaf nodes in the Total Product hierarchy.
- Select Planning Workflow (Leaf), and then from the Value drop-down list select Notify. This selection enables the workflow access group assigned to a stage in the workflow model to only be notified of requests for leaf nodes in the Total Product hierarchy.
- View the COA Manager Workflow (Leaf) group and note that the group already has the Commit access. This selection enables the workflow access group assigned to the Commit stage of the workflow to commit requests for leaf nodes in the Total Product hierarchy.
-
Click the Save button at the bottom to save the access assignment changes.
-
Close the Total Product - Vision Jan 2013 tab and log out as user admin.
Extracting Workflow Metadata for Migration
-
In the Address bar of the web browser, enter the following URL to access the Data Relationship Management Migration Utility:
http://<yourhostname>/drm-migration-client.
The Data Relationship Management Migration Utility home page is displayed.
-
Click Extract and enter connection information to the COAMGMT application.

-
Click Log In.
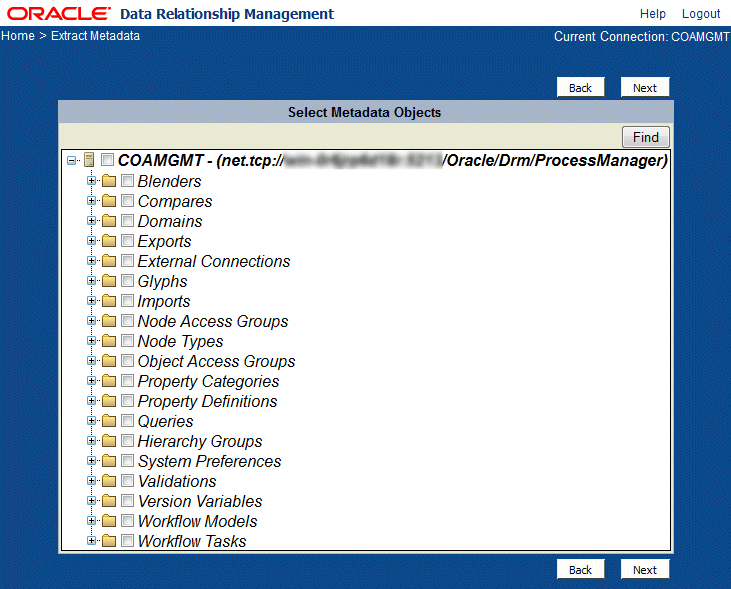
The list of metadata and security object categories in the COAMGMT application is displayed.
Expand the Node Access Group folder to view the list of node access groups and select Custom.Accounting.

Expand the Workflow Models folder to view the list of workflow models and select Inactivate Product.

-
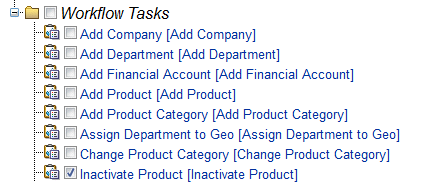
Expand the Workflow Tasks folder to view the list of workflow models and select Inactivate Product.
-
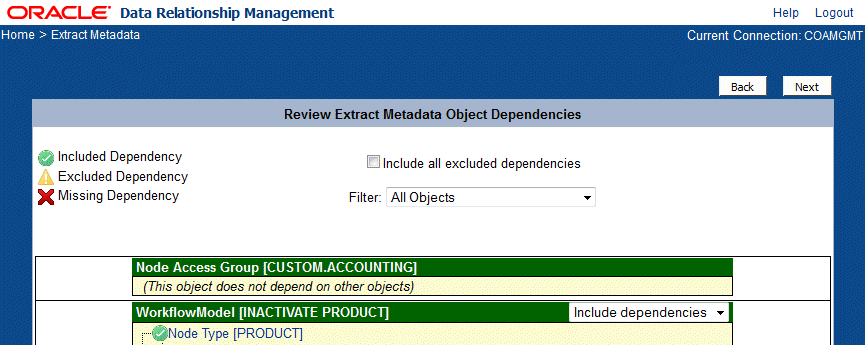
Click Next and view the dependecies for the metadata and security objects to be extracted.
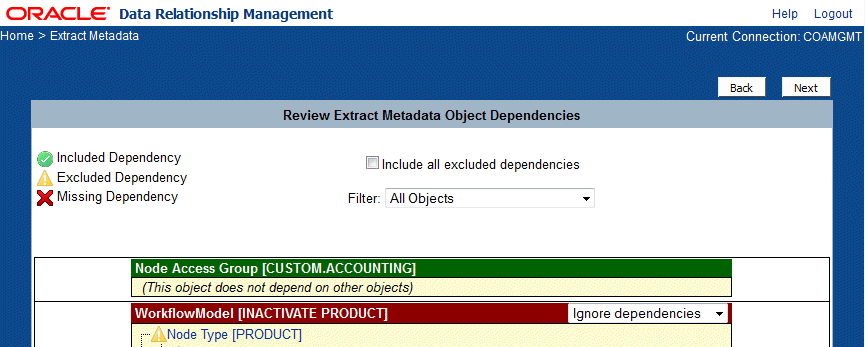
-
For the Inactivate Product workflow model, select Include Dependencies from the drop-down list.
-
Click Next and enter the following metadata details:
- Title = Inactivate Product Workflow Model
- Purpose = Migrate metadata and security objects for a workflow model used for the inactivation of products.
- Usage = This file should only be loaded into a new target application. to load into the existing application, first compare the file to the target application using the Difference feature.
- Application Version = 11.1.2.3
- File Version = 1.0
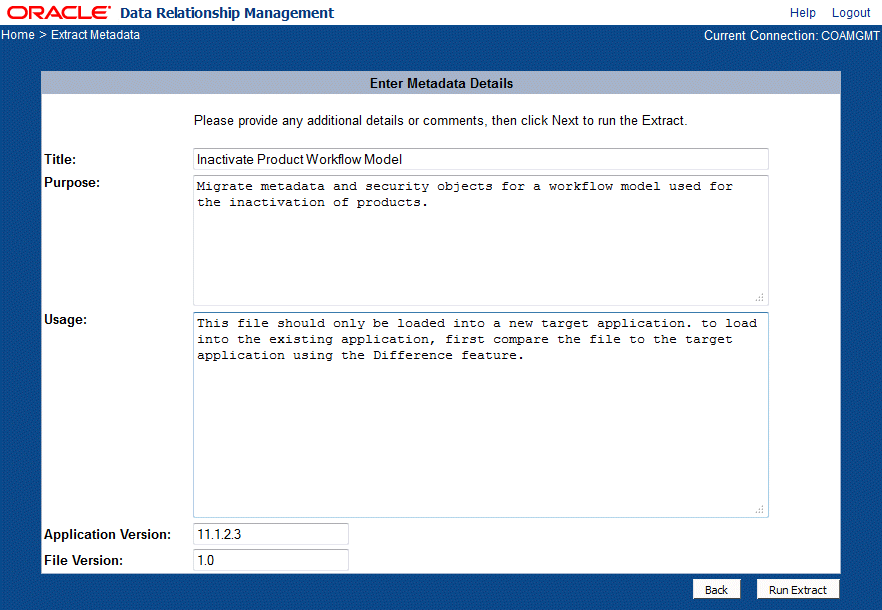
-
Click Run Extract.
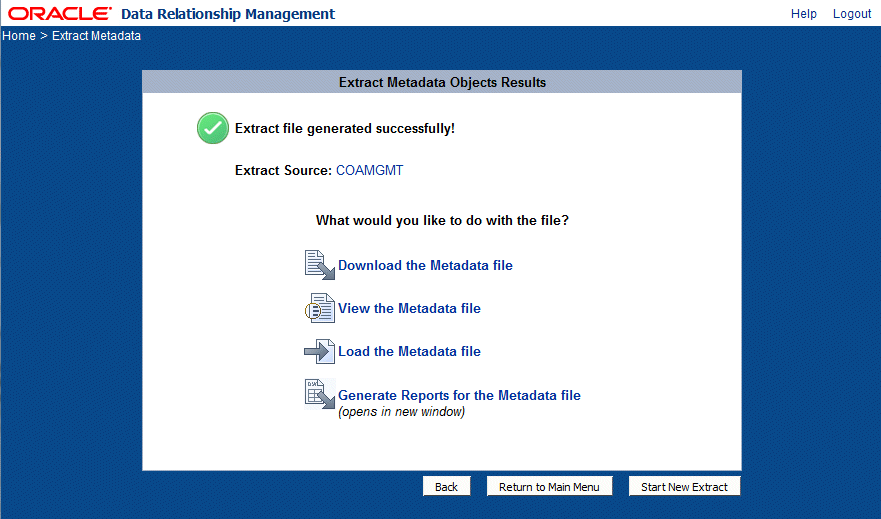
-
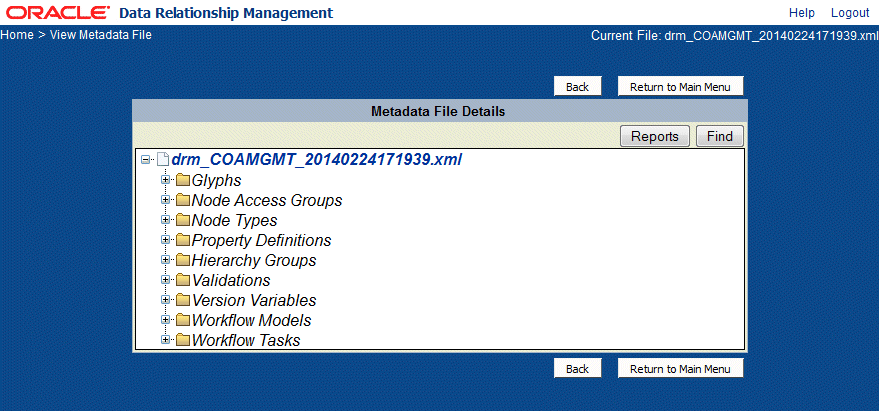
Click View the Metadata file.
-
Click Logout to log out as user admin.
Summary
In this tutorial, you learned how to:
- Add a governance user and assign the user to a new workflow node access group.
- Create a workflow task and workflow model for a new type of change request.
- Define workflow stages to control how the request gets submitted, approved, and committed.
- Define filters for the workflow model to restrict requests to a specific version, hierarchy, and node types.
- Assign workflow node access groups to hierarchies used by the workflow model and extract the workflow metadata for migration purposes.
Resources
- Oracle Data Relationship Governance on Oracle Technology Network (OTN)
- Oracle Data Relationship Management 11.1.2.3 Documentation
- To learn more about Data Relationship Management refer to additional OBEs in the Oracle Learning Library
To navigate this Oracle by Example tutorial, note the following:
- Topic List:
- Click a topic to navigate to that section.
- Expand All Topics:
- Click the button to show or hide the details for the sections. By default, all topics are collapsed.
- Hide All Images:
- Click the button to show or hide the screenshots. By default, all images are displayed.
- Print:
- Click the button to print the content. The content that is currently displayed or hidden is printed.
To navigate to a particular section in this tutorial, select the topic from the list.