Creating a Multiple Item Request
Overview
Purpose
This tutorial demonstrates the submission, review, pushback, correction, and approval of a multiple item change request using an Oracle Data Relationship Governance workflow model.
Time to Complete
Approximately 30 minuntes.
Introduction
In this tutorial, you create a multiple item request by searching and browsing for nodes and then submit the request for intermediate approval and final commitment. As the approver, you review the request, claim and approve the request to send it to the final commitment user. As the commitment user, you run validations and push back the request to the submitting user to make a correction. As the submitting user, you claim the assigned request, make your correction and resubmit the request. As the approving and committing users, you re-approve the new changes to the request.
Prerequisites
Before starting this tutorial, you should:
- Have access to or have installed Oracle Data Relationship Management 11.1.2.3.301.
- Have access to or have installed the COAMGT Data Relationship Management application. You can download the application here and use these instructions to install and configure the application.
Creating a Multiple Item Request
-
Launch Data Relationship Management Web Client.
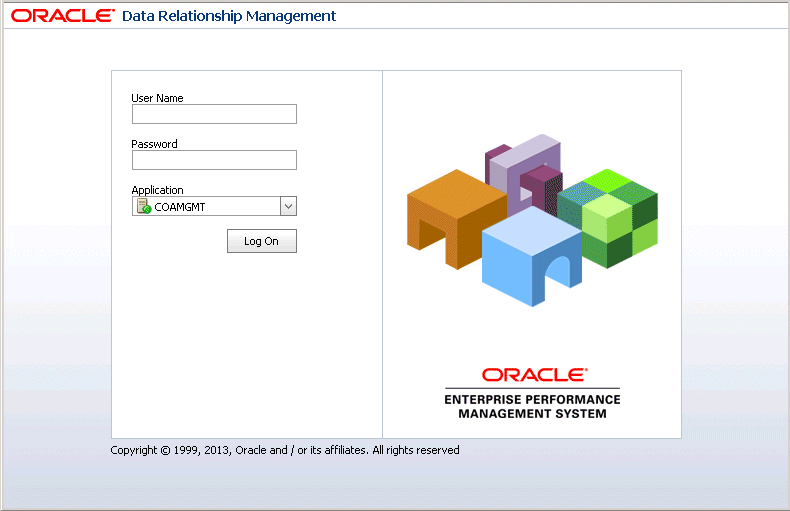
The logon page for Oracle Data Relationship Management is displayed.
-
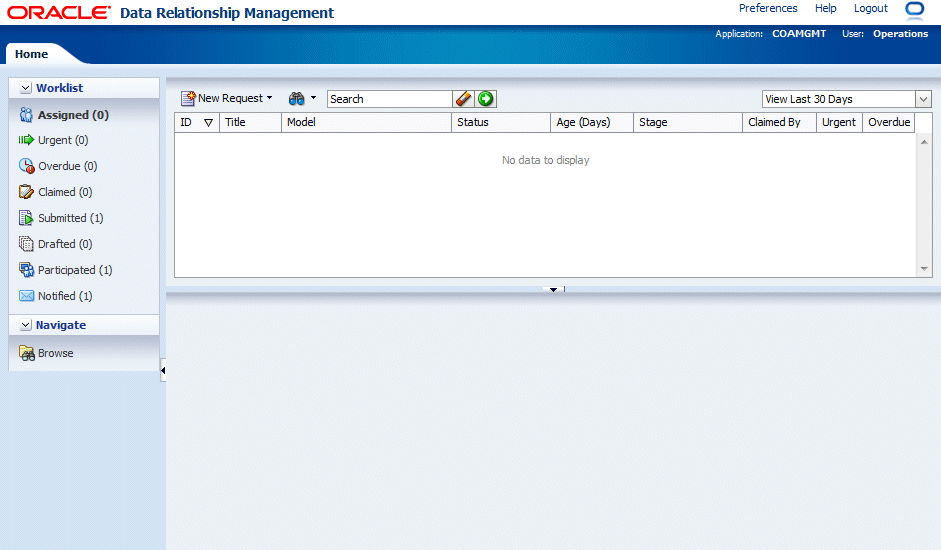
Log on to the COAMGMT application as user Operations with a password of Welcome!.
-
Select New Request and then Product Maintenance.
Note: Load the version if prompted.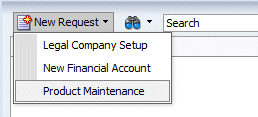

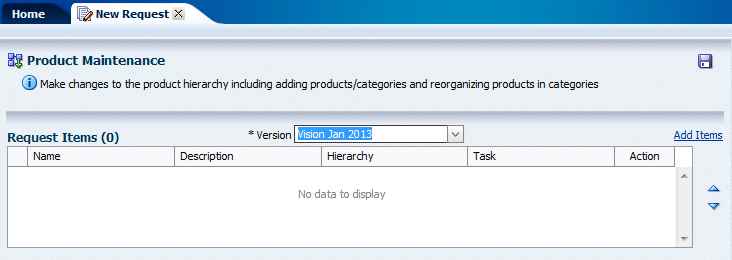
The New Request tab is displayed. The workflow model label and description is displayed at the top of the tab.
-
From the Version drop-down list, select Vision Jan 2013.
-
Click Add Items to add a request item.
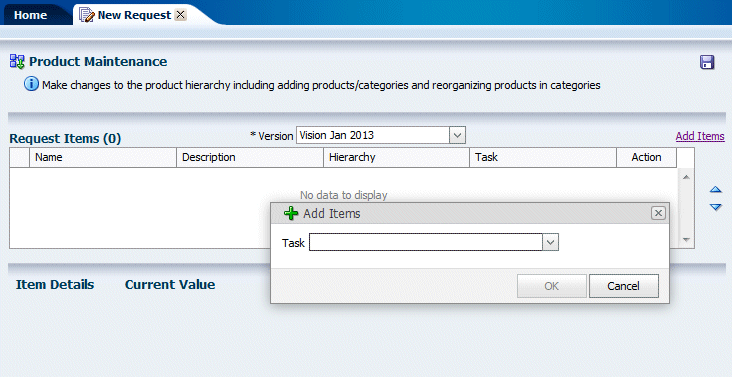
The Add Items dialog box and a list of available workflow tasks are displayed.
-
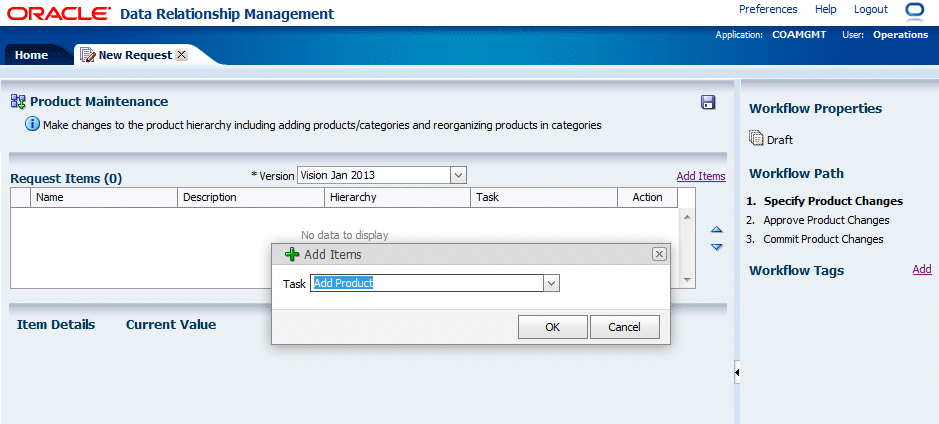
Multiple tasks are available to perform within this wokrflow stage. From the Tasks drop-down list, select the Add Product workflow task.
-
Click OK.
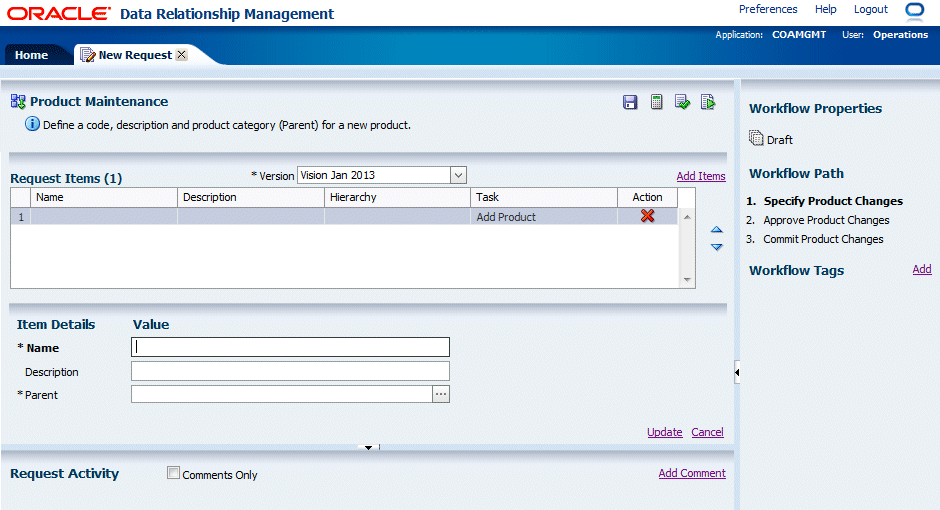
The Add Product task is added to the Request Items table and the Item Details fields are displayed below the table.
-
Define the following values for the new product:
- Name = P_161
- Description = Tablet Standard
- Parent = Tota Productl~P_TP1

-
Click the Update link to temporarily save your changes to the request item.
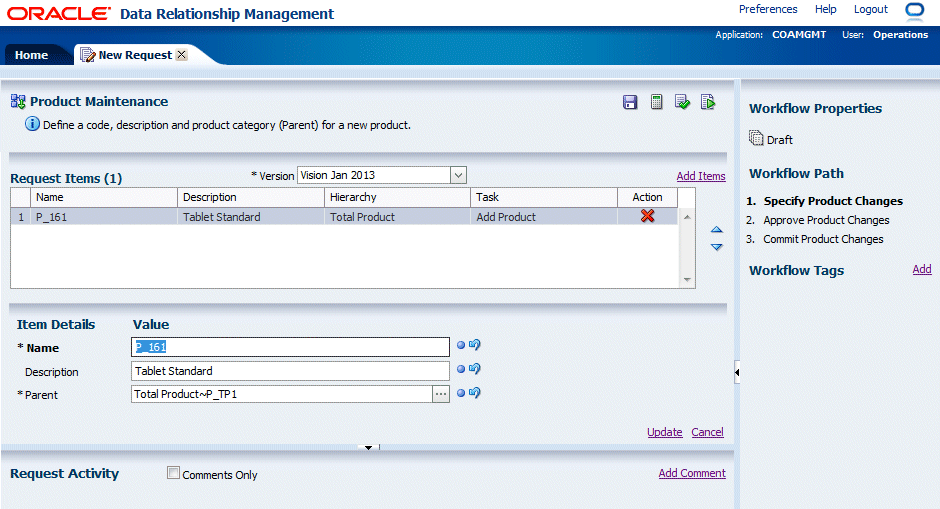
The request item is updated with your saved changes.
-
Click Add Items to add a request item.

The Add Items dialog box and a list of available workflow tasks are displayed.
-
From the Tasks drop-down list, select the Add Product Category workflow task.
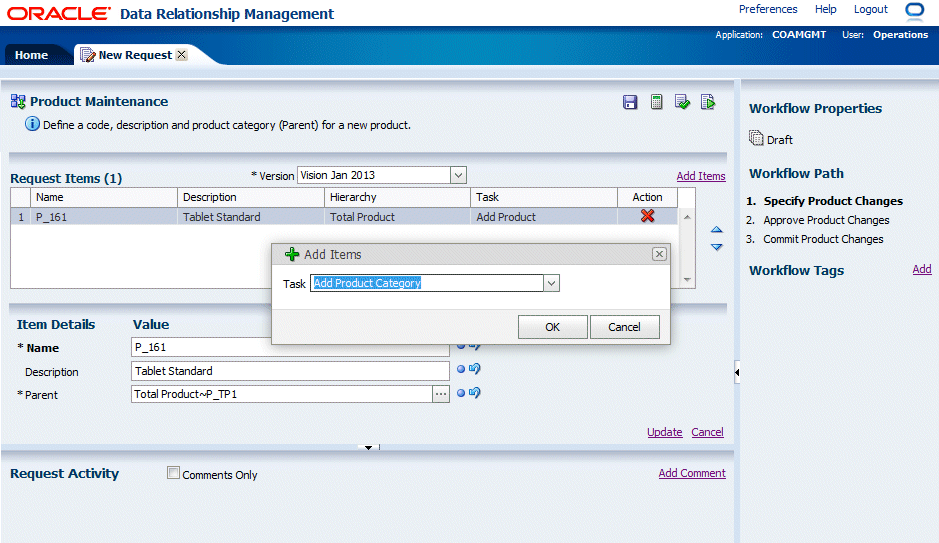
-
Click OK.
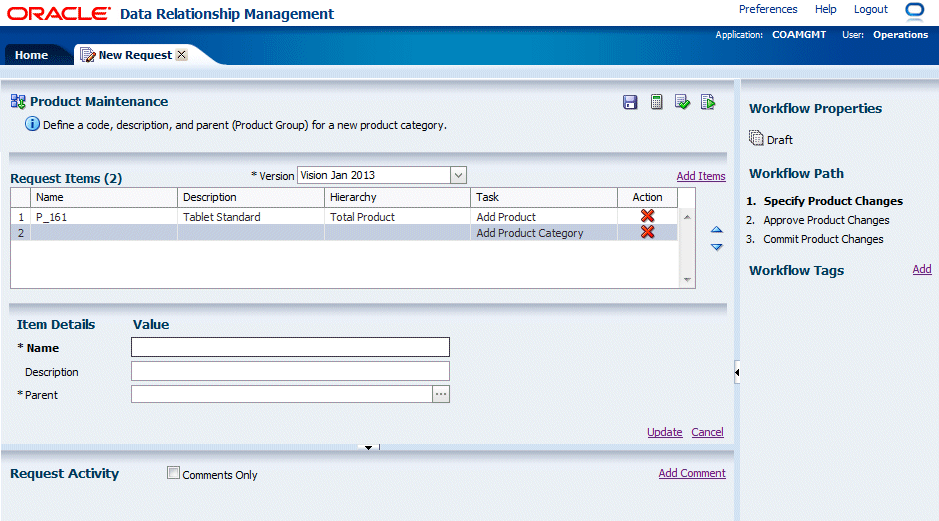
The Add Product task is added to the Request Items table and the Item Details fields are displayed below the table.
-
Define the following values for the new product category:
- Name = P_160
- Description =myPad Tablet
- Parent = Total Product~P_TP1

-
Click the Update link to temporarily save your changes to the request item.
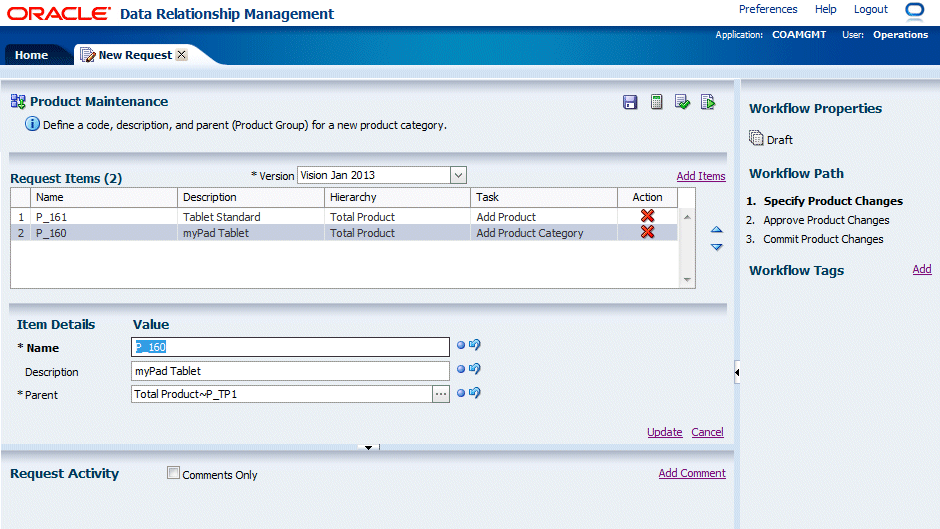
The request item is updated with your saved changes.
-
Repeat steps 10 through 14 to add two other request items for the following new product categories:
- Name = P_170, Description =Sentinel Server, Parent = Total Product~P_TP1
- Name = P_180, Description =Envoy Desktop, Parent = Total Product~P_TP1
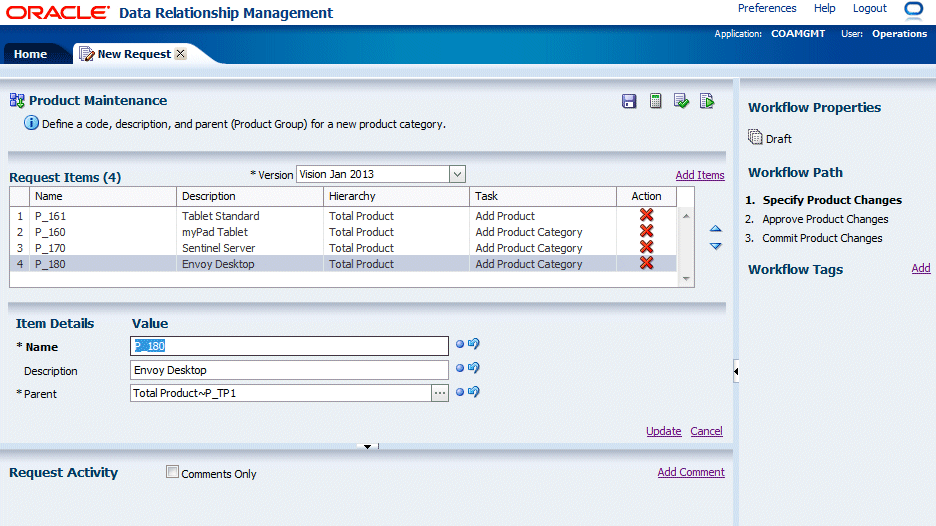
The Worklist page is displayed with a list of requests currently assigned to the user is available for review.
Filtered Node Searching and Browsing
-
Click Add Items to add a request item and then select the Change Product Category task from the Task drop-down list.
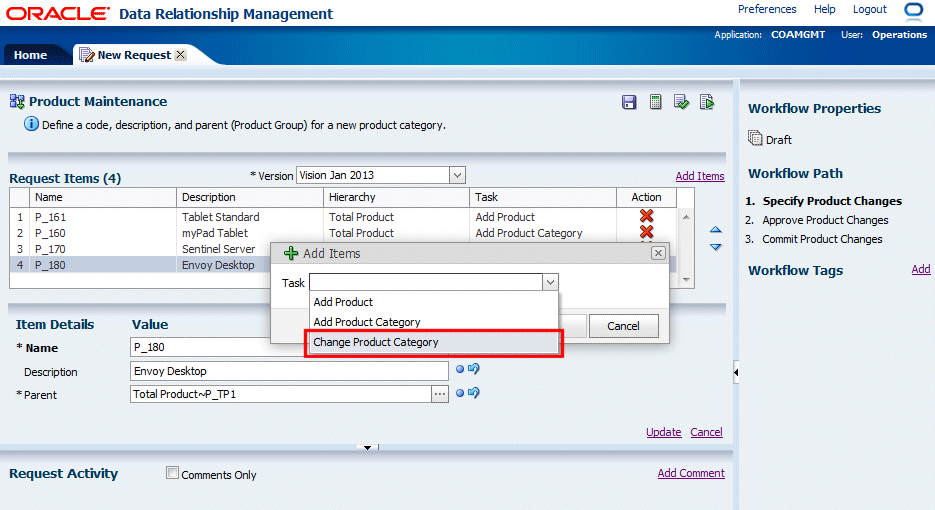

The Add Items dialog box is displayed and enables you to select on or more existing options. The Search tab is selected by default.
-
In the Search field, type * (asterisk) and click the Search icon (
 ).
).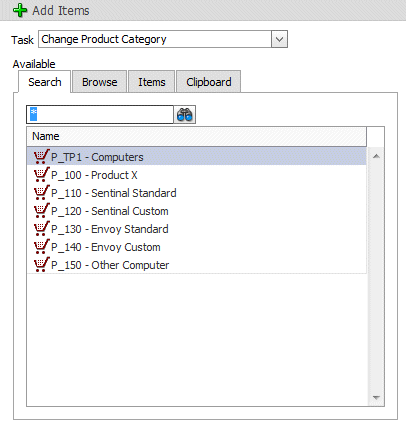
Note that only Computer nodes are returned by the search based on your workflow node access.
-
Press and hold down Shift and select P_110, P_120, P_130, and P_140 from the search results, and then click the Select button (
 ) to select the nodes.
Note that only Computer nodes are returned by the search based on your workflow node access.
-
Select the Browse tab and expand the P_TP1 - Computers node.
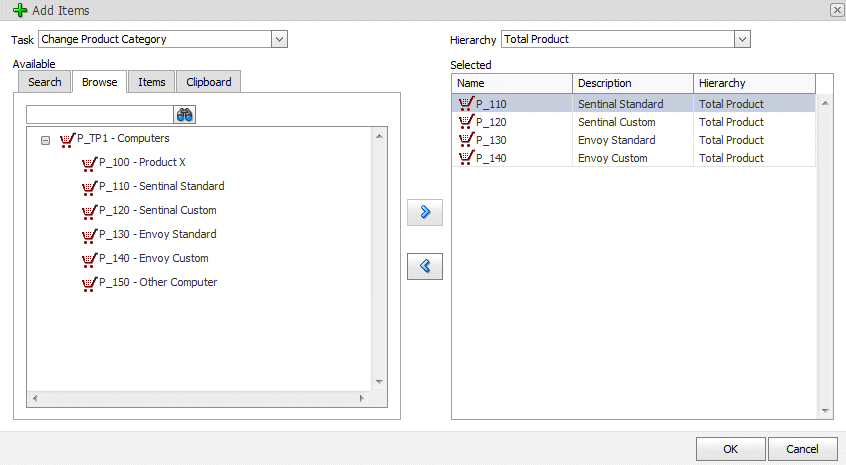
Note that you can view only Computers section of the Products hiearachy based on your workflow node access to the hierarchy.
-
Click OK.
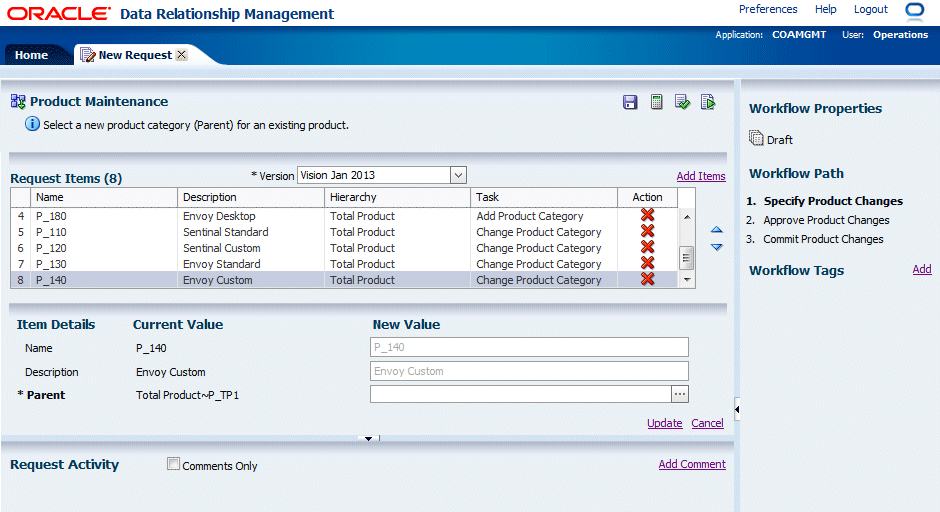
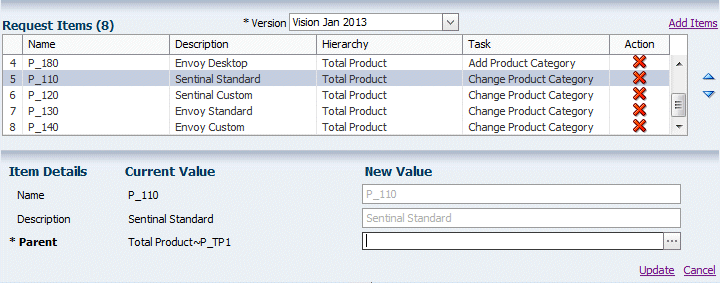
Four additional items are displayed for the request. Note that the last item is selected by default. Because the Change Product Category task is used to make a change for exiisting nodes, the Item Details section displays information in the Current vs. New Value format.
-
In the Request Items list, select the P_110 item.
-
In the New Value column for the Parent field, click the ellipsis button (
 ).
).
The Select Parent dialog box is displayed.
-
Select the Items tab and then select the Total Product~P_170 node as the Parent for the P_110 request item.

-
Click OK and then click the Update link to save the change.

-
Repeat steps 6 through 9 to select the following parent nodes for the request items:
- For node P_120, select Parent as Total Product~P_170
- For node P_130, select Parent as Total Product~P_180
Saving a Draft Request
-
In the toolbar, click the Save button (
 ).
).
The Save Request dialog box is displayed.
-
In the Request Title box, enter Computer Products Reorganization and click OK.
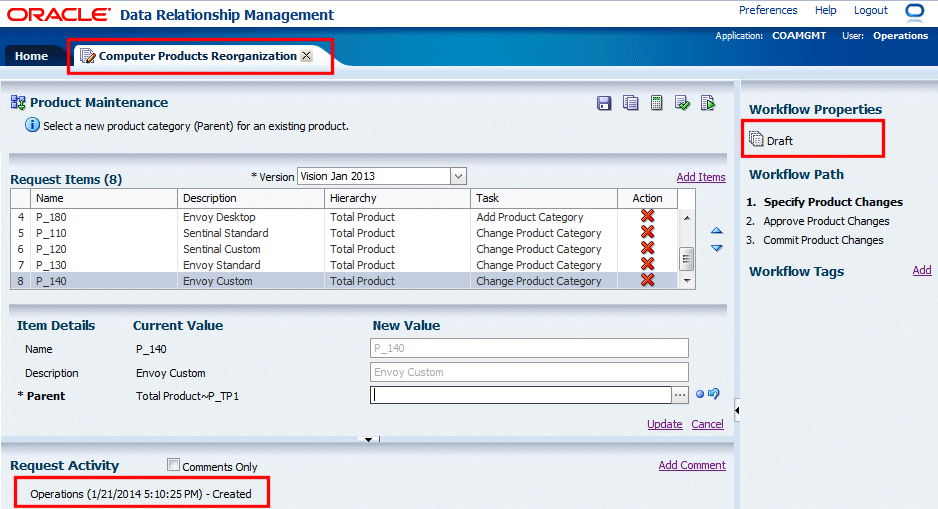
The New Request tab is changed to Computer Products Reorganization, the Workflow Properties area of the page displays the Draft status of the request, and the Request Activity area displays a new record stating creation of the request.
Submitting the Request
In the toolbar, click the Validate button (
 ).
).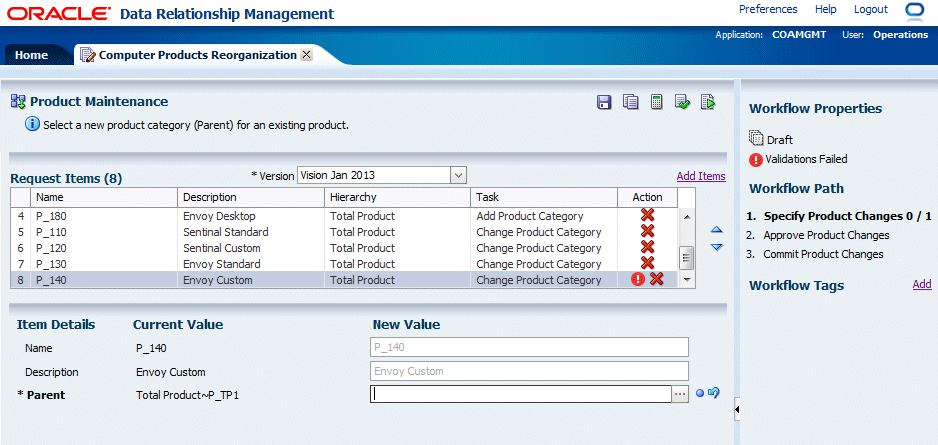
Request item P_140 displays a validation failure indicator.
-
In the Action column for the P_140 request item, click the Validation Error icon (
 ) to show the validation errors.
-
Click OK to close the Warning dialog box.
-
In the New Value column for the Parent field, click the ellipsis button (
 ).
).
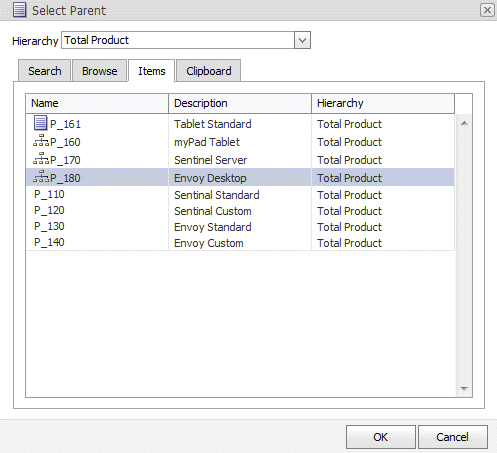
The Select Parent dialog box is displayed.
-
Select the Items tab and then select the Total Product~P_180 node as the Parent for the P_140 request item.
-
Click OK and then click the Update link to save the change.

-
In the toolbar, click the Validate button (
 ) to ensure all validation failures have been resolved.
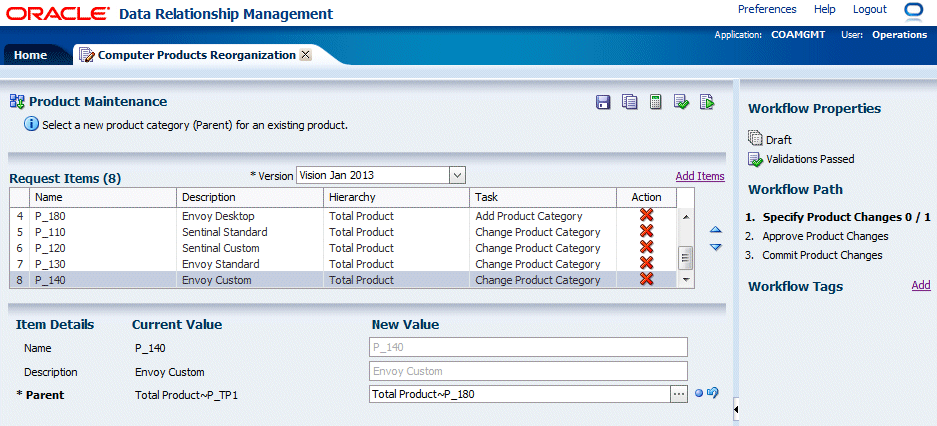
The request is validated without failrues.
-
In the toolbar, click the Submit button (
 ).
).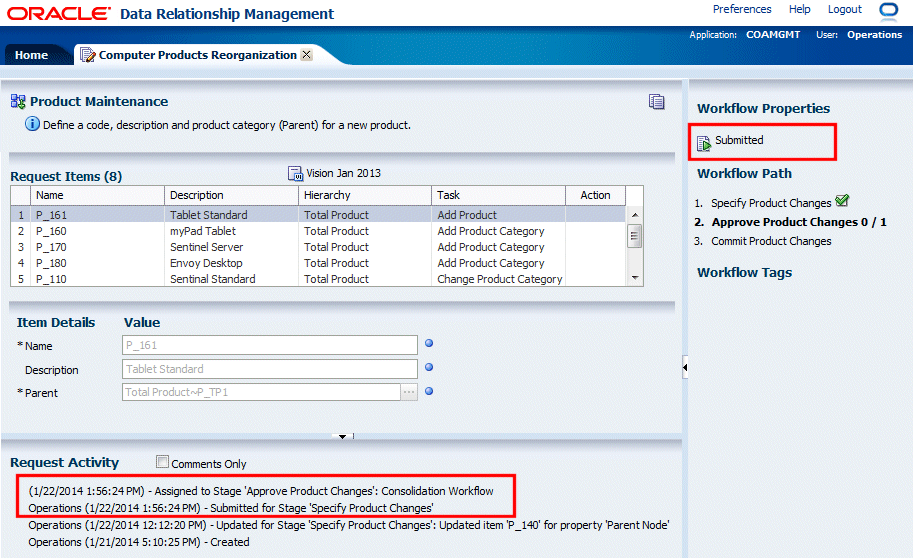
The request is submitted to the workflow model for assignment to the next user(s). The Workflow Path area displays the request status (Submitted) and the current stage of the request in bold font. The previous stage that has been completed is marked with a checkmark icon. The Request Activity area displays new records stating submission of the request. Note that the submitted request is no longer editable or actionable by the submitting user.
-
Close the Computer Products Reorganization tab and log out as user Operations.
Reviewing Assigned Requests, Claiming and Approving the Request
-
Log in to the COAMGMT application as user jcooper with a password Welcome!.
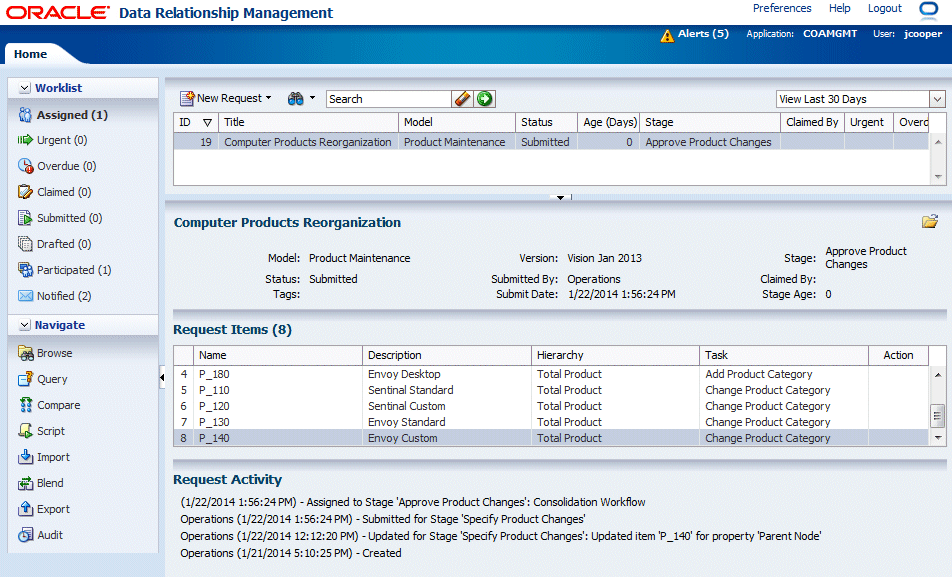
The Worklist page displays the assigned Computer Products Reorganizattion request and its summary.
-
Click the Open button (
 ) to open the request.
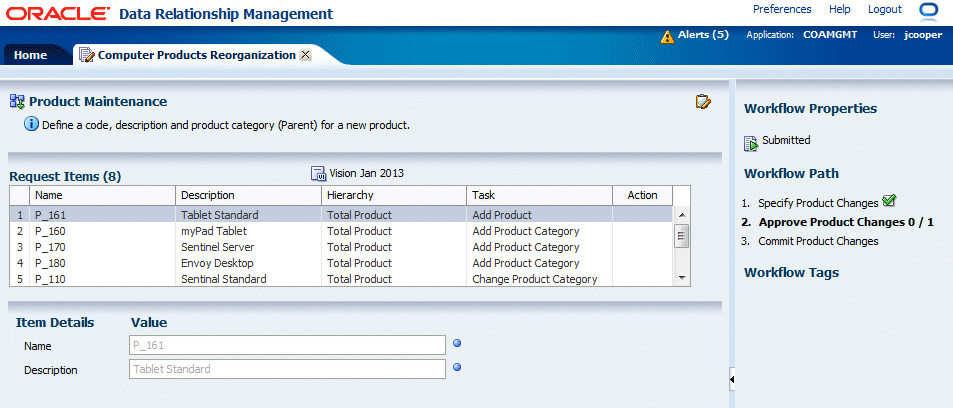
The Computer Products Reorganization request is opened on a new tab. Note that the Item Details of the request item in the request are not yet editable.
-
Click the Claim button (
 ) to act upon the request.
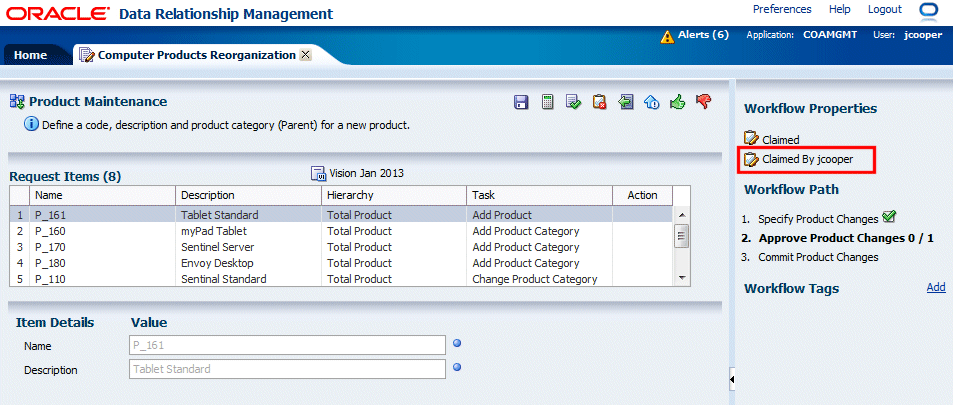
The Workflow Properties area displays that the request is claimed by user jcooper. Note that item details are still read-only because the active stage is an Approval only stage.
-
In the toolbar, click the Approve button (
 ).
).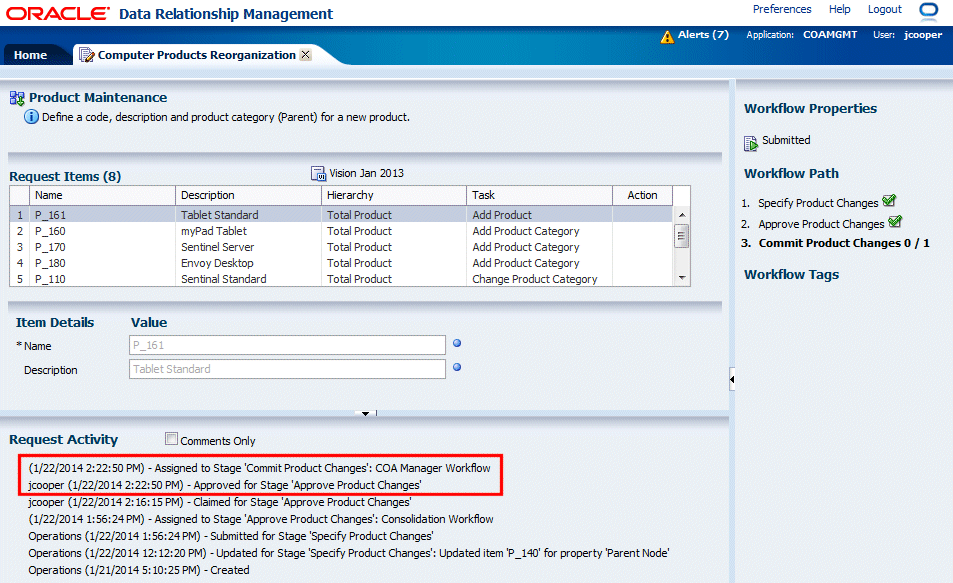
The request is submitted to the workflow model for assignment to the next user(s). The Workflow Path area displays the request status (Submitted) and the current stage of the request in bold font. The previous stage that has been completed is marked with a checkmark icon. The Request Activity area displays new records stating submission of the request.
-
Close the Computer Products Reorganization tab and log out as user jcooper.
Pushing Back the Request
-
Log in as user jstein with a password Welcome! and then select the Worklist task group.
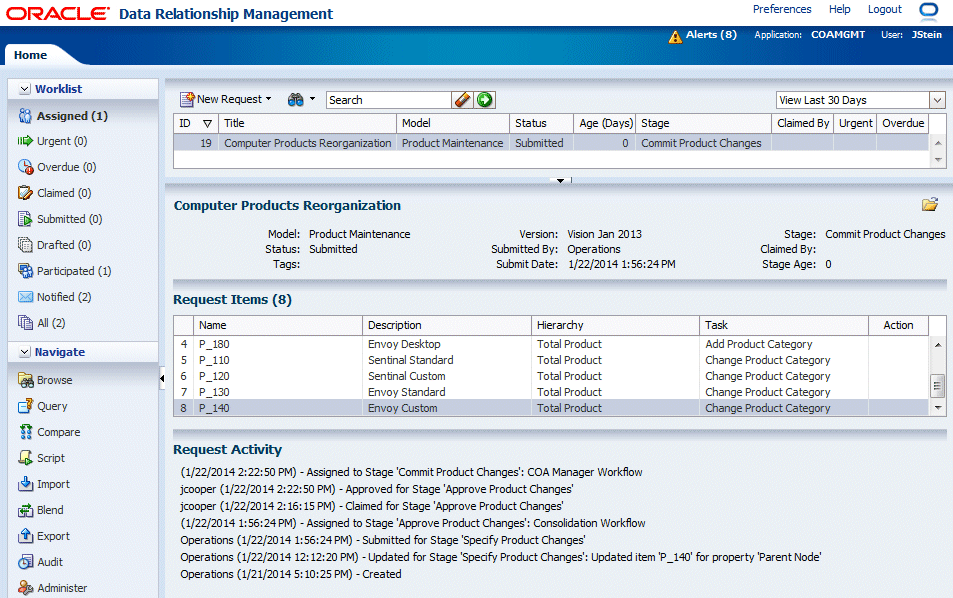
The Worklist page and the list of assigned requests are displayed.
-
Click the Open button (
 ) to open the request.
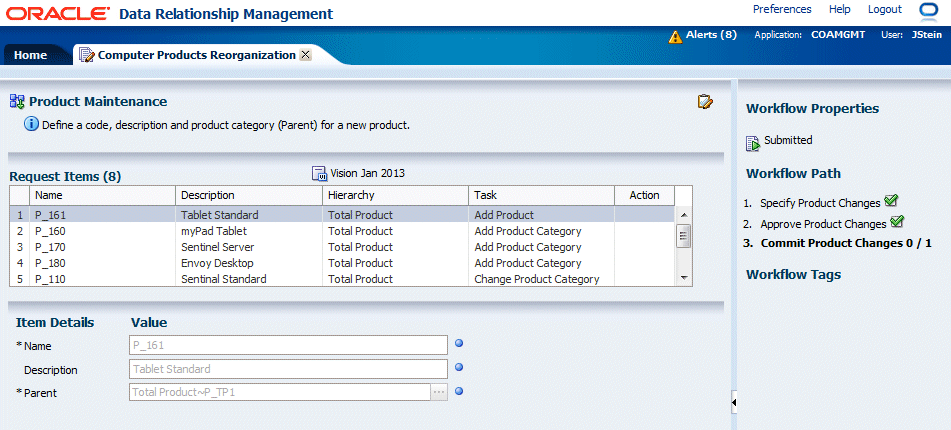
The Computer Products Reorganization request is opened on a new tab. Review the Item Details area for the P_161 request item. Note that the product is a tablet product but its Parent is not the new tablet product category (P_160).
-
Click the Claim button (
 ) to act upon the request.
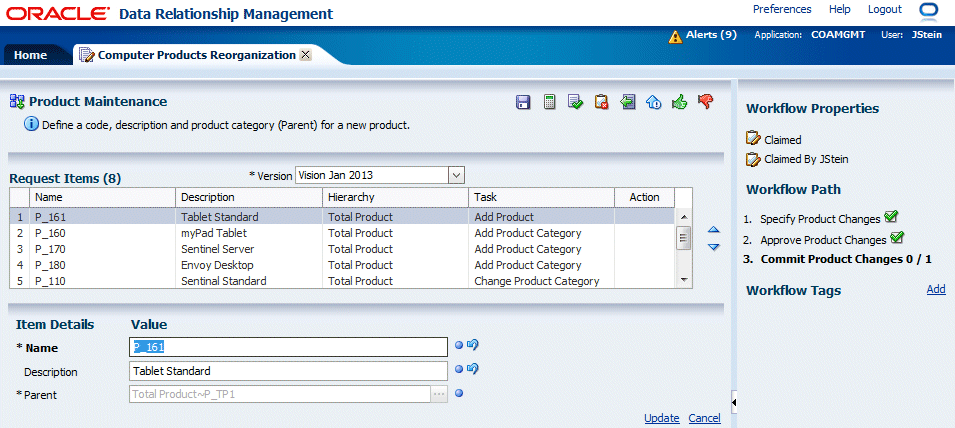
The Workflow Properties area displays that the request is claimed by user JStein and the request is in the final workflow stage (Commit Product Changes). The item details for the P_161 request are editable with the exception of the Parent which can only be edited in the stage where the request item was added.
-
In the toolbar, click the Pushback button (
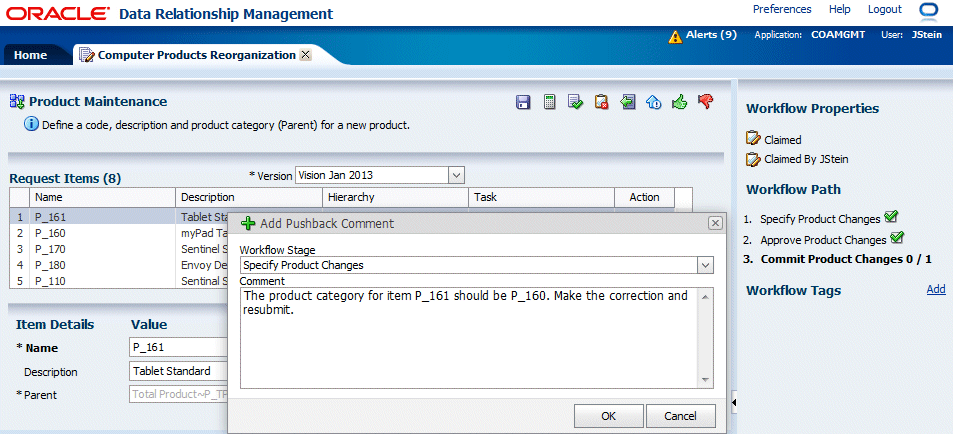
 ) to send the request back to the submitting user so he can make the correction.
Select the Specify Product Changes stage as the target for the pushback and enter the reason for the pushback (for example, enter The product category for item P_161 should be P_160. Make the correction and resubmit.)
-
Click OK.
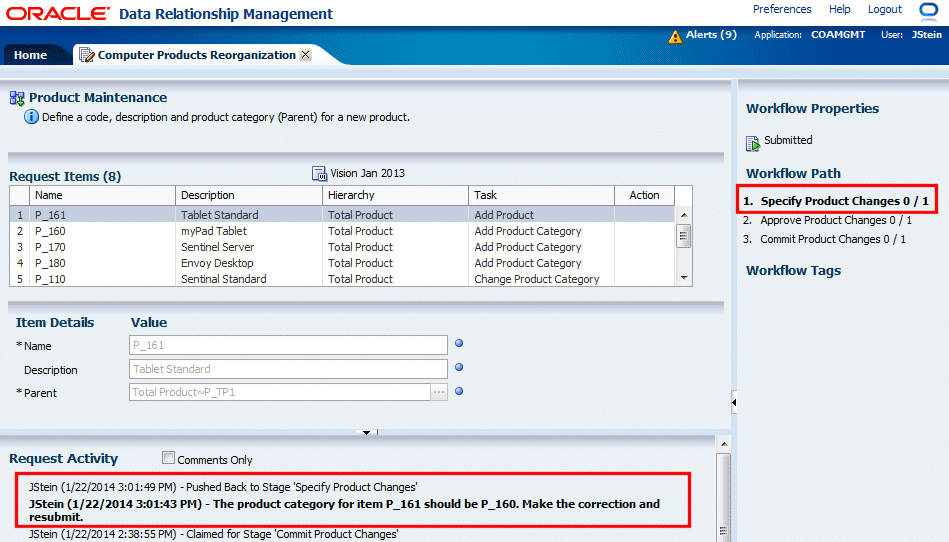
The Workflow Paths area displays that the request is now back to the Specify Product Changes workflow stage. The comment and pushback are added to the Request Activity area along with the user and a timestamp.
-
Close the Computer Products Reorganization tab and log out as user jstein.
Correcting and Re-Submitting the Request
-
Log in as user Operations with a password Welcome!.
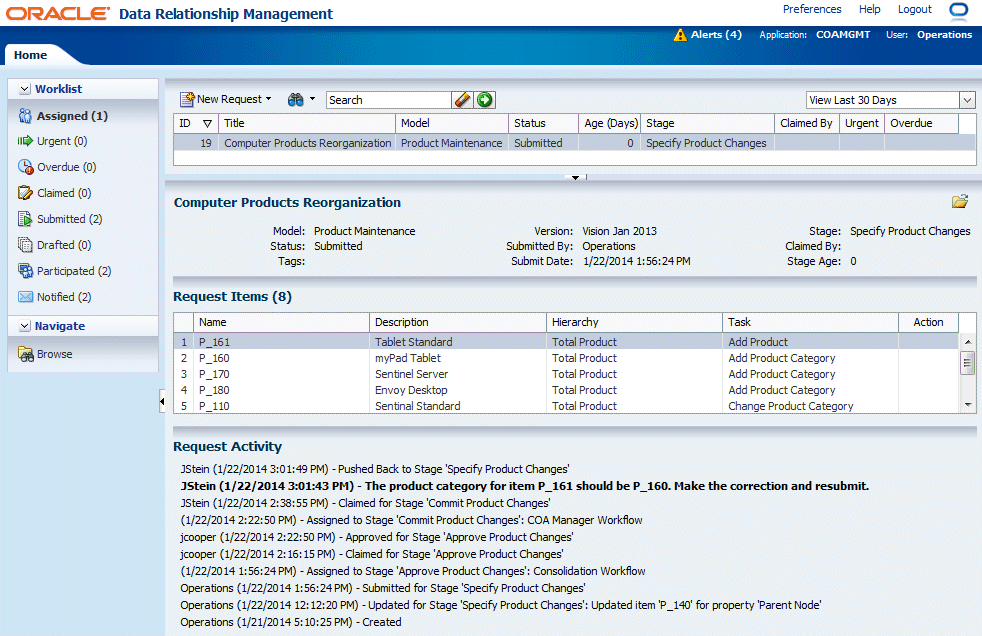
The Worklist page and the list of assigned requests are displayed.
-
Click the Open button (
 ) to open the request.
The Computer Products Reorganization request is opened on a new tab. Review the Item Details area for the P_161 request item. Note that the product is a tablet product but its Parent is not the new tablet product category (P_160).
-
Click the Claim button (
 ) to act upon the request.
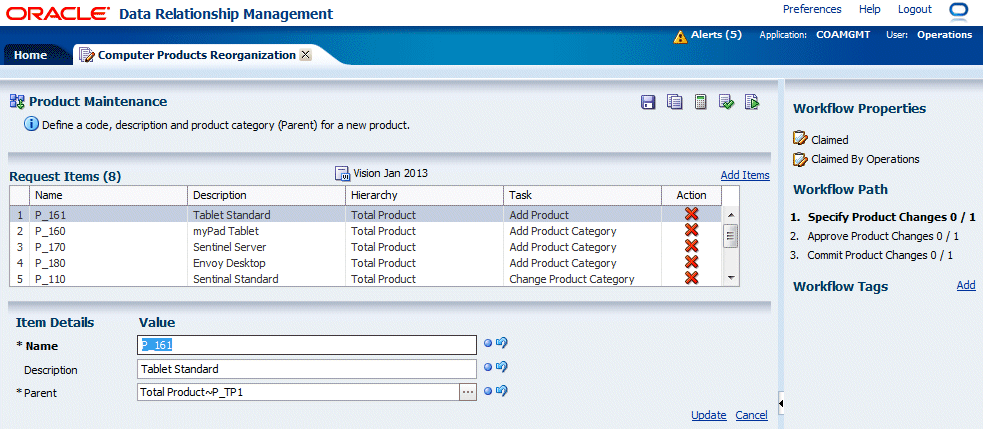
The Workflow Properties area displays that the request is claimed by user Operations and the request is in the initial workflow stage (Specify Product Changes).
-
Click Add Items to add a request item.
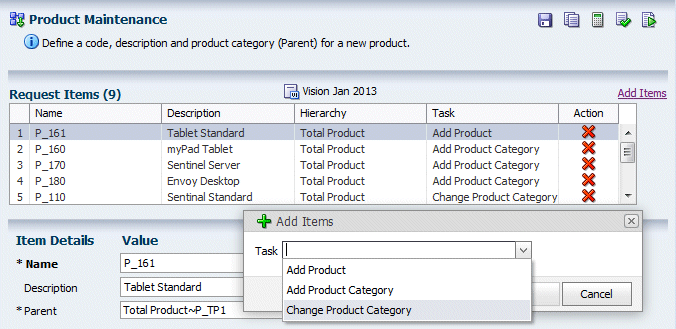
The Add Items dialog box and a list of available workflow tasks are displayed.
-
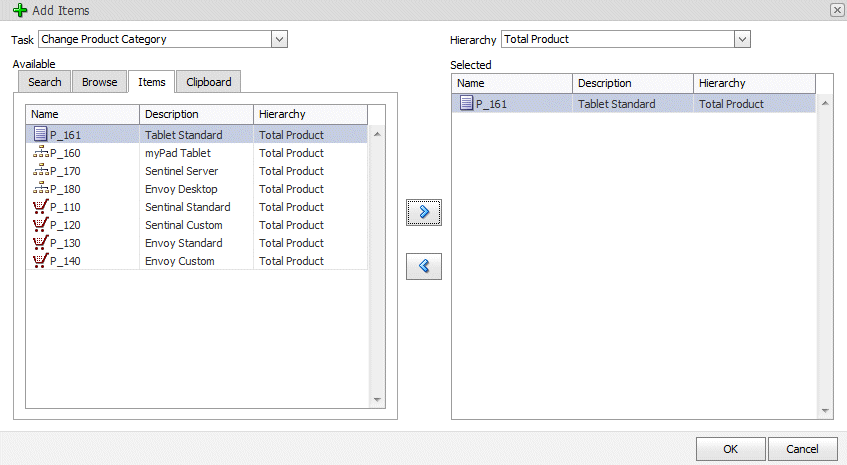
Select the Change Product Category task from the Task drop-down list, select the Items tab, and then select the P_161 item.
-
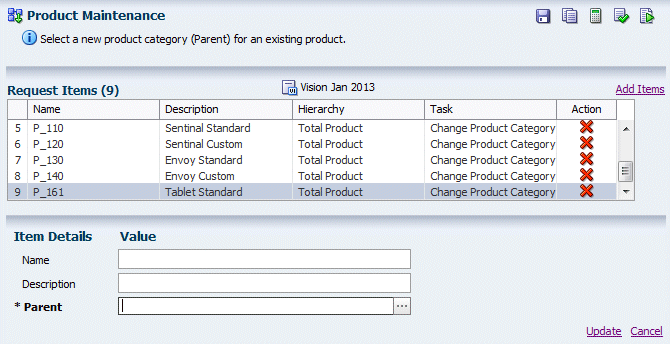
Click OK.
-
In the New Value column for the Parent field, click the ellipsis button (
 ).
).
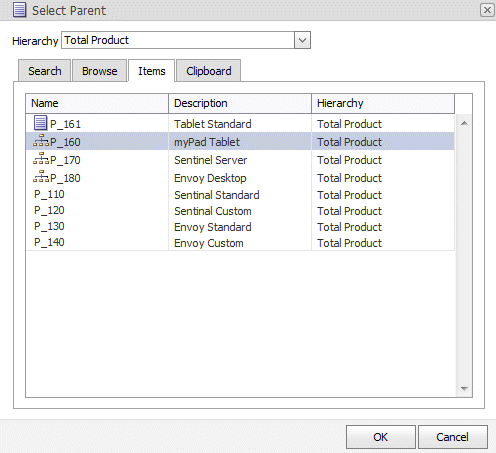
The Select Parent dialog box is displayed.
-
Select the Items tab and then select the Total Product~P_160 node as the Parent for the P_161 request item.
-
Click OK and then click the Update link to save the change.

-
In the toolbar, click the Submit button (
 ) to re-submit the request for approval.
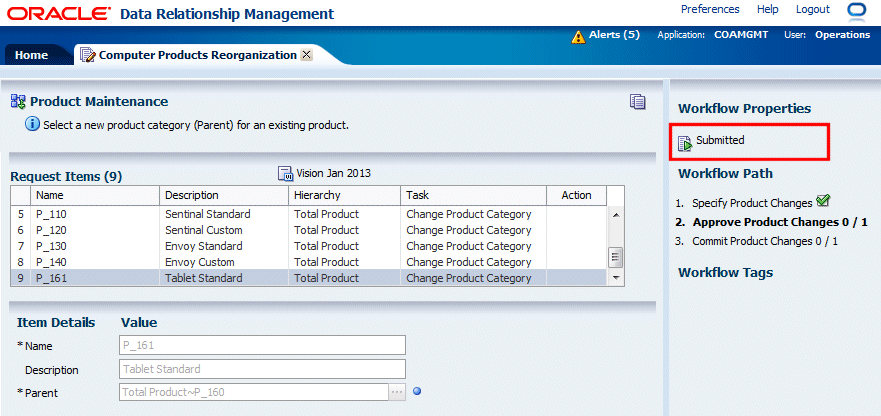
The request is submitted to the workflow model for assignment to the next user(s). The Workflow Path area displays the request status (Submitted) and the current stage of the request in bold font. The previous stage that has been completed is marked with a checkmark icon.
-
Close the Computer Products Reorganization tab and log out as user Operations.
Re-Approving the Request
-
Log in to the COAMGMT application as user jcooper with a password Welcome!.
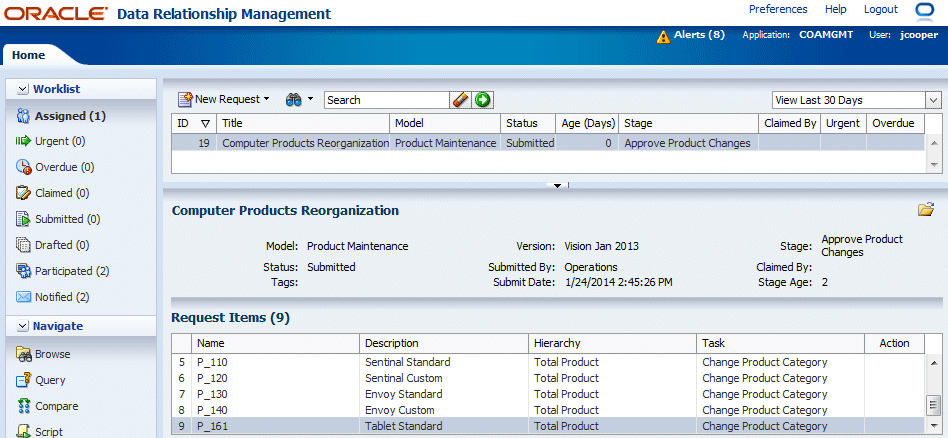
The Worklist page displays the assigned Computer Products Reorganizattion request and its summary.
-
Click the Open button (
 ) to open the request.
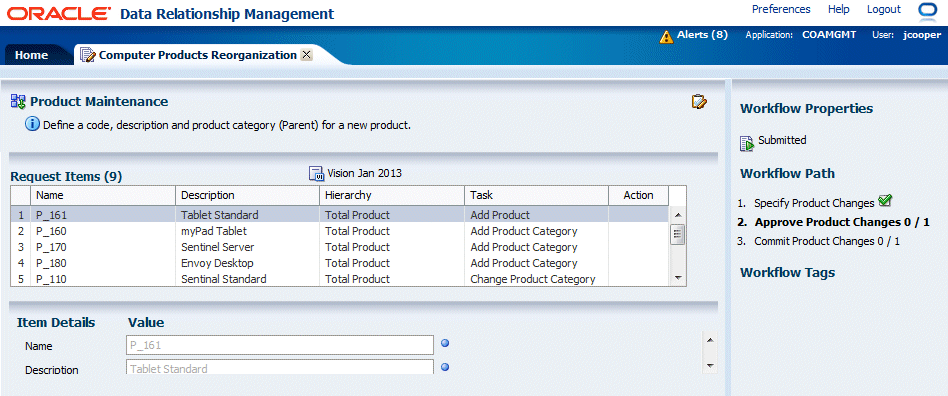
The Computer Products Reorganization request is opened on a new tab. Note that the Item Details of the request item in the request are not yet editable.
-
Click the Claim button (
 ) to act upon the request.
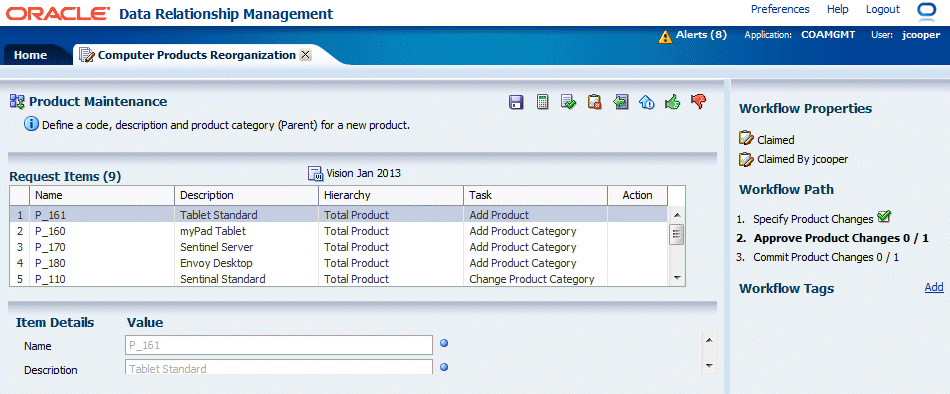
The Workflow Properties area displays that the request is claimed by user jcooper.
-
In the toolbar, click the Approve button (
 ) to re-approve the request with the correction made.
The request is submitted to the workflow model for assignment to the next user(s). The Workflow Path area displays the request status (Submitted) and the current stage of the request in bold font. The previous stage that has been completed is marked with a checkmark icon.
-
Close the Computer Products Reorganization tab and log out as user jcooper.
-
Log in as user jstein with a password Welcome! and then select the Worklist task group.
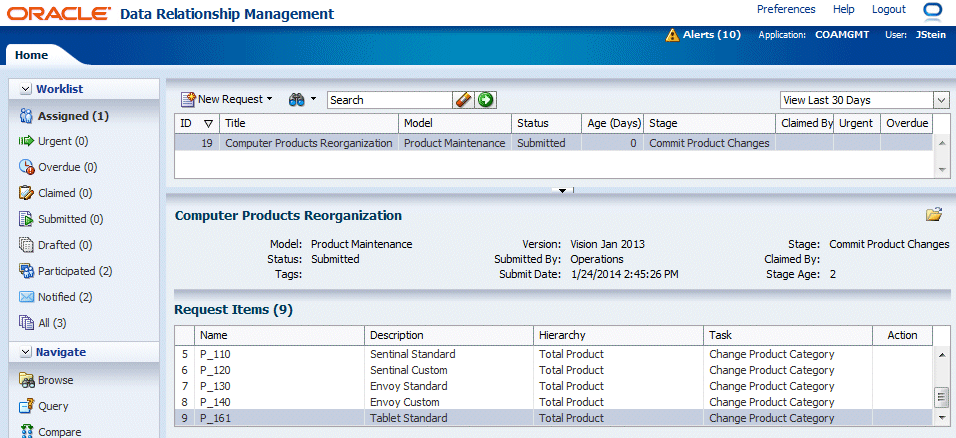
The Worklist page and the list of assigned requests are displayed.
-
Click the Open button (
 ) to open the request.
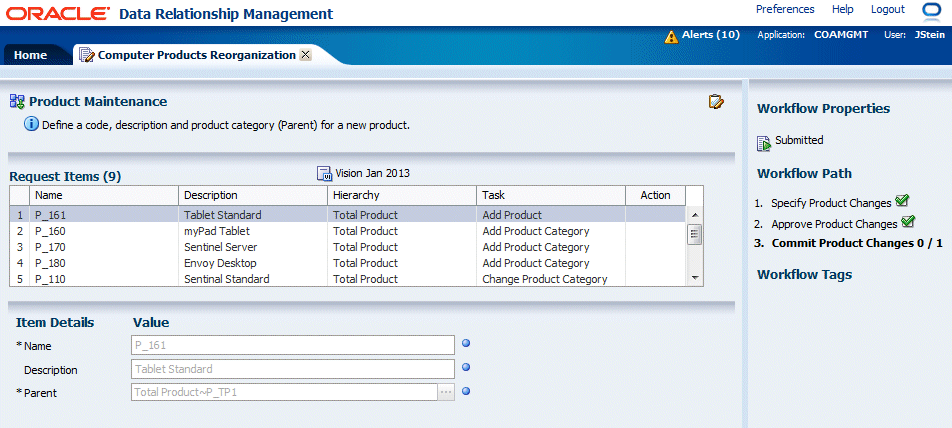
-
Click the Claim button (
 ) to act upon the request.
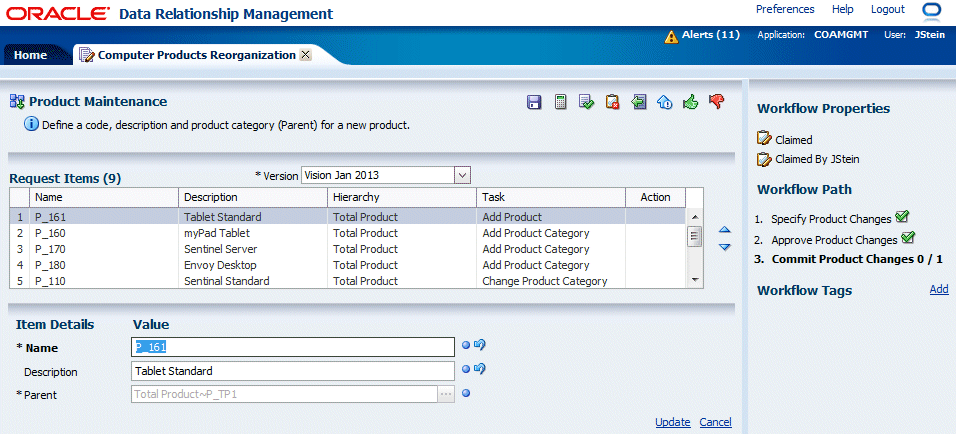
The Workflow Properties area displays that the request is claimed by user JStein and the request is in the final workflow stage (Commit Product Changes).
-
In the toolbar, click the Approve button (
 ) to re-approve the request with the correction made.
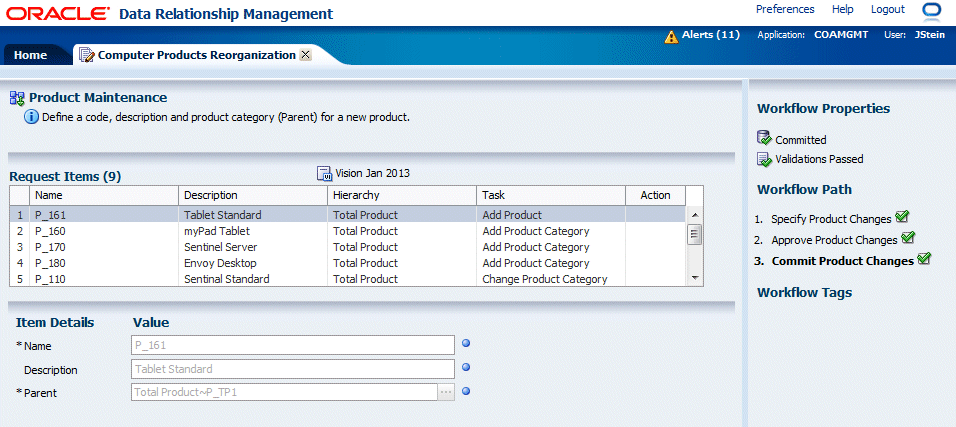
The Workflow Path indicates that all required workflow stages have been completed.
-
Close the Computer Products Reorganization tab and log out as user jstein.
Summary
In this tutorial, you learned:
- As the request creator, to create a multiple item change request by searching and browsing for nodes and then submit the request for intermediate approval and final commitment.
- As the approver, to review the request, claim and approve the request to send it to the final commitment user.
- As the commitment user, to run validations and push back the request to the submitting user to make a correction.
- As the submitting user, to make your correction and resubmit the request.
- As the approving and committing users, to re-approve the new changes to the request.
Resources
- Oracle Data Relationship Governance on Oracle Technology Network (OTN)
- Oracle Data Relationship Management 11.1.2.3 Documentation
- To learn more about Data Relationship Management refer to additional OBEs in the Oracle Learning Library
To navigate this Oracle by Example tutorial, note the following:
- Topic List:
- Click a topic to navigate to that section.
- Expand All Topics:
- Click the button to show or hide the details for the sections. By default, all topics are collapsed.
- Hide All Images:
- Click the button to show or hide the screenshots. By default, all images are displayed.
- Print:
- Click the button to print the content. The content that is currently displayed or hidden is printed.
To navigate to a particular section in this tutorial, select the topic from the list.