Installing and Configuring Peoplesoft Integration Types for Financial Close Management 11.1.2.3
Overview
Purpose
This tutorial covers installing and configuring Oracle Peoplesoft (PFST) end user and event monitoring integration types for the Close Manager module of Oracle Hyperion Financial Close Management 11.1.2.3.
Time to Complete
Approximately 3 hours.
Introduction
This tutorial covers configuring Oracle Peoplesoft (PSFT) end user and event monitoring integration types for the Close Manager module of Oracle Hyperion Financial Close Management 11.1.2.3 (FCM).
Prerequisites
This tutorial assumes that you have installed and configured FCM 11.1.2.3, and that you are familiar with both Close Manager and Peoplesoft administration. Before starting this tutorial, you should have access to the PSFT91IntegrationTypes_11_1_2_3.xml integration type XML file. This file is available for download from My Oracle Support as patch 16825682.
Performing Pre-import Configuration
Synchronizing Time
The PSFT-FCM system automated integration requires FCM to call the PSFT PROCESS_INITIATION web service. This web service makes use of the SAML 1.0 Web Service Security Policy. This security policy is extremely time sensitive when processing web service requests. Therefore it is required that the two servers FCM and PSFT are time synchronized. Use this url: http://wwp.greenwichmeantime.com/gmt-timestamp.htm to correct the GMT time on the machine’s clock
Note: The steps below must be performed on both the FCM and PSFT servers..
-
In your browser, connect to the url http://wwp.greenwichmeantime.com/gmt-timestamp.htm.
The link converts the machine's clock time to GMT format.
Compare the machine’s UTC time zone’s time to the time given in the link.
-
If a mismatch is found, correct the UTC time and set it to match the one provided in the link.
IB Service and Anonymous Node Configuration
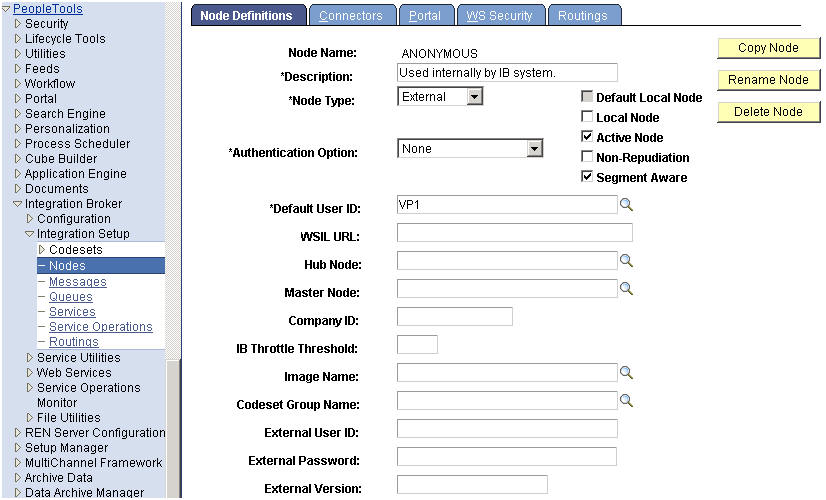
You must configure the IB service and the ANONYMOUS node. To configure the ANONYMOUS node, you must verify that the the Default User ID on the delivered IB Node ANONYMOUS (used internally by the IB system) is a valid user ID. It is delivered as PSADMIN by default, which is not a valid user in PSFT environments.
-
To configure the IB service, on the IB Service Configuration page, enter the target location in the Target Location field. You must include the Default Local Node at the end, as follows:
http://<server_name>:<port>/PSIGW/PeopleSoftServiceListeningConnector/<Default Local Node>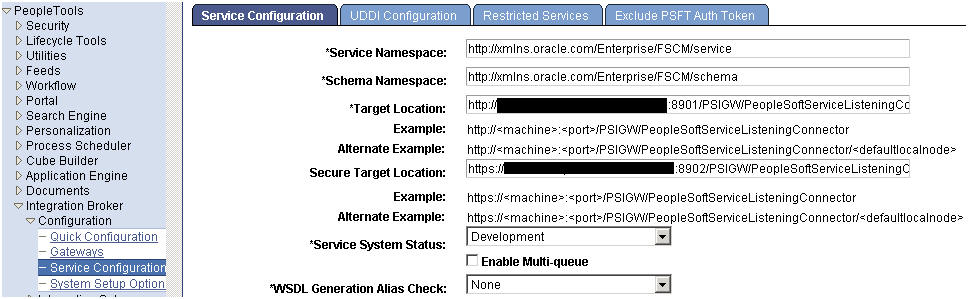
Note: The values for <machine>:<port> can be found on the Local Gateway URL field on the IB Quick Configuration page, shown below (when using the default port number 80, it can be omitted):

-
To configure the ANONYMOUS node, on the Node Definitions tab, verify that the Default User ID field is a valid user id. It is delivered as PSADMIN by default, which is not a valid user in FSCM environments.
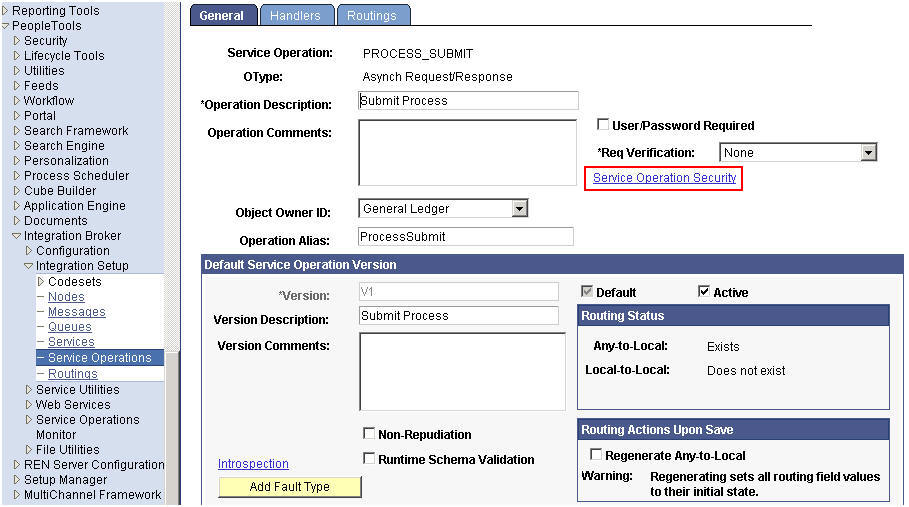
Activating the IB Objects Used for FCM and PSFT Integration
You need to activate service operation PROCESS_SUBMIT, and generate a local to local routing for service operation PRCS_STATUS_OPER.
-
Perform the following steps to activate service operation PROCESS_SUBMIT:
-
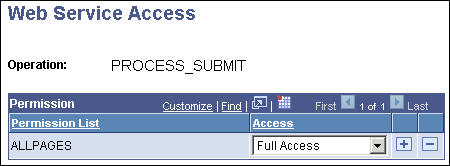
Grant the permission to this service by clicking on the Service Operation Security hyperlink.
-
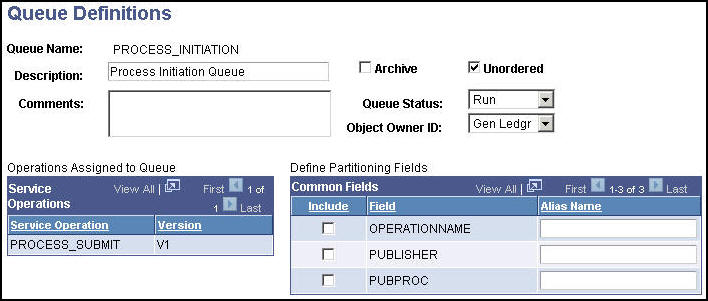
Activate Queue PROCESS_INITIATION by clicking on either of the two View Queue hyperlinks.
-
Activate the Handler.
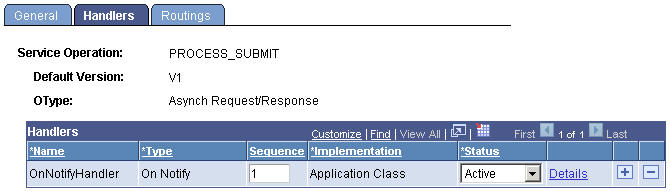
- Activate the Any-to-Local Routing PROCESS_SUBMIT.
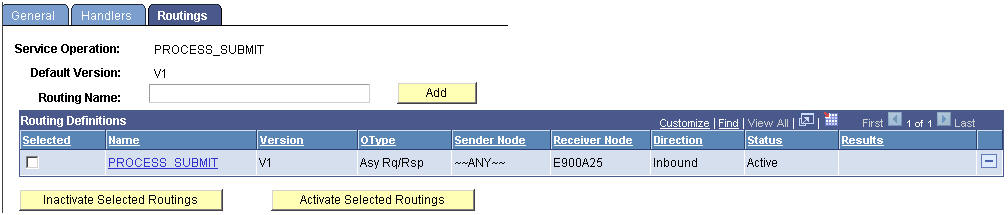
- To generate a Local-to-Local Routing for the service operation PRCS_STATUS_OPER, follow these steps:
- For the service operation PRCS_STATUS_OPER, from the General tab, select the Generate Local-to-Local check box in the Routing Actions Upon Save group box, and save the page.
- From the Routings tab, make sure a system-generated Local-to-Local routing is there, named ~GENERATED~NNNNNNNN (NNNNNNNN is a system assigned number) with an Active status.

Note: You can rename the system-generated Local-to-Local routing to a meaningful name using the IB Service Administration Utility. (Access PeopleTools, Integration Broker, Service Utilities, Service Administration, Routings. Open the Rename group box, enter the Routing Name and New Name, and click the Rename button.)
Setting Up PSFT Parameters for Returning URLs to FCM
Depending on the PIA and Single Signon (SSO) implementation, there might be two Protocols and four Port numbers:
|
http (Non-SSL) |
https (SSL) |
Web Server Port |
Port1 |
Port2 |
WebGate Port for SSO |
Port3 |
Port4 |
For this OBE, we shall be discussing the Non-SSL & Non-SSO scenario ONLY.
Process Monitor URL for PSJob
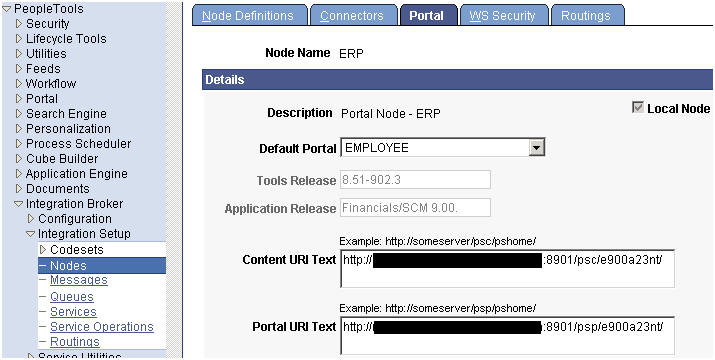
To set up the Process Monitor URL for PSJob, fill in the Portal URI Text value for the delivered IB Node ERP.
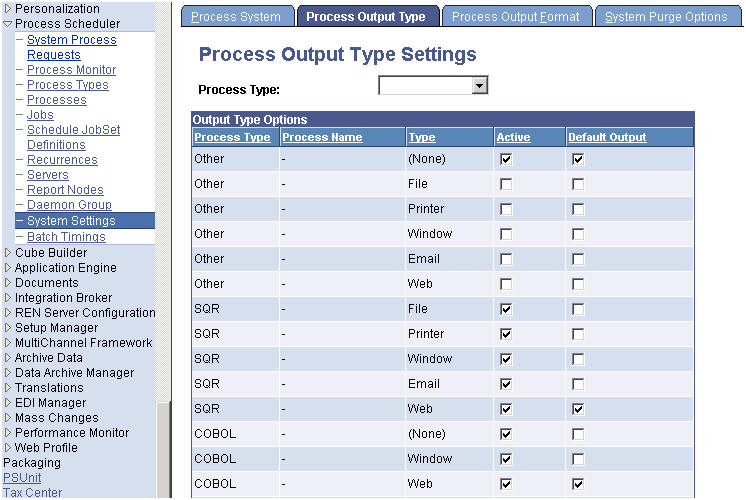
Report Repository
To post the report/trace/log files to the report repository, the process types have to be set to use Web as the Default Output on the System Settings – Process Output Type page. COBOL is delivered to use (None) as the default; you need to change it to use Web.
Enabling SAML Tokens with Encryption on the PSFT System
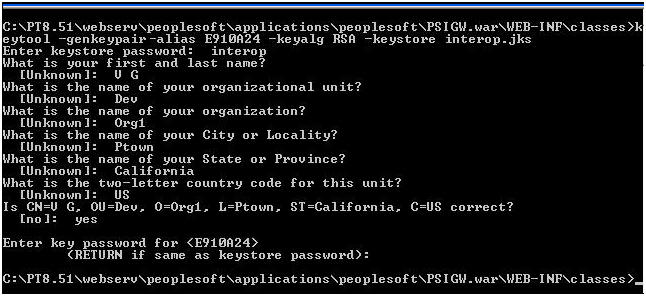
This procedure requires the FCM and PSFT systems to exchange their respective public certificates as part of SAML 1.0 token encryption usage as the Web Service Security policy. This step makes use of the keytool utility and it has to be specifically JDK 1.6 version based. This is because the utility uses the genkeypair", "-importcert" , and "-exportcert" commands.
-
PSFT server: Export public certificate. Perform the following steps on the PSFT server to export public certificates:
- Use the Java keytool Utility command "-genkeypair" to generate a public key based out of the default local node name, into the interop.jks keystore delivered with PeopleTools E910A24, as in this example.
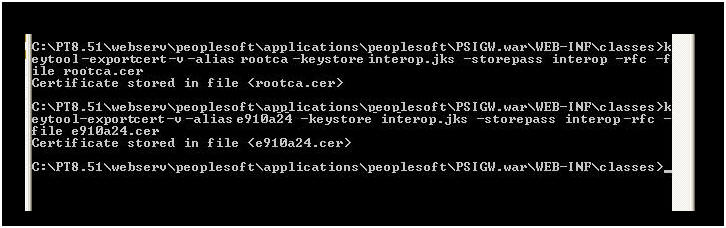
- Use the Java keytool Utility command "-exportcert" to export the certificate files of public keys rootca & <default local node name>, (e910a24 as in this example) out of interop.jks keystore. This will create the rootca.cer and <default local node name>.cer files inside the PSIGW.war\WEB-INF\classes directory.
- Use the Java keytool Utility command "-genkeypair" to generate a public key based out of the default local node name, into the interop.jks keystore delivered with PeopleTools E910A24, as in this example.
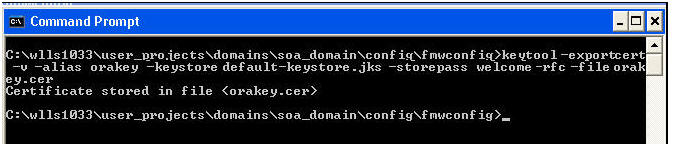
- FCM server: Export public certificate. On the FCM Server,
use the Java keytool utility command "-exportcert" to export the certificate file of public key named orakey, out of default-keystore.jks keystore. This command will create the orakey.cer file inside the fmwconfig directory of the EPM domain.
Note: It is required to have a keystore in place as documented in the EPM Install Guide section – Setting up Keystore for Message Protection.
-
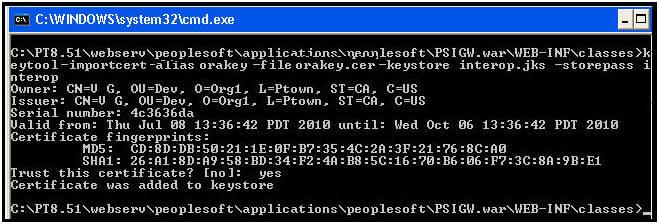
PSFT Server: Import FCM's public certificate. On the PSFT server, use the Java Keytool utility command of "-importcert" to import the FCM public certificate orakey.cer into interop.jks keystore.
-
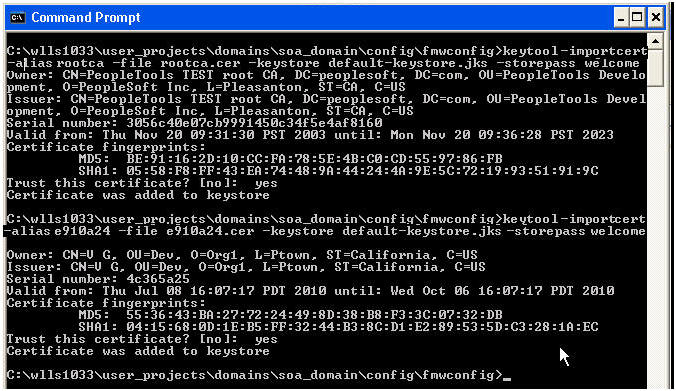
FCM server: Import PSFT public certificates. On the FCM Server side, use the Java keytool Utility command "-importcert" to import the certificate files rootca.cer and <default local node name>.cer (e910a24.cer in this example) into FCM’s default-keystore.jks keystore.
-
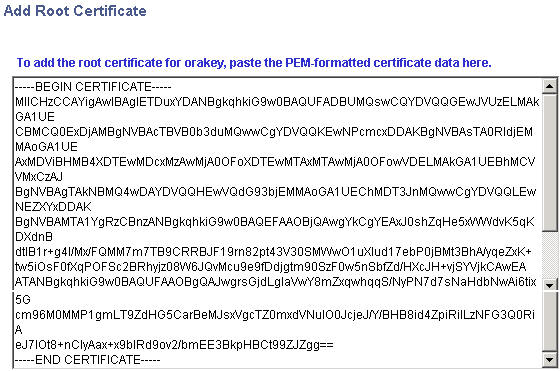
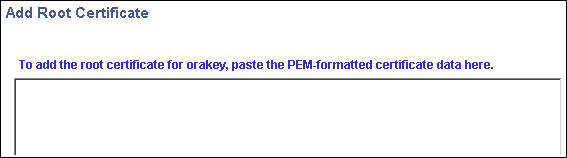
PSFT Server: Add the digital certificate for orakey. Perform these steps to add the certificate:
- First add it as the type of Root CA.
- Click on the Add Root hyperlink:
- Open the orakey.cer file generated from FCM’s default-keystore.jks, and using any text editor, copy the whole content, and paste in the Add Root Certificate box.
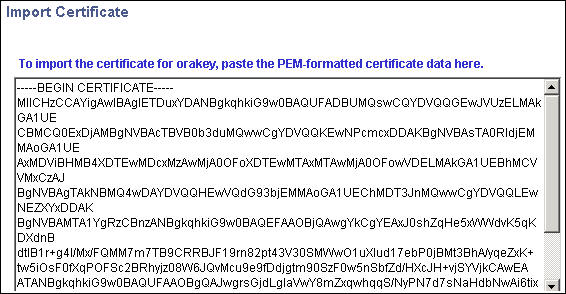
- Then add it as the type Remote.

- Click on the Import hyperlink, and paste the content of orakey.cer in the Import Certificate box.
- The end results should match the screen below (
Note: verify that the certificate expiry date is not a past date):


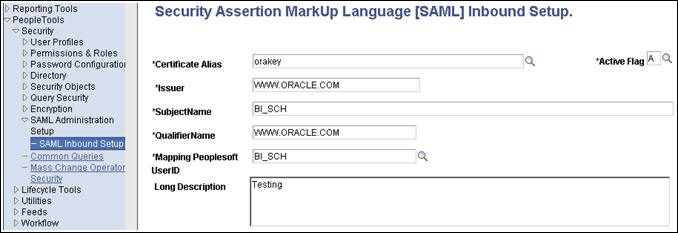
- PSFT server: Add orakey to the SAML Inbound Setup page. Add orakey to SAML Inbound Setup page for each of the OWSM SubjectNames, for example FCM User BI_SCH.
- PSFT server: Edit the wssSAML.properties.
Open the wssSAML.properties file under %PS_HOME%\webserv\peoplesoft\applications\peoplesoft\PSIGW.war\WEB-INF\classes, and replace the two occurrences of “.peoplesoft.com” with “www.oracle.com”:
org.apache.ws.security.saml.issuer=www.oracle.com org.apache.ws.security.saml.subjectNameId.qualifier=www.oracle.comNote: It is required to bounce the PSFT Web Server after performing this step.
-
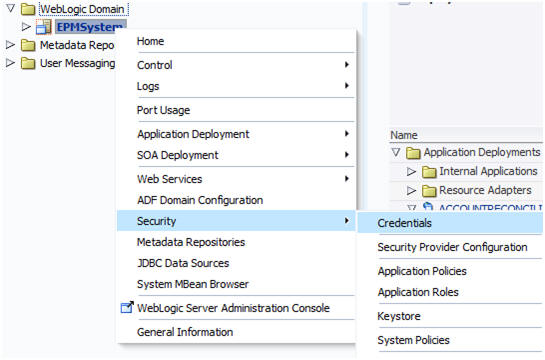
FCM server: Configure the cwallet.sso and jps-config.xml files. Perform these steps to configure cwallet.sso and jps-config.xml:
- In Enterprise Manager, access the Credentials menu through the WebLogic Domain as shown below:
- It should match the screen shot below. If oracle.wsm.security map is already there, it can be deleted, as it will be generated in the following steps.
(Note: Only select and delete the oracle.wsm.security map).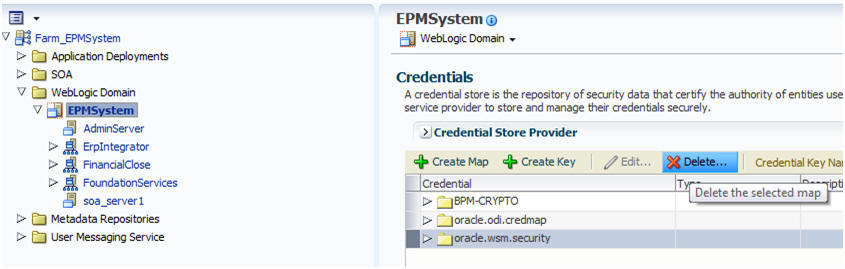
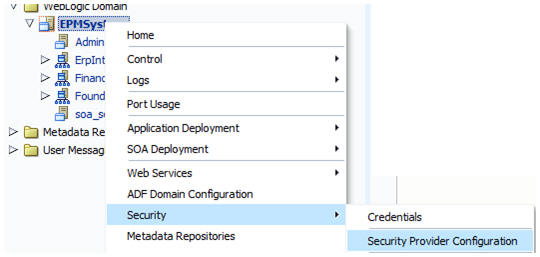
- Using EM as shown, access Security Provider Configuration.
- In the Security Provider Configuration page, expand the keystore link and click on the Configure button.

- Provide the values for the password and keys, and click OK.

- Return to the Credentials menu and verify that the oracle.wsm.security map is created there and create an additional key for the basic credentials, as shown below:
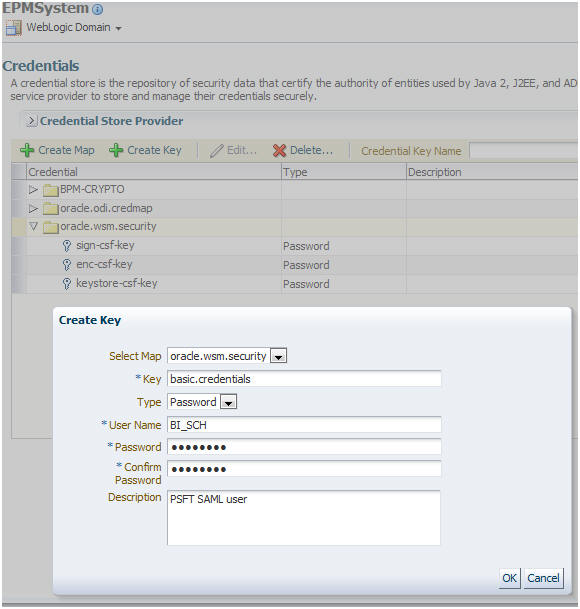
This configures the the cwallet.sso and the jps-config.xml file. Be sure to bounce the WebLogic server for the changes to effect:
-
PSFT server: Enable the SAML with full encryption. Perform these steps to enable the SAML with full encryption:
- Enable the SAML with full encryption at the outbound of Routing PROCESS_SUBMIT.
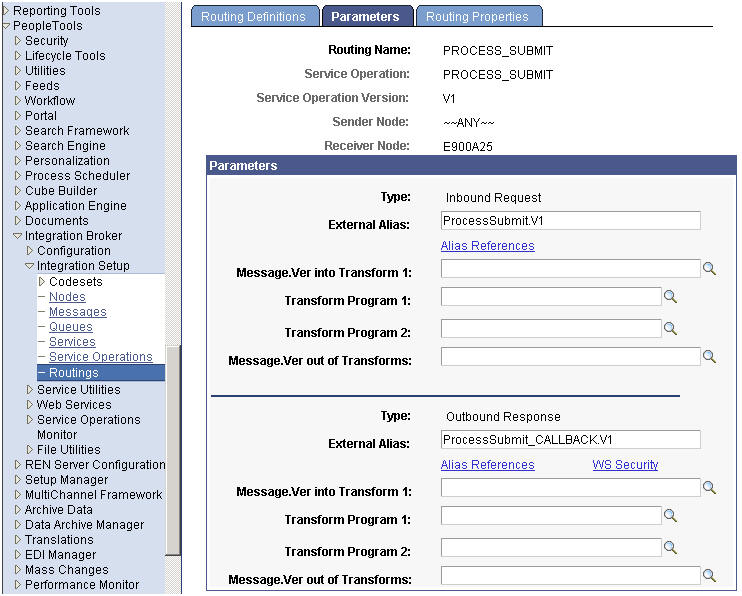
- Click on the WS Security hyperlink, and enter the information as shown below:
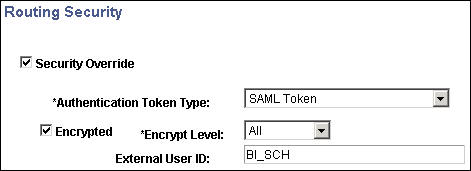
Note: The External User ID needs to exist on the FCM server as well.
- Enable the SAML with full encryption at the outbound of Routing PROCESS_SUBMIT.
Generating PSFT PROCESS INITIATION Web Service WSDL
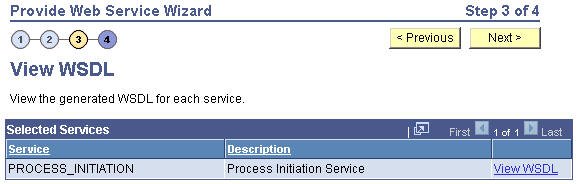
Click on the Provide Web Services hyperlink, and select the Service Operation PROCESS_SUBMIT.

-
Click on the Next button.

-
Click on the Next button again.
-
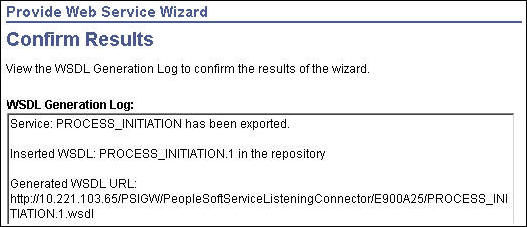
Click Finish.
The Results screen is displayed.
Note: Verify that you can open the URL shown below via a Web browser.
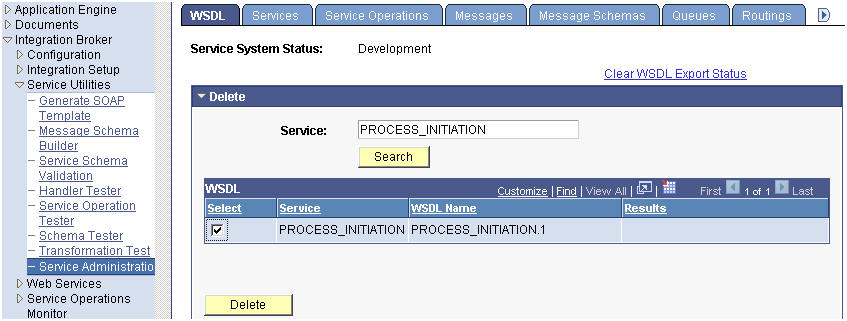
Deleting PSFT PROCESS INITIATION Web Service WSDL
If you need to re-generate the WSDL (for example, due to some issues related to SAML) , then delete the old one first via the IB Service Administration utility (shown below). To delete the service, select the service and click Delete.
Importing PeopleSoft Integration Types into Close Manager
You create integration points between PSFT and the Close Manager module of FCM by importing the file PSFT91IntegrationTypes_11_1_2_3.xml into Close Manager. After importing the integration types, you edit the application information, and then seed the system automated integration types.
-
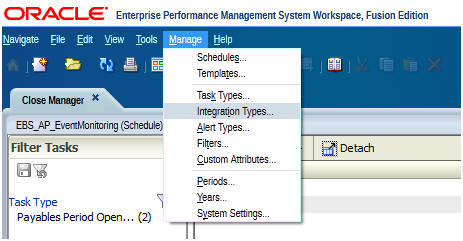
Login to Close Manager as an administrator.
-
Select Manage > Integration Types.
-
In the Manage Integrations Types dialog box toolbar, click Import.
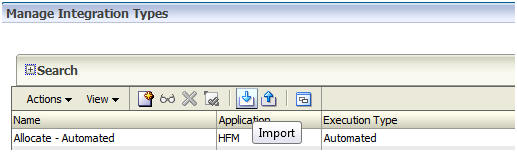
You import the product-specific integration type XML files into Close Manager using the Import Integration Type wizard, which you access from the Manage Integration Types dialog box. The wizard loads the integration types from the XML file and creates corresponding tasks types in Close Manager.
-
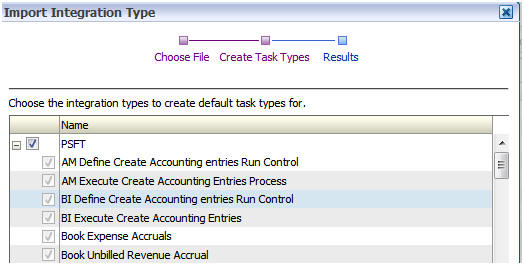
Browse to select PSFT91IntegrationTypes_11_1_2_3.xml, and click Next.

-
Select the integration types for which you want to automatically create task types, and click Next to import the integration types.
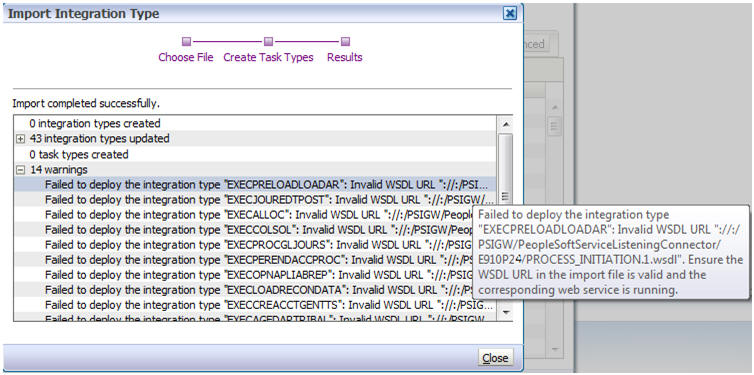
-
The Results screen displays. The integration types are created with warnings. Click Close.
After importing the integration types, you next edit the PSFT application information.
-
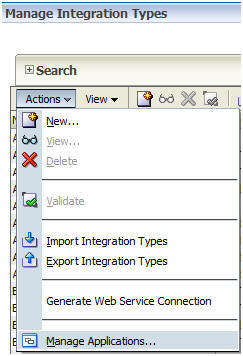
Select Manage > Integration Types.
-
Select Actions > Manage Applications.
-
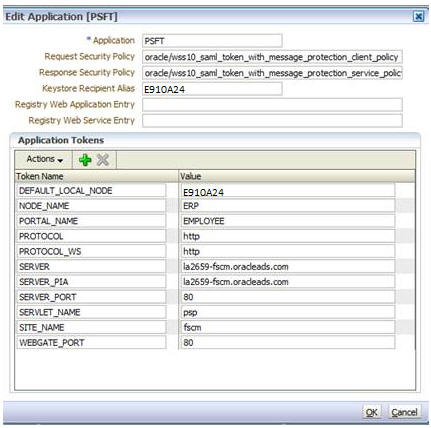
Open the PSFT application and fill the application tokens with the required information.
After configuring the PSFT application, you next seed the automated integration types.
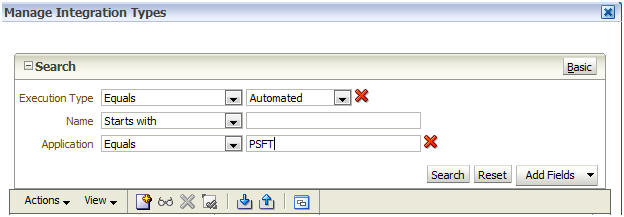
- In the Manage Integration Types dialog box, filter the integration types for the Automated execution type and the PSFT application.
-
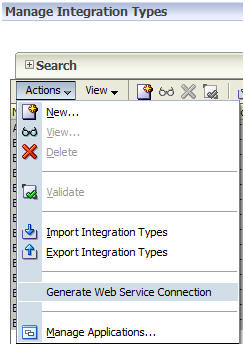
Select all the filtered automated PSFT integration types.

-
Select Actions > Generate Web Service Connection.
-
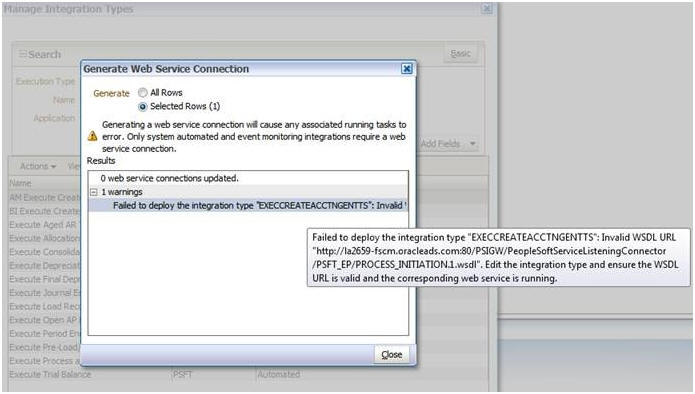
Click Generate to generate the automated integration types.

Troubleshooting
The following sections cover some typical problems and suggested solutions.
Location of PSFT and FCM Log Files
IB error log location: http://<webserver>:<port>/PSIGW/errorLog.html, or
%PS_HOME%\webserv\peoplesoft\applications\peoplesoft\PSIGW.war\errorLog.html
SOA server logs location:
%MIDDLEWARE_HOME%\user_projects\domains\<EPM_Domain>\servers\<Soa_Server>\logs\<soa_server>_diagnostic.log
FCM server logs location:
%MIDDLEWARE_HOME%\user_projects\domains\<EPM_Domain>\servers\FinancialClose0\logs\FinancialClose.log
FCM server logs in case of a compact deployment: %MIDDLEWARE_HOME%\user_projects\domains\<EPM_Domain>\servers\EPMServer\logs\FinancialClose.log
FCM Error While Seeding PSFT System Automated integration Type
Cause
The PSFT server is not accessible.
Fix
Add the following Java options to the setDomainEnv.cmd (setDomainEnv.sh in case of Linux):
set JAVA_OPTIONS=%JAVA_OPTIONS% -Dhttp.proxyHost=<proxy-server-name> -Dhttp.proxyPort=<proxy-server-port> -Dhttp.nonProxyHosts="localhost|localhost.localdomain|127.0.0.1|::1|<FCM_server_full_computer_name>|<FCM_Server_Computer_Name>|*.<FCM_server_domain_name>" -Dhttps.nonProxyHosts="localhost|localhost.localdomain|127.0.0.1|::1|<FCM_server_full_computer_name>|<FCM_Server_Computer_Name>|*.<FCM_server_domain_name>"
In the above example, replace the tokens with their actual values. The tokens are described below.
Token |
Description |
<proxy-server-name> |
The web proxy server used by the organization |
<proxy-server-port> |
The web proxy server port that the server listens to |
<FCM_server_full_computer_name> |
The FCM servers fully qualified name that includes computername.domain_name |
<FCM_Server_Computer_Name> |
This is the FCM server’s computer name |
<FCM_server_domain_name> |
This is the organization’s domain name |
Note: The FoundationService0 and FinancialClose0 managed servers need to be started from the command line using startManagedWeblogic command after this change is made.
IB Error: Security processing failed; nested exception is: org.apache.ws.security.WSSecurityException: An unsupported token was provided (Token type "for decryption (BST)")
Cause
The PeopleSoft public security key cer files (<defaultLocalNode>.cer & rootca.cer) were generated using an older version of the keytool utility commands.
Fix
Regenerate the cer files using the JDK 1.6 based keytool utility and pass to FCM for importing, by following the steps in the Enabling SAML Tokens with Encryption on the PSFT System section of this tutorial.
IB Error: Security processing failed; nested exception is: org.apache.ws.security.WSSecurityException: Cannot encrypt/decrypt data; nested exception is: java.lang.Exception: alias is null (or Cannot find key for alias: orakey)
Cause
FCM didn’t provide the Current Value for keystore.recipient.alias for orakey, which is the PeopleSoft IB Default Local Node.
Fix
In the PFST application settings, provide the Keystore Recipient Alias application property for as shown in step 9 of the Importing PeopleSoft Integration Types into Close Manager section of this tutorial.
IB Error: Security processing failed; nested exception is: org.apache.ws.security.WSSecurityException: SAML Assertion that's not yet valid or Expired assertion
Cause
The times on the two boxes hosting PSFT Web Server and OWSM are out of synch.
Fix
Time-synch the PSFT and FCM server boxes using the procedure described in the Synchronizing Time section of this tutorial. If the error persists, then add a skew time on the FCM server using the steps in the Tuning Web Service Security Policy Enforcement section of the Oracle® Fusion Middleware Security and Administrator's Guide for Web Services 11g Release 1 (11.1.1.5), available from this link.
IB Error: Security processing failed; nested exception is: org.apache.ws.security.WSSecurityException: The message has expired (WSSecurityEngine: Invalid timestamp The security semantics of the message have expired)
Cause
The times on the two boxes hosting PSFT Web Server and OWSM are out of synch.
Fix
Time-synch the PSFT and FCM server boxes using the procedure described in the Synchronizing Time section of this tutorial. If the error persists then add a skew time on the FCM server using the steps in the document at the following URL:
IB Error: SAML Authentication failed for Service Operation ProcessSubmit.V1. (158,456)
This error has three possible causes.
Cause 1
A new orakey has been imported into PSFT system, but the entries on the Digital Certificates page have not been re-added yet.
Fix
Delete the old entries for orakey on the Digital Certificates page, and then re-add them using the new orakey.cer file as detailed in step 5 of the Enabling SAML Tokens with Encryption on the PSFT System section of this tutorial.
Cause 2
The FCM OWSM user ID was not added to the SAML Inbound Setup page yet.Fix
Add OWSM user ID to the SAML Inbound Setup page as described in step 6 of the Enabling SAML Tokens with Encryption on the PSFT System section of this tutorial.
Cause 3
SAML was not set up at all or not correctly on the routing for Service Operation PROCESS_SUBMIT.Fix
Delete the WSDL if it already exists, and then add or correct the SAML setup on the routing as detailed in the Enabling SAML Tokens with Encryption on the PSFT System section of this tutorial. Next, re-generate the WSDL, as detailed in the Generating PSFT PROCESS INITIATION Web Service WSDL section of this tutorial.
IB Error: HttpTargetConnector:ExternalApplicationException. External System responded with an Error status. (158,10623) HttpStatusCode returned : 500. FailedAuthentication : The security token cannot be authenticated
Cause
The passed External User ID is not a valid user on FCM.
Fix
Add the external user ID into FCM’s LDAP.
IB Error: Unable to find a Routing corresponding to the incoming request message. (158,505)
Cause
FCM passed a wrong or non-existing ExternalOperationName to PSFT.
Fix
Correct the process name in the FCM task parameter.
IB Error: HttpTargetConnector:ExternalSystemContactException Stream closed. IOException: The host couldn't be resolved. (158,10721)
Cause
The FCM server is down.
Fix
Ensure that the EPM FCM server and SOA servers are up.
IB Error: HttpTargetConnector:PSHttpFactory init or setCertificate failed. (158,99999)
Cause
The secureFileKeystorePasswd is not encrypted on the IB Local Gateway Properties file.
Fix
Perform the following steps:
- Access the IB Local Gateway Properties file.
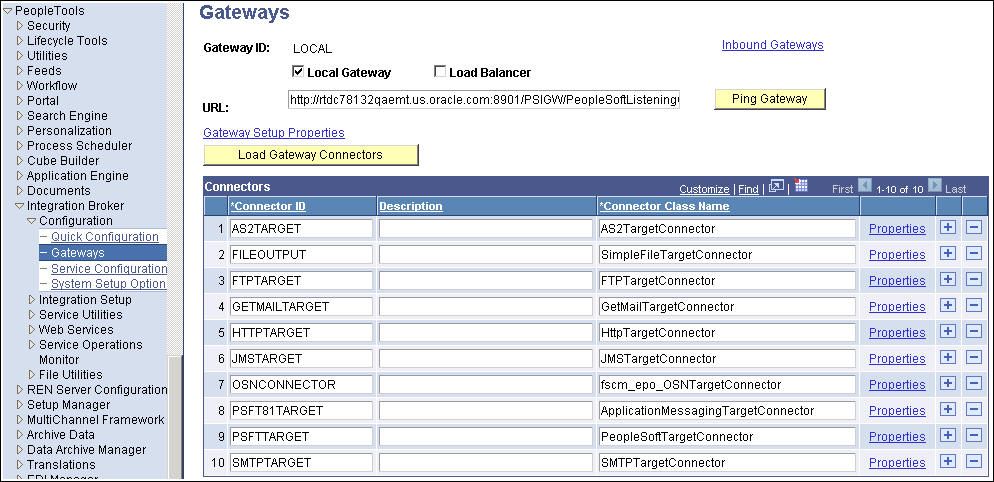
- Click on the Gateway Setup Properties link.
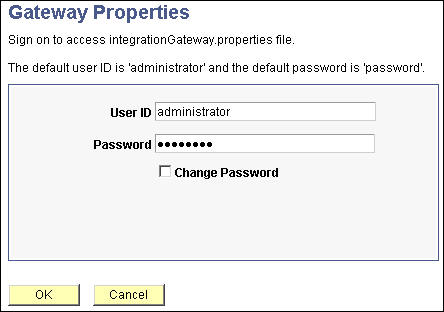
- Enter the default User ID/Password as shown, and click OK.
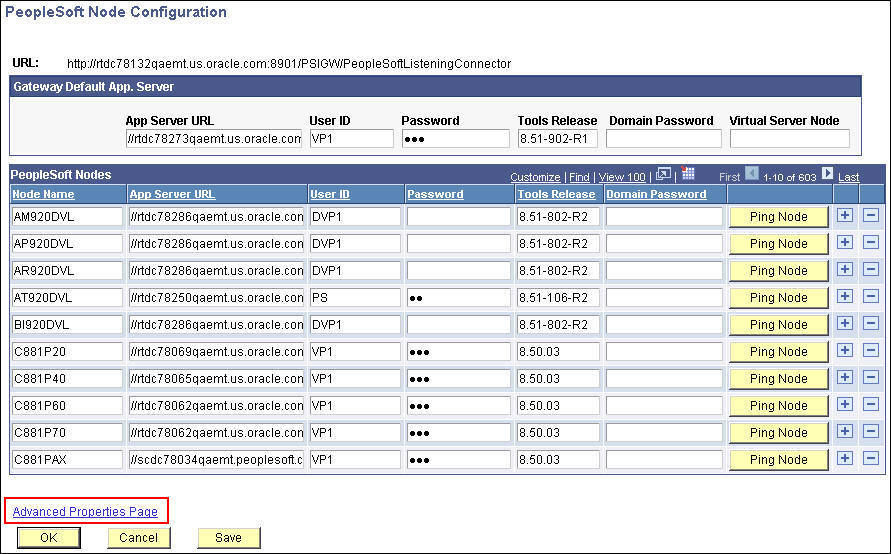
- Click the Advance Properties Page link.
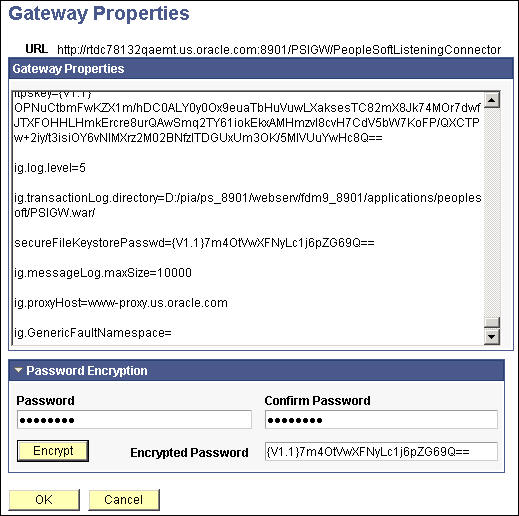
- Search for secureFileKeystorePasswd.
- Use the Password Encryption provided to encrypt the password (default password), and then paste the encrypted password back to the file. Then click OK, and save the page.
IB Error: UserName not defined in database. (158,55) PSADMIN
Cause
The Default User ID on the delivered IB Node ANONYMOUS is PSADMIN, which is not a valid PSFT user.
Fix
Replace PSADMIN with a valid PSFT user using the procedure described in step 2 of the IB Service and Anonymous Node Configuration section of this tutorial.
IB Error: Security processing failed..; nested exception is: org.apache.ws.security.WSSecurityException: The signature or decryption was invalid; nested exception is: java.lang.Exception: alias is null
Cause
PSFT IB is not able to decrypt because the <local node name>.cer is out of synch between the two systems.
Fix
Send the latest <local node name>.cer to FCM, to be re-imported to the OWSM.
IB Error: org.apache.ws.security.components.crypto.Merlin cannot create instance (details - Caused by: java.io.FileNotFoundException: interop.jks (The system cannot find the file specified)
Cause
The PSFT web server is missing the Interop.jks key.
Fix
Add the Interop.jks key to the PeopleSoft web server location.
Summary
In this tutorial, you learned to:
- Perform pre-import configuration
- Import Peoplesoft integration types into Close Manager
- Perform troubleshooting
Credits
- Lead Curriculum Developer: Mark Mitsock
- Other Contributors: Ashutosh Bhatikar, Ron Reiley
To navigate this Oracle by Example tutorial, note the following:
- Topic List:
- Click a topic to navigate to that section.
- Expand All Topics:
- Click the button to show or hide the details for the sections. By default, all topics are collapsed.
- Hide All Images:
- Click the button to show or hide the screenshots. By default, all images are displayed.
- Print:
- Click the button to print the content. The content that is currently displayed or hidden is printed.
To navigate to a particular section in this tutorial, select the topic from the list.