This tutorial covers installing and configuring Oracle E-Business Suite (EBS) end user and event monitoring integration types for the Close Manager module of Oracle Hyperion Financial Close Management 11.1.2.4.
Time to Complete
Approximately 3 hours.
Background
This tutorial covers configuring Oracle E-Business Suite (EBS) End User and Event Monitoring integration types for the Close Manager module of Oracle Hyperion Financial Close Management 11.1.2.4 (FCM).
What Do You Need?
This tutorial assumes that you have installed and configured FCM 11.1.2.4, and that you are familiar with both Close Manager and E-Business Suite administration. Before starting this tutorial, you should have access to the following integration type XML files:
Oracle FCM supports three types of Integration Types for E-Business Suite:
End User Integration - for Accounts Payables, Accounts Receivables and General Ledger
Event Monitoring Integration - for Accounts Payables, Accounts Receivables, Purchasing and General Ledger
Automated Integration - for General Ledger
The following XML files contain the Integration Types and definitions associated with E-Business Suite and are available for download from My Oracle Support patch 16825738:
EBS_AP_Integration_11123.xml
EBS_AR_Integration_11123.xml
EBS_GL_Integration_11123.xml
EBS_AP_EventMonitoring_11124.xml
EBS_AR_EventMonitoring_11124.xml
EBS_GL_EventMonitoring_11124.xml
EBS_PO_EventMonitoring_11124.xml
EBS_GL_EnhancedJournalMonitoring_11124.xml
Supported Versions
FCM
EBS
11.1.2.4.102
12.0.x, 12.1.x and 12.2.x
EBS Patches Required for Sub-ledger Events
Event Name
Description
EBS Patch bug
oracle.apps.ap.CloseProcess.period
Account Payables: Open/Close Sub-Ledger period
17240991
oracle.apps.ar.CloseProcess.period
Account Receivables: Open/Close Sub-Ledger period
16222505
oracle.apps.po.period.close
Purchase Order Open/Close Sub-Ledger period
16995323
EBS Patch Required for Automated Integration
16715496 (EBS GL Journal Entry Monitoring Web Service)
Importing End User Integration Types
You create end user integration points between EBS by importing integration types from XML files. To import end user integration types, you create an EBS application in Close Manager and configure the application properties. You then load the XML files for the end user integration types into Close Manager. The end user integration XML files are:
EBS_AP_Integration_11123.xml
EBS_AR_Integration_11123.xml
EBS_GL_Integration_11123.xml
Log in to FCM as an administrator.
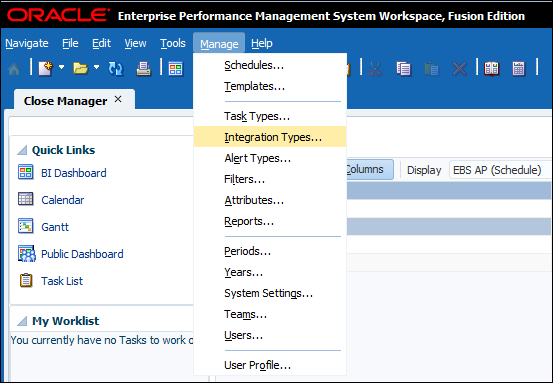
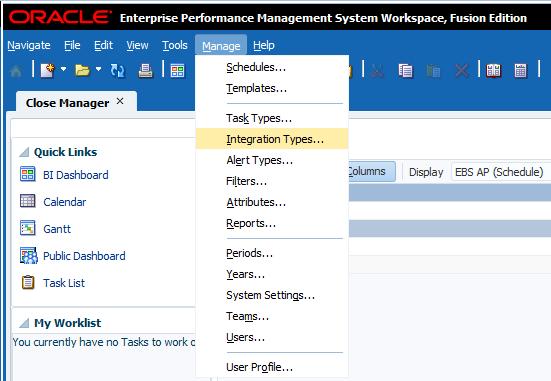
Select Manage > Integration Types.
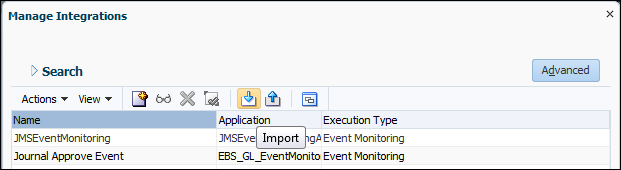
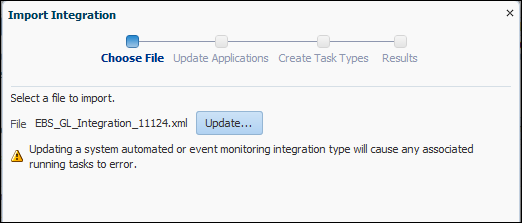
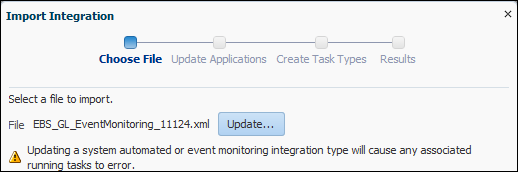
Click the Import icon.
Select Integration XML.
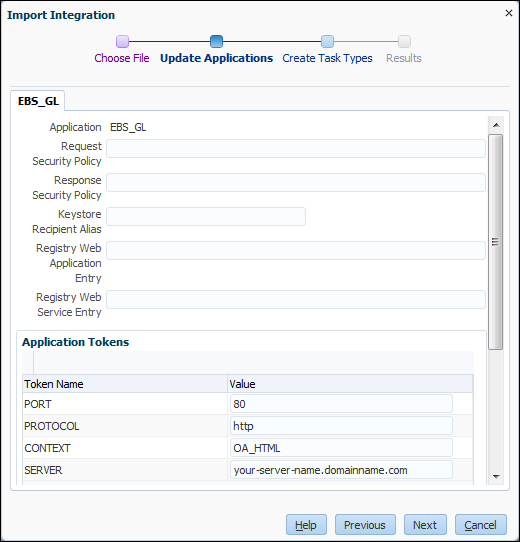
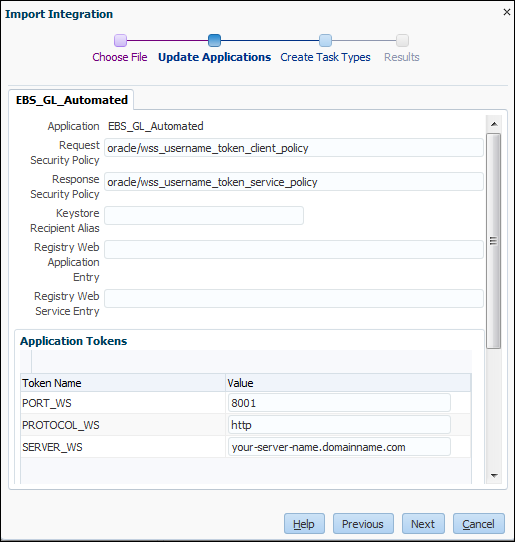
Fill in Application tokens.
Token Name
Token descriptions
CONTEXT
Property used for URL-based integration, EBS URL context. Example: OA_HTML
PORT
Property used for URL-based integration, port used to access EBS server. Example: 80
PROTOCOL
Property used for URL-based integration, Web-based protocol used to access EBS server. Example: http
SERVER
Property used for URL-based integration, EBS server name.
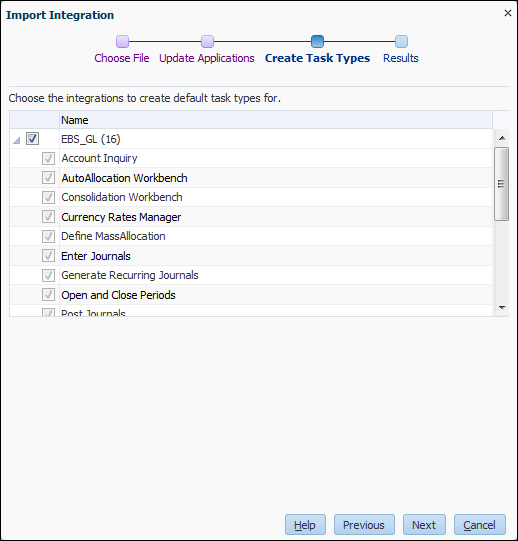
Select Integration Types to create default Task Types.
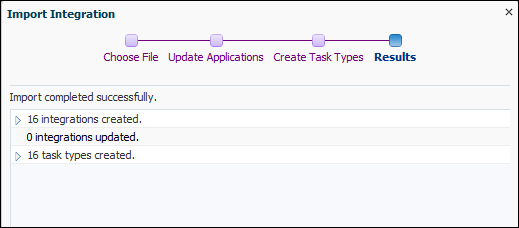
Integration Types created.
Importing Event Monitoring Integration Types
The Event Monitoring feature of FCM helps in monitoring a particular operation or activity in an external product being used as part of the close process, and provides information about its status to other tasks of a financial close schedule.
In this guide we discuss FCM and EBS product integration using the OracleAppsAdapter SOA Resource Adapter which is based on Oracle’s JCA technology.
Details about Oracle Apps Adapter are provided in FMW documents available at: http://docs.oracle.com/cd/E28280_01/nav/soa.htm.
Event Monitoring Integration Types
Use the following Integration XML files for Event Monitoring Integration Types:
EBS_AP_EventMonitoring_11124.xml
EBS_AR_EventMonitoring_11124.xml
EBS_GL_EventMonitoring_11124.xml
EBS_PO_EventMonitoring_11124.xml
The following table describes the EBS events that are monitored:
Event Name
Description
oracle.apps.gl.Journals.journal.approve
General Ledger: Journal Approved
oracle.apps.gl.Journals.journal.post
General Ledger: Posting Completed
oracle.apps.gl.CloseProcess.period.close
General Ledger: Period Closed
oracle.apps.gl.CloseProcess.period.open
General Ledger: Period Opened
oracle.apps.gl.CloseProcess.period.reopen
General Ledger: Period Reopened
oracle.apps.ap.CloseProcess.period
Account Payables: Period Open/Close/Reopen
oracle.apps.ar.CloseProcess.period
Account Receivables: Period Open/Close/Reopen
To configure Event Monitoring the user needs to have fair knowledge of Oracle FMW and Oracle EBS Administration. The user must have knowledge of EPM Oracle Hyperion FCM with regard to using end-user and system-automated tasks.
Pre-Import Configuration
You must perform the following before creating event monitoring integrations for EBS events.
Verify that the Oracle EBS DB’s APPS schema has the privileges to write to queue tables.
This is a MANDATORY step because you run a SQL script on the EBS Oracle DB after creating integration points in FCM. The scripts must be executed on the APPS schema. Therefore, it is required that this schema has the required DB privilege.
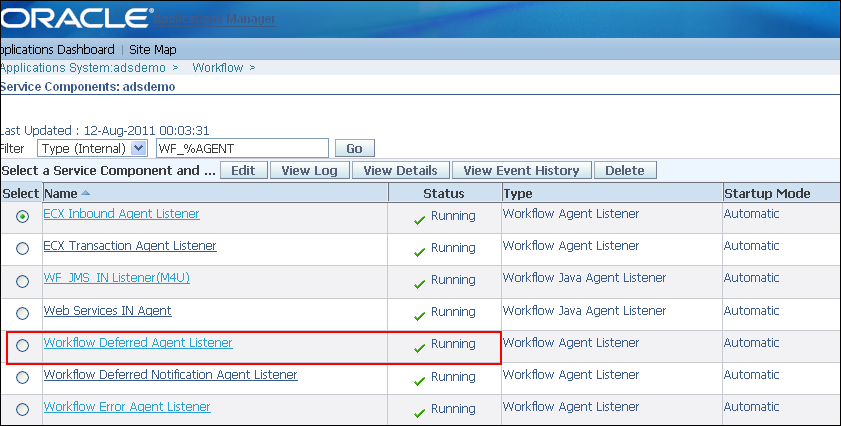
Verify that the WF_DEFERRED queue agent listener is running.
The Oracle EBS events make use of Oracle Advance Queuing technology to propagate business event message payload to external applications. This is achieved through a dedicated queue name WF_DEFERRED. Therefore, it is required to check if this queue listener is running in EBS instance.
To verify that the WF_DEFERRED agent is running:
Log on to Oracle Applications.
Select Workflow Administrator Web Applications responsibility and Workflow Manager under Oracle Applications Manager.
Click on the icon next to Agent Listeners.
Navigate through the list of Agent Listeners and make sure that WF DEFERRED Agent Listener is running.
Perform the following steps for EPM-side WebLogic server configuration of the OracleAppsAdapter (also known as the EBS Adapter):
Verify all managed servers are stopped.
Open a command prompt window.
Navigate to MIDDLEWARE_HOME/wlserver_10.3/server/bin.
Execute the following command setWLSEnv.cmd (for Linux execute setWLSEnv.sh).
Next execute the following command:
for Windows:
Java weblogic.WLST %EPM_ORACLE_HOME%/products/FinancialClose/wlscripts/FCM_EBSConfig_WLS_Script.py
for Linux: java weblogic.WLST $EPM_ORACLE_HOME/products/FinancialClose/wlscripts/FCM_EBSConfig_WLS_Script.py
Provide the connection properties when prompted for EBS Data Source connection details:
Database Name
This is the Oracle DB SID, for example ORCL
Host Name
The EBS server host name
Port
This is the Oracle DB port, for example 1521
Database User Name
APPS
Database Password
APPS schema password, for example APPS
Target
EPM SOA managed server, for example soa_server1
Perform the following steps for EPM-side WebLogic server configuration of the DbAdapter (also known as the Database Adapter):
Verify all managed servers are running.
Open a command prompt window.
Navigate to MIDDLEWARE_HOME/wlserver_10.3/server/bin.
Execute the following command setWLSEnv.cmd(for Linux execute setWLSEnv.sh).
Next execute the following command:
for Windows:
java weblogic.Deployer -adminurl t3://<admin-url>:<admin server port> -user <admin user> -password <password> -update -name DbAdapter -plan <db plan location>\FCM_DBAdapter_Plan.xml
for Linux: java weblogic.Deployer -adminurl t3://<admin-url>:<admin server port> -user <admin user> -password <password> -update -name DbAdapter -plan <db plan location>/FCM_DBAdapter_Plan.xml
Here is an example: java weblogic.Deployer -adminurl t3://localhost:7001 -user weblogic -password welcome1 -update -name DbAdapter -plan C:\Oracle\Middleware\EPMSystem11R1\products\FinancialClose\wlscripts\FCM_DBAdapter_Plan.xml
This creates the DbAdapter connection factory “eis/DB/financialclose” inside the DbAdapter deployment.
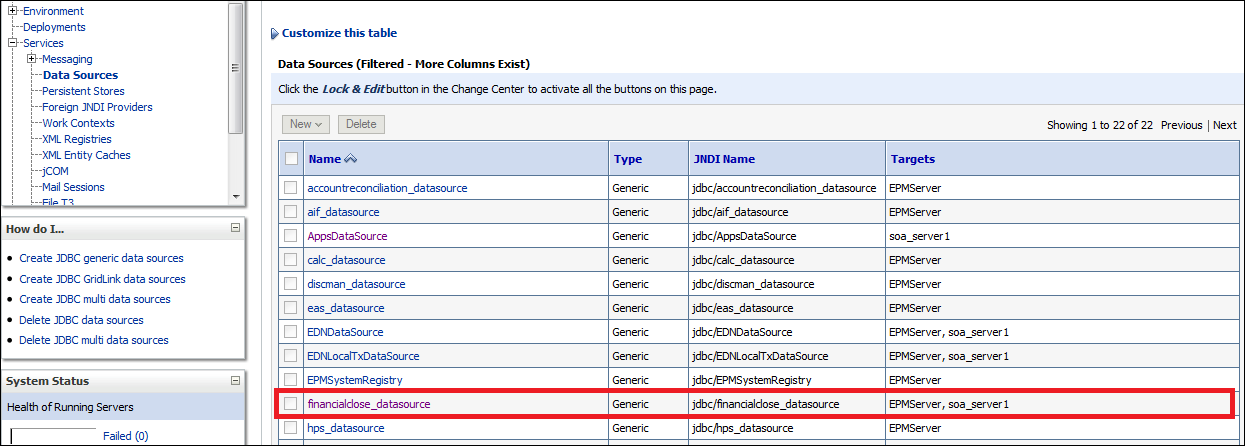
Lastly, ensure that the financialclose_datasource is targeted to SOA server in addition to the EPM Server/FinancialClose server.
Importing Event Monitoring Integration Types
You create event monitoring integration points between EBS by importing integration types from an XML file. To import event monitoring integration types, you create an EBS application in Close Manager and configure the application properties. You then load the XML files for the end user integration types into Close Manager. The event monitoring integration XML file is EBS_GL_EventMonitoring_11123.xml.
Log in to FCM as administrator.
Select Manage > Integration Types.
Click the Import icon.
Select Integration XML.
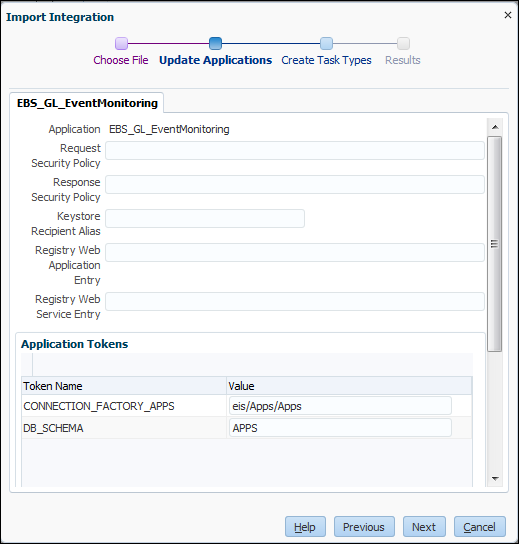
Fill in Application tokens.
Token Name
Token descriptions
CONNECTION_FACTORY_APPS
The Oracle Apps Adapter’s javax.resource.cci.ConnectionFactory JNDI name. Value is eis/Apps/Apps
DB_SCHEMA
EBS DB Schema Name that has access to the DB queues. Value is APPS
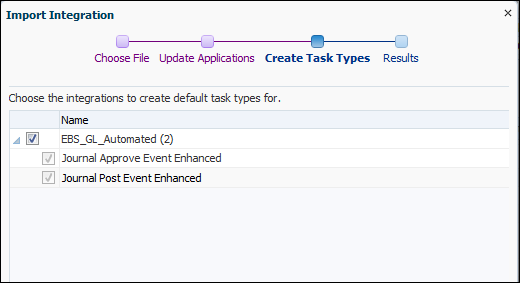
Select Integration Types to create default Task Types.
Integration Types created.
Set the event monitoring integration types parameters:
The General Ledger Journals Event Monitoring integration types use the same task parameter:
Name
Type
Required
Order
Hidden
Batch ID
Text
Yes
1
N
The General Ledger Close Process Period Event Monitoring integration types use the same task parameter:
Name
Type
Required
Order
Hidden
LedgerID
Text
Yes
1
N
PeriodName
Text
Yes
2
N
The Accounts Payables, Accounts Receivables and Purchasing Close Process Period integration types parameters:
Name
Type
Required
Order
Hidden
LedgerID
Text
Yes
1
N
PeriodName
Text
Yes
2
N
Action
Static List
Yes
3
N
Post-Import Configuration
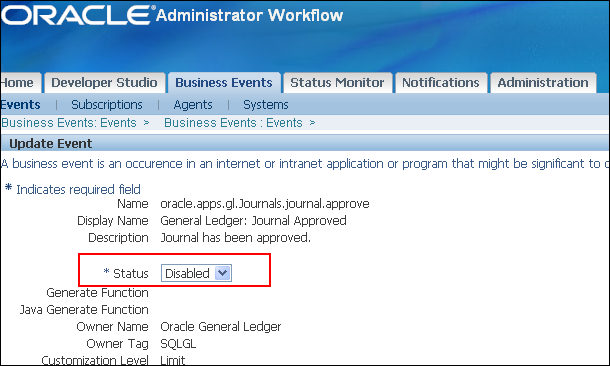
You run the parameterized SQL script “Subscribe_to_EBS_Events.sql” by connecting to the Oracle EBS DB instance using the APPS schema. Prior to running the SQL script, ensure that the event is enabled for subscription using the following steps:
Login to EBS using your administrator credentials.
Select the Workflow Administrator role from the left tree.
Select the Business Events tab, and find the event in question, for example “oracle.apps.gl.Journals.journal.approve”.
When you find the event name, click the Update button.
Run the parameterized SQL script Subscribe_to_EBS_Events.sql, either from SQL Plus or from SQL Developer, by connecting to the EBS instance using APPS schema credentials.
You will find the SQL script “Subscribe_to_EBS_Events.sql” at the following location: %EPM_ORACLE_HOME%\products\FinancialClose\database\external_sql_scripts.. Note: To subscribe to multiple EBS Events, user has to use a new SQL Worksheet for each Event.
This script takes one parameter: the EBS event name string that is specified in the integration type.
FCM generates a unique key called Consumer ID which is associated with the integration type and event name.
The
Consumer ID and event name association can be found at Manage Integration Types > Edit/View Integration Type UI.
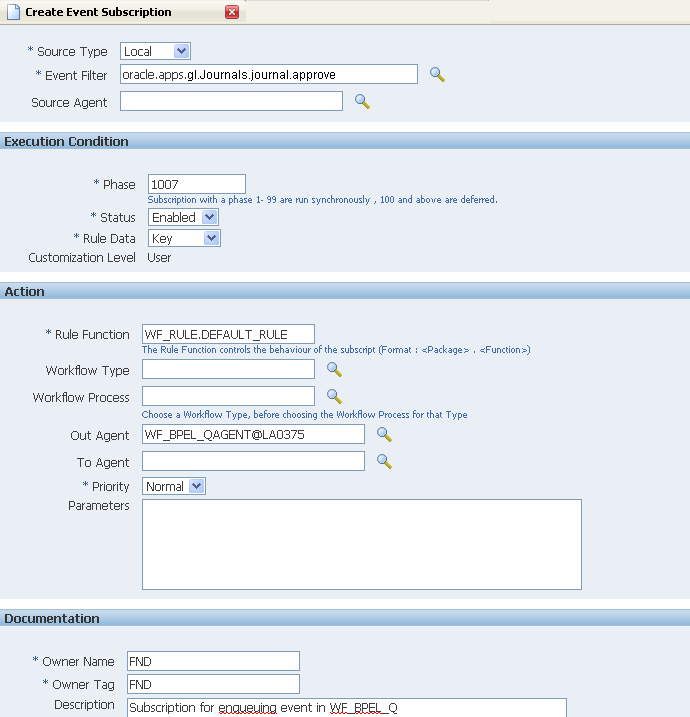
Confirm the event subscription by running the following SQL query in SQL Developer after connecting to the EBS DB instance: select aq$_wf_bpel_qtab_s.name, aq$wf_bpel_qtab_r.rule from apps.aq$_wf_bpel_qtab_s, aq$wf_bpel_qtab_r where apps.aq$_wf_bpel_qtab_s.name = aq$wf_bpel_qtab_r.name;
This query will give the Consumer ID (NAME column) and event name (RULE column) to which it is related. The subscriptions should resemble the figure below for each event. (Note: If the phase value is greater than 99, change it to a value between 1 and 99).
Executing EBS Tasks that Raise Business Events
Now that you have configured the EBS Business event system to subscribe to the required events, you can verify your results by raising business events. The following sections describe how to run the EBS tasks that raise the events you track using the OracleAppsAdapter in SOA.
Select the General Ledger, Vision Operations (USA) role from the left tree.
Select Journals, then Enter and wait for Oracle Applications to start.
Click No for the “Find records in this folder?” message.
Click New Batch on the Find Journals screen.
Window (Vision Operation (USA)) is displayed.
Enter a unique batch name in the Batch field.
Navigate to File menu and click Save to save the batch.
Note: When you click Save, the cursor needs to be inside the Batch field.
Click OK at the “Please enter one or more Journals” message.
Click Journals.
Enter a unique name in the Journal field.
Provide Line entries starting with Line 1. Provide debit and credit values for the accounts.
After you finish entering the line values, move the cursor into the Journal field.
Navigate to the File menu and click New.
Click Yes at the “Do you want to save the changes you made?” prompt.
Note:
This enables you to add multiple Journal entries into the Batch.
After finishing all the journal entries for the last Journal, move the cursor into the Journal field.
Navigate to the File nenu and click Save to save the last journal entry.
Focus on the Batch (Vision Operation (USA)) and select the Batch field.
Click the Help menu and select Diagnostics, then Examine.
For Oracle password, specify APPS.
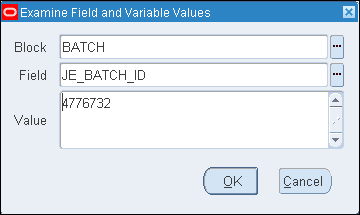
Enter JE_BATCH_ID in the Field box and click inside the Value box to get the unique Journal batch ID.
The figure below shows an example value for JE_BATCH_ID.
Copy this value to Notepad. This batch ID will be used as value in FCM for the “EVENT_DATA” parameter of the Event Monitoring task.
Perform the following steps in FCM:
Create a new schedule in a Pending state.
Create a task for event monitoring task to monitor oracle.apps.gl.Journals.journal.approve.
In the Parameters page, provide a value for EVENT_DATA as the journal batch ID from EBS.
Save the task and set the schedule state to Open.
In EBS, on Batch (Vision Operation (USA)), the Approve button is now enabled for the specified batch.
Click Approve to raise the journal approval event.
Perform the following steps in FCM:
Wait for the task to be set to the Open state. It takes a couple of minutes for SOA to capture the EBS event.
After two or three minutes, click Refresh in Workspace.
Select the General Ledger, Vision Operations (USA) role from the left tree.
Select Select Open/Close, then Enter and wait for Oracle Applications to start.
At the Find Period dialog box, click the Find button to open the Open and Close Period dialog box.
From the list of displayed periods, choose the one you want to close.
Select the status column for that period.
Click the Status Options button.
A status list pops up.
Selected the Closed status and click OK.
Make a note of the period in Notepad.
Navigate to the File menu and click Save to save the status.
Focus on the status column of the period.
Click the Help menu and select Diagnostics, then Examine.
For the Oracle password, specify APPS.
Enter LEDGER_ID in the Field box and click inside the Value box to get the unique Ledger ID.
The figure below shows an example value for LEDGER_ID.
Copy this value to Notepad. You will use Ledger ID as the value in FCM for the LedgerID:PeriodName parameter of the Event Monitoring task.
Perform the following steps in FCM:
Create a new schedule in a Pending state.
Create a task for event monitoring to monitor oracle.apps.gl.CloseProcess.period.close.
In Parameters page, provide a value for LedgerID:PeriodName as “LedgerID:PeriodName” from EBS (for example: 1:Dec-10, where 1 is Ledger ID and Dec-10 is period).
Save the task and set the schedule state to Open.
Perform the following steps in EBS:
Close the Open and Close Period dialog box.
Click OK in the Submit Request Node message box.
Examine the status of the EBS request by selecting the View menu, then Requests, then Specific Requests.
Perform the following steps in FCM:
Wait for the task to be set to the Open state. It takes a couple of minutes for SOA to capture the EBS event.
After two or three minutes, click Refresh in Workspace.
Select the General Ledger, Vision Operations (USA) role from the left tree.
Select Open/Close, then Enter and wait for Oracle Applications to start.
At the Find Period dialog box, click the Find button to open the Open and Close Period dialog.
Copy the period you want to open to Notepad.
Focus on the status column of the period.
Click the Help menu and select Diagnostics, then Examine.
For the Oracle password, specify APPS.
Enter LEDGER_ID in the Field box and click inside the Value box to get the unique Ledger ID.
The figure below shows an example value for LEDGER_ID.
Copy this value to Notepad. You will use Ledger ID as the value in FCM for the LedgerID:PeriodName parameter of the Event Monitoring task.
Perform the following steps in FCM:
Create a new schedule in a Pending state.
Create a task for event monitoring to monitor oracle.apps.gl.CloseProcess.period.open.
In the Parameters page, provide a value for LedgerID:PeriodName as “LedgerID:PeriodName” from EBS (for example: 1:Dec-10, where 1 is Ledger ID and Dec-10 is period).
Save the task and set the schedule state to Open .
Perform the following steps in EBS:
Click Open Period.
Select the period to open and click OK to raise the event.
Examine the status of the EBS request by selecting the View menu, then Requests, then Specific Requests.
Perform the following steps in FCM:
Wait for the task to be set to the Open state. It takes a couple of minutes for SOA to capture the EBS event.
After two or three minutes, click Refresh in Workspace.
Select the General Ledger, Vision Operations (USA) role from the left tree.
Select Open/Close, then Enter and wait for Oracle Applications to start.
At the Find Period dialog box, click the Find button to open the Open and Close Period dialog.
Copy the closed period that you want to reopen to Notepad.
Focus on the status column of the period.
Click the Help menu and select Diagnostics, then Examine.
For the Oracle password, specify APPS.
Enter LEDGER_ID in the Field box and click inside the Value box to get the unique Ledger ID.
The figure below shows an example value for LEDGER_ID.
Copy this value to Notepad. You will use Ledger ID as the value in FCM for the LedgerID:PeriodName parameter of the Event Monitoring task.
Perform the following steps in FCM:
Create a new schedule in a Pending state.
Create a task for event monitoring to monitor oracle.apps.gl.CloseProcess.period.reopen.
In the Parameters page, provide a value for LedgerID:PeriodName as “LedgerID:PeriodName” from EBS (for example: 1:Dec-10, where 1 is Ledger ID and Dec-10 is period).
Save the task and set the schedule state to Open.
Perform the following steps in EBS:
Click Open Period.
Select the closed period to open and click OK to raise the event.
Examine the status of the EBS request by selecting the View menu, then Requests, then Specific Requests.
Perform the following steps in FCM:
Wait for the task to be set to the Open state. It takes a couple of minutes for SOA to capture the EBS event.
After two or three minutes, click Refresh in Workspace.
Expand Payables, Vision Operations (USA) role from the left tree.
Expand Accounting and select Control Payables Periods. This will launch the Control Payables Periods form.
Specify the Ledger and Operation Unit. Do not close the Find Payables Periods dialog. Instead, perform the following steps to identify the LedgerID value.
Select Help and select Diagnostics, and then Examine.
If requested for credentials specify the APPS schema credentials.
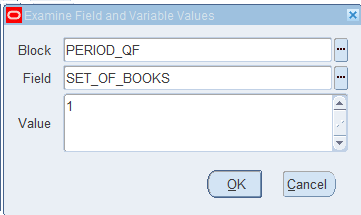
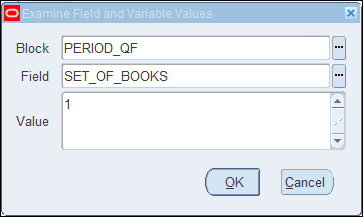
This should bring up the Examine Fields and Variable Values form.
Specify PERIOD_QF as Block, SET_OF_BOOKS as the Field. This should return the Ledger ID numeric value.
The figure below shows an example value for LEDGER_ID.
Copy this value to Notepad. This Ledger ID will be used as value in FCM for the LedgerID parameter of the Event Monitoring task.
Perform the following steps in FCM:
Create a new schedule in a Pending state.
Create a task for event monitoring to monitor oracle.apps.ap.CloseProcess.period.
In the Parameters page, provide a value for LedgerID, PeriodName and Action from EBS.
Example: Ledger ID: 1, Period Name: Dec-10, Action: Closed.
Save the task and set the schedule state to Open.
Perform the following steps in EBS:
Find the period in EBS Control Payables Periods.
Click on Period Status column for that period.
In Control Statuses form, select the appropriate status.
Select File, and then Save to raise the event.
Perform the following steps in FCM:
Wait for the task to be set to the Open state. It takes a couple of minutes for SOA to capture the EBS event.
After two or three minutes, click Refresh in Workspace.
Note: The EBS implementation raises the events only for Closed and Open statuses. Permanently Closed status will not raise any event.
Refer to this document for further information on Payables Periods:
Expand Purchasing, Vision Operations (USA) role from the left tree.
Before going to Control Purchasing Periods, one should be aware of numeric Ledger Id value. Perform the following steps to identify the LedgerID value.
Expand Setup, then Financials, and then Accounting and select Open and Close Periods. This will launch the Open and Close Periods form.
Select a valid Ledger and click OK in Find Periods form.
Once in the main form, select Help and select Diagnostics, and then Examine.
If requested for credentials specify the APPS schema credentials.
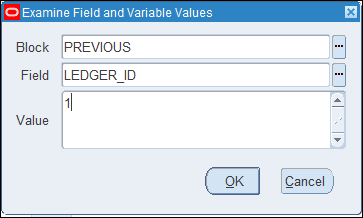
This should bring up the Examine Fields and Variable Values form.
Specify PREVIOUS as Block, LEDGER_ID as the Field. This should return the Ledger ID numeric value.
The figure below shows an example value for LEDGER_ID.
Copy this value to Notepad. This Ledger ID will be used as value in FCM for the LedgerID parameter of the Event Monitoring task.
Now, expand Setup, and then Financials and select Control Purchasing Periods. This will open Control Purchasing Periods page
Perform the following steps in FCM:
Create a new schedule in a Pending state.
Create a task for event monitoring to monitor oracle.apps.po.period.close.
On the Parameters window, provide values for LedgerID, PeriodName and Action from EBS.
Example: Ledger ID: 1, Period Name: Dec-10, Action: Closed.
Save the task and set the schedule to Open state.
Perform the following steps in EBS:
Find the period in EBS Control Purchasing Periods page.
From the Period Status dropdown column, select the appropriate status.
Click on Save button to raise the event.
Perform the following steps in FCM:
Wait for the task to be set to the Open state. It takes a couple of minutes for SOA to capture the EBS event.
After two or three minutes, click Refresh in Workspace.
Note: The EBS implementation raises the events only for Closed and Open statuses. Other statuses will not raise any event.
Refer to this document for further information on Purchasing Periods:
In case of Event Monitoring Integrations, Journal Batch Id has to be manually retrieved from EBS and entered into a task in Close Manager.
This inconvenience is addressed by automated integrations which do not need manual entry of Batch Id. These only need Batch Name and Period Name as mandatory parameters. Other optional parameters are Ledger Name, Journal Name and Source.
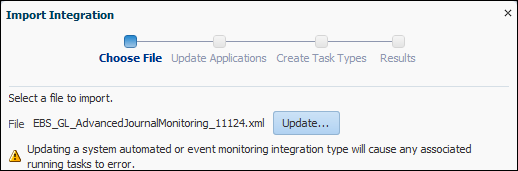
Automated Integration Types
Use the following Integration XML file for Automated Integration Types:
EBS_GL_EnhancedJournalMonitoring_11124.xml
Automated Integrations are currently available for the following EBS events:
Create a task with automated EBS task type ‘Journal Post Event Enhanced’.
In Parameters page provide values for Batch Name and Period Name. Optionally provide values for Ledger Name, Journal Name and Source.
Save task and set the schedule to Open state.
Wait for the task to be set to Open state.
Log on to EBS.
Select General Ledger, Vision Operations (USA) role from the left tree.
Select Journals, then press Enter and wait for Oracle Applications to start.
Click No for “Find records in this folder?” message.
Click New Batch on the Find Journals screen.
Window (Vision Operation (USA)) is displayed.
In Batch, enter the same batch name that was entered as task parameter.
Select the same period that was entered as task parameter.
Note: When you click Save, the cursor needs to be inside the Batch field.
Select File and then click Save to save the batch.
Click OK for the “Please enter one or more Journals” message.
Click Journals.
Give the same Journal Name that was entered as task parameter. Provide any name if Journal Name task parameter was left blank.
Provide Line entries starting with Line 1. Provide debit and credit values for the accounts.
After you finish entering the line values, move the cursor into the Journal field.
Navigate to File menu and click New.
Click Yes for “Do you want to save the changes you made?” message.
Note: This way, you will be able to add multiple Journal entries into the Batch.
After you finish the journal entries for the last Journal, move the cursor into the Journal field.
Navigate to the File Menu and click Save to save the last journal entry.
On the Batch (Vision Operation (USA)) the Post button is now enabled for the specified batch.
Click Post to fire a new EBS Request ID. Note this ID.
Examine the status of EBS request by selecting the View menu, then Requests, then Specific Requests.
Specify the Request ID that was noted earlier.
Perform the following steps in FCM:
FCM task keeps polling the EBS web-service to retrieve information on Post activity.
After few min, click Refresh in Workspace. Task will go to Closed state once EBS web-service returns with the Posted Journal.
Unsubscribing From EBS Events
Perform the steps below to unsubscribe from an EBS business event.
Perform the following steps to execute a SQL query to verify that the Consumer ID is subscribed to an EBS Event:
Open SQL Developer.
Connect to the EBS Oracle DB instance using the APPS schema.
Copy and paste the following SQL script:
select aq$_wf_bpel_qtab_s.name, aq$wf_bpel_qtab_r.rule from apps.aq$_wf_bpel_qtab_s, aq$wf_bpel_qtab_r where apps.aq$_wf_bpel_qtab_s.name = aq$wf_bpel_qtab_r.name;
Click the execute SQL button
A list of Consumer ID and EBS event names is displayed.
If the Consumer ID is found for the event, then perform the steps below to execute a SQL script to unsubscribe:
Open SQL Developer.
Connect to the EBS Oracle DB instance using the APPS schema.
Copy and paste the SQL script provided below step e.
Click the execute SQL button.
Supply values for EventName and Consumer ID when prompted.
declare
subscriber sys.aq$_agent;
begin
-- remove subscription
delete from wf_event_subscriptions where event_filter_guid in(
select guid from wf_events where name = '&EventName')
and out_agent_guid in ( select guid from wf_agents where name = 'WF_BPEL_QAGENT');
-- remove subscriber
begin
subscriber := sys.aq$_agent('&ConsumerId', NULL, NULL);
dbms_aqadm.remove_subscriber(queue_name => 'WF_BPEL_Q', subscriber => subscriber);
exception
when others then null;
end;
end;
/
commit;
The Consumer ID will be unsubscribed from the event.
Troubleshooting
The following sections cover some typical problems and suggested solutions.
Unable to Execute DBAdapter Configuration Command
F:\>java weblogic.Deployer -adminurl t3://server_name:7001 -user epm_admin -password ****** -update -name DbAdapter -plan F:\Oracle\Middleware\EPMSystem11R1\products\FinancialClose\wlscripts\FCM_DBAdapter_Plan.xml
weblogic.Deployer invoked with options: -adminurl t3:// server_name:7001 -user epm_admin -update -name DbAdapter -plan F:\Oracle\Middleware\EPMSystem11R1\products\FinancialClose\wlscripts\FCM_DBAdapter_Plan.xml
<Oct 7, 2013 2:25:14 AM CDT> <Warning> <WebLogicDescriptorWL> <BEA-2156000> <"config-root" C:\Oracle\Middleware\Oracle_SOA1\soa\connectors\plan was not found>
<Oct 7, 2013 2:25:14 AM CDT> <Info> <J2EE Deployment SPI> <BEA-260121> <Initiating update operation for application, DbAdapter [archive: null], to configured targets.>
Task 0 initiated: [Deployer:149026]update application DbAdapter on soa_server1.
Task 0 completed: [Deployer:149026]update application DbAdapter on soa_server1.
Target state: update completed on Server soa_server1
To fix this problem, edit FCM_DBAdapter_Plan.xml:
The <config-root> node property C:\Oracle\Middleware\Oracle_SOA1\soa\connectors\plan could be changed to the correct location by locating the SOA_HOME and then change to %SOA_HOME%\soa\connectors\plan path. For example, if SOA_HOME is F:\Oracle\Middleware\Oracle_SOA1, then set the value for <config-root> to F:\Oracle\Middleware\Oracle_SOA1\soa\connectors.
Re-run the DBAdpter configuration commands.
EBS Consumer ID conflicts with EBS Event Name
This scenario could occur if we make use of multiple FCM servers to subscribe to the same EBS DB instance. It is advised to use a single FCM server to subscribe to an EBS DB instance because the consumer ID is generated based on integration type ID which is unique for a given server. If a different FCM server subscribes an event, with the same Consumer ID, then it is possible that the subscription will not be successful because EBS Oracle DB will detect it as a duplicate entry.
If at all, we have to use different FCM server to test the integrations, then it is advised to first unsubscribe the unused Consumer Ids first.
EBS Events Not Appearing in SOA
To verify the EBS Events are not appearing in SOA:
Verify Oracle WebLogic DataSource jdbc/AppsDataSource connects to EBS Oracle DB instance.
Verify that WF_DEFERRED Agent listener is running in EBS Oracle Workflow.
Verify that the financialclose_datasource has SOA server in its target list.
Check the SOA logs for errors of type [ERROR] [] [oracle.soa.adapter].
The OracleAppsAdapter supports Oracle ODL logging and will log errors to SOA server log. Typical errors could be:
java.sql.SQLException: ORA-24010: QUEUE APPS.WF_BPEL_Q does not exist.
java.sql.SQLException: ORA-25226: dequeue failed, queue APPS.WF_BPEL_Q is not enabled for dequeue.
For these errors, please check if:
EBS DB has access permissions for APPS schema.
Queue WF_BPEL_Q is present and supports message DQUEUE -ing.
If the above errors are not seen in the SOA server log, use the following procedure to troubleshoot the EBS Oracle DB instance:
Connect to EBS Oracle DB using Oracle SQL Developer with APPS schema credentials (APPS/APPS).
Expand the Other Users node and select APPLSYS user.
Expand Queue Tables, then WF_DEFERRED.
Use filter CORRID = 'APPS:<your EBS event name>'.
Check if data is present. If no data exists, reboot the EBS instance.
If data exists in the WF_DEFERRED queue table, then check if data is available in the APPS.WF_BPEL_QTAB queue table.
If data does not exist in APPS.WF_BPEL_QTAB, then ensure Out Agent is set correctly for the event subscription.