Before You Begin
Purpose
This tutorial covers how to set up and use the Supplemental Data Manager (SDM) module in Oracle® Hyperion Financial Close Management.
Time to Complete
90 minutes
Background
Supplemental Data Manager is a system for the management of supplemental data, typically transactional in nature. SDM helps organize, update, edit, and manage supplemental data for financial analytical applications such as Hyperion Financial Management (HFM). You can:
- Define the data sets and associated data forms for data collection
- Create validations to regulate data entry and formulas for calculated values
- Deploy data entry schedules to open periods, notify users and monitor the workflow
Scenario
Your task is to set up the system, and enter supplemental payroll data. You start with administrative tasks such as defining system settings, data sets, and form templates. After configuring the system, you open the first period and enter supplemental payroll expense information. You then post this information to the HFM-SDMDrill application. Finally, you view dashboards and create a report.
What Do You Need For This OBE?
Download the following files:
Creating the Hyperion Financial Management application (Optional)
You use the Shared Services module and the LCM functionality to create the HFM application.
-
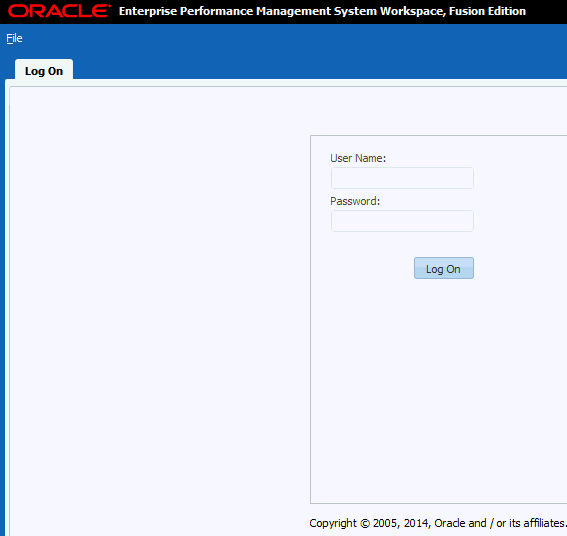
Log on to the EPM system. You may need to obtain the system URL and user credentials from your system administrator.
-
Download the LCM Dataset using the link noted in the What Do You Need For This OBE? section above.
-
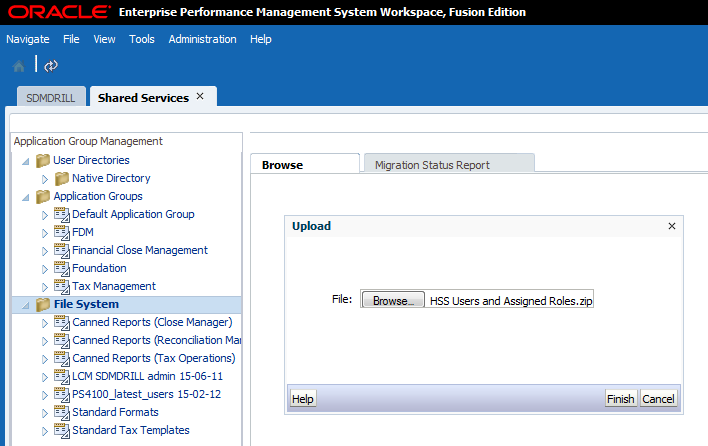
In the Menu Bar, select Navigate, Administer, then Shared Services Console.
- Right-click on File System, and select Upload.
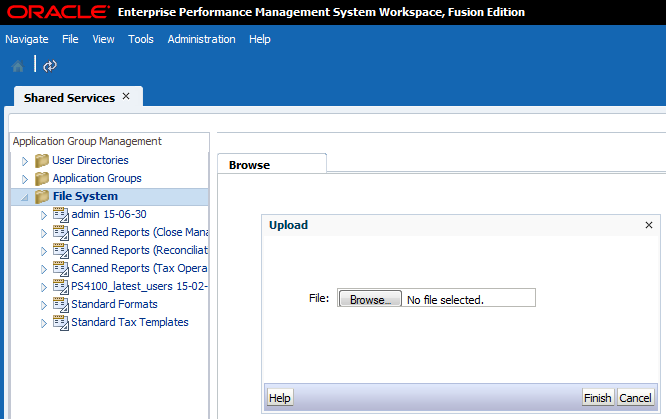
- Click Browse, and locate the LCM SDMDRILL admin 15-06-11.zip file. Perform the following actions:
- Select the file and click Open.
- Click Finish, then OK.
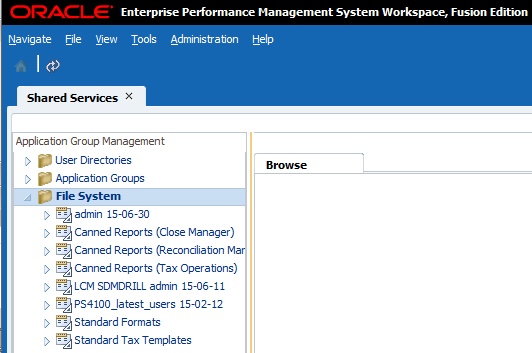
- Expand LCM SDMDRILL and select HFM-SDMDRILL. Select Application Snapshot, and click Import.

- Wait for the migration to complete. Verify the HFM application was created by navigating to Navigate, Applications, Consolidation, then SDMDRILL.
Loading Users and Roles
You use the LCM functionality to load users and their roles.
-
In Shared Services, right-click on File System and select Upload. Browse to select the HSS Users and Assigned Roles.zip file and click Finish.
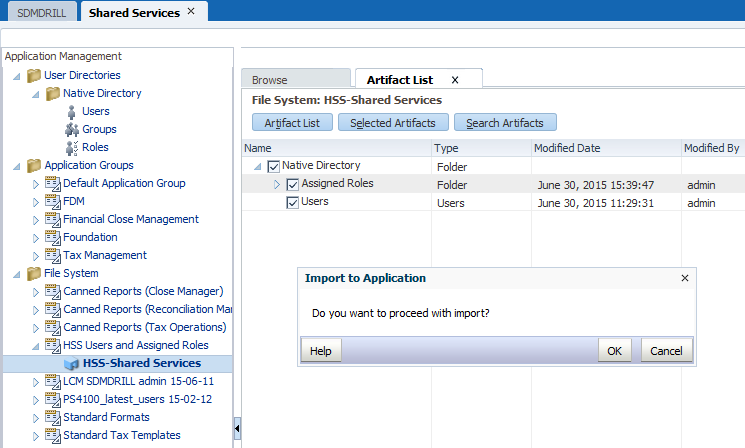
- Under File System, expand HSS Users and Assigned Roles, and select HSS-Shared Services. Perform the following actions:
- Expand Native Directory.
- Select Assigned Roles and Users.
- Click Import and OK.
- Log off.
Note: Alternatively, you can right-click on "HSS Users and Assigned Roles" and select Import.
Adding Users in WebLogic Server
- Log in to WebLogic Server with a username and password. You may need to obtain the URL (for example, http://<servername>:7001/console) and credentials from your system administrator.
-
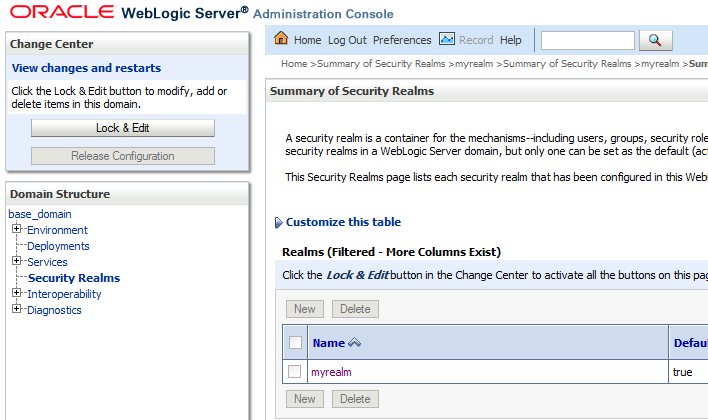
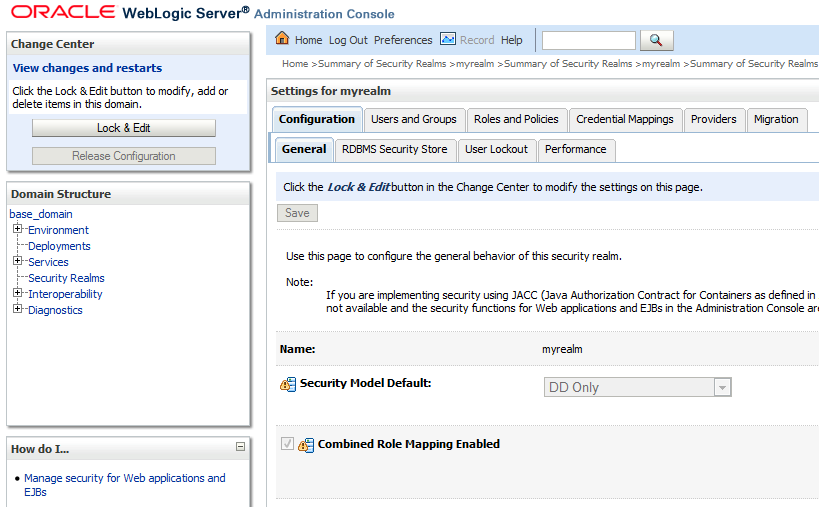
In the Domain Structure, select Security Realms.
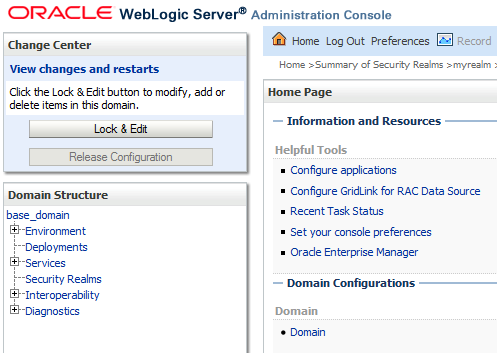
- Click myrealm.
-
Click the Users and Groups tab.
- Click New.
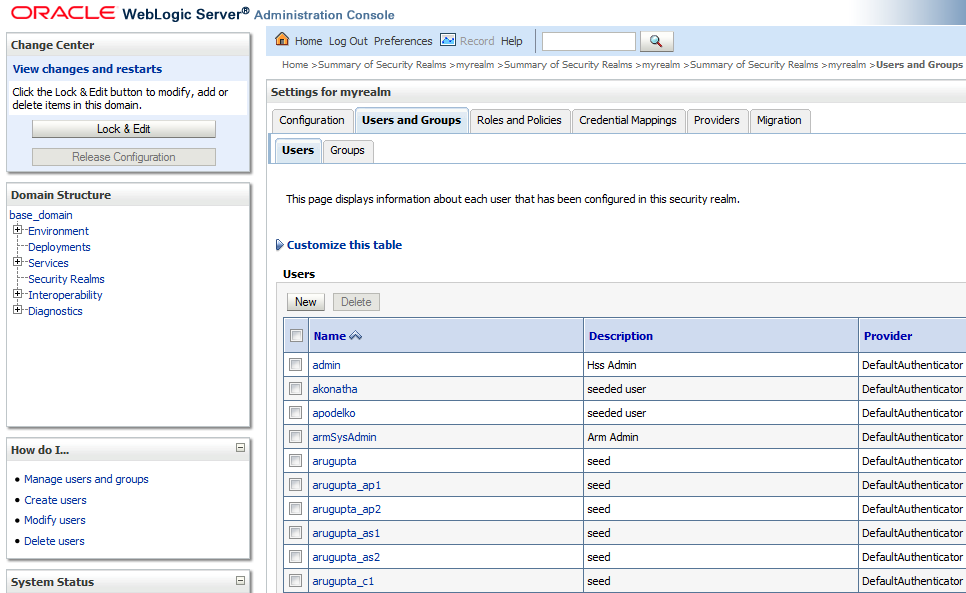
- Enter the following data for user Chris and click OK:
- Name: Chris
- Password: hyperion1
- Confirm Password: hyperion1
- Repeat the steps above to add Pat and Lori. Use the same password.
- Click Log Out.
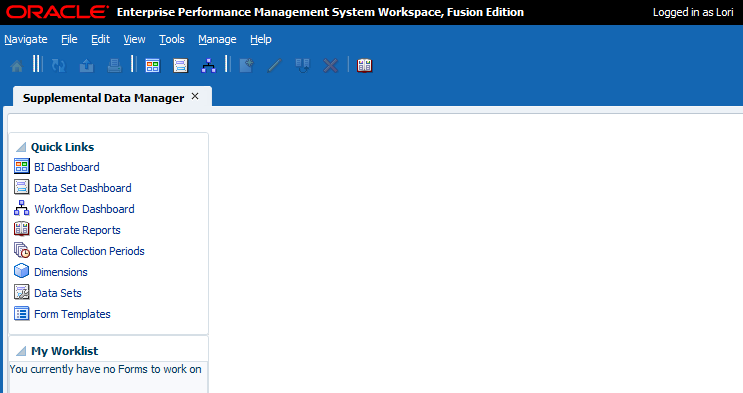
- In the EPM Log On screen, enter Chris for User Name and enter hyperion1 for Password. Navigate to Applications, Financial Close Management, then Supplemental Data Manager. Repeat this step for users Pat and Lori (password is hyperion1).
Defining System Settings
-
Log in to the EPM system. Enter admin for User Name and welcome1 for the Password.
To open SDM using the Menu Bar, select Navigate, Applications, Financial Close Management, then Supplemental Data Manager.
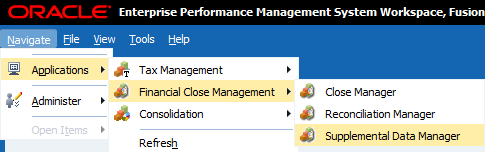
-
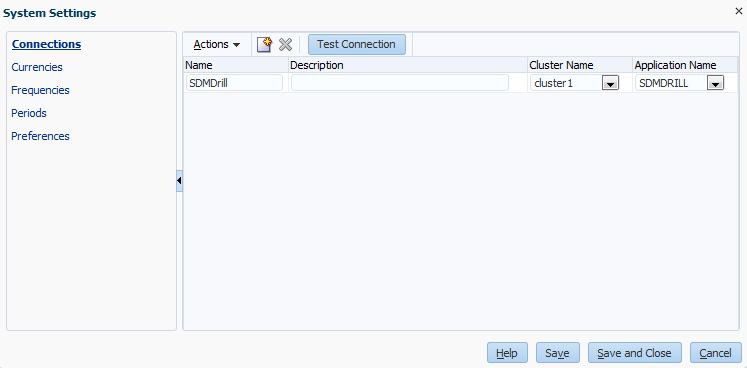
With the application open, select Manage, System Settings, then Connections. Click New. Perform the following actions:
- Enter a Name and Description.
- Select a Cluster Name and Application Name.
- Click Save.
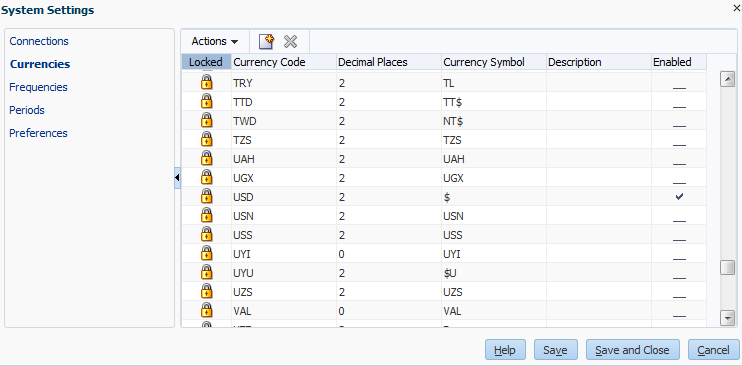
- Click Currencies. Enable USD.
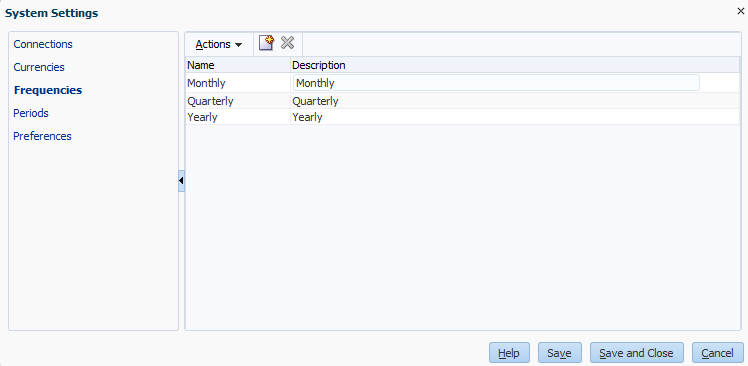
- Click Frequencies. Click New. Perform the following actions:
- Enter Monthly for Name and Description. Click Save.
- Repeat these actions to create Quarterly and Yearly frequencies.
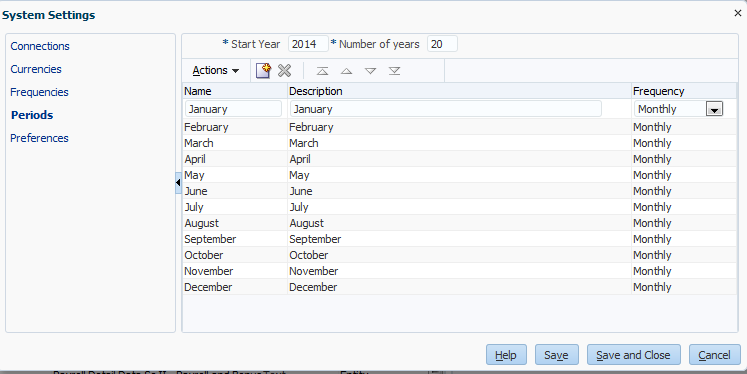
- Click Periods. In the Start Year, enter 2014. For Number of years enter 20. Click New. Perform the following actions:
- Enter January for Name and Description. Enter Monthly for Frequency.
- Click Save.
- Repeat these actions to create February through December monthly periods.
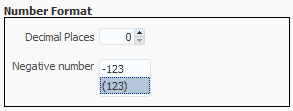
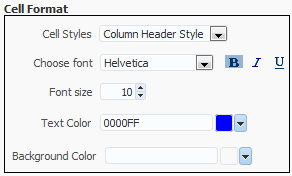
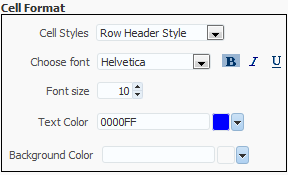
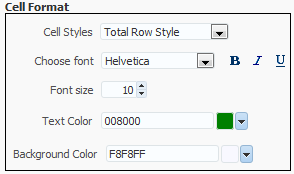
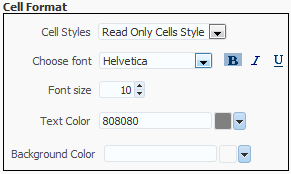
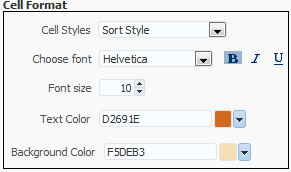
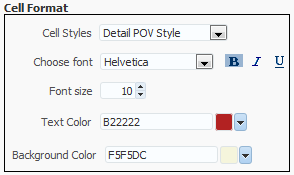
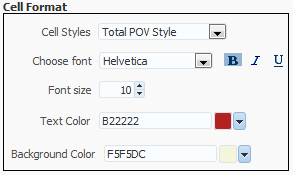
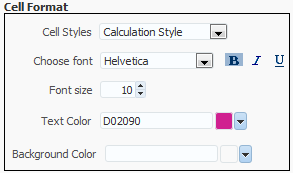
- Click Preferences. Set the preferences for Number and Cell Formats as listed in the screenshots below.
Creating the Required Dimensions
Creating Dimensions
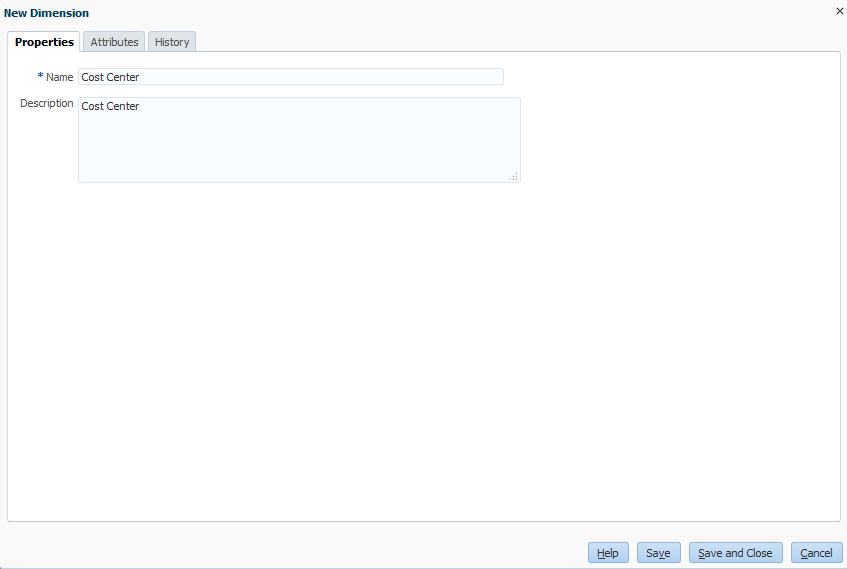
- In the Menu Bar, select Manage, then Dimensions. Click Add. For Name and Description, enter Cost Center.
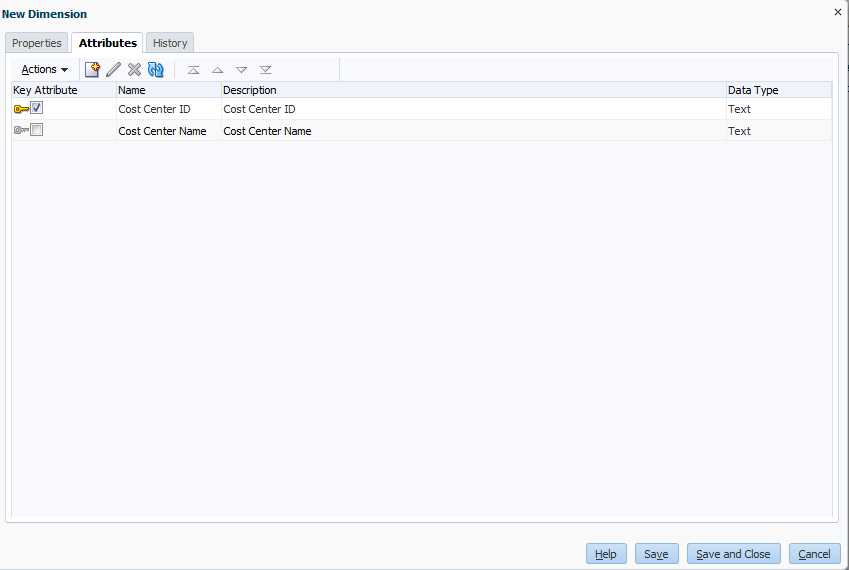
- Click the Attributes tab. Click Add Attribute, and enter the following information and click OK.
- Name and Description: Cost Center ID
- Key Attribute: Yes (select checkbox)
- Data Type: Text
- Click Add Attribute and enter the following information and click OK.
- Name and Description: Cost Center Name
- Data Type: Text
- Add the Cost Center Location attribute using this information:
- Name and Description: Cost Center Location
- Data Type: List
- In the Data Type section, click Add. In the Value field, enter Connecticut.
- Repeat Step 5 above and enter the following values. Click OK when finished.
- San Francisco
- New York
- Vermont
- New Hampshire
- Massachusetts
- New Jersey

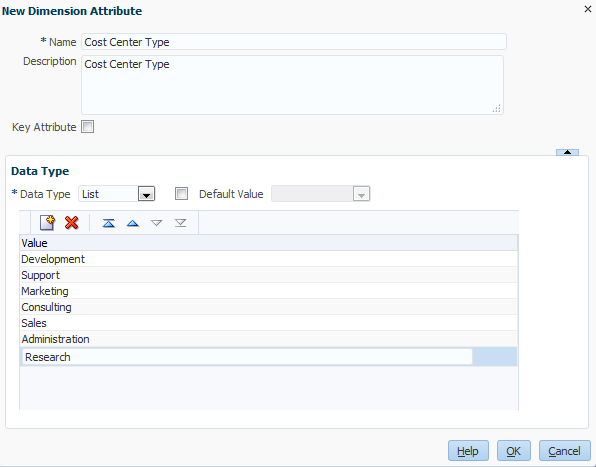
- Add the Cost Center Type attribute using this information:
- Name and Description: Cost Center Type
- Data Type: List
- In the Data Type section, click Add. In the Value field, enter Development.
- Repeat Step 8 above and enter the following values. Click OK when finished.
- Support
- Marketing
- Consulting
- Sales
- Administration
- Research
- Add the Phone Number attribute using the information below. Click OK when finished.
- Name and Description: Phone Number
- Data Type: Text
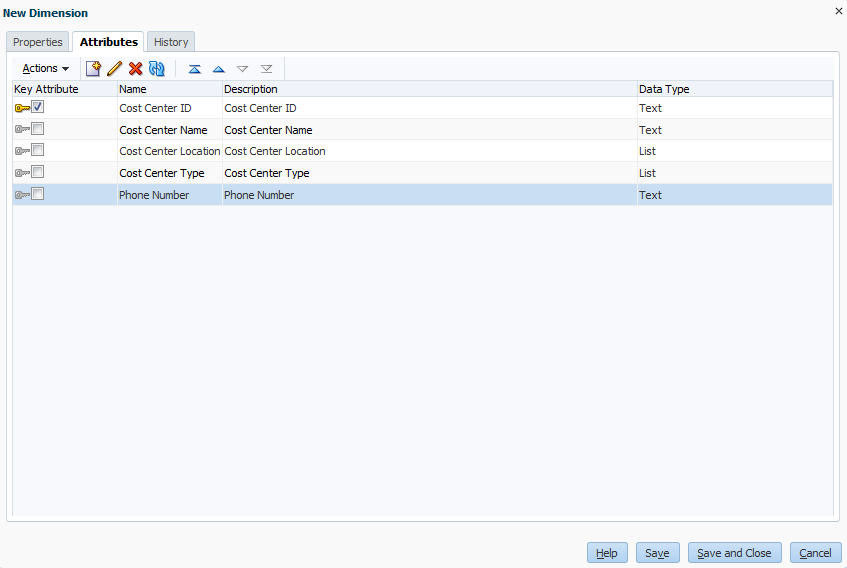
- Click Save and Close.
Adding and Loading Dimension Members
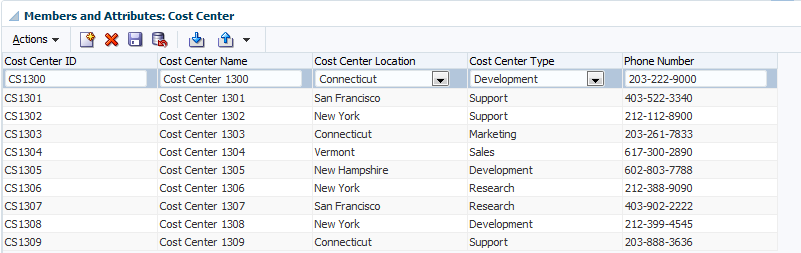
- In the Dimension section, click on Cost Center. The Members and Attributes: Cost Center section is displayed.
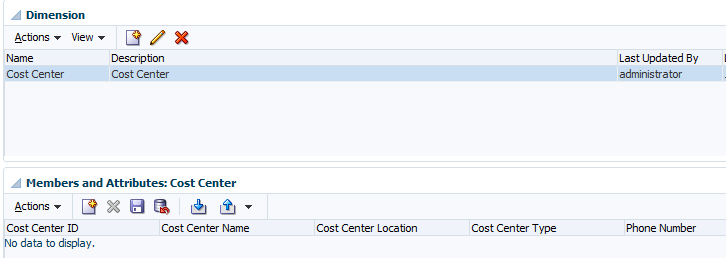
- In the Members and Attributes section, click Add.

- Enter the following metadata for the first member of the Cost Center Dimension. Click Save.
- Cost Center ID: CS1300
- Cost Center Name: Cost Center 1300
- Cost Center Location: Connecticut
- Cost Center Type: Development
- Phone Number: 203-222-9000

- Load the remaining members, click Import.
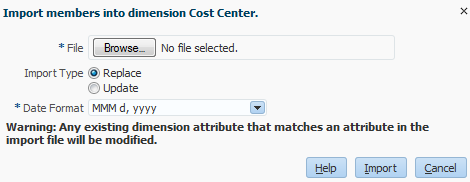
- Click Browse, and locate and select the file "Load File - Cost Center Members". Click Open. Make the following selections and click Import.
- Import Type: Update
- Date Format: dd-MMM-yy
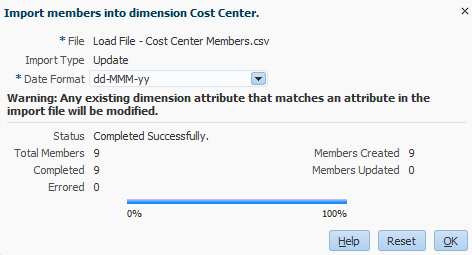
- Click OK. Verify the members as noted in the screenshot.
- In the Dimension section, select Entity. In the Members and Attributes: Entity section, click Add, and enter the following entities. Click Save.
- LE101
- LE102
- LE103
- In the Dimension section, select Scenario. In the Members and Attributes: Scenario section, click Add, and enter the following scenarios. Click Save.
- Actual
- Budget
- Forecast
Creating the Payroll Dataset
In this topic, you learn how to define the data to be collected.
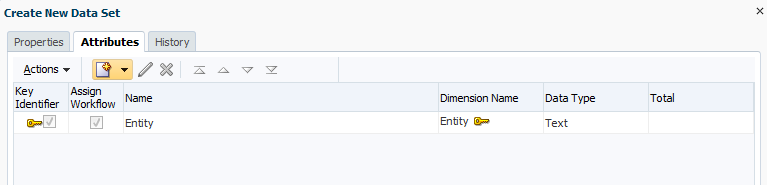
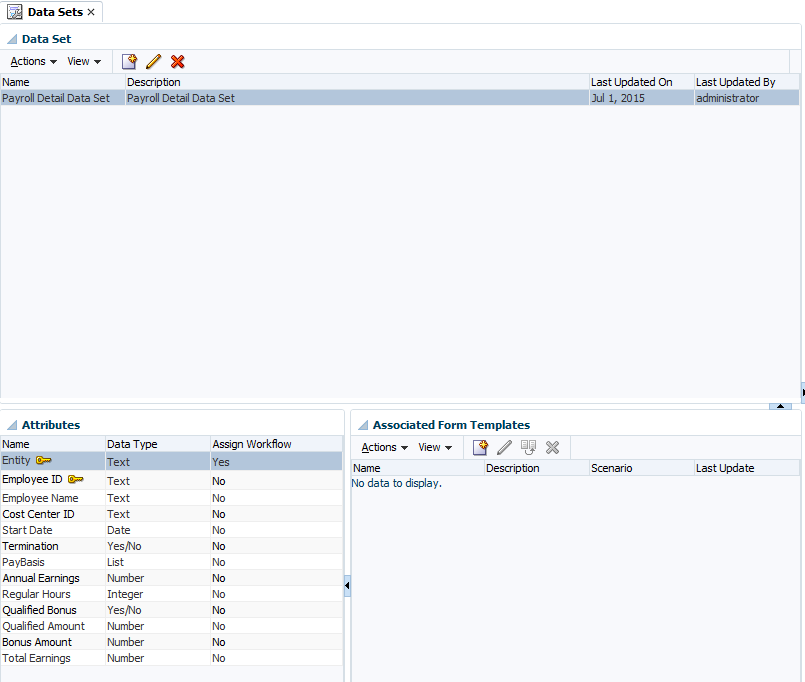
- In the Menu Bar, select Manage, then Datasets. In the Data Set section, Click New.
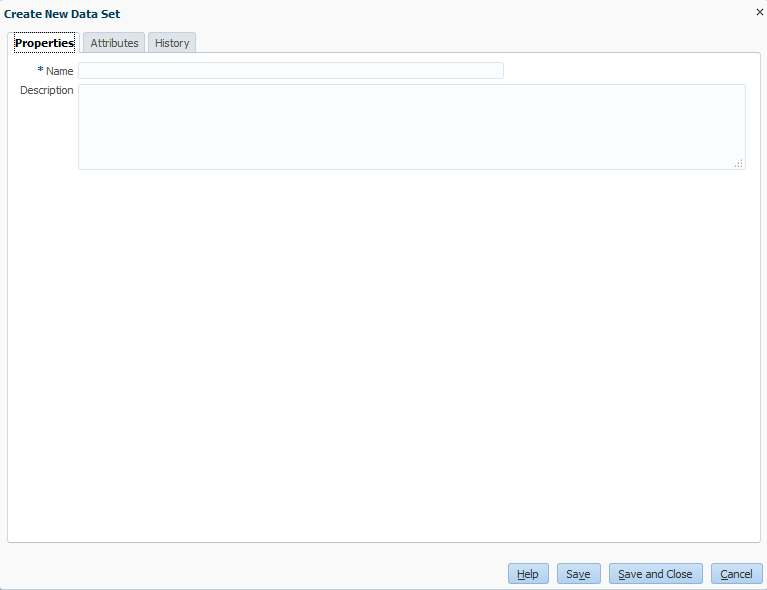
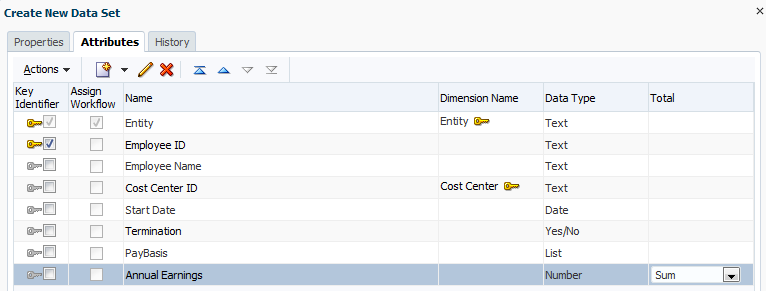
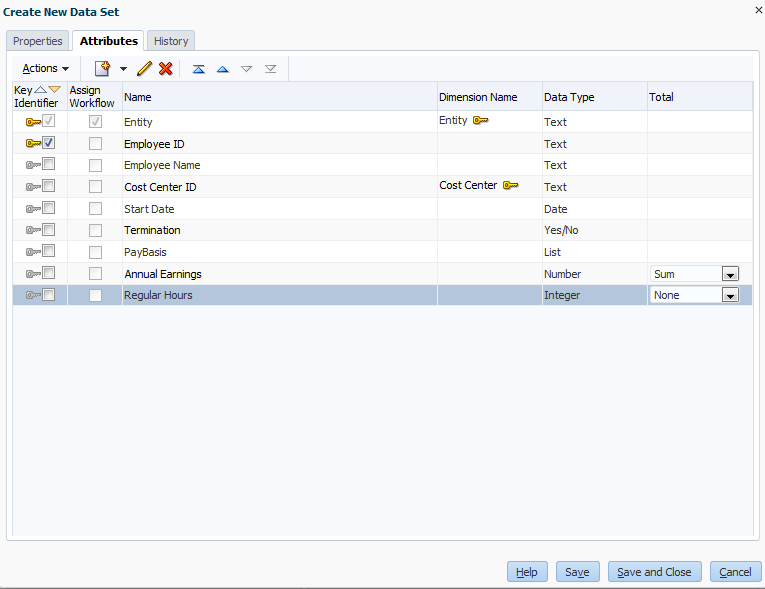
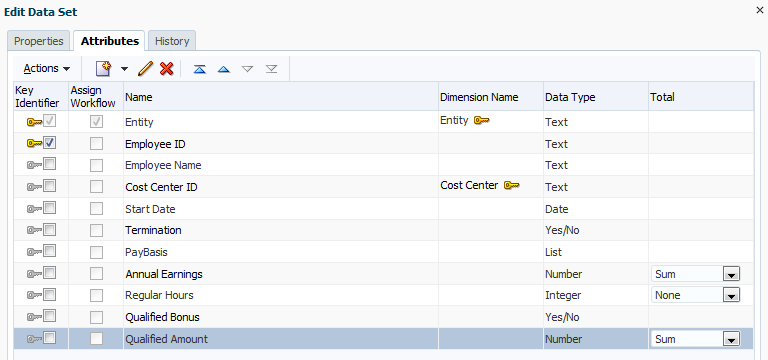
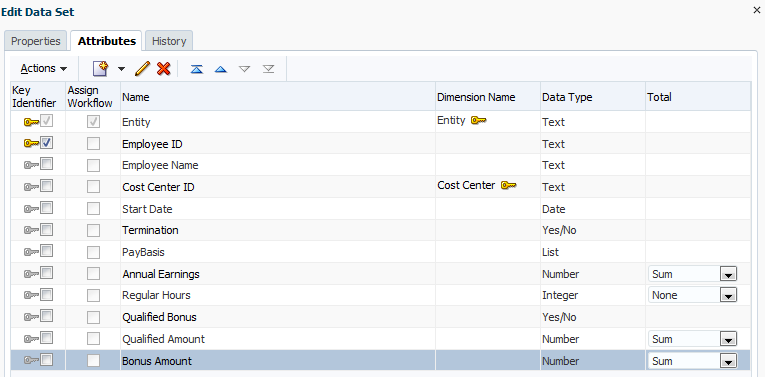
- In the Name and Description fields, enter Payroll Detail Data Set, and click the Attributes tab. Notice Entity is the first attribute.
- Click Add Attribute. Enter the following information for Employee ID. When finished, click OK.
- Name and Description: Employee ID
- Data Type: Text
- Input: Yes
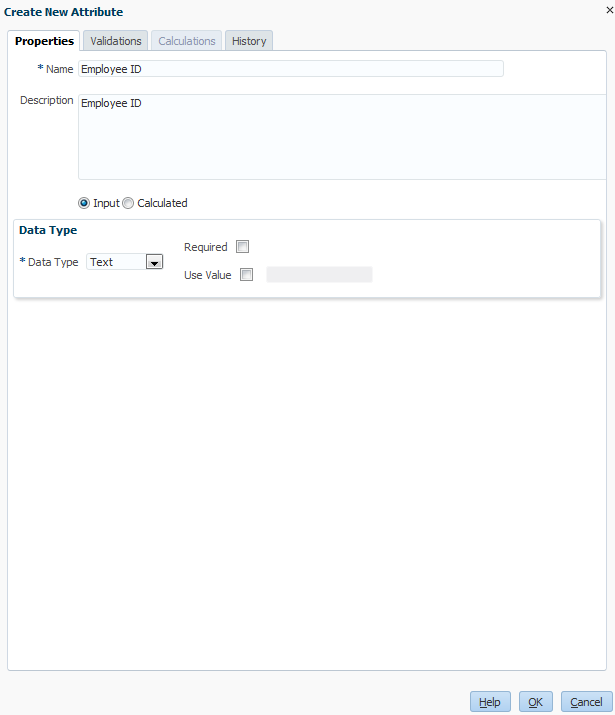
- Select Key Identifier for the Employee ID attribute.
- Click Add Attribute. Enter the following information for Employee Name. When Finished, click OK.
- Name and Description: Employee Name
- Data Type: Text
- Input: Yes
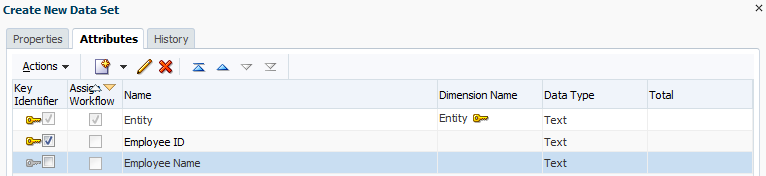
- Click Add Attribute from Dimension. Enter the following information, and click OK.
- Dimension: Cost Center
- Selected Attribute: Cost Center ID
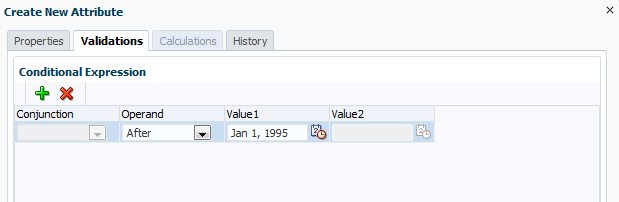
- Click Add Attribute. Enter the following information, then click the Validations tab.
- Name and Description: Start Date
- Data Type: Date

- Click Add. Enter the following information, then click OK and Save.
- Operand: After
- Value1: Jan 1, 1995
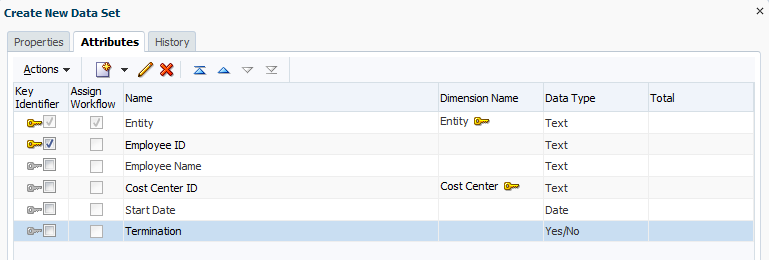
- Click Add Attribute. Enter the following information and click OK.
- Name and Description: Termination
- Data Type: Yes/No
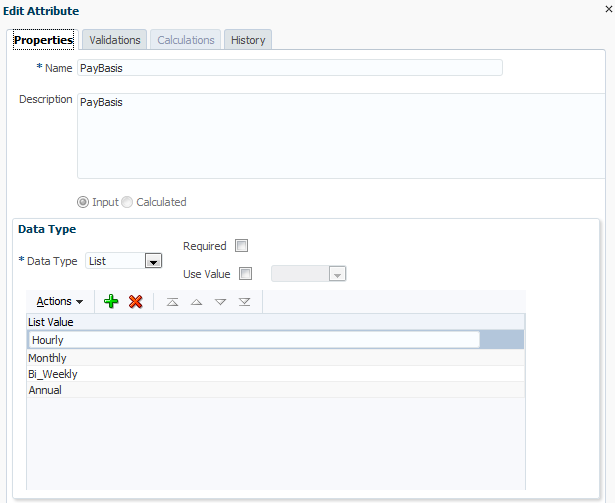
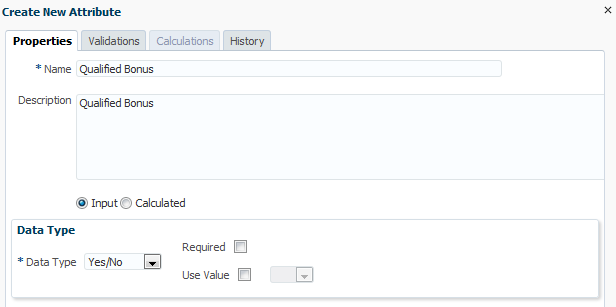
- Click Add Attribute. Enter the following information and click OK.
- Name and Description: PayBasis
- Data Type: List
- In the Data Type section, click Add, and add the following PayBasis Data Types. When finished, click OK, then Save.
- Hourly
- Monthly
- Bi_Weekly
- Annual
- Click Add Attribute. Enter the following information, click OK, then Save. In the Total column, verify Sum is selected.
- Name and Description:Annual Earnings
- Data Type: Number
- Decimal Places: 0
- Use Thousand separator: Yes
- Negative Number Format: (123)
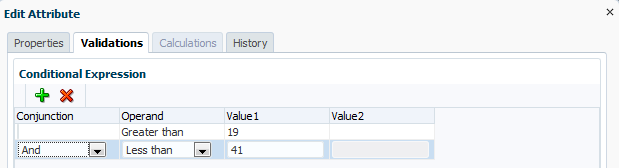
- Click Add Attribute. Enter the following information, then click the Validations tab.
- Name and Description:Regular Hours
- Data Type: Integer
- Click Add. Enter the information as noted in the screenshot. When finished, click OK. In the Total Column, select None. Click Save.
- Click Add Attribute. Enter the following information, click OK, then Save.
- Name and Description: Qualified Bonus
- Data Type: Yes/No
- Click Add Attribute. Enter the following information, then click the Calculations tab.
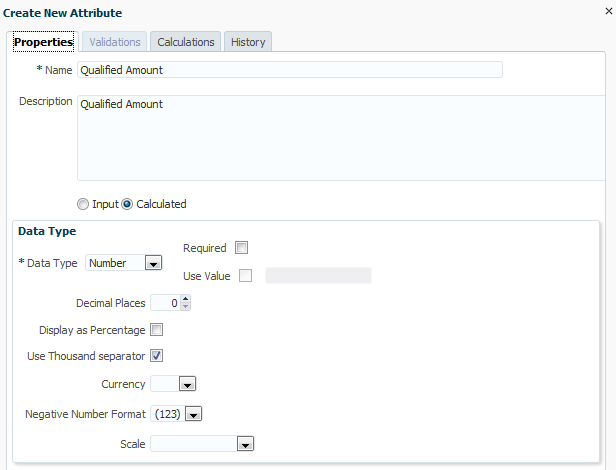
- Name and Description: Qualified Amount
- Calculated: Yes
- Data Type: Number
- Use Thousand separator: Yes
- Negative Number Format: (123)
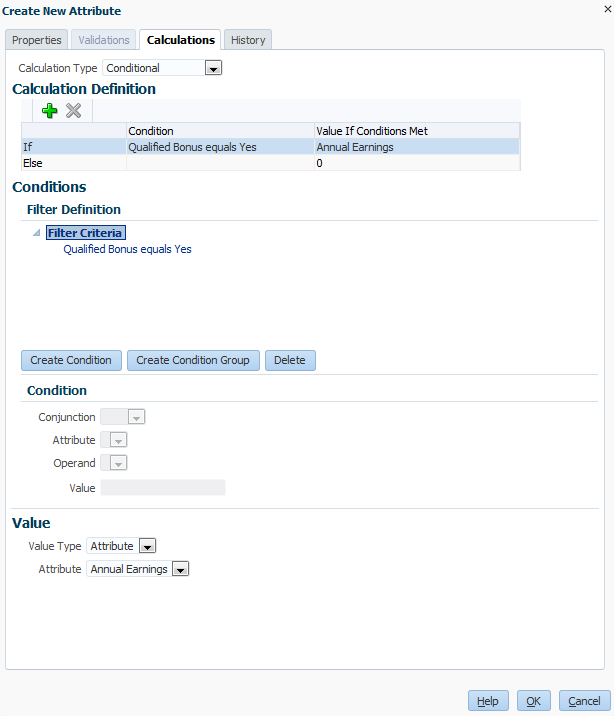
- For Calculation Type, select Conditional. Enter the Calculation Definition by performing the following actions. When finished click OK, then Save.
- Click Create Condition.
- For Attribute, select Qualified Bonus.
- For Operand, select Equals.
- For Value, select Yes.
- In the Value section, for Value Type, select Attribute.
- For Attribute, select Annual Earnings.
- Select the Else line.
- For Value, enter 0.
- Click Add Attribute. Enter the following information, then click the Calculations tab.
- Name and Description: Bonus Amount
- Calculated: Yes
- Data Type: Number
- Use Thousand separator: Yes
- Negative Number Format: (123)
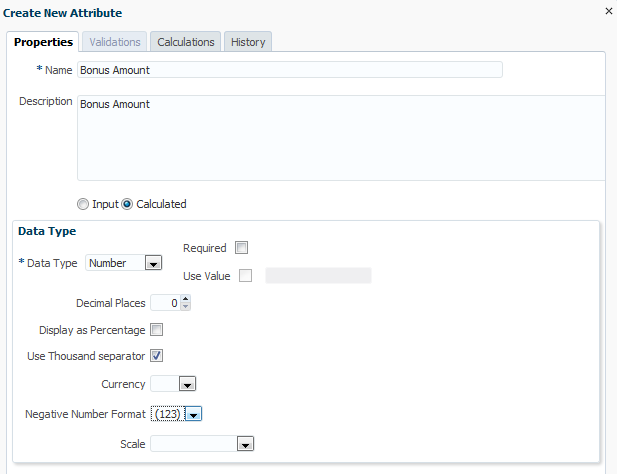
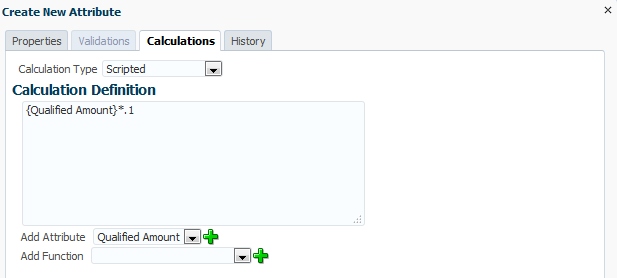
- For Calculation Type, select Scripted. Enter the Calculation Definition by performing the following actions. When finished click OK, then Save.
- For Add Attribute, select Qualified Amount, then click the green add sign.
- In the Calculation Definition box, enter *.1.
- Click Add Attribute. Enter the following information, then click the Calculations tab.
- Name and Description: Total Earnings
- Calculated: Yes
- Data Type: Number
- Use Thousand separator: Yes
- Negative Number Format: (123)
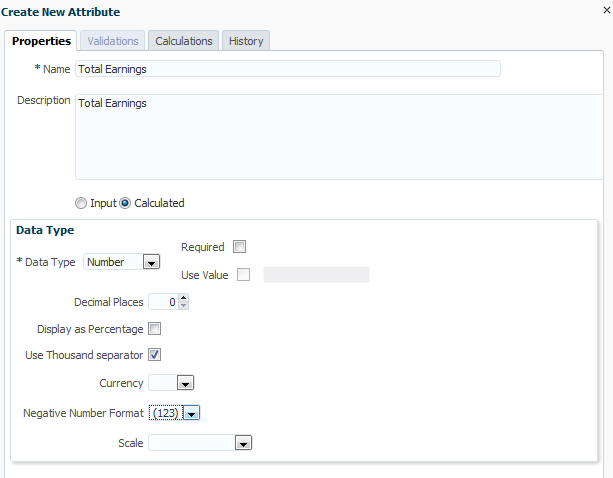
- For Calculation Type, select Scripted. Enter the Calculation Definition by performing the following actions. When finished click OK, then Save.
- For Add Attribute, select Annual Earnings, then click the green add sign.
- In the Calculation Definition box, enter a plus sign (+).
- For Add Attribute, select Bonus Amount, then click the green add sign.
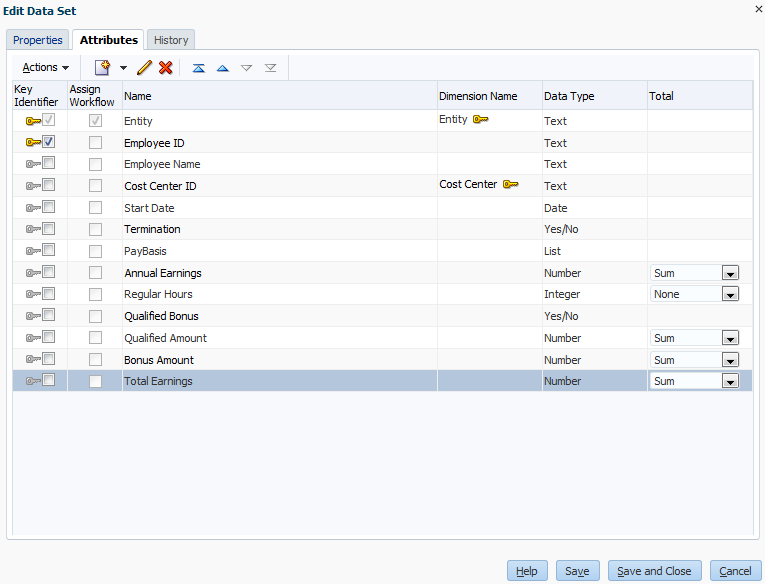
- Click Save and Close. In the Data Set tab, notice the data set you created along with the list of attributes.
Creating the Payroll Form Template
You create Form Templates to enter and manage your supplemental data.
Note: To see the completed template, with entered supplemental data, go to Step 7 in the Entering Form Data topic.
Defining Form Template Sections and HFM Mappings
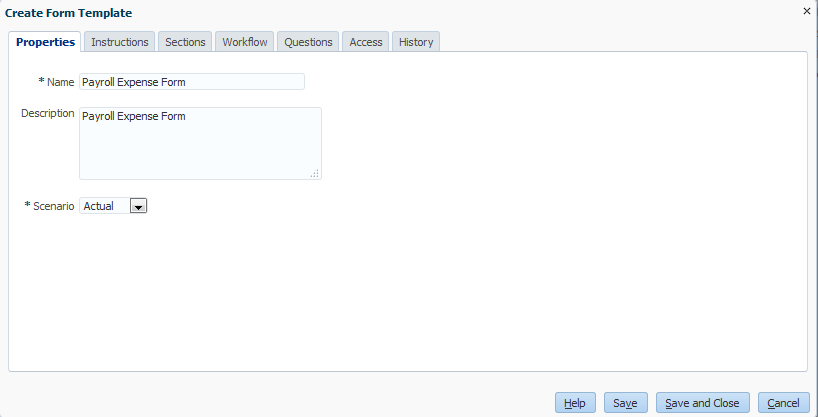
- In the Menu Bar, select Manage, then Form Templates. In the Form Templates section, Click New. Enter the following:
- Name and Description: Payroll Expense Form
- Scenario: Actual
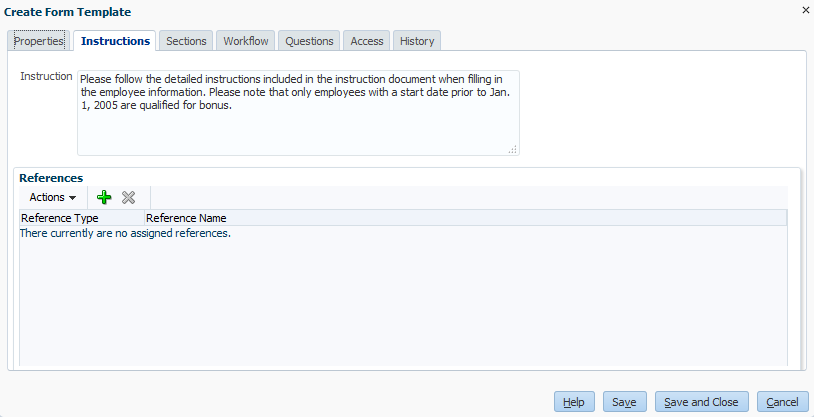
- Click the Instructions tab. In the Instruction box, enter the following text:
- Please follow the detailed instructions included in the instruction document when filling in the employee information. Please note that only employees with a start date prior to Jan. 1, 2005 are qualified for bonus.
Note: You can use the References section to attach documents, Repository Files, or URLs.
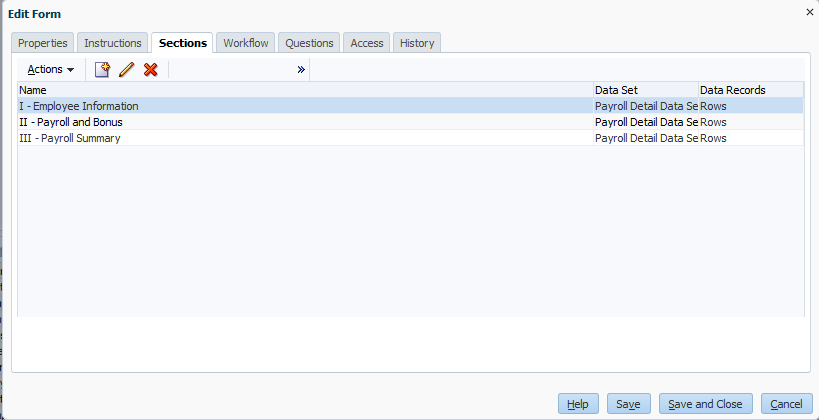
- Click the Sections tab (in order to create the 3 sections for this form template).
- Click New, and enter the following information for section 1:
- Name: I - Employee Information
- Data Set: Payroll Detail Data Set
- Data Records: Rows
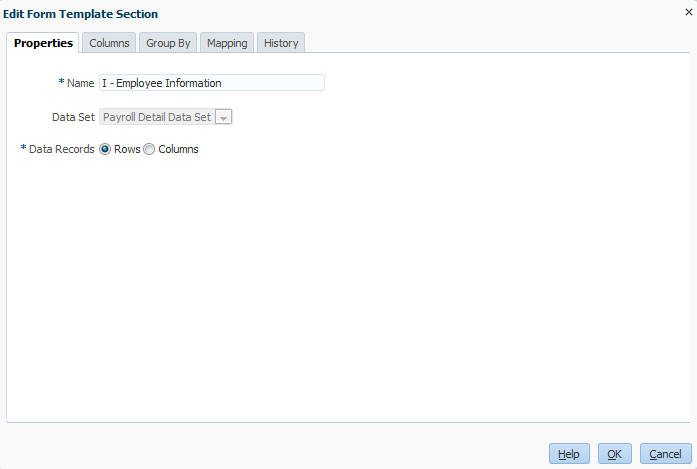
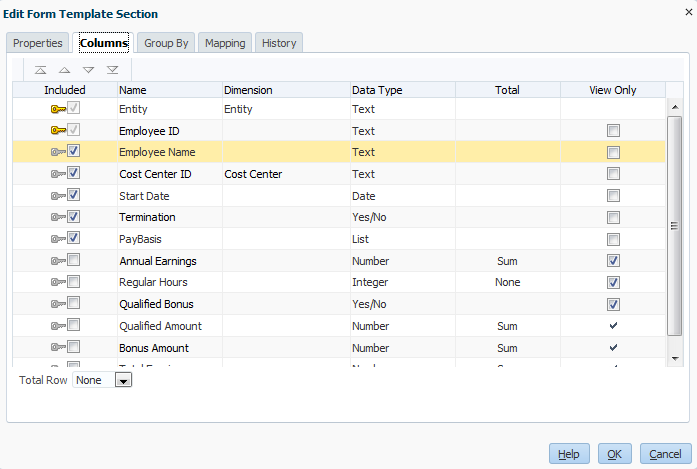
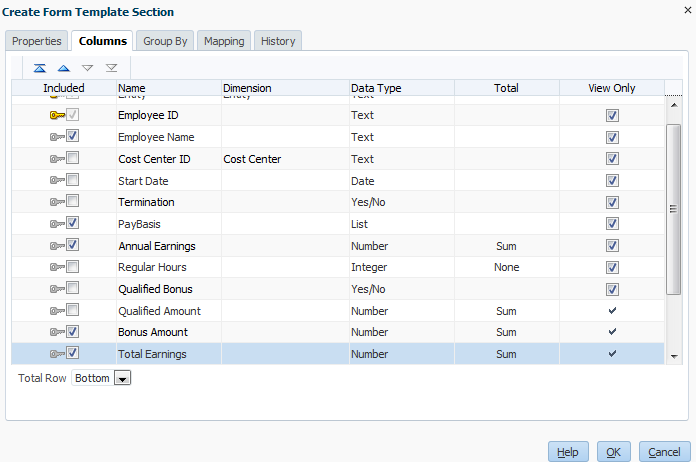
- Click the Columns tab. Perform the following actions:
- In the Included column, select the following attributes: Employee Name, Cost Center ID, Start Date, Termination, and PayBasis.
- In the View Only column, select the following attributes: Annual Earnings, Regular Hours, and Qualified Bonus.
- For Total Row, select None.
- Click OK.
- Click New, and enter the following information for section 2:
- Name: II - Payroll and Bonus
- Data Set: Payroll Detail Data Set
- Data Records: Rows
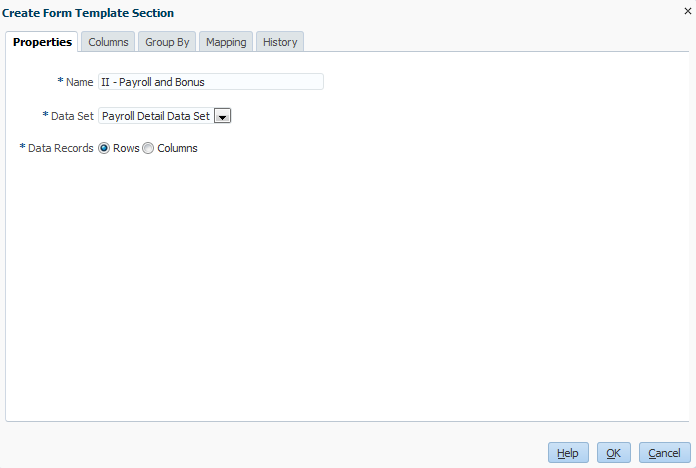
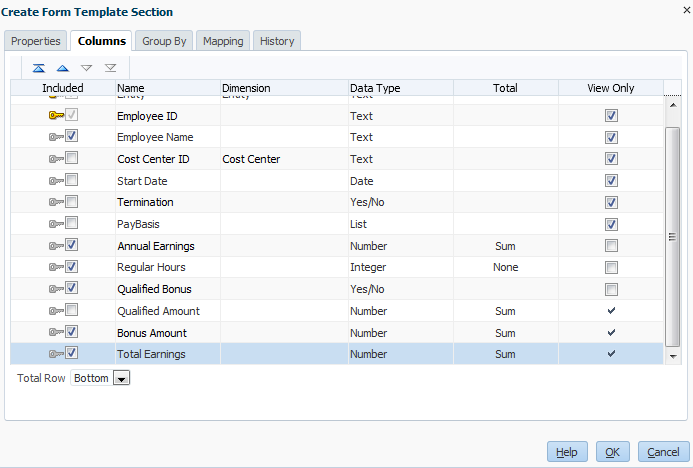
- Click the Columns tab. Perform the following actions:
- In the Included column, select the following attributes: Employee Name, Annual Earnings, Regular Hours, Qualified Bonus, Bonus Amount, and Total Earnings.
- For Total Row, select Bottom.
- Click OK.
- Click New, and enter the following information for section 3:
- Name: III - Payroll Summary
- Data Set: Payroll Detail Data Set
- Data Records: Rows
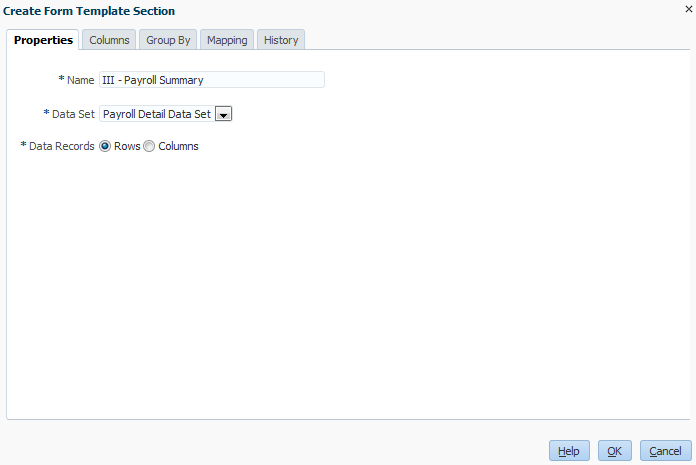
- Click the Columns tab. Perform the following actions:
- In the Included column, select the following attributes: Employee Name, PayBasis, Annual Earnings, Bonus Amount, and Total Earnings.
- For Total Row, select Bottom.
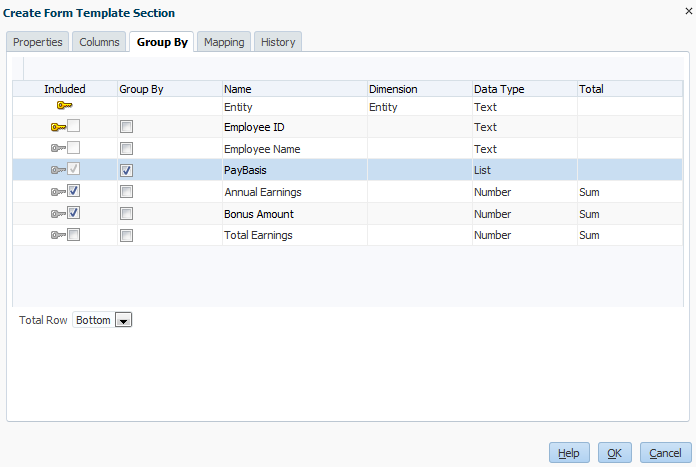
- Click the Group By tab. Perform the following actions:
- In the Included column, select Annual Earnings and Bonus Amount.
- In the Group By column, select PayBasis.
- For Total Row, select Bottom.
Defining HFM Mappings
You use the Mapping tab to map attribute summed amounts to HFM Points of View. The attribute amounts are summed using the attribute selected in the Group By tab. In our example, we are grouping amounts by the PayBasis types of Hourly, Bi_Weekly, Monthly, and Annual. These 4 types are summed and each is mapped to an HFM point of view. In the example below, the mapping creates 4 HFM Points of View, one for each member of the PayBasis attribute.
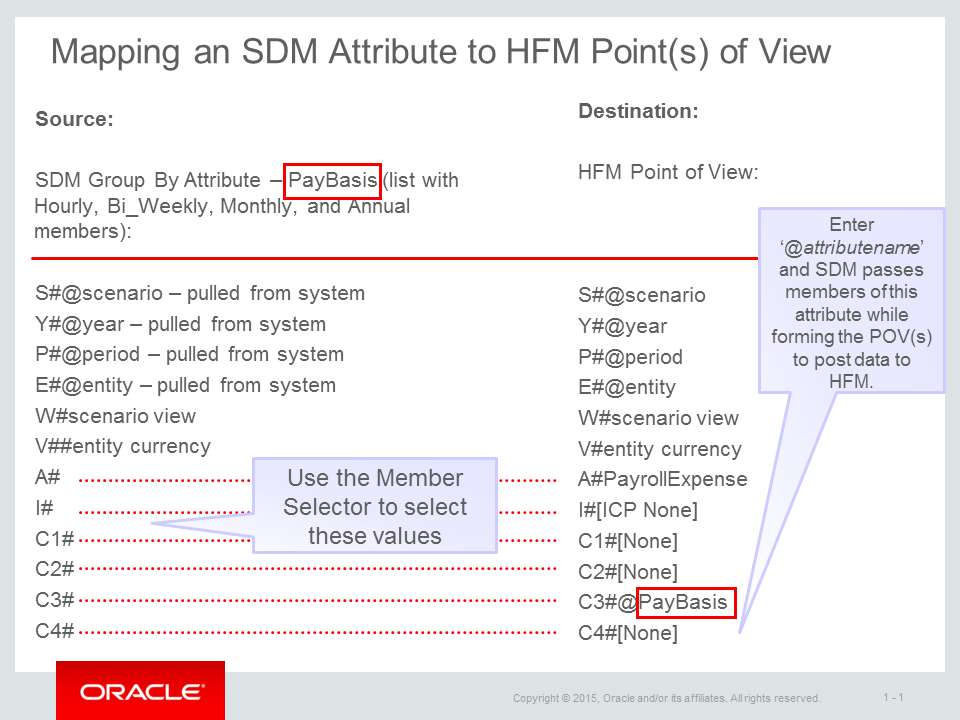
- Click the Mapping tab. In the Connection field, select SDMDrill. Perform the following actions:
- In the first row (a yellow color), under Annual Earnings, click the Member Selector icon.
- Use the member selector to select the following Point of View: A#PayrollExpense, I#[ICP None], C1#[None], C2#[None], C3# leave unselected, C4#[None]
- In the HFM Mapping section, replace and enter C3#@Missing with C3#@PayBasis and click OK.
- In the second row (a blue color), under Bonus Amount, click the Member Selector icon.
- Use the member selector to select the following Point of View: A#Bonus, I#[ICP None], C1#[None], C2#[None], C3#[None], C4#[None]
- Click OK.
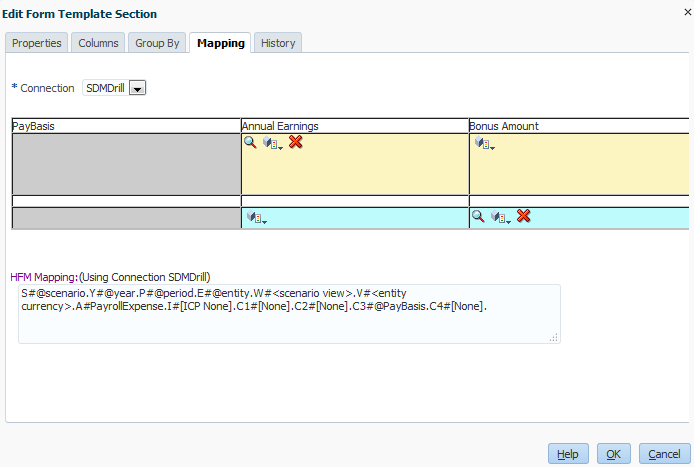
- Click Save.
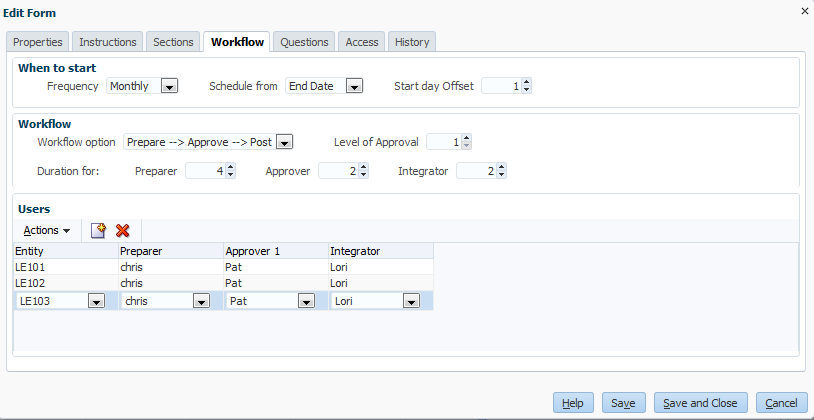
Defining Form Template Workflow
- Click the Workflow tab. Select the following:
- Frequency: Monthly
- Schedule from: End Date
- Start day Offset: 1
- Workflow option: Prepare, Approve, Post
- Level of Approval: 1
- Duration for Preparer: 4
- Duration for Approver: 2
- Duration for Integrator: 2
- In the Users section, click New. Select the following:
- Entity: LE101
- Preparer: Chris
- Approver: Pat
- Integrator: Lori
- Repeat Step 2 for LE102 and LE103.
Adding Questions and User Access
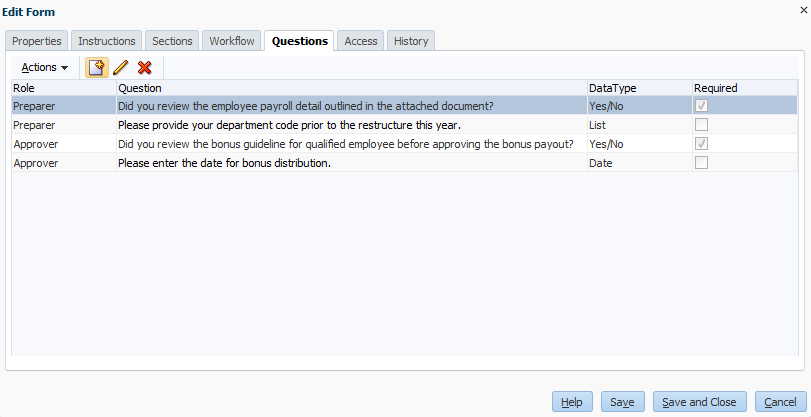
- Click the Questions tab. Click New. Enter or select the following information for each question and click OK.
- Question: Did you review the employee payroll detail outlined in the attached document?
- Data Type: Yes/No
- Role: Preparer
- Required: Yes
- Question: Please provide your department code prior to the restructure this year.
- Data Type: List
- Role: Preparer
- List codes: DEV101, MKT400, CON333
- Question: Did you review the bonus guideline for qualified employee before approving the bonus payout?
- Data Type: Yes/No
- Role: Approver
- Required: Yes
- Question: Please enter the date for bonus distribution.
- Data Type: Date
- Role: Approver
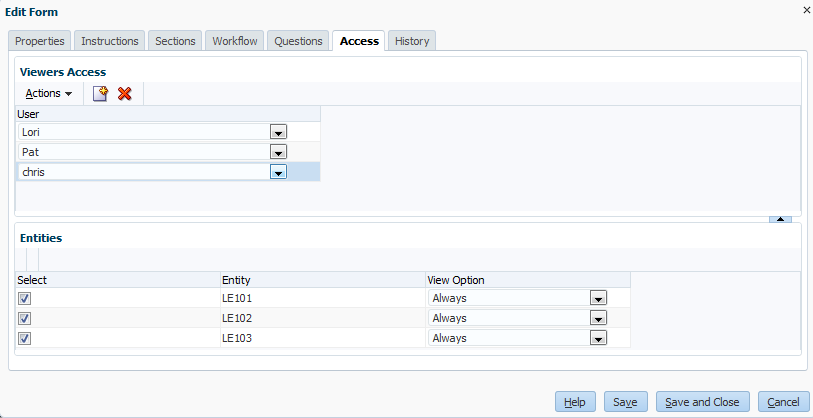
- Click the Access tab. Perform the following actions, then click Save and Close:
- For User, select Lori.
- For View Option, select After Approval.
- Note that Lori will only be able to view data after approval.
- Click New.
- For User, select Pat.
- For View Option, select After Submission.
- Click New.
- For User, select Chris.
- For View Option, select Always.
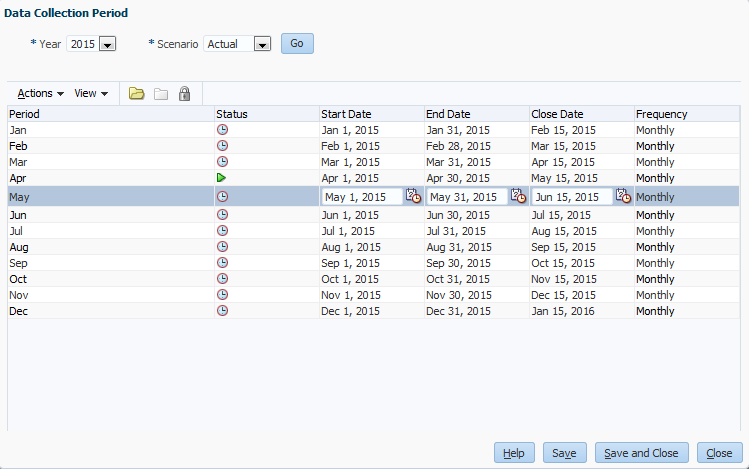
Setting Up Data Collection Periods
Use the Data Collection Periods screen to open your periods. The Start and End Dates correspond to the accounting period cycle. The Close Date represents when all activities should be completed for the accounting period. The End and Close Dates, combined with the offset dates defined in form templates determine when the notifications for the form instances are sent, and when the forms would be considered late.
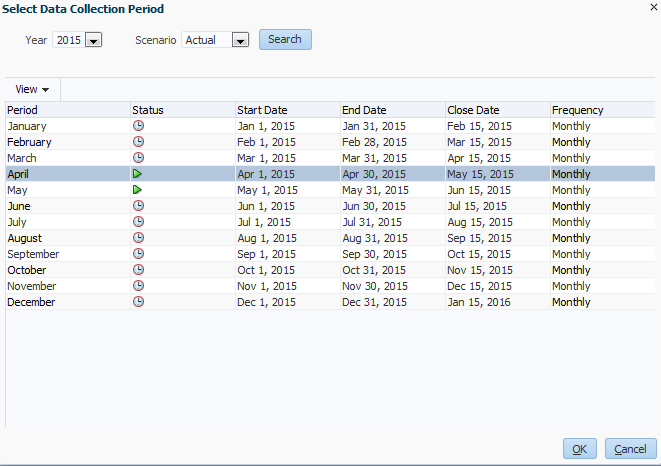
- In the Menu Bar, select Manage, then Data Collection Periods. Perform these actions:
- For Year, select 2015.
- For Scenario, select Actual.
- Click Go.
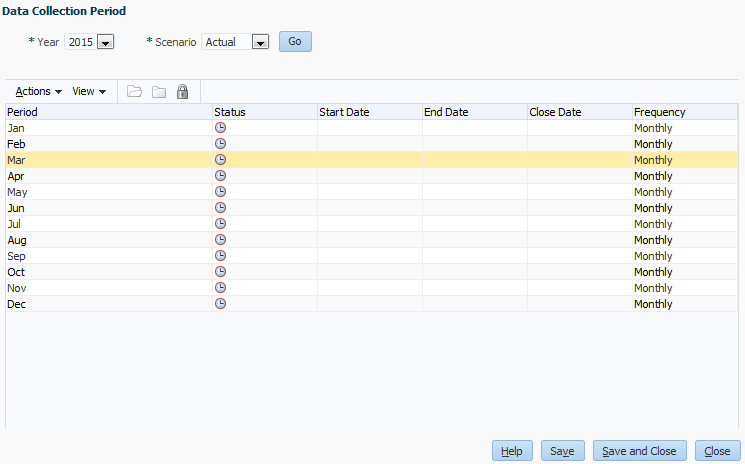
- Select a period, and perform the following actions:
- For Start Date, click the Select Date icon and enter the related Start Date, End Date, and Closing Date.
- Repeat for the remaining periods and click Save.
- Select a period, and click Open Period.
- Click Save and Close.
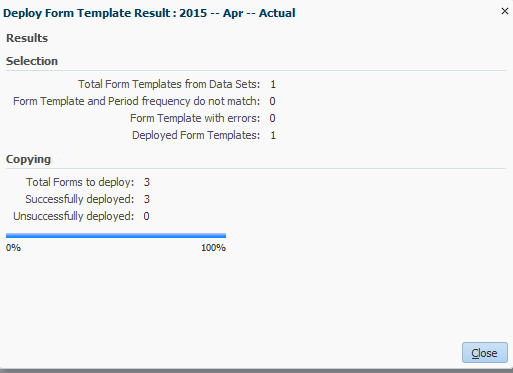
Deploying the Payroll Form Template to a Data Collection Period
Deploying Form Templates generates Form Instances and also sends notifications to users responsible for preparing supplemental data.
- In the Menu Bar, select Manage, then Form Templates. Perform the following actions:
- Select the Payroll Expense Form.
- Click Deploy.
- Click the Search icon and select an open period.
- Click Deploy, then Yes to confirm.
- View the Results. Note in the example that 3 Form Instances are deployed, one for each entity.
- Click Close.
Entering, Approving, and Posting Form Data
With Form Instances, users enter, approve, and then post the supplemental data. In the example, user Chris opens the Payroll Expense Forms, enters the data and then submits the data to Pat for Approval. Once Pat approves the data, Lori posts the data to the HFM application.
Entering Form Data
-
Log On as user Chris and password hyperion1.
-
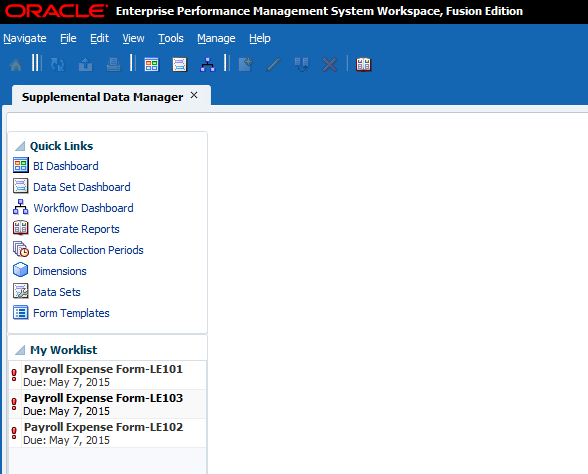
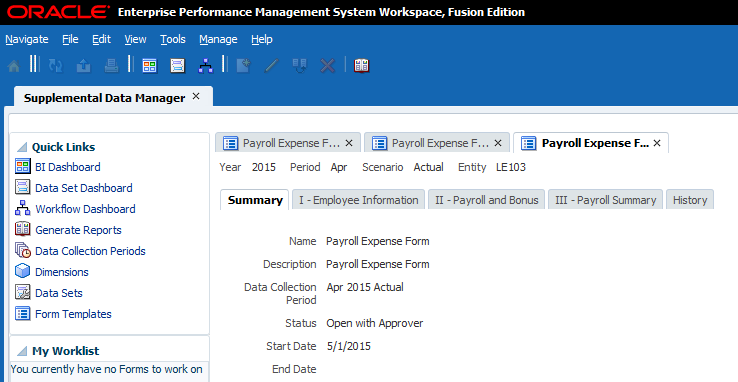
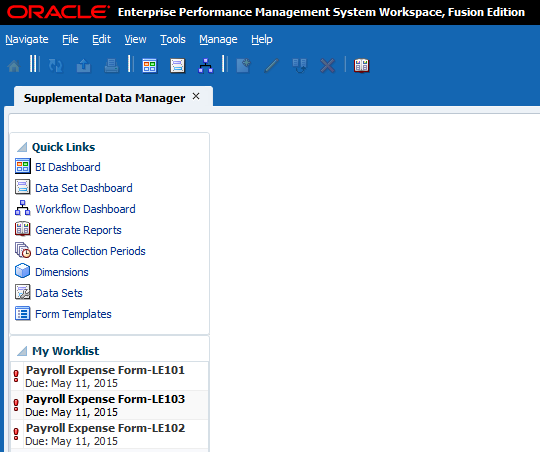
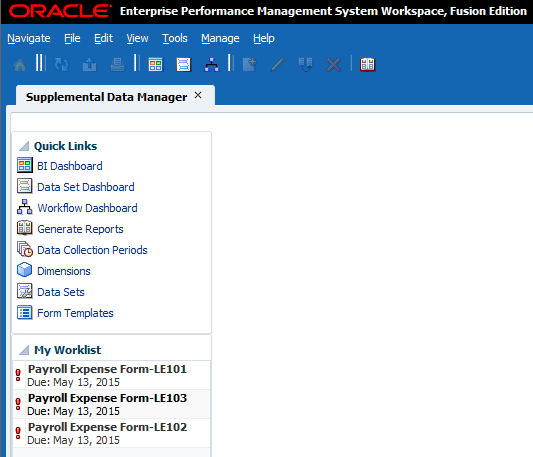
In the Menu Bar, select Navigate, Applications, Financial Close Management, then Supplemental Data Manager. Note the 3 forms listed in My Worklist.
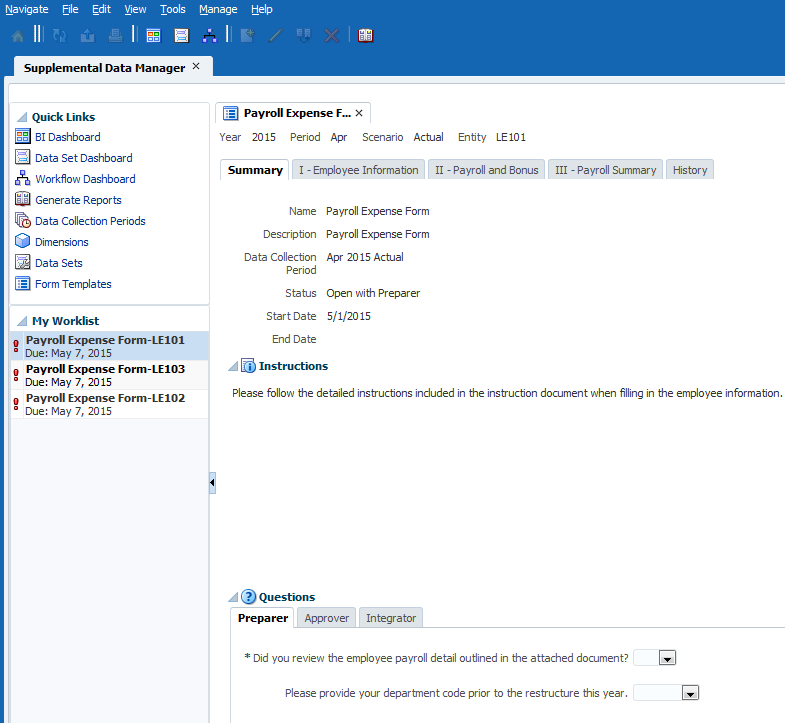
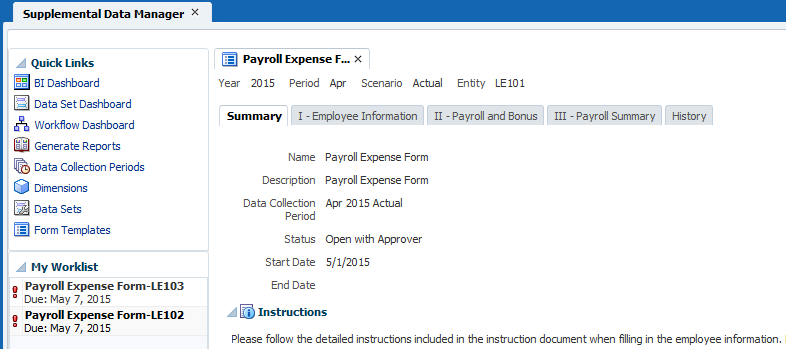
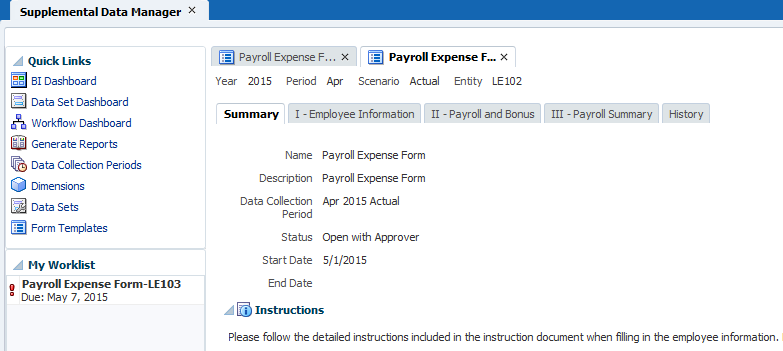
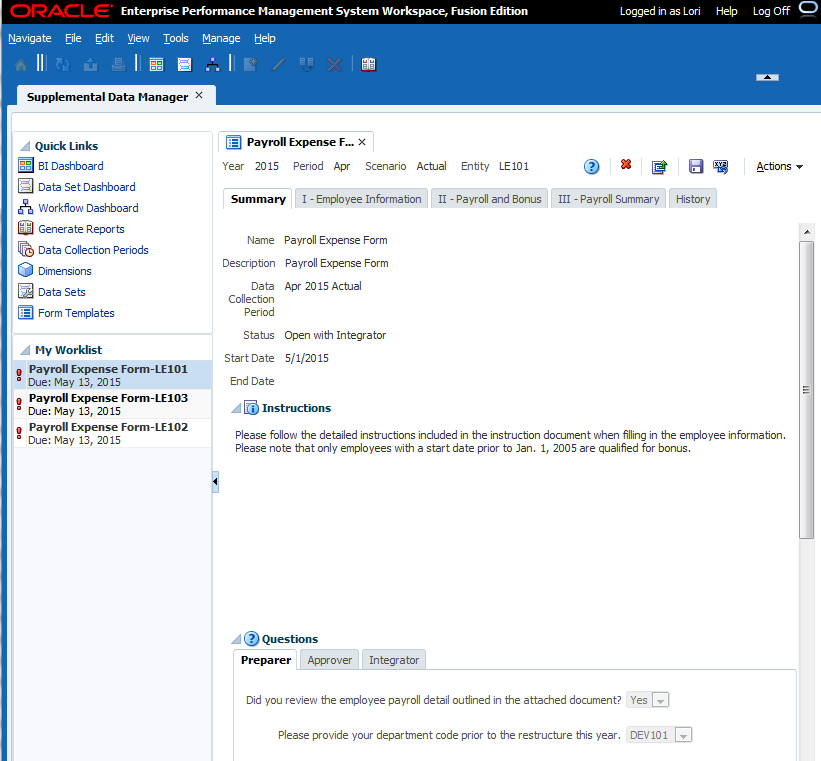
- Click Payroll Expense Form - LE101. The Summary tab is opened. Note the Instructions and Questions for the Preparer of this form. Answer the questions as noted below and click Save:
- Did you review the employee payroll detail outlined in the attached document?: Yes
- Please provide your department code prior to the restructure this year: DEV101
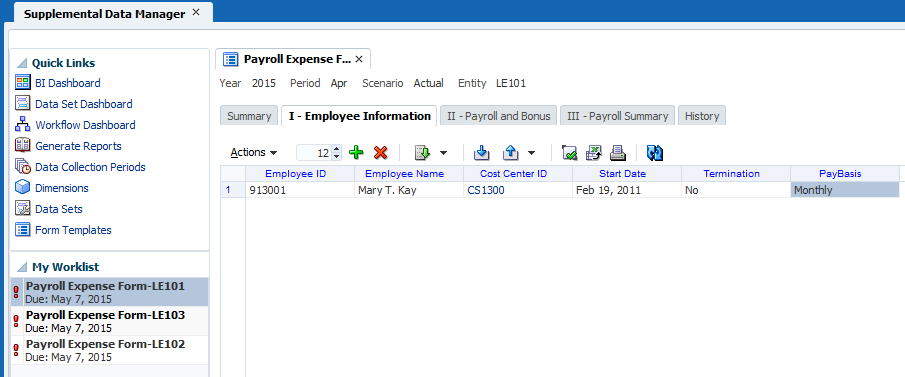
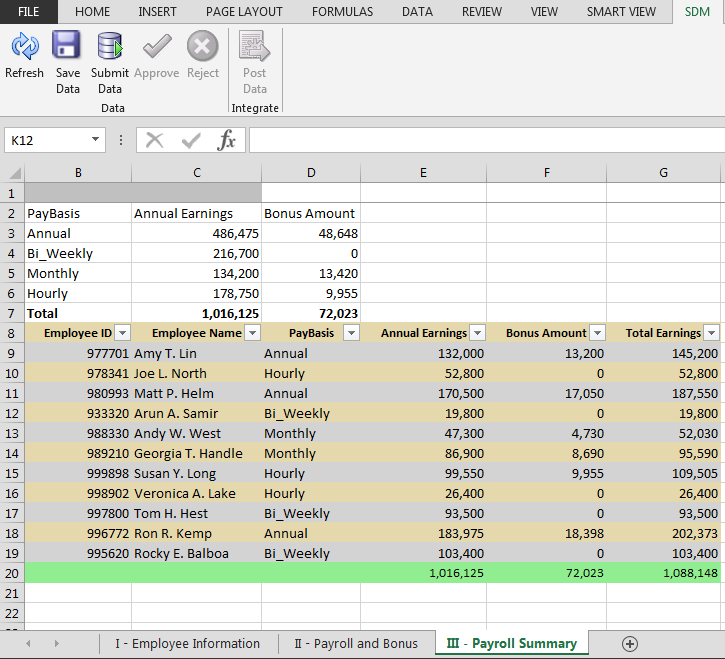
- Click the I - Employee Information tab. Perform the following actions:
- From the Actions menu, select Add Rows. Note the attributes in the columns.
- Enter the following data in Row 1, then click Save:
- Employee ID: 913001
- Employee Name: Mary T. Kay
- Cost Center ID: CS1300
- Start Date: Feb 19, 2011
- Termination: No
- PayBasis: Monthly
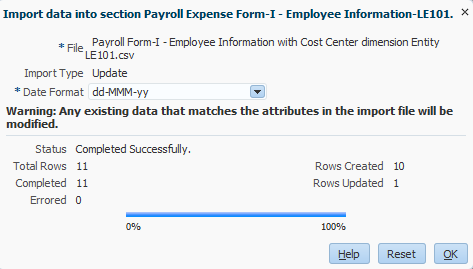
- Click Import. Perform the following actions:
- Click Browse and select the file titled Payroll Form-I - Employee Information with Cost Center dimension Entity LE101.csv.
- For Import Type, select Update.
- For Date Format, select dd-MMM-yy.
- Click Import.
- View import results, click OK, and Save.
- Click the II - Payroll and Bonus tab. Perform the following actions:
- In Row 1 (for Mary T. Kay), enter the following:
- Annual Earnings: 75000
- Regular Hours: 40
- Qualified Bonus: Yes
- Click Save. Note that Bonus Amount and Total Earnings are automatically calculated.
- Click Import.
- Click Browse and select the file titled Payroll Form-II - Payroll and Bonus LE101.csv.
- For Import Type, select Update.
- For Date Format, select dd-MMM-yy.
- Click Import.
- View import results, click OK, and Save.
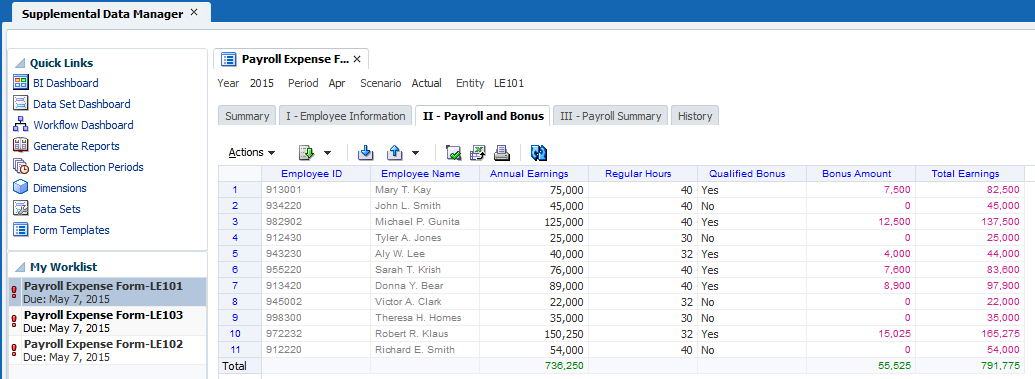
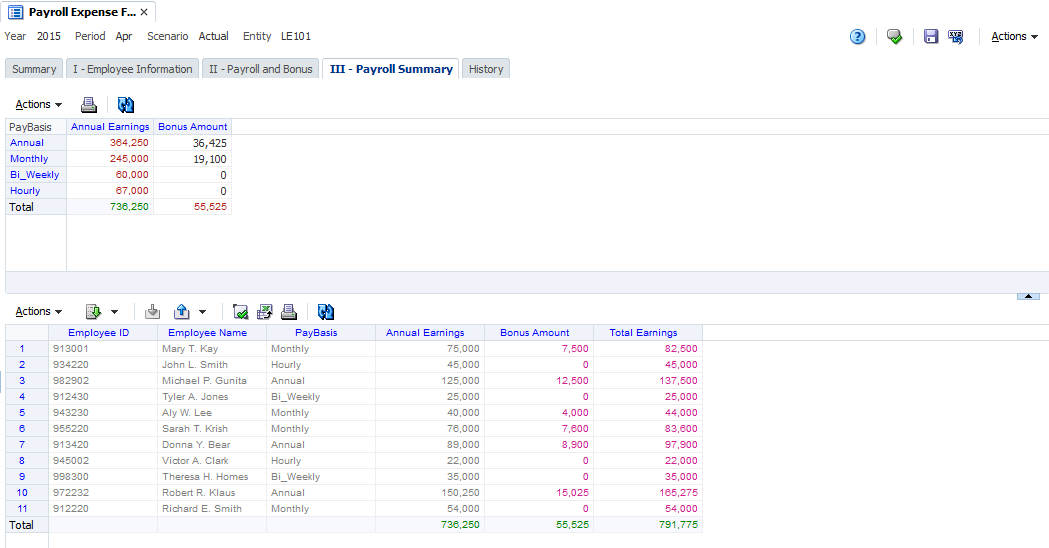
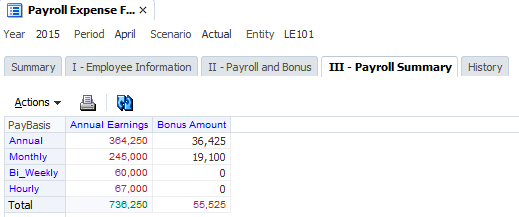
- Click the III - Payroll Summary tab. Note the Summary totals for Annual Earnings and Bonus Amount. Click Save.
- In the Actions menu, select Submit. Note the Status changed to Open with Approver and the form is removed from My Worklist.
- In My Worklist, select Payroll Expense Form-LE102. Process LE102 by performing the same actions as noted above and in summary below:
- In the Summary tab, answer both questions as with LE101.
- In the I - Employee Information tab, click Import. Load file Payroll Form-I - Employee Information with Cost Center dimension Entity LE102.csv.
- In the II - Payroll and Bonus tab, click Import. Load file Payroll Form-II - Payroll and Bonus LE102.csv.
- Click the III - Payroll Summary tab. Note the summary totals for Annual Earnings and Bonus Amount, and click Submit. Status for LE102 changed to Open with Approver.
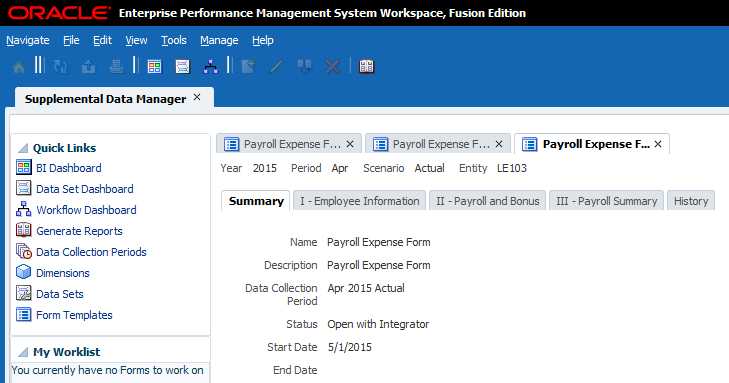
- In My Worklist, select Payroll Expense Form-LE103.
- In the Summary tab, answer the two questions providing the same responses as above.
- Click the I - Employee Information tab.
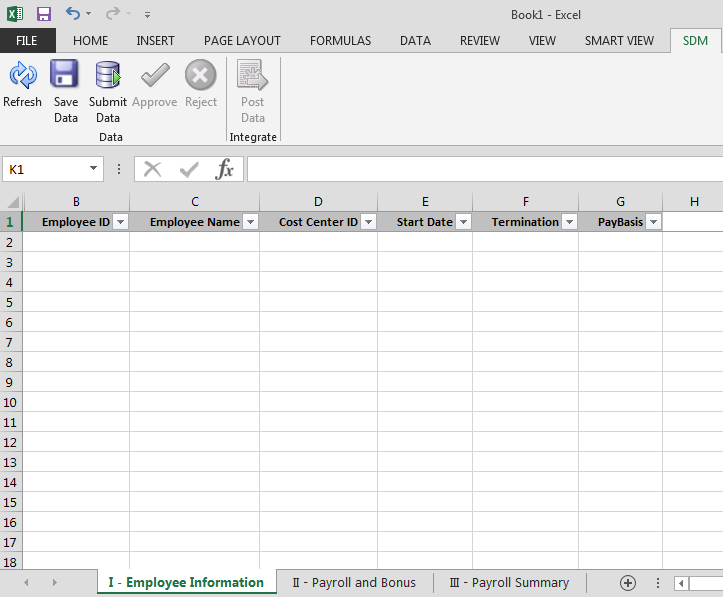
- Click the Open Form in Smart View icon. The form opens in Microsoft Excel, with the Smart View and SDM ribbons available.
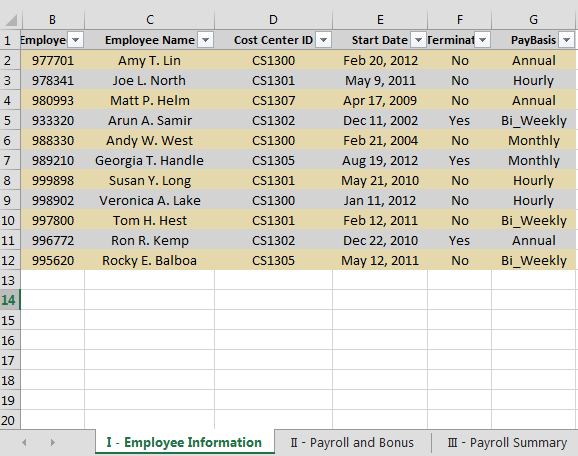
- Open the file titled Payroll Form-I - Employee Information with Cost Center dimension Entity LE103.csv, and copy and paste the data (A2..F12) into Section I - Employee Information. Click Save Data.
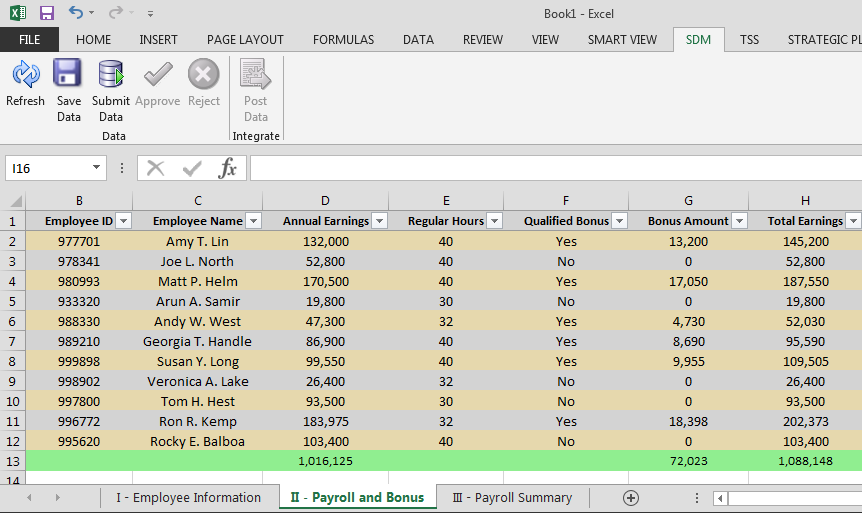
- Open the file titled Payroll Expense Form-II - Payroll and Bonus Entity LE103.csv, then copy and paste the data (C2..E12) into Section II - Payroll and Bonus. Click Save Data.
- Select the Section III - Payroll Summary tab and view the summary data. When finished, click Submit Data.
- Return to your browser and view the status of LE103 as Open with Approver.
- Log out.
Approving Form Data
Log in as Pat to approve the supplemental data for the 3 entities.
-
At the Log On screen, for User Name and Password, enter Pat and hyperion1. Click Log On.
-
In the Menu Bar, select Navigate, Applications, Financial Close Management, then Supplemental Data Manager. Note the 3 Forms in My Worklist.
-
In My Worklist, select Payroll Expense Form-LE101.

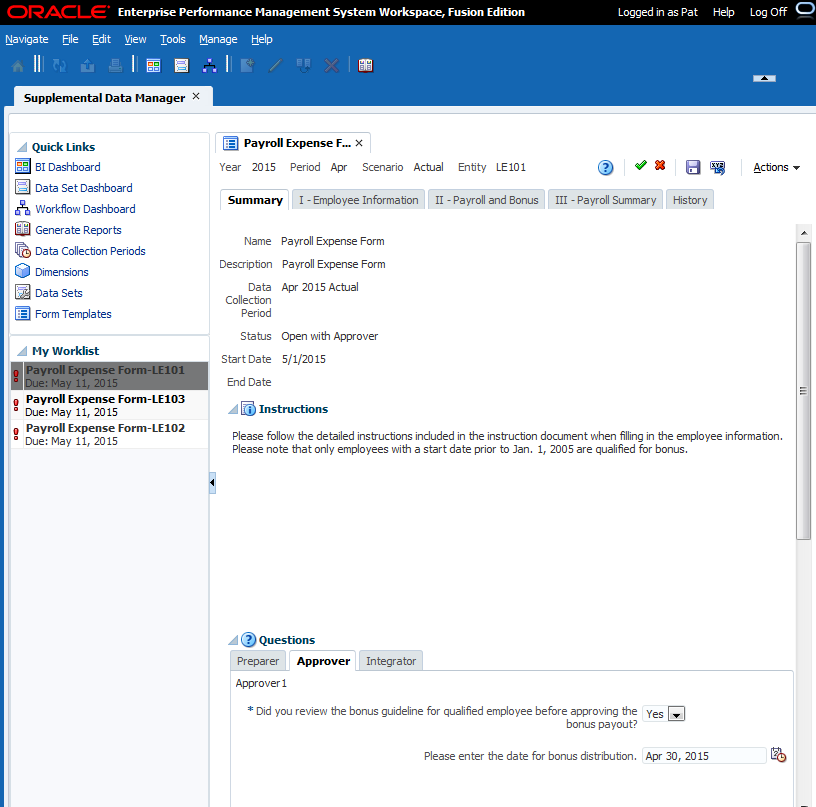
- In the Questions section, select the Approver tab. Answer the questions as follows:
- Did you review the bonus guideline for qualified employee before approving the bonus payout?: Yes.
- Please enter the date for bonus distribution: Apr 30, 2015.
-
In the Actions Menu (on the right side), select Approve. Note the status changes to Open with Integrator.
-
Repeat steps 4 and 5 for LE102 and LE103.
- Log off.
Posting Form Data
Log in as Lori to post the supplemental data to HFM.
-
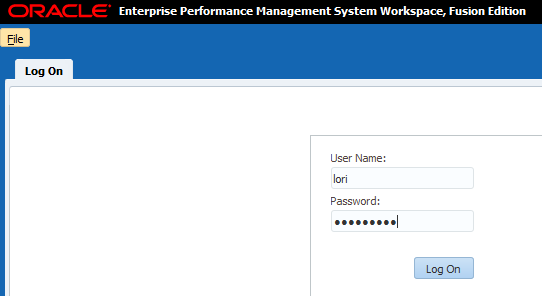
At the Log On screen, for User Name and Password, enter lori and hyperion1. Click Log On.
-
In the Menu Bar, select Navigate, Applications, Financial Close Management, then Supplemental Data Manager. Note the 3 Forms in My Worklist.
-
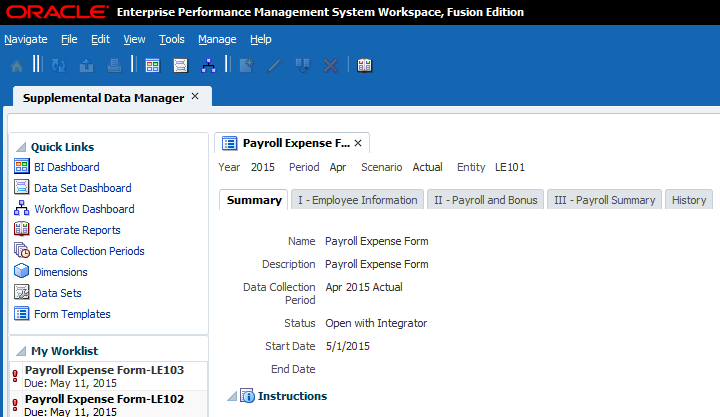
In My Worklist, select Payroll Expense Form-LE101.
-
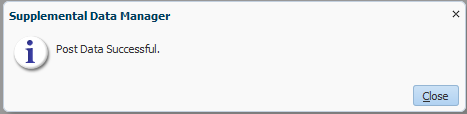
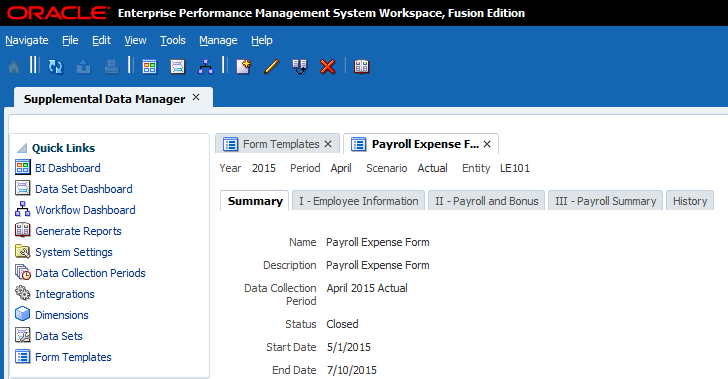
In the Actions Menu (on the right side), select Post. Note the status changes to Closed.
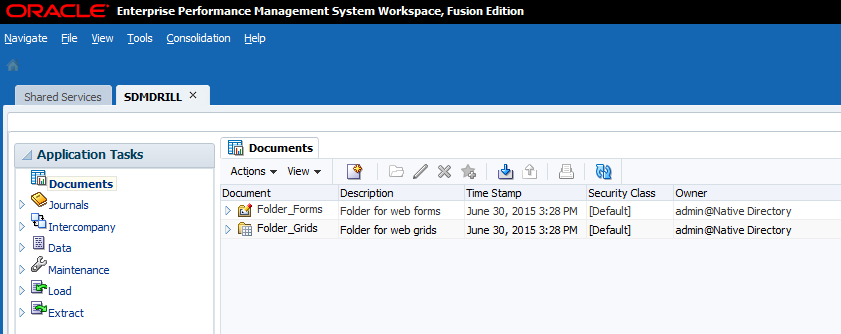
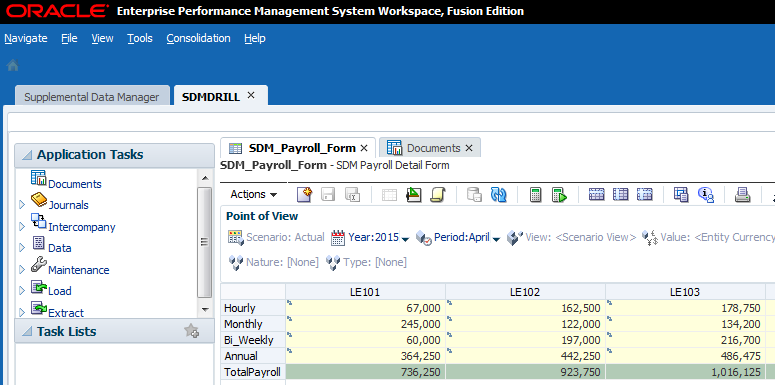
- Open the SDMDRILL Consolidation Application. In the Menu Bar, select Navigate, Applications, Consolidation, then SDMDRILL. Perform the following actions:
- In the Menu Bar, select Consolidation, then Documents.
- Expand Folder_Forms.
- Select SDM_Payroll_Form and click Open Selected Document.
- In the POV select 2015 for Year, and April for Period.
- View the data.
-
To drill back to the supplemental data form from HFM, Right-Click on the LE101 Hourly cell and select Drill, then Drill Through to SDM.

-
View the supplemental data in SDM:
Viewing Dashboards
You can use the Dashboards to quickly view current statuses, due dates, assignment data, and remaining work to be done.
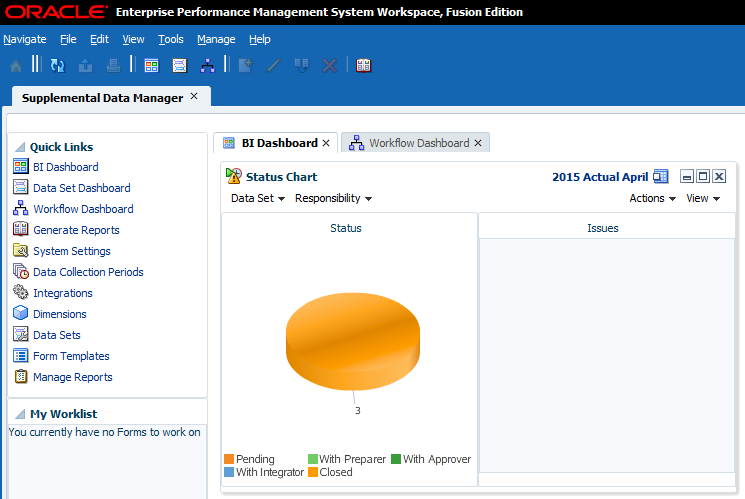
Viewing the BI Dashboard
The BI dashboard provides up to 4 portlets of data. You can view a Status Chart, Workflow, Data Set, or My Worklist portlet.
-
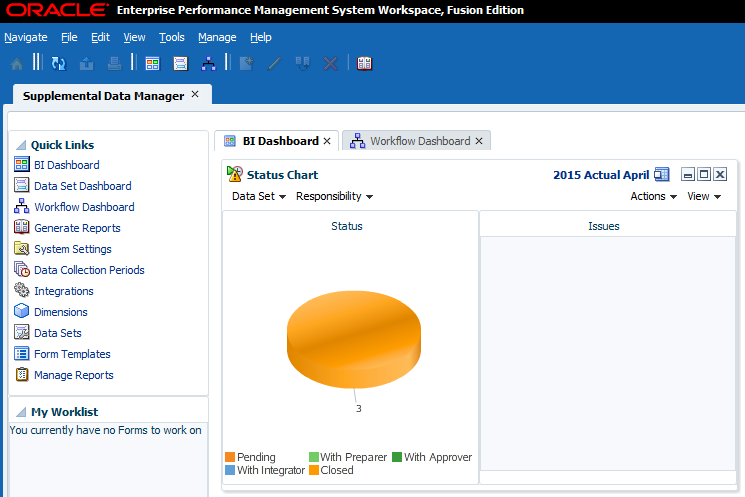
In the Quick LInks section, click BI Dashboard.
-
Click Data Collection Periods and select a period. Click OK.
- In the Status Chart Portlet, you can perform any of the following actions:
- View by Data Set, Responsibility, or Lateness (Currently Late or Ever Been Late)
- Move the Portlet Box by dragging to a new spot
- Click the Pie Chart to drill through to the data
- Print or Export the Portlet data
-
Right-click outside of a portlet to add another portlet. Select New Workflow Portlet.
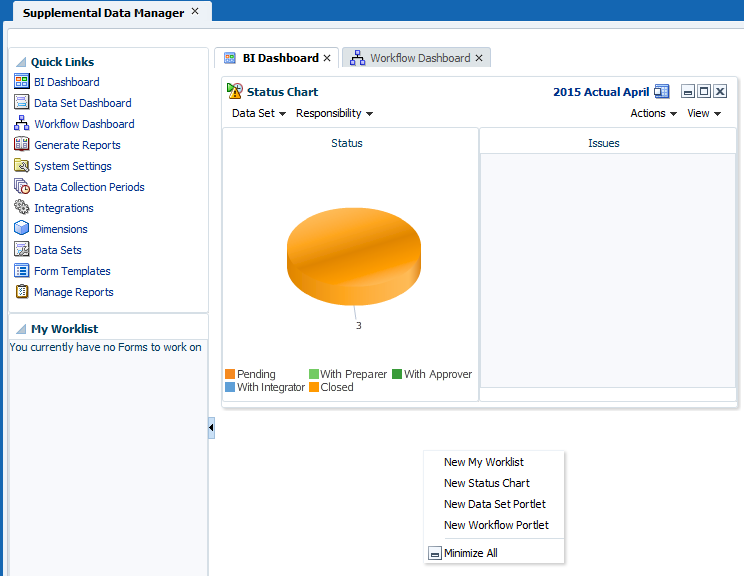
-
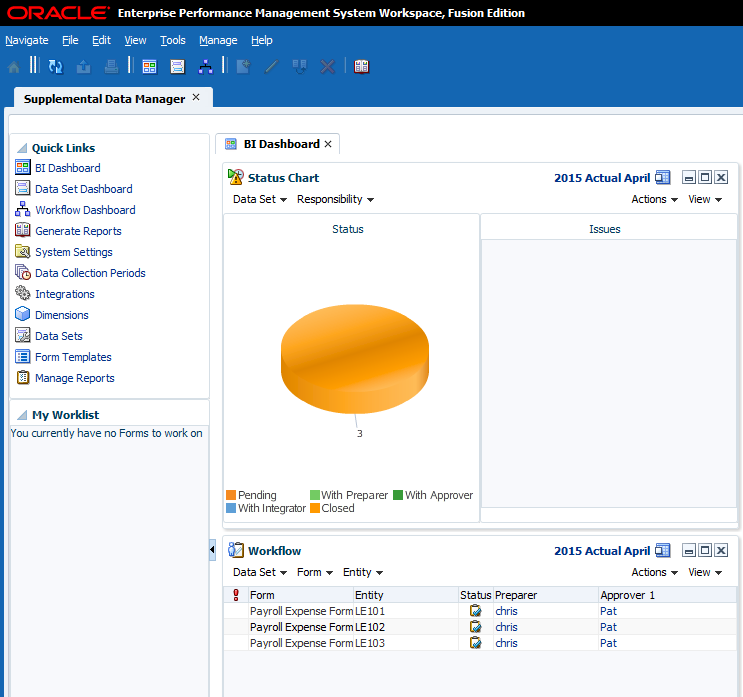
View the Workflow Portlet data.
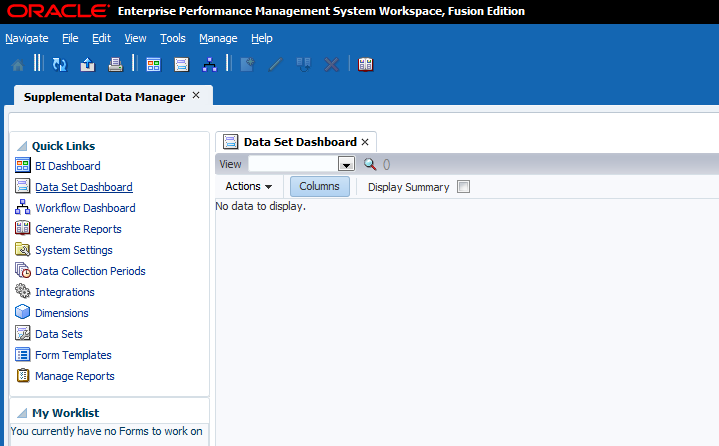
Viewing the Data Set Dashboard
-
In the Quick LInks section, click Data Set Dashboard.
-
Click the Search icon and select a period. Click OK. For Data Set, click the down arrow and select a data set.

- In the Data Set Dashboard, you can perform any of the following actions:
- Select a data set attribute to view attribute Properties, including Form, Entity, and Status. You can view Workflow related information.
- Click the Columns button to display, reorder, or remove column data
- Click a column heading to sort by Ascending or Descending order
- Drag-and-drop columns
- Filter the data
- Export or Print the data
- Display Summary data

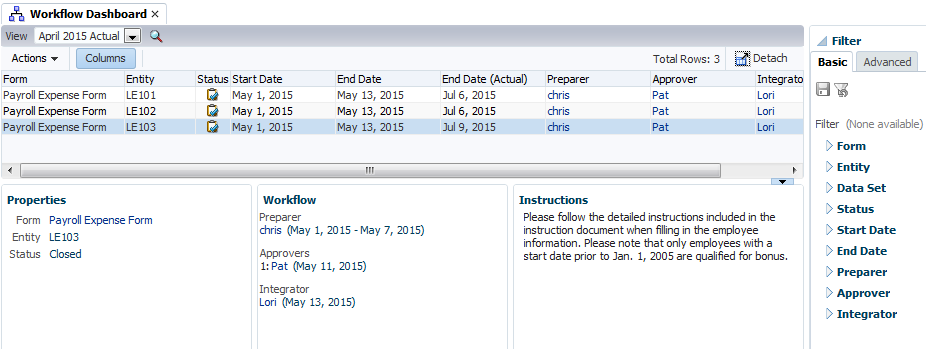
Viewing the Workflow Dashboard
-
In the Quick LInks section, click Workflow Dashboard. For View, click the Search icon to select a period, then click OK.
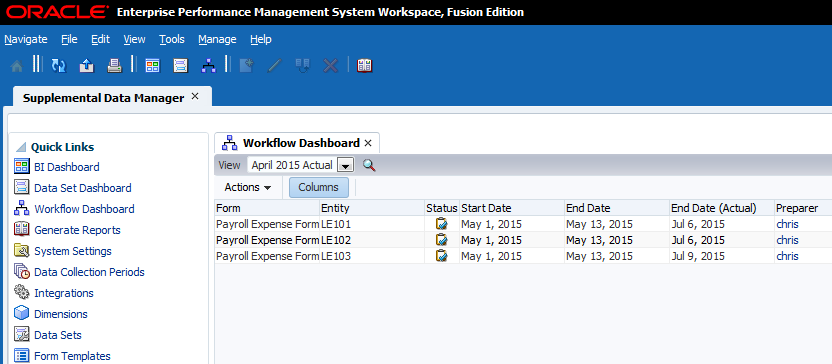
- In the Workflow Dashboard, you can perform any of the following actions:
- Select a form to view Properties, Workflow, and form-related Instructions information.
- View a form by selecting Actions, then View (or right-click on a form and select View).
- Click the Columns button to display, reorder, or remove column data.
- Click a column heading to sort by Ascending or Descending order.
- Drag-and-drop columns.
- Filter the data.
- Export or Print the data.
Creating Reports
To create reports you create a Report Query and Report Group, then the Report Definition. Once the report definition is created, you can generate print-quality reports in HTML, PDF, or XLS format.
Note that you need to install Oracle BI Publisher Desktop to design reports. You can download it here.
Creating a Report Query and Report Group
-
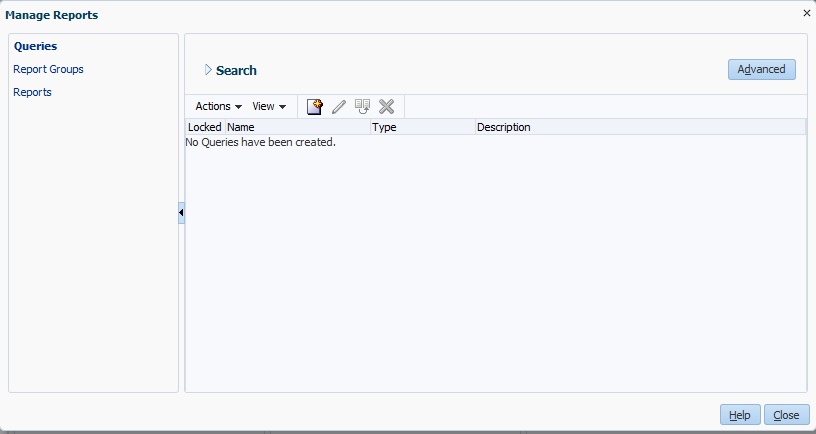
In the Menu Bar, select Manage, then Reports. The Queries section is displayed.
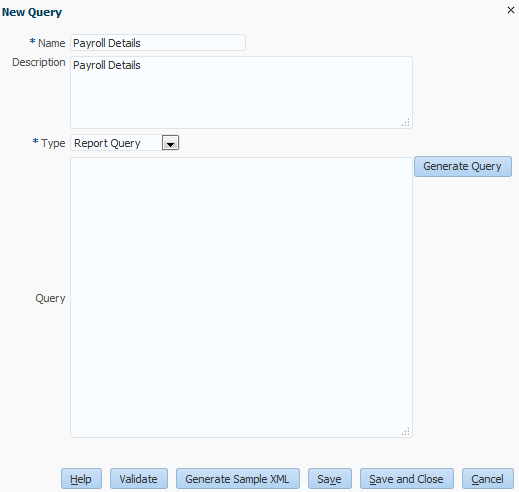
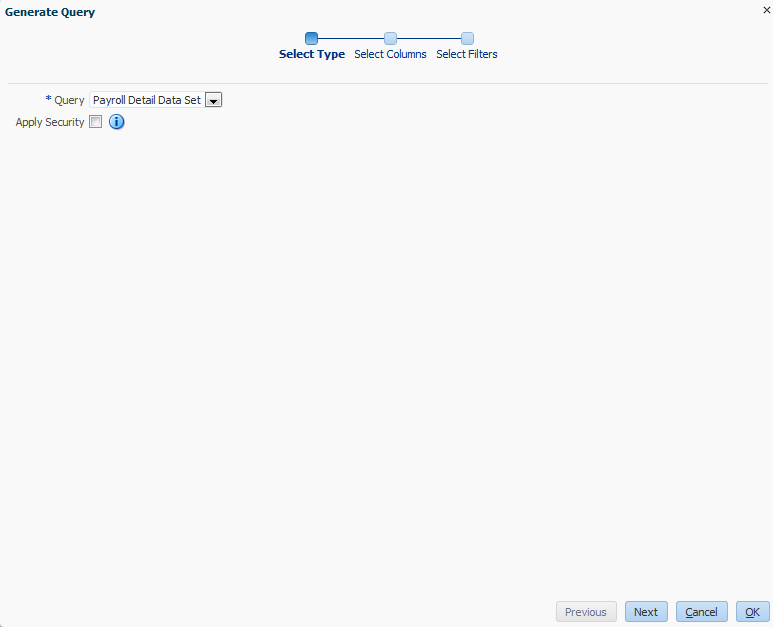
- Click New. Enter the following information, then click Generate Query.
- Name and Description: Payroll Details
- Type: Report Query
-
For Query, select Payroll Detail Data Set and click Next.
-
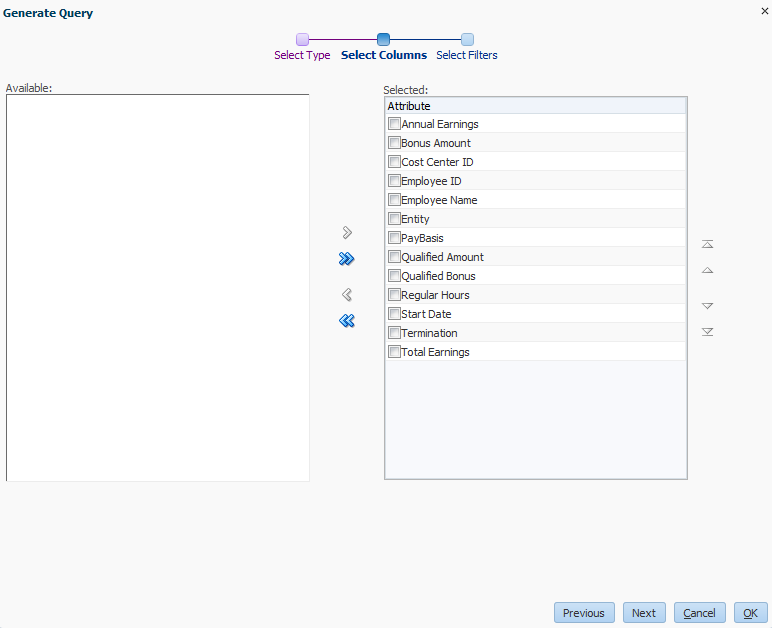
For Select Columns, click Add All and click Next. For Select Filters (optional), click OK.
-
Click Save.
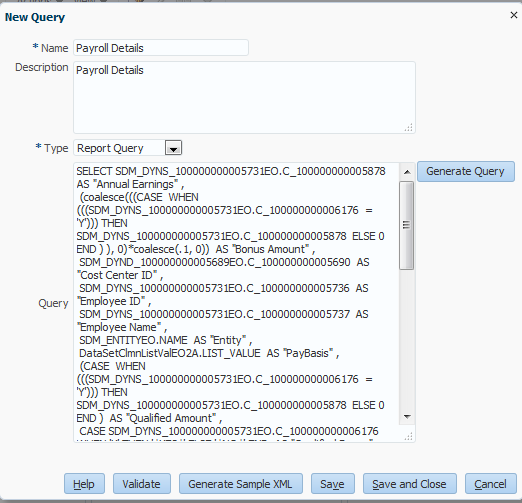
- Click Generate Sample XML, and perform the following actions:
- Select Save File to save the Payroll Details.xml file to a local folder. Click OK.
- Select the folder and click OK.
- Click Save and Close.

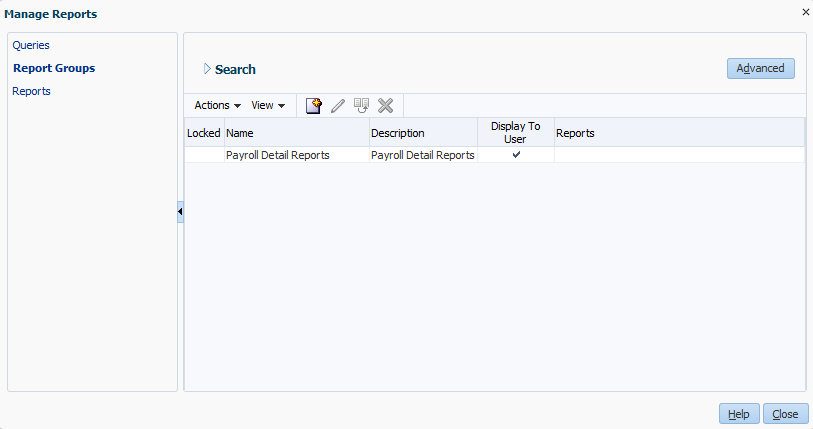
- Click Report Groups. Click New. Enter the following information, then click Save and Close.
- Name and Description: Payroll Detail Reports
- Display to User: Yes
Creating a Report Definition
-
Open Microsoft Word and select the BI Publisher ribbon.
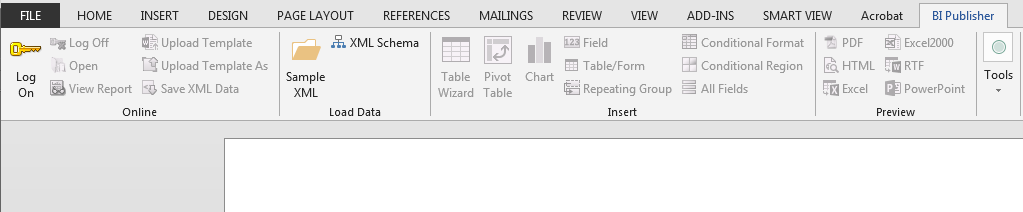
-
Click Sample XML, select the Payroll Details.xml file, then click OK.
-
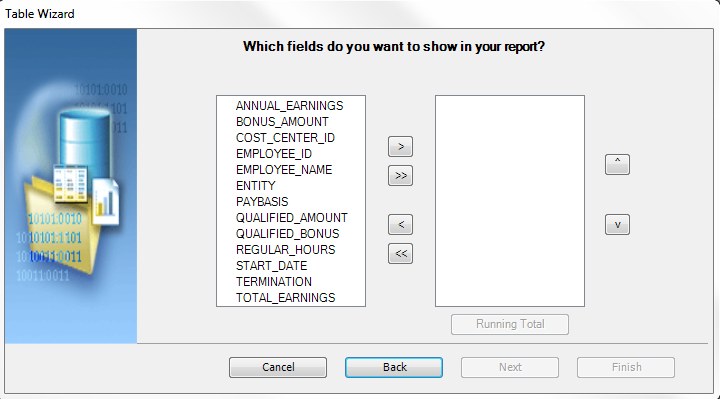
Click Table Wizard. Click Next and then Next again.
-
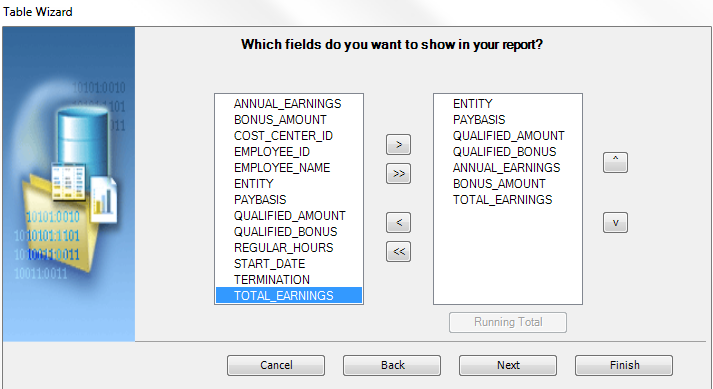
In the Which Fields do you want to show in your report? screen, select the columns Entity, PayBasis, Qualified Amount, Qualified Bonus, Annual Earnings, Bonus Amount, and Total Earnings. Click Next.
-
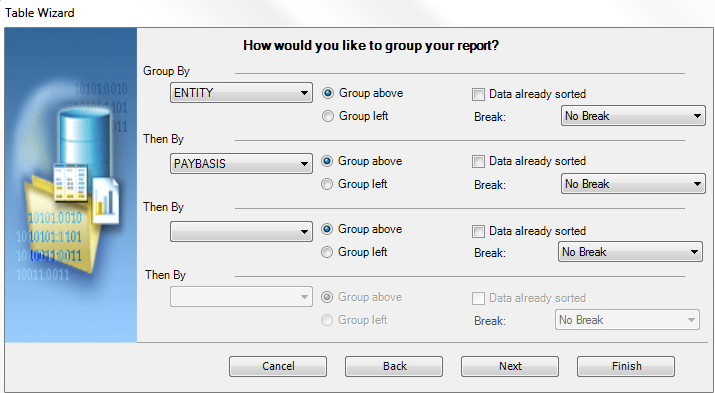
In the How would you like to group your report? screen, select Group By Entity, Then By PayBasis. Click Finish.
-
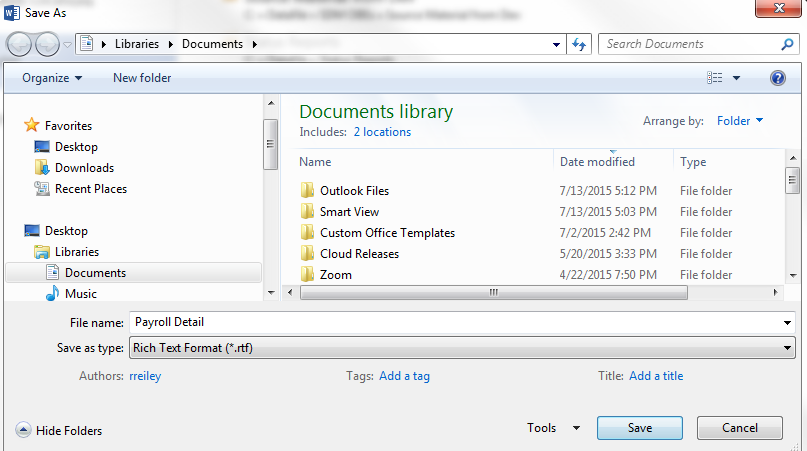
Save the Word document as an RTF file.
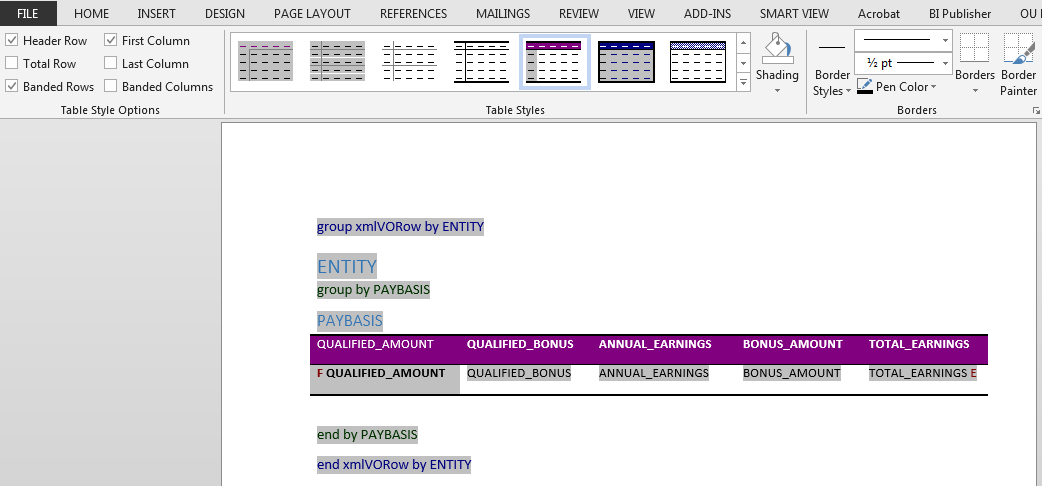
- Optional: With the Payroll Detail.rtf file open, select the Table, and perform the following actions:
- Click the Design tab and in the Table Styles section, select Table Classic 2
- Decrease the font size from the default to 9.
- Save the file.
-
Save the file and exit from Word.
-
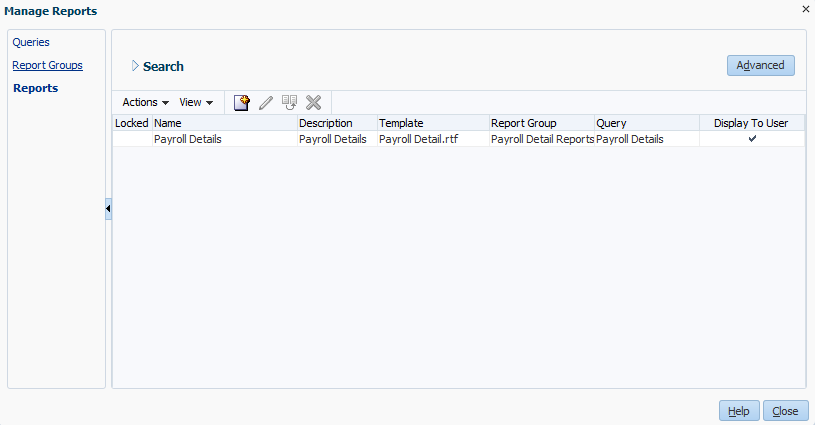
In the Menu Bar of Supplemental Data Manager, select Manage, then Reports. Click the Reports section, then click New.
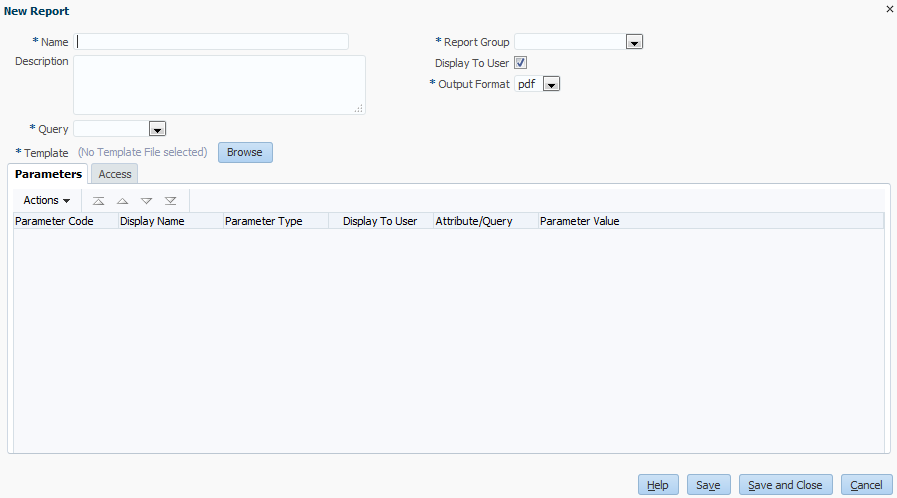
- Enter the following information, then click the Access tab.
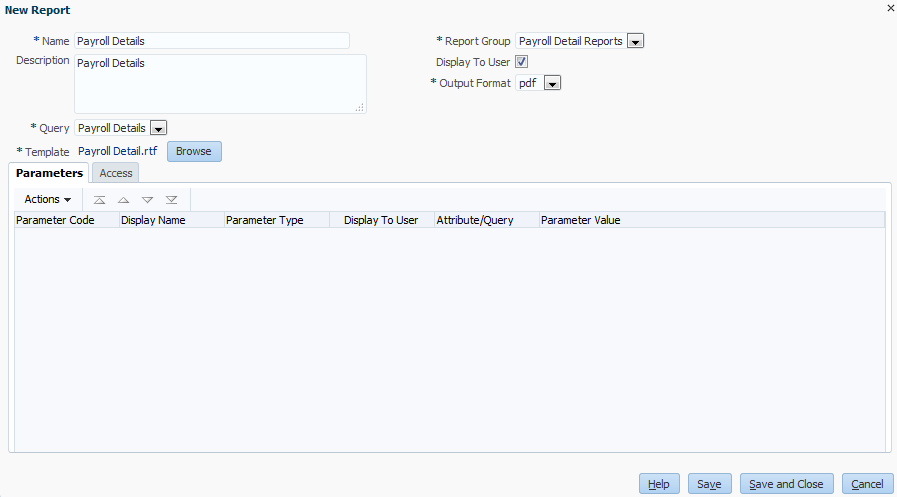
- Name and Description: Payroll Details
- Report Group: Payroll Detail Reports
- Display to User: Yes
- Output Format: pdf
- Query: Payroll Details (created earlier in the Creating a Report Query Topic)
- Template: Payroll Detail.rtf (click Browse to select the .rtf file created in Step 6)
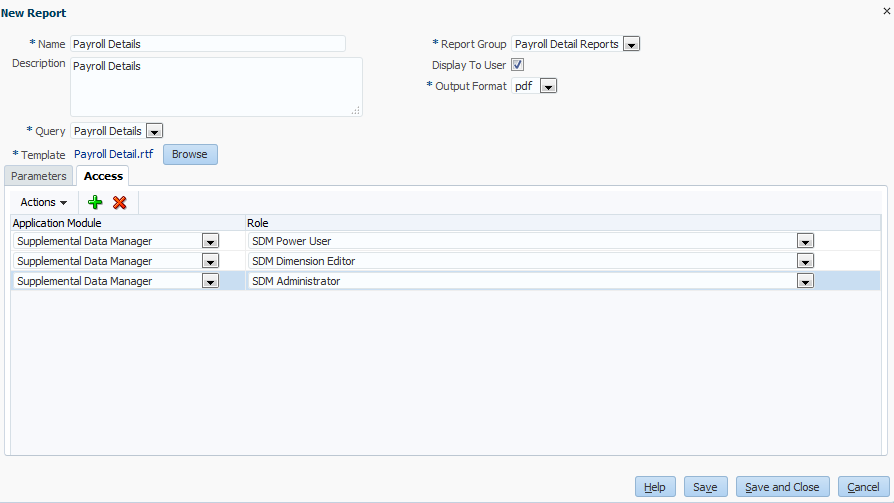
- Click Add. In the Application Module field, select Supplemental Data Manager. In the Role field, select SDM Power User. Add the following additional access:
- Application Module: Supplemental Data Manager Role: SDM Dimension Editor
- Application Module: Supplemental Data Manager Role: SDM Administrator
-
Click Save and Close. Then click Close.
-
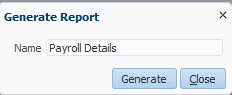
In the Quick Links section, click Generate Reports. In the Report Group field, select Payroll Detail Reports, then click Generate.
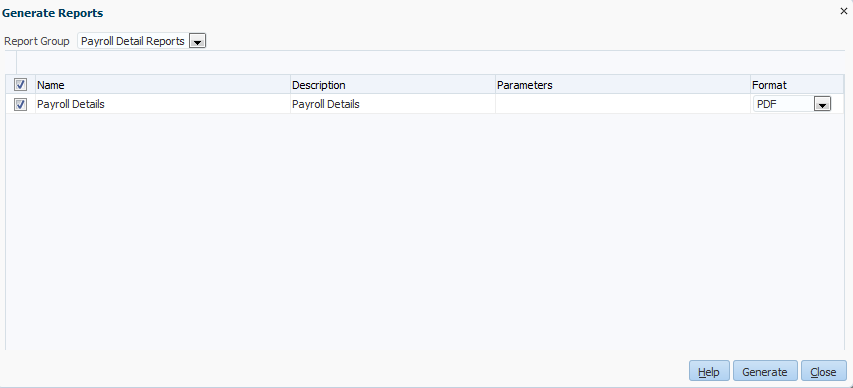
-
Click Generate.
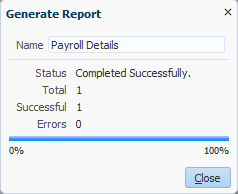
- View the system Status and click Close.
-
Select Save File and click OK.
-
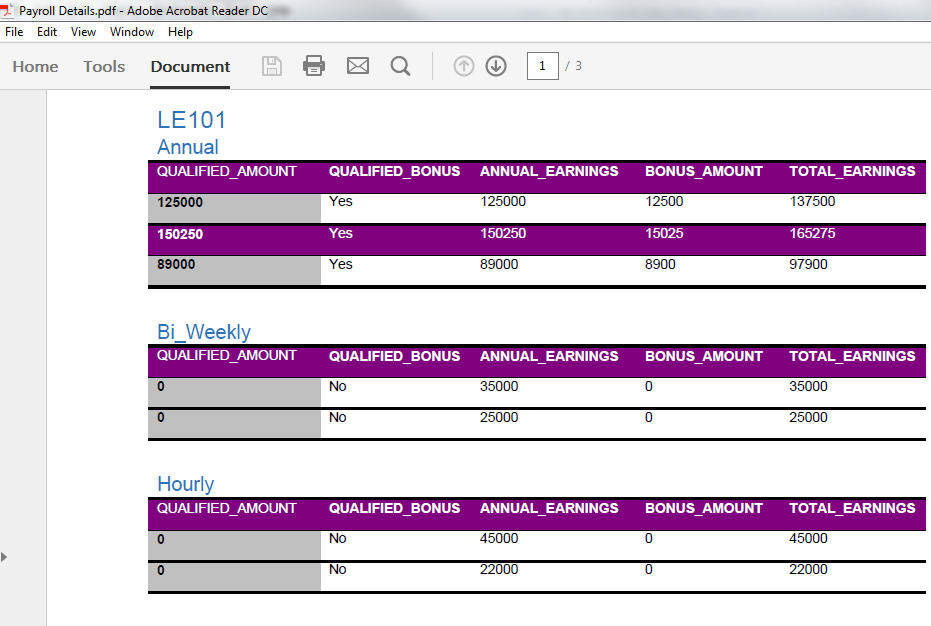
Unzip the file, then double-click the file to open the report.

-
View the report data.