Installing and Configuring EPM 11.1.1.3 System with SSL Enabled on All Layers
Purpose
This tutorial covers installation and configuration of EPM System 11.1.1.3 with SSL enabled on all layers, with WebLogic 9.2.2, Apache 2.0.59 and IIS6. The document reveals the full SSL configuration for a single-box setup. All communications between WebApps, WebServer and clients are configured to use SSL communications..
Time to Complete
Approximately 4 hours.
Overview
In this tutorial, you perform a full SSL EPM System 11.1.1.3 installation and configuration. You learn how to:
- Define and manage certificates for WebLogic, IIS and Apache
- Configure Apache with SSL
- Configure WebLogic with SSL
- Configure IIS with SSL
- Configure EPM System for SSL
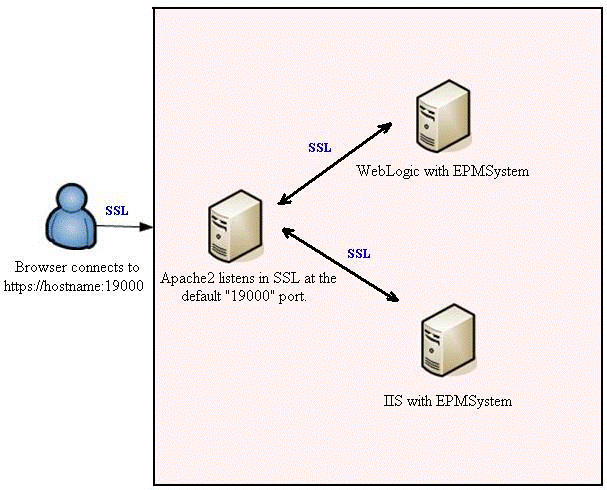
Deployment scheme:
Scenario
- Install all products you want to configure.
- Configure Foundation Services and check the Enable SSL checkbox on the Common Settings panel.
- Generate and import keystore and certificates.
- Configure HSS WebLogic server.
- Configure all other products.
- Configure IIS (In case you installed Financial Management, Strategic Finance, Enterprose Performance Management Architect, or Financial Disclosure Management).
- Configure Apache Web server (In case you installed Workspace).
Prerequisites
Before starting this tutorial, you should:
. |
Download EPM System 11.1.1.3 assemblies from edelivery.oracle.com. |
|---|---|
. |
User had received the public (root) certificate of the CA used for the certificates signing in case the CA is not the trusted one. |
. |
User had generated and signed personal certificates signed by the CA for the every host used in the EPMSystem's configuration. See 9. Certificates generation and management for details. |
. |
User had installed and configured OpenSSL on the system in order to use SSL in Apache2. The latest version of OpenSSL can be found at: http://www.openssl.org. See 11.1 and 11.2 for details. |
. |
User had installed and configured all EPMSystems products and components and enabled SSL on Common Settings and WebServer Configuration panels. See «8. Configure EPM System» for details. The installation of Workspace is required in order to get the bundled Apache2 Web Server and WebServer Configuration» task in the configuration utility. |
Install EPM System
Perform the installation of all EPM Systems products you want to configure. In this tutorial, we will configure Foundation Services and Workspace using the following data:
- Fully-qualified domain name (FQDN): hitqew2k3-1.eng.hyperion.com
- HYPERION_HOME%: c:\HyperonSSL
- JKS location: %HYPERION_HOM%\ssl\keystore
- JKS password: password
- Personal cert password: password
- Personal cert alias in JKS: epm_ssl
- Root CA cert: %HYPERION_HOME%\ssl\CA.crt
Configure EPM System - Foundation Services
To configure Foundation Services, perform the following steps:
. |
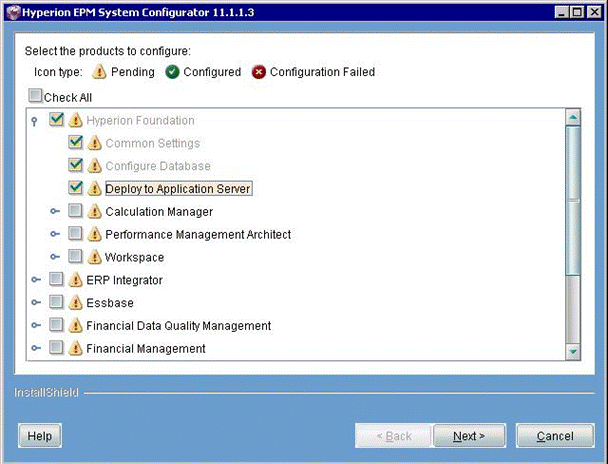
Launch the configuration utility and select Hyperion Foundation. Note that Common Settings and Configure Database tasks are pre-selected.
Click Next
|
|---|---|
. |
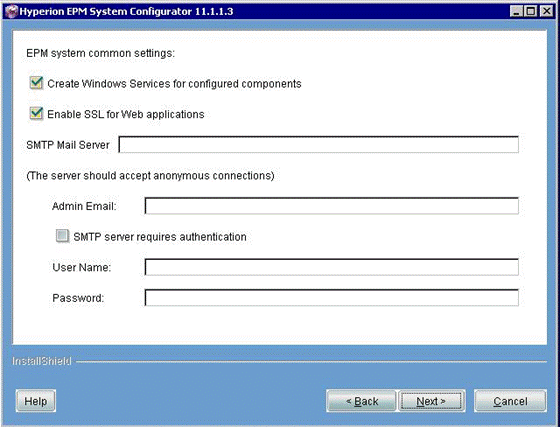
In the Common Settins panel, select the Enable SSL for Web applications checkbox. This flag makes all EPM applications to use SSL communications and sets the useSSL flag to True in the EPM Registry:
Click Next
|
. |
Provide the DB connectivity information and proceed to the Application Server Selection panel. Select Oracle WebLogic 9.
Click Next
|
. |
Specify Foundation Services HTTP and SSL ports. These values are stored in EPM Registry so that all products can access Foundation Services through the specified HTTPS ports in case SSL communications are enabled.
|
. |
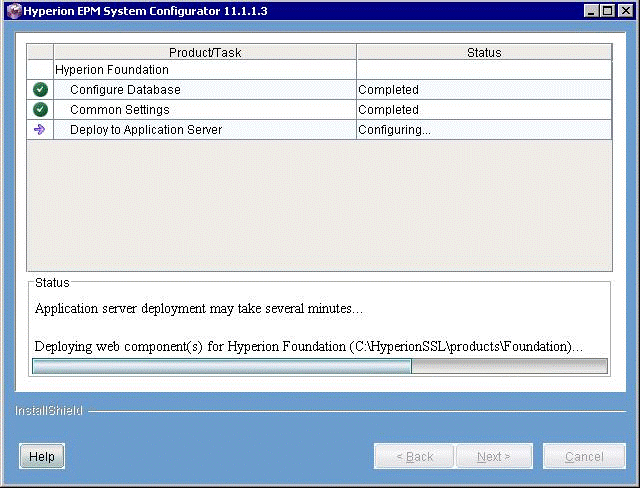
Click Next. Foundation Services is being configured
|


Certificates generation and management
To generate certificates, perform the following steps:
. |
Create the %HYPERION_HOME%\ssl folder (For example, c:\HyperionSSL). The folder is used as the single location for all certificates and keystores for EPM System Note: You need to adjust all statements listed below on 64-bit systems, since the location of JVM is different. |
|---|---|
. |
Create a new JKS keystore. This keystore is used to store WebLogics Server Certificate. Make sure that the CN reflects you system's fully qualified domain name (For example, hitqew2k3-1.eng.hyperion.com). In the following command, we use epm_ssl as the alias to store our private key in the keystore, and password as the JKS keystore's password. The keystore is generated in the %HYPERION_HOME%\ssl folder. The same syntax applies for UNIX systems: %HYPERION_HOME%\common\JRE\Sun\1.5.0\bin\keytool.exe -genkey -dname "cn=hitqew2k3-1.eng.hyperion.com" -alias epm_ssl -keypass password -keystore %HYPERION_HOME%\ssl\keystore -storepass password -validity 365 -keyalg RSA
|
. |
Import the root (public) certificate of the Certification Authority (CA) that is being used for signing of the certificate into the newly generated JKS keystore. Note: You do not need to do this in case the CA is the trusted one. The list of the Java Trusted Certificate Authorities is available here.
|
. |
Rename the root certificate of the CA to CA.crt and copy it to the %HYPERION_HOME/ssl/ folder. The following command imports the certificate into JKS keystore using blister alias and marks it as the trusted CA (-trustcacerts option). When prompted, confirm the import by entering yes. %HYPERION_HOME%\common\JRE\Sun\1.5.0\bin\keytool.exe -import -alias blister -keystore %HYPERION_HOME%\ssl\keystore -trustcacerts -file %HYPERION_HOME%\ssl\CA.crt -storepass password
|
. |
Generate the certificate request (CSR) for you hostname (make sure to use the same alias that was used for the private key/JKS keystore generation. The certificate request will be stored in the %HYPERION_HOME%\ssl\HyS9WL.csr file): %HYPERION_HOME%\common\JRE\Sun\1.5.0\bin\keytool.exe -certreq -alias epm_ssl -keyalg RSA -file %HYPERION_HOME%\ssl\HyS9WL.csr -keystore %HYPERION_HOME%\ssl\keystore -storepass password
|
. |
Open %HYPERION_HOME%\ssl\HyS9WL.csr with Notepad. Copy the certificate request and send it to your CA for the signing. The certificate request should look like the following sample: -----BEGIN NEW CERTIFICATE REQUEST----- MIIBZzCB0QIBADAoMSYwJAYDVQQDEx1oaXRxZXcyazMtMTguZW5nLmh5cGVyaW9uLmNvbTCBnzANBgkqhki
|
. |
The Certification Authority (CA) signs your request (CSR) and issues the personal certificate for you. Open the certificate and save it as %HYPERION_HOME%\ssl\HyS9WL.crt.
|
. |
Import this personal certificate into the JKS keystore under the same alias that was used for the CSR generation ( For example, epm_ssl): %HYPERION_HOME%\common\JRE\Sun\1.5.0\bin\keytool.exe -import -alias epm_ssl -keystore %HYPERION_HOME%\ssl\keystore -storepass password -file %HYPERION_HOME%\ssl\HyS9WL.crt The following message is displayed: "Certificate reply was installed in keystore".
|
. |
In case your CA is not the JVM-trusted one, import the root (public) certificate of the Certification Authority (CA) that is being used for signing of the personal certificate into the configuration utility's JVM: %HYPERION_HOME%\common\JRE\Sun\1.5.0\bin\keytool.exe -import -alias blister keystore %HYPERION_HOME%\common\JRE\Sun\1.5.0\lib\security\cacerts -trustcacerts -file %HYPERION_HOME%\ssl\CA.crt -storepass changeit Note: "changeit" is the default JVM's keystore password. It is highly recommended to change it right after the installation.
|
. |
In case your CA is not the JVM-trusted one, import the root (public) certificate of the Certification Authority (CA) that is being used for signing of the Server certificate into WebLogic's JRockIt: C:\bea\jrockit90_150_10\jre\bin\keytool -import -alias blister -keystore C:\bea\jrockit90_150_10\jre\lib\security\cacerts -trustcacerts -file %HYPERION_HOME%\ssl\CA.crt -storepass changeit Note: "changeit" is the default JVM's keystore password. It is highly recommended to change it right after the installation. |
Configure Foundation Services WebLogic Server with SSL
. |
Start WebLogic Admin Server: %HYPERION_HOME%\deployments\WebLogic9\startWebLogic.cmd
|
|---|---|
. |
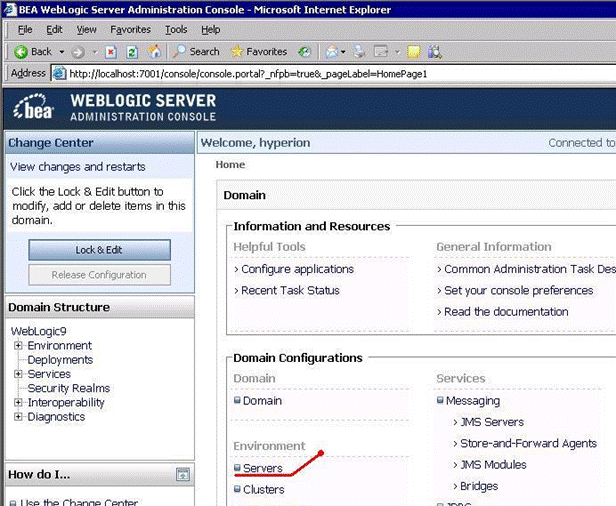
Log in to WebLogic Console at: http://localhost:7001/console Note: Default credentials are hyperion/hyperion.
|
. |
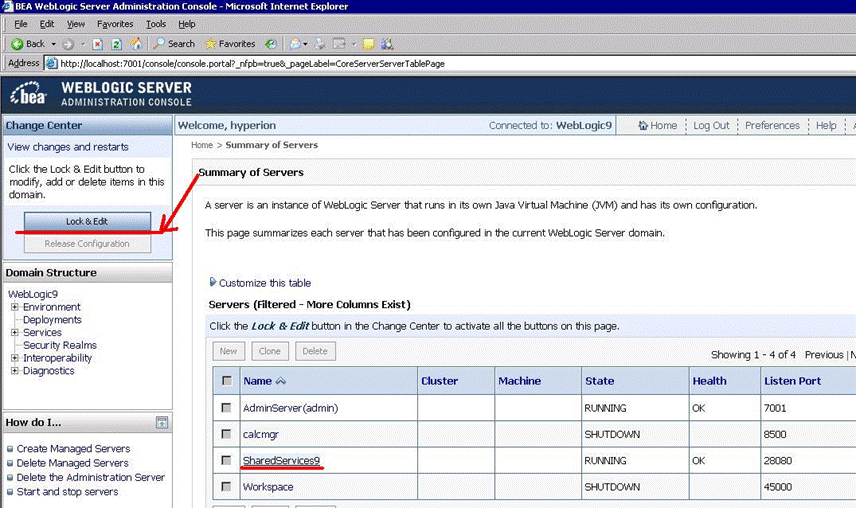
Navigate to Servers | SharedService9
|
. |
On the left pane, click Lock & Edit.
|
. |
On the General tab, disable HTTP Port and enable the HTTPS port. Verify that HTTPS port matches the one that was specified during Foundation Services deployment. 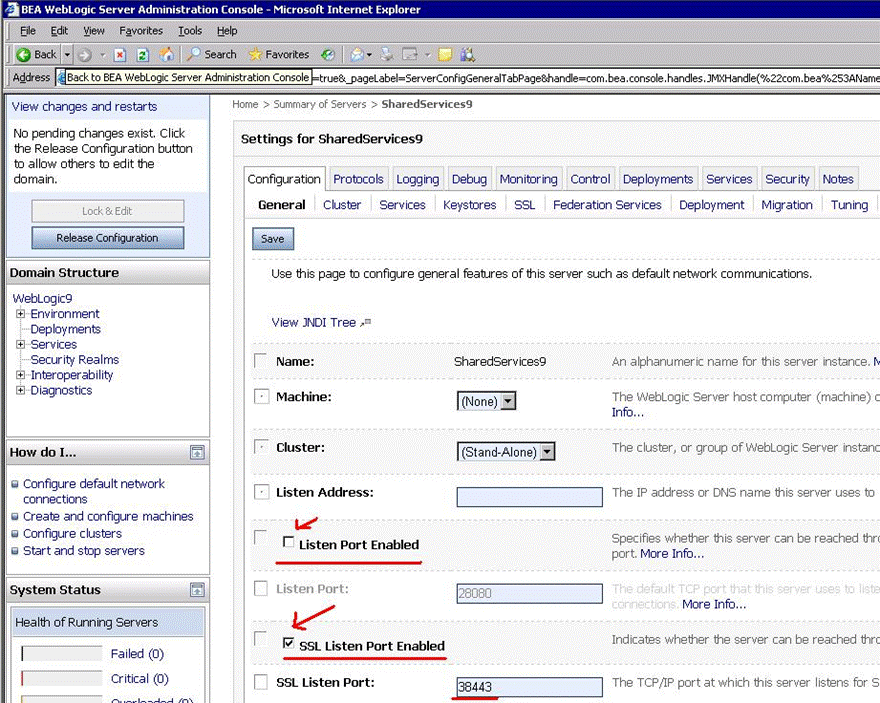
|
. |
Click Save.
|
. |
Navigate to the Keystores tab and perform the following tasks:
|
. |
Click Save.
|
. |
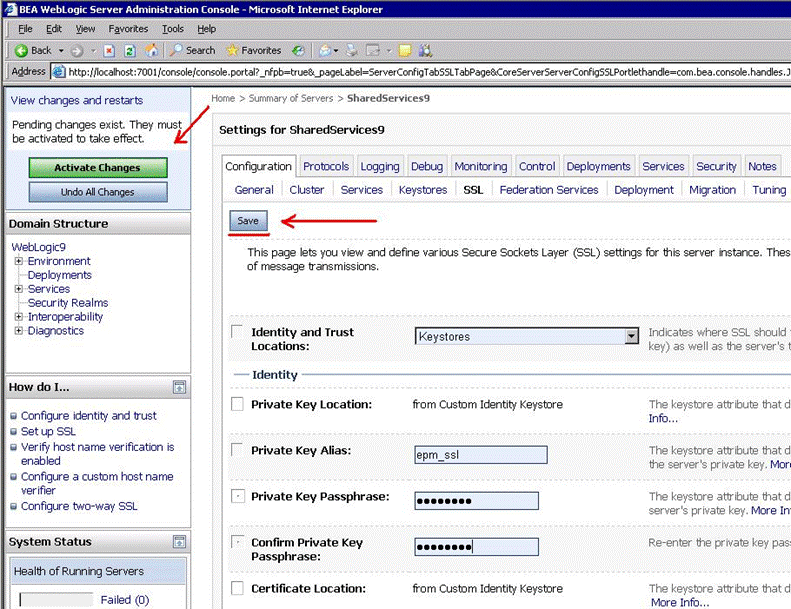
Navigate to the SSL tab and perform the following tasks:
|
. |
Click Save.
|
. |
On the left pane, click Activate Changes.
|
. |
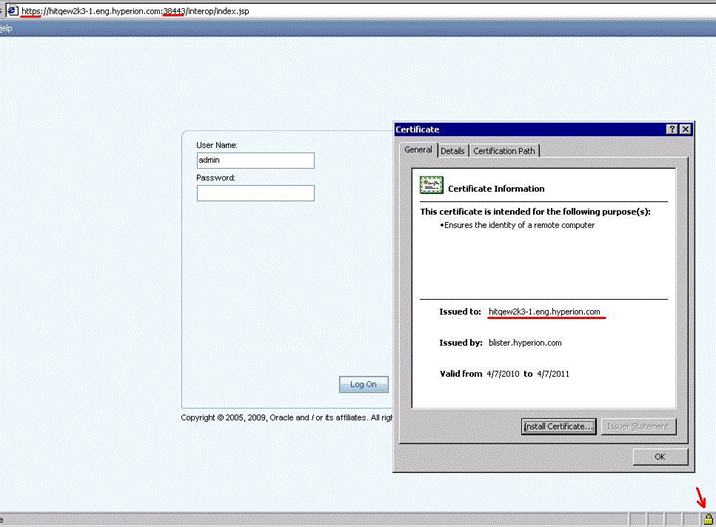
Start Foundation Services Server. Check that Foundation Services is available via HTTPS url on the port specified in the configuration utility and Weblogic console (For example, https://hitqew2k3-1.eng.hyperion.com:28443/interop/index.jsp.) Open the certificate in the browser, check that all parameters are correct.
|

Configure Apache Web Server with SSL
Note: All products and Web Server Configuration tasks should be completed in the configuration utility. The Enable SSL checkbox should be selected on the Web Server Configuration panel.
. |
Install and configure OpenSSL on your system in order to use SSL in Apache2. The latest version of OpenSSL can be found at: http://www.openssl.org.
|
|---|---|
. |
Configure OpenSSL:
|
. |
Generate you private SSL key. It is encrypted and stored in %HYPERION_HOME%\ssl\privkey.pem openssl genrsa -out %HYPERION_HOME%\ssl\privkey.pem 1024 -des3
|
. |
Generate a Certificate Signing Request (CSR) for your Apache2 Web Server using your private key. Make sure that the CN reflects you system's fully-qualified domain name. It is highly recommended to avoid default passwords, such as changeit, password, and so on. Store the CSR in the %HYPERION_HOME%\ssl\epm_apache.csr file. openssl req -new -out %HYPERION_HOME%\ssl\epm_apache.csr key %HYPERION_HOME%\ssl\privkey.pem When prompted, enter the following data:
|
. |
Remove the passphrase from the private key: openssl rsa -in %HYPERION_HOME%\ssl\privkey.pem -out %HYPERION_HOME%\ssl\epm_apache.key When prompted, enter passphrase for privkey.pem (For example, password). |
. |
Send the CSR (%HYPERION_HOME%\epm_apache.csr) that you created to your Certification Authority (CA) for signing. After the CA signs your CSR request and issues a personal certificate for you, open the certificate and save it in the %HYPERION_HOME%\ssl\epm_apache.crt file. Note: Make sure that there are no spaces or empty lines after the -----END CERTIFICATE----- tag. |
. |
Stop Apache Web Server using the corresponding Windows service or batch script. |
. |
Edit the %hyperion_home%\common\httpServers\Apache\2.0.59\conf\httpd.conf file by performing the following tasks:
|
. |
Edit the %hyperion_home%\common\httpServers\Apache\2.0.59\conf\ssl.conf file by performing the following tasks:
|
. |
Edit the %hyperion_home%\common\httpServers\Apache\2.0.59\conf\HYSL-WebLogic.conf file by Adding the following parameter: TrustedCAFile %HYPERION_HOME%\ssl\CA.crt Note: You need to resolve %HYPERION_HOME% and enter the absolute path. Note: CA.crt is the root (public) certificate of the CA that was used for signing WebLogic certificates. This parameter tells Apache - WebLogic plug-in that it should trust all certificates issued by this CA. |
. |
Enable SSL mode in Apache's startup parameters by performing one of the following tasks:
|
. |
Verify that Apache is up and running (listen port specified in the configuration utility and Apache's SSL.conf), open the certificate in the browser, and check that all parameters are correct.
|
. |
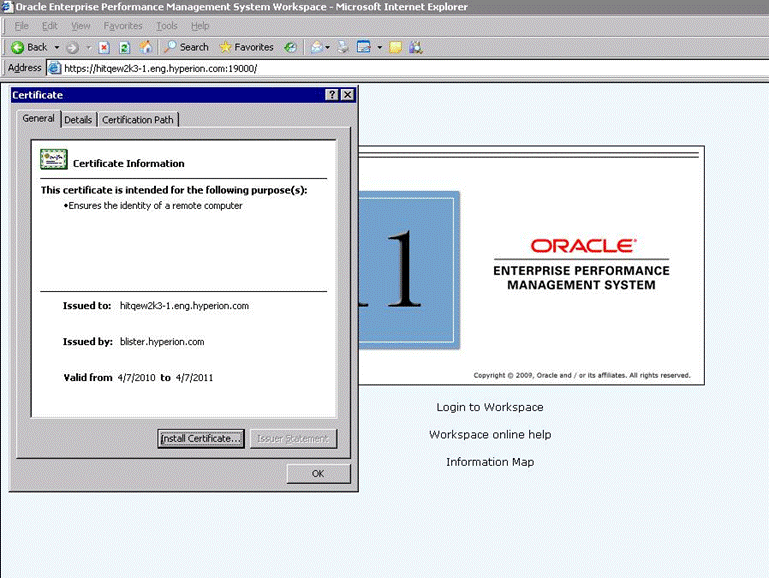
Verify that all EPM Systems WebLogic applications are available via Apache Web server: https://hitqew2k3-1.eng.hyperion.com:19000/interop/index.jsp
|
. |
Verify that all EPM System’s IIS applications are available via Apache Web server: https://hitqew2k3-1.eng.hyperion.com:19000/hfm/
|
Configure IIS with SSL
It is highly recommended to setup your IIS with SSL before the configuration of EPM System. Configuration Utility resolves IIS port during the configuration of the Web server and stores it in Apaches httpd.conf. You have to re-configure EPM System's Web server in case you have not configured your IIS before the configuration of EPM System.
. |
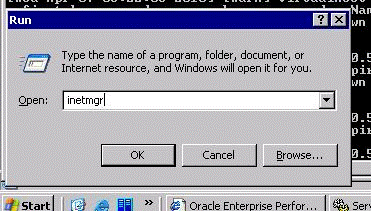
Launch IIS Manager from Windows toolbar by selecting Start Menu > Administration Tools or from Windows command prompt by running the inetmgr command.
|
|---|---|
. |
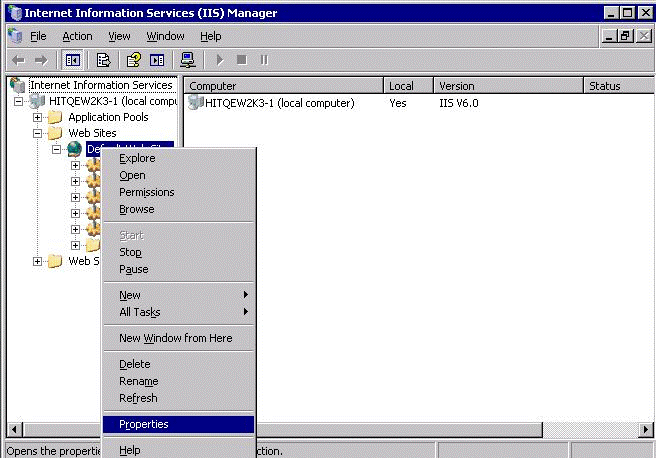
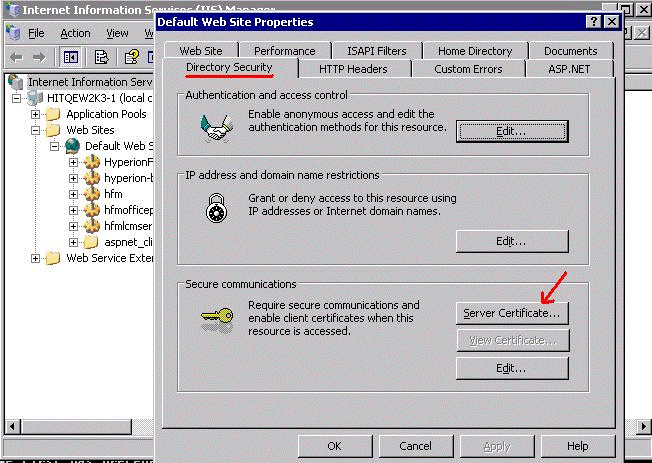
In IIS Manager, expand local computer > Web Sites, right-click Default Web Site, and select Properties.
|
. |
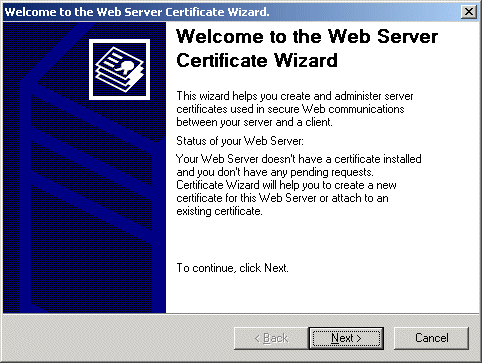
In the Default Web Site Properties dialog box, select the Directory Security tab and click Server Certificate.
Click Next.
|
. |
In the Server Certificate page, select the Create a new certificate option.
Click Next.
|
. |
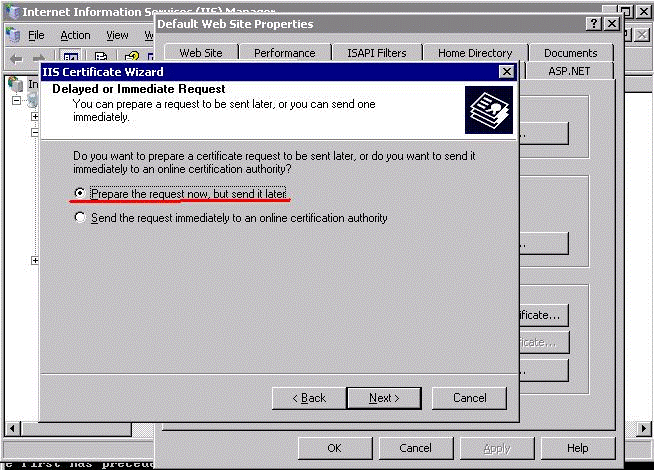
In the Delayed or Immediate Request page, select the Prepare the request now, but send it later option.
Click Next.
|
. |
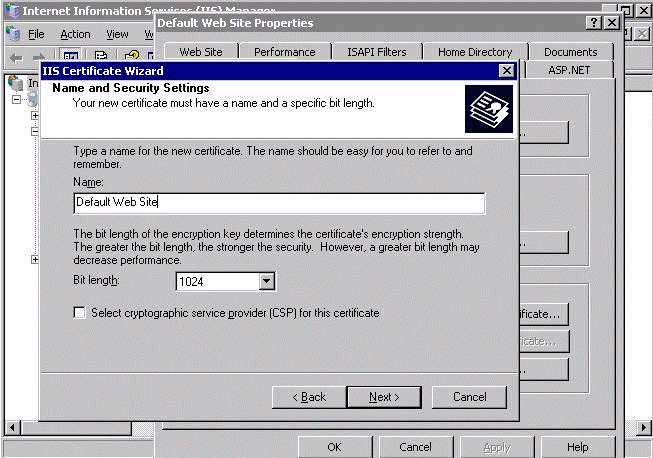
In the Name and Security Settings page, specify the name and the bit length of the certificate.
Click Next.
|
. |
In the Organization Information page, enter the name of your organization and organizational unit.
Click Next.
|
. |
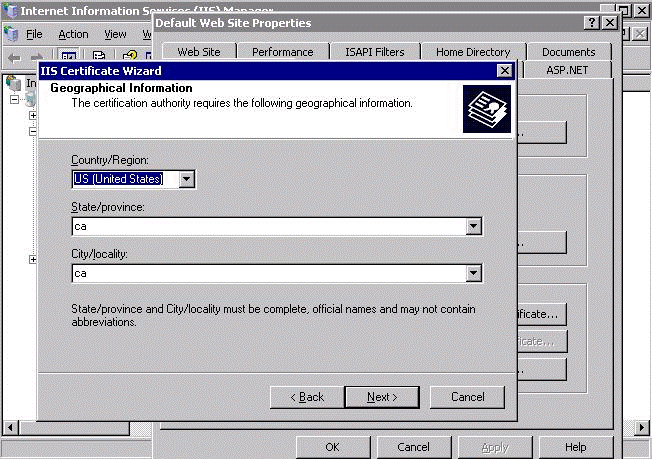
In the Geographical Information, specify your country/state/city.
Click Next.
|
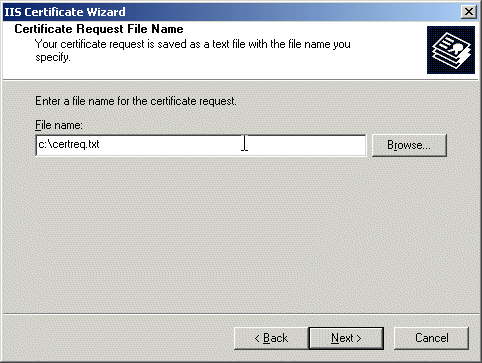
. |
Iin the Certificate Request File Name, enter c:\certreq.txt.
Click Next.
|
. |
Send the certificate request to your Certificate Authority (CA) for signing. CA will issue the certificate for you. Save it in the c:\cert.cer text file.
Note: Make sure there are no spaces, or empty lines after the -----END CERTIFICATE----- tag.
|
. |
Launch IIS Management Console.
|
. |
In IIS Manager, expand local computer > Web Sites, right-click Default Web Site, and select Properties.
|
. |
In the Default Web Site Properties dialog box, select the Directory Security tab and click Server Certificate.
|
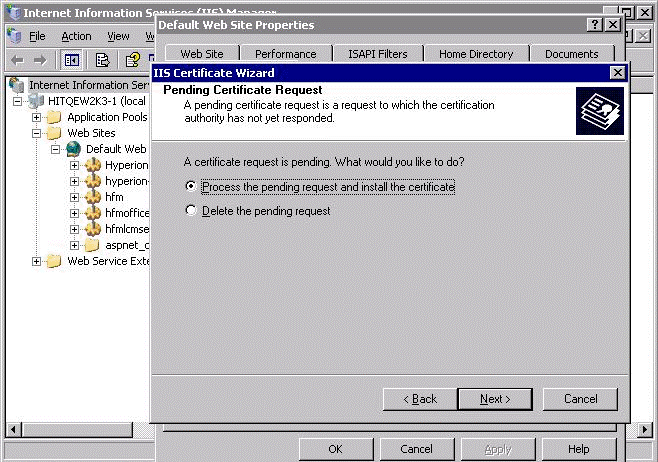
. |
In the Pending Certificate Request page, select the Process the pending request and install the certificate option.
Click Next.
|
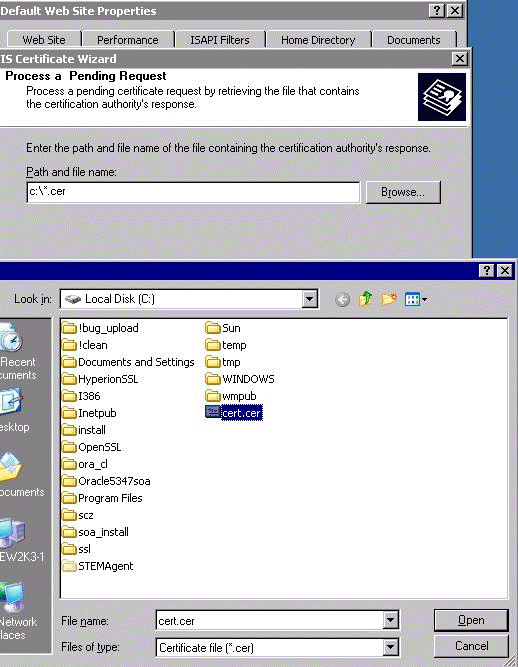
. |
in the Process a Pending Request page, select c:\cert.cer and import the certificate.
|
. |
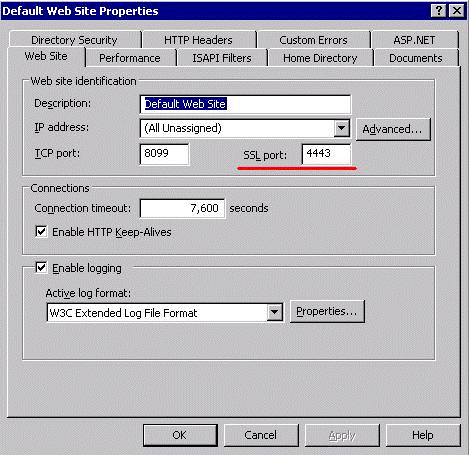
In the Default Web Site Properties window, select the Web Site tab, enter the HTTPS port you want IIS to listen on (the default port is 443). If you enter a non-default port for IIS and you have already configured EPM System, then you need to re-configure Web Server Configuration task in the configuration utility.
|
. |
Verify that IIS is running at the specified HTTPS port. https://hitqew2k3-1.eng.hyperion.com:4443 |


Summary
After completion of the described scenario you should have a fully-functional configuration of EPM System with all communications going through SSL:
- Client to WebServer (OHS)
- WebServer to all managed WebLogic servers with EPM Applications
- WebServer to IIS-based applications
However, if you require strong encryption or have strict security standards, you should consider additional security options described in WebLogics and Apaches documentation (for example, two way SSL, on-default trusted keystores, and so on).
Resources
![]()

|
About
Oracle |Oracle and Sun | |