Creating and Using Contexts and Dependency Injection (CDI)
Interceptors
Overview
- @Audit is an interceptor binding type applied to a method of the MyBean class.
- Just before beanMethod() is invoked, the auditMethod in the AuditInterceptor class is invoked and passes an instance of InvocationContext.
- You can use the InvocationContext object instance to
retrieve information about the calling class and method,
including the class name, the method name, and any parameters
passed to the method. After the interceptor completes its
task, it returns control to the calling method by calling the
proceed() method of the InvocationContext object.
- Java Platform, Standard Edition (Java SE) 7 (Java SE 7u11
recommended)
- NetBeans 7.x IDE Java EE version (NetBeans 7.2 recommended)
- GlassFish 3.1.2
- Have some experience with writing and deploying Java EE
applications.
- Have installed and started NetBeans 7.2 Java EE edition.
- Have unzipped the EmployeeApplication.zip file.
- Have opened the EmployeeApplication project in NetBeans.
- Have created the EmployeeDB database per the instructions in the README file of the EmployeeApplication.zip file.
Purpose
This tutorial covers creating and using interceptors with
Contexts and Dependency Injection (CDI).
Time to Complete
Approximately 45 minutes
Introduction
Contexts and Dependency Injection (CDI) was introduced with
Java Platform, Enterprise Edition (Java EE) 6 as JSR-299. The
Contexts part of CDI allows beans to share and participate in
the life cycle of another bean, while the Dependency Injection
part of CDI allows beans to get a reference to an instance of
another bean simply by injecting it. CDI power is the ability to
loosely couple classes by removing the instantiation process and
simultaneously enforcing strong-type checking. CDI provides an
@Inject annotation to create a reference to another bean
(avoiding the older context lookup process). CDI enforces typing
by eliminating string-based lookup so that the compiler can
detect errors. CDI works very well with integrated development
environments (IDEs).
This tutorial looks at a particular kind of CDI service called
an interceptor. An interceptor is invoked prior to the
invocation of a method on which the interceptor binding
annotation is placed. Interceptors are very useful for tasks
that need to be applied to several methods without adding more
code to the existing methods. These tasks are often referred to
as cross-cutting tasks. Logging and auditing are
examples of tasks that cut across business methods,
In this tutorial, you create an interceptor binding type, which is an annotation used to associate an interceptor with either a method or a bean class. The interceptor binding type is also associated with an interceptor class that contains a single method annotated with @AroundInvoke.
In the following figure:
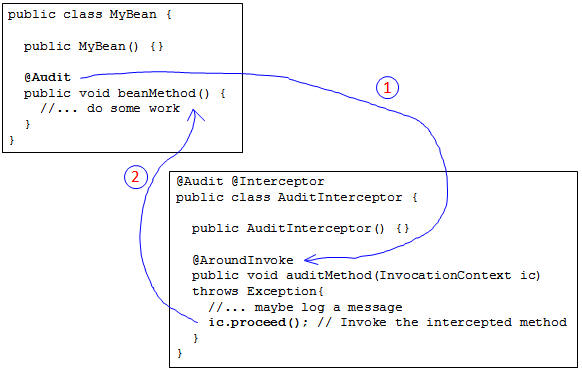
In this figure, the @Audit annotation is a custom interceptor
annotation; the implementation of the Audit interceptor is the
AuditInterceptor class. Because of the interceptor annotation on
beanMethod, the auditMethod is invoked before the beanMethod is
invoked (step 1.) The auditMethod could contain logic to perform
checking, logging, or even transaction management. When the
auditMethod completes its work, it passes execution back to the
beanMethod by invoking the proceed method of the
InvocationContext (step 2.)
In this tutorial, you will create a similar interceptor to
audit the operations performed on Employee entity records.
Scenario
An application to manage the employee HR data was created for
the XYZ Company. This application has a JavaServer Faces (JSF)
user interface and allows HR employees to view, add, update, and
remove employee records. The data is stored in a database
through an Enterprise JavaBeans (EJB) that works with a Java
Persistence API (JPA) Entity. The code for the NetBeans project
is in the requirements section. HR management wants to be able
to audit changes made to the application and turn the auditing
code on and off without changing the core application.
Software Requirements
The following is a list of hardware and software requirements:
Prerequisites
Before starting this tutorial, you should:
Creating a Package to Hold the Interceptor Binding
Annotation and Class
Add a package to the EmployeeApplication called com.example.interceptor:
a. Right-click Source Packages and select New
> Java Package.
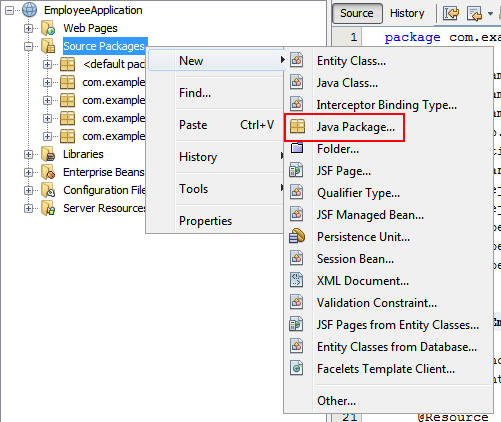
b. Enter com.example.interceptor as the package
name and click Finish.

A package is created to hold the interceptor binding annotation and interceptor class.
Creating an Interceptor Binding
Creating a CDI interceptor is a multistep process that begins
with creating an interceptor binding (annotation).
Right-click the new package and select New > Other.
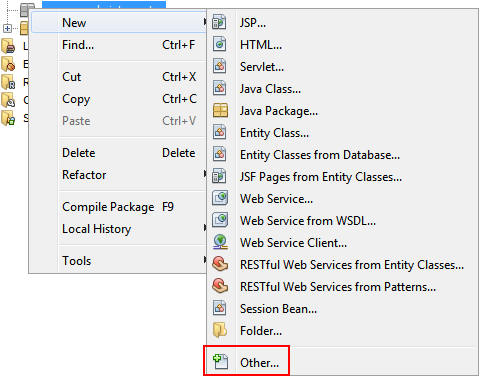
Select Contexts and Dependency Injection from Categories, select Interceptor Binding Type from File Types, and click Next.

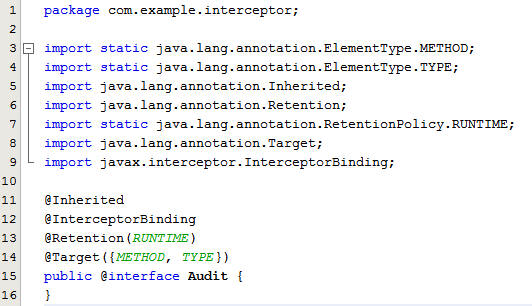
Enter Audit as the class name and click Finish.
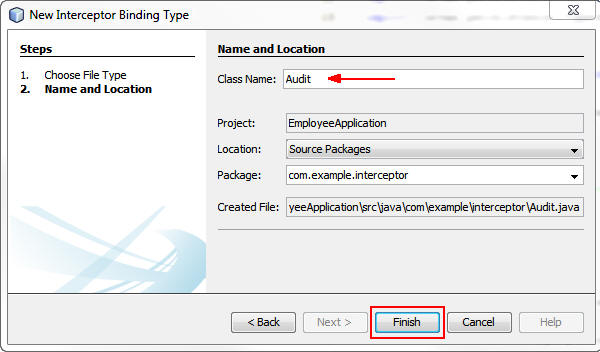
The generated code is an InterceptorBinding annotation type called Audit. You will use this annotation to define when and where you want your Audit interceptor called.
Creating an Interceptor Implementation
The next step of the process is to create an implementation
class that contains the method which is invoked to intercept the
method invocation on the bean.
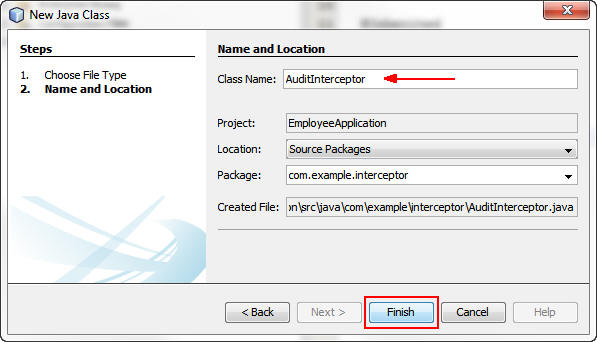
Right-click the com.example.interceptor package and select New > Java Class.

Enter AuditInterceptor as the class name and click
Finish.
Add the @Inteceptor annotation (indicating that
this is an interceptor bean) and the @Audit
annotation that you created.
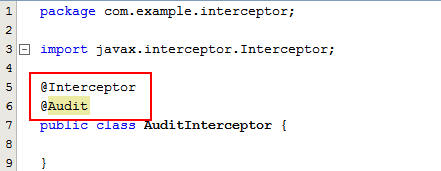
Note: The Interceptor annotation is in the javax.interceptor package.
Interceptors have a single method annotated with @AroundInvoke.
This method is called just before the method annotated with
@Audit is called. The signature for the method is a public
method that returns an object and takes an InvocationContext
object as a parameter. From the InvocationContext instance
passed to the method, you can get any parameters passed to the
calling method as an array of objects. Because you want to audit
any changes made to employee records, make the interceptor
recordAction method a bit more specific by identifying which
employee record was modified by the EmployeeEJB class and
logging the information in the server log.
Add the following code to the AuditInterceptor class:
private static final Logger logger
= Logger.getLogger("AuditInterceptor");
@Inject
private EmployeeEJB ejb;
public AuditInterceptor() {
}
@AroundInvoke
public Object recordAction(InvocationContext context) throws
Exception {
Employee emp = null;
String className =
context.getMethod().getDeclaringClass().getName();
String method =
context.getMethod().getName();
logger.log(Level.INFO, "Executing
method : {0} in class : {1}", new String[]{method,
className});
Object[] parameters =
context.getParameters();
// If the class is EmployeeEJB,
these are the methods
switch (method) {
case
"delete":
int id = ((Integer) parameters[0]).intValue();
emp = ejb.findById(id);
break;
case
"update":
case "add":
emp = (Employee)parameters[0];
break;
default:
break;
}
if (emp != null) {
logger.log(Level.INFO, "Attempting
: {0} of Employee record: \n{1}", new String[]{method,
emp.toString()});
}
return context.proceed();
}
Notice the injection of the EmployeeEJB class. The delete method of the EJB class takes an integer ID for the employee record, so you can use the findById method of the EJB class to delete the employee record.
Adding @Audit Annotations to the EmployeeEJB Class
Next, use the @Audit annotation to specify which methods in the
EmployeeEJB class to audit.
Add the @Audit annotation to the add, update,
and delete methods in EmployeeEJB:

You can also apply the @Audit annotation at the class level, in which case the recordAction method will be invoked for all methods in EmployeeEJB.
Enabling the Audit Interceptor and Testing the Application
The final step is to enable the Audit interceptor by adding it
to the beans.xml file.
Right-click the beans.xml file in the Configuration Files
folder of the project and select Open.

Add an <interceptors> element to the file that defines the AuditInterceptor as an interceptor type:
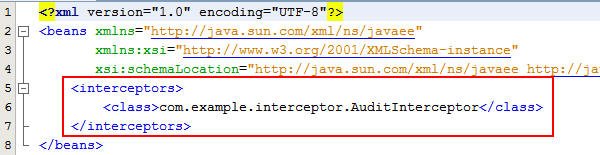
Note: The class definition is the fully qualified class name of the interceptor implementation.
Deploy the application to the server (GlassFish 3.1.2 by default).

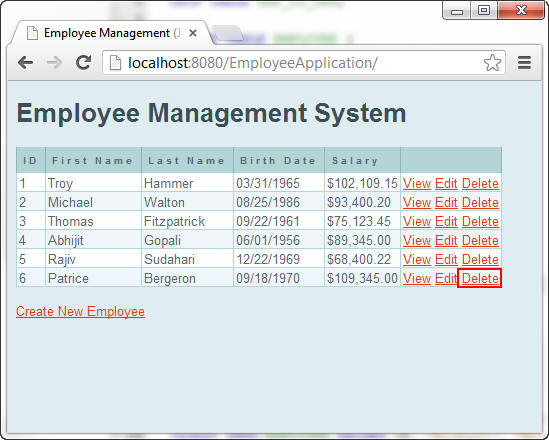
In a browser, enter the URL localhost:8080/EmployeeApplication
to open the application.
a. Click the Delete link on the last employee
record, Patrice Bergeron:
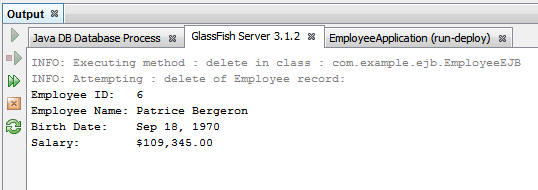
In the Output window of NetBeans in the GlassFish Server
tab, notice that the action to delete the employee record
for Patrice Bergeron was captured by the Audit interceptor
and logged.
Perform additional tests by adding new employees or
updating the records of existing employees.
Disabling Interceptors
To disable auditing, you do not have to change the code that
you created, and you do not have to modify or remove the @Audit
annotations.
Comment out or remove the interceptor from the beans.xml
file:

Right-click the project and select Deploy to
redeploy the application:
Test the application again and notice the absence of audit
messages in the console.
Summary
- Create an interceptor binding type
- Create an interceptor class associated with the binding type
- Use InvocationContext to get the name of the class, method,
and parameters of the method being intercepted
- Turn on and off interceptors through the beans.xml file
- Installing, Configuring, and Testing WebLogic Server 12c Developer Zip Distribution in NetBeans: This tutorial covers how to install the Oracle WebLogic Server 12c (12.1.1) developer instance on Windows and configure it as a Java EE Application Server in NetBeans.
- Developing Applications with Java EE 6 on WebLogic Server 12c: This course covers the breadth of Java EE technologies that are part of the Java EE 6 Web Profile.
- Developing Web Applications using JSF Technologies: This course covers JavaServer Faces (JSF), the server-side component framework designed to simplify the development of user interfaces for Java EE applications.
- Business
Component Development with EJB Technology, Java EE 6:
This course covers Enterprise JavaBeans (EJB) stateless,
stateful, singleton, and timer beans and much more,
- Building
Database Driven Applications with JPA: This course
covers the standard Java object-relational-mapping technology,
Java Persistence API.
- The
Java EE 6 Tutorial - Contexts and Dependency Injection
for the Java EE Platform: This tutorial is an excellent source
of information about the technologies included in Java EE 6,
including Contexts and Dependency Injection.
- JSR-299:
Contexts and Dependency Injection for the Java EE Platform:
This is the official specification for CDI.
- To learn more about Java EE, visit other OBE tutorials in
the Oracle
Learning Library.
- Lead Curriculum Developer: Tom McGinn
In this tutorial, you learned how to:
Resources
The application in this tutorial uses a combination of JSF
Facelets and managed beans, EJB session beans, and JPA entities.
To learn more about these technologies, see the following
resources:
Credits
To help navigate this Oracle by Example, note the following:
- Hiding Header Buttons:
- Click the Title to hide the buttons in the header. To show the buttons again, simply click the Title again.
- Topic List Button:
- A list of all the topics. Click one of the topics to navigate to that section.
- Expand/Collapse All Topics:
- To show/hide all the detail for all the sections. By default, all topics are collapsed
- Show/Hide All Images:
- To show/hide all the screenshots. By default, all images are displayed.
- Print:
- To print the content. The content currently displayed or hidden will be printed.
To navigate to a particular section in this tutorial, select the topic from the list.