Using EJB Lite and JPA in a Java SE Application
Overview
- JDK 7
- NetBeans 7.2 Java EE version IDE
- GlassFish 3.1.1
- Have downloaded and installed JDK7 from this link
- Have downloaded and installed NetBeans 7.2 Java EE version from this link
- Have installed GlassFish server that was part of the
NetBeans installation
- Have started NetBeans IDE in your system.
- Have prior programming knowledge of EJB 3.1,
dependency injection and JPA
Purpose
This tutorial covers the steps to use EJB Lite and Java
Persistence API (JPA) in a standalone Java application.
Time to Complete
Approximately 45 minutes
Introduction
EJB Lite is a subset of the features of EJB 3.1. An
embeddable enterprise bean container supports EJB Lite and can
run within a Java SE application in the same JVM. So one can run
EJB outside an application server and a Java SE client can
access the EJB locally.
The embedded enterprise bean container is typically used for
testing enterprise beans without having to deploy them to a
server. Enterprise bean components execute similarly in both
embedded and Java EE environments, and therefore the same
enterprise bean can be easily reused in both standalone and
networked applications.
JPA provides Java developers with an object/relational mapping facility for managing relational data in Java applications.JPA can be used in a standalone Java application and in an enterprise application.
In this tutorial, you will develop a Java SE client that
invokes a stateless EJB which is running in an embedded
container in the same JVM as the Java client. The EJB will use a
JPA entity to insert data into a database. The name of the Java
application is ProductManager and it invokes ProductEJB
which uses Product JPA entity to insert
product data into the Product table.
Scenario
A simple application has to be created to demonstrate
how to develop and invoke an EJB locally withing a standalone
Java program. The EJB should be running in the same JVM as the
Java client and should not be packaged and deployed explicitly
to an application server. There will be no application server
running. The EJB should use JPA for database persistence.
Hardware and Software Requirements (Optional)
The following is a list of hardware and software requirements:
Prerequisites
Before starting this tutorial, you should:
Create a Java Application
To create a Java Application using NetBeans IDE, complete the following steps:
From the NetBeans Menu bar, click File > New
Project
In the New Project dialog box, select Categories > Java,
select Projects: > Java Application and
click Next

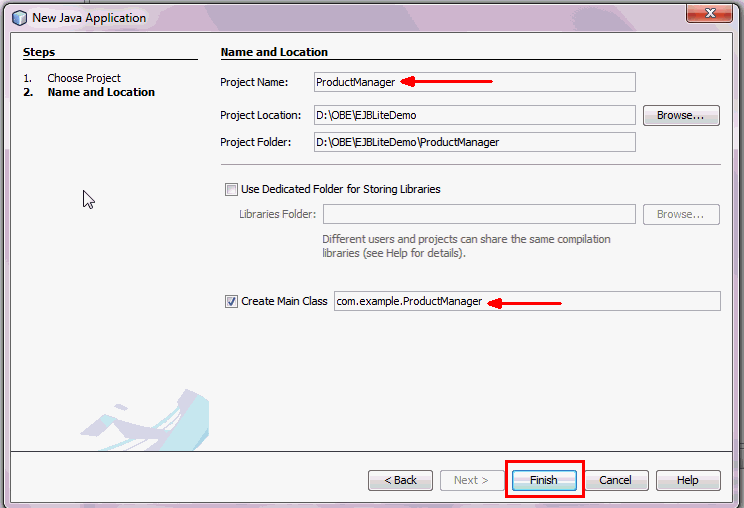
In the New Java Application dialog box, provide the following information:
Project Name: ProductManager
Project Location: Click Browse
and select a folder in your system drive
Create Main Class: Select
check box and enter com.example.ProductManager
Click Finish
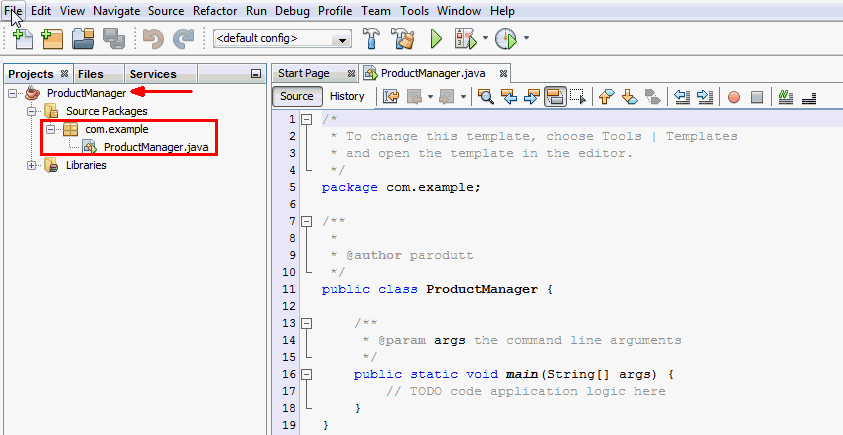
The Java application, ProductManager opens
in the Projects window. Verify that the com.example
package is created under Source Packages
and ProductManager.java opens in the code
editor window.
Create the Database, the JPA Entity Class and the
Persistence Unit
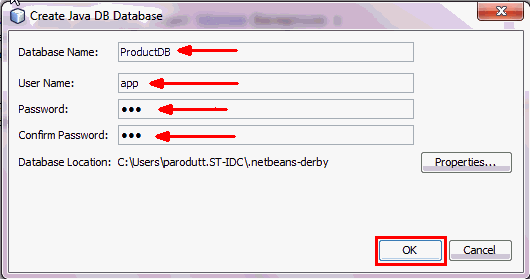
- Database Name:
ProductDB - User Name:
app - Password:
app - Confirm Password:
app
- Class Name:
Product - Package:
com.example.entity
To Use JPA in your Java application, complete the following steps:
To create the ProductDB database, go to
the Services window in NetBeans.
Select Databases > Java DB
and right click. Select Start Server
option from the drop down menu
Right click Java DB and select Create
Database option from the drop down menu
In the Create Java DB Database dialog box, enter the following details and click OK:
The ProductDB database is visible in the Services window as
Databases >Java DB >ProductDB
node.
A connection is also registered as jdbc:derby://localhost:1527/ProductDB
[app on APP].
Select and right click the ProductDB connection
and select Connect from the drop down
menu options.
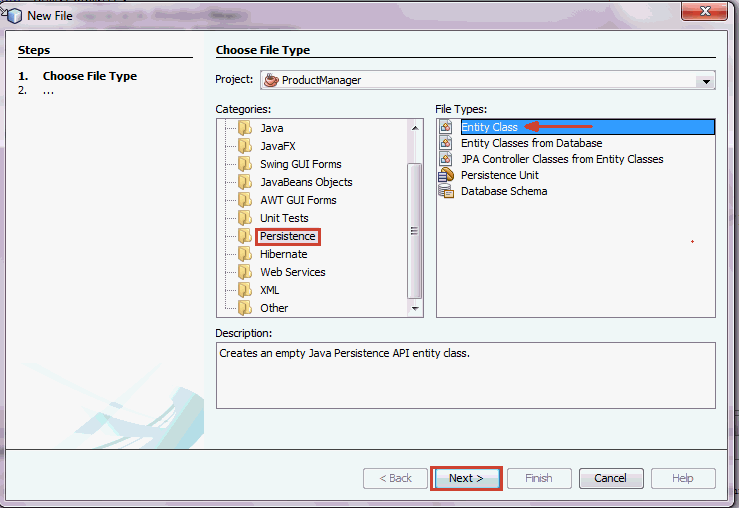
In the Projects window, right click ProductManager and select New > Other from the drop down menu options
In the New File dialog box, select
Categories > Persistence and File
Types > Entity Class. Click Next
In the Name and Location dialog box, enter the following information:
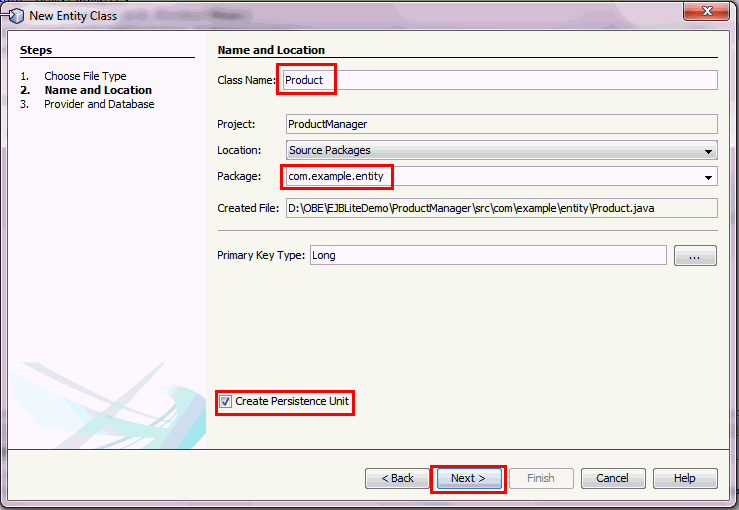
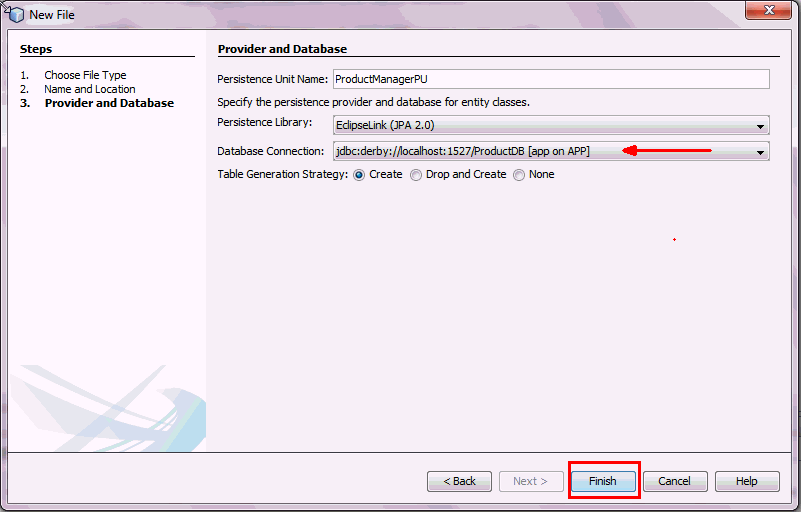
In the Provider and Database section accept the default entries.
In the Database Connection drop down,
select the jdbc:derby://localhost:1527/ProductDB [app
on APP] connection option
Click Finish
Verify that Product.java, the entity class is
created in the com.example.entity package and
the persistent unit, persistence.xml is created
at ProductManager > Source Packages >
META-INF folder
Examine the Product.java entity class that
is open in the code editor window.
Add privtae String Name as a field to the Product
entity class
Add getter and setter methods for the name
field

Open the persistence.xml file from the
Projects window. It is located at ProductManager
> Source Packages > META-INF node
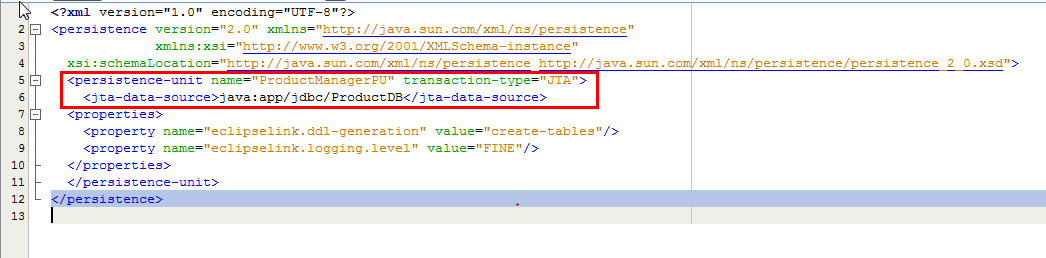
Modify the persistent-unit element in file
as shown in the following screenshot. Ensure to provide
the correct jta-data-source name
Save and close the file
Add the Required Library to The ClassPath
To add the Java EE 6 API library to your application class path, complete the following steps:
In the Projects window, right click ProductManager
and select Properties from the drop down
menu.
The Project Properties - ProductManager dialog
box opens up.
Select Libraries from the Categories
section and click the Add Library...
button
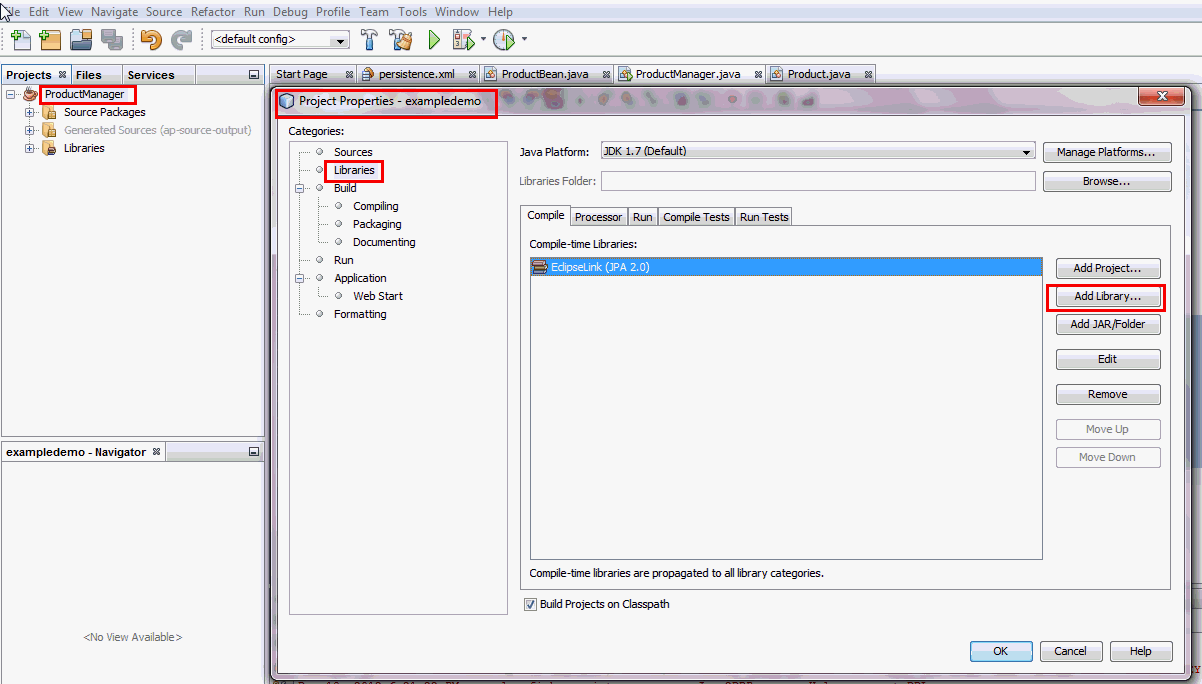
In the Add Library dialog box, select Java
EE 6 API Library and then click
the Add Library button.
Click the OK button to close the Project
Properties - Product Manager window.

Create an EJB Class
- Class Name:
ProductBean - Package:
com.example.ejb Add the following annotations to the beginning of the class:
@Stateless@DataSourceDefinition
Add the following field in the class:
@PersistenceContext private EntityManagerem;Add the following method in the class:
public void addProduct(String[] names)Add all the required import statements
To create a no interface EJB class in the ProductManager application, complete the following steps:
In the Projects window, right click ProductManager
and select New > Java Class..
In the New Java Class dialog box, enter
the following information and click Finish

Verify that ProductBean.java is created under
ProductManager > Source Packages >
com.example.ejb node at the Projects window.
Modify ProductBean.java to make it an EJB
class,in the code editor window.

Verify that your code of
ProductBean EJB matches
with the above code snippetUpdate main Method and Run the Program
In the main method, you will invoke the ProductBean
EJB method. To update the main method in the code
editor window, complete the following steps:
Create an EJBContainer instance and retrieve
the container's Context.
Using the Context object, look up for the EJB
in the container. Invoke the addProduct method
of the EJB
Add the required import statements

Verify your code with the code snippet in the above
screenshot.
To add the embedded container to your application 's class
path, complete the following steps:
a. At the projects window, right click ProductManager
and select Properties option from the drop
down menu
b. At the Project Properties - ProductManager dialog box, select Libraries in the Categories section and click the Add JAR/Folder button
c. Browse to the GlassFish installation location in
your system and go to the glassfish\lib\embedded folder
and select the glassfish-embedded-static-shell.jar
file

To add arguments to the main method, complete the following steps:
a. Right click ProductManager and select Properties from the drop down menu
b. At the Project Properties - ProductManager
dialog box, select Run in the Categories
section
d. Click OK to close the Project Properties - ProductManager dialog box.

From the Services window, ensure that GlassFish Server is not running and the Java DB Server is running,
In the Projects window, right click ProductManager
and select Run from the drop down
menu options.
In the output window, you will see several messages
that would denote the embedded container starting and
the ProductBean deployed to it.

You can verify the records inserted into the Product
table of ProductDB database.
Complete the following steps
At the Services window, expand Databases
>
jdbc:derby://localhost:1527/ProductDB
                      [app on APP]
> APP > Tables
Verify if Product table is created. Right click
Product and select View Data
option from the drop down menu.
You will see all the records of the Product table at
the output window.
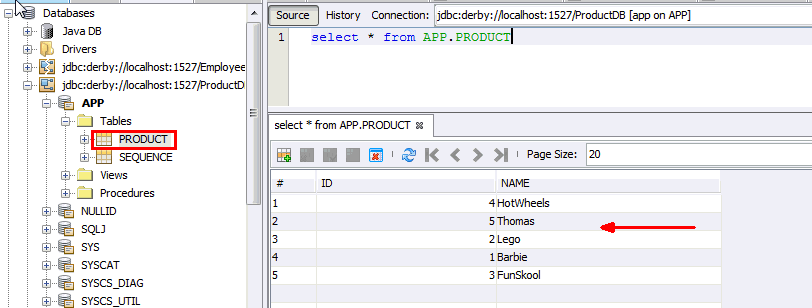
Verify if you see all the names in the Product table
Summary
- Run a embeddable EJB container within a Java SE
application
- Run and access an EJB outside an application server
environment
- Develop a Java SE client that accesses EJB running in the
same JVM
- Use JPA in an EJB class
- Using
the Embedded Enterprise Bean Container: Java EE 6 Tutorial
- JSR-000318
Enterprise JavaBeansTM 3.1
- Introducing the Java EE 6 Platform: Part 3
- To learn more about EJB 3.1 new features refer to additional OBEs in the Oracle Learning Library: EJB 3.1 New Features Series
- Lead Curriculum Developer: Paromita Dutta
In this tutorial, you have learned how to:
Resources
Credits
To help navigate this Oracle by Example, note the following:
- Hiding Header Buttons:
- Click the Title to hide the buttons in the header. To show the buttons again, simply click the Title again.
- Topic List Button:
- A list of all the topics. Click one of the topics to navigate to that section.
- Expand/Collapse All Topics:
- To show/hide all the detail for all the sections. By default, all topics are collapsed
- Show/Hide All Images:
- To show/hide all the screenshots. By default, all images are displayed.
- Print:
- To print the content. The content currently displayed or hidden will be printed.
To navigate to a particular section in this tutorial, select the topic from the list.