Java EE 7: Using Non-blocking I/O in the
Servlet 3.1 API
Overview
Purpose
This tutorial covers how to use the non-blocking I/O functionality with GlassFish and NetBeans. Non-blocking I/O was introduced in Servlet 3.1, a new API in Java Platform, Enterprise Edition 7 (Java EE 7) .
Time to Complete
Approximately 45 minutes
Introduction
Non-blocking I/O was introduced in Servlet 3.1(JSR
340) to develop scalable applications. Servlet 3.0 allowed
asynchronous request processing, but the API allowed only
traditional I/O, which can restrict scalability of your
applications. In a typical application, ServletInputStream
is read in a while loop. However, if the incoming
data is blocked or is streamed slower, the server thread must wait
for the data. The same situation can happen if the data is written
to ServletOutputStream.
Servlet 3.1 resolves the problem by adding event listeners: ReadListener
and WriteListener interfaces. You register these
event listeners by using ServletInputStream.setReadListener
and ServletOutputStream.setWriteListener. The
listeners have callback methods that are invoked when the content
is available to be read or that can be written without blocking.
In this tutorial, you learn how to use the new non-blocking I/O API with an example of non-blocking read and then non-blocking write.
- Create a Java EE 7 web application.
- Modify
index.htmlto include an HTML5 file upload control to enable the user to select a file.
- Develop two Java classes that implement
ReadListenerandWriteListenerinterfaces. - Develop a servlet that performs a non-blocking I/O. The servlet reads the contents of the file selected by the user and writes the contents of the file as a response by using non-blocking I/O.
- Deploy the project to the GlassFish Server.
- Test the project.
Hardware and Software Requirements
The following is a list of hardware and software requirements:
- Download and install the latest JDK from this link (Java Platform, Standard Edition 7u21 recommended).
- Download and install NetBeans 7.3.1 with Java EE, which includes GlassFish 4 (Java EE download bundle), from this link. During installation, be sure to select the check box to install GlassFish. JUnit is an optional installation and is not required for this tutorial.
- Download and unzip
SampleFiles.zip, which contains two sample input files to upload.
Prerequisites
Before starting this tutorial, you should:
- Have installed the required software.
- Ensure that NetBeans is running.
Creating a Web Application
In this section, you create a Java EE 7 web application in the NetBeans IDE.
-
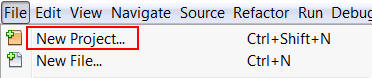
Select File > New Project.
-
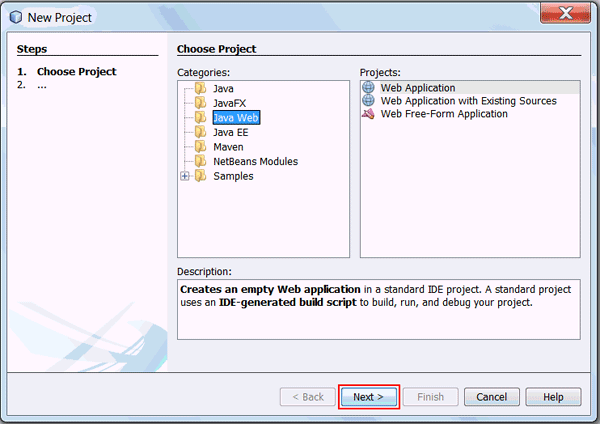
In the New Project dialog box, perform the following steps on the Choose Project page:
- Select Java Web from Categories.
- Select Web Application from Projects.
- Click Next.
-
On the Name and Location page, enter HTML5andServlet3.1 as the project name and click Next.

-
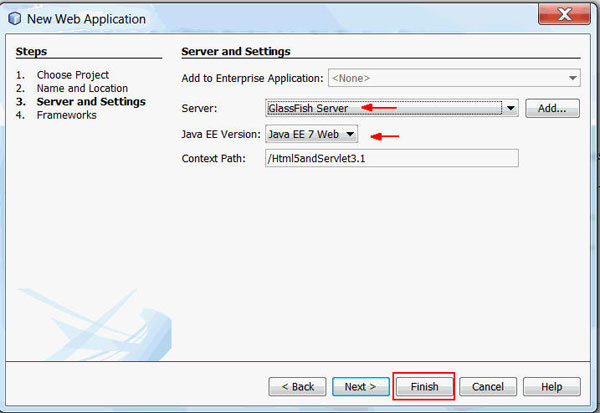
On the Server and Settings page, perform the following steps:
- Select GlassFish Server from the Server list.
- Select Java EE 7 Web from the Java EE Version list.
- Click Finish.
The
Html5Servlet3.1project is created in NetBeans.
Modifying index.html
In this section, you modify index.html.
-
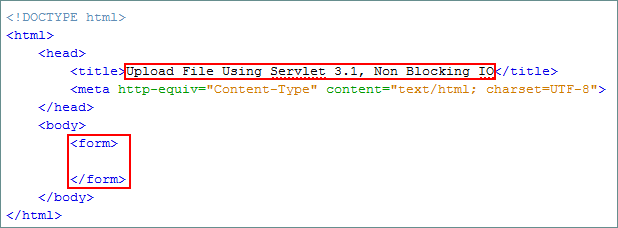
Enter Upload File Using Servlet 3.1, Non Blocking IO for the title of the page.
-
In the body section, delete IDE-generated code and add a form.
-
Add the
labelelement to the form to display the Select a File to Upload prompt.<label for="fileToUpload">Select a File to Upload</label><br/>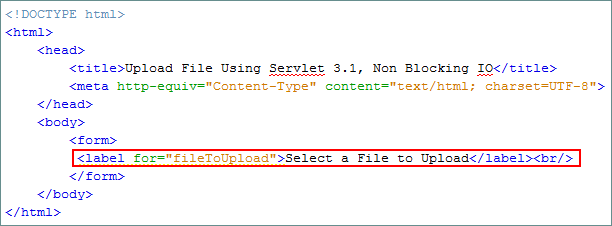
-
Add the
<input type="file"/>file upload element.<input type="file" name="fileToUpload" id="fileToUpload" onchange="fileSelected();"/>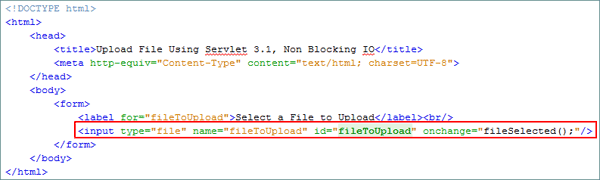
The
onchangeevent of the<input type="file">element is assigned to thefileSelected()JavaScript method. Each time you browse and select a file on your local system, this event is raised. -
Add the following lines of code to display the attributes of the file to be uploaded:
<div id="fileName"></div>
<div id="fileSize"></div>
<div id="fileType"></div>
-
Add the
Uploadsubmit button.<div>
<input type="submit" value="Upload"/>
</div>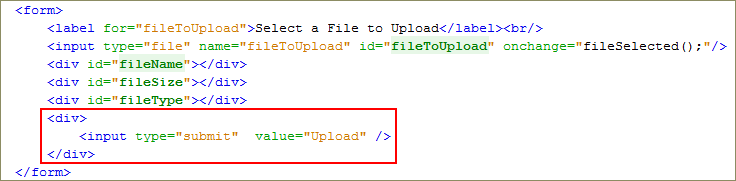
-
Add the following attributes to the
form:<form enctype="multipart/form-data" method="post" action="UploadServlet">
The submit button is attached to the
onsubmitevent. When you click submit, it makes an HTTP POST request to theUploadServlet, as specified in the action attribute of the form. -
Add the
fileSelected()JavaScript function to the<head>section.<script type="text/javascript">
function fileSelected() {
var file = document.getElementById('fileToUpload').files[0];
if (file) {
var fileSize = 0;
if (file.size > 1024 * 1024)
fileSize = (Math.round(file.size * 100 / (1024 * 1024)) / 100).toString() + 'MB';
else
fileSize = (Math.round(file.size * 100 / 1024) / 100).toString() + 'KB';
document.getElementById('fileName').innerHTML = 'Name: ' + file.name;
document.getElementById('fileSize').innerHTML = 'Size: ' + fileSize;
document.getElementById('fileType').innerHTML = 'Type: ' + file.type;
}
}
</script>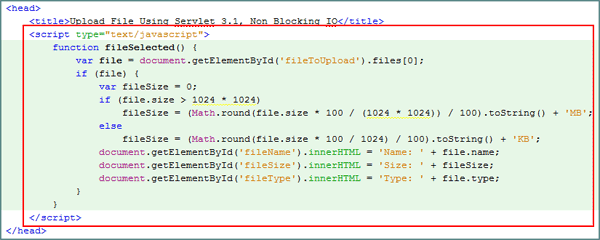
The
<input type="file"/>element provides access to theFileListobject, which is new in HTML5 and is part of the File API specifications. AFileListobject is a collection of file objects and has the following properties:- name: Name of the file (excluding any path)
- type: MIME type of the file (in lowercase)
- size: Size of the file in bytes
Because
<input type="file"/>provides access to this information on the client side, thefileSelected()JavaScript method accesses theFileListobject and provides information about the file that the user selected.Note:
<meta http-equiv="Content-Type" content="text/html; charset=UTF-8">, this NetBeans generated code can be optionally added to the<head>section.
Developing the WriteListenerImpl Class
In this section, you develop the WriteListenerImpl
class, which performs write operations in a non-blocking mode. WriteListenerImpl
implements the WriteListener interface. This
implementation has two callback methods:
-
onWritePossible()is invoked when data is available to be written. onError()is invoked if the request generates an error.
Perform the following steps to implement the WriteListenerImpl
class:
-
On the Projects tab, right-click
Html5andServlet3.1and select New > Other.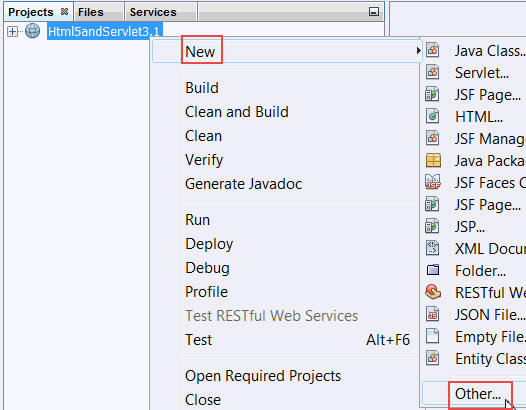
-
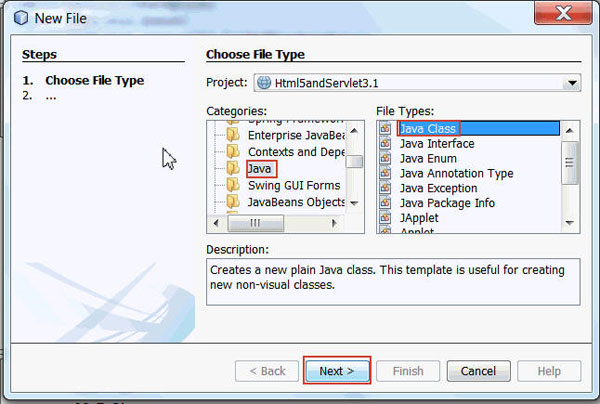
In the New File dialog box, perform the following steps on the Choose File Type page:
- Select Java from Categories.
- Select Java Class from File Types.
- Click Next.
-
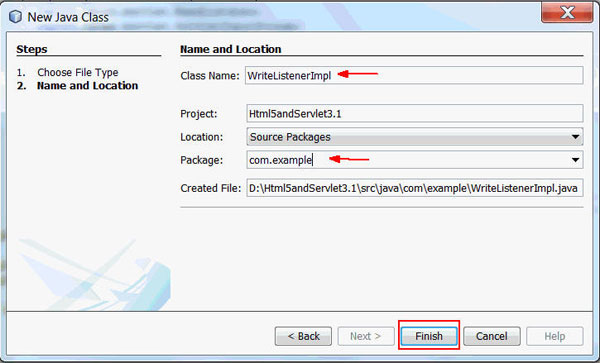
On the New Java Class page, perform the following steps:
- Enter WriteListenerImpl as the class name.
- Enter com.example as the package name.
- Click Finish.
-
Import the following packages:
import java.io.IOException;
import java.util.Queue;
import javax.servlet.AsyncContext;
import javax.servlet.ServletOutputStream;
import javax.servlet.WriteListener;
-
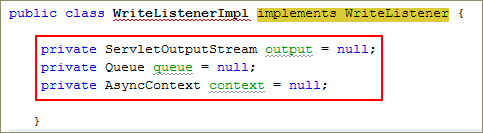
Modify the class to implement the
WriteListenerInterface.public class WriteListenerImpl implements WriteListener { -
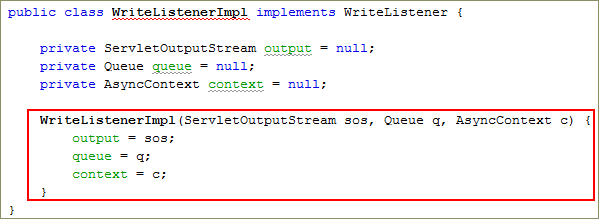
Declare the following variables:
private ServletOutputStream output = null;
private Queue queue = null;
private AsyncContext context = null;
-
Add a
constructorto the class.WriteListenerImpl(ServletOutputStream sos, Queue q, AsyncContext c) {
output = sos;
queue = q;
context = c;
}
-
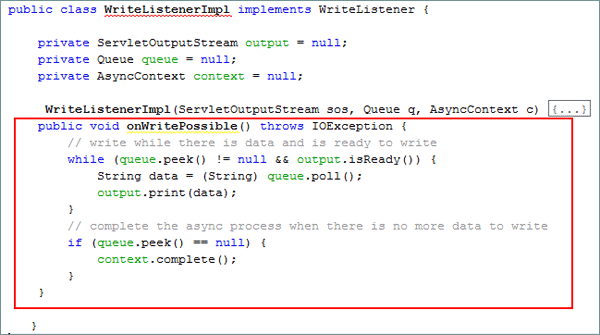
Add the
onWritePossible()method.public void onWritePossible() throws IOException {
while (queue.peek() != null && output.isReady()) {
String data = (String) queue.poll();
output.print(data);
}
if (queue.peek() == null) {
context.complete();
}
}
-
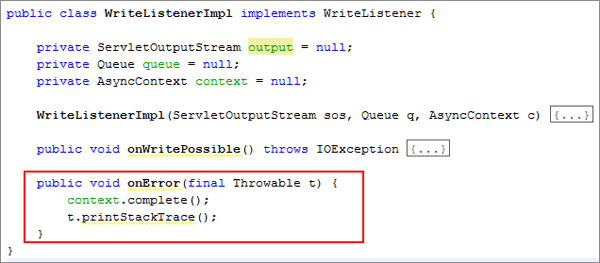
Add the
onErrormethod.public void onError(final Throwable t) {
context.complete();
t.printStackTrace();
}
Developing the ReadListenerImpl Class
In this section, you develop the ReadListenerImpl
class, which performs the read operation in a non-blocking mode. ReadListenerImpl
implements the ReadListener interface. This
implementation has three callback methods:
onDataAvailableis called when data can be read without blocking.
onAllDataReadis invoked when data for the current request is completely read.
onErroris invoked if the request generates an error.
Perform the following steps to implement the ReadListenerImpl
class:
-
On the Projects tab, right-click
Html5andServlet3.1and select New > Other.
-
In the New File dialog box, perform the following steps on the Choose File Type page:
- Select Java from Categories.
- Select Java Class from File Types.
- Click Next.
-
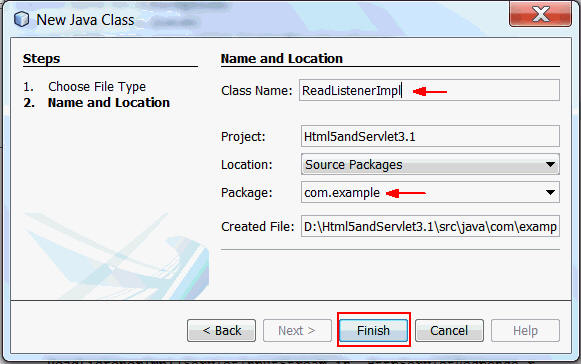
On the New Java Class page, perform the following steps:
- Enter ReadListenerImpl as the class name.
- Enter com.example as the package name.
- Click Finish.
-
Import the following packages:
import java.io.IOException;
import java.util.Queue;
import java.util.concurrent.LinkedBlockingQueue;
import javax.servlet.AsyncContext;
import javax.servlet.ReadListener;
import javax.servlet.ServletInputStream;
import javax.servlet.ServletOutputStream;
import javax.servlet.WriteListener;
import javax.servlet.http.HttpServletResponse;
-
Modify the class to implement the
ReadListenerinterface.public class ReadListenerImpl implements ReadListener -
Declare the following variables:
private ServletInputStream input = null;
private HttpServletResponse res = null;
private AsyncContext ac = null;
private Queue queue = new LinkedBlockingQueue();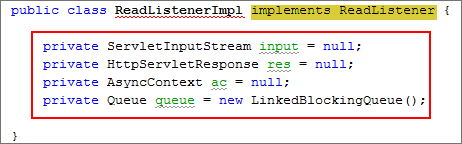
-
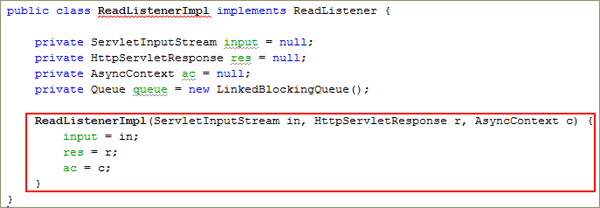
Add a
constructorto the class.ReadListenerImpl(ServletInputStream in, HttpServletResponse r, AsyncContext c) {
input = in;
res = r;
ac = c;
}
-
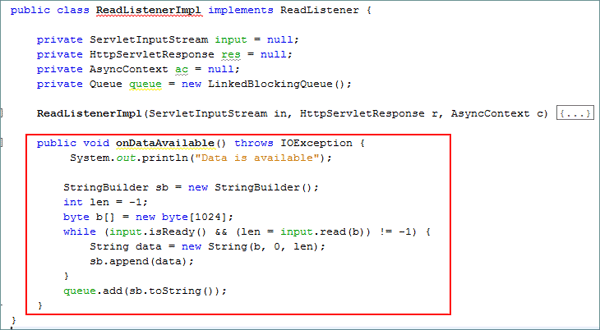
Add the
onDataAvailable()method.public void onDataAvailable() throws IOException {
System.out.println("Data is available");
StringBuilder sb = new StringBuilder();
int len = -1;
byte b[] = new byte[1024];
while (input.isReady() && (len = input.read(b)) != -1) {
String data = new String(b, 0, len);
sb.append(data);
}
queue.add(sb.toString());
}
-
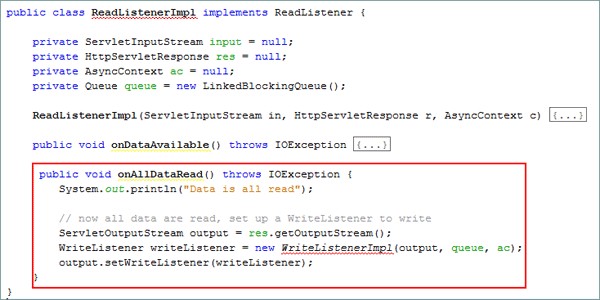
Add the
onAllDataRead()method.public void onAllDataRead() throws IOException {
System.out.println("Data is all read");
// now all data are read, set up a WriteListener to write
ServletOutputStream output = res.getOutputStream();
WriteListener writeListener = new WriteListenerImpl(output, queue, ac);
output.setWriteListener(writeListener);
}
-
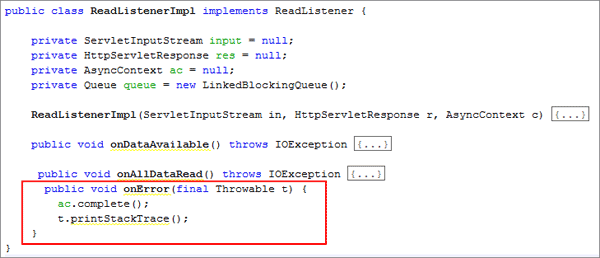
Add the
onErrormethod.public void onError(final Throwable t) {
ac.complete();
t.printStackTrace();
}
After
ServletInputStream.setReadListeneris called,ReadListener#onDataAvailableis invoked immediately if there is data to read. Otherwise, it is invoked when the data is ready. When all data is read,ReadListenerImpl#onAllDataReadsets up aWriteListenerImplfor writing data in a non-blocking mode.
Developing the UploadServlet Servlet
In this section, you develop a servlet, UploadServlet,
which reads and writes the contents of a file with the
non-blocking I/O Servlet 3.1 API. The servlet processes the HTTP
POST request made by the client asynchronously.
The servlet performs the following to implement non-blocking I/O:
- Obtains an input stream and/or an output stream from the
request and response objects.
- Assigns a read listener to the input stream and a write
listener to the output stream.
- Processes the request and the response inside the listener's callback methods.
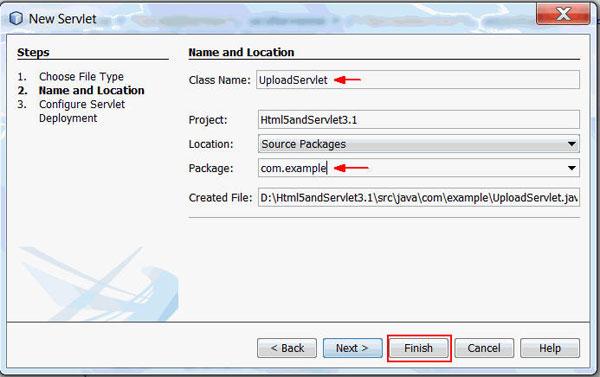
-
On the Projects tab, right-click
Html5andServlet3.1and select New > Other.
-
In the New File dialog box, perform the following steps on the Choose File Type page:
- Select Web from Categories.
- Select Servlet from File Types.
- Click Next.

-
On the Name and Location page, perform the following steps:
- Enter UploadServlet as the class name.
- Enter com.example as the package name.
- Click Finish.
- Import the following packages:
import java.io.IOException;
import javax.servlet.AsyncContext;
import javax.servlet.AsyncEvent;
import javax.servlet.AsyncListener;
import javax.servlet.ReadListener;
import javax.servlet.ServletException;
import javax.servlet.ServletInputStream;
import javax.servlet.annotation.WebServlet;
import javax.servlet.http.HttpServlet;
import javax.servlet.http.HttpServletRequest;
import javax.servlet.http.HttpServletResponse; -
Expand all editor folds and delete all IDE-generated code inside the servlet.
-
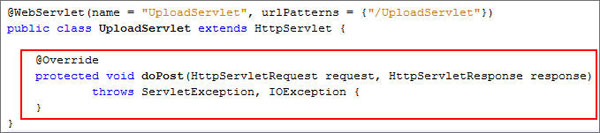
Add the
doPost()method.@Override
protected void doPost(HttpServletRequest request, HttpServletResponse response)
throws ServletException, IOException {
}
-
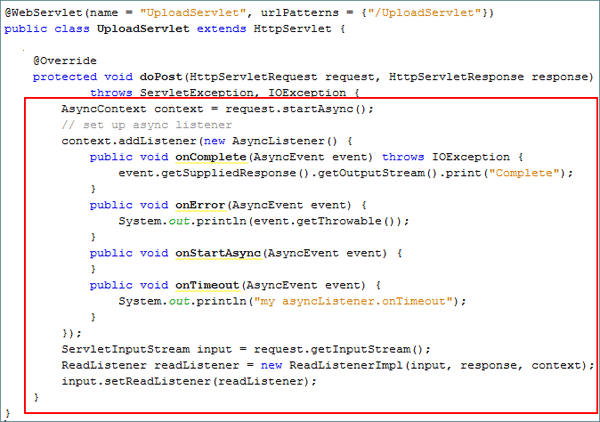
Add the following code to the
doPost()method:AsyncContext context = request.startAsync();
// set up async listener
context.addListener(new AsyncListener() {
public void onComplete(AsyncEvent event) throws IOException {
event.getSuppliedResponse().getOutputStream().print("Complete");
}
public void onError(AsyncEvent event) {
System.out.println(event.getThrowable());
}
public void onStartAsync(AsyncEvent event) {
}
public void onTimeout(AsyncEvent event) {
System.out.println("my asyncListener.onTimeout");
}
});
ServletInputStream input = request.getInputStream();
ReadListener readListener = new ReadListenerImpl(input, response, context);
input.setReadListener(readListener);
}
-
Set the
asyncmode in the servlet with the@WebServletannotation.@WebServlet(name = "UploadServlet", urlPatterns = {"/UploadServlet"}, asyncSupported=true)
Testing the Application
In this section, you upload a file by using asynchronous read and write.
-
Perform the following steps on the Projects tab:
- Expand the
Html5andServlet3.1project. - Expand
Web Pages. - Right-click
index.htmland select Run File.
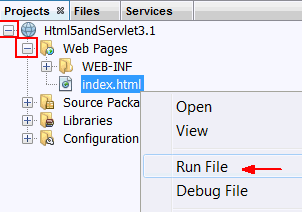
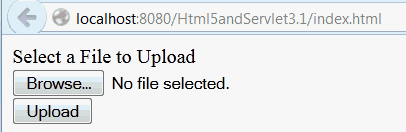
The application appears in the browser.
- Expand the
-
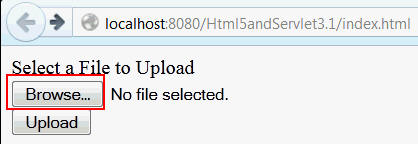
Click Browse and select the file that you want to upload from your local file system.
The file's name and attributes are displayed. In this case,
inputFileSuccess.txtis selected.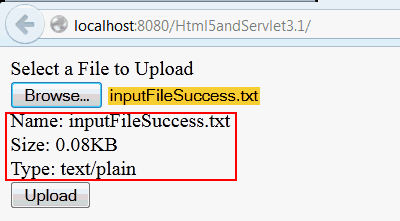
-
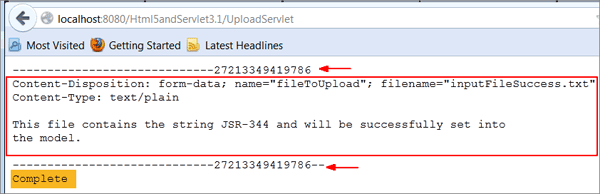
Click Upload.
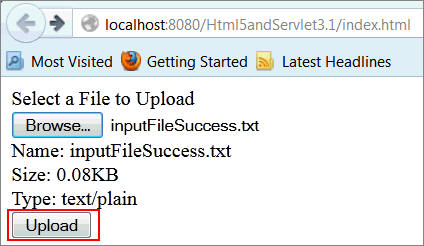
The contents of the uploaded file are displayed, and the status is "Complete."
Summary
In this tutorial, you learned to:
- Use the non-blocking I/O API in Servlet 3.1
- Perform non-blocking read and non-blocking write operations
- Use the HTML5
<input
                        type="file">
element to upload a file
Resources
- Java EE 7 Tutorial
- JSR
340: Servlet 3.1 API
- To learn more about Java EE 7, refer to additional OBEs in the Java EE 7: New Features Series in the Oracle Learning Library.
Credits
- Lead Curriculum Developer: Anjana Shenoy
- Editor: Susan Moxley
- QA: Anju Subbiah Pillai
To navigate this Oracle by Example tutorial, note the following:
- Topic List:
- Click a topic to navigate to that section.
- Expand All Topics:
- Click the button to show or hide the details for the sections.
By default, all topics are collapsed.
- Hide All Images:
- Click the button to show or hide the screenshots. By default,
all images are displayed.
- Print:
- Click the button to print the content. The content that is
currently displayed or hidden is printed.
To navigate to a particular section in this tutorial, select the
topic from the list.