Java EE 7: Creating a Java Message
Service 2.0 Producer and Receiver
Overview
JMSContextreplaces the separateConnectionandSessionobjects in the classic API with a single object.JMSProduceris a lightweight replacement for theMessageProducerobject in the classic API. It allows message delivery options, headers, and other properties.
JMSConsumerreplaces theMessageConsumerobject in the classic API and is used in a similar way.
- Create a Java EE 7 web application
- Develop two JavaServer Faces (JSF) managed beans:
ReceiverBeanandSenderBean
- Develop two JSF pages:
sender.xhtmlandreceiver.xhtml - Modify the JSF managed beans to send and receive a JMS message
- Configure JMS resources in GlassFish Server
- Deploy the project to the GlassFish Server
- Test the project to send and receive a JMS message
- Download and install the latest JDK from this link (Java Platform, Standard Edition 7u21 recommended).
- Download and install NetBeans 7.3.1 with Java EE, which includes GlassFish 4 (Java EE download bundle) from this link. During installation, be sure to select the check box to install GlassFish. JUnit is an optional installation and is not required for this tutorial.
- Have installed the required software.
- Be familiar with JMS 1.1.
- Ensure that NetBeans is running.
Purpose
This tutorial covers Java Messaging Service 2.0 (JMS 2.0), a new API for sending and receiving messages in Java Platform, Enterprise Edition 7 (Java EE 7) web applications by using GlassFish and NetBeans.
Time to Complete
Approximately 60 minutes
Introduction
JMS 2.0 is part of the Java EE 7 platform and was released in April 2013. JMS 2.0 is the first update to the JMS specification since version 1.1 was released in 2002. JMS 2.0 introduces a new API for sending and receiving messages that reduces the amount of code which a developer must write. For applications that run in a Java EE application server, the new API also supports resource injection. This feature allows the application server to take care of creating and managing JMS objects, thereby simplifying the application even further. You can use JMS in Java EE web or Enterprise Java Beans (EJB) applications or you can use it alone in a Java Platform, Standard Edition (Java SE) environment.
The new API introduced in JMS 2.0 is known as the simplified API. As the name suggests, it is simpler and easier to use than the JMS 1.1 API. The simplified API consists of three new interfaces:
The JMS 1.1 API is now referred to as the classic API
(with the familiar Connection, Session,
MessageProducer, and MessageConsumer
objects of JMS 1.1) or the simplified API (the JMSContext,
JMSProducer, and JMSConsumer objects
introduced in JMS 2.0). It is not deprecated and will remain
part of JMS indefinitely.
In this tutorial, you learn how to:
Hardware and Software Requirements
The following is a list of hardware and software requirements:
Prerequisites
Before starting this tutorial, you should:
Creating a Web Application
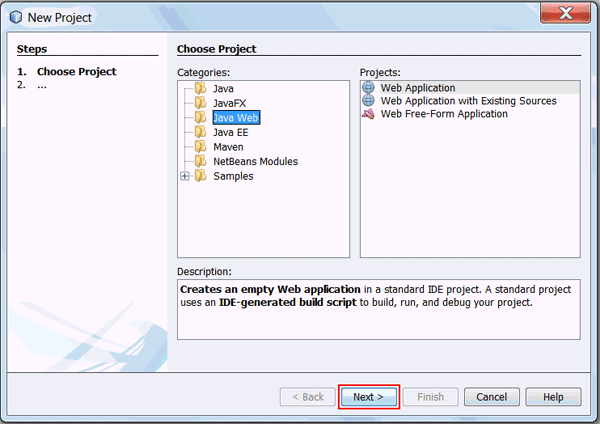
- Select Java Web from Categories.
- Select Web Application from Projects.
- Click Next.
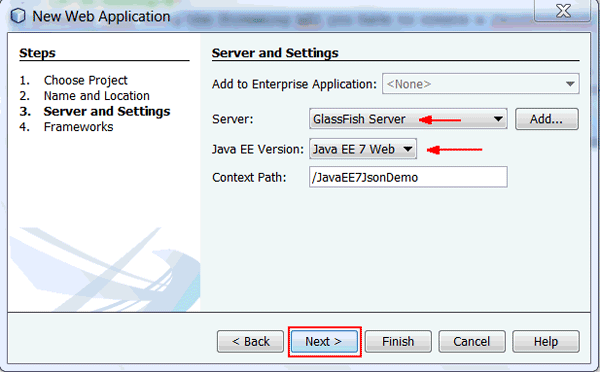
- Select GlassFish Server from the Server list.
- Select Java EE 7 Web from the Java EE Version list.
- Click Next.
In this section, you create a Java EE 7 web application in the NetBeans IDE.

In the New Project dialog box, perform the following steps
on the Choose Project page:
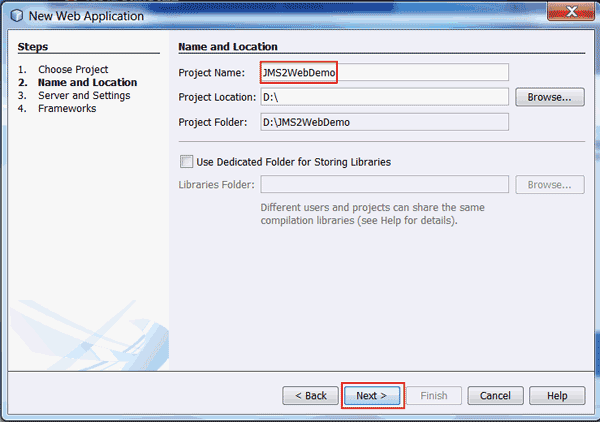
On the Name and Location page, enter JMS2WebDemo
as the project name and click Next.
On the Server and Settings page, perform the following steps:
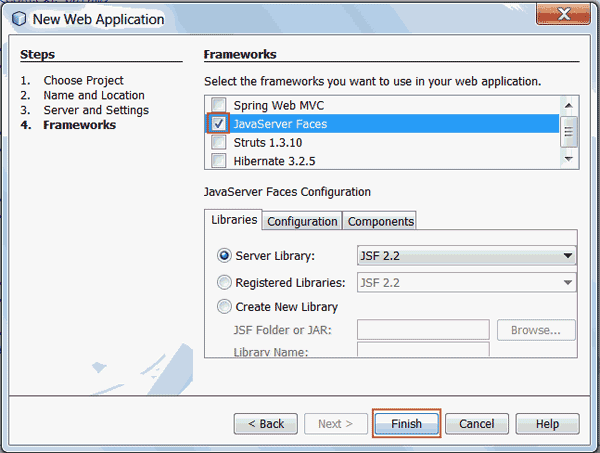
On
the Frameworks page, select JavaServer
Faces and click Finish.
JMS2WebDemo
project is created in NetBeans. Creating the JMS Producer and Receiver Managed Beans
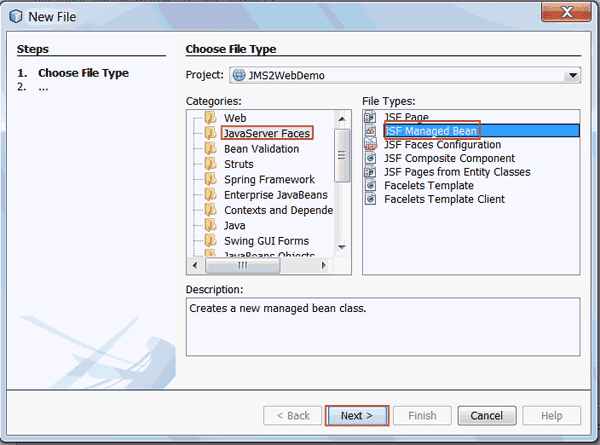
- Select JavaServer Faces from Categories.
- Select JSF Managed Bean from File Types.
- Click Next.
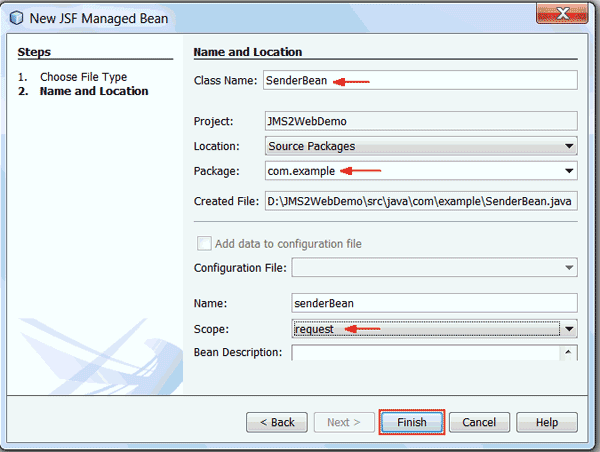
- Enter
SenderBeanas the class name - Enter
com.exampleas the package name. - Select
requestas the scope. - Click Finish.
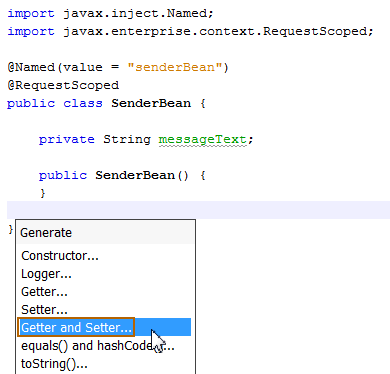
- Right-click in the file just above the last closing brace and select Insert Code.
- Select Getter and Setter from the Generate
list.
- In the Generate Getters and Setters dialog box,
select
SenderBeanand click Generate.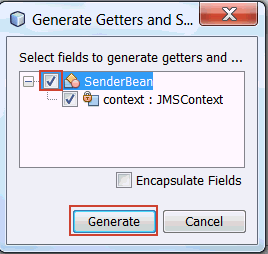
- Examine the generated code.
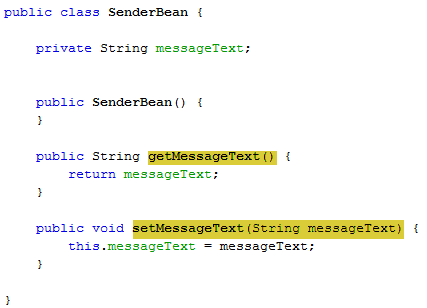
In this section, you create two JSF Managed Beans: SenderBean
and ReceiverBean.
Creating SenderBean and ReceiverBean
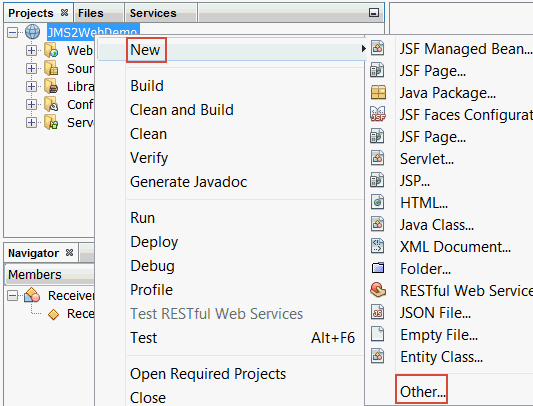
On
the Projects tab, right-click JMS2WebDemo
and select New
> Other.
In the New File dialog box, perform the following
steps on the Choose File Type page:
On the Name and Location page, perform the following steps:
Repeat steps 1, 2, and 3 to create the second JSF
managed bean, ReceiverBean.

Modifying SenderBean to Include the Field String Message
In this section, you modify SenderBean
to implement a String message field, messageText.
Open SenderBean
in the Editor and then add a String field,
messageText.
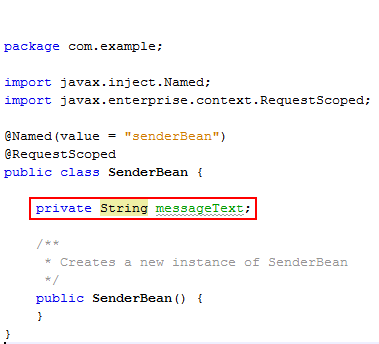
To generate the getter and setter methods for this field, perform the following steps:
Developing the JSF Pages
In this section, you create two JSF pages: sender.xhtml
and receiver.xhtml.
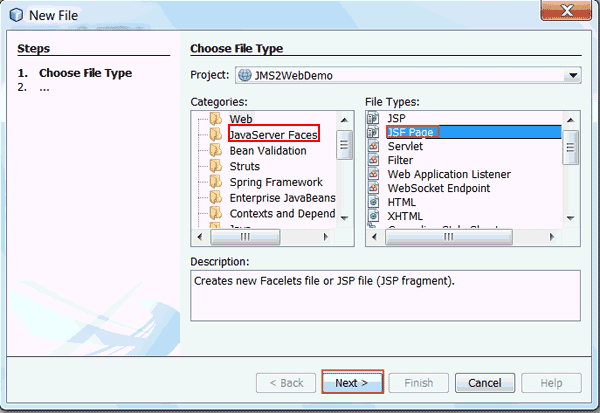
- Select JavaServer Faces from Categories.
- Select JSF Page from File Types.
- Click Next.
On the Projects tab, right-click the
project and select New > Other.

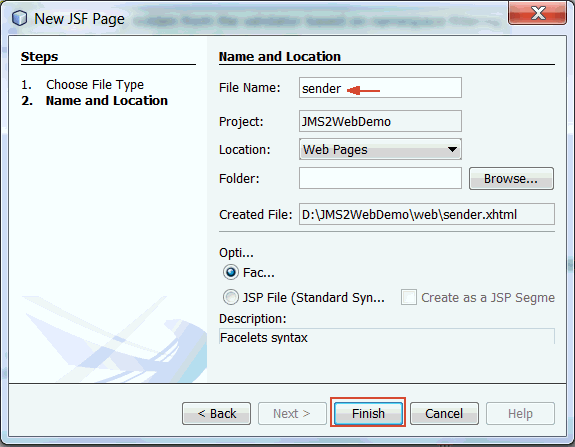
In the New File dialog box, perform the following steps:
On the Name and Location page, enter sender
as the file name and click Finish.
,receiver.xhtml.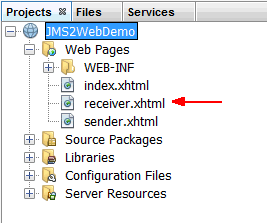
Modifying the JSF Pages
In this section, you modify the sender JSF
page so that the user can enter text that will be
sent as a JMS message to a JMS Queue. You will
configure the JMS Queue in the GlassFish Server in
a later section. Next, you modify the receiver JSF
page, which retrieves the messages from the JMS Queue
and displays it.
Modifying the sender
JSF Page
Enter Message Sender for the title of the page.
In the h:body section, delete
IDE-generated code and add an h:form
element with a heading.
   <h:form>

                               <h2>Type your message
                          in the Message Text field.</h2>

                            </h:form>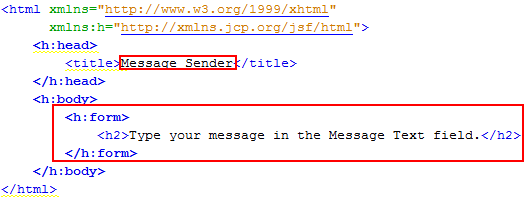
In h:form, add a label, <h:outputLabel>.
<h:outputLabel for="messagetext" value="Message
                          Text: "/>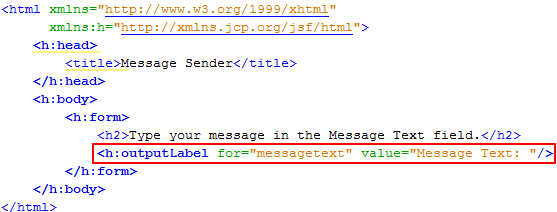
In h:form, add an <h:InputText>
text box to enter the message.
  <h:inputText id="messagetext"


                          title="Message text"


                          value="#{senderBean.messageText}"


                          required="true"


                          requiredMessage="Error: Message text is required."


                          maxlength="128"


                          size="32" />

                             <p></p>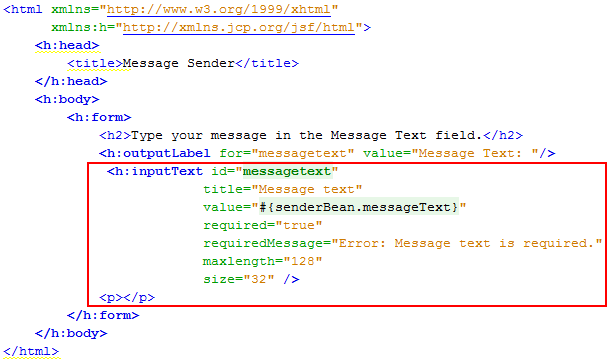
The text box <h:inputText>
validates the message entered by the user.
Add an

In h:form, add a command button, <h:commandButton>,
labeled Send Message.
<h:commandButton value="Send Message"
                          action="#{senderBean.sendJMSMessageToMyQueue}" />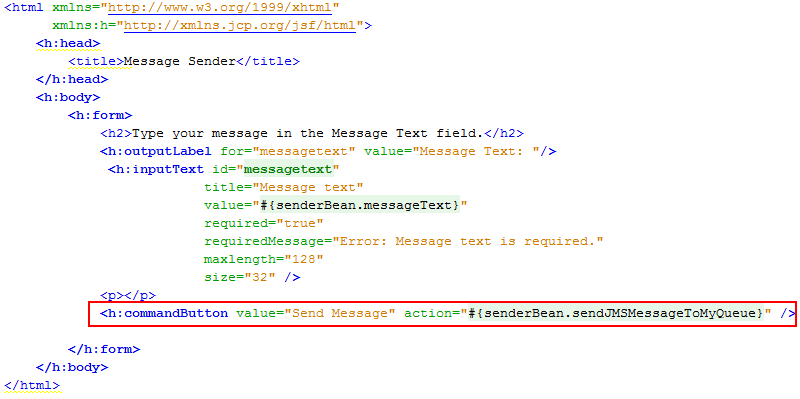
The command button invokes the sendJMSMessageToMyQueue
method of SenderBean.
In h:form, add a command button, <h:coomandButton>,
labeled Go to Receive Page.
     <h:commandButton
                            value="Go to Receive Page"  action="receiver"
                            />
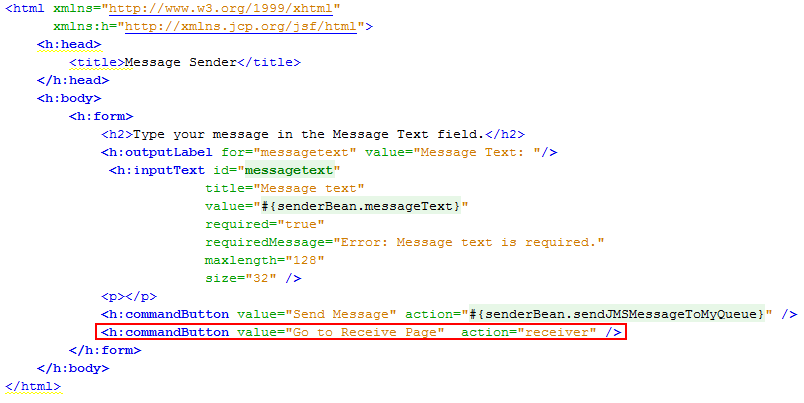
This button renders the receiver JSF
page.
h:form, add a 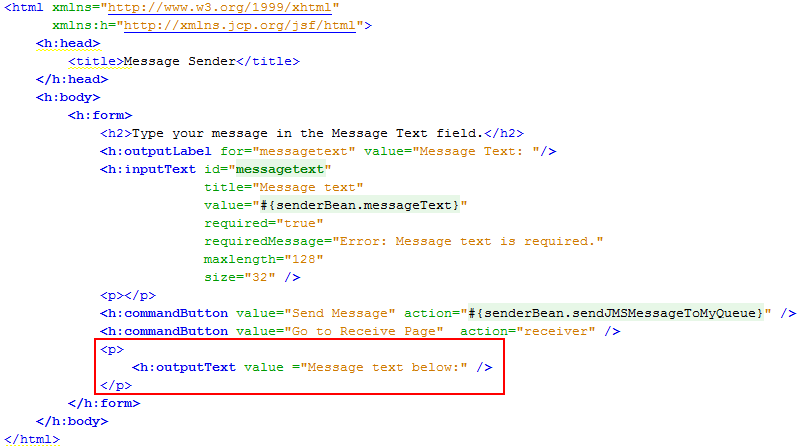
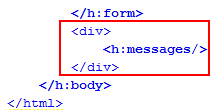
Add <h:messages> to the h:body
section to display validation messages.
      <div>


                            <h:messages/>


                            </div>
Modifying the receiver JSF Page
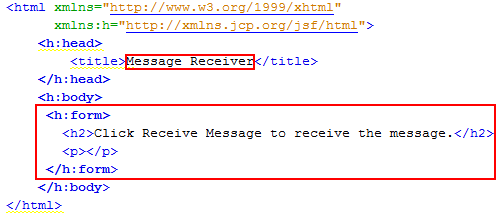
Enter Message Receiver
for the title of the page.
In the h:body section, delete
IDE-generated code and add the following:
<h:form>


      <h2>Click
                            Receive Message to receive the message.</h2>

                                 <p></p>
</h:form>
In h:form, add a command button, <h:commandButton>,
labeled Receive Message.
<h:commandButton id="back" value="Receive
                          Message" action="#{receiverBean.getMessage}" />
The command button invokes the getMessage
method defined in the ReceiverBean,
which retrieves the messages from the JMS Queue.
In h:form, add a command button, <h:commandButton>,
labeled Send Another Message.
 <h:commandButton id="send" value="Send
                          Another Message"  action="sender" />
This command button renders the sender
JSF page.
Configuring JMS Resources
In this section, you configure the JMS resource, Queue,
in the GlassFish Server. You do not configure Connection Factory
because you are using the default connection factory.
Right-click the project and select New > Other.

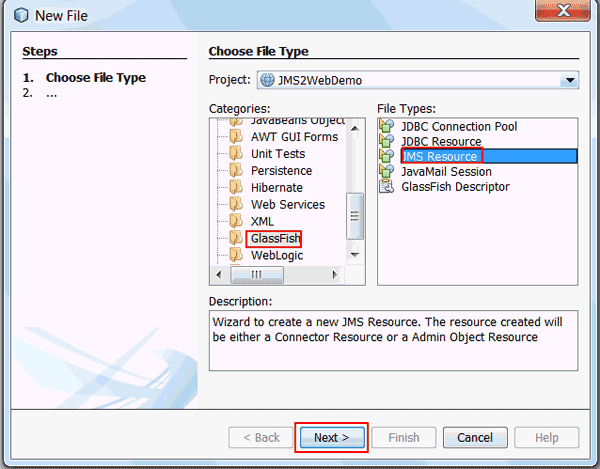
Select GlassFish from Categories and JMS Resource from File Types, and click Next.
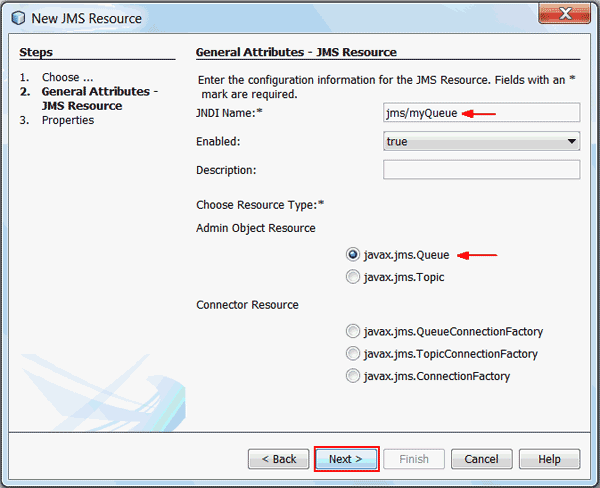
Accept the default Java Naming and Directory Interface
(JNDI) name, jms/myQueue, and the default
Admin Object Resource, javax.jms.Queue, and
click Next.
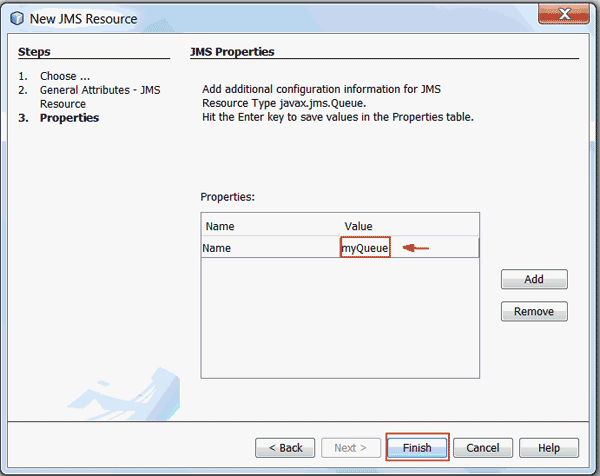
Enter myQueue in the value field,
press Enter, and then click Finish.
Every JMS application requires a connection factory (an
object that implements javax.jms.ConnectionFactory)
and at least one destination (an object that implements
either javax.jms.Queue or javax.jms.Topic).
In JMS, ConnectionFactory is the object that
is used to create the connection to the JMS provider, and
Queue or Topic is the object that identifies
the physical queue or topic that messages are being sent
to or received from. How these objects are configured
varies from one JMS provider to another. A default JMS
connection factory is available in any Java EE 7
application server so that you do not have to configure
any connection factories. However, for those cases when a
specially configured connection factory is needed, you can
configure it.
Verifying the JMS Resources
- Expand Servers.
- Right-click GlassFish Server and select Start.
- Expand the Servers > GlassFish folder.
- Expand the Resources folder, and then expand the Connectors folder.
- Right-click Admin Object Resources and select Refresh.
In this section, you verify the JMS resources (JMS
Queue,myQueue, and the default connection factory,
jms/_defaultConnectionFactory) by deploying the
application to GlassFish Server.
Perform the following steps on the Services tab:
Note: If your instance of GlassFish has a green triangle next to the fish icon, the server is already started and the Start option is disabled.
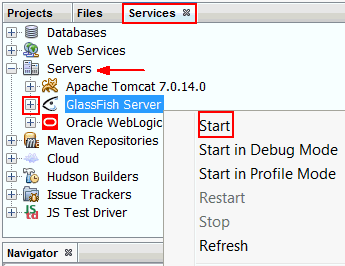
In the Output window, the GlassFish Server console indicates that GlassFish has started.
On the Projects tab, right-click the project and select Deploy.
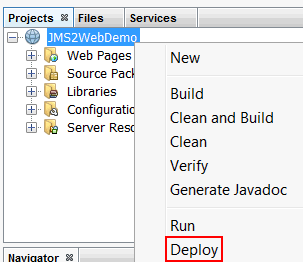
In the Output window, a message indicates that the project
was built successfully.
Perform the following steps on the Services tab:
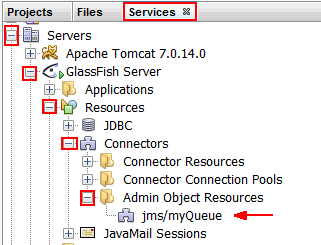
jms/myQueue is displayed.
Expand the Connector Resources folder.
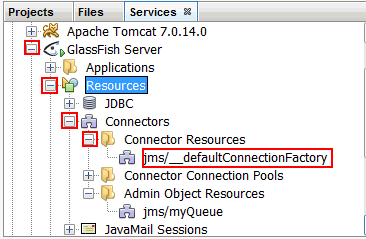
jms/_defaultConnectionFactory is displayed.
Generating the JMS Code in the Managed Beans
- Open
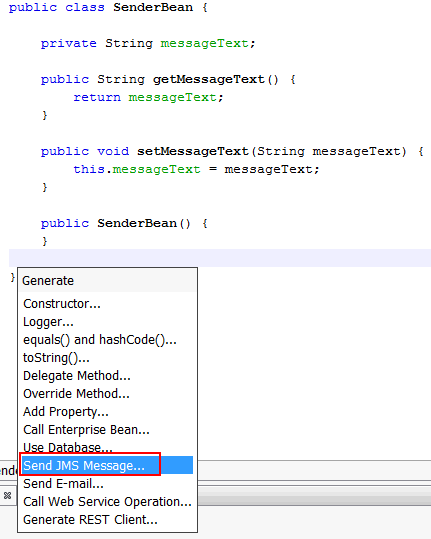
SenderBeanin the editor. - Right-click in the bottom of the file, just before the closing brace, to open the NetBeans Code Generator feature.
- Select Send JMS Message from the Generate list.
- Scroll to the bottom of the file to see the
sendJMSMessageToMyQueue(String
                                messageData)
method. - Delete this method and then add the modified method as follows:
- Instead of creating separate
ConnectionandSessionobjects, you create a singleJMSContextobject. - You do not have to create a
TextMessageobject and set its body to be the specified string. Instead, you simply pass the string into the send method. The JMS provider automatically creates aTextMessageand sets its body to the supplied string. - One feature of the simplified API is that its
methods do not declare checked exceptions. If an
error condition is encountered, a
JMSRuntimeExceptionis thrown. This new exception is a subclass ofRuntimeException, which means that it does not need to be explicitly caught by the calling method or declared in its throws clause. Compare this with the classic API, in which almost every method is declared to throw aJMSExceptionthat the calling method must either catch or throw itself. Instead of creating separate ConnectionandSessionobjects, we create a singleJMSContextobject.In JMS 1.1 we need to call connection.start()to start delivery of messages to the consumer. In the JMS 2.0 simplified API, the connection is automatically started.There's no need to receive a Messageobject, cast it to aTextMessage, and then callgetTextto extract the message body. Instead, we callreceiveBody, which returns the message body directly.
In this section, you modify the JSF managed beans (SenderBean
and ReceiverBean). You modify SenderBean
to generate JMS code to send a message to the configured JMS
Queue,jms/myQueue. You modify ReceiverBean
to retrieve JMS messages from the JMS Queue,jms/myQueue.
Modifying the SenderBean
Perform the following steps:
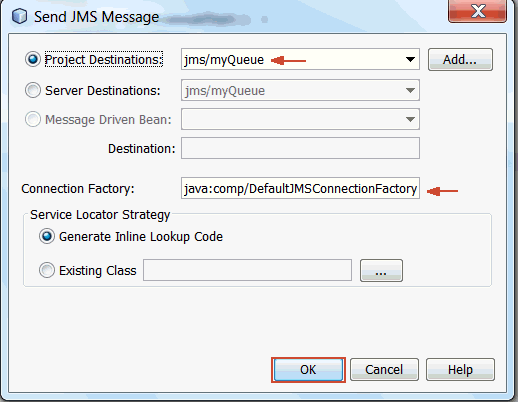
In the Send JMS Message dialog box, accept the default values for Project Destinations and Connection Factory and click OK.
Scroll to the top of the file and verify the resource
declarations of the Queue and JMSContext
instances.
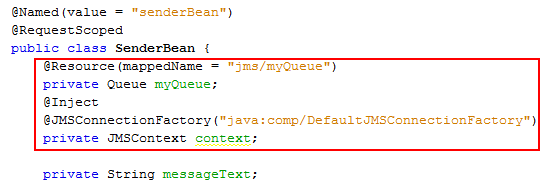
The following code injects a JMSContext
and uses it to send a message. There is no code to
create and close the JMSContext.
Instead, we simply declare a field of type JMSContext
and add the @Inject annotation, which
tells the container to create the JMSContext
when it is needed. An injected JMSContext
is created and closed automatically by the application
server. The @JMSConnectionFactory
annotation is used to specify the connection factory.
In this case, the default connection factory is used.
Perform the following steps:
public void sendJMSMessageToMyQueue() {


                              try {


                              String text = "Message from producer: " +
                              messageText;


                              context.createProducer().send(myQueue, text);


                              FacesMessage facesMessage =


                              new FacesMessage("Sent message: " + text);


                              FacesContext.getCurrentInstance().addMessage(null,
                              facesMessage);

                                      } catch
                              (JMSRuntimeException t) {


                              System.out.println(t.toString());

                                      }

                                  }
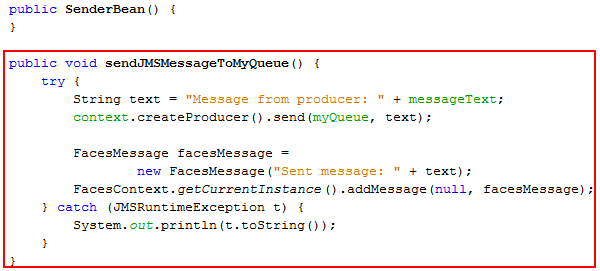
Examine the code in sendJMSMessageToMyQueue.
As you can see, the amount of code you have to write
compared to JMS 1.1 is reduced. Here's why:
Modifying the ReceiverBean
Open ReceiverBean in the Editor.
import javax.annotation.Resource;

                            import javax.faces.application.FacesMessage;

                            import javax.faces.context.FacesContext;

                            import javax.inject.Inject;

                            import javax.jms.JMSConsumer;

                            import javax.jms.JMSContext;

                            import javax.jms.JMSRuntimeException;

                            import javax.jms.Queue;
Add the following code after the class declaration:
    @Inject

                                private JMSContext context;

                                @Resource(lookup = "jms/myQueue")

                                private Queue queue;
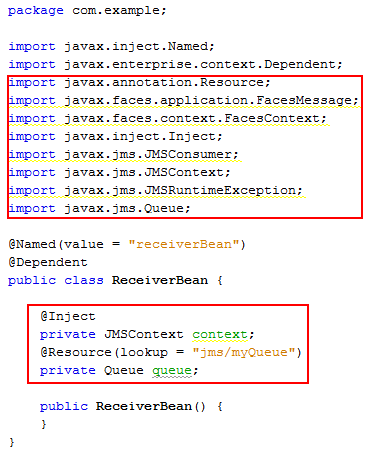
The following code injects a JMSContext
and uses it to send a message. There is no code to
create and close JMSContext. Instead, we
simply declare a field of type JMSContext
and add the @Inject annotation, which
tells the container to create the JMSContext
when it is needed. An injected JMSContext
is created and closed automatically by the application
server.
Add a getMessage method.
 public void getMessage() {

                                  try {


                          JMSConsumer receiver = context.createConsumer(queue);


                          String text = receiver.receiveBody(String.class,
                          1000);


                          if (text != null) {


                          FacesMessage facesMessage =


                          new FacesMessage("Reading message: " + text);


                          FacesContext.getCurrentInstance().addMessage(null,
                          facesMessage);


                          } else {


                          FacesMessage facesMessage =


                          new FacesMessage("No message received after 1
                          second");


                          FacesContext.getCurrentInstance().addMessage(null,
                          facesMessage);


                          }

                                  } catch
                          (JMSRuntimeException t) {


                          System.out.println(t.toString());

                                  }

                              }
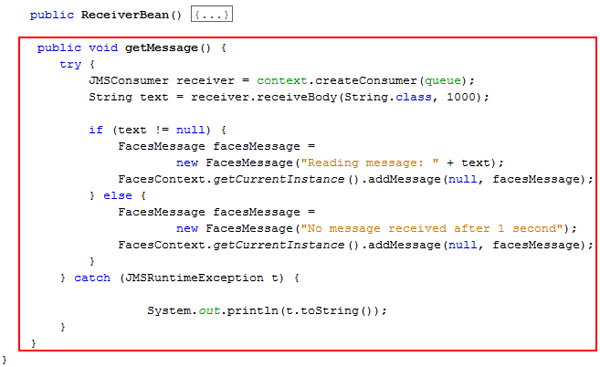
As with sending a message, the amount of code we have
written is reduced.
Testing the Application
- Expand the JMS2WebDemo project.
- Expand Configuration Files.
- Double-click web.xml to open it in the editor.
Perform the following steps on the Projects tab:

Update the value of the <welcome-file>
element to faces/sender.xhtml.

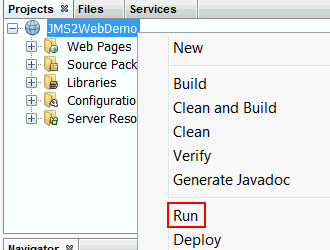
On the Projects tab, right-click the project and select Run.
The application appears in the browser.
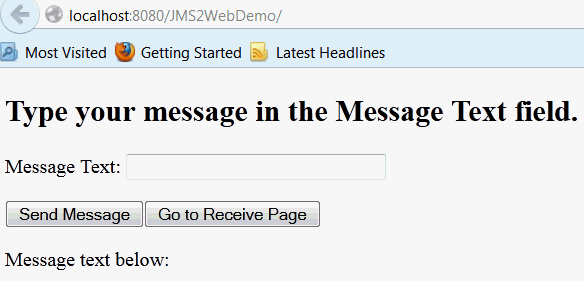
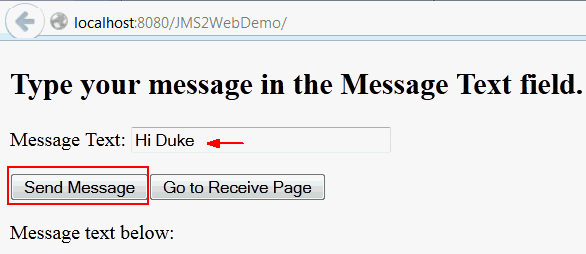
Enter text in the Message Text box and click Send Message.
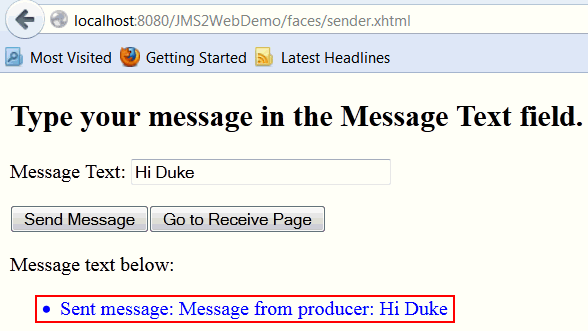
The message is displayed.
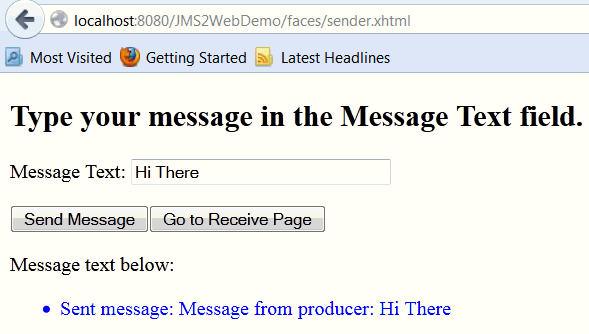
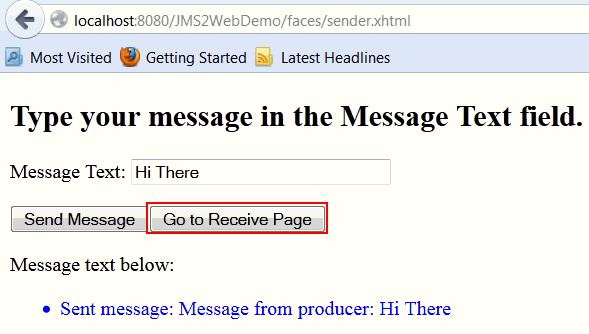
Repeat step 4 to send the following message: Hi There.
Click Go to Receive Page.
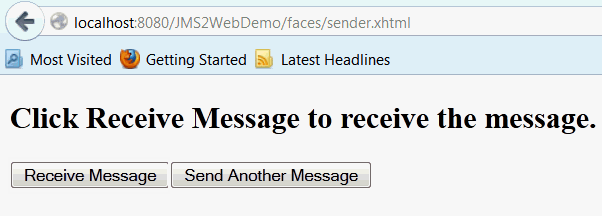
The receiver page is rendered in the browser.
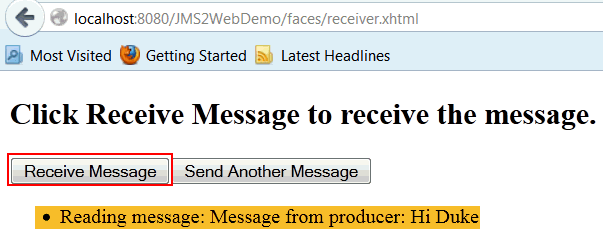
Click Receive Message.
The first message is displayed: Hi Duke.
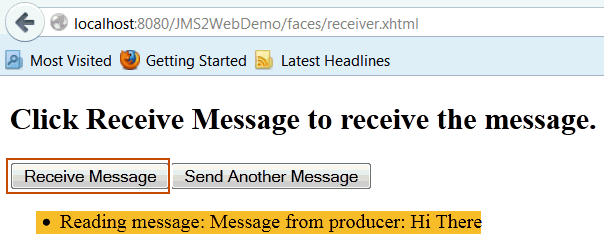
Click Receive Message.
The second message is displayed: Hi There.
Click Receive Message.
Because there are no more messages, the following message is displayed: No message received after 1 second.
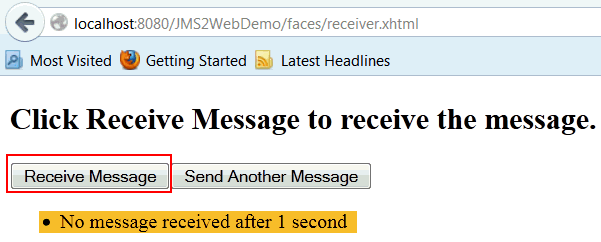
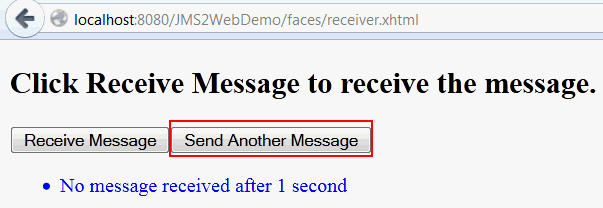
Click Send Another Message to send more messages and continue.
Summary
- Use new features added to JMS 2.0, which enable developers to write significantly fewer lines of code
- Use the JMS 2.0 simplified API in a Java EE 7 web application
- Configure JMS resources in GlassFish Server
- Send and receive JMS messages
In this tutorial, you learned how to:
- Java EE 7 Tutorial
- JSR 343: Java
Message Service 2.0
- What's New in JMS 2.0, Part One: Ease of Use
- To learn more about Java EE 7, refer to additional OBEs in the Java EE 7: New Features Series in Oracle Learning Library.
- Lead Curriculum Developer: Anjana Shenoy
- Editor: Susan Moxley
- QA:
Diganta Choudhury
Resources
Credits
To help navigate this Oracle by Example, note the following:
- Hiding Header Buttons:
- Click the Title to hide the buttons in the header. To show the buttons again, simply click the Title again.
- Topic List Button:
- A list of all the topics. Click one of the topics to navigate to that section.
- Expand/Collapse All Topics:
- To show/hide all the detail for all the sections. By default, all topics are collapsed
- Show/Hide All Images:
- To show/hide all the screenshots. By default, all images are displayed.
- Print:
- To print the content. The content currently displayed or hidden will be printed.
To navigate to a particular section in this tutorial, select the topic from the list.