Creating a Publish/Subscribe Model with Message-Driven Beans and GlassFish Server
Overview
- Download and install Java JDK 7 from this link.
- Download and install NetBeans IDE 7.1.2 Java EE version
which includes GlassFish 3.1.2 (Java EE download bundle) from
this link.
During installation, be sure to check the box to install Glassfish. JUnit is an optional installation and not required for this tutorial.
- Have the software installed as listed under Software
Requirements.
- Start the NetBeans IDE.
- Download and unzip the JSFHotelReservation.zip
file that contains a NetBeans project you need to complete
this tutorial.
Note: It is recommended that the location where you unzip the NetBeans projects does not contain spaces or non-alphanumeric characters.
Purpose
This tutorial covers how to create a simple publish/subscribe
model using Java Message Service (JMS) and message-driven beans
(MDBs.)
Time to Complete
Approximately 1 hour
Introduction
In this tutorial, you will be implementing a Java Message Service Publish/Subscribe system. The user interface components, a JavaServer Faces (JSF) page and managed bean have already been developed. Your task is to create a second managed bean to produce a message from the data in the form, and publish it to a JMS topic. You will then create message-driven beans (MDBs) that subscribe to the topic and use a message selector to filter the messages depending upon the value of a message property. For the purpose of this tutorial, you will simply write the content of the messages out to the console.
Scenario
The Chamber of Commerce for California's Wine Valley (which
includes several regions) would like you to create a set of
pages to allow visitors to their web site to request hotel
accommodations in one or more of the wine regions. Rather than
overwhelming their guests with page after page of hotels (and
take them off of the Chamber of Commerce page), they have
created a simple HTML form that a visitor to their site can use
to enter some data and request a response from participating
hotels. The data that the hotels have asked for includes: the
date the visitor is asking for, a number of nights they would
like to stay for, and the number of guests in their party. The
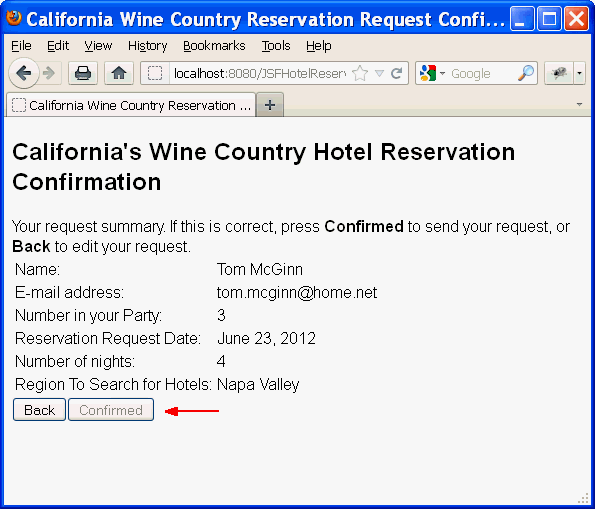
JSF-driven form that the Chamber of Commerce built is shown in
Figure 1.
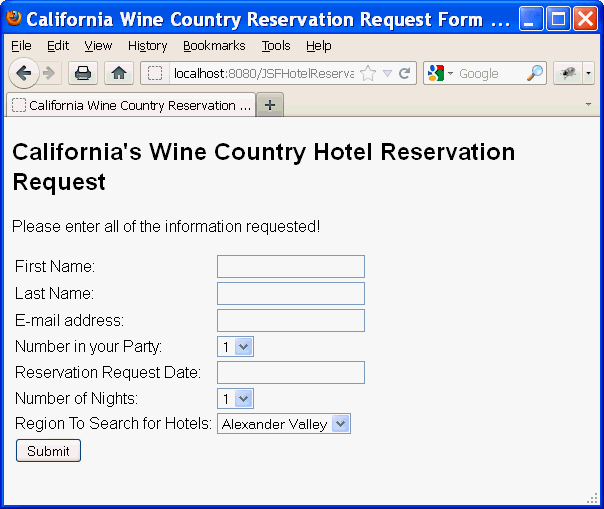
Figure 1: The California Wine Country Chamber of
Commerce's Hotel Reservation Request form.
The Chamber of Commerce would like the data that is entered by
the visitor to be sent only to hotels in a particular region,
unless the visitor selects All, in which case the data can go to
all of the hotels. Hotels in a particular region are added as
subscribers to messages for their region. This design is
referred to as an Observer Pattern. Messages from a source (in
this case, the visitor web page) are consumed by observers
interested in messages that pertain to them. Observers can be
added or removed without changing the underlying code.
There are two reasons that the Chamber of Commerce decided to go with this design. First, the design allows hotels to change over time without recompiling or changing the base code. Second, some hotels have automated registration systems and websites, and some just have e-mail. This approach allows the messages to be delivered to each hotel in a flexible way.
The architecture of the system is shown in Figure 2.
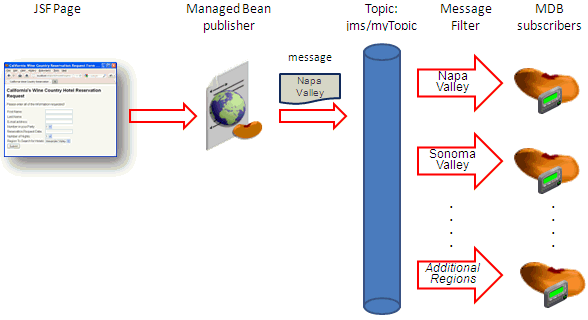
Figure 2: The California Wine Country Chamber of
Commerce JMS publish/subscribe system architecture
Your task in this tutorial is to implement the message topic
producer and MDB subscribers.
Software Requirements
The following software is required to complete this tutorial in
Windows platform. You must install the software
in the given order.
Prerequisites
Before starting this tutorial, you should:
Run the JSFHotelReservation Application
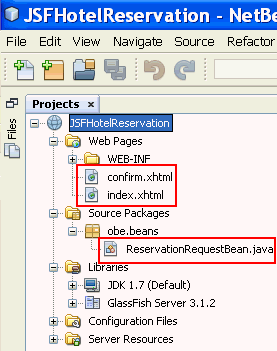
Start the NetBeans IDE, open the provided JSFHotelReservation project, and expand the Web Pages, Source Package and Libraries folders.
Open the two JSF view pages (index.xhtml and confirm.xhtml)
and the ReservationRequestBean managed bean and
review the code.
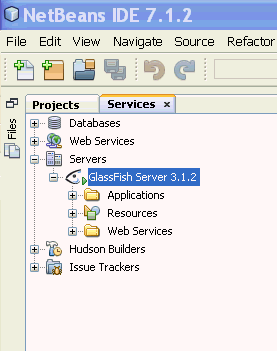
Open the Services Tab, expand Servers, right-click on GlassFish
Server, and select Start.
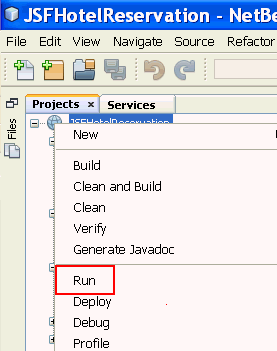
Back on the Projects tab, right-click on the JSFHotelApplication
and select Run.
The default browser for the platform will open with the
application.
If the application does not open automatically, open a
browser, and start the application by entering http://localhost:8080/JSFHotelReservation
as the URL.
Enter some data into the form and click the Submit button to see the confirmation page.

You can use the Back button to edit your data. The Confirmed button is not functional yet. You will make it function in this tutorial.
Create a Plain Old Java Object (POJO) to hold the request
Data
In this task, you will create a model class (ReservationRequest) to pass an the reservation request data to the message producer bean.
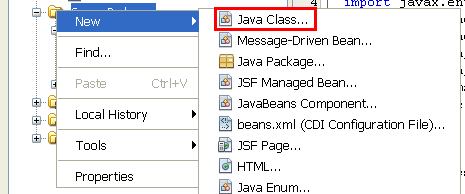
Right-click on Source Packages and select New
-> Java Class.
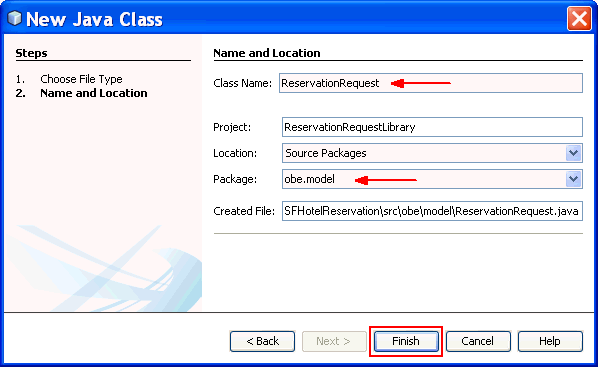
Enter ReservationRequest as the Class Name and obe.model
as the Package. Click Finish.
Copy the all fields except region from the
ReservationRequestBean class in the
JSFHotelReservation class to the ReservationRequest
class.

Add a new line after numberInParty, then add a
constructor by right-clicking in that line and selecting Insert
Code.
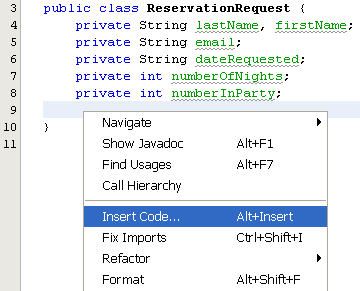
Choose Constructor from the list.
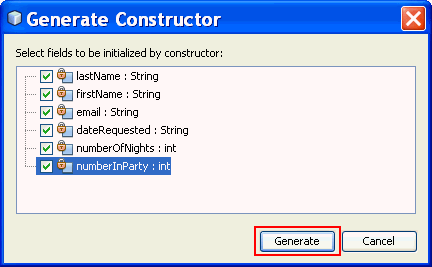
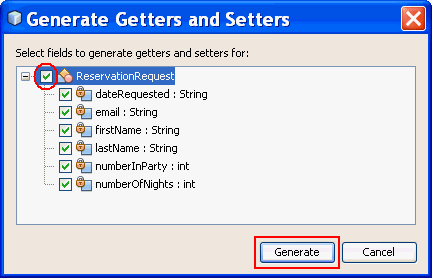
Select all of the fields and click Generate.
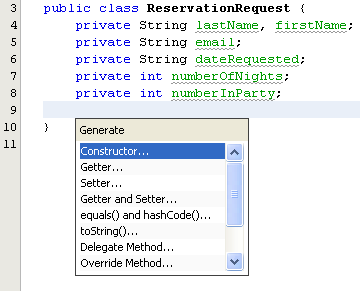
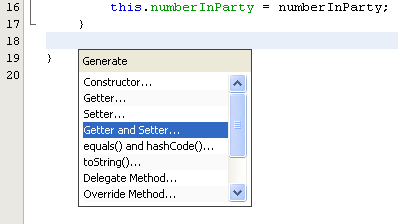
Next generate getters and setters by selecting the line
after the constructor and right-clicking in that line and
selecting Insert Code. Choose Getter and Setter
from the list.
Select the class name (ReservationRequest) to choose
all the fields and click Generate.
Create the Request Producer
In this task, you will create a JMS Producer bean, and add the
necessary JMS resources to the project.
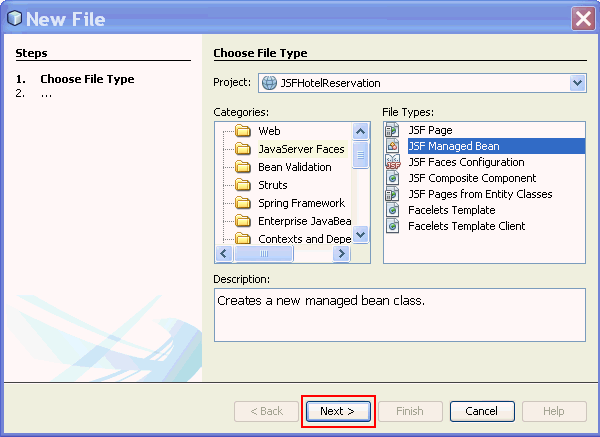
Create the RequestProducerBean class
Right-click on the obe.beans package and
select New -> Other.
Choose JavaServer Faces from Categories and JSF
Managed Bean from File Types. Click Next.
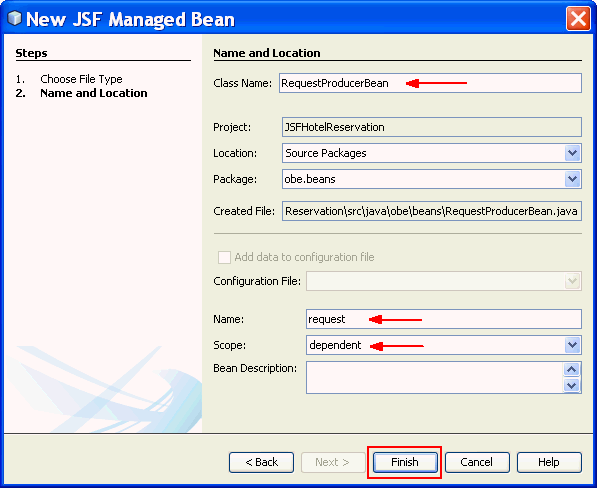
 R
R Enter RequestProducerBean as the Class Name.
Enter request as the Name.
Select dependent as the bean Scope.
Click Finish.
Implement the RequestProducerBean class
This class will also be passed as an object and
therefore must implement Serializable.
public class RequestProducerBean implements Serializable {
Add annotations to the class to declare a topic called "jms/myTopic" and a factory for the connection called "jms/myTopicFactory".
@Resource(mappedName = "jms/myTopic")
private Topic myTopic;
@Resource(mappedName =
"jms/myTopicFactory")
private ConnectionFactory
myTopicFactory;
Next, write a send method to create and send
a map of the fields in the request object to
the topic for subscribers to pick up.
public
void send(ReservationRequest request, String region)
throws JMSException {
Connection
connection = null;
Session
session = null;
try {
connection = myTopicFactory.createConnection();
session = connection.createSession(false,
Session.AUTO_ACKNOWLEDGE);
MessageProducer messageProducer =
session.createProducer(myTopic);
MapMessage mm = session.createMapMessage();
mm.setString("LastName", request.getLastName());
mm.setString("FirstName", request.getFirstName());
mm.setString("EMail", request.getEmail());
mm.setString("DateRequested",
request.getDateRequested());
mm.setInt("NumberOfNights",
request.getNumberOfNights());
mm.setInt("NumberInParty",
request.getNumberInParty());
mm.setStringProperty("Region", region);
messageProducer.send(mm);
} finally {
if (session != null) {
try {
session.close();
} catch (JMSException e) {
Logger.getLogger(this.getClass().getName()).log(Level.WARNING,
"Cannot close session", e);
}
}
if (connection != null) {
connection.close();
}
}
}
In the send method, an MapMessage,
rather than a TextMessage is sent to the
topic destination. You also could have sent the
request object as an ObjectMessage, however,
there are three advantages to a MapMessage.
First, if you use an ObjectMessage, then the
subscribers, possibly in another server context, must
also have the object class definition passed in the ObjectMessage.
This would couple the publishers and subscribers a bit
more tightly. The second reason to use a MapMessage
is to allow the subscriber to be written in
another language. If the message payload is a Java
Object, the subscribers would have to be written in
Java. Finally, using a map allows the message payload
to change without requiring a recompilation of the
subscribers - the map can contain more (or fewer)
elements without affecting the subscriber code.
Notice that the region string is passed as property of the message. The property will be used by the subscribers to filter out messages that do not apply. The send method is invoked from the ReservationRequestBean. In the next section you will add the code to the ReservationRequestBean class to create the ReservationRequest object and invoke this method.
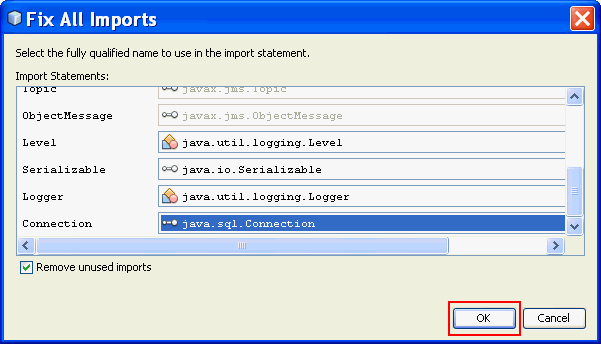
Add any missing import statements to the class.
Press Ctrl-Shift-I key to open the Fix
All Imports wizard.
Imports that have more that one possible option have a
drop down menu. Scroll to the bottom of the list and
select javax.jms.Connection to satisfy the Connection
object (the default is java.sql.Connection).

Click OK to fix all of the missing import
statements and save the file.
TIP: You can
"clean up" your code and reformat it by pressing the Ctrl-Shift-F
key.
Modify the application to send a ReservationRequest option
to the RequestProducerBean.
Modify the ReservationRequestBean
Open the ReservationRequestBean class.
Inject an instance of RequestProducer into
this bean. With this technique you are effectively
"wiring" these two managed beans together.
@Inject
private RequestProducerBean
producer;
Add the import statement for javax.inject.Inject.
Add a method called sendRequest to the
ReservationRequestBean class. This method
creates an instance of a ReservationRequest object,
then calls the send method of the RequestProducerBean.
The method also adds a string message to the current
JSF view page (the confirmation screen) through the
current FacesContext.
public
void sendRequest() {
FacesContext facesContext =
FacesContext.getCurrentInstance();
ReservationRequest request = new
ReservationRequest(lastName, firstName, email,
dateRequested, numberOfNights, numberInParty);
try {
producer.send(request, region);
FacesMessage facesMessage = new FacesMessage("Request
sent successfully");
facesMessage.setSeverity(FacesMessage.SEVERITY_INFO);
facesContext.addMessage(null, facesMessage);
} catch
(JMSException je) {
FacesMessage facesMessage = new FacesMessage("Request
NOT sent. Error: " + je);
facesMessage.setSeverity(FacesMessage.SEVERITY_ERROR);
facesContext.addMessage(null, facesMessage);
}
}
Fix any missing import statements and save the file.
Modify the confirm.xhtml JSF view page
Update the Confirmed command button component to call
the sendRequest method you added to
ReservationRequestBean.
Remove the attribute style="color: grey" and
add an action attribute that invokes the sendRequest
method.
<h:commandButton value="Confirmed" action="#{reserve.sendRequest()}"/>
Save the file.
Add a topic and connection factory to the project.
Right-click on the project and select New ->
Other.
Choose GlassFish from Categories and JMS
Resource from File Types. Click Next.
Enter jms/myTopic as the JNDI Name.
Select javax.jms.Topic as the Admin Object
Resource. Click Next.
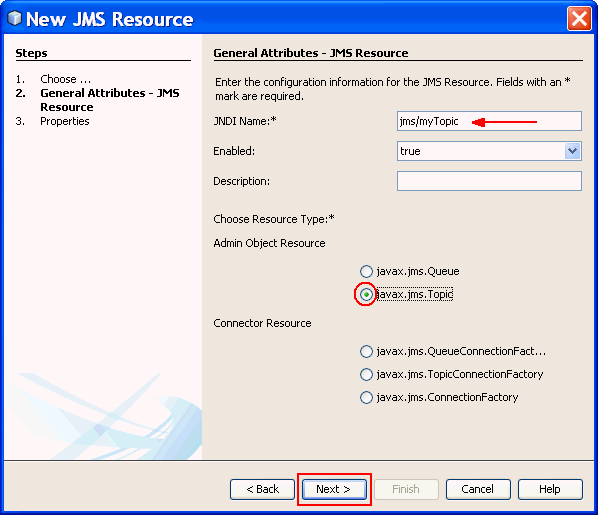
On the JMS Properties screen, enter myTopic in
the Value field for Name. Press the Enter key.
Click Finish.

Repeat Step 1 above.
Then, on the New JMS Resource screen, enter
jms/myTopicFactory and select javax.jms.TopicConnectionFactory.
Click Finish.

Create a subscriber message-driven bean (MDB)
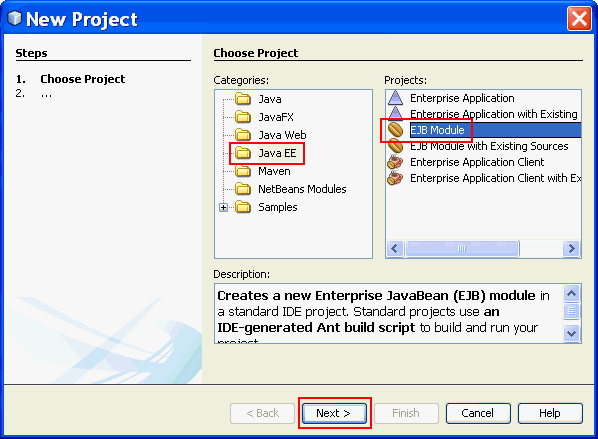
Create a new EJB Module Project
Create a new project called NapaSubscriberMDB by
clicking on New -> Project.
Select Java EE from Categories and EJB
Module from Projects. Click Next.
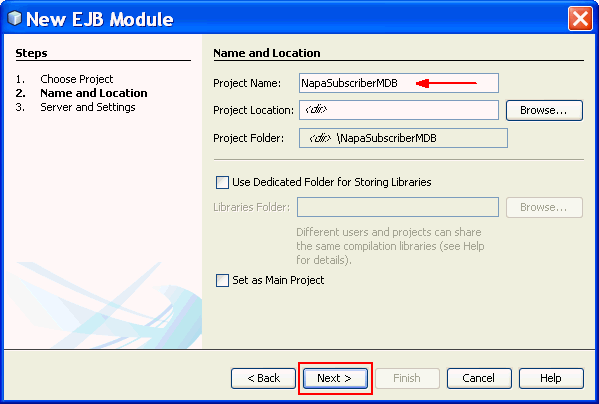
Enter NapaSubscriberMDB as the Project Name.
The Project Location should be the same directory as
the JSFHotelReservation project. Click Next.
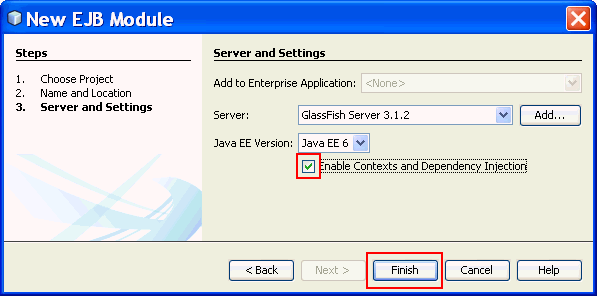
On the next screen, GlassFish Server should be
selected.
Select Enable Contexts and Dependency Injection.
Click Finish.
Add a Message-Driven Bean to the project.
Right-click on the Source Packages folder and
select New -> Other.
Select Enterprise JavaBean from Categories and
Message-Driven Bean from File Types. Click Next.
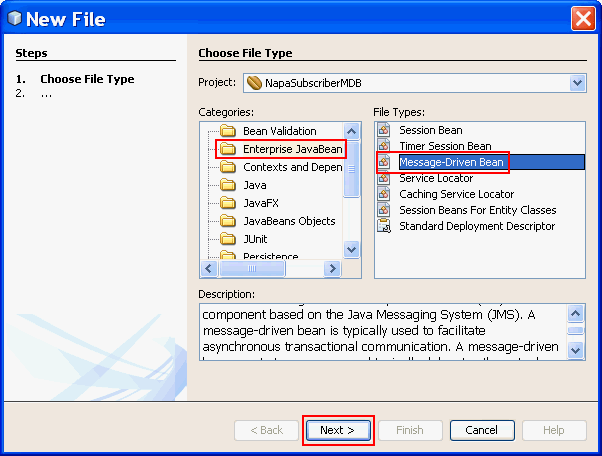
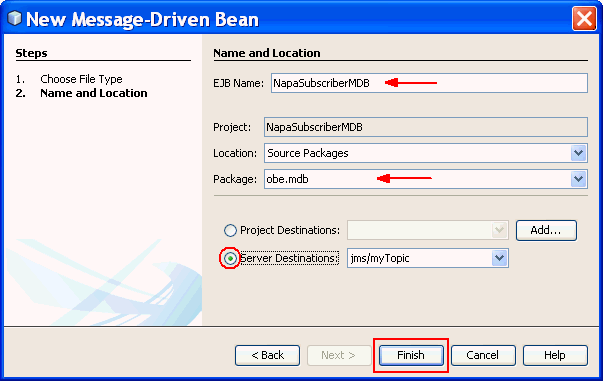
Enter NapaSubscriberMDB as the EJB Name.
Enter obe.mdb as the Package.
Select Server Destinations and make sure jms/myTopic
is selected. Click Finish.
Modify the NapaSubscriberMDB class
The annotation @MessageDriven defines the characteristics of this MDB. Add an ActivationConfigurationProperty as the first line to filter messages sent to the topic to those that are for the "Napa Valley" or "All Regions"
@MessageDriven(mappedName =
"jms/myTopic", activationConfig = {
@ActivationConfigProperty(propertyName
= "messageSelector", propertyValue = "Region = 'Napa
Valley' OR Region = 'All Regions'"),
Modify the onMessage method to display the
contents of the MapMessage object by iterating through
the map key-value pairs. Fix any missing imports.
public
void onMessage(Message message) {
if (message
instanceof MapMessage) {
MapMessage mm = (MapMessage) message;
String request = null;
try {
Enumeration<String> mapNames = mm.getMapNames();
while (mapNames.hasMoreElements()) {
// Read all of the map elements as strings
String name = mapNames.nextElement();
request += name + ": " + mm.getString(name) + " | ";
}
System.out.println(this.getClass().getName() + ":
Received a request for " +
message.getStringProperty("Region"));
System.out.println(request);
} catch (JMSException ex) {
System.out.println("Failed to get request message");
Logger.getLogger(this.getClass().getName()).log(Level.SEVERE,
null, ex);
}
}
}
The onMessage method will be called by the container when a message is sent to the topic that has a header property "Region" that matches "Napa Valley" or "All Regions".
This method currently just prints the contents of
each map element as a string, but this
is where the application could send an e-mail to the
registered hotels or perform additional processing.
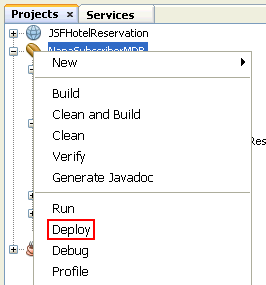
Deploy the NapaSubscriberMDB
Right-click on the NapaSubscriberMDB project and select Deploy.
Run the application and test it
In a new browser window, open the JSFHotelReservation
application again by entering the URL: http://localhost:8080/JSFHotelReservation.
Enter some data, select Napa Valley as the region and click
Submit.
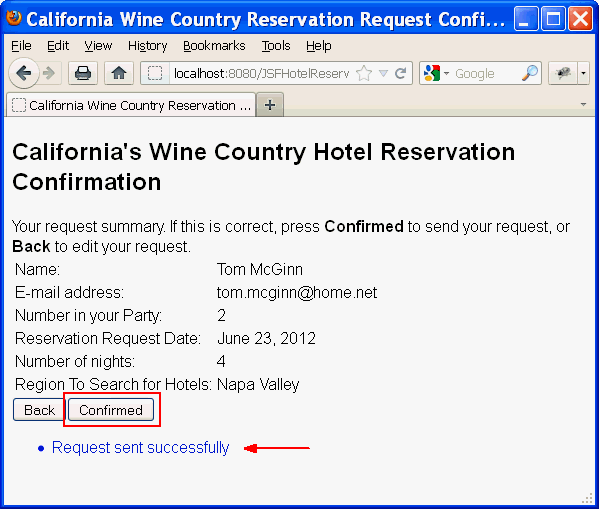
On the Confirmation page, when you click Confirmed,
your request should be sent successfully as an object to the
topic, and a success message will appear on the page.
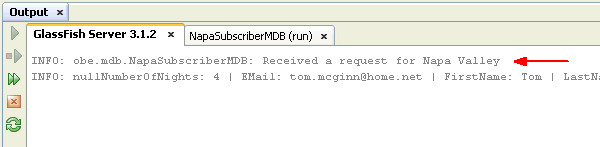
In the Output Window, under the GlassFish Server tab, you will see that the NapaSubscriberMDB received a request for reservations in Napa Valley
Enter another Reservation request, but this time choose All.
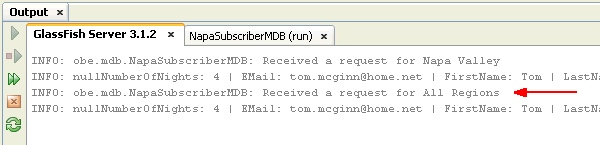
The message is again printed by the NapaSubscriberMDB.
Try creating reservation requests for other regions. Do they print out?
Add a second subscriber MDB
Repeat the steps in the section Create a subscriber
message-driven bean (MDB), but instead of Napa, use
Sonoma.
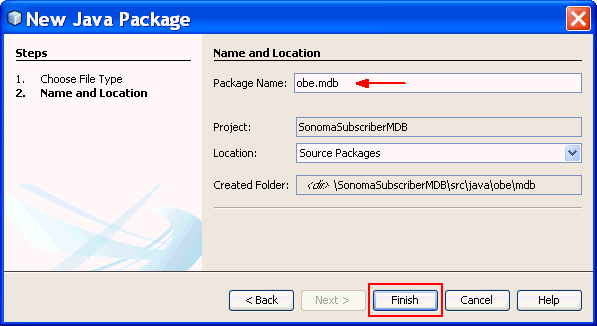
Create a new project with the name SonomaSubscriberMDB
Create a new package, obe.mdb.
Right-click on the Source Packages folder and select
New -> Java Package.
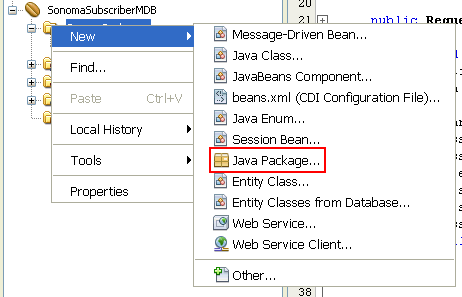
Enter obe.mdb as the Package Name and click Finish.
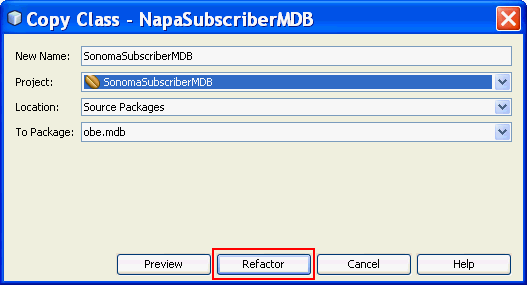
Perform a Refactor Copy on the NapaSubscriberMDB.java file in the NapaSubscriberMDB project. Right-click on the file and select Refactor then Copy.
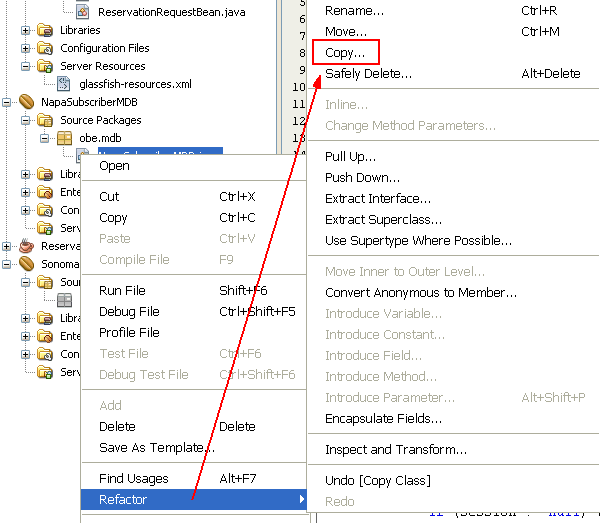
Enter SonomaSubscriberMDB as the New Name.
Select SonomaSubscriberMDB as the project and click
Refactor.
Add the ReservationRequestLibrary to the project.
Look at the task Add the ReservationRequestLibrary to
the project as a reminder for how to add a library to
the project.
In the SonomaSubscriberMDB class, modify the messageSelector filter in the first ActivationConfigProperty to reflect 'Sonoma Valley'.
@ActivationConfigProperty(propertyName = "messageSelector",
propertyValue = "Region = 'Sonoma
Valley' OR Region = 'All Regions'"),
Modify the clientId and subscriptionName properties to reflect SonomaSusbcriberMDB instead of NapaSubscriberMDB.
@ActivationConfigProperty(propertyName = "clientId",
propertyValue = "SonomaSubscriberMDB"),
@ActivationConfigProperty(propertyName =
"subscriptionName", propertyValue = "SonomaSubscriberMDB")
Save the file and deploy the SonomaSubscriberMDB project.
Run the application again, and this time select Sonoma
Valley as your destination. You will see SonomaValleyMDB
receive the request, and if you select All as your
destination Region, there will be two sets of messages
printed, one from the NapaSubscriberMDB and the
other from the SonomaSubscriberMDB. Note, the order
that the messages print in may be different.

Summary
- Create a dependent managed bean and inject that bean into
another JSF managed bean
- Create a topic destination and publish a MapMessage to it
- Create JMS subscribers as Message-driven Beans (MDB's)
- Add a message filter property to a subscriber
- The Java EE 6 Tutorial: Java Message Service
Concepts
- Java Message Service Documentation
- Developing Java EE 6 Applications for the
Java EE 6 Platform
- To learn more about using the Java Message Service in Java
EE applications, refer to additional OBEs in the Oracle Learning Library.
- Lead Curriculum Developer: Tom McGinn
In this tutorial, you successfully implemented the California
Wine Country Chamber of Commerce Java Message Service
Publish/Subscribe architecture.
In this tutorial, you have learned how to:
Resources
Credits
To help navigate this Oracle by Example, note the following:
- Hiding Header Buttons:
- Click the Title to hide the buttons in the header. To show the buttons again, simply click the Title again.
- Topic List Button:
- A list of all the topics. Click one of the topics to navigate to that section.
- Expand/Collapse All Topics:
- To show/hide all the detail for all the sections. By default, all topics are collapsed
- Show/Hide All Images:
- To show/hide all the screenshots. By default, all images are displayed.
- Print:
- To print the content. The content currently displayed or hidden will be printed.
To navigate to a particular section in this tutorial, select the topic from the list.