In this tutorial, you apply the Java Native Interface
(JNI) secure coding guidelines and implement exception
handling and memory management.
Time to Complete
Approximately 120 minutes
What Do You Need?
A virtual machine based on Oracle Linux 6.5
64-bit. The installation
guide contains the steps to install and
configure the virtual machine (VM). The guide covers
the following:
Downloading and Installing
VBOX
Downloading the VM from Oracle Technology
Network
Importing VM on the VBOX
Installing JDK in the VM
Downloading exercises in the VM
Note: Perform all steps in the
installation guide before you start this tutorial.
Introduction to JNI
What Is JNI?
JNI allows Java code that runs inside a Java Virtual
Machine (JVM) to interoperate with applications and
libraries written in other programming languages, such
as C, C++, and assembly. The most important benefit of
JNI is that it imposes no restrictions on the
implementation of the underlying JVM. Therefore, JVM
vendors can add support for JNI without affecting
other parts of the JVM. Programmers can write one
version of a native application or library and expect
it to work with all JVMs that support JNI. Native
methods in a shared library (.dll, .so, .dylib)
are connected to a Java method definition with the native
keyword.
JNI Development Workflow
When you develop JNI-based libraries, the Java source
is transformed into class files using the javac
compiler. Then, you generate the native headers (*.h)
with the javah utility. These headers
are included in the implementation source code (*.c,*.cpp),
and are compiled and linked to a platform-dependent
shared library using a C/C++ compiler. A Java class
contains native methods that typically load the shared
JNI library in a static initializer. During runtime,
the JVM invokes methods in the shared library when it
encounters a JNI method definition during control
flow.
JNI Threat Model
The Java runtime environment safely manages memory: It
performs automatic checks on access within array
bounds, and it has no explicit pointer arithmetic.
When you compare Java with C and C++programs, you find
that C and C++ programs can fail because of memory
corruption that is caused by heap and buffer
overflows. Because the Java runtime environment often
executes nontrusted code, it must protect against
unauthorized access to privileged resources, which
results in a different set of coding antipatterns than
C and C++. To keep Java programs safe when you use
JNI, be aware of the typical C and C++ antipatterns
during development of JNI code.
JNI Runtime Behavior
A specific behavior of a runtime environment is
considered a vulnerability if it allows an attacker to
subvert the checking mechanisms that protect the
confidentiality, integrity, and availability of an
environment. In the context of Java, this applies to
bypassing the security manager checks. Native
functions are capable of bypassing the Java security
architecture. The action of native code is not checked
against the security policy or visibility declarations
(for example, public, protected). For example, JNI
code might alter the values of normally immutable
classes such as java.lang.Integer, and
it also might allow read and modify (for example,
private key data) from arbitrary private fields. If
attackers can inject values into a native function
that doesn't have appropriate range checks, they could
trigger buffer or heap overflows that could lead to
arbitrary code execution on behalf of the attackers.
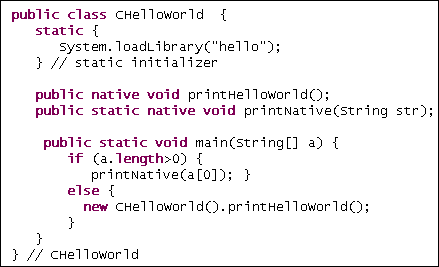
Components of a JNI Application
JNI Source Code
In the JNI program, native language stubs are
attributed with the native keyword.
Implementation of the native method itself is
provided in a native library, and you link the
method to the JVM address space with the System.loadLibrary
command.
Generated JNI Headers
The javah JDK tool generates native
prototypes from those methods that are marked with
the native keyword. The jni.h
library contains the definitions required for JNI
development.
Native JNI implementation
The JNI methods are implemented using the generated
prototypes. The JNICALL and JNIEXPORT
macros are translated to the platform counterpart
declarations. With every typical C and C++ program,
memory is explicitly allocated and released.
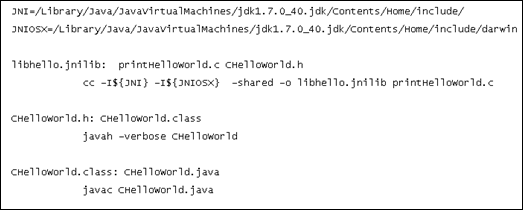
JNI Makefile File
The Makefile file automates the build
process. You execute it by running the make binary.
Creating the CHelloWorld.java File
In this section, you perform the following tasks:
Compile the CHelloWorld.java
file.
Test CHelloWorld.java for security
issues.
Create a secure version of the program by
applying code changes and using secure compile and
link flags.
Automate the program with Makefile.
Compiling Source Files
Open the directory, click the terminal
icon, and browse to the Exercise 0
directory:
cd ~/HOL6325/LABS/Exercise_0/
Compile the java source file:
javac CHelloWorld.java
Generate the header files:
javah CHelloWorld
The CHelloWorld.h header file
is created.
Compile the CHelloWorld.c C
code:
gcc CHelloWorld.c
Error messages are displayed because the
compile command didn't include the
directories.
Compile again, but include the
platform-independent JNI headers (jni.h)
and the platform-dependent JNI headers. The
header files are in the JDK include
directory: /usr/java/latest/include and
/usr/java/latest/include/linux.
Link the binary code to a shared library to
create a JNI library. In Linux, use the -shared
and –fPIE options and add a
file name for the library. The file name is
specified in the loadLibrary
call. Use lib as the prefix
and .so as the extension.
The stack dump shows that the loadLibrary
call failed because it didn’t find the
native library, even though it’s in the
current directory. To successfully load the
CHelloWorld.java file, you must
specify the directory containing the native
library with the java.library.path
system property.
Load the CHelloWorld.java
file:
java –Djava.library.path=.
                                      CHelloWorld
The program executes successfully and
"Hello World" is displayed.
Testing Code for
Security Issues
In this section, you investigate the code for
security issues and test the program with
arbitrary values.
The crash occurs if special characters are
passed in the input parameter. The crash
occurred in the IO_vfprintf
function inside libc. The input
parameter, one%ntwo%nthree%n,
contains the %n format string.
This format string writes the number of
successfully written characters to an integer
pointer.
Creating Secure
Program Versions
In this section, you create a secure version of
the program by applying the code changes and
using secure compile and link flags.
Find the log file name:
ls
The hs_err_pidxxxx.log
(replace xxxx with the actual process ID)
hotspot log file provides information about
the type of crash.
Open the hs_err_pidxxxx.log
file:
vi hs_err_pidxxxx.log
The siginfo indicates that
the reason for the crash is a processor
signal 11: A segmentation violation (SIGSEGV,)
was detected. The SIGSEGV
violation occurred because of an access
error (si_code=2) while writing
the address specified in si_addr.
Verify printf by using GCC.
Because printf and the
related standard library calls (sprintf)
may cause problems, you can check their
proper use with GCC during compilation. The
–Wformat and –Wformat-security
compile flags emit a warning message when a
printf allows variable input
in its first parameter. The -Wformat
-Werror=format-security compile
flag ensures that code is compiled even when
GCC finds vulnerable use of format strings.
Because the compiler rejects source code in
this vulnerable shape, you need a patch. You
can find out about the vulnerable code
location by analyzing the calls to printf.
Open the CHelloWorld.c file:
vi CHelloWorld.c
Press Insert to edit the code.
Replace the call to printfwith a string
variable format:
printf("%s",nativeString);
Press Esc, and then enter :wq
to write and quit.
Add input, one%ntwo%nthree%n,
to the command, and verify the output.
After you apply the fix, GCC builds the
program binary with the secure compile
settings. Running the program with the
previous input no longer generates a crash
dump.
Automating the Program
In this section, you automate the program with
Makefile.
Run the make binary to
execute the Makefile, and
specify the class name in the CLASSNAME
environment variable.
CLASSNAME=CHelloWorld make
The Makefile is updated.
CLASSNAME=CHelloWorld make runjava
-verbose:jni -Xcheck:jni -cp .
-Djava.library.path=. CHelloWorld
Note: The Makefile
also specifies two options for tracing the
linking and execution of JNI methods:
The –Xcheck: jni option
traces JNI calls and performs a range of
basic checks on the sanity of arguments
passed to a JNI method. However, these
checks don't replace secure programming
practices.
The –verbose: jni option
dumps the registering and linking actions
for JNI methods.
Execute the Makefile:
CLASSNAME=CHelloWorld make run
The program works as expected. When you
execute the Makefile, the
output is enhanced with JNI tracing
messages. You have now automated the build
of your JNI program.
Close the terminal.
Note: You need to be aware of
C and C++ secure coding practices.
Vulnerabilities caused by bad practices (like
allowing attacker-controlled format strings) are
still relevant. Follow the documented
recommendations for secure compile and link to
enable optimal use of platform protection
mechanisms.
Applying JNI Secure Coding Guidelines
In this section, you apply JNI secure coding
guidelines to a JNI utility class. The class uses
native code that reads a string from stdin
and concatenates the string with the host name. The
class also places the result in an instance of java.lang.String.
Perform the following tasks:
Compile the source and link the shared library
with secure compiler and linker settings.
Test the JNI utility class.
Verify that the class is secure. If it isn't,
identify the affected code parts and the input
values that trigger the bug.
Modify the code for a secure solution.
Compiling Source Files
Open the directory, click the terminal
icon, and browse to the Exercise 1
directory:
cd ~/HOL6325/LABS/Exercise_1/
Compile the code with Makefile:
CLASSNAME=ReadLine make
If you use the provided Makefile
headers, the class file and the dynamic
library messages are generated.
Open the ReadLine.c C file:
vi ReadLine.c
Replace printf()with a call
to puts():
puts(thebuffer);

                                    puts("\n");
Press Esc, and then enter :wq
to write and quit the ReadLine.c
C file.
Compile the code:
CLASSNAME=ReadLine make
The compilation is successful, and you can
execute the program.
Testing the JNI
Utility Class
Run the program:
CLASSNAME=ReadLine make run
The program starts executing and waits for
input from the user.
The program crashed with the following error:
The –fstack-protector-all option
detected a stack corruption scenario and
stopped the program. This segmentation
violation could harm security on platforms
that don't support this flag.
Creating a Secure
Program
Open the ReadLine.c C file
and examine the code:
vi ReadLine.c
Notice the following code:
char thebuffer[64];
Because the input consisted of 70
characters, but the declared array size
was smaller, the processing of the entered
string wrote past the reserved 64-byte
range of the stack and damaged other
important data.
gets(thebuffer);
Because the gets function
doesn't check for a maximum size, it's
impossible to limit the input to a proper
size. The better alternative is to use fgets,
which accepts a parameter to specify the
input length.
In the next steps, you implement the fixes.
Limit the lengths of the entered string.
char hostnamebuf[32];

                                        puts("Enter a string [32 chars
                                      max]:");

                                        fgets(thebuffer,32,stdin);
You reduce the size of the string that
contains the host name. You want host names
that are 32 bytes or fewer; otherwise, the
host name isn't appended. Also you limit the
length of the input string to 32 bytes by
replacing the usage of the unsafe gets
function with a call to the length-delimited fgets().
Increase the array length to a safe
value.
To apply the first fix, edit the ReadLine.c
file: hostnamebuf[31] = '\0';
int c = gethostname(hostnamebuf,31 );
This change adjusts the safety null byte in
hostnamebuf and calls gethostname
while storing the return value.
if (!c) {
strcat(thebuffer,hostnamebuf);
}
This change appends only the host name when
the gethostname function
successfully acquires it. This change
prevents a corrupted temporary string from
being appended.
The output is as follows:
Verifying the Secure
Program
Run the program:
CLASSNAME=ReadLine make run
The program executes and waits for input from
the console.
Enter a longer string. For example, enter
the following: 11111111111111111111111111111111111111111111111111111111111111111111111111111111111111111.
The program works as expected. When you
compare native code with Java, you see that
built-in array bounds don't check native
code. However, compiler flags detect buffers
that are written with overlong string
values.
Close the terminal.
Violating Visibility Rules with JNI
In this section, you learn how the JNI code can
subvert the Java security model, because JNI has
access to all information hidden in private fields
and methods. You learn how native code
changes the internal value of an integer, which
breaks the immutability property of the java.lang.Integer
type.
Perform the following tasks:
Compile the source and link the shared library
with secure compiler/linker settings.
Test the code.
Start the program with a security manager, and
define a minimal security policy.
Write a Java program that causes the same
effect as the native code, and define a minimal
security policy.
Compiling Source
Files
Open the directory, click the terminal
icon, and browse to the Exercise
2 directory:
cd ~/HOL6325/LABS/Exercise_2/
Open the MutableInteger.java
file, review the code, and then close
the file.
vi MutableInteger.java.
Open the C file, review the code, and
then close the file.
viMutableInteger.c
Testing Code for
Security Issues
Use a security manager to determine whether a
security policy can help to better control the
access facilities of native code. Start the
program with a security manager and define a
minimal security policy.
Compile the program with the supplied Makefile
file:
CLASSNAME=MutableInteger make
Run the Makefile file:
CLASSNAME=MutableInteger make run
The output illustrates the fundamental
problem with JNI: You can't prevent native
code access to fields that are
inaccessible to the Java code.
You successfully loaded the native library
with an enabled security manager. No further
permissions are required to modify fields
that are inaccessible to Java code. You
can't limit this capability because the
security manager can't intercept native code
modifications of Java fields.
Developing a Pure
Java Solution
In this section, you develop a Java
solution for the private field. You replace
the native code solution with calls to the
Reflection API to modify the private field
value. Next, you add a policy that allows
the program to run under a security
manager.
Examine the MutIntReflection.java
file.
Compile the following commands:
javac MutIntReflection.java
java MutIntReflection
The output is displayed.
Add RuntimePermission
to the ex2reflect.policy file:
grant {

                                           permission
                                          java.lang.RuntimePermission
                                          "accessDeclaredMembers";

                                           permission
                                          java.lang.reflect.ReflectPermission
                                          "suppressAccessChecks";

                                          };
You successfully created a pure Java
solution that modifies the private field
in an Integer instance.
Close the terminal.
Handling Exceptions
In this section, you implement exception handling
in the JNI code.
Perform the following tasks:
Compile the source and link the shared library
with secure compile and link settings.
Test the code.
Use a debugger to verify that the JNI code
contains security vulnerabilities.
Fix the vulnerable code parts, so that the Java
program can safely complete the entire loop of
array sizes.
In this example, the native code copies a Java-side
byte array into a fixed-size native buffer. When the
passed byte array is too large to fit in the native
buffer, the native code throws an exception back to
the Java layer.
Compiling Source Files
In this section, you compile the source and
link the shared library with secure compile
and link settings.
Open the directory, click the terminal
icon, and browse to the Exercise 3
directory:
cd ~/HOL6325/LABS/Exercise_3/
Open the VulnerableExceptionHandling.java
file:
vi VulnerableExceptionHandling.java
Open the VulnerableExceptionHandling.c
C file:
vi VulnerableExceptionHandling.c
Testing the Code Using
Makefile
Run the VulnerableExceptionHandling
file:
CLASSNAME=VulnerableExceptionHandling
                                      make run
The program copied the byte array for sizes
256 and 512 because they’re smaller than the
reserved native array size. The 576-byte
array threw a warning when it was copied:
One of the –Xcheck:jni checks
found a suspicious call to a JNI function
while an exception was pending. The crash
dump indicates that the corruption caused a
later crash in a memory operation, but it
was caught by the GCC stack protection.
When you disable the stack protection in Makefile,
you can discover the root cause of the stack
corruption.
Clean the intermediate file:
make clean
Execute the VulnerableExceptionHandling
class file.
CLASSNAME=VulnerableExceptionHandling
                                    make run
The program fails with an error:
From the canary value of 42 (which should
be 0), you see that the destination array
was written beyond its bounds (the adjacent
stack memory location of the canary).
The crash occurred in the memcpy
standard library function.
The debugger stops at the program's first
instruction.
Enter r to continue.
The following output is displayed:
Ignore the debugger message about missing debuginfo
information.
Disassemble the native instruction at the
crash location:
(gdb) disass $pc,$pc+1
The $pc and $pc+1
parameters indicate the crash location.
Verify the value of the rsi
process register:
(gdb) i r rsi
The rsi register is filled
with 0x2a bytes, and 0x2a is hexadecimal for
42. Therefore, the rsi
register was initialized from a corrupt
stack when the array was written beyond its
borders.
Execute the bt backtrace
command to examine where the crash occurred.
(gdb)bt
The crash occurred in the jni_ReleaseByteArrayElements
call when it was called into memcpy.
The source parameter in rsi
was corrupt, and the program subsequently
crashed with an illegal read memory access.
Enter quit to exit the(gdb)
prompt.
Implementing the Fixes
Add the issafe flag to the VulnerableExceptionHandling.c
native code.
After a JNI exception is thrown, avoid a
call to other JNI operations. In this
example, you can use the issafe
flag to call the dangerous memory-moving
code at the end of the native method only
for the issafe=True case.
Run the VulnerableExceptionHandling
file:
CLASSNAME=VulnerableExceptionHandling
                                    make run
The loop safely executed. To avoid integer
overflows, secure your JNI implementation in
Java while testing for valid ranges.
Close the terminal.
Managing Memory
In this section, you learn how a Java program's
security can be subverted by inconsistent memory
management and false assumptions about integer
arithmetic.
Perform the following tasks:
Compile the source and link the shared library
with secure compiler and linker settings.
Test whether the range-checking code is
complete.
Test whether the memory management of the native
array can resist corruptions.
Compiling Source Files
Open the directory, click the terminal
icon, and browse to the Exercise 4
directory: cd ~/HOL6325/LABS/Exercise_4/
Open the ByteArray.java Java
file:
vi ByteArray.java
Open the ByteArray.c C file:
vi ByteArray.c
Compile and run the ByteArray.java
file with the following parameters: ARGV="50 10 20 42 25 15 84"
CLASSNAME=ByteArray make run
The values in the ARGV
parameters initiate an array of size 50.
They fill the array from offset 10 to entry
30 (length 20) with value 42, and afterwards
from offset 25 to offset 40 (length 15) with
value 84.
Testing Code for a
Range of Values
In this section, you test two cases. For case
1, you catch negative edge values for offset and
length. For case 2, you test with the offset
value.
Execute the ByteArray.java
file with the following parameters:
ARGV="50 10 20 42 -250 230 84"
                                      CLASSNAME=ByteArray make run
An error occurs. The program seems to be
missing checks against negative offset
values.
In Java Platform, Standard Edition (Java
SE) 7 and 8, integer sums can easily
overflow, and the vulnerable pattern occurs
in fill_array. Notice that the
secure compile flags didn't detect the
integer overflow.
Execute the ByteArray.java
file with the following parameters: ARGV="1250 10 20 42 2147483500 170 84"
CLASSNAME=ByteArray make run
Java SE 8 also catches the overflow case.
Note: With Java SE 7 and
earlier, rearrange the comparison to prevent
the overflow: if ((length >=0) && (offset
>=0) && (offset <= size -
length))
To prevent manipulation, store native memory
addresses in private fields and treat them as
read-only in Java. To avoid integer overflows,
secure your JNI implementation in Java while
testing for valid ranges.


 Java SE 8 also catches the overflow case.