Java EE 7: Implementing CSRF Protection with JSF 2.2
Overview
- Create a Java Platform, Enterprise Edition 7 (Java EE
7) web application
- Develop two JSF pages:
csrfExample.xhtmlandcsrf_protected_page.xhtml - Modify the web application to implement CSRF protection
- Deploy the project to the GlassFish Server and verify the
CSRF protection feature
- Download and install the latest JDK from this link (Java Platform, Standard Edition 7u21 recommended).
- Download and install NetBeans 7.3.1 with Java EE, which includes GlassFish 4 (Java EE download bundle) from this link. During installation, be sure to select the check box to install GlassFish. JUnit is an optional installation and is not required for this tutorial.
- Have installed the required software.
- Ensure that NetBeans is running.
Purpose
This tutorial covers how to implement Cross-Site Request
Forgery (CSRF) protection with JavaServer Faces 2.2 (JSF 2.2).
Time to Complete
Approximately 45 minutes
Introduction
CSRF is a type of attack that tricks the browser into sending
requests which the user did not actually intend to initiate. For
example, this attack could result in transferring funds,
changing passwords, or purchasing items in the user's context.
In JSF 2.2, postback requests and non-postback requests (like
GET) are inspected for protection. For postback requests, the
client state or view state is “on” by default; for non-postback
requests, a new configuration element, <protected
views>, was implemented.
In this tutorial, you learn how to:
Hardware and Software Requirements
The following is a list of hardware and software requirements:
Prerequisites
Before starting this tutorial, you should:
Creating a Web Application
In this section, you create a Java EE 7 web application in the NetBeans IDE.
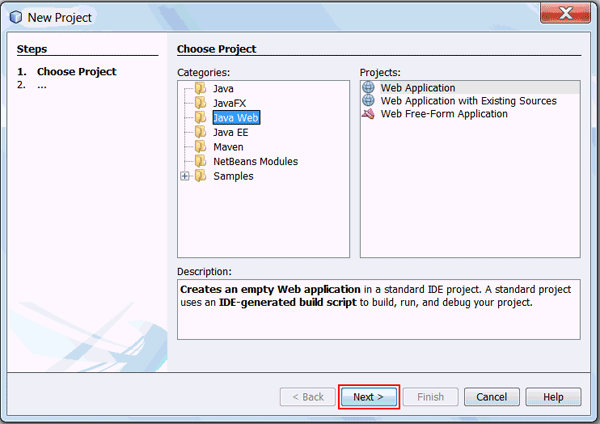
In the New Project dialog box, perform the following steps
on the Choose Project page:
b. Select Web Application from Projects.
c. Click Next.
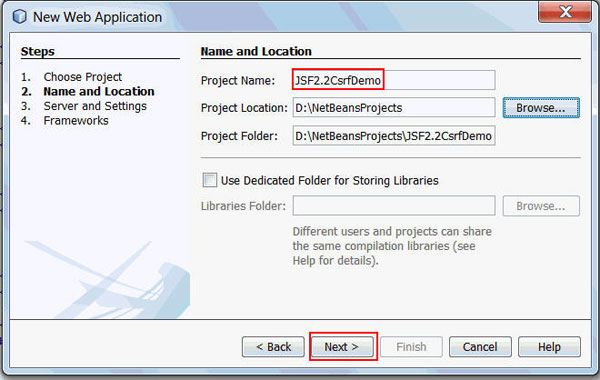
On the Name and Location page, enter JSF2.2CsrfDemo
as the project name and click Next.
On the Server and Settings page, perform the following steps:
a. Select GlassFish Server from the Server list.
b. Select Java EE 7 Web from the Java EE Version
list.
c. Click Next.
On
the Frameworks page, select JavaServer
Faces and click Finish.
JSF2.2CsrfDemo
project is created in NetBeans. Developing the JSF Pages
In this section, you create two JSF pages: csrfExample.xhtml
and csrf_protected_page.xhtml.
In
the Projects window, right-click
JSF2.2CsrfDemo and select New
> Other.
In the New File dialog box, perform the following steps on
the Choose File Type page:
a.
Select Web from Categories.
b.
Select JSF
Page from
File Types.
c.
Click Next.

csrfExample
as the file name and click Finish.
,csrf_protected_page.xhtml.
Modifying the csrfExample JSF Page
In this section, you modify the csrfExample
JSF page. You add the following components: <h:commandButton>
generates a POST request and <h:link>
generates a GET request.
Enter JSF 2.2 CSRF Protection Demo for the title of the page.
Delete IDE-generated code in the <body>
section and add an h:form element with
a heading.
    <h:form
                    prependId="false">


                    <h3>Cross-site request forgery protection</h3>

                            </h:form>

<h:commandButton>,
Go to protected view, to h:form.
                       <p>Go to a protected page via
                      postback</p>
<p><h:commandButton
id="button_postback" value="Go to protected view"
action="/csrf_protected_page"/></p>
The command button always generates a POST request. In
this case, it generates a POST request to csrf_protected_page
as defined in the action attribute.
<h:button>,
Go to protected view, to h:form. <p>Go to a protected page via
non-postback</p>
<p><h:button id="button_non_postback"
value="Go to protected view"
outcome="/csrf_protected_page"/></p>
This button generates a GET request. In this case, it
generates a GET request to csrf_protected_page
as defined in the outcome attribute.
Modifying the csrf_protected_page JSF Page
In this section, you modify csrf_protected_page.
Enter CSRF protected page
for the title of the page.
<h:body>
section and add the following to the <h:body>
section:<p>This is a protected view</p>
Testing Without CSRF Protection
In this section, you test the project by deploying and running it without CSRF protection for the POST and GET requests.
Modify web.xml to set the welcome file of the
project to csrfExample.xhtml instead of
index.html.
a. Expand the JSF2.2CsrfDemo project
in the Projects window.
b. Expand Configuration Files and double-click web.xml
to open it in the editor.
c. Update the value of the <welcome-file>
element to faces/csrfExample.xhtml.

In the Projects window, right-click the project and select Run.
The application appears in the browser.

a. Click Go to protected view under "Go to a protected page via postback."

csrf_protected_page
is displayed. 
b. Click Go to Protected view under "Go to a protected page via non-postback.".
csrf_protected_page
is displayed.
Implementing CSRF Protection
In this section, you modify the project to implement the CSRF
protection feature for non-postback requests, like GET, by
declaring the <protected-views> element in faces-config.xml.
In the Projects window, right-click JSF2.2CsrfDemo
and select New >
Other.
In the New File dialog box, perform the following steps on
the Choose File Type page:
a. Select JavaServer Faces from Categories.
b. Select JSF Faces Configuration from File Types.
c. Click Next.
faces-config, and click Finish.
The faces-config.xml file is created in the
projects under the Configuration Files folder.
Add the following code to the faces-config.xml
file:
<protected-views>


                    <url-pattern>/csrf_protected_page.xhtml</url-pattern>

                      </protected-views>
The csrf_protected_page.xhtml JSF page is a
protected page because you added it within the <protected-views>
element.
Testing with CSRF Protection
In
this section, you verify the CSRF protection feature by
deploying and running the project .
In the Projects window, right-click JSF2.2CsrfDemo
and select Run.
The application appears in the browser.
a. Click Go to protected view under "Go to a protected page via postback."
Notice that there is no change in the URL for postback requests when calling the protected page. In JSF 2.2, the client state or view state is “on” by default for postback requests.
csrf_protected_page JSF page is
displayed.
Summary
- Create a Java EE 7 web application
- Implement CSRF protection with JSF 2.2
In this tutorial, you learned how to:
- Java EE 7 Tutorial
- JSF 2.2 Specification
- Learn more about CSRF from OWASP
and OWASP
Principles.
- To learn more about Java EE, refer to additional OBEs in the Oracle Learning Library.
- Lead Curriculum Developer: Anjana Shenoy
- Editor: Susan Moxley
- QA:
Diganta Choudhury
Resources
Credits
To help navigate this Oracle by Example, note the following:
- Hiding Header Buttons:
- Click the Title to hide the buttons in the header. To show the buttons again, simply click the Title again.
- Topic List Button:
- A list of all the topics. Click one of the topics to navigate to that section.
- Expand/Collapse All Topics:
- To show/hide all the detail for all the sections. By default, all topics are collapsed
- Show/Hide All Images:
- To show/hide all the screenshots. By default, all images are displayed.
- Print:
- To print the content. The content currently displayed or hidden will be printed.
To navigate to a particular section in this tutorial, select the topic from the list.