Java SE 8: Adding JavaFX Graphics to Your HTTP Link Checker Application
Overview
Purpose
This tutorial shows you how to use the JavaFX API in Java Platform, Standard Edition (Java SE) 8 to design the user interface (UI) for the HTTP link checker application.
Time to Complete
Approximately 120 minutes
Introduction
JavaFX is a set of graphics and media packages that enables
developers to design, create, test, debug, and deploy rich client
applications that operate consistently across diverse platforms.
Because the JavaFX library is written as a Java API, the JavaFX
application code can reference APIs from any Java library. For
example, JavaFX applications can use Java API libraries to access
native system capabilities and connect to server-based middleware
applications.
The following features are included in JavaFX 8 and later
releases:
- Java APIs: JavaFX is a Java library of classes and interfaces that are written in Java code. The APIs are designed to be a friendly alternative to Java Virtual Machine (JVM) languages, such as JRuby and Scala.
- Swing interoperability: Existing Swing applications can be updated with JavaFX features, such as rich graphics media playback and embedded web content.
- WebView: This web component uses WebKitHTML technology to make it possible to embed web pages in a JavaFX application. JavaScript running in WebView can call Java APIs, and Java APIs can call JavaScript running in WebView.
- Canvas API: The Canvas API enables you to draw directly within an area of the JavaFX scene that consists of one graphical element (node).
In this OBE, you learn how to add JavaFX UI features (layouts, VBox, HBox) and widgets (buttons, pie charts, and progress bars) to your HTTP link checker application and design the UI to demonstrate the application.
Scenario
A testing team wants to verify and validate a given set of URLs. Using JavaFX, you design the UI for the link checker application. A pictorial representation of the URLs would be better than simply displaying them in the console.
Hardware and Software Requirements
- Install the Java SE 8 JDK.
- Install NetBeans 8.0.
- Extract the Url_file.zip file.
- Extract the JavaFXLinkChecker.zip
file (The project contains
HTTPClient.java, HTTPClientTest.java, Results.java, URLStatus.java,andMyStyle.css.) - Download the source for HTTPClientTest.java, and MyStyle.css.
Creating a JavaFX Application
In this section, you create a JavaFX application that you will use to demonstrate the HTTP link checker by using concurrency.
-
In NetBeans IDE 8.0, select New Project from the File menu.

- On the Choose Project page, perform the following steps:
- Select JavaFX from Categories.
- Select JavaFX Application from Projects.
- Click Next.
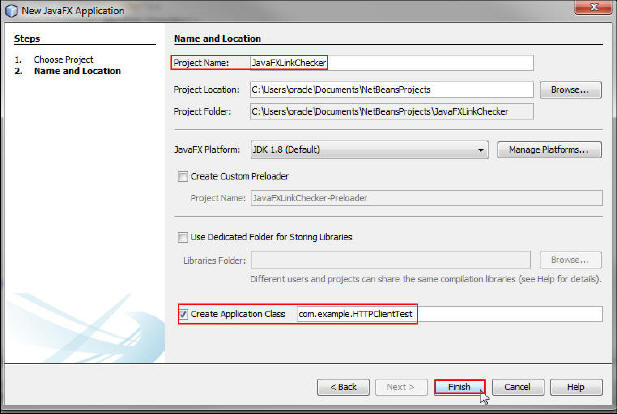
- On the Name and Location page, perform the following steps:
- Enter JavaFXLinkChecker as the project name.
- Select the Create Application Class field, and enter com.example.HTTPClientTest. (The package name and the class name are implied and match the UI to create a Java project in NetBeans.)
- Click Finish.

The Java SE 8 JavaFXinkChecker project is created in NetBeans. You're now ready to use the HTTPClientTest.java file to implement the HTTP link checker application.
Note: You import and use theJavaFXLinkChecker
project with all files required for the tutorial.Designing the Cascading Style Sheets File
In this section, you learn how to use the JavaFX Cascading Style
Sheets (CSS) file to style your application with a set of
formatting rules. CSS gives you better control over the appearance
of your page; you can position widgets and set the font size and
style.
Web developers can use CSS to customize and develop themes for
JavaFX controls and scene-graph objects. JavaFX has a rich set of
CSS extensions in support of features such as color derivation,
property lookup, and multiple background colors and borders for a
single node.
-
In the NetBeans IDE, perform the following steps:
- Open the provided JavaFXLinkChecker project.
- Expand
Source Packages,and then expandresources.style. - Open the downloaded MyStyle.css and paste in your NetBeans IDE project file.
-
Retrieve the CSS code.

Use the following properties to specify fills and borders:
- Fills for background color, size, and position:
-fx-background-color, -fx-background-size, -fx-background-position - Stroked borders:
-fx-border-color,
                      -fx-border-style, -fx-border-width, -fx-border-radius,
                      -fx-border-insets
Each border property contains a series of items. The number of items in the
-fx- border-colorproperty determines the number of borders that are painted. Each border in the series is painted by using information from the corresponding series item of the other properties.
MyStyle.cssfile contains the styling for labels, buttons, pie charts, and so on.
You can create your own CSS file, as shown in the following screenshot:
- Fills for background color, size, and position:
Creating a Java enum Data Type
In this section, you create an enum data type to store the HTTP response code. An enum data type is a special data type that includes a set of predefined constants for a variable. The variable must be equal to a predefined value. You declare the HTTP response code and validate the URLs against them.
You use URLStatus, which has values like HTTP_OK (200, "OK", "SUCCESS"), NO_CONTENT (204, "No Content", "SUCCESS"), and INTERNAL_SERVER_ERROR (500, "Internal Server Error", "ERROR").
-
Create URLStatus.java and initialize it by using a constructor.
-
Retrieve the HTTP status message.
public static String getStatusMessageForStatusCode(int httpcode) {
String returnStatusMessage = "Status Not Defined";
for (URLStatus object : URLStatus.values()) {
if (object.statusCode == httpcode) {
returnStatusMessage = object.httpMessage;
}
}
return returnStatusMessage;
}
The getStatusMessageForStatusCode()method receives httpcode as the input parameter. The httpcode parameter is verified across all defined enum values. For
httpcode,if an enum is defined, then the HTTP message for that code is returned; otherwise,"Status Not Defined" isreturned. -
Retrieve the result of the URL.
public static String getResultForStatusCode(int code) {
String returnResultMessage = "Result Not Defined";
for (URLStatus object : URLStatus.values()) {
if (object.statusCode == code) {
returnResultMessage = object.result;
}
}
return returnResultMessage;
}
}
The getResultForStatusCode() method receives
codeas the input parameter. Thecodeparameter is verified across all defined enum values. Forcode,if an enum is defined, then the result for that code is returned; otherwise,"Result Not Defined"is returned. -
Review the code. Your code should look like the following:

  public enum URLStatus {


                      HTTP_OK (200, "OK", "SUCCESS"), NO_CONTENT
                  (204, "No Content", "SUCCESS"),

                      MOVED_PERMANENTLY (301, "Moved
                  Permanently", "SUCCESS"), NOT_MODIFIED (304, "Not modified",
                  "SUCCESS"),

                      USE_PROXY (305, "Use Proxy", "SUCCESS"),
                  INTERNAL_SERVER_ERROR (500, "Internal Server Error", "ERROR"),

                      NOT_FOUND (404, "Not Found", "ERROR");


                      private int statusCode;

                      private String httpMessage;

                      private String result;

                      public int getStatusCode() {

                          return statusCode;

                      }

                      private URLStatus(int code, String message,
                  String status) {

                          statusCode = code;

                          httpMessage = message;

                          result = status;

                      }
You defined the set of HTTP response code values as constants inside the URLStatus enum type. You initialized the declared enum values by using the constructor.
Note: Here is an explanation of some HTTP response codes:
- 200, OK: The client request was received, understood, and processed successfully.
- 301, Moved Permanently: The location was moved, and you're directed to the new location.
- 500, Internal Server Error: An error occurred during execution.
Creating a Singleton Class
In this section, you create a Java class named
Results.java that holds status messages for successful,
failed, and incorrect URLs. Here, you create Results.java as
a Singleton
class to ensure that only a single instance of the class is
created. In this application, you use a single instance of
Results.java across the threads.
In Results.java,
you create an object reference for the typed AtomicReference
variables that will be updated atomically, depending on the status
of the URLs. You also initialize a CountDownLatch
class named latch
to allow one or more threads to wait for completion of a set of
operations being performed in other threads.
You use the AtomicReference and CountDownLatch classes to retrieve the status message of the URL, append the message, and create the setter and getter method for the typed atomic reference objects.
-
Create Results.java and import the following packages:
-
Create typed AtomicReference objects.
-
Initialize the CountDownLatch variable.
private CountDownLatch latch;
public void setLatch(CountDownLatch latch) {
Results.getInstance().latch = latch;
}
public CountDownLatch getLatch() {
return latch;
}
public void latchCountDown() {
Results.getInstance().latch.countDown();
}
}
A CountDownLatch is initialized with the value equal to the number of URLs in the url-list.txt file. Because the countDown() method was invoked, the await() method is blocked until the current count reaches zero. Then, all waiting threads are released, and subsequent invocations of
awaitare returned immediately. The CountDownLatch doesn't require that threads calling countDown wait for the count to reach zero before proceeding. It simply prevents threads from proceeding past an await until all threads are executed.Note: You can also use the sleep() or wait() method in main() to wait until the threads have validated the URLs. However, you must set a timeout value to wait for all threads to be executed. If a thread is still executing after the timeout, the main thread takes over, the executing thread continues its execution, and main()returns incomplete results.
-
Create typed ArrayList objects.
-
Review the code. Your code should look like the following:

import java.util.ArrayList;

                  import java.util.List;

                  import java.util.concurrent.CountDownLatch;

                  import java.util.concurrent.atomic.AtomicReference;
public class Results {

                      private static Results resultInstance =
                  null;

                      private Results() {  }


                      public static Results getInstance() {

                        if (resultInstance == null) {

                          resultInstance = new
                  Results(); }

                        return resultInstance;

                      }

                      private AtomicReference<String>
                  failedURLS = new AtomicReference<>("");

                      private AtomicReference<String>
                  succeededURLS = new AtomicReference<>("");

                      private AtomicReference<String>
                  incorrectURLS = new AtomicReference<>("");


                      public void appendFailed(String message) {

                      failedURLS.accumulateAndGet(message, (s1,
                  s2) -> s1 + s2); }


                      public String getFailed() {

                      return failedURLS.get(); }

                      public void appendSucceeded(String message)
                  {

                      succeededURLS.accumulateAndGet(message,
                  (s1, s2) -> s1 + s2);  }

                      public String getSucceeded() {

                      return succeededURLS.get(); }


                      public void appendIncorrect(String message)
                  {

                      incorrectURLS.accumulateAndGet(message,
                  (s1, s2) -> s1 + s2); }


                      public String getIncorrect() {

                      return incorrectURLS.get();  }
In the Singleton class, the getInstance() static method returns the single instance of the class. You use Java generics to create a typed AtomicReference object. The get()method retrieves the status of each URL in the url-list.txt file. The accumulateAndGet() method automatically updates the current value with the results of applying the given function to the current and given values, returning the updated value.
    private
                  List<String> failedURLList = new
                  ArrayList<String>();

                      private List<String> succeededURLList
                  = new ArrayList<String>();

                      private List<String> incorrectURLList
                  = new ArrayList<String>();


                      public List<String>
                  getFailedURLList() {

                      return failedURLList;

                      }


                      public void
                  setFailedURLList(List<String> failedURLList) {

                      Results.getInstance().failedURLList =
                  failedURLList;

                      }


                      public List<String>
                  getSucceededURLList() {

                      return succeededURLList;

                      }


                      public void
                  setSucceededURLList(List<String> succeededURLList) {

                      Results.getInstance().succeededURLList =
                  succeededURLList;

                      }


                      public List<String>
                  getIncorrectURLList() {

                      return incorrectURLList;

                      }

                       public AtomicReference<String>
                  getFailedURLS() {

                      return failedURLS;

                      }


                      public void
                  setFailedURLS(AtomicReference<String> failedURLS) {

                      Results.getInstance().failedURLS =
                  failedURLS;

                      }


                      public AtomicReference<String>
                  getSucceededURLS() {

                      return succeededURLS;

                      }


                      public void
                  setSucceededURLS(AtomicReference<String> succeededURLS)
                  {

                      Results.getInstance().succeededURLS =
                  succeededURLS;

                      }


                      public AtomicReference<String>
                  getIncorrectURLS() {

                      return incorrectURLS;

                      }


                      public void
                  setIncorrectURLS(AtomicReference<String> incorrectURLS)
                  {

                      Results.getInstance().incorrectURLS =
                  incorrectURLS;

                      }


                      public void
                  setIncorrectURLList(List<String> incorrectURLList) {

                      Results.getInstance().incorrectURLList =
                  incorrectURLList;

                      }
You use ArrayList of type string to
store the URLs in a separate string array list of succeeded
URLs, failed URLs, and incorrect URLs for each URL in the url-list.txt
file.
Verifying and Validating URLs
In this section, you verify and validate the URLs that are available in the url-list.txt file. You verify the URL for its correct format by using the verifyUrl method, and then validate the verified URLs by using the validateUrl method to check for broken URLs. You also add the url-list.txt file to the source package.
Verifying the URLs
In this section, you use the Java SE 8 regular expression to validate the correctness of the URL format. The verifyUrl method in the HTTPClient.java file accepts the URL as the input parameter.
- Import the following packages:
-
Implement the Runnable interface in the HTTPClient.java file.
public class HTTPClient implements Runnable{The Runnable interface is implemented by HTTPClient.java, whose instance is executed by a thread. The class defines a method of no arguments called run.
-
Add the following method to the HTTPClient.java file to verify the URL format:
-
Review the code. Your code should look like the following:

 import
                      java.net.HttpURLConnection;

                      import java.net.URL;

                      import java.util.logging.Level;

                      import java.util.logging.Logger;

                      import java.util.regex.Matcher;

                      import java.util.regex.Pattern;
    private boolean
                      verifyUrl(String url) {

                              String urlRegex =
"^(http|https)://[-a-zA-Z0-9+&@#/%?=~_|,!:.;]*[-a-zA-Z0-9+@#/%=&_|]";
Pattern pattern =
Pattern.compile(urlRegex);
Matcher m =
pattern.matcher(url);
return m.matches();
}
The verifyUrl
method verifies the url parameter passed as
the input parameter by matching it with the regular
expression. If the match is successful, then it returns true;
otherwise, it returns false.
Validating the URLs
In this section, you validate the URLs listed in the url-list.txt file.
-
Modify HTTPClient.java and use a constructor to initialize it.
private final String
                        urlToBevalidated;


                        public HTTPClient(String url) {

                        this.urlToBevalidated = url;

} -
Invoke the verifyUrl method in the validateUrl() method.
public void
                        validateUrl(String url) throws Exception {

                            if (verifyUrl(url)) {

                                try {
The validateUrl method receives the URL as an input parameter. In the if condition, you verify the URL by passing url as an input parameter to the
verifyUrlmethod. TheverifyUrlmethod returns true for a valid URL format; otherwise, it returns false. If theverifyUrlmethod returns true, then the if condition is true, and the code is executed in thetryblock.
-
Create the HttpURLConnection connection.
-
Validate the URL with the response code.
if (myConnection.getResponseCode() == URLStatus.HTTP_OK.getStatusCode()) {
Results.getInstance().getSucceededURLList().add(url);
Results.getInstance().appendSucceeded("\n" + url + "****** Status message is : "
+ URLStatus.getStatusMessageForStatusCode(myConnection.getResponseCode()));
} else {
Results.getInstance().getFailedURLList().add(url);
Results.getInstance().appendFailed("\n" + url + "****** Status message is : "
+ URLStatus.getStatusMessageForStatusCode(myConnection.getResponseCode()));
}
The myConnection instance receives the URL's response code and verifies the status. If the status code is 200 (HTTP_OK), then the URL is classified as succeededURLS; otherwise, it's classified as
failedURLS. -
Close try with the catch block.
} catch (Exception e) {
Results.getInstance().getFailedURLList().add(url);
Results.getInstance().appendFailed("\n" + url + "****** Status message is : " + e.getMessage());
}The catch block is executed when an exception is thrown while
HttpURLConnectionis created or opened. - Verify the incorrect URLs.
}else {
Results.getInstance().getIncorrectURLList().add(url);
Results.getInstance().appendIncorrect("\n" + url);
}
}
The else block is executed when the
verifyUrlmethod returns false because the URL validation failed. -
Implement the run()method.
@Override
public void run() {
System.out.println("Started thread " + Thread.currentThread().getName() + " Verifying URL " + this.urlToBevalidated);
try {
this.validateUrl(this.urlToBevalidated);
} catch (Exception e) {
Logger.getLogger(HTTPClient.class.getName()).log(Level.SEVERE, null, e);
}
Results.getInstance().latchCountDown();
}
}
The executor.execute method calls the run()method defined in HTTPClient.java.
-
Review the code. Your code should look like the following:

URL myURL = new URL(url);

                      HttpURLConnection myConnection = (HttpURLConnection)
                      myURL.openConnection();
Next, you create a myURL instance and open the connection with the HttpURLConnection class.
Using JavaFX to Design the User Interface
In this section, you edit HTTPClientTest.java
and use JavaFX Scene Builder to design the UI for your JavaFX
application. You load the MyStyle.css
style sheet from the URL specified in the getStylesheets
property of the Scene object.
-
In the NetBeans IDE, perform the following steps:
- Open the provided JavaFXLinkChecker project.
- Expand
Source Packages,and then expandcom.example. - On the Projects tab, double-click HttpClientTest.java.
- Open the downloaded HttpClientTest.java and paste in your NetBeans IDE project file.
-
Import the following packages to design the JavaFX UI for your HTTP link checker application:

-
Review
HttpClientTest.java. - Line 40: HTTPClientTest.java extends
the Application class.
You need this basic structure to start a JavaFX application.
-
Lines 42 to 50: This block of code creates the PieChart, Borderpane, Label, ProgressBar, and ImageView objects and assigns it to the variables named chart, controlLayout, ProgressText, bar, and imageView, respectively. Two Button object instances are named startButton and chartButton, and two VBox object instances are named progressBar and paneBox.
-
Lines 51 and 52: The start() method is automatically called when the application is launched from the
mainmethod. - Lines 53 to 57: Stage
is the main container, which is typically a window
with a border and the minimize, maximize, and close buttons.
Inside
Stage,you add a Scene object to hold your JavaFX widgets like BorderPane, Label, andbutton.You also set Scene object properties likewidth, height,andtitle. - Line 58: Use the getStylesheets.add() method to apply the CSS styles in MyStyle.css.
- Lines 59 to 62: Create a rectangle that's the same size as your scene and add it to your Group object instance named root. The rectangle appears as a border.
- Lines 63 to Line 71: Create a VBox object instance named vb and add buttons to it.
- Lines 63 and Line 71: Create a VBox object instance named vb. vb.setSpacing(5); sets five vertical spaces between each child in vbox.
- Lines 64 to 70: Create a button instance named closeButton
and set the properties with setId
and setText.
Use the setOnAction
method of the
Buttonclass to define what happens when a user clicks the button. The ActionEvent event type is processed by EventHandler. An EventHandler object provides the handle method to process an action fired for a button and close the application. - Lines 72 to 77: The elements of the UI are laid out with a
BorderPane.Use theBorderPaneinstance to set the preferred size, ID, style, and image at the center of the UI screen. - Lines 78 to 80: Create a Task
instance by overriding the call
method where you implement the executable logic of the
background thread. Your implementation of the
Taskclass must override thecallmethod to do the background work and return the result. TheTaskclass is used with the JavaFX UI applications, and it ensures that changes to public properties, change notifications for errors or cancellation, event handlers, and states occur on the JavaFX application thread. Disable the Start button by setting setDisable(true); - Lines 81 to 88: ExecutorService uses the executor instance through which threads in the thread pool execute the URL validation. The Executors class creates a thread pool with five threads. In this application, you create a urlList collection of type string to store the URLs in url-list.txt. The CountDownLatch()method retrieves the size of urlList and sets that value to the latch variable.
- Lines 90 to 95: Inside the call method, invoke the updateProgress method to update the progress bar and the updateMessage method to update the task message. Invoking the two methods is important because you can now use the progressProperty method to retrieve the progress of the task and bind the progress of the bar to the progress of the task.
- Lines 96 to 104: The await() method causes the current thread to wait until the latch counts down to zero. If it's interrupted during wait, then it throws InterruptedException; otherwise, it displays the invalid URLs, the valid URLs that connected, the broken URLs that didn't connect, and the status code of all URLs. The shutdown() method allows previously submitted tasks to execute before terminating, and then ExecutorService shuts down.
- Lines 105 to 106: If the task was canceled, a return value from the call method is ignored.
- Lines 107 to 112: When the state of the task transitions to the SUCCEEDED state, then the succeeded() method is invoked on the JavaFX application thread. The VBox class instance named progressBox removes that Start button, the progress text message, the progress bar, and the image from the layout.
- Lines 113 to 116: Convert the number of succeeded, failed, and invalid URLs to a percentage for mapping to the ratio in pie chart format.
- Lines 117 to 126: Instantiate the PieChart class, define the data, assign the data items to the PieChart object, and add the chart to the application. Create a chart data named PieChart.Data. These objects form as many slices as you want to appear. Each PieChart.Data object has two fields: the name of the pie slice and its corresponding value. The setTitle method sets the pie chart's title.
- Lines 127 to 129: Create a button named details and set the ID and the text on the button.
- Lines 130 to 132: The ActionEvent
event type is processed by EventHandler.
The EventHandler
object provides the
handlemethod to process an action fired for a button. When you press the "Click to see Details" button, information about the succeeded, failed, and invalid URLs is displayed in the list, and the View Chart button is enabled so that you can verify the details in pie chart format. - Lines 133 to 135: Create an instance of ListView to store failed, incorrect, and succeeded URLs.
- Lines 136 to 138: Use the Results.getInstance() method to retrieve the list of failed, succeeded, and incorrect URLs.
- Lines 139 to 141: ObservableList enables listeners to track changes when they occur. Create the list that contains a collection of the failed, incorrect, and succeeded URLs.
- Lines 142 to 155: For the pie chart's dimensions, use ROW_HEIGHT for the radius and ROW_WIDTH for the diameter. Three titled panes are created, and the content for each titled pane is defined as a ListView object.
- Lines 156 to 165: Move the size (number of items) in the VBox
object instance into the paneSize
variable, and verify that the size is greater than zero. If
the size isn't equal to zero, then use the
remove()method to remove existing elements. Next, use the addAll() method to add the titled panes to the VBox object. Set the titled pane elements tovboxRow_WIDTH. - Lines 166 to 168: When paneBox is displayed, disable progressBox so that only one VBox instance is active at a time.
- Lines 169 to 175: The EventHandler
object provides the
handlemethod to process an action that is fired when you click chart-button. When you click the View Chart button, the paneBox instance is removed, the pie chart is displayed, the View Chart button is disabled, and the "Click to see Details" button is enabled. - Lines 176 to 182:
HBoxlays out its children in a single horizontal row. When you create an instance of HBox, it stores the details of failed, incorrect, and succeeded URLs, the close button, and the chart button. ThesetSpacing()method helps to set spacing between the items, and thesetPadding()method helps to set the content to be laid out within those insets. - Lines 183 to 185: Set the spacing of the progress bar, add
the progress bar text message, and place the progress bar at
the bottom of your border pane layout.
- Lines 186 to 192: Create a label to place the title at the top of your application, set the size of your progress bar, and bind the task with the progress bar.
- Lines 193 to 199: Create a thread instance named thread1 and assign the task to the thread named thread2. When the Start button is clicked, an action event is called to display the progress bar. The thread1.start() method calls the call() method.
- Lines 200 to 204: Add the Start button to the VBox
instance named progressBox.
Add the border pane content to the VBox
named vb.
Set the vb,
VBox instance as the root of the scene and display
vbby using the stage.show() method.

Here are the descriptions:


You successfully added JavaFX components to your application in the NetBeans IDE.
Running the Application
In this section, you use the main() method in HTTPClientTest.java to execute the application. You run the application by passing a set of URLs as input, and then verify and validate the URLs. Depending on the correctness of the URL, they will be classified and displayed in the JavaFX UI application.
-
On the Projects tab, right-click HTTPClientTest.java and select Run File.
-
Review the set of URLs displayed in the url-list.txt file.
-
To verify the output, click Start to open the HTTP link checker application in the JavaFX UI.
-
Click the Click to see Details button to display the list of URLs in each category.

- Review the categories and then click Close Window
button to close the application.


For the given set of URLs, the application retrieves each URL, verifies it, validates it, and classifies it accordingly.

The application retrieves the URLs in the url-list.txt
file, and then processes, verifies, validates, and
classifies each URL accordingly. The progress bar displays the
status of the verification and then displays a "Verification
Complete" message after the URLs are verified.

The results are displayed in a pie chart on the Link Analysis screen. Successful URLs are displayed in green, failed and broken URLs are displayed in red, and incorrect URLs are displayed in grey. The number enclosed in parentheses represents the number of URLs in each category.

Note: When you run this application on the Oracle network, some URLs may be blocked, and a connection timeout error is displayed.
Summary
In this tutorial, you learned how to create a JavaFX project. JavaFX helps you to design, create, and test your client applications by using a set of graphics and media packages. You also learned how to use the Thread, URL, and HttpURLConnection classes.
Resources
- To learn more about JavaFX , see
Java SE docs: JavaFX.
- To learn more about JavaFX ObservableList , see
Java SE docs: JavaFX ObservableList.
- To learn more about JavaFX sample applications, see
Java SE docs: JavaFX sample applications.
- To learn more about JavaFX or any of the techniques used in
this OBE, see
Java SE docs: Concurrency in JavaFX.
- To learn more about HttpURLConnection
in Java, see
Java SE docs: HttpURLConnection.
- To learn more about URLs in Java, see Java SE docs: URL.
- To learn more about URLs in Java, see Java SE docs: Concurrency.
- To learn more about Java SE, refer to additional OBEs in the Oracle Learning Library.
Credits
- Curriculum Developer: Shilpa Chetan
To navigate this Oracle by Example tutorial, note the following:
- Topic List:
- Click a topic to navigate to that section.
- Expand All Topics:
- Click the button to show or hide the details for the sections.
By default, all topics are collapsed.
- Hide All Images:
- Click the button to show or hide the screenshots. By default,
all images are displayed.
- Print:
- Click the button to print the content. The content that is
currently displayed or hidden is printed.
To navigate to a particular section in this tutorial, select the topic from the list.