Java Platform, Enterprise Edition 7:
Generating JSON Data
Overview
- The
javax.jsonpackage contains a reader interface, a writer interface, and a model builder interface for the object model (similar to the DOM API for XML).
- The
javax.json.streampackage contains a parser interface and a generator interface for the streaming model (similar to the StAX API for XML). - Create a Java EE 7 web application
- Develop two Java servlets to generate JSON data:
ServletJsonGenerateObjectModelandServletJsonGenerateStreaming - Modify
index.htmlto invoke the two servlets - Consuming JSON with a JavaScript client
- Deploy the project to the GlassFish server and verify the
deployment
- Download and install the latest JDK from this link (Java SE 7u21 recommended).
- Download and install NetBeans 7.3.1 with Java EE, which includes GlassFish 4 (Java EE download bundle) from this link. During installation, be sure to select the check box to install GlassFish. JUnit is an optional installation and is not required for this tutorial.
- Have installed the required software.
- Ensure that NetBeans is running.
- Download and unzip the
jquery-1.9.1.js.zipfile.
Purpose
This tutorial covers how to generate JavaScript Object
Notation (JSON) data by using the object model and the streaming
model. It
also demonstrates how to consume the generated JSON
using a JavaScript client.
Time to Complete
Approximately 45 minutes
Introduction
JSON is a lightweight data-interchange format that is used in
web applications and REST WebServices. With the popularity of
JSON and the availability of many JSON libraries for the Java
platform (for example, org.json, Jackson,
and google-gson), there is a need to standardize
how developers create and consume JSON.
Java Platform, Enterprise Edition 7 (Java EE 7) introduces the JSON Processing API, which provides a standard API to parse and generate JSON so that the applications can rely upon a portable API. The JSON Processing API contains the following two packages:
In this tutorial, you learn how to:
Hardware and Software Requirements
The following is a list of hardware and software requirements:
Prerequisites
Before starting this tutorial, you should:
Creating a Web Application
In this section, you create a Java EE 7 web application in the NetBeans IDE.
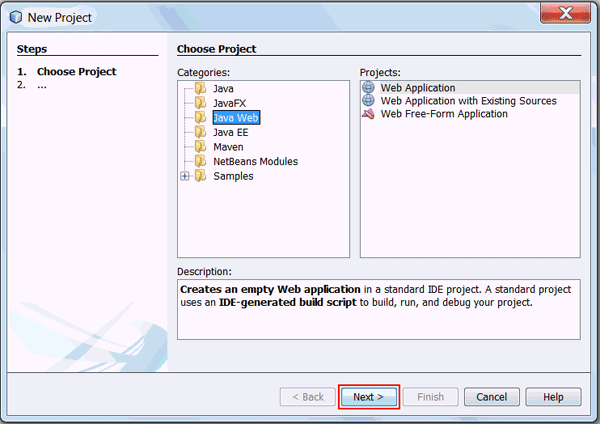
In the New Project dialog box, perform the following steps
on the Choose Project page:
b. Select Web Application from Projects.
c. Click Next.
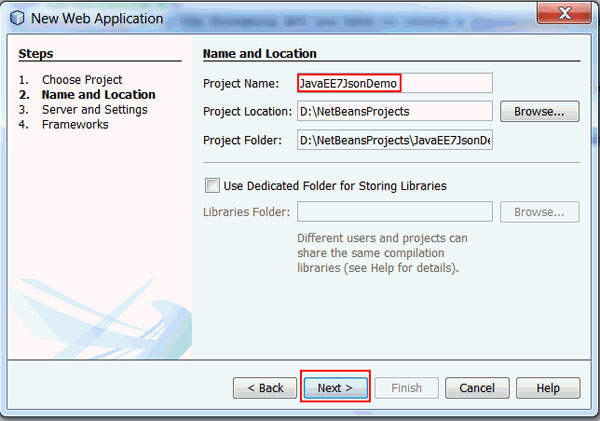
On the Name and Location page, enter JavaEE7JsonDemo
as the project name and click Next.
On the Server and Settings page, perform the following steps:
a. Select GlassFish Server from the
Server list.
b. Select Java EE 7 Web from the Java EE
Version list.
c. Click Next.
In
the Frameworks dialog box, click Finish.

Developing the Servlets
In this section, you create two servlets: ServletJsonGenerateObjectModel
generates JSON data with the object model, and ServletJsonGenerateStreaming
generates JSON data with the streaming model.
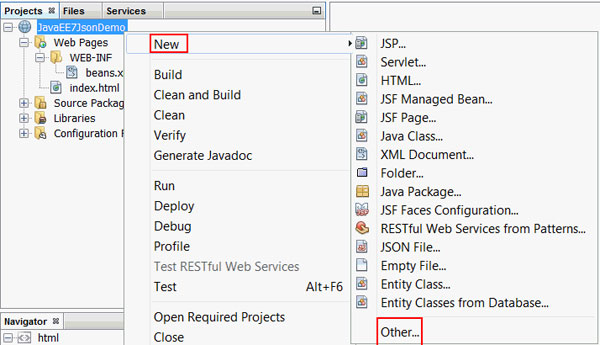
In
the Projects window, right-click
JavaEE7JsonDemo and select New
> Other.
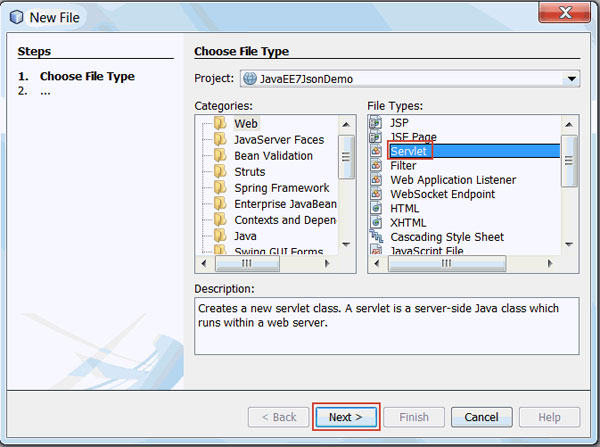
In the New File dialog box, perform the following steps on
the Choose File Type page:
a.
Select Web from Categories.
b.
Select Servlet from File Types.
c.
Click Next.
a. Enter ServletJsonGenerateObjectModel
as the class name.
b. Enter com.example as the
package name.
c. Click Next.
ServletJsonGenerateStreaming
servlet.
Modifying ServletJsonGenerateObjectModel
In this section, you modify ServletJsonGenerateObjectModel
to generate JSON data with the object model. You will build a
JSON representation of an Item with the object
model API.
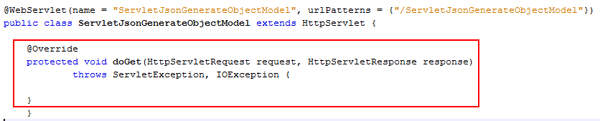
In the ServletJsonGenerateObjectModel class,
expand all editor folds and then delete all IDE-generated
code.

import java.io.OutputStream;

                    import javax.json.Json;

                    import javax.json.JsonObject;

                    import javax.json.JsonWriter;
Implement the doGet() method in the servlet.
@Override

                        protected void doGet(HttpServletRequest request,
                      HttpServletResponse response)


                      throws ServletException, IOException {
}
Add the following code to the doGet()
method to generate JSON objects that represent three Item
objects:
JsonObject jsonObject = Json.createObjectBuilder()


                      .add("items", Json.createArrayBuilder()


                      .add(Json.createObjectBuilder()


                      .add("name", "laptop")


                      .add("quantity", 1)


                      .add("price", 1500.0))


                      .add(Json.createObjectBuilder()


                      .add("name", "tablet")


                      .add("quantity", 2)


                      .add("price", 500.0))


                      .add(Json.createObjectBuilder()


                      .add("name", "cellphone")


                      .add("quantity", 1)


                      .add("price", 259.99)))


                      .add("Total", 2759.99).build();
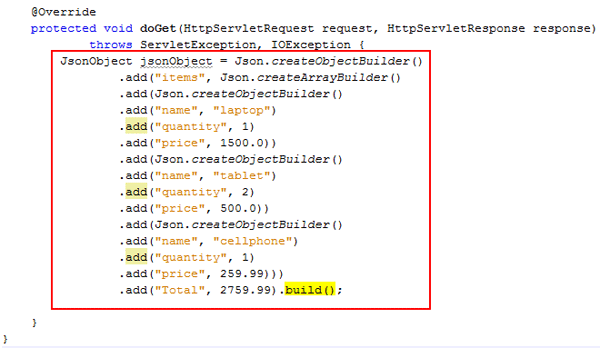
To generate JSON with the object model API,
you must create the JSON objects by using its builders. Use
the Json.createObjectBuilder() method to
create JSON objects and Json.createArrayBuilder
to create arrays.
doGet()
method to write JSON objects to OutputStream: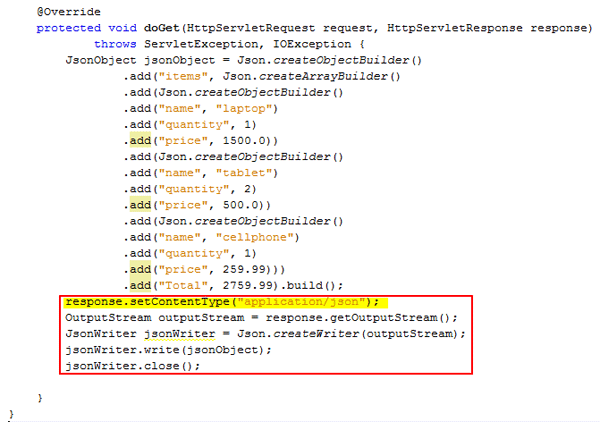
The content type is set to application/json.
Writing object model JSON objects is a simple process of
creating a JsonWriter with the destination
output stream and then writing the objects to it. Finally,
closing the jsonWriter finalizes the output
and closes the underlying stream.
Modifying ServletJsonGenerateStreaming
In this section, you modify the ServletJsonGenerateStreaming
servlet to generate JSON data with the streaming model. You will
build a JSON representation of an Item with the
streaming model API.
Delete all IDE-generated code inside the ServletJsonGenerateStreaming
class.
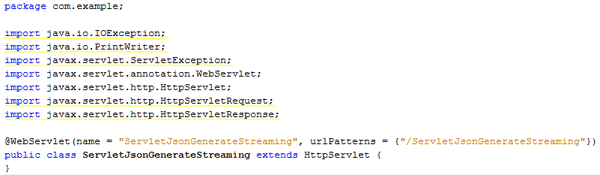
import java.io.OutputStream;

                    import javax.json.Json;

                    import javax.json.stream.JsonGenerator;
Perform
the following steps to modify the doGet()method:
a. Add
the following code to the doGet() method:
response.setContentType("application/json");

                        OutputStream out = response.getOutputStream();
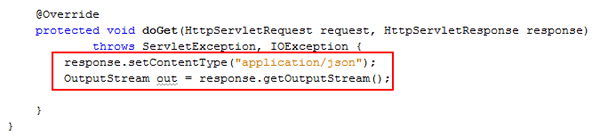
This code sets the ContentType to application/json
and creates an instance of OutputStream to
write JSON objects to the stream.
Item
objects by using the streaming model: JsonGenerator generator = Json.createGenerator(out);
generator.writeStartObject();
generator.writeStartArray("items");
generator.writeStartObject();
generator.write("name", "laptop");
generator.write("quantity", 1);
generator.write("price", 1500.0);
generator.writeEnd();
generator.writeStartObject();
generator.write("name", "tablet");
generator.write("quantity", 2);
generator.write("price", 500.0);
generator.writeEnd();
generator.writeStartObject();
generator.write("name", "cellphone");
generator.write("quantity", 1);
generator.write("price", 259.99);
generator.writeEnd();
generator.writeEnd();
generator.write("total", 2759.99);
generator.writeEnd();
generator.close();
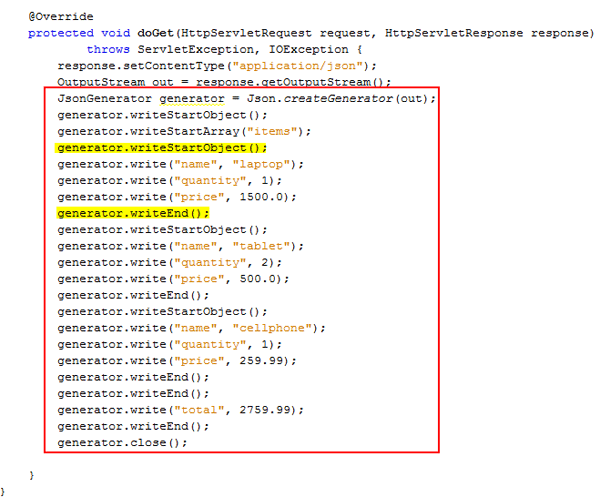
JsonGenerator with the desired outputStream.
You must sequentially write the JSON string by using JsonGenerator.
Closing the generator finalizes the writing and
closes the underlying stream. Modifying index.html
In this section, you invoke the two servlets by changing index.html.
Enter JSON Processing for the title of the page.
Delete IDE-generated code in the <body>
section and add a <table>
section with a heading.
Add two <a> elements to the <table>
section to create hyperlinks to the servlets.
<tr>

                         <td><a
                      href="http://localhost:8080/JavaEE7JsonDemo/ServletJsonGenerateStreaming">Generate
                      using Streaming API</a></td>

                        </tr>


                        <tr>


                         <td><a
                      href="http://localhost:8080/JavaEE7JsonDemo/ServletJsonGenerateObjectModel">Generate
                      using Object Model API</a></td>

                        </tr>

Testing the JSON Generation in the Servlets
In
this section, you verify the JSON generation in the two
servlets by deploying and running the project .
In the Projects window, right-click JavaEE7JsonDemo
and select Deploy.

In the Projects window, right-click JavaEE7JsonDemo
and select Run.
The application appears in the browser.
a. Click Generate using Streaming API.
ServletJsonGenerateStreaming
is invoked, and the JSON data generated with the streaming API
is displayed.
b. Click Generate using Object Model API.
ServletJsonGenerateObjectModel
is invoked, and the JSON data generated with the object model
API is displayed.
Consuming JSON with a JavaScript Client
In this section, you develop a JavaScript client that contacts
the ServletJsonGenerateObjectModel servlet,
retrieves data via an AJAX call, and displays it on the HTML
page by using jQuery, JavaScript library.
Add the jQuery library to the project.
a. Browse to the location where you saved the jquery-1.9.1.js
file specified in the Prerequisites section.
b. Copy jquery-1.9.1.js.
c. In the Projects window, under JavaEE7JsonDemo, right-click Web Pages, and select Paste. The jquery-1.9.1.js file is copied to the Web Pages folder.
Perform
the following steps to edit
index.html:
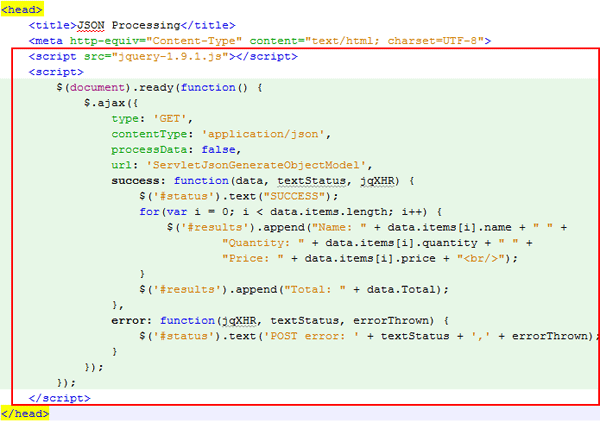
a. In the <head> section, add the
<script> tags to
generate an AJAX request.
  <script
                      src="jquery-1.9.1.js"></script>

                              <script>


                      $(document).ready(function() {


                      $.ajax({


                      type: 'GET',


                      contentType: 'application/json',


                      processData: false,


                      url: 'ServletJsonGenerateObjectModel',


                      success: function(data, textStatus, jqXHR) {


                      $('#status').text("SUCCESS");


                      for(var i = 0; i < data.items.length; i++) {


                      $('#results').append("Name: " + data.items[i].name + " " +


                      "Quantity: " + data.items[i].quantity + " " +


                      "Price: " + data.items[i].price + "<br/>");


                      }


                      $('#results').append("Total: " + data.Total);


                      },


                      error: function(jqXHR, textStatus, errorThrown) {


                      $('#status').text('POST error: ' + textStatus + ',' +
                      errorThrown);


                      }


                      });


                      });

                              </script>
b. Add the following code to the <body>
section to render the response and the status:
                      <b>Status:</b>   <div
                      id="status"></div>

                            <b>Response:
                      </b><div id="results"></div>

Testing the JavaScript Client
In
this section, you verify the response from the JSON client.
You do that by deploying and running the project .
In the Projects window, right-click JavaEE7JsonDemo
and select Deploy.
In the Projects window, right-click JavaEE7JsonDemo
and select Run.
The application appears in the browser.
Item
details is displayed. Summary
- Create a Java EE 7 web application
- Generate JSON data by using the Java API for JSON processing
- Develop a JSON JavaScript client
In this tutorial, you learned how to:
- Java EE 7 Tutorial
- JSR
353:Java API for JSON Processing
- Java API for JSON Processing presentation from JavaOne on YouTube.
- To learn more about Java EE, refer to additional OBEs in the Oracle Learning Library.
- Lead Curriculum Developer: Anjana Shenoy
- Other Contributors: Eduardo Moranchel, Matt Heimer
- Editor: Susan Moxley
- QA:
Diganta Choudhury
Resources
Credits
To help navigate this Oracle by Example, note the following:
- Hiding Header Buttons:
- Click the Title to hide the buttons in the header. To show the buttons again, simply click the Title again.
- Topic List Button:
- A list of all the topics. Click one of the topics to navigate to that section.
- Expand/Collapse All Topics:
- To show/hide all the detail for all the sections. By default, all topics are collapsed
- Show/Hide All Images:
- To show/hide all the screenshots. By default, all images are displayed.
- Print:
- To print the content. The content currently displayed or hidden will be printed.
To navigate to a particular section in this tutorial, select the topic from the list.