Java EE 7: Applying JSF 2.2 Resource Library Contracts
Overview
- Java Platform, Standard Edition 7 (Java SE 7; Java SE 7u11
recommended)
- NetBeans 7.3.1 IDE Java Platform, Enterprise Edition (Java
EE)
- GlassFish 4
- Have some experience writing and deploying JSF web applications.
- Have some experience creating JSF 2.0 templates and template
clients.
- Have installed NetBeans 7.3.1 Java EE and GlassFish 4.
- Have started NetBeans.
- Have unzipped the
JSFTemplateExampleApp.zipfile. - Have opened the
JSFTemplateExampleAppproject in NetBeans.
Purpose
This tutorial covers the steps required to apply JavaServer
Faces 2.2 (JSF 2.2) Resource Library Contracts while using
facelet templates in a web application.
Time to Complete
Approximately 45 minutes
Introduction
JSF technology is a user interface (UI) framework for developing Java web applications. It is based on components, events, and Model-View-Controller (MVC) architecture. JSF 2.0 introduced facelets as the default View Description Language (VDL). With facelets, you can create templates by using XHTML and CSS, and you can then use the templates to provide a consistent look and feel across different pages of an application.
Resource Library Contracts allows facelet templates to be
applied to an entire application in a reusable and
interchangeable manner.
Scenario
In this tutorial, you modify a sample web application, which
has a standard header template for all pages. You create
multiple templates and apply them to different pages of the same
application. You also allow users to select the template that
they want to apply.
Hardware and Software Requirements
The following is a list of hardware and software requirements:
Prerequisites
Before starting this tutorial, you should:
Running and Examining the JSFTemplateExampleApp
Project
Complete the following steps:
On the Projects tab in NetBeans, right-click the JSFTemplateExampleApp
project and select Run.
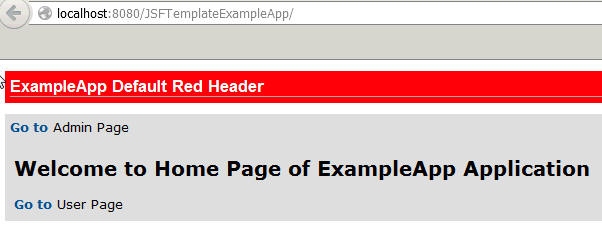
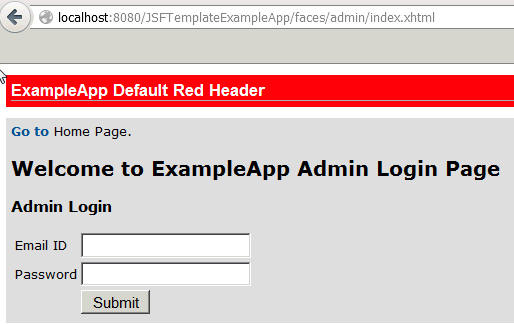
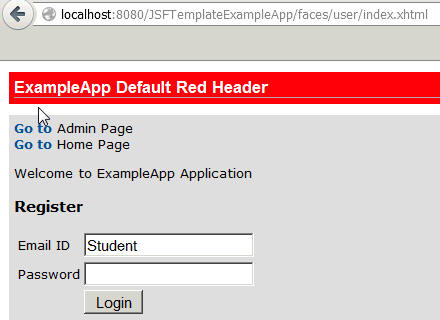
On the home page, click the Go to Admin Page link and the Go to User Page link, one at a time, to open the two pages.
The Admin page and the User page use the same template (red
header and grey background) as the home page.
Admin page
User page
Note: The JSFTemplateExampleApp sample
application demonstrates the features of Resource Library
Contracts. It does not contain the complete code to support
Register and Login functionality.
On the Projects tab in NetBeans, expand the JSFTemplateExampleApp project and review the project directory structure.
The resources folder contains the XHTML
and CSS files.
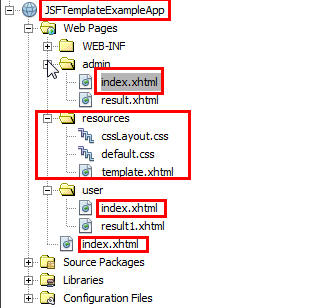
Under resources, double-click the template.xhtml file.
Notice that the template file refers to the CSS files, which contain the resources for this template.

One at a time, open the index.xhtml file in the Web Pages, admin, and user folders.
Notice that these files uses the same template file.

Creating Contracts, Templates, and Resources for the
Application
A resource library contract is a resource library that resides
in the contracts
directory of the web-app root. In this section,
you create contracts by creating a contracts
folder and then adding resources to the folder.
Creating a contracts
Folder
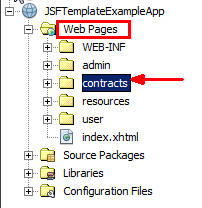
On the Projects tab in NetBeans, expand JSFTemplateAppExample
and Web Pages
and then create a folder named contracts.
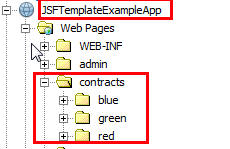
In the contracts folder, create three
subfolders named blue, green,
and red (one for each defined contract).
Adding Resources to the contracts
Folder
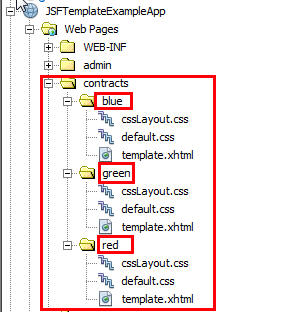
Copy cssLayout.css,
default.css, and
template.xhtml in
the resources folder and paste them in
the blue, green, and red
folders.
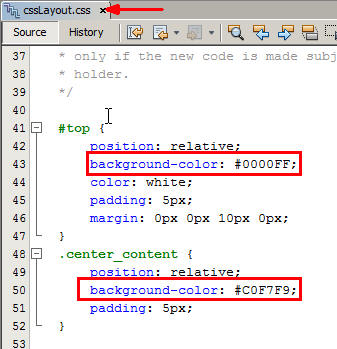
In the cssLayout.css files in the blue and green
folders, modify the values as listed in the following
table, and then save and close the files:
| Folder | #top background-color | .center_content |
| blue | #0000FF | #C0F7F9 |
| green | #03FF71 | #F3C7F7 |
In the default.css files for the green
folder, add the following h3
style elements and then save and close the file:
h3 {

                            font-family: Arial, "Arial CE",
                        "Lucida Grande CE", lucida, "Helvetica CE", sans-serif;

                            border-bottom: 1px solid #AFAFAF;

                            font-size:  10px;

                            font-weight: bold;

                            margin: 0px;

                            padding: 0px;

                            color:#FF0314;

                        }
Open template.xhtml
files in the blue, green
and red folders and modify
the path of the css files in the <link>
tag within the <meta> tag, as
shown in the following underlined code snippets:
In contracts/blue/template.xhtml:

                          <link href="${facesContext.externalContext.requestContextPath}/contracts/blue/default.css"
                          rel="stylesheet" type="text/css" />

                          <link href="${facesContext.externalContext.requestContextPath}/contracts/blue/cssLayout.css"
                          rel="stylesheet" type="text/css" />
In contracts/green/template.xhtml:<link href="${facesContext.externalContext.requestContextPath}/contracts/green/default.css"
rel="stylesheet" type="text/css" />
<link href="${facesContext.externalContext.requestContextPath}/contracts/green/cssLayout.css"
rel="stylesheet" type="text/css" />
In contracts/red/template.xhtml: <link href="${facesContext.externalContext.requestContextPath}/contracts/red/default.css"
rel="stylesheet" type="text/css" />
<link href="${facesContext.externalContext.requestContextPath}/contracts/red/cssLayout.css"
rel="stylesheet" type="text/css" />Delete the resources folder.
Applying Resource Library Contracts
- Expand Web Pages, and then open the following files in the code editor window:
index.htmluser/index.xhtmladmin/index.xhtmluser/result1.xhtmladmin/result.xhtml- Modify the
templateattribute of the<ui:composition>tag in the files: - Save and close the files.
In this section, you apply the three resource library contracts in your web application.
Modify the template clients to use the appropriate template file.
<ui:composition template="/template.xhtml">In the WEB-INF folder, open the faces-config.xml
file and enter the following resource library contracts
within the application tags:
<application>

                          <resource-library-contracts>


                    <contract-mapping>


                    <url-pattern>/admin/*</url-pattern>


                    <contracts>blue</contracts>


                    </contract-mapping>


                    <contract-mapping>


                    <url-pattern>/user/*</url-pattern>


                    <contracts>green</contracts>


                    </contract-mapping>


                    <contract-mapping>


                    <url-pattern>*</url-pattern>


                    <contracts>red</contracts>


                    </contract-mapping>


                    </resource-library-contracts>

                      </application>
Note: A contract is applied based on the invoked URL pattern. Thus, the "red" contract will be applied to "
faces/index.xhtml",
the "green" contract will be applied to "faces/user/*l",
and the "blue" contract will be applied to "faces/admin/*".Changing Templates Dynamically
- On the Projects tab in NetBeans, expand JSFTemplateExampleApp and Source Packages.
- Right-click and select New > Java Package.
- In the New Java Package dialog box, enter the package name as com.example.beans and click Finish.
- Add the
@Namedand@SessionScopedannotations. - Create a new
Stringproperty and name it contract. Initialize it with a value of "red". - Add a getter and setter for the
contractproperty. - Add all required import statements.
- On the Projects tab in Netbeans, expand JSFTemplateExampleApp and Web Pages.
- Double-click index.html.
- Add a form element with option buttons.
- Open the following files in the code editor window:
Web Pages > user/index.xhtmlWeb Pages > user/result1.xhtml
- In each file, add the following line of code before the <ui:composition> tag:
- Add the </f:view>
tag at the end of the page before the
</body>tag. - Save and close the files.
In this section, you change the template of a web page dynamically:
Create a Contexts and Dependency Injection (CDI) bean that will be referred in a JSF page.
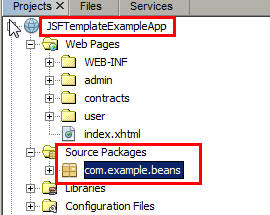
The com.example.beans package appears under
the Source Packages folder.
Create a Java class in the com.example.beans
package and name it TemplateBean.java.
package com.example.beans;


                        import java.io.Serializable;

                        import javax.enterprise.context.SessionScoped;

                        import javax.inject.Named;


                        @Named

                          @SessionScoped

                        public class TemplateBean implements Serializable {


                            String contract = "red";


                              public String getContract() {

                                  return
                          contract;

                              }


                              public void setContract(String
                          contract) {


                          this.contract = contract;

                              }

                        }
Perform the following steps to allow the user to select a template:
<h:panelGrid columns="1">

                           <p/>

                             <h2> Welcome to Home Page
                        of ExampleApp Application </h2>

                              <p/><p/>

                              Choose a template for
                        User Page:<br/>

                              <h:form>

                              <h:selectOneRadio
                        value="#{templateBean.contract}" layout="pageDirection"
                        required="true">

                              <f:selectItem
                        itemValue="red" itemLabel="Red Header and Grey
                        Body"/>

                              <f:selectItem
                        itemValue="green" itemLabel="Green Header and Mauve
                        Body"/>

                              </h:selectOneRadio>

                              <h:commandButton
                        value="Apply" action="/user/index" />

                              </h:form>

                         </h:panelGrid>

                        </ui:define>

                        </ui:composition>
</f:view>
Note:
When the user clicks the Apply button, the
user/index.xhtml page opens.
Modify the template clients to apply the user's
template selection.
<f:view contracts="#{templateBean.contract}">
<ui:composition template="/template.xhtml">Note:
The contracts attribute is bound to an
Expression Language (EL), whose value is populated
when the user selects an option. After the user clicks
Apply, the new template is applied to the User page.
Running and Verifying the Output of JSFTemplateExampleApp
- The
"red"contract is applied to the home page. - The user can select a template and apply it to the User page.
- On the Admin page, click the Go to Home Page link.
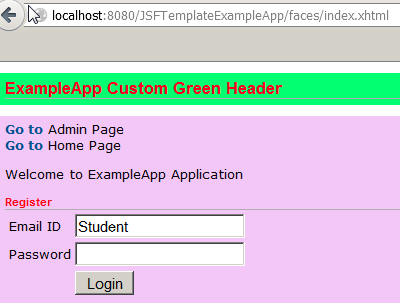
- On the Home page, select the '
Green Header
                          and Mauve Body
' option button and click Apply. Observe that the User page opens with the selected template applied to it.
In this section, you run JSFTemplateExampleApp
and verify its output.
On the Projects tab in Netbeans, right click JSFTemplateExampleApp
and select Run.
The home page of the application opens in a web browser window. Observe the following:
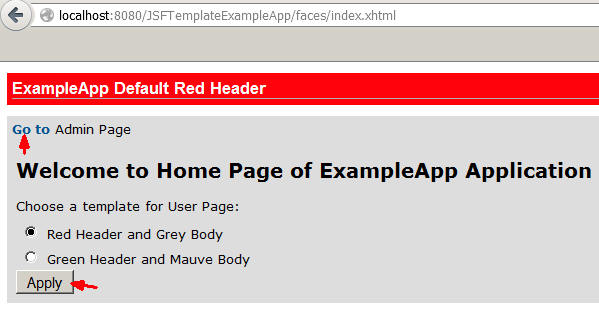
On the home page, click the Go to Admin Page link to open the Admin page.
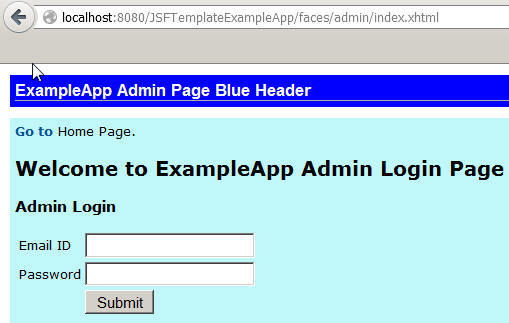
Observe that the "blue" contract is applied to the Admin
page. This was configured in the faces-config.xml
file.
Perform the following steps:
Summary
- Create multiple templates for an application by using JSF
2.2 Resource Library Contracts
- Configure your application to use multiple templates based
on URL patterns
- Enable the user to select and apply template to the pages
- Oracle
blog about Resource Library Contracts
- JSR-
344, JSF 2.2 Specification
- The
Java EE 7 Tutorial: The tutorial is an excellent source
of information about the technologies included in Java EE 7
- To learn more about Java EE 7, visit other OBE tutorials in the Oracle Learning Library
- Lead Curriculum Developer: Paromita Dutta
- Editor: Susan Moxley
- QA: Madhavi Siddireddy
In this tutorial, you learned how to:
Resources
The application in this tutorial uses JSF facelets and JSF 2.2 Resource Library Contracts. To learn more about these technologies, see the following resources:
Credits
To help navigate this Oracle by Example, note the following:
- Hiding Header Buttons:
- Click the Title to hide the buttons in the header. To show the buttons again, simply click the Title again.
- Topic List Button:
- A list of all the topics. Click one of the topics to navigate to that section.
- Expand/Collapse All Topics:
- To show/hide all the detail for all the sections. By default, all topics are collapsed
- Show/Hide All Images:
- To show/hide all the screenshots. By default, all images are displayed.
- Print:
- To print the content. The content currently displayed or hidden will be printed.
To navigate to a particular section in this tutorial, select the topic from the list.