Using Java Persistence API for Java SE 7 Desktop applications in
NetBeans 7- Part 2
Overview
Purpose
This tutorial covers implementing CRUD database
operations using Java Persistence API(JPA) for desktop
applications.
Time to Complete
Approximately 45 minutes.
Introduction
This example demonstrates implementing CRUD database operations using Java Persistence API for desktop applications.
The Java Persistence API provides Java developers with an
object/relational mapping facility for managing relational data
in Java applications. Some of the features of JPA are
- You won't have to create complex data access objects (DAO).
- The API helps you manage transactions.
- JPQL is database agnostic, freeing you from vendor-specific code.
- JPQL is portable whereas SQL is not.
- You can avoid SQL in preference to a query language, JPQL that uses your class names and properties.
- You can also use the Java Persistence API for desktop application persistence.
- Create a database connection
- Generate Entity classes for tables in the database
- Create Operation- persist data in the database
In this tutorial, you will create java client programs to demonstrate the following CRUD operations- Retrieve, Update and Delete operations using Entity clases. The Create operation is covered in the Part-1 of this OBE.
The Part-1 of this OBE covers the following:
- Have the software installed as listed under Hardware and Software Requirements section.
- Start the NetBeans IDE.
- Start the Java DB database server from NetBeans.
- Click Services tab.
- Expand Databases node.
- Right-click Java DB icon.
- Select Start Server
- Download and unzip the PersistenceDemo.zip file that contains a NetBeans project you need to complete this tutorial.
- Create playerDB database, follow the steps in Creating a database connection section of Part-1 of the OBE
- Create tables and populate them with data in playerDB
database.
- Download and unzip the
playerDB.zip - In NetBeans select File > Open File .
- In the file browser navigate to the directory, which
contains
playerDB.sql. - Select
playerDB.sql and click open. The script automatically opens in the SQL Editor. - Select
jdbc:derby://localhost:1527/playerDBin Connection drop-down box in the SQL Editor toolbar. - Click the Run SQL icon to execute the script.
- Download and unzip the
Hardware and Software Requirements
The following is a list of hardware and software requirements:
Prerequisites
Before starting this tutorial, you should:
Retrieve Operation
- Retrieve a single record from
Playertable and display in the console. - Retrieve all records from the
Playertable and display in the console.
The Java Persistence API (JPA) provides various ways to
retrieve objects from the database. The retrieval of objects
does not require an active transaction because it does not
change the content of the database. In this section you
create a Java class RetrievePlayers.java
to demonstrate the following
Retreiving a single record
from Player
In this section you create a Java class RetrievePlayers.java
to retrieve a record from the Player
table using find method and display in the
console.
Source Packages > demo. Player.java
to open it in the code editor window.Delete any IDE generated code in the toString
method and add the below code.
@Override

                                public String toString() {

                                    String
                            player = String.format("[Jersey Number: %d, First
                            Name: %s, Last Name: %s]", jerseynumber, firstname,
                            lastname);

                                    return
                            player;

                                }
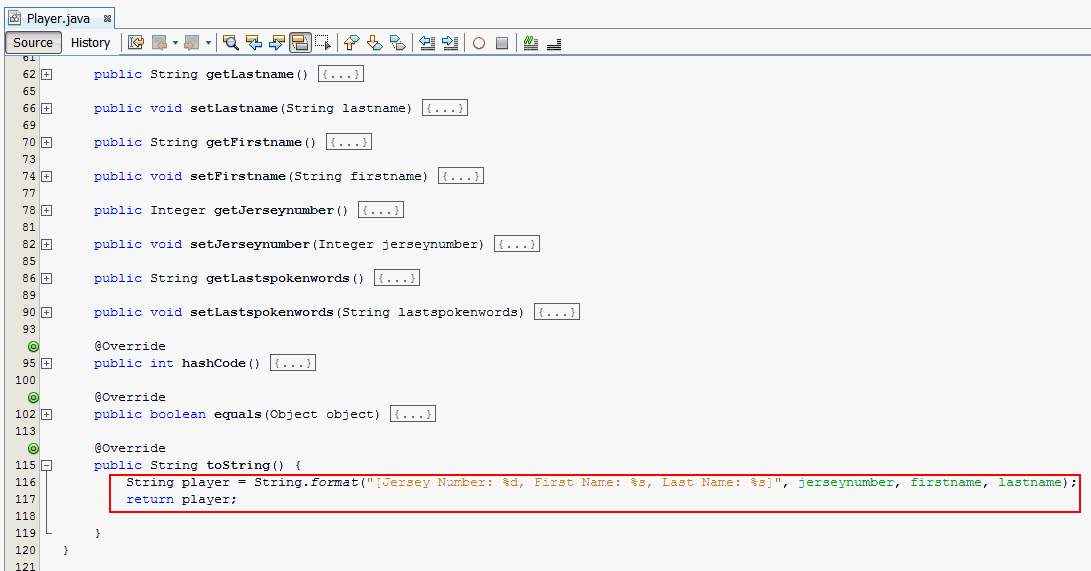
toString method
in the entity class, Players.java to
display the details of the Players objects
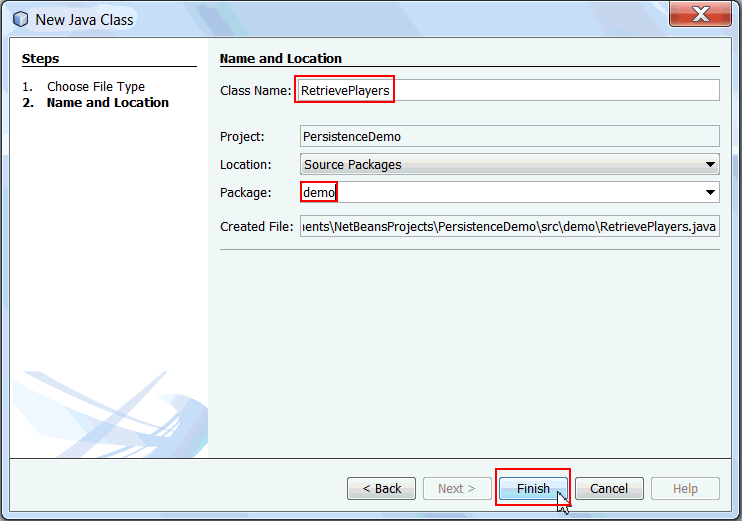
to the console.a. In the Project Window, right-click PersistenceDemo project and select New > Java Class.

Class Name: RetrievePlayers
Package Name: demo
Click Finish.
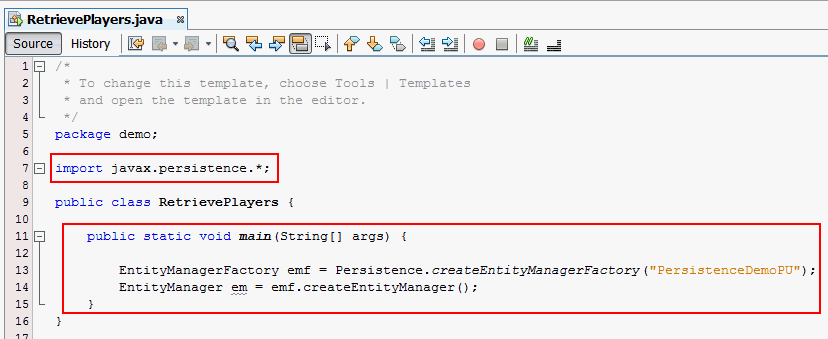
RetrievePlayers.java
a. Import the following packages
import javax.persistence.*;b. Create
main
method and add the following lines of code.public static void main(String[] args) {
EntityManagerFactory emf =
Persistence.createEntityManagerFactory("PersistenceDemoPU");
EntityManager em = emf.createEntityManager();
}
EntityManager.
An EntityManager provides methods to begin
and end transactions, to persist and find entities and
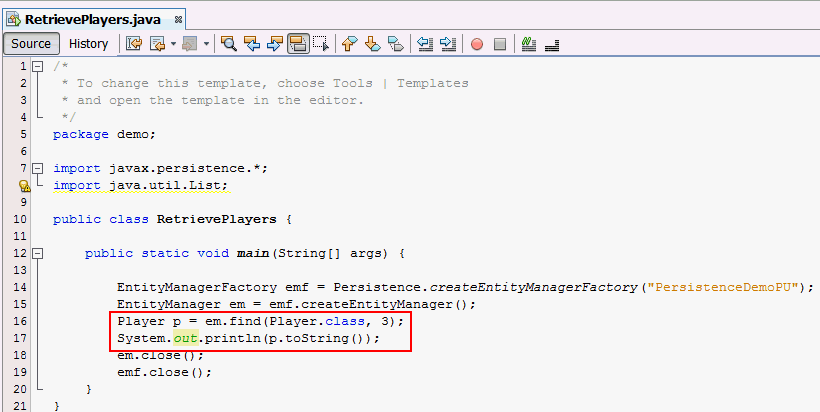
also to create and execute queries. c. Add the below code to
main method
to retrieve a Player object whose
primary key is 3.
                                  Player p =
                          em.find(Player.class, 3);


                          System.out.println(p.toString());

find method.
Every entity object can be uniquely identified and
retrieved by the combination of its class and its
primary key.d. Add the below statements to the
main
method. em.close();
emf.close();
Right-click Project > Project Properties> Libraries.
Select Add JAR/Folder.
Browse to C:\Program Files\Java\jdk1.7.0_05\db\lib\derbyclient.jar
Click Open > Click OK.
Examine the
PersistenceDemo tab in
the Output window.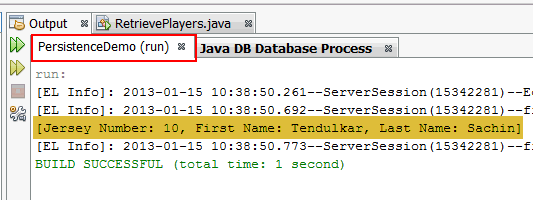
Details of the
Player object with primary
key 3 is displayed in the console.Retrieving all records from
Player
In this section you modify RetrievePlayers.java
to retrieve all records from the Player
table using JPQL query and display in the console.
1. Import the following package
import java.util.List;

2. Delete the following code from main method.
Player p = em.find(Player.class, 3);

                        System.out.println(p.toString());
3. Add the following code to the main method.
  Query query =
                        em.createQuery("SELECT p FROM Player p", Player.class);


                        List<Player> playerList = query.getResultList();


                        System.out.println("Player List:");

                                for (Player p
                        : playerList) {


                        System.out.println(p.toString());

                                }
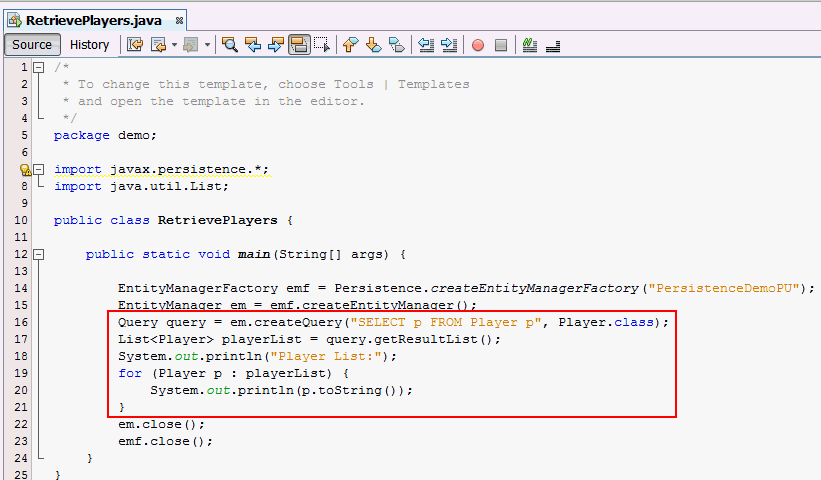
Player entity and display in
the console.
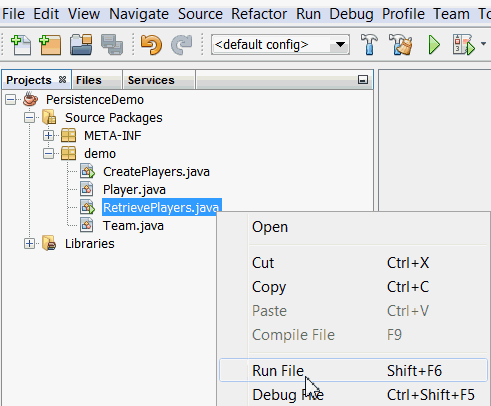
4. In the Projects window, right-click RetrievePlayers.java
and select Run File from the right-click menu.
8. Verify the output.
Examine the PersistenceDemo tab in
the Output window.

The details of all Player objects are
displayed in the console.
Update Operation
In this section, you create a java class, UpdatePlayers.java
to demonstrate updating an existing Player object.
You have to obtain a managed entity object and modify it
within an active transaction.
In the Project Window, right-click PersistenceDemo
project and select New > Java Class.
Class Name: UpdatePlayers
Package Name: demo
Click Finish.
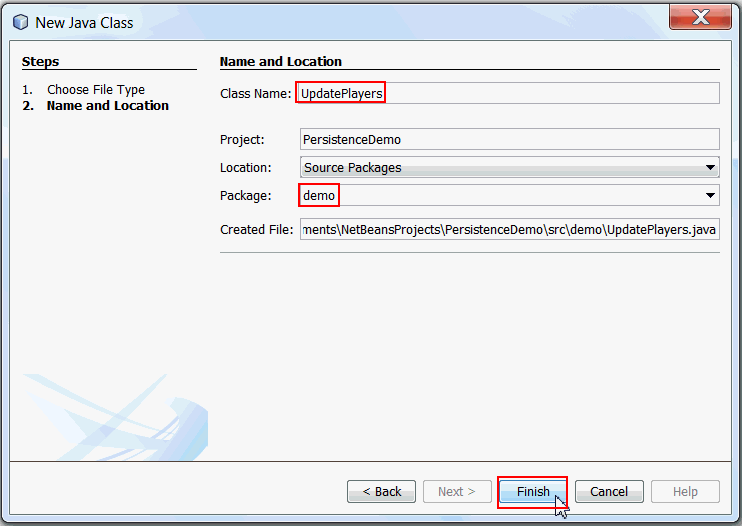
UpdatePlayers.java
a. Import the following packages
import javax.persistence.*;b. Create
main
method and add the following lines of code.public static void main(String[] args) {
EntityManagerFactory emf =
Persistence.createEntityManagerFactory("PersistenceDemoPU");
EntityManager em = emf.createEntityManager();
}

Player
table. Add the following code to the main() method.
                      em.getTransaction().begin();

                              Player p =
                      em.find(Player.class, 5);


                      p.setJerseynumber(60);

                              em.merge(p);


                      em.getTransaction().commit();
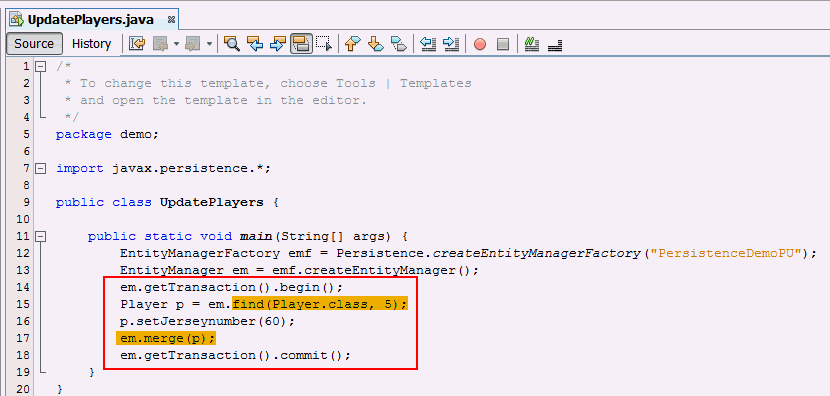
The above code updates the
jerseynumber field to
60 for the row with primary key, 5 in
the Player table.You can update the entity and merge it back into the persistence context with the
merge method. You
can use JQPL to perform an update but the more efficient (and
OO) way is to use merge.JPQL update is typically recommended for bulk update operations.
main
method.em.close();
emf.close(); 
In the Projects window, right-click UpdatePlayers.java and select Run File from the right-click menu.

a. In the Services window, expand the
jdbc:derby://localhost:1527/playerDB
connection under the Databases node.b. Right-click the connection and select Refresh.
c. Expand the FRED schema > Expand Tables Node > PLAYER Table.
d. Right-click PLAYER table node and select View Data.
You see the row with
ID
5 updated in the Player table.
Delete Operation
In the Services window, expand the jdbc:derby://localhost:1527/playerDBconnection under the Databases node.Right-click the connection and select Refresh. Expand the FRED schema > Expand Tables Node >PLAYER Table. Right-click PLAYER table node and select View Data.
In this section, you create a java class,
DeletePlayers.java to delete an object from the
database. To delete an object, you need to obtain an object
(usually by retrieval) and invoke the remove method
within the context of an active transaction. The entity
object marked for deletion by the remove
method is physically deleted from the database when the
transaction is committed.
a. In the Project Window, right-click PersistenceDemo
project and select New > Java Class.
b. Specify the Java Class details as follows:
Class Name: DeletePlayers
Package Name: demo
Click Finish.

DeletePlayers.java
a. Import the following packages
import javax.persistence.*;b. Create
main
method and add the following lines of code.public static void main(String[] args) {
EntityManagerFactory emf =
Persistence.createEntityManagerFactory("PersistenceDemoPU");
EntityManager em = emf.createEntityManager();
}

Player
table.Add the following code to the main() method.
  em.getTransaction().begin();

                       Player player = em.find(Player.class, 5);

                       if (player != null) {

                       System.out.println(player.toString());

                       em.remove(player);

                       }

                       em.getTransaction().commit();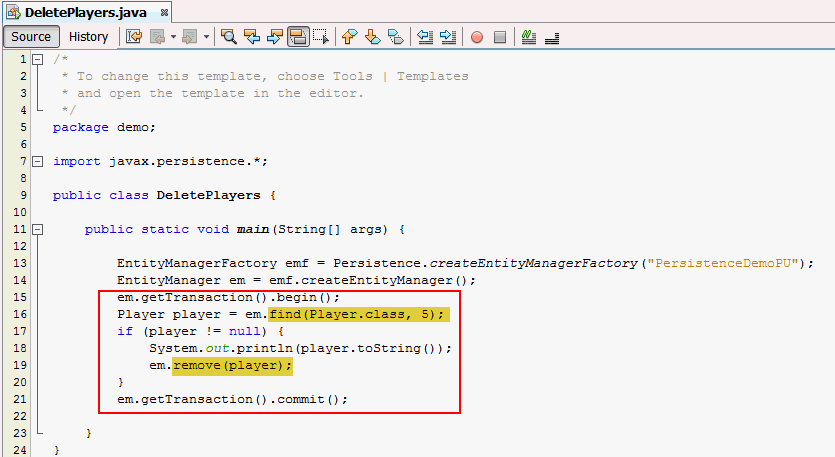
Player object
with playerID equals to 5 from the Player
table using the find method and then
the object is deleted using the remove
method.main
method. em.close();
emf.close();
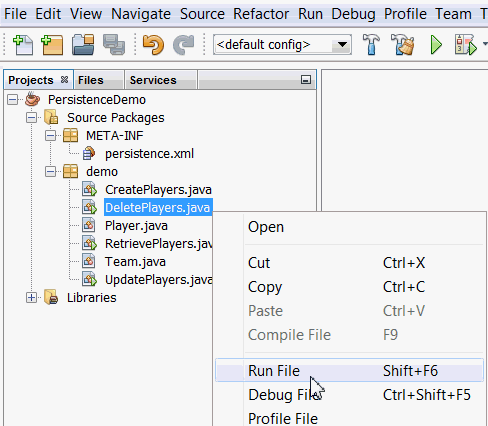
In the Projects window, right-click DeletePlayers.java and select Run File from the right-click menu.
a. Examine your console, the deleted Player object
is displayed.
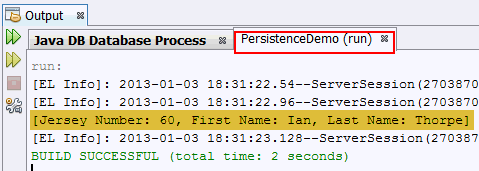
b. Examine the contents of the database.
playerID
equals to 5 deleted from the Player table.
Summary
- Define persistable entities in your application
- Use the API in Java SE environment.
- To implement CRUD operations.
- How to configure your NetBeans integrated development environment (IDE) to use the API.
In this tutorial, you have learned how to:
- Java
EE 6 Tutorial
- JSR 317: Java Persistence 2.0
- Using Java Persistence API for Java SE 7 Desktop applications in NetBeans 7
- To learn more about Java Enterprise Edition refer to additional OBEs in the Oracle Learning Library.
- Lead Curriculum Developer: Anjana Shenoy
Resources
Credits
To help navigate this Oracle by Example, note the following:
- Hiding Header Buttons:
- Click the Title to hide the buttons in the header. To show the buttons again, simply click the Title again.
- Topic List Button:
- A list of all the topics. Click one of the topics to navigate to that section.
- Expand/Collapse All Topics:
- To show/hide all the detail for all the sections. By default, all topics are collapsed
- Show/Hide All Images:
- To show/hide all the screenshots. By default, all images are displayed.
- Print:
- To print the content. The content currently displayed or hidden will be printed.
To navigate to a particular section in this tutorial, select the topic from the list.