Java EE 7: Adding a JavaServer Faces 2.2 viewAction
Component to a Web Application
Overview
- Java Platform, Standard Edition 7 (Java SE 7; Java SE 7u11 recommended)
- Java Platform, Enterprise Edition (Java EE)
- NetBeans 7.3.1 IDE
- GlassFish 4
- Have some experience writing and deploying JSF web applications.
- Have some experience using the
<f:viewParam>tag in a JSF page .
- Have installed NetBeans 7.3.1, Java EE, and GlassFish 4.
- Have started NetBeans.
- Have unzipped the
ViewActionApp.zipfile. - Have opened the
ViewActionAppproject in NetBeans.
Purpose
This tutorial covers the steps required to add a JavaServer
Faces 2.2 (JSF 2.2) viewAction component to a web
application.
Time to Complete
Approximately 30 minutes
Introduction
JSF technology is an user interface (UI) framework for developing Java web applications. It is based on components, events, and Model-View-Controller (MVC) architecture. JSF 2.0 introduced the ability to view parameters. This feature provided a mechanism to process GET requests and pass parameters.
JSF 2.2 defines a new tag, <f:viewAction>,
that extends GET processing further by leveraging a feature from
Seam 3. This tag is an ActionSource2
UIComponent that executes actions on initial GET
requests and post-back requests. The viewAction
component is declared as a child of the <f:metadata>
metadata facet.
By default, the viewAction component is executed
in the INVOKE_APPLICATION phase. It has an immediate
attribute as other actions in JSF. The viewAction
component also provides a phase attribute, which
can specify the JSF phase for executing the action.
Scenario
In this tutorial, you modify a sample web application, which
displays a list of products and its details. The product details
are displayed in response to a post-back request. You will use a
viewAction component to display the product details
via a GET request, resulting in a lighter-weight
call.
Hardware and Software Requirements
The following is a list of hardware and software requirements:
Prerequisites
Before starting this tutorial, you should:
Running and Examining the ViewActionApp
Project
- Locate the loadProduct method.
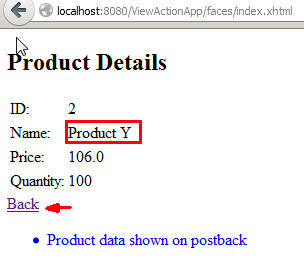
- Notice the content of the String
msg variable.
Note: Recall that in step 2, the Product Details page displayed a message ("Product data shown on postback") because the method was invoked at a post-back request. - Observe that the
loadProductmethod returns theproductDetails.xhtmlpage.
Complete the following steps:
On the Projects tab in NetBeans, right-click the ViewActionApp
project and select Run.
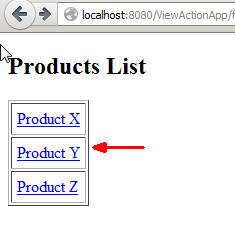
On the home page, click the Product
Y link to view its Product Details page, and then
click the Back link to return to the home
page.
On the Projects tab in NetBeans, expand the ViewActionApp project and review the project directory structure, including the JSF pages and the Java classes.

In the Web Pages folder, double-click the index.xhtml file.
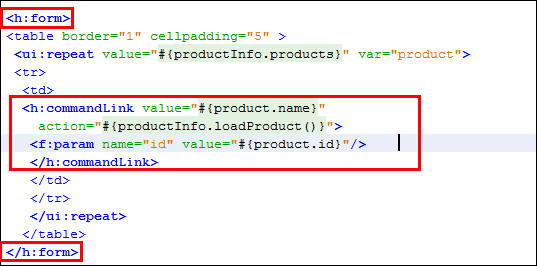
Notice that the form element has a commandLink
for each product name.
The action attribute refers to the loadProduct
method of the productInfo bean.
Open the ProductInfo.java file under Source Packages > com.example.beans, and then perform the following steps:

Using the viewAction Component
- Replace the <h:commandLink> tag with an <h:link> tag.
- Add the outcome attribute with a value of productDetails.
- Leave the <f:param> tag as is, within the <h:link> tag.
- Add an <f:metadata> tag before the <h:head> tag.
- Add an <f:viewParam> tag whose name is "id"and whose value is "#{productInfo.selectedId}".
- Add an <f:viewAction> tag with an action attribute whose value is "#{productInfo.loadProduct}".
You incorporate the viewAction component into the JSF life cycle on the initial request. It allows the same kind of action methods that are used for post-backs, and it is processed before the entire component tree is built.
Modifying the Home Page
On the Projects tab in NetBeans, expand ViewActionApp and Web Pages.
Click index.xhtml to open it.
Perform the following steps:

Adding the <f:viewAction>
Tag
Under Web Pages, double-click the productDetails.xhtml file.
Perform the following steps:

Running and Verifying the Output of ViewActionApp
Project
In this section, you run ViewActionApp and verify its output.
On the Projects tab in Netbeans, right click ViewActionApp and select Run.
The home page opens in a web browser window. A list of products is displayed.
On the home page, click Product Z to open the Product Details page.
Notice that the "Product data shown on initial request "
message is displayed as the viewAction
component invokes the productInfo.loadProduct
method on the initial request.

Note: You will see an additional message
displayed twice, in the ProductDetails page: "The metadata component needs to be
nested within a f:metadata tag. Suggestion: enclose the
necessary components within <f:metadata>". This
is a reported bug
in NetBeans and can be ignored.
Summary
- Use the <f:viewAction>
tag in a JSF page
- Call actions on GET requests
- Enable lighter-weight calls in a JSF life cycle
- An
article about
viewActioncomponent - Oracle
blog about JSF 2.2 features
- The
Java EE 7 Tutorial (The tutorial is an excellent source
of information about the technologies included in Java EE 7.)
- To learn more about Java EE 7, visit other OBE tutorials in the Oracle Learning Library.
- Curriculum Developer: Paromita Dutta
- Editor: Susan Moxley
- QA: Veerabhadra Rao Putrevu
In this tutorial, you learned how to:
Resources
The application in this tutorial uses JSF facelets and the JSF 2.2 <f:viewAction> tag. To learn more about these technologies, see the following resources:
Credits
To help navigate this Oracle by Example, note the following:
- Hiding Header Buttons:
- Click the Title to hide the buttons in the header. To show the buttons again, simply click the Title again.
- Topic List Button:
- A list of all the topics. Click one of the topics to navigate to that section.
- Expand/Collapse All Topics:
- To show/hide all the detail for all the sections. By default, all topics are collapsed
- Show/Hide All Images:
- To show/hide all the screenshots. By default, all images are displayed.
- Print:
- To print the content. The content currently displayed or hidden will be printed.
To navigate to a particular section in this tutorial, select the topic from the list.