Java SE 8: Using the Date and Time API to Calculate Date Offsets
Overview
Purpose
In earlier versions of Java Platform, Standard Edition 8(Java SE 8), during the development of applications, programmers often needed to represent date and time and used the java.util.Date package. The java.util.Date package had inadequate support for the date and time use cases. In order to address these problems and provide better support in the Java Development Kit (JDK) core, a new date and time API was introduced. This tutorial covers some of the new features of the Java SE 8 Date and Time API.
Time to Complete
Approximately 30 minutes.
Introduction
This tutorial covers how to use the Java SE 8 Date and Time API, which replaces the existing java.util.Date and java.util.Calendar classes by incorporating ideas from Joda-Time. Here are some of the challenges faced by developers with earlier Java versions:
-
Poor API design (for example, months start with 1 and days start with 0)
-
Not thread safe
- No consistency within the java.util and java.sql classes
-
No support for internationalization and time zones
The new Date and Time API was introduced in Java SE 8 with the following solutions:
-
The improved API design clearly separates the human-readable date time and machine time.
-
The new Date and Time API makes all the classes immutable, which is suitable for the multithreaded environment.
-
There is more clarity in the API design level. The methods are clearly defined and perform the same action in all classes.
-
The API defines separate classes for Date, Time, DateTime, Timestamp, TimeZone, and so on. The new Date and Time API works with the ISO-8601 calendar. However, you can use the API with non-ISO calendars as well.
Scenario
In this tutorial, a life insurance policy management scenario demonstrates the Date and Time API.
In this scenario, Mr. John bought a 25-year term policy and wants to pay a life insurance premium for the policy. His date of birth is April 6, 1986.
Here are the scenarios that you will compute:
Scenario 1: Policy details, such as policy start date, number of installments paid, policy end date, and policy maturity date
Scenario 2: Monthly interest paid by the company, closing balance without interest by the end of the policy, interest amount paid for 25 years, and interest amount gained per year
Scenario 3: Premium payment details of the policy, such as last premium paid date, next premium date, and due date to pay the premium
Scenario 4: Duration of the premium paid, such as the duration of the policy being active and the duration of the site being active
Hardware and Software Requirements
Prerequisites
Before starting this tutorial, you should have:
-
Installed NetBeans 8.0 and Java SE 8.
-
Started NetBeans 8.0.
Creating a Java Application
In this section, you create a Java application.
-
Select File > New Project.

- Select Java from Categories and Java Application from Projects column and then click Next.
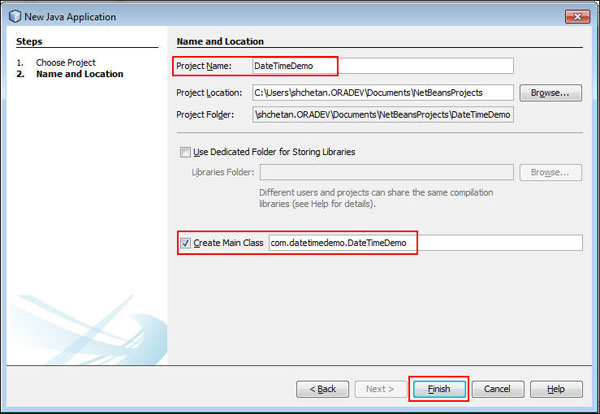
- Enter or select the following details in the Name and Location
dialog box:
- Project Name: DateTimeDemo
- Select Create Main Class.
- Verify the following:
- package name: com.datetimedemo
- class name: DateTimeDemo
- Click Finish.
-
Expand the DateTimeDemo project and perform the following steps:
- Open DateTimeDemo.java in the editor.
- Observe the main method.
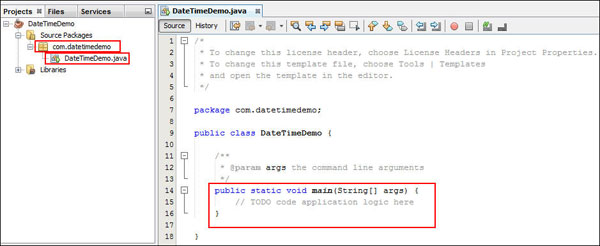

A Java SE 8 project named DateTimeDemo is created in NetBeans.
Setting the Date and Time API
In this section, you set the Date and Time variables by using the LocalDate, LocalTime, and LocalDateTime APIs. All classes of the Java SE 8 Date and Time API are located in the java.time package. The Date and Time API represents date and time in a human-readable format. LocalDateTime is a composite class that is a pairing of the LocalDate and LocalTime API. You use these APIs to work with the Date and Time fields.
Use the LocalDate class, of()factory method to set Mr.John's date of birth to April 06, 1986 using DateTimeDemo.java.
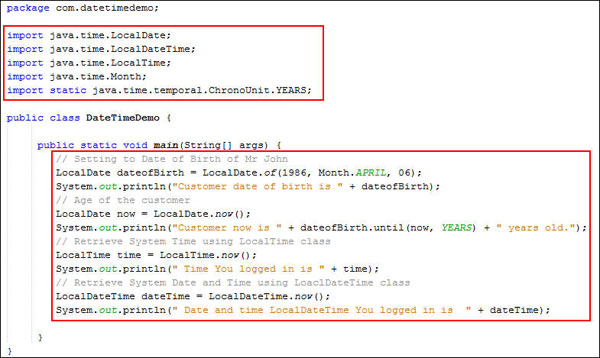
- Import the following packages:
-
Add the following code to the main method to set the value for the date of birth:
-
Add the following code to the main method to retrieve the customer's age:
-
Add the following code to the main method to retrieve the system time and system date and time:
- Review the code. Your code should look like the following:
-
To execute the program, right-click DateTimeDemo.java on the Projects tab and select Run File.
-
Verify the output.
import java.time.LocalDate;
import java.time.LocalDateTime;
import java.time.LocalTime;
import java.time.Month;
import static java.time.temporal.ChronoUnit.YEARS;
public static void main(String[] args) {
LocalDate dateofBirth =
LocalDate.of(1986, Month.APRIL, 06);
System.out.println("Customer
date of birth is " + dateofBirth);
}
This code sets the date of birth to April 6, 1986, and displays the date of birth in the console.
LocalDate now = LocalDate.now();
System.out.println("Customer now is " +
dateofBirth.until(now, YEARS) + " years old.");
This code retrieves the customer's age by using the LocalDate class, now method and displays the value in the console.
LocalTime time = LocalTime.now();
System.out.println(" Time You logged in is
" + time);
LocalDateTime dateTime =
LocalDateTime.now();
System.out.println(" Date and time
LocalDateTime You logged in is " + dateTime);
This code uses the now method to get the system time and system date with time from the LocalTime and LocalDateTime classes and displays the values in the console.


Scenario 1: Computing Policy Details
In this section, you use the Java SE 8 Date and Time API to process the policy details, such as policy start date, number of installments paid to date, policy end date, and policy maturity date.
-
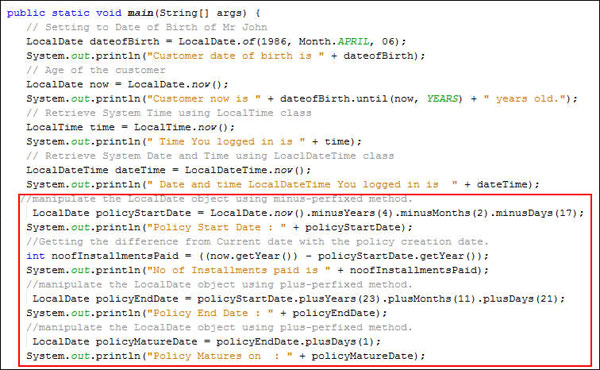
In the main method, add the following code to calculate the policy start date by manipulating the LocalDate class minus-prefixed method:
-
In the main method, add the following code to retrieve the number of installments paid to date:
-
In the main method, add the following code to retrieve the policy end date and the policy maturity date:
- Review the code. Your code should look like the following:
-
To execute the program, right-click DateTimeDemo.java on the Projects tab and select Run File.
-
Verify the output.
LocalDate policyStartdate = LocalDate.now().minusYears(4).minusMonths(2).minusDays(17);
System.out.println("Policy Start Date : " + policyStartdate);
The code displays the policy start date in the console:
Note (for reference):LocalDate now= LocalDate.now(); // It will get the system date
LocalTime time= LocalTime.now(); // It tries to get the system time
LocalDateTime dateTime= LocalDateTime.now(); //Combination of date and time. viewed as year-month-day-hour-minute-second –nanoseconds. No time zone or offset.
int noofInstallmentsPaid = ((now.getYear()) - policyStartdate.getYear());
System.out.println("No of Installments paid is " + noofInstallmentsPaid);
The code uses the now method to get the difference between the current date and the policy start date and displays the results in the console.
LocalDate policyEnddate = policyStartdate.plusYears(23).plusMonths(11).plusDays(21);
System.out.println("Policy End Date : " + policyEnddate);
LocalDate policyMaturedate = policyEnddate.plusDays(1);
System.out.println("Policy Matures on : " + policyMaturedate);
This code retrieves the policy end date by manipulating the LocalDate object using the plus-prefixed method. It will plus/add 4 years, 2 months, and 17 days to the current date. It sets the policy maturity date by manipulating the LocalDate object using the plus-prefixed method. It will plus/add 1 day to the policy end date.

Scenario 2: Computing the Interest Rate
The Java SE 8 Date and Time API provides various ways to retrieve date and time in different formats. In this section, you see how the Java 8 Date and Time API calculates the interest rate.
-
In the main method, add the following code to calculate the closing balance:
int openingBalance = 0;
float premiumAmount = 35000;
System.out.println("Premium Amount :" + premiumAmount);
int monthlyInterest = (24 / 12);
System.out.println("Monthly Interest Paid by company :" + monthlyInterest);
int noofInstallments = 25;
float closingBalance = ((openingBalance + premiumAmount) * noofInstallments);
System.out.println("closingBalance without interest " + closingBalance);
This code sets the policy's closing balance and displays the value in the console.
-
In the main method, add the following code to calculate the interest rate:
float interestRate = (float) ((Math.pow((noofInstallments /
4), monthlyInterest)) / monthlyInterest) * (1 +
monthlyInterest); -
In the main method, add the following code to calculate the number of installments paid by the customer at the age of 40:
int
yearAtForty=(dateofBirth.getYear())+40; -
In the main method, add the following code to calculate the interest rate paid when the customer is 40 years old:
float
interestAtForty = (float) ((Math.pow((noOfPremiumAtForty / 4),
monthlyInterest)) / monthlyInterest) * (1 + monthlyInterest); -
In the main method, add the following code to calculate the maturity amount:
float
maturityAmount = interestRate * premiumAmount; -
In the main method, add the following code to calculate the interest amount gained:
float
interestAmount = maturityAmount - closingBalance; - Review the code. Your code should look like the following:

-
To execute the program, right-click DateTimeDemo.java on the Projects tab and select Run File.
-
Verify the output.
System.out.println("Overall Interest Rate paid for 25 years is " + interestRate);
This code sets the value of the interest rate and displays the value in the console.
System.out.println("Customer will be 40 at "+ yearAtForty );
int noOfPremiumAtForty= yearAtForty-(policyStartdate.getYear());
System.out.println("No of Premium paid by customer at the age of 40 years is "+noOfPremiumAtForty);
This code sets the value of the number of installments that the customer paid at the age of 40 and displays the value in the console.
System.out.println("Interest received by customer at the age of 40 is :"+interestAtForty +"%");
This code sets the value of the interest amount paid by the insurance and displays the value in the console.
System.out.println("Maturity Amount is " + maturityAmount);
This code sets the value of the maturity amount and displays the value in the console.
System.out.println("Interest Amount gained is " + interestAmount);
This code sets the value of the interest amount paid by the insurance and displays the value in the console.

Scenario 3: Computing the Payment Details
In this section, compute premium payment details, such as last premium paid date, next premium date, and due date to pay the premium.
- Import the following packages:
-
In the main method, add the following code to calculate the payment date of the previous installment:
LocalDate lastinstallmentsPaidDate =
LocalDate.now().minusMonths(2).minusDays(15); -
In the main method, add the following code to calculate the next installment date:
LocalDate
NextinstallmentDate =
lastinstallmentsPaidDate.plusYears(1).withDayOfMonth(5); -
In the main method, add the following code to calculate the due date of the premium payment:
LocalDate dueDateofPremium =
NextinstallmentDate.with(TemporalAdjusters.dayOfWeekInMonth(3,
DayOfWeek.MONDAY)); - Review the code. Your code should look like the following:
-
To execute the program, right-click DateTimeDemo.java on the Projects tab and select Run File.
-
Verify the output.
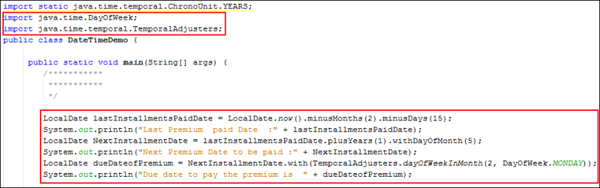
import java.time.DayOfWeek;
import java.time.temporal.TemporalAdjusters;
System.out.println("Last Premium paid Date :" + lastinstallmentsPaidDate);
This code sets the value of the last installment paid date of the policy and displays the value in the console.
System.out.println("Next Premium Date to be paid :" + NextinstallmentDate);
This code sets the value of next year's installment date and displays the value in the console. Next year's installment date is set by adding one year to the last installment date, and withDayOfMonth(5) is set to April 9.
System.out.println("Due date to pay the premium is " + dueDateofPremium);
This code sets the dueDateofPremium value and adjusts the date by selecting the second Monday of the month. The value is displayed in the console.

Scenario 4: Computing the Duration of the Premium Paid
In this section, you compute the duration of the premium paid by using the duration features of the Java SE 8 Date and Time API.
- Import the following packages:
-
In the main method, add the following code to calculate the policy's duration:
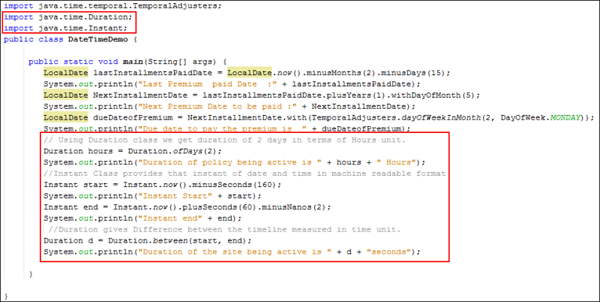
Duration h = Duration.ofDays(2);
System.out.println("Duration of policy being active is " + h + " Hours");
This code sets the duration for 2 days and displays the value in the console. -
In the main method, add the following code to calculate the instant class date and time:
Instant
start = Instant.now().minusSeconds(160); -
In the main method, add the following code to calculate the time difference by using the duration class:
Duration
a = Duration.between(start, end); -
Review the code. Your code should look like the following:
 Note: Highlighted code is for Scenario 4.
 -
To execute the program, right-click DateTimeDemo.java on the Projects tab and select Run File.
-
Verify the output.
import java.time.Duration;
import java.time.Instant;
System.out.println("Instant Start" + start);
Instant end = Instant.now().plusSeconds(60).minusNanos(2);
System.out.println("Instant end" + end);
This code sets the value of the instant start and instant end dates and displays the values in the console.
System.out.println("Duration of the site being active is " + a + "seconds");
This code sets the value of the site's active time by using the duration class. It displays the value in the console.

Summary
Java SE 8 ships with a new date and time API in the java.time package that completely replaces the old java.util.Date or java.util.Calendar classes. This API offers greatly improved safety and functionality for developers. It models the domain well and has a good selection of classes.
In this tutorial, you learned to use the following Java SE 8 Date and Time API classes:
- LocalDate
- LocalTime
- LocalDateTime
- Duration
- Instant
Resources
To learn more about the Java SE 8 Date and Time API, see the following resources:
Credits
- Curriculum Developer: Shilpa Chetan
To navigate this Oracle by Example tutorial, note the following:
- Topic List:
- Click a topic to navigate to that section.
- Expand All Topics:
- Click the button to show or hide the details for the sections.
By default, all topics are collapsed.
- Hide All Images:
- Click the button to show or hide the screenshots. By default,
all images are displayed.
- Print:
- Click the button to print the content. The content that is
currently displayed or hidden is printed.
To navigate to a particular section in this tutorial, select the topic from the list.