Using Java EE Environmental Entries
Overview
- Download and install Java JDK 7 from this link.
- Download and install an IDE and Application Server such as
NetBeans 7.1.2 with Java EE which includes GlassFish 3.1.2
(Java EE download bundle) from this link.
During installation, be sure to check the box to install
GlassFish. JUnit is an optional installation and not required
for this tutorial.
- Access to an SMTP server
- Valid credentials (username and password) for the SMTP server
- The starting project used in this tutorial can be downloaded from here.
- The solution project created in this tutorial can be downloaded from here.
- Have access to an SMTP server. You must know the host name, port number, and security settings for your SMTP server. Web mail providers may offer SMTP access, view your email account settings or help to find further information. Be aware that your username is often your full email address and not just the name that comes before the @ symbol.
- A Java EE IDE and Application Server such as GlassFish or Oracle WebLogic Server.
- Have basic familiarity with Servlets and Session EJBs (helpful but not required)
Purpose
This tutorial shows you how to avoid hard-coding variable values within your application that may frequently need to be modified.
Time to Complete
Approximately 30 minutes.
Introduction
In applications which create network connections you must know a host name or ip address, port number and possibly a user name and password. Many developers place this information within Java class files in the form of hard-coded variables. If the network destination were to ever change then the application source code would require modification and recompilation. Java EE applications allow you to place the values for these types of variables into deployment descriptors such as the web.xml or ejb-jar.xml files. Deployment descriptors can be modified without requiring an application to be recompiled. Additionally, application servers may allow you to modify environmental variables at runtime. GlassFish provides the command line set-web-env-entry command.
Scenario
In this tutorial you will modify an existing application to use environmental entries. The existing application uses the JavaMail API to send emails through a SMTP server. Currently all the information about the SMTP server is hard-coded within a Session bean. You will need to know the host name, port, connection type (SMTP, SMTPS, TLS), and authentication information for your SMTP server if you would like to enable the project to successfully send emails.
Hardware and Software Requirements (Optional)
The following is a list of hardware and software requirements:
Prerequisites
Before starting this tutorial, you should:
Running the EmailSender Project
If you haven't already, download the EmailSender project from here. This project sends an email when an HTML form is submitted. Currently all the server settings are hard-coded in the com.example.EmailSessionBean class. You must modify the values in the com.example.EmailSessionBean class to configure the application to work with your SMTP server. It is required that anytime a different SMTP server or user account is used the Java source code for the com.example.EmailSessionBean class must be modified and recompiled. You will eliminate this requirement using environmental entries.
Download the EmailSender project and unzip it.
Open the EmailSender project in NetBeans.
Open the com.example.EmailSessionBean class and find the fields which contain the hard-coded SMTP server settings.
Edit the fields to correspond to your SMTP settings.
Save your changes

Deploy and run the application.
Write an email to yourself

After pressing Send an email should be sent to the destination you specified in the form.
Check your INBOX to verify that the message arrived.
View the debug output in the GlassFish Server Output tab in NetBeans in the event of an error.

The EmailSender project should now function for you although it does not handle changing the SMTP settings easily.
Creating an Environmental Entry
- java.lang.Boolean
- java.lang.Byte
- java.lang.Character
- java.lang.String
- java.lang.Short
- java.lang.Integer
- java.lang.Long
- java.lang.Float
- java.lang.Double
- java.lang.Class
- any enumeration type (i.e. a subclass of java.lang.Enum)
To create an environmental entry in the ejb-jar.xml deployment descriptor, perform the following steps
Right-click on the EmailSender project and select New->Other.
In the New File window, select a category of Enterprise JavaBeans and a file type of Standard Deployment Descriptor.
Click Next.

Notice the location for the ejb-jar.xml deployment descriptor in the New Standard Deployment Descriptor (web.xml) window.
Click Finish.

Open the ejb-jar.xml file and view the XML source.
Create a new <env-entry> entry for the EmailSessionBean
<enterprise-beans>
    <session>
        <ejb-name>EmailSessionBean</ejb-name>
        <env-entry>
            <description>This example uses JNDI</description>
            <env-entry-name>mailhost</env-entry-name>
            <env-entry-type>java.lang.String</env-entry-type>
            <env-entry-value>smtp.example.com</env-entry-value>
        </env-entry>
    </session>
</enterprise-beans>
Change the value to match your SMTP server settings.
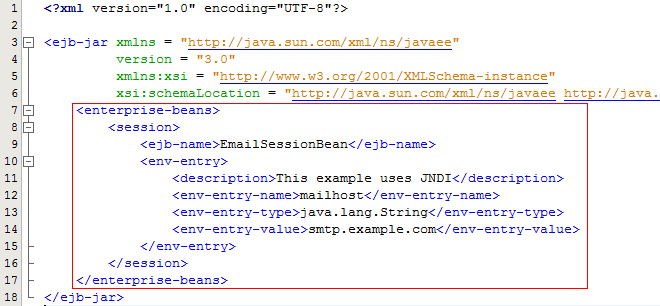
You should replace the smtp.example.com text with the host name of your SMTP server.
Each EJB has it's own collection of environmental entries thus avoiding naming conflicts.
The following table describes the purpose of the <env-entry> elements.
| Element | Purpose |
| <description> |
An optional description of the environmental entry. |
| <env-entry-name> |
The name of the entry. This name can used to retrieve the value from within Java classes. Environmental entries are placed within the JNDI java:comp/env context using this name. |
| <env-entry-type> | The data type of the environmental entry. The
following data types are valid in Java EE 6:
|
| <env-entry-value> | A string that represents the value of the environmental entry. |
Now that your have an environmental entry in place the next step is to modify the application to read the value at runtime.
Using JNDI to Read an Environmental Entry
This section shows you how to read an environmental entry using JNDI. Prior to Java EE 5 this was the only method to read environmental entries. Later sections will show you other techniques to obtain the value of environmental entries.
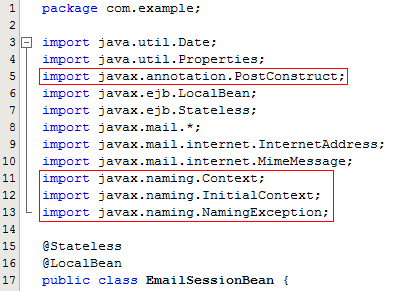
Open the EmailSessionBean class.
Remove the value of the existing host variable like so:
private String host;

Create a @PostConstruct annotated method that will run when the Session bean is initialized
Perform a JNDI lookup in the java:comp/env context for the mailhost environmental entry.
Save the retrieved value in the host field.

Run the Fix Imports wizard (Ctrl+Shift+I) to add the imports needed for JNDI.
Deploy and run the application.
Using @Resource() to Inject an Environmental Entry
In this section you will use the @Resource annotation to request that the application server perform dependency injection of a environmental variable's value into a component.
Open the ejb-jar.xml file and view the XML source.
Add an new <env-entry> element containing a java.lang.Integer value which is the SMTP server port number.
<env-entry>
    <description>This example uses @Resource()</description>
    <env-entry-name>com.example.EmailSessionBean/port</env-entry-name>
    <env-entry-type>java.lang.Integer</env-entry-type>
    <env-entry-value>465</env-entry-value>
</env-entry>

Notice that the <env-entry-name> is the fully qualified class name followed by a forward slash and the name of a field within the class.
Change the value to match your SMTP server settings.
Open the EmailSessionBean class.
Remove the value of the port field.
Add a @Resource() annotation to the port field.
Run the Fix Imports wizard (Ctrl+Shift+I) to add the import for javax.annotation.Resource.

An environmental field annotated with @Resource() will cause the server to inject the value (if any) returned from a lookup of java:comp/env/package.Class/field.
Deploy and run the application.
Using @Resource(name="env-entry-name") to Inject an Environmental Entry
In this section you will use the @Resource annotation to request that the application server perform dependency injection of a named environmental variable's value into a component.
Open the ejb-jar.xml file and view the XML source.
Modify the ejb-jar.xml file to use EJB 3.1. EJB 3.1 is required to use enum types as environmental variables. Both the version number and the schema location should be updated.

Open the ejb-jar.xml file and view the XML source.
Add an new <env-entry> element containing a com.example.Protocol value which is a Java enum.
<env-entry>
    <description>This example uses @Resource(name="env-entry-name")</description>
    <env-entry-name>transport</env-entry-name>
    <env-entry-type>com.example.Protocol</env-entry-type>
    <env-entry-value>SMTPS</env-entry-value>
</env-entry>

Open the EmailSessionBean class.
Remove the value of the protocol field.
Add a @Resource(name="transport") annotation to the protocol field. Notice that the value of the name attribute corresponds to the value of the <env-entry-name> element in the ejb-jar.xml file.

Deploy and run the application.
Open the EmailSessionBean class.
Notice the value of the debug field. Leave the field with a default value of true.
Add a @Resource(name="debug") annotation to the debug field. Currently there is no corresponding <env-entry> element in the ejb-jar.xml file.

Deploy and run the application.
View the debug out in GlassFish output window inside of NetBeans when sending an email.
Open the ejb-jar.xml file and view the XML source.
Add an new <env-entry> element containing a java.lang.Boolean value which is used for the debug field.
<env-entry>
    <description>@Resource(name="env-entry-name") with a default value</description>
    <env-entry-name>debug</env-entry-name>
    <env-entry-type>java.lang.Boolean</env-entry-type>
    <env-entry-value>false</env-entry-value>
</env-entry>

Notice that the <env-entry-value> is false.
Clear the content of the GlassFish output window in NetBeans (Ctrl+L).
Deploy and run the application.
Notice there is no longer any debug output in NetBeans when sending an email.
By combining environmental entries and resource injection you can override the default value of fields using a deployment descriptor.
Using <injection-target> to Inject an Environmental Entry
An environmental variable can be injected into a field that does not have a @Resource annotation by using the <injection-target> element. Care should be taken when injecting values in this fashion because it may be difficult to recognize where a field is obtaining its value from.
Open the ejb-jar.xml file and view the XML source.
Add three new <env-entry> elements that control the use of SMTP authorization and specify the related username and password.
<env-entry>
    <description>This is an example of using injection-target</description>
    <env-entry-name>authEnable</env-entry-name>
    <env-entry-value>true</env-entry-value>
    <injection-target>
        <injection-target-class>com.example.EmailSessionBean</injection-target-class>
        <injection-target-name>auth</injection-target-name>
    </injection-target>
</env-entry>
<env-entry>
    <description>This is an example of using injection-target</description>
    <env-entry-name>user</env-entry-name>
    <env-entry-value>matt@example.com</env-entry-value>
    <injection-target>
        <injection-target-class>com.example.EmailSessionBean</injection-target-class>
        <injection-target-name>username</injection-target-name>
    </injection-target>
</env-entry>
<env-entry>
    <description>This is an example of using injection-target</description>
    <env-entry-name>pw</env-entry-name>
    <env-entry-value>secretpw</env-entry-value>
    <injection-target>
        <injection-target-class>com.example.EmailSessionBean</injection-target-class>
        <injection-target-name>password</injection-target-name>
    </injection-target>
</env-entry>

Change the values to match your SMTP server settings.
Open the EmailSessionBean class.
Remove the values for the auth, username, and password fields. Do not add @Resource annotations to the fields.

Deploy and run the application.
Additional Information
The following additional information may be relevant when considering the use of environmental entries:
Web components such as Servlets share environmental entries. For web components you place the <env-entry> elements directly within the <web-app> element of the web.xml deployment descriptor.
Not all classes support resource injection. The most common component types that support injection are: Servlets, Servlet filters, Servlet event listeners, JSP tag handlers, JSP tag library event listeners, JSF scoped managed beans, JAX-WS service endpoints, JAX-WS handlers, EJB beans, EJB interceptors, managed beans, CDI managed beans, and CDI decorators.
The @Resource annotation can be placed on setter methods instead of on fields. When placed on setter methods JavaBean naming conventions apply.
There are other techniques to avoid hard-coding volatile information. Some resources (JDBC DataSources, JavaMail Sessions) could be created as fully configured administered object by application server administrators. You might be able to use @Resource to inject a configured JavaMail Session. For textual content displayed in a user interface you should use message bundles which are a component of Java Internationalization.
Summary
- Create environmental entries within deployment descriptors.
- Look up environmental entries using JNDI.
- Inject environmental entries.
- Lead Curriculum Developer: Matt Heimer
- Other Contributors: Tom McGinn
In this tutorial, you have learned how to:
Resources
Credits
To help navigate this Oracle by Example, note the following:
- Hiding Header Buttons:
- Click the Title to hide the buttons in the header. To show the buttons again, simply click the Title again.
- Topic List Button:
- A list of all the topics. Click one of the topics to navigate to that section.
- Expand/Collapse All Topics:
- To show/hide all the detail for all the sections. By default, all topics are collapsed
- Show/Hide All Images:
- To show/hide all the screenshots. By default, all images are displayed.
- Print:
- To print the content. The content currently displayed or hidden will be printed.
To navigate to a particular section in this tutorial, select the topic from the list.