Installing, Configuring, and Testing WebLogic Server 12c Developer Zip Distribution in NetBeans
Overview
- Download WebLogic Server (WLS) 12c developer zip file and
extract the contents
- Set up environment variables as required
- Run the installation configuration script
- Set up WLS environment
- Create a new WLS domain
- Register the Oracle WebLogic Server with the NetBeans IDE
- Open the Admin Console
- Start Java DB
- Use the sample database and generate the JPA entities from the database
- Generate JSF pages from the Entities
- Deploy the application to WebLogic Server
- Download and install Java JDK 7 from this link.
- Download and install NetBeans IDE 7.2 from this link.
Purpose
This tutorial covers how to install Oracle WebLogic Server 12c (12.1.1) developer zip file distribution on Windows and configure it as a Java EE Application Server in NetBeans.
Also covers how to test the WebLogic Server installation by
deploying a Web application based on JSF and JPA entities.
Time to Complete
Approximately 45 minutes
Introduction
Oracle WebLogic Server 12c is an application server for
building and deploying enterprise Java EE applications and it is
now available for download. The zip distribution for development
offers Java EE 6 Full Profile development; it includes WebLogic
Server only.
With NetBeans IDE you can create web applications and deploy
them to the Oracle WebLogic Server.
Scenario
In this tutorial, you perform the following:
Prerequisites
Downloading WebLogic Zip File and Extracting the Contents
In this section you will download the development zip file and unzip the contents in a directory.
Open a browser and type the following URL:
http://www.oracle.com/technetwork/middleware/weblogic/downloads/index.html
Click Download File for "Zip for Windows x86, Linux
x86, Mac OS X", under Oracle Fusion Middleware Software
Downloads section.
You need to Accept Licence Agreement before you can download the file.

Windows, Linux, Mac OS X and Generic Installer (for use
with 64-bit JVMs) are also options to download in addition
to the developer zip file.
Create the D:\weblogic\wls directory in your computer.
Unzip the downloaded file wls1211_dev.zip into the wls directory folder.
Setting Up the Environment
- Create a default configuration and boot? y
- Enter username to boot Weblogic server: weblogic
- Enter password to boot Weblogic server: welcome1
In this section, you will set up the three environment variables needed: JAVA_HOME, MW_HOME and JAVA_VENDOR. Also, you will run the installation script and create the WebLogic Server domain.
Setting Up the Three Environment
Variables
Verify the path and the folder name of your JDK 7
installation in your computer. Normally it is under C:\Program Files\Java\ :

Your JDK 7 installation folder name could include a build version: jdk1.7.0_<build version>. You will need to type the full folder name when setting JAVA_HOME two steps further.
Open a command window. (Start>Run>cmd).
Type the following command to go to the D:\weblogic\wls folder, which is where you unzipped the developer zip file:
pushd D:\weblogic\wls
Type the following commands to set the three
environment variables.
set
JAVA_HOME=C:\PROGRA~1\Java\jdk1.7.0
set MW_HOME=D:\weblogic\wls
set JAVA_VENDOR=Sun

Note: The JAVA_HOME
value cannot contain any spaces, and that is why PROGRA~1 is used as the PROGRAM FILES directory
short name.
To discover the short name of your Program Files folder you can use the dir /X command
Keep the Command Prompt window opened for the next
step. This is in order to maintain the environment
variables.
Running the Installation
Configuration Script
In MW_HOME(D:\weblogic\wls),
execute configure.cmd to launch the
installation configuration script.

Type the following command to set up the WLS
environment in the current shell :
%MW_HOME%\wlserver\server\bin\setWLSEnv.cmd

Keep the Command Prompt window opened for the next
step.
Creating the Domain
Before you can develop and run WebLogic, you must first create a WebLogic Server domain, which is the basic administration unit:
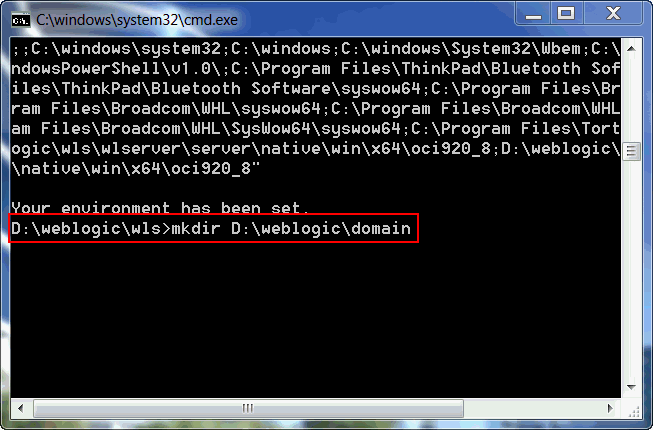
Create the domain folder.
Type the following command:
mkdir D:\weblogic\domain
Move to the recently created domain folder:
Run the following command to set up the domain on
this folder:
%JAVA_HOME%\bin\java.exe weblogic.Server %JAVA_OPTIONS% -Xmx1024m -XX:MaxPermSize=350m
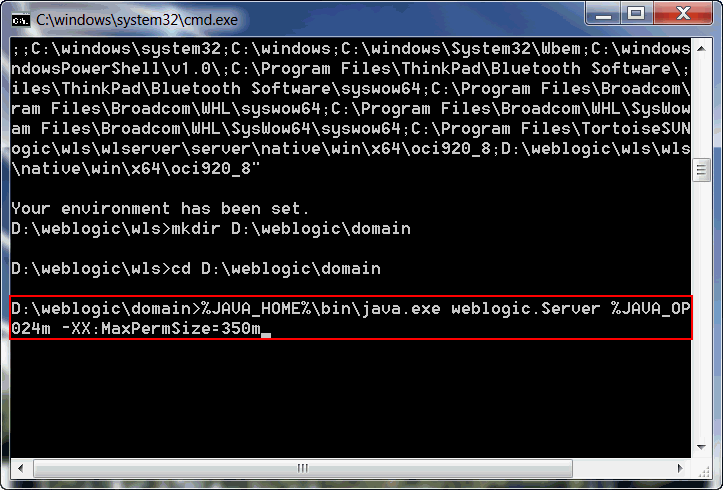
Because you are using JDK 7 you might encounter
PermGen errors, and because of that you are using a MaxPermSize value of 350
to avoid it. Otherwise you can use the default of
128m:
%JAVA_HOME%\bin\java.exe weblogic.Server %JAVA_OPTIONS% -Xmx1024m -XX:MaxPermSize=128m
3.1. Answer the installation questions:
WebLogic finishes loading and displays <The server started in RUNNING mode.> in the output window.
There is additional information at
the end of this tutorial about using 64-Bit JDK and
using GUI mode when creating the domain.
Press Ctrl + C to stop the WebLogic Server.
Last command besides configuring the domain also
started the WebLogic Server. However this is not the
normal procedure to start the server. Following step
shows how to start the WebLogic Server from the
command line.
Start the WebLogicServer by executing the following command, which is provided in the domain folder:
startWebLogic.cmd

5.1. Press Ctrl + C To shut the
WebLogic Server down.
Configuring WebLogic Server in NetBeans
This section will show you how to register the WebLogic Server with the NetBeans IDE.
Start NetBeans. Open the Services Window (Window -> Services).
Expand the Servers folder - GlassFish Server is included with NetBeans Enterprise Edition and installed automatically.

Right-click the Servers folder. Select Add Server...

Select Oracle WebLogic Server. Click Next.

Enter D:\weblogic\wls\wlserver as the Server Location. Click Next.

Verify that the Domain location is D:\weblogic\domain.
Enter weblogic for username and welcome1
for password.
Click Finish.

NetBeans has created in Services tab the WebLogic
Server instance.
From the Services tab, right-click the Oracle WebLogic Server under the Servers node. Click Start.

WebLogic finishes loading and displays <The
server started in RUNNING mode.> in the output
window.
Now you can Start, Stop and Deploy Web Applications using
WebLogic Server in the NetBeans IDE.
Right-click the Oracle WebLogic Server. Click View Admin Console.
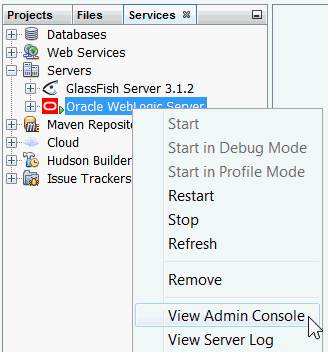
The Admin Console enables you to administer the WebLogic Server.
Alternatively, you can open a web browser and enter the URL http://localhost:7001/console
On the Admin Console, enter weblogic for username and welcome1 for password.

With the Admin Console you can administer your WebLogic Server
Testing your WebLogic Server Installation
In this section, you will test your WebLogic Server installation by deploying a Web application using JSF and JPA entities from the sample database.
Opening Sample Database
In NetBeans, in the Services tab, expand the Databases folder.
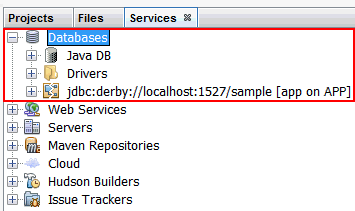
Right-click Java DB. Click Start Server.
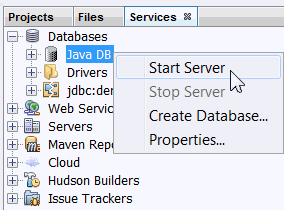
An Output Window opens and indicate that Apache Derby Network Server 10.8.1.2 started.
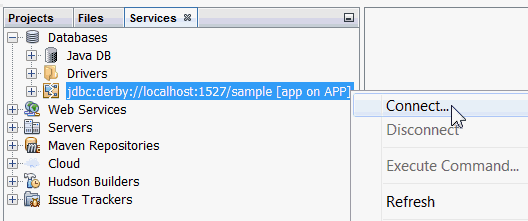
Right-click the connection titled jdbc:derby://localhost:1527/sample [app on APP]. Click Connect.
Expand the connection. Expand APP.
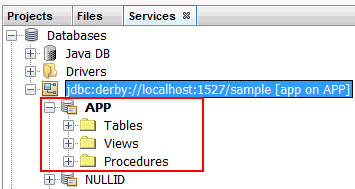
This is the name of the schema for the sample
database, it contains all of the tables, views and
stored procedures associated with this schema.
Expand the Tables.
Right-click CUSTOMER. Select View Data.
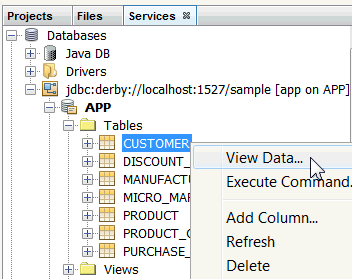
This is one of the ways to perform SQL queries directly on the database tables. In the SQL Command Window that opened, you can execute other queries as well.
Creating a Java EE Web Application Project
Click File -> New Project.
Select Java Web from Categories and Web Application from Projects. Click Next.

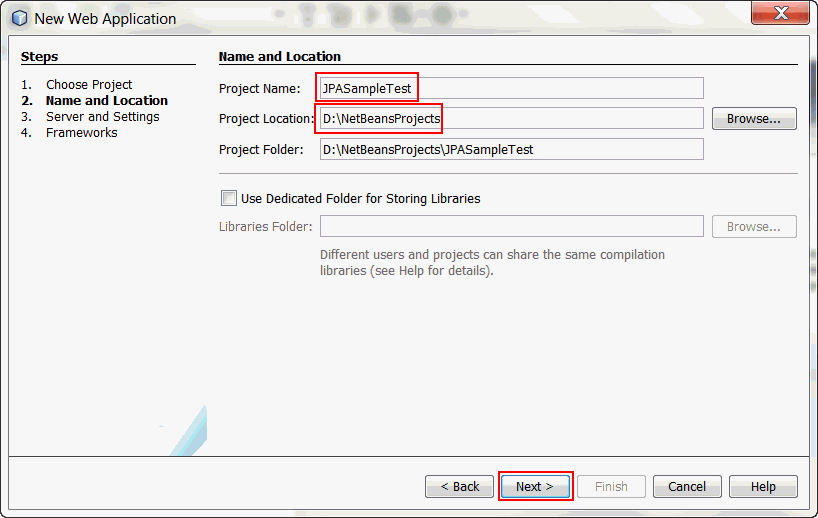
Enter JPASampleTest as the Project Name.
Set the Project Location to D:\NetBeansProjects or the folder path that you want for your NetBeans projects.
Click Next.
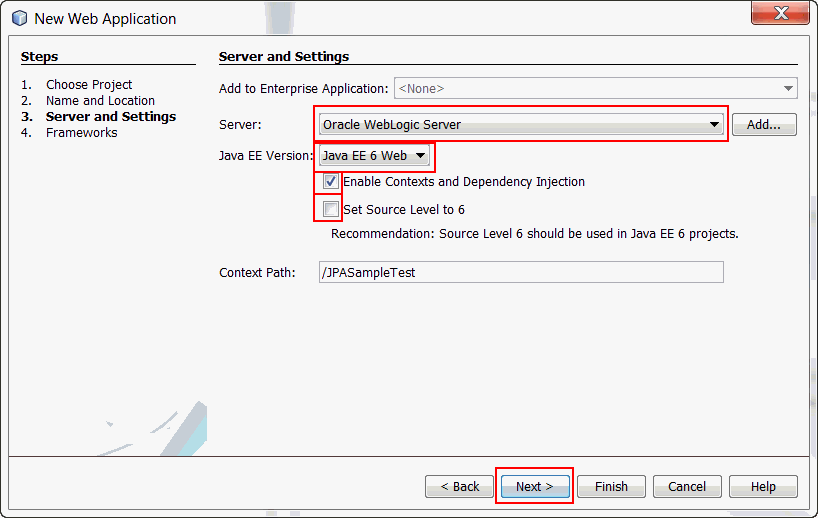
Verify that Oracle WebLogic Server is selected as the Server.
Verify that Java EE version is Java EE 6 Web.
Check the box for Enable Contexts and Dependency Injection.
Uncheck the default box to Set Source Level to 6.
Click Next.
Select JavaServer Faces as the Framework. Click Finish.

Adding Entities Generated from the
Sample Database to the Project
The sample database is provided with every NetBeans installation. It contains a number of tables populated with data.
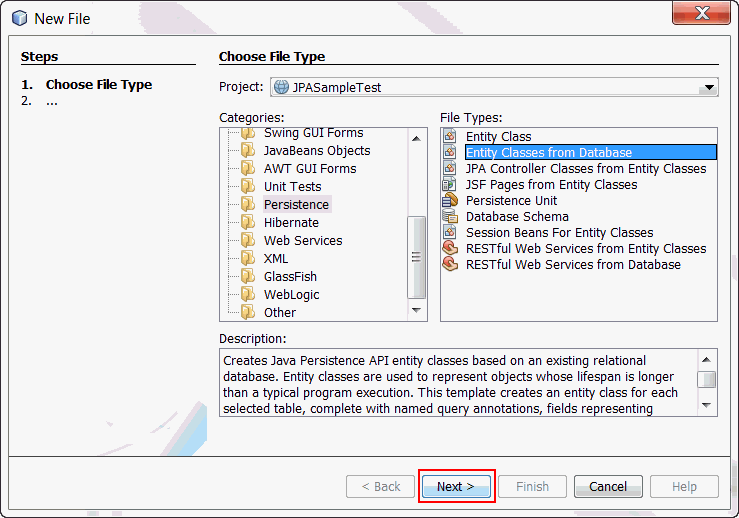
Right-click the project. Select New -> Other.
Choose Persistence from Categories and Entity Classes from Database as the file type. Click Next.
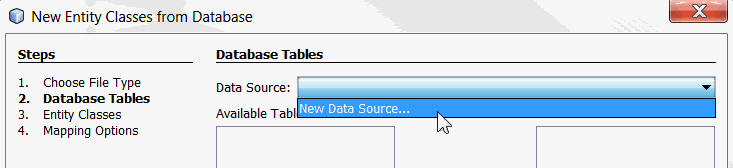
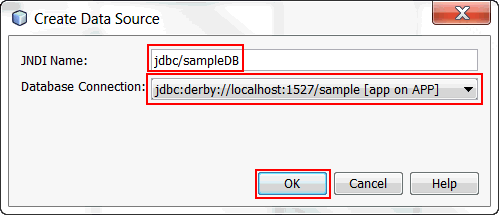
Click the Data Source drop-down list. Select New Data Source.
Enter jdbc/sampleDB
as the JNDI Name.
Select jdbc:derby//localhost:1527/sample [app on
APP] as the Database connection.
Click OK.
Click Add All to move all of the tables from the Available Tables column to the Selected Tables column. Click Next.
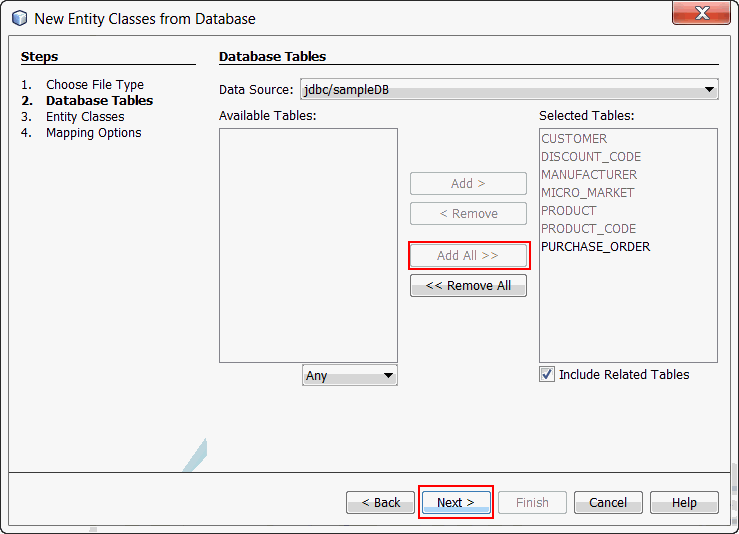
Enter com.example.entity as the package name.
Uncheck Generate JAXB Annotations. JAXB is not used on this example.
Click Finish.

NetBeans generates the Entity classes and Named queries for each of the tables in the database.
Reviewing the Entity Classes Created
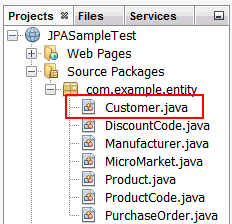
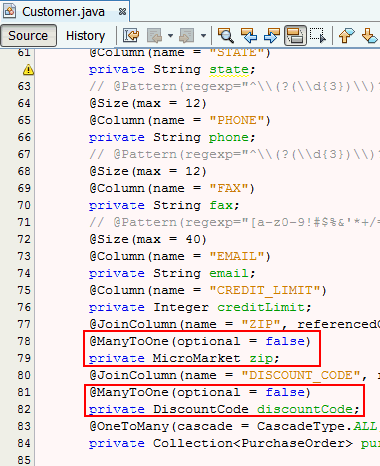
Open the Customer.java entity file located under the com.example.entity folder:
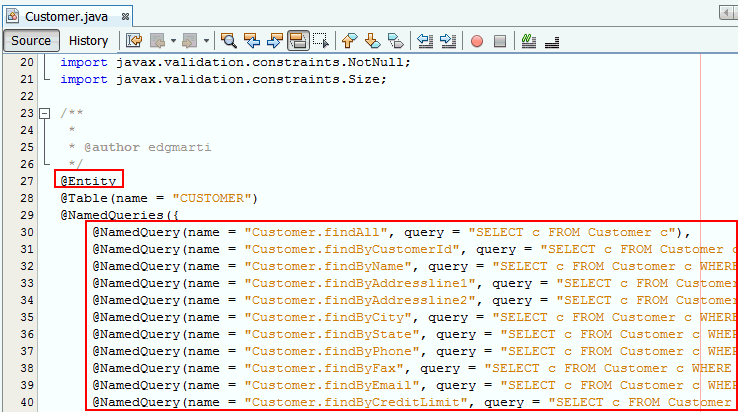
At the top of the class is the @Entity annotation that indicates this is an entity for the CUSTOMER table.
Named queries contain Java Persistence Query Language statements, which look like SQL commands, one for every combination of query of the table:
The class declares a fields for each of the table's columns, using @Id to define the primary key column:

Near the bottom of the field list, there are some relationship annotations named @ManytoOne, which define the relationship between this entity and other entities. MicroMarket and DiscountCode are two examples of @ManytoOne annotations:
The rest of the class contains getter/setter methods.
Adding JSF View Pages and
Supporting Classes to the Project
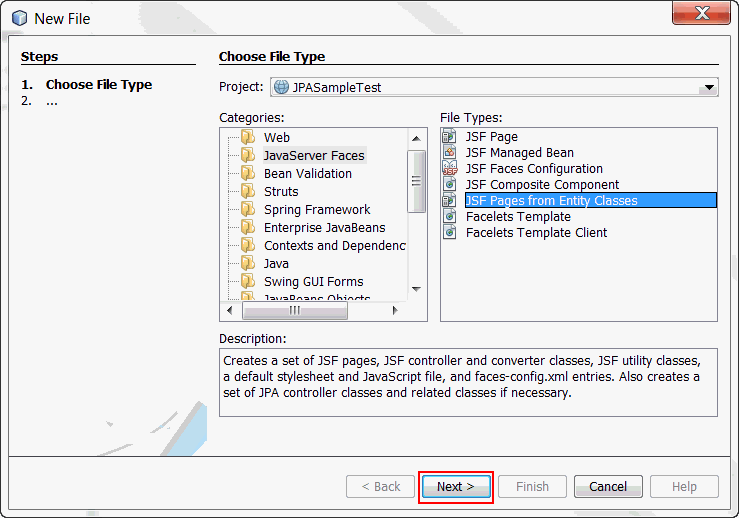
Right-click the project. Select New -> Other.
Select JavaServer Faces from Categories and JSF Pages from Entity Classes from File Types. Click Next.
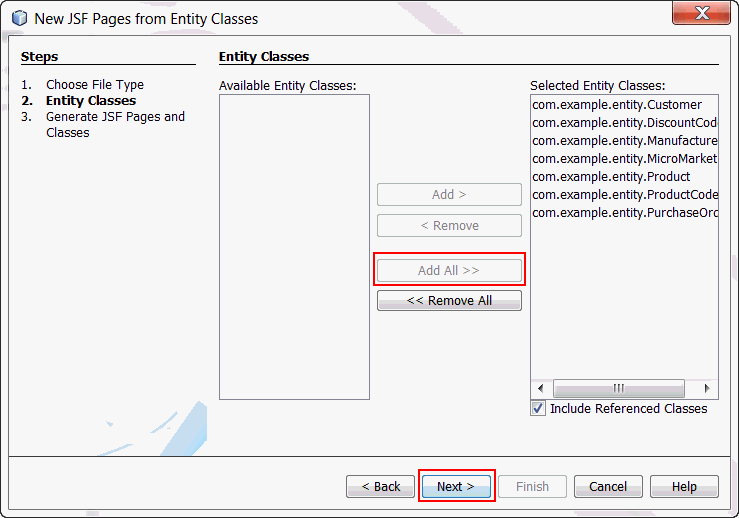
Click Add All to move the Available Entity classes column to the Selected Entity classes column. Click Next.
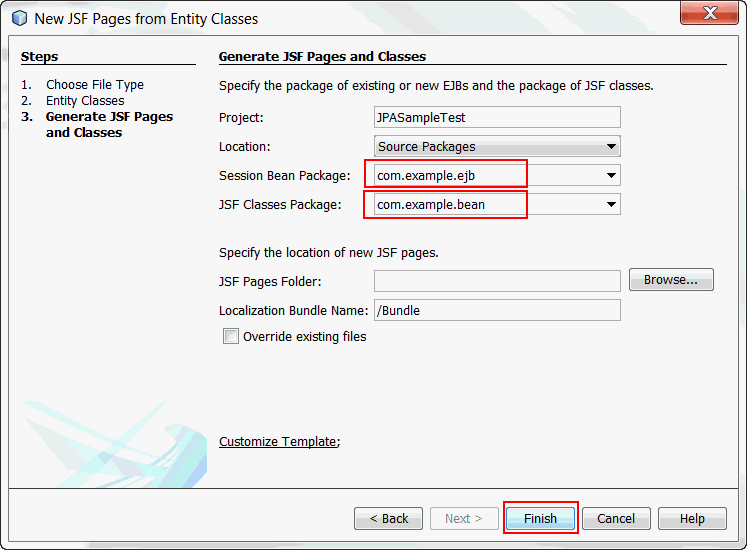
Modify the package name of the Session Bean Package to com.example.ejb.
Modify the package name of the JSF
classes to com.example.bean.
Click Finish.
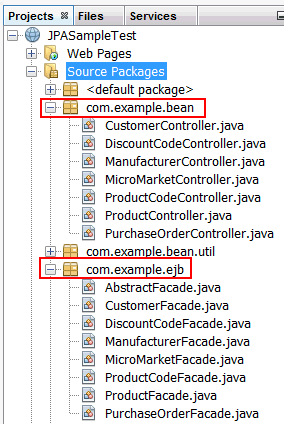
NetBeans generates a set of view pages under the Web
Pages folder, with each group of view functionality
pages (view, edit, create, list) in a folder named by
the table they support.
The com.example.bean folder contains the generated view/controller classes (JSF managed beans) for each of the tables in the sample database.
The com.example.ejb package contains the session beans that perform the work of getting the data out of and into the database using EJB Session beans. These classes are named with Facade - for example, CustomerFacade. The class uses the facade design pattern - basically, this class represent the "face" of the Customer entity to the CustomerController class:
Running the Project and Testing
the Code
Run the project.
Right-click the project. Select Run.

This will take awhile to compile and build the
classes, to copy the JDBC drivers to the appropriate
folder in WebLogic server and to deploy the project
and start the Web browser.
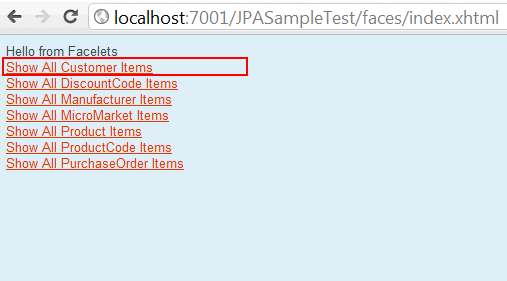
Test the Code.
Click the Show All Customer Items link.
2.1. Experiment wit the View, Edit and Destroy links on the far right side of the table:
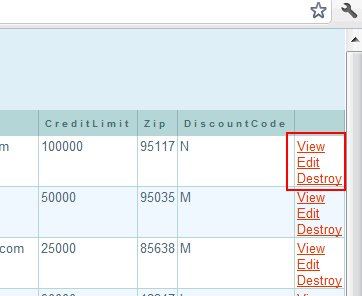
This is a quick way to check that WebLogic Server is
operating properly and can connect to the database
through JPA.
Additional Information on Creating Domains
If you get the following error while creating the domain:
<Error><Security><BEA-090783><Server
is Running in Development Mode and Native
Library(terminalio) to read the password securely from
commandline is not found.>
Then you are using a 64-bit JDK. You can either switch to a 32-bit JDK or change four environment variables in the %MW_HOME%\wlserver\server\common\bin\commEnv.cmd file. Find the following lines in the file and change them as shown:
set JAVA_USE_64BIT=true
set WL_USE_X86DLL=false
set WL_USE_IA64DLL=false
set WL_USE_AMD64DLL=true
You might need to close the current Command Prompt window
and open a new one, then set up the three environment
variables and execute setWLSEnv.cmd
again.
You can also create the domain by invoking the GUI
configuration in the Command Prompt window:
%MW_HOME%/wlserver/common/bin/config.cmd
You need to set up the three environment variables JAVA_HOME,
MW_HOME and JAVA_VENDOR to execute this
command. You can extend an existing WebLogic Domain using
the Configuration Wizard.
Summary
- Run the WebLogic Server 12c installation configuration script
- Set up WebLogic Server environment
- Create a new WebLogic Server domain
- Register the Oracle WebLogic Server with the NetBeans IDE
- Test your WebLogic Server installation by deploying a Web
application that uses JSF and JPA entities.
- Oracle Fusion Middleware Documentation Library.
- Oracle WebLogic Server Documentation.
- WebLogic Server 12c - 5 Mins with the Zip File Distribution video.
- JavaServer Faces Technology.
- Java
Persistence API.
- Curriculum Developer: Edgar Martinez
- Other Contributors: Tom Mcginn
In this tutorial, you have learned how to:
Resources
Credits
To help navigate this Oracle by Example, note the following:
- Hiding Header Buttons:
- Click the Title to hide the buttons in the header. To show the buttons again, simply click the Title again.
- Topic List Button:
- A list of all the topics. Click one of the topics to navigate to that section.
- Expand/Collapse All Topics:
- To show/hide all the detail for all the sections. By default, all topics are collapsed
- Show/Hide All Images:
- To show/hide all the screenshots. By default, all images are displayed.
- Print:
- To print the content. The content currently displayed or hidden will be printed.
To navigate to a particular section in this tutorial, select the topic from the list.