Using the Oracle Business Intelligence Server Metadata XML API
Purpose
In this tutorial, you learn how to use two utilities that employ the Oracle Business Intelligence (BI) Server XML API to create an XUDML (an Extensible Universal Database Markup Language) file version of your Oracle BI Repository metadata and interchange the converted metadata to build a new version of the BI Repository.
Time to Complete
Approximately 1 hour.
Overview
Earlier releases of Oracle BI Enterprise Edition (EE) stored the BI Repository metadata in binary format within the repository (rpd) file. Two command-line utilities provide an XUDML file version of the same metadata and a method to interchange the converted file with the repository file, allowing you to write utilities, tools, and interfaces to manipulate or reuse the BI Repository metadata. You can use these command-line tools to generate XUDML from an existing repository file and to execute XUDML scripts to create or modify repository files.
Scenario
In this tutorial, you run the nqxudmlgen.exe command-line utility against a small sample BI Repository to create an XUDML file of the BI metadata. You modify the XML-representation metadata by adding a logical column object. Finally, you run the nqxudmlexec.exe command-line script, to create a new version of the BI Repository file, containing a new logical column.
Software Requirements
The following is a list of software requirements:
- Oracle BI EE 10.1.3.4 or later must be installed
- Windows 2000 or later must be installed
- Download Sample XML Utilities from OTN at this link
- A text editor (such as WordPad or Notepad) or XML editor must be installed
Prerequisites
Before starting this tutorial, you should:
- Have the proper permissions for configuring the BI Repository on your company's system
- Have downloaded the sample
XML_Utilities.zip file, and unzipped and copied all sample file to
the following locations:
- samplesmall3NoCustNoPresBilled.rpd repository file to <installdrive>:\OracleBI\server\Repository
- executable (.exe) and schema files (.xsd and .xsx), and the dynamic link library file (.dll) to the <installdrive>:\OracleBI\server\Bin
Note: Screen captures for this tutorial were taken in a Windows XP Professional environment; therefore, Start menu options will vary.
Creating an XUDML File, Using the Nqxudmlgen.exe Utility
By default, BI Repository files are stored in binary format. To review the sample BI Repository and create an XUDML file from the sample repository file, perform the following steps:
Reviewing the Sample Repository
| . |
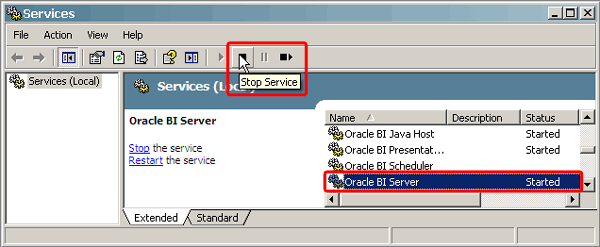
Stop the Oracle BI Server services: a. Select Start > All Programs > Administrative Tools > Services. b. In the Services dialog box, stop the Oracle BI Server service.
|
|---|---|
| . |
Select File > Exit to close the Services dialog box.
|
. |
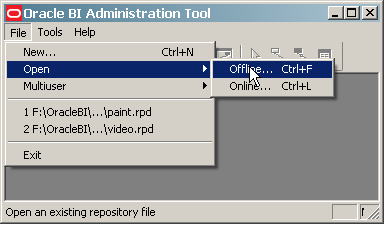
Open the Oracle BI Administration Tool: a. Select Start > All Programs > Oracle Business Intelligence > Administration. b. Select File > Open > Offline.
|
. |
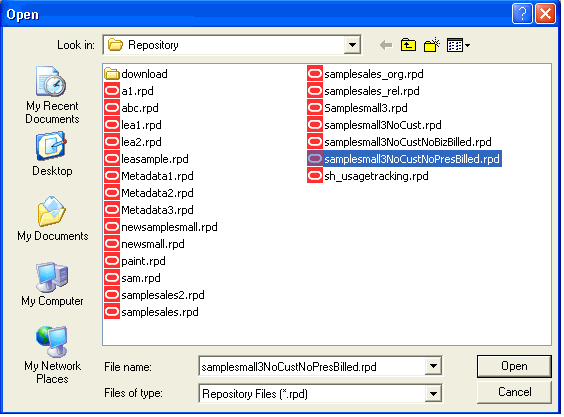
Select samplesmall3NoCustNoPresBilled.rpd in the Open dialog box and click Open to view the repository in the Oracle BI Administration tool.
|
. |
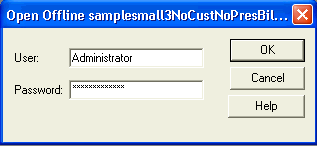
In the Open Offline dialog box, enter Administrator in the User and Password text boxes and click OK.
Note: Verify the Administrator user name and password at your site.
|
. |
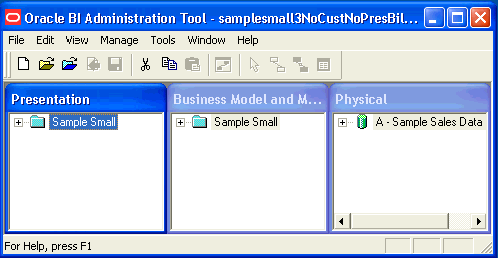
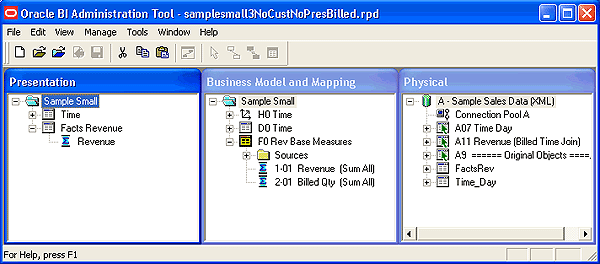
The samplesmall3NoCustNoPresBilled repository opens.
You use the Oracle BI Administration Tool to build, manage, and maintain repositories. This tool is a Windows application that separates the BI Repository into three distinct panes or layers. These three layers are named Physical, Business Model and Mapping, and Presentation. This repository stores the BI metadata within a file (rpd) that is rendered inside the Oracle BI Answers and Oracle BI Interactive Dashboards clients, as well as other clients. Click the plus sign icons
(
|
. |
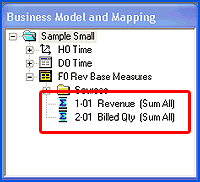
The F0 Rev Base Measures folder within the Business Model and Mapping layer contains two logical columns, 1-01 Revenue (SUM All) and 2-01 Billed Qty (SUM All), both representing measures.
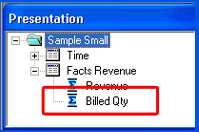
The Presentation layer contains only one logical column in the Facts Revenue folder, but should have a corresponding column for Billed Qty (as shown in the following image).
Once you run the nqxudmlgen.exe utility to create an XUDML file, you can update that file to create the corresponding Billed Qty logical column in the Presentation layer. Select File > Exit to close the Oracle BI Administration Tool.
|
Creating an XUDML File
|
. |
Ensure that the Oracle BI Server service is not running. Select Start > Run to open a command-line window and navigate to <installdrive>:\OracleBI\server\Bin.
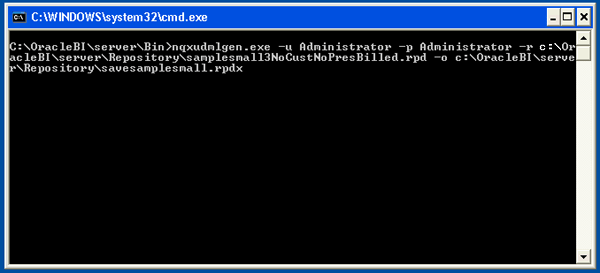
Enter the following command to run the generate utility to create an XUDML file from the binary rpd file and press Enter: nqxudmlgen.exe -u Administrator -p Administrator-r <installdrive>:\OracleBI\server\Repository\samplesmall3NoCustNoPresBilled.rpd -o <installdrive>:\OracleBI\server\Repository\savesamplesmall.rpdx Where:
The command line should look like this:
|
||||||||||
|---|---|---|---|---|---|---|---|---|---|---|---|
. |
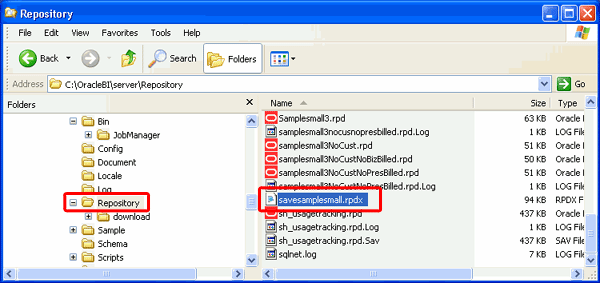
Verify the output by navigating to the <installdrive>:\OracleBI\server\Repository in Windows Explorer.
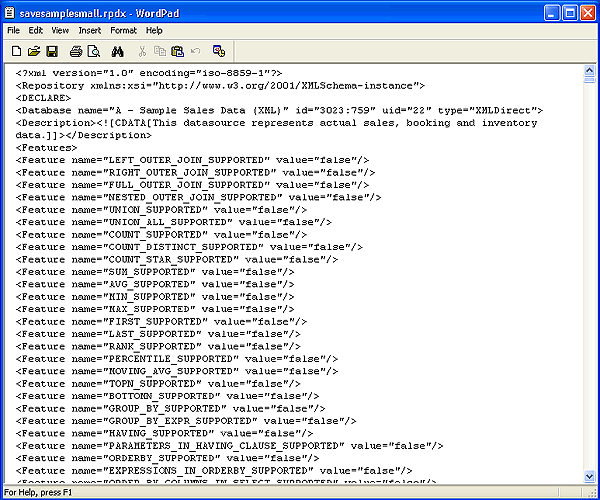
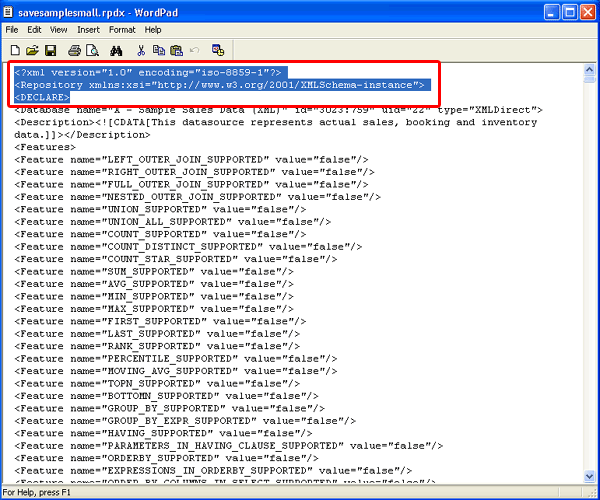
Open savesamplesmall.rpdx, using a text editor such as WordPad.
Leave savesamplesmall.rpdx open to use in the next section, “Creating a Repository Update File.”
|
Creating a Repository Update File
The XUDML file created in the previous section, “Creating an XUDML File,” contains code that can be used to create a new version of the repository or modify an existing one. In this section, you use components of the code to create a new change file that you will apply against the existing repository to create a new version of the rpd file in the final section, “Creating a Repository, Using the Nqxudmlexec.exe Utility.”
To create an update file, perform the following steps:
. |
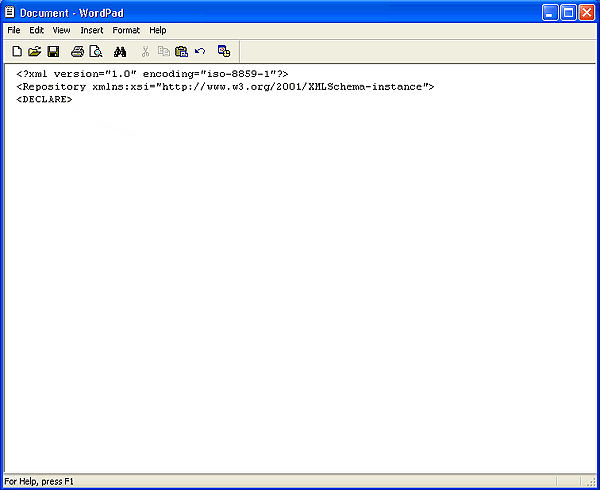
With savesamplesmall.rpdx still open, use a text editor to open a new file. To ensure that the script that you are creating is syntactically correct, you copy the XML from the savesamplesmall.rpdx into your new document throughout the next series of steps. Select the first three lines from savesamplesmall.rpdx and select Edit > Copy.
|
|---|---|
. |
In the new document, select Edit > Paste.
|
. |
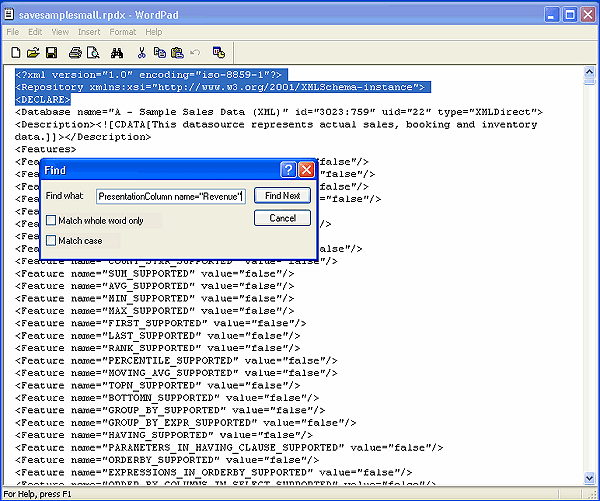
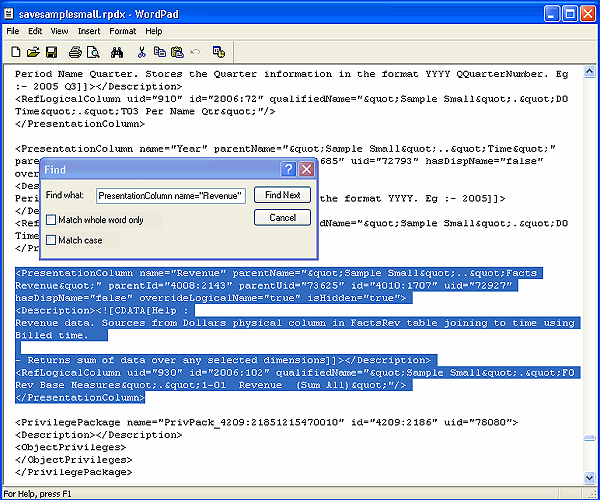
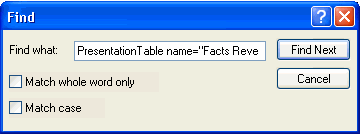
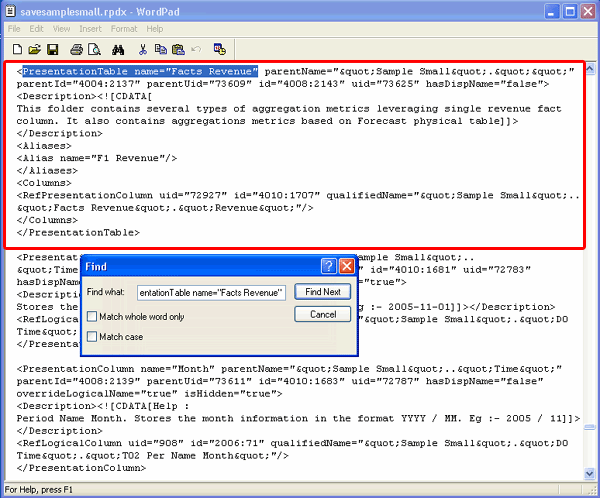
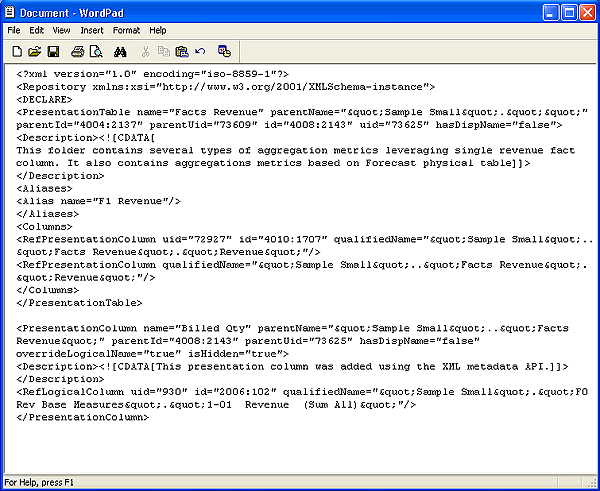
Recall from “Reviewing the Sample Repository,” that you need to create a logical column, named Billed Qty, in the Presentation layer. This logical column must reference the corresponding column, 2-01 Billed Qty (SUM All), to which it maps and the Facts Revenue table to which it belongs. You use the Revenue logical column as a template to create Billed Qty. In savesamplesmall.rpdx, select Edit > Find. In the “Find what” text box, enter PresentationColumn name="Revenue"and click Find Next.
Find locates the XML text.
Note: For additional information on syntax and code, please refer to the Oracle BI Services Administration Guide.
|
. |
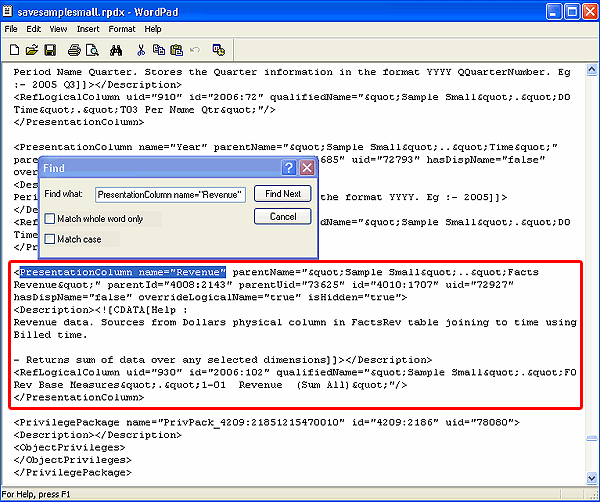
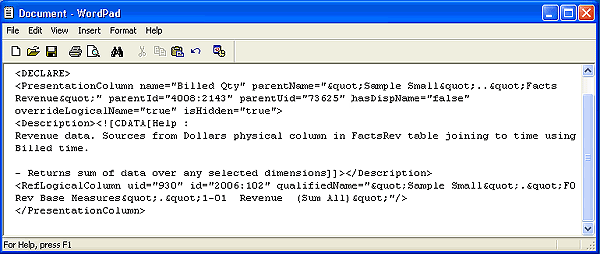
Select the code as indicated in the following image and select Edit > Copy
|
| . |
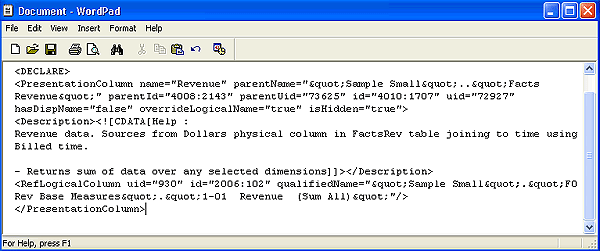
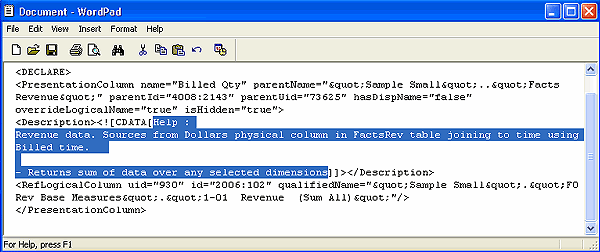
Navigate to the new document and select Edit > Paste. Your new document should look like the following image:
|
. |
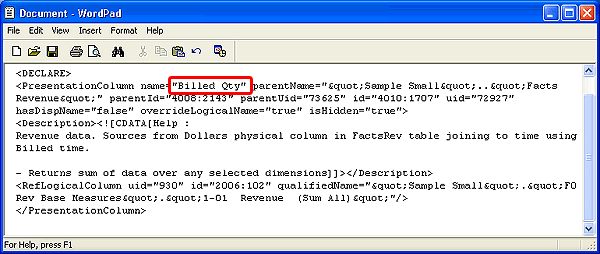
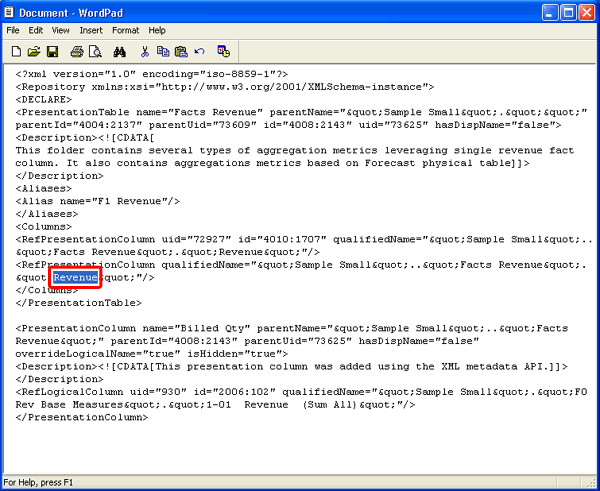
Select the value of the PresentationColumn name attribute (Revenue).
|
| . |
Enter Billed Qty between the double quotation marks.
|
. |
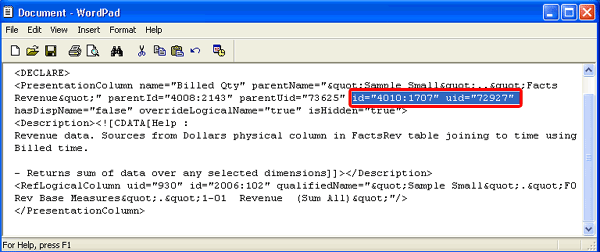
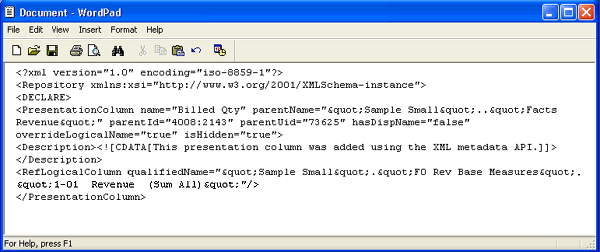
Select the id and uid attributes, including their respective values, for PresentationColumn and press Delete.
The id is the global unique identifier of the object and can be used to reference objects instead of using their qualified names. The uid is the internal identifier of the object. Both of these attribute values are automatically generated by the BI Server the first time the BI Server uses the updated rpd file. These values are lifetime values for each object.
|
. |
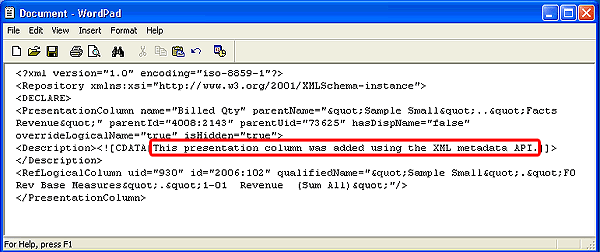
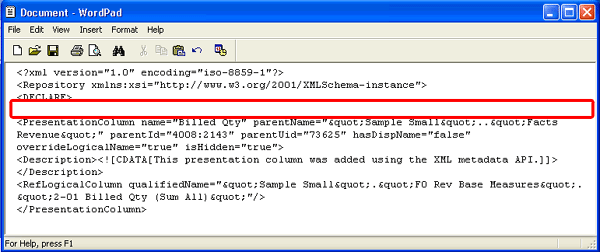
Select the value of the <Description> statement and enter This presentation column was added using the XML metadata API. between the double brackets.
Your new document should look like the following image:
|
| . |
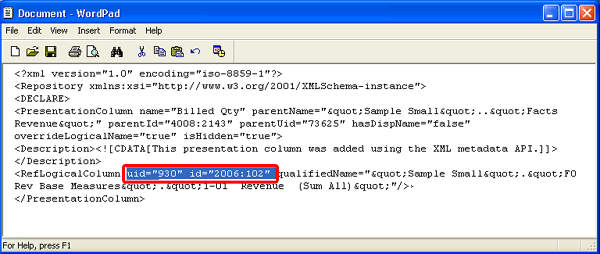
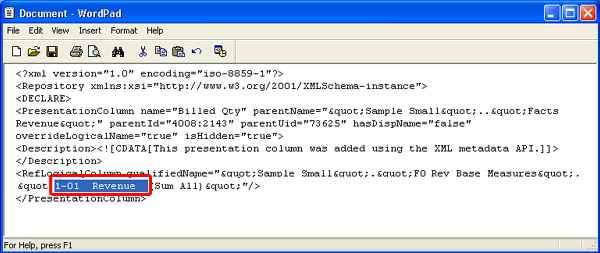
Select the id and uid attributes, including their respective values, for RefLogicalColumn and press Delete.
Your new document should look like the following image:
|
. |
Select the value 1-01 Revenue.
|
. |
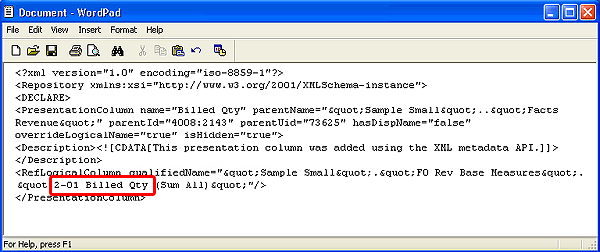
Enter 2-01 Billed Qty.
The new logical column is now qualified properly for the Presentation layer.
|
| . |
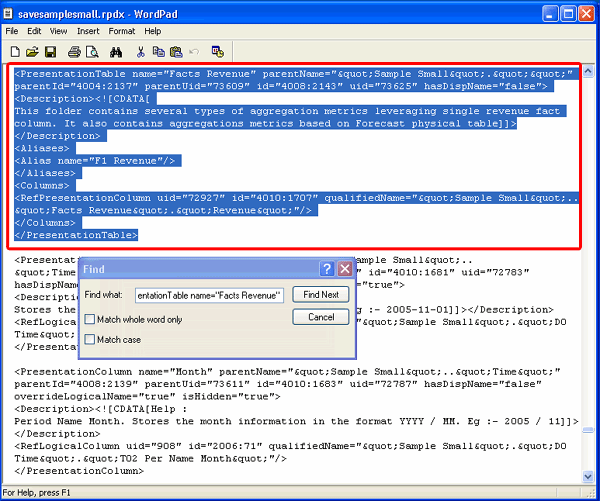
To complete the required detail for the update, you must add a reference to the new column object in the corresponding Presentation layer table. You use the savesamplesmall.rpdx to copy the code once again. In savesamplesmall.rpdx, select Edit > Find. In the “Find what” text box, enter PresentationTable name="Facts Revenue" and click Find Next.
Find locates the XML text.
|
. |
Select the code as indicated in the following image and select Edit > Copy.
|
. |
Navigate to the new document and insert a blank line following the <DECLARE> statement.
|
| . |
Select Edit > Paste. Your document should look like the following image:
|
. |
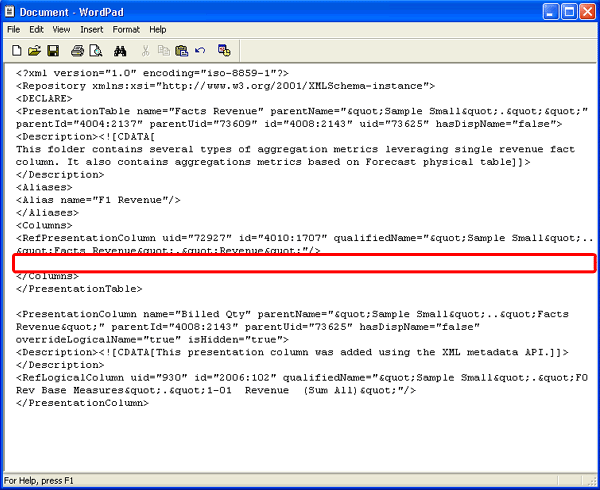
Insert a blank line following the <RefPresentationColumn> statement.
|
| . |
Select the entire <RefPresentationColumn> statement, as shown in the following image and select Edit > Copy.
|
. |
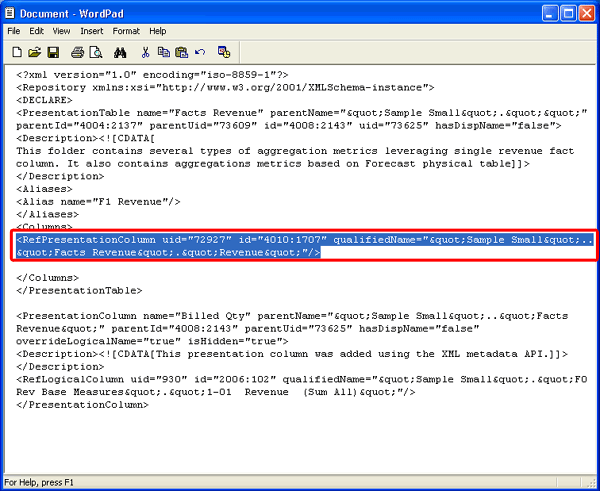
Position your cursor on the blank line and select Edit > Paste.
|
| . |
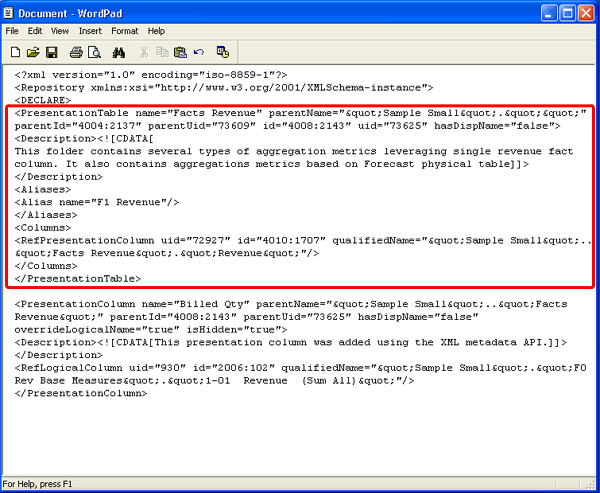
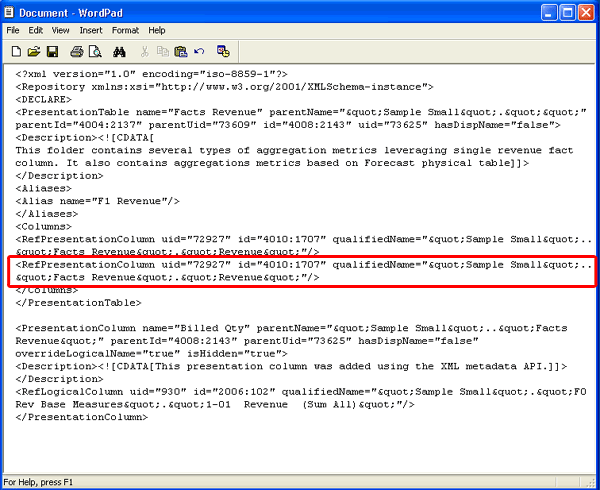
Select the id and uid attributes, including their respective values, for RefPresentationColumn and press Delete.
Your document should look like the following image:
|
. |
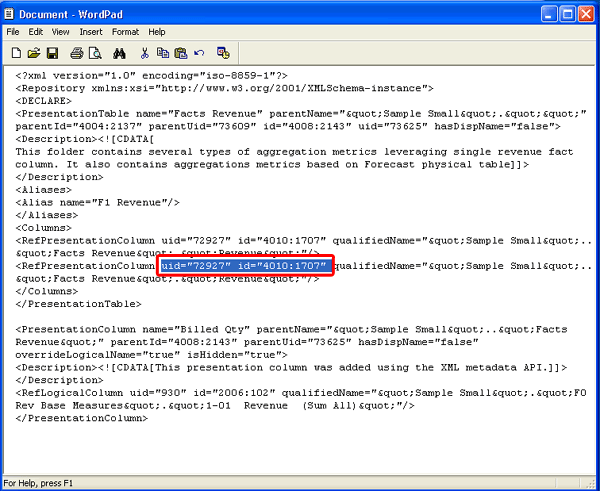
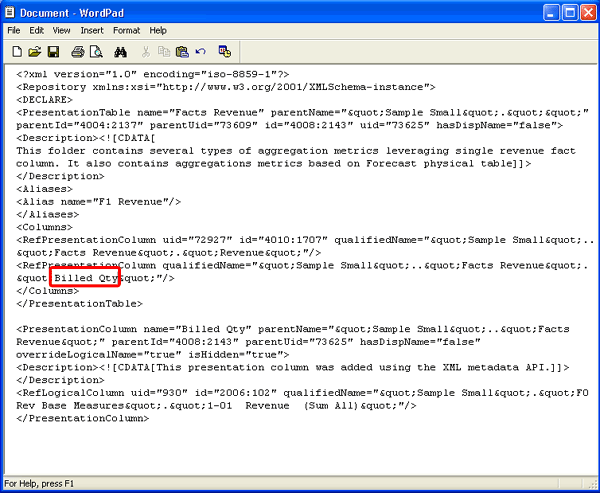
Select the value Revenue, as shown in the following image:
|
| . |
Enter Billed Qty:
The new logical column is now qualified properly within the Facts Revenue Presentation layer table. You can use this script to update the Presentation layer of the repository with your new logical column or to create a new repository.
|
. |
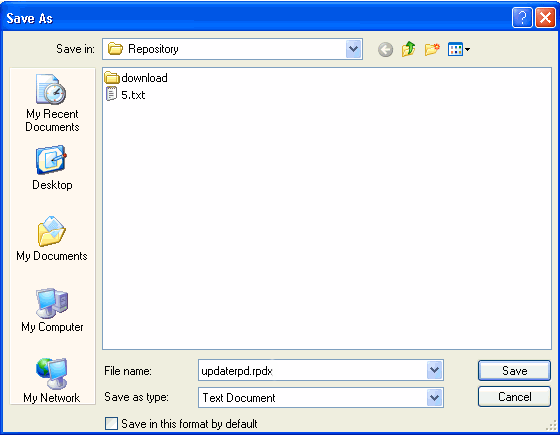
Select File > Save. Navigate to <installdrive>:\OracleBI\server\Repository, name the document updaterpd.rpdx, and click Save.
|

Creating a Repository, Using the Nqxudmlexec.exe Utility
You use the nqxudmlexec.exe script in conjunction with your XUDML file (updaterpd.rpdx) created in the previous section, “Creating a Repository Update File,” to update an existing or create a new version of the BI Repository.
| . |
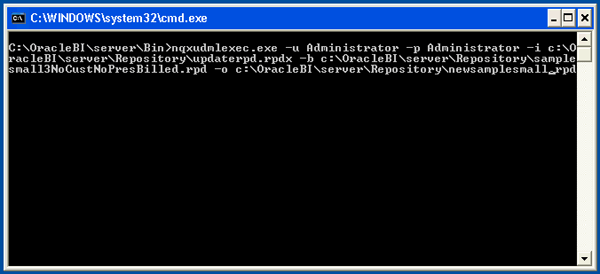
Select Start > Run to open a command-line window and navigate to <installdrive>:\OracleBI\server\Bin.
Enter the following command to run the exec utility to create a new version of the repository file and press Enter. nqxudmlexec.exe -u Administrator -p Administrator-i <installdrive>:\OracleBI\server\Repository\updaterpd.rpdx.rpd -b <installdrive>:\OracleBI\server\Repository\samplesmall3NoCusNoPresBilled.rpd -o <installdrive>:\OracleBI\server\Repository\newsamplesmall.rpd Where:
The command-line should look like this:
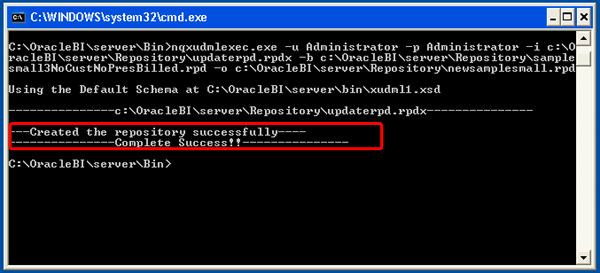
The script executes successfully and creates a new version of the repository file.
|
||||||||||||
|---|---|---|---|---|---|---|---|---|---|---|---|---|---|
. |
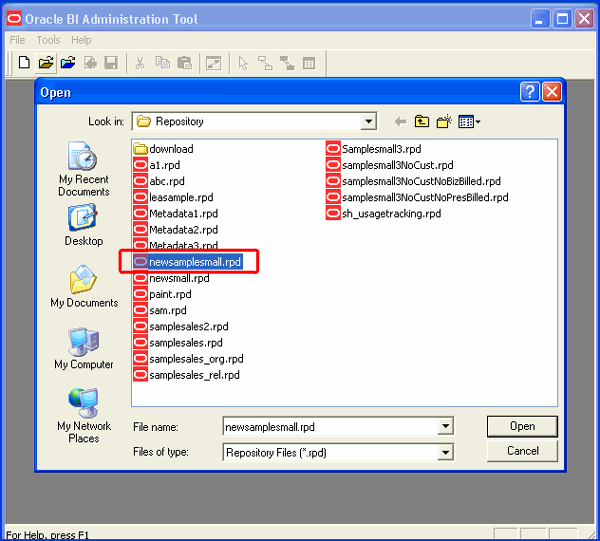
Verify the output. Select Start > All Programs > Oracle Business Intelligence > Administration to open the Oracle BI Administration Tool. Select File > Open > Offline.
|
||||||||||||
. |
Select newsamplesmall.rpd in the Open dialog box and click Open to view the repository.
|
||||||||||||
. |
In the Open Offline dialog box, enter Administrator in the User and Password text boxes and click OK.
|
||||||||||||
. |
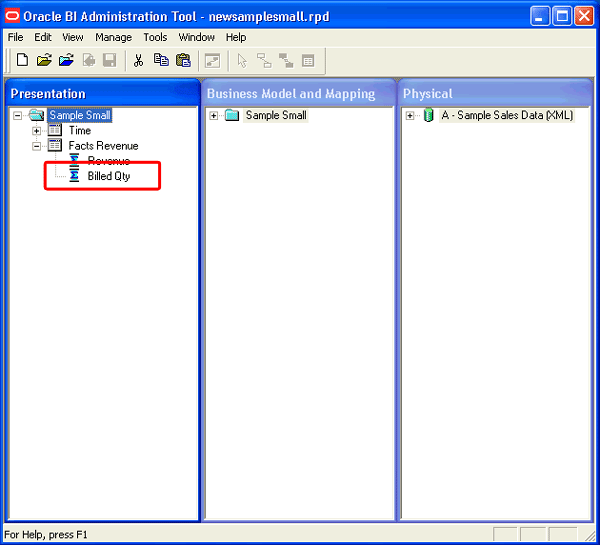
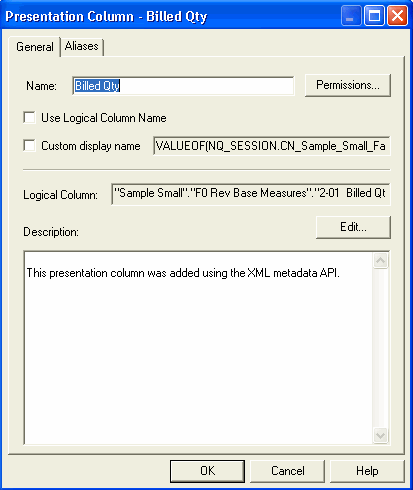
The newsamplesmall.rpd repository opens. Open and expand the Facts Revenue folder in the Presentation layer to view the logical columns and note that your new column, Billed Qty, has been added.
|
||||||||||||
| . |
Double-click the Billed Qty column in the Presentation layer to view the properties. The Properties dialog box appears. From this dialog box, you can edit the column on the General tab or use the Aliases tab to specify or delete an alias for the column.
|
||||||||||||
| . | Select File > Exit to close the Oracle BI Administration Tool. |
Summary
The XUDML command-line utilities provide you with the ability to to write your own utilities, tools, and interfaces to manipulate or reuse the BI Repository metadata, which provides you with maximum flexibility to leverage your existing metadata.
In this tutorial, you should have learned how to:
- Create an XUDML file, using the nqxudmlgen.exe utility
- Build an update file to create a new version or modify an existing repository
- Create a new version of the repository, using the nqxudmlexec.exe utility
Resources
- Oracle BI Services Administration Guide, Appendix A
- To learn more about Oracle BI Enterprise Edition and Oracle BI Server Administration, refer to additional OBEs in the Oracle Learning Library
![]()
|
|
Copyright © 2012, Oracle and/or its affiliates. All rights reserved |