

This document will continue to evolve as existing sections change and new information is added. All updates appear in the following table:
| Date | Feature | Notes |
|---|---|---|
| 30 AUG 2019 | Created initial document. |
This guide outlines the information you need to know about new or improved functionality in Oracle Service Cloud Agent Browser UI August 2019 and describes any tasks you might need to perform for the update. Each section includes a brief description of the feature, the steps you need to take to enable to begin using the feature, any tips or considerations that you should keep in mind, and the resources available to help you.
For a listing of hardware and software requirements for Oracle products, log in to our support site and access Answer ID 31.
Give Us Feedback
We welcome your comments and suggestions to improve the content. Please send us your feedback.
Column Definitions:
Report = New or modified, Oracle-delivered, ready to run reports.
UI or Process-Based: Small Scale = These UI or process-based features are typically comprised of minor field, validation, or program changes. Therefore, the potential impact to users is minimal.
UI or Process-Based: Larger Scale* = These UI or process-based features have more complex designs. Therefore, the potential impact to users is higher.
Customer Action Required = You MUST take action before these features can be used by END USERS. These features are delivered disabled and you choose if and when to enable them. For example, a) new or expanded BI subject areas need to first be incorporated into reports, b) Integration is required to utilize new web services, or c) features must be assigned to user roles before they can be accessed.
| Ready for Use by End Users Reports plus Small Scale UI or Process-Based new features will have minimal user impact after an update. Therefore, customer acceptance testing should focus on the Larger Scale UI or Process-Based* new features. |
Customer Must Take Action before Use by End Users Not disruptive as action is required to make these features ready to use. As you selectively choose to leverage, you set your test and roll out timing. |
|||||
|---|---|---|---|---|---|---|
| Feature |
Report |
UI or |
UI or |
Customer Action Required |
||
The Page Peek control is now supported on the Interaction WS for chat in Agent Browser.
If the Engagement Engine is enabled, the Page Peek control can be added to the Interaction WS through the .NET Designer.
To add the Page Peek control:
- Add a Tab Set control to the Interaction WS in the Designer. Tip: Delete the Incident View control when editing a standard workspace and then add the Tab Set. Then add the Incident View control to the first tab and rename the tab.
- Add a Tab to the Tab Set and rename it to Page Peek. Drop the Page Peek control under the new tab.
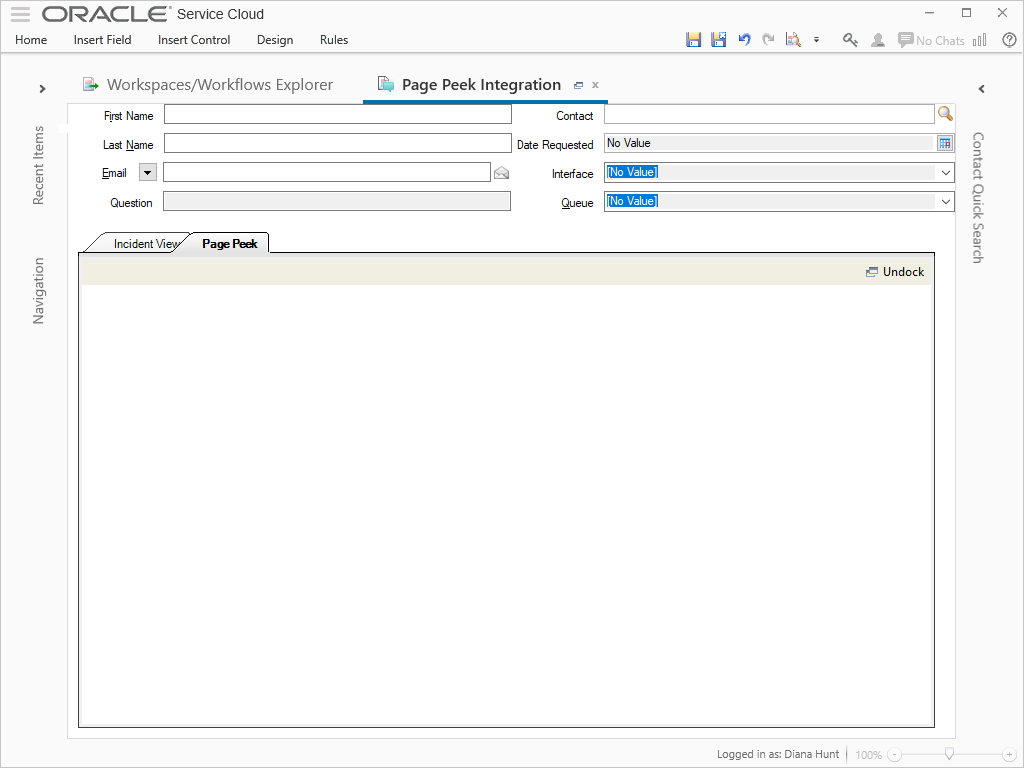
Page Peek Control in Interaction WS Designer
The Page Peek control will now render in the Agent Browser UI.
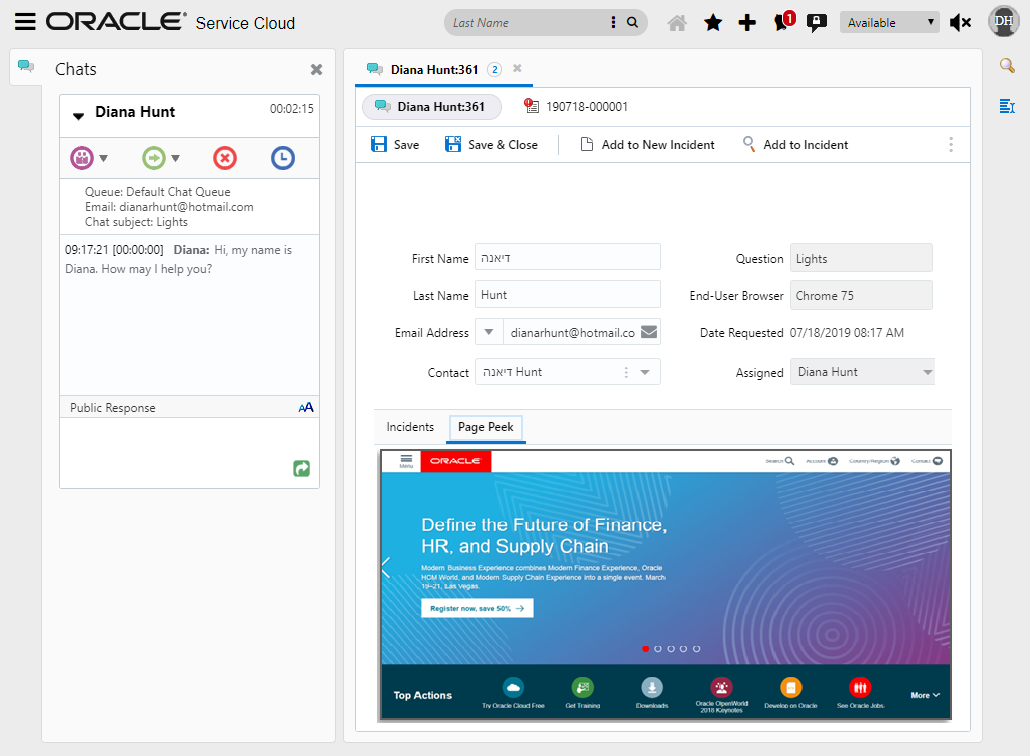
Page Peek in Agent Browser UI Runtime
Steps to Enable
To enable this feature you need to log a Service Request (SR).
- Engagement Engine needs to be enabled
Please see Answer ID 6537 Getting Started Guide for Visitor Browser History and Page Peek
- While the Interaction WS is open in the .NET Workspace Designer, Add the Page Peek control to a new tab
To add the Page Peek control:
- Add a Tab Set control to the Interaction WS in the Designer. Tip: Delete the Incident View control when editing a standard workspace and then add the Tab Set. Then add the Incident View control to the first tab and rename the tab)
- Add a Tab to the Tab Set and rename it to Page Peek. Drop the Page Peek control under the new tab.
- In Agent Browser UI runtime, the agent will be able to access and utilize Page Peek
Tips And Considerations
Answer ID 6537 Getting Started Guide for Visitor Browser History and Page Peek
TIP: Delete the Incident View control when editing a standard workspace and then add the Tab Set. Then add the Incident View control to the first tab and rename the tab.
Role Information
- If the Engagement Engine is not yet enabled please see steps to enable and getting started with Page Peek. A service request will be required.
- Once Engagement Engine is enabled and Page Peek is configured the administrator can add the Page Peek control to the Interaction Workspace.
- Agents will be able to utilize the Page Peek control in Agent Browser UI runtime.
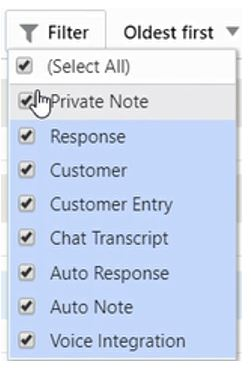
Incident Thread Type Filtering
The thread control within the incident workspace in Agent Browser UI now includes a 'filter' button where users can select which thread types are viewable.
Steps to Enable
You don't need to do anything to enable this feature.
Tips And Considerations
This feature is available to all users who have permissions to view incident workspaces that include thread controls.
The feature provides functional parity with the thread filter control that's available for the .NET agent console.
When a user applies a filter, that filter will persist until it is changed by the user. When a filter is applied, the filter button will be highlighted in blue.
Key Resources
New functionality has been added to the Agent's Chat experience within the Browser User Interface, where chat messages that have not been delivered to the end-user are highlighted by the Message Post Indicator. Agents can now see the Message Post Indicator within the chat session, so they can easily see which messages were unable to reach the end user. This update should keep the Agent more informed if a network issue occurs.
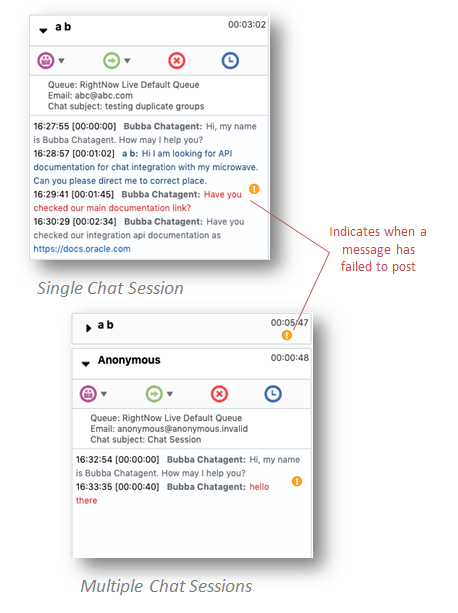
Chat Message Post Indicator in Browser User Interface
Steps to Enable
You don't need to do anything to enable this feature.
Tips And Considerations
This update is automatically available for Agents handling Chat sessions within the Browser User Interface.
Role Information
Roles that will utilize this feature:
- Chat Agent
- Supervisor Agent