
- Revision History
- Overview
- Feature Summary
- Modern User Experience
- Enterprise Platform
- Differentiate
- Customer Requested Features and Enhancements
- Pre-Upgrade Considerations
- Post-Upgrade Considerations
| Date | Feature | Notes |
|---|---|---|
| 14 MAY 2019 | Created initial document. |
Oracle Configure, Price, and Quote (CPQ) Cloud enables companies to streamline the entire opportunity-to-quote-to-order process, including product selection, configuration, pricing, quoting, ordering, and approval workflows. CPQ Cloud provides a flexible, scalable, enterprise-ready solution ideal for companies of all sizes that sell products and services across direct, indirect, and e-commerce sales channels.
This guide outlines the information you need to know about new or improved functionality in Oracle CPQ Cloud 19B and describes any tasks you might need to perform for the update. Each section includes a brief description of the feature, the steps you need to take to enable or begin using the feature, any tips or considerations that you should keep in mind, and the resources available to help you.
Key Resources
Refer to CPQ Cloud Administration Online Help for detailed descriptions and instructions.
In CPQ Cloud 19B, we are introducing new Administrator Videos in our Administration Online Help. These videos provide quick demonstrations for several administration tasks.
Security & New Features
We would like to remind you if your system has modified security structures you may need to advise your security administrator of new features you would like to implement.
GIVE US FEEDBACK
We welcome your comments and suggestions to improve the content. Please send us your feedback at cpqcloud_documentation_us_grp@oracle.com.
| Action Required to Enable Feature |
||||
|---|---|---|---|---|
| Feature |
Automatically Available |
End User Action Required |
Administrator Action Required |
Oracle Service Request Required |
JET Configuration UI Key Changes, Limitations, and Known Issues |
||||
Configuration Run-Time Data and Administration REST API Enhancements |
||||
Add Transaction Arrays to Document Designer and Email Designer Documents |
||||
Display Entire System Data JSON in the Configuration Pipeline Viewer |
||||
The following CPQ Cloud 19B enhancement leverages the rich interface and interactive capabilities available in CPQ Cloud to provide an intuitive selling experience.
JET Responsive Configuration UI
CPQ Cloud 19B introduces the JET Configuration UI. JavaScript Extension Toolkit (JET) leverages popular open-source technologies, and features a rich set of modern UI components with built-in accessibility and mobile support. The responsive design provides layouts that can flow vertically to fit within different browser display widths, allowing users to view and edit Configurations across multiple devices using the same Configuration layout.
The following functionality is available in CPQ Cloud 19B:
- JET Configuration User Experience Enhancements
- JET Configuration UI Support for Existing Functionality
- AJAX Functionality for Configuration Recommendation Rules
- JET Configuration UI Layout Enhancements
- Configuration Options for the JET Configuration UI
- JET Configuration UI Layout Access Control
- CSS Customization of the JET Configuration UI
JET Configuration User Experience Enhancements
The JET Configuration UI provides a modernized and fully responsive user experience to walk users through the configuration process on any device and in any CPQ-supported language. CPQ Cloud’s JET Configuration UI supports the most vital functionality of the legacy UI with the following user experience enhancements:
- Most actions now display updated content without requiring a full page refresh.
- Display a page loading indicator while the JET Configuration UI is being loaded into the page.
- The JET Configuration UI header and action toolbar remain "sticky" at the top of the screen to provide improved scrolling behavior.
- Simple filters allow users to quickly locate key items within arrays and item tables.
- View menus allow users to hide and show columns in arrays and item tables.
- Array and item list columns can be resized and sorted.
- Improved options for displaying Totals and Items List in side-panel.
- New display options are available for attributes and tabs.
- Error messages display inline and in a collapsible sticky header bar Error Panel.
JET Configuration UI Support for Existing Functionality
The JET Configuration UI supports all basic configuration features previously available in CPQ’s legacy Configuration UI:
- Product Hierarchy and configuration attributes of all data types, including Single Select Pick Lists (SSPLs); image menus; and horizontal, vertical, and tabbed arrays.
- Configuration rules, including: Recommendation Rules, Constraint Rules, Hiding Rules, Pricing Rules, Recommended Item Rules, and BOM Mapping Rules.
- Standard configuration actions, Process Invocations, punch-ins, and navigation to/from Commerce UIs including Update, Start Over, Next/Previous, Add to Transaction, Add to Favorites, Add to Cart, Add from Catalog, Reconfigure a model from Commerce, Reconfigure from Favorites, Resume Pending Configuration, and Search Flows.
- Single and multi-node configuration UI flows with Price, Recommended Item and BOM Item table panels, and Configuration flow rules.
- Configuration options, UI settings, and CSS styling customization.
The JET Configuration experience retains the following legacy UI pages and dialogs:
- Pipeline Viewer
- Favorites
- Pending Configurations
- Shopping Cart
- Search Flows
IMPORTANT: Subscription Ordering flows, System Configuration, Attribute Calculators, and External Configurators are not supported in the CPQ Cloud 19B JET Configuration UI.
AJAX Functionality for Configuration Recommendation Rules
CPQ Cloud 19B provides AJAX functionality in the JET UI for Recommendation Rules, which are used to help buyers configure products by offering suggested attribute values. Now recommendations can be displayed when the Recommendation Rule is triggered without reloading the whole page. Recommendations can be created for each Configuration where a model would likely have certain attribute values. In prior releases, recommendations were not displayed until an action was performed or the page was refreshed.
Navigate to the applicable Configuration Recommendation Rule and select the Ajax Enabled checkbox to enable AJAX functionality for JET Configuration UIs.
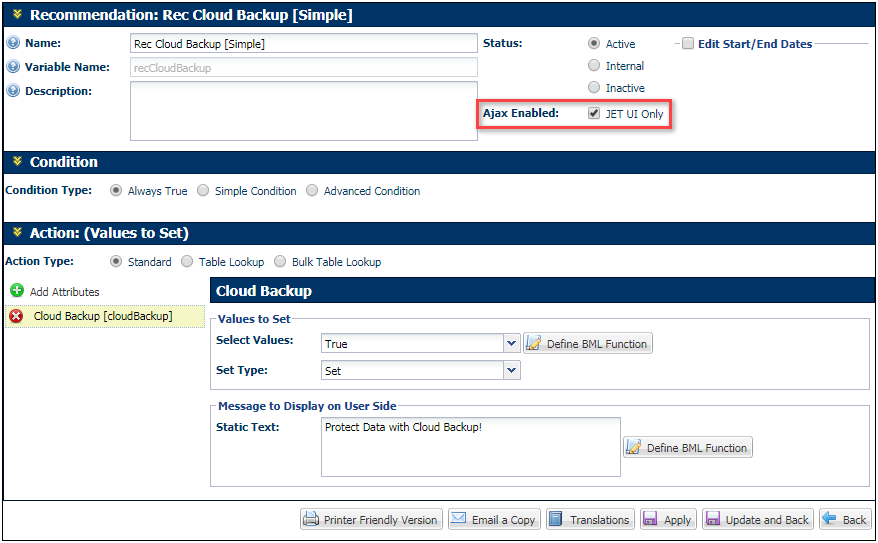
IMPORTANT: AJAX functionality is only provided for JET Configuration UIs, this functionality is not available for legacy Configuration UIs.
Steps to Enable
AJAX functionality for Configuration Recommendation Rules requires administrator setup on CPQ Cloud 19B sites.
JET Configuration UI Layout Enhancements
Enhanced UI features of the JET Configuration UI are defined by enhancements to the administration of attribute and UI layouts. A single configuration flow UI layout is used for both legacy and JET Configuration UIs. The JET-specific features will display only in the JET Configuration UI - when the end user has access rights to the JET Configuration UI for the associated Product Family.
CPQ Cloud 19B provides JET Configuration UI enhancements for price table and item list layouts, tabs, and attribute display options.
Price Table and Item List Layout Enhancements
Administrators can individually select the placement of price tables and items lists (e.g. recommended items, mandatory items, and BOM items). Right sidebars are initially hidden on the JET Configuration UI. To view the sidebar the user clicks on the Total price button. The following image shows two of the possible display options.
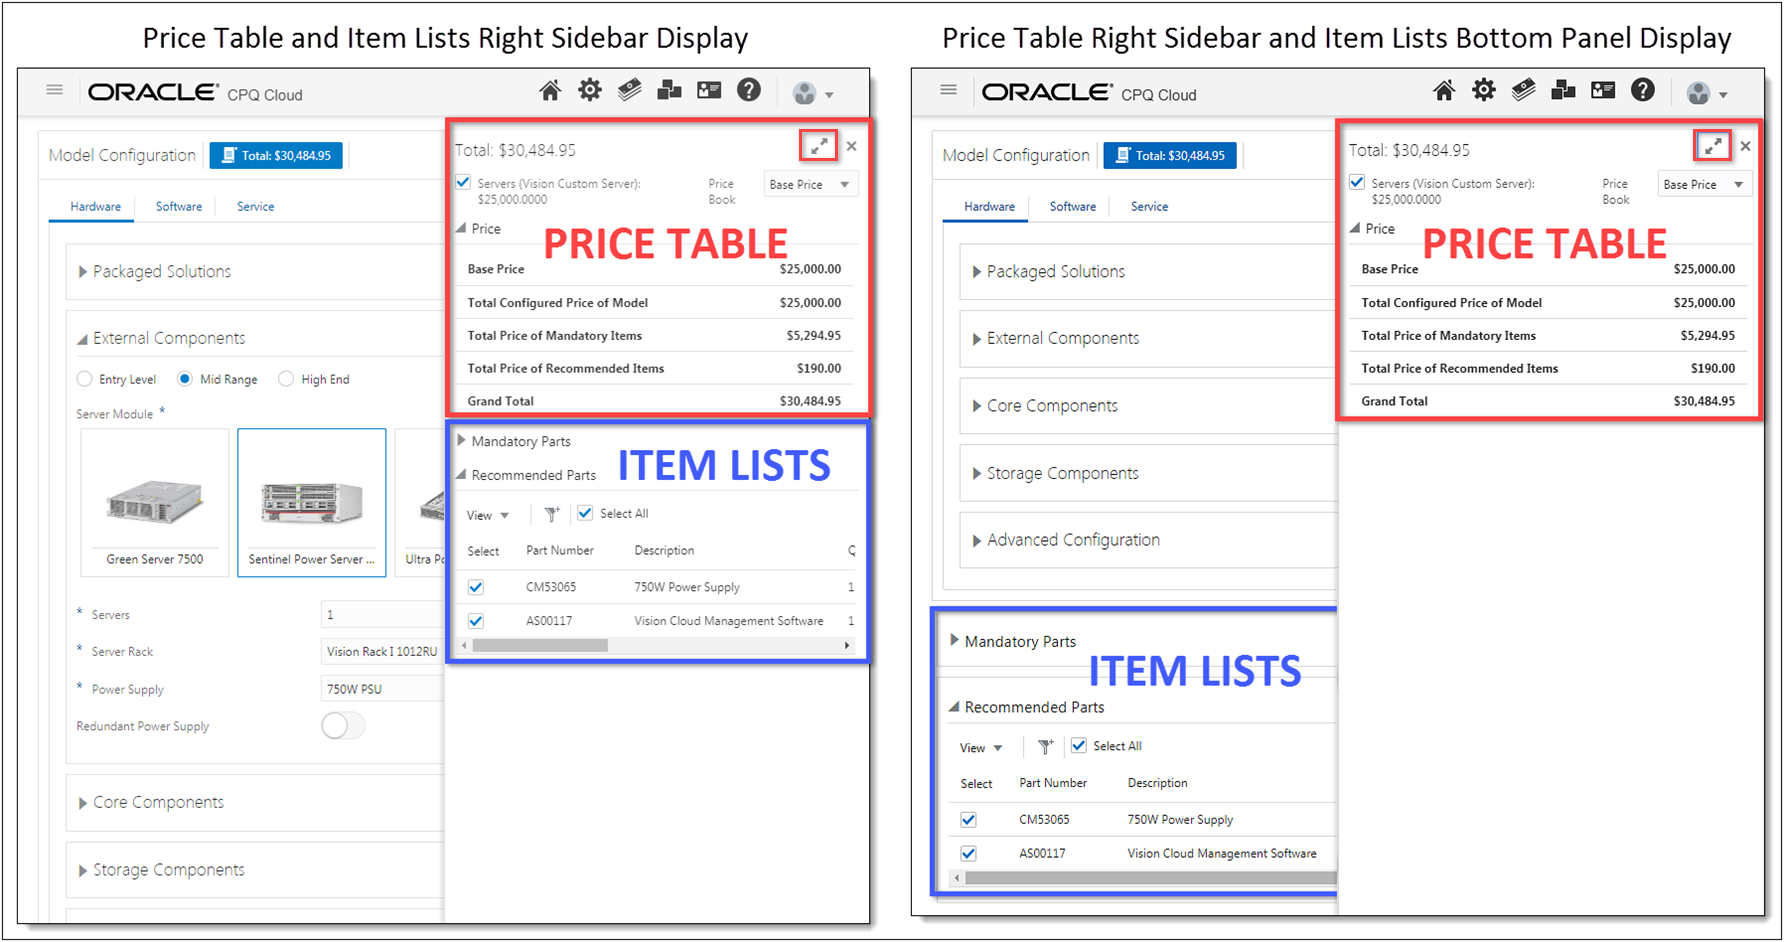
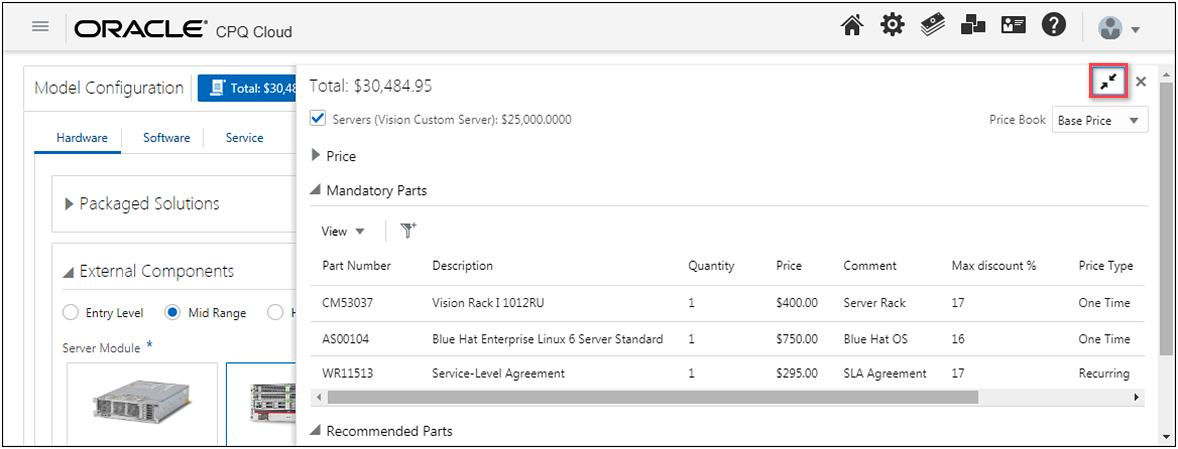
To improve viewing of item list tables with several columns, users can click on the expand icon to increase the size of the right sidebar.
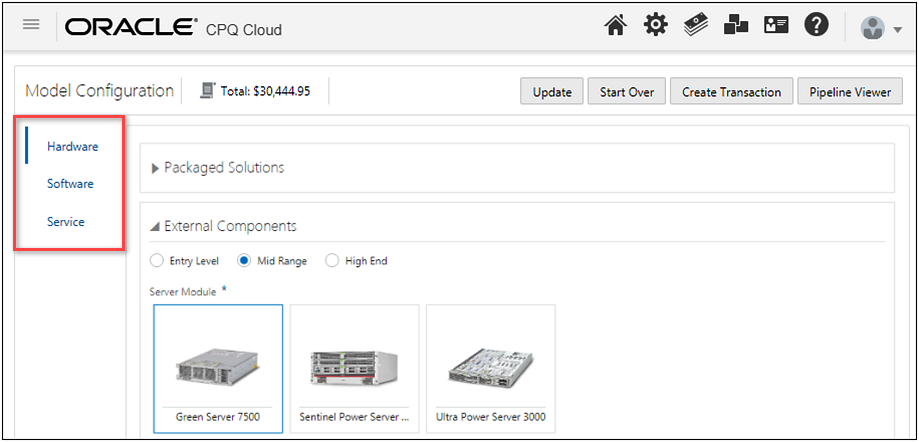
Vertical Tabs for Configuration UI Panels
In CPQ Cloud, administrators can use tab components to show different groups of content within the Configuration UI. CPQ Cloud 19B allows administrators to display vertical tabs for the JET Configuration UI. Vertical tabs are arranged on the left side of a panel instead of on the top in horizontal space.
JET Configuration Layout Properties
CPQ Cloud 19B provides new JET-specific layout properties for the Configuration UI. The following options control the behavior for the JET Configuration UI.
IMPORTANT: The layout Template is only used for Legacy layouts. Templates do not control the layout for JET Configuration UIs.
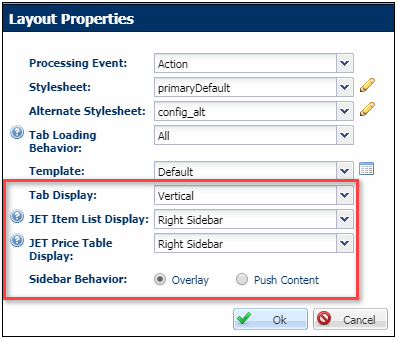
The following table describes the JET-specific layout options:
| Option |
Description |
|---|---|
| Tab Display |
Administrators can select Horizontal or Vertical tab placement |
| JET Item List Display |
This option controls whether items lists (e.g. recommended items, mandatory items, and BOM items) are displayed in the right sidebar or the bottom panel. |
| JET Price Table Display |
This option controls whether price tables are displayed in the right sidebar, bottom panel, or hidden. When item lists are displayed in the right sidebar, the price table can only be displayed in the right sidebar or hidden. |
| Sidebar Behavior |
This option controls sidebar behavior when price tables or item lists are displayed as right sidebars. Overlay or push content behavior can be selected. |
New Attribute Display Options for the JET Configuration UI
The JET Configuration provides new attribute display options for Boolean attributes, numeric attributes, and image menus.
Boolean Attribute Display Options
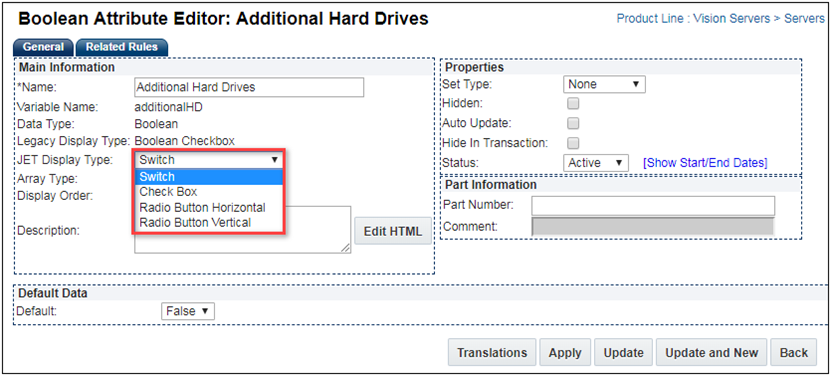
CPQ Cloud 19B allows administrators to display a Switch, Checkbox, Radio Button Horizontal, or Radio Button Vertical for Boolean attributes displayed on the JET Configuration UI. The Switch selector is the default JET Display Type option. The following image shows the four different display options available for JET Configuration UI Boolean attributes.

CONFIGURATION BOOLEAN ATTRIBUTE EDITOR
The Configuration Attribute Editor lists the Legacy Display Type and JET Display Type for Boolean data type attributes. The Switch and Radio Button display options are only available for the JET Configuration UI. The Attribute Editor defines the default display type properties for all layouts.
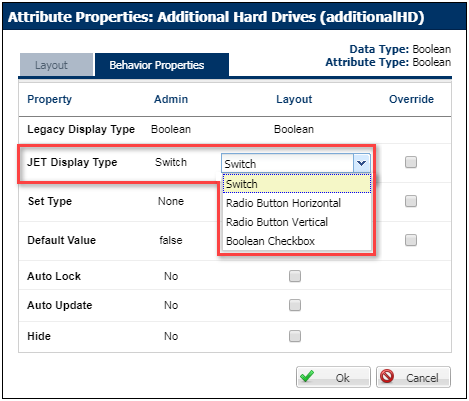
CONFIGURATION LAYOUT BOOLEAN ATTRIBUTE PROPERTIES
The Configuration Layout Attribute Properties Behavior Properties tab also lists the Legacy Display Type and JET Display Type for Boolean Attributes. When Override is selected, the display type for the layout attribute properties will override the default display type defined in the Attribute Editor for only this layout.
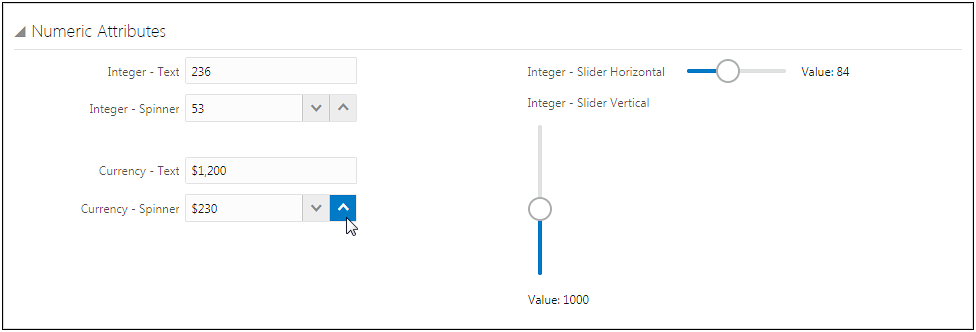
Numeric Attribute Display Options
CPQ Cloud 19B allows administrators to display a Text field, Spinner, Slider Horizontal, or Slider Vertical for integer attributes displayed on the JET Configuration UI. Currency attributes can only be displayed as a Text field or a Spinner. The Spinner JET Display Type is also available for Float attributes. The Text field is the default JET Display Type option. The following image shows the display options available for JET Configuration UI integer and currency attributes.
CONFIGURATION INTEGER ATTRIBUTE EDITOR
CPQ Cloud 19B provides support for Text, Spinner, Slider Horizontal, and Slider Vertical layouts for Integer attributes on JET Configuration UIs. The Configuration Attribute Editor for integer data types lists the Legacy Display Type and JET Display Type for Integer Attributes. The Spinner and Slider layout options are only available for the JET Configuration UI. Sliders require administrators to choose the increment value for sliders. It is recommended that a default value always be designated for sliders.The Attribute Editor defines the default display type properties for all layouts.

CONFIGURATION LAYOUT INTEGER ATTRIBUTE PROPERTIES
The Configuration Layout Attribute Properties Behavior Properties tab also lists the Legacy Display Type and JET Display Type for Integer Attributes. When Override is selected, the display type for the layout attribute properties will override the default display type defined in the Attribute Editor for only this layout.

Image Menu Display Options
CPQ Cloud 19B allows administrators to display Cards, Select Choice, Filmstrip Horizontal, or Filmstrip Vertical for image menu attributes displayed on the JET Configuration UI. The following image shows the display options available for JET Configuration UI image menu attributes. Additional settings are available to display arrows and/or paging controls. In the image below, the Filmstrip Horizontal is displaying Arrows and Paging Controls and the Filmstrip Vertical is displaying Arrows and Paging Information.
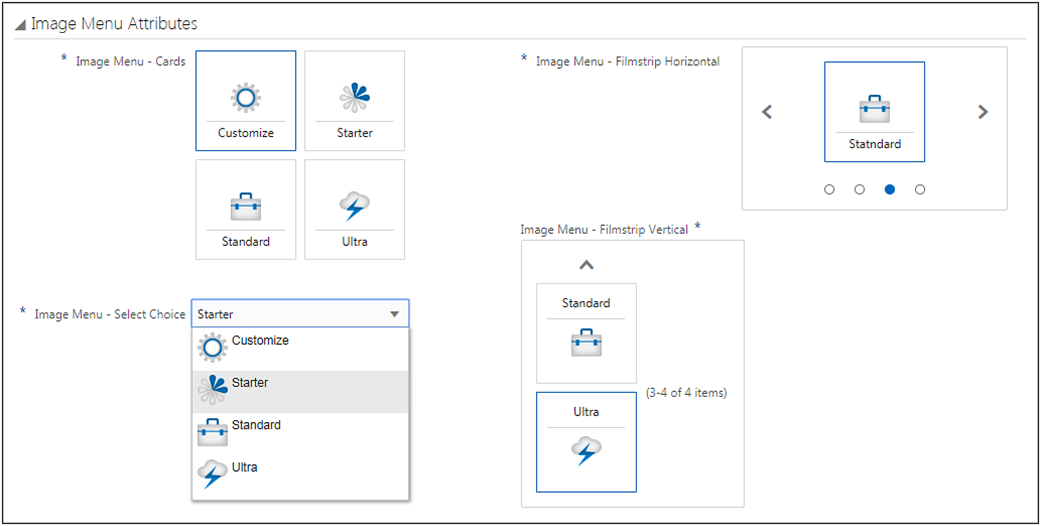
CONFIGURATION MENU ATTRIBUTE EDITOR
The Configuration Menu Attribute Editor lists the Legacy Display Type and JET Display Type for image menu attributes. The Select Choice, Film Strip Horizontal, Film Strip Vertical, and Cards layout options are only available for the JET Configuration UI. The Attribute Editor defines the default display type properties for all layouts. Additional JET-specific image properties and filmstrip controls are also defined using the Attribute Editor.

CONFIGURATION LAYOUT IMAGE MENU ATTRIBUTE PROPERTIES
The Configuration Layout Attribute Properties Behavior Properties tab also lists the Legacy Display Type and JET Display Type for image menu attributes. When Override is selected, the display type for the layout attribute properties will override the default display type defined in the Attribute Editor for only this layout.

Steps to Enable
No steps are required to enable this feature.
Configuration Options for the JET Configuration UI
Beginning in CPQ Cloud 19B, administrators can enable pagination for vertical arrays and set the table height for vertical arrays and item lists displayed on JET Configuration UI layouts. The following image shows a vertical array with pagination enabled and the table height set to 5 rows.

Configure JET Configuration UI Options
To enable pagination for vertical arrays and set table height for vertical arrays and item lists, perform the following steps:
- Navigate to Configuration Options page. Admin > Products > Configuration Settings
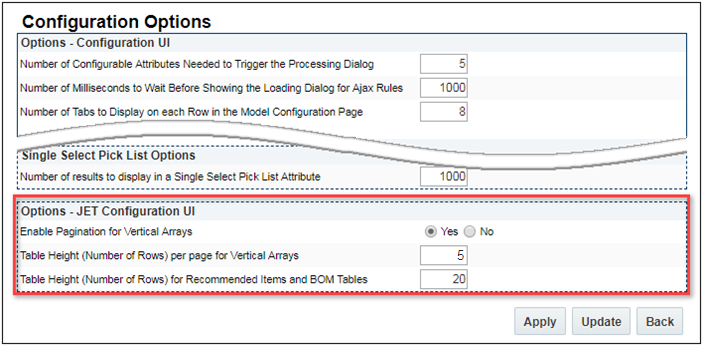
- If desired, set the Enable Pagination for Vertical Arrays option to Yes.
- Enter the Table Height (Number of Rows) per page for Vertical Arrays.
- Enter the Table Height (Number of Rows) for Recommended Items and BOM Tables. This setting is applicable to recommended items, mandatory items, and BOM items.
- Click Apply or Update.
Steps to Enable
No steps are required to enable this feature.
JET Configuration UI Layout Access Control
Administrators have the option of enabling the JET Configuration UI while continuing to use the legacy UI for some users. The JET UI is rendered from the same layout definition as the legacy UI. Administrators can assign user access to JET Configuration UI based on user type or user group. With both layouts enabled, customers can make the transition to the JET Configuration layout at their own pace. Since the JET Configuration UI is enabled at the Product Family level, customers can also gradually transition to the JET Configuration UI by enabling only selected Product Families.
Enable the JET Configuration UI Layout for a Product Family
To enable the JET Configuration UI for a product family and assign user access rights, perform the following steps:
- Navigate to the Supported Product Families page. Admin > Products > Catalog Definition > Product Families
- Select Layout Access Control from the applicable Product Family Navigation drop-down, and then click List. The Layout Access Control page opens.
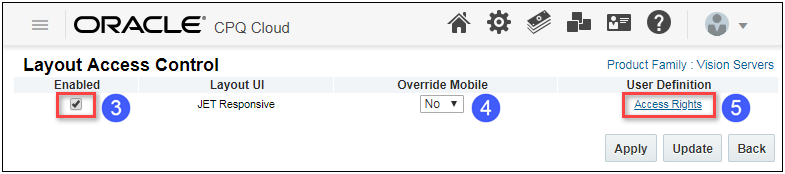
- Select the Enabled checkbox.
- (Optional) To replace the mobile layout with the JET Configuration layout, select Yes from the Override Mobile drop-down.
- Click the Access Rights link to assign user and group access.
- Specify the user types and groups that will view the JET Configuration UI. Only the users types or groups assigned to the Show column will view this layout, all other users types or groups will view the legacy layout.
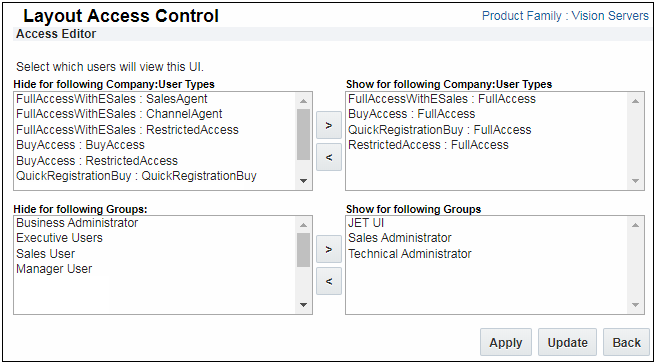
- Click Update to save user and group access rights.
- Click Apply or Update.
Steps to Enable
No steps are required to enable this feature.
CSS Customization of JET Configuration UI
A single JET-specific CSS file reduces complexity and provides a customized, seamless aesthetic for the JET Configuration and Transaction UIs as well as future JET UI enhancements.
Unlike Legacy UI’s, the new JET UI applies only a single custom Stylesheet in addition to the base framework-generated styling. Any existing customizations applied through the other legacy CSS files will not affect the new JET UIs. The new JET Stylesheet applies to all JET UIs in CPQ Cloud site-wide rather than to a single UI or set of UIs. As a result, site-wide standards such as corporate styling can be implemented more easily, in one place. When additional JET UIs such as Homepage are released, these pages will also apply the single JET Stylesheet.
Rather than downloading an initial CSS stylesheet, modifying it and uploading the modified file, customers will now reference the JET UI’s system-generated CSS using a web development tool, such as Chrome Development Tools, create any desired modifications to the base styling, and then upload a custom CSS file to revise the JET styling. For optimal performance, it is recommended that only modifications to the styling be included in this CSS file.
Upload a Custom CSS File
The custom CSS file will be uploaded on the Stylesheet administration page.
- Navigate to the Stylesheet Manager. Admin > Style and Templates > Stylesheet
The Stylesheet Manager page displays as shown below.
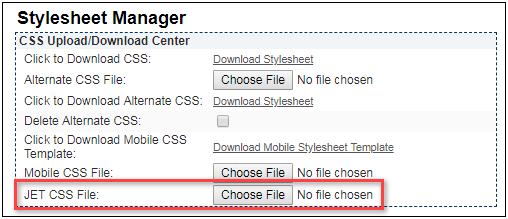
- Click Browse to upload and apply styling customizations to JET UIs.
Steps to Enable
Administrators should review the CPQ Cloud JET CSS: Branding and Styling (Doc ID 2462711.1) document prior to implementing CSS Customization for the JET Configuration UI.
JET Configuration UI Key Changes, Limitations, and Known Issues
The following list provides descriptions of key changes, limitations, and known issues present in the JET Configuration UI as of CPQ Cloud 19B.
| User Interface Element |
Description of Key Changes, Limitations, and Known Issues |
|---|---|
| JET CSS Stylesheet |
JET uses a different CSS stylesheet from the legacy standard and alt stylesheets. As a result, CSS customizations may need to be refactored to work correctly with the JET Responsive Transaction UI. For additional details, refer to CPQ Cloud JET CSS: Branding and Styling (Doc ID 2462711.1). |
| JET Help Text |
The JET Configuration UI help text does not support Rich Text, links, or HTML tags in CPQ 19B. |
| JET HTML DOM |
JET uses a different Document Object Model (DOM) from legacy UI pages. As a result, JavaScript customizations to the CPQ Configuration UI are not warrantied to work as expected. |
| Asset-Based Ordering Flows |
UI flows between CPQ's asset page and JET Configuration UIs, (i.e. reconfiguring an asset) are not supported in CPQ 19B. Oracle recommends that customers not enable JET Configuration UI access for product families that use ABO. |
| System Configuration |
The JET Configuration UI does not support system configuration, the system configuration UI pane, or the implementation of models as children of other models in CPQ 19B. Oracle recommends that customers not enable JET UI access for product families that use system configuration. |
| Configuration Integrations |
The JET Configuration UI does not support platform-supported Configuration Integrations, including HTTP Post, Custom, and Client-side types in CPQ 19B. |
| External Configurator Integration |
Integration of the JET Configuration UI with external configurators is not supported in CPQ 19B. |
| Configurable Attribute Calculators |
The JET Configuration UI does not support configurable attribute calculators in CPQ 19B. |
| UI Controls in Configuration Arrays |
Integer and Float attributes with Slider controls, and Boolean attributes with Switch display type, are not supported in Vertical and Horizontal Configuration Array sets. |
| Search Flows, Favorites, Pending Configurations |
Navigation between the JET Configuration UI and Search Flow, Favorites, or Pending Configuration pages is supported, but these pages continue to display as legacy UI pages in CPQ 19B. |
| Image Dropdown Menus (Select Choice) |
Image dropdown menus using the JET "Select Choice" display option only display images in the dropdown list. Images are not displayed for the selected items. |
| Message Display |
The JET Configuration UI does not support the "Bottom of Page" Message Placement option in CPQ 19B. The messages will display in the sticky header Error Panel. |
| Layout Preview |
The Configuration Layout Editor Preview will not display JET-specific controls and options. |
Steps to Enable
Administrators should review JET Configuration UI Key Changes, Limitations, and Known Issues prior to implementing the JET Configuration UI.
The following CPQ Cloud 19B features and enhancements cater to the needs of large, complex enterprises for a robust, integrated, and performant platform:
- Configuration Run-Time Data and Administration REST API Enhancements
- Email Approval Notification Enhancements
- Subscription Management Solution Enhancements
- Subscription Ordering Enhancements
- Transaction Array Enhancements
Configuration Run-Time Data and Administration REST API Enhancements
Customer configuration flows dictate how users go through the pages and the options available to the users as they create Transactions. Configuration flow rules consist of a condition and flow attributes. Actions display on the node depending on defined criteria. CPQ Cloud 19B adds Configuration Run-Time Data REST API services endpoints to support the new JET Configuration UI. Configuration Run-Time Data REST APIs enable customers to build modern and responsive custom UIs.
CPQ Cloud 19B supports the following process invocations in the Configuration Run-Time Data REST API:
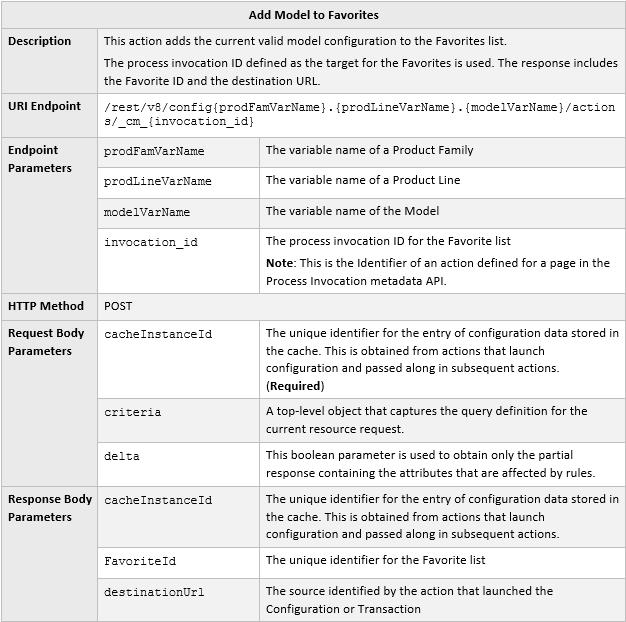
- Add a Model configuration to the Favorites list
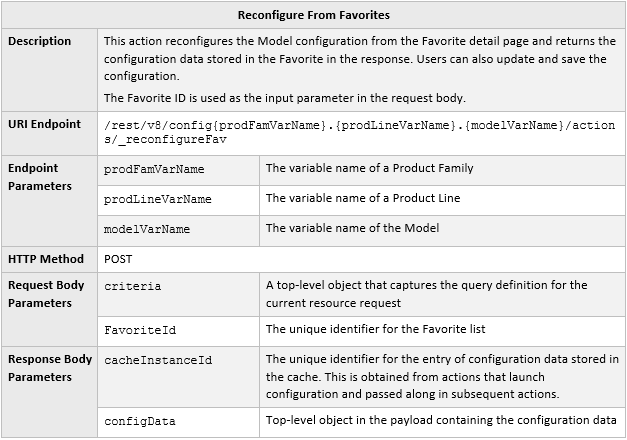
- Reconfigure a Model configuration from the Favorites list
- Calculate total prices of recommended items, BOM items, and attribute value based on designated pricing implementation
IMPORTANT: In 19B the rest version is updated to v8. The Configuration Run-Time Data REST API Add from Catalog endpoint is not supported in version 8, instead the Add from Catalog flow is supported using the Configure a Model endpoint and request payload parameters. Refer to CPQ Cloud Online Help for detailed information.
Configuration Run-Time Data REST API Enhancements
Add Model to Favorites
URI Endpoint Sample

Sample Request Body

Sample Response Body

Reconfigure From Favorites
URI Endpoint Sample

Sample Request Body

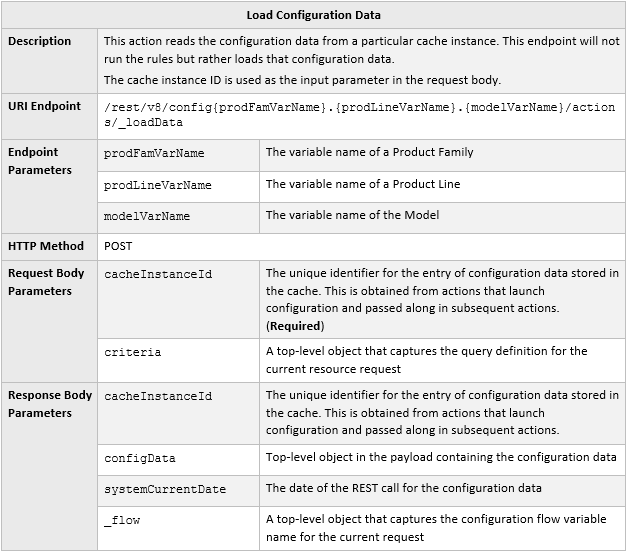
Load Configuration Data
URI Endpoint Sample

Sample Request Body
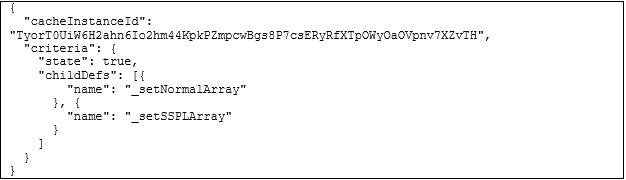
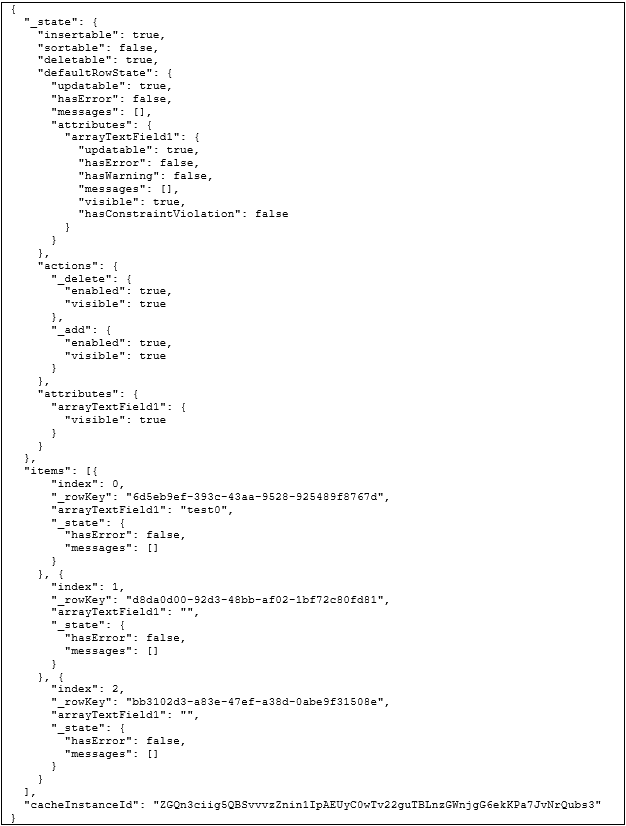
Load Array Set Data
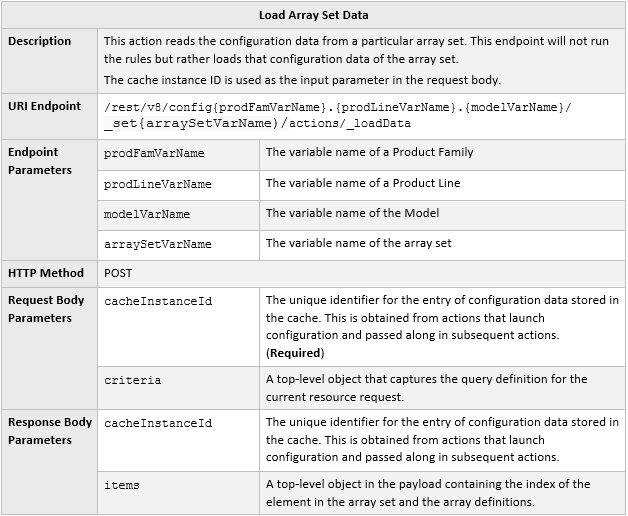
URI Endpoint Sample

Sample Request Body

Sample Response Body
Steps to Enable
The Configuration Run-Time Data REST API enhancements are automatically available with CPQ Cloud 19B. Administrators need to update any systems that interact with these CPQ web services to begin using these new features.
Configuration Administration REST API Enhancement
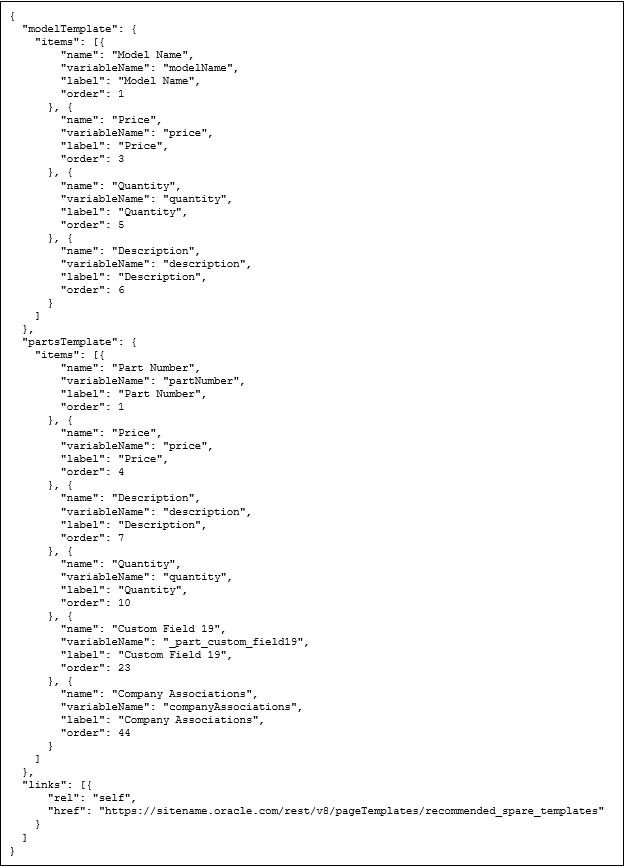
Get Recommended Items Metadata

URI Endpoint Sample

URI Endpoint Sample with Language Code (Optional)

Sample Response Body
Steps to Enable
The Configuration Administration REST API enhancements are automatically available with CPQ Cloud 19B. Administrators need to update any systems that interact with these CPQ web services to begin using these new features.
Email Approval Notification Enhancements
Email Approval Notifications help shorten the quote lifecycle by minimizing the lag between when an approval is requested and when an approver takes action. Emails notify approvers that a sales user has submitted a quote for approval and allows approvers to approve or reject without logging into CPQ Cloud. CPQ Cloud 19B improves the usability of email approval notifications with the following enhancements.
Default Approval Email Notification Enhancements
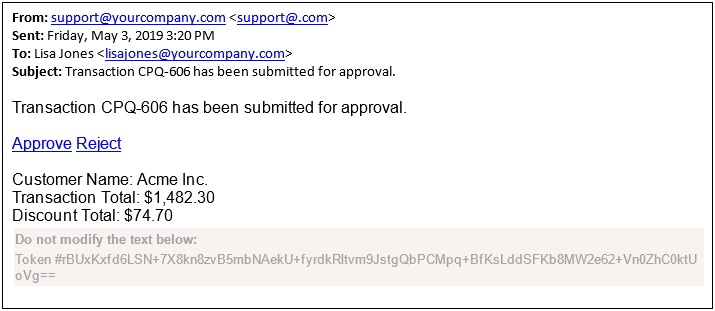
In CPQ Cloud 19B, the Default Approver Template uses an HTML format which includes improved layout, format, and style. The system-generated token is relocated from the email subject line to the end of the message body. This improves readability and reduces the likelihood the email is flagged as spam or causes the user to be suspicious that the email contains a virus.
In addition, the Default Approver Template now includes Approve and Reject mailto links. Refer to Email Approval Response Enhancements.
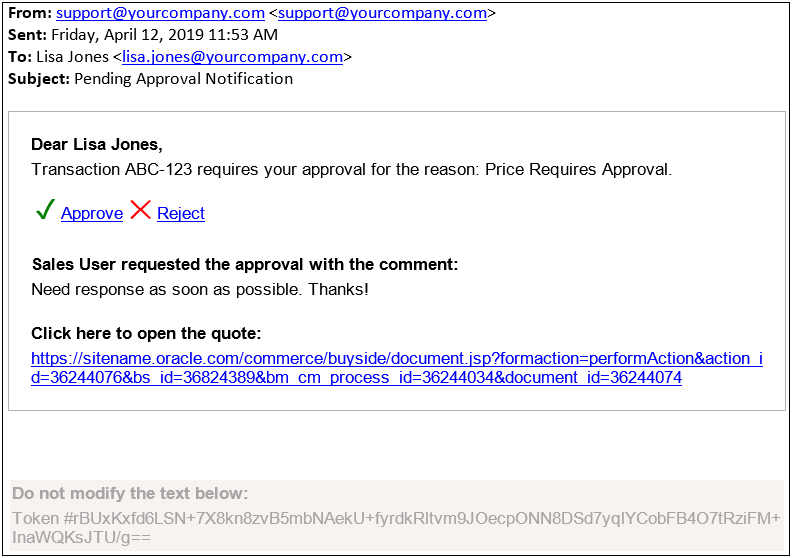
Sample Default Approval Email Notification
To enable HTML approval email notifications, complete the following steps:
- Navigate to the Commerce Options page. Admin Home > Commerce and Documents > Commerce Settings

- Select Yes to set the Enable HTML Approval Email option.
- Click Update.
IMPORTANT: Once the HTML Approval Email is enabled, all new approval email notifications will be sent using the new HTML format. All in-progress approvals that were sent using the old format can be approved or rejected using the legacy response format.
If you have not defined your approval process and want to create a process that uses the default notification, complete the following steps:
- Navigate to the Processes page. Admin Home > Commerce and Documents > Process Definitions
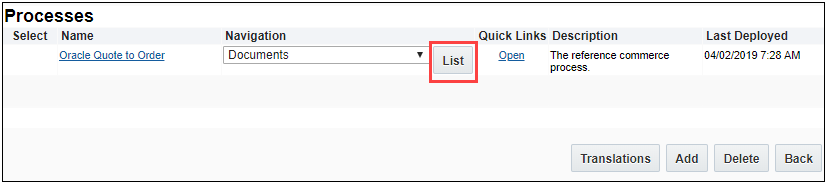
- For a process, select Documents from the Navigation drop-down and then click List. The Documents List page displays.
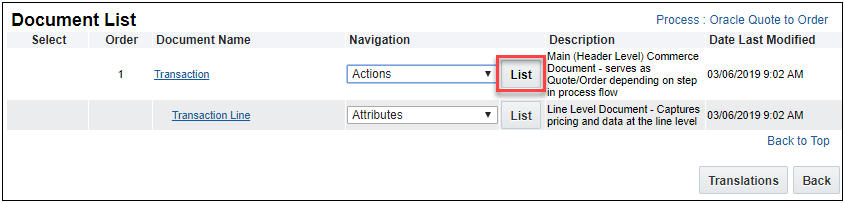
- For a Document, select Actions from the Navigation drop-down and then click List. The Action List page displays.
- Click on the Submit action link. The Admin Action page displays.

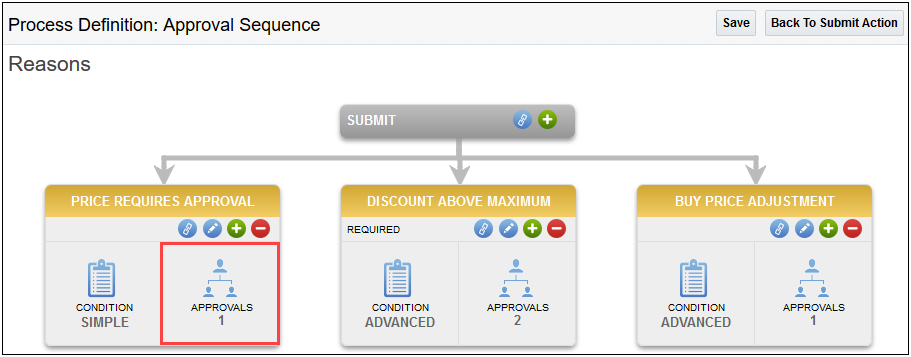
- Click Edit Approvals under Approval Sequence. The Process Definition: Approval Sequence Reasons page displays.

- For each approval reason, click into Approvals box.
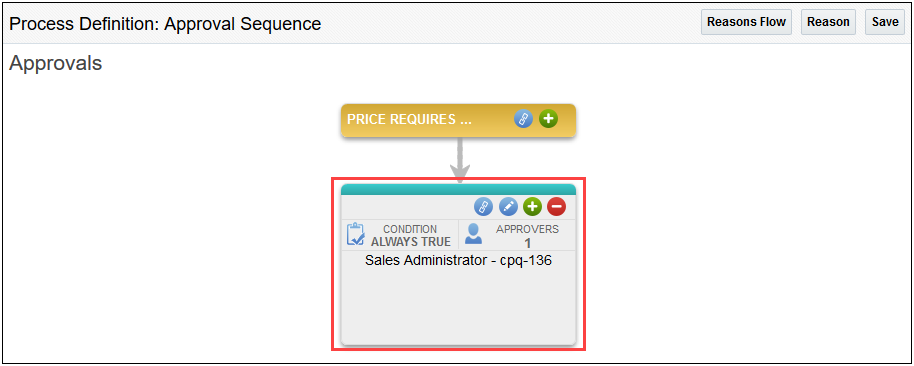
- Click into the Approvals box. The Approval Details screen displays.
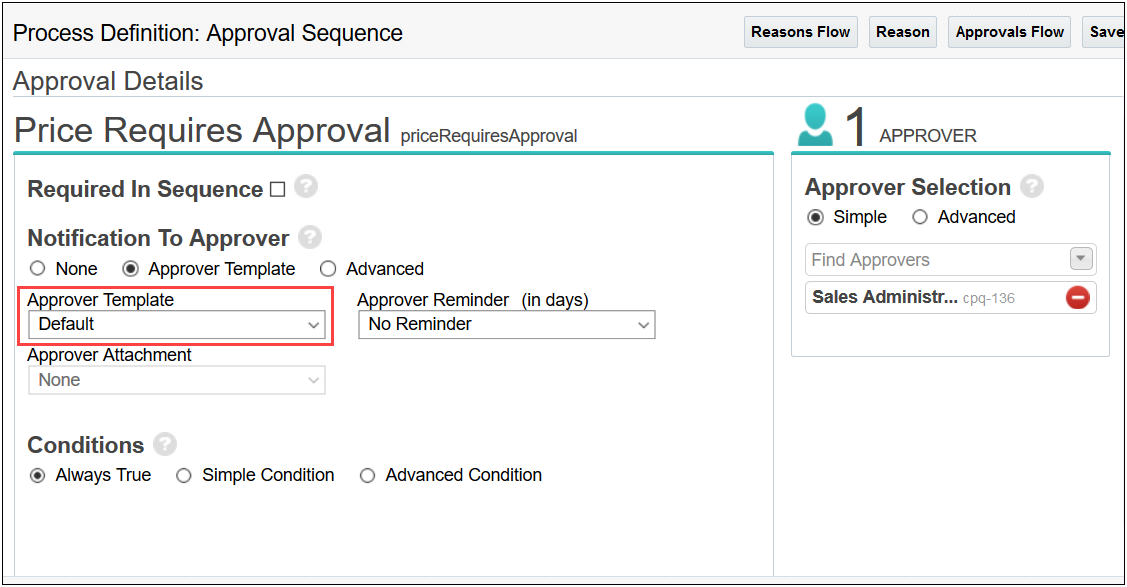
- Select Approver Template under Notification To Approver.
- Select Default in the Approver Template drop-down.
- Click Save.
Steps to Enable
The Default Approval Email Notification requires administrator setup on CPQ Cloud 19B sites. Instructions are included in this document and CPQ Cloud Online help.
Tips And Considerations
The Default Notification email is presented to recipients in their preferred languages. However, the token and action are not translatable objects.
Custom Approval Email Notification Enhancements
Custom Approver Templates built using the Email Designer relocate the system-generated token from the email subject line to the end of the message body. This improves readability and reduces the likelihood the email is flagged as spam or causes the user to be suspicious that the email contains a virus.
The Email Designer allows administrators to add dynamic Approve and Reject mailto links to their email templates. Refer to Email Approval Response Enhancements.
Sample Custom Approval Email Notification
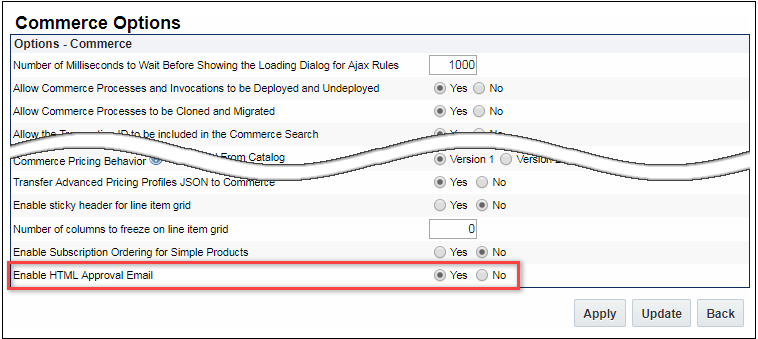
To enable HTML approval email notifications, complete the following steps:
- Navigate to the Commerce Options page. Admin Home > Commerce and Documents > Commerce Settings

- Select Yes to set the Enable HTML Approval Email option.
- Click Update.
IMPORTANT: Once the HTML Approval Email is enabled, all new approval email notifications will be sent using the new HTML format. All in-progress approvals that were sent using the old format can be approved or rejected using the legacy response format.
If you have not defined your approval process and want to create a process that uses a custom notification, complete the following steps:
- Navigate to the Processes page. Admin Home > Commerce and Documents > Process Definitions

- For a process, select Documents from the Navigation drop-down and then click List. The Documents List page displays.

- For a Document, select Actions from the Navigation drop-down and then click List. The Action List page displays.
- Click on the Submit action link. The Admin Action page displays.

- Click Edit Approvals under Approval Sequence. The Process Definition: Approval Sequence Reasons page displays.
- For each approval reason, click into Approvals box.

- Click into the Approvals box. The Approval Details screen displays.
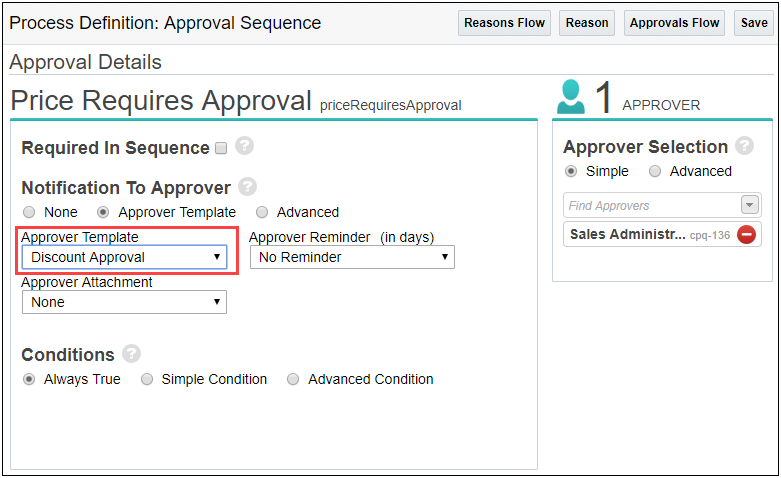
- Select Approver Template under Notification To Approver.
- Select Default in the Approver Template drop-down.
- Click Save.
To add the dynamic Approve and Reject mailto links to your existing Email Template, complete the following steps:
- Navigate to the Email Designer Templates page. Admin Home > Commerce and Documents > Email Designer
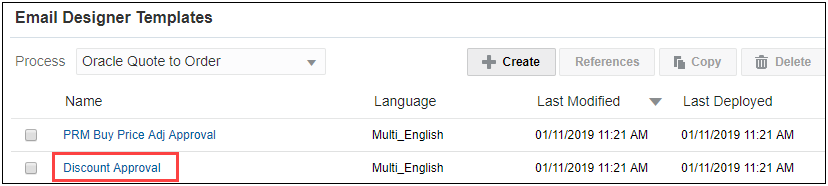
- Select the Template you want to add the Accept and Reject mailto links to. The Email Designer: Template page displays.
If you need to create a new Text Element section, complete steps 3-4.
If you have an existing Text Element, skip to step 5.
- Click Elements in the Properties panel to expand the Elements pane.
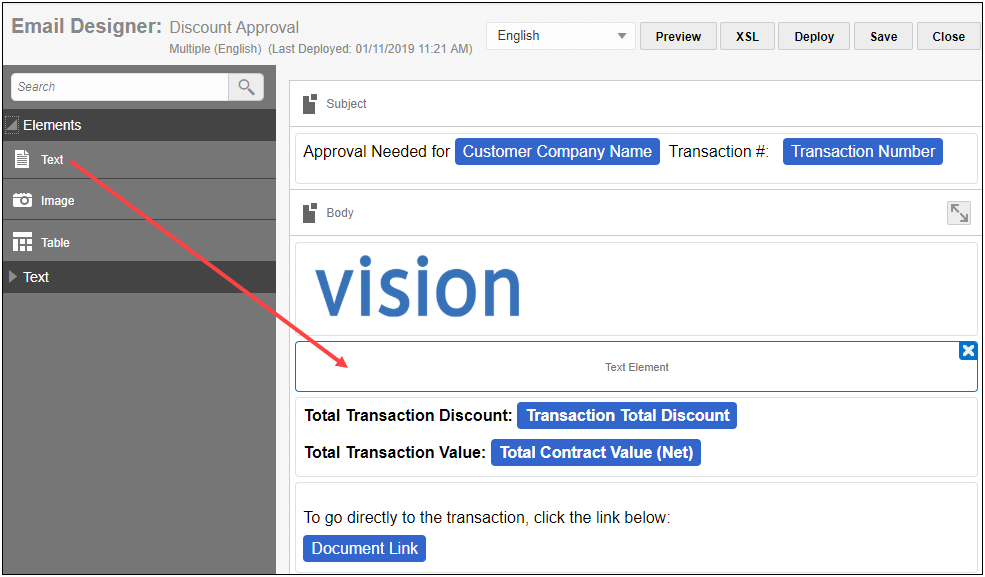
- Click and drag the Element you wish to add to the template into the Body in the Template Flow.
- Double-click on the Element to open the Text Element page.
- Enter any content you wish to include and select the Approve Link and Reject Link attributes from the Attribute drop-down.
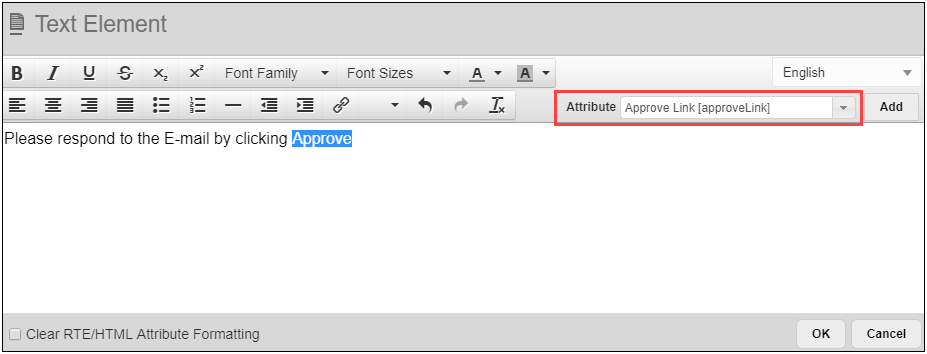
- Click Add to add the link to the text element.
- Click Ok to save the Text Element and return to the Email Designer page.
- Click Preview if you wish to see the change to the template.
- Click Save.
Steps to Enable
The Custom Approval Email Notification requires administrator setup on CPQ Cloud 19B sites. Instructions are included in this document and CPQ Cloud Online help.
Advanced Approval Email Notification Enhancements
Advanced Approver Templates built using BML relocate the system-generated token from the email subject line to the end of the message body. This improves readability and reduces the likelihood the email is flagged as spam or causes the user to be suspicious that the email contains a virus.
In CPQ Cloud 19B, a new BML enhancement allows administrators to choose two new rule input variables for inserting Approve and Reject mailto links into Advanced Approval Notifications. These new rule input variables are dynamically replaced with the appropriate mailto links when the notification is sent. Refer to Email Approval Response Enhancements.
To enable HTML approval email notifications, complete the following steps:
- Navigate to the Commerce Options page. Admin Home > Commerce and Documents > Commerce Settings
- Select Yes to set the Enable HTML Approval Email option.
- Click Update.
IMPORTANT: Once the HTML Approval Email is enabled, all new approval email notifications will be sent using the new HTML format. All in-progress approvals that were sent using the old format can be approved or rejected using the legacy response format.
To add an Advanced Notification Template, complete the following steps:
- Navigate to the Processes page. Admin Home > Commerce and Documents > Process Definitions

- For a process, select Documents from the Navigation drop-down and then click List. The Documents List page displays.

- For a Document, select Actions from the Navigation drop-down and then click List. The Action List page displays.
- Click on the Submit action link. The Admin Action page displays.
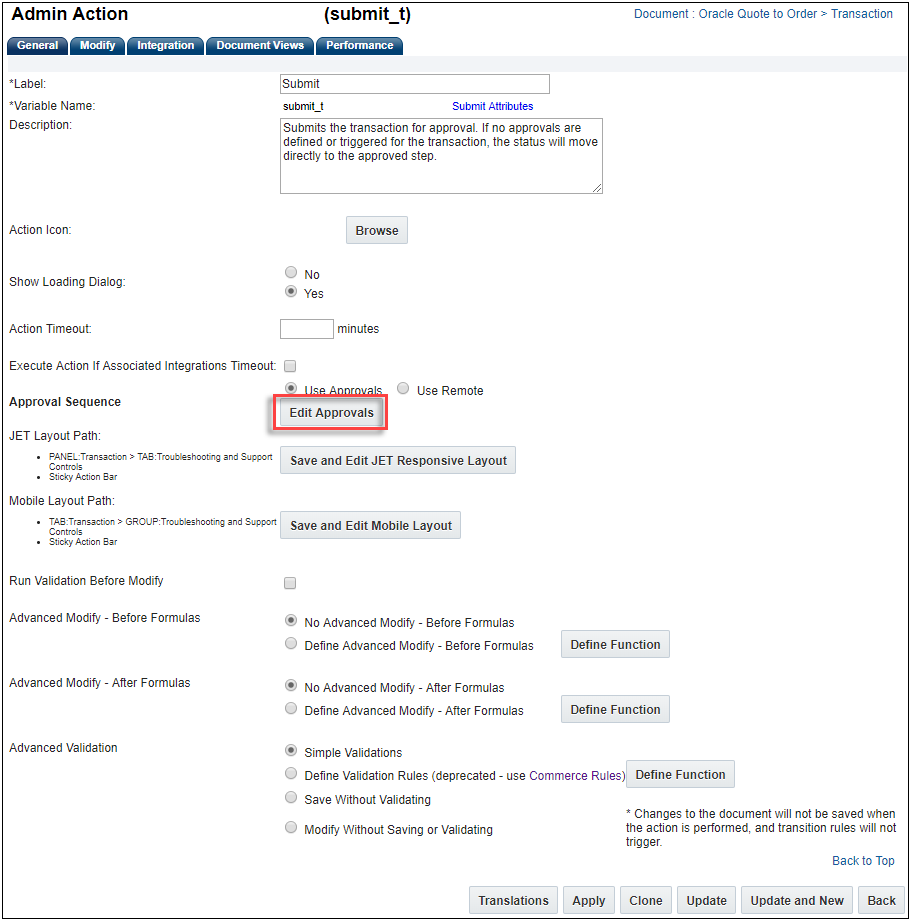
- Click Edit Approvals under Approval Sequence. The Process Definition: Approval Sequence Reasons page displays.

- For each approval reason, click into Approvals box.

- Click into the Approvals box. The Approval Details screen displays.
- Click Edit Approvals under Approval Sequence. The Process Definition: Approval Sequence page displays.

-
Select Advanced under Notification To Approver. If associated BML has not been defined for the Advanced Notification, complete steps 1-11 for adding the rule input variables for the mailto links.
- Click Save.
To add the rule input variables for the mailto links to your Advanced Notifications, complete the following steps:
- Navigate to the Process Definition: Approval Details page. Complete steps 1-10 for adding an Advanced Notification Template.
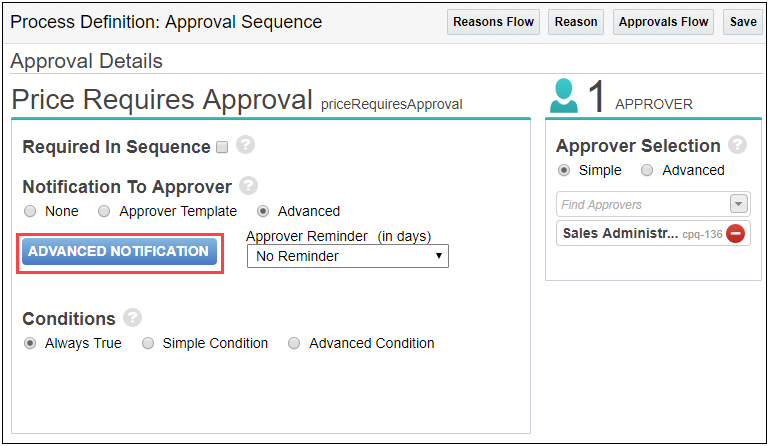
- Click Advanced Notification. The Select Attribute page displays.
- Go to the appropriate Variable Name tab.
- Select the Approve Link and Reject Link attribute checkboxes. For example, transaction_approve_link or transaction_reject_link.
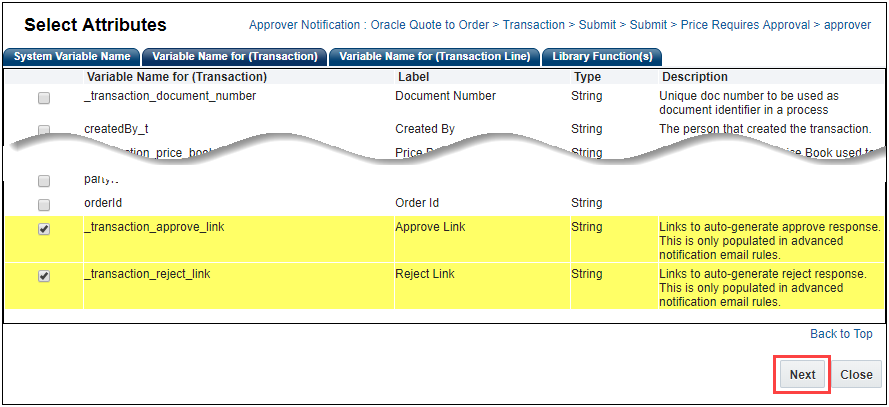
- Click Next. The BML Editor page displays.
- Create the HTML for the email notifications using the BML editor. The BML function must return a string. The following sample HTML body text provided for reference.
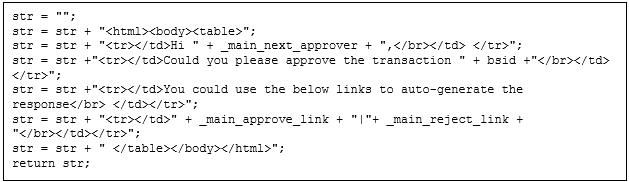
- Place the cursor in the BML editor where you want the Approve Link to be inserted.
- Click on the transaction_approve_link to add it to the BML function.
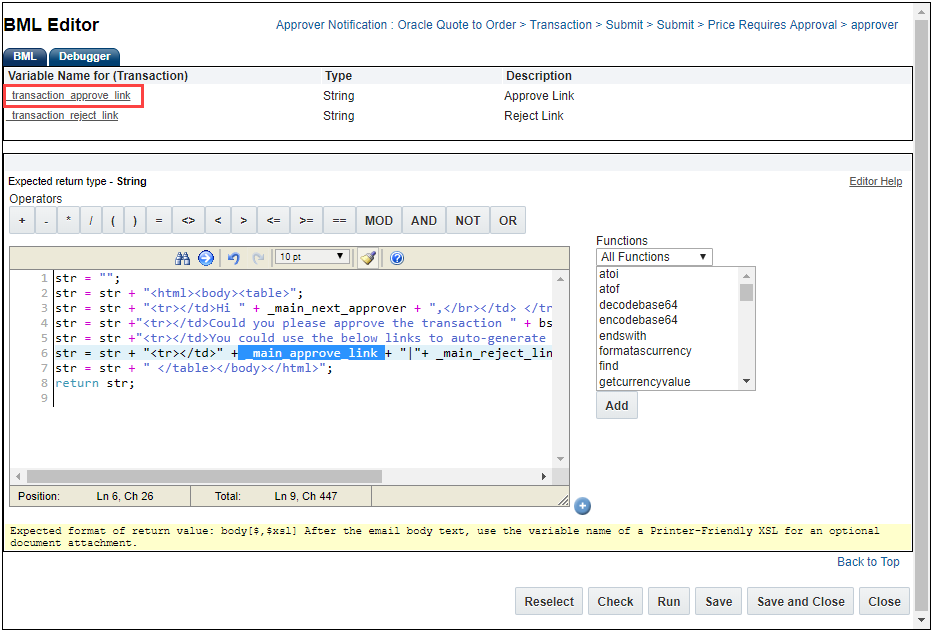
- Place the cursor in the BML editor where you want the Reject Link to be inserted.
- Click on the transaction_reject_link to add it to the BML function.
- Click Save.
Steps to Enable
The Advanced Approval Email Notification requires administrator setup on CPQ Cloud 19B sites. Instructions are included in this document and CPQ Cloud Online help.
Transition Rule Notification Enhancements
Step transitions in CPQ can trigger Email Notifications. When HTML Approval Email is enabled the system-generated token is relocated from the subject line to the end of the message body for all step transition notifications. This improves readability and reduces the likelihood the email is flagged as spam or causes the user to be suspicious that the email contains a virus.
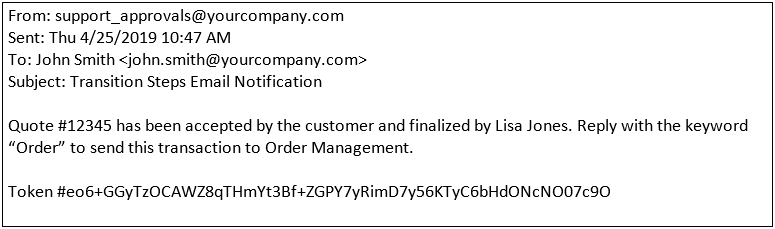
Sample Transition Rule Approval Email Notification
To enable the HTML email notifications, complete the following steps:
- Navigate to the Commerce Options page. Admin Home > Commerce and Documents > Commerce Settings

- Select Yes to set the Enable HTML Approval Email option.
- Click Update.
IMPORTANT: Once the HTML Approval Email is enabled, all new step transition notifications are sent using the new token placement. Responses to these notifications continue to use the same format as prior release.
If you have not defined an email notification for a step transition and want to create one, complete the following steps:
- Navigate to the Process page. Admin > Process Definition > Processes
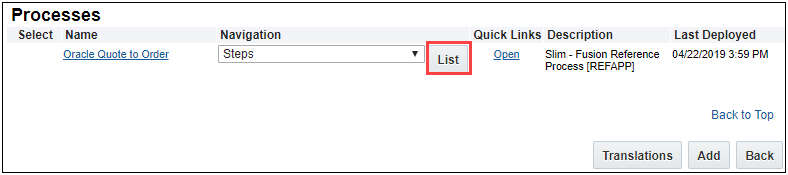
- For a process, select Steps from the Navigation drop-down and then click List. The Process Steps List page displays.
- Select a Transition Rule you wish to add an Email Notification. The Transition Rule detail panel displays.
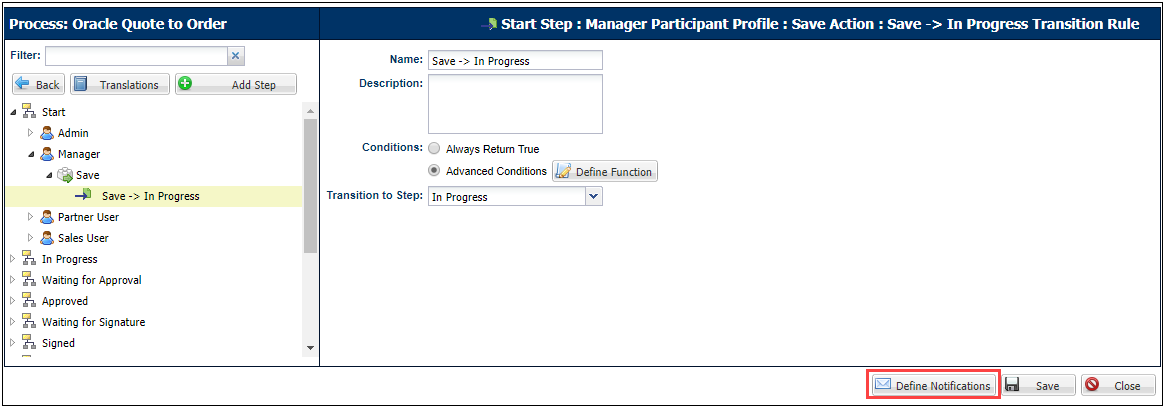
- Click Define Notifications. The Add Notification Rule page displays.
- Select the Send Email checkbox. The Email Information displays.
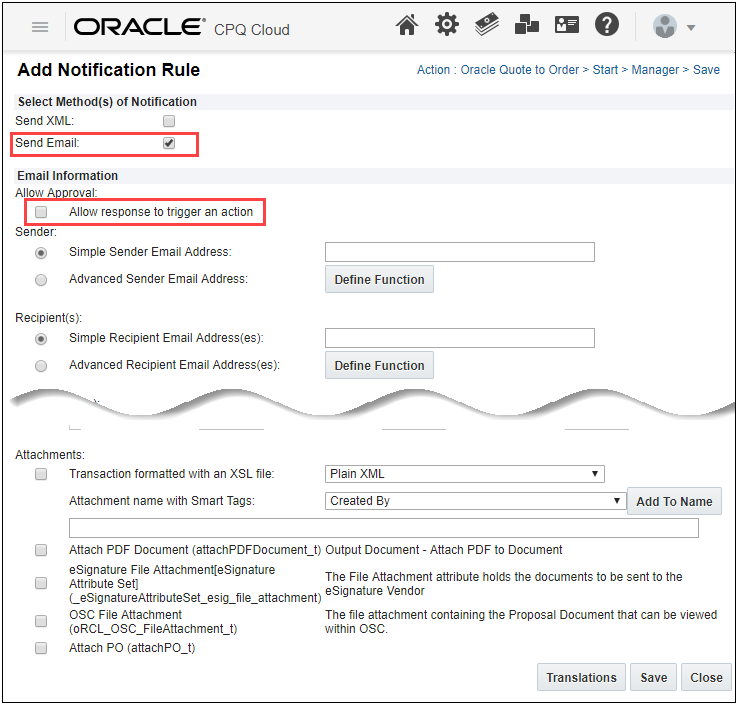
- Select the Allow response to trigger an action checkbox.
IMPORTANT: If you do not select the Allow response to trigger an action checkbox, a token is not added to the notification because it is not needed.
- Click Save.
Steps to Enable
The Transition Rule Notification enhancement requires an administrator to enable for CPQ Cloud 19B sites. Instructions are included in this document and CPQ Cloud Online help.
Tips And Considerations
Mailto links are not supported with Transition Rule Notifications. Do not use an Email Template which contains mailto links with Transition Rules.
Email Approval Response Enhancements
CPQ Cloud 19B improves the way approvers can respond to email notifications to Approve or Reject quotes via email. These enhancements reduce the likelihood of an approver mistyping an Approve or Reject keywords or improperly formatting the response causing an error which slows down the approval process.
When the HTML Approval Emails setting is enabled, the response email includes mailto links for your Approve and Reject actions. The mailto links automatically generate your email response which includes the Approve or Reject labels and their associated action variable name, moves the token to the message body, and provides space for approver comments.
IMPORTANT: Approver comments are saved only if provided in the first line of the email message. Any text after the first line, such as automatic email signatures, is discarded and not recorded in the Approval History.
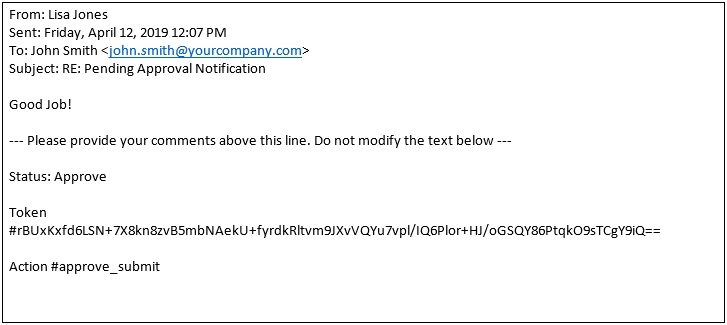
Sample Email Approval Response
Steps to Enable
The Email Approval Response Notification requires administrator to enable the HTML email notifications in the Commerce Setting page on CPQ Cloud 19B sites. Instructions are included in this document and CPQ Cloud Online help.
Tips And Considerations
An email response generated by a mailto link is presented to recipients in their preferred languages. However, the token and action are not translatable objects.
Subscription Management Solution Enhancements
In 19A, CPQ Cloud introduced a Subscription Management solution. This solution allows customers to create and manage products and services in a subscription model. The subscription model supports managing a given product or service as a recurring and usage-based price item. Supported by Oracle Subscription Management Cloud, Oracle Integration Cloud, and attributes, actions, and BML functions created within the CPQ Cloud platform, the solution enables sales users to capture subscription orders and perform subscription management activities throughout the lifecycle of these customer relationships.
In CPQ Cloud 19B, we enhance the Subscription Management solution by including the following functionality:
- Subscription Workbench
- Subscription Workbench Layout Editor Support Enhancement
- Account REST API Services
CPQ Cloud 19B enhances the Customer Assets List page, now known as the Subscription Workbench, to provide sales users with a centralized location to easily access subscription information by account ID or account name. In CPQ Cloud 19A or earlier, customer’s leveraging CPQ Subscription Ordering functionality are restricted to a predefined flow for users. To see the list of assets owned by a given account, a sales user was required to access a Transaction first. This enhancement decouples the Subscription Workbench page from the Transaction UI and allows users to view the assets/subscriptions belonging to a given account directly through a navigation link.
To view the Subscription Workbench, a user-defined link must be set up. If the user-defined link is not set up, the Subscription Workbench is only viewable from the Transaction.
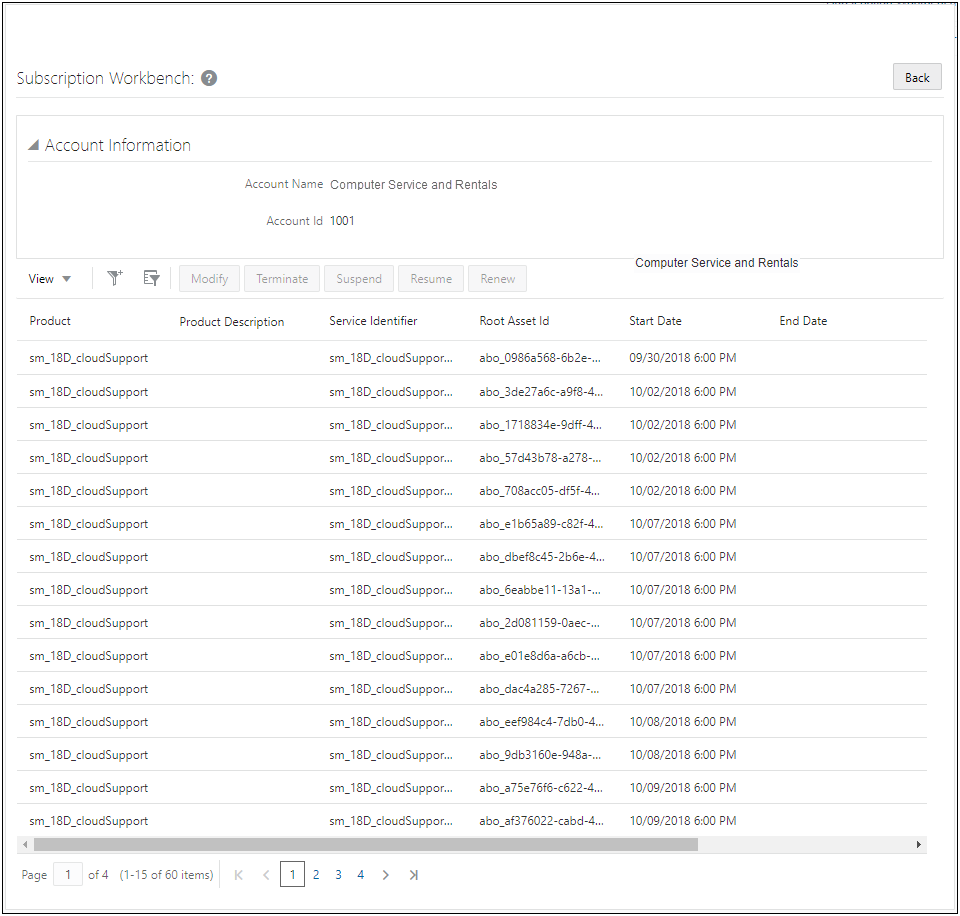
Sample Subscription Workbench
To setup a user-defined Link for accessing the Subscription Workbench, complete the following steps:
- Navigate to Admin Home page.
- Click Navigation Menus under Styles and Templates. The Navigation Menus page displays.
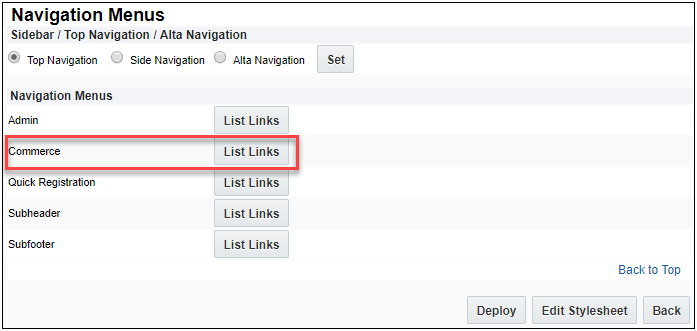
- Click List Links for Commerce. The Navigation Items List – Commerce page displays.
- Select the User Defined tab.
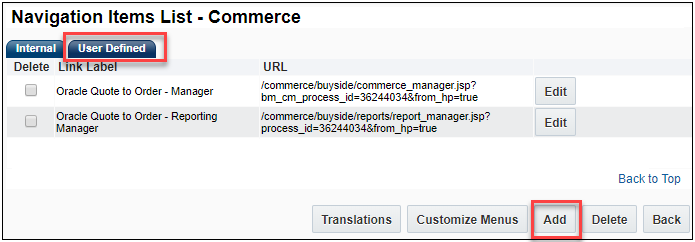
- Click on Add. The Link Editor page displays.
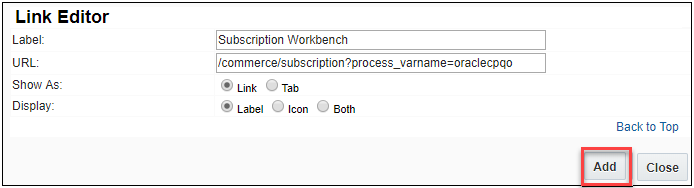
- Enter Subscription Workbench for the Label.
- Enter a valid URL. For example, /commerce/subscription?process_varname={PROCESS_VARNAME} where process_varname is the valid Commerce process.
- Select Link for Show As.
- Select Label for Display.
- Click Add. The Navigation Items List - Commerce page displays.
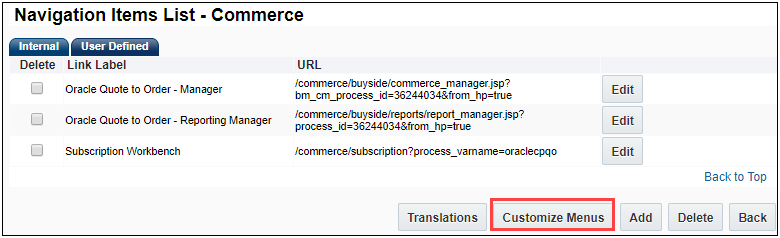
- Click Customize Menus within the User Defined tab. The Customize Links for Commerce page displays.

- Select Subscription Workbench from the Hidden Links list and then click Add. The Subscription Workbench link is moved to under the Top Navigation Tab.
- (Optional) Click the arrows to move the Subscription Workbench link to the desired location to display on the UI.
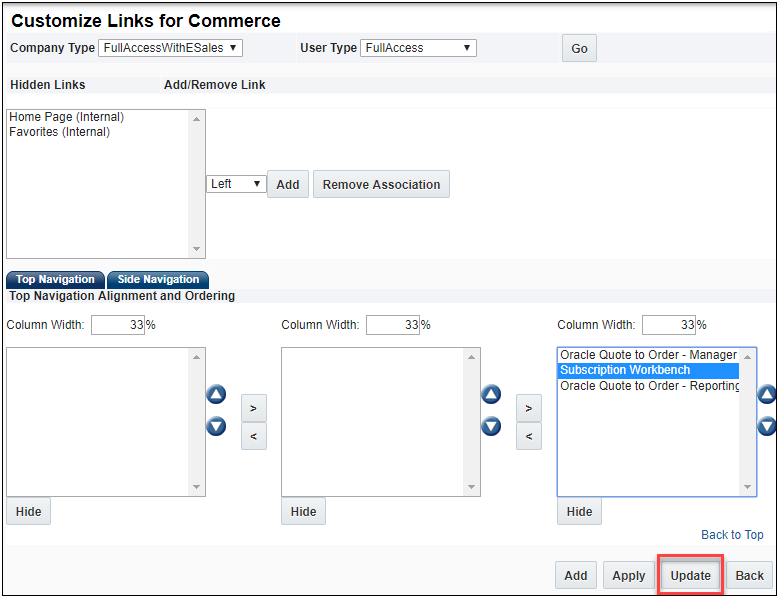
- Click Update to get back to Navigation Items List – Commerce page
- Click Back to get to the Navigation Menus page.
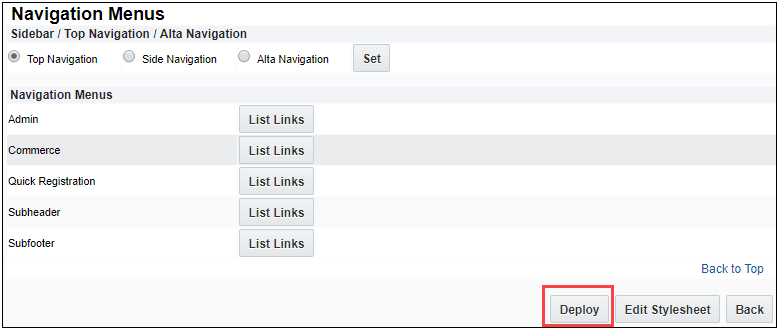
- Click Deploy to deploy the Subscription Workbench to the User-Defined Navigation Menu UI.
To enable the Accounts Lookup Library function for Integrations with CRMs, complete the following steps:
- Navigate to the Admin Home page.
- Select Commerce Settings under Commerce and Documents. The Commerce Options page displays.
- Select an Account Lookup BML script from the Accounts Lookup Library Function drop-down.
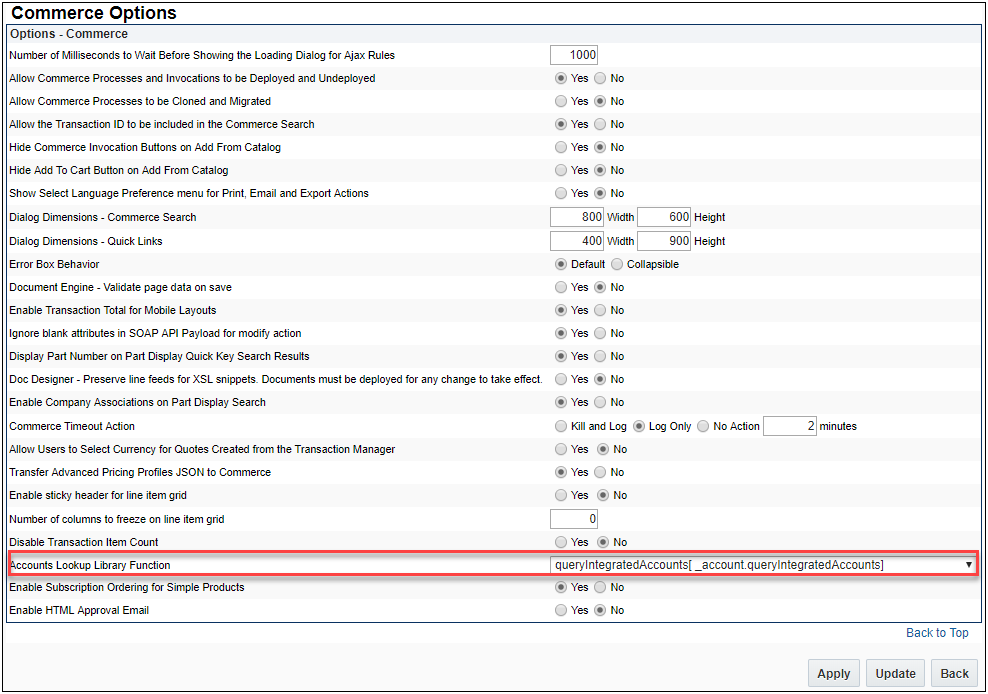
- Click Apply.
IMPORTANT: The Accounts Lookup Library Function drop-down is only available for sites that are integrated with a CRM. Refer to the CPQ Online Help for information about the Integration Center.
Administrators need to develop an Account Lookup BML script in order for the lookup feature to know what data to search. A sample BML script is included within the 19B Subscription Management Installation package. The following examples provide the input and output BML format for the accounts lookup script.
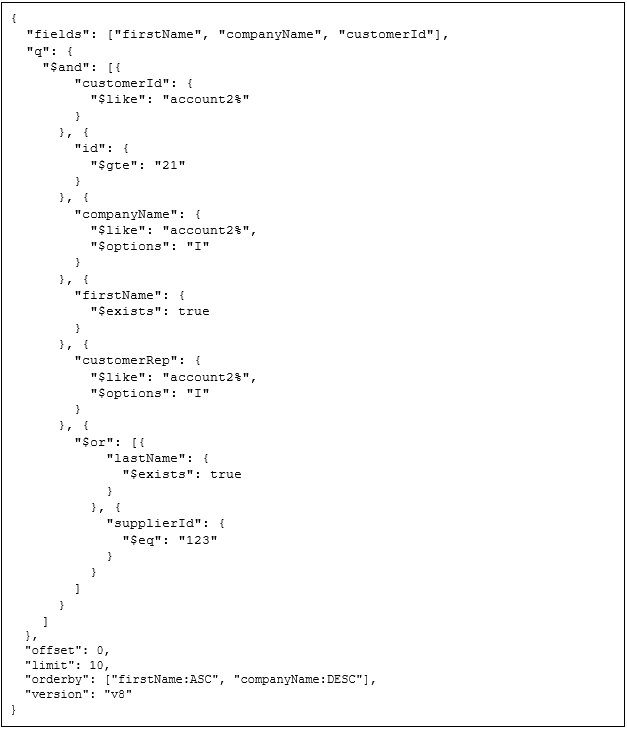
Sample Input BML
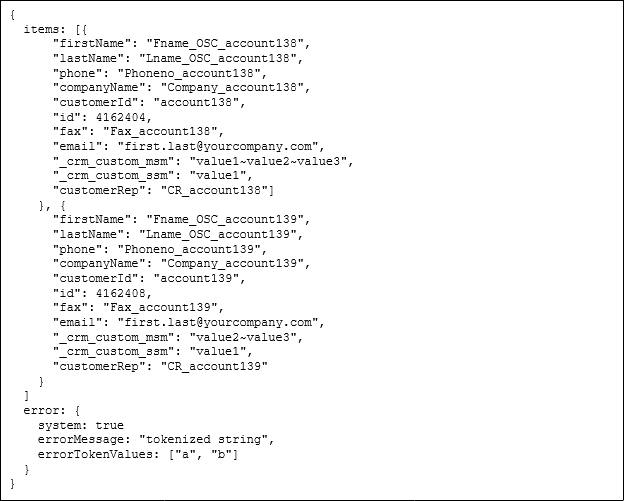
Sample Output BML
To view the Subscription Workbench, complete the following steps:
- Log in to CPQ, click Subscription Workbench. The Subscription Workbench page displays.

Subscription Workbench
- Perform one of the following steps:
- Enter the account name in the Account Name field.
- Enter the account ID in the Account Id field.
- Click on the Look up Key to select an account.

- Click Next. The Subscription Workbench showing the list of assets/subscriptions for that account displays.

Sample Subscription Workbench
Steps to Enable
The Subscription Workbench requires administrator interaction to turn on the user-defined link and enable the lookup to a defined script.
Subscription Workbench Layout Editor Support Enhancement
Administrators have the ability to edit the Subscription Workbench, formerly Customer Assets List page, and add additional account and asset attributes through the UI Designer Layout Editor.
UI Designer contains a drag-and drop interface that allows administrators to easily customize layouts. In 19B, the UI Designer default layout for Customer Assets is modified for the new Subscription Workbench title and new Account Information panel.
To access the new Customer Assets layout, complete the following steps:
- Navigate to the UI Designer page. Admin Home > General > UI Designer
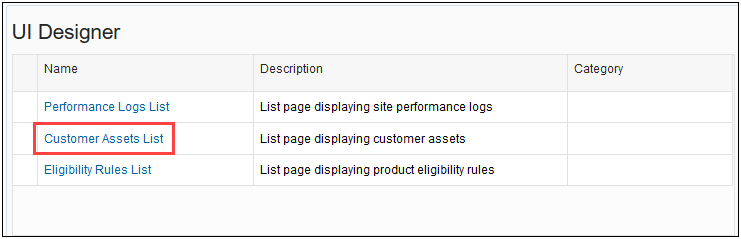
UI Designer Page
- Click Customer Assets List under Name. The UI Designer: Customer Assets List page displays.

UI Designer: Customer Assets List Page
The Customer Assets List layout shows the new Subscription Workbench title and Account Information panel. If you select the Account Information panel, the list of supported asset and account attributes are available. Also, administrators can modify the page and layout labels within the Layout Settings panel. Refer to the UI Designer article in the CPQ Cloud Online Help for details on the UI Designer.
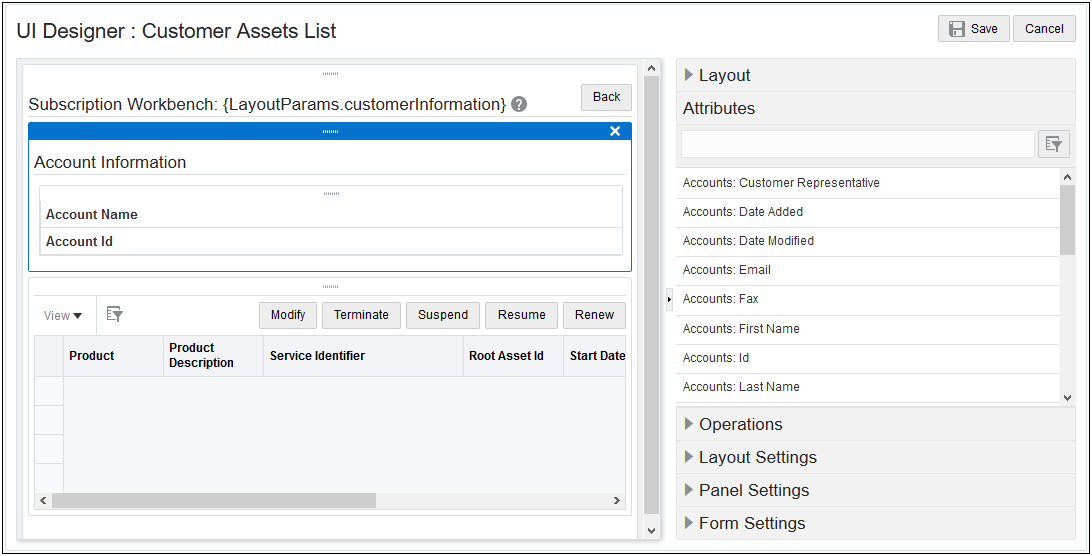
UI Designer: Customer Assets List showing Account Panel Attributes
Steps to Enable
No steps are required to enable this feature.
Tips And Considerations
Administrators can remove the Account Information panel on the Customer Assets List through the UI Designer, if desired.
Account REST API services are added to support integrating and querying external system accounts. The Accounts REST API is added to the Integration Catalog. The following services are available:
- Get Account
- Get Accounts
Custom Account Attributes
You may need custom account attributes. By default, all customer account deployed custom account attribute types are available in the account object except for the following:
- Single Select Menu with the menu value exceeding 30 characters
- Attribute variable names exceeding 116 characters
All custom account attributes are given the accounts object prefix _crm_custom. In the case of native accounts, where CPQ is the source master, Single Select Menu and Multi-select Menu attributes are not searchable and custom attribute filters are required.
The table below defines differences between native and integrated CPQ Cloud Subscription Management custom attribute feature support.
| Feature |
Native (CPQ Cloud is Master Source) |
Integrated (Integration is Master Source) |
|---|---|---|
| Complex search with more than one level |
Supported |
Not Supported |
| Custom attribute filters |
Supported |
Not Supported |
| Search on Multi-select Menu and Single Select Menu |
Not Supported |
Administrators can extend support in BML |
| Limit |
Maximum 1000 characters |
Maximum 500 characters |
| hasMore |
Supported |
Supported with some restrictions |
| Translations |
Not Supported |
Not Supported |
Get Account
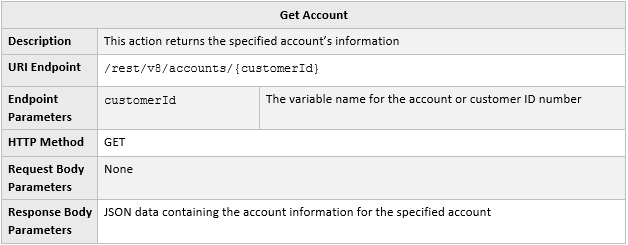
URI Endpoint Sample

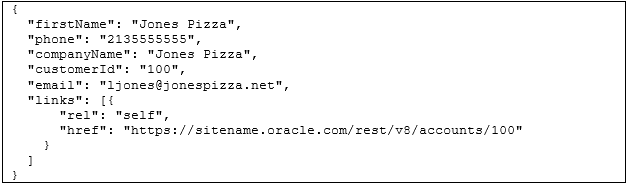
Sample Response Body
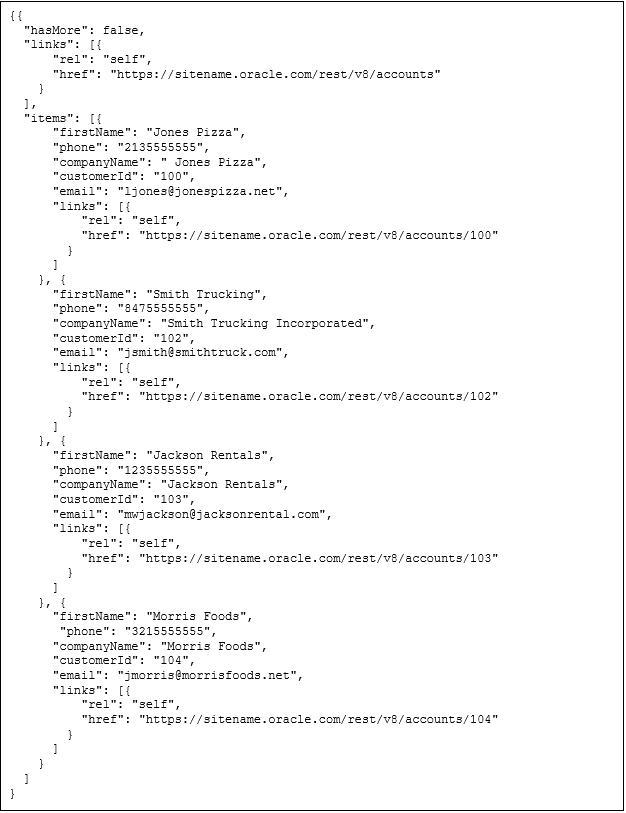
Get Accounts
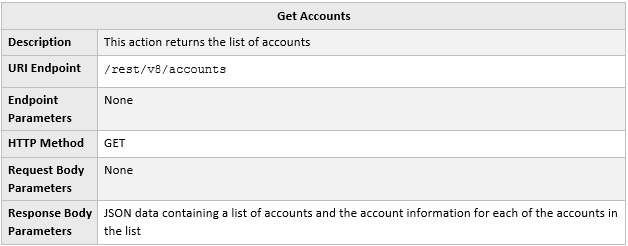
URI Endpoint Sample

Sample Response Body
Steps to Enable
The Accounts REST API enhancements are automatically available with CPQ Cloud 19B. Administrators need to update any systems that interact with these CPQ web services to begin using these new features.
Subscription Ordering Enhancements
Companies use Subscription Ordering, often referred to as Asset Based Ordering, to sell tangible assets or subscriptions for services delivered over a period of time. Sales users can create, modify, suspend, resume, renew, and terminate assets in CPQ Cloud. They can also reconfigure an asset or create a follow-on order that modifies an order that was previously quoted in CPQ Cloud.
The following functionality is available in CPQ Cloud 19B:
- Simple product support for Subscription Ordering
- Multi-Select support for asset operations
- New Transaction support for asset operations
- Asset REST API enhancements
Simple Product Support for Subscription Ordering
Beginning in CPQ Cloud 19B, customers can enable Subscription Ordering support to directly add simple products to a Commerce Transaction for an asset-based order. A simple product is a product that does not have its part number associated with any of the related configuration models. When enabled, users can use Quick Add to add simple products to a Transaction without navigating away from the Transaction page. They can also add simple products using a parts search.
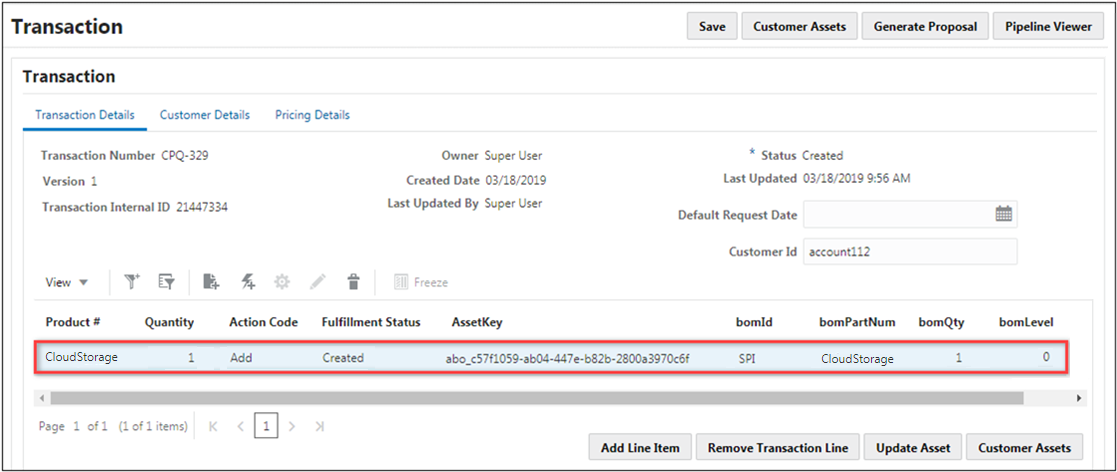
Simple Product Line Item
When Subscription Ordering for Simple Products is enabled and a simple product is added to a Transaction, the following attributes are automatically populated.
| Line Item Attribute |
Simple Product Value |
|---|---|
| BOM ID |
SPI |
| BOM Part Number |
The simple product part number |
| BOM Quantity |
1 |
| BOM Level |
0 |
| Asset Key |
A unique ID is generated to track the simple product as an asset. |
| Action Code |
Add |
Simple product assets can be modified, suspended, resumed, renewed, and terminated for internal applications.
Enable Subscription Ordering for Simple Products
To enable Subscription Ordering for Simple Products, perform the following steps:
-
Navigate to Commerce Options page. Admin > Commerce and Documents > Commerce Settings
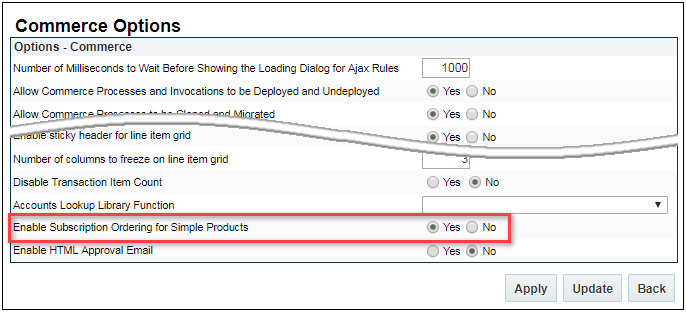
- Set the Enable Subscription Ordering for Simple Products option to Yes.
- Click Apply or Update.
Steps to Enable
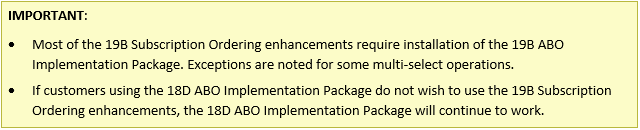
CPQ Cloud strongly recommends that administrators install the 19B ABO Implementation Package to use simple products. Refer to the 19B ABO Implementation Guide for instructions to use simple products with the 18D ABO Package.
IMPORTANT: Simple Product functionality is not supported in external order implementations, such as Oracle Commerce Cloud.
Multi-Select Support for Asset Operations
Users can now select multiple assets on the Subscription Workbench (previously called the Customer Assets page) to modify, renew, resume, suspend, or terminate. For Example: A customer needs to terminate cloud backup services for five users effective on the 1st day of next month. The Customer Support Representative identifies the assets to be terminated, selects the assets, then clicks Terminate.
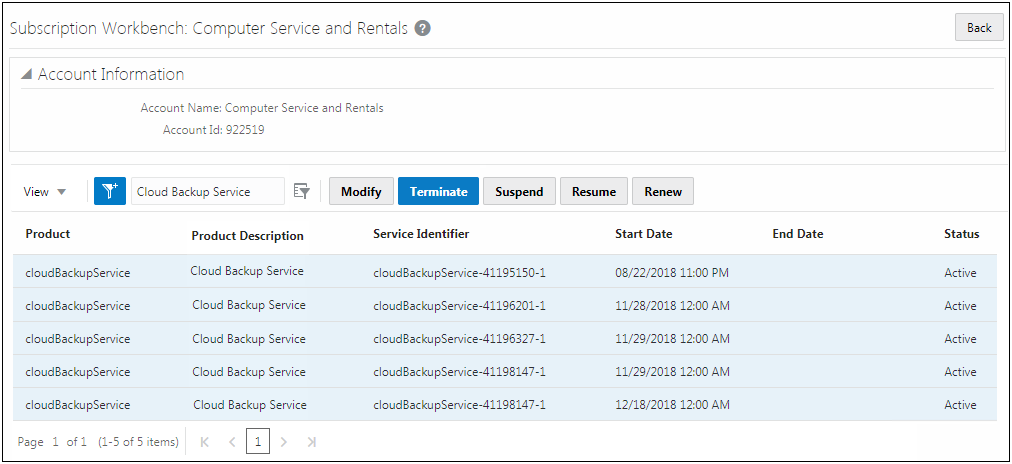
Subscription Workbench > Multi-Select Terminate
After the Customer Support Representative selects Terminate, the Transaction UI page opens. The selected assets and the appropriate action are displayed.
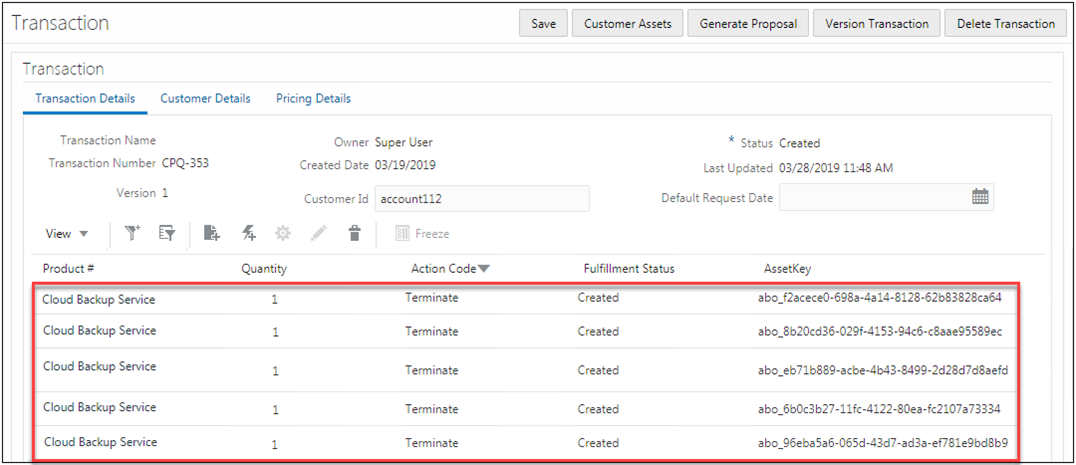
Transaction UI Page > Multi-Select Terminate
Steps to Enable
- Administrators must install the 19B ABO Implementation Package to enable Multi-select modify for multiple assets.
- Multi-select suspend, resume, renew, and terminate will work with the 18D ABO package.
New Transaction Support for Asset Operations
Beginning in CPQ Cloud 19B, customers can perform asset operations from the Subscription Workbench for assets without an associated Transaction ID. When a user invokes an asset operation for an asset without an associated Transaction ID, a new transaction is created and associated with the requested operation. This behavior is also supported in the v8 asset operation REST APIs.
Steps to Enable
- Administrators must install the 19B ABO Implementation Package to enable New Transaction Support for Asset Operations.
- New Transaction Support is not supported for external applications in CPQ Cloud 19B.
CPQ Cloud 19B introduces new endpoints to provide multi-select support for asset operations. These operations calculate the projected state of the designated assets for the requested date. Projected State Calculation is a step in the subscription ordering process flow, where open orders and current changes made to the quote line items are applied to the existing assets to generate a future projected state of the asset for the requested date.
-
Modify Assets - This operation calculates the projected state of the designated assets for the requested date. For modify requests the action codes are set to "-" for No Update.
-
Suspend Assets - This operation merges a suspend request with the projected assets for the requested date, and then stores the results to a Configuration BOM Instance. For suspend requests, the root and subordinate action codes are set to Suspend.
-
Resume Assets - This operation merges a resume request with the projected asset for the requested date, and then stores the results to a Configuration BOM Instance. For resume requests, the root and subordinate action codes are set to Resume.
-
Renew Assets - This operation merges a renew request with the projected asset for the requested date, and then stores the results to a Configuration BOM Instance. For renew requests, the root and subordinate action codes are set to Renew.
-
Terminate Assets - This operation merges a termination request with the projected asset for the requested date, and then stores the results to a Configuration BOM Instance. For termination requests, the root item action code is set to Terminate and subordinate asset action codes are set to Delete.

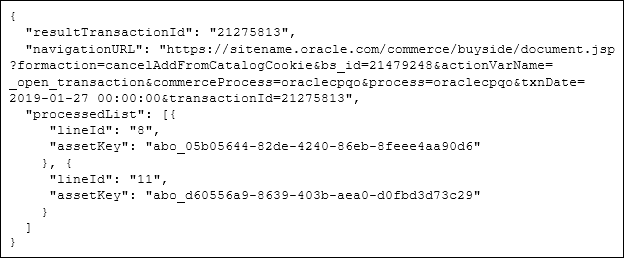
Modify Assets URI Endpoint Sample

Modify Assets Request Sample

Modify Assets Response Sample
Steps to Enable
The Assets REST API enhancements are automatically available with v8 web services in CPQ Cloud 19B. Administrators need to update any systems that interact with these CPQ web services to begin using these new features.
Key Resources
To implement 19B ABO Package, refer to the CPQ Cloud 19B Asset-Based Ordering Implementation Guide, available on My Oracle Support Doc ID 2182966.1.
Transaction Array Enhancements
Organizations using CPQ rely heavily on CPQ Commerce to sell their product offerings to customers and capture the orders. In the quote life cycle, there is a lot of information that needs to be captured at the Transaction and Transaction Line level. Some information, such as revenue time periods or locations, is repetitive, but dynamically varies from one Transaction to another. Transaction Arrays allow customers to group multiple array elements using a single data structure that can capture repeatable data. The array attributes can then be instantiated multiple times at runtime without explicitly defining each instance.
The following functionality is available in CPQ Cloud 19B:
- Add Transaction Arrays to Document Designer and Email Designer documents
- Transaction Array UI Enhancements
- Simplified Add All Attributes to JET Layout
Add Transaction Arrays to Document Designer and Email Designer Documents
Transaction Array attributes can be added to Document Designer and Email Designer templates, for both main documents and sub-documents. Administrators can also iterate over the transaction array data set through loop editors, and add corresponding array attributes in relevant template elements.
- To add a main document transaction array attribute, a loop for the array must be created on a section, table, table row, text element, or XSL snippet element.
- To add a sub-document transaction array attribute, a loop for the array must be nested within a sub-document (i.e. Line Item) loop. The "outer" loop must exist on a section or a table row, and it must loop over Line Items (model or part). The nested loop can be created on a table row, a text element, or an XSL snippet element.
Add a Main Document Transaction Array
To add a transaction array to a main document and configure a loop over the array set items, perform the following steps:
- Navigate to the Document Designer templates. Admin > Commerce and Documents > Document Designer
- Select the Commerce Process, then click the applicable document link, the Document Designer Editor opens.
- Select a Section, Table, Table Row, Text Element, or XSL Snippet Element.
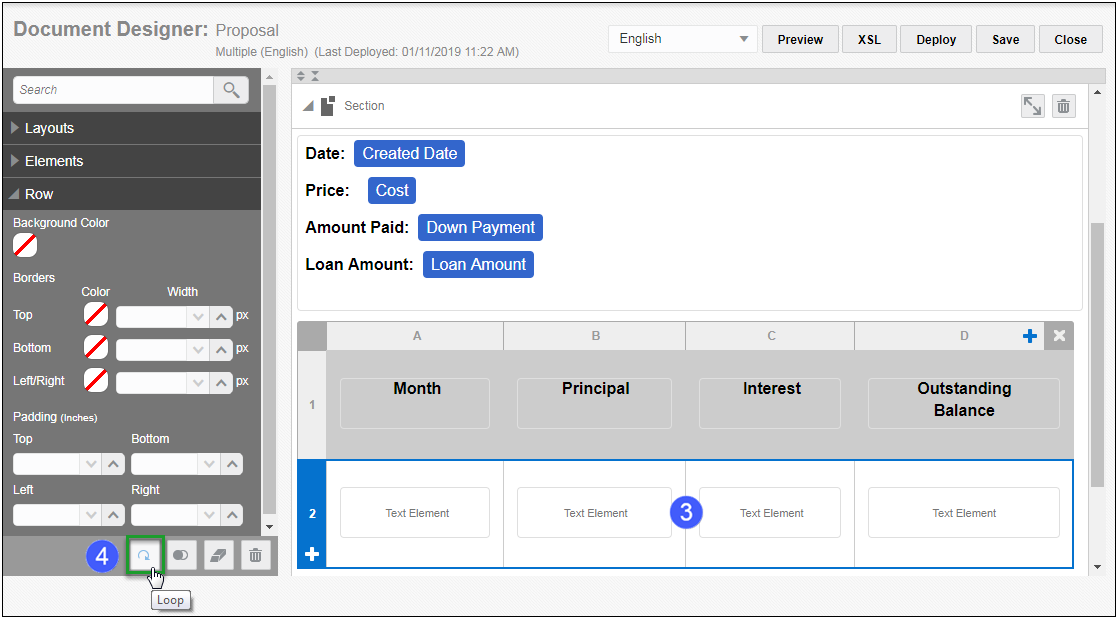
- Click the Loop button in the Dynamic Content Bar. The Loop editor opens.
- Select Transaction Array Sets from the Loop On drop-down.
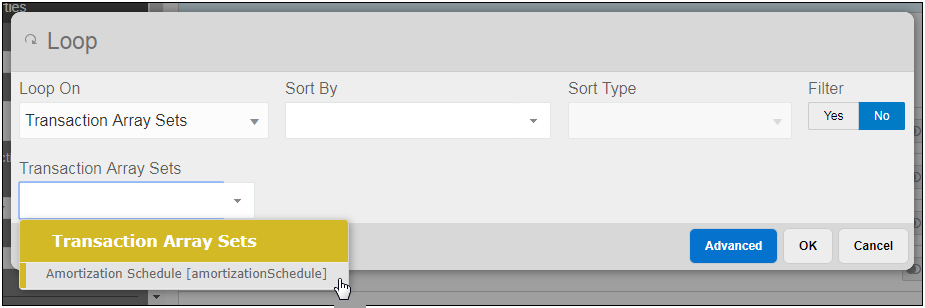
- Select the applicable array set from the Transaction Array Sets drop-down.
- Optionally select an attribute to sort by from the Sort By drop-down.
- Optionally select a sort type from the Sort Type drop-down.
- Optionally add a Filter to the Loop by clicking Yes for Filter, then define the filter criteria.
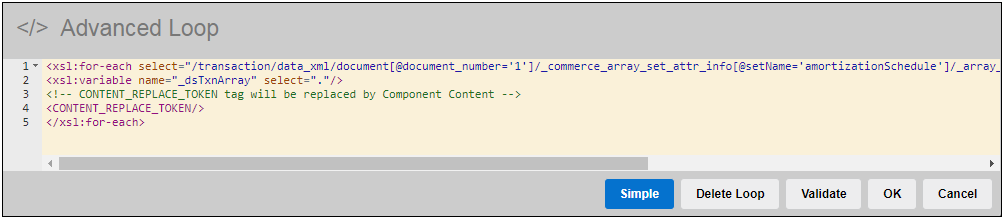
- Optionally click Advanced to convert a Loop to an Advanced Loop that displays in XSL format.
- Click OK to save the Loop. The Loop icon
 is added to the template element.
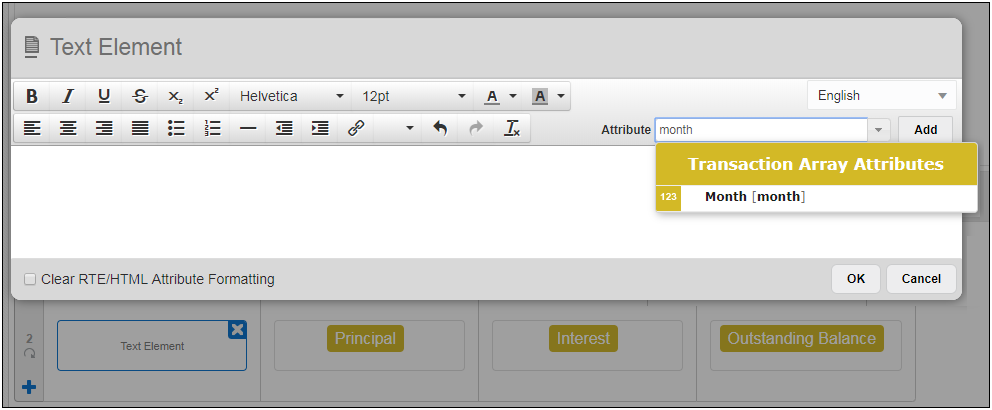
 - Add the Transaction Array Attributes.
- Save and Deploy the template.
Add a Sub-Document Transaction Array
To add a sub-document transaction array and configure the nested Loop to loop over the array set items perform the following steps:
- Navigate to the Document Designer templates. Admin > Commerce and Documents > Document Designer
- Select the Commerce Process, then click the applicable document link. The Document Designer Editor opens.
- Navigate to the element with a Line Item Loop.
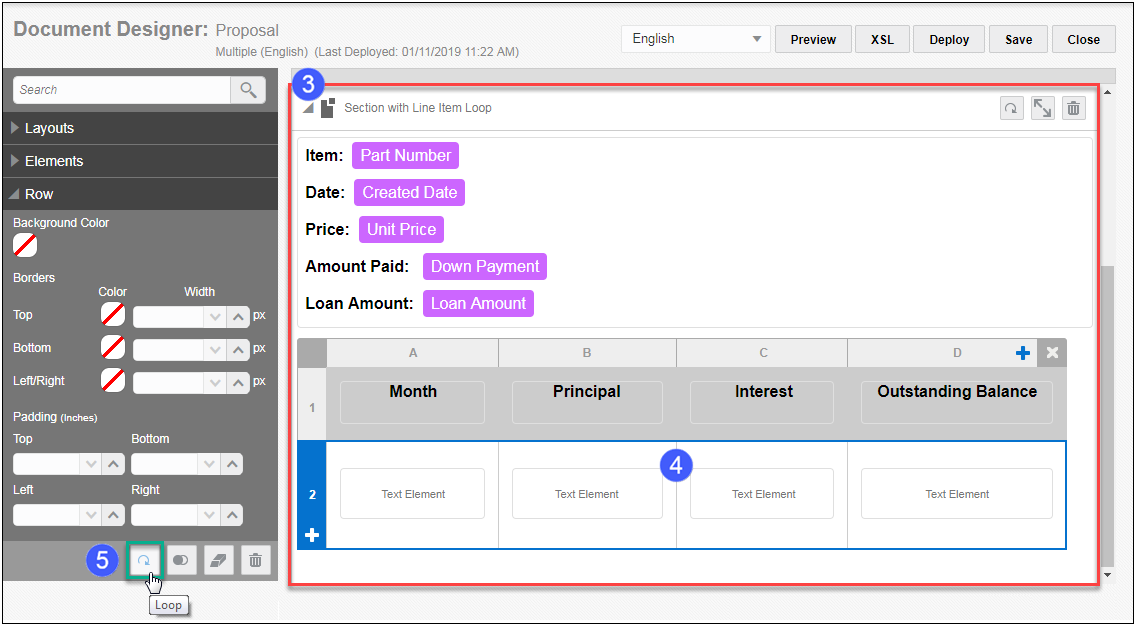
- Select a Section, Table, Table Row, Text Element, XSL Snippet Element within the Line Item Loop.
- Click the Loop button in the Dynamic Content Bar. The Loop editor opens.
- Select Transaction Line Array Sets from the Loop On drop-down.
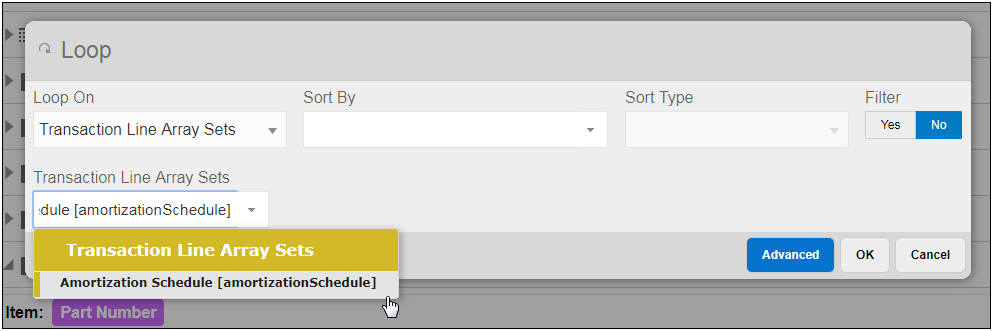
- Select the applicable array set from the Transaction Line Array Sets drop-down.
- Optionally select an attribute to sort by from the Sort By drop-down.
- Optionally select a sort type from the Sort Type drop-down.
- Optionally add a Filter to the Loop by clicking Yes for Filter, then specify the filter criteria.
- Optionally click Advanced to convert a Loop to an Advanced Loop that displays in XSL format.

- Click OK to save the Loop. The Loop icon
 is added to the template element.
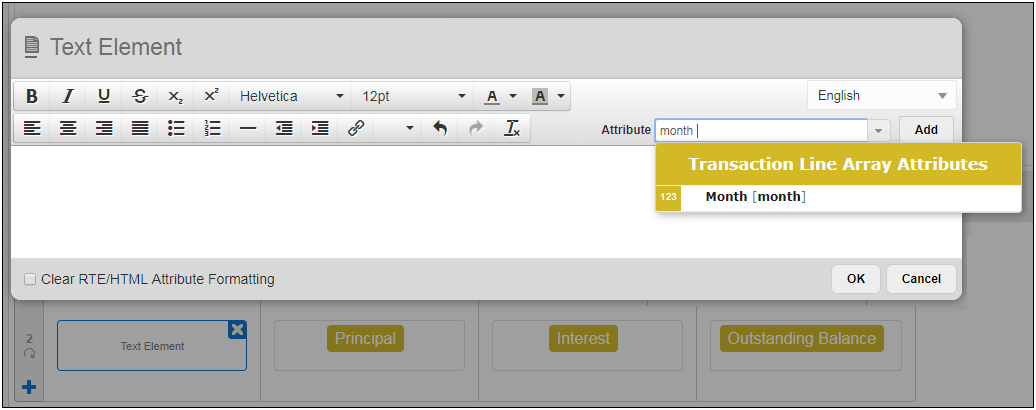
 - Add the Transaction Line Array Attributes.
- Save and Deploy the template.
Steps to Enable
No steps are required to enable this feature.
Tips And Considerations
When migrating Document Designer or Email Designer templates that contain transaction arrays, administrators should ensure that the array set and all array set attributes are also migrated.
For example, the following image shows a migration package containing the Document Designer "Proposal" document, note that the "amortizationSchedule" array set and all of its child attributes are also selected.
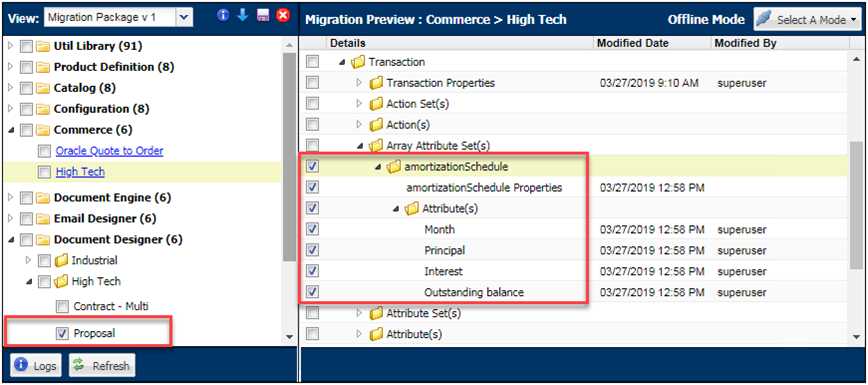
Migration Package with Document Designer Document and Transaction Array Attributes
Transaction Array UI Enhancements
In Release 19B, CPQ provides several usability improvements for users of CPQ's JET Transaction Arrays. Users can change their Transaction Array table to view only specified columns or resize columns. These user preferences are saved in the browser session. When a user returns to a Transaction that displays this element during the current browser session, they will observe the Transaction Array with their display preferences.
Steps to Enable
No steps are required to enable this feature.
Simplified Add All Attributes to JET Layout
This enhancement provides administrators with a single step option to add all array set attributes for a Transaction Array to the JET layout at the same time. Previously, when array set attributes were removed from the layout, administrators had to remove the array set from the layout, save the layout, exit the JET Responsive Layout Editor, re-enter the JET Responsive Layout Editor, and then add the array set back to the layout to expose removed attributes.
Beginning in CPQ Cloud 19B, administrators can simply click Add All Attributes on the Array Set Table dialog to expose and add all array set attributes for a Transaction Array.
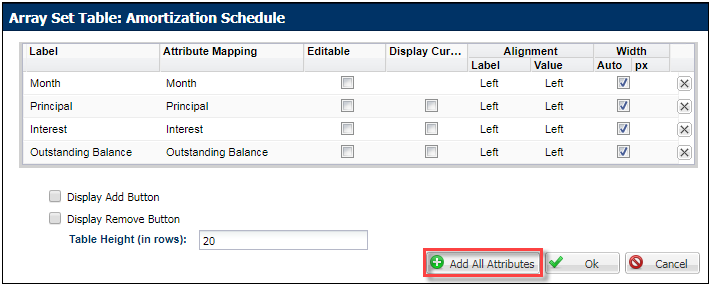
Array Set Table Dialog
Steps to Enable
No steps are required to enable this feature.
The following CPQ Cloud 19B enhancements pioneer the next generation selling platform:
- Collaborative Quoting
- System Configuration Enhancements
For many customers, creating a quote is a team effort that requires several people with different knowledge, responsibilities, and concerns. There are often situations where these multiple stakeholders need to simultaneously work together on the same Transaction to complete it quickly. The entire sales team may need to collaborate to deliver a quote before a fiscal deadline, a holiday, or key milestone in a sales cycle.
In previous versions of CPQ, it was not possible for multiple users to simultaneously work on the same Transaction without conflicts resulting in lost changes and frequent page refreshes. Transaction Locking was introduced to prevent these conflicts by ensuring that only one user could edit a quote at a time. However, this meant users essentially had to take turns editing a quote.
CPQ Cloud Update 19B introduces Collaborative Quoting which supports multiple users collaborating in real-time on a single Transaction without conflict. In addition to allowing multiple users to simultaneously work on a Transaction, this feature also allows inbound integrations and email approvals to complete without disrupting active users.
The following functionality is available in CPQ Cloud 19B:
- Concurrent Quote Updates
- Current Editor Display
- Real-Time Activity Display
- Lock Action
- Granular Activity History Changes
- Commerce REST API Enhancements
The principal benefit of Collaborative Quoting is that it allows multiple users to concurrently edit a single Transaction. These users are able to work together on a shared version of the Transaction and each user's changes are merged as they are saved. Also, a Transaction can be updated by an external system, usually via web services, and these changes can be merged without disrupting users actively editing the Transaction in the UI.
When a user creates or opens a Transaction a collaboration session begins. Other users can join this collaboration session and they will all be viewing the latest version of the document. The collaboration session ends when all users have left.
With collaboration, user edits are sent to the server when the user clicks off the attribute. These edits are seen immediately by other users, but they are not saved to the Transaction until a user invokes a modify action. Unsaved changes are preserved on the Transaction as long as one of more users are collaborating on it. When the collaboration session ends all unsaved changes are discarded.
Collaborating user edits and actions are executed in the same order in which they are performed. If there is a long running action, all subsequent changes will wait until the previous action completes. Transaction updates from email approvals, integrations, web services, and timer based actions are queued along with actions performed by users and everyone viewing the Transaction will see the results of those changes as they complete.
Users can configure and reconfigure different model lines at the same time with collaboration, but only one user can reconfigure each line at a time. When a line is being reconfigured it is locked and cannot be reconfigured by other users. When users invoke a Reconfigure or Add from Catalog action they remain active in the collaboration session unless they are in configuration longer than the session time out.
Enable Collaborative Editing
Complete the following steps to enable collaborative editing and configure unlock behavior for a Commerce Process.
- Navigate to the Commerce Processes Page. Admin > Commerce and Documents > Process Definition
- Select the applicable Commerce process.
- Select the Collaborative Editing option.
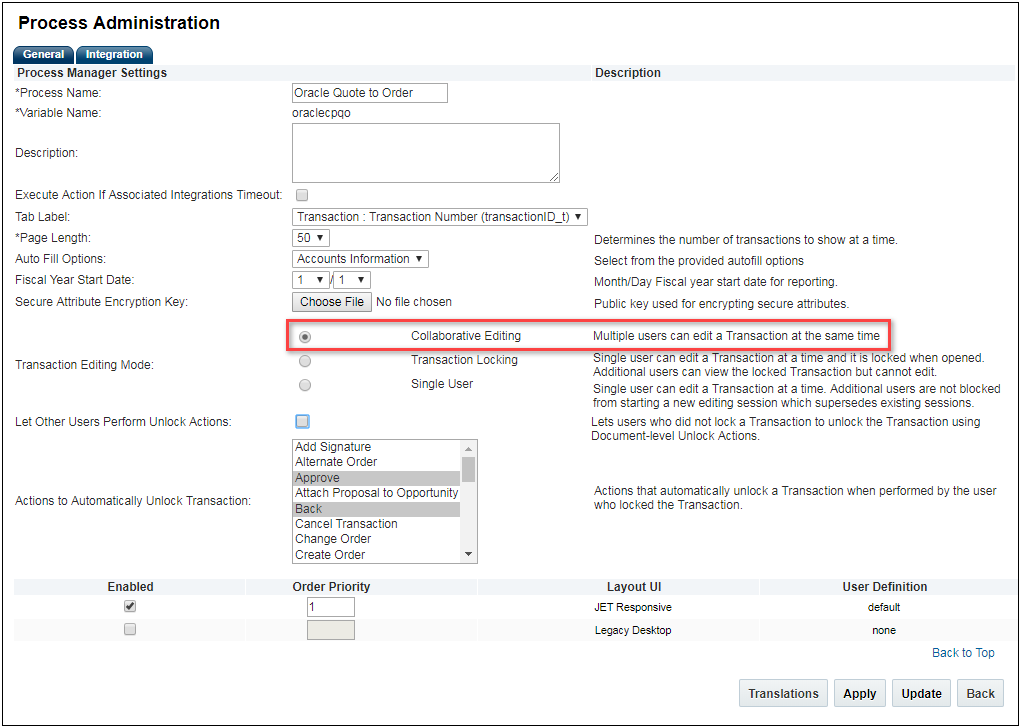
- If desired, select the Let Other Users Perform Unlock Actions option.
- Select unlock actions from the Actions to Automatically Unlock Transaction list.
- Click Apply or Update.
Steps to Enable
Administrators must enable the JET Responsive UI and disable the Legacy Desktop UI for all users and remove all secure attributes from the Commerce process before they can enable Collaborative Editing.
Tips And Considerations
Consider the following tips when using Collaborative Quoting:
- Secure Attributes are not supported in Collaborative Transactions in CPQ Cloud 19B. Secure Attributes must be removed from the Commerce process when enabling Collaborative Editing.
- History Attributes are not supported in Collaborative Transactions. History attribute data is cleared when an auto update is invoked in a collaborative session. CPQ Cloud recommends removing History Attributes from your Commerce JET Transaction UI layout if enabling Collaborative Editing
- Operations or actions that affect multiple Transactions are not supported in Collaborative Transactions in CPQ Cloud 19B. Other collaboration session users are not affected when these events fail. For example, a SOAP updateTransaction request that updates multiple Transactions will fail if collaboration enabled. SOAP updateTransaction requests to update a single Transaction are still functional.
- When using auto-update to set an array set value, it is important to specify the row number in the JSON. Otherwise, the entire row is removed and recreated which can cause rendering issues.
- When Collaborative Editing is enabled for a Commerce Process the Mobile layout will be replaced with the Commerce JET Transaction UI layout.
- If a user is on a Line Item Detail page and the Line Item is deleted by another user, the record is removed immediately and changes will be lost. The user will need to use browser navigation buttons to return to the main document.
- If a user's collaboration session times out while they are reconfiguring a model, their lock on that model is removed. If another user opens that model the first user will not be able to save it.
- Print and email actions only include attribute values that are saved when the document is generated. Unsaved changes entered by other users after the action is invoked are not included in the output document.
- The Copy action only includes attribute values that are saved when creating a duplicate Transaction. Unsaved changes entered by other users after the action is invoked are not carried over to the new copy.
- If a user enters a value which triggers an immediate error, either due to a Constraint Rule or simple validations on attributes, that value is not shared with other users until it is resolved. Entered values that do not trigger errors until an action is performed will be shared with other users and the error will be displayed when the action runs.
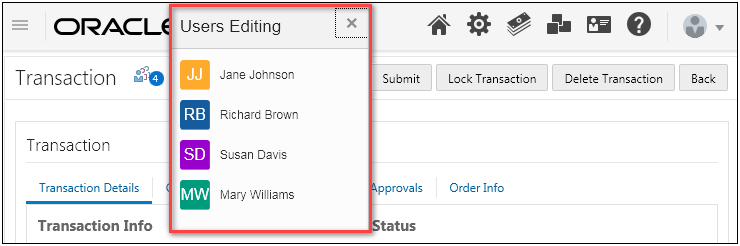
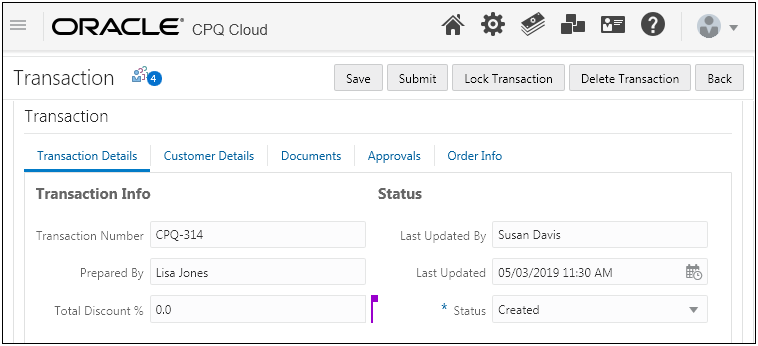
The Current Editor Display shows a list of the other users who are currently working on a Transaction. The collaborative quoting icon is displayed when collaborative quoting is enabled and there are multiple users active on a Transaction. The icon also indicates how many other users are active. For example, the following image displays a collaborative quoting session with four other active users.

Users can click on the collaborative quoting icon to view a list of the other users editing the Transaction. Each user is assigned a color which allows all users to identify who is making changes. The following image shows the active user list with four other users.
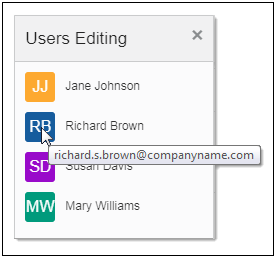
As shown in the following image, users can hover over a name in the active user list to view the user's email address. This can help users distinguish between users with similar names.
Users remain on the active user list until they leave the collaboration session by invoking the Back action. If a user navigates away from the Transaction without invoking the Back action, they will remain active in the collaboration session until they are timed out. The collaboration session time out is equal to the login session time out. Typically the login session timeout is set to thirty minutes.
Steps to Enable
No steps are required to enable this feature.
Tips And Considerations
Consider the following tips when using the Current Editor Display:
- Users may see a short delay between the time they are timed out and when they are removed from the collaboration session. Users are also removed from a collaboration session if they log out or are logged out due to inactivity.
- Users may see a short delay between when another user joins the quote and when they appear in the current editors list.
- Integration users updating the Transaction via REST or SOAP APIs are not shown in the active user list.
- User updates from Email Approvals are not shown in the active user list.
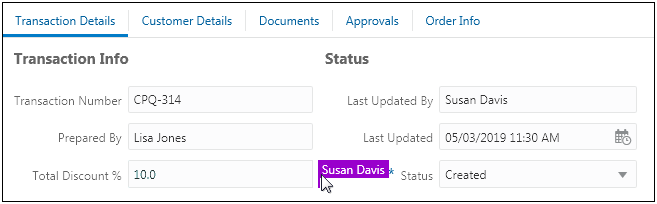
When multiple users are working together on a Transaction it is important that they can see what the other users are editing and what the results of those changes are. They also need an up-to-date view of the most current version of the Transaction at all times. The Real-time Activity Display shows which attribute, product, section, or tab a specific user is editing by flagging it with that user's assigned color. For example, in the following image a flag is displayed to the right of the "Total Discount %" attribute. This indicates another user is currently changing this attribute.
As shown in the following image, users can hover over the flag to display the name of the user making updates.
When another user is changing attributes on a different tab a flag is displayed to the right of that tab. For example, the following image shows another user is making changes on the "Order Info" tab.

Collaborative Quoting constantly polls for changes and highlights any updated values that are the result of another user's changes. For example, in the following image another user updated the quantity for the Ultra 135 Laptop. The quantity field and any fields updated by auto-update are highlighted for all users until the changes are saved. This ensures that everyone working on the Transaction can keep track of what is changing.

Steps to Enable
No steps are required to enable this feature.
Tips And Considerations
Consider the following tips when using the Real-time Activity Display:
- Users may see a short delay between when another user clicks on a attribute and when the user activity flag appears. Users may also see a short delay between when another user makes a change and when the updated values are received. Open a ticket on My Oracle Support if you would like to adjust the responsiveness of your site.
- Users should avoid editing an item in the Line Item Grid while another user is actively editing that line.
- Activity flags are not displayed when users are interacting with the following attribute types:
- File attachment attributes
- Boolean attributes
- Date attributes updated using the date picker
- Integer attributes updated using spinner controls
- Menu items displayed as radio buttons
- Multi Select Menu items displayed as checkboxes
When Collaborative Quoting is enabled there may be situations when a Transaction owner needs to freeze activity on the Transaction and prevent any further changes. Examples include, prior to submitting a quote for approval or when finalizing a quote and converting it to an order. The Lock Action is a new Commerce action type, available on main documents, that allows a user to lock the Transaction. When a Transaction is locked, only the locking user can make changes. Other users are only able to view the Transaction in read-only mode. For example, in the following image the user can click the Lock action on the Transaction.
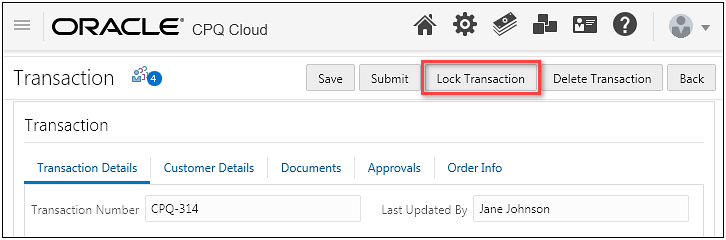
The Lock action is not automatically available on the JET Transaction UI. Administrators must create a lock action and then add the action to the Commerce JET Responsive Layout.
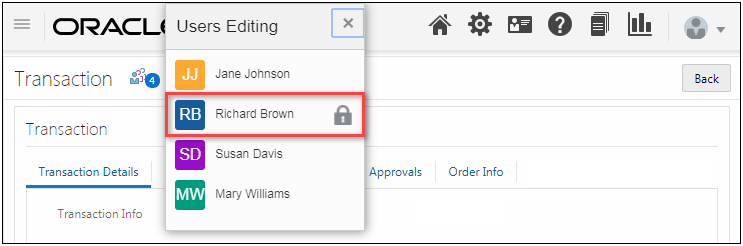
When a user has locked the Transaction the other users can see who locked it by viewing the Concurrent Editors Display as shown in the following image.
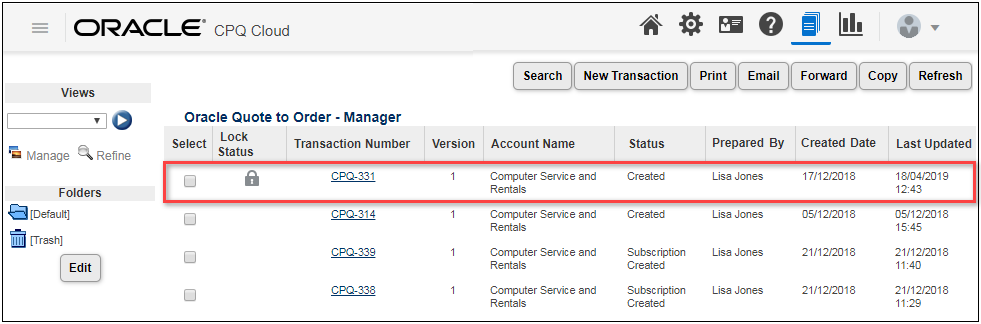
The Lock Status column displays in Transaction Manager whenever administrators enable Transaction locking for a Commerce process. An icon displays in the Lock Status column next to each locked Transaction.
UNLOCKING A TRANSACTION
When a Transaction owner performs any of the main document actions selected by an administrator in the Actions to Automatically Unlock Transaction list, a locked Transaction will unlock. For example: If an administrator selects Back and Version as the Actions to Automatically Unlock Transaction, the user who locks a Transaction for editing becomes the Transaction owner and can unlock the Transaction by clicking either Back or Version. When the Transaction owner logs out of CPQ Cloud or their CPQ Cloud session times out, the locked Transaction automatically unlocks.
When an administrator selects the Let Other Users Perform Unlock Actions checkbox on the Process Administration page, users other than the Transaction owner can unlock a locked Transaction when the main document has an Unlock type action that is available to those users via their Participant Profiles.
Create a Commerce Lock Action
Complete the following steps to create a Commerce Lock action.
- Navigate to the Commerce Processes page: Admin > Commerce and Documents > Process Definition
- Select Documents from the Navigation drop-down menu, then click List.
- Click Add at the bottom of the Actions List page.
- Enter the action name in Label field.
- Enter a unique Variable Name. The Variable Name field populates automatically. The entry can be changed before saving, but after saving the value is read-only.
- Select Lock from the Action Type drop-down menu.

- Click Add.
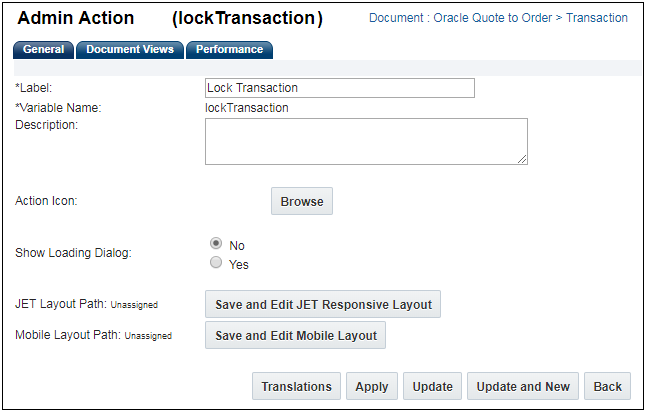
- Enter an action Description, if required.
- To define an Action Icon, click Browse.
- To define views for the action, click the Document Views tab.
- Click Apply or Update.
Steps to Enable
Beginning in CPQ Cloud 19B, the new Commerce Lock type action is available for Commerce processes with Collaborative Quoting or Transaction Locking enabled.
Granular Activity History Tracking
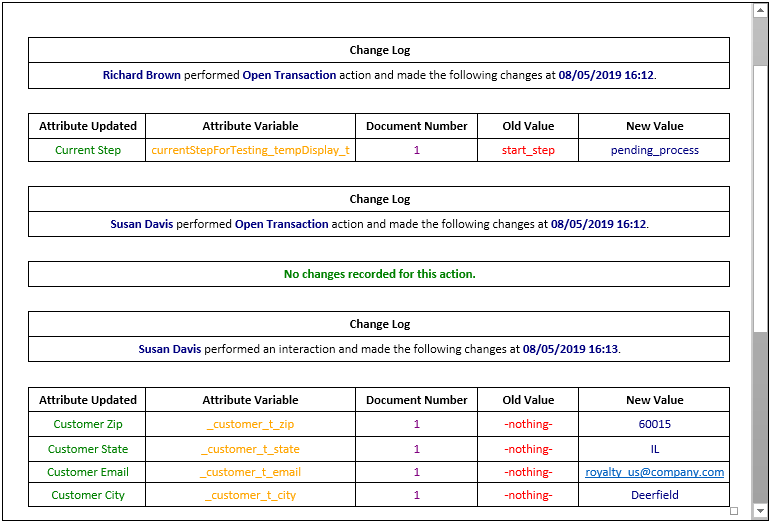
Collaborative Quoting allows multiple users to make changes to different attributes at the same time. The user who changes a value may not be the same user who runs the action and saves it to the database. Granular Activity History Tracking improves the history by logging individual interactions along with the user who made the change. In the following example three entries are shown in the history.
- Richard Brown opens the transaction, which updates the step.
- Susan Davis opens the Transaction, is added to the collaborative session, and makes no changes on open.
- Susan Davis fills in an address, no action is specified because this was an interaction and an action was not invoked.
Steps to Enable
No steps are required to enable this feature.
Tips And Considerations
Display History changes for collaboration do not specify an action varname in the XML. Administrators can adjust the XSL to represent these entries in a clear and concise way.
Commerce REST API Enhancements
Collaborative Quoting Commerce REST API enhancements provide the ability to communicate which users are editing a specific item and add new collaboration specific error messages. CPQ Cloud 19B introduces the "revisionId" parameter to track changes and the focus object to notify users which items are being changed.
REVISION ID PARAMETER
The "revsionId" parameter can be included in the request and response body for most Commerce action REST APIs. The revisionId is a critical part of client-server communication for collaboration. It enables the server to identify the latest revision from the clients. The most recent revision of a data change is applied on top of the last revision. Without the revision id, it's possible that an out-of-date request from one client could accidentally revert a concurrent change requested by a different client.
Unlike the cacheInstanceId, "-1" is not a valid revisionId value. When loading a Transaction for the first time, the revisionId parameter is omitted from the request. After the first request, the client should retrieve the revisionId from every response, store it on client side, and include it with the next request.
IMPORTANT: The following Commerce actions currently do not accept the revisionId parameter: _dropCache, _send_email, _print_document, _pipelineViewer, and _retrieve_alternate_address.Do not send the revisionId parameter with these actions.
FOCUS OBJECT
The focus object identifies when a user is editing a specific item and is sent with Interact calls. It lists active collaboration users and specifies if a user has locked the focused item.
The following describes the server behavior when a request contains the following focus values.
| Focus Value |
Server Behavior |
|---|---|
| Attribute Varname |
The server sets the user's focus to the corresponding attribute with a five second timeout. |
| Empty String |
The server removes the user's focus. |
| Null |
The server does not modify or remove the user's focus. Clients should avoid sending null focus values. |
Steps to Enable
The Commerce REST API enhancements are automatically available with v8 web services in CPQ Cloud 19B. Administrators need to update any systems that interact with these CPQ web services to begin using these new features.
Tips And Considerations
Consider the following tips when using Commerce REST APIs with Collaborative Quoting:
- When Collaborative Quoting is enabled, CPQ attempts to determine the state of each client in relation to the shared state of the Transaction. For this reason, calls to the "_interact" endpoint that request CPQ to manage state via cacheinstanceid can see a difference in response after Collaborative Quoting is enabled. When using a headless UI to build collaboration functionality:
- The revisionId should be included in all Interact requests.
- Only the attributes that have been changed since the last interact request should be sent.
- When Collaborative Quoting is enabled, line item Sequence Numbers and Group Sequence Numbers can only be updated via the Interact action. Sequence Numbers or Group Sequence Numbers from any other action are ignored. This includes adding ad-hoc parts using a REST API request. Any Sequence Number data from the request are ignored and the items are added at the end of the existing line item list.
- The client should send the user's current focus for all collaboration polling calls, but is expected to omit the user's current focus from other Interact calls.
System Configuration Enhancements
System Configuration refers to the manner in which customers use CPQ Cloud to configure and bundle the product or set of products they wish to sell using a group of related models that together define an entire system. A system is a hierarchical arrangement of connected configurable models with a system root containing all of the other models.
The following functionality is available in CPQ Cloud 19B:
- System Navigation Panel Status Display Enhancements
- System Navigation Panel Item Naming Enhancements
- Display System Data JSON in the Configuration Pipeline Viewer
- Favorites Support for BOM-Related Models
System Navigation Panel Status Display Enhancement
The System Navigation Panel contains model and part icons to show the hierarchy of a system and status icons to identify models requiring user action. CPQ Cloud 19B enhances the system navigation panel to display the status for system configuration models.
The panel will display items that are valid, incomplete, and invalid. It will also indicate if models have warnings or errors. The following table describes possible states for models within the system navigation panel and identifies if invocation is allowed for each state.
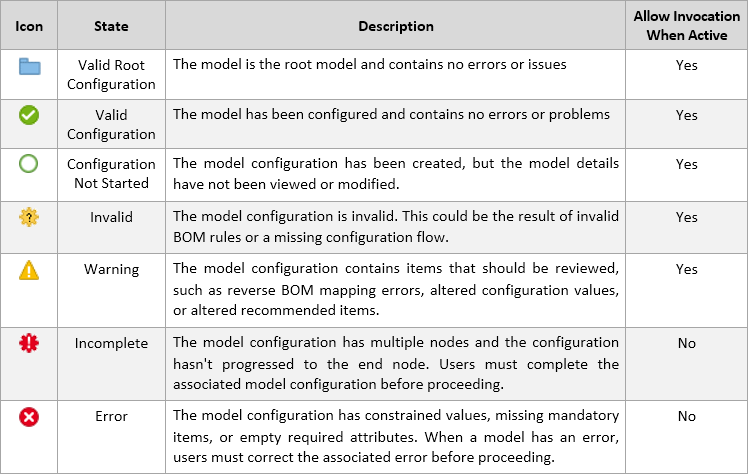

For example: The following image shows a system configuration with five models. The status icons in the system navigation panel indicate valid completed configurations for the Blade Server, Router, and Security models. The status icons for the Rack Server and Backup Device models indicate these items have not been configured.
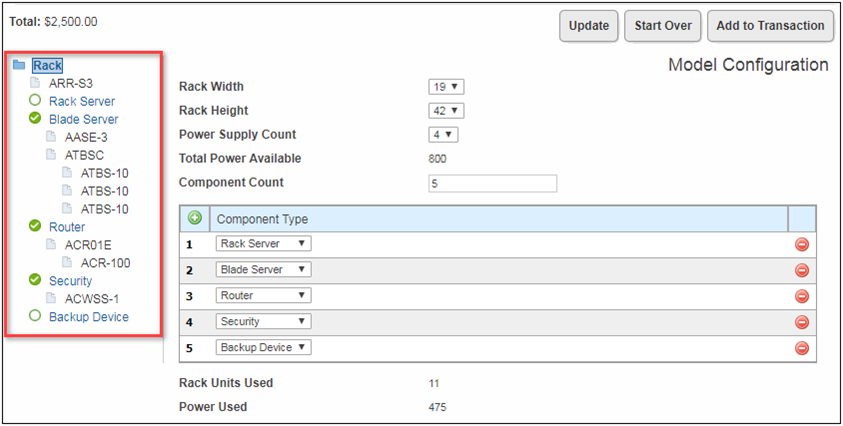
System Navigation Panel with Status Icons
System Navigation Panel Style Customizations
The default system navigation panel elements can be customized using a CSS file. The root item model has a unique class. The status icons are not applied to the root model. The child models are represented by four different classes to indicate the status of the model configuration. When warnings or errors exist, the applicable class is applied to the relevant model. If desired, administrators can use an alternate CSS file to customize the system navigation panel styles and assign different styles or icons for the specific warning or error classes.
The following table shows the default icons and identifies the CSS class names for the status, warning, and error classes.
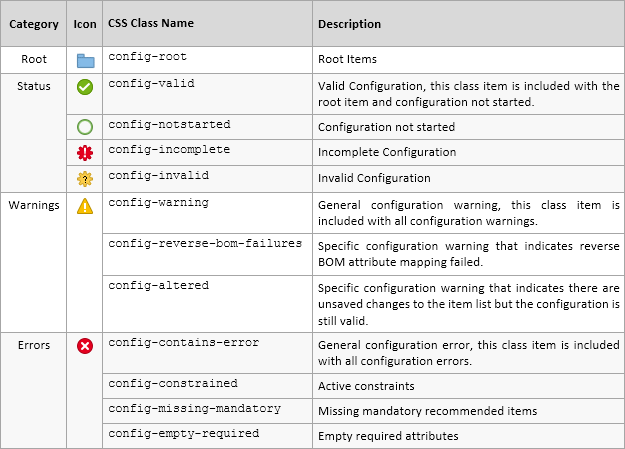
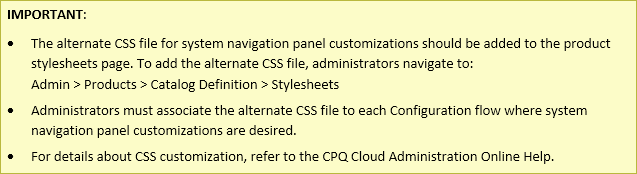
Steps to Enable
No steps are required to enable this feature.
System Navigation Panel Item Naming Enhancements
The system navigation panel now displays item names that can be defined by a new attribute mapping type in the BOM Attribute Map table. This allows administrators to dynamically name individual instances of a model or part item. In other words, a single item can have different names when it is referenced multiple times within a BOM structure. Additionally, parts in systems now display their "Part Display Number".
For Example: The following image shows a system configuration with BOM attribute mapping item names, which are highlighted in red. In this configuration, two Backup Device models were added. The first "Backup Device" model was renamed "Primary Backup" using the Component Name attribute, which updates the model name in the system navigation panel using the new "DISPLAY_NAME" Target Type in the BOM Attribute Map table. The second "Backup Device" model was also renamed to "Secondary Backup" on the configuration page for that model.
The item highlighted in blue shows a system part, which now displays the Part Display Number (SSD Backup) instead of the Part Number (ASB). For details about the Part Display Number functionality, refer to the CPQ Cloud Administration Online Help.
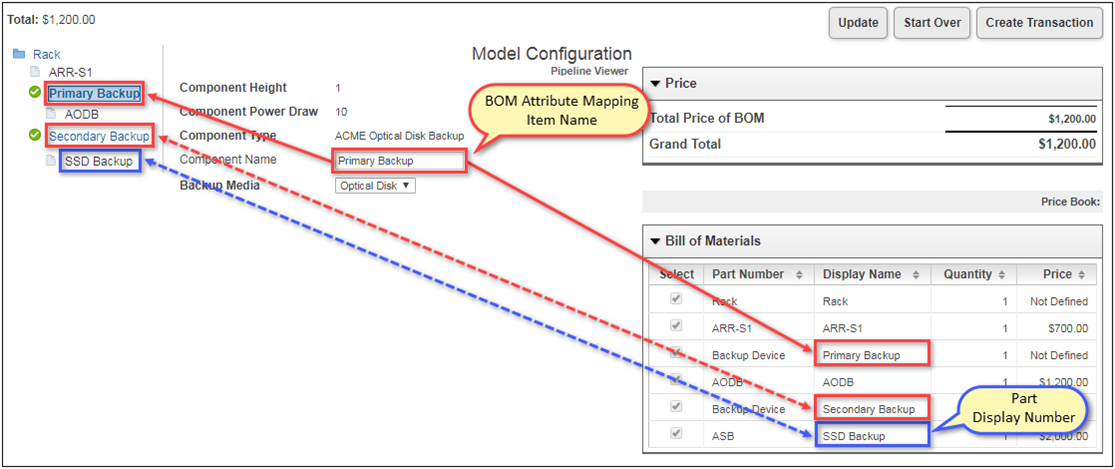
The following image shows the Backup Device entry in the BOM Attribute Map table.
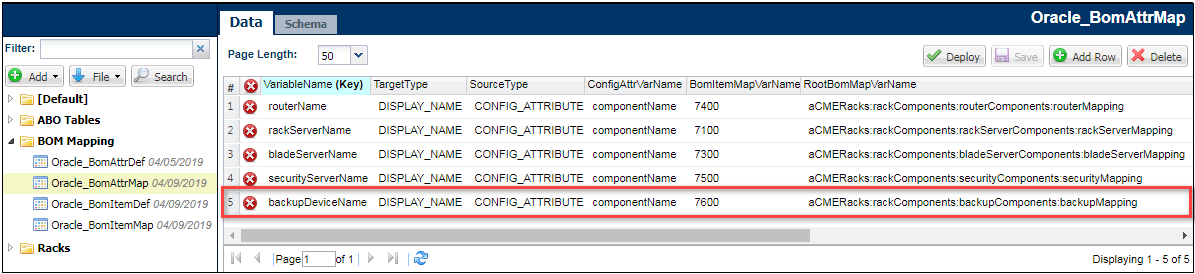
Items renamed using BOM attribute mapping item names or the Part Display Number will display the updated names in the Bills of Materials panel, Recommended Items panel, Favorites, and the Commerce Transaction UI.
The following table shows the order of precedence for naming items in the system navigation panel.
| Models | Part Numbers |
|---|---|
| BOM Attribute Mapping Item Name |
BOM Attribute Mapping Item Name |
| BOM Model Name | Part Display Number |
| Part Number |
Line BOM Display Name Attribute
CPQ Cloud 19B introduces the _line_bom_display_name Commerce sub-document system attribute to support BOM Attribute Mapping Item Naming.
- This attribute holds the value of the Display Name set in Configuration.
- This attribute is only available via BML. Administrators must output this value into an attribute that accepts strings in order for it to be visible on a buy-side Commerce transaction.
- If a display name is not defined, the attribute value will be blank.
Display Item Names Using BOM Attribute Mapping
To implement BOM attribute mapping Item names the following tasks must be completed.
- Create a Configuration attribute to capture the new item name.
- Add the attribute to the Configuration Flow page for the applicable model.
- Add a row to the BOM Attribute Map table and enter the applicable data for the fields displayed in the following table:
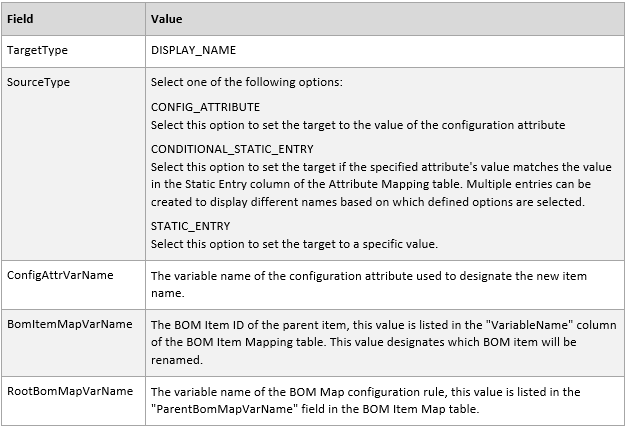
IMPORTANT: If the BOM Attribute Map table does not exist on your site, refer to the BOM Implementation Guide for information about adding and implementing this table.
Steps to Enable
No steps are required to enable this feature.
Display Entire System Data JSON in the Configuration Pipeline Viewer
The Configuration Pipeline Viewer can help administrators confirm configuration set-ups when implementing or maintaining system configurations. Beginning in CPQ Cloud 19B, the entire system data JSON is displayed in the Configuration Pipeline Viewer System Configuration tab. This provides administrators with a hierarchical JSON structure representing the entire system, along with the key components of all configured models in the system. The BOM Item Instance tab still displays the JSON for the current model.

Pipeline Viewer System Configuration Tab
Steps to Enable
No steps are required to enable this feature.
Favorites Support for BOM-Related Models
Favorites allow each user to list their Favorite products and parts for quick access and quote creation in a Favorites List. Favorite lists are maintained independently of catalog and parts. Beginning in CPQ Cloud 19B, users can save BOM-related models and system configurations as Favorites. Associated parts and models are displayed in their hierarchical order. A system configuration can be added to Favorites from Configuration or Commerce. The only BOM item that can be chosen is the root. However, recommended items from either the root model or any descendant model can be independently added as Favorites from Commerce. From within Configuration, the entire system will be added as a Favorite along with all of the currently selected recommended items. When optional and mandatory recommended items are added to Favorites they will appear directly below the model that added them.
When non-BOM Favorites are added to a Transaction, the items are added exactly as they are saved in Favorites. The behavior for non-BOM items and previously saved Favorites are not changed in CPQ 19B.
When BOM-based Favorites are added to a Transaction, the items may differ from Favorites since they go through invocation prior to being added to a Transaction. This behavior is different than the existing Favorites functionality.
When a model has a defined BOM Mapping Rule, any changes to Recommended Item Rules or pricing will impact what gets added to the Transaction. Therefore, what is seen in Favorites may not match what is added to the Transaction. Updated items can be synchronized to Favorites by reconfiguring and saving the modified items. The following circumstances cause changes to occur:
- If a Recommended Items Rule that is active on the BOM-related Favorite has item changes, the BOM items are updated to reflect the items defined in the rule.
- If a Recommendation Rule that is active on the BOM-related Favorite has item changes, the recommendation will fire on invocation according to its new condition requirements, action attributes, and values.
- If a Pricing Rule that is active on a model included in a BOM-type Favorite is changed, the prices will be updated.
- If Attribute Value Pricing (AVP) is changed, the prices are updated according to the current AVP prices.
Under some circumstances invocation is blocked and the BOM-related Favorites must be reconfigured before the items can be added to a Transaction. The following circumstances cause invocation to fail:
- If the BOM hierarchy is changed and doesn't match the BOM-related Favorites.
- If system updates cause constraint errors on the root or child models.
Favorites List Page
Favorite entries are created for the entire system configuration and all potential recommended items. These entries are all visible on the Favorites page.
The following BOM-related information is displayed in the Favorites list:
- Name: The attribute mapping item name or BOM model name for models and the attribute mapping item name, part display name, or part number for parts
- Quantity: The effective or exploded quantity, i.e. multiplied by the parent Quantity
- Total Price: For BOM models, line quantity can be more than one, the total price uses this quantity when calculating the total price for the Favorites item. This is different from the standard Configuration total price, where the unit price assumes the model quantity is one.
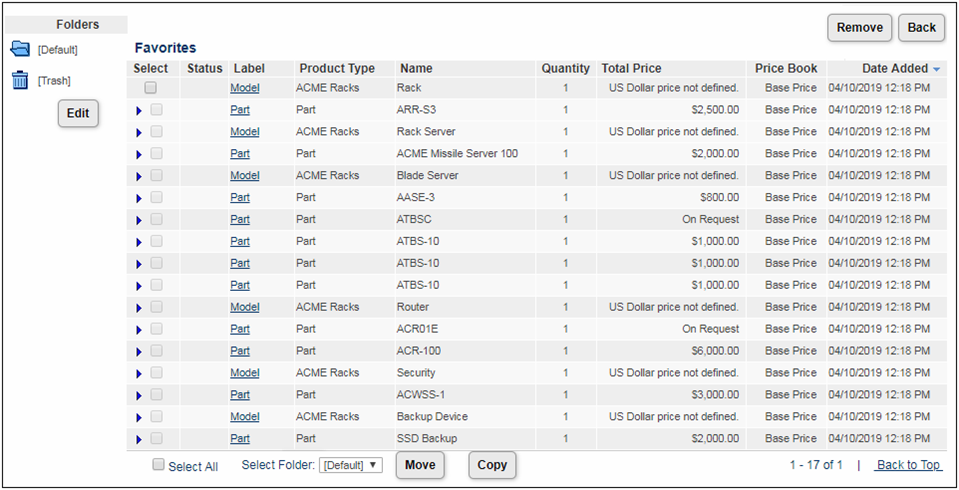
Favorites Details Page
The Favorites Detail page provides information for the selected Favorites line item. The following table describes the sections on this page and indicates if the section is available for root items, child models, or parts.
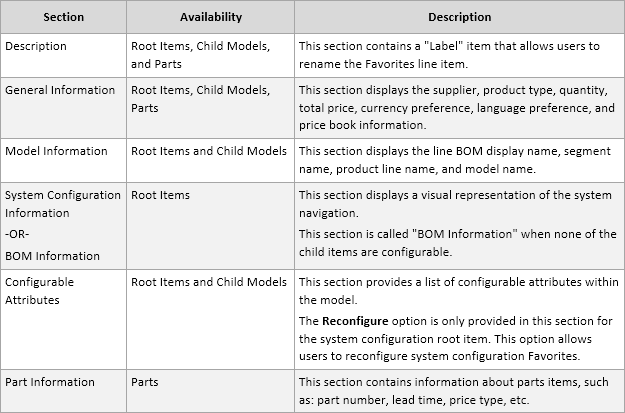
The following image shows the Favorite Detail page for a system configuration root item.

The following image shows the Favorite Detail page for a system configuration child model.
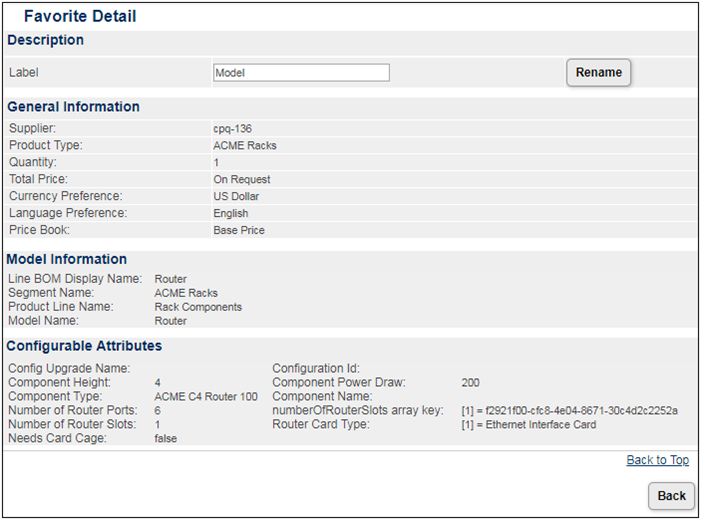
The following image shows the Favorite Detail page for a part within a system configuration.
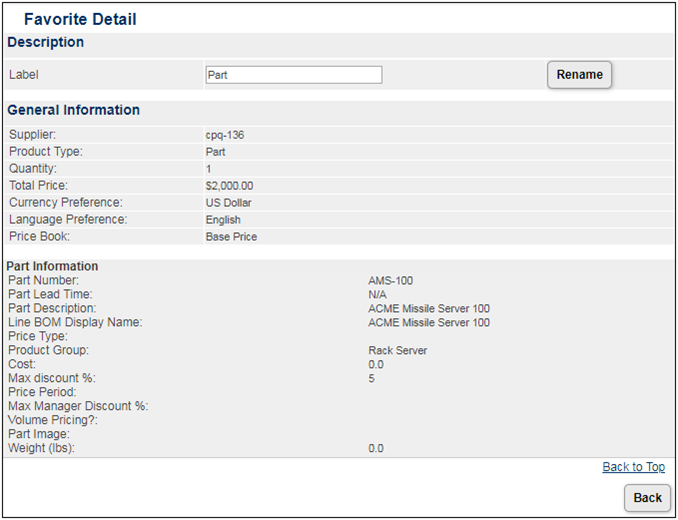
Steps to Enable
No steps are required to enable this feature.
Tips And Considerations
The following Commerce system variables, which were added in previous releases, were converted to Commerce system sub-document attributes:
- _line_bom_model_path (added in 18B)
- _line_bom_condition_index (added in 18D)
- _line_bom_sequence_index (added in 18D)
IMPORTANT: Any use of those variables to default Commerce sub-document attributes will be automatically converted to a BML function that provides the same functionality. Any other use of those system variables must be updated to the new Commerce system sub-document attribute.
Customer Requested Features and Enhancements
The CPQ Cloud 19B introduces the following customer requested features and enhancements:
- Approval Justification Text Entry
- Clone Commerce Action
- Supported Currency Enhancement
- Select All Columns with BMQL JOIN Clause
- Transaction Count Setting
Approval Justification Text Entry
In 19B the approval justification comment text entry is increased from 1000 to 4000 characters. This allows users to enter more detailed justification information.
Steps to Enable
No steps are required to enable this feature.
CPQ Cloud 19B supports cloning of Commerce Actions and all of the associated action properties.
To clone a Commerce action, complete the following steps:
- Navigate to the Processes page. Admin Home > Commerce and Documents > Process Definitions

- For a process, select Documents from the Navigation drop-down and then click List. The Documents List page displays.

- For a Document, select Actions from the Navigation drop-down and then click List. The Action List page displays.
- From the Admin List page, click a checkbox to select a Commerce action:
- Select the checkbox next to the Commerce action you wish to clone and then click Clone.
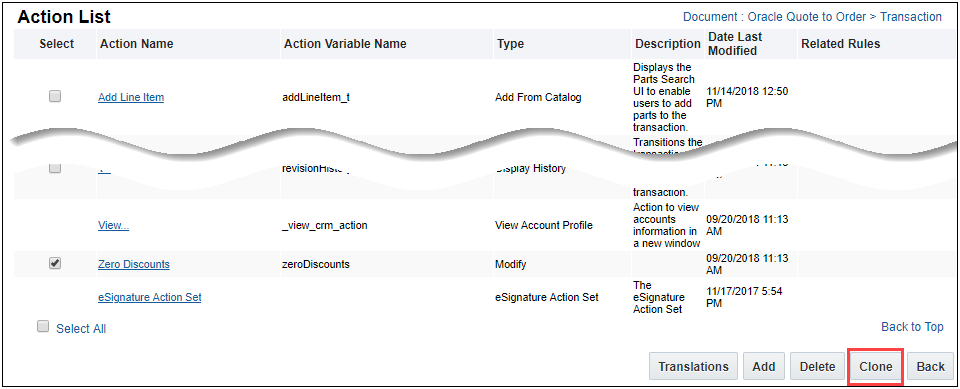
IMPORTANT: Only one Commerce action can be selected to clone at a time. Selecting multiple actions from the Admin List page results in an error message.
- Click on the Commerce action you wish to clone. When the Admin Action page displays, click Clone.
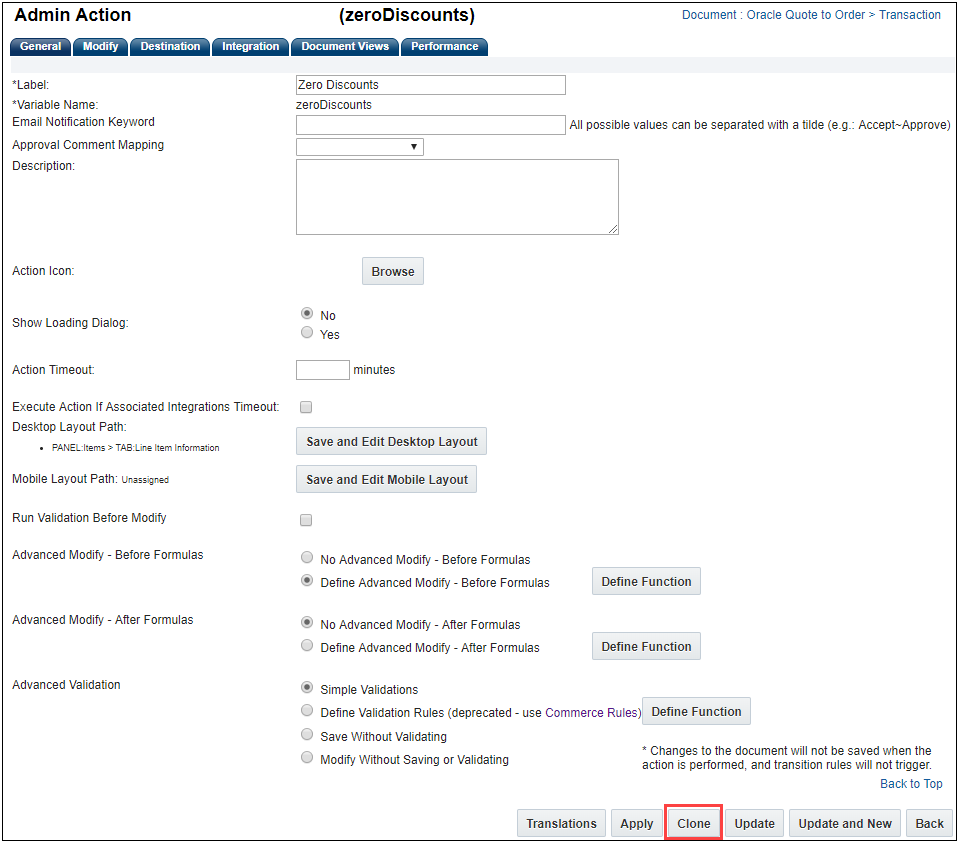
The Admin Action page for the newly cloned action displays.

- Enter a label in the Label field for the new cloned action.
- Enter a unique variable name or accept the default variable name in the Variable Name field for the new cloned action.
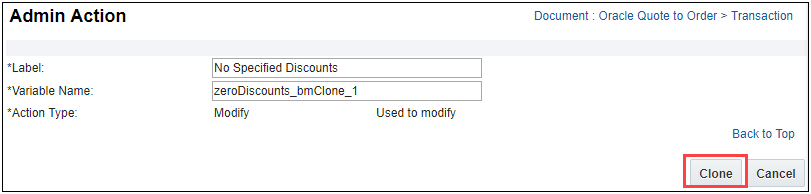
- Click Clone. The Admin Action page for the new cloned action displays.
- Modify the new cloned action using the Admin Action page as desired.
Steps to Enable
No steps are required to enable this feature.
Supported Currency Enhancement
This enhancement provides standard and globally accepted Currency codes for the Supported Currency list. CPQ Cloud 19B includes currency code and definition updates as shown in the following table:
| New 19B Currency and Currency Code |
Previous Currency and Currency Code |
|---|---|
| Belarusian Ruble (BYN) |
Belarusian Ruble (BYR) |
| Mauritanian Ouguiya (MRU) |
Mauritanian Ouguiya (MRO) |
| Sao Tome and Principe Dobra (STN) |
Sao Tome and Principe Dobra (STD) |
| Venezuelan Bolivar (VES) |
Venezuelan Bolivar (VEF) |
To update to the 19B currency codes, complete the following steps:
- Navigate to the Company Administration page. Admin Home > General > Hosted Company Info or Admin Home > Partner Organization > Company Administration List > Select Company Name
- Click to enable a currency from the Supported Currencies list.
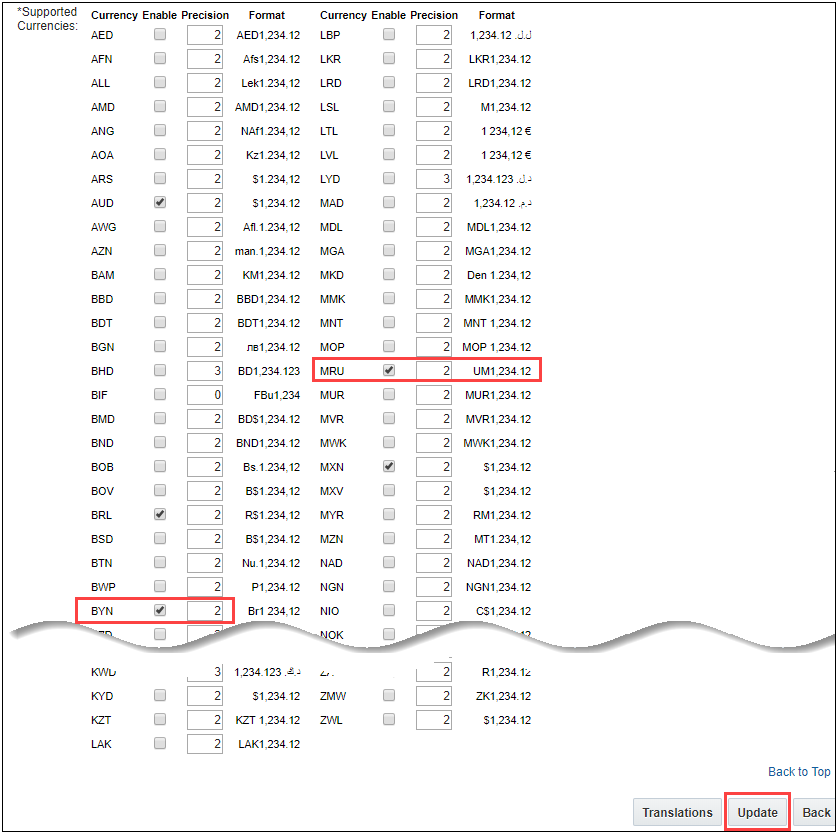
-
Click Update.
Steps to Enable
The Supported Currency enhancement requires a Service Request (SR) to enable on CPQ Cloud 19B sites.
Select All Columns with BMQL JOIN Clause
CPQ Cloud 19B supports the Select * function for columns in BMQL JOIN clauses for Data Table queries with two or more tables. For Data Tables with large number of columns, this greatly simplifies BMQL statements and reduces the risk of missing columns in Data Table queries.
To use the Select * function with a Data Table JOIN statements, the following is required:
- Must have two deployed Data Tables to JOIN
- Both Data Tables have a column with matched data
- At least one joined column must be indexed
The following example shows a SELECT statement for joining two tables.
SELECT Order.OrderId, Products.ProductId, Products.Name, Products.UnitPrice FROM Products INNER JOIN Orders ON Products.ProductId = Orders.ProductId
By using SELECT *, this statement can be simplified as shown in the following example.
SELECT * FROM Products INNER JOIN Orders ON Products.ProductId = Orders.ProductId
Steps to Enable
The Select All Columns with BMQL Join Clause enhancement is automatically available on CPQ Cloud 19B sites.
Tips And Considerations
Administrators need to keep in mind that their JOINs mean that changing either of the two Data Tables can affect one query.
A new Disable Transaction Count setting is added to the Commerce Settings page. Administrators have the ability to determine if the system performs an exact Transaction count when the Transaction Manager is displayed. Disabling the Transaction count, when there are a large number of Transactions, may improve the time required for the Transaction Manager to load.
When the Disable Transaction Count setting is selected, the Transaction count displayed on the page does not provide the exact total number of Transactions but rather indicates “of Many”. For example, the Transaction count at the bottom of the page may indicate 1 – 25 of Many, 1 – 50 of Many, or 51 – 100 of Many.
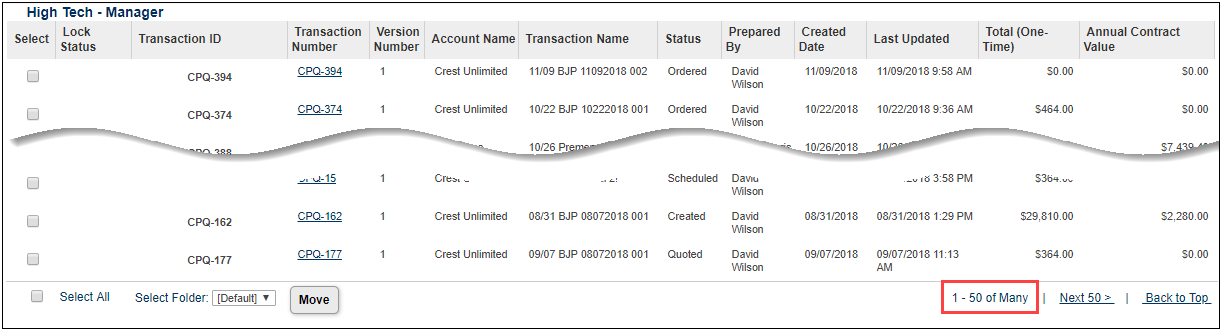
Example for Disable Transaction Count
To disable Transaction Counts, complete the following steps:
- Navigate to the Commerce Options page. Admin Home > Commerce and Documents > Commerce Settings
- Click Yes for Disable Transaction Item Count.
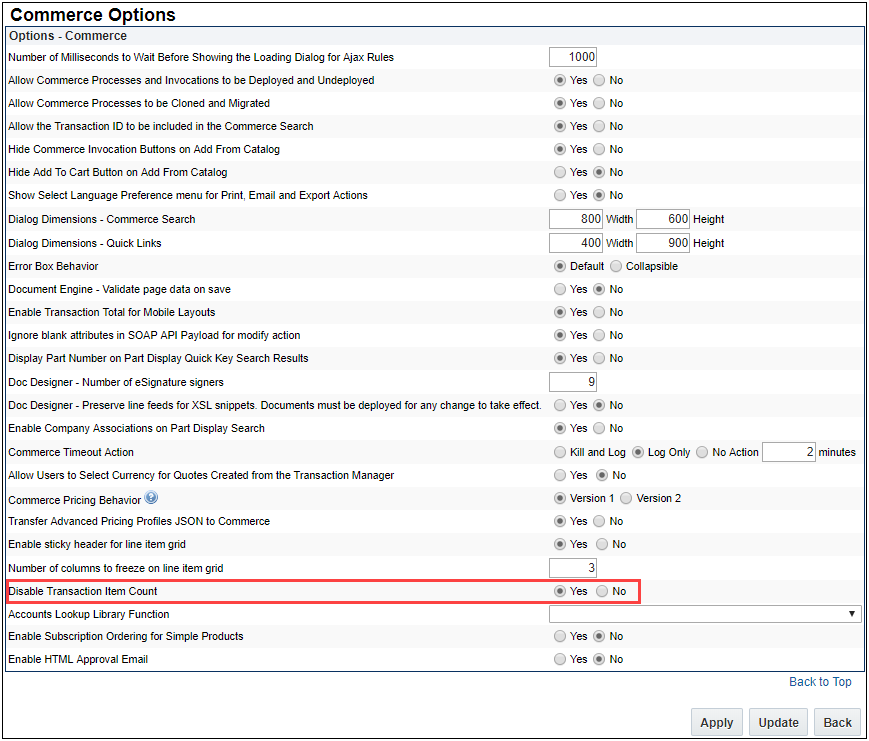
- Click Update. The Transaction count will not perform an exact Transaction count.
IMPORTANT: The Disable Transaction Count setting default is No.
Steps to Enable
No steps are required to enable this feature.
Tips And Considerations
Customers with a very large number of Transactions and a slow-loading Transaction Manager should consider this feature to improve the Transaction load time.
Behavior Modifications to Known Functionality
The following changes to known functionality are implemented in CPQ Cloud 19B:
- If an auto-update script updates an attribute to be invalid, based on the simple validations of the attribute, the attribute must be manually updated to a valid value before auto-update can be executed again.
- When modifying a template, FullAccess users as well as SuperUser administrators have the XSL button available in the Admin Action Bar within the Document Designer Editor. Refer to the CPQ Cloud Online Help for details.
- The order of operations for BOM attribute mapping and default values in Commerce is modified so that the attribute mapping value will overwrite the default data. In previous releases, attribute mapped values were overwritten when the attribute also had default data.
Migration
When migrating from one site to another using the Migration Center or Migration Packages, both sites must use the same major update. The migration of content can only occur across minor updates within the same major update. Migration across major updates cannot occur.
- “Major update” = Update 19B
- “Minor update” = Update 19B Patch 1
Resolved Known Issues
For information on bugs fixed in Release 19B, refer to the CPQ Cloud 19B Resolved Known Issues document available on My Oracle Support and the CPQ Cloud Online Help.
Translation
For some system-defined messages and components, strings were removed and others added in CPQ Cloud 19B. If you have created your own implementation-specific translations of system-defined strings, some of these strings may no longer appear. Other strings may appear in English. The strings appearing in English are new and require translation.
Most of these messages and components are on the Administration side of CPQ Cloud, but you should review both your end user and administration pages before deploying your updated installation to confirm that all strings appear in the desired language.
Translation Status
CPQ Cloud supports the consumption of both single and multi-byte character sets. Submit a service request on My Oracle Support to enable your site for a new language.
For the following languages, a translation of the CPQ Cloud user interface is available for both the platform and the reference application:
- Chinese (Simplified) [China]
- Chinese (Traditional) [Taiwan]
- Czech [Czech Republic]
- Danish [Denmark]
- Dutch [Netherlands]
- English
- Finnish [Finland]
- French
- French [Canada]
- German
- Hungarian [Hungary]
- Italian
- Japanese [Japan]
- Korean [South Korea]
- Norwegian (Bokmål) [Norway]
- Polish [Poland]
- Portuguese [Brazil]
- Romanian [Romania]
- Russian [Russia]
- Spanish (Worldwide)
- Swedish [Sweden]
- Turkish [Turkey]
Upgrade and test all test instances on Oracle CPQ Cloud 19B before upgrading to production.
Browser Support
CPQ Cloud supports all browser versions that meet the criteria of the Oracle Software Web Browser Support Policy.
If you experience issues using a supported browser version, open a ticket on My Oracle Support to resolve the issue. If an issue arises when using a supported browser, use a certified browser version until the delivery of a fix. Certified browsers are selected based on current market share and thoroughly tested to work with the current version's standard functionality.
Certified Browsers
Windows
- Google Chrome 73.x
- Mozilla Firefox 66.x
- Internet Explorer 11.x
IMPORTANT: Compatibility issues with the selected browsers may exist when sites contain additional JavaScript, alternate CSS, or other custom functionality. Customizations may require add-on work. Contact My Oracle Support to determine the availability of workarounds and minor fixes.
Salesforce Integration Support
Oracle officially supports version 8 and version 8.1 (installed package version 1.10 and 8.1 respectively) of the Oracle CPQ Connector for Salesforce. We also continue to support version 7.2 of the legacy Oracle CPQ Commerce Integration.
IMPORTANT: Previous versions of these packages are expected to continue to function; however Oracle will not address new issues that arise. We strongly encourage customers to upgrade to the latest supported version
Training
Please refer to the release documentation for all versions between your current version and the version to which you are upgrading to see all new functionality, resolved known issues, and functional known issues.
Refer to the CPQ Cloud Online Help to become familiar with the new features introduced in Oracle CPQ Cloud 19B. For additional help, see My Oracle Support.
Verify any information not explicitly mentioned in this document as supported by the software against the product help for Oracle CPQ Cloud 19B or the Oracle CPQ Cloud Consulting team.
Additional Information
For more information on Oracle CPQ Cloud, visit the Oracle CPQ Cloud documentation site.
Disclaimer
The details in this document are provided for high-level informational purposes only and are not intended to function as a specification or to replace the Online Help. Upgrading to a subsequent release may require the re-deployment of Commerce Processes, Configuration, or global function settings. Modifications to integration XSL files or APIs may also be required.
---