
- Revision History
- Overview
- Feature Summary
- Modern User Experience
- Enterprise Platform
-
- BML Enhancements
- Commerce Integration Enhancement
- Integration Center Enhancement
- Microsoft Dynamics 365 Integration Enhancements
-
- Account Information Auto-Fill and Refresh Using BML Account Integration
- Select Alternate Address Information from Contact List
- Use Price List Items When Creating Opportunity Products
- Automatically Delete Opportunity Products When Associated Quote Is Deleted
- Consistent Window Behavior
- Improved Button Bar
- Opportunity Auto-Refresh On Save
- JET Responsive UI Support
-
- REST API Enhancements
- Salesforce Integration Enhancements
-
- Allow Unquoted Opportunity Products
- Automatically Deactivate a CPQ User When Linked Salesforce User Is Deactivated
- Do Not Allow Account Quotes
- Mark as Active Enhancements
- New Quotes Must Be Attached to a Parent
- Oracle User and Oracle User Profile Time Zone List Enhancement
- Win Probability and Price Optimization Analytic Support in Lightning UI
-
- Differentiate
- Customer Requested Features and Enhancements
- Pre-Upgrade Considerations
- Post-Upgrade Considerations
This document will continue to evolve as existing sections change and new information is added. All updates appear in the following table:
| Date | Feature | Notes |
|---|---|---|
| 14 NOV 2019 | Pre-Upgrade Considerations | Updated document. Removed Behavior Modification to Known Functionality section. |
| 26 AUG 2019 | Pre-Upgrade Considerations | Updated document. Added Behavior Modification to Known Functionality section. |
| 16 AUG 2019 | Created initial document. |
Oracle Configure, Price, and Quote (CPQ) Cloud enables companies to streamline the entire opportunity-to-quote-to-order process, including product selection, configuration, pricing, quoting, ordering, and approval workflows. CPQ Cloud provides a flexible, scalable, enterprise-ready solution ideal for companies of all sizes that sell products and services across direct, indirect, and e-commerce sales channels.
This guide outlines the information you need to know about new or improved functionality in Oracle CPQ Cloud 19C and describes any tasks you might need to perform for the update. Each section includes a brief description of the feature, the steps you need to take to enable or begin using the feature, any tips or considerations that you should keep in mind, and the resources available to help you.
Key Resources
Refer to CPQ Cloud Administration Online Help for detailed descriptions and instructions.
Security & New Features
We would like to remind you if your system has modified security structures you may need to advise your security administrator of new features you would like to implement.
Give Us Feedback
We welcome your comments and suggestions to improve the content. Please send us your feedback at cpqcloud_documentation_us_grp@oracle.com.
Column Definitions:
Report = New or modified, Oracle-delivered, ready to run reports.
UI or Process-Based: Small Scale = These UI or process-based features are typically comprised of minor field, validation, or program changes. Therefore, the potential impact to users is minimal.
UI or Process-Based: Larger Scale* = These UI or process-based features have more complex designs. Therefore, the potential impact to users is higher.
Customer Action Required = You MUST take action before these features can be used by END USERS. These features are delivered disabled and you choose if and when to enable them. For example, a) new or expanded BI subject areas need to first be incorporated into reports, b) Integration is required to utilize new web services, or c) features must be assigned to user roles before they can be accessed.
The following CPQ Cloud Release 19C enhancement leverages the rich interface and interactive capabilities available in CPQ Cloud to provide an intuitive selling experience.
- JET Responsive Configuration UI Enhancements
- JET Responsive UI Enhancements
JET Responsive Configuration UI Enhancements
Introduced in CPQ Cloud 19B, the JET Configuration UI provides a modernized and fully responsive user experience allowing users to view and edit Configurations across multiple device types using the same Configuration layout. The responsive design provides layouts that can flow vertically to fit within different browser display widths and features a rich set of modern UI components with built-in accessibility and mobile support.
In CPQ Cloud 19C, we enhance the JET Configuration UI by adding the following functionality.
Embedded JET Configuration UI Support
Beginning in CPQ Cloud 19C, CPQ supports using Client-side integrations to display the JET Configuration UI within an iFrame for external integrations, such as Oracle Commerce Cloud. Client-side integrations enable the sharing of data between CPQ Cloud and a partner site. When an external user wants to configure a model, the CPQ JET Configuration UI page is embedded in an iFrame that displays within the integrated application.
Steps to Enable
You don't need to do anything to enable this feature.
Beginning in CPQ Cloud 19C, the JET Configuration UI supports Subscription Ordering operations. For Modify operations and Follow-on Orders the user can perform Update, Start Over, Add to Transaction, Return to Transaction, and Add to Cart actions. For Reconfigure operations, the user can Cancel or Save the reconfiguration.
Suspend Asset
After creating assets, sales users can create a modify order to can perform any of the asset actions (i.e. Suspend, Resume, Renew, Modify, or Terminate).
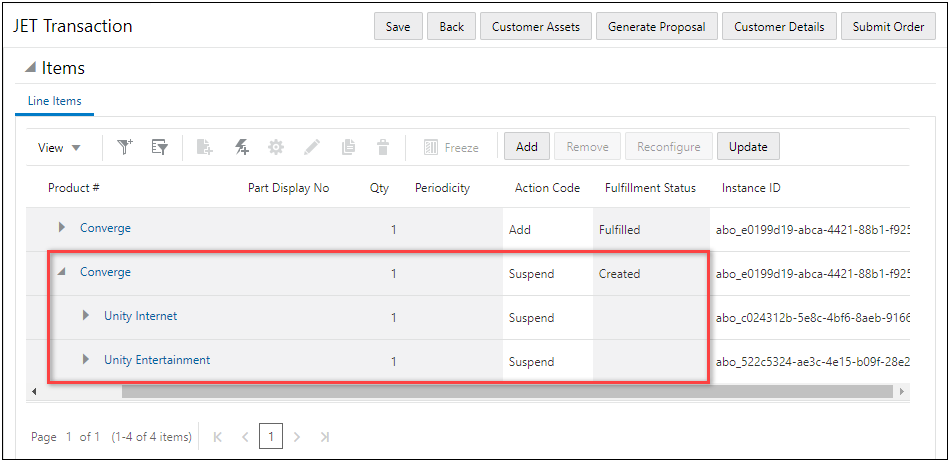
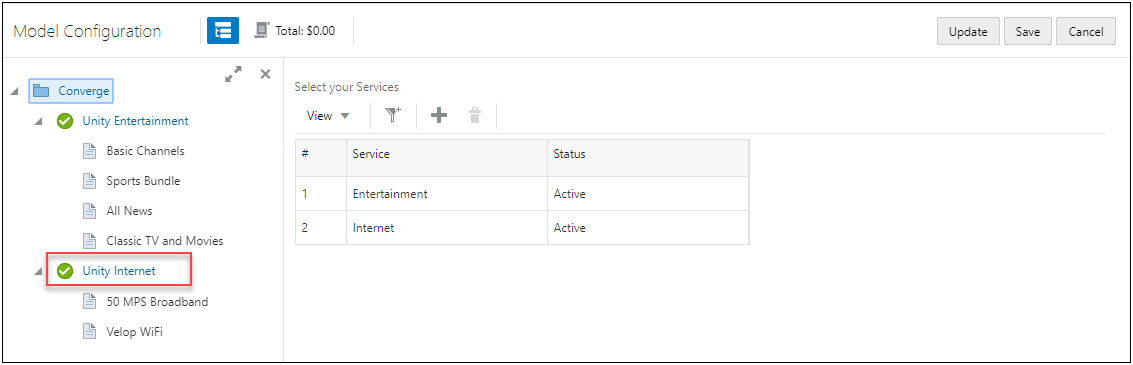
For example, a customer is going on vacation and they want to suspend their entertainment and internet services. The Customer Support Representative creates a new Transaction, enters the Request Date, and then clicks Customer Assets to open the Subscription Workbench to view active assets associated with the customer. The representative selects the appropriate asset and clicks Suspend.
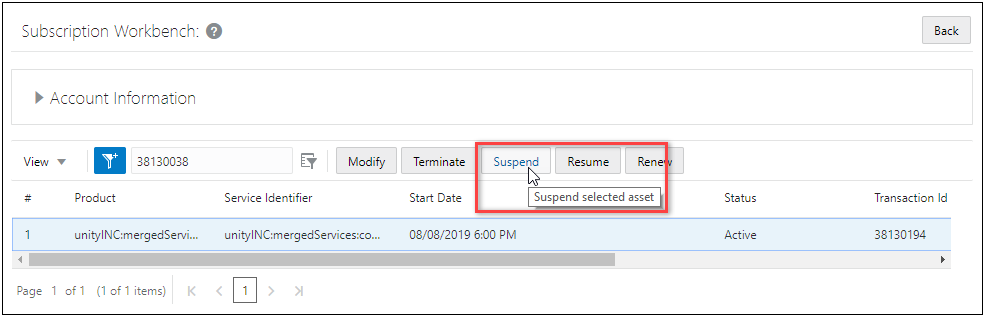
The JET Transaction UI opens and the Action Codes reflect the requested changes, Unity Internet and Unity Entertainment are set to "Suspend".
Resume Asset
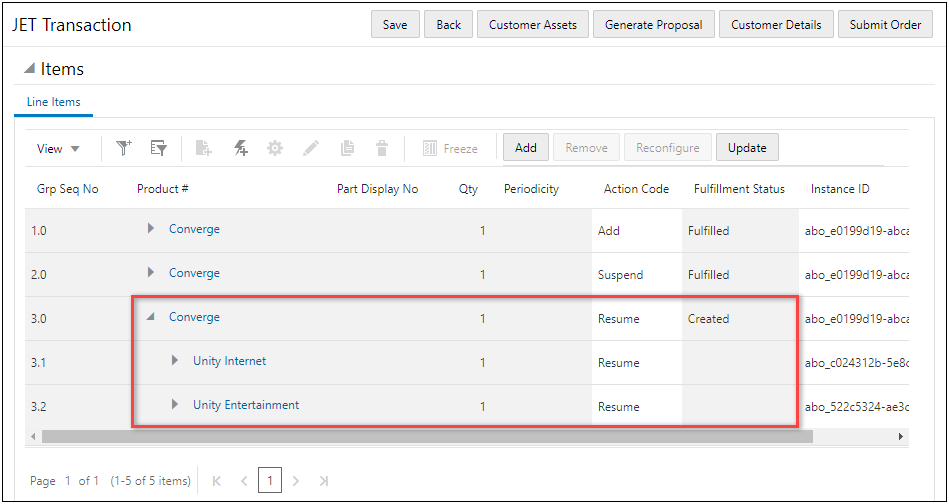
After the customer returns from vacation they want to resume their internet and entertainment services. The Customer Service Representative navigates to the Transaction, updates the Request Date, and then clicks Customer Assets to open the Subscription Workbench. The representative selects the appropriate asset and clicks Resume.

The JET Transaction UI opens and the Action Codes reflect the requested changes, Unity Internet and Unity Entertainment are set to "Resume".
Reconfigure Asset
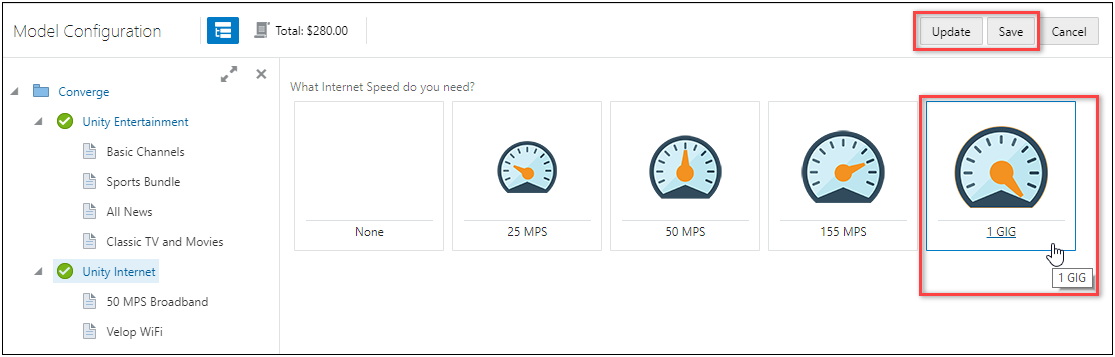
The customer also wants to upgrade their internet service. The Customer Service Representative selects the line item for the root item and clicks the Reconfigure icon.
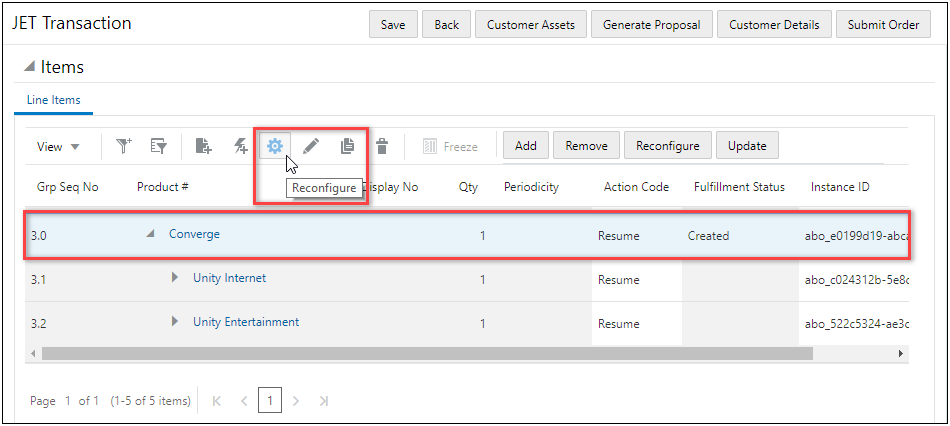
The JET Configuration UI opens to the root system item. The representative clicks on the Unity Internet sub-model in the system navigation panel.
The Unity Internet model configuration opens. The representative upgrades the internet speed to 1 GB, clicks Update, and then clicks Save.
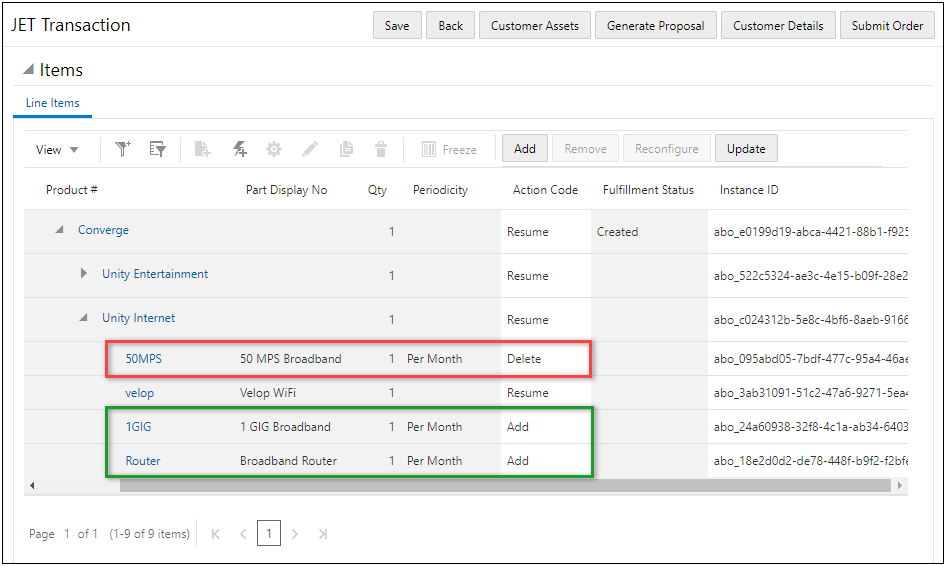
The JET Transaction UI opens and the Action Codes reflect the requested changes: the 50 MPS Broadband is set to "Delete" and 1 GIG Broadband and Broadband Router items are set to "Add".
Steps to Enable
You don't need to do anything to enable this feature.
Tips And Considerations
IMPORTANT:
- The JET Configuration UI has been certified with the 19B ABO package and requires elements of that package to function properly with JET.
- To implement 19B ABO package, refer to the CPQ 19B Asset-Based Ordering Implementation Guide, available on My Oracle Support Doc ID 2182966.1.
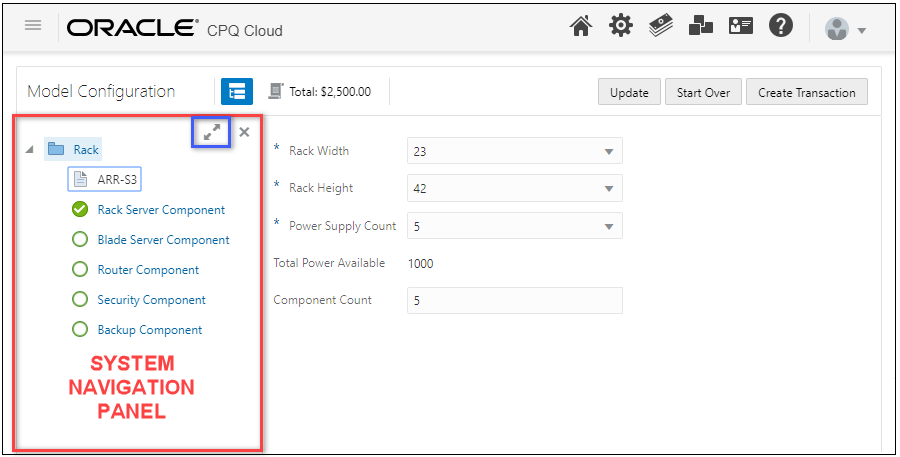
Beginning in CPQ Cloud 19C, the JET Configuration UI supports all features of system configurations, which are hierarchical arrangements of configurable models within a system root item. The system navigation panel contains icons to identify the status of models in the system, such as those requiring user action. The system navigation panel will display items that are valid, incomplete, invalid, and will also indicate if models have warnings or errors.
The system navigation panel is initially hidden on the JET Configuration UI. To view the system navigation panel, the user clicks on the system configuration icon.

The system navigation panel is displayed on the left side of the page. The Overlay or Push Content behavior for all JET Configuration UI sidebars is defined in the Configuration Layout Properties. To increase the size of the system navigation panel, users can click on the expand icon. The expand icon is outlined in blue in the following image.
User Access for System Configuration in JET Configuration UI
If all Product Families included in a system are JET enabled for a system with cross-family models that are configured so a user has a mix of legacy and JET flows, the Configuration UI that is displayed for a system configuration is determined by the root model. The following table shows the Configuration UI display for mixed legacy and JET flows.
| JET Configuration UI Enabled for Product Family of the Root model |
User Has JET Configuration UI Access Rights to the Root Model |
JET Configuration UI Enabled for Product Family of the Root Model |
|---|---|---|
| Yes | Yes | JET UI displays for the entire system, including child models. |
| Yes | No | Legacy UI displays for the entire system, including child models. |
| No | No | Legacy UI displays for the entire system, including child models. |
IMPORTANT:
- When JET is enabled for the Product Family of the Root model, but not all child Product Families, users will be unable to navigate to the non-enabled child models, and an error will be displayed to the user.
- Refer to CPQ Cloud Administration Online Help for full details of how JET handles use cases involving a mixture of JET user access and enablement.
Steps to Enable
You don't need to do anything to enable this feature.
Tips And Considerations
IMPORTANT: Beginning in CPQ 19C, the sidebar is always enabled to support the System Navigation Panel. In CPQ 19B, the sidebar was disabled when the JET Item List Display was set to "Bottom Panel" and the JET Price Table Display was set to "Bottom Panel" or "Hidden".
- Customers that enabled the JET Configuration UI in 19B and disabled the sidebar may experience an issue opening the System Navigation Panel after upgrading to CPQ 19C. If this error occurs, they should deploy the corresponding Product Family to resolve this issue.
- Beginning in CPQ 19C, this is not an issue for customers that initially enable the JET Configuration UI.
As part of CPQ's goal to provide a responsive high-performance JET UI, a Working Indicator is now displayed in the JET Configuration UI header. This provides an immediate, visual indication that the user's action has had an effect. When the user performs an action, such as clicking a button, an animated icon displays beside the page title notifying the user that the action is being processed.

A tooltip note is available on this icon to provide more details.
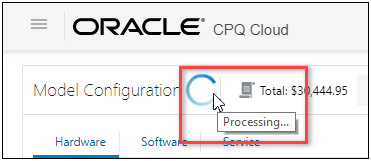
Some or all actions may be temporarily disabled while the system is processing, but the user is able to continue working during this time. Once completed, the indicator changes to show that the processing is complete.

Steps to Enable
You don't need to do anything to enable this feature.
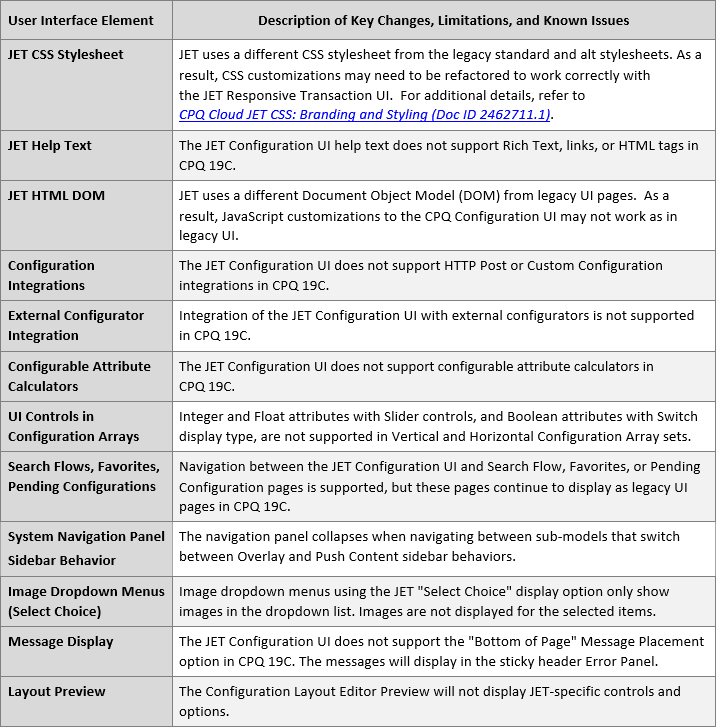
JET Configuration UI Key Changes, Limitations, and Known Issues
The following list provides descriptions of key changes, limitations, and known issues present in the JET Configuration UI as of CPQ Cloud 19C.
Steps to Enable
Administrators should review JET Configuration UI Key Changes, Limitations, and Known Issues prior to implementing the JET Configuration UI.
JET Responsive UI Enhancements
Introduced in CPQ Cloud 18C, the JET Responsive UIs provide a modernized and responsive user experience. The responsive design provides layouts that can flow vertically to fit within different browser display widths and features a rich set of modern UI components with built-in accessibility and mobile support.
In CPQ Cloud 19C, we enhance the JET Responsive UI by adding the following functionality.
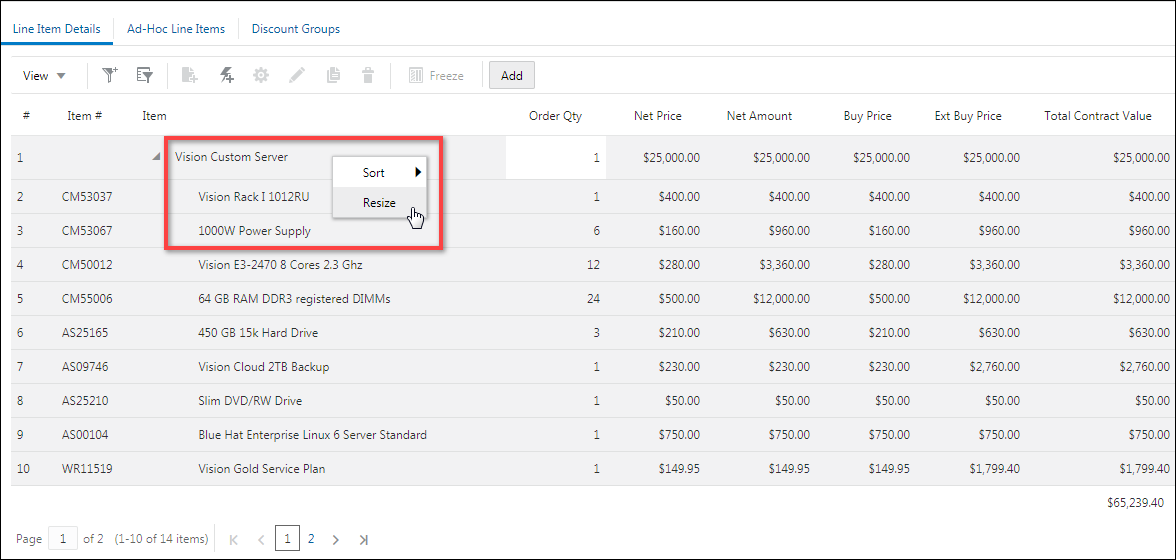
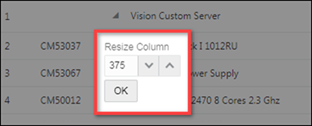
The column resize dialog is now available for all JET UI tables. The dialog provides a user-friendly method to resize columns, is much easier for tablet and phone displays, and allows users to enter a precise column width.
Users can right-click on the column header, select Resize, and then enter the column width. For tablet and phone displays, users tap and hold the column header to access the Resize option.
The Resize Column dialog allows users to specify the exact column width.
Steps to Enable
You don't need to do anything to enable this feature.
Discontinue Panel Expansion and Last Tab Used Persistence
In prior releases, the JET UIs would open the last tab a user viewed even when opening a new or different Transaction. The JET Transaction UI would also retain expanded panel settings. The JET UI now opens the default tab and no longer retains panel expansion settings for new sessions or Transactions.
Steps to Enable
You don't need to do anything to enable this feature.
The following CPQ Cloud Release 19C features and enhancements cater to the needs of large, complex enterprises for a robust, integrated, and performant platform:
- BML Enhancements
- Commerce Integration Enhancement
- Integration Center Enhancement
- Microsoft Dynamics 365 Integration Enhancements
- REST API Enhancements
- Salesforce Integration Enhancements
The CPQ Cloud 19C introduces the following new BML functions.
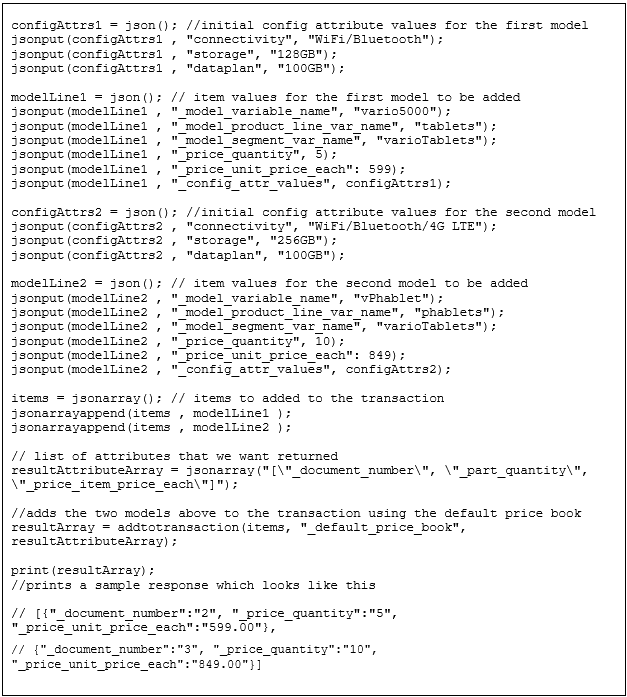
CPQ Cloud 19C supports a new BML function that allows administrator to add Models to a Transaction using BML. The "addToTransaction" function can be used to automatically add a new Transaction Line which contains a Model which is pending configuration by the sales user.
BML Syntax:

Parameters:
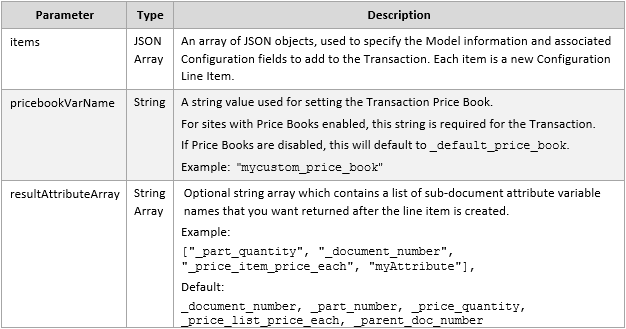
Return Type: JSON Array
Example:
Steps to Enable
You don't need to do anything to enable this feature.
Tips And Considerations
- The "addToTransaction" function can be executed in a BML function for any Commerce action.
- "addToTransaction" is only available for Advanced Modify Before/After Formulas on Commerce actions.
- When assigning values to Configuration attributes the following are supported: decimals, integers, currencies, dates, booleans, and strings.
Generate HMAC Message Function
CPQ Cloud 19C adds a new BML function that allows administrators to create Hash-based Message Authentication Codes for use in securing outbound web service calls to public web services. The "generateHmacMessage" function supports five types of hashing algorithms including: SHA-256, SHA-384, SHA-512, SHA-1, and MD5.
BML Syntax:

Parameters:
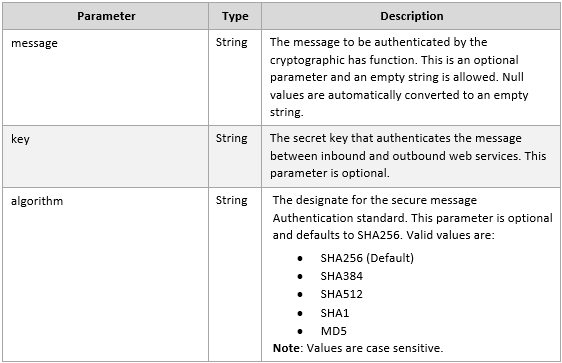
Return Type: String
Example:

Steps to Enable
You don't need to do anything to enable this feature.
Tips And Considerations
- This BML function can be used with a Digital Assistant Integration. You can use BMQL to retrieve a key value from an integration that has been enabled. Refer to Digital Assistant Integration Type.
- This function may be used to "sign" callouts, such as for a JSON Web Token (JWT) signature.
Commerce Integration Enhancement
Commerce Integrations are used to send or receive information from external systems when a user performs an Action. Some common examples are importing Opportunity details from a CRM, exporting Quote details from CPQ to a CRM or Order Management System or retrieving inventory or pricing information from other external resources.
The CPQ Cloud 19C introduces the following Commerce Integration enhancement.
Create Transaction Line Via Integration
CPQ Cloud 19C adds the ability to import line items during Integration. This can be used to import line items from an Opportunity when initially creating a Transaction. Some sales processes allow product selection on the Opportunity before it is ready to be quoted, this enhancement eliminates the need to re-enter those products once the Transaction is created.
In the Result Parser for your Import integrations you can now generate the XML for both the Transaction and Transaction Lines to be created or updated. The XSL snippet below shows the structure used when creating Line Items in addition to the Transaction.
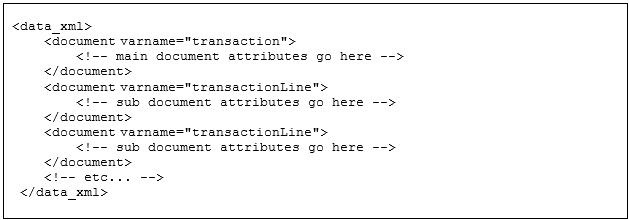
Sample XSL Structure
IMPORTANT: In the example above, the varname needs to match the varname of the document type that you are creating.
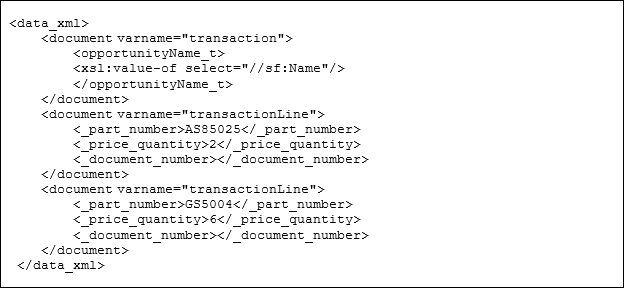
Adding Parts as Transaction Lines
When adding parts as Transaction Lines, the following system attributes can be set in the Result Parser.
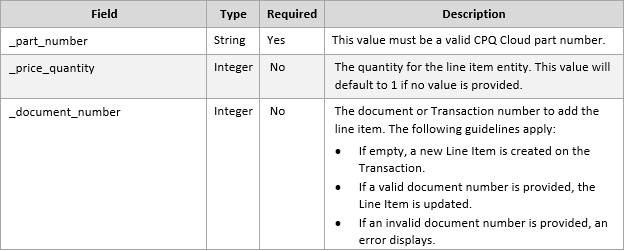
Example:
The following example will populate the Opportunity Name on a Transaction and create two Line Items with Parts.
Adding Configurations as Transaction Lines
When adding Configurations as Transaction Lines, the following system attributes can be set in the Result Parser.

Example:
The following example will populate the Opportunity Name on a Transaction and create one Line Item with an unconfigured Model that presets a few configuration attribute values.

Steps to Enable
To enable this feature you need to log a Service Request (SR).
Tips And Considerations
- When assigning values to Configuration attributes the following are supported: decimals, integers, currencies, dates, booleans, and strings.
- Unlike Transactions, any Transaction Line Items that are created or updated during this integration will not be available to subsequent integrations during the same action.
- The _part_number, _model_variable_name, _model_product_line_var_name, _model_segment_var_name, and _config_attr_values attributes cannot be modified on existing Line Items.
- The Price Book should be set on the Transaction, not the Transaction Line Item. If a Transaction Line Item Price Book is entered, it must match the Price Book of the Transaction. An error results if they do not match.
Integration Center Enhancement
The CPQ Cloud application can integrate with different types of applications, in different ways. Some integration needs can be handled by the default functionality within the software packages themselves, with some additional configuration. Other functionality may need to be built on a custom basis, depending on the business's needs and the limitations of the software.
The Integration Center provides a centralized location to establish third party integrations with CPQ Cloud. There are many benefits to integration, including:
- Streamlining the marketing and sales processes
- Organizing and updating customer information
- Preventing manual data entry
- Removing redundant, unnecessary or tedious everyday steps
The CPQ Cloud 19C introduces the following Integration Center feature.
Digital Assistant Integration Type
CPQ Cloud 19C adds a new integration type to the Integration Center called Digital Assistant. This integration defines the connection details for an external chatbot/messaging service. Once defined, the details can be retrieved via BML and used to send a message to the external service.
Steps to Enable
To create a Digital Assistant Integration within CPQ Cloud, complete the following steps:
- Navigate to the Integration Center page. Admin Home > Integration Platform > Integration Center
- Click Create Integration.

- Select Digital Assistant from the Type drop-down.
- Enter a unique Name. This name will be the variable name for this integration.
- Enter a Description for the integration.
- Enter the Login URL for the external chatbot/messaging service.
IMPORTANT: When the Digital Assistant is enabled, the Login Domain URL is validated against the allowed_partner_domains list. If additional domains need to be added to the whitelist, please create an SR on My Oracle Support to add your domain to the allowed_partner_domians.
- Enter the Username and Password to access the external chatbot/messaging service.
- Enter the Endpoint URL. This is defined as the Inbound URL field within the external chatbot/messaging service.
- Enter the Client Secret. This is defined as the Secret Key field within the external chatbot/messaging service.
- Check the Enable Integration checkbox.

- Click Save.
After the Digital Assistant integration has been created, the details can be retrieved using BMQL and used in a BML integration to send messages to an external chatbot/messaging service. Example BMQL is provided below.

Sample BMQL for Digital Assistant
Microsoft Dynamics 365 Integration Enhancements
Microsoft Dynamics 365 for Sales (CRM) customers can integrate with Oracle CPQ Cloud, allowing their users to access CPQ Cloud from an opportunity, to create new quotes, and to edit existing quotes with a seamless Single Sign-On experience. Quote data and line items are synced back to Dynamics to enable more reliable forecasts and reports.
As part of continuing improvements to the Dynamics 365 integration, the following enhancements are available with version 1.0 of the Oracle CPQ Cloud Connector for Dynamics 365 and CPQ Cloud 19C.
Account Information Auto-Fill and Refresh Using BML Account Integration
Administrators can create a BML type Account integration that automatically imports Microsoft Dynamics 365 account information into CPQ Cloud when customers create a new Oracle Quote from Dynamics 365 and allows them to refresh the account information at any time.
After creating the BML type Account integration, administrators can add the integration to the Refresh Address action (i.e. "_auto_fill_action") and map the attributes returned by the integration to Transaction attributes. When users create a new Oracle Quote in Dynamics 365, the Refresh Address action is invoked and the mapped values are added to the Oracle Quote.
Steps to Enable
To enable this enhancement, customers must install or upgrade to the 19C Microsoft Dynamics Migration Package and create Account Integrations. Refer to the Integrating Oracle CPQ Cloud and Microsoft Dynamics 365 Implementation Guide.
Select Alternate Address Information from Contact List
Administrators can create a BML-type Account integration that imports alternate addresses from the Contact list in Microsoft Dynamics 365 and saves the selected address information to the Bill To and Ship To address sets on the Transaction.
After creating the BML type account integration, add the integration to the Select Alternate Address action (i.e. "_select_alternate_address_action)" and map the attributes returned by the integration to Transaction attributes. When users create or edit an Oracle Quote in Dynamics 365 and select an alternate address from the Contact list, the Bill To and Ship To address sets on the Oracle Quote are populated with the mapped attribute values.
Steps to Enable
To enable this enhancement, customers must install or upgrade to the 19C Microsoft Dynamics Migration Package and create Account Integrations. Refer to the Integrating Oracle CPQ Cloud and Microsoft Dynamics 365 Implementation Guide.
Use Price List Items When Creating Opportunity Products
In CPQ Cloud 19C when a Transaction is marked as Active, the Upsert Primary Quote Information integration can set an active Price List on the Opportunity and add products as Price List Items.
When users click the Quote Is Primary checkbox, it designates the Quote as the active Quote on the Opportunity. The Line Items on that Quote are synced to the Opportunity as Opportunity products. In prior releases, these products were marked as "Write-in Products". In this release, when a Price List is specified, the products are added as "Existing Products".
Steps to Enable
To enable this enhancement, customers must install or upgrade to the 19C Microsoft Dynamics Migration Package and modify the Line Item Upsert Integration. Refer to the Integrating Oracle CPQ Cloud and Microsoft Dynamics 365 Implementation Guide.
Automatically Delete Opportunity Products When Associated Quote Is Deleted
In CPQ Cloud 19C, when users delete an Oracle Quote that is associated to an Opportunity, all of the associated Opportunity products are automatically deleted.
Steps to Enable
To enable this enhancement, customers must install or upgrade to version 1.0 of the Oracle CPQ Cloud Connector for Dynamics 365. Refer to the Integrating Oracle CPQ Cloud and Microsoft Dynamics 365 Implementation Guide.
In prior releases, when a user created a new Oracle Quote a pop-up window opened for entry of the new Quote information. When the user later edited that Quote, the Quote opened in the active window. Oracle has removed this inconsistency in 19C, so the new Quote and the edit Quote experience both open in the active window.

Consistent Window Behavior
Steps to Enable
To enable this enhancement, customers must install or upgrade to version 1.0 of the Oracle CPQ Cloud Connector for Dynamics 365. Refer to the Integrating Oracle CPQ Cloud and Microsoft Dynamics 365 Implementation Guide.
When users created or edited Oracle Quotes in prior releases, the Dynamics button bar displayed buttons native to Dynamics 365 that were not applicable to the CPQ Cloud – Dynamics 365 integration. With the CPQ Cloud 19C enhancements, the Dynamics button bar no longer displays when users create or edit Oracle Quotes.

Improved Button Bar
Steps to Enable
To enable this enhancement, customers must install or upgrade to version 1.0 of the Oracle CPQ Cloud Connector for Dynamics 365. Refer to the Integrating Oracle CPQ Cloud and Microsoft Dynamics 365 Implementation Guide.
Opportunity Auto-Refresh On Save
When users create or edit a new Oracle Quote and then later return to the Opportunity, the Opportunity auto-refreshes and displays the updated Oracle Quotes and Opportunity Products lists.
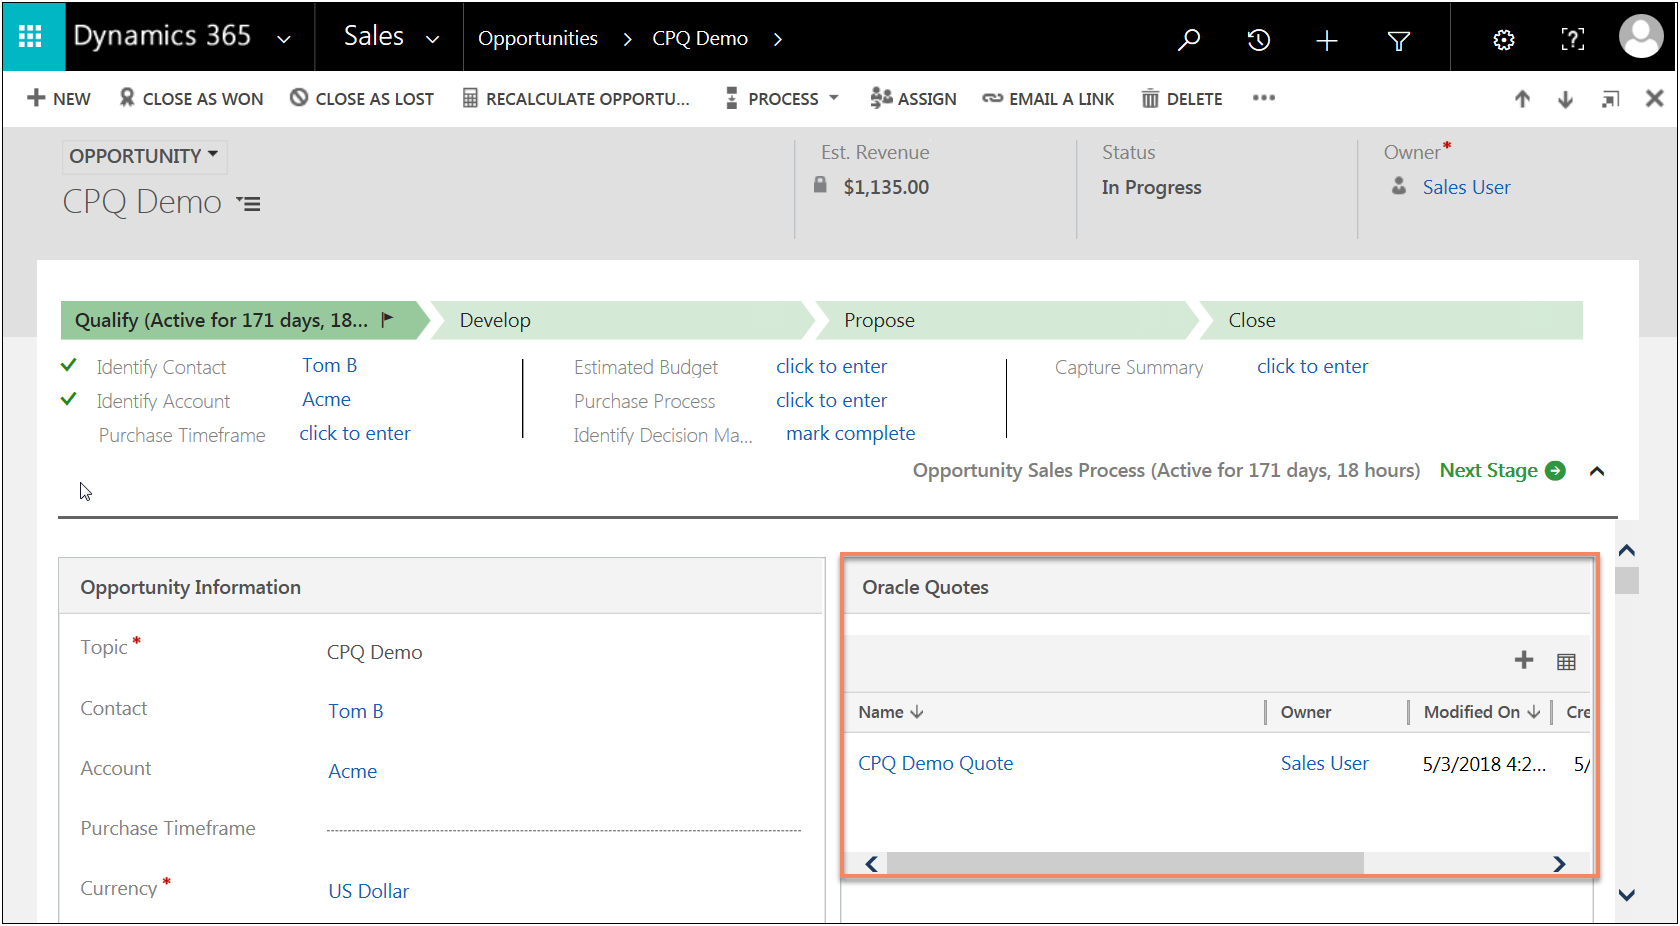
Sample Opportunity with New Oracle Quote
Steps to Enable
To enable this enhancement, customers must install or upgrade to version 1.0 of the Oracle CPQ Cloud Connector for Dynamics 365. Refer to the Integrating Oracle CPQ Cloud and Microsoft Dynamics 365 Implementation Guide.
The Microsoft Dynamics 365 Integration allows sales reps to create and edit quotes from their CRM by opening the CPQ Cloud UI within Dynamics. In previous releases, only the legacy desktop UI was supported. The new version of the Dynamics Solution adds the ability to also embed the JET Responsive UI.
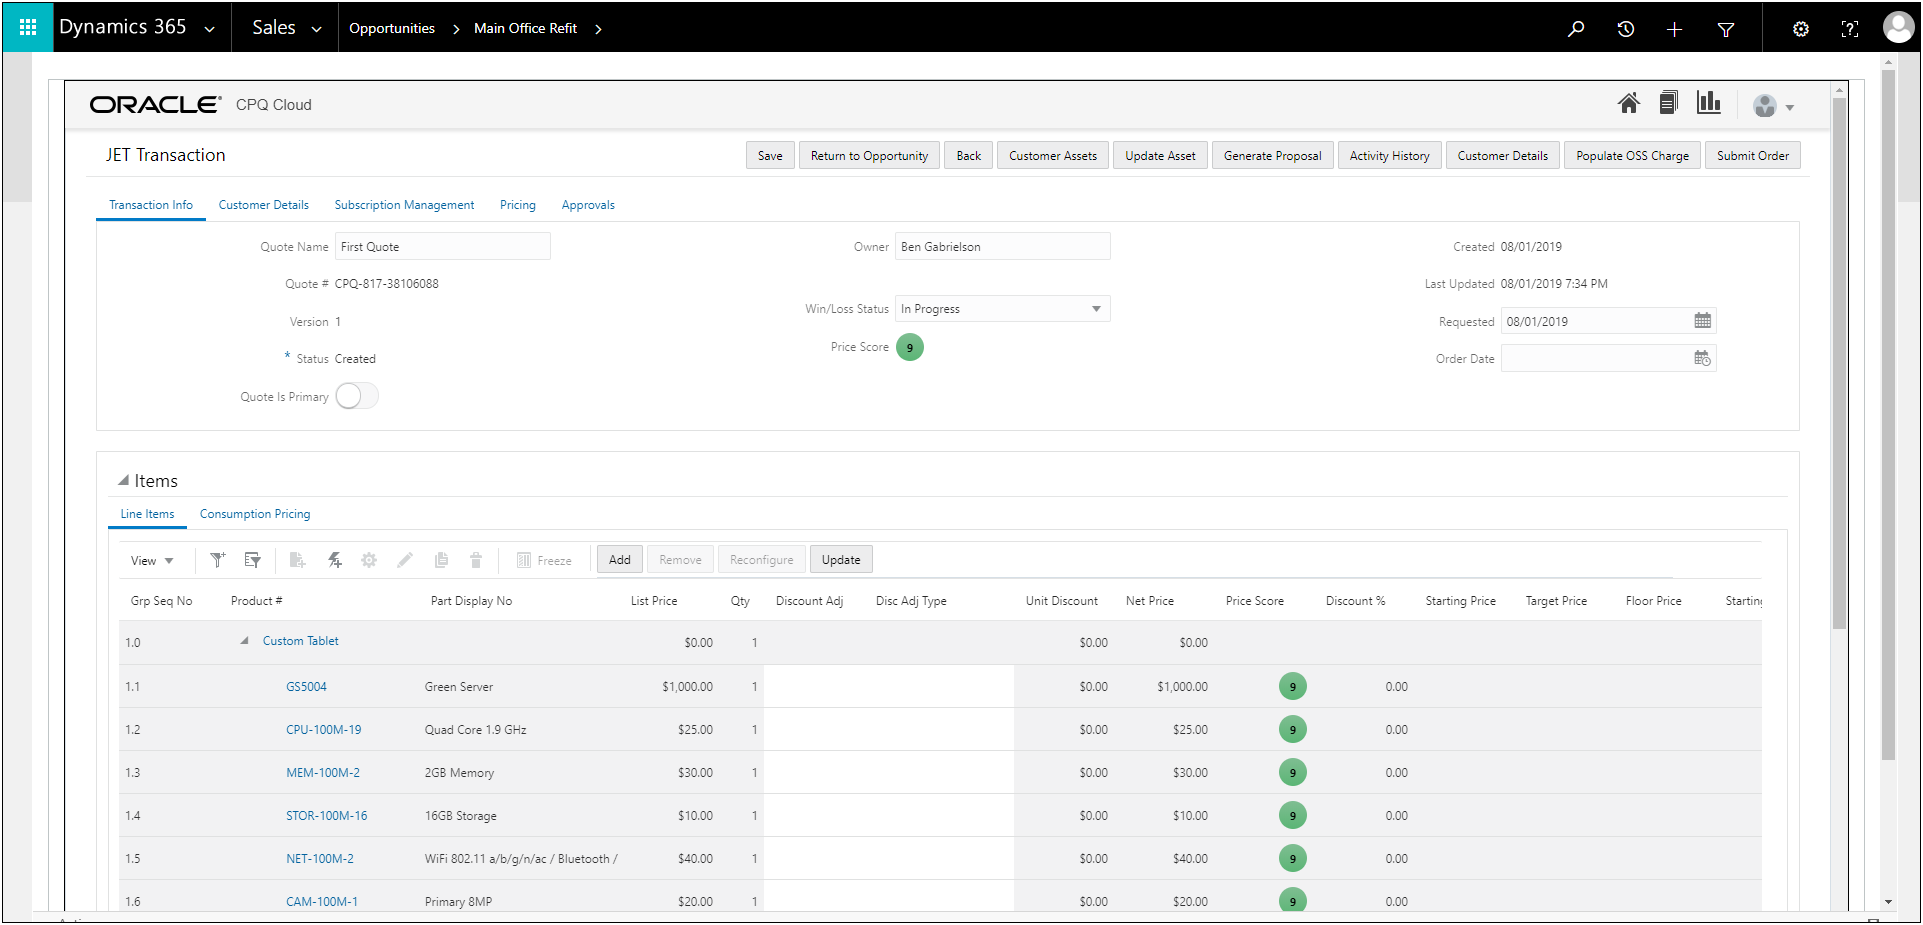
Sample JET Responsive UI
Steps to Enable
To enable this enhancement, customers must install or upgrade to version 1.0 of the Oracle CPQ Cloud Connector for Dynamics 365 and CPQ Cloud 19C. Refer to the Integrating Oracle CPQ Cloud and Microsoft Dynamics 365 Implementation Guide.
CPQ Cloud exposes objects and data through REST APIs and RESTful standards. Exposing objects and data through REST APIs promotes simpler API calls and more robust integrations using HTTP standards. With appropriate HTTP Basic authentication, any other third-party system can query CPQ Cloud's REST APIs, get a response, and use the return data as needed.
CPQ Cloud 19C includes REST API enhancements that support the following functionality.
Show Parent Attribute Query Parameter for Configuration Metadata REST APIs
Beginning in CPQ 19C, the "showParentAttrs=true" query parameter can be added to Configuration attribute and array set metadata REST API endpoints to return all applicable metadata inherited from parent level attributes. Prior to 19C customers had to make several REST calls to retrieve all of the inherited attributes. To retrieve all applicable attributes for a single model, they had to make REST calls to the model, Product Line, Product Family, and all Product Families.
URI Endpoint Sample
For example, the following endpoint returns attribute metadata for the "ultraPowerSolutionsPackage" Model, the "servers" Product Line, the "vision" Product Family, and metadata for attributes defined for all Product Families.

Steps to Enable
Review the REST service definition in the REST API guides, available from the Oracle Help Center > your apps service area of interest > REST API. If you're new to Oracle's REST services you may want to begin with the Quick Start section.
Configuration Metadata REST API Enhancements for Product Family Integration
CPQ Cloud 19C introduces the following Configuration metadata endpoints to support Product Family Integrations for the JET Configuration UI.
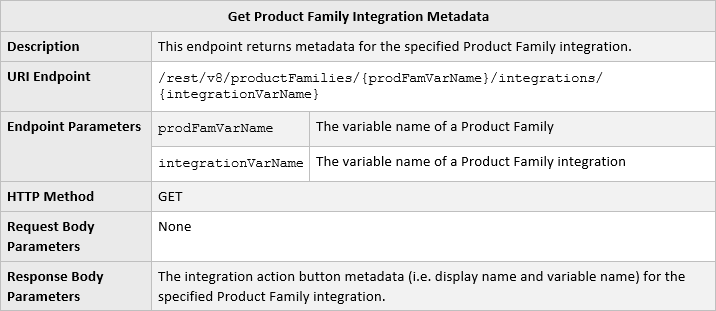
URI Endpoint Sample

Sample Response Body
Steps to Enable
Review the REST service definition in the REST API guides, available from the Oracle Help Center > your apps service area of interest > REST API. If you're new to Oracle's REST services you may want to begin with the Quick Start section.
Configuration Run-Time Data REST API Enhancements for Subscription Ordering
CPQ Cloud 19C provides support for Subscription Ordering flows. Configuration Run-Time Data Configure Model and Reconfigure Model enhancements provide support for Subscription Ordering Modify, Reconfigure, and Follow-On Order actions.
Configure Model Enhancements
The "_configure" action is used to configure a Model with appropriate inputs and generates the configuration data. For Subscription Ordering, this action is used when modifying an asset or creating a follow-on order. Beginning in CPQ 19C, the Configure Model REST API accepts the following request body parameters for internal asset modification flows:
- configContextKey - a key to the global cache entry which contains the projected BOM and configuration. It is used to pass ABO package data between Commerce and Configuration.
- rootBomItemId – The identifier for the root BOM item.
For asset modification the "configContextKey" and "rootBomItemId" parameters are retrieved from the Modify Asset response. For follow-on orders the "configContextKey" and "rootBomItemId" parameters are retrieved from the Commerce Transaction Create Follow-On Order response.
Configure Model Request Body Sample (Internal Asset Modification Flow)
For external asset modification flows the Configure Model REST API accepts the following request body parameters:
- fromPartner - indicates that configure is requested from partner site. The value is true for client-side integrations. This value is automatically set to "true" when an assetKey is provided.
- assetKey – a key that uniquely identifies the asset component for the lifetime of the asset.
- transactionDate - the date and time that the service request needs to be processed or fulfilled. This field is optional when an assetKey is provided. This is not allowed when an assetKey is not provided.
- transactionId - the current Transaction identifier for external process integrations.
Configure Model Request Body Sample (External Asset Modification Flow)

Reconfigure Model Enhancements
This "_reconfigureTxn" action is used for Model reconfiguration from the Transaction to execute the configuration rules in order to retain the previous selection and configuration data. For Subscription Ordering, this action is used when reconfiguring an asset for internal applications. Beginning in 19C, the Reconfigure Model REST API accepts the "configContextKey" request body parameter.
For asset reconfiguration the "configContextKey" parameter is retrieved from the Reconfigure Asset response.
Reconfigure Model Request Body Sample (Internal Asset Modification Flow)

Steps to Enable
Review the REST service definition in the REST API guides, available from the Oracle Help Center > your apps service area of interest > REST API. If you're new to Oracle's REST services you may want to begin with the Quick Start section.
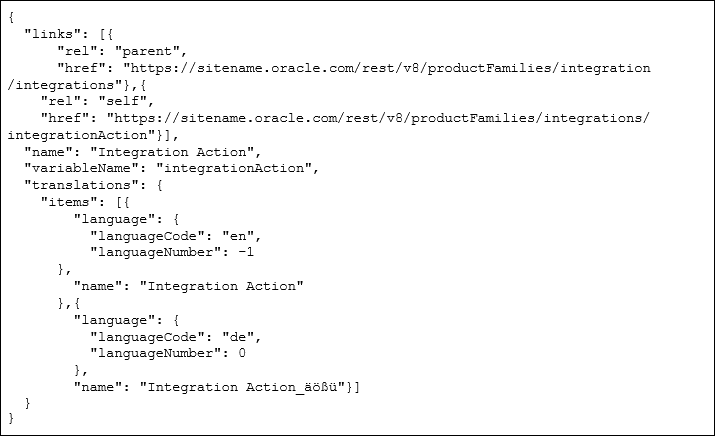
Configuration REST API Enhancements for System Configuration
System configurations have a system navigation panel that contains model and part icons to show the hierarchy of a system and status icons to identify models requiring user action.
System Navigation Status Object
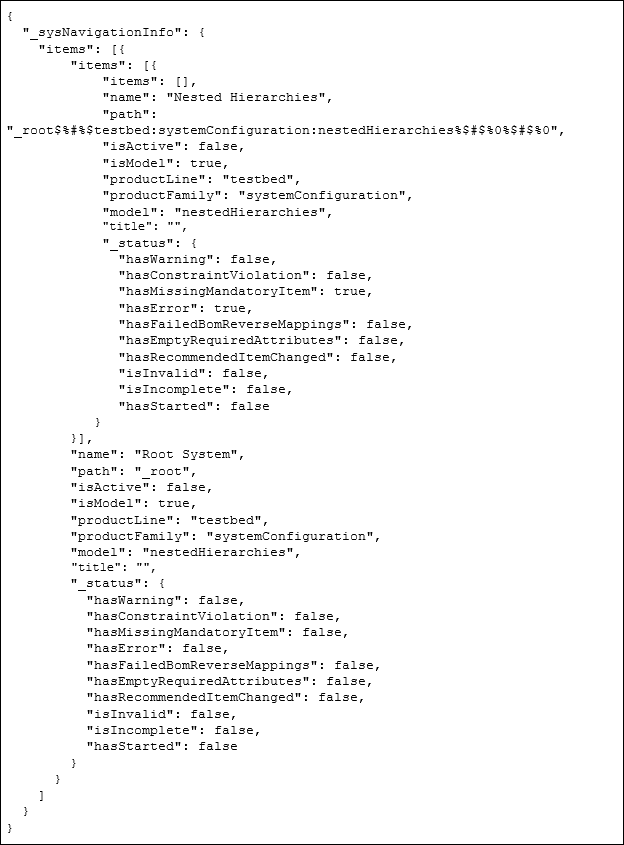
The information for the system navigation panel is stored within the "_sysNavigationInfo" resource in the Configuration Run-Time Data REST APIs. CPQ Cloud 19C adds a new "_status" object within the "_sysNavigationInfo" resource. The "_status" object is a set of Boolean objects that give all the possible states of configuration for the items in the system.
The following table lists the items within the "_status" object.
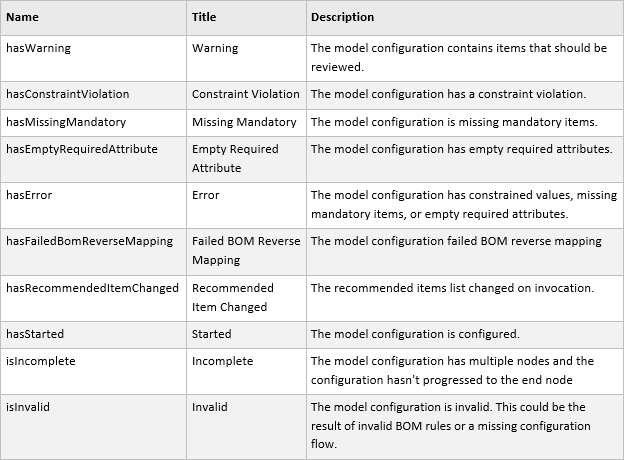
Sample Response Body
Navigate Between System Configuration Models
The system navigation panel also allows users to switch between different models within the system configuration. CPQ Cloud 19C adds the following Configuration Run-Time Data REST API service endpoint to support system configuration navigation in the JET Configuration UI.

URI Endpoint Sample

Sample Request Body

Steps to Enable
Review the REST service definition in the REST API guides, available from the Oracle Help Center > your apps service area of interest > REST API. If you're new to Oracle's REST services you may want to begin with the Quick Start section.
Salesforce Integration Enhancements
The Oracle CPQ Connector for Salesforce is the next generation Salesforce integration solution for Oracle CPQ Cloud built on the Salesforce Platform. This solution makes CPQ Cloud the most advanced and powerful Lightning and Salesforce Mobile enabled CPQ solution on the market today.
As part of continuing improvements to the Salesforce integration, the following enhancements are available with version 8.2 of the Oracle CPQ Cloud Connector for Salesforce.
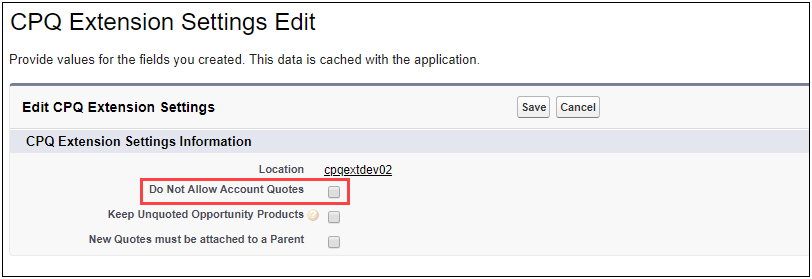
Allow Unquoted Opportunity Products
A new toggle gives administrators the option to either retain or replace any Opportunity Products that were added directly to the Opportunity, i.e. products that were not added by CPQ, when an Oracle Quote is marked as active.
Steps to Enable
To set the toggle to allow unquoted Opportunity Products:
- Click on Setup > Build > Develop.
- Click Custom Settings.
- Click Manage next to the CPQ Extension Settings in the Custom Settings page.
- Click Edit in the CPQ Extension Settings page.
- Select the Keep Unquoted Opportunity Products checkbox.
- Click Save.
Automatically Deactivate a CPQ User When Linked Salesforce User Is Deactivated
When a Salesforce user which has been linked to a CPQ user is deactivated that user's account will automatically deactivate in all connected CPQ sites as well.
Steps to Enable
You don't need to do anything to enable this feature.
Tips And Considerations
When a user is deactivated the Salesforce user is also unlinked from the CPQ user. If later you want to re-activate the user in both Salesforce and CPQ, you must recheck the Link to CPQ User checkbox on the Oracle User record.
A new toggle gives administrators the ability to block the creation of new Quotes that are only attached to an Account.
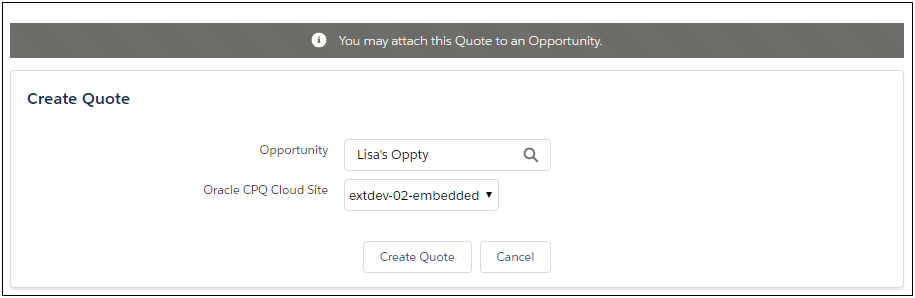
When enabled users will not have the option to select an Account when creating a New Quote.
Steps to Enable
To set the toggle to block the creation of Quotes which are not attached to an Account:
- Click on Setup > Build > Develop.
- Click Custom Settings.
- Click Manage next to the CPQ Extension Settings in the Custom Settings page.
- Click Edit in the CPQ Extension Settings page.
- Select the Do Not Allow Account Quotes checkbox.
- Click Save.
The Mark as Active feature has been simplified to no longer require synchronizing Price Book Entries between CPQ and Salesforce. The Mark as Active feature takes Quote Line Items and converts them into Opportunity Products. In prior versions of the CPQ Connector for Salesforce, each Quote Line Item needed to specify the correct Price Book Entry ID for the combination of product, Price Book and currency in order to successfully create Opportunity Products. This logic needed to be managed inside CPQ Cloud which was cumbersome and time consuming.
This enhancement simplifies that process by allowing the creation of Opportunity Products with any of the following values:
- Salesforce Product ID
- CPQ Cloud Part Number
- Salesforce Price Book Entry ID
Steps to Enable
To enable this feature, administrators must modify their existing Export Integrations to supply one of the values specified above. Refer to the Oracle CPQ Connector for Salesforce Setup Guide for specific details on setting up Parts Sync and Quote Line Item Upsert.
Tips And Considerations
- If a currency is provided on the Oracle Quote then that currency is always used when Opportunity Products are created.
- If using Multi-currency and no currency is provided, the products are created using the Opportunity's currency.
- If a Price Book ID is provided on the Oracle Quote then that Price Book is always used when Opportunity Products are created.
- If no Price Book is provided, the products are created using the default Price Book.
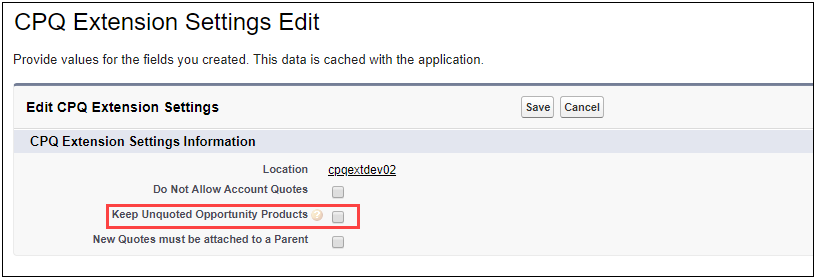
New Quotes Must Be Attached to a Parent
A new toggle gives administrators the ability to block the creation of Quotes which are not attached to either an Account or an Opportunity.
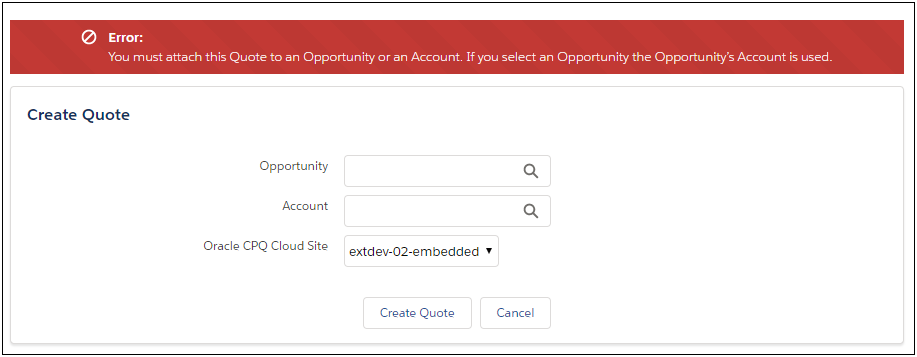
If a user attempts to create a new quote without selecting an Opportunity or Account they are prompted with an error.
Steps to Enable
To set the toggle to block the creation of Quotes which are not attached to either an Account or Opportunity:
- Click on Setup > Build > Develop.
- Click Custom Settings.
- Click Manage next to the CPQ Extension Settings in the Custom Settings page.
- Click Edit in the CPQ Extension Settings page.
- Select the New Quotes must be attached to a Parent checkbox.

- Click Save.
Oracle User and Oracle User Profile Time Zone List Enhancement
This enhancement changes the way time zones are displayed on both the Oracle User page and on the Oracle User Profile pages. It also adds several new time zones and replaces several outdated time zones with an updated equivalent. This ensures that the time zone options available in Salesforce mirror the options used in CPQ Cloud.
| Stored Value | Displayed Value |
|---|---|
| Africa/Algiers |
(GMT+1:00 GMT+1:00) Algiers |
| Africa/Cairo |
(GMT+2:00 GMT+2:00) Cairo |
| Africa/Casablanca |
(GMT+0:00 GMT+1:00) Casablanca |
| Africa/Johannesburg |
(GMT+2:00 GMT+2:00) Johannesburg |
| Africa/Nairobi |
(GMT+3:00 GMT+3:00) Nairobi |
| Africa/Tripoli |
(GMT+2:00 GMT+2:00) Tripoli |
| Africa/Tunis |
(GMT+1:00 GMT+1:00) Tunis |
| Africa/Windhoek |
(GMT+2:00 GMT+2:00) Windhoek |
| America/Adak |
(GMT-10:00 GMT-9:00) Adak |
| America/Anchorage |
(GMT-9:00 GMT-8:00) Anchorage |
| America/Bogota |
(GMT-5:00 GMT-5:00) Bogota |
| America/Buenos_Aires |
(GMT-3:00 GMT-3:00) Buenos Aires |
| America/Caracas |
(GMT-4:00 GMT-4:00) Caracas |
| America/Chicago |
(GMT-6:00 GMT-5:00) Chicago |
| America/Denver |
(GMT-7:00 GMT-6:00) Denver |
| America/El_Salvador |
(GMT-6:00 GMT-6:00) El Salvador |
| America/Godthab |
(GMT-3:00 GMT-2:00) Godthab |
| America/Halifax |
(GMT-4:00 GMT-3:00) Halifax |
| America/Indianapolis |
(GMT-5:00 GMT-4:00) Indianapolis |
| America/Lima |
(GMT-5:00 GMT-5:00) Lima |
| America/Los_Angeles |
(GMT-8:00 GMT-7:00) Los Angeles |
| America/Mazatlan |
(GMT-7:00 GMT-6:00) Mazatlan |
| America/Mexico_City |
(GMT-6:00 GMT-5:00) Mexico City |
| America/New_York |
(GMT-5:00 GMT-4:00) New York |
| America/Noronha |
(GMT-2:00 GMT-2:00) Noronha |
| America/Panama |
(GMT-5:00 GMT-5:00) Panama |
| America/Phoenix |
(GMT-7:00 GMT-7:00) Phoenix |
| America/Puerto_Rico |
(GMT-4:00 GMT-4:00) Puerto Rico |
| America/Regina |
(GMT-6:00 GMT-6:00) Regina |
| America/Santiago |
(GMT-4:00 GMT-3:00) Santiago |
| America/Sao_Paulo |
(GMT-3:00 GMT-2:00) Sao Paulo |
| America/Scoresbysund |
(GMT-1:00 GMT+0:00) Scoresbysund |
| America/St_Johns |
(GMT-3:30 GMT-2:30) St Johns |
| America/Tijuana |
(GMT-8:00 GMT-7:00) Tijuana |
| Asia/Almaty |
(GMT+6:00 GMT+6:00) Almaty |
| Asia/Amman |
(GMT+2:00 GMT+3:00) Amman |
| Asia/Baghdad |
(GMT+3:00 GMT+3:00) Baghdad |
| Asia/Baku |
(GMT+4:00 GMT+4:00) Baku |
| Asia/Bangkok |
(GMT+7:00 GMT+7:00) Bangkok |
| Asia/Beirut |
(GMT+2:00 GMT+3:00) Beirut |
| Asia/Calcutta |
(GMT+5:30 GMT+5:30) Kolkata |
| Asia/Colombo |
(GMT+5:30 GMT+5:30) Colombo |
| Asia/Damascus |
(GMT+2:00 GMT+3:00) Damascus |
| Asia/Dhaka |
(GMT+6:00 GMT+6:00) Dhaka |
| Asia/Dubai |
(GMT+4:00 GMT+4:00) Dubai |
| Asia/Ho_Chi_Minh |
(GMT+7:00 GMT+7:00) Ho Chi Minh |
| Asia/Hong_Kong |
(GMT+8:00 GMT+8:00) Hong Kong |
| Asia/Irkutsk |
(GMT+8:00 GMT+8:00) Irkutsk |
| Asia/Jakarta |
(GMT+7:00 GMT+7:00) Jakarta |
| Asia/Jerusalem |
(GMT+2:00 GMT+3:00) Jerusalem |
| Asia/Kabul |
(GMT+4:30 GMT+4:30) Kabul |
| Asia/Kamchatka |
(GMT+12:00 GMT+12:00) Kamchatka |
| Asia/Karachi |
(GMT+5:00 GMT+5:00) Karachi |
| Asia/Katmandu |
(GMT+5:45 GMT+5:45) Katmandu |
| Asia/Krasnoyarsk |
(GMT+7:00 GMT+7:00) Krasnoyarsk |
| Asia/Kuala_Lumpur |
(GMT+8:00 GMT+8:00) Kuala Lumpur |
| Asia/Magadan |
(GMT+11:00 GMT+11:00) Magadan |
| Asia/Manila |
(GMT+8:00 GMT+8:00) Manila |
| Asia/Novosibirsk |
(GMT+7:00 GMT+7:00) Novosibirsk |
| Asia/Oral |
(GMT+5:00 GMT+5:00) Oral |
| Asia/Rangoon |
(GMT+6:30 GMT+6:30) Yangon |
| Asia/Riyadh |
(GMT+3:00 GMT+3:00) Riyadh |
| Asia/Seoul |
(GMT+9:00 GMT+9:00) Seoul |
| Asia/Shanghai |
(GMT+8:00 GMT+8:00) Shanghai |
| Asia/Singapore |
(GMT+8:00 GMT+8:00) Singapore |
| Asia/Taipei |
(GMT+8:00 GMT+8:00) Taipei |
| Asia/Tashkent |
(GMT+5:00 GMT+5:00) Tashkent |
| Asia/Tbilisi |
(GMT+4:00 GMT+4:00) Tbilisi |
| Asia/Tehran |
(GMT+3:30 GMT+4:30) Tehran |
| Asia/Tokyo |
(GMT+9:00 GMT+9:00) Tokyo |
| Asia/Vladivostok |
(GMT+10:00 GMT+10:00) Vladivostok |
| Asia/Yakutsk |
(GMT+9:00 GMT+9:00) Yakutsk |
| Asia/Yekaterinburg |
(GMT+5:00 GMT+5:00) Yekaterinburg |
| Asia/Yerevan |
(GMT+4:00 GMT+4:00) Yerevan |
| Atlantic/Azores |
(GMT-1:00 GMT+0:00) Azores |
| Atlantic/Bermuda |
(GMT-4:00 GMT-3:00) Bermuda |
| Atlantic/Cape_Verde |
(GMT-1:00 GMT-1:00) Cape Verde |
| Atlantic/South_Georgia |
(GMT-2:00 GMT-2:00) South Georgia |
| Australia/Adelaide |
(GMT+9:30 GMT+10:30) Adelaide |
| Australia/Brisbane |
(GMT+10:00 GMT+10:00) Brisbane |
| Australia/Darwin |
(GMT+9:30 GMT+9:30) Darwin |
| Australia/Hobart |
(GMT+10:00 GMT+11:00) Hobart |
| Australia/Lord_Howe |
(GMT+10:30 GMT+11:00) Lord Howe |
| Australia/Melbourne |
(GMT+10:00 GMT+11:00) Melbourne |
| Australia/Perth |
(GMT+8:00 GMT+8:00) Perth |
| Australia/Sydney |
(GMT+10:00 GMT+11:00) Sydney |
| Etc/GMT+12 |
(GMT-12:00 GMT-12:00) |
| Europe/Amsterdam |
(GMT+1:00 GMT+2:00) Amsterdam |
| Europe/Athens |
(GMT+2:00 GMT+3:00) Athens |
| Europe/Belgrade |
(GMT+1:00 GMT+2:00) Belgrade |
| Europe/Berlin |
(GMT+1:00 GMT+2:00) Berlin |
| Europe/Brussels |
(GMT+1:00 GMT+2:00) Brussels |
| Europe/Bucharest |
(GMT+2:00 GMT+3:00) Bucharest |
| Europe/Dublin |
(GMT+0:00 GMT+1:00) Dublin |
| Europe/Helsinki |
(GMT+2:00 GMT+3:00) Helsinki |
| Europe/Istanbul |
(GMT+3:00 GMT+3:00) Istanbul |
| Europe/Lisbon |
(GMT+0:00 GMT+1:00) Lisbon |
| Europe/London |
(GMT+0:00 GMT+1:00) London |
| Europe/Minsk |
(GMT+3:00 GMT+3:00) Minsk |
| Europe/Moscow |
(GMT+3:00 GMT+3:00) Moscow |
| Europe/Paris |
(GMT+1:00 GMT+2:00) Paris |
| Europe/Prague |
(GMT+1:00 GMT+2:00) Prague |
| Europe/Rome |
(GMT+1:00 GMT+2:00) Rome |
| Europe/Warsaw |
(GMT+1:00 GMT+2:00) Warsaw |
| GMT |
(GMT+0:00 GMT+0:00) GMT |
| Pacific/Auckland |
(GMT+12:00 GMT+13:00) Auckland |
| Pacific/Chatham |
(GMT+12:45 GMT+13:45) Chatham |
| Pacific/Enderbury |
(GMT+13:00 GMT+13:00) Enderbury |
| Pacific/Fiji |
(GMT+12:00 GMT+13:00) Fiji |
| Pacific/Gambier |
(GMT-9:00 GMT-9:00) Gambier |
| Pacific/Guadalcanal |
(GMT+11:00 GMT+11:00) Guadalcanal |
| Pacific/Honolulu |
(GMT-10:00 GMT-10:00) Honolulu |
| Pacific/Kiritimati |
(GMT+14:00 GMT+14:00) Kiritimati |
| Pacific/Marquesas |
(GMT-9:30 GMT-9:30) Marquesas |
| Pacific/Niue |
(GMT-11:00 GMT-11:00) Niue |
| Pacific/Norfolk |
(GMT+11:00 GMT+11:00) Norfolk Island |
| Pacific/Pago_Pago |
(GMT-11:00 GMT-11:00) Pago Pago |
| Pacific/Pitcairn |
(GMT-8:00 GMT-8:00) Pitcairn |
| Pacific/Ponape |
(GMT+11:00 GMT+11:00) Pohnpei |
| Pacific/Tongatapu |
(GMT+13:00 GMT+14:00) Tongatapu |
Steps to Enable
You don't need to do anything to enable this feature.
Tips And Considerations
Existing time zone selections will not be modified when the package is updated. Any current selections will be retained until they are updated by a user. The old values will continue to work without issue, but they will not be available for selection when creating new users.
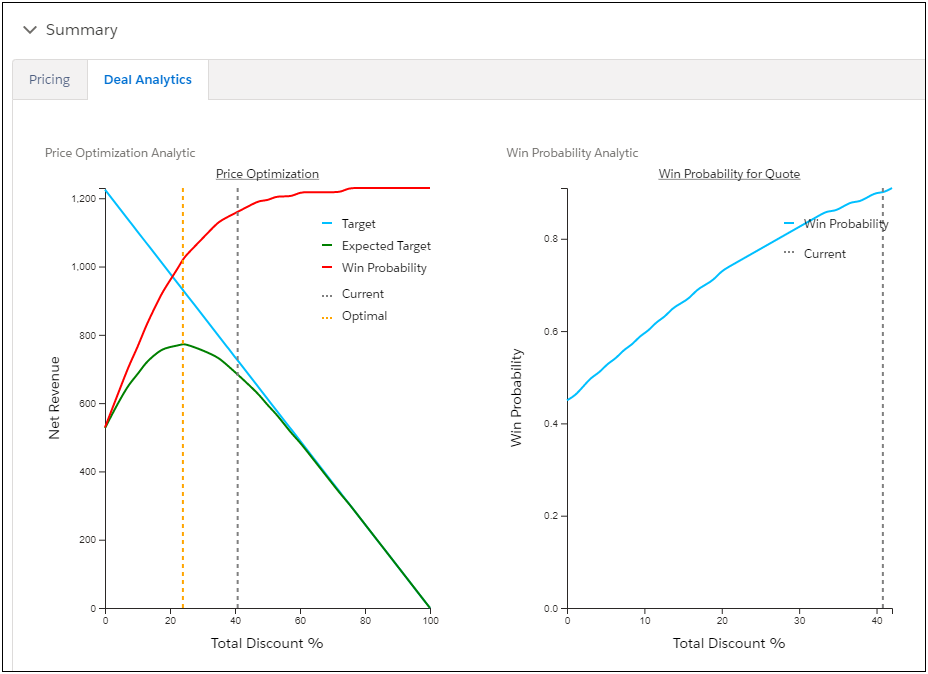
Win Probability and Price Optimization Analytic Support in Lightning UI
We have added support for Win Probability and Price Optimization charts in the Salesforce Lightning UI. These charts display predictions from the win probability and price optimization analytics provided by CPQ Cloud.
Sample Win Probability and Price Optimization Charts
Steps to Enable
To enable this feature, administrators must follow the steps to enable the Win Probability or Price Optimization analytics and charts in CPQ Cloud. Additionally, administrators must follow the standard steps for adding new attributes to the Lightning Transaction UI in the CPQ Connector for Salesforce.
Tips And Considerations
The Win Probability and Price Optimization charts in Lightning behave differently than the same charts in the CPQ JET and legacy UIs. For example:
- The Lightning charts do not support the mouse over feature which displays the precise coordinate on the plots.
- The Lightning charts will always display the chart legend inside the chart area instead of being offset to the side.
- The Lightning charts use a fixed pixel width for the chart area.
Key Resources
Refer to the Deal Management article within the CPQ Cloud Online Help for additional information.
The following CPQ Cloud Release 19C enhancements pioneers the next generation selling platform:
- Price Optimization Enhancements
- System Configuration Enhancement
Price Optimization Enhancements
Price Optimization uses mathematical analysis to predict how customers will respond to different prices for products or services in order to optimize net revenue or margin. CPQ Cloud provides out-of-the-box machine learning Price Optimization solutions and, with Update 19C adds price guidance analytics and visualization. Since CPQ Cloud customers use different metrics to determine revenue and profitability, these features support selection of custom attributes to provide an easy, code free setup. Customers with low or zero marginal costs, such as software companies, can manage the discount percentages off standard list prices, without capturing costs or margins. Customers with meaningful variable costs, such as manufacturers, can capture costs and margins in CPQ Cloud, and manage either net revenue or margin percentages.
In CPQ Cloud 19C, we enhance the Price Optimization solution by adding the following functionality.
Analytics List Page Enhancements
CPQ Cloud 19C introduces a new user-friendly interface to create and manage analytics. The Analytics page displays all analytics for the current Commerce process. The analytic name, description, variable name, last modified, last deployed, the Commerce document, and related rules. Administrators can click on the analytic name to access the details for a specific analytic.
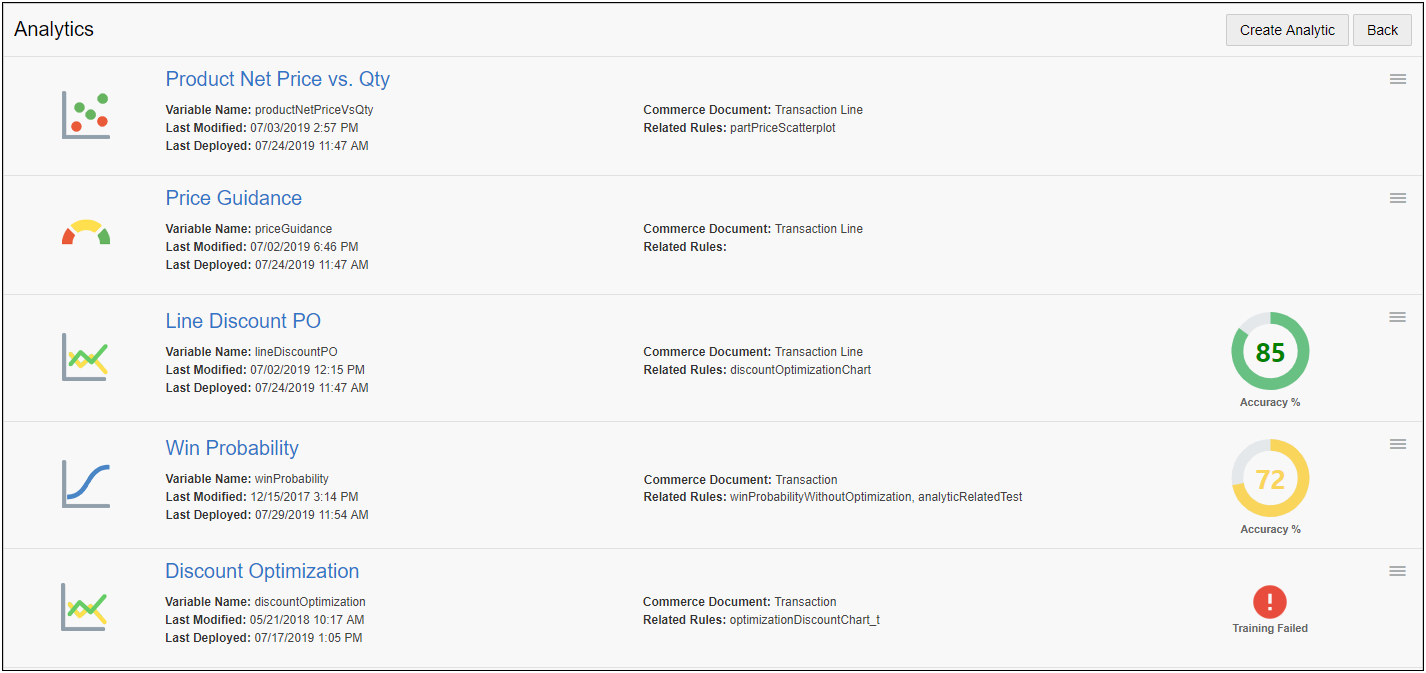
Training status icons are displayed for Price Optimization and Win Probability analytics to indicate the accuracy or failure of training sessions. Administrators can hover over the successful status icons to view the details of the latest successful training session.

Analytic drop-down menus provide quick access to copy, delete, and provide translations for analytics.

To create a new analytic, click Create Analytic and scroll through the filmstrip menu to view a brief description and a sample image for analytics that can be created.

Steps to Enable
You don't need to do anything to enable this feature.
CPQ Cloud 19C introduces the new Price Guidance analytic that provides the ability to evaluate historical or optimization-based values to guide users on the appropriate and permitted discounts or prices for Commerce Transactions and Transaction Line documents. The Price Guidance analytic populates Commerce attributes with pricing guidance values for discount percentages or net prices. For example, a Starting, Target, and Maximum Discount can be defined for a type of quote or product to guide sales users on discounts that should be offered to the customer. After set up is complete, the guidance values can be displayed to sales users on the Transaction UI using attribute values or the Price Guidance Gauge.
Create a Price Guidance Analytic
To create a Price Guidance analytic, navigate to Admin > Commerce Process > Analytics and click"Create Analytic". Then scroll to the Price Guidance option and click "Create".
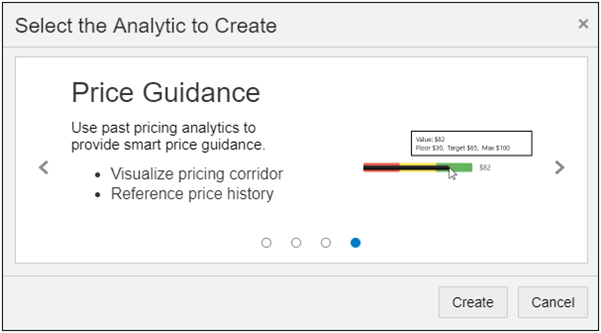
The Price Guidance wizard opens and guides administrators through the analytic creation process.
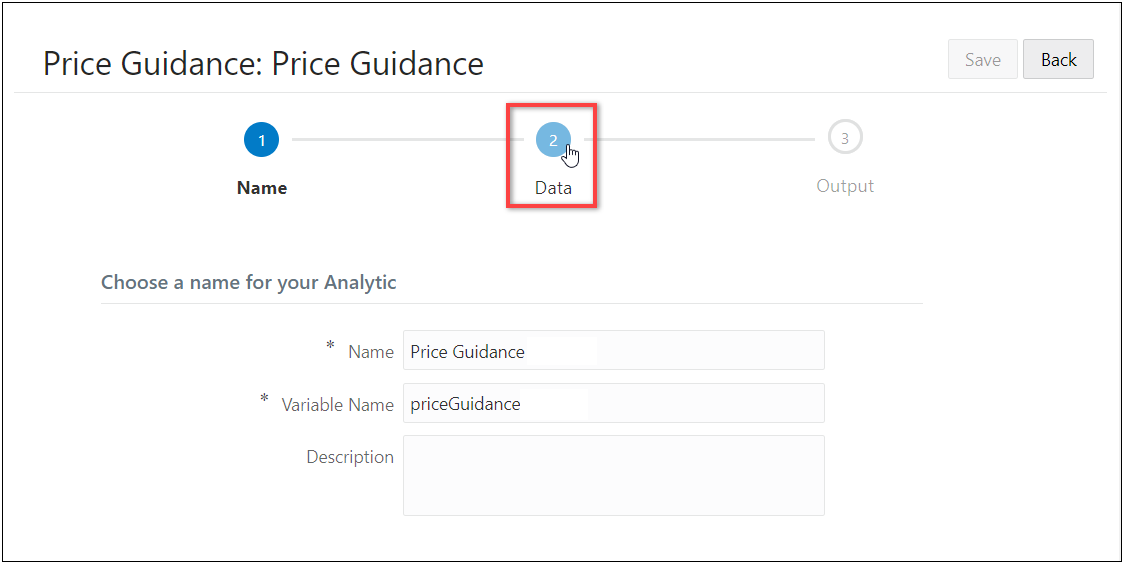
Name Page
On the first page, define Name, Variable Name, and Description (optional). After providing the required information, click on the Data icon to proceed to the next page.
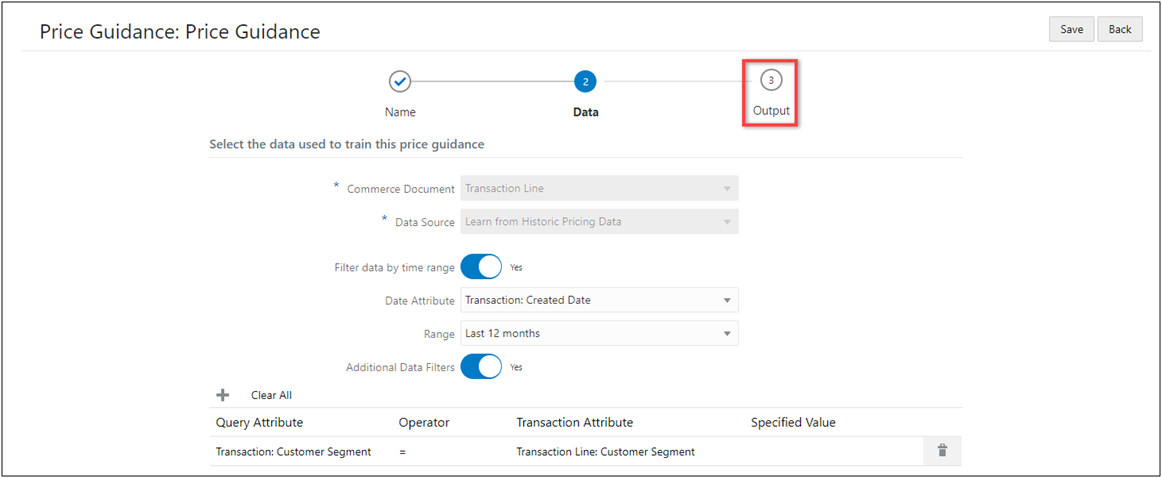
Data Page
On the second page, select the applicable Commerce document (e.g. Transaction or Transaction Line). Select "Learn from Historic Pricing Data" or "Use Trained Price Optimization" for the analytic Data Source.
Learn from Historic Data
When "Learn from Historic Pricing Data" is selected, administrators can add time range filters and additional data filters. When "Filter data by time range" is set to "Yes", select a target date attribute used to filter historical Transactions for the analysis and the filter Range. When "Additional Data Filters" is set to "Yes", click the "+" icon to add a filter, and then specify the following criteria: Query Attribute, Operator, Transaction Attribute, and Specified Value.
After providing the required information, click on the Output icon to proceed to the next page.
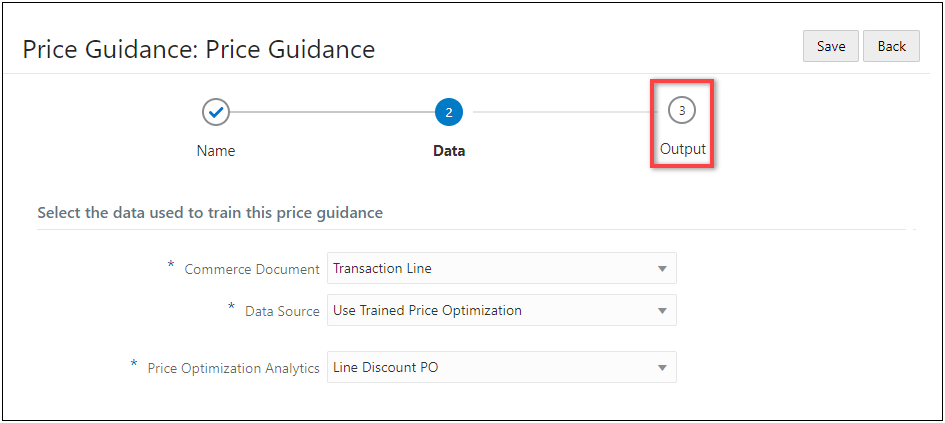
Use Trained Price Optimization
When "Use Trained Price Optimization" is selected, administrators can select the target Price Optimization analytic from an automatically populated list. After providing the required information, they click on the Output icon to proceed to the next page.
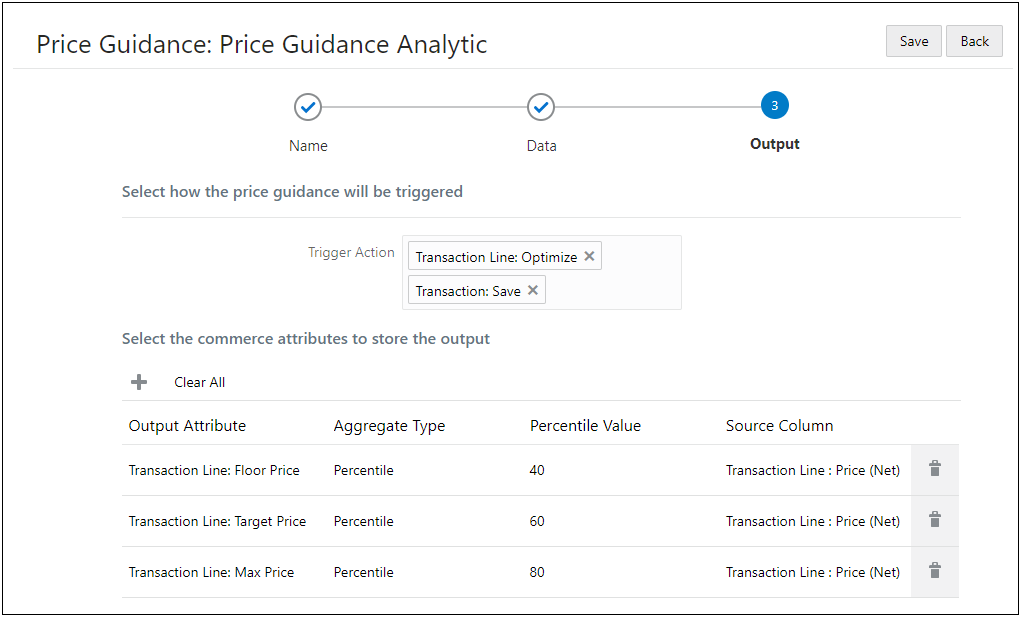
Output Page
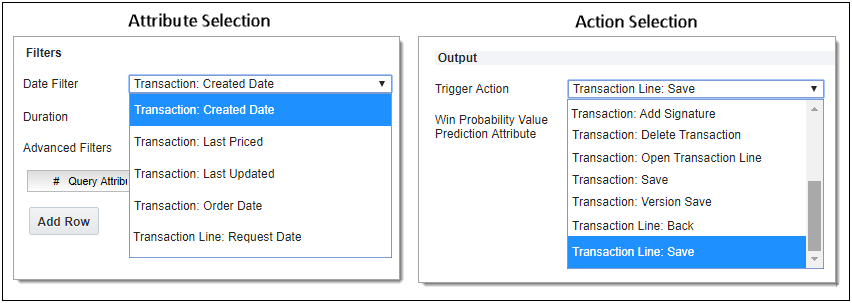
On the third page, select one or more modify actions as Trigger Actions. When a sales user invokes a trigger action on the Commerce UI, the price guidance calculation is executed and the calculation result is stored in the Output Attributes, which are also defined on this page.
The price guidance calculation is executed after "Formula", but before "Advanced Modify - After Formula" BML.
IMPORTANT: When a Transaction action is selected for a Transaction Line price guidance Trigger Action, the trigger action will invoke the Transaction Line price guidance against all line items of the current quote. If a quote contains a large number of line items, performance must be validated before deploying to sales users.
Learn from Historic Pricing Data
For analytics using "Learn from Historic Pricing Data", aggregate functions are used to calculate a price guidance value based on historic pricing data. Administrators can use the following aggregate functions for output attributes: Max, Min, Average, Percentile, Standard Deviation, or Latest. In the case of Percentile, the Percentile Value is also defined.
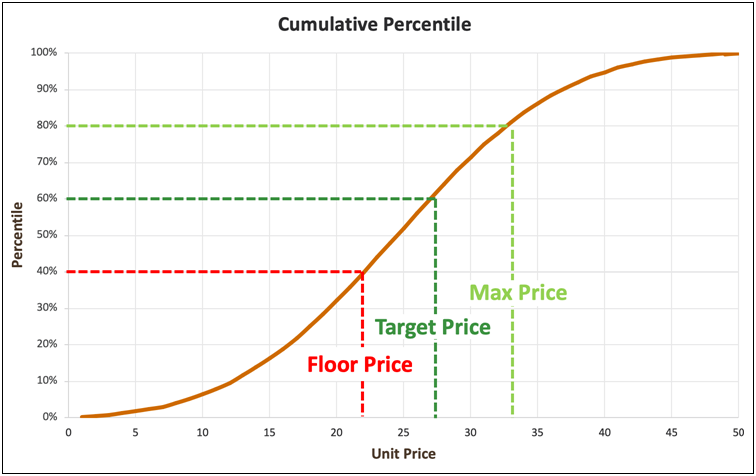
Percentile Aggregates
When the Aggregate Type is Percentile, the output result is generated based on the cumulative percentile value. For example, the following graph shows the price thresholds for 40%, 60%, and 80% Percentile Values.
Use Trained Price Optimization
For analytics using "Use Trained Price Optimization", output attributes are defined based on the ratio to the optimum price from the analytic selected on the previous page. For each output, the ratio is defined as the "Delta Percentage", then the Direction of the offset is specified as Lower Bound or Higher Bound.
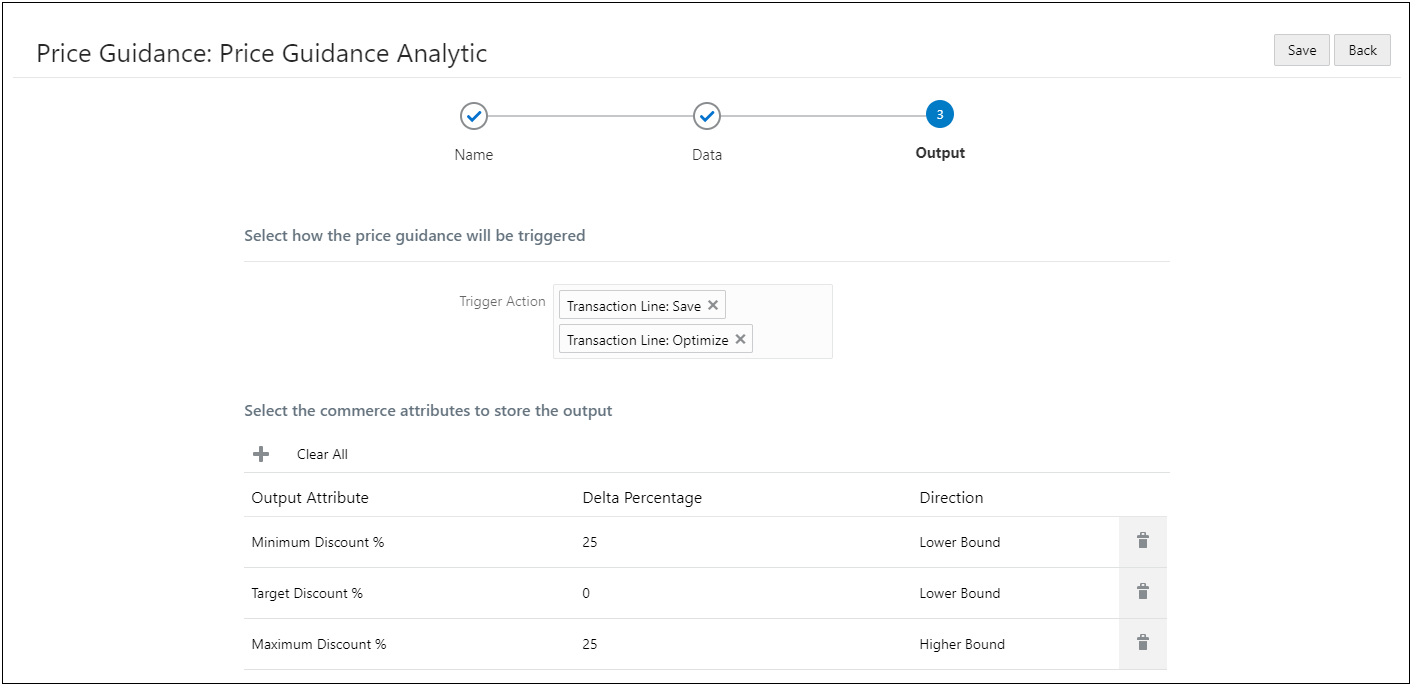
Delta Percentages
The following price guidance values are used for the example below.

- The Floor Discount % is at the net contribution that is 25% less than the maximum and at the lower bound side.
- The Target Discount % adjusts the target price to optimum price.
- The Max Discount % is at the net contribution that is 25% more than the maximum and at the higher bound side.
The following price optimization chart shows the discount percentage offsets.
Steps to Enable
The Price Guidance Analytic is automatically available for Transaction Lines with CPQ Cloud 19C. To display this new feature to sales users, administrators must perform the following tasks:
- Set up Data Columns for any attributes used as driver attributes, filter attributes, or optimizations settings.
- Define and successfully train the analytic the Price Optimization analytic when using a trained analytic to define price guidance.
- Add the HTML attribute with the analytic and any desired output attributes to the applicable Commerce layout.
- Deploy the Commerce process.
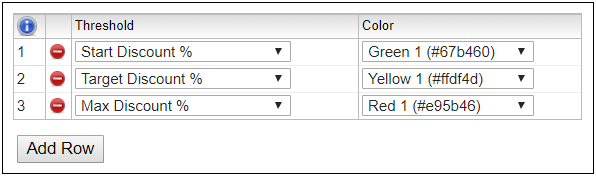
In CPQ Cloud 19C, CPQ introduces the new Price Guidance Gauge that provides the ability to create a visualization for current price or discount values at the Transaction and Transaction Line level relative to a range of acceptable values. While the gauge is intended to support pricing guidance, it can be used to depict thresholds and the desirability for any numeric values relative to a range or gradient.
Sales users can hover over the gauge to view price guidance details. Administrators define a simple or graduated scale for a price guidance gauge. A minimum of two thresholds is required, but customers can define thresholds using five color ranges with two variations for each color. When users hover over the gauge, a tooltip displays the values for each threshold. For example, the following image displays a Price Guidance gauge with three thresholds and a hover tooltip.

Transaction Line gauges, which are HTML attributes, can only be displayed in the Transaction Line Details page.
Create a Price Guidance Gauge
Perform the following steps to define a Commerce Price Guidance Gauge.
- Navigate to the Attribute List page for the applicable Transaction or Transaction Line document.
Admin > Process Definition > Documents > Attributes
- Click Add. The Attribute Editor page opens.
- Enter a Label and Variable Name.
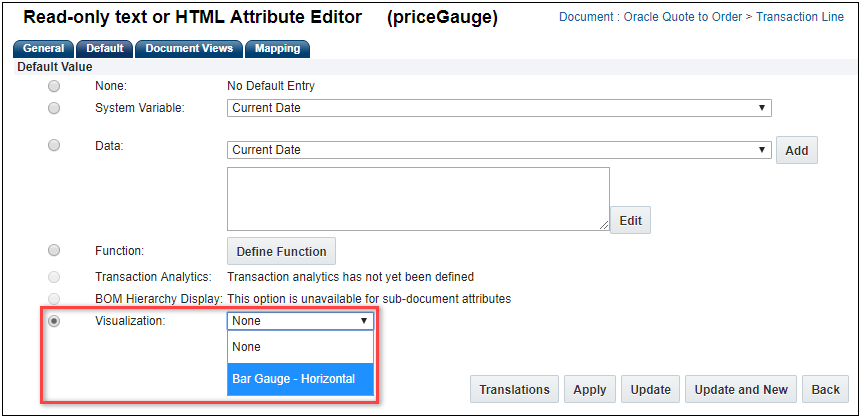
- Select Read-only text or HTML from the Attribute Type menu, then click Add.
- Select the Default tab.
- Select the Visualization Default Value option.
- Select Bar Gauge - Horizontal from the drop-down menu.
- Select an attribute from the Current Value drop-down menu.
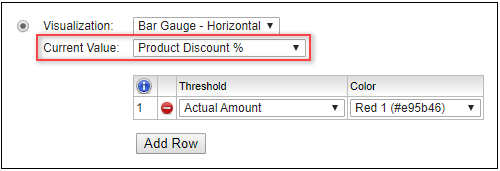
- Select the Threshold attributes and set the Color values. Click Add Row to add additional threshold items.
- Click Apply to save the attribute settings.
Steps to Enable
The Price Guidance Gauge is automatically available as a HTML attribute visualization Lines with CPQ Cloud 19C. To display this new feature to sales users, administrators must perform the following tasks:
- Administrators must define the Bar Gauge Visualization.
- Add the HTML attribute with the visualization to the applicable Commerce layout.
- Deploy the Commerce process.
Tips And Considerations
- The Price Guidance Gauge is certified only for JET Transaction UI.
- Price Guidance Gauges cannot be added to the Line Item Grid, because the Line Item Grid does not support HTML attributes.
Optimal Values for Transaction Lines
Beginning in CPQ Cloud 19C, customers can provide guidance to sales users on the optimal discount to maximize net revenue or margins on Transaction Lines. Optimal values are based upon historical Transaction data and attributes with predictive significance (also referred to as 'driver attributes'). Customers can define which attribute value will be optimized and which attributes will be populated with the results of the optimization. Administrators can derive optimal net prices from optimal discount percentage using list prices as a benchmark. After set up and the initial machine learning tasks are complete, optimal value recommendations can be presented to sales users on the Commerce UIs.
CPQ Cloud 19C simplifies the process to create Price Optimization analytics for Transactions and Transaction Lines. To create a Price Optimization analytic, administrators navigate to Admin > Commerce Process > Analytics and click "Create Analytic". They scroll to the Price Optimization option and click "Create". The "with Optimization" option is automatically selected and the Price Optimization settings are displayed when the Analytics Definition Editor opens.
Administrators can select Transaction or Transaction Line attributes when defining settings and filters for a Transaction Line Price Optimization analytic. They can also select Transaction or Transaction Line actions when defining output trigger actions. When selecting an attribute, the document name precedes the attribute or action and Transaction items are listed first.
Steps to Enable
The Price Optimization Analytic is automatically available for Transaction Lines with CPQ Cloud 19C. To display this new feature to sales users, administrators must perform the following tasks:
- Set up Data Columns for any attributes used as driver or filter attributes, or optimizations settings.
- Define and successfully train the analytic.
- Add the HTML attribute with the analytic and any desired output attributes to the applicable Commerce layout.
- Deploy the Commerce process.
Tips And Considerations
- Only Transaction attributes and actions are available for Transaction Price Optimization analytics.
- Even though Transaction Line Price Optimization analytics can use Transaction attributes, which are defined in Data Columns, this functionality is not available for Transaction Line Scatterplots.
Win Probability for Transaction Lines
Understanding the Win Probability of a current price is key to maximizing the profit for a Transaction or Transaction Line. While negotiating pricing with customers, sales users need to understand how sensitive their customer will be to changing discounts and pricing, and how likely they are to buy at a particular price point or discount. The Win Probability analytic, introduced in CPQ Cloud 2017 R2, allowed sales users to predict the Win Probability of a Transaction based on historical data. CPQ Cloud 19C extends this functionality and provides Win Probability analytics for Transaction Line documents.
Administrators can select Transaction or Transaction Line attributes when defining settings and filters for a Transaction Line Win Probability analytic. They can also select Transaction or Transaction Line actions when defining output trigger actions. When selecting an attribute, the document name precedes the attribute or action and Transaction items are listed first.
Steps to Enable
The Win Probability Analytic is automatically available for Transaction Lines with CPQ Cloud 19C. To display this new feature to sales users, administrators must perform the following tasks:
- Set up Data Columns for any attributes used as driver or filter attributes.
- Define and successfully train the analytic.
- Add the HTML attribute with the analytic and any desired output attributes to the applicable Commerce layout.
- Deploy the Commerce process.
Tips And Considerations
- Only Transaction attributes and actions are available for Transaction Win Probability analytics.
- Even though Transaction Line Win Probability analytics can use Transaction attributes, which are defined in Data Columns, this functionality is not available for Transaction Line Scatterplots.
System Configuration Enhancement
System Configuration refers to the manner in which customers use CPQ Cloud to configure and bundle the product or set of products they wish to sell using a group of related models that together define an entire system. A system is a hierarchical arrangement of connected configurable models with a system root containing all of the other models.
The following functionality is available in CPQ Cloud 19C.
System Configuration Model Path
CPQ Cloud 19C introduces the new System Configuration Model Path (_system_config_model_path) system attribute to return a JSON path with the exact location of the current model in the system. "_system_config_model_path" returns a path that includes all of the current model's parent models and the array index associated with the current model.
The indices provided in the JSON path system attribute leverage the absolute position of the elements. They describe the BOM hierarchy path to get to the current model. Even though system configuration model paths are only returned for models, all BOM items (i.e. models and parts) get their own index in the list of children at each level of the hierarchy. The following example shows the system configuration model paths for a basic system configuration.
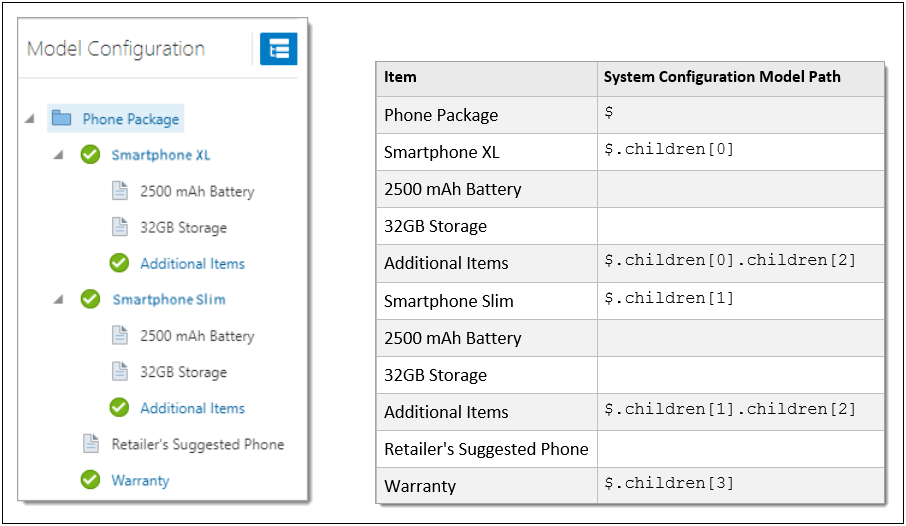
Administrators can use "_system_config_model_path" in inter-model rules to retrieve a path that includes all of the current model's parent models and the array index associated with the current model. For example, a customer wants to retrieve the "color" attribute value from its direct parent model. The following code sample uses "_system_config_model_path" to retrieve the path for the parent model.

Steps to Enable
You don't need to do anything to enable this feature.
System Configuration Support for RFQ
CPQ Cloud 19C provides system configuration support for Commerce integration quote requests, also known as Request For Quote (RFQ). Commerce integration self-service users can request a CPQ Cloud quote, thereby initiating a CPQ transaction that a sales specialist can modify, reconfigure, or discount. Once finalized in CPQ Cloud, the quote is returned to the Commerce integration for acceptance and ordering by the self-service user.
Prior to CPQ 19C, an RFQ for a system configuration created a transaction with the root model and child models, but the models were not configured. Beginning in CPQ 19C, an RFQ for a system configuration will add all configured models in the system to the transaction.
Steps to Enable
You don't need to do anything to enable this feature.
Customer Requested Features and Enhancements
CPQ Cloud 19C introduces the following customer requested features and enhancements:
- Automatically Save Documents with Print Action
- Clone Configuration Attribute
- Document Merge
- eSignature Integration Enhancement – Sequential or Parallel Requests
- Send Notification on Real-Time Integration Failure
Automatically Save Document with Print Action
In CPQ Cloud 19C JET Responsive UI, the Save Automatically option on a Print action is enhanced so that the document is automatically saved in the file attachment attribute and is accessible to the user in a pop-up window. This enhancement prevents the user from having to perform an additional save step.
Steps to Enable
You don't need to do anything to enable this feature.
CPQ Cloud 19C supports cloning of Configuration Attributes and all of the associated attribute properties.
To clone a Configuration attribute, complete the following steps:
- Navigate to the Supported Products page. Admin Home > Products > Catalog Definition

- Select Configurable Attribute from the Navigation drop-down and then click List. The Configurable Attributes Administration List page displays.
- From the Configurable Attributes Administration List page, perform one of the following steps:
- Select the checkbox next to the Configuration action you wish to clone and then click Clone.
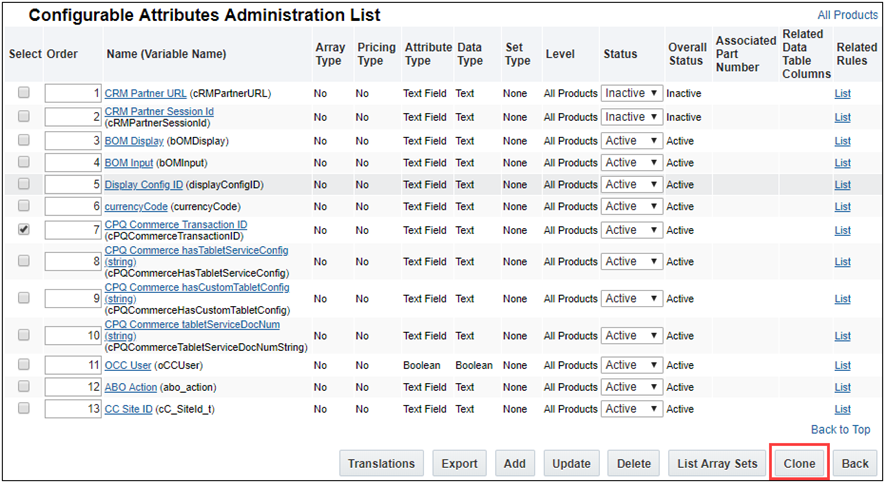
IMPORTANT: Only one Configurable attribute can be selected to clone at a time. Selecting multiple attributes from the Configurable Attributes Administration List page results in an error message.
- Click on the Configurable Attribute you wish to clone. When the Text Attribute Editor page displays, click Clone.
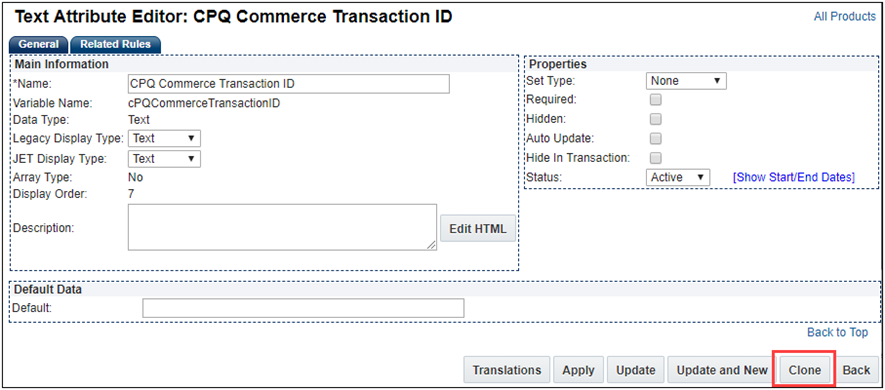
The Text Attribute Editor page displays with the Name field showing "Copy Of" and a default Variable Name showing "Clone_1".
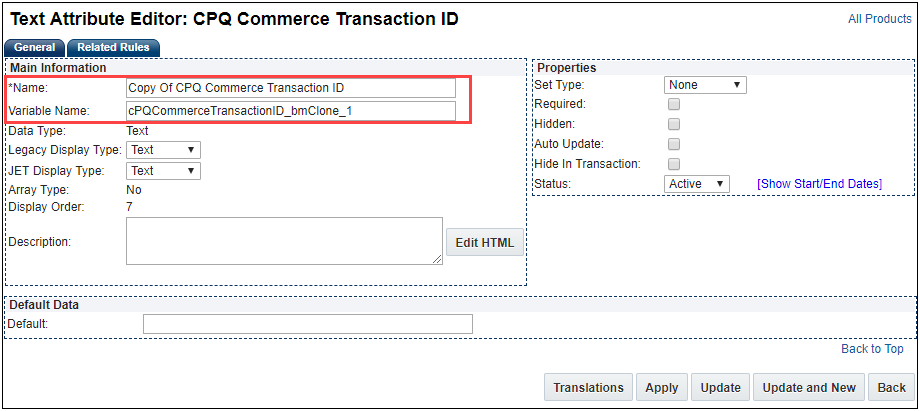
- Enter a name in the Name field for the new cloned attribute.
- Enter a unique variable name or accept the default variable name in the Variable Name field for the new cloned action.
- Click Apply to create the new cloned Configurable attribute. The Text Attribute Editor page for the new cloned Configurable attribute displays.
- (Optional) Modify the new cloned Configurable attribute fields in the General and Related Rules tab as desired.
- Click Update to save the changes to the new cloned Configurable attribute.
Steps to Enable
You don't need to do anything to enable this feature.
Tips And Considerations
The cloned Configurable attribute is available to administrators to add to a layout. The cloned attribute is not automatically added to a layout even if the original attribute is on a layout.
In CPQ Cloud 19C, the PDF Drivers for Document Designer's .pdf output format has been enhanced. All customers now have the Multi-source Document Creation license enabled on their environments. Enhancements include but are not limited to the following:
- Customer are now able to merge PDF documents with the Document Designer template. Refer to CPQ Cloud Online Help > Document Designer > Elements > Embed Document article for details.
- Using the Keep Together property no longer clips the combined content if the bound elements have content longer than the page length. Content will gracefully flow over to the next page.
- Improved handling of font spacing.
Steps to Enable
You don't need to do anything to enable this feature.
Tips And Considerations
Please validate the current PDF outputs to ensure that the print output meets your expectations. If you find significant layout differences, please open a ticket on My Oracle Support.
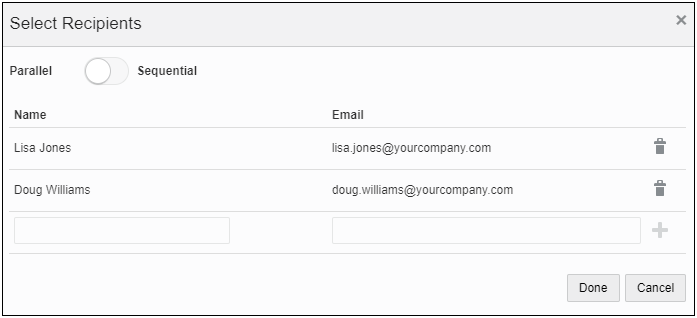
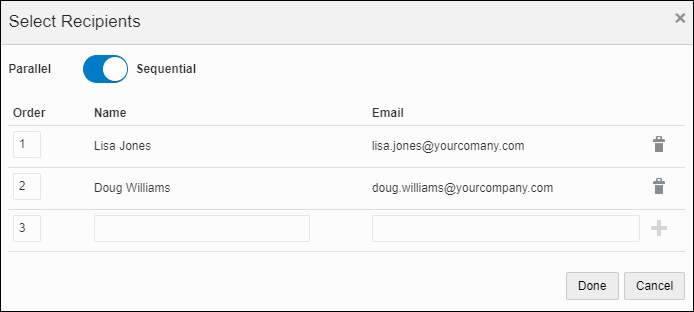
eSignature Integration Enhancement - Sequential or Parallel Requests
In CPQ Cloud 19C, DocuSign integration support has been added to designate if the eSignature request routing for a Transaction needs to be parallel or sequential. If the routing preference is sequential, the sales user can specify a sequence number for recipients to receive the signature request.
For parallel routing, all recipients receive the eSignature request at the same time.
For sequential routing, recipients receive the eSignature request in a specified order. This routing option also allows for a mixing of parallel and sequential routing. You can designate as many recipients as necessary for each sequence routing number. All recipients marked with the same routing number will receive the eSignature request at the same time.
The example below shows a document that requires a sequential eSignature routing and entry of this routing in the Select Recipients dialog box.

Sequential Routing Example
Sales users can designate DocuSign sequential or parallel eSignature routing when they are ready to request eSignatures for a document, as follows:
- Navigate to the desired Transaction.

- Click Choose File to select a document to upload for signature.
- Click Edit Recipients to select the recipients of the document. The Select Recipients dialog box displays.
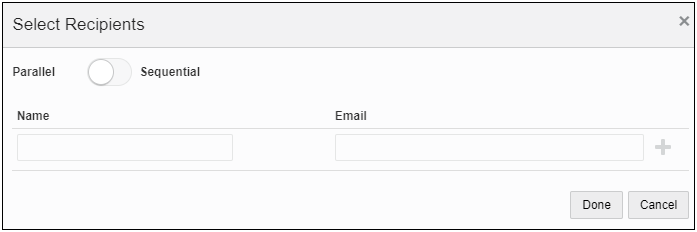
- Determine the eSignature routing method:
- If the routing is Parallel, verify the button switch is set to Parallel.
- Type the Recipient's Name and Email into the fields.
- Click the add (+) icon to add a recipient or click the remove icon to remove a recipient.
- If the routing is Sequential, verify the button switch is set to Sequential.
- Enter the sequential order number for each recipient under the Order column.
- Type the Recipient's Name and Email into the fields.
- Click the add (+) icon to add a recipient or click the remove icon to remove a recipient.
- Click Done. The recipient information is saved and the Transaction information display.

- Click Request Signature to send the document to the recipients for signature.
Steps to Enable
DocuSign eSignature integration must be set up for the CPQ Cloud site. Administrators must notify sales users of this feature.
Send Notification on Real-Time Integration Failure
A new Retry Failed Integrations button and Email Recipient after Maximum Retry setting is added to the Real-Time Integration Settings. Administrators can set a maximum number retry fails with an Integration before an email is sent to designated recipients. Also, the Retry Failed Integrations button is added to simplify the retry process for an administrator.
To have an email sent to a recipient after the maximum real-time integration retries fail, complete the following steps:
- Navigate to the Real-Time Integration page. Admin Home > Integration Platform > Integration Settings
- Enter the email address or one or more recipients in the Email Recipient After Maximum Retry field.
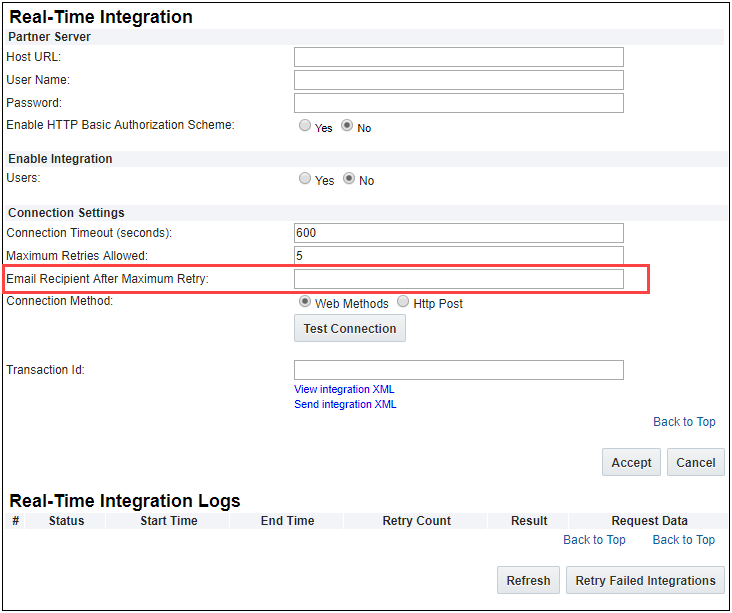
IMPORTANT: In order for an email notification to be sent after the maximum retries fail, the Maximum Retries Allowed value must be a value greater than 1.
- Click Accept.
To retry failed integrations, complete the following steps:
- Navigate to the Real-Time Integration page. Admin Home > Integration Platform > Integration Settings
- Click Retry Failed Integrations under the Real-Time Integration Logs section. This will retry all failed Real-Time Integrations.
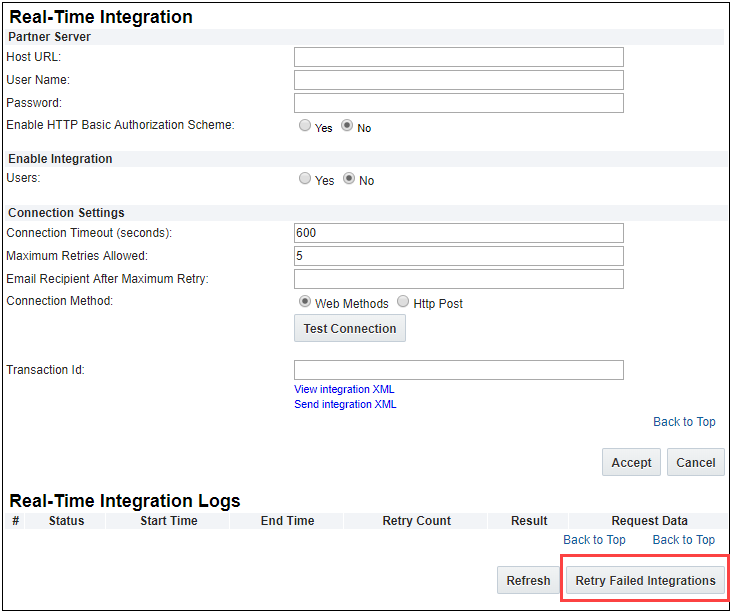
IMPORTANT:
- Administrators may want to routinely clear failed Real-Time Integrations once network and/or connection issues are resolved.
- Once a failed Real-Time Integration is successfully connected, it is removed from the failed Real-Time Integration list.
Steps to Enable
You don't need to do anything to enable this feature.
Migration
When migrating from one site to another using the Migration Center or Migration Packages, both sites must use the same major update. The migration of content can only occur across minor updates within the same major update. Migration across major updates cannot occur.
- “Major update” = Update 19C
- “Minor update” = Update 19C Patch 1
Resolved Known Issues
For information on bugs fixed in Update 19C, refer to the CPQ Cloud 19C Resolved Known Issues document available on My Oracle Support and the CPQ Cloud Online Help.
Translation
For some system-defined messages and components, strings were removed and others added in CPQ Cloud 19C. If you have created your own implementation-specific translations of system-defined strings, some of these strings may no longer appear. Other strings may appear in English. The strings appearing in English are new and require translation.
Most of these messages and components are on the Administration side of CPQ Cloud, but you should review both your end user and administration pages before deploying your updated installation to confirm that all strings appear in the desired language.
Translation Status
CPQ Cloud supports the consumption of both single and multi-byte character sets. Submit a service request on My Oracle Support to enable your site for a new language.
For the following languages, a translation of the CPQ Cloud user interface is available for both the platform and the reference application:
- Chinese (Simplified) [China]
- Chinese (Traditional) [Taiwan]
- Czech [Czech Republic]
- Danish [Denmark]
- Dutch [Netherlands]
- English
- Finnish [Finland]
- French
- French [Canada]
- German
- Hungarian [Hungary]
- Italian
- Japanese [Japan]
- Korean [South Korea]
- Norwegian (Bokmål) [Norway]
- Polish [Poland]
- Portuguese [Brazil]
- Romanian [Romania]
- Russian [Russia]
- Spanish (Worldwide)
- Swedish [Sweden]
- Turkish [Turkey]
Upgrade and test all test instances on Oracle CPQ Cloud 19C before upgrading to production.
Browser Support
CPQ Cloud supports all browser versions that meet the criteria of the Oracle Software Web Browser Support Policy.
If you experience issues using a supported browser version, open a ticket on My Oracle Support to resolve the issue. If an issue arises when using a supported browser, use a certified browser version until the delivery of a fix. Certified browsers are selected based on current market share and thoroughly tested to work with the current version's standard functionality.
Certified Browsers
Windows
- Google Chrome 75.x
- Mozilla Firefox 67.x
- Internet Explorer 11.x
IMPORTANT: Compatibility issues with the selected browsers may exist when sites contain additional JavaScript, alternate CSS, or other custom functionality. Customizations may require add-on work. Contact My Oracle Support to determine the availability of workarounds and minor fixes.
Salesforce Integration Support
Oracle officially supports version 8 and version 8.1 (installed package version 1.10 and 8.1 respectively) of the Oracle CPQ Connector for Salesforce. We also continue to support version 7.2 of the legacy Oracle CPQ Commerce Integration.
IMPORTANT: Previous versions of these packages are expected to continue to function; however Oracle will not address new issues that arise. We strongly encourage customers to upgrade to the latest supported version.
Training
Please refer to the release documentation for all versions between your current version and the version to which you are upgrading to see all new functionality, resolved known issues, and functional known issues.
Refer to the CPQ Cloud Online Help to become familiar with the new features introduced in Oracle CPQ Cloud 19C. For additional help, see My Oracle Support.
Verify any information not explicitly mentioned in this document as supported by the software against the product help for Oracle CPQ Cloud 19C or the Oracle CPQ Cloud Consulting team.
Additional Information
For more information on Oracle CPQ Cloud, visit the Oracle CPQ Cloud documentation site.
Disclaimer
The details in this document are provided for high-level informational purposes only and are not intended to function as a specification or to replace the Online Help. Upgrading to a subsequent release may require the re-deployment of Commerce Processes, Configuration, or global function settings. Modifications to integration XSL files or APIs may also be required.
---