
This document will continue to evolve as existing sections change and new information is added. All updates appear in the following table:
| Date | Feature | Notes |
|---|---|---|
| 08 NOV 2019 | Created initial document. |
Oracle Configure, Price, and Quote (CPQ) Cloud enables companies to streamline the entire opportunity-to-quote-to-order process, including product selection, configuration, pricing, quoting, ordering, and approval workflows. CPQ Cloud provides a flexible, scalable, enterprise-ready solution ideal for companies of all sizes that sell products and services across direct, indirect, and e-commerce sales channels.
This guide outlines the information you need to know about new or improved functionality in Oracle CPQ Cloud 19D and describes any tasks you might need to perform for the update. Each section includes a brief description of the feature, the steps you need to take to enable or begin using the feature, any tips or considerations that you should keep in mind, and the resources available to help you.
Key Resources
Refer to CPQ Cloud Administration Online Help for detailed descriptions and instructions.
In CPQ Cloud 19D, we are introducing new Administrator Videos in our Administration Online Help. These videos provide quick demonstrations for several administration tasks.
Security & New Features
We would like to remind you if your system has modified security structures you may need to advise your security administrator of new features you would like to implement.
Give Us Feedback
We welcome your comments and suggestions to improve the content. Please send us your feedback at cpqcloud_documentation_us_grp@oracle.com.
Column Definitions:
Report = New or modified, Oracle-delivered, ready to run reports.
UI or Process-Based: Small Scale = These UI or process-based features are typically comprised of minor field, validation, or program changes. Therefore, the potential impact to users is minimal.
UI or Process-Based: Larger Scale* = These UI or process-based features have more complex designs. Therefore, the potential impact to users is higher.
Customer Action Required = You MUST take action before these features can be used by END USERS. These features are delivered disabled and you choose if and when to enable them. For example, a) new or expanded BI subject areas need to first be incorporated into reports, b) Integration is required to utilize new web services, or c) features must be assigned to user roles before they can be accessed.
| Ready for Use by End Users Reports plus Small Scale UI or Process-Based new features will have minimal user impact after an update. Therefore, customer acceptance testing should focus on the Larger Scale UI or Process-Based* new features. |
Customer Must Take Action before Use by End Users Not disruptive as action is required to make these features ready to use. As you selectively choose to leverage, you set your test and roll out timing. |
|||||
|---|---|---|---|---|---|---|
| Feature |
Report |
UI or |
UI or |
Customer Action Required |
||
Map a Price Attribute to Configuration Attribute for Dynamic Pricing Engine Update |
||||||
System Path Warnings for Favorites and Pending Configurations |
||||||
The following CPQ Cloud Release 19D features and enhancements cater to the needs of large, complex enterprises for a scalable, integrated, and performant platform:
- Content Delivery Network Integration
- Commerce Integration Enhancement
- Migration Center Enhancements
- REST API Enhancements
Content Delivery Network Integration
Customers can enable better end-user performance by integrating CPQ Cloud with a CDN to help manage internet content and traffic. CDNs offer geographically distributed proxy servers to provide enhanced availability and performance by distributing services close in proximity to end users.
The following CDN integration is available in CPQ Cloud 19D.
Oracle CPQ Cloud provides an integration with Akamai to allow our customers to deploy CPQ Cloud content using the Akamai Content Delivery Network (CDN).
Akamai integration provides a customer with the following benefits:
- Forward deploy static files within the Akamai network for improved load time performance.
- Access to the Akamai network to route calls through the fastest path from client to server.
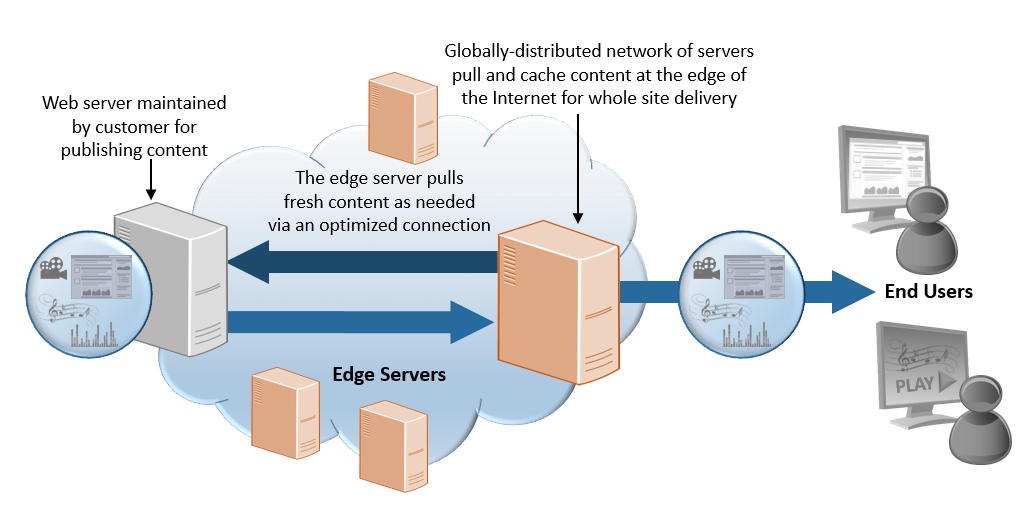
Content Delivery Network Integration Overview
Steps to Enable
To enable this feature you need to log a Service Request (SR).
Tips And Considerations
Review the following considerations before starting this Integration:
- A unique vanity URL is required.
- You will need a purchased certificate that validates CPQ Cloud content routing on the Akamai CDN.
Commerce Integration Enhancement
Commerce Integrations are used to export and import quote information to and from external systems, commonly CRMs or ERPs, when a Commerce Action is triggered.
The following Commerce Integration enhancement is available in CPQ Cloud 19D.
General Support for BML Integrations
BML Integrations can be used on Commerce Actions to send and receive data from external systems typically using REST Web Services. BML Integrations provide all the power and flexibility of BML functions and are defined on the Integrations page under each Commerce Process. Once defined, the BML integration is associated with a specific Commerce action under the action's Integrations tab. In prior releases, the BML Integration type was only available when integrating CPQ Cloud with Microsoft Dynamics 365 or when there was a Generic Integration established in the Integration Center. Beginning in 19D, this functionality is available generally for all CPQ sites.
Steps to Enable
To add a BML integration to a Commerce process, complete the following steps:
- Navigate to the Admin Home page.
- Click Process Definition in the Commerce and Documents section. The Processes page displays.
- For the applicable Commerce process, select Integrations in the Navigation drop-down.
- Click List. The Integrations page displays.
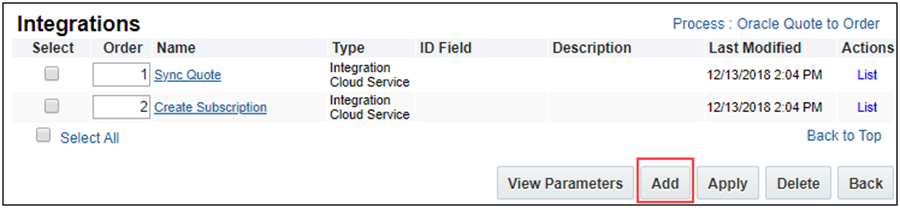
- Click Add. The Select Integration Types page displays.
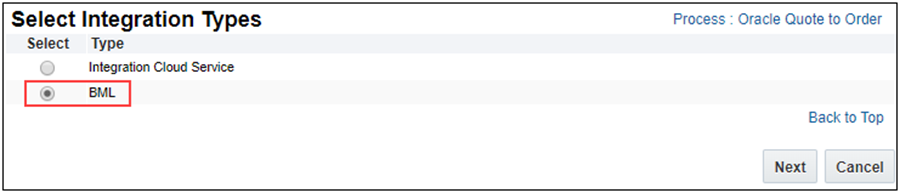
- Select BML and then click Next. The Edit Integration page displays.
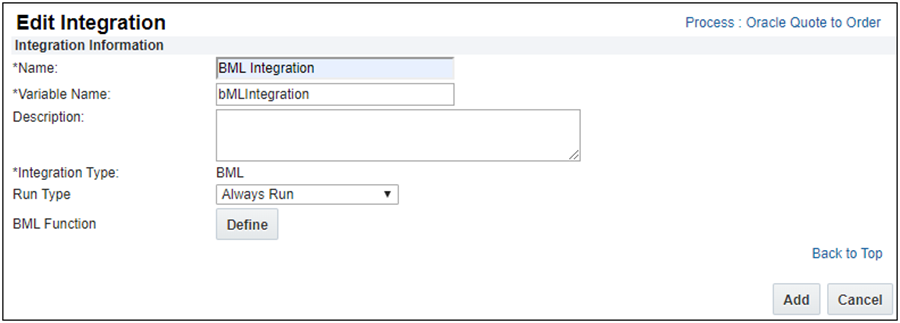
- Enter the Name and Variable Name for the BML integration.
- (Optional) Enter a Description.
- Select a Run Type value:
- Always Run: the BML function runs every time the process is requested.
- Requires Partner Session: the BML function only runs when a partner session is active.
- Click Define to define the BML function. The Select Attributes page displays.
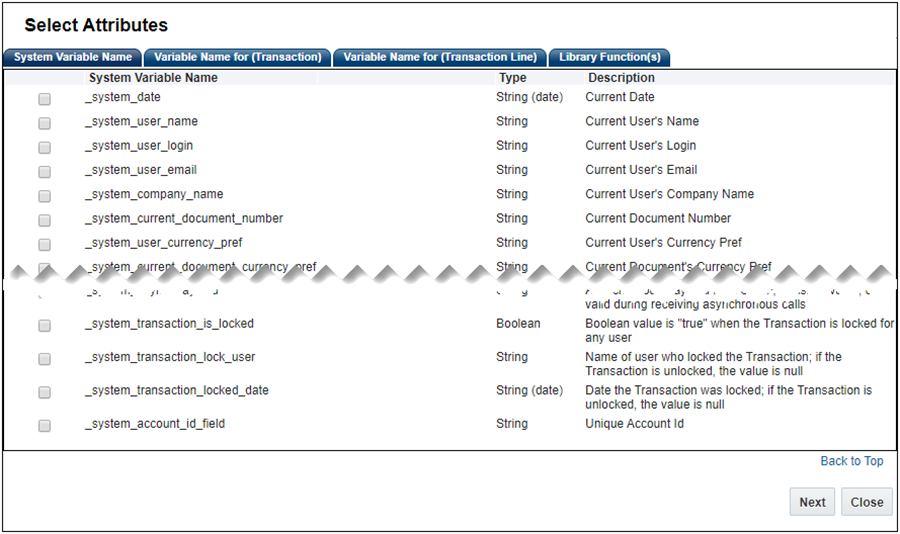
- Select the variables or functions that you want to use in the BML function. Click Next. The BML Editor displays for that attribute.
- Using the BML Editor, define the BML function that you want to run when the Commerce action is invoked.
IMPORTANT: Refer to Commerce Integrations within the CPQ Cloud Online Help for additional information on associating an Integration to a Commerce action.

- Click Check to check for errors.
- Click Run to validate BML provides expected response.
- Click Save to save the BML integration for the Commerce action.
- Click Close to close the BML Editor and return to the Edit Integration page.
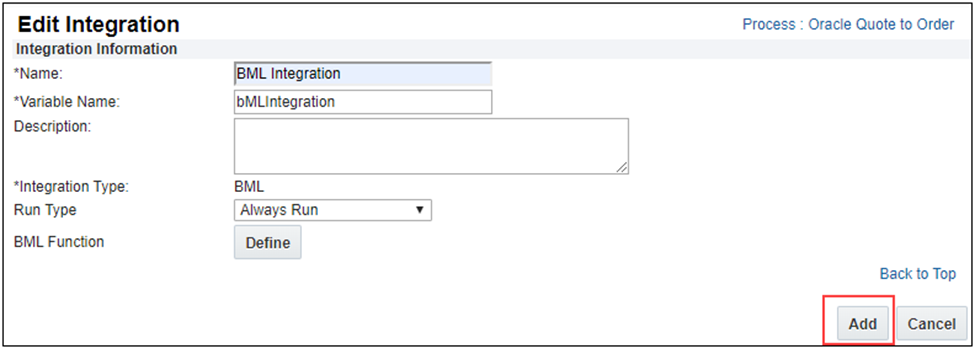
- Click Add to save this Integration. You are returned to the Integrations List page.
Tips And Considerations
After upgrading to 19D administrators are able to create new BML integrations in addition to the currently available SOAP-based Integrations (Import, Export, etc.) or Integration Cloud Service Integrations. However, only integrations of a single type are able to be used on a given Commerce Action; you cannot mix integration types.
Most CPQ Cloud customers have multiple environments to manage their CPQ Cloud implementations. The Migration Center is used to move administrative data and metadata between environments. Migration saves administrators time and reduces user errors by eliminating the need to manually replicate setup details across multiple sites. Migrations can be performed between two CPQ Cloud sites, or between a CPQ Cloud site and a migration package.
The following functionality is available in CPQ Cloud 19D.
- Forward Version Package Migration
- Display Variable Names in Migration Center
Forward Version Package Migration
Migration packages allow administrators to create collections of components for repeated migrations that can be downloaded and uploaded to another site. Oracle also uses migration packages to distribute collections of components to customers to implement certain functionality on a CPQ Cloud site. In prior releases, migration packages could only be uploaded to sites on the same major release. CPQ Cloud 19D introduces Forward Version Package Migration which enables migration packages from 19A and forward to be uploaded to the latest site version.
When an administrator uploads a 19A, 19B, or 19C migration package to a 19D site, the package is transformed to be compatible with 19D. Migration packages with the same major site version bypass the transformation service and are uploaded directly to the site.

Going forward, CPQ will support migration from 19A through the current site version. For example, when CPQ Cloud 20A is released administrators will be able to upload migration packages from 19A through 20A.
Steps to Enable
Administrators can upload migration packages from 19A through 19C to CPQ Cloud 19D sites.
Tips And Considerations
IMPORTANT:
- Forward Version Package Migration does not support migration packages prior to CPQ Cloud 19A.
- Migration packages are not backwards compatible. For example, a 19C migration package can't be migrated to a 19B site.
- Forward Version Migration is only available for migration packages. Forward Version Migration is not supported for site migration modes, such as Import From Source and Connect To Destination.
- Administrators cannot upload a package when other migration tasks are in progress (e.g. revert to snapshot, creation of snapshot, or a migration).
Display Variable Names in Migration Center
In prior releases, the Migration Center only displayed labels for items, which made it difficult to identify items for migration when multiple items had the same display label. CPQ Cloud 19D provides options to display variable names and allow sorting in the Migration Center. When enabled, this enhancement makes it easier for administrators to identify appropriate items for migration. For example, in the following image applicable variable names are displayed and items are sorted in the left-hand navigation and the details panel.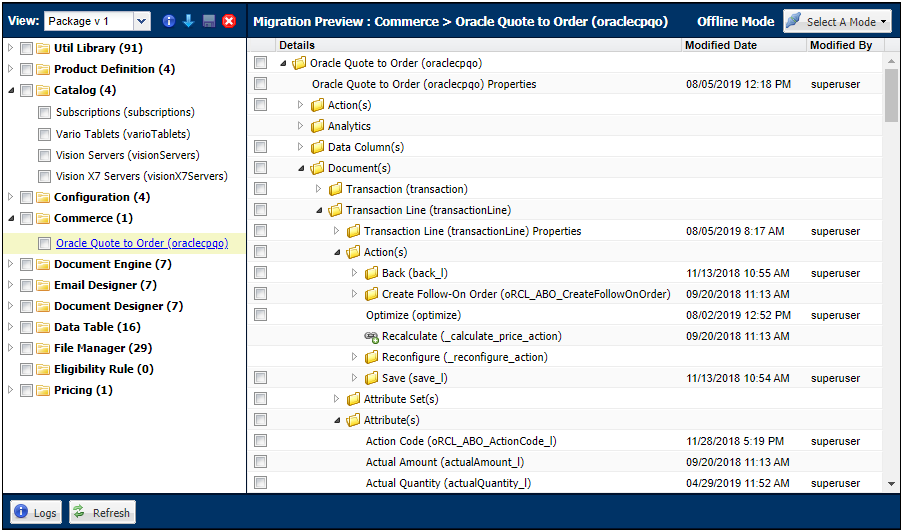
Steps to Enable
Complete the following steps to display variable names in the Migration Center.
- Navigate to the Options - General page.
Admin Home > General > General Site Options
- Set the Display Variable Name in Migration Center option to Yes.
- Select the Sort by default in Migration Center option:
- Yes - Display Migration Center items in alphabetical order.
- No - Display Migration Center items in the order they are listed in their parent folder.
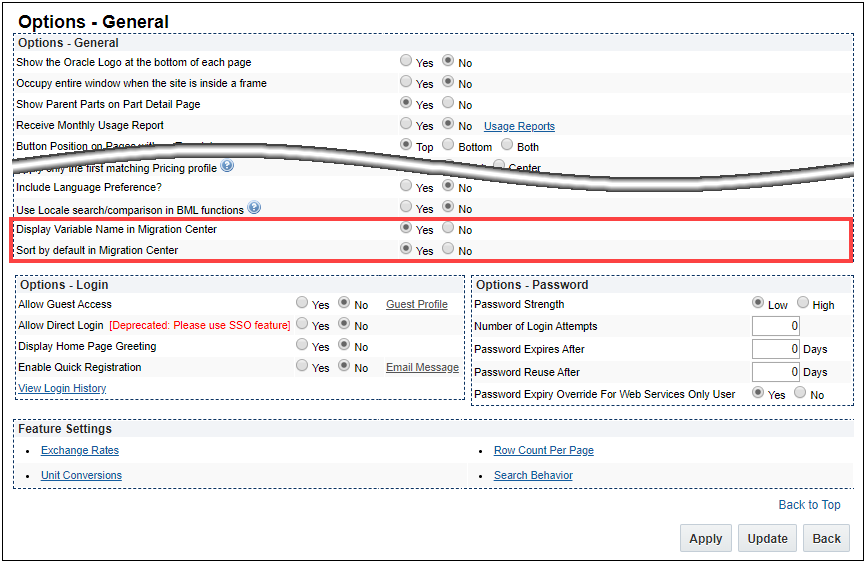
- Click Update to save your changes and return to the previous page.
CPQ Cloud exposes objects and data through REST APIs and RESTful standards. Exposing objects and data through REST APIs promotes simpler API calls and more robust integrations using HTTP standards.
CPQ Cloud 19D introduces REST API enhancements to support the following functionality.
- Add Multiple Models to a Transaction API
- Data Table REST APIs
Add Multiple Models to Transaction REST API
CPQ Cloud 19D introduces a Configuration endpoint to add multiple Model configurations to a Transaction.
Bulk Add to Transaction – This REST API is used to add several Model configurations to a Transaction. The Transaction Id, Document Id, and Model configuration items are specified in the request body. The Product Family, Product Line, and Model along with the configdata or punch-in information are defined for each item to be added.
- /rest/v8/config/actions/_bulkAddToTxn
- POST method
Steps to Enable
Review the REST service definition in the REST API guides, available from the Oracle Help Center > your apps service area of interest > REST API. If you're new to Oracle's REST services you may want to begin with the Quick Start section.
CPQ data table REST APIs allow an external system to access deployed data in CPQ data tables. CPQ Cloud 19D expands the data table REST APIs for administrators to support functions for data table properties, columns, records, imports, exports, searches, folders, and status logs. Refer to CPQ Cloud Administration Online Help or the REST API Services for CPQ Cloud for additional information and examples.
Data Tables
The data table endpoints retrieve data table properties and perform actions to create, delete, deploy, export, import, move, and update data tables.
Get List of Data Tables - This endpoint returns a list of data tables visible to the current user.
- /rest/v8/datatables
- GET method
Get Data Table Properties – This endpoint is used to retrieve properties for the specified data table. The following properties are returned: the Id, name, description, parent folder, "Live" status, if the data table has changes that are not deployed, last deploy date, last modification date, and creation date.
- /rest/v8/datatables/{tableName}
- GET method
Create Data Table – This endpoint is used to create a new data table. The data table name, description, isLive property, and the parent folder are specified in the request body.
- /rest/v8/datatables
- POST method
Delete Data Table – This endpoint is used to delete the specified data table.
- /rest/v8/datatables/{tableName}
- DELETE method
Delete Data Tables – This endpoint is used to delete multiple data tables. Table selections to delete are provided in the request body.
- /rest/v8/datatables/actions/deleteTables
- POST method
Deploy Data Tables – This endpoint deploys the specified data tables. Table selections to deploy are provided in the request body. The response returns links to the status log deploy tasks.
- /rest/v8/datatables/actions/deploy
- POST method
Export Data Tables – This endpoint is used to export data tables. Table selections to export are provided in the request body. The response returns a link to the status log task, which contains a link to the export file.
- /rest/v8/datatables/actions/export
- POST method
Import Data Tables – This endpoint is used to import data table files. The files to be imported, delimiters, and the parent data table folder are specified in the request body.
- /rest/v8/datatables/actions/import
- POST method
Move Data Tables – This endpoint is used to move data tables from one folder to another folder. Table selections for moving and the new target folder are specified in the request body.
- /rest/v8/datatables/actions/moveTables
- POST method
Update Data Table Properties – This endpoint is used to update the properties for the specified data table. Description, isLive properties, and parent folder updates can be specified in the request body.
- /rest/v8/datatables/{tableName}
- POST method
Data Table Columns
The data table column endpoints retrieve data table column information and perform actions to create, update, and delete data table columns.
Get List of Data Table Columns – This endpoint returns all data table column properties (e.g. name, description, type, index, key, order, creation date, last modification date, and validation and relationship information).
- /rest/v8/datatables/{tableName}/fields
- GET method
Get Data Table Column Properties – This endpoint returns properties for the specified data table column (e.g. name, description, type, index, key, order, creation date, last modification date, and validation and relationship information).
- /rest/v8/datatables/{tableName}/fields/{fieldName}
- GET method
Create or Update Data Table Column – This endpoint is used to create or update a data table column. The data table column information is specified in the request body.
- /rest/v8/datatables/{tableName}/fields
- POST method
Delete Data Table Column – This endpoint deletes the specified data table column.
- /rest/v8/datatables/{tableName}/fields/{fieldName}
- DELETE method
Delete Data Table Columns – This endpoint is used to delete multiple data table columns. Column selections to delete are provided in the request body.
- /rest/v8/datatables/{tableName}/fields/actions/deleteFields
- POST method
Synchronize Data Table Columns – This endpoint is used to create, update, or delete data table columns. The data table column information is specified in the request body.
- /rest/v8/datatables/{tableName}/fields/actions/synchronize
- POST method
Update Data Table Column Properties – This endpoint is used to update properties for the specified data table column (e.g. description, index, key, and order).
- /rest/v8/datatables/{tableName}/fields/{fieldName}
- POST method
Data Table Data
The data table data endpoints retrieve data table data (i.e. rows or records) and perform actions to clear, create, delete, and update data table rows.
GET Data Table Data – This endpoint returns all rows for the specified data table.
- /rest/v8/adminCustom{tableName}
- GET method
This endpoint can interpret query specifications to search for specific data within the specified data table. For example, the following query returns Status table records where the State equals CREATED or PICKED.
/rest/v8/adminCustomStatus?q={$or:[{State:'CREATED'},{ State:'PICKED'}]}
Get Data Table Row – This endpoint returns the specified data table row.
- /rest/v8/adminCustom{tableName}/{rowId}
- GET method
Clear Data Table Data – This endpoint deletes all rows from the specified data table.
- /rest/v8/adminCustom{tableName}/actions/clearData
- POST method
Create Data Table Row – This endpoint is used to create a new row for the specified data table. The data table row information is specified in the request body.
- /rest/v8/adminCustom{tableName}
- POST method
Delete Data Table Row – This endpoint deletes the specified data table row.
- /rest/v8/adminCustom{tableName}/{rowId}
- DELETE method
Delete Data Table Rows – This endpoint is used to delete multiple data table rows. Row selections to delete are provided in the request body.
- /rest/v8/adminCustom{tableName}/actions/deleteRows
- POST method
Search Data Tables – This endpoint is used to search multiple data tables. Query table selections and keywords are provided in the request body. When table selections are not provided all data tables are queried.
- /rest/v8/datatables/actions/getQueryStatistics
- GET method
Synchronize Data Table Rows – This endpoint is used to create, update, or delete data table rows. The data table row information and related action are specified in the request body.
- /rest/v8/adminCustom{tableName}/actions/synchronize
- POST method
Update Data Table Row – This endpoint is used to update the specified data table row. The data table row information is specified in the request body.
- /rest/v8/adminCustom{tableName}/{rowId}
- POST method
Data Table Folders
The data table folder endpoints retrieve data table folder properties and perform actions to create, update, and delete data table folders.
Get Data Table Folders – This endpoint returns a list of data table folders visible to the current user.
- /rest/v8/dataTableFolders
- GET method
Get Data Table Folder – This endpoint returns the properties for the specified data table folder.
- /rest/v8/dataTableFolders/{folderVarName}
- GET method
Create Data Table Folder – This endpoint is used to create a new data table folder. The data table folder name and variable name are specified in the request body.
- /rest/v8/dataTableFolders
- POST method
Update Data Table Folder – This endpoint is used to update the name for the specified data table folder. The new name is provided in the request body.
- /rest/v8/dataTableFolders/{folderVarName}
- POST method
Delete Data Table Folder – This endpoint is used to delete the specified data table folder.
- /rest/v8/dataTableFolders/{folderVarName}
- DELETE method
Data Table Status Logs
The data table status log endpoints retrieve status for data table tasks, cancel, and delete tasks, and retrieve files associated with a task (e.g. log files and export zip files).
Get Data Table Status Log Tasks - This endpoint returns a list of data table status log tasks. The query parameter is required and the only category values allowed are '13', '17', and/or '26'. '13' returns import tasks, '17' returns deploy tasks, and '26' returns export tasks.
- /rest/v8/tasks/?q={category:{$in:['13','17','26']}}
- GET method
Get Status Log Task - This endpoint returns information for the specified data table status log task.
- /rest/v8/tasks/{taskId}
- GET method
Cancel Status Log Task - This endpoint cancels the specified data table task.
- /rest/v8/tasks/{taskId}/actions/cancel
- POST method
Delete Status Log Task - This endpoint deletes the specified task from the data table status log.
- /rest/v8/tasks/{taskId}
- DELETE method
Delete Status Log Tasks - This endpoint delete multiple tasks from the data table status log. Task selections to delete from the data table status log are provided in the request body.
- /rest/v8/tasks/actions/deleteTasks
- POST method
Get List of Files for a Status Log Task - This endpoint returns a list of files associated with a data table task (e.g. log files and export zip files).
- /rest/v8/tasks/{taskId}/files
- GET method
Download a Status Log Task File - This endpoint downloads the specified data table task file (e.g. log files and export zip files). File names are acquired from the Get List of Files for a Data Task REST API response.
- /rest/v8/tasks/{taskId}/files/{fileName}
- GET method
Steps to Enable
Review the REST service definition in the REST API guides, available from the Oracle Help Center > your apps service area of interest > REST API. If you're new to Oracle's REST services you may want to begin with the Quick Start section.
The following CPQ Cloud 19D enhancements pioneer the next generation selling platform:
- Pricing Enhancements
- System Configuration Enhancements
The Pricing Engine, also known as the Rating/Pricing Engine, expands the capabilities of the Pricing Profiles and Rules to support a wider range of pricing use cases. This is accomplished by enabling Pricing Profiles to be defined using additional attributes, applying multiple Pricing Profiles to derive the list price for parts and lines, and supporting the ability to provide real-time pricing using RESTful web services.
The following new functionality is available in CPQ Cloud 19D:
- Map a Price Attribute to Configuration Attribute for Dynamic Pricing Engine Update
- Attribute Revert To Default Behavior Enhancement
Map a Price Attribute to Configuration Attribute for Dynamic Pricing Engine Update
Customers desire the ability to get pricing data updates as they make configuration and pricing modifications in the CPQ configurator, as in the case of Oracle Commerce Cloud and CPQ Cloud integration. To support this scenario, beginning in 19D, Price attributes can be mapped to Configuration attributes so that the Pricing Engine remains the central pricing logic manager for the products. The Pricing Engine can then support pricing updates from either a Product Configuration change or from a Commerce Transaction change.
CPQ Cloud 19D introduces Signed Punch-in attributes to ensure proper pricing information is provided only to the designated buyer. These attributes function identically to Configuration attributes except they require verification of digital signature data before pricing data is provided to the end customer. The digital signature includes the configurable attribute request data and encoded key pairing of the CPQ public key and customer private key.
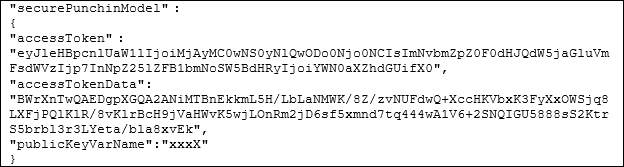
The punch-in request includes the following parameters in the Request body of the CPQ Cloud Configuration Run-Time Data REST API:
- Access Token (accessToken) – An encrypted Base64 encoded digital signature generated from the CPQ access token data and a private key using a SHA-256 with RSA algorithm.
- Access Token Data (accessTokenData) - An encoded object generated from a CPQ JSON string consisting of the expiry time, a JSON array of strings representing the permitted configurable attribute keys, and a JSON object of string values containing the configuration attribute values to be set during punch-in. Access token data can include multiple asset keys and/or configurable attribute key/value pairs.
- Public Key (publicKeyVarName) – The variable name of the pubic key uploaded in the CPQ Integration Center.
Configuration Run-Time Data REST API Digital Signature Parameters Example:
IMPORTANT:
- The digital signature data must be generated and verified every time a Signed Punch-in Attribute pricing request is initiated. Administrators will need to define a process to automate encoding the access token, access token data, public key and private key data using a SHA-256 with RSA algorithm. See Steps to Enable for more information.
- CPQ Cloud does not hold the private key; it is retained by the customer's system.
- Public keys are validated and stored in a secure keystore and used to verify the authorized digital signature. At runtime, public keys are retrieved from the keystore and used for encryption.
- You cannot migrate public keys between CPQ Cloud environments. The public keys can be the same for each environment, but they must be uploaded to each Commerce Process on each environment individually.
Creating a Signed Punch-In Attribute
To create a Signed Punch-in Attribute, complete the following steps:
- Navigate to the Admin Home page.
- Click Catalog Definition in the Products section. The Supported Products page displays.
- Navigate to the Attributes Administration List page for the appropriate Product Family, Product, or Model for adding the Signed Punch-in Attribute.
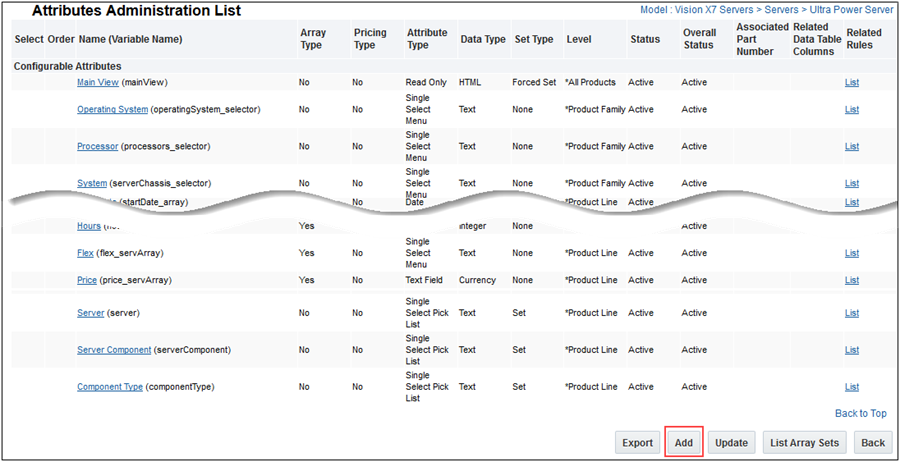
- Click Add to add the new attribute. The Attribute Editor page displays.
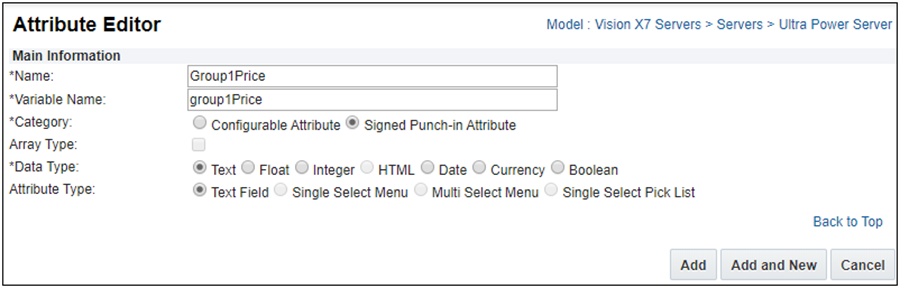
- Enter the Name and Variable Name of the attribute. The Variable Name field populates automatically. Variable names can only contain alpha-numeric characters and underscores. The entry can be changed before saving, but after saving the value is read-only.
- Select Signed Punch-in Attribute for the Category.
IMPORTANT: Array attributes, Multi Select Menu attributes, Single Select Menu attributes, Picklist attributes, and HTML attributes cannot be Signed Punch-in Attributes.
- Select the desired Data Type for the attribute.
- Click Add. The Text Attribute Editor for that attribute displays.
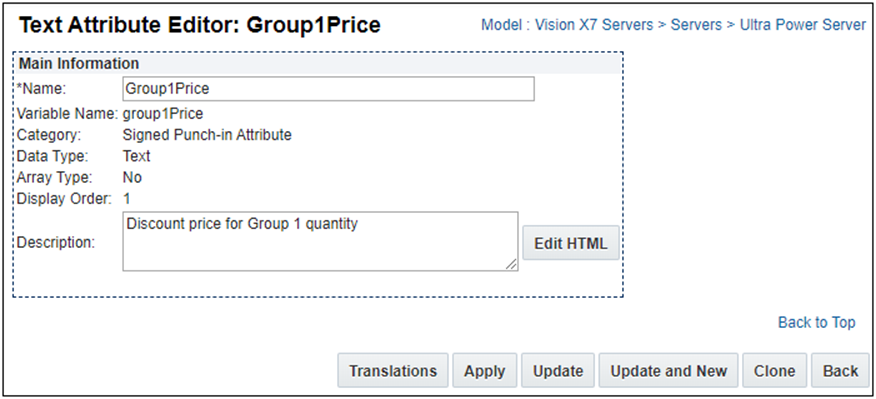
- (Optional) Enter a Description for the attribute.
- Click Apply. The Attributes Administration List displays with the new attribute showing under the Signed Punch-in Attributes section.
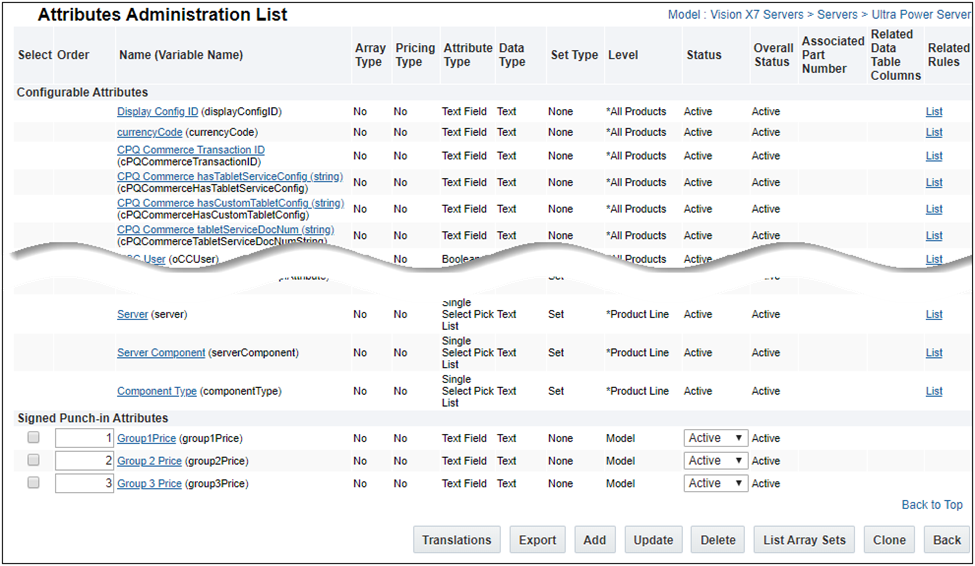
Mapping a Price Attribute to a Configuration Attribute
To map a price attribute to a Configuration attribute, complete the following steps:
- Navigate to the Admin Home page.
- Click Rating/Pricing Engine in the Products section. The Product Pricing page displays.
- Select the Attributes tab. The Pricing Attributes are displayed.
IMPORTANT: If the desired Pricing attribute is not listed. You can add a Pricing Attribute by clicking the Add Attribute button and entering the necessary information on the New Pricing Attribute screen. Refer to CPQ Online Help for instructions.
- Select the desired Pricing Attribute from the list.
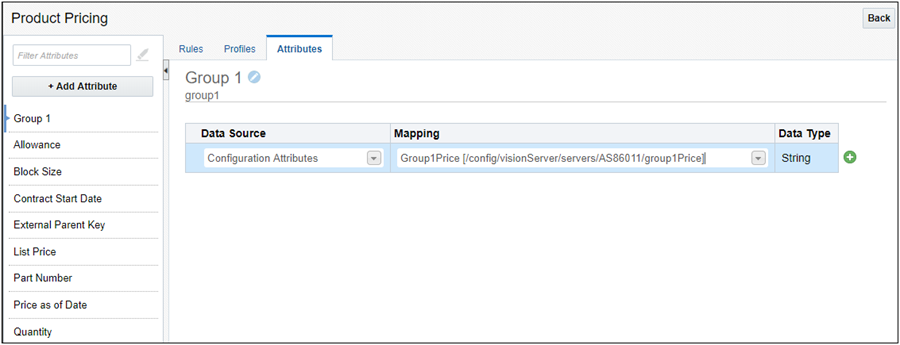
- Select Configuration Attributes from the Data Source drop-down. Selecting Configuration Attributes from the drop-down will include both signed and unsigned Configuration attributes.
- Select the mapped attribute from the Mapping drop-down. The Data Type for the Configuration Attribute displays.
- Click the Add (+) icon to save attribute mapping information.
Once a Pricing attribute is mapped to a Configuration attribute, it is available for use with Pricing Profiles and Pricing Rules. Refer to CPQ Online Help for instructions.
Steps to Enable
If you are implementing unsigned Configuration attributes, administrators need to map a Price attribute to a new or existing Configuration attribute. Refer to Mapping a Price Attribute to a Configuration Attribute.
If you are implementing Signed Punch-in attributes, administrators need to complete the following steps:
- Define a process to automate encoding and verifying the digital signature data every time a Signed Punch-in Attribute request is initiated. Refer to Data Requirements for Encoding Signed Punch-in Attribute Requests.
- Create a Signed Punch-in attribute. Refer to Creating a Signed Punch-In Attribute.
- Map a Price attribute to the Signed Punch-in attribute. Refer to Mapping a Price Attribute to a Configuration Attribute.
Data Requirements for Encoding Signed Punch-in Attribute Requests
The Signed Punch-in attribute URL includes attribute request data and encoded key pairing of the CPQ public key and customer private key. The following table defines the required data and format to make the Signed Punch-in attribute request:
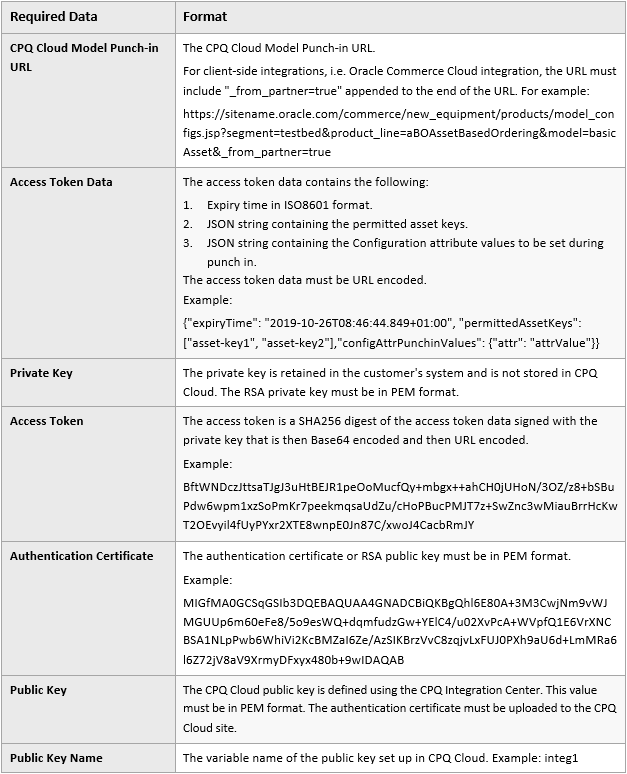
IMPORTANT: For more information about authentication certificates, public keys, and public key names, refer to the Integrations article within CPQ Cloud Online Help.
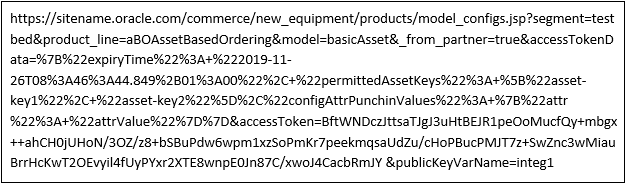
The following provides an example of the resulting punch-in URL.
Tips And Considerations
A Signed Punch-in attribute functions the same as a Configuration attribute except that private and public key data is assigned to a Signed Punch-in attribute and this secure access token is verified when a pricing request is made.
In addition, Signed Punch-in attributes are:
- Not able to be modified
- Not available for putting on a Layout
- Not available for use in BML Editing
- Not available as inputs to rule condition
Attribute Revert to Default Behavior Enhancement
In 19D, customers now have the option to not execute Advanced Default BML at the main document and sub-document level for an Action when that action has Revert to Default enabled for any attributes. A new Commerce pricing option, Version 3, is available in the Commerce Settings to enable this behavior.
IMPORTANT:
- Advanced Default BML executes for actions that create a main document or sub-document.
- Switching pricing Version options may affect existing pricing and transactions. Oracle recommends thoroughly testing the impact of the new version before implementing the change into a production environment. Once Version 2 or Version 3 is enabled in a production environment, returning transactional data to Version 1 may require significant effort.
Steps to Enable
To set the Commerce Pricing Behavior, complete the following steps:
- Navigate to the Admin Home page.
- Click Commerce Settings in the Commerce and Documents section. The Commerce Options page displays.
- Click Version 3 for the Commerce Pricing Behavior.
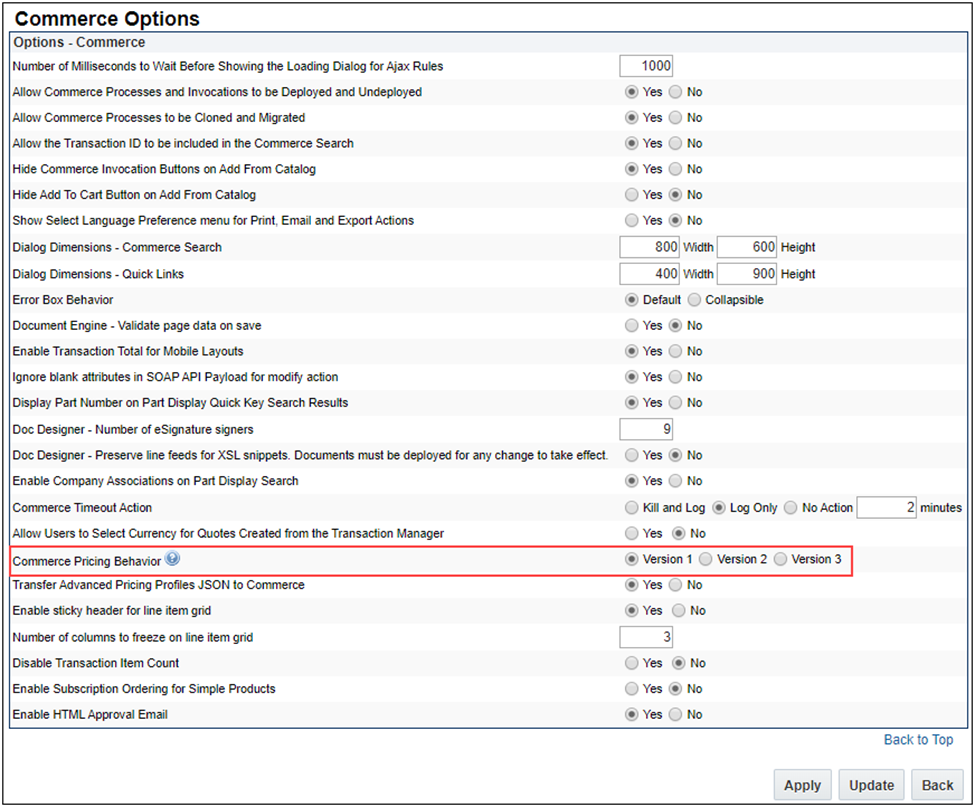
- Click Update to apply the new setting and update the Commerce Settings.
Tips And Considerations
Administrators may want to select the Version 3 Pricing Behavior if they have a large number of Revert to Default attributes defined for main documents or sub-documents. Version 3 Pricing Behavior retains all Version 2 adjustments. Therefore, if you have a Pricing Engine rule set up in such a way that it is dependent on an advance default value and you select Version 3 pricing behavior, you may need to update your pricing rule to ensure an accurate value is rendered.
System Configuration Enhancements
System Configuration refers to the manner in which customers use CPQ Cloud to configure and bundle the product or set of products they wish to sell using a group of related models that together define an entire system. A system is a hierarchical arrangement of connected configurable models with a system root containing all of the other models.
The following functionality is available in CPQ Cloud 19D.
- System Configuration Initialization
- System Path Warnings for Favorites and Pending Configurations
System Configuration Initialization
In prior releases the child models were not configured until the Configuration UI was launched for each child model. Beginning in CPQ Cloud 19D, when customers launch system configurations a defined collection of child models can have an initial configuration applied. The initial configuration will consist of attribute default values, layout default values, and the result of configuration rules. New system configuration options allow administrators to define the number of models and the depth of descendant models to initialize.
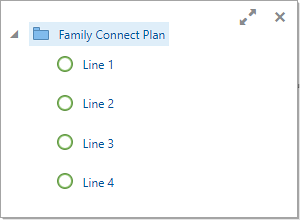
For example, a cellular provider offers a Family Connect Plan that comes standard with four lines. Each line comes with an xPhone S with a 2 year warranty, and an Unlimited Nation-wide Plus plan that has unlimited nation-wide calls, text, and data.
Without system configuration initialization the child models are not configured when the Configuration UI for the root model is launched. The following image shows the Family Connect Plan system with the un-configured child models. This is the same behavior when system configuration initialization is disabled.
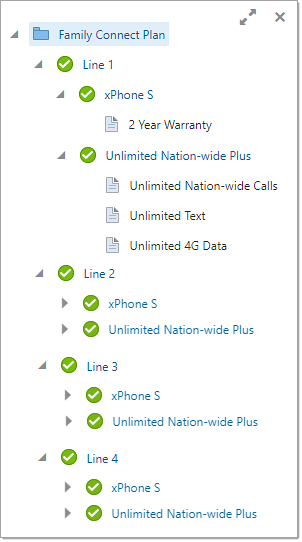
When system configuration initialization is enabled the child models can be configured when the Configuration UI for the root model is launched. The following image shows the Family Connect Plan system with all of the child models initialized and configured.When system configuration initialization is enabled the child models can be configured when the Configuration UI for the root model is launched. The following image shows the Family Connect Plan system with all of the child models initialized and configured.
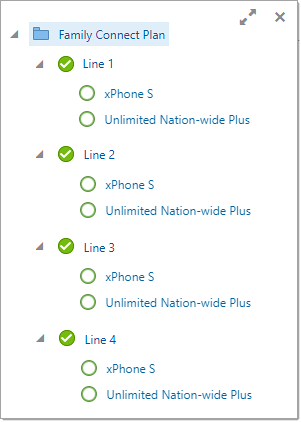
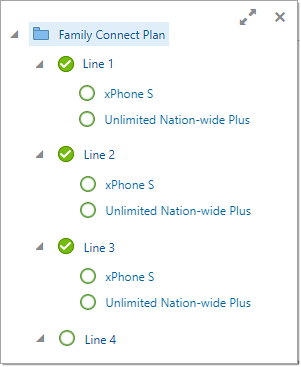
There are initialization scenarios when the system will be partially configured. This can occur when the depth of descendant models setting is lower than the number of descendant levels in the system. For example, the following image shows a system where the depth of descendant models is set to "1", the number of models is set to "20", and the system configuration has two descendant levels. Notice only the level one child models are configured (Line 1, Line 2, Line 3, and Line 4).There are initialization scenarios when the system will be partially configured. This can occur when the depth of descendant models setting is lower than the number of descendant levels in the system. For example, the following image shows a system where the depth of descendant models is set to "1", the number of models is set to "20", and the system configuration has two descendant levels. Notice only the level one child models are configured (Line 1, Line 2, Line 3, and Line 4).
Another scenario that can cause partial configuration is when the when the number models setting is lower than the number of models in the system. The system will initialize all of the first level children and then continue to the next enabled level until it reaches the limit set for the number of models. For example, the following image shows a system where the depth of descendant models is set to "3", the number of models is set to "3", and the system configuration has two descendant levels and twelve descendant models. Notice only the first three level one child models are configured (Line 1, Line 2, and Line 3).Another scenario that can cause partial configuration is when the when the number models setting is lower than the number of models in the system. The system will initialize all of the first level children and then continue to the next enabled level until it reaches the limit set for the number of models. For example, the following image shows a system where the depth of descendant models is set to "3", the number of models is set to "3", and the system configuration has two descendant levels and twelve descendant models. Notice only the first three level one child models are configured (Line 1, Line 2, and Line 3).
Steps to Enable
Complete the following steps to enable system configuration initialization.
- Navigate to the Configuration Options page.
Admin Home > Products > Configuration Settings
- Set the Number of descendant models to initialize.
- Set the Depth of descendant models to initialize.

- Click Update to save your changes and return to the previous page.
Tips And Considerations
IMPORTANT:
- CPQ 19D, the default setting for the system configuration initialization options is zero. In other words, system configuration initialization is disabled by default in CPQ 19D.
- Model configurations with multiple nodes are not fully configured during initialization. These models are incomplete until the configuration has progressed to the end node and users must complete the associated model configuration before proceeding.
- Attribute changes resulting from inter-model rules are not applied until system invocation or the user opens the configuration UI for the impacted model.
System Path Warnings for Favorites and Pending Configurations
System configurations use system paths to identify the location of each instance of a model within a system. Beginning in 19D, CPQ will apply a new CSS warning class to any model in a system whose system path exceeds the maximum supported length. Systems containing a model whose system path exceeds the supported length cannot be saved to Favorites, nor fully populated when restoring from a Pending Configuration.
Pending Configuration Behavior for Models with Excessive System Path Lengths
When Pending Configurations are enabled, models with excessive system paths are highlighted in the system navigation panel. When a user hovers over a highlighted model a message is displayed to notify the user that the Pending Configuration for this model could not be saved.
When restoring the Pending Configuration of a system configuration that contained one or more models whose system path exceeds the maximum size, only those configured models that could be saved are restored. Any models with excessive system paths are returned to an un-configured state and a warning message is displayed to notify the user that the Pending Configuration for this system could not be fully restored.
Favorites Behavior for Models with Excessive System Path Lengths
Users cannot create a Favorite for a system configuration that contains one or more models whose system path is beyond the maximum size.
Steps to Enable
You don't need to do anything to enable this feature.
Tips And Considerations
Configuration, invocation, and reconfiguration of a system that contains one or more models whose system path exceeds the supported length will work correctly, but with the limitations noted above.
Customer Requested Features and Enhancements
CPQ Cloud 19D introduces the following customer requested features and enhancements.
- Commerce Attribute for Filtering Line Item Document Numbers
- Configure CC and BCC Fields in Email Action Definition
- JET Transaction UI Enhancement
- Performance Logging
- Reset eSignature Attributes Using BML
Commerce Attribute for Filtering Line Item Document Numbers
In CPQ Cloud 19D, a new Commerce Line Item Document Number filter attribute, _system_filtered_document_numbers, is added as input for a BML rule. This filter will contain a list of all applicable document numbers in the result set. If the Line Item includes a parent/child relationship, the filter results indicate only the child. If desired, additional filter queries can determine the parent Line Item Document Number.
Steps to Enable
Administrators can use the _system_filtered_document_numbers attribute as input when defining a BML rule.
Tips And Considerations
-
The _system_filtered_document_numbers filter attribute cannot be populated when used in advanced Auto Update BML.
-
When using advanced modification, a tilde-delimited list of document numbers cannot be returned. Therefore, you can include a replace function to change a tilde delimiter in order to process multiple document numbers. For example:

Configure CC and BCC Fields in Email Action Definition
Beginning in 19D, administrators are able to customize the email CC and BCC fields along with the To and From fields within Email actions. Administrators have the ability to apply and update the CC and BCC values. Therefore, when the end user invokes the Email action, the CC Email and BCC Email fields populate with the configured email address information.
Steps to Enable
To configure the CC and BCC email fields on an existing Email action, complete the following steps:
- Navigate to the Admin Home page.
- Click Process Definition in the Commerce and Documents section. The Processes page displays.
- Select Documents from the Navigation drop-down for the applicable process.
- Click List. The Document List page displays.
- Select Actions from the Navigation drop-down for the applicable Document Name.
- Click List. The Action List page displays.
- Click on the link under the Action Name column for the applicable Email action. The Admin Action page for the Email action displays.
- Select the Email Fields tab.
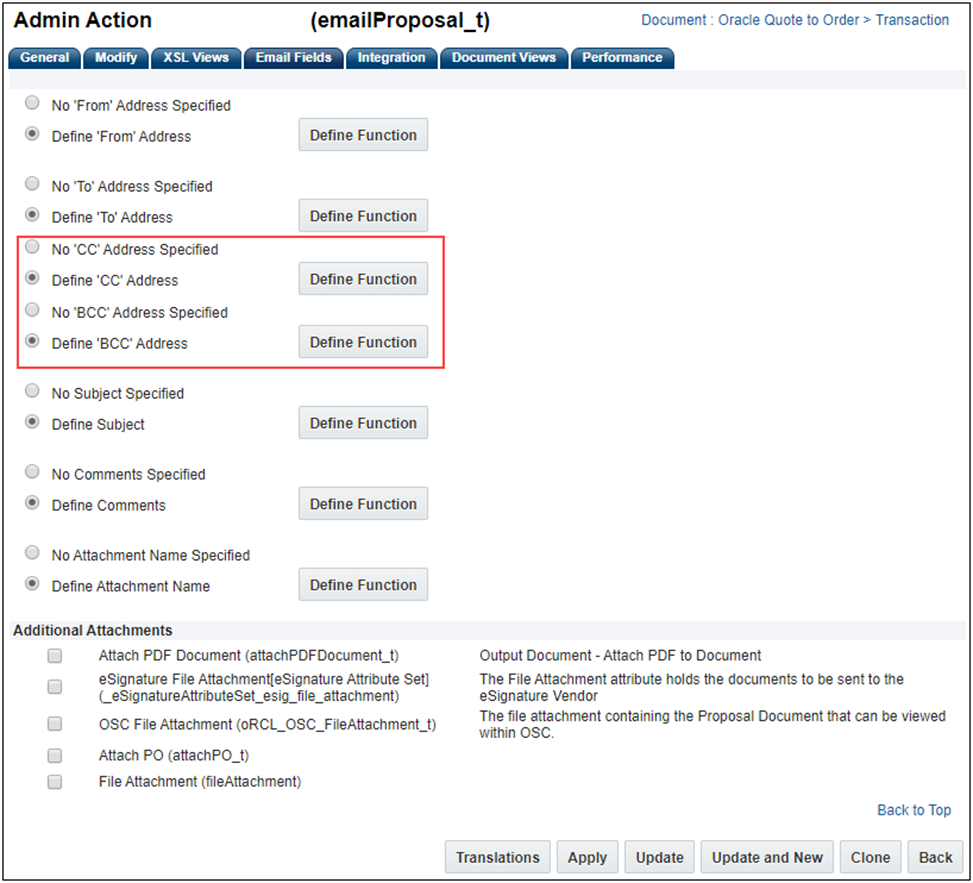
- Select Define 'CC' Address.
- Click Define Function. The Select Attributes page displays.

- Select one or more attributes by clicking on the checkbox next to the Attribute Variable Name and then click Next. The BML Editor displays.
- Using the BML Editor, define the BML to run when the Email action is invoked.
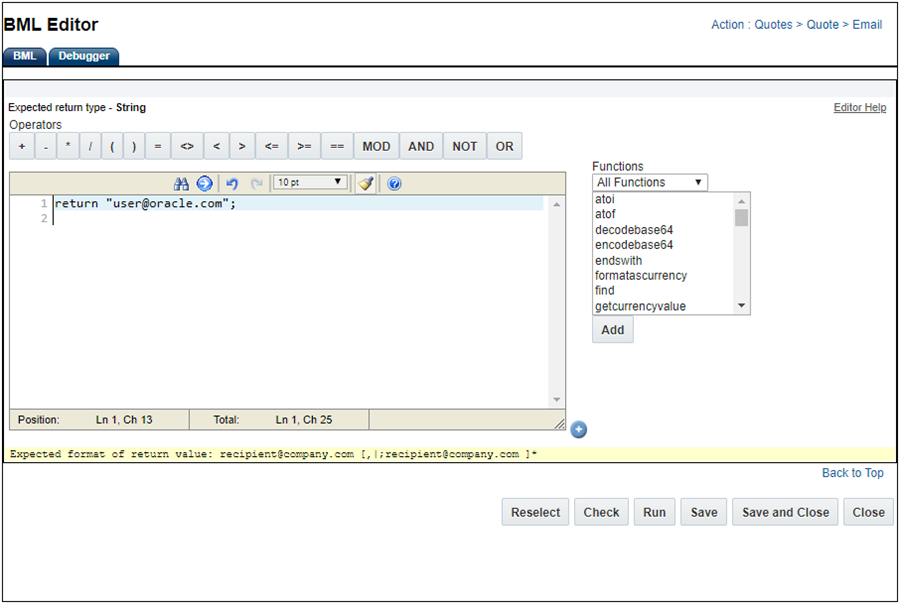
- Click Check to check for errors.
- Click Run to validate BML provides expected response.
- Click Save to save the BML integration for the Email action.
- Click Close to close the BML Editor and return to the Admin Action page.
- Repeat steps 9 through 16 to define BML for the BCC Address.
- Click Apply to add the CC and BB information to the Email action.
JET Transaction UI Enhancement
CPQ Cloud 19D provides improved data loading time and progressive loading of content for the JET Transaction UI. Auto-generated placeholders display the general layout of content with panels, Line Item Grid, tabs, etc. Transaction content renders in progressive stages so that all rules are run before the content displays.
Steps to Enable
You don't need to do anything to enable this feature.
Performance Logs allow administrators to monitor and analyze the performance experienced by CPQ Cloud end users. Administrators can view user actions such as logins, logouts, commerce and configuration actions, with the elapsed server and browser times required to complete the actions. Additionally, performance details for all Web Service calls invoked from integrations, external applications, BML scripts, etc. are logged.
In 19D, the following new performance details are logged:
- BML URL Data Functions – the time to execute urldata, urldatabyget, urldatabypost, urldatabypostasync functions are logged. For asynchronous operations, the time between the request and acknowledgement is recorded.
- Account Integration – added Transaction ID and Action columns to the Performance Log to capture details for partner account integration. Performance details now include Transaction Number, Action requested, Autofill detail, and Contact import detail.
Steps to Enable
Administrators can access performance log data by selecting Performance Logs in the Developer Tools section of the Admin Home pageAdministrators can access performance log data by selecting Performance Logs in the Developer Tools section of the Admin Home page.
Reset eSignature Attributes Using BML
CPQ Cloud 19D adds the ability to reset eSignature attribute values like attachments, recipients, status, etc. through BML implementation. For example, if a Transaction is versioned using Version action, the associated Modify action can implement the BML to reset the eSignature attributes values for the new Version.
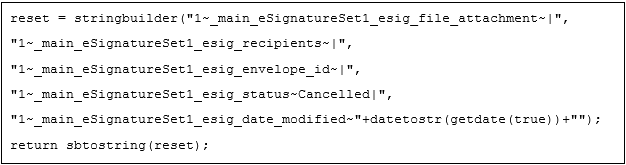
Reset eSignature Attribute Sample BML
Steps to Enable
Administrators must use the BML Editor to add the applicable BML to reset the eSignature attribute values.
Tips And Considerations
Modifying eSignature attribute values outside of the standard flow may cause integration issues if the attribute values are not setup properly. Please verify the changes and test the integration to make sure it is functioning as expected.
Behavior Modifications to Known Functionality
The following changes to known functionality are in CPQ Cloud 19D:
- Due to performance problems in Internet Explorer 11, the number of line items displayed for Internet Explorer users in the JET Transaction UI is limited to 10 per page. This does not affect the JET Transaction UI for users of any other browser.
- In JET Transaction UI, the Quick Add action is not supported for Eligibility Rules of type "Available".
- The JET Responsive UIs have been enhanced to simplify customization. Refer to CPQ Cloud Online Help for details.
Migration
When migrating directly from a source site or to a destination site using the Migration Center, both sites must use the same major update. The migration of content can only occur across minor updates within the same major update.
- “Major update” = Update 19D
- “Minor update” = Update 19D Patch 1
Beginning in 19D, migration packages from 19A and forward can be uploaded to the latest site version
Resolved Known Issues
For information on bugs fixed in Update 19D, refer to the CPQ Cloud 19D Resolved Known Issues document available on My Oracle Support and the CPQ Cloud Online Help.
Translation
For some system-defined messages and components, strings were removed and others added in CPQ Cloud 19D. If you have created your own implementation-specific translations of system-defined strings, some of these strings may no longer appear. Other strings may appear in English. The strings appearing in English are new and require translation.
Most of these messages and components are on the Administration side of CPQ Cloud, but you should review both your end user and administration pages before deploying your updated installation to confirm that all strings appear in the desired language.
Translation Status
CPQ Cloud supports the consumption of both single and multi-byte character sets. Submit a service request on My Oracle Support to enable your site for a new language.
For the following languages, a translation of the CPQ Cloud user interface is available for both the platform and the reference application:
- Chinese (Simplified) [China]
- Chinese (Traditional) [Taiwan]
- Czech [Czech Republic]
- Danish [Denmark]
- Dutch [Netherlands]
- English
- Finnish [Finland]
- French
- French [Canada]
- German
- Hungarian [Hungary]
- Italian
- Japanese [Japan]
- Korean [South Korea]
- Norwegian (Bokmål) [Norway]
- Polish [Poland]
- Portuguese [Brazil]
- Romanian [Romania]
- Russian [Russia]
- Spanish (Worldwide)
- Swedish [Sweden]
- Turkish [Turkey]
Upgrade and test all test instances on Oracle CPQ Cloud 19D before upgrading to production.
Browser Support
CPQ Cloud supports all browser versions that meet the criteria of the Oracle Software Web Browser Support Policy.
If you experience issues using a supported browser version, open a ticket on My Oracle Support to resolve the issue. If an issue arises when using a supported browser, use a certified browser version until the delivery of a fix. Certified browsers are selected based on current market share and thoroughly tested to work with the current version's standard functionality.
Certified Browsers
Windows
- Google Chrome 77.x
- Mozilla Firefox 69.x
- Internet Explorer 11.x
IMPORTANT: Compatibility issues with the selected browsers may exist when sites contain additional JavaScript, alternate CSS, or other custom functionality. Customizations may require add-on work. Contact My Oracle Support to determine the availability of workarounds and minor fixes.
Salesforce Integration Support
Oracle officially supports version 8.1 and version 8.2 of the Oracle CPQ Connector for Salesforce. We also continue to support version 7.2 of the legacy Oracle CPQ Commerce Integration.
IMPORTANT: Previous versions of these packages are expected to continue to function; however Oracle will not address new issues that arise. We strongly encourage customers to upgrade to the latest supported version.
Training
Please refer to the release documentation for all versions between your current version and the version to which you are upgrading to see all new functionality, resolved known issues, and functional known issues.
Refer to the CPQ Cloud Online Help to become familiar with the new features introduced in Oracle CPQ Cloud 19D. For additional help, see My Oracle Support.
Verify any information not explicitly mentioned in this document as supported by the software against the product help for Oracle CPQ Cloud 19D or the Oracle CPQ Cloud Consulting team.
Additional Information
For more information on Oracle CPQ Cloud, visit the Oracle CPQ Cloud documentation site.
Disclaimer
The details in this document are provided for high-level informational purposes only and are not intended to function as a specification or to replace the Online Help. Upgrading to a subsequent release may require the re-deployment of Commerce Processes, Configuration, or global function settings. Modifications to integration XSL files or APIs may also be required.