
This document will continue to evolve as existing sections change and new information is added. All updates appear in the following table:
| Date | Product | Feature | Notes |
|---|---|---|---|
| 07 OCT 2021 | Asset-Based Ordering | Support for Commerce Delta Pricing | Updated document. Revised section. |
| 07 OCT 2021 | Commerce | Commerce Layout Editor | Updated document. Revised section. |
| 01 OCT 2021 | Created initial document. |
Oracle Configure, Price, and Quote (CPQ) enables companies to streamline the entire opportunity-to-quote to-order process, including product selection, configuration, pricing, quoting, ordering, and approval workflows. Oracle CPQ provides a flexible, scalable, enterprise-ready solution ideal for companies of all sizes that sell products and services across direct, indirect, and e-commerce sales channels.
This guide outlines the information you need to know about new or improved functionality in Oracle CPQ 21D.
Security & New Features
We would like to remind you that if your system has modified security structures, you may need to advise your security administrator of new features you would like to implement.
 HAVE AN IDEA?
We’re here and we’re listening. If you have a suggestion on how to make our cloud services even better then go ahead and tell us. There are several ways to submit your ideas, such as through the Ideas Lab on Oracle Customer Connect. Wherever you see this icon after the feature name it means we delivered one of your ideas.
GIVE US FEEDBACK
We welcome your comments and suggestions to improve the content. Please send us your feedback at cpqcloud_documentation_us_grp@oracle.com.
DISCLAIMER
The information contained in this document may include statements about Oracle’s product development plans. Many factors can materially affect Oracle’s product development plans and the nature and timing of future product releases. Accordingly, this Information is provided to you solely for information only, is not a commitment to deliver any material, code, or functionality, and should not be relied upon in making purchasing decisions. The development, release, and timing of any features or functionality described remains at the sole discretion of Oracle.
This information may not be incorporated into any contractual agreement with Oracle or its subsidiaries or affiliates. Oracle specifically disclaims any liability with respect to this information. Refer to the Legal Notices and Terms of Use for further information.
Column Definitions:
Report = New or modified, Oracle-delivered, ready to run reports.
UI or Process-Based: Small Scale = These UI or process-based features are typically comprised of minor field, validation, or program changes. Therefore, the potential impact to users is minimal.
UI or Process-Based: Larger Scale* = These UI or process-based features have more complex designs. Therefore, the potential impact to users is higher.
Features Delivered Disabled = Action is needed BEFORE these features can be used by END USERS. These features are delivered disabled and you choose if and when to enable them. For example, a) new or expanded BI subject areas need to first be incorporated into reports, b) Integration is required to utilize new web services, or c) features must be assigned to user roles before they can be accessed.
| Ready for Use by End Users Reports plus Small Scale UI or Process-Based new features will have minimal user impact after an update. Therefore, customer acceptance testing should focus on the Larger Scale UI or Process-Based* new features. |
Customer Must Take Action before Use by End Users Not disruptive as action is required to make these features ready to use. As you selectively choose to leverage, you set your test and roll out timing. |
|||||
|---|---|---|---|---|---|---|
| Feature |
Report |
UI or |
UI or |
|
||
Reconfigure Line Item Grid Pricing Behavior for Child Models |
||||||
Support for Deal Comparison Scatter Plot Data Point Cache Configuration |
||||||
User-Specific Rich Text Editor (RTE) Templates for JET Transaction UI |
||||||
Support for Oracle CPQ Usage Metrics in Oracle Cloud Dashboard |
||||||
The following Administration feature is available in Oracle CPQ 21D.
Export Commerce Reports in .XLSX Format
Oracle CPQ 21D introduces the ability to export Commerce reports in .XLSX format. Reports exported in .XLSX format can populate up to 1,048,575 results. This is a significant increase in results as opposed to exporting in .XLS format, which has a limit of 65,535 results. A new General Options setting, Export commerce report as XLSX, allows administrators to determine which export format is preferred. For new site installation, the default setting is Yes. Upon upgrade, the default setting is set to No and exporting reports remains in .XLS format.
Administrators can export larger reports.
Steps to Enable
For a new site installation, the export Commerce reports in .XLSX format feature is set as enabled. You do not need to anything to enable this feature.
For sites upgrading to 21D, enable this feature by performing the following steps:
- Navigate to the Options – General page. Admin > General > General Site Options
- Click Yes for the Export commerce report as XLSX setting.
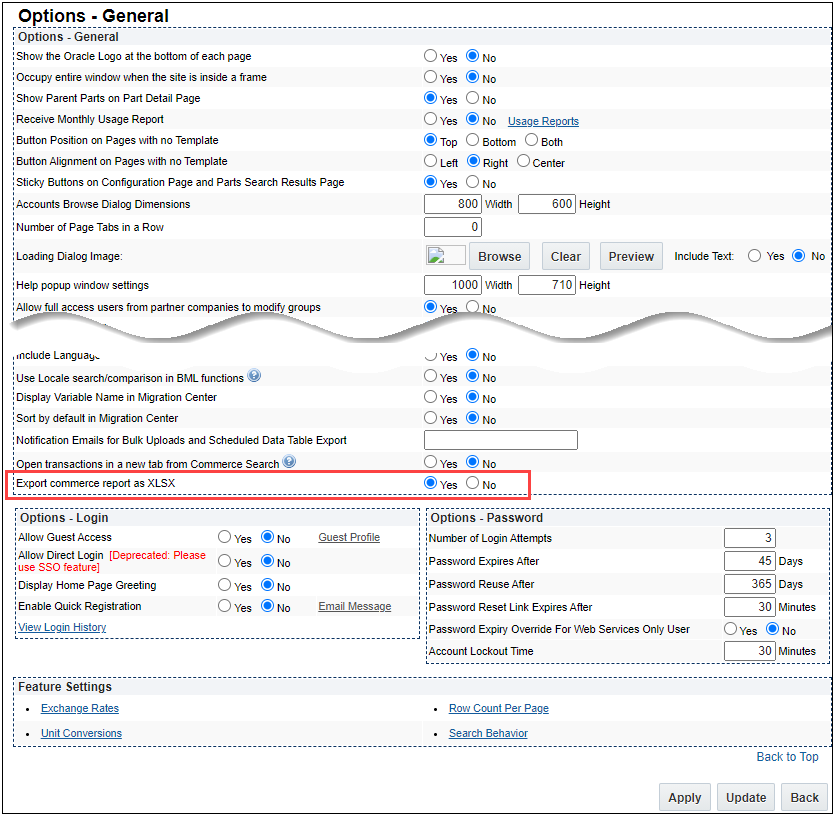
- Click Update.
Tips And Considerations
If a report has groupings enabled, the limit of 65,535 results remains regardless of exporting to an .XLSX file or .XLS file.
The following Asset-Based Ordering (ABO) features are available in Oracle CPQ 21D.
Reconfigure Line Item Grid Pricing Behavior for Child Models
Beginning in Oracle CPQ 21D, users who have ABO enabled can directly reconfigure child system models from the Line Item Grid in the Transaction UI. In previous releases, users could only reconfigure the child models of a system by first reconfiguring the root model, then navigating to the child to make changes.
This feature makes reconfiguring child system models easier for end users.
Steps to Enable
For an ABO enabled site with system configuration implemented, the following ABO Commerce library functions must be added to the Transaction and Transaction Line Commerce processes. BML scripts for these library functions are included as part of the 19B or later ABO Implementation Package and detailed instructions are included in the Oracle CPQ Asset-Based Ordering Implementation Guide (19B and later).
- oRCL_abo_ReconfigureAction
- oRCL_abo_BuildLineItemHierarchy
Tips And Considerations
Refer to My Oracle Support, Oracle CPQ Asset-Based Ordering (Document 21829661) for more information.
Support for Commerce Delta Pricing
Oracle CPQ 21B provided configuration delta pricing information inside the Configuration UI when implemented with Asset-Based Ordering (ABO). Oracle CPQ 21D introduces a new sub-document Delta Pricing Attribute Set and a new Commerce library function to extend the delta pricing to Oracle CPQ Commerce transactions for ABO sites.
The sub-document Delta Pricing Set contains the following Currency type attributes:
-
The Delta Price attribute (_delta_price) displays the price difference for the updated line item.
-
The Prior Price attribute (_prior_price) displays the prior price for the updated line item.
-
The Rollup Delta Price attribute (_rollup_delta_price) displays the model level price difference of all child items for the updated model.
Sample Use Case
A sales user wants to update a SIM card order for their customer. The customer wants to change the original request of 100 - 5G SIM cards to 400 – 5G SIM cards, and 100 - 3G SIM cards to 25 – 3G SIM cards. In the Subscription Workbench, the sales user selects the previously fulfilled model and clicks Modify to bring up the existing asset details. After changing the SIM card quantities for the previous configuration, the sales user clicks Add to Transaction to proceed.
The transaction displays the original request (100 - 4G SIM cards, 100 - 5G SIM cards, and 100 - 3G SIM cards) and the modified order (100 - 4G SIM cards, 400 - 5G SIM cards, and 25 - 3G SIM cards). The Prior Price and Delta Price columns show the values for each line item, and the Rollup Delta Price column shows the total delta change for the model.

This feature allows for delta pricing information to be easily available to end users by enabling the following valuable operations:
-
View delta pricing information on the Line Item Grid and the sub-document page for both legacy and JET Transaction UIs.
-
Support delta pricing on the Transaction UI for Add, Update, Delete, Renew, and Terminate ABO flows.
-
Provide rollup delta pricing for new, updated, and modified models.
Steps to Enable
To enable this feature administrators need perform the following tasks:
-
Create the required attributes. Refer to Create a Sub-document Delta Pricing Attribute Set.
-
Add the sub-document delta pricing attributes to the line item grid on the Transaction UI layout. Refer to the Oracle CPQ Administration Online Help > Commerce Layout Editor topic for instructions to add attributes to the Line Item Grid.
IMPORTANT: To create and enable a BML function for Commerce Delta Pricing, refer to Oracle CPQ Administration Online Help > Implementations > Asset-Based Ordering > ABO Implementations - Enable Commerce Delta Pricing.
Create a Sub-Document Delta Pricing Attribute Set
Perform the following steps to create a sub-document Delta Price Attribute Set.
-
Click Admin to go to the Admin Home Page.
-
Click Process Definition in the Commerce and Documents section.
-
Select Documents from the applicable commerce process Navigation drop-down, and then click List.
-
Select Attributes from the sub-document Navigation drop-down, and then click List.
-
Click Add at the bottom of the Attribute List page.
-
Select Delta Pricing Set from the Attribute Type drop-down.

- Click Add, the Delta Pricing Set attributes are displayed.
IMPORTANT: To delete the Delta Pricing Set, navigate to the sub-document Delta Pricing Set and select Delete All.
Tips And Considerations
-
The delta pricing feature does not require a specific ABO Implementation Package upgrade. However, to implement this feature, the site is required to be on ABO Implementation Package 18D or later.
-
The delta price is the difference (+/-) of the current price of the item as compared to the existing price of the saved asset.
-
Delta price will not be available until after an initial order is saved. The delta price fields populate upon a Modify on an existing asset from the Subscription Workbench or Assets page. This feature is available for asset modifications and follow-on orders only.
-
The delta price is displayed in the same currency as the model/parts in the Transaction UI.
-
Without delta pricing enabled, when configuring a system the Total Price of BOM on the root level remains the same—regardless if child models were configured or not. With delta pricing enabled, the Total Price of the entire system updates on the root level if the child models are configured.
Support for Delta Pricing in Formulas and BML Functions
In addition to Commerce delta pricing support, Oracle CPQ 21D will also support delta pricing in Commerce Formulas and BML functions.
This feature will allow administrators to use delta pricing attributes in BML editors to define main and sub-document default values using:
- Functions
- Modify Actions
- Before and After Formulas
- Advanced Conditions and Actions for Commerce Rules
Administrators can also use delta pricing attributes for:
- Commerce Library Functions
- Price Scores
- Advanced Defaults and Auto Update scripts
Steps to Enable
You don't need to do anything to enable this feature.
The following Commerce feature is available in Oracle CPQ 21D.
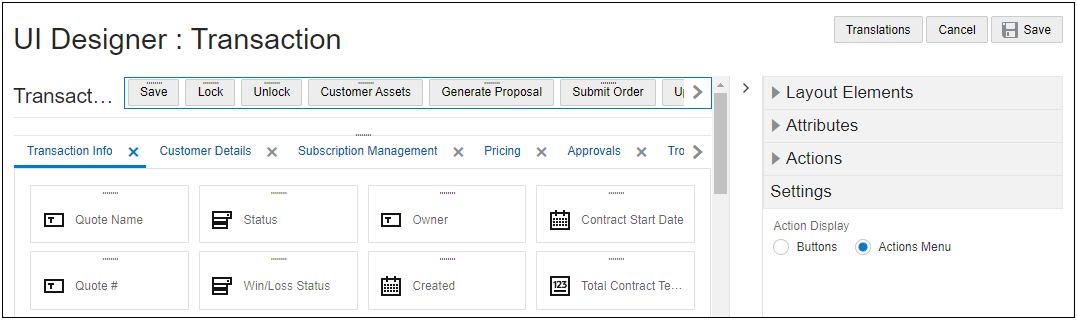
Oracle CPQ 21D replaces the current Commerce Layout Editor for both JET and legacy commerce UIs with a new Commerce Layout Editor. The Commerce Layout Editor provides the same functionality as the previous editors combined with improved usability. Refer to the following videos for Commerce Layout Editor demonstrations.
The editor contains a layout panel and a collapsible side panel. Administrators can easily select items from the side panel and drag-and-drop the item into layout.
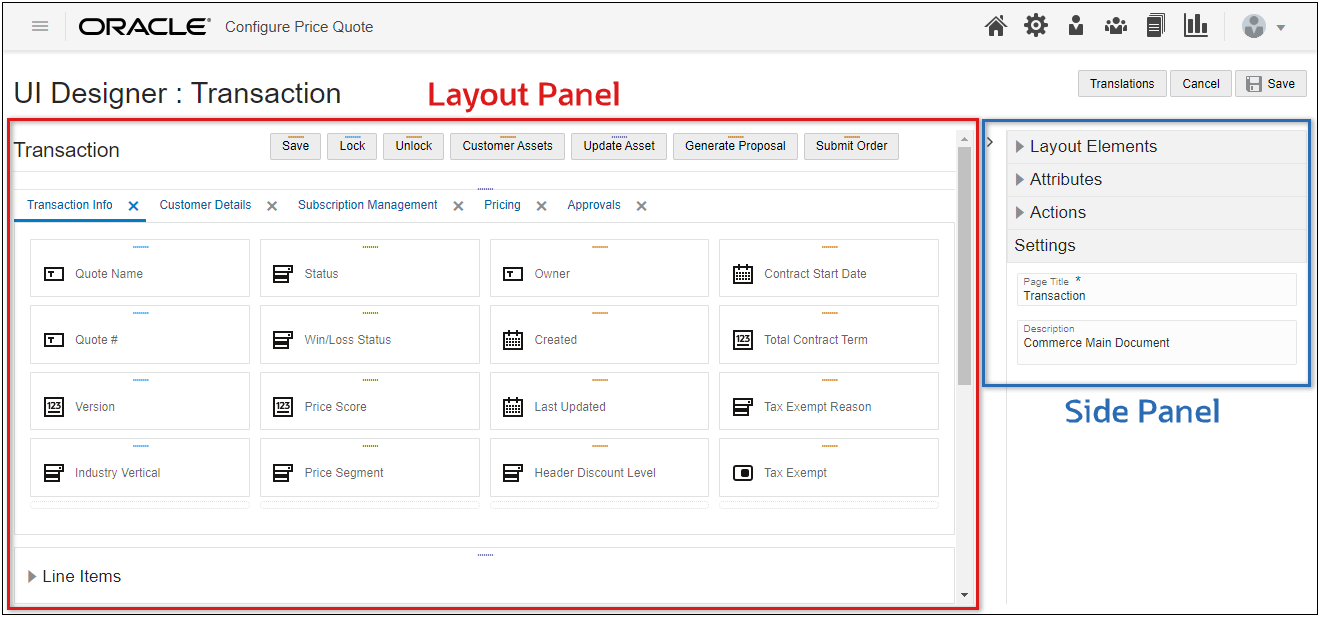
The side panel contains Layout Elements, Attributes, Actions, and Settings. The Settings section will display the properties for items that are selected in the layout panel. The document properties are displayed when no items are selected.
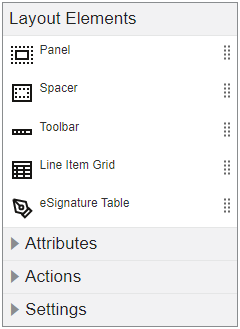
Layout Elements
The Commerce Layout Editor contains Panel, Spacer, Toolbar, Line Item Grid, and eSignature Table elements. To add a layout element, administrators drag-and-drop the desired element from the side panel. To edit an element, select the applicable element in the layout panel and modify the properties in the side panel Settings section.
| Element |
Description |
|---|---|
| Panels |
Panels are containers for layout elements.
|
| * Tabs |
The Commerce Layout Editor does not have a specific "Tab" element to add tabs to the layout. Tabs are added by inserting a Panel element inside an existing layout panel. |
| * Panel Columns |
The Commerce Layout Editor does not have a specific "Panel Column" element to add panel columns to the layout. After items are added to a tab panel, select the column and use the side panel Settings to modify column properties. |
| Spacers |
Spacers have a default of 25px, though administrators can set the height as necessary. |
| Toolbars |
Toolbars contain one or more actions. Administrators can choose the width and alignment of the actions in a toolbar. A Toolbar element is automatically created if an Action is not inserted inside an existing toolbar. |
| Line Item Grid |
Line item grids contain Transaction Line information and are available in the main document layout. Administrators add attributes by dragging them from the side panel Attributes Transaction Line element. |
| eSignature Grid |
eSignature functionality allows an Oracle CPQ user to attach a document to the quote and then request signatures using an eSignature vendor (e.g. DocuSign). The documents can be created by print action or uploaded by the user. |
IMPORTANT: The method for adding the elements preceded by an asterisk using the Commerce Layout Editor differs from the JET Responsive Editor and Legacy Desktop Editor. Refer to the Commerce Layout Editor topic in the Oracle CPQ Administration Online Help for detailed instructions.
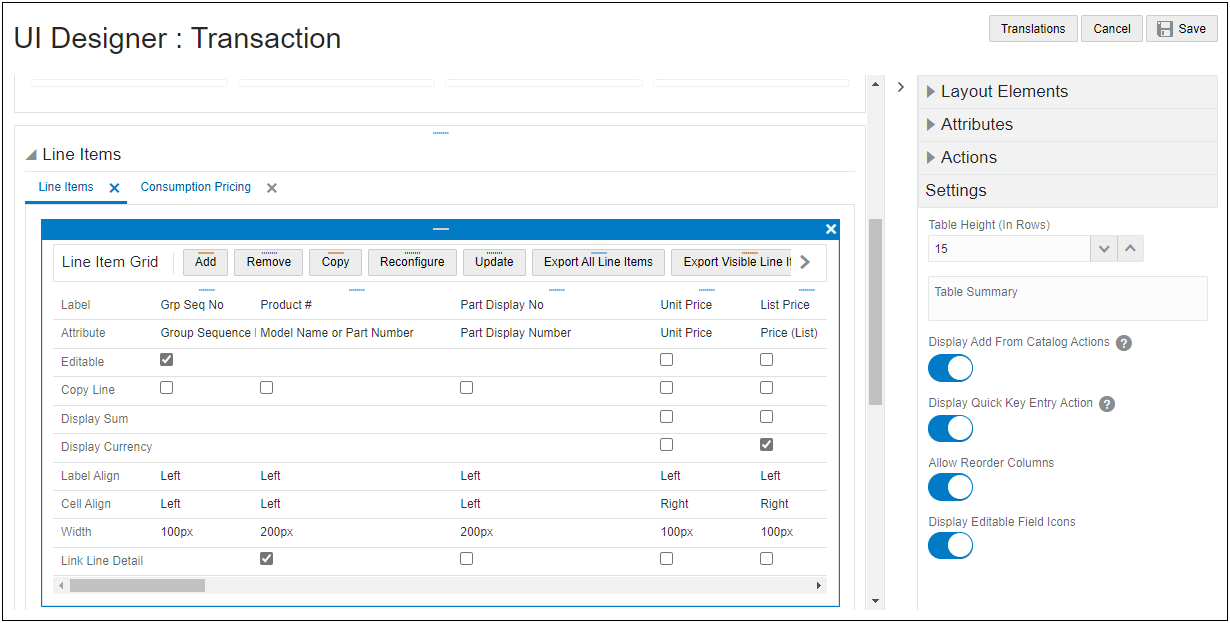
Line Item Grid
Adding Transaction Line attributes to the Line Item Grid and editing their behavior is significantly easier using the Commerce Layout Editor. Administrators simply drag-and-drop the Transaction Line Attributes from the side panel to the layout Line Item Grid. Mapping the attributes is no longer required. After Transaction Line attributes have been added to the Line Item Grid, the attribute behavior can be modified directly in the layout or the side panel Settings.
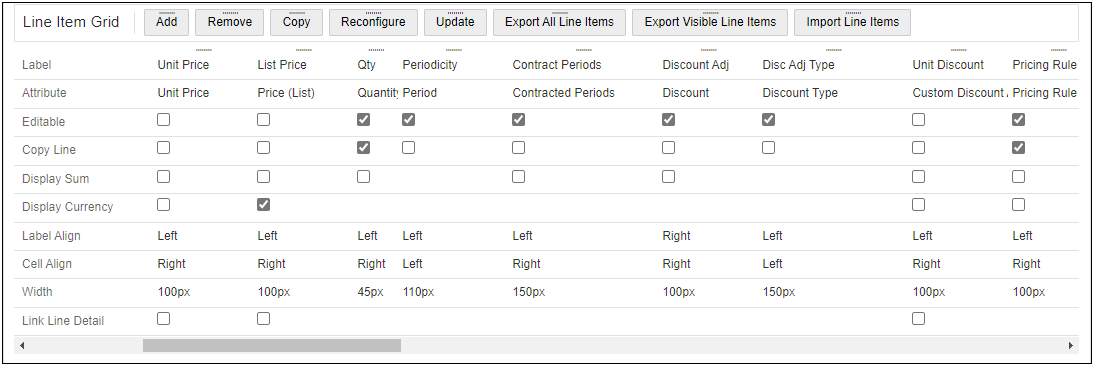
Select the Line Item Grid element and click Settings to access the Line Item Grid properties.
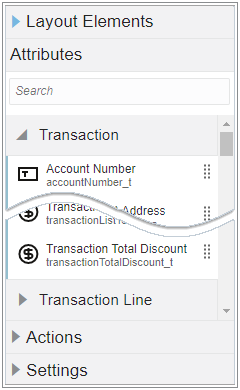
Attributes
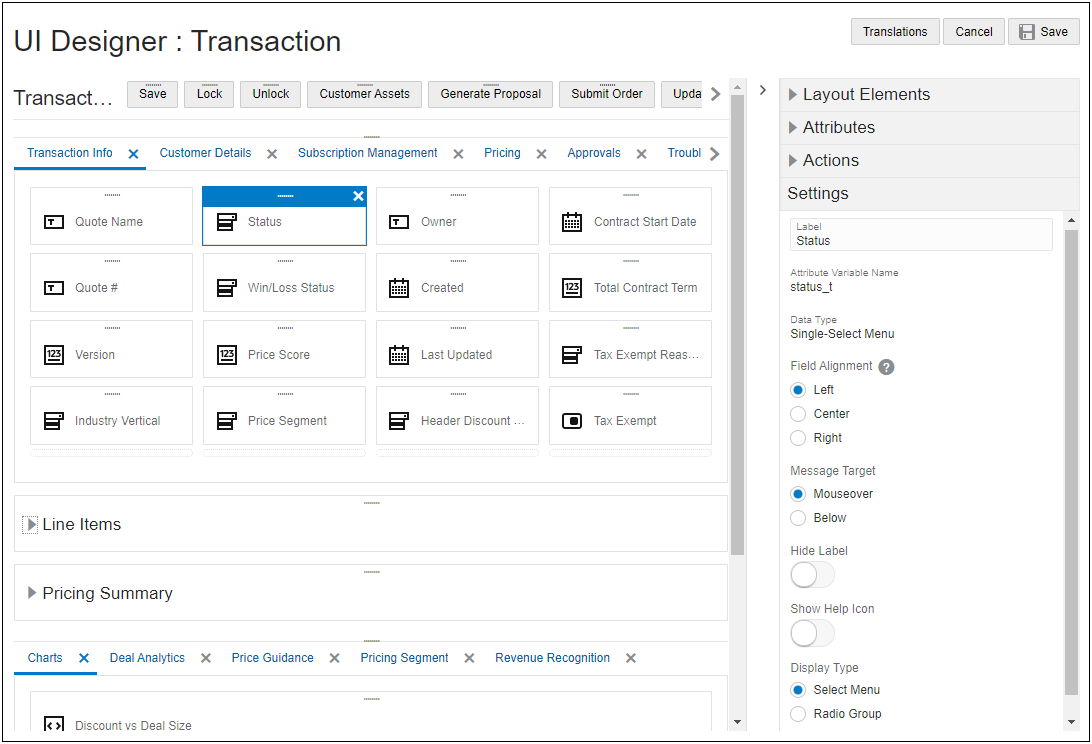
Attributes are input elements used to display Commerce attributes on the Transaction UI. To add an attribute, administrators drag-and-drop the desired Transaction or Transaction Line attribute from the side panel. To edit an attribute, select the applicable attribute in the layout panel and modify the properties in the side panel Settings section.
Select an Attribute and click Settings to access the Attribute properties.
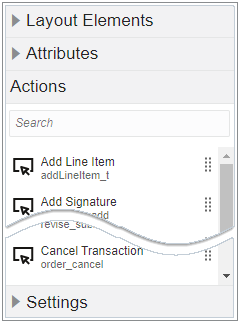
Actions
Administrators can place actions in Toolbars or the Sticky Action Toolbar. To add an action, administrators drag-and-drop the desired action from the side panel. A Toolbar element is automatically created if an action is not inserted inside an existing toolbar. To edit an action, select the applicable action in the layout panel and modify the properties in the side panel Settings section.
Select an Action and click Settings to access the Action properties.

Select an Action Toolbar and click Settings to access the Toolbar properties.
The new Commerce Layout Editor provides administrators with a simple and intuitive way to create and edit JET and legacy Transaction UI pages within Oracle CPQ. This editor provides the groundwork for a common user experience across all Oracle CPQ administration pages.
Steps to Enable
You don't need to do anything to enable this feature.
Tips And Considerations
-
The upgrade to new layout editor will not affect any previous customizations to the layout.
-
The Commerce Layout Editor does not have a specific “Tab” element to add tabs to the layout. Tabs are added by inserting a Panel element inside and existing layout panel.
-
The Commerce Layout Editor does not have a specific “Panel Column” element to add panel columns to the layout. After items are added to a tab panel, select the column and use the side panel Settings to modify column properties.
-
For the Line Item Grid, Array Sets, and signature elements, columns are shown on the layout editor itself with all available properties.
-
Beginning in Oracle 21D, you can only add 12 columns to the layout. This is a decrease from the previous limit of 20 columns. Previous layouts with more than 12 columns will still function and you will be able to save these layouts in the layout editor.
-
Preview functionality is not available in Oracle CPQ 21D.
The following Deal Comparison Scatter Plot Analytic feature is available in Oracle CPQ 21D.
Support for Deal Comparison Scatter Plot Data Point Cache Configuration
Beginning in Oracle CPQ 21D, administrators can define data point cache settings for HTML attributes for Deal Comparison Scatter Plot Analytics. The Deal Comparison Scatter Plot Analytic is a graph that displays data points as a comparison set in a scatter plot chart. The scatter plot is exposed to a user by adding an HTML attribute to the Transaction UI. Prior to Oracle CPQ 21D, every time a user viewed a scatter plot analytic it required a separate database call to generate the HTML attribute from the defined list of data points.
With this feature, the list of data points for the HTML attribute are cached and can be retrieved more efficiently.
Steps to Enable
To create or edit a Deal Comparison Scatter Plot with the data point cache configuration feature, complete the following steps:
- Create a new scatterplot analytic or edit an existing scatterplot analytic.The Analytics Definition Editor page opens.
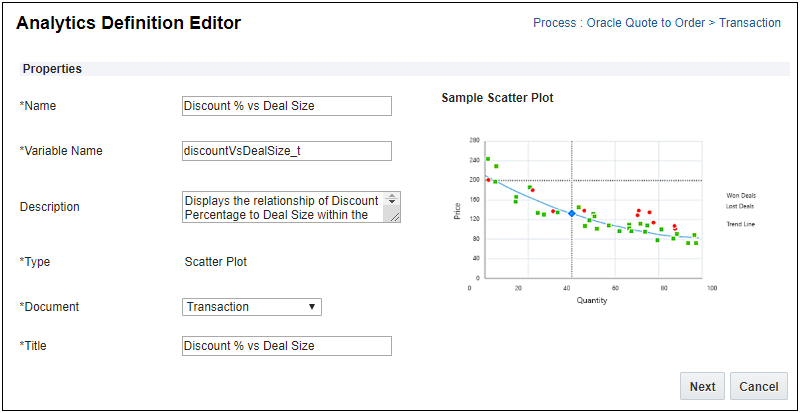
- Define the following parameters:
- Name - The name for the analytic.
- Variable Name - The variable name for the analytic.
- Description (Optional) - The description for the analytic.
- Document - The selected Commerce main document or sub-document. (i.e. Transaction or Transaction Line).
- Title - The title for the chart.
- Click Next.
- Define Chart Settings.

- X-Axis - select which attribute will be represented on the x-axis. This selection will also be the x-axis name on the chart.
- Y-Axis - select which attribute will be represented on the y-axis. This selection will also be the y-axis name on the chart.
- Group By (Optional) - select how data items are grouped.
- Curve Fit Group Value (Optional) - select the curve fit value if "Group By" is used.
- Define Filters.
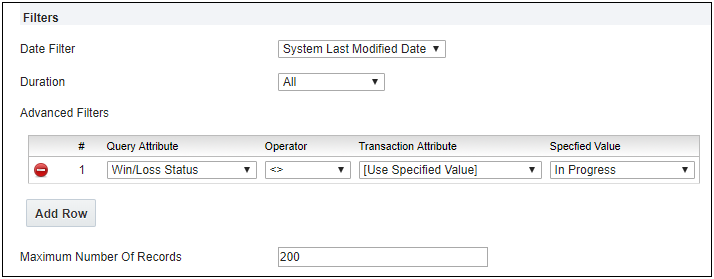
- Date Filter - The name of the Commerce date attribute used to filter historical Transactions for the analysis. System attributes such as 'System Last Modified Date' may also be selected.
- Duration - The time period prior to today's date to include in the analysis. The data selection duration is cumulative. Administrators may select from options including Last 30 days, Last 90 days, Last 6 months, Last 12 months, and All Transactions.
- Advanced Filters allow administrators to limit the results displayed in Transaction and Transaction Line scatter plots. Click Add Row to add additional items to filter. There can be an unlimited number of filters for each Scatter Plot.
-
Select Query Attributes from predefined Data Columns.
-
Select the Operator used to match the selected criteria.
-
Operators relevant to the query data type display to enable administrators easy and accurate editing of filters. Attributes without values can also be filtered out using the 'Is Empty' and 'Is Not Empty' operators, providing administrators with flexibility to assure that only clean data is included in their predictive model.
-
If applicable, select Transaction Attributes or [Use Specified Value].
-
If applicable, select or define the Specified Value to be used in the query filter.
-
Select a value from a drop-down list for Menu or Boolean attributes, a date for Date attributes, or enter a value for Text or Numeric attributes. For example, Scatter Plots can display only data for the same industry or customer present on the current Transaction.
-
-
Maximum Number Of Records - Th e default value is "200". If a value is not specified, a maximum of "1200" records will be used.
- Select the Enable Cache checkbox.

- Enter the number of minutes to retain the data point values in the cache before the values are refreshed from the database. The default is "1440" Minutes. The minimum value is "1" and maximum value is "7200" Minutes.
- Select a value from the Truncate Advanced Filters Timestamp drop-down box to define the granularity (days or hours) of date-time attributes used to access cached data.
- To Dates Only – Truncate Advanced Filters Timestamp attributes to date only and ignoring hours, minutes and seconds when data points are cached.
- To Hours Only – Truncate Advanced Filters Timestamp attributes to include date and hour, ignoring minutes and seconds when data points are cached.
- Select one of the following options:
- Click Apply to save changes and remain on the Editor page.
- Click Update to save changes and return to the Analytics list page.
- Click Update and New to define another analytic.
- Click Back to return to the Analytics list page without saving changes.
Tips And Considerations
- Before you enable cache, evaluate the caching effectiveness for the scatterplot. Caching is most effective if the scatterplot is shared among quotes and sales users. For example, a discount vs revenue scatterplot by sales regions is a good candidate for caching, as it is the same for all sales users in the same region. On the other hand, if every quote or sales user would see a different scatterplot (for example, quote history of the current sales user), caching is unlikely to be effective. Instead, in this example, you may want to set the HTML attribute to "Leave Value Unchanged" in its Modify tab. This prevents the HTML attribute from refreshing in the corresponding modify actions.
- Enter the least number of Maximum Number Of Records acceptable for your business need. The maximum number of records is defaulted to 200, and cannot exceed 1,200. The more data points in a scatterplot, the larger its storage consumption. Each data point equals approximately 28 bytes of storage. A scatterplot with 200 data points takes approximately 5.6k bytes and 1,200 data points is 34k bytes of storage. The maximum limit for the scatterplot cache is 50M bytes. Once the storage limit is reached, the least recently used entries are removed from the cache to make space for new data point entries.
The following Integration features is available in Oracle CPQ 21D.
Automatic Purge of Real-Time Integration Failure Logs
Upon upgrade to Oracle CPQ 21D, failed logs are deleted automatically after 30 days. If you would like to modify the time the failures persist prior to deleting for your site, submit a Service Request (SR) on My Oracle Support.
Automatically purging the Real-Time Integration failure logs reduces the storage required for data that you are not actively using.
Steps to Enable
You don't need to do anything to enable this feature.
The following JET Transaction UI feature is available in Oracle CPQ 21D.
User-Specific Rich Text Editor (RTE) Templates for JET Transaction UI
Oracle CPQ 21D provides user-specific RTE Templates for the JET Transaction UI inline editor. With this new functionality, users will be able to:
- Create new RTE templates
- Save RTE templates
- Insert previously saved RTE templates
- Rename existing RTE templates
- Delete multiple RTE templates
Beginning in Oracle CPQ 21D the following RTE template functions are available from the inline editor. Function tooltips display when users hover over the toolbar icons.

The following table defines icons for the RTE Template Editor.
| Icon | Description |
|---|---|
 |
Create Template |
 |
Insert Template |
 |
Edit Template |
 |
Delete Template |
 |
Save |
 |
Cancel |
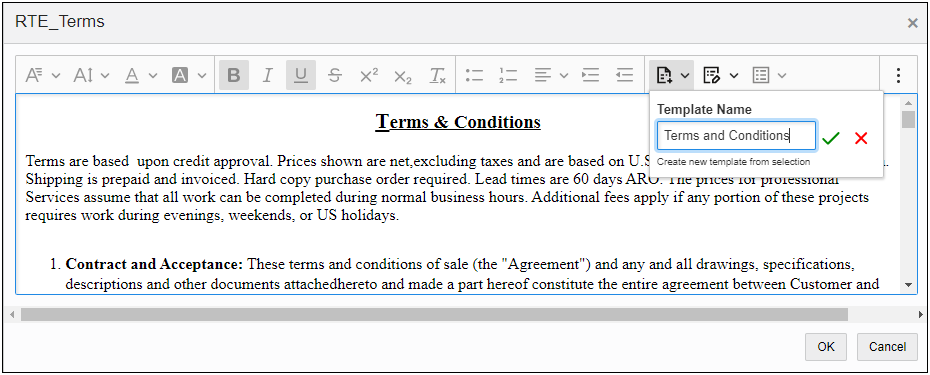
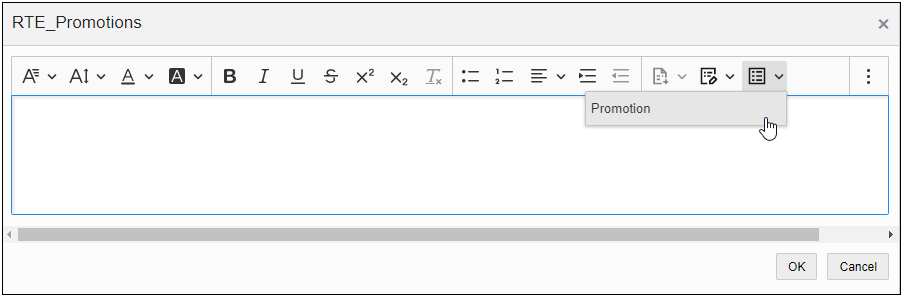
Create an RTE Template
Users can perform the following steps to create an RTE template in the JET Transaction UI inline editor.
-
Enter text in the RTE inline editor for a Commerce RTE attribute.
-
Select the text for the template.
-
Click the Create Template icon.
-
Enter the template name.
-
Click the Save icon.
Insert an RTE Template
After creating an RTE template, users can perform the following steps to insert a saved template.
-
Open the RTE inline editor for an existing RTE attribute.
-
Click the Insert Template icon.
-
Select the appropriate template name.
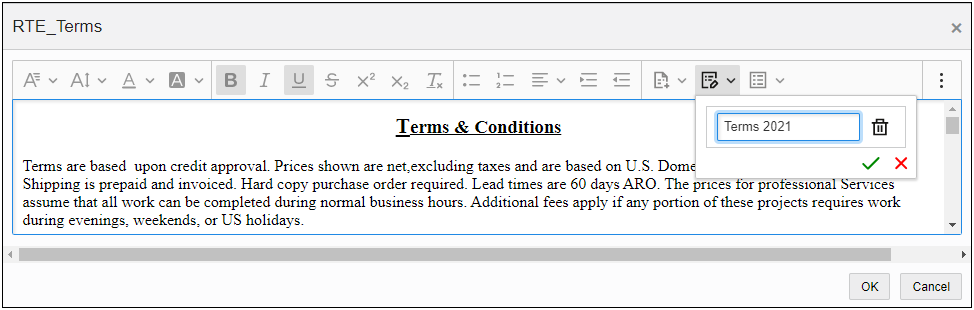
Rename an Existing RTE Template
Perform the following steps to rename an existing template.
-
Open the RTE inline editor for an existing RTE attribute.
-
Click the Edit Template icon.
-
Select the appropriate template name.
-
Enter the new template name.
-
Click the Save icon.
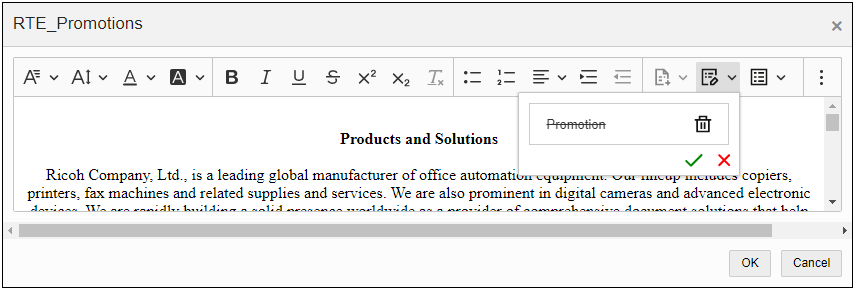
Delete an RTE Template
Perform the following steps to rename an existing template.
-
Open the RTE inline editor for an existing RTE attribute.
-
Click the Edit Template icon.
-
Click the Delete icon for the template you want to delete.
Strike-through format is applied to the template name.
-
Click the Save icon.
Beginning in Oracle CPQ 21D users can avoid repetitive work by using the RTE Templates for the JET Transaction UI inline editor.
Steps to Enable
You don't need to do anything to enable this feature.
Tips And Considerations
- Saved RTE templates for the JET Transaction UI inline editor are user and attribute specific.
- JET Transaction UI inline editor RTE templates cannot be shared with other users in Oracle CPQ 21D.
- This feature changes the behavior of the legacy RTE templates by making them both user and attribute specific.
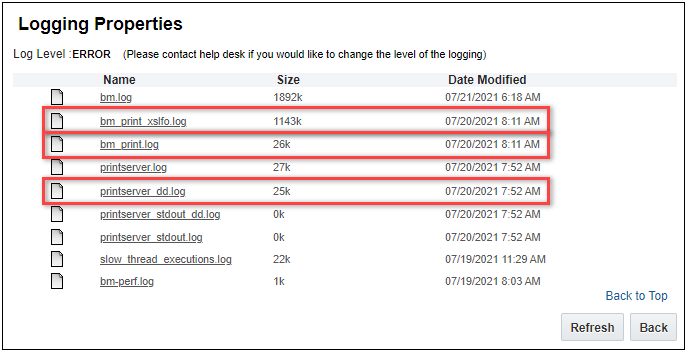
The following Print Server Log Enhancements are available in Oracle CPQ 21D.
Beginning in Oracle CPQ 21D, CPQ introduces three new print logs to provide details about print server requests, connections, and status if a print request fails or times out.
- bm_print.log provides information to help administrators isolate printing errors.
- bm_print_xslfo.log provides information to allow administrators to reproduce errors.
IMPORTANT: You have to submit a service request on My Oracle Support to enable the bm_print_xslfo.log on your site.
- printserver_dd.log provides information about slow running print jobs and maximum allowable print requests.
When enabled, administrators can perform the following steps to access the new print if printing issues occur:
- Navigate to the Admin Home Page.
- Click Error Logs under Developer Tools.
- Click on the bm_print.log, bm_print_xslfo.log, or printserver_dd.log.
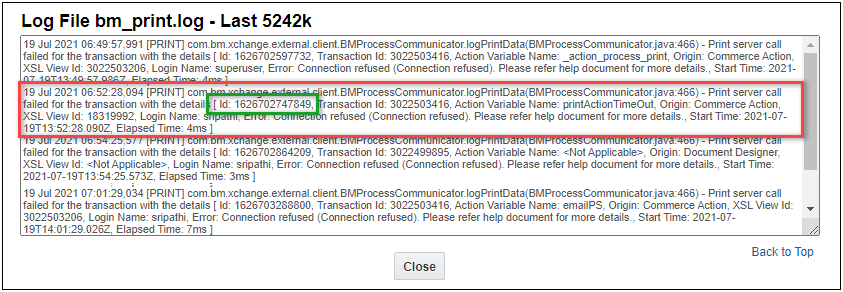
Print Log (bm_print.log)
When a print error occurs, administrators can access the bm_print.log to view the following information:
| Name | Description |
|---|---|
| Id |
The unique identifier that correlates entries between the bm_print.log, bm_print_xslfo.log, and printserver_dd.log. |
| Transaction Id |
The bs_id of the transaction under process. |
| Action Variable Name |
The variable name of the action being performed. When a print error is not triggered by an action (e.g. Document Designer preview) <Not Applicable> is displayed. |
| Origin |
The area where the action was invoked. For example; Commerce Action, Document Designer preview, or XSL View preview. |
| XSL View Id |
The Id of the XSL View associated with the action that triggered the print error. This field is only available for Commerce flows. |
| Login Name |
Login name of the user. |
| Error |
An error message explaining possible cause for the failure. Sample Error Messages:
|
| Start Time |
The time the request was sent to the print server. |
| Elapsed Time |
The difference of time between when the print request was sent and the error response is received from the print server. This value is specified in milliseconds and is only calculated for print server failures. |
For example, the following image shows an error entry for Id: 1626702747849.
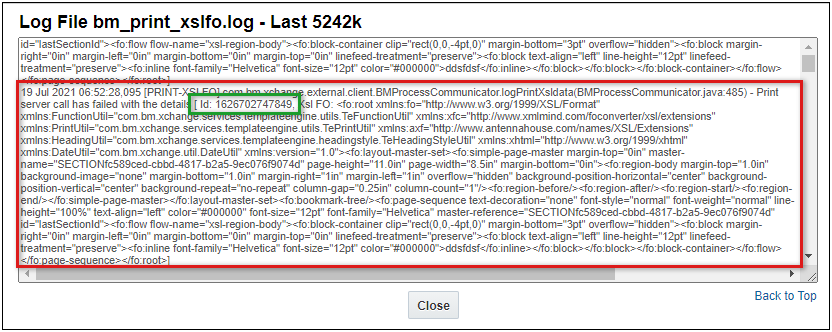
Print XSLFO Log (bm_print_xslfo.log)
When a print error occurs, administrators can use the Id from the bm_print.log to search for corresponding bm_print_xslfo.log entry. The XSL FO can help administrators recreate and isolate printing issues.
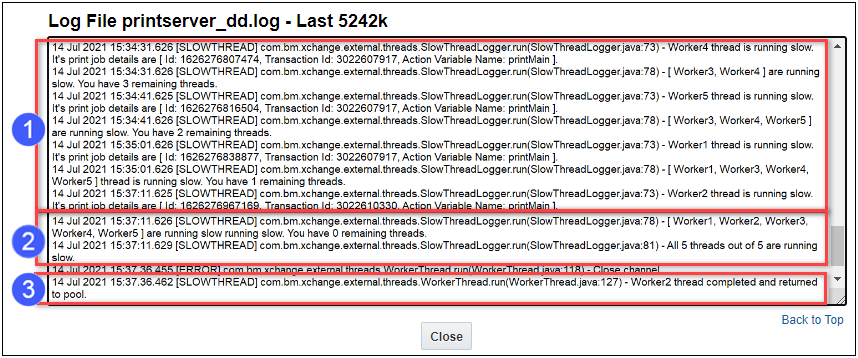
Print Server Logging Threshold
Oracle CPQ 21D also establishes a print server slow thread detection time limit. When the print request exceeds the pre-defined limit, a log entry is recorded in the printserver_dd.log. Log entries are recorded:
- For slow running print threads
- When all print threads are busy, and
- When a print thread completes and is returned to the pool.
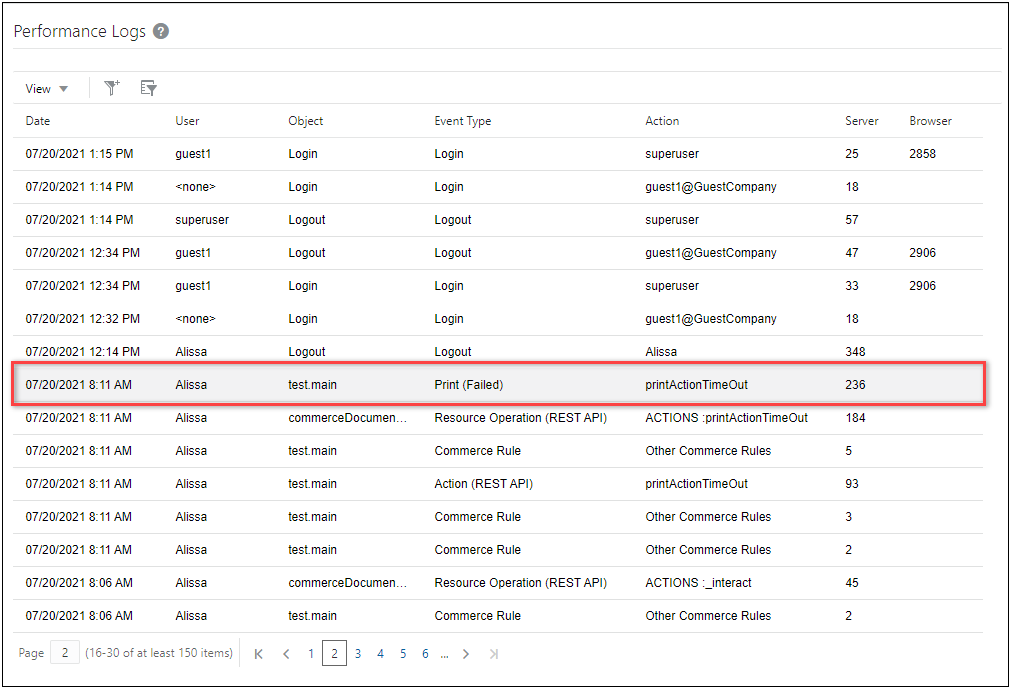
Performance Log Entries for Print Server Failures and Timeouts
In addition to the new logs, print action failures and timeouts are now recorded in the Performance Log.
The new enhanced print logs improve the logging to help administrators identify and isolate errors when print issues occur.
Steps to Enable
You don't need to do anything to enable this feature.
The following Pricing enhancements are available in Oracle CPQ 21D.
Simple Condition Pricing Rules
Oracle CPQ 21D introduces a Simple condition pricing rule type that allows administrators to select the necessary condition attributes and comparison operators, and then specify the values of the attributes for which the pricing rule is invoked.
Administrators can also search and specify available account names for a condition input. To help customers distinguish between similar account names, the Company Id is displayed with the Company Name when searching for account values.

The Simple condition pricing rule type allows administrators to easily create Simple conditions for pricing rules without creating BML scripts in an Advanced type pricing rule.
Steps to Enable
Administrators add Simple condition pricing rules to specify conditions to update pricing. Then when conditions are met and the end user updates the transaction, the new prices are applied.
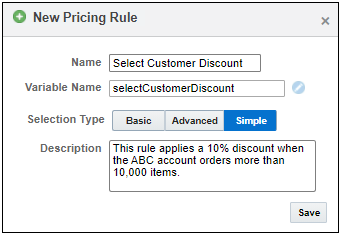
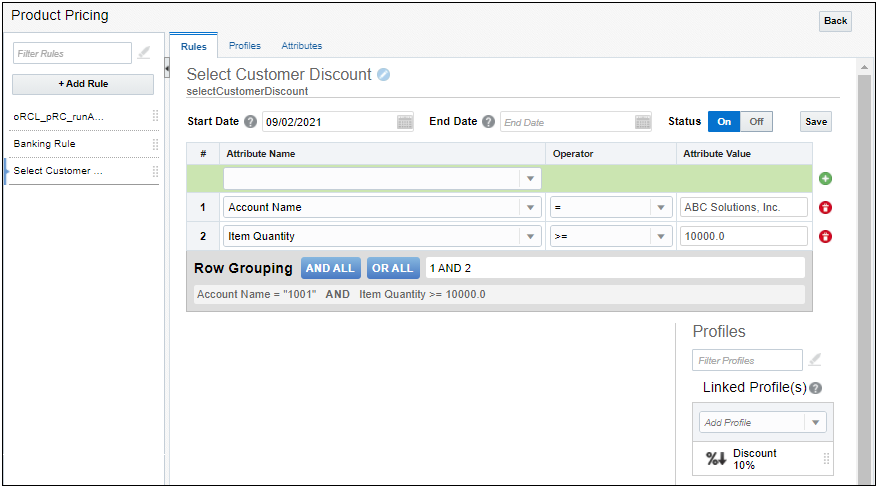
Simple Condition Pricing Rule Use Case
A customer may want a discount automatically applied to relevant line items upon update when a select account orders a large quantity of specific items.
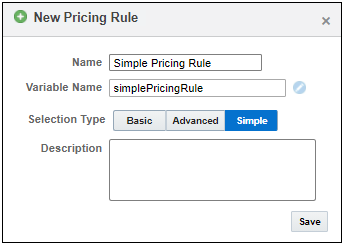
Create a Simple Condition Pricing Rule
Complete the following steps to add a Simple Condition to a Pricing Profile in the Pricing Engine.
-
Log in to Oracle CPQ and open the Admin Home page.
-
Click Pricing Engine in the Products section.
-
Select the Rules tab.
-
Click Add Rule in the left panel.
-
Enter a name in the Name field.
-
The Variable Name field populates automatically. Variable names can only contain alpha-numeric characters and underscores. The entry can be changed before saving, but after saving the value is read-only.
-
Select the Simple Selection Type option.
-
Click Save.
-
Enter the Start Date for the rule.
-
(Optional) Enter the End Date for the rule.
-
Create a simple condition:
-
Select an Attribute Name from the drop-down list of the Pricing Attributes defined for this site.
-
IMPORTANT: Only Pricing Attributes with the Header Level option enabled are available for selection. For more information on Pricing Attribute options, refer to Pricing Attributes topic in Oracle CPQ Administration Online Help.
-
-
Select an Operator.
-
Enter the desired Attribute Value.
-
-
Click the Add icon to add the condition to the pricing rule.
-
(Optional) Repeat Steps 10 and 11 to add additional conditions.
-
Enter Row Grouping.
-
Click Save.
-
In the right-hand panel, link a profile to the rule you created.
Support Granular Pricing for Subscription Products
Oracle CPQ 21D introduces a new subscription pricing structure that provides a consistent pricing structure for subscription and non-subscription products by allowing single price type for each line item. With the new pricing structure, a price change can be made at a more granular level since every charge is represented with a distinct part. Every line item/part charge is able to roll-up to the Model price.
The following graphic shows the new subscription product pricing structure.
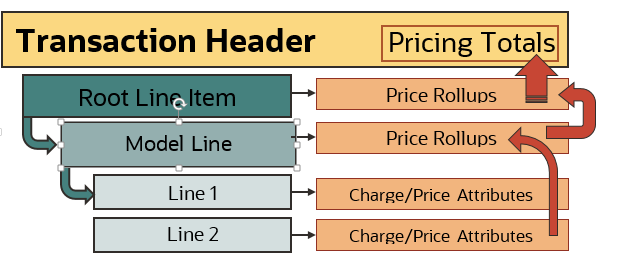
Granular Pricing for Subscription Products
In Oracle CPQ 21C and earlier, subscription product line items under the Model part were rolled up into one Model-level price and part number. The introduction of the common pricing structure provides flexibility to customers who sell both tangible and subscription-based product types, keeping the end user experience the same for both Commerce and Configuration products. In addition the new subscription pricing model continues to support the various types of product pricing (i.e., tiered pricing, adjustments/discounts, usage rating, etc.) in a single transaction.
Steps to Enable
The Granular Pricing for Subscription Products is available only to new site installations. The site must be set up using the latest (21D) Subscription Management (SM) package.
Go to the Integrating Oracle Subscription Management and Oracle CPQ (Doc ID 2508999.1) on My Oracle Support to access the latest Subscription Management package. Refer to the Subscription Management Implementation Guide for more information.
The following Usage Metrics feature is available in Oracle CPQ 21D.
Support for Oracle CPQ Usage Metrics in Oracle Cloud Dashboard
Beginning in Oracle CPQ 21D, the following new CPQ Usage Metrics data is available to view from the Oracle Cloud dashboard:
- Total number of API licenses consumed per day.
- Total amount of disk space consumed in Gigabytes (GB).
Having one central location for accurate and real-time licenses information helps administrators in decision making, usage tracking, and troubleshooting.
Steps to Enable
You don't need to do anything to enable this feature.
Tips And Considerations
The disk space consumption metric represents a snapshot in time and reported once daily.
The following Web Services features are available in Oracle CPQ 21D.
Consolidated Asset View REST API
Oracle CPQ 21D expands Web Service support for users with Asset-Based Ordering enabled by introducing a v13 Consolidated Asset View REST API.
Search Projected Assets by Customer
This REST API call provides a consolidated list of fulfilled and pending order asset lines in a hierarchical list for a specific customer. In addition, users can perform search and sort operations on the consolidated list of projected assets.
- Endpoint: /rest/v13/projectedAssets/actions/search
- Method: POST
The customer identifier (customerId) and Commerce process (sourceIdentifier) are required for this REST call. Additionally, this REST API requires the Commerce process must have data columns established with the following ABO attributes populated:
- assetkey (instanceid_l)
- fulfillmentstatus (fulfillmentStatus_l)
- actionCode (oRCL_ABO_ActionCode_l)
- requestDate (requestDate_l)
Steps to Enable
Review the REST service definition in the REST API guides, available from the Oracle Help Center > your apps service area of interest > REST API. If you're new to Oracle's REST services you may want to begin with the Quick Start section.
Tips And Considerations
- This service can be used to return root asset only (enableHierarchy=false) or asset tree (enableHierarchy=true). By default the server processes a maximum of 100,000 rows for all assets and in addition a maximum of 100 root rows for the tree search. When the results exceed the server limits, the state parameter includes a warning in the response.
- The Commerce process assetkey (instanceid_l) data column must be indexed.
- If upgrading to 21D and an ABO Commerce process is already implemented, you must repopulate the data column if there are any pending fulfilled transaction lines already in the Commerce process.
- The search and sort behavior when enableHierarchy=true is very similar to the Transaction Line hierarchical search and sort. The result line returns in a flat list with children following their parent. Only results that match the specified criteria are returned and non-matching results for those parent/child items are not provided in the result. The sort feature takes into account parent/child relationship but does not sort between children of different parents.
- The search results take into account the information available in the database and from a memory search of merged data of the projected assets. With this in mind, the child component of the search/sort will always match the specified criteria; however, a root line search/sort can only guarantee to match the criteria from the database query.
Due to the nature of combination of database search and in-memory search, there could be differences in the search results based on the user-specified criteria for multiple changeable attributes.
For example:
| Quantity | Date Added | |
|---|---|---|
| Asset (database query) | 10 | Oct 1 |
| Pending Fulfilled Order (database query) | 20 | Nov 1 |
| Projected Asset (merged data) | 20 | Oct 1 |
-
- If the user searches on the projected asset, the result would indicate a Quantity of 20 with the Date Added of Oct 1.
- If the user searches for Quantity less than 10 and Date added is less than Oct 15, the asset would not return a result because the criteria was filtered out in the database query prior to the merged projected asset query.
In general, avoid a combination multiple attributes for a search when those attributes may change the result from the pending fulfillment order query.
-
When there are multiple pending fulfilled order lines for the same asset, the projected asset info will come from the pending fulfilled line of latest request date. Therefore if the first pending fulfilled order line is asset creation order with action code of Add, even if the asset doesn't exist, the action in the final projected asset will still show as updated based on the second pending fulfilled line.
- If the response includes hasMore=true, this indicates that more results can be retrieved via pagination without changing search criteria. You could still get a warning of too much result data even if the response is hasMore=false. In this case, you should apply more restrictive search criteria.
-
If you get a warning that there are too many results from the root asset search of the database, try to apply more restrictive criteria. You won't be able to limit the number of results from the database by adding restrictive criteria using fulfillmentstatus, action code, creation date, or modification date attributes as those are only being applied in memory.
- For flat mode, partNumber is the only attribute that can for more restrictive search results.
- For tree search mode, try to apply criteria with partNumber, assetkey, lineId, or transactionId attributes.
- The 21C and earlier ABO package sample Update Asset script incorporates all the pending fulfilled lines information to update the asset. This script logic assumes the pending fulfilled order will always update the asset in the order of request date. If this logic does not fit your business case, the Update Asset script will need to be customized to your needs.
- The 21C and earlier ABO package includes an Update Asset sample script which needs to be updated for this feature to populate the origTransactionid attribute for the asset. Modify the 'abo_convertDeltaBomToAsset' function by adding the following line to the asset payload:

Oracle CPQ 21D introduces new v13 REST APIs to support user-specific JET RTE templates. The following web services are now available:
Get a List of Templates for an RTE Attribute
Use this endpoint to retrieve a user-specific list of templates for a specific RTE attribute.
This REST API endpoint with the Commerce process variable name, document variable name, and RTE variable name query parameters can be used to retrieve a user-specific list of templates for the specified RTE attribute.
For example, the following endpoint sample returns the current user's list of RTE templates for the 'coverLetter_t' RTE attribute in the 'oraclecpqo' Commerce process 'transaction' document.
- Endpoint Sample:
https://sitename.oracle.com/rest/v13/commerceAttrRichTextTemplates?q={$and:[{'processVarName':'oraclecpqo'},{'documentVarName':'transaction'},{'attributeVarName':'coverLetter_t'}]}&fields=name,id&orderby=name
- Method: GET
Get an RTE Template
Use this endpoint to retrieve the content of a user's saved RTE Template for the specified template Id.
- Endpoint: /rest/v13/commerceAttrRichTextTemplates/{id}
- Method: GET
Create an RTE Template
Use this endpoint to create an RTE Template for the specified RTE attribute. The Commerce process variable name, document variable name, RTE variable name, and content are specified in the request body.
- Endpoint: /rest/v13/commerceAttrRichTextTemplates
- Method: POST
Delete an RTE Template
Use this endpoint to delete the specified RTE Template.
- Endpoint: /rest/v13/commerceAttrRichTextTemplates/{id}
- Method: DELETE
Create, Rename, or Delete Multiple RTE Templates
Use this endpoint to create, rename, or delete multiple RTE templates. The desired action and the applicable information are specified in the request body. For rename requests, the new name and template Id are required. For delete requests, the template Id is required.
- Endpoint: /rest/v13/commerceAttrRichTextTemplates/actions/synchronize
- Method: POST
These REST API endpoints provide web services to support user-specific RTE templates for the JET Transaction UI RTE inline editor. Refer to the RTE Template REST APIs topic in Oracle CPQ Administration Online Help or REST API Services for Oracle CPQ in the Oracle Help Center for additional information and examples.
Steps to Enable
Review the REST service definition in the REST API guides, available from the Oracle Help Center > your apps service area of interest > REST API. If you're new to Oracle's REST services you may want to begin with the Quick Start section.
Oracle CPQ 21D expands the Usage Metrics REST API web service to provide administrators with easier access to disk space usage information. Usage Metrics REST API v13 provides the disk space consumption in Gigabytes (GB). Disk space consumption is calculated as the sum of the following:
- The cumulative size of all the files attached through file attachment attributes
- The cumulative size of all the files uploaded through file manager
Get Usage Metrics
This endpoint returns licensing and disk space usage information.
- Endpoint: /rest/v13/companies/usage
- Method: GET
The REST API endpoint with the disk space query parameter can be used to return the current disk space consumption information as follows:

The REST API response body for disk space consumption includes the total and usage parameters. The example response body for the disk space query follows:

This REST call provides accurate and real-time disk space usage information to help administrators in decision making, usage tracking, and troubleshooting. Refer to the Usage Metrics REST API topic in Oracle CPQ Administration Online Help or REST API Services for Oracle CPQ in the Oracle Help Center for additional information and examples.
Steps to Enable
Review the REST service definition in the REST API guides, available from the Oracle Help Center > your apps service area of interest > REST API. If you're new to Oracle's REST services you may want to begin with the Quick Start section.
Tips And Considerations
The disk space consumption metric represents a snapshot in time and reported once daily.
IMPORTANT Actions and Considerations
PRE-UPGRADE CONSIDERATIONS
Modifications to Known Functionality
Before upgrading to Oracle CPQ 21D, we recommend you review the modifications to known functionality and plan accordingly.
| Oracle CPQ Feature |
Description |
| Configuration Actions |
Configuration Process Invocation REST service calls establish the sequence of Configuration Actions to be presented in the order they are within the Oracle CPQ database. Administrators need to be aware of this and check the UI to ensure the order of the actions are as desired. |
| Single Sign-On Guest Users and User Language and Currency Preferences |
For Single Sign-On guest users, user preferences, such as language and currency, are not able to be updated. Only registered users are able to update user preferences. |
| Configuration Page Templates |
This administrative feature was not widely implemented. If you are among the customers that currently have configuration page templates in your environment you need to migrate to standard configuration flows. Beginning in Oracle CPQ 21D, customers are no longer be able to create and edit the configuration page templates. To learn more about Configuration Flows, refer to the Configuration Flows topic in the Oracle CPQ Administration Online Help. |
| Document Engine |
Document Engine, which is used to created proposals and submissions, is being deprecated. Customers need to recreate their existing DocEngine Templates with the Document Designer. Upon upgrade to Oracle CPQ 21D, customers no longer have access to Document Engine administration for the editing of templates. However, customers retain edit access to the raw XSL templates that Document Engine produced. Print actions using templates created with the Document Engine continue to function for end users. To learn more about Document Designer, refer to the Document Designer Overview topic in the Oracle CPQ Administration Online Help. |
Planned Changes to Supported Features
To continually improve our application, Oracle CPQ routinely evaluates product capabilities to identify older features that should be replaced with improved functionality. Supporting outdated features adversely impacts the value that we bring to our customers. This announcement provides information to CPQ administrators and IT professionals to prepare for future updates, including the uptake of provided alternative functionalities. The table below includes planned feature deprecations and their removal release schedule.
What does this mean?
“Deprecated” means the feature is planned for removal in a future Oracle CPQ Update (see End of Life column in the table below). The feature will continue to function for existing users until that time but will not be further enhanced or documented. After removal, the feature will no longer be supported or function.
| Oracle CPQ Feature |
Deprecation Announced |
End of Life and Removal |
Description |
| Oracle CPQ Shopping Cart |
21A |
22A |
The Oracle CPQ shopping cart feature is being deprecated from Legacy Configuration UI. We are working on developing a similar experience for the JET Configuration UI.
|
| ExtJS Library Helper |
21C |
22A |
ExtJS is a JavaScript library for building web application pages. Oracle CPQ used this framework for its internal implementation and did not expose this library for customer use. We are eliminating this library from our product. If you are using JavaScript for your CPQ implementation and have made any custom references to ExtJS Library functions, we strongly recommend you remove those references from your script. With the Oracle CPQ 22A release, we will be removing this framework from the Oracle CPQ product. Please follow the below steps to verify the custom usage of EXTJS Library in your CPQ implementation. Step 1 To verify if you are referencing ExtJS Library in your Home XSL Template, follow the instructions below:
<xsl:variable name="gSkinJsCode"> ... </xsl:variable> Step 2
Step 3
Step 4 If you have defined and referenced custom JavaScript from the File Manager, perform the document search with "Ext." to find the ExtJS references. |
| Legacy Global Functions |
21C |
22B |
In earlier versions of Oracle CPQ the Legacy Global Functions, also known as Jython scripts, allowed customers to write custom python scripts to use with BML for various types of processing. Due to poor performance, Oracle CPQ ended support for these scripts several years ago. If your Oracle CPQ implementation uses this functionality, we recommend administrators migrate to standard supported functionality (e.g., Util BML Libraries, Commerce BML Libraries, and BMQL). With Oracle CPQ 22B, we will be removing this functionality from the product. To verify if you have Legacy Global Functions enabled in your environment, follow the steps below: Navigate to the Admin Home Page. Under Developer Tools section, if you see the Global Functions option available this indicates that Legacy Global Functions are enabled for your CPQ environment. |
| Legacy Commerce UI |
21C |
22C |
In Oracle CPQ 21C, we announced the deprecation of Legacy Commerce Transaction UI. The end of life and removal of this functionality will occur in Oracle CPQ 22C. We introduced JET Responsive UI for Commerce in Oracle CPQ 18C, and after years of evolution and production experience, our customers are experiencing the benefits of the new JET Responsive UI for both Commerce and Configuration. The majority of Oracle CPQ customers have successfully made the complete transition to the JET UI. Moving forward, we are focusing our development efforts on enhancing the JET Responsive UI to improve the overall user experience. We’re announcing these changes to give our customers early visibility and the opportunity to prepare for this update. If your Oracle CPQ implementation still uses Legacy Commerce UI, we encourage you to start preparing for the transition to the JET UI. For more information on enabling JET Commerce UI, visit the Oracle CPQ Administration Online Help JET Transaction UI topic or watch the CPQ JET UI: Best Practices and Customization Video. |
| Legacy Configuration UI |
21C |
22C |
In Oracle CPQ 21C, we announced the deprecation of Legacy Configuration UI. The end of life and removal of this functionality will occur in Oracle CPQ 22C. We introduced JET Responsive UI for Configuration in Oracle CPQ 19B, and after years of evolution and production experience, our customers are experiencing the benefits of the new JET Responsive UI for both Commerce and Configuration. The majority of Oracle CPQ customers have successfully made the complete transition to the JET UI. Moving forward, we are focusing our development efforts on enhancing the JET Responsive UI to improve the overall user experience. We’re announcing these changes to give our customers early visibility and the opportunity to prepare for this update. If your Oracle CPQ implementation still uses Legacy Configuration UI, we encourage you to start preparing for the transition to the JET UI. For more information on enabling JET Configuration UI, visit the Oracle CPQ Administration Online Help JET Configuration UI topic or watch the CPQ JET UI: Best Practices and Customization Video. |
| Legacy Commerce and Configuration Mobile Layouts |
21C |
22C |
In Oracle CPQ 21C, we announced the deprecation of Legacy Commerce and Configuration Mobile Layouts. The end of life and removal of this functionality will occur in Oracle CPQ 22C. We introduced JET Responsive UI for Configuration in Oracle CPQ 19B, and after years of evolution and production experience, our customers are experiencing the benefits of the new JET Responsive UI for both Commerce and Configuration. The majority of Oracle CPQ customers have successfully made the complete transition to the JET UI. Moving forward, we are focusing our development efforts on enhancing the JET Responsive UI to improve the overall user experience. We’re announcing these changes to give our customers early visibility and the opportunity to prepare for this update. If your Oracle CPQ implementation still uses Legacy Configuration UI, we encourage you to start preparing for the transition to the JET UI. For more information on enabling JET Configuration UI, visit the Oracle CPQ Administration Online Help JET Configuration UI topic or watch the CPQ JET UI: Best Practices and Customization Video. |
| Legacy Rich Text Editor |
21C |
22C |
In Oracle CPQ 21C, we are announced the deprecation of the Legacy Rich Text Editor. The end of life and removal of this functionality will occur in Oracle CPQ 22C. Oracle CPQ occasionally disables old areas of the product that have been replaced by newer and improved versions. As previously announced in CPQ 20C, we introduced a new inline editor for rich-text editable attributes (RTE). The new JET editor includes more text formatting options than the legacy editor. Features include undo/redo, images, links, table tools, and functions with the browser's native spell-check. We are also working on adding user-specific template support to the new editor before retiring the legacy editor from the product. |
| GXT Customer Images and CSS References |
21C |
22C |
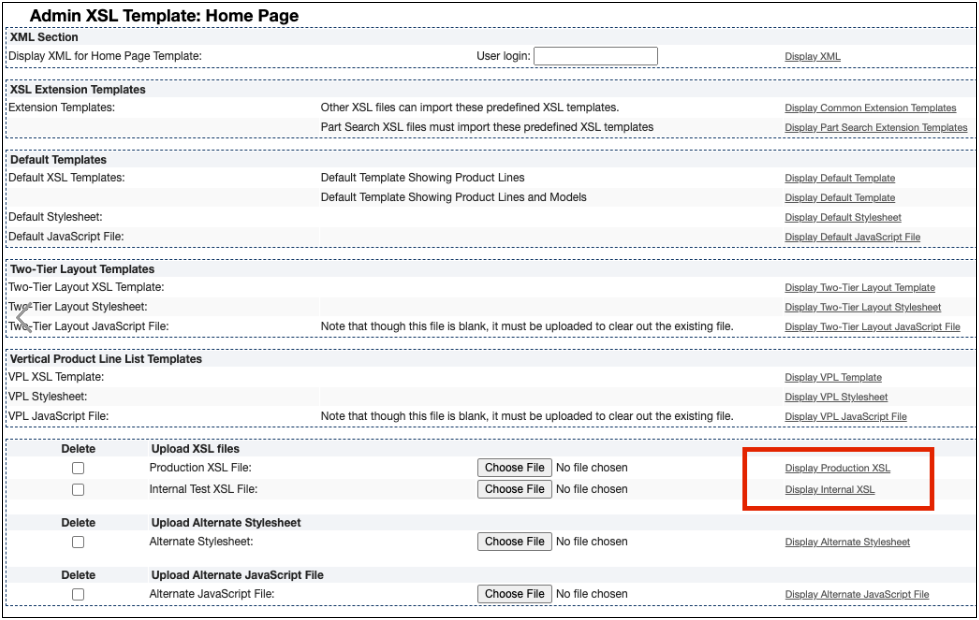
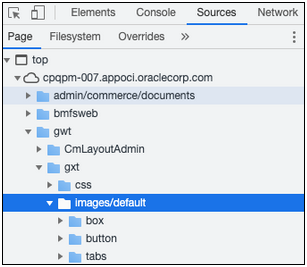
GXT is a Java framework for building web application pages. Oracle CPQ used this framework for its internal implementation and did not expose this for customer use. We are eliminating this framework from our product. If you are referencing images or CSS provided by this framework, we strongly recommend you to remove those references from your implementation. With the Oracle CPQ 22C release, we will be removing this framework from the Oracle CPQ product. GXT Images/Icons References The images used by this framework can be found under the folder path: "/gwt/gxt/images/default/" Refer to the example below. If you are referencing any image from this folder, remove those references and use the File Manager to manage your customized images.
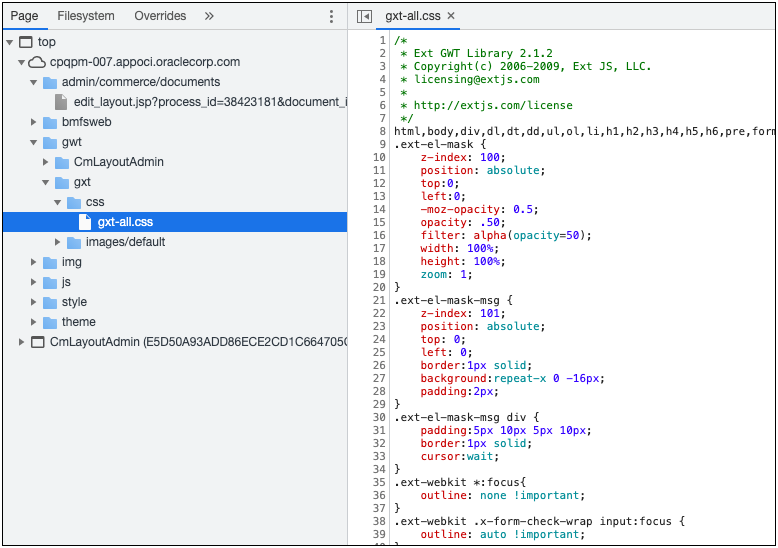
GXT CSS References The CSS file used by this framework can be found under this folder path: "/gwt/gxt/css/gxt-all.css". Refer to the example below. If you have customized the above CSS file or referencing any CSS classes from this file, remove those customizations and use Stylesheet Manager to manage your customized CSS.
|
Custom Javascript
While Oracle CPQ does not endorse or guarantee the use of JavaScript customizations, we recognize that some customers have extended the Oracle CPQ. Customizations may conflict with new Oracle CPQ platform features, data may be corrupted or lost, maintenance and support may be difficult, cross-browser support must be verified, performance may be impaired, and testing is required for each upgrade. Customers should consider carefully the relative benefits of JavaScript customizations in light of the associated risks.
If customers have added custom JavaScript that leverages the Document Object Model (DOM) structure or specific elements, classes or IDs, this customization should be thoroughly tested and may require refactoring.
Update 21C and later, which supports JET v8.3.0, includes changes to the following DOM structures that will very likely impact existing JavaScript Customizations:
- JET widget CSS applies to elements with class that starts with '.oj'. Oracle JET reserves this as a namespace. As such all customized elements that include '.oj' should be reviewed, tested, and refactored. Going forward no customized elements should include '.oj' in order to prevent future issues.
Refer to the following resources for more information:
- Oracle CPQ Administration Online Help > Style & Templates > JavaScript Customizations for JET UIs
- Oracle CPQ JET Configuration and Transaction UI: Refactoring Existing JavaScript Customizations (Doc ID 2490016.1)
- JavaScript Extension Toolkit and JET v8.3.0 Release Notes
Migration
When using Import From Source or Connect To Destination to migrate content, both sites must use the same major update. The migration of content can only occur across minor updates within the same major update.
- "Major update" = Update 21D
- "Minor update" = Update 21D Patch 1
When using Migration Packages, content from 19A and forward can be uploaded to the latest site version.
Resolved Known Issues
For information on bugs fixed in Update 21D, refer to the Oracle CPQ 21D Resolved Known Issues document available on My Oracle Support and the Oracle CPQ Administration Online Help.
Translation
For some system-defined messages and components, strings were removed and others added in Oracle CPQ 21D. If you have created your own implementation-specific translations of system-defined strings, some of these strings may no longer appear. Other strings may appear in English. The strings appearing in English are new and require translation.
Most of these messages and components are on the Administration side of Oracle CPQ, but you should review both your end user and administration pages before deploying your updated installation to confirm that all strings appear in the desired language.
Translation Status
Oracle CPQ supports the consumption of both single and multi-byte character sets. Submit a service request on My Oracle Support to enable your site for a new language.
For the following languages, a translation of the Oracle CPQ user interface is available for both the platform and the reference application:
- Chinese (Simplified) [China]
- Chinese (Traditional) [Taiwan]
- Czech [Czech Republic]
- Danish [Denmark]
- Dutch [Netherlands]
- English
- Finnish [Finland]
- French
- French [Canada]
- German
- Hungarian [Hungary]
- Italian
- Japanese [Japan]
- Korean [South Korea]
- Norwegian (Bokmål) [Norway]
- Polish [Poland]
- Portuguese [Brazil]
- Romanian [Romania]
- Russian [Russia]
- Spanish (Worldwide)
- Swedish [Sweden]
- Turkish [Turkey]
POST-UPGRADE CONSIDERATIONS
Upgrade and test all test instances on Oracle CPQ 21D before upgrading to production.
Customer Upgrade Testing
Customers should actively test new versions applied to non-production environments before a scheduled production upgrade. At minimum, customers should test the lifecycle of a transaction, with the typical actions that sales users perform. These may include but are not limited to: start transaction, new configuration, reconfigure existing configuration, parts search, discounting, printing, revisions, and approvals. Integration points should also be tested. Reviewing the What's New is highly recommended as this practice may indicate additional focus areas for testing.
Customers should also test any customizations made on the environment, especially JavaScript and unsupported integrations. Note that custom JavaScript is the most frequent cause of post-upgrade issues. Custom JavaScript and unsupported integrations are not supported by Oracle Support or Development. In particular, note that an upgrade may introduce changes to the DOM, which could impact use of customer JavaScript and CSS.
While Oracle CPQ does not endorse or guarantee the use of JavaScript customizations, we recognize that some customers have extended Oracle CPQ to support critical use cases. JavaScript API ("CPQJS") includes methods for accessing attributes, actions, and other elements on the JET Configuration and JET Transaction UIs. Customers should consider carefully the relative benefits of JavaScript customizations in light of the associated risks. Customizations may conflict with new Oracle CPQ platform features, data may be corrupted or lost, maintenance and support may be difficult, cross-browser support must be verified, performance may be impaired, and testing is required for each upgrade.
Oracle CPQ does extensive testing as part of the release cycle. Therefore your testing plan efforts should focus on testing customer-specific use cases rather than general tasks such as adding a configuration attribute.
Issues after Upgrade
If a customer experiences issues after the upgrade, there are two different processes depending on if the upgrade is a non-production or production upgrade.
Issues after Non-Production Upgrade
- Log a Service Request (SR) through My Oracle Support.
- The Service Request will be picked up by Customer Support, and assigned to the Point of Contact (POC).
- The Service Request is worked as a standard Customer Support Service Request.
NOTE: In some instances the customer administrator may resolve issues without opening a Customer Support Service Request.
Issues after Production Upgrade
- In most cases, production upgrades go smoothly and the Upgrade Service Request is closed once the upgrade completes.
- The customer is instructed to open a "Severity 1" Service Request in the event that there is a critical issue after the production upgrade that was not identified after the non-production upgrade. Critical issues after upgrade would be considered production site down, 100% of users cannot quote, or other revenue impacting business critical issues.
- Once the "Severity 1" Service Request is created, the on-call team is notified.
- On-call team member(s) will work the Service Request towards resolution.
- On-call team member will then reach out to Oracle Upgrade Specialist who performed the post upgrade validation if needed.
Browser Support
Oracle CPQ supports all browser versions that meet the criteria of the Oracle Software Web Browser Support Policy.
If you experience issues using a supported browser version, open a ticket on My Oracle Support to resolve the issue. If an issue arises when using a supported browser, use a certified browser version until a fix is delivered. Certified browsers are selected based on current market share and are thoroughly tested to work with the current version’s standard functionality.
Certified Browsers
Windows
- Google Chrome 92.x
- Mozilla Firefox 90.x
- Microsoft Edge 92.x
Mobile Devices
- Apple iPad iOS 14.x, Safari browser
- Apple iPhone iOS 14.x, Safari browser
IMPORTANT:
- Internet Explorer browser certification and support was discontinued in Oracle CPQ 21A.
- Compatibility issues with the selected browsers may exist when sites are created with additional JavaScript, alternate CSS, or other custom functionality. Customizations may require add-on work. Contact My Oracle Support to determine the availability of workarounds and minor fixes.
Salesforce Integration Support
Oracle officially supports version 8.1, 8.2 and 8.3 of the Oracle CPQ Connector for Salesforce. We also continue to support version 7.2 of the legacy Oracle CPQ Commerce Integration.
Training
Please refer to the release documentation for all versions between your current version and the version to which you are upgrading to see all new functionality, resolved known issues, and functional known issues.
Refer to the Oracle CPQ Administration Online Help to become familiar with the new features introduced in Oracle CPQ 21D. For additional help, see My Oracle Support.
Verify any information not explicitly mentioned in this document as supported by the software against the product help for Oracle CPQ 21D.
Additional Information
For more information on Oracle CPQ, visit the Oracle CPQ documentation site.
Disclaimer
The details in this document are provided for high-level informational purposes only and are not intended to function as a specification or to replace the Online Help. Upgrading to a subsequent release may require the re-deployment of Commerce Processes, Configuration, or global function settings. Modifications to integration XSL files or APIs may also be required.