

This document will continue to evolve as existing sections change and new information is added. All updates appear in the following table:
| Date |
Feature |
Notes |
|---|---|---|
| 18 JUL 2018 |
Updated document. Revised feature information. Added clarification regarding supported HTML attributes. |
|
| 02 OCT 2017 |
Created initial document. |
The purpose of this guide is to outline the information regarding any new or improved functionality in the Oracle Adapter for Salesforce Lightning Winter 18 Release. Each section includes a brief description of the feature, the steps necessary to enable or begin using the feature, any tips or considerations to keep in mind, and the resources available to help you complete them.
Additionally, this document assumes that you are familiar with the Oracle Adapter for Salesforce Lightning (otherwise referred to as Lightning Adapter throughout the document) and all of its basic concepts. If you are not familiar and require help, you can refer to the following links for more information:
- Oracle CPQ Cloud Support Center
- The Summer 17 Release Integration Guide
- The Winter 18 New Feature Summary Guide
We welcome your comments and suggestions to improve the content. Please send us your feedback at cpqcloud_documentation_us_grp@oracle.com.
The Oracle Adapter for Salesforce Lightning (also referred to as Lightning Adapter throughout this document) is our next generation Salesforce integration solution for CPQ Cloud, built on Salesforce’s App Cloud. In the Winter 18 release, we have made several updates to enhance both the administration and usability of our application.
Some of the new features are automatically available to users after the upgrade while some require action from your administrator and/or Oracle support. The following table lists these features along with what actions are required to enable them.
| Action Required to Enable Feature |
||||||
|---|---|---|---|---|---|---|
| Feature |
Automatically Available |
End User Action Required |
Administrator Action Required |
Oracle Service Request Required |
||
| Simplified Setup |
||||||
|
|
||||||
| Lightning Transaction UI |
||||||
|
|
||||||
|
|
||||||
|
|
||||||
|
|
||||||
|
|
||||||
|
|
||||||
|
|
||||||
|
|
||||||
| Quote Management |
||||||
|
|
||||||
|
|
||||||

Before you upgrade to or install the Oracle Adapter for Salesforce Lightning’s Winter 18 release, it is important that you are aware of the following requirements:
- CPQ Cloud 2017 R1 or R2.
- For all new features introduced in Winter 18, you must have CPQ Cloud 2017 R2 or later.
- The Lightning Adapter (all versions) only functions with a Salesforce Instance using Enterprise or above.
- You must have access to the links and passwords for the Lightning Adapter’s new Managed Packages in order to update to the Winter 18 release. If you have not received the latest links or passwords, you can create an SR at https://support.oracle.com to request them.
After installing the Winter 18 release, it is important to verify and complete the following:
- Use the Supported Browsers for Lightning Experience
- Enable the Lightning Experience
- Select your version of CPQ Cloud from CPQ Site Settings (See CPQ Cloud Version Setting for more information.)
The Lightning Adapter for Salesforce Lightning is an integration solution for CPQ Cloud and Salesforce.com. Since the first release, many new features were created and many changes were made in the application coding that may interfere with compatibility between different versions. Therefore, it is best to check their compatibility before you implement an upgrade since their release dates may not coincide.
| Oracle Adapter for Salesforce Lightning Version |
Compatible with |
Compatible with |
|---|---|---|
| Summer 17 |
Yes |
NO, Errors may occur. Upgrade to Winter 18 |
| Winter 18 |
Yes |
Yes |
NOTE: Oracle Adapter for Lightning Summer 17 and CPQ Cloud 2017 R2 are NOT compatible and will cause errors or user disruption. By checking with the table above, you can be sure if your two versions are fully compatible.
Installation and Configuration Changes
The installation and setup process of the Oracle Adapter for Salesforce Lightning (Lightning Adapter) has changed in two ways:
- It is no longer necessary to manually install the Salesforce Lightning Design System into your environment.
- Administrators need to set the CPQ Cloud Version in CPQ Site Settings (see Section CPQ Cloud Version Setting) to match the CPQ Cloud Version you are integrating with.
NOTE: Whenever you perform administrative actions, remember to use the Classic UI.
In the previous release, Administrators were directed to install the Salesforce Lightning Design System (SLDS) separately. Since the Winter 18 release, this step no longer applies because it is now included in the new managed packages. Also, the previously installed SLDS package can be uninstalled following the upgrade.
Key Resources
The installation and setup guide will be provided on the My Oracle Support website.
After upgrading to the Winter 18 release, a new field appears on the CPQ Site Settings detail screen called CPQ Cloud Version. This new field is very important because it allows you to select the correct or currently used version of CPQ Cloud with the Lightning Adapter. This selection is important because it acts as a switch, enabling access to the new features or new APIs available to those who have the CPQ Cloud 2017 R2 and avoid any unnecessary errors or disruption. So, after you upgrade your version to Winter 18, be sure to update this selection by following the instructions below.
To select the correct CPQ Cloud version:
- Switch to the Classic UI.
- Select the CPQ Site Settings tab.
- Select your CPQ Site Settings link from the list.
- Click Edit.
- From the CPQ Cloud Version drop-down menu, select 2017R1 or 2017R2.
- Click Quick Save.
- Click Generate Actions.
- Click Cache Actions.
- Click Save to finish.
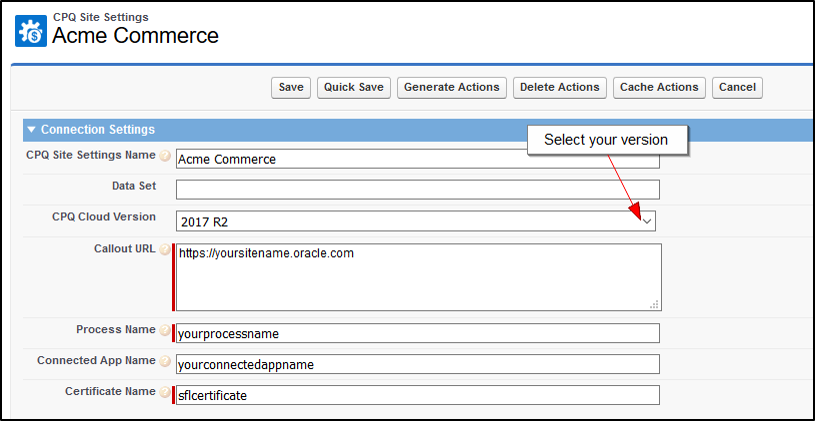
CPQ Site Settings with New CPQ Cloud Version Field
For a more detailed description of the CPQ Site Settings page, refer to the Oracle Adapter for Salesforce Lightning’s Installation and Setup Guide.
New Features in the Lightning Quote UI
This chapter describes all the new features that affect the User Interface (UI) in Salesforce Lightning when using the Winter 18 release of the Oracle Adapter for Salesforce Lightning. These features make the quote creation and management process even more intuitive for sales users while supporting more CPQ Cloud features with the implementations of the following new UI components and enhancements:
- File Attachment Attributes
- HTML Attributes
- Rich-Text Attributes
- Approvals
- Price Score Attributes
- Display Error Messages in Line Item Grid
- Show/Hide Reconfigure and Delete Action in Line Item Grid
- Show/Hide Line Item Grid Cells
NOTE: A CPQ Cloud site running 2017 R2 is required to enable these features.
When File Attachment Attributes are configured to appear in the Quote layout, they can be used as insightful resources for sales users such as Product Data Sheets or Quote Documents that are easily accessible from within the quote. When sales users see a quote with an attached file, it is a read-only type and appears as a simple document name link.
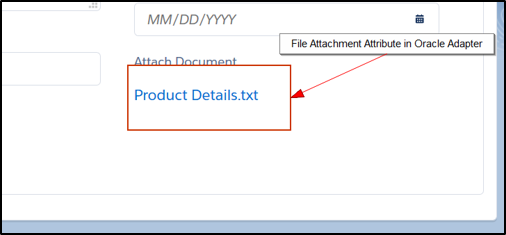
Example of a File Attachment Field
To view the file, the sales user simply clicks the document link and it will open in the same format that it was created.
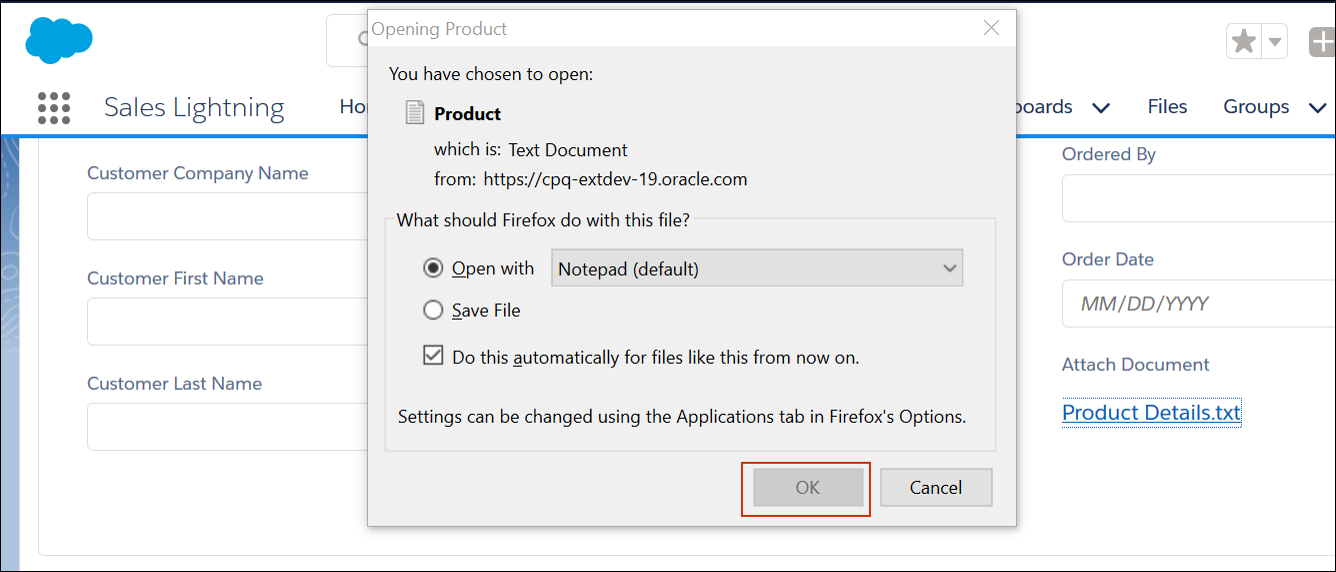
After the Document Link is selected
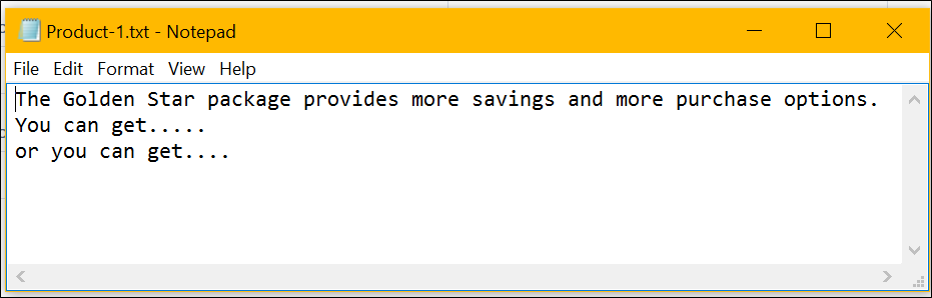
The Document Opens for the Sales User to Read
In this release, the sales user can only download any attached files.
Steps to Enable
This attribute must first be configured in CPQ Cloud. Once the file attachment field is successfully added to the transaction layout, then it can be enabled in Lightning Adapter.
To enable this attribute, your Administrator must add the field name to the Document Scope section in CPQ Site Settings.
Tips and Considerations
- Remember to update the CPQ Cloud Version that is selected in your CPQ Site settings to accurately reflect what you are currently using (see CPQ Cloud Version Setting).
- Do not forget to Generate Actions and Cache Actions after you add this field to CPQ Site Settings.
- File Attachments can only be downloaded in the same format they were saved in.
Key Resources
- For more information regarding the CPQ Cloud File Attachment attribute and its implementation process, refer to the MOS article called Using the File Attachment Commerce Attribute.
- For a more detailed description of the CPQ Site Settings page, refer to the Oracle Adapter for Salesforce Lightning’s Installation and Setup Guide.
When HTML Attributes are configured to appear in the Quote layout, they can be used to provide images and logos with rich-text to communicate lots of information to the sales users without having to navigate away from the Quote.
They can communicate business branding or helpful tips anywhere they appear in the layout.
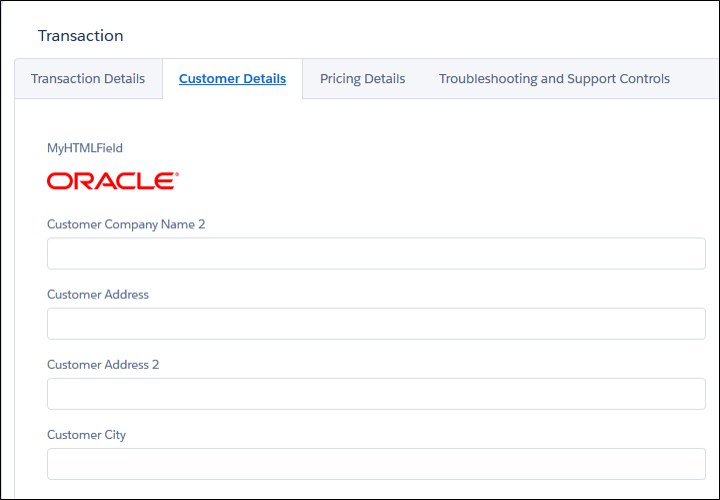
Example of an HTML Attribute in the Lightning Adapter
Supported Tags and Attributes for HTML Attributes Rendered in the Lightning Adapter
IMPORTANT: The Salesforce Lightning Framework applies additional processing and filtering on HTML Attributes. Due to this, some HTML tags supported in the CPQ desktop UI may not be supported in the Lightning UI.
HTML Attributes support the following HTML tags: a, b, br, big, blockquote, caption, cite, code, col, colgroup, del, div, em, h1, h2, h3, hr, i, img, ins, kbd, li, ol, p, param, pre, q, s, samp, small, span, strong, sub, sup, table, tbody, td, tfoot, th, thead, tr, tt, u, ul, var, strike.
Supported HTML attributes include: accept, action, align, alt, autocomplete, background, bgcolor, border, cellpadding, cellspacing, checked, cite, class, clear, color, cols, colspan, coords, datetime, default, dir, disabled, download, enctype, face, for, headers, height, hidden, high, href, hreflang, id, ismap, label, lang, list, loop, low, max, maxlength, media, method, min, multiple, name, noshade, novalidate, nowrap, open, optimum, pattern, placeholder, poster, preload, pubdate, radiogroup, readonly, rel, required, rev, reversed, rows, rowspan, spellcheck, scope, selected, shape, size, span, srclang, start, src, step, style, summary, tabindex, target, title, type, usemap, valign, value, width, xmlns.
IMPORTANT: The list of supported HTML tags and attributes is managed as part of the Salesforce Lightning/Aura Framework and therefore is subject to change. For additional information, contact Salesforce Support.
Steps to Enable
This attribute must first be configured in CPQ Cloud. Once the HTML field is successfully added to the transaction layout, then it can be enabled in Lightning Adapter.
To enable this attribute, your Administrator must add the field name to the Document Scope section in CPQ Site Settings.
Tips and Considerations
- Refer to the Salesforce Online Help article called Supported HTML Tags for more information.
- Remember to update the CPQ Cloud Version that is selected in your CPQ Site settings to accurately reflect what you are currently using (see CPQ Cloud Version Setting).
- Do not forget to generate actions and cache actions after you add this field to CPQ Site Settings.
Key Resources
- Read more about Configuring HTML Attributes in this online MOS article called Commerce Document Attributes.
- For a more detailed description of the CPQ Site Settings page, refer to the Oracle Adapter for Salesforce Lightning’s Installation and Setup Guide.
Rich-Text Attributes are great tools to communicate information to the sales rep from within the Quote. Because the text can be richly formatted, it will stand apart from all the other text the sales user sees. These attributes are read-only.
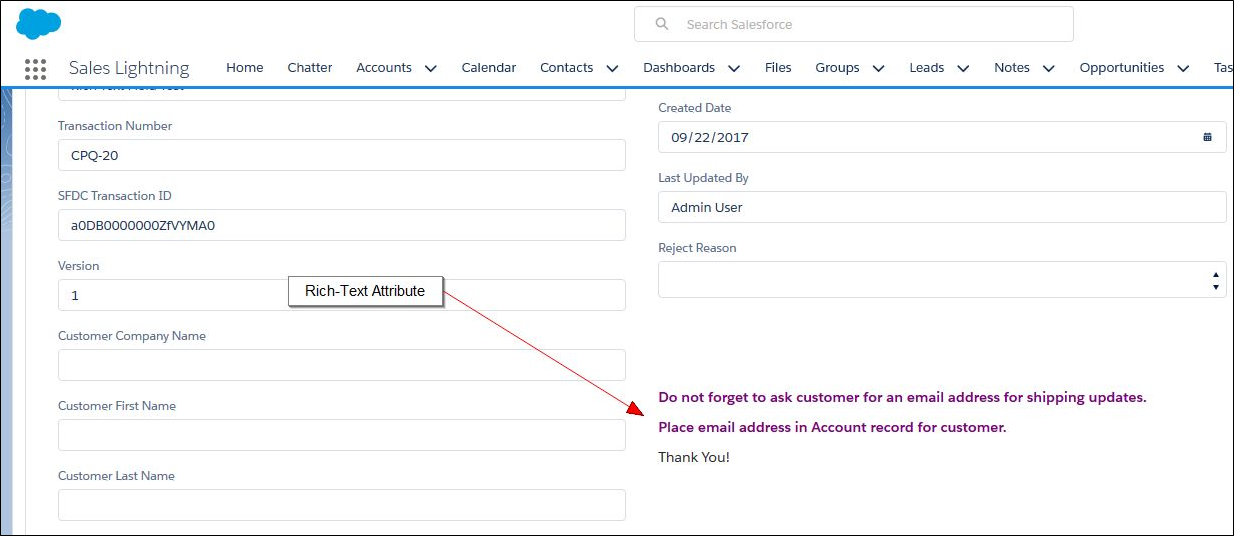
Lightning Quote using Rich-Text Attribute Example
The example screen shot shows how the admin can place a reminder on the Oracle Quote for the sales reps to see. This is a Rich-Text attribute and it stands out from all the other text on the screen to grab the sales reps attention. Of course, you can use this type of attribute for any other purpose or need your organization may have such as:
- Examples of desired selections
- Step-by-step instructions
Steps to Enable
This attribute must first be configured in CPQ Cloud. Once the Rich-Text field is successfully added to the transaction layout, then it can be enabled in Lightning Adapter.
To enable this attribute, your Administrator must add the field name to the Document Scope section in CPQ Site Settings.
Additionally, administrators need to include the attribute in their Field Mappings if they want to save the data to Salesforce.
Tips and Considerations
- The CPQ Cloud Rich-Text Editor is not supported.
- Remember to update the CPQ Cloud Version that is selected in your CPQ Site settings to accurately reflect what you are currently using (see CPQ Cloud Version Setting).
- Do not forget to generate actions and cache actions after you add this field to CPQ Site Settings.
Key Resources
- Read more about Configuring Rich-Text Attributes in this online MOS article called Commerce Document Attributes.
- For a more detailed description of the CPQ Site Settings page, refer to the Oracle Adapter for Salesforce Lightning’s Installation and Setup Guide.
An efficient approvals process is critical to both the velocity of deals and the maximization of profits. Approvals in CPQ Cloud helps keep deals moving by allowing for quick communication between both requesters and approvers. Additionally, Approvals help to provide a clear indication of where and with whom a request sits in a given process. This process also protects margins by ensuring visibility into and accountability for discounting and preventing late-cycle modifications to already reviewed quotes.
In the Lightning UI for CPQ, the sales user can now:
- Submit quotes for approval and immediately see the Reason(s) why a given quote needs a review.
- Provide a Comment before submitting that deal for review to help the approver understand the reason for the request.
- Revise an already submitted quote in the event a mistake occurred at any time.
Similarly, once an Approver is notified of a pending approval, he or she can:
- Open the Transaction in the Lightning UI and view the My Approval(s) attribute.
- Provide a Comment to send back to the sales rep upon the Approve or Reject action for the request.
Once a quote is in an approval process, both the sales rep and approver can monitor the status of a quote approval by viewing the Approval Status and Approval History attributes if they are on the page layout.
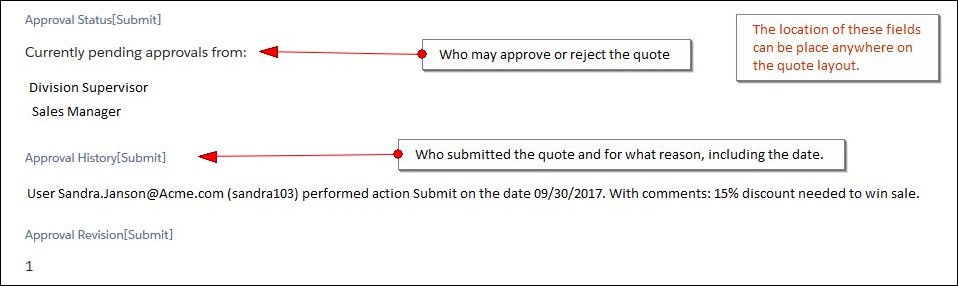
Example of a Quote with the Approval Status, Approval History, and Approval Revision Fields
This Approvals process supports simple approvals as well as, multiple serial or parallel approvers. The sales user will be able to see a new Submit button in their Oracle Quote screen.

Example of Submit Button on the Oracle Quote
When you are ready to submit your quote for approval, you simply click Submit from the Oracle Quote and the Submit for Approval screen appears.
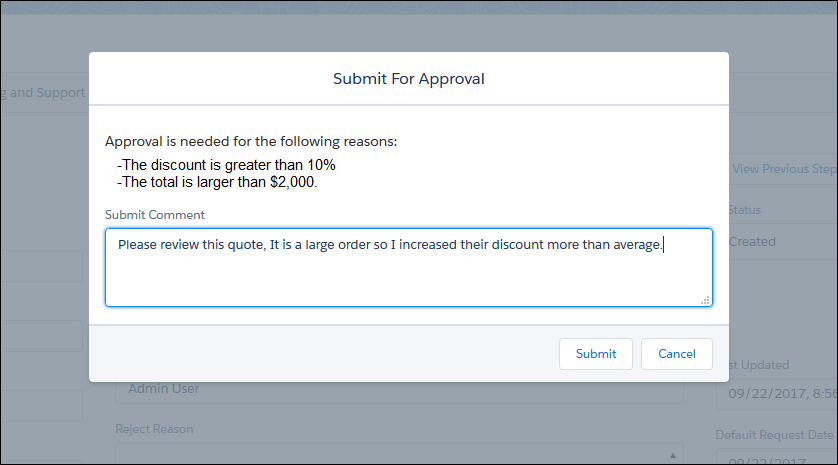
Submit for Approval Screen
The sales rep can see from the Submit for Approval screen why it needs approval and can enter in any relevant information regarding the quote’s approval before selecting Submit. Once submitted, your organization’s Approvals process may notify anyone who has permission to approve or reject the quote. Fields about the approval such as its current status, when it was submitted, or even the Approve and Reject button can be placed anywhere in the Quote layout.

Example of the Approve/Reject Buttons
The Approve and Reject buttons can include a field for entering any information that will be sent back to the sales rep regarding the action. There is no limit on the number of times a quote can be submitted or rejected before it is approved.
Steps to Enable
This attribute must first be configured in CPQ Cloud. Once the approvals processes and fields are applied to the transaction layout, then they can appear in the Lightning Adapter. However, you may need to verify that your CPQ Site Settings has the following Document Field Excludes:
- approval_revision_submit_t
- approve_reject_icon_submit_t
- cafsl__Oracle_Quote__c
- _currency_pref
- _document_link
- _currency_pref
- _submit_comment
It is important to note that the approval_revision_ and approval_reject_icon_ are both per Submit action and the following text (i.e., submit_t) will vary based on your submit action’s API name. In other words, the Submit action set has a VAR name of submit_t. Your specific VAR name will vary and will need to be copied exactly into your CPQ Site Settings.
Tips and Considerations
- Remember to update the CPQ Cloud Version that is selected in your CPQ Site settings to accurately reflect what you are currently using (see CPQ Cloud Version Setting).
- Do not forget to generate actions and cache actions after you add this field to CPQ Site Settings.
Key Resources
- For Administrative help to build an approval sequence in CPQ Cloud, while logged in as an Administrator, click the Approval Sequences Overview link to read all about it.
- For a more detailed description of the CPQ Site Settings page, refer to the Oracle Adapter for Salesforce Lightning’s Installation and Setup Guide.
Sales users and approvers should know how profitable the current pricing is, in order to guide their decisions to increase, decrease, or remove the discount. Since many administrators choose not to reveal direct cost or margin information to their sales reps, a smart Price Score metric can be used to provide this guidance.
This metric can be placed anywhere in the Oracle Quote layout to help the sales user know if the Quote pricing is highly competitive or way off the mark.

Screen Shot Example of CPQ Cloud Price Score Metric
Since the information comes from CPQ Cloud, it will behave the same way in the Lightning Adapter such as:
- 1 indicates the worst or lowest profitability
- 9 indicates the best or highest profitability
- Price Score numbers are highlighted with different colors (red, yellow, and green) to provide a quick visual indication of profitability for Transactions and Transaction Lines.
A Sales Rep can use their knowledge of the Price Score Metrics to tweak the Quote a little until all Price Scores are green.
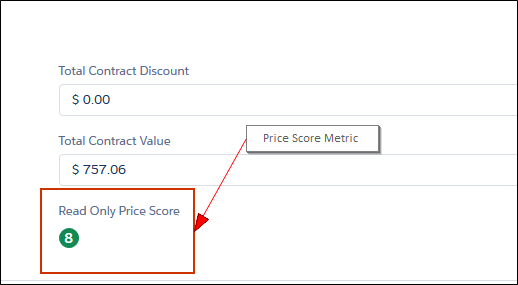
A Price Score placed in the Oracle Quote
Steps to Enable
This is actually an Integer attribute with Price Score settings and must first be configured in CPQ Cloud. Once the attribute is configured to have Price Score metrics and the resulting field is successfully added to the transaction layout, then it can be enabled in Oracle Adapter.
To enable this attribute, your Administrator must add the field name to the Document Scope section in CPQ Site Settings.
Tips and Considerations
- Remember to update the CPQ Cloud Version that is selected in your CPQ Site settings to accurately reflect what you are currently using (see CPQ Cloud Version Setting).
- Do not forget to generate actions and cache actions after you add this field to CPQ Site Settings.
- The Price Score metric may be placed on the Transaction document, the Transaction Line subdocument, and within the Line Item Grid itself. For more help on how to create and implement a Price Score, refer to the CPQ Online help files in Deal Negotiation Metrics.
Key Resources
- Reference the CPQ Cloud Help for more information on Price Scores.
- For a more detailed description of the CPQ Site Settings page, refer to the Oracle Adapter for Salesforce Lightning’s Installation and Setup Guide.
Display Error Messages in Line Item Grid
With the Winter 18 release, cell-specific error messages can now appear in the Line Item Grid when a user either selects an incorrect option or triggers a constrained attribute value.
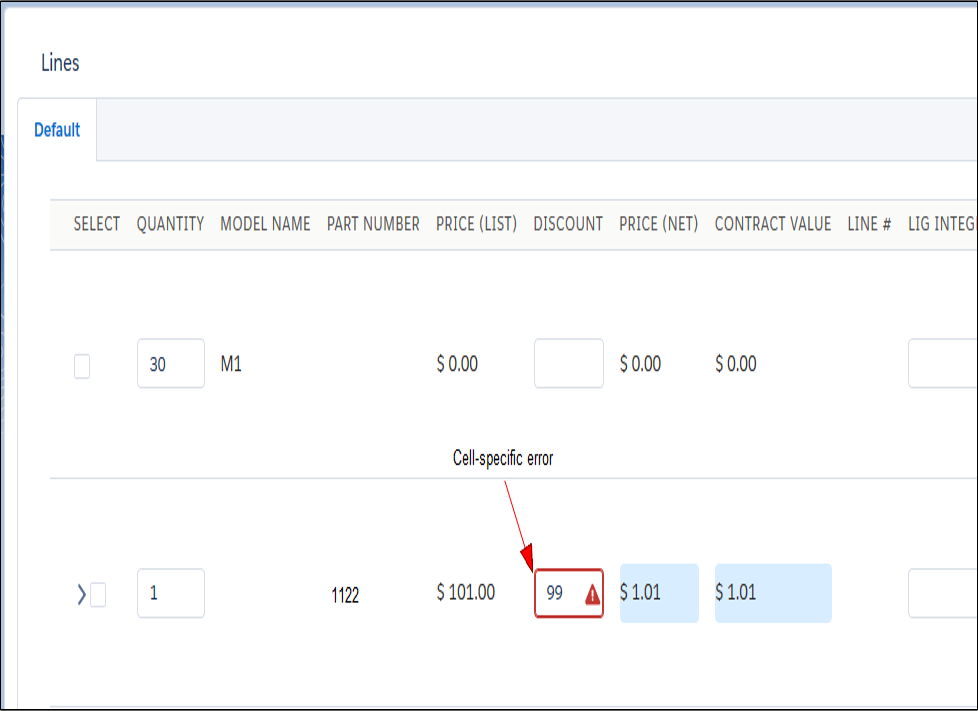
Example Screen Shot Demonstrating a Cell-Specific Error Message
Steps to Enable
There are no steps needed to enable this feature.
Tips and Considerations
Remember to update the CPQ Cloud Version that is selected in your CPQ Site settings to accurately reflect what you are currently using (see CPQ Cloud Version Setting).
Key Resources
For a more detailed description of the CPQ Site Settings page, refer to the Oracle Adapter for Salesforce Lightning’s Installation and Setup Guide.
Show/Hide Reconfigure and Delete Action in Line Item Grid
Not all rows in the Line Item Grid are created equal; they contain different types of items such as Models, Mandatory Line Items, and Recommended Line Items which behave differently from each other (e.g., Mandatory parts cannot be deleted or parts cannot be reconfigured).
In this new Winter 18 release, the Lightning UI can show or hide Reconfigure and Delete actions based on the type of item in that row.
Steps to Enable
There are no steps necessary to enable this feature.
Tips and Considerations
Remember to update the CPQ Cloud Version that is selected in your CPQ Site settings to accurately reflect what you are currently using (see CPQ Cloud Version Setting).
Key Resources
- For more information about Commerce Document Actions in CPQ Cloud, see the online MOS article called Commerce Document Actions.
- For a more detailed description of the CPQ Site Settings page, refer to the Oracle Adapter for Salesforce Lightning’s Installation and Setup Guide.
Show/Hide Line Item Grid Cells
When a sales user triggers a rule or condition that is intended to show or hide a particular field in the Line Item Grid, it will now do so, without affecting anything else. Cell-level hiding in CPQ Cloud allows the Lightning UI to remove cells and their data from the display.
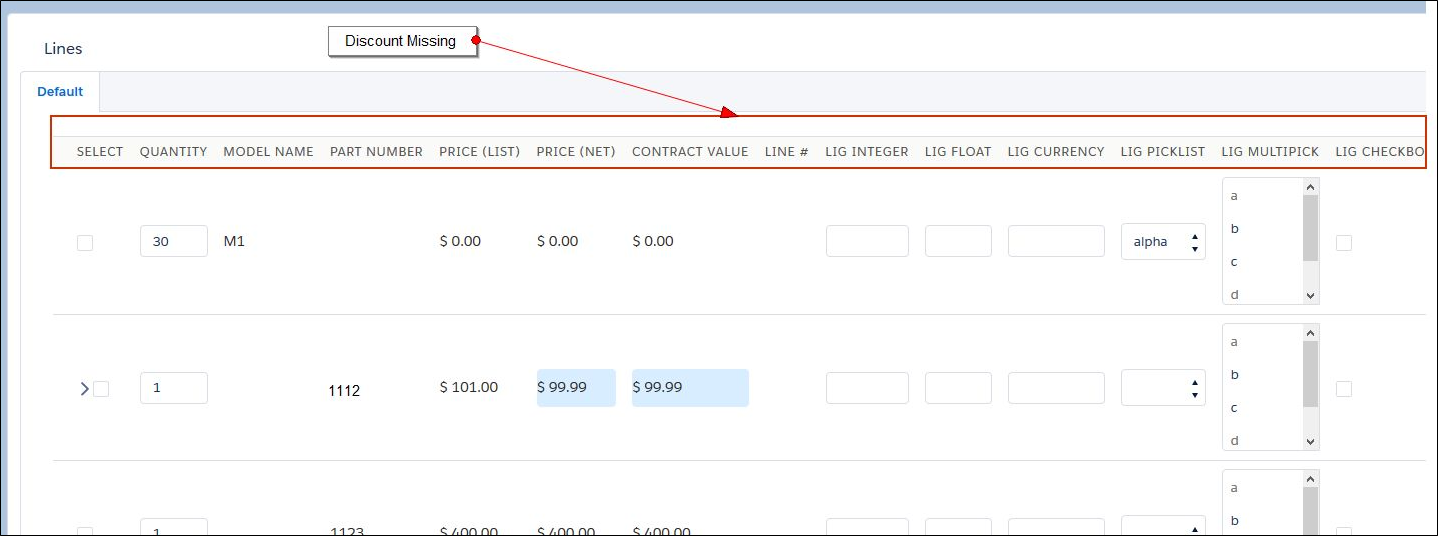
Example of Triggering a Hiding Rule that Hides the Discount Field
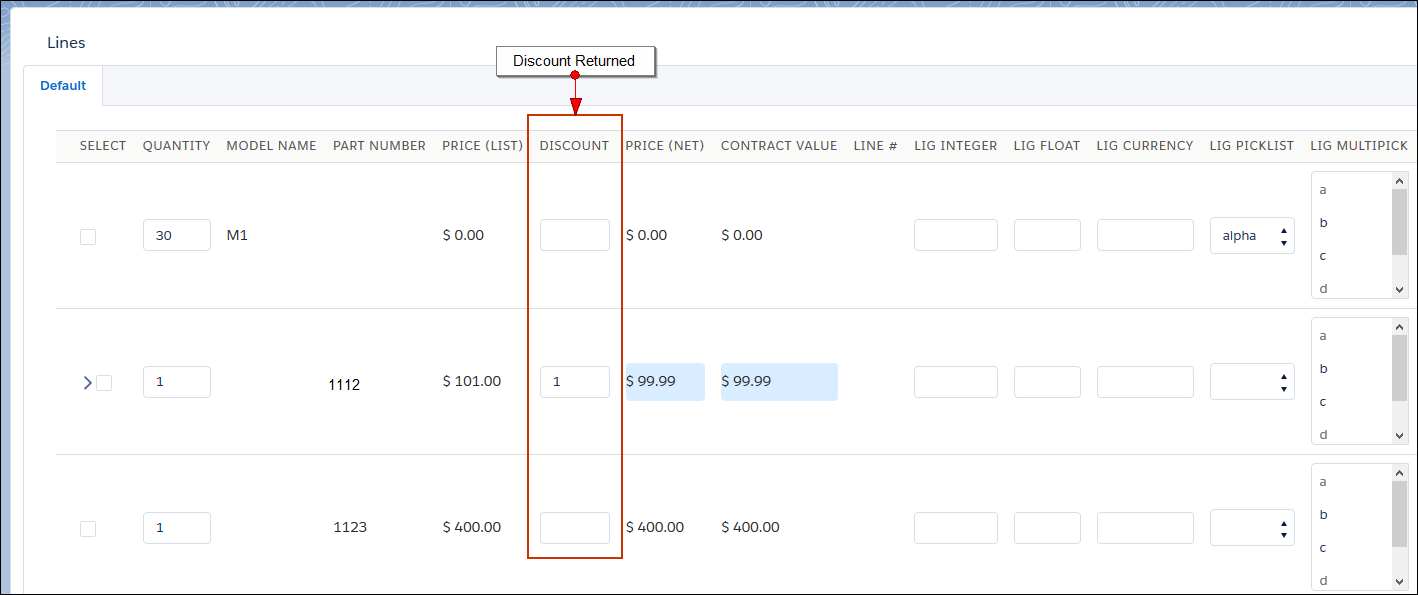
Example of the Hiding Rule Deactivated and Returning the Hidden Field
Steps to Enable
There are no steps necessary to enable this feature.
Tips and Considerations
Remember to update the CPQ Cloud Version that is selected in your CPQ Site settings to accurately reflect what you are currently using (see CPQ Cloud Version Setting).
Key Resources
- For more information about configuring Hiding Rules in CPQ Cloud, refer to the online help.
- For a more detailed description of the CPQ Site Settings page, refer to the Oracle Adapter for Salesforce Lightning’s Installation and Setup Guide.
Salesforce users can better manage their CPQ Cloud quotes in both Lightning and Classic UIs with the following new features:
No one likes repeated data entry, and for that reason, Cloning Quotes is a great productivity feature for sales reps. It allows them to take a quote that they previously created and duplicate it with a single click. The duplicated quote can be used to make a revision to the first quote for a customer or as a starting point for a new quote, each reducing the amount of data entry the user needs to perform. When combined with the Move Quote feature, this new feature also allows a sales rep to take a favorite or common quote and reuse it on a new account or opportunity which is a huge time saver.
Whether you are using the new Lightning UI or still using the Classic UI, users will now see a new Clone button available on the Oracle Quotes related list or the Oracle Quote related on the Account or Opportunity. By selecting the new Clone button, a duplicated quote will be created in both Salesforce and CPQ Cloud. The user is then navigated directly to this new quote record.
For a sales user to clone an existing quote from an opportunity:
- Navigate to the Opportunity that contains the quote to be cloned.
- From the Quotes related list, click View All.
- From the new screen (which presents a list of all the quotes related to this opportunity), check the box beside the quote you want to clone.
- Click Clone.
- Your quote is cloned and opened up for you to edit. The word (clone) is placed beside the original name of the quote.
- You should edit the name and Save.
- Now if you want to Move the quote to another object or opportunity (see Move Quotes for information).
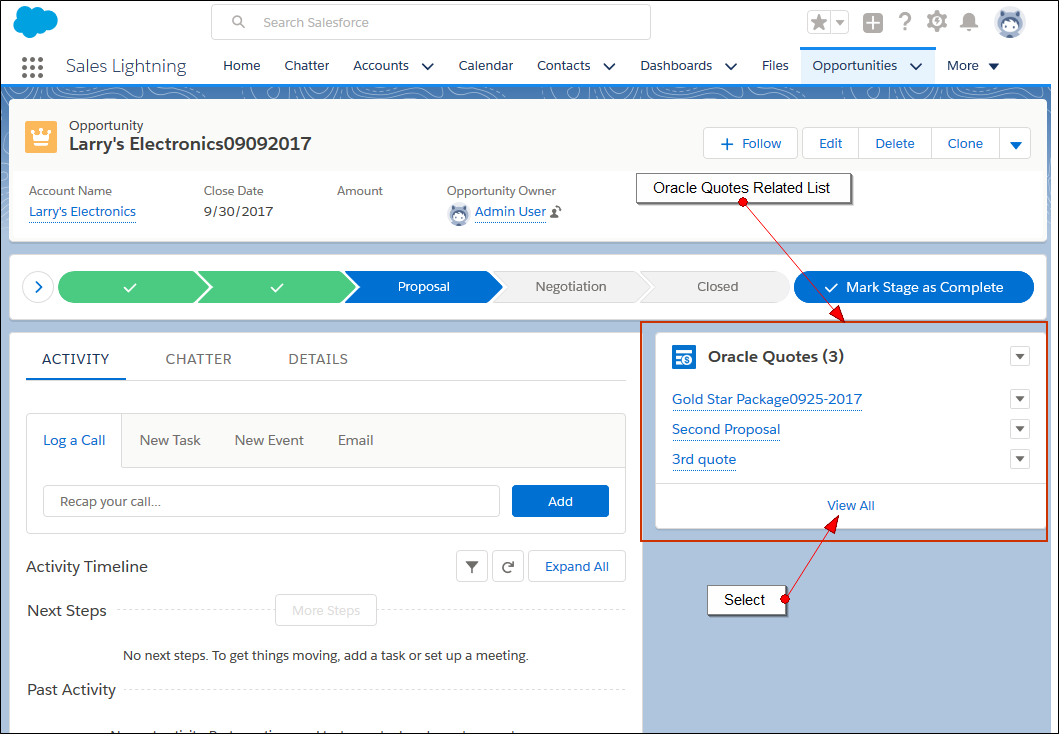
Opportunity Showing the Oracle Quotes Related List
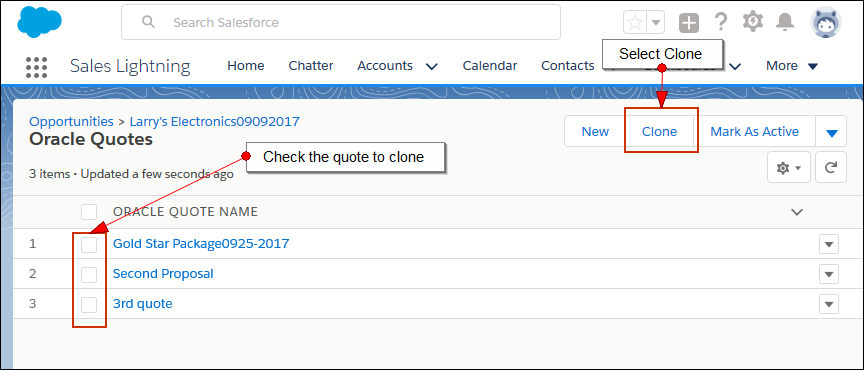
List of All Quotes Related to the Opportunity
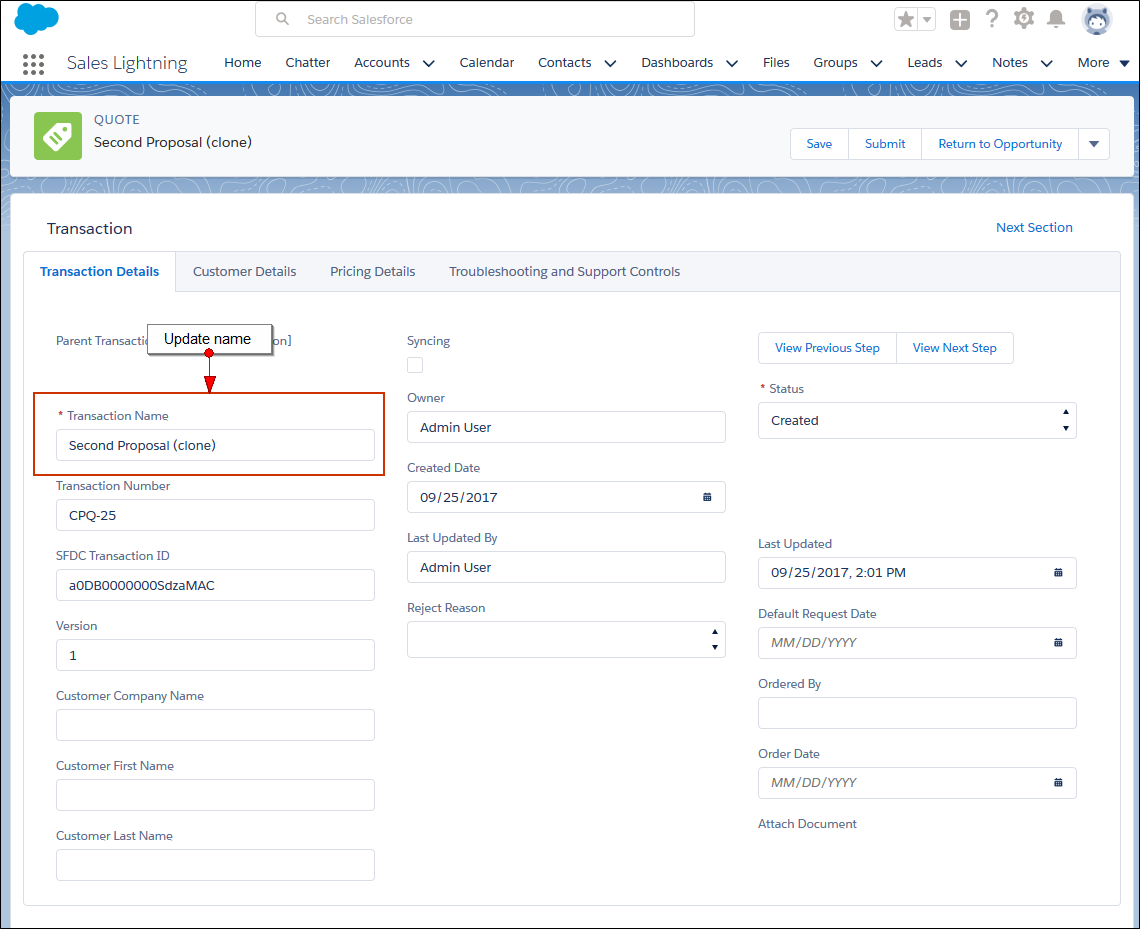
Example of a Cloned Quote
Steps to Enable
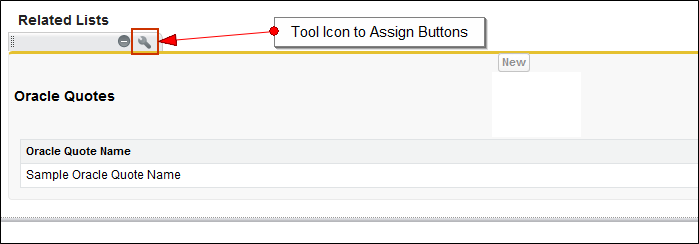
To ensure that you can access and use the Clone button on the Opportunity related list:
- From the Classic UI, select Customize > Opportunities > Page Layout.
- Select Edit.
- From the Related Lists section, click the Tool icon.
- From the Related List Properties dialog, click the Expand icon from the Buttons section.
- Select all the buttons on the left and click Add.
- Click Ok.
- Select Save.
Opportunities Page Layout
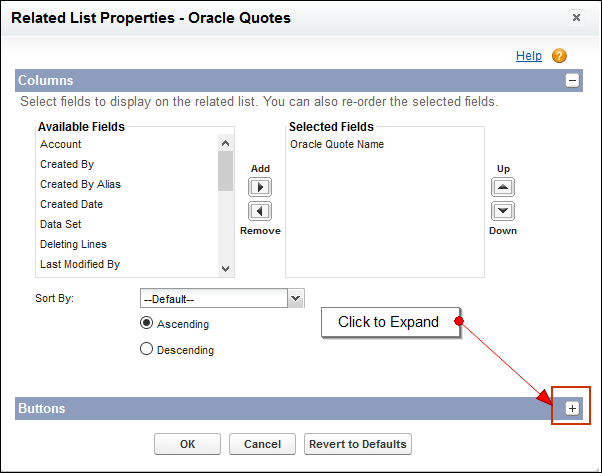
Expand Buttons
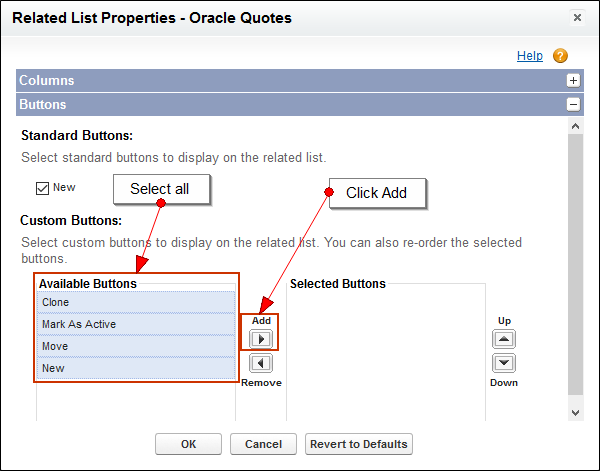
Adding New Clone Button (and others) to become accessible
Tips and Considerations
- In order for the clone list page to load correctly at least one button must be added on the Oracle quote search layout.
- Remember to update the CPQ Cloud Version that is selected in your CPQ Site settings to accurately reflect what you are currently using (see CPQ Cloud Version Setting).
- This feature can be used from any Object page where the Oracle Quote is a related list or from the Oracle Quote list view.
Key Resources
For more information on the Copy action in CPQ Cloud, refer to the MOS article called Process Actions Overview- Standard Process Actions.
Quoting processes are often fluid. For instance, a sales reps may want to create a new Account or a new Opportunity and move an existing quote from an old record into the new one. Also, one might have cloned a quote from another account and want to reuse it on a different account. In either case, moving a quote is now faster and simpler than having to recreate it from scratch.
Both Lightning UI and Classic UI users will see a checkbox next to their Oracle Quotes along with a new Move button allowing a user to select a quote and attach it to a new record. Once the sales rep clicks Move, the user is prompted to choose a new parent record. This new feature is especially powerful because quotes can now be moved from a Lead to an Opportunity or from an Account to a Case (or anywhere else a quote can live).
For a sales user to move an existing quote from an Opportunity:
- Navigate to the Opportunity that contains the quote to be moved.
- From the Quotes related list, click View All.
- From the new screen (which presents a list of all the quotes related to this opportunity), check the box beside the quote you want to clone.
- Click Move. Another screen appears where you indicate the location for quote.
- From the Parent Lookup menu, select the Parent Object.
- From the Search field below, click the Search icon to select a record of the Parent Object.
- Click Save.
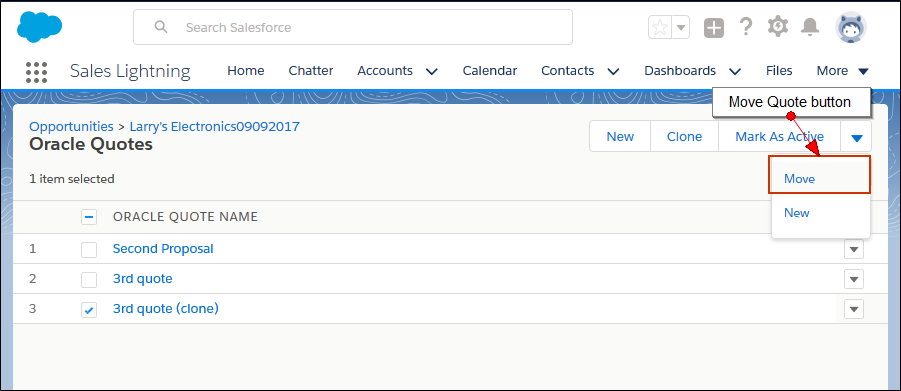
Oracle Quotes List of the Opportunity
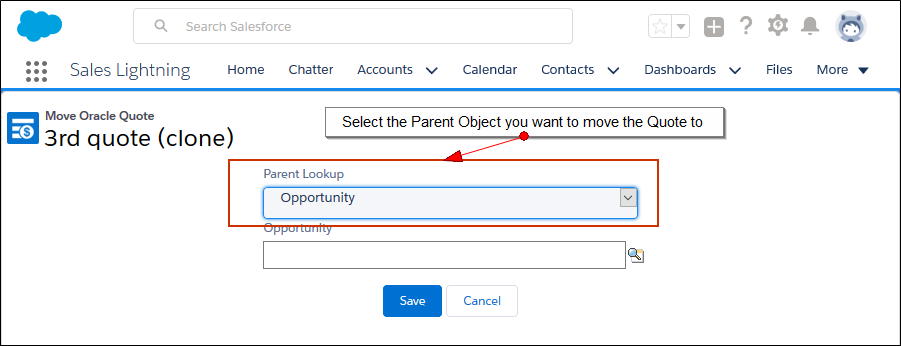
New Screen to Select a Parent Object and Record to Move the Quote to
Steps to Enable
To ensure that you can access and use the Move button on the Opportunity:
- From the Classic UI, select Customize > Opportunities > Page Layout.
- Select Edit.
- From the Related Lists section, click the Tool icon.
- From the Related List Properties dialog, click the Expand icon in the Buttons section.
- Select all the buttons on the left and click Add.
- Click Ok.
- Select Save.
Opportunities Page Layout
Expand Buttons
Adding New Move Button (and Others) to Be Visible
Tips and Considerations
Remember to update the CPQ Cloud Version that is selected in your CPQ Site Settings to accurately reflect what you are currently using (see CPQ Cloud Version Setting).
Key Resources
For more information on the Move action in CPQ Cloud, refer to the MOS article called Process Actions Overview- Standard Process Actions.
---

Copyright © 2017, 2018, Oracle and/or its affiliates. All rights reserved.
This document is provided for information purposes only, and the contents hereof are subject to change without notice. This document is not warranted to be error-free, nor subject to any other warranties or conditions, whether expressed orally or implied in law, including implied warranties and conditions of merchantability or fitness for a particular purpose. We specifically disclaim any liability with respect to this document, and no contractual obligations are formed either directly or indirectly by this document. This document may not be reproduced or transmitted in any form or by any means, electronic or mechanical, for any purpose, without our prior written permission.
Oracle and Java are registered trademarks of Oracle and/or its affiliates. Other names may be trademarks of their respective owners.
Intel and Intel Xeon are trademarks or registered trademarks of Intel Corporation. All SPARC trademarks are used under license and are trademarks or registered trademarks of SPARC International, Inc. AMD, Opteron, the AMD logo, and the AMD Opteron logo are trademarks or registered trademarks of Advanced Micro Devices. UNIX is a registered trademark of The Open Group.