
This document will continue to evolve as existing sections change and new information is added. All updates appear in the following table:
| Date | Product | Feature | Notes |
|---|---|---|---|
| 18 NOV 2021 |
Integration | Applications Page in Redwood Theme | Updated document. Added feature information. |
| 18 NOV 2021 |
Integration | Updated document. Added feature information. |
|
| 18 NOV 2021 |
Administration | Control Message Delivery to Helpdesk or Helpdesk Operator in Message Scenario |
Updated document. Revised feature information. |
| 18 NOV 2021 |
Integration | Enable Oracle CX Service From Oracle Field Service Applications Page |
Updated document. Revised feature information. |
| 18 NOV 2021 |
Plugin Framework | Updated document. Revised feature information. |
|
| 21 OCT 2021 | Created initial document. |
This guide outlines the information you need to know about new and improved functionality in Oracle Field Service Update 21D. Each section includes a brief description of the feature, the steps you need to take to enable or begin using the feature, any tips or considerations that you should keep in mind, and the resources available to help you. For a listing of browsers supported by Oracle Field Service, log in to our support site and access Answer ID 8415.
Oracle Field Service Best Practices Guide: Please be sure to download our Oracle Field Service Best Practices Guide found on the Oracle Service Cloud Support Portal Answer ID 8215 (requires a login). This book contains many helpful hints and suggestions to help you improve and get the full benefit from your Oracle Field Service subscription.
 HAVE AN IDEA?
We’re here and we’re listening. If you have a suggestion on how to make our cloud services even better then go ahead and tell us. There are several ways to submit your ideas, for example, through the Ideas Lab on Oracle Customer Connect. Wherever you see this icon after the feature name it means we delivered one of your ideas.
GIVE US FEEDBACK
We welcome your comments and suggestions to improve the content. Please send us your feedback at oracle_fusion_applications_help_ww_grp@oracle.com.
DISCLAIMER
The information contained in this document may include statements about Oracle’s product development plans. Many factors can materially affect Oracle’s product development plans and the nature and timing of future product releases. Accordingly, this Information is provided to you solely for information only, is not a commitment to deliver any material, code, or functionality, and should not be relied upon in making purchasing decisions. The development, release, and timing of any features or functionality described remains at the sole discretion of Oracle.
This information may not be incorporated into any contractual agreement with Oracle or its subsidiaries or affiliates. Oracle specifically disclaims any liability with respect to this information. Refer to the Legal Notices and Terms of Use for further information.
Column Definitions:
Report = New or modified, Oracle-delivered, ready to run reports.
UI or Process-Based: Small Scale = These UI or process-based features are typically comprised of minor field, validation, or program changes. Therefore, the potential impact to users is minimal.
UI or Process-Based: Larger Scale* = These UI or process-based features have more complex designs. Therefore, the potential impact to users is higher.
Features Delivered Disabled = Action is needed BEFORE these features can be used by END USERS. These features are delivered disabled and you choose if and when to enable them. For example, a) new or expanded BI subject areas need to first be incorporated into reports, b) Integration is required to utilize new web services, or c) features must be assigned to user roles before they can be accessed.
| Ready for Use by End Users Reports plus Small Scale UI or Process-Based new features will have minimal user impact after an update. Therefore, customer acceptance testing should focus on the Larger Scale UI or Process-Based* new features. |
Customer Must Take Action before Use by End Users Not disruptive as action is required to make these features ready to use. As you selectively choose to leverage, you set your test and roll out timing. |
|||||
|---|---|---|---|---|---|---|
| Feature |
Report |
UI or |
UI or |
|
||
Control Message Delivery to Helpdesk or Helpdesk Operator in Message Scenario |
||||||
Support for Draft Message and Other User-Interface Improvements |
||||||
Enable Oracle CX Service From Oracle Field Service Applications Page |
||||||
Removal of Deprecated Support for Events Without Subscription |
||||||
Control Message Delivery to Helpdesk or Helpdesk Operator in Message Scenario
Currently, when a user sets up a message scenario to send a message to a helpdesk recipient, the message is delivered to all the helpdesk operators. However, there may be situations where an individual operator has to take actions based on the message received. For example, a helpdesk operator monitoring activities that have started after their ETAs may have to call a technician and ask about the reason for the delay. To handle similar scenarios, an option is now available in the message scenario Recipients selection. This image shows the Message scenario step screen with Recipients selection:
Message Scenario Step Screen
Administrators can control the message delivery to a helpdesk group or to helpdesk operators based on this configuration. The broadcast message sent to a helpdesk will be available in the helpdesk as a system message. A helpdesk operator can take this chat and it will be moved to the operator's active chat list where they can take appropriate action. Other operators will not see that message in the helpdesk queue, but they can view this message from the chats in progress menu to know who is working on this message. If the user has selected the option "Deliver to help desk operators", the message will be delivered to all the operators within the helpdesk.
This feature provides a new option in the message scenario to manage situations where an individual operator has to take actions based on the message received.
Steps to Enable
You don't need to do anything to enable this feature.
Key Resources
Generate a Client Secret for an Application
Starting with Update 21D, you can use the ‘Generate client secret for an application’ (POST /rest/ofscMetadata/v1/applications/{label}/custom-actions/generateClientSecret) REST API method to generate the client secret for an application. Generating the client secret using the API allows fully automated control over the application with no manual operations.
This function includes:
- Method: POST
- URL: /rest/ofscMetadata/v1/applications/{label}/custom-actions/generateClientSecret
- Each call to this function will generate and return new value of the client secret for the application.
- Path parameters
- label - label of the application, for which the client secret is to be generated.
- Request parameters: N/A
- Response parameters
- clientSecret: string - the value of the newly generated client secret.
- Response Example:
{
clientSecret: "926393f65015c19d8142a87b5f16126e557d5f9aba05e56dbcf8c6c2bd3b"
}
- Permissions
- Requesting application must have read/write permissions for Metadata API - Applications.
This feature enables generating the client secret using the API and thereby, allows fully automated control over the application with no manual operations.
Steps to Enable
Review the REST service definition in the REST API guides, available from the Oracle Help Center > your apps service area of interest > REST API. If you're new to Oracle's REST services you may want to begin with the Quick Start section.
Key Resources
Get and Update Inventory Types
Starting with Update 21D, you can use these REST API methods to get, create, and update inventory types:
- Get an inventory type (GET/rest/ofscMetadata/v1/inventoryTypes/{label})
- Create or update an inventory type (PUT/rest/ofscMetadata/v1/inventoryTypes/{label})
GET inventory type single item
Public documentation example: http://ohcrest.doceng-oci.oraclecorp.com/client/ofsc/fieldservice/OFSC-116394/html/op-rest-ofscmetadata-v1-inventorytypes-label-get.html
This function includes:
- Method: GET
- URL: /rest/ofscMetadata/v1/inventoryTypes/{label}
- The request returns the inventory type item, or 404 HTML code if it doesn't exist.
- Path parameters
- label: string - Inventory type label
- Query parameters
- language: string - The translation language code. Based on the value of this parameter, the translations for the name and unit of measurement of the inventory type is returned in the 'name' and 'unitOfMeasurement' fields:
- If the value is specified, then the translated value is returned in the 'name' and 'unitOfMeasurement' fields, and the 'translations' field is not returned in the response.
- If translation for the specified language does not exist, then the value in the 'name' and 'unitOfMeasurement' fields are returned in English.
- If the value is not specified, then the 'translations' field is returned in the response and contains the translations to every language in the system.
- language: string - The translation language code. Based on the value of this parameter, the translations for the name and unit of measurement of the inventory type is returned in the 'name' and 'unitOfMeasurement' fields:
- Response parameters
- active: boolean - If true, then the inventory type is listed as a possible value in the 'Inventory Type' drop-down list in Manage or Mobility apps while creating an inventory. If false, then the inventory type is not listed as a value in the drop-down list.
- label: string - Inventory type label.
- modelProperty(optional): string - Label of an inventory property which is used to identify model of this inventory
- name: string - Minimum Length:, Maximum Length: 40.
- unitOfMeasurement(optional): string - The translation for the unit of measurement of the inventory type. If the value of the language parameter is specified, then the unit of measurement is provided the specified language. If the value is not specified, then the unit of measurement is provided in English. This attribute is used only for non-serilized inventory.
- nonSerialized: boolean - Contains one of the following values: true or false. If true, then the inventory is serialized, that is, it has a serial number. If false, then the inventory is non-serialized, that is, it does not have a serial number.
- quantityPrecision(optional): integer - Number of digits after decimal point of the quantity for non-serialized inventory . '0' value means that the quantity doesn't have fractional part
- translations: array - The list of translations associated with the name and unit of measurement of the inventory type. The list is only returned if the language parameter is not specified in request.
- language: string - The language code of the translated text. The code in the response is two characters long (for example, 'en', 'es').
- languageISO(optional): string - The ISO language code (for example, 'en-US').
- name: string - The specified name of the property translated to the language code available in the system.
- unitOfMeasurement(optional): string - The translation for the unit of measurement of the inventory type. This attribute is used only for non-serilized inventory.
Create/Replace inventory type item
This function includes:
- Public documentation example : http://ohcrest.doceng-oci.oraclecorp.com/client/ofsc/fieldservice/OFSC-116394/html/op-rest-ofscmetadata-v1-inventorytypes-label-put.html
- Method: PUT
- URL: /rest/ofscMetadata/v1/inventoryTypes/{label}
- This operation creates a new inventory type or updates an existing inventory type.
- If inventory type with 'label' already exists, the function replaces it with the new values.
- Response code 200 is returned when an inventory type object is updated.
- Response code 201 is returned when an inventory type object is created.
- Path parameters
- label: string - Inventory type label
- Query parameters: N/A
- Request parameters
- active: boolean - If true, then the inventory type is listed as a possible value in the 'Inventory Type' drop-down list in Manage or Mobility apps while creating an inventory. If false, then the inventory type is not listed as a value in the drop-down list.
- modelProperty(optional): string - Label of an inventory property which is used to identify model of this inventory. Default value - empty string. This value can be set only when the object is created, in update operation this parameter will be ignored, the value will not be modified.
- nonSerialized: boolean - Contains one of the following values: true or false. If true, then the inventory is serialized, that is, it has a serial number. If false, then the inventory is non-serialized, that is, it does not have a serial number.
- quantityPrecision(optional): integer - Number of digits after decimal point of the quantity for non-serialized inventory . '0' value means that the quantity doesn't have fractional part
- translations: array - The list of translations associated with the name and unit of measurement of the inventory type.
- language: string - The language code of the translated text. The code in the response is two characters long (for example, 'en', 'es').
- languageISO(optional): string - The ISO language code (for example, 'en-US').
- name: string - The specified name of the property translated to the language code available in the system.
- unitOfMeasurement(optional): string - The translation for the unit of measurement of the inventory type. This attribute is used only for non-serilized inventory.
- Response
The function returns the created or updated item, the response is similar to the "get inventory type" function.
The feature introduces new Metadata API functions to support operations on Oracle Field Service inventory types.
Steps to Enable
Review the REST service definition in the REST API guides, available from the Oracle Help Center > your apps service area of interest > REST API. If you're new to Oracle's REST services you may want to begin with the Quick Start section.
Key Resources
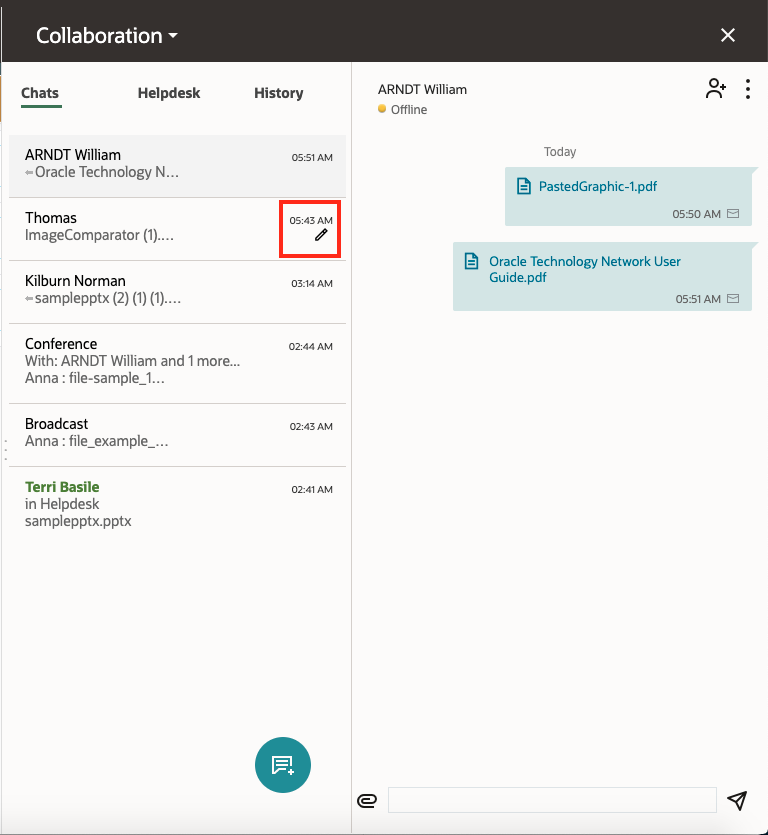
Share Files in a Conversation through Collaboration
Collaboration supports the sharing of images, locations, resource info, activity, and inventory details within a conversation. Starting with Update 21D, you will also be able to transfer documents from within a conversation. Users can attach and transfer documents in one-to-one conversations, helpdesk chats or in group conversations like conferences or broadcasts.
Select the Attach option from within Collaboration and select the document or image that you want share in the conversation. This image shows the Collaboration window with the attach icon highlighted:
Collaboration Window
Documents will be attached as messages in Collaboration. This image shows the documents attached to a message:
Documents Attached to a Message
You can attach DOC, DOCX, ODT, PDF, XLS , XLSX, ODS, ODP, PPT, PPTX, TXT, CSV, RTF and all image type files. If you attach a file type that is not supported, the message "The file type is not supported. Only images or document files are allowed" is displayed. This image shows the error message for an unsupported file type:
Collaboration Window Showing Error Message for Unsupported Files
This message will disappear upon refreshing the page or application.
The maximum file size that can be transferred through Collaboration will be restricted to 5 MB. You can see the message "The file is too large. Please choose a file less than 5MB" when you try to share a file larger than 5MB. This message will disappear upon refreshing the page or application. This image shows the error message for a large file:
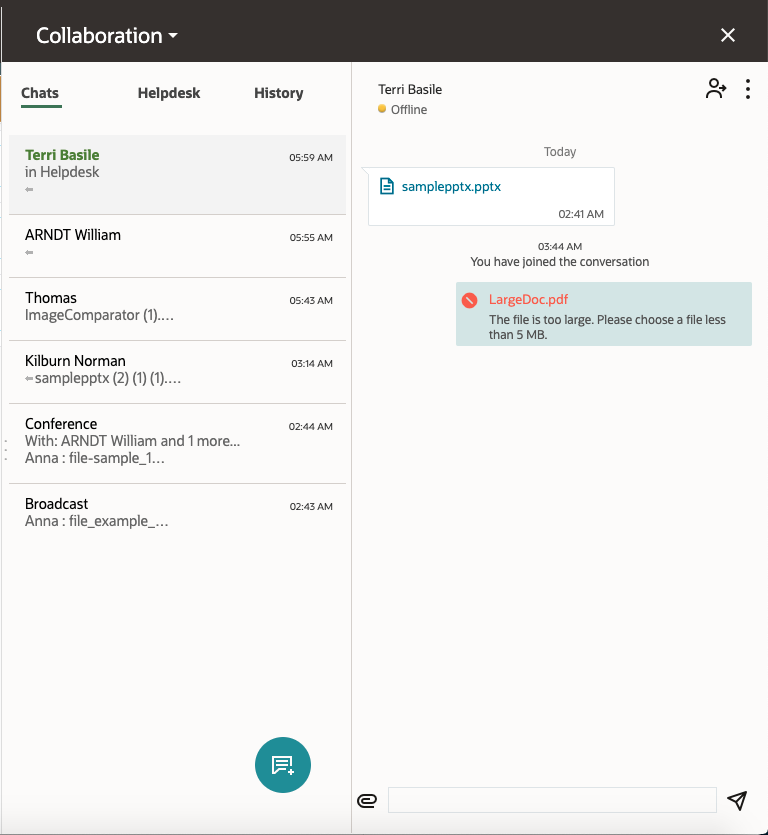
Collaboratiion Window Showing Error Message for Large Files
This feature enables the sharing of images, locations, resource info, activity, and inventory details within a conversation and thereby provides an excellent user experience.
Steps to Enable
You don't need to do anything to enable this feature.
Key Resources
Support for Draft Message and Other User-Interface Improvements
Sometimes when you are typing messages in a chat window, you may have to attend to some other important conversations, or your attention may be needed elsewhere in the application. Starting with Update 21D, such unsent messages can be kept as drafts in Collaboration chats, so that when you come back to the chats, you can complete the typing and send the message. The message is saved as a draft within the context of an active session. The draft message is not retained in the chat window, if you refresh the page or re-log in to the application.
Draft message indicator:
This image displays the Draft message indicator in the Collaboration window:
Collaboration Window Showing Draft Message
Other User Interface Improvements
The History icon in the Collaboration window on mobile devices are presented with Redwood style. This image shows the History icon in Redwood style:
Collobaration Window Showing History Icon in Redwood Style
Better usability experience while typing messages in the Collaboration chat window in landscape mode. The screen size utilization has been improved so that you can use the full screen width while typing in landscape mode. This image shows the typing field in landscape mode:

Collaboration Chat Window
You can now save unsent messages as drafts so that you can complete the typing and send that message at a later time. This feature also provides other user interface improvements such as landscape mode for better usability experience.
Steps to Enable
You don't need to do anything to enable this feature.
Key Resources
Assignment Assistant: Display Manual Move Reason
Starting with Update 21D, Oracle Field Service provides capabilities to capture Move Reasons during manual work order assignments. When moving activities using the Assignment Assistant, you can select a Move Reason from a pre-configured list. You can now view, add or edit Move Reasons in the new 'Assignment Assistant' section within the Business Rules screen. You can understand when to make manual changes at a glance, instead of utilizing routing and optimization features. The collected information allows you to make improvements in operations and routing plans accordingly.
CONFIGURE MOVE REASONS
You can now view, add or edit Move Reasons in the new 'Assignment Assistant' section from within the Business Rules screen.
Follow these steps:
- Click Configuration, Business Rules to navigate to the Business Rules screen.
- Scroll down the Business Rules screen to view Move Reasons. This image displays the Business Rules screen showing the Move Reasons:
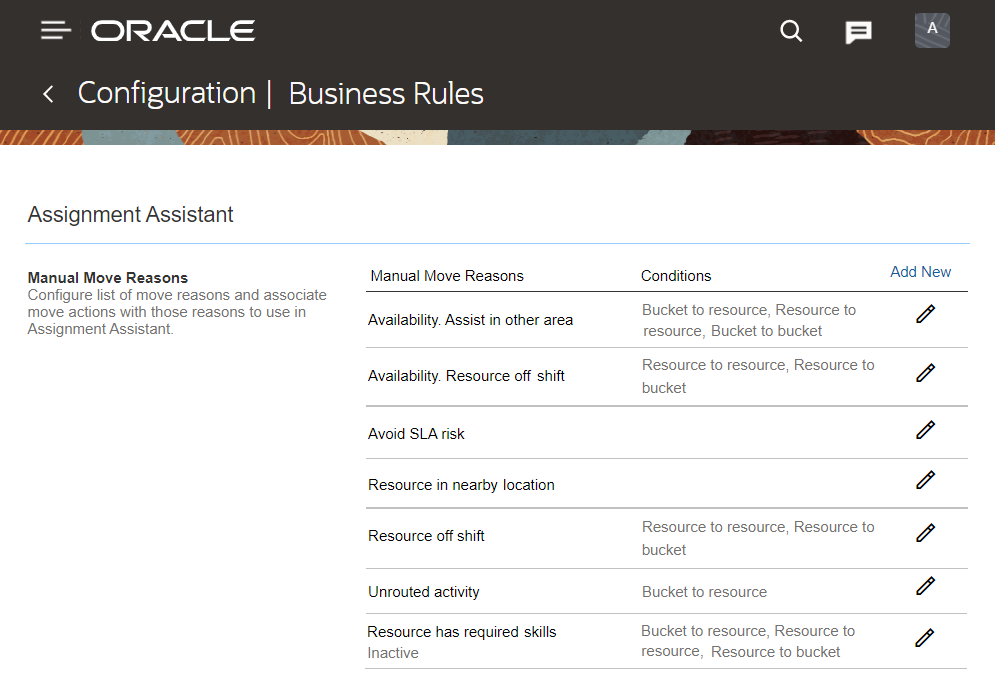
Business Rules Screen
The list of configured Move Reasons contain the name, status, and move type conditions.
NOTE: The Conditions field is blank when all move conditions are enabled for the Move Reason.
- Move Reasons are sorted alphabetically. Inactive Move Reasons are displayed in the end, highlighted with the 'Inactive' label.
- Click Add to add a Move Reason.
The Add Move Reason dialog box opens. This image displays the Add Move Reason dialog box.

Add Move Reason Dialog Box
Alternatively, click the pencil icon to edit a Move Reason.
The Edit Move Reason dialog box opens. This image displays the Edit Move Reason dialog box.
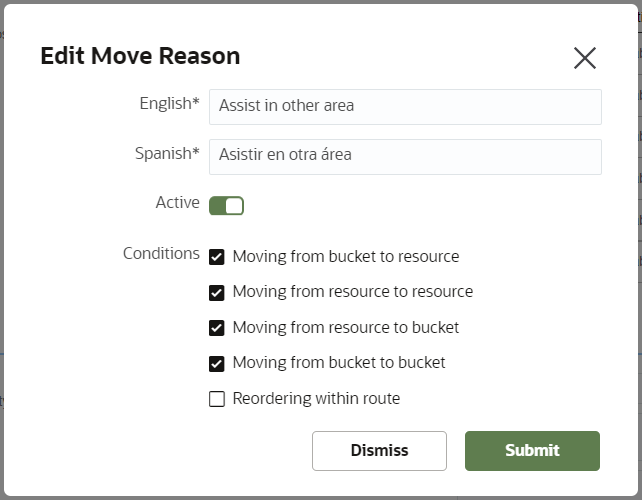
Edit Move Reason Dialog Box
- When creating or editing an activity, follow these steps:
- Type the name of the Move Reason.
- Provide the translation name.
- Set the status as Active (or inactive).
- Check the relevant boxes to assign move conditions.
- Click Submit.
- Move conditions are intended to narrow down based on the Move Reason usage. You can specify these move conditions when the reason is displayed:
- Moving from bucket to resource
- Moving from resource to resource
- Moving from resource to bucket
- Moving from bucket to bucket
- Reordering within route
NOTE: You must select at least one move condition for each Move Reason.
SELECT MOVE REASON IN ASSIGNMENT ASSISTANT
This feature is available only when moving activities using the Assignment Assistant user interface. You must select a Move Reason when there is at least one active Move Reason related to the current move type, for example resource to resource and resource to bucket.
Follow these steps:
- Enable Assignment Assistant for User Type.
- Add Move Reasons.
- In Dispatch Console, drag-and-drop an activity to move it. Alternatively, you can move an activity using the 'Move' action link from activity hint or activity details or activity list.
- You can select the item from the list of Move Reasons configured for the current move type.
This image displays the Select Move Reason dialog box.

Select Move Reason Dialog Box
The combined set of reasons is available for selection when you move several activities with different Move Reasons.
DISPLAY MOVE REASON IN ACTIVITY HISTORY
Activity History displays the specified Move Reason if the move operation contains one. This image displays the Activity History screen.
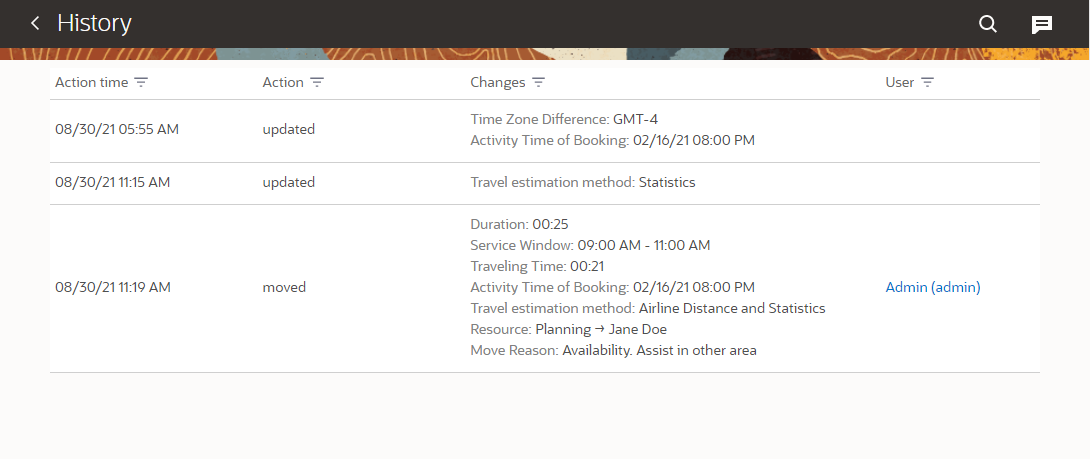
Activity History Report
MOVE REASON REPORTS
The following internal reports are available:
- Manual Assignment by Users
- Manual Assignment Trends
Manual Assignment by Users
The report is based on the number of manual moves - how many activities were manually moved by each user for the selected period. The Top 20 users with max number of moved activities are displayed in the chart. This image displays the Manual Assignment by Users screen.
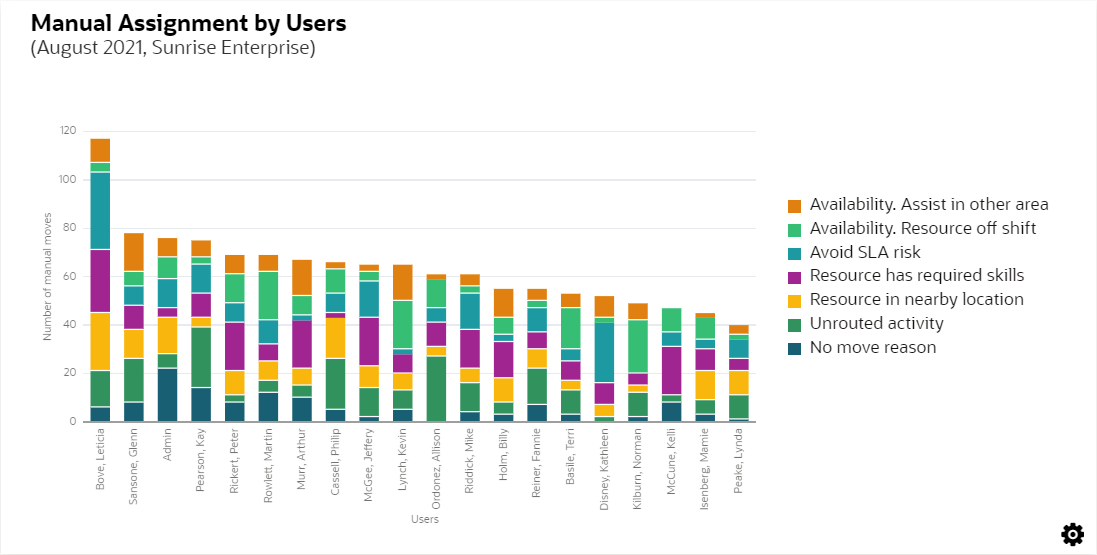
Manual Assignment by Users Report
Each bar represents a user, and they are colored by Move Reasons. Move Reasons with associated colors are displayed in the legend on the right.
Manual Assignment Trends
The report is based on the number of manual moves - how many activities were manually moved per day for the selected period.
This image displays the Manual Assignment Trends screen.
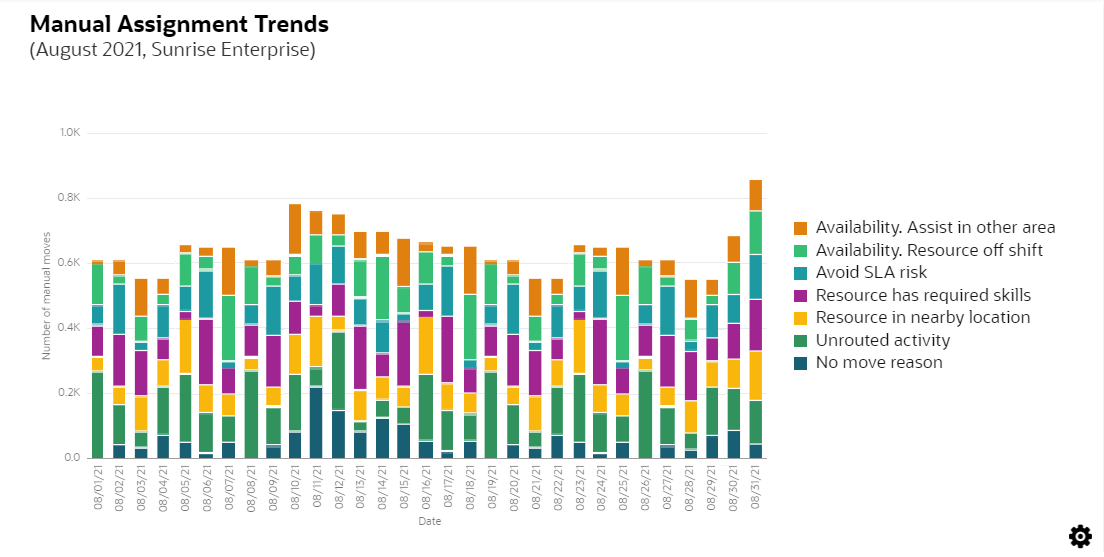
Manual Assignment Trends Report
Each bar represents a date, colored by Move Reasons. Move Reasons with associated colors are displayed in the legend on the right.
This feature lets you to understand at-a-glance why you should make manual changes instead of utilizing routing and optimization features and how you can use the collected information to make improvements in operations and routing plans accordingly. This feature helps improve efficiency and productivity, reduces the need of manual assignments and creates optimal routes and schedules.
Steps to Enable
You must complete this prerequisites to enable this feature:
- Enable Assignment Assistant for the User Type.
- Configure at least one active Move Reason.
Key Resources
Assignment Assistant: Suggest Optimal Resources
Starting with Update 21D, when using the Assignment Assistant, the application suggests optimal resources to assist you in picking one resource instead of scanning through a potentially large list of resources. Assignment Assistant provides a more efficient assignment process. For example, there may be multiple available resources who fulfill the activity requirements; however, one resource can be the most optimal because of nearby location. Resources that are optimal for selected activities are highlighted with a badge and displayed at the top of the screen.
HOW OPTIMAL RESOURCES ARE CALCULATED
Resources with the lesser route impact are set as optimal when they satisfy these conditions. Overall, the criteria to define an optimal resource is travel time and absence of violations:
- The moved activities have no violations after the move is performed.
- The number of other activities in the route with violations is not increased after a move is performed.
Several resources can be considered as optimal when the extra travel time between them differs not more than 10%. It is possible that there are no optimal resources for a given move.
EXAMPLES
Example 1
Here is an example to move activities using the Move link. This image displays activities moved using the Move link.

Move Activities Example 1
Example 2
Here is an example to drag and drop activities onto a resource to move them.
This image displays an example to move activities using the drag-and-drop action.

Move Activities Example 2
When you drag and drop activities on a selected resource, the application suggests a list of resources. Optimal resources are displayed on the top of the list.
This feature helps improve efficiency in the back office operations when users make manual assignment decisions and helps improve ROI. There are multiple potential benefits of this feature, such as saving travel time, saving fuel costs, providing an opportunity to assign additional activities, creating more realistic routes, and overall helping make faster yet efficient decisions.
Steps to Enable
You don't need to do anything to enable this feature.
Key Resources
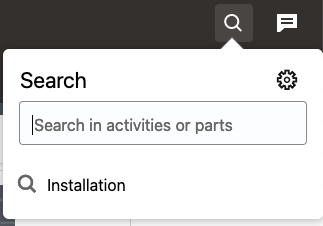
Immediate Search in Core Application
There are two changes implemented with the feature "Immediate Search in Core Application":
- The Search component in Core Application is changed to begin searching immediately while the user is typing. There is still a small delay after you stop typing and before the search is performed in order to decrease the load on the search engine. Nevertheless, the delay is small and you don't need to press "Enter" to perform the search. On large screens, the search component is displayed in the header of the application and not hidden under the magnifying glass.
- Small changes in the visual presentation have been made to align with the Redwood design guidelines. For example, the "Search Preference" link has been replaced with a "Gear" icon.
Search for an Activity
You might search for an activity in order to add some details, find out it's status, know the actual time taken to complete it, and so on. You can also use the Search option to search for inventories and parts.
- On a large screen, start typing in the "Search" field in the header of the Core Application. This image shows the Search field on a large screen:

Search Field in Large Screens
- On a tablet, smart phone, or just a small screen, click the magnifying glass to open the Search field. This image shows the Search field on a small screen:
Search Field in Small Screens
- Enter at least three characters of the word or the numerical value that you want to search, or select one from the last five searched keywords. The results will be displayed below the search field. You don't need to press Enter to perform a search.
- Click the result from the list to view the Activity Details, Inventory Details, or Part Details.
NOTE: For all the activity search results, the date associated with an activity is displayed only if the activity is scheduled for any other day than the current day.
Navigation in Search
When you search for an activity, inventory, or a Parts Catalog item, the relative results appear on the page. If you open Search from the Landing Page, search for some activity details and then click Back, you are navigated back to the Landing Page. Similarly, if you open Search from the Manage page and search for activity details or inventory details and then click Back, you are navigated back to the Manage page.
NOTE: You cannot initiate an inventory or parts search from the Manage page.
Narrow Activity Search Results
You can use Search Preferences to narrow and order the search results. Search Preferences are pre-configured by your administrator.
- Click the "Gear" icon to view the search preference.
- Select the checkboxes next to the options that you want to search by from the Search Preferences menu. This image shows the Search Preferences menu:
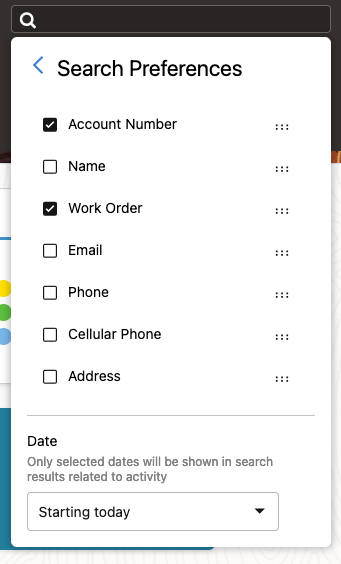
Search Preferences Menu
The Search Preferences section also contains Inventory search fields with other search fields configured on Business Rules.
- Drag and drop the categories in the list to change the priority of the preferences in the search results.
- Select the date range for the search results from the Date drop-down list. The value you select for this field is saved and retained even after you log out and log in again. If you don't select anything, the default value, starting from today, is applied until you change it to something else.
NOTE: Searching through a long time in the past, especially without restrictions, may have an impact on the performance of search.
- Click Back to search and enter the search value.
Search in Offline Mode
You can search for Parts and Inventory in offline mode. But, you cannot search for activities in offline mode. This image shows searching for the Parts and Inventory in offline mode.
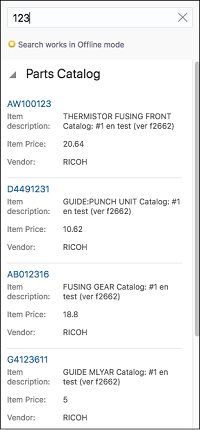
Parts and Inventory in Parts Catalog
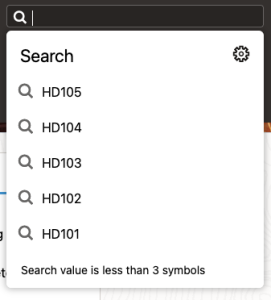
RECENT SEARCHES
You can view the last five Search keywords in the Search field. This image shows the recent search keywords:
Search Keywords in the Search Field
You cannot view the last five recent searches if you log in from a new session of Oracle Field Service.
SEARCH INVENTORY WITH BARCODE SCANNER
You can use the Barcode Scanner button to search for inventory within the Mobile application.
NOTE: The Barcode Scanner button is available in the inventory search screen when using the Mobile application (for both iOS and Android applications). The button is not available when using the browser-based Oracle Field Service application, unless a plug-in is developed and configured.
In general, parts and equipment have barcodes printed on their package. The Barcode Scanner button is available in Search in order to help you to find a part or equipment without the need to type any text and tap the Search button. This feature allows the Barcode Scanner to scan the barcode and run the Search without the need to tap the button and populate the result.
The following figure shows the inventory search screen with the Barcode Scanner option on a small screen:
When opening the application on a large screen, the barcode button is located separately from the search field:
To use the Barcode Scanner:
- Click Search at the header of the application when on a small screen. The Search field with the barcode scanner appears on the screen. When on a large screen, click the Search field at the header of the application. The drop-down list appears with the barcode scanner button in it.
- Click the Barcode scanner button and place the mobile device in front of the printed barcode on any of the packages. The barcode information is captured and the search is run. All the relative inventory items will appear on the screen. You can select the required part or equipment and continue with your activity.
This feature saves time for those users (dispatchers or field managers) who need to search often.
Steps to Enable
You don't need to do anything to enable this feature.
Key Resources
Improved En Route Page for Dispatchers
When an activity is set to En Route status by a user that is not the activity owner, then the assigned resource's position is obtained from the Smart Location service.
If the assigned resource's position is available and the position has been gathered within the past 5 minutes, then:
- The map displays the route from the resource's position to the activity (if activity coordinates are available).
- Travel time is updated using Real Time Traffic (if Real Time Traffic conditions are met).
This image shows the map with the travel time updated using Real Time Traffic:
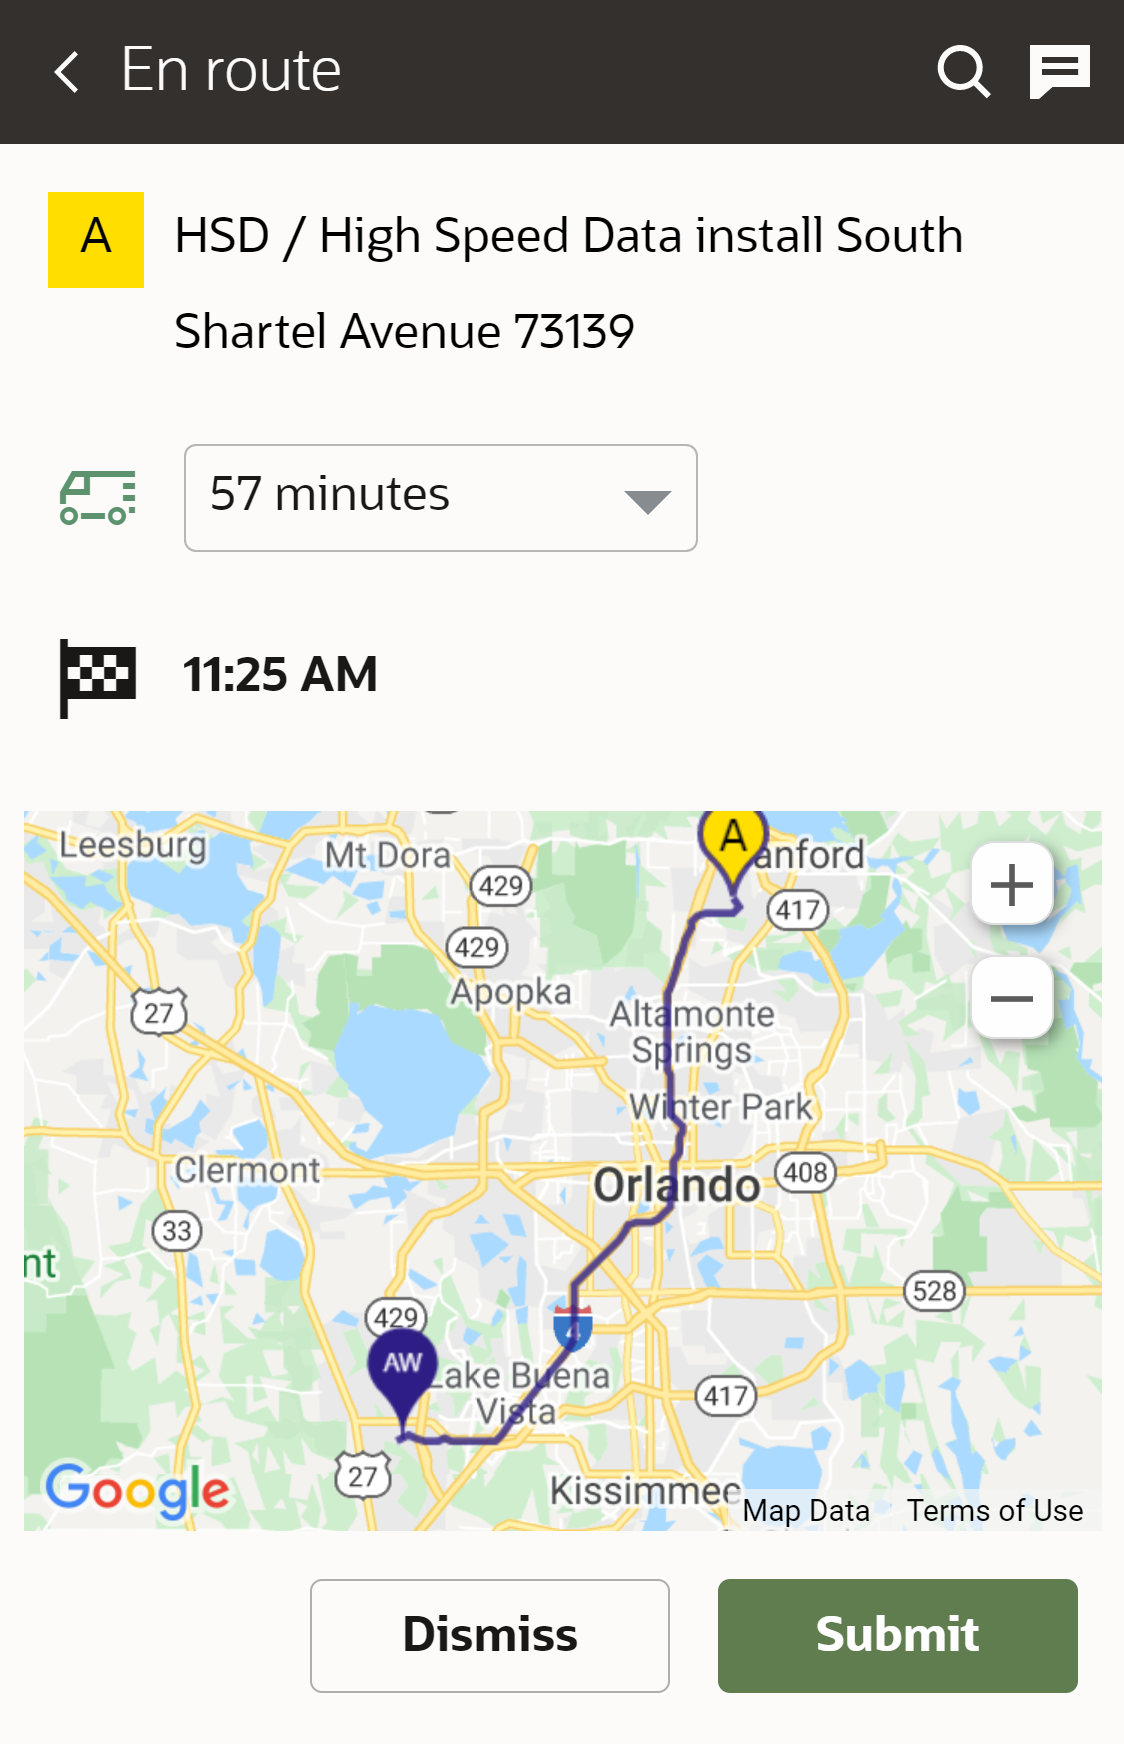
Enroute Screen When Travel Time is Available
If the assigned resource's position is not available, or the position has been gathered longer than 5 minutes ago, then, the message, 'Cannot identify resource location' is displayed on the map. This image shows the map with the travel time when the resource's position is not available:
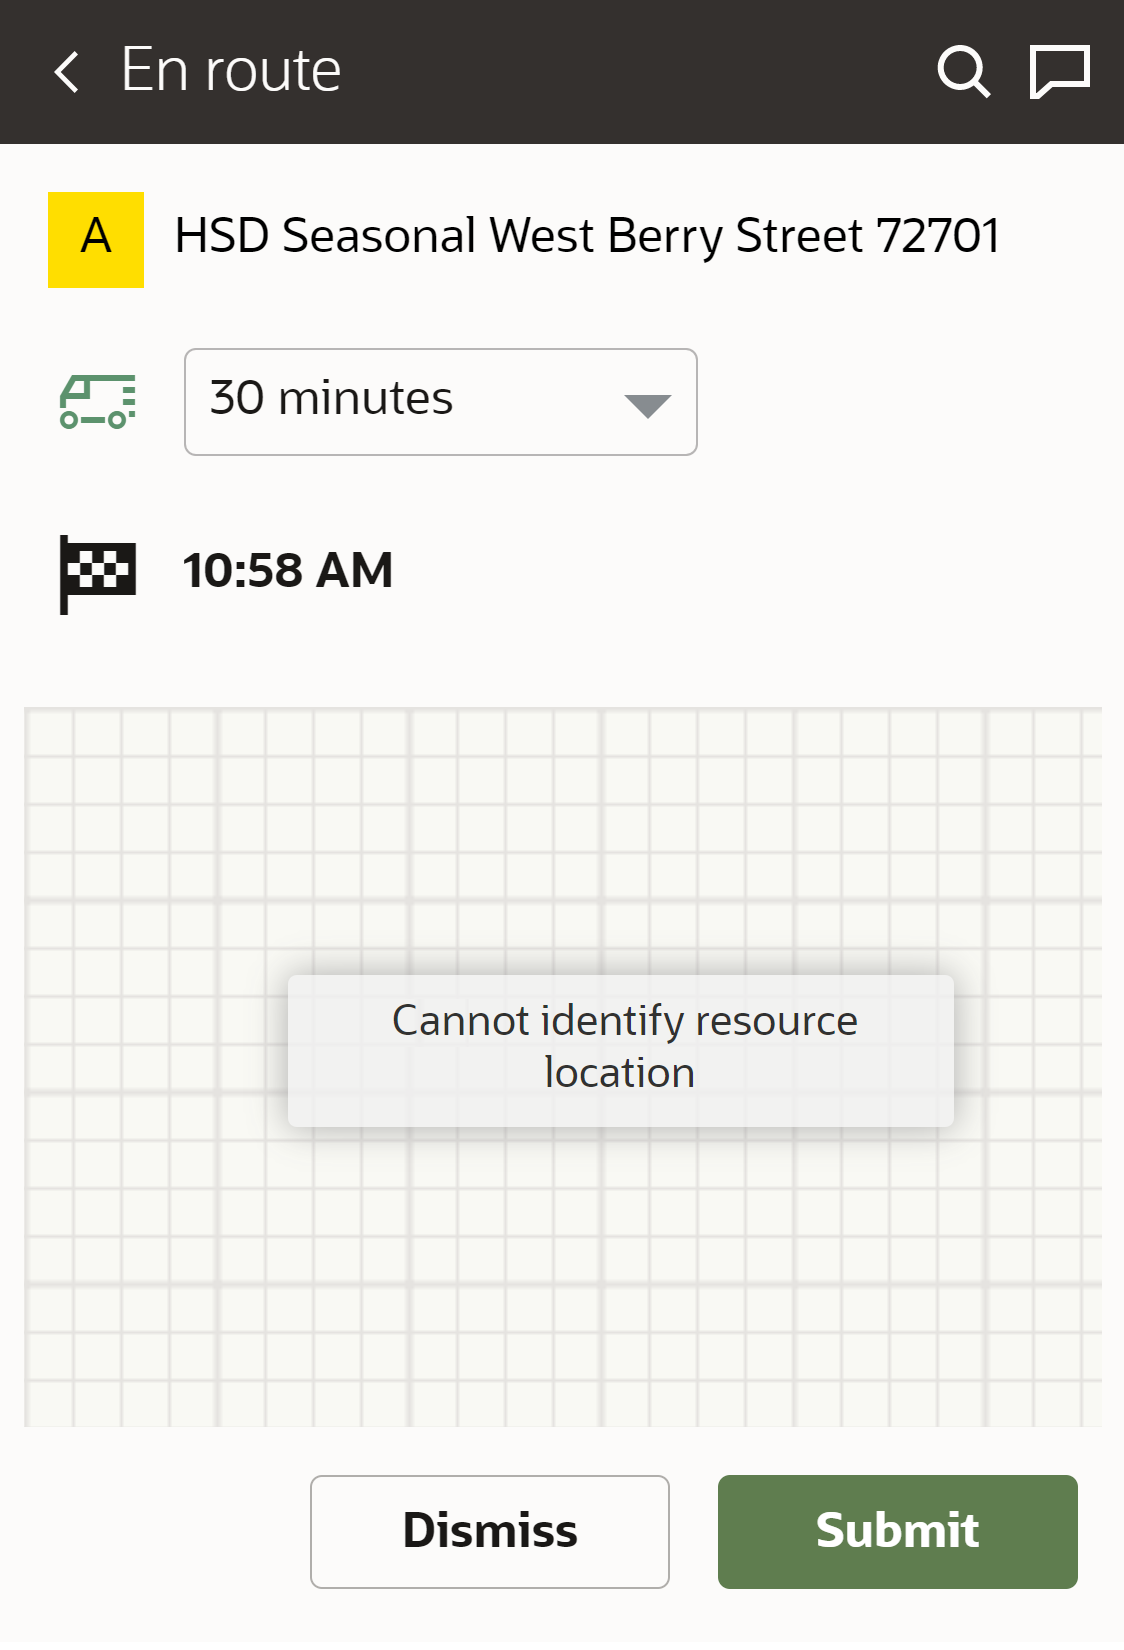
Enroute Screen When Travel Time is Not Available
This feature alllows you to set the ‘En Route’ status for an activity so that the real-time travel data from the map data provider is used to update the travel time to that activity.
Steps to Enable
You don't need to do anything to enable this feature.
Key Resources
Redwood Style for Check boxes and Radio Buttons
Starting with Update 21D, improvements have been made to the pages that appear in the Redwood theme. With this feature, check boxes and radio buttons inherit the visual style and experience from the 'Redwood' concept, so that they are visually unified with other Oracle Fusion applications and optimized for touch screen interactions.
What's new:
- Visual representation
- Optimization for touch screens
VISUAL REPRESENTATION
These are the visual representation changes:
-
The order of elements for check boxes is changed, where now a square to tick a check box goes first, followed by the label.
-
Check boxes are always located on the right (content) side of the section; there is no label for check boxes on the left side.
-
Checked Read-only check boxes are now displayed as non-clickable squares with ticks inside.
-
Empty check boxes are not showed on screens (same behavior as for other elements).
OPTIMIZATION FOR TOUCH SCREENS
In the touch screens, the size of icons for both check boxes and radio buttons has increased. This change enables Technicians to use the elements on mobile devices being in the field. Mandatory check boxes are displayed with the * sign that you must enable them.
New check box visualization is displayed on the Resource and Activity Hints on Manage.
NOTE: The improvements for this feature are applicable to the pages that are primarily used by field workers, for example: Start activity, Activity details, End activity, and forms. These improvements are not available on Dispatch Console, Quota, Routing, and Configuration pages.
The feature represents improvements for most commonly used elements as checkboxes and radio buttons and provides the visual style and experience from the 'Redwood' concept so that they are visually unified with other Oracle Fusion applications and are optimized for touchscreen interactions.
Steps to Enable
You don't need to do anything to enable this feature.
Key Resources
Resource Navigation Improvements
Starting with Update 21D, the navigation to resource settings has been improved to reduce the number of clicks it takes to get there. You can configure the most popular actions such as Resource Calendar, Work Zones, Work Skills, and Locations within the Resource Hint context based on your role in the organization. This feature allows you to open resource settings without navigating to the Resource Info screen. Also, the Calendar widget on the Resource Info screen is now extended with the ability to switch to other months.
WHAT'S NEW
New buttons are available on the Resource Hint context layout:
- Resource Calendar
- Work Skills
- Work Zones
- Locations
- Resource Inventory
New arrows display on the Calendar tile on the Resource Info screen.
HOW TO CONFIGURE
- Open Configuration, User Type. Resource Hint context layout.
- Add buttons required for a particular User Type. The following options are available:
- Resource Calendar
- Work Skills
- Work Zones
- Locations
- Resource Inventory
- Save the configuration.
HOW TO USE RESOURCE NAVIGATION
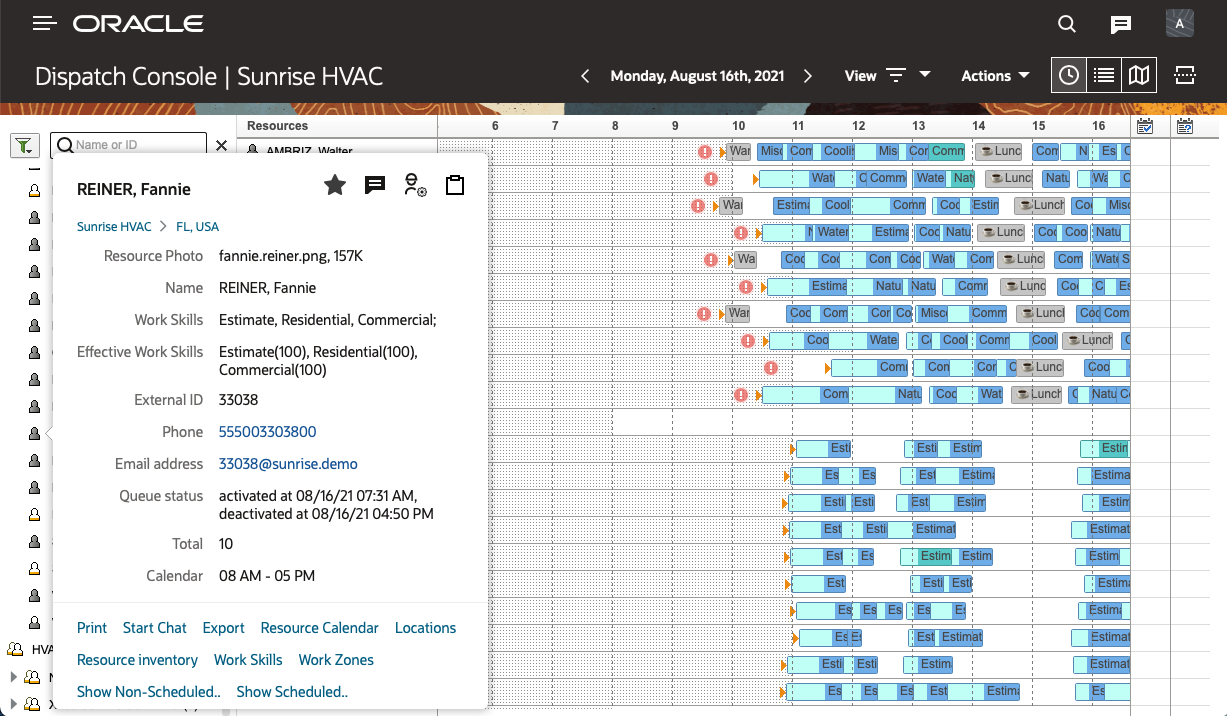
To navigate to resource settings, click a resource from the Manage screen or Dispatch Console and select the available screen: Resource Calendar, Work Zones, Work Skills, Locations, or Resource Inventory through the Resource Hint.
BEST PRACTICES
To update the resources settings, open the required Organization unit or Bucket and navigate to the Resources section. Click a resource that you want to change and select Resource Calendar, Work Zones, Work Skills, Locations, or Inventory on the Resource hint. Make changes and go back to select another resource to view or edit. This image shows the Resource hint on the Resource Info page:

Dispatchers who manage activities and usually work within the Dispatch Console or Manage screen can navigate to the resources settings right from the Resource Tree. This image shows the Resource hint in the Dispatch Console:
HOW TO USE THE CALENDAR NAVIGATION
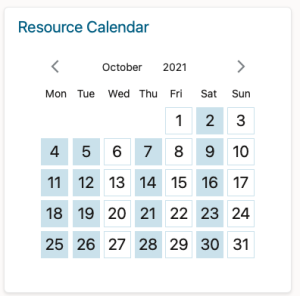
You can verify working and non-working days for future and past months on the Resource Calendar tile on the Resource Info page.
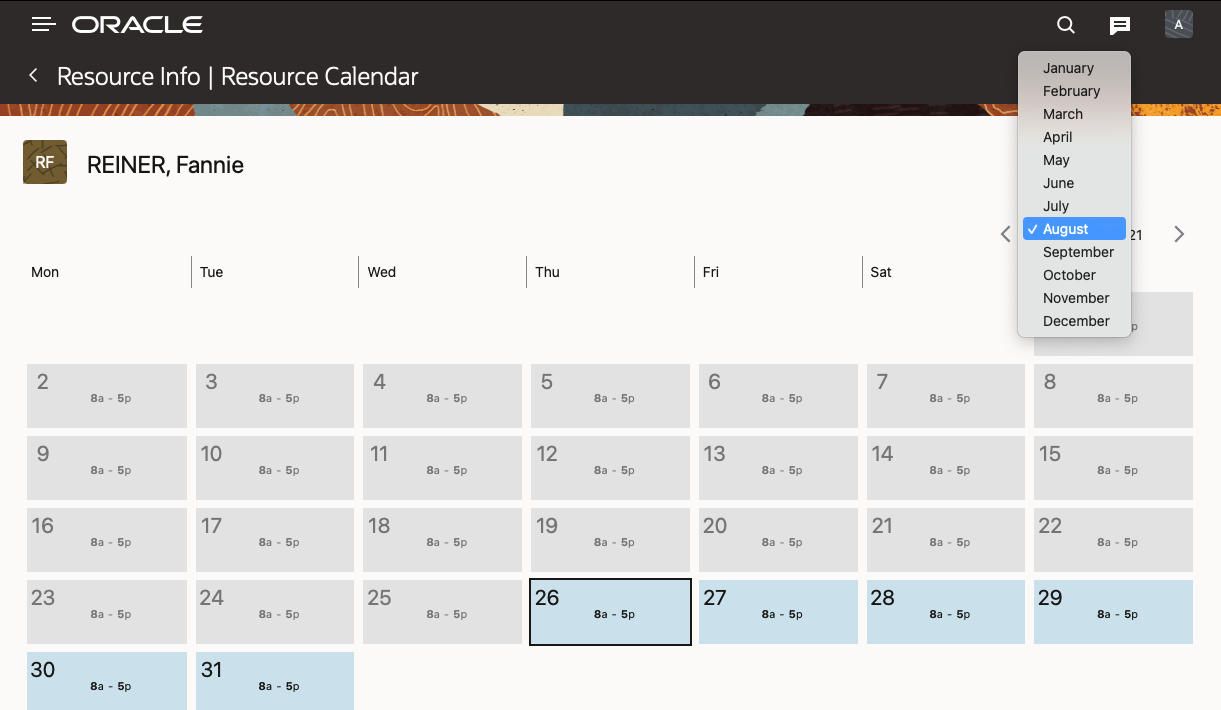
Use the arrow to verify the working schedule month by month. When you select the particular month on the Resource Info page, it is saved and you can see the details in the Resource Calendar screen. This image shows the Resource Calendar widget with forward and backward arrows to change the month:
Also, you can click a month and year to navigate to the specific period in two clicks. This image shows the months list on a small screen:

This image shows the months list on a large screen:
The enhancements added to this feature help improve the user experience and navigation efficiency.
Steps to Enable
You don't need to do anything to enable this feature.
Key Resources
This feature introduces a new kind of visualization of activity workflow that will guide technicians through the required flow while performing activities. New types of interactions with the application will simplify the user experience and save time when on-boarding new hires. Fresh configuration concepts will shorten the time of system configuration and decrease time-to-production for new activity flows.
AVAILABILITY
Workflow Manager is available automatically; access to it is controlled by configuration settings and it becomes visible to users based on configuration updates.
WHAT IS A FLOW?
A 'flow' represents a number of steps that a technician should complete while working on an activity, occurring between the 'Start activity' and 'End activity' actions. The idea with this is that a technician states 'I've arrived at the activity site' when starting an activity, and declares 'I've departed to the next activity' when clicking 'Complete'.
The actual work flow occurs between these two actions and is represented as steps that the tech should perform to finish the activity.
A user clicks the steps available in the flow panel, enters applicable data and submits them. The feature is intuitive for end users, as it follows a genuine 'easy-to-use' approach which doesn't require any specific qualifications or training.
HOW DOES A FLOW WORK?
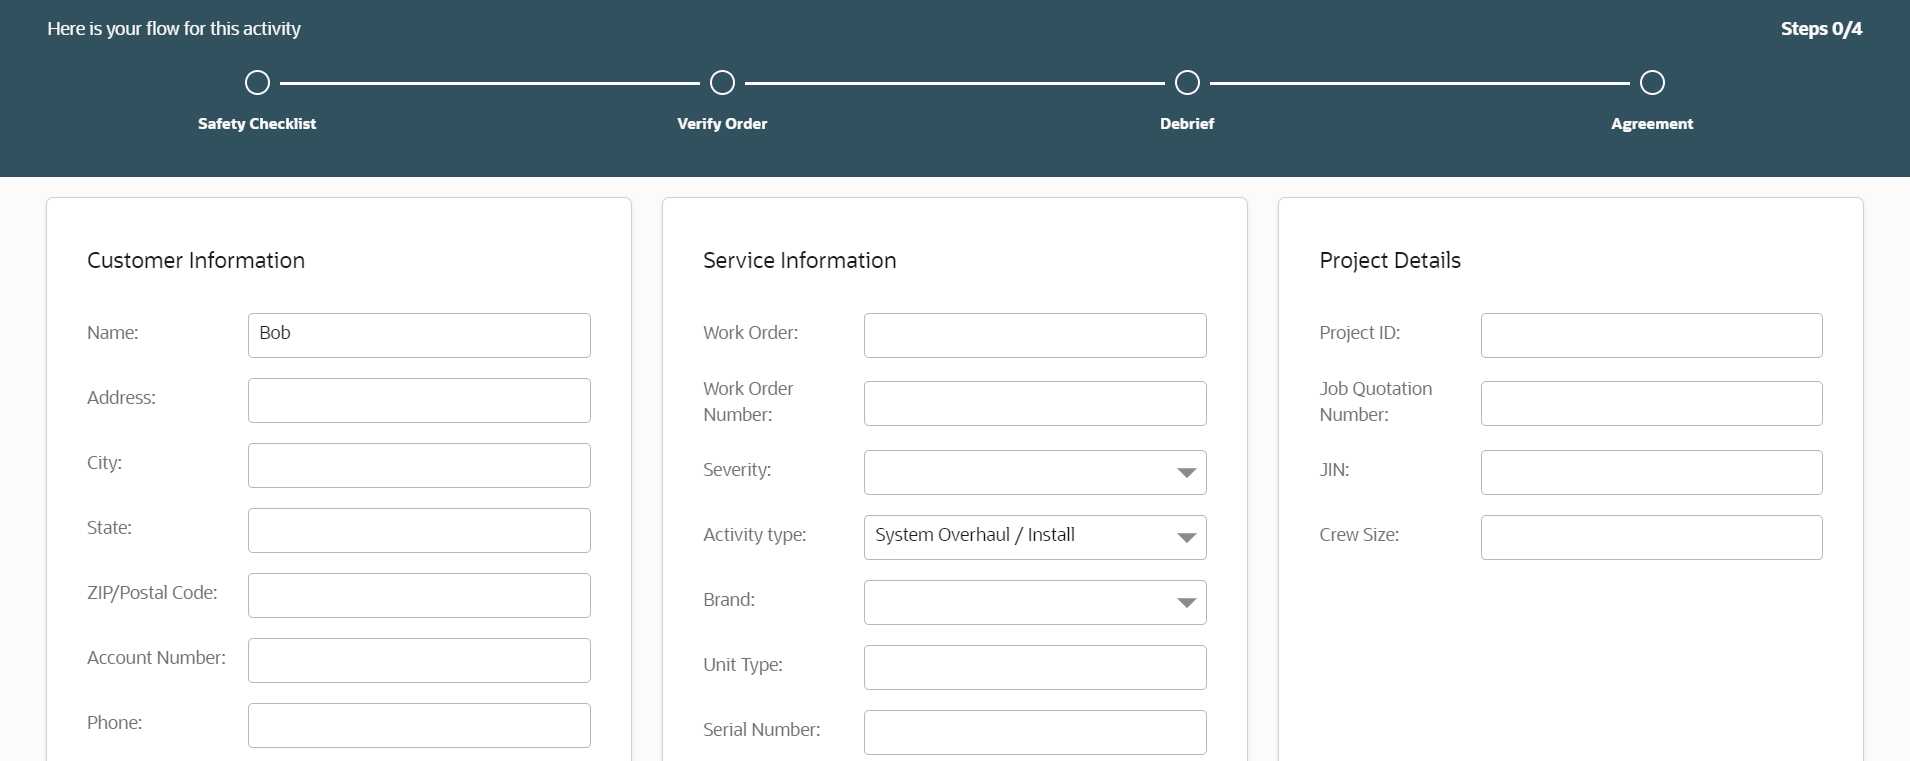
The Flow Panel
A flow is displayed inside a panel that's embedded into the Activity Details page ('Edit/View Activity' context). The flow is available on the main page of an activity and doesn't appear on any other pages. This image shows the workflow on a large screen:
Workflow in Large Screens
This image shows the workflow on a small screen:
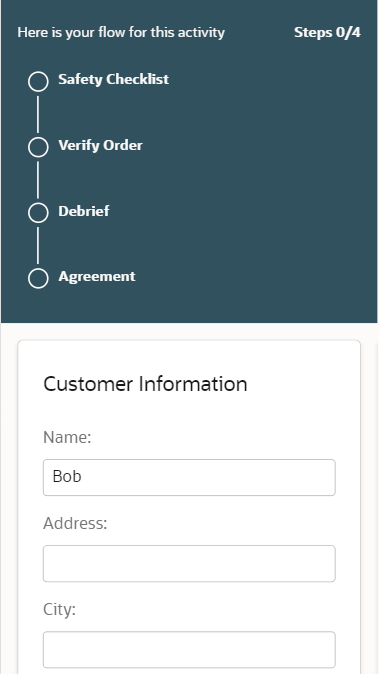
Workflow in Small Screens
Flow step visualization
The flow panel displays steps that match configured conditions:
- An 'available' step is presented as a 'circle' icon. Tap on this icon and a page where you should enter data will pop up.
- A 'completed' step is displayed with a green checkbox inside the circle. Completed steps are always shown as a part of flows.
- There could be the case when some completed steps won't be available for modification. Such steps will be displayed with the green checkbox inside and disabled step's name. This step will be just visualized but cannot be clicked.
- Any 'Not completed' steps that don't match configured conditions will not appear on the flow panel.
This image shows the completed and not started steps in a workflow:
The positioning of steps within the flow panel is as follows:
- The first available 'not completed' step is always visible on the page.
- The 'completed' step preceding the first available 'not completed' step also is visible, if there is one.
- When all steps are completed, then the position is pointed to the last step of the flow.
- The application recognizes any connections to steps that aren't actually visible and demonstrates that there are more steps in the flow rather than what's displayed upfront. When a user navigates to the activity - the page is automatically scrolled to the next available flow step to make it easy to distinguish.
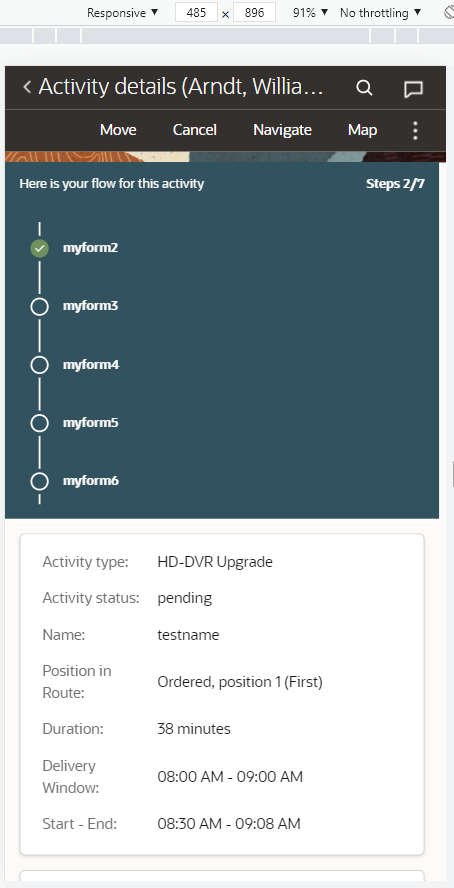
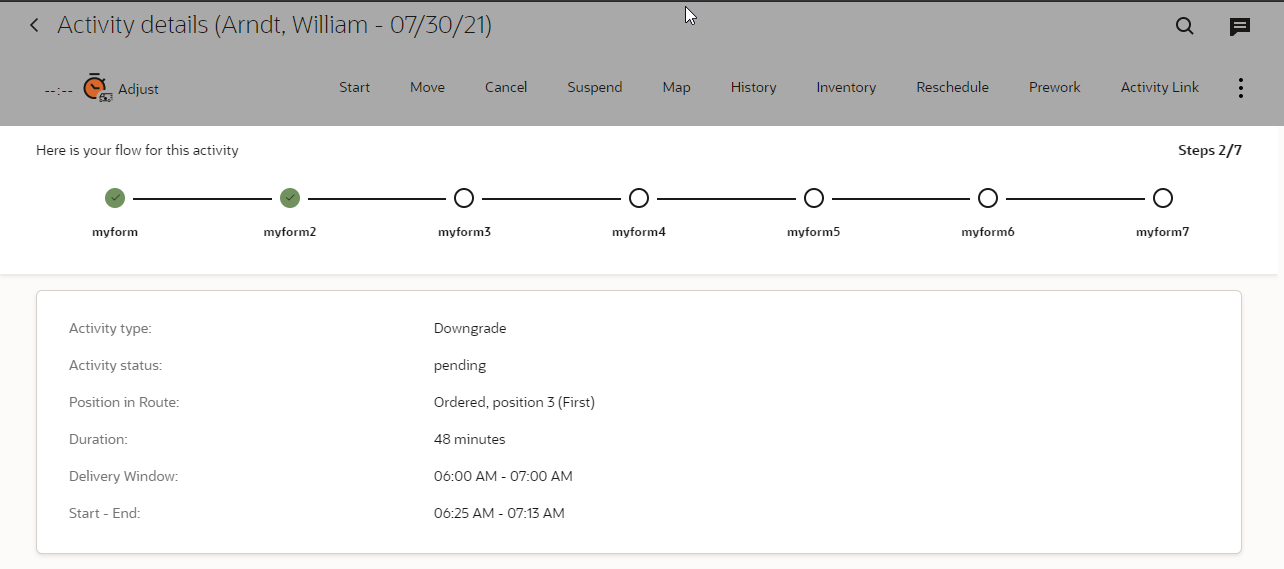
There is a counter of steps displayed in the right top corner of flow panel. It helps a technician to see how many steps are in the flow and how many of them are already completed. Let's look at the following example - there is 'Steps 2/7' counter which means that 7 steps in total are visible for a tech, and two of them have been completed.
This image shows the workflow with the count of steps:

NOTE: The counter will show the total number of steps that are visible on the page, but it doesn't necessarily reflect all steps that are configured for a flow. The reason for that is that the availability of steps is driven by data collected in the field, and the application cannot predict which of the steps will be visible and which be displayed.
Flow panel size considerations
The application allocates some limited space to show the flow panel and in some cases, not all of the steps will fit within its height or width. When that happens, users can scroll inside the panel and access any steps that are located to either side of the page.
On large screens having widths greater than or equal to 600 pixels (desktops, laptops and tablets, for example), the flow panel is displayed horizontally; in this landscape orientation, the flow panel will always be presented on the page when scrolling left-right. The panel can contain up to 7 steps.
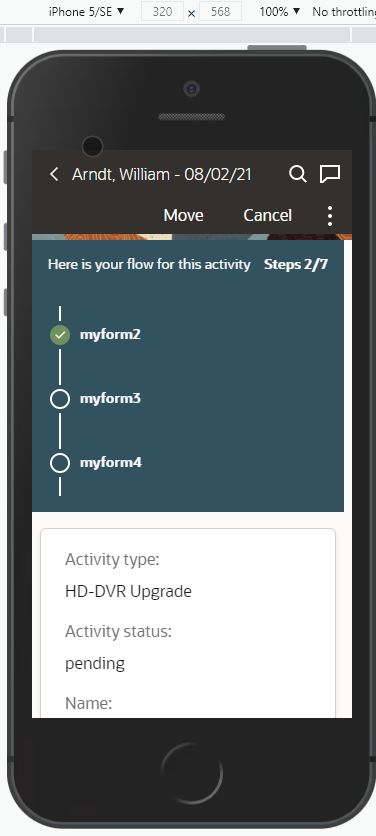
Given the portrait orientation of mobile devices, in those cases, the flow displays vertically. In portrait orientation, the flow panel will behave the same as all other sections on the page. In small screens of mobile devices having up to a width of 599 pixels, the panel is displayed vertically and shows up to 5 steps upfront. This image shows the workflow with the count of steps on a small screen:
Workflow on a Small Screen
If the panel's height doesn't take up more than 50% of the screen height, then 3 steps are displayed. If there are more than 3 steps, then users can scroll inside the panel to access the other steps. This image shows the workflow with the count of steps indicating that users can scroll to see the remaining steps:
Workflow on a Small Screen
OFFLINE SUPPORT
Flows are supported in offline mode; there is no difference in functionality whether online or offline.
NOTE: Some plug-ins taking part in flows can be disabled in offline because of configuration settings. Steps leading to such plug-ins will be displayed in offline mode, however these steps will be disabled therefore technicians won't be able to click and open them.
Flow Configuration
Enabling the feature
To enable the feature, you'll have to configure the 'Workflow Manager' page as Read/Write from the 'Configuration' context layout for required User Types. For any User Types that can access the 'Forms & Plugins' page, the 'Workflow manager' configuration page will be added automatically.
The 'Workflow Manager' page
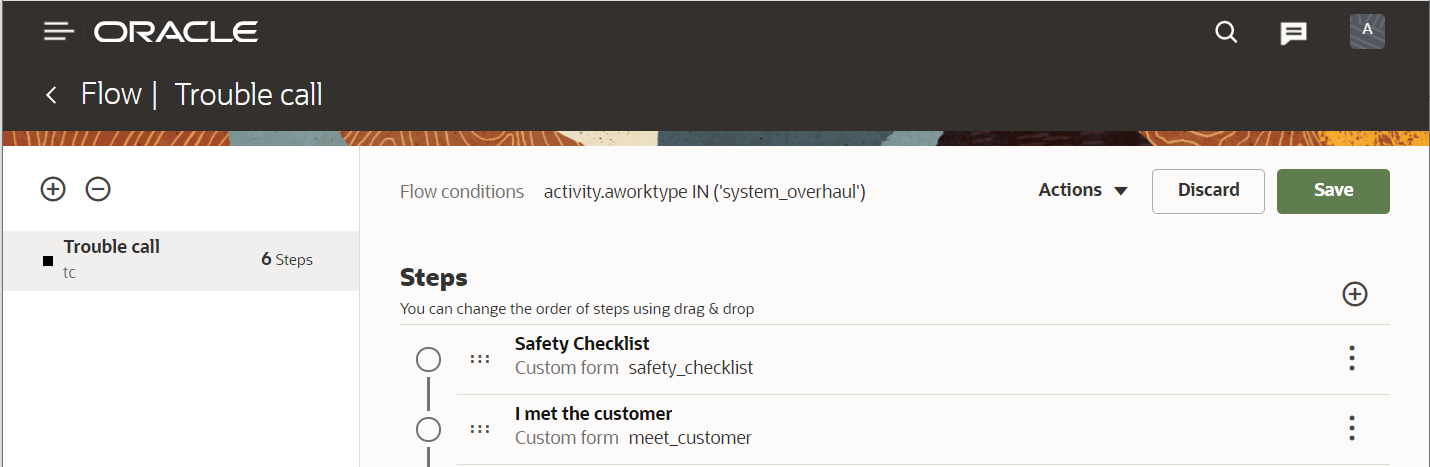
You can create, modify, view and delete flows using the new 'Workflow Manager' page. This page can be found by starting in the Configuration area and clicking 'Workflow Manager' from the Displays section. This image shows the Displays section of the Configuration page, where you can see the Workflow option:
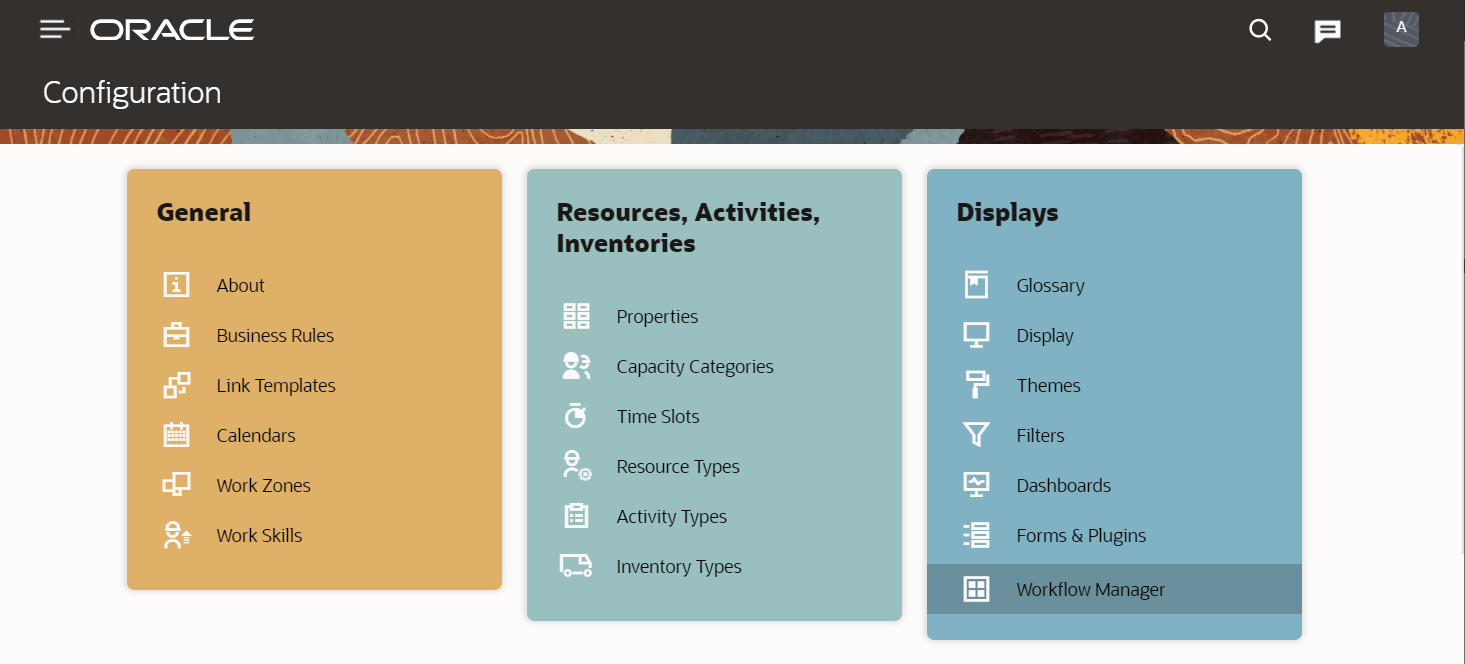
Configuration Page Showing Displays Section
All new flows are set as 'inactive' by default, which means that they won't be available for technicians until their status is changed to 'active'. You can create a new flow and set it to 'active' right away, but our advice is to thoroughly review the flow, check its configuration, and only then enable it for field resources. This image shows the steps configured for a flow:
Steps Configured in a Flow
FLOW CONDITIONS
When a new flow is added, you can configure conditions for it by clicking the 'Modify' action.
Flow conditions is the expression that defines the rules of when a flow will be visible for field resources. You can think of these conditions as the evolution of two familiar concepts:
- Visibility conditions that define the appearance of fields and buttons on pages. The same works here, as a flow will become visible when the conditions match values of fields and properties of an activity.
- Default values - you can use the same expressions as when configuring default values
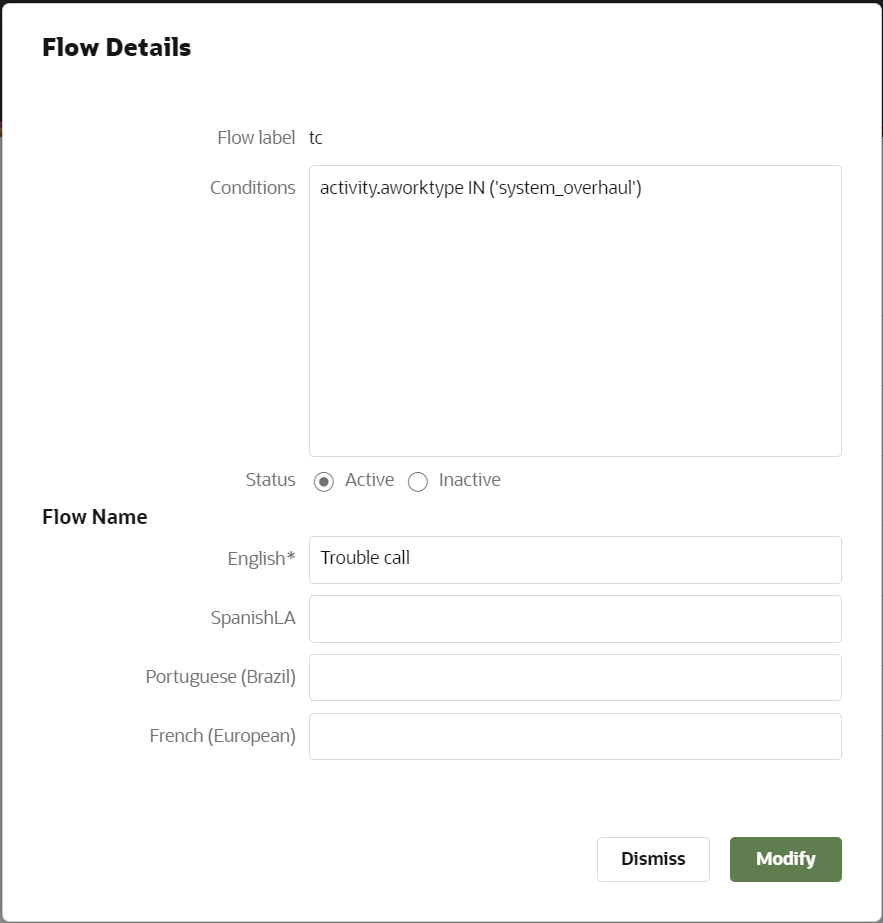
Note that an empty flow condition implies that this flow matches all activities. This image shows the Flow Details page:
Flow Details Page
EXAMPLES
Here are some fundamental examples regarding how to run flows for limited groups of activities or users:
- Building flow conditions for activity types - You can use activity type (e.g. 'Install") as the parameter within flow conditions; with this approach, the new flow will be applicable only for activities of this activity type.
- Building flow conditions for user types - Another approach is to dedicate a flow to a certain group of users; here you could use User Type as the parameter within flow conditions.
CONFIGURE FLOW STEPS
Create a New Step
Once the flow is created, you can start adding steps into it. To do so, click the '+' button placed at the top of the 'Steps' section.
Here you'll have to select a page that will be opened for this step. For now, the application allows for the selection of either forms or plug-ins as flow steps, and you must specify the appropriate ones when adding or modifying the steps. This is the one mandatory setting for a step and, once it's configured, you can move along to other steps.
Step Conditions
There are two rules that define the behavior of flow steps - 'Show available when' and 'Show completed when'. 'Show available when' determines when a step will be visible for field resources while 'Show completed when' defines the conditions of when the step will be considered as completed.
Default conditions is a new concept that doesn't require any more sophisticated configuration.
- 'Always available (no conditions)' - this condition states that a step will be displayed for end users initially.
- 'Form submitted' - this new concept states that clicking the form's 'Submit' button defines behavior of the flow. In other words, it means 'Click 'Submit' and then you're done with this step. Comparing this to the configuration of User Types, this is an advanced approach that doesn't require the creation of any new properties to build the conditions regarding the showing/hiding of pages.
NOTE: 'Form submitted' works as the default conditions for steps that are linked to forms. This condition isn't available for steps that open plug-ins.
There could be additional complex business rules that determine when steps should become available or set to completed. Another new concept is available that you can use other flow steps as conditions - again, minimizing the need to create extra properties just for use within conditions to show or hide pages.
This new idea works as follows - you can configure a step as 'Available' when another one is 'Completed' or even state that some step is finished when other steps are turned into 'Completed' state.
For this, you'll have to add or modify 'Available when'/'Completed when' conditions and select 'Flow steps' from the drop-down list at the top of the 'Conditions' section.
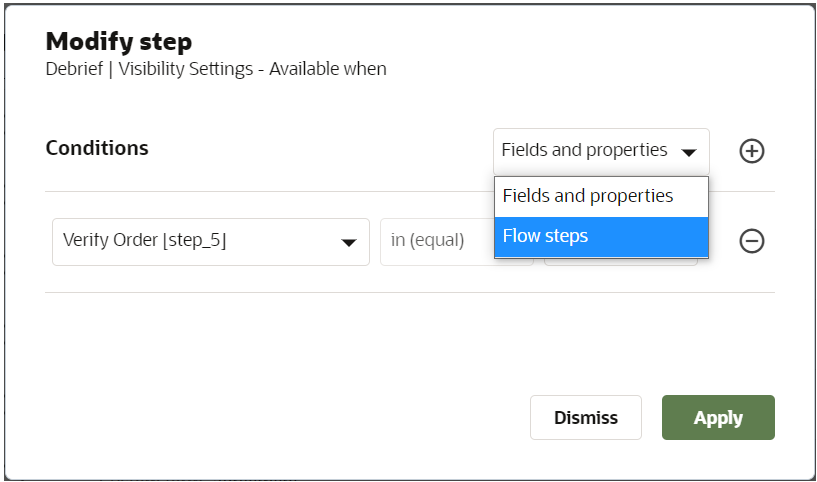
The addition of these new ideas/concepts doesn't mean that we decided to get rid of other well-known approaches that have been available for years. Therefore, you can build either 'Available when' or 'Completed when' conditions based on properties or fields similarly to how it works in the configuration of User Types, if preferred.
Context Layout Configuration Suggestions
Here are some suggestions regarding how to configure the 'Activity details' page (Edit/View Activity context) when using flows:
This page should be built from information perspective, meaning that it should contain all the useful information that a technician might require in the field (i.e. info about the environment, technical limitations, neighbors, links to useful knowledge on external resources, etc.). All of the forms and plug-ins required for a job should be presented within the flow. Buttons on Activity Details should lead just to those pages that aren't a part of a flow (that is, 'Inventory list, 'History', etc...).
The main idea behind these suggestions is that the majority of pages that a technician interacts with while working on an activity should be encapsulated within the flow. This essentially navigates the technician throughout the process of the entire activity. Everything else is side information that might be important, but cannot be considered as tasks that absolutely must be performed in order to finish activities.
Also, consider making the 'Start activity' and 'End activity' pages as simple as possible, as users shouldn't spend much time to perform these actions.
FLOW USE CASE EXAMPLES
Use Case example #1: Configure a non-linear flow for an Activity Type
This use case shows how to configure a flow where the order of the steps doesn't matter. This flow should be triggered only for a specific activity type.
Pre-conditions:
- The flow contains just the use of forms, and all forms are already configured within the Oracle Field Service instance.
- The flow should work only for the 'Trouble Call' activity type.
Actions:
- Add a new flow, and configure a condition for it using 'activity.aworktype IN ('trouble_call')'.
- Add the flow steps and point them to the forms that should be used within this flow.
- Leave the default conditions for all steps.
Results:
The flow will be displayed just for activities belonging to the 'Trouble Call' activity type. All steps will be displayed as available for technicians when opening activities and they'll be able to complete the steps in any order. This image shows a non-linear workflow:
Non-linear Workflow
NOTE: You can easily implement a new flow based on the current configuration of the Activity Details page. For that, you'll have to use the same forms that are actually configured on this page.
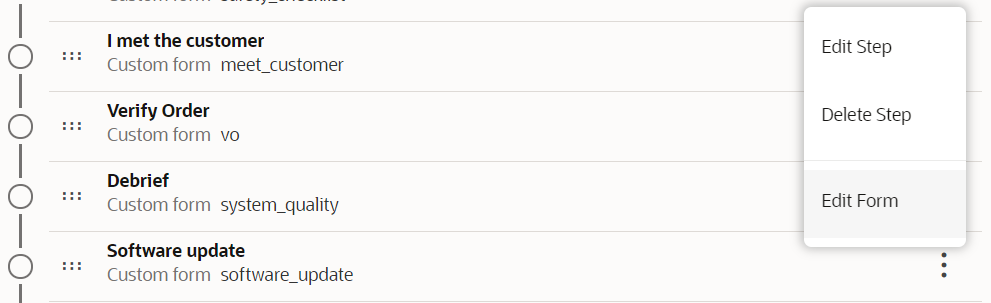
Use case Example #2: Configure a Linear Flow for a User Type
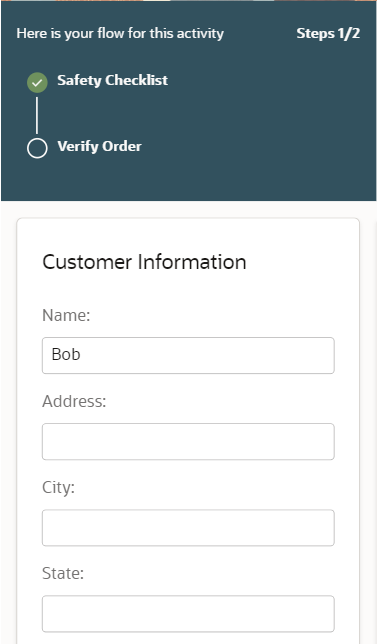
This use case describes how to configure a flow where the steps should become available one by one. This flow should be available only for a certain group of users.
Pre-conditions:
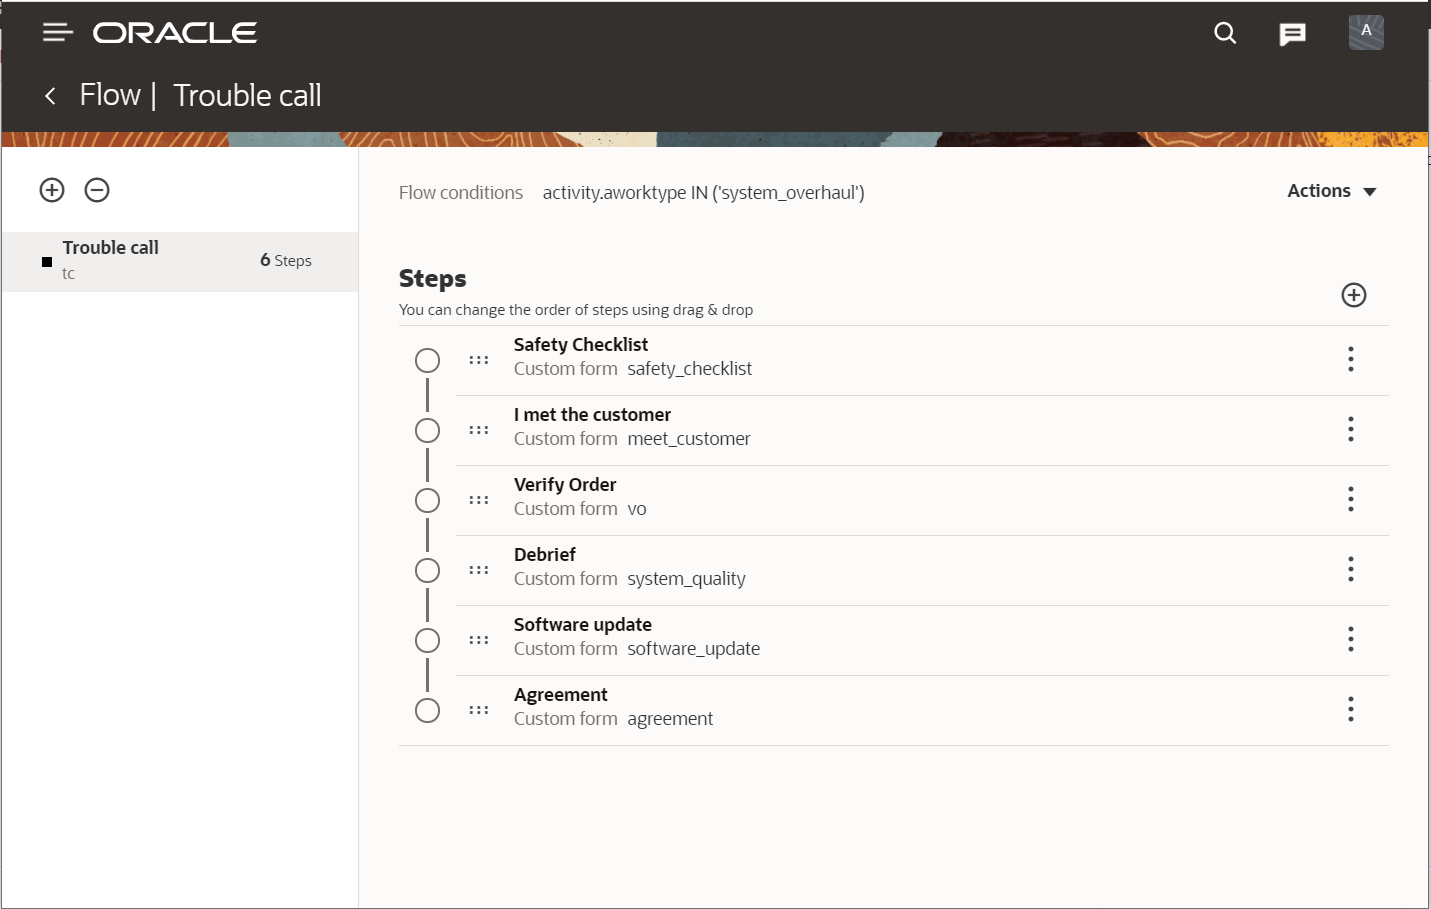
- The flow contains just the use of forms, and all forms are already configured within the Oracle Field Service instance.
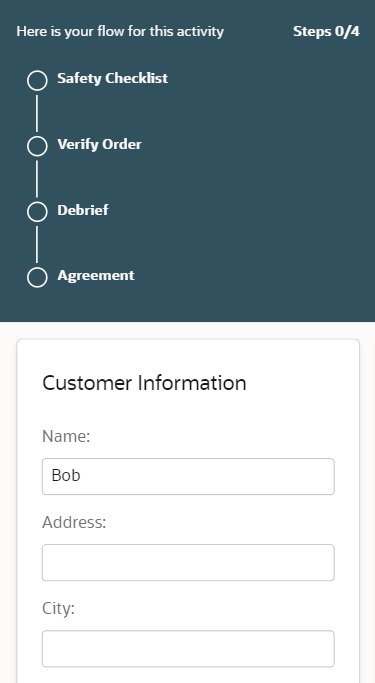
- There are 4 steps within the flow called 'Safety checklist', 'Verify Order', 'Debrief' and 'Agreement'.
- The flow should work for the 'Technician' user type.
Actions:
- Add the new flow, and configure a condition for it using 'user.type IN ('technician')'.
- Add 'Safety checklist' as the first step, leaving the default conditions for it.
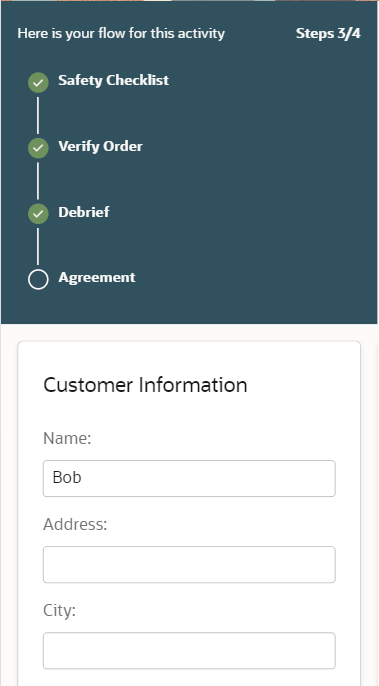
- Add 'Verify Order' step and specify a ''Safety checklist is completed' condition in the 'Show available when' section.
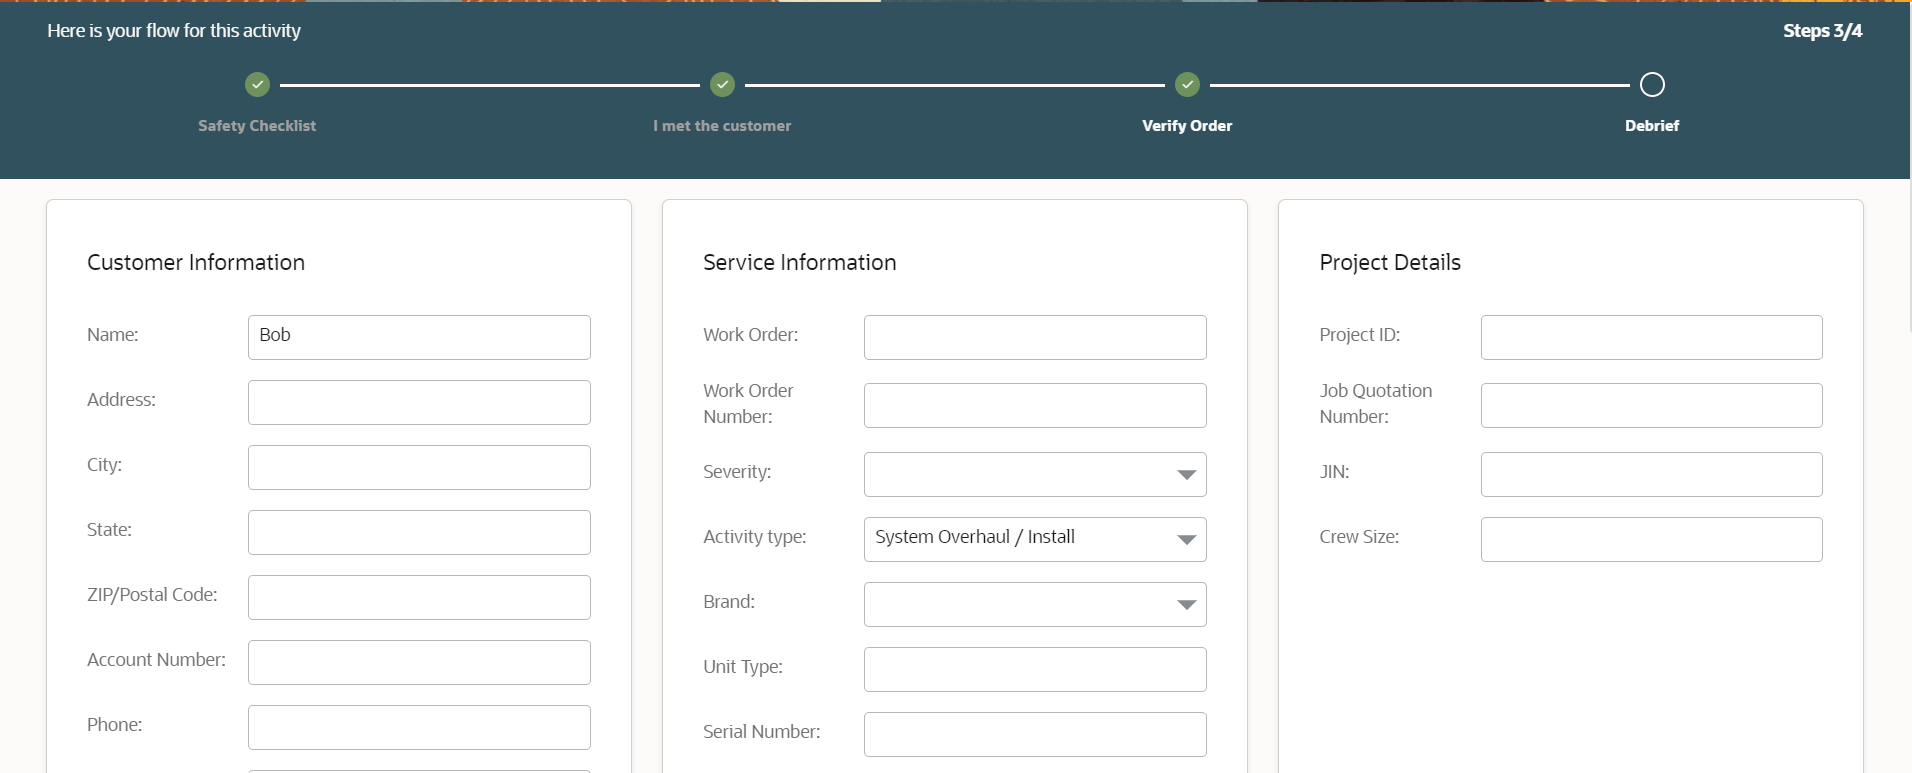
- Add 'Debrief' step and specify a 'Verify Order is completed' condition in the 'Show available when' section.
- Add 'Agreement' step and specify a 'Debrief is completed' condition in the 'Show available when' section.
Results:
This flow will appear to users assigned the 'Technician' user type, and the steps will become available one by one.
The first step will be available from the beginning: This image shows the first step of a linear flow:
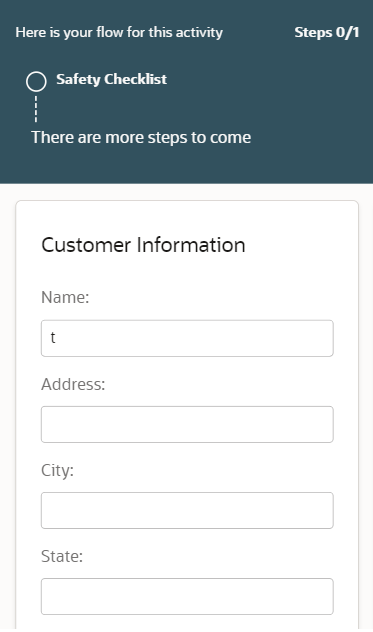
First Step of a Linear Flow
The second step becomes available once the first one is completed. This image shows the second step of a linear flow:
Second Step of a Linear Flow
Similarly, the third one becomes visible when the second one is ready. And the last one becomes available once the third step is completed. This screenshot shows the last step of the flow:
Third Step of a Linear Flow
ADDITIONAL FLOW CONSIDERATIONS
This section lists the additional flow considerations.
Parameters
'Parameters' are supported for flow steps and provide the ability to pre-fill data on pages. This functionality works the same as for configuring contexts using the Visual Form editor.
Reordering of steps
You can use drag-n-drop to reorder steps. This is quite useful and doesn't require opening steps for modification.
Another option is to click 'Edit step' and change it's order using the 'Position' field. Using this, you can explicitly specify the sequence of steps within a flow.
Aggregated saving of configuration
The application will accumulate configuration changes and let you to apply them all together. The app will show 'Save' and 'Discard' buttons upon any configuration update of a selected flow.
- Upon clicking 'Save', all changes will be preserved, and the application will send them to mobile devices of field workers.
- Upon clicking 'Discard', you'll be returned to the state from where you began to change the configuration of the flow.
This image shows the Save button on the flow configuration page:
Flow Configuration Page
Notification about not saved configuration
The application will prevent you from inadvertently losing configuration changes. When navigating to any other page having not saved the flow configuration updates, the application will prompt you either to move forward and discard all ongoing changes or go back and save them. This image shows the Discard warning:
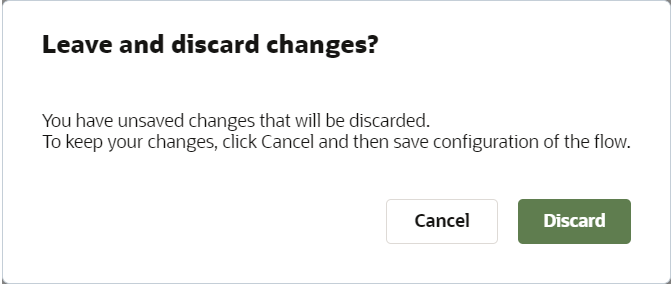
Leave and Discard Changes Dialog Box
Edit forms from the Workflow Manager Page
You can modify the configuration of forms directly from within the 'Flows' page. This functionality saves a number of clicks and simplifies the navigation between pages involved in a specific flow. When you realize that some form requires modification, click on the context menu along the step, which will open this form. From there, select the 'Edit form' menu item.
Configuration of this form will be opened in the Visual Form Editor and you'll be able to make the required changes. This image shows the Edit form option for a flow:
Edit Form Option for a Flow
Export and Import of flows
The Export/Import functionality will let you migrate flows between instances. While it works for a single flow, you'll have to take the following steps to transfer a flow to another Oracle Field Service instance:
- Export the flow from the source instance
- Manually create the flow in the target instance
- Select the 'Import' menu button from the 'Actions' menu and import the flow
The system will validate the file and provide the output. Critical errors will reject the operation, while warnings and notices will display items that may require your attention later on. This image shows the Import flow content dialog box:
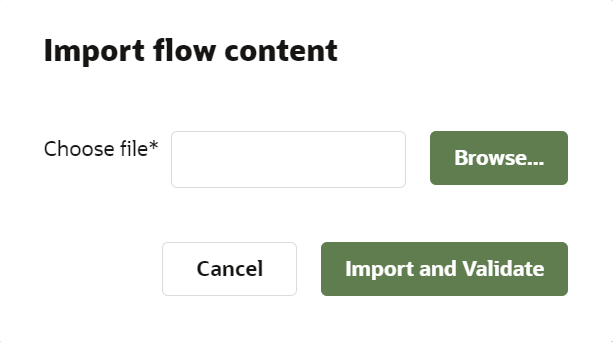
Import Flow Content Dialog Box
NOTE: To minimize the number of changes that might be needed afterwards, please make sure that all necessary data is already configured in the target instance before you import the flow. See the below examples.
For example:
- Be sure any relevant forms and plug-ins are there.
- Custom properties used within conditions are in place.
- Any corresponding enumeration values for product fields such as 'Activity type' of 'Resource type' are configured appropriately.
Custom themes
The Flow panel also reflects any custom themes configured by customers, with its color dependent on the color selected as the background for the header. For 'dark' themes, the panel will be displayed in the default color, and for 'light' themes the background of flow panel will be white.
This image shows the flow page within a configured custom theme with a grey header:
Custom Theme With a Grey Header:
Completing flow steps
The main path to completing flow steps is to move through an activity, open the steps, collect data and submit them. However steps could be completed by others:
- by dispatchers and managers through the UI.
- using API calls or by message scenarios. This will work for steps where 'Show completed when' conditions are based on field and custom property values.
Steps can be completed in the order directed by the configuration of a specific flow, just conditions of flow steps influence of when steps become available or completed.
There is no strict relation between visibility of 'Start activity' or 'End activity' page and completion of flow steps. Visibility conditions for these buttons should be configured separately on the 'Edit/View activity' context layout.
Inventory can be added into Workflow Manager as plug-ins that manage equipment.
Standard Inventory pages aren't supported for flows yet. Therefore, you should configure inventory-related pages as buttons on 'Activity details' page.
ACTIVITY-FLOW ASSOCIATION
Flows can be associated with activities in two ways:
- Using API
The Core REST API supports the 'Activity flow' field within the 'create activity' & 'update activity' calls. This field can be set through the Inbound SOAP API as well. It's also possible to monitor the 'Activity flow' field through the Events API.
You should specify the flow label within the API requests when creating or updating activities.
It's also possible to set flows for activities in 'Pending' and 'En route' status, where any requests to specify or update flows for activities in other statuses would be rejected. The new 'Activity flow' field establishes and maintains the activity-flow association, but you'll have to specify a flow label when updating this field.
- Based on flow conditions
Activity flows will be dynamically calculated by the application basing on configured flow conditions. This will work for those activities in 'Pending' and 'En route' status where flows weren't specified through API.
When an activity status is changed from 'Pending' or 'En route', the application will inevitably associate the flow with the activity, save the flow label into the 'Activity flow' field and stop recalculation.
As the continuation of default values concept, dynamic calculation works partially same when filling in empty 'Activity flow' field. However we believe that the flow cannot be changed once a tech starts its job and this is what differs this approach from the initial implementation of default values.
Flow for activities in final statuses
Flow remains displayed for activities in final statuses, i.e. 'Completed', 'Not Done' etc. There is no difference in visualization of flow panel or steps for activities in these statuses, availability of steps here is determined by step's configuration.
Flows for segmentable activities
All segments of a segmentable activity can be associated just with a single flow, it's not possible that different segments will be associated with various flows. here segments inherit a flow from the master activity which serves as the umbrella for all of them.
The feature will help technicians in the field to not miss important steps when working at the activity site. As the Workflow Manager guides the mobile workforce though the work order execution process:
- It provides guided assistance within the application. As use cases get more and more complex, providing mobile resources with consistent and accurate information is extremely important.
- New employees and 3rd party resources can be on-boarded faster now, ensuring they follow defined business rules and standards.
- The feature drives the common workflows regardless of whether the resource has been doing that type of work for years or if this is the first time they're doing the work.
With this feature, customers can enforce compliance in various ways. For example:
- Corporate compliance requires the mandatory completion of some form. Forms dealing with COVID19 are a great example of this type of compliance.
- Safety compliance requires field workers to fill in a security or safety form as part of the process of starting an activity.
The feature allows customers to streamline technological processes, placing all steps related to technological actions in their required order.
Workflow Manager provides a new kind of audit for dispatchers and managers; now they can easily identify how technicians are moving through their activities. Previously a dispatcher had to call a technician and ask how many tasks are completed and how many of them are left; now the application visualizes this state in details.
Later on, machine learning could use information reported by technicians for every single step to predict estimated activity completion times more precisely.
Steps to Enable
You don't need to do anything to enable this feature.
Key Resources
Applications Page in Redwood Theme
Starting Update 21D, the Applications page now displays the Redwood theme to provide better user experience.
Follow these steps:
- Click Configuration, Applications to navigate to the Applications page.
This image displays the Applications page.
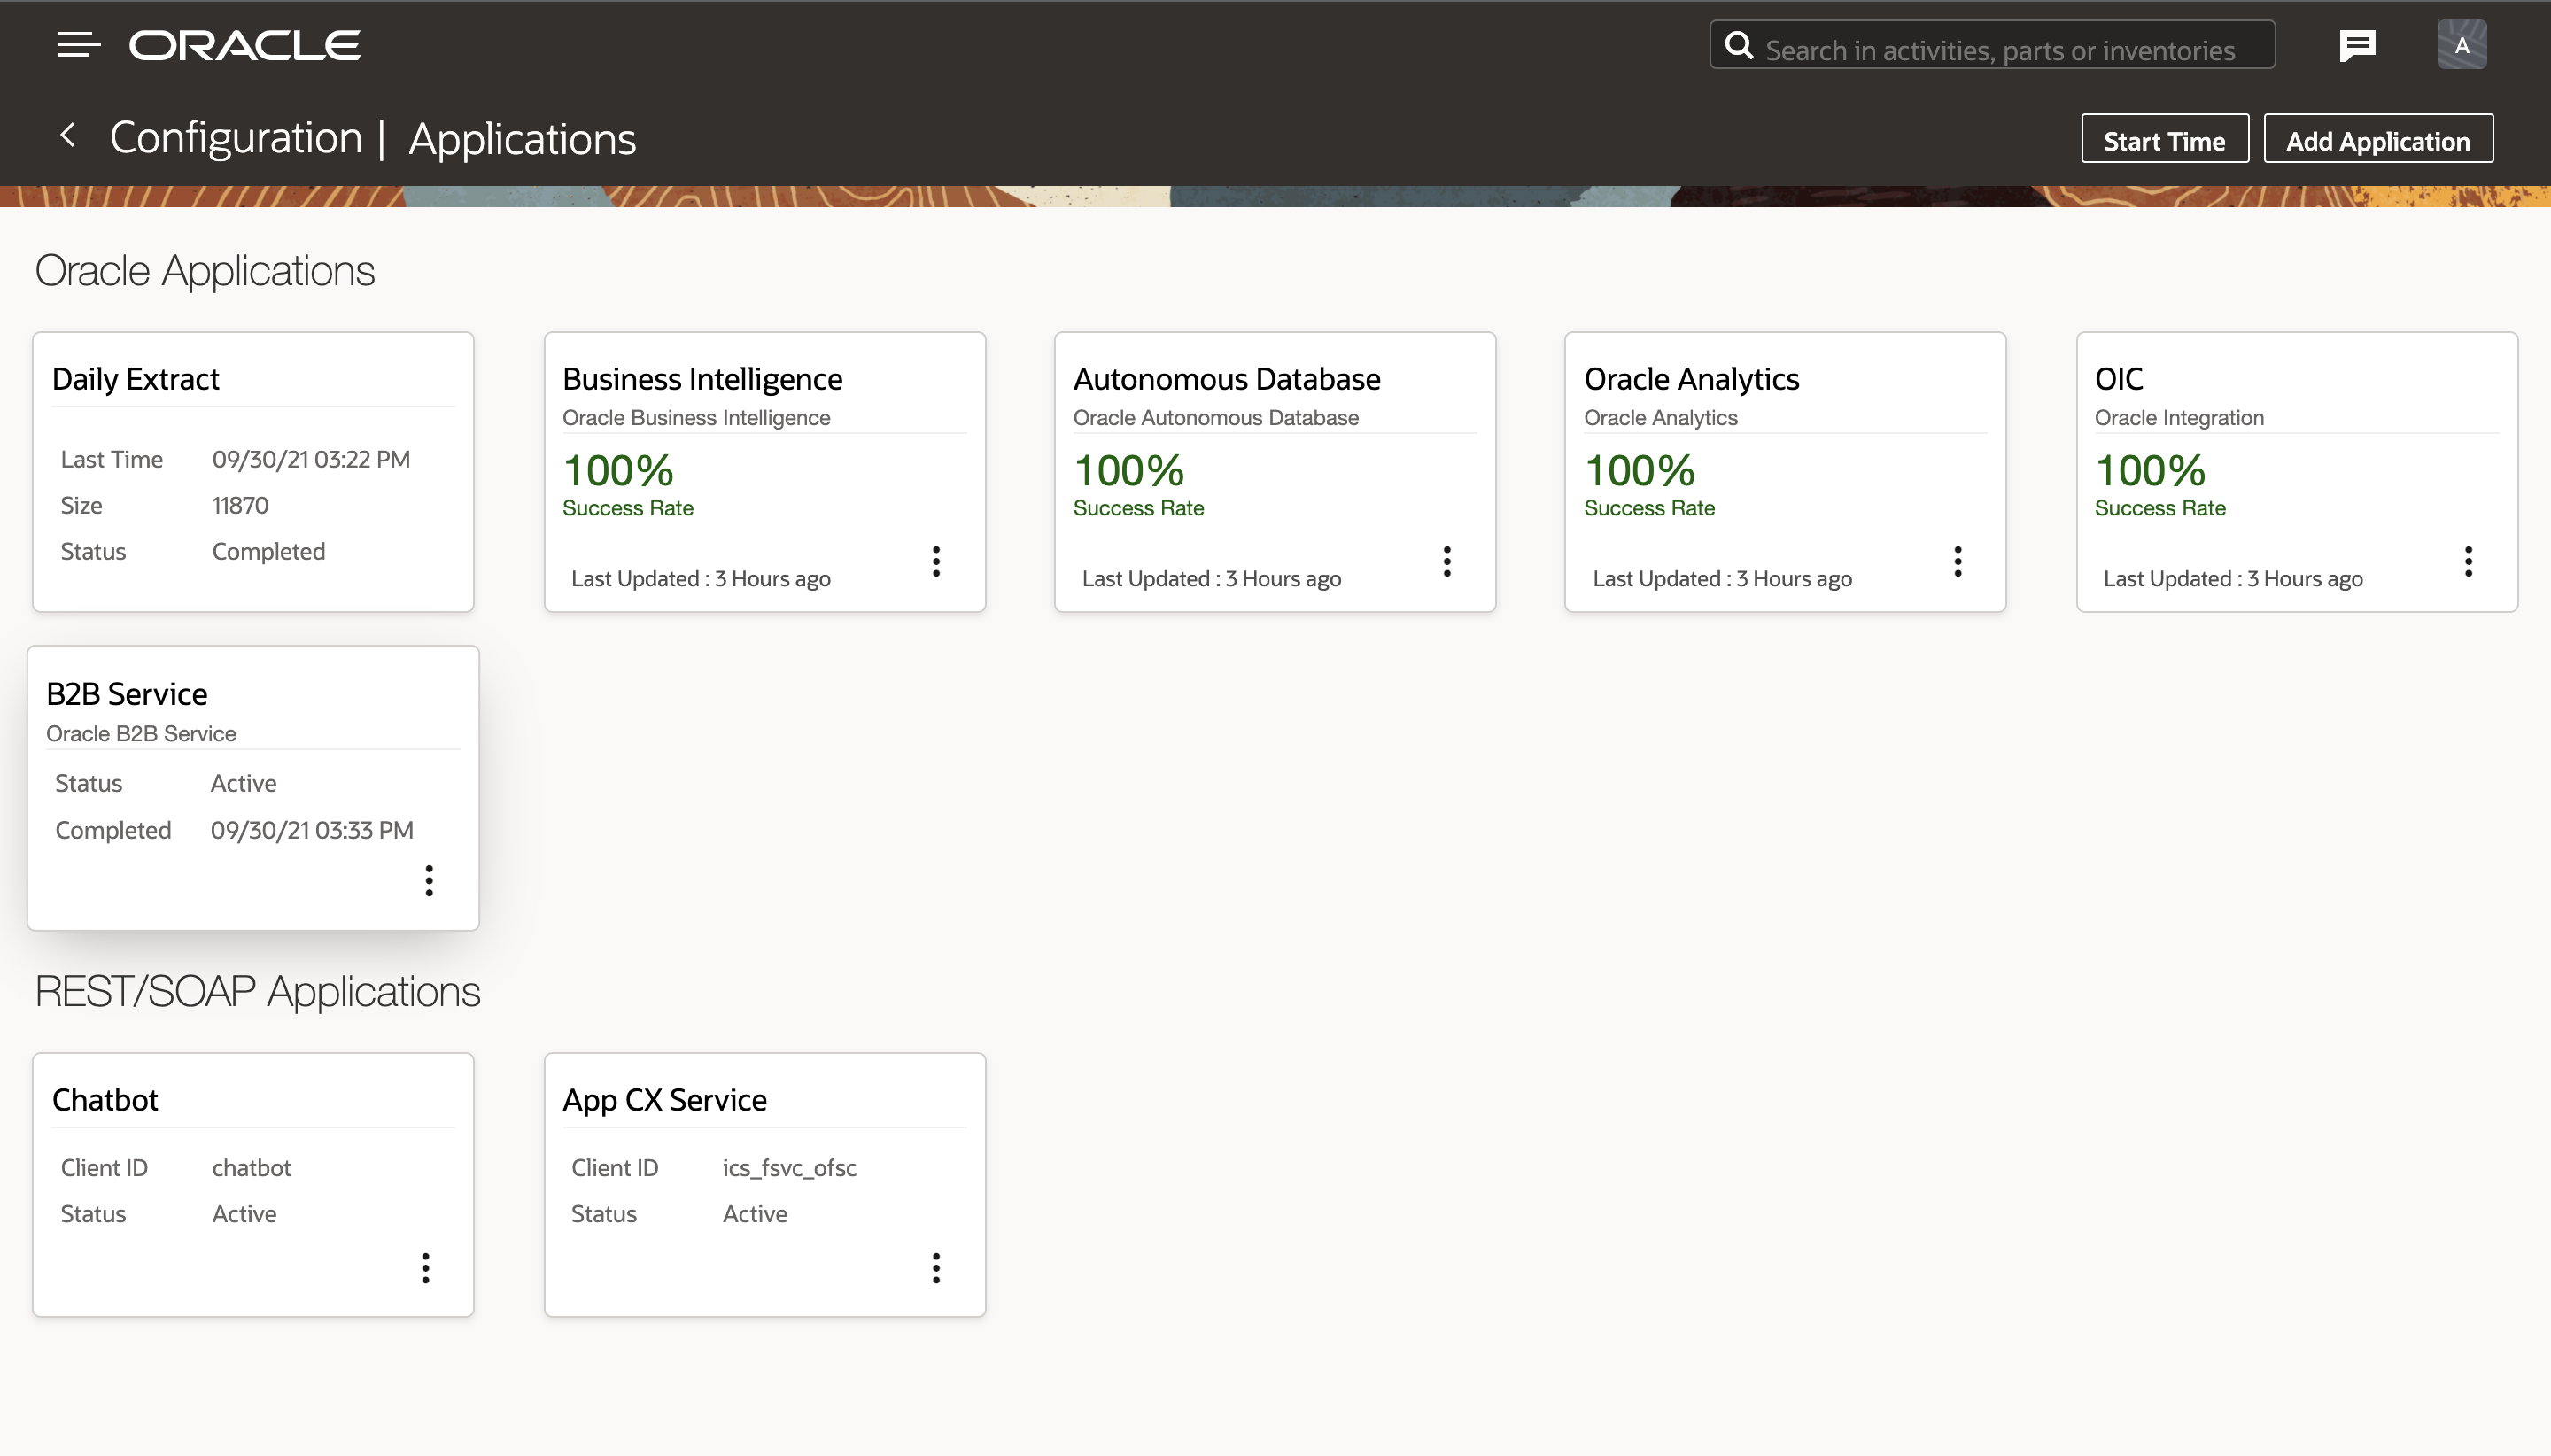
Applications Page
The Applications page shows two sections
- Oracle Applications
Applications of type Oracle Analytics, Oracle Integration, Oracle Autonomous Database, Oracle Business Intelligence and Daily Extract will be available under this section.
- REST / SOAP Applications
Applications that are configured to use Oracle Field Service REST APIs will be available under this section.
- Click the three dots icon to display a set of menu options.
You can edit a configured application setup, delete any unwanted application, or retry in case of CX service if you want to reconnect the CX-service once again.
This feature provides an enhanced Applications page to provide better user experience.
Steps to Enable
You don't need to do anything to enable this feature.
Key Resources
Enable Oracle CX Service From Oracle Field Service Applications Page
This feature enhances the user experience for Oracle Field Service customers who use the 'Oracle B2B Service to Oracle Field Service Integration I Oracle Integration Cloud Recipe' for real-time data updates between Oracle B2B Service and Oracle Field Service.
Starting with Update 21D, you can enable this recipe in Oracle Field Service by configuring a new Application Type namely 'Oracle B2B Service' from within the Oracle Field Service Applications page.
What's New:
- Unify the configuration of the Applications and Outbound Integration Channels pages.
- New look and feel for the Applications page (old Outbound Channel Configuration).
- Ability to configure Oracle B2B Service from Oracle Field Service.
This feature enhances the user experience for configuring the Oracle B2B Service with the help of a new user interface.
Steps to Enable
Steps to enable the integration flow from Oracle Field Service
- Configure the Oracle Integration Cloud (OIC) application from within the Applications screen. This will be used as the integration channel between Oracle B2B Service and Oracle Field Service.
- Configure a new application of type 'Oracle CX Service'.
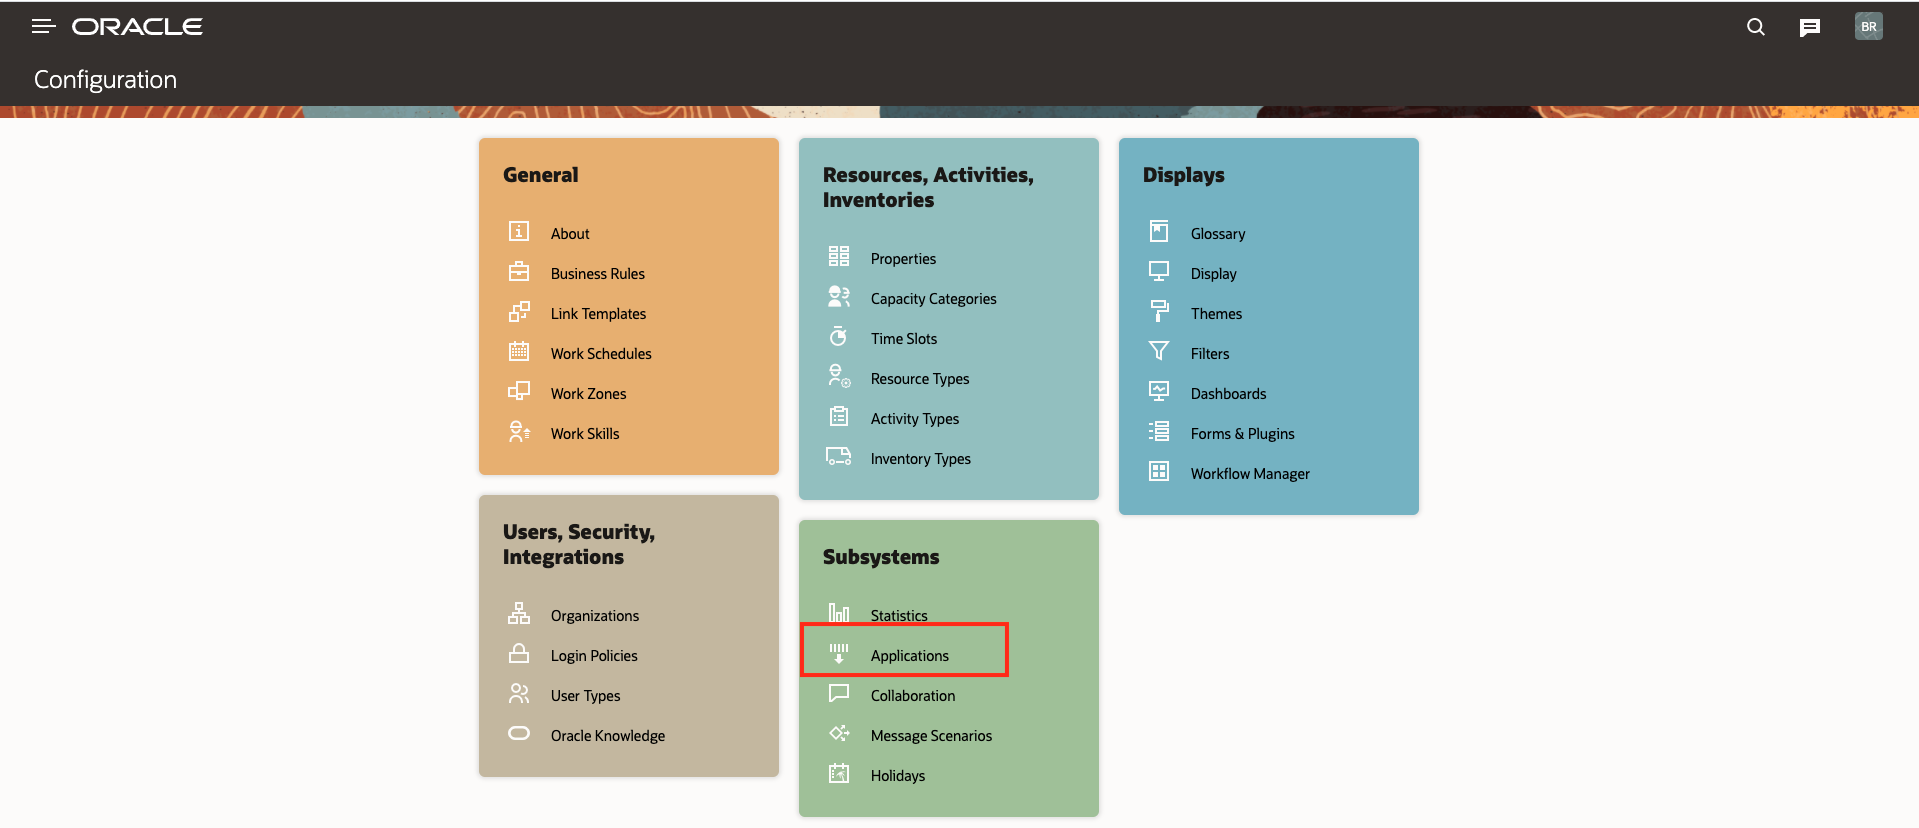
- Select Applications from the Configuration screen.
This image shows the Configuration screen.

Configuration Screen
2. In the Applications screen, click Add Application on the header.
This image shows the Applications screen.

Applications Screen
3. Select 'Oracle B2B Service' as the Application Type.
This image shows the Application Type drop-down list in the Add Application dialog box.
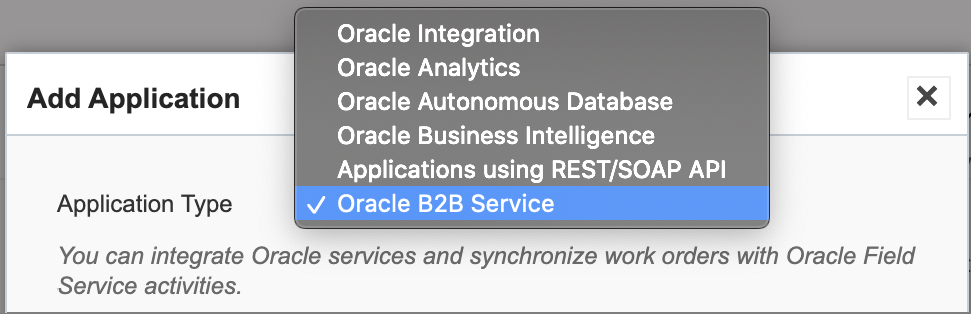
Application Type Drop-Down List
4. Configure the end point details of Oracle B2B Service.
This image shows the Add Application dialog box.
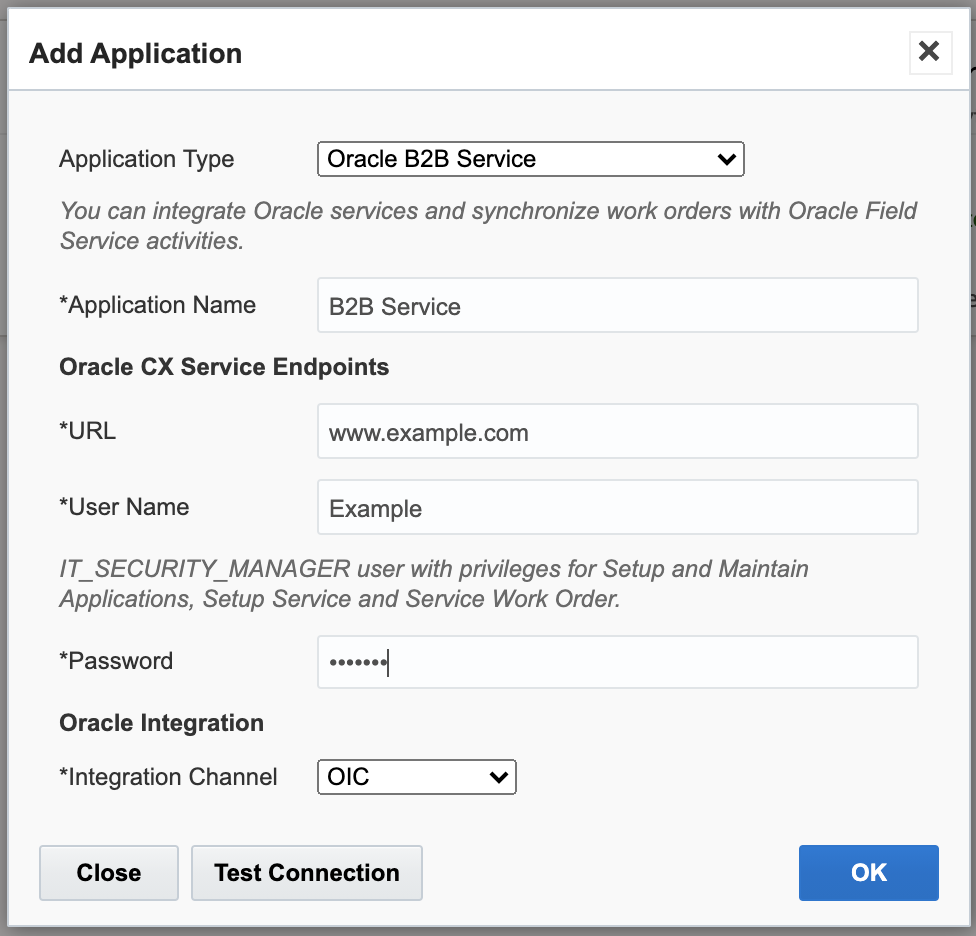
Add Application Dialog Box
This table lists the end point details to be provided in the Add Application dialog box.
| Field |
Description |
|---|---|
| Application Name | Name of the application to be displayed on the Applications screen. |
| URL | Oracle B2B Service application URL . Note: This field supports URL of the format 'https://<host>' only. |
| User Name | Oracle B2B Service user with 'IT Security Manager' job role. With privileges for:
|
| Password | Password for this user. |
- Select the previously-configured OIC Integration Channel.
- You can check the connectivity using the test connection button and make sure the end points configured are valid. In case of an invalid host, the message 'Host unreachable'. Please check credentials' is displayed.
Once the end point details are entered and validated, a new application will be created on the Applications screen with the name provided.
VALIDATIONS AND WARNINGS
This table lists the validations and warnings:
| Warnings |
Description |
|---|---|
| Host unreachable. Please check credentials |
"Endpoints for configuring CX Service is not reachable." |
| The service is temporarily unavailable. Please try again later |
"CX Service is temporarily down." |
| Configuration is in progress. |
"CX Service configuration is in progress" |
| Unable to configure the service. Please retry |
"CX Service configuration failed. You can retry the configuration by clicking the option menu or by clicking the retry button inside the application details page." |
| Configured successfully |
"CX Service configuration completed" |
Now the system will perform the below setups automatically to enable the integration flow between Oracle B2B Service and Oracle Field Service.
- Set up configurations on the Oracle Field Service side
- Create a new OFS REST API application that will be used by Oracle B2B Service OIC to use OFS REST APIs.
- In order to run the OIC recipe, a set of resource, activity and inventory properties have to be configured in OFS. The Application will automatically create these administrator-defined properties in Oracle Field Service.
- The details of the predefined properties are available at docs.oracle.com/en/cloud/saas/b2b-service/21c/faefs/oracle-field-service-configuration.html#FAEFS2421200.
- Set up Oracle B2B Service configurations
- Expose the work order setup, details are available at docs.oracle.com/en/cloud/saas/b2b-service/21c/faefs/oracle-b2b-service-configuration.html#FAEFS2415183.
- Set up an Oracle Integration Cloud user and access privileges that is used in Oracle B2B Service to connect with Oracle Field Service. The details about the user account and access privileges are mentioned docs.oracle.com/en/cloud/saas/b2b-service/21b/faefs/oracle-b2b-service-configuration.html#FAEFS2415285.
- Set up Oracle Integration Cloud
- Set up OIC recipe in OIC
- Configure connection to Oracle B2B Service
- Configure connection to Oracle Field Service
- Activate the integration test flow.
You can view the progress of these steps from the Applications details screen.
NOTE: In case any of these steps fail, a corresponding step will be displayed with 'Failed' status. You can retry these steps by clicking the Retry option from the Applications detail screen .
After successfully completing the configuration setup steps, the status will be shown as 'Completed'.
On completion of these setup steps, the integration flow will become activated. Now you can:
- Create a work order record in Oracle B2B Service. An activity will be automatically created in Oracle Field Service.
- Move the activity in Oracle Field Service to a different date and time slot. It will automatically synchronize the scheduled time of the corresponding work order in Oracle B2B Service.
- Reschedule the work order in Oracle B2B Service to a different date and time slot. It will automatically synchronize the scheduled time of the corresponding activity in Oracle Field Service.
- Cancel the work order in Oracle B2B Service. It will automatically cancel the corresponding activity in Oracle Field Service.
Key Resources
New User Interface for Oracle applications and Other Third Party Applications in Oracle Field Service
Currently Oracle applications such as Oracle Analytics, Oracle Business Intelligence, Oracle Autonomous Database Service and Oracle Integration, and field service daily extracts are configured within the Outbound Integration Channels page. You can also create other third party applications using the Applications page that allow Oracle Field Service REST / SOAP APIs to synchronize data between Oracle Field Service and other applications. Starting update 21D, both configuration pages (Outbound Integration Channels and Applications) are unified so that you can use a single page to set up and monitor Oracle applications and other third party applications.
The key changes include:
- The Outbound Integration Channels and Applications pages have been merged into a single page (as Applications) that is available under Subsystems.
- The configuration previously named as Application under the heading Users, Security Integrations will not be available in 21D.
- The configuration menu labeled Outbound Integration Channels is changed to Applications.
Changes between the 21C and 21D versions of this configuration page include:
- Headers
In the new application page, the label of the header (previously Configuration I Outbound Integration Channels) is now Configuration I Applications and the Add Channel button is now Add Application.
- 21C: This image displays the header in 21C:

Header in Update 21C
- 21D: This image displays the header in 21D:
Header in Update 21D
- Add Application button:
The Add Channel dialog box is now Add Application. In the dialog box, the label (previously Add Channel) is now Add Application and the Channel Type dropdown list is now Application Type.
- 21C: This image displays the Add Application dialog box in Update 21C:
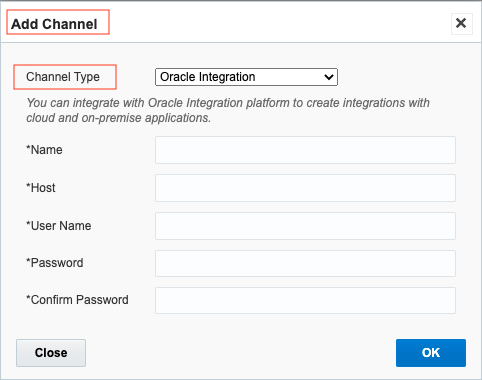
Add Channel Dialog Box in Update 21C
- 21D: This image displays the Add Application dialog box in Update 21D:
Add Application Dialog Box in Update 21D
- Context layout
In the Configuration, User Types, Configuration page, the Configuration context layout is now Applications This context layout configuration page will have the button context for Application. Note the button context for Outbound Integration Channels has been removed.
- 21C: This image displays the context layout for Configuration in Update 21C:
Context Layout for Configuration in Update 21C
- 21D: This image displays the context layout for Applications in Update 21D:
Context Layout for Applications in Update 21D
- Add New Third Party Applications
New section for third party applications and an option to allow third party applications to call OFS REST / SOAP APIs from the Applications page.
- 21C: This image displays the previous Outbound Integration Channels page in Update 21C:

Outbound Integration Channels page in Update 21C
-
21D: This image displays the new Applications page in Update 21D:
Applications Page in Update 21D
NEW THIRD PARTY APPLICATIONS PAGE
You can add a new third party application to call OFS REST / SOAP APIs from the Applications page:
Follow these steps
- In the Applications page, click Add Application.
- Select the Application type as Applications using REST / SOAP API and provide the Application Name and Application ID.
- If you click the Applications page, a new tile with the Application name is created.
- If you click the Application tile, the details page opens. You can configure the API access settings and authentication settings, and then save the setup.
Points to note:
- All the existing applications configured under the previous Applications page (Application configurations under Users, Security Integrations) will be available in the new Applications page under Subsystems by default.
- Those who have permission to access Outbound Integration Channels will get access to the new Applications page by default.
- Make sure that you provide access permissions to those users who had access to the previous Applications page but did not have access to the Outbound Integrations Channels page in Update 21C so that they can get access to the new Applications page through their User Type configuration.
This feature lets you to use a single page to set up and monitor Oracle applications and other third party applications.
Steps to Enable
You don't need to do anything to enable this feature.
Key Resources
Create an Activity with Inventory Using the Plug-In API
Starting with Update 21D, integrators can update activities using the new 'update' and 'updateResults' methods that significantly simplify plug-in implementations. You will be able to apply multiple updates and receive the most recent information about activity and inventory without leaving the plug-in's screen. This provides the abilities to create an activity with inventory within one request, update activity and inventories without closing a plug-in, update the status for one or several activities. Also, integrators can work with the features that are configured for activity types, and with this version they can now define if the activity type supports segments or not. For example they could limit activity types for the plug-in that creates follow-up activities. In addition, working with the segments in the plug-in, integrators can now see the main multi-day activity (called "masterActivityId" in all APIs).
WHAT'S NEW?
- New methods "update" and "updateResult".
- New attribute 'features' of activity type is available. So now it's possible to know if the activity type has the "Enable segmenting and extended duration" feature enabled or not.
- New field "masterActivityId" for segmentable activity in Activity in the ActivityList collection.
Scenarios that can be accomplished using these new features
The plug-in API now supports updating Oracle Field Service entities (activity, inventory, queue) without closing the plug-in screen, so the complex business flow doesn't over-complicate the plug-in, making its development and debugging much easier and straightforward. For example:
- Activate/Deactivate route
- Create an activity with inventory
- Change status for the existed activity and deinstall inventory
- Multiple statuses change for one or many activities
- Get actual information about an activity, inventory without updating
OVERVIEW
This feature makes it possible for plug-ins to apply multiple updates and receive the most recent information about Oracle Field Service entities without leaving the plug-in's screen. It's much easier now to develop plug-ins with a complex business flow, especially for customers whose business requires users to use plug-ins most of the working day.
The second improvement provides plug-in developers with a straightforward and robust way to create/ install or deinstall inventories for activities that are also created via plug-in API. plug-in API now allows referencing activities by a temporary id that is generated on the client-side even after synchronization with the server and obtaining permanent AID. A plug-in may generate a temporary id for activities it creates on its own to ease further actions related to these activities.
Additionally, with this feature, a new field is sent for each segment of a segmentable activity in the "Activity" and "ActivityList" collection - masterActivityId, which contains the ID of the main activity that this segment belongs to. To make this field useful, each activity type item in the attributeDescription collection now has the information about whether the "Enable segmenting and extended duration" option is enabled for the type.
NOTE: As the new methods "update" and "updateResult" are almost identical to their counterparts "close" and "open", plug-in may be switched to the new approach with minimal effort.
APPLY UPDATES WITHOUT CLOSING A PLUG-IN
The plug-in API now supports updating Oracle Field Service entities (activity, inventory, queue) without calling the "close" method so the complex business flow doesn't require over-complicating the plug-in, making its development and debugging much easier and straightforward. This also improves the user experience as the user won't have to wait until the plug-in finishes the self-redirection sequence. Also, plug-ins now can retrieve current entities data without reopening a plug-in, so it can operate with the most recent information and can check whether the updates were applied correctly.
Two new methods are supported by plug-in API:
- "update" - is sent by the plug-in to the Core Application. The message format is the same as for the "close" method. All entity updates and actions are applied the same as for the "close" message, but the plug-in's screen remains opened and it can send text messages.
- "updateResult" - is sent by the plug-in API to the Core Application in response to the "update" message. The message format is the same as for the "open" method, but with the message most recent entity's data (including updates applied by last "update" message).
UPDATE METHOD
The main purpose of the "update" method is to allow plug-ins to apply updates for Oracle Field Service entities without leaving the plug-in's screen.
Oracle Field Service validates the format of the "update" message and processes it in the same way as the "close" message. The only differences between the "update" and "close" methods are:
- "update" messages may be sent by a plug-in multiple times before closing (but it's not allowed to send the next "update" message until the previous "update" is applied and the "updateResult" message is sent to plug-in).
- plug-in screen is not closed after applying the "update" message and its iframe is not destroyed.
- These message fields are ignored: wakeupNeeded, backScreen, backActivityId, backInventoryId, backplug-inLabel, backplug-inButtonId, backplug-inOpenParams, and iconData.
- Upon successful processing of the "update" message, Oracle Field Service sends a message with the "updateResult" method.
If validation or processing of the "update" message fails, the plug-in API sends the "error" message of same format (with the same "type" and "code" values) and as for the "close" message.
If the user needs to stay at the plug-in's screen after applying updates, it is highly recommended to use the "update" method instead of "close". This will improve the user experience and reduce the consumption of the device's resources (RAM and CPU), as the plug-in's screen won't be recreated and the plug-in itself won't have to process open data again.
{
"apiVersion": 1,
"method": "update",
"activity": {
"caddress": "Cleveland",
"aid": "4224031"
}
}
"updateResult" method
Oracle Field Service sends the "updateResult" message in response to the "update" message. It contains the latest available entity data, including changes applied by the last "update" message. The "updateResult" message has the same format and contents as an "open" message. This allows the plug-in to work with actual data with no need to close and reopen the plug-in screen.
If the plug-in needs to get latest entities' data without changing anything, it may just send the "update" message with no entity collections.
Note that the changes applied on the server by other users or through REST API are not delivered instantly to the user's device, and contents of the "updateResult" message reflects the current state of Oracle Field Service entities on the particular device (in particular a session of a browser or the Oracle Field Service installed app).
{
"apiVersion": 1,
"method": "updateResult",
"activityList": {
"4224031": {
"WO_COMMENTS": null,
"cname": null,
"caddress": "Cleveland",
"ccity": null,
"aworktype": "4",
"astatus": "pending",
"aid": "4224031",
"atype": "regular"
}
},
"inventoryList": {
"21064417": {
"invsn": "PTI1234789",
"invpool": "provider",
"invid": "21064417",
"inv_aid": null,
"inv_pid": 3000001
}
},
"queue": {
"date": "2021-08-17",
"status": "notActivated",
"isActual": true
},
"resource": {
"pid": 3000001,
"external_id": "33001",
"currentTime": "2021-08-17 20:48:26",
"deviceUTCDiffSeconds": 0,
"timeZoneDiffSeconds": -14400
},
"team": {
"teamMembers": {},
"assistingTo": {},
"assistingMe": []
},
"user": {
"allow_desktop_notifications": 1,
"allow_vibration": 1,
"design_theme": 11,
"format": {
"date": "m/d/y",
"long_date": "l, F jS, Y",
"time": "h:i A",
"datetime": "m/d/y h:i A"
},
"providers": [
2
],
"sound_theme": 2,
"su_zid": 2,
"uid": 2315,
"ulanguage": 1,
"ulogin": "admin",
"uname": "Admin",
"week_start": 0
},
"buttonId": "20348",
"openParams": {}
}
Example of empty "update" message for data refresh
{
"apiVersion": 1,
"method": "update"
}
WORKING WITH INVENTORY FOR NEWLY CREATED ACTIVITIES
Each time a new instance of an Oracle Field Service entity (Activity or Inventory) is created on a user's device, either via plug-in API or a standard Oracle Field Service screen (such as "Add activity" or one of the Inventory screens), a temporary ID is generated. It's used as a value of Activity ID (aid) and Inventory ID (invid) fields until data is synchronized with the server, so the user and plug-ins may operate with newly created entities even offline. After synchronization, a temporary ID is replaced with an actual aid/invid generated by the server.
To allow the plug-in to perform any operation on activities created on the client-side (using the "create" action of the plug-in API or the standard "Add activity" screen) both in offline or online modes, the following changes are introduced:
- The value of the client-generated temporary id is stored in the "temporary_aid" field of the activity, which persists even after data is synced with server and permanent aid (generated by a server) is obtained.
- Temporary aid may be used as a legit value of "inv_aid" param for all inventory actions, "inv_aid" field for "inventoryList" and "inventory" collection updates, "aid" field for "activityList" and "activity" collection updates even after synchronization with server.
- The plug-in may generate a temporary id for activities on its own and send it in the "temporaryAid" param of the "create" activity action. plug-in may store this value and use it to reference the created activity in later actions without even knowing the actual aid.
- It's allowed to use the value of the generated temporaryAid as a value of inv_aid param for inventory actions even in the same "close" or "update" message as the "create" activity action itself.
{
"apiVersion": 1,
"method": "update",
"actions": [
{
"entity": "activity",
"action": "create",
"temporaryAid": "16297673252100-2175p",
"activityType": "4",
"scheduled": true,
"date": "2021-08-23"
},
{
"entity": "inventory",
"action": "create",
"inv_aid": "16297673252100-2175p",
"invtype": "NT",
"invpool": "customer",
"properties": {
"invsn": "KCD1403WH"
}
}
]
}
ACTIVITY TYPE FEATURES IN init MESSAGE
The "attributeDescription" field of "init" message now contains "features" object inside enum items of the "aworktype" (activity type) property. If the "Enable segmenting and extended duration" option is enabled for the activity type, the "features" object contains "isSegmentingEnabled" with value equal to true.
{
"apiVersion": 1,
"method": "init",
"attributeDescription": {
"WO_COMMENTS": {
"fieldType": "property",
"entity": "ENTITY_ACTIVITY",
"gui": "text",
"label": "WO_COMMENTS",
"title": "WO Comments",
"type": "string",
"access": "READ_WRITE",
"lines": 4
},
"aworktype": {
"fieldType": "field",
"entity": "ENTITY_ACTIVITY",
"gui": "grouped-combobox",
"label": "aworktype",
"title": "Activity type",
"type": "enum",
"access": "READ_WRITE",
"enum": {
"5": {
"label": "5",
"text": "Inv Pick up",
"features": {}
},
"VH": {
"label": "VH",
"text": "Vehicle Maintenance",
"features": {}
},
"Multiday": {
"label": "Multiday",
"text": "Multi-day activities",
"features": {
"isSegmentingEnabled": true
}
},
},
"groups": [
{
"label": "internal",
"text": "Internal",
"items": [
"VH"
]
},
{
"label": "customer",
"text": "Customer",
"items": [
"5",
"Multiday"
]
}
]
}
},
"buttons": [
{
"buttonId": "20348",
"params": {}
}
]
}
NEW ACTIVITY FIELD masterActivityId
Each segment of a segmentable activity has a new field called "masterActivityId". It's and id of the main activity which the segment belongs to. This field may be usable in a scenario when a plugin needs to deinstall inventory from a segmentable activity because customer pool inventory is assigned to the main segmentable activity (through "inv_aid" field) which is absent in the activity list. Using the new "masterActivityId" activity field, the plug-in can filter inventories from the "inventoryList" which belong to the main segmentable activity.
Example of an "open" message which contains segments of a segmentable activity and customer pool inventory
{
"apiVersion": 1,
"method": "open",
"entity": "activityList",
"user": {
"allow_desktop_notifications": 1,
"allow_vibration": 1,
"design_theme": 11,
"format": {
"date": "m/d/y",
"long_date": "l, F jS, Y",
"time": "h:i A",
"datetime": "m/d/y h:i A"
},
"providers": [
2
],
"sound_theme": 2,
"su_zid": 15,
"uid": 2315,
"ulanguage": 1,
"ulogin": "admin",
"uname": "Admin",
"week_start": 0
},
"resource": {
"pid": 3000037,
"currentTime": "2021-08-30 05:21:23",
"deviceUTCDiffSeconds": 0,
"timeZoneDiffSeconds": -14400
},
"team": {
"teamMembers": {},
"assistingTo": {},
"assistingMe": []
},
"queue": {
"date": "2021-08-30",
"status": "notActivated",
"isActual": true
},
"activityList": {
"4227119": {
"acoord_status": null,
"acoord_x": null,
"acoord_y": null,
"aworktype": "LU",
"appt_number": null,
"astatus": "pending",
"aid": "4227119"
},
"4227120": {
"acoord_status": null,
"acoord_x": null,
"acoord_y": null,
"aworktype": "4",
"appt_number": null,
"astatus": "pending",
"aid": "4227120"
},
"4227122": {
"acoord_status": null,
"acoord_x": null,
"acoord_y": null,
"aworktype": "Multiday",
"appt_number": null,
"astatus": "pending",
"aid": "4227122",
"masterActivityId": 4227121
},
"4227123": {
"acoord_status": null,
"acoord_x": null,
"acoord_y": null,
"aworktype": "Multiday",
"appt_number": null,
"astatus": "pending",
"aid": "4227123",
"masterActivityId": 4227121
},
"4227133": {
"acoord_status": null,
"acoord_x": null,
"acoord_y": null,
"aworktype": "Multiday",
"appt_number": null,
"astatus": "pending",
"aid": "4227133",
"masterActivityId": 4227132
}
},
"inventoryList": {
"21258560": {
"invpool": "customer",
"invid": "21258560",
"inv_aid": 4227121,
"inv_pid": null,
"invsn": null,
"invtype": "EC",
"quantity": 42
},
"21258561": {
"invpool": "customer",
"invid": "21258561",
"inv_aid": 4227132,
"inv_pid": null,
"invsn": null,
"invtype": "HD12",
"quantity": 100
}
},
"buttonId": "20360",
"openParams": {}
}
New error codes
This table gives the new error codes available in the plug-in API.
New error codes introduced in this update
| Type |
Code |
When occurs |
|---|---|---|
| TYPE_ACTION_PARAM |
CODE_ACTION_PARAM_NOT_UNIQUE |
Value of "temporary_aid" param of "create" activity action duplicates the value of "temporary_aid" field of another activity in the route |
| TYPE_ACTION_ERROR |
CODE_ACTION_NUMBER_LIMIT_EXCEEDED |
Number of items in "actions" field of "close" or "update" message is larger than 10000 |
"Add activity" screen
For each activity created using the "Add activity" screen, the value of the client-side generated temporary id is stored in the "temporary_aid" field. It's saved into the application's device storage and on the server side, so it's also available for other users.
Here is an example of complex scenario that can be executed by plugin without closing even once.
This table displays the scenario that can be executed without closing the plug-in.
| Message sent by Oracle Field Service to Plug-in (Oracle Field Service Plugin) |
Message sent by Plug-in (Oracle Field Service Plugin) to Oracle Field Service |
|---|---|
| 1. Open plug-in | |
| { "apiVersion": 1, "method": "open", "entity": "activityList", "user": { ... }, "resource": { ... }, "team": { ... }, "queue": { "date": "2021-08-23", "status": "notActivated", "isActual": true }, "activityList": { "4225434": { "appt_number": "Activity_1", "X_READINGS": null, "cname": "Daniel G Diaz", "caddress": "4327 Glenwood Avenue", "ccity": "Cleveland", "aworktype": "MR", "astatus": "pending", "aid": "4225434" } }, "inventoryList": { "20991207": { "invsn": "5CEBME4AW055698", "invpool": "provider", "invid": "20991207", "inv_aid": null, "inv_pid": 3000015 } }, "buttonId": "20358", "openParams": {} } |
|
| 2. Activate queue and start Activity 1 | |
| { "apiVersion": 1, "method": "update", "backScreen": "default", "wakeupNeeded": false, "actions": [ { "entity": "queue", "action": "activate_queue", "action_time": "2021-08-23 20:02:05" } ] } |
|
| { "apiVersion": 1, "method": "updateResult", "entity": "activityList", "user": { ... }, "resource": { ... }, "team": { ... }, "queue": { "date": "2021-08-23", "status": "activated", "isActual": true, "activationTime": "2021-08-23 20:02:05" }, "activityList": { ... } }, "inventoryList": { ... } }, "buttonId": "20358", "openParams": {} } |
|
| { "apiVersion": 1, "method": "update", "activityList": { "4225434": { "X_READINGS": "10348.97:57ZHVBNLFF00000:-0027.9:YZ|0|B|@|9", "astatus": "started" } } } |
|
| { "apiVersion": 1, "method": "updateResult", "entity": "activityList", "user": { ... }, "resource": { ... }, "team": { ... }, "queue": { ... }, "activityList": { "4225434": { "appt_number": "Activity_1", "X_READINGS": "10348.97:57ZHVBNLFF00000:-0027.9:YZ|0|B|@|9", "cname": "Daniel G Diaz", "caddress": "4327 Glenwood Avenue", "ccity": "Cleveland", "aworktype": "MR", "astatus": "started", "aid": "4225434" } }, "inventoryList": { ... } }, "buttonId": "20358", "openParams": {} } |
|
| 3. Suspend Activity 1; Create Activity 2; Create an inventory for Activity 2 |
|
| { "apiVersion": 1, "method": "update", "activityList": { "4225434": { "astatus": "suspended" } }, "actions": [ { "entity": "activity", "action": "create", "temporaryAid": "16297673252100-2175p", "activityType": "4", "scheduled": true, "date": "2021-08-23", "positionInRoute": { "position": "first" }, "properties": { "appt_number": "Activity_2", } }, { "entity": "inventory", "action": "create", "inv_aid": "16297673252100-2175p", "invtype": "NT", "invpool": "customer", "properties": { "invsn": "KCD1403WH" } } ] } |
|
| { "apiVersion": 1, "method": "updateResult", "user": { ... }, "resource": { ... }, "team": { ... }, "queue": { ... }, "activityList": { "4225434": { "appt_number": "Activity_1", "X_READINGS": "10348.97:57ZHVBNLFF00000:-0027.9:YZ|0|B|@|9", "cname": "Daniel G Diaz", "caddress": "4327 Glenwood Avenue", "ccity": "Cleveland", "aworktype": "MR", "astatus": "pending", "aid": "4225434" }, "16297674693-1518": { "appt_number": "Activity_1", "X_READINGS": "10348.97:57ZHVBNLFF00000:-0027.9:YZ|0|B|@|9", "cname": "Daniel G Diaz", "caddress": "4327 Glenwood Avenue", "ccity": "Cleveland", "aworktype": "MR", "astatus": "suspended", "aid": "16297674693-1518" }, "16297673252100-2175p": { "appt_number": "Activity_2", "X_READINGS": null, "cname": "Cathy V France", "caddress": "3621 Vineyard Drive", "ccity": "Cleveland", "aworktype": "MR", "astatus": "pending", "aid": "16297673252100-2175p" "temporary_aid": "16297673252100-2175p" } }, "inventoryList": { "20991207": { "invsn": "5CEBME4AW055698", "invpool": "provider", "invid": "20991207", "inv_aid": null, "inv_pid": 3000015 }, "16298478632-5012": { "invsn": "KCD1403WH", "invpool": "customer", "invid": "16298478632-5012", "inv_aid": "16297673252100-2175p", "inv_pid": null } }, "buttonId": "20358", "openParams": {} } |
|
| 4. Get latest data | |
| { "apiVersion": 1, "method": "update" } |
|
| { "apiVersion": 1, "method": "updateResult", "user": { ... }, "resource": { ... }, "team": { ... }, "queue": { ... }, "activityList": { "4225434": { "appt_number": "Activity_1", "X_READINGS": "10348.97:57ZHVBNLFF00000:-0027.9:YZ|0|B|@|9", "cname": "Daniel G Diaz", "caddress": "4327 Glenwood Avenue", "ccity": "Cleveland", "aworktype": "MR", "astatus": "pending", "aid": "4225434" }, "4225435": { "appt_number": "Activity_2", "X_READINGS": null, "cname": "Cathy V France", "caddress": "3621 Vineyard Drive", "ccity": "Cleveland", "aworktype": "MR", "astatus": "pending", "aid": "4225435", "temporary_aid": "16297673252100-2175p" }, "4225436": { "appt_number": "Activity_1", "X_READINGS": "10348.97:57ZHVBNLFF00000:-0027.9:YZ|0|B|@|9", "cname": "Daniel G Diaz", "caddress": "4327 Glenwood Avenue", "ccity": "Cleveland", "aworktype": "MR", "astatus": "suspended", "aid": "4225436" } }, "inventoryList": { "20991207": { "invsn": "5CEBME4AW055698", "invpool": "provider", "invid": "20991207", "inv_aid": null, "inv_pid": 3000015 }, "21258547": { "invsn": "KCD1403WH", "invpool": "customer", "invid": "21258547", "inv_aid": 4225435, "inv_pid": null } }, "buttonId": "20358", "openParams": {} } |
|
| 5. Start Activity 2; Install and deinstall inventory |
|
| { "apiVersion": 1, "method": "update", "backScreen": "default", "wakeupNeeded": false, "activityList": { "16297673252100-2175p": { "astatus": "started" } }, "actions": [ { "entity": "inventory", "action": "install", "inv_aid": "16297673252100-2175p", "invid": "20991207", "properties": {} }, { "entity": "inventory", "action": "deinstall", "inv_pid": "3000015", "invid": "21258547", "properties": {} } ] } |
|
| { "apiVersion": 1, "method": "updateResult", "user": { ... }, "resource": { ... }, "team": { ... }, "queue": { ... }, "activityList": { "4225434": { "appt_number": "Activity_1", "X_READINGS": "10348.97:57ZHVBNLFF00000:-0027.9:YZ|0|B|@|9", "cname": "Daniel G Diaz", "caddress": "4327 Glenwood Avenue", "ccity": "Cleveland", "aworktype": "MR", "astatus": "pending", "aid": "4225434", }, "4225435": { "appt_number": "Activity_2", "X_READINGS": null, "cname": "Cathy V France", "caddress": "3621 Vineyard Drive", "ccity": "Cleveland", "aworktype": "MR", "astatus": "started", "aid": "4225435", "temporary_aid": "16297673252100-2175p" }, "4225436": { "appt_number": "Activity_1", "X_READINGS": "10348.97:57ZHVBNLFF00000:-0027.9:YZ|0|B|@|9", "cname": "Daniel G Diaz", "caddress": "4327 Glenwood Avenue", "ccity": "Cleveland", "aworktype": "MR", "astatus": "suspended", "aid": "4225436" } }, "inventoryList": { "20991207": { "invsn": "5CEBME4AW055698", "invpool": "install", "invid": "20991207", "inv_aid": 4225435, "inv_pid": 3000015 }, "21258547": { "invsn": "KCD1403WH", "invpool": "deinstall", "invid": "21258547", "inv_aid": "4225435", "inv_pid": 3000015 } }, "buttonId": "20358", "openParams": {} } |
|
| 6. End Activity 2; Start Activity 1 again |
|
| { "apiVersion": 1, "method": "close", "backScreen": "default", "wakeupNeeded": false, "activityList": { "16297673252100-2175p": { "astatus": "complete", "X_READINGS": "0:NA:-0573:ZZ|0|B|-|7", } } } |
|
| { "apiVersion": 1, "method": "updateResult", "user": { ... }, "resource": { ... }, "team": { ... }, "queue": { ... }, "activityList": { "4225434": { "appt_number": "Activity_1", "X_READINGS": "10348.97:57ZHVBNLFF00000:-0027.9:YZ|0|B|@|9", "cname": "Daniel G Diaz", "caddress": "4327 Glenwood Avenue", "ccity": "Cleveland", "aworktype": "MR", "astatus": "pending", "aid": "4225434", }, "4225435": { "appt_number": "Activity_2", "X_READINGS": "0:NA:-0573:ZZ|0|B|-|7", "cname": "Cathy V France", "caddress": "3621 Vineyard Drive", "ccity": "Cleveland", "aworktype": "MR", "astatus": "complete", "aid": "4225435", "temporary_aid": "16297673252100-2175p" }, "4225436": { "appt_number": "Activity_1", "X_READINGS": "10348.97:57ZHVBNLFF00000:-0027.9:YZ|0|B|@|9", "cname": "Daniel G Diaz", "caddress": "4327 Glenwood Avenue", "ccity": "Cleveland", "aworktype": "MR", "astatus": "suspended", "aid": "4225436" } }, "inventoryList": { ... }, "buttonId": "20358", "openParams": {} } |
|
| 7. Cancel Activity 1; Deactivate queue |
|
| { "apiVersion": 1, "method": "update", "activityList": { "4225434": { "astatus": "cancelled" } } } |
|
| { "apiVersion": 1, "method": "updateResult", "user": { ... }, "resource": { ... }, "team": { ... }, "queue": { ... }, "activityList": { "4225434": { "appt_number": "Activity_1", "X_READINGS": "10348.97:57ZHVBNLFF00000:-0027.9:YZ|0|B|@|9", "cname": "Daniel G Diaz", "caddress": "4327 Glenwood Avenue", "ccity": "Cleveland", "aworktype": "MR", "astatus": "cancelled", "aid": "4225434", }, "4225435": { "appt_number": "Activity_2", "X_READINGS": null, "cname": "Cathy V France", "caddress": "3621 Vineyard Drive", "ccity": "Cleveland", "aworktype": "MR", "astatus": "complete", "aid": "4225435", "temporary_aid": "16297673252100-2175p" }, "4225436": { "appt_number": "Activity_1", "X_READINGS": "10348.97:57ZHVBNLFF00000:-0027.9:YZ|0|B|@|9", "cname": "Daniel G Diaz", "caddress": "4327 Glenwood Avenue", "ccity": "Cleveland", "aworktype": "MR", "astatus": "suspended", "aid": "4225436" } }, "inventoryList": { ... }, "buttonId": "20358", "openParams": {} } |
|
| { "apiVersion": 1, "method": "update", "actions": [ { "entity": "queue", "action": "deactivate_queue", "action_time": "2021-08-24 21:08:53", "properties": {} } ] } |
|
This feature makes it possible for plugins to apply multiple updates and receive the most recent information about Oracle Field Service entities without leaving the plugin's screen. It is much easier now to develop plugins with a complex business flow, specially for those customers whose business requires users to use plugins most of the working day.
Steps to Enable
Review the REST service definition in the REST API guides, available from the Oracle Help Center > your apps service area of interest > REST API. If you're new to Oracle's REST services you may want to begin with the Quick Start section.
Key Resources
IMPORTANT Actions and Considerations
Removal of Deprecated Support for Events Without Subscription
The API function Get Events has a mandatory request parameter subscriptionId: string - the identifier of a previously created subscription. Only those events that match the subscription's filter are returned in the response.
WHAT HAS CHANGED?
The API function Get Events has a request parameter which is documented as below (since 20D) :
This parameter becomes mandatory for this function, starting with 21D, the documentation describes the parameter as follows :
GET Events API requests without the parameter specified will be provided with the standard response 400 Bad Request, "Mandatory parameter 'subscriptionId' is missing.
NOTE: If you do not use events without subscription, no actions are required.
Steps to Enable
You don't need to do anything to enable this feature.