
This document will continue to evolve as existing sections change and new information is added. All updates appear in the following table:
| Date | Product | Feature | Notes |
|---|---|---|---|
| 4 FEB 2022 | Core Application | Updated document. Revised feature information. |
|
| 4 FEB 2022 |
Core Application | Updated document. Revised feature information. | |
| 4 FEB 2022 |
Administration |
Updated document. Revised feature information. |
|
| 4 FEB 2022 |
Core Application |
Updated document. Revised feature information. |
|
| 4 FEB 2022 | Routing | Use Machine Learning to Suggest Optimal Value of Routing Plan Run Time |
Updated document. Revised feature information. |
| 28 JAN 2022 |
Updated document. Added feature information. |
||
| 28 JAN 2022 |
Reporting | Updated document. Revised feature information. |
|
| 28 JAN 2022 |
Integration | Updated document. Revised feature information. |
|
| 28 JAN 2022 |
Integration | Updated document. Revised feature information. |
|
| 28 JAN 2022 | Administration | Simplified SSO Log In Flow | Updated document. Revised feature information. |
| 21 JAN 2022 | Created initial document. |
This guide outlines the information you need to know about new and improved functionality in Oracle Field Service Update 22A. Each section includes a brief description of the feature, the steps you need to take to enable or begin using the feature, any tips or considerations that you should keep in mind, and the resources available to help you. For a listing of browsers supported by Oracle Field Service, log in to our support site and access Answer ID 8415.
Oracle Field Service Best Practices Guide: Please be sure to download our Oracle Field Service Best Practices Guide found on the Oracle Service Cloud Support Portal Answer ID 8215 (requires a login). This book contains many helpful hints and suggestions to help you improve and get the full benefit from your Oracle Field Service subscription.
 HAVE AN IDEA?
We’re here and we’re listening. If you have a suggestion on how to make our cloud services even better then go ahead and tell us. There are several ways to submit your ideas, for example, through the Ideas Lab on Oracle Customer Connect. Wherever you see this icon after the feature name it means we delivered one of your ideas.
GIVE US FEEDBACK
We welcome your comments and suggestions to improve the content. Please send us your feedback at oracle_fusion_applications_help_ww_grp@oracle.com.
DISCLAIMER
The information contained in this document may include statements about Oracle’s product development plans. Many factors can materially affect Oracle’s product development plans and the nature and timing of future product releases. Accordingly, this Information is provided to you solely for information only, is not a commitment to deliver any material, code, or functionality, and should not be relied upon in making purchasing decisions. The development, release, and timing of any features or functionality described remains at the sole discretion of Oracle.
This information may not be incorporated into any contractual agreement with Oracle or its subsidiaries or affiliates. Oracle specifically disclaims any liability with respect to this information. Refer to the Legal Notices and Terms of Use for further information.
Column Definitions:
Report = New or modified, Oracle-delivered, ready to run reports.
UI or Process-Based: Small Scale = These UI or process-based features are typically comprised of minor field, validation, or program changes. Therefore, the potential impact to users is minimal.
UI or Process-Based: Larger Scale* = These UI or process-based features have more complex designs. Therefore, the potential impact to users is higher.
Features Delivered Disabled = Action is needed BEFORE these features can be used by END USERS. These features are delivered disabled and you choose if and when to enable them. For example, a) new or expanded BI subject areas need to first be incorporated into reports, b) Integration is required to utilize new web services, or c) features must be assigned to user roles before they can be accessed.
| Ready for Use by End Users Reports plus Small Scale UI or Process-Based new features will have minimal user impact after an update. Therefore, customer acceptance testing should focus on the Larger Scale UI or Process-Based* new features. |
Customer Must Take Action before Use by End Users Not disruptive as action is required to make these features ready to use. As you selectively choose to leverage, you set your test and roll out timing. |
|||||
|---|---|---|---|---|---|---|
| Feature |
Report |
UI or |
UI or |
|
||
Perform 'What-if' Analysis by Applying Changes to Statistics Configuration on Demand |
||||||
Use Machine Learning to Suggest Optimal Value of Routing Plan Run Time |
||||||
Bulk-Transfer Forms and Plug-Ins
This improvement simplifies the transfer of forms and plug-ins between Oracle Field Service instances. It reduces the number of manual steps necessary to migrate forms or plug-ins from one instance to another and ensures that data remains consistent across different instances. For example, you can now create a new form or plug-in in a test instance, and then easily transfer it to the production instance, when ready.
Previously, you had to manually create a single form, then export its content from the source instance and import it into the target one, repeating these steps over and over again for each form. This feature introduces bulk export and import operations for forms, making it easier and faster to migrate your data between instances. With this change, you can select specific plug-ins for export as well, and then import just this set of plug-ins into a target instance. Previously, you had to export and import all of them and then manually remove any not-needed plug-ins within the target instance.
The screen designs are based on the Oracle Redwood theme, which makes them more intuitive, usable, and consistent with other features within Oracle Field Service and with Oracle Fusion apps.
This section discusses how to use this feature.
EXPORTING FORMS OR PLUG-INS
There is an Export button placed in the action bar of the Forms and Plugins screen. Click that button and the screen to export forms or plug-ins pops up.
Depending on whether you choose Export Forms or Export Plugins, the application displays a list of respective items presented in the instance. You could choose specific items from the list or select all of them. The filter helps you to narrow down the results and find the required forms or plug-ins that you would like to migrate to another instance.
One more useful element on this screen is the Selected identifier showing the selected items versus the total number of items in the list. This is extremely important, as a number of forms or plug-ins might be huge, so not all of them will be displayed upfront without requiring additional scrolling. This image shows the Export Forms or Plugins window:
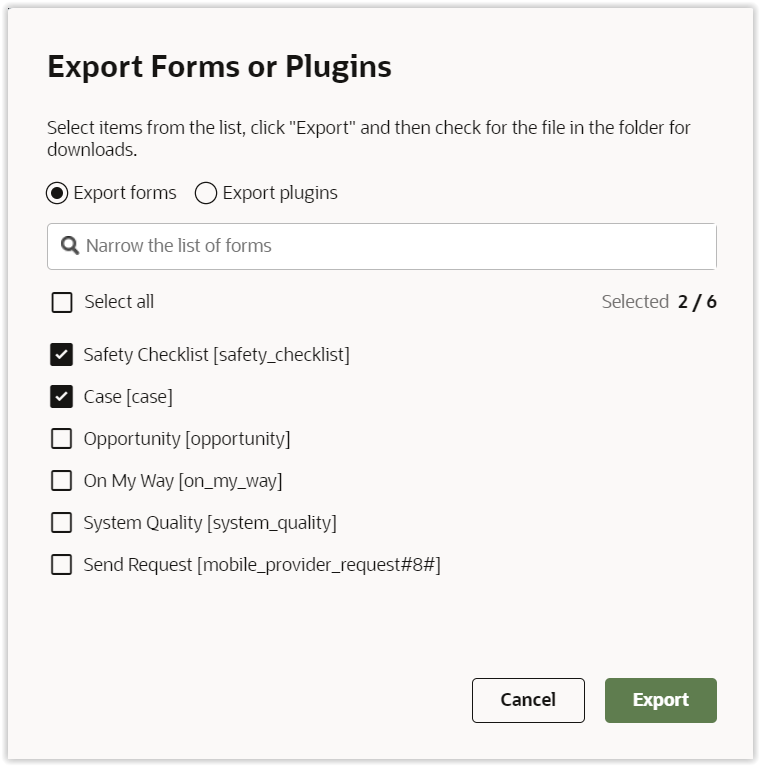
Export Forms or Plugins Window
As soon as you're comfortable with your choice, you should click Export and then check for the file in your download folder. When exporting forms, the application creates a .zip file archive, whereas an XML file format is preserved for plug-ins.
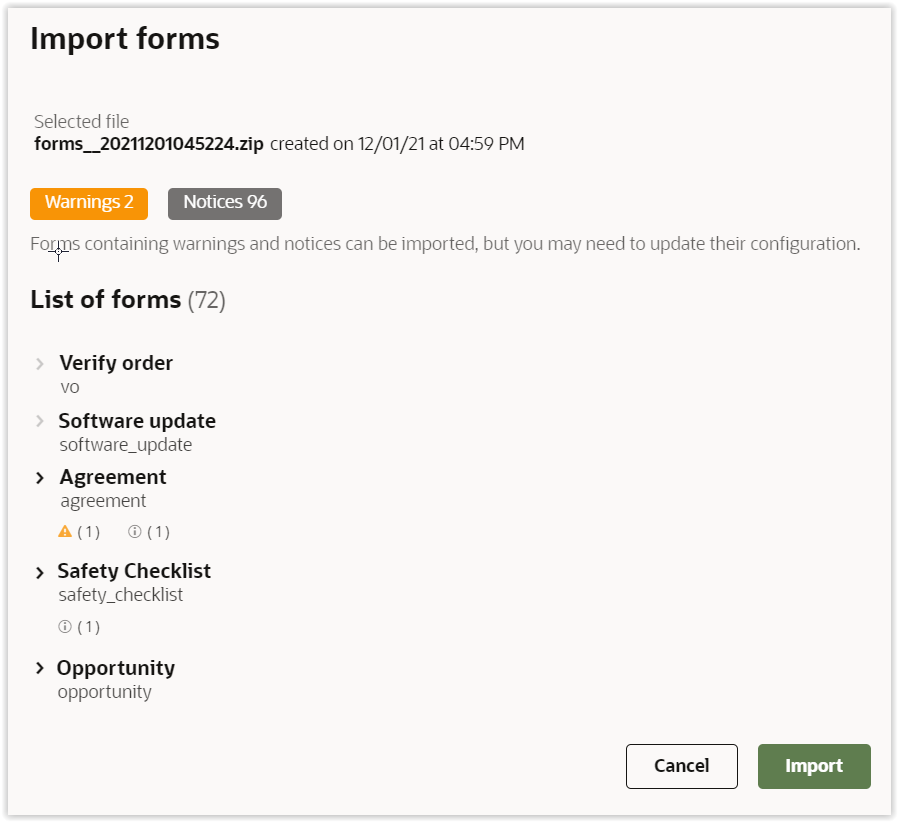
IMPORTING FORMS
To import forms, you should select Import and click the Forms menu item from the drop-down list. Then, the screen to start the import process appears. From there, you can attach the file or drag and drop it onto the screen. This image shows the Import forms window:

Import forms Window
The import process consists of three stages:
- File uploading
- File validation
- File import
FILE UPLOADING AND VALIDATION
Once you attach the file, the application automatically starts the uploading and validation phases. You're presented with more and more details while the application uploads and validates attached file.
The file name and the file's creation date appears first. Then, validation status badges indicating a number of errors, warnings, and notices are displayed. You're able to view a full list of forms from the archive, accompanied with details of any errors, warnings, or notices for each form, if any were found during the validation phase. This image shows the validation of forms that are being imported:
Import Forms Window Showing Validation Check of Imported Forms
At this stage, the file isn't imported yet. You should review the provided information and make the decision whether to finally import it or not. To find out more about each detected issue, you can click the arrow near the form where problems were found and the details of them are displayed.
IMPORTING FORMS
Once you've decided to proceed with the import, click Import and the application performs the operation and shows a Success message. This image shows the forms that are successfully imported:

Import Forms Window Showing a Successful Import
The algorithm of importing would be as follows:
- All new forms are created
- Content of existing forms are replaced
The application matches forms by labels to identify what forms are new and what forms existed in the instance earlier.
Now you can close the screen and view the results. All newly updated items are displayed at the top of the Forms and Plugins screen, and their fields reflecting the update date are highlighted. This allows you to differentiate those items that were updated from those that were not touched. This image shows the highlighted Updated field for the first four forms:
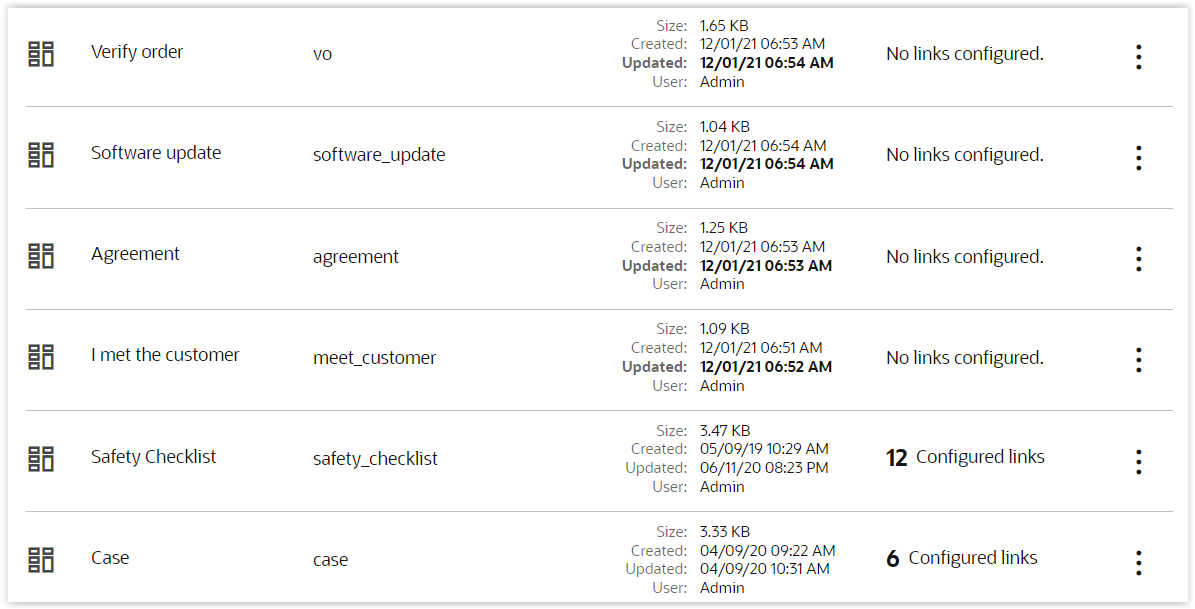
Forms and Plugins Screen Showing Updated Field
NOTE: It doesn't matter whether you import forms in bulk or import form content for a single form. Whatever option you choose, the forms are moved to the top of the list with the highlighted update date.
This image shows the Import Content option, which can be used to import content for a single form:
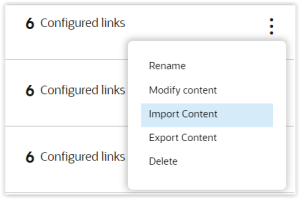
Drop-down Menu Showing Import Content
ERRORS, WARNINGS AND NOTICES
The process of file validation was introduced in previous releases, therefore it's not necessary to describe it again here. However, keep in mind two key points:
- Importing with errors is not possible; the application prevents this from happening
- Importing with warnings and notices is possible but with some flaws, though it might require some configuration attention afterwards
What is worth mentioning are some new error and warning messages introduced with this feature.
ERRORS INTERRUPTING CONTINUOUS FILE VALIDATION
- The file is not a zip archive.
- Archive content is incorrect (that is, the archive doesn't contain mandatory files, or the JSON structure for any of forms is broken).
- The maximum allowed file size is 32MB. This limitation might not be effective if any other restrictions are applied on your end (for example, if VPN servers do not allow to send files that exceed 16Mb).
This image shows the error due to an incorrect type of image:
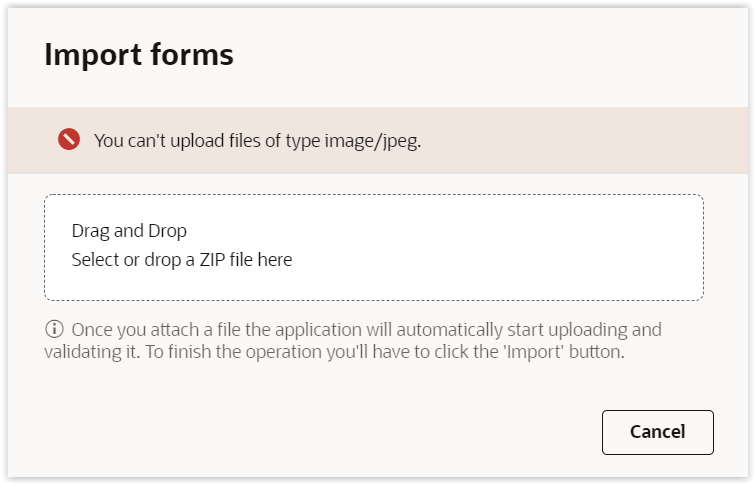
Import Forms Window Showing Image Import Error
NEW ERROR FOR ERROR VALIDATION
This image shows the error when the form label is empty:

Import Forms Window Showing Import Error
This improvement simplifies the transfer of forms and plug-ins between Oracle Field Service instances. It reduces the number of manual steps necessary to migrate forms or plug-ins from one instance to another and ensures that data remains consistent across different instances. For example, you can now create a new Form or plug-in in a test instance, and then easily transfer it to the production instance when ready.
Steps to Enable
You don't need to do anything to enable this feature.
Perform 'What-if' Analysis by Applying Changes to Statistics Configuration on Demand
Administrators now have the ability to apply changes made to the Statistics page and apply overrides added using the Statistics API manually in Test and Production instances. They can try different configurations for statistics configurations and apply them immediately to check how the new configurations would work for them. For example you can gauge the impact of adding an additional field under Activity travel stats fields or increasing the number of characters of the zip code to be considered. It may increase the accuracy or may also make travels keys to be too small for meaningful estimations.
In Production and Test instances, there is an additional button on the Statistics page (Navigate to Configuration, Statistics) called Apply Changes. This includes the functionality to save changes to the statistics configuration. Hence, the Save button at the bottom of the screen is not displayed. This image shows the Apply Changes button on the Statistics page:
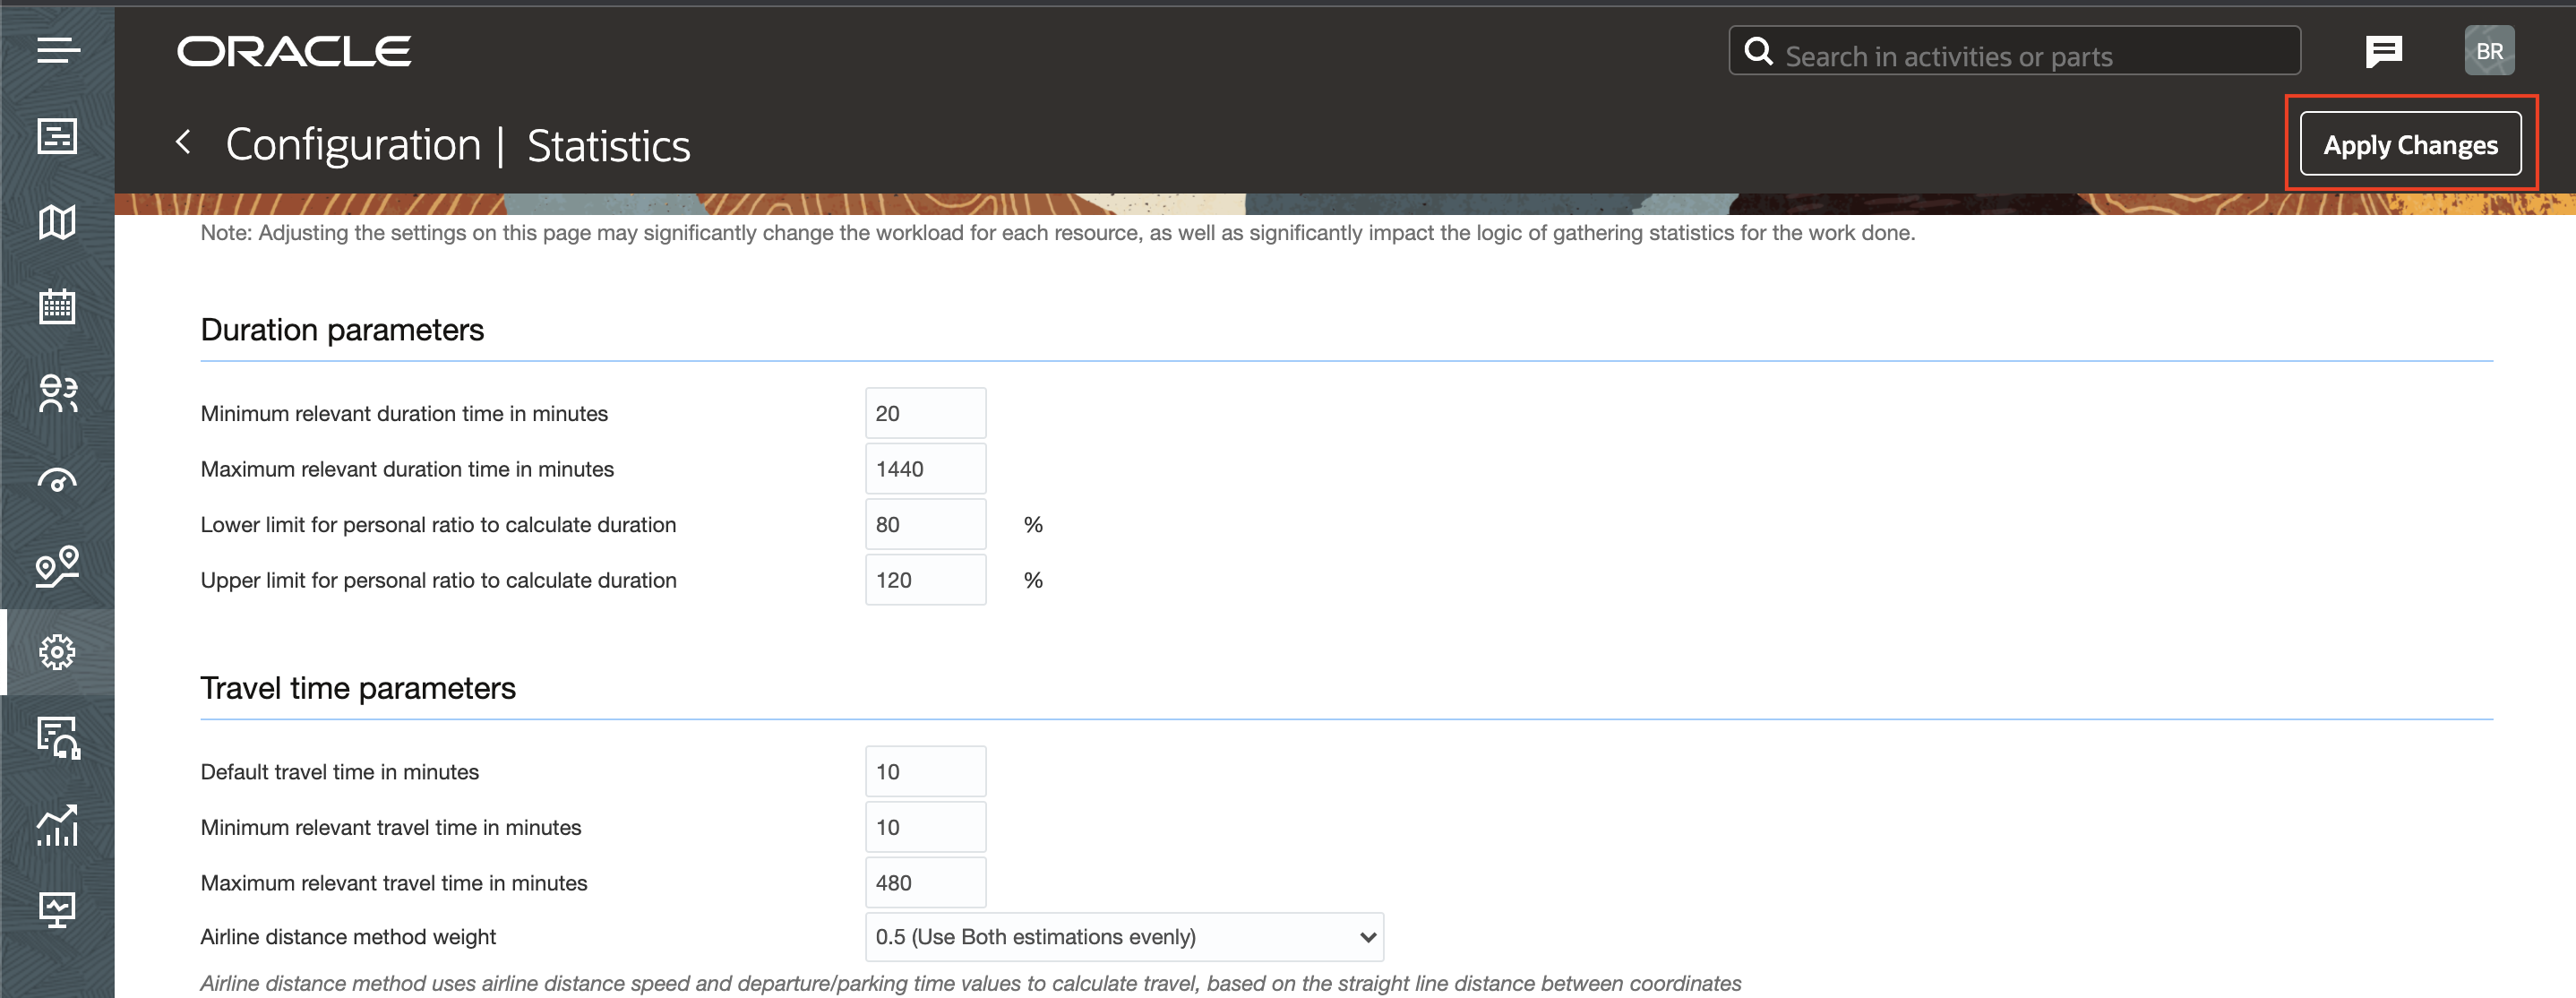
Statistics Page Showing Apply Changes Button
PRODUCTION INSTANCES
Clicking Apply Changes in Production instances displays the Apply Changes dialog box. This image shows the Apply Changes dialog box:
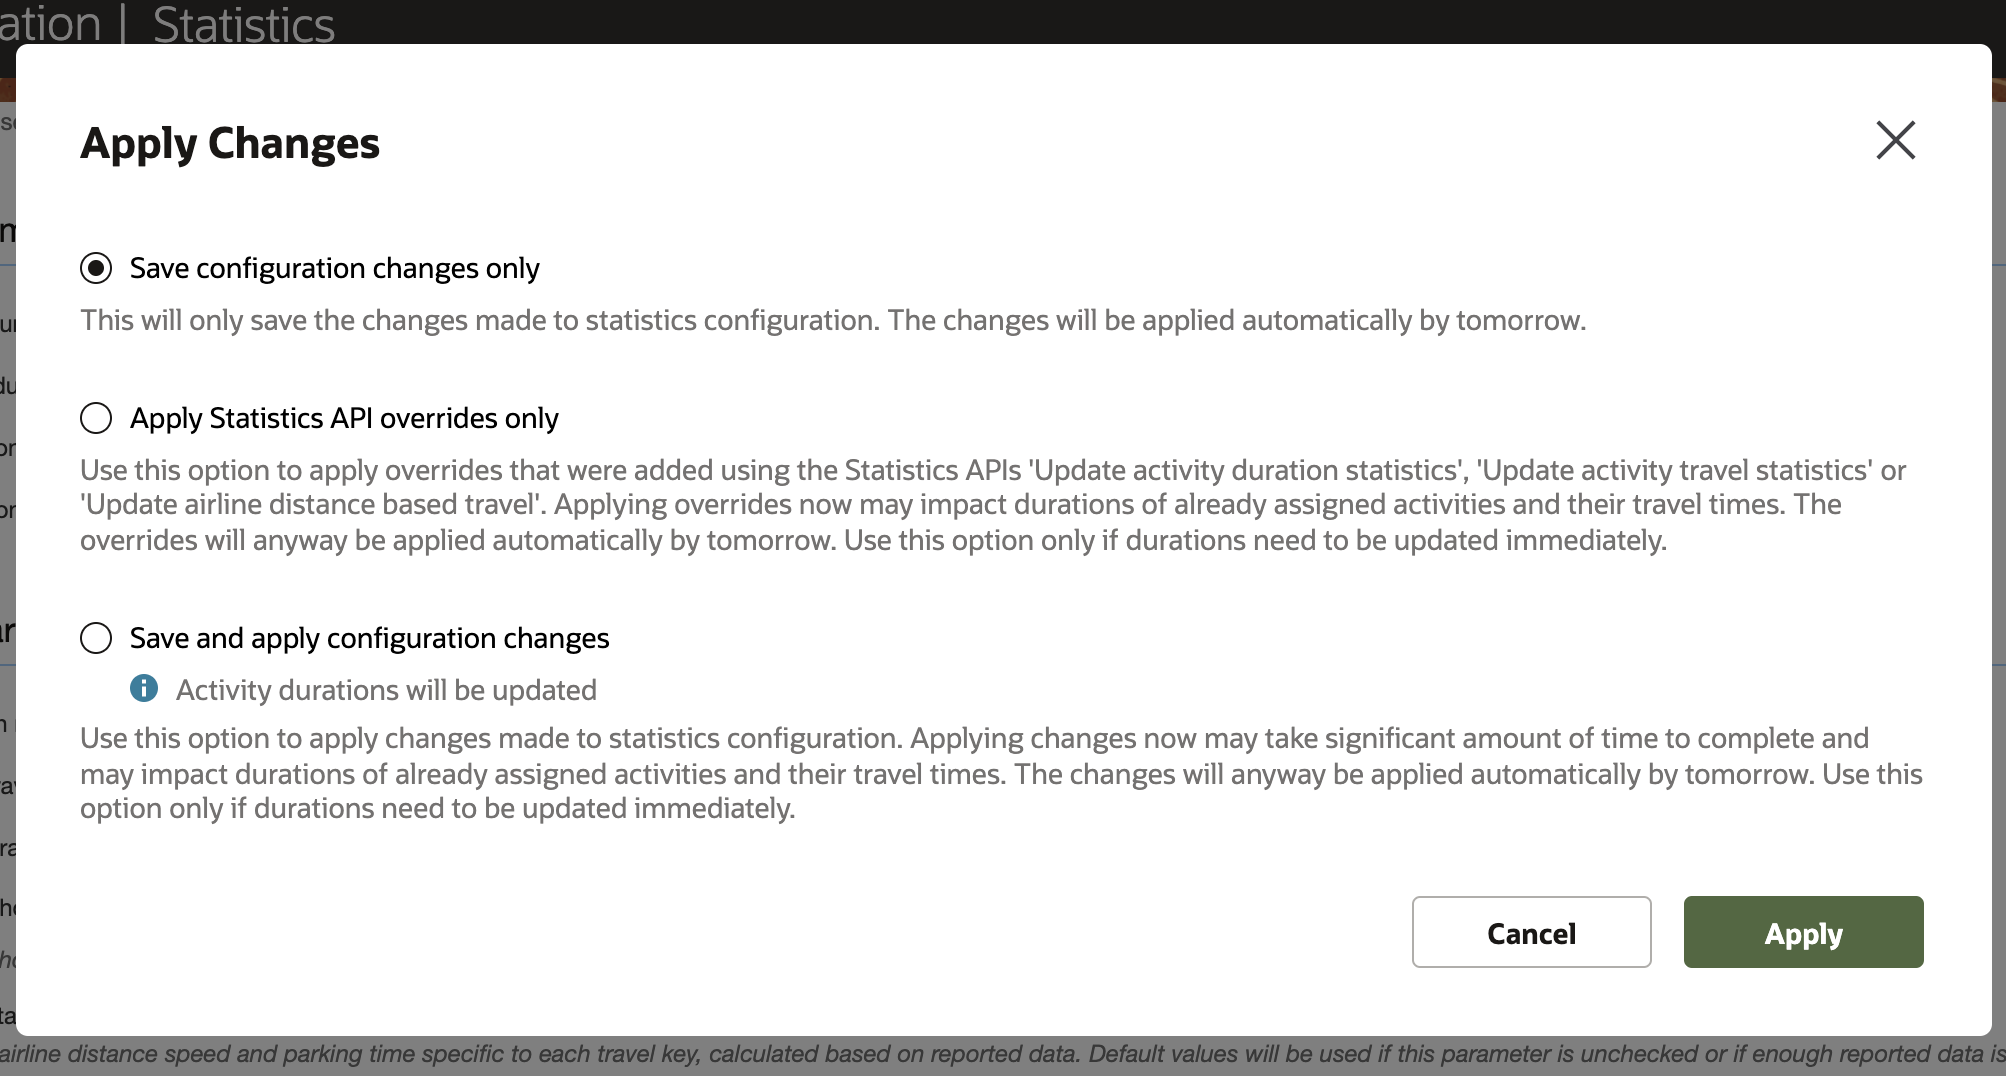
Apply Changes Dialog Box
The first option Save configuration changes only performs the same way as the earlier Save button. It saves the changes made to the Statistics page, if any.
If there are no configuration changes to be saved, this option is disabled with a message stating the same. This image shows the previous Save configuration changes only option:

Save Configuration Option With No Configuration Changes
The second option to Apply Statistics API overrides only can be used to manually apply the overrides that may have been added using the Statistics API's Update activity duration statistics, Update activity travel statistics or Update airline distance based travel methods.
The third option to Save and apply configuration changes or Apply configuration changes recalculates the travel duration statistics or the activity duration statistics (or both) depending on which fields within the Statistics pages were modified. If there were changes made to the Activity duration stats fields or any of the fields under Duration parameters, all activity durations are recalculated since these fields affect the duration of activities. Similarly, if there were changes made to the Activity travel stats fields, Resource travel stats fields or any of the fields under Travel time parameters, all travel durations are recalculated. If there were changes in fields related to activity duration and travel duration then both activity duration and travel durations are recalculated.
If there are unsaved changes, the option reads Save and apply configuration changes. In this case, all the changes are first saved and then applied. If all changes were already saved but there are changes that have not yet been applied, the option reads Apply configuration changes. In addition, there are messages stating whether Activity duration, Travel duration or both get updated based on the fields that were modified. This image shows the Apply configuration changes option enabled when the settings were changed:

Apply Configuration Changes Option
If there are no configuration changes to be applied, the third option is disabled with a note stating the same. This image shows the Apply configuration changes and No configuration changes to apply options:

Apply Configuration Changes Option With No Configuration Changes
NOTE: For production instances, both processes - applying overrides as well as applying configuration changes - would, in any case, be run as a part of the daily script. Therefore, unless the changes need to be applied immediately on priority, the second and third options need not be used in production instances.
Once the recalculation is triggered using the Apply Statistics API overrides or Apply configuration changes, the Apply changes button has been disabled until the process is completed. Until such time, the text of the button changes to Applying Changes and you cannot use it until the previous process is complete.
On completion of the process the status - either successful or unsuccessful - is displayed on top of the screen.
Success message on saving changes only:
This image shows the success message after saving configuration changes:

Statistics Page Showing Previous Success Message
Success message on applying changes:
This image shows the success message after applying configuration changes:

Statistics Page Showing Success Message After Applying Configuration Changes
If process was unsuccessful for some reason:
This image shows the success message after applying changes:

Statistics Page Showing Success Message After Applying Changes
If a user revisits the Statistics page after the process has been completed, a message is displayed to show the last operation as well as when the changes were applied. This image shows the Statistics page error message:

Statistics Page Showing Message That Applying Changes Was Not Successful Previously
This message is cleared once the daily process of recalculating statistics is run.
TEST INSTANCES
In Test instances, the functionality of all options remains the same. However, the description given below each option are different, owing to the fact that the daily recalculation of statistics is not done within test instances. Therefore, changes are not automatically applied by the next day. Administrators can use this feature to apply changes to statistics configurations manually in test instances. This image shows the Apply Changes dialog box in a Test instance:
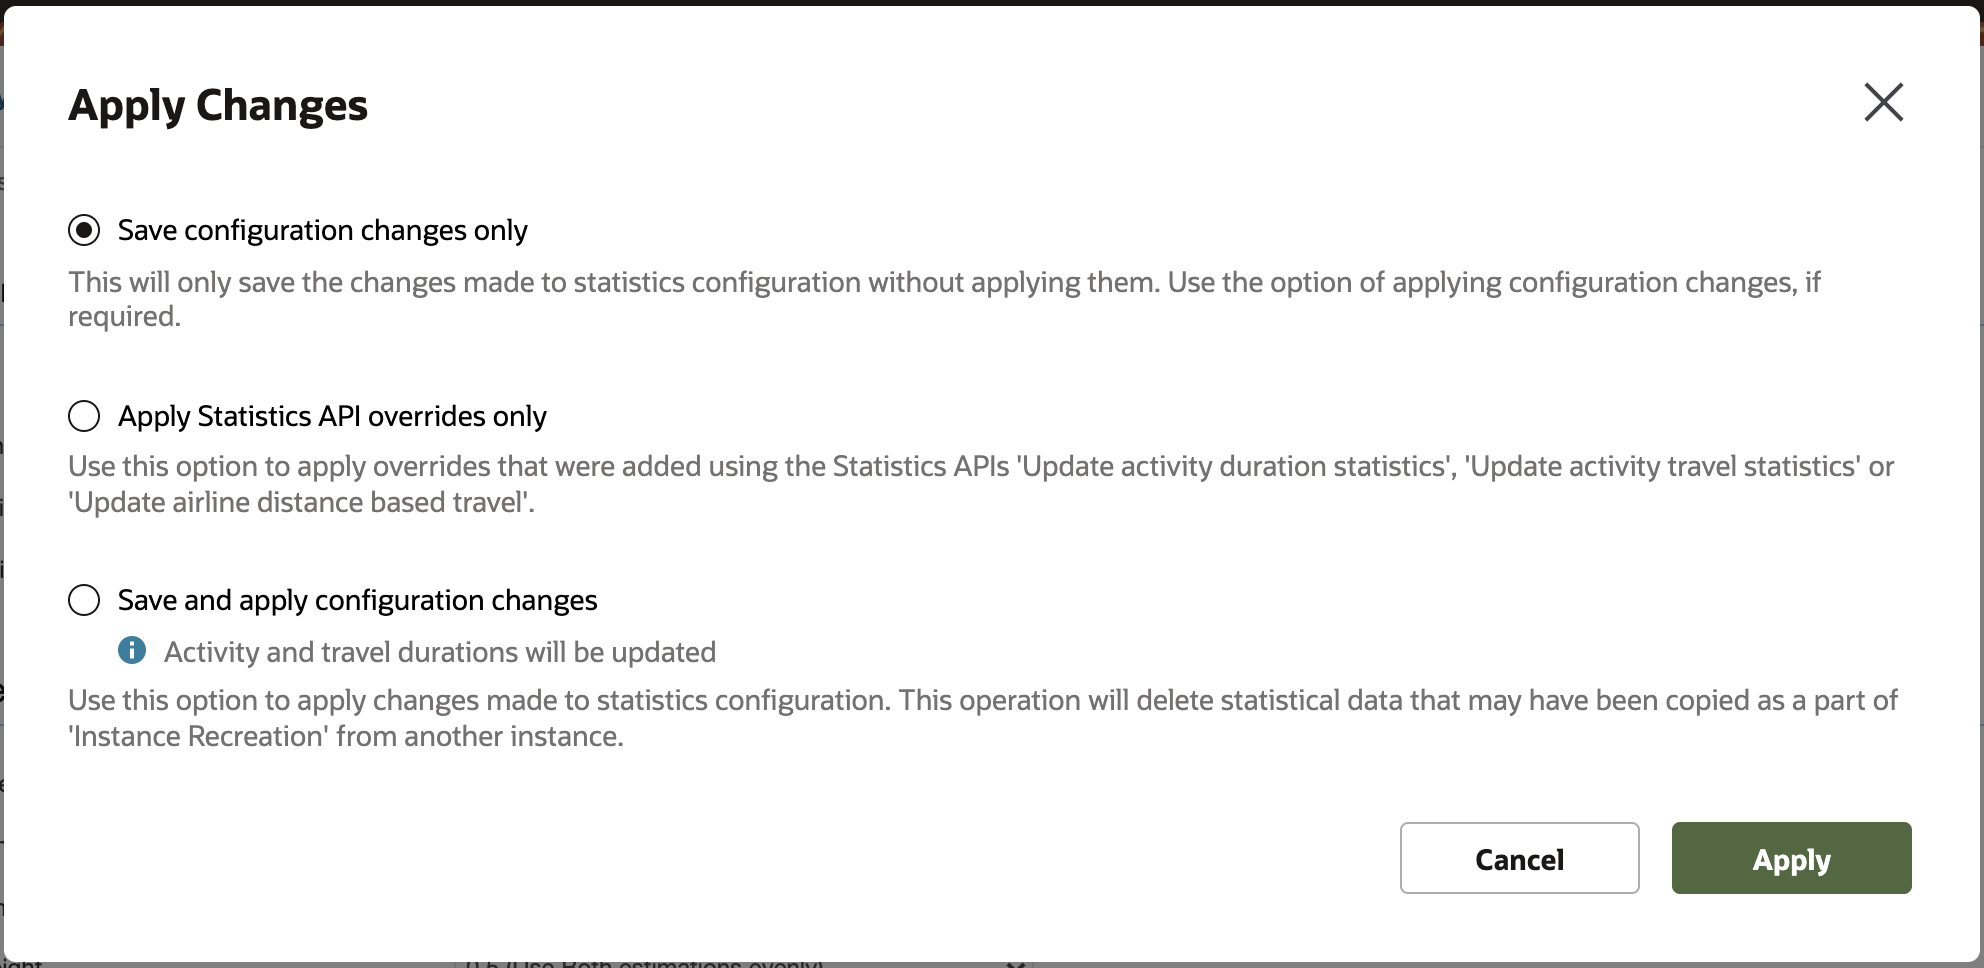
NOTE: As Test instances typically would not have enough data to meaningfully calculate statistics, changing any of the configuration parameters and applying those changes is not recommended as it removes any statistical data that may have been copied as a part of an Instance Recreation process.
By trying out different configurations for statistics configurations and applying them immediately to check and gauge the impact of adding an additional field under ‘Activity travel stats fields’ or increasing the number of characters of the zip code to be considered. This may increase the accuracy or may also make travels keys to be too small for meaningful estimations.
Steps to Enable
You don't need to do anything to enable this feature.
Key Resources
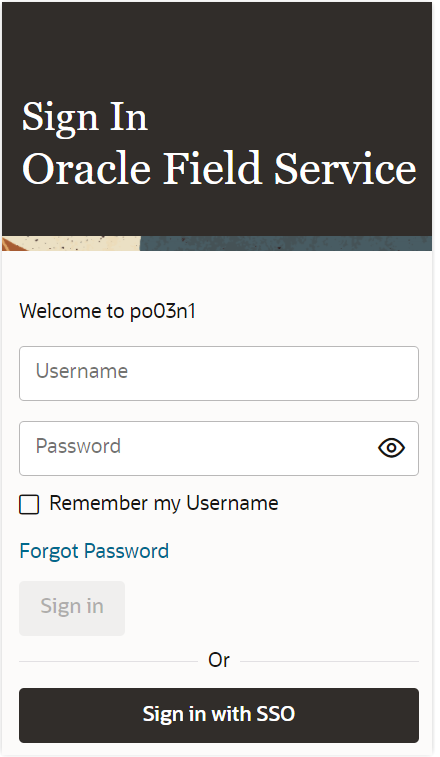
The feature simplifies the sign in flow for users accessing the application through the Single Sign-On type of authentication. With this improvement, users assigned SAML/OpenID login policies are provided with a consistent user experience that matches the standards of all Fusion applications. This feature saves clicks along the authentication routine and makes signing into Oracle Field Service smooth and transparent.
HOW TO USE
The Sign in with SSO button is available on the Sign in screen for those instances where login policies of either SAML or OpenID types are configured.
HOW IT WORKS WHEN THERE IS A SINGLE SSO LOGIN POLICY IN THE INSTANCE
Clicking Sign in with SSO redirects you to a login screen of the Identity provider configured for the login policy. When you enter the credentials, the IdP passes your request back to the application.
NOTE: All of the attributes of your Identity provider should be specified within the associated login policy configuration. You can upload metadata to pair your IdP with the application using SAML or manually configure all the parameters for both SAML and OpenID authentication methods.
HOW IT WORKS WHEN THERE ARE SEVERAL SSO LOGIN POLICIES IN THE INSTANCE
For instances having several SSO login policies, the application displays one more interim step along the way. In those cases, when clicking Sign in with SSO, you are prompted to enter your username - this is needed to associate your account with the required login policy and make the correct redirect to the IdP. From there, you'll have to populate your user name.
This image shows the Sign-in Screen with SSO login option:
Sign-in Screen With SSO Login
Click Continue with SSO and the application transfers your request to the identity provider for further authentication.
This image shows Continue with SSO button in the Sign-in screen:
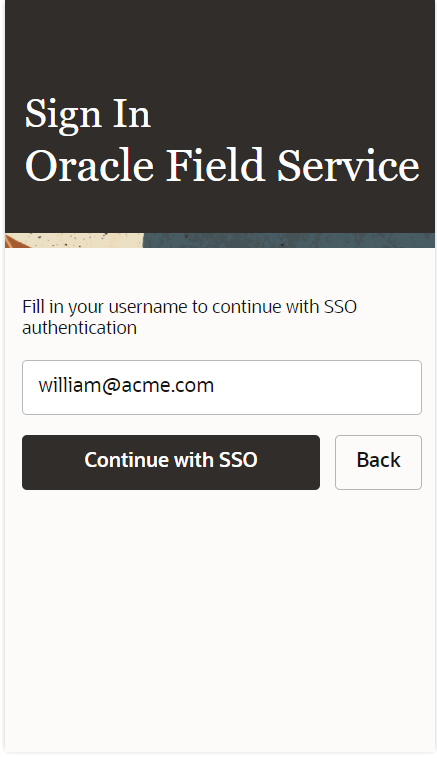
Sign-in Screen Showing Continue with SSO
USAGE OF INSTANCE NAME
You do not need to populate a long URL containing the login policy label to proceed with the SSO authentication. Just use the instance URL in the browser application, or populate an instance name on the Instance screen within the installed app.
From now, a short instance name is the only thing that you have to know to access your instance using Single Sign-On. The current approach for installed apps either using long URLs on the instance screen or keeping it within the configuration file managed remotely by Mobile Device Management (MDM) will continue to work as previously.
MINIMIZED NUMBER OF CLICKS IN INSTALLED APPS
For installed apps, the apps preserve your last successful login. When you open the app once again, you are navigated directly to your Identity provider to continue Single Sign-On authentication. Moreover, if your session is still live, then you log in with just one move.
Here are the steps showing the new path through the SSO authentication:
- Populate instance name on the Instance screen.
- In the Sign in screen, click Sign in with SSO .
- Type credentials on the IdP login screen which redirects you back to your instance.
- Close the app.
- Open the app again.
- You are redirected to your IdP amending all the Oracle Field Service screens related to the sign in routine. If your session is still live, then you can log in back to your instance with just one move. You should upgrade your app to the latest version from Google play (for Android) or App store (for iOS) to get access to this functionality.
AVAILABILITY OF THE FEATURE
The feature is available on the instances running on Update 22A and the following versions. You are advised to proceed with the update to benefit from the new functionality.
This feature provides a consistent user experience that matches the standards of all Fusion applications. This feature saves clicks along the authentication routine and makes signing into Oracle Field Service smooth and transparent.
Steps to Enable
You don't need to do anything to enable this feature.
Key Resources
View Quota Information Using the showBookingGrid Method
Starting with Update 22A, if the showBookingGrid (POST /rest/ofscCapacity/v1/showBookingGrid) REST API method response contains capacity areas that use quota management, it has information about total and remaining quota for the levels where it is applicable for the configuration.
If the response contains capacity areas that use quota management, the response will contain information about total and remaining quota for the levels where it is applicable for the configuration.
Two parameters were added into the response of the 'Show booking grid' function for a day/category level:
showBookingGrid -> areas -> dates
- originalQuota: integer
The quota value that is defined on a day level. For interval-based booking, if there is no quota defined, this parameter is not returned.
- remainingQuota: integer
The quota available on the day level after the activity booking. If there is no quota defined, the parameter is not returned.
Two similar parameters were added into the response of the 'Show booking grid' function for a time-slot level.
showBookingGrid -> areas -> dates -> timeSlots
- originalQuota: integer
The minimum quota value defined at the time slot level for activity fields or capacity categories. The parameter is returned only for timeslot-based booking.
- remainingQuota: integer
The available quota after activity booking. If there are multiple constraints (for example, day and category quota), the minimal quota value is returned.
The parameter is returned only for timeslot-based booking.
Response example:
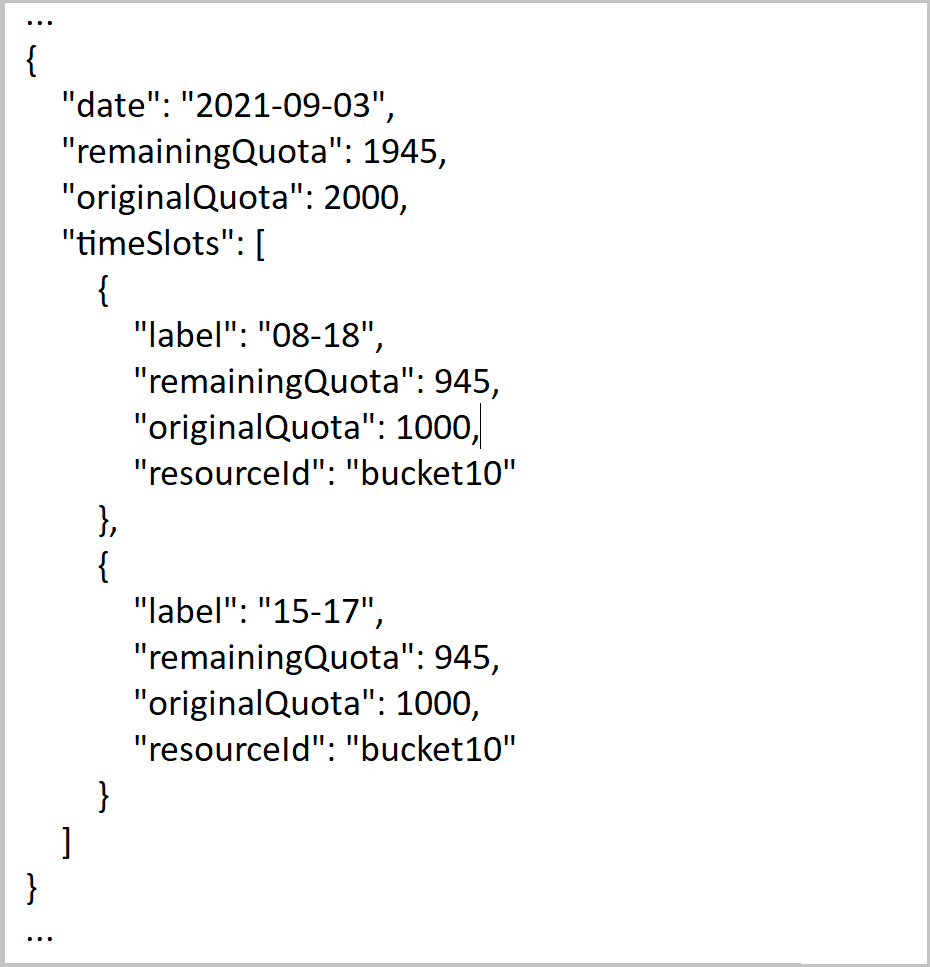
Response Example
This feature enhances the API function 'showBookingGrid' with information about quota for making booking decisions.
Steps to Enable
Review the REST service definition in the REST API guides, available from the Oracle Help Center > your apps service area of interest > REST API. If you're new to Oracle's REST services you may want to begin with the Quick Start section.
Key Resources
Add Install Required Inventory to Workflow Manager
This feature introduces new Workflow Manager capabilities, providing the ability to incorporate out-of-the-box inventory actions and screens into workflows.
USAGE OF REQUIRED INVENTORY
Now you can use the installation of required inventory as a workflow step. With this, the system will check when all required inventory items are installed and respectively show a step within a workflow as completed. This image shows the Install Inventory step in a workflow:
Install Inventory Dialog Box
To achieve this, you need to configure the 'Inventory list' screen for a step and in the 'Show completed when' section, be sure the condition is set to 'Required inventory in (equal) Installed', which is the default condition for this screen. You can expand this condition by adding other conditions based on completion of other workflow steps and fields/properties as needed. This image shows the Modify step page for the Install Inventory workflow:
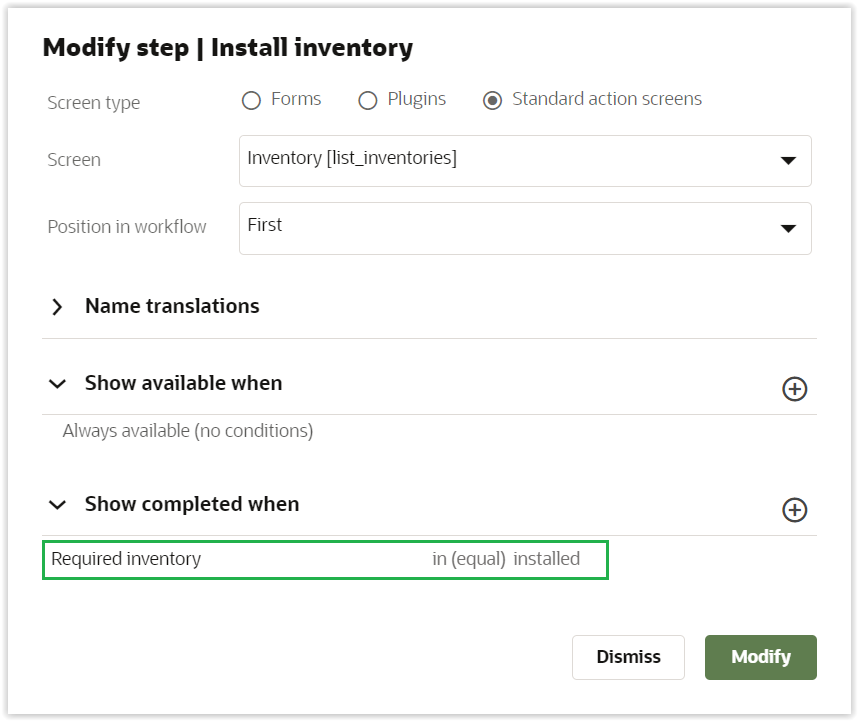
Modify Step Install Inventory Dialog Box
NOTE: If you would like to incorporate just required inventory into your workflow, the advice is to rename this step to something that provides more context of what this step is about, for example, 'Install inventory'.
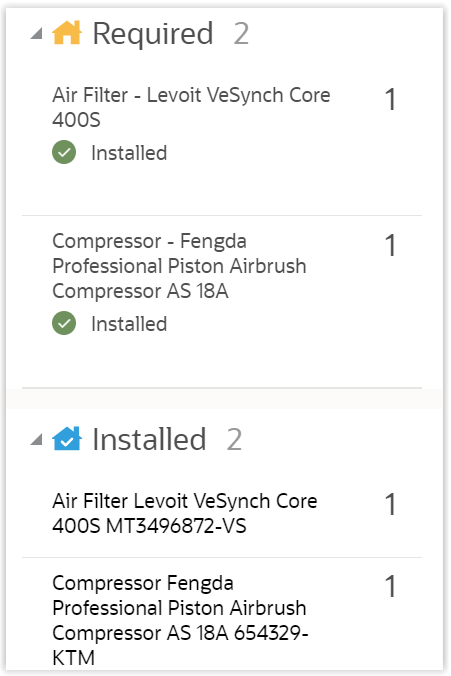
Another improvement is that the 'Installed' marker is now displayed for each installed inventory item within the 'Required inventory' section on the 'Inventory list' screen. This change provides better visualization of performed actions, especially on mobile devices where not a lot of information is displayed on the screen. Here, technicians will be presented with the status of actions up front, eliminating the need to scroll down and find these installed inventories inside other sections of the screen.
In the landscape view, the marker is shown in the respective column. This image shows the marker in the landscape view.
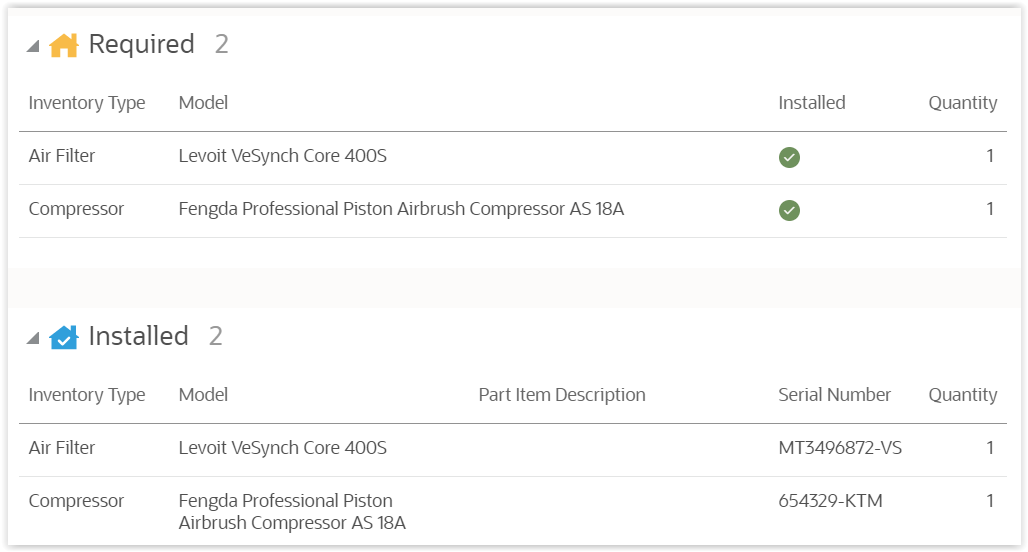
Marker in Landscape View
In the portrait view it will be placed at the bottom of each inventory record: This image the marker in the portrait view.
Marker in Portrait View
The application must work this way for activities with and without workflows.
Another method to show inventory actions as 'completed'
There could be various scenarios related to inventory which address more sophisticated scenarios (e.g. some activities could be de-installations, others could require to replace equipment, technicians might wait for inventory activation from external systems, etc.). Even in these variable cases, the application provides the option to visualize that a technician's work with inventory is finished. And this can be done using the completion of other workflow steps.
USE CASE EXAMPLE
There is the step which leads to the 'Inventory list' screen where a tech performs all actions with inventory. Then there is another 'Inventory checklist' step where a technician self-checks itself to make sure that all of the work has been done properly. A technician will do everything needed with the inventory, fill in a checklist, and then both of these steps will be displayed as 'completed'. These image shows the workflow before and after completing and Install Inventory and Inventory checklist steps:

Install Inventory and Inventory Checklist - Workflow
The configuration approach here is simple - configure the 'Inventory' step to be shown as 'completed' when 'Inventory checklist' is completed. This image shows the configuration of the workflow step when an inventory checklist has to be filled:
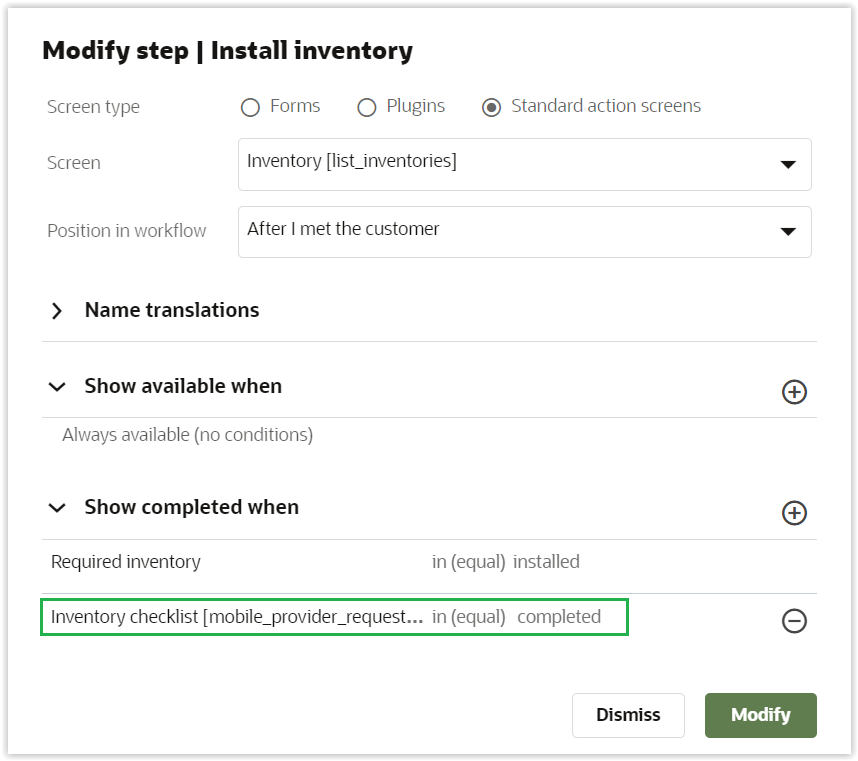
Install Inventory and Inventory Checklist - Workflow Configuration
All of the steps will be displayed with the green check box showing that the technician is compliant with the process, not missing any important steps along the way.
This feaure provides he following benefits
- a more consistent user experience across activities with and without workflows
- a shortened time of roll-out and decreased cost of implementation, as there will be a lesser need to implement plugins
Steps to Enable
You don't need to do anything to enable this feature.
Tips And Considerations
With this feature, customers will benefit from:
- a more consistent user experience across activities with and without workflows
- a shortened time of roll-out and decreased cost of implementation, as there will be a lesser need to implement plugins
Key Resources
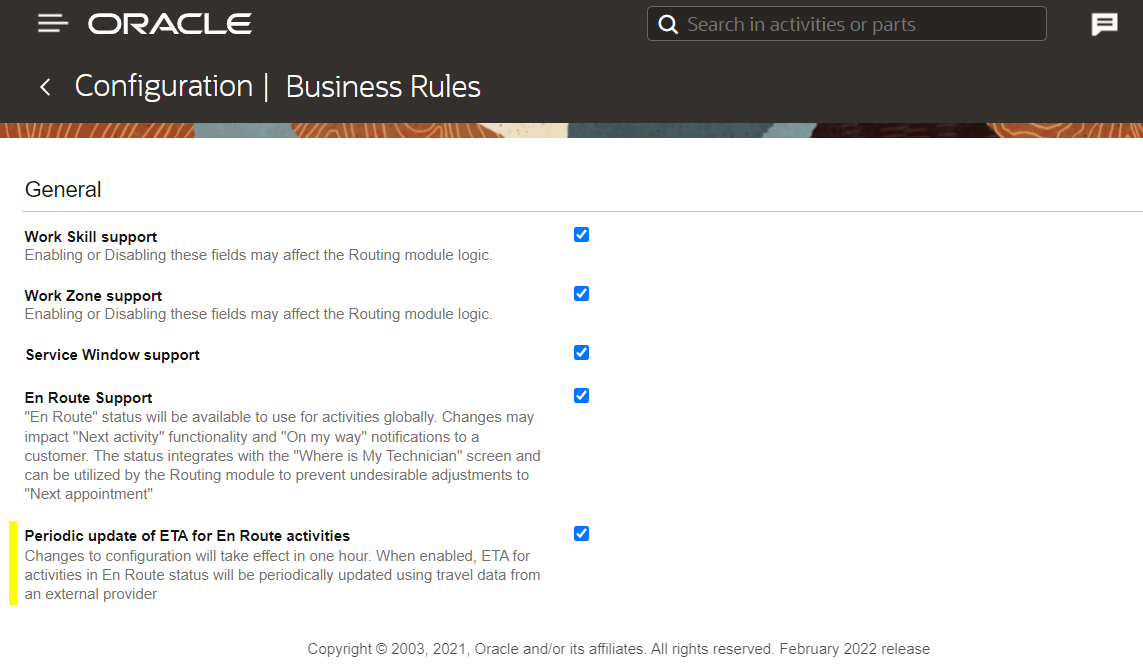
Auto-Adjustment of ETA for En Route Activities
Now users can get actual information and ongoing updates about the Estimated Time of Arrival (ETA) of En Route activities even for cases when traffic situation changes. This new feature allows for auto-adjusting the ETA for En Route activities once a technician is set to travel and until the travel is finished. It takes into account changing traffic situations, a technician taking a different route, or a technician running late or ahead of schedule.
Compared to the existing real-time traffic feature which calculates the ETA only once at the start of travel, this new feature will spot potential deviations to the ETA (subject to limitations) and would automatically re-adjust it based on different criteria.
WHO CAN USE THE FEATURE?
This feature is available for customers using Oracle Field Service Enterprise with Google Maps.
HOW IT WORKS?
The feature will work automatically once it is enabled on the Business Rules page. See How to configure. The feature provides periodic auto-adjustments to the estimated time of arrival (ETA) to an activity site while an activity is in En Route status. These adjustments could be seen in updated ETA values across the product and also recorded in the History of any particular activity.
Activity starts getting auto-adjustments when:
- Activity is set to En Route status.
- Activity has coordinates resolved either with High accuracy or were provided by a customer.
- Activity travel was not manually set by a user (travel estimation method is not 'Manual adjustment').
- Continuous position data is available for a resource assigned to an activity with a coordinates accuracy of 100 meters or less.
Activity stops getting auto-adjustments when:
- Travel to an activity is finished (activity status set to any other status than En Route).
- Activity travel was manually set by a user (travel estimation method is 'Manual adjustment').
ETA for an activity would be updated when:
The latest position data is available for a resource (with accuracy 100 meters or less), and it indicates that a field resource deviated from a calculated route for more than approximately 500 meters or for more than approximately 5 minutes (late or ahead of schedule).
After this, the system would try to recalculate the new route (subject to geoprovider data availability) considering new resource position data. Once a new route and new ETA are available, the ETA for an activity would be updated in the system.
HOW TO CONFIGURE?
To enable/disable this feature, follow these steps:
- Click Configuration, Business Rules.
- Under the 'General' section, check/uncheck the 'Periodic update of ETA for En Route activities' check box. This image shows the 'General' section in the Business Rules page:
Business Rules Page
NOTE: Changes to Periodic update of ETA for En Route activities on the Business Rules page takes effect in one hour and does not affect existing activities with En route status.
This feature identifies potential deviations to the ETA (subject to limitations) and would automatically re-adjust it based on different criteria.
Steps to Enable
You must enable the Use real-time traffic data for a user type of the user assigned to a resource traveling to an activity site for this feature to work properly.
Key Resources
Screen Navigation Improvements
Starting with Update 22A, improvements have been made to the Oracle Field Service main menu navigation.
This feature includes these improvements:
- The Main Menu bar is always visible on the left side of the screen when you open Oracle Field Service on a large screen (above 1440 pixels). It contains only icons and you can expand it to show both icons and text through a hamburger menu.
- When the screen width is medium or small, the menu bar disappears and becomes available through a hamburger menu.
- When the screen width is large, the Main menu is available on any screen in the system including Activity details and Inventory details.
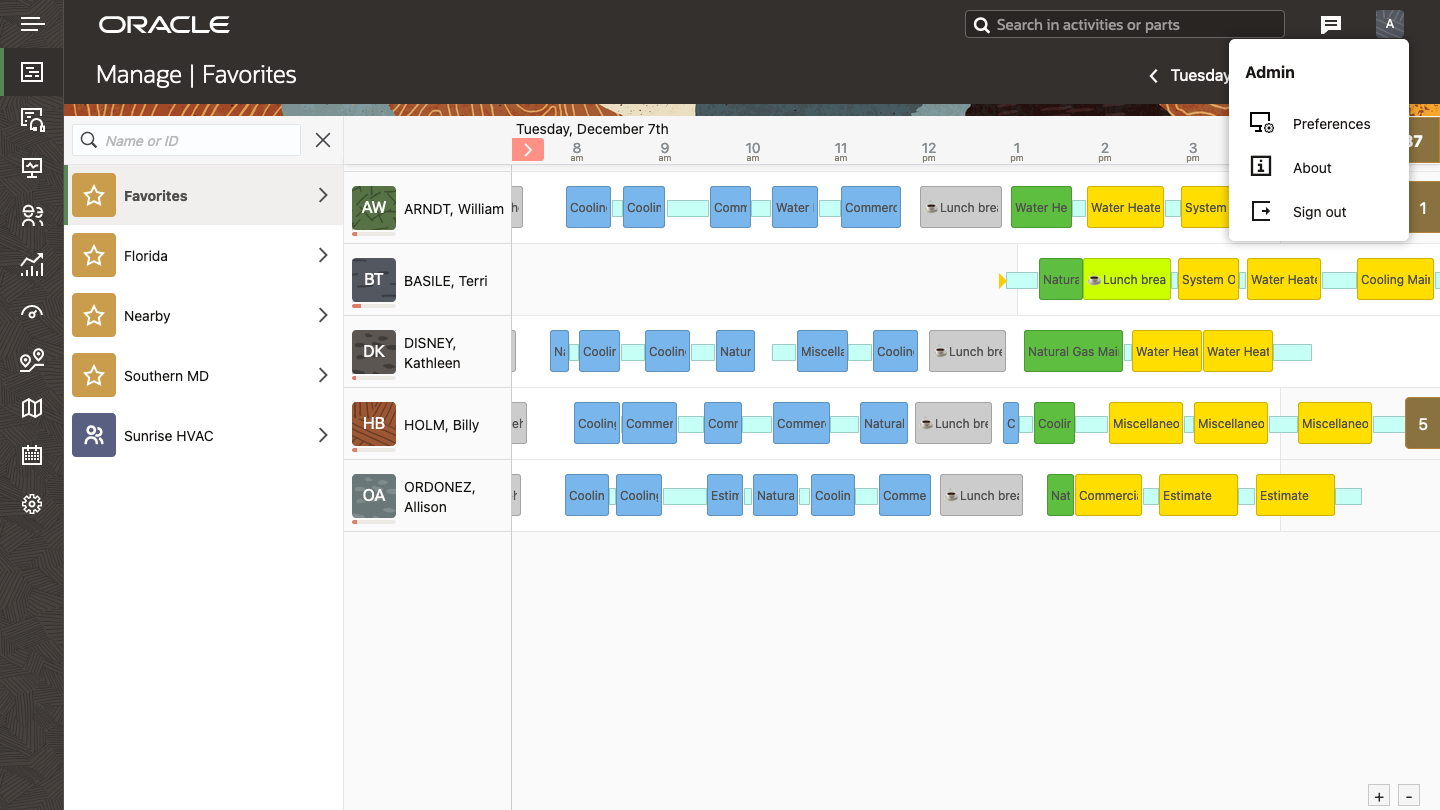
- The Setting menu item has been renamed to Preferences to align with the terminology used in other Fusion Applications.
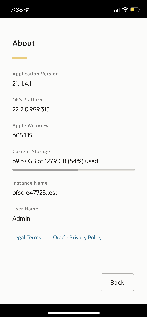
- The About link has been removed from the Configuration screen and placed together with Preferences and Sign Out.
- When opened from a native application, the About screen shows additional information such as available free space on a device.
- Preferences, About, Sign Out menu items can be accessed by clicking the user avatar at the top-right corner of the app on large and medium screens.
- As the user avatar is not available on small screens, menu items are displayed in the Main Menu.
- Visual presentation of the Main Menu has been improved.
EXAMPLES
Main Menu
Here is an example of how the Main Menu looks like on large screens.
- This screen shows the Main menu with Menu buttons.
Default Main Menu.in Large Screens
- This screen shows the Main menu with closed Menu and Menu icons in large screens:

Closed Menu and Menu Icons in Large Screens
- This screen shows the Main menu with drop-down menu in large screens:
Main menu with Drop-Down Menu in Large Screens
New About Screen
Here is an example of the new About screen.
When opened from a native application, the About screen shows additional information such as Available free space on a device:
- This screen shows the About screen.in large screens
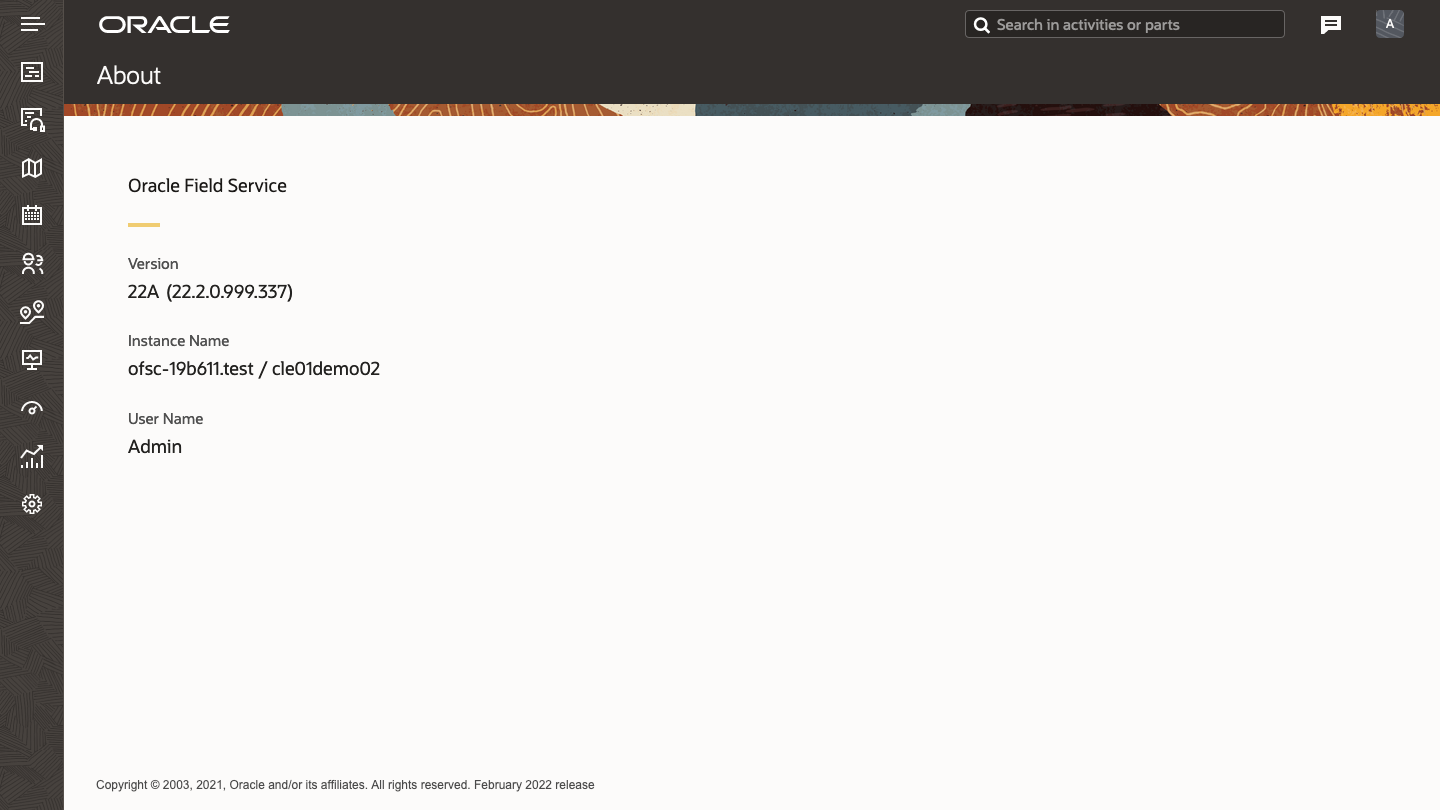
About Screen.in Large Screens
- This screen shows the About screen.in small screens
About Screen.in Small Screens
This feature provides an improved visual presentation of the Main Menu.
Steps to Enable
You don't need to do anything to enable this feature.
Key Resources
Select Default Work Zones for a Resource
When setting work zones for a resource, users can select from the list of work zones that are the default for the resource's bucket or organization unit.
- The 'Default Work Zones' section contains active work zones that have been added to the resource's bucket or organization unit. When the bucket or organization unit has no work zones assigned, then work zones of its parent are considered and so forth.
- The 'Other Work Zones' section contains other active work zones that are not considered as default.
This image shows the Add Work Zones dialog box with the Default Work Zones and Other Work Zones sections:
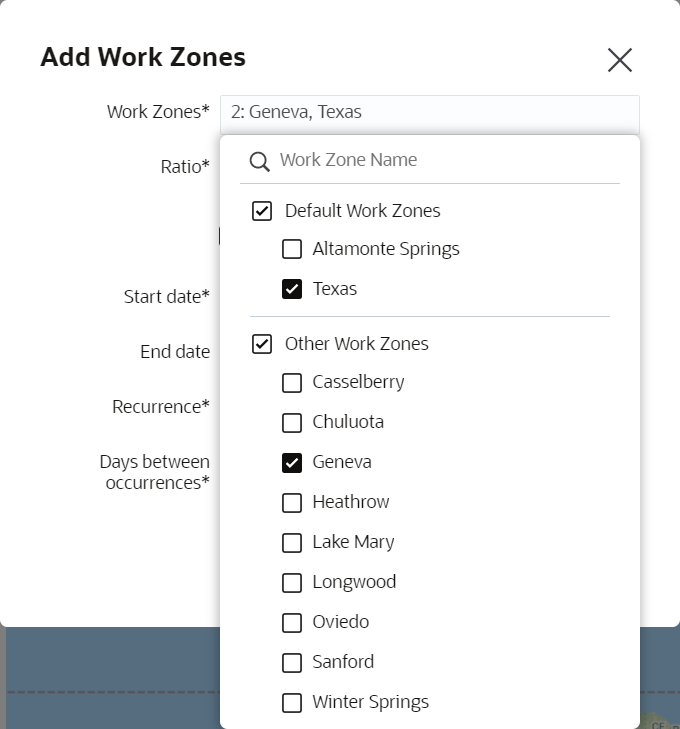
Add Work Zones Dialog Box With Work Zone Drop-Down Menu
The Add Work Skills dialog box is also updated.
This feature provides these business benefits:
- Enhanced User Experience
- Faster adoption
- Reduce the number of manual errors and incorrect WZ assignments
Steps to Enable
You don't need to do anything to enable this feature.
Key Resources
Starting in 22A, a new tool called Update Activity Location is available in Oracle Field Service. This feature allows you to perform these tasks:
- Find out why an activity's address is not resolved
- See alternative addresses provided by Google Maps.
- Modify address components and check an option when the address gets resolved
- Check the activity location on the map
- Set an updated address and coordinates for the selected activity
The new Update Activity Location screen is opened after clicking the configured Update location button for a selected activity. This screen contains these elements:
- Fields Address, City, Postal Code, State and Country - the address components that are used for geocoding.
- After the screen opens, the fields are populated from the corresponding activity's field values.
- The Country field contains the list of country values configured using the Available countries section in Configuration > Business Rules > Maps and Geocoding. This field is not displayed when Available countries contains only one item. When the country is not specified for an activity, then the Default country for geocoding from the Business Rules screen is selected by default.
- After clicking the Resolve button, the address gets geocoded the same way as when the address is initially specified for the activity. The Resolve button is enabled after user changes any address component on the screen. Once it is clicked, it becomes disabled.
- Map displays the activity location if the address is resolved. When the address is not resolved, then a corresponding message is displayed instead.
- Coordinates are displayed below the map when they are available.
- The Dismiss button closes the screen with no actions taken.
- The Update button updates the activity address fields and coordinates that were obtained after clicking the Resolve button.
- The Alternative Locations section (available only to customers using Google Maps) contains suggestions provided by Google geocoding service, based on the Address, City, Postal Code, State and Country field values. When possible, parts of the alternative address that differ from the original Address, City, Postal Code, State and Country field values are highlighted in bold. Users can copy any part of the alternative address from this section and paste it into one of the editable fields: Address, City, Postal Code, State. The address section gets updated after the screen is opened and also after clicking the Resolve button. If there is no alternative address provided by the geo provider then the Alternative Location section is not displayed.
The Update Activity Location screen is opened for a not-resolved activity location. In this example, the Address and Postal Code fields are highlighted in the Alternative Locations section, as they differ from the original address. This image shows the Update Activity Location screen.
Update Activity Location Screen Showing Not-Resolved Activity Location
The Update Activity Location screen shows the activity on the map with it's coordinates after resolving the address with the suggested street name and postal code. This image shows the Update Activity Location screen with the activity on the map.
Update Activity Location Screen Showing Activity
HOW TO CONFIGURE
Configure the new 'Update location' button for appropriate User Types within the 'Edit/View activity' or 'Activity Hint' context layouts.
This feature helps you to determine why an activity's address is not resolved
Steps to Enable
You don't need to do anything to enable this feature.
Key Resources
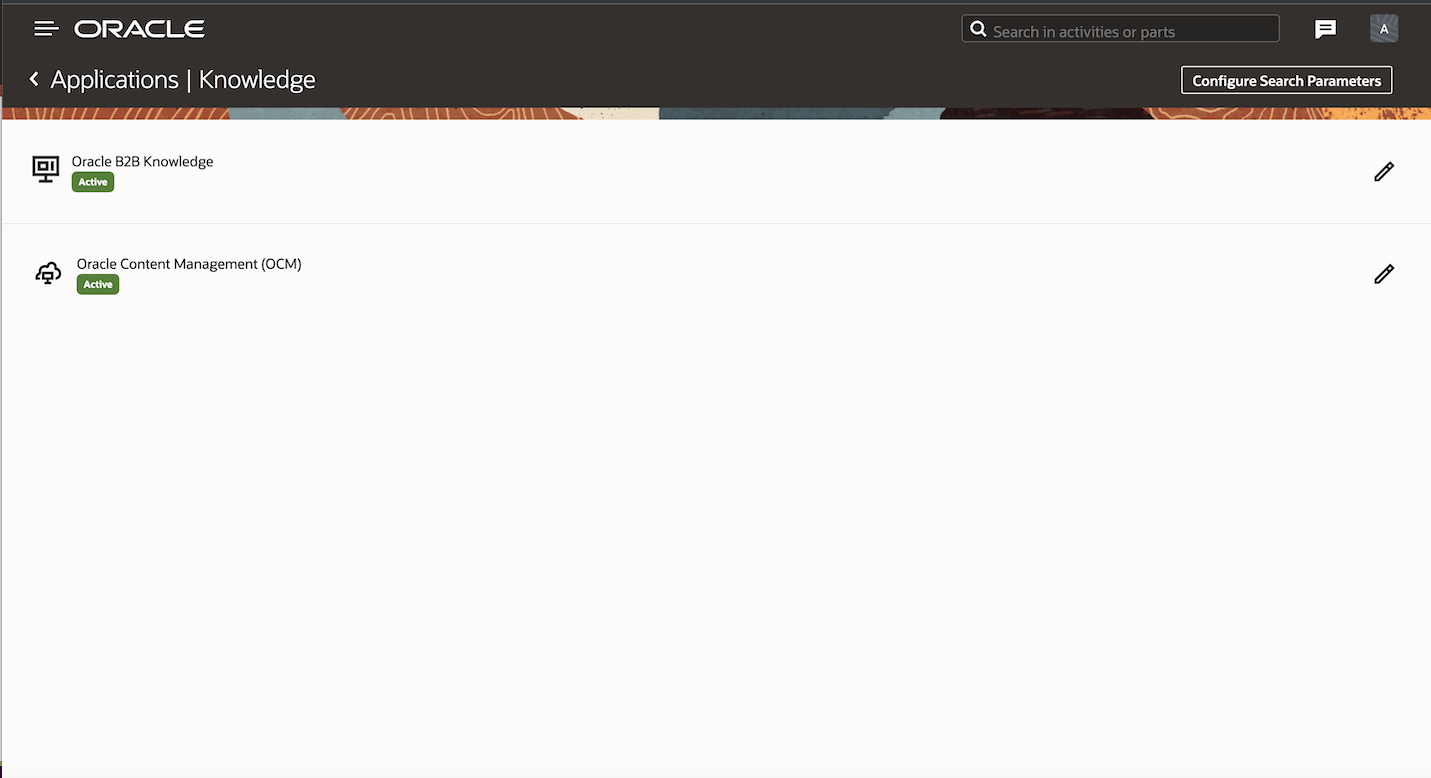
Enable Oracle Knowledge Management Natively
Starting with Update 22A, you can enable Oracle Knowledge Management (OKM) and Oracle Content Management (OCM) from within Oracle Field Service. With this integration. a technician can access the most relevant information related to the job they are working on and complete the job efficiently. They can access Knowledge articles or files from Oracle Knowledge Management or Oracle Content Management or both, based on the configuration.
SET UP ORACLE KNOWLEDGE IN ORACLE FIELD SERVICE
Prerequisites
To use Knowledge within Oracle Field Service, you must have a valid license for either or both of the following products: Oracle B2B Knowledge Management and Oracle Content Management.
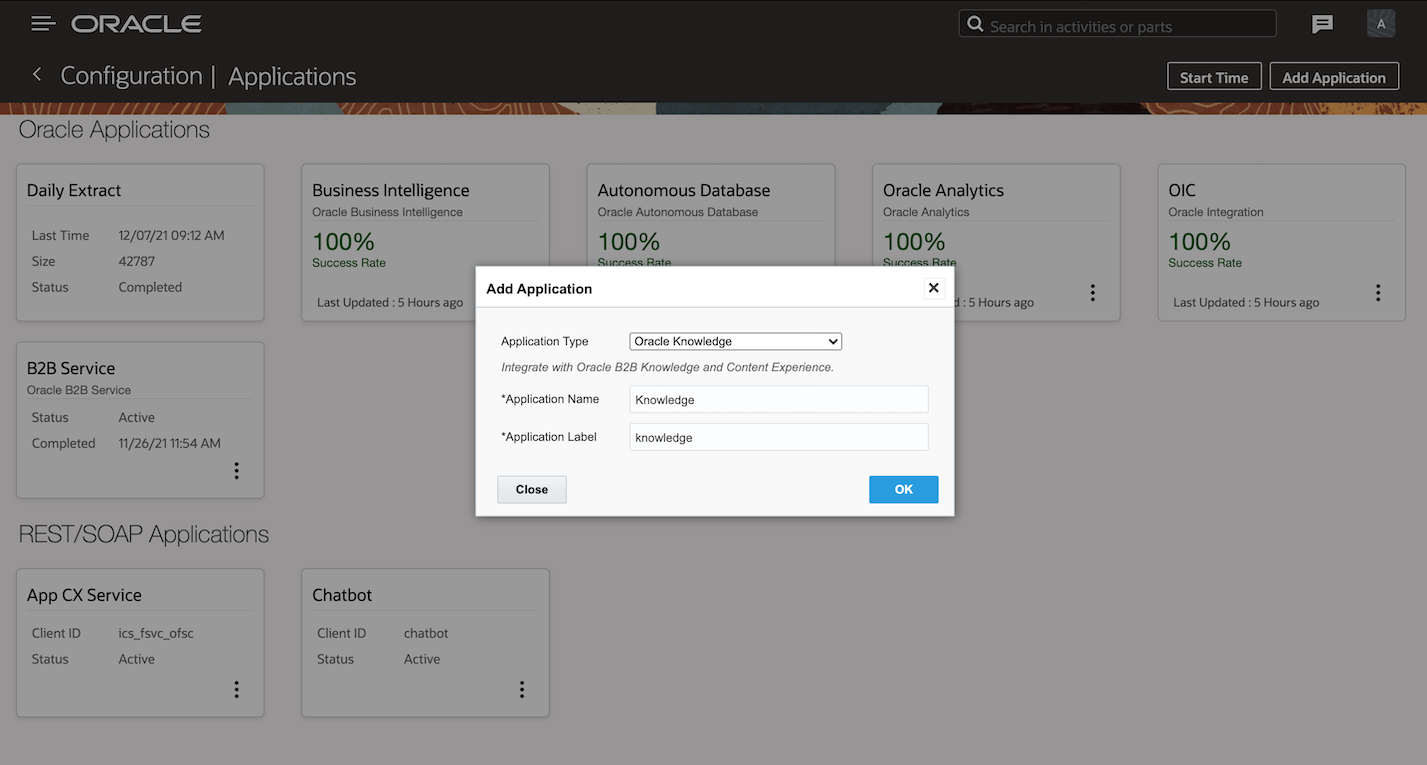
Configure the Oracle Knowledge Application
You can configure Knowledge management using Applications on the Configuration page.
Follow these steps:
- Select Applications from the Configuration page.
This image displays the Configuration page.
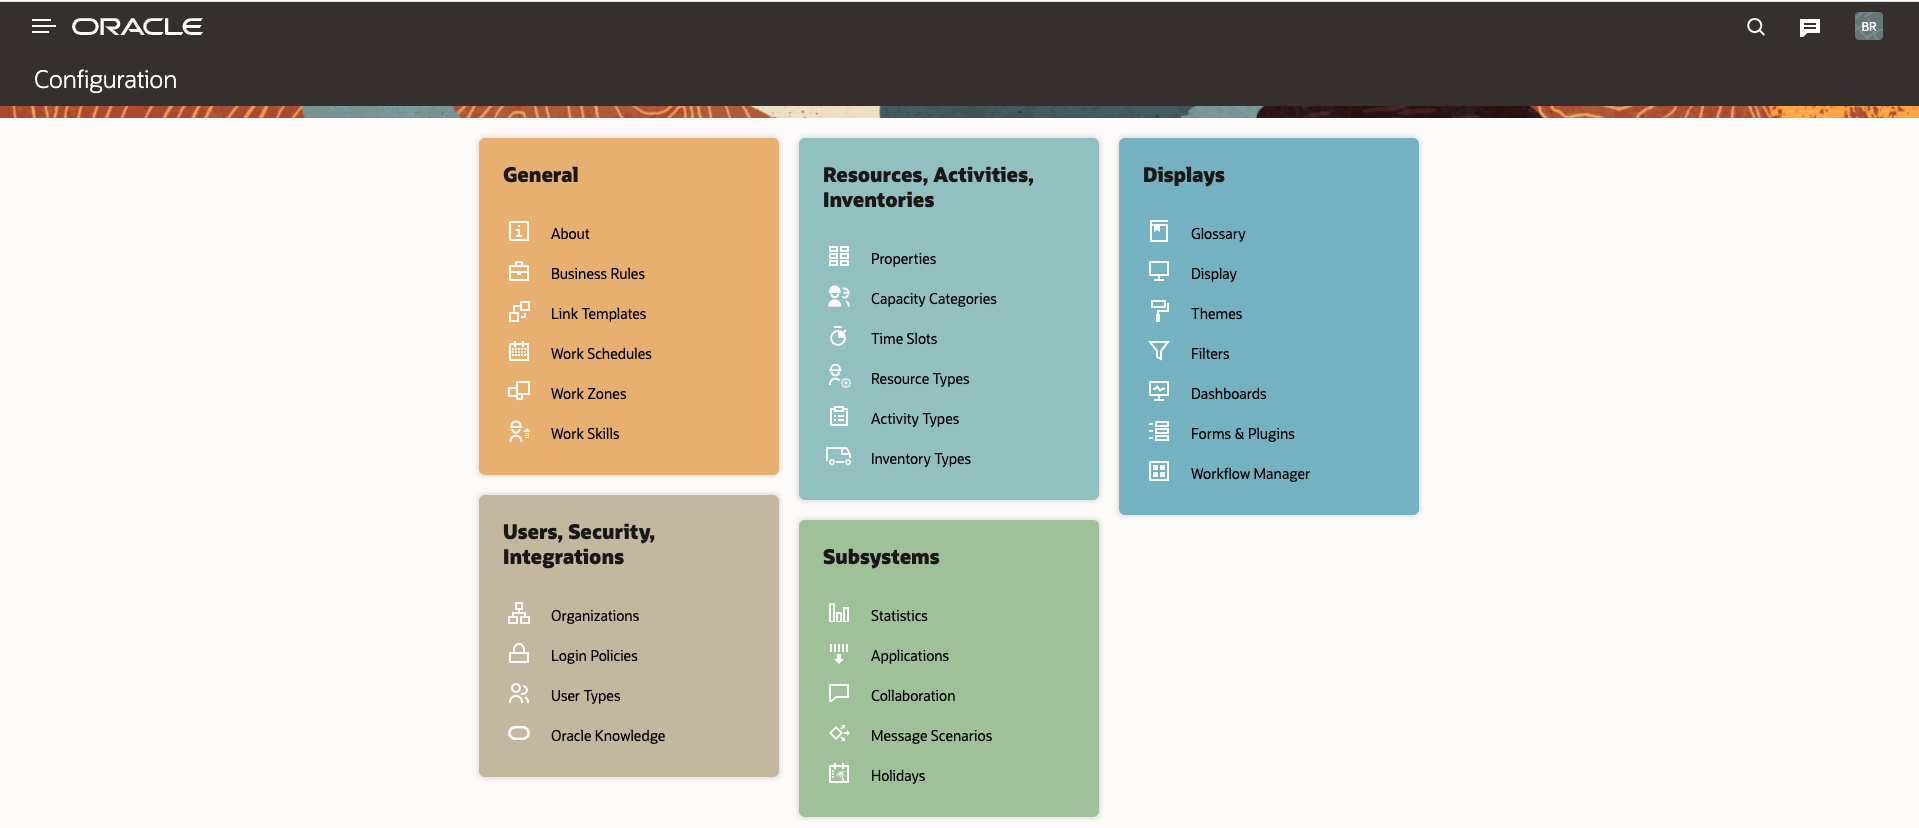
Configuration Page
This image displays the Applications page.
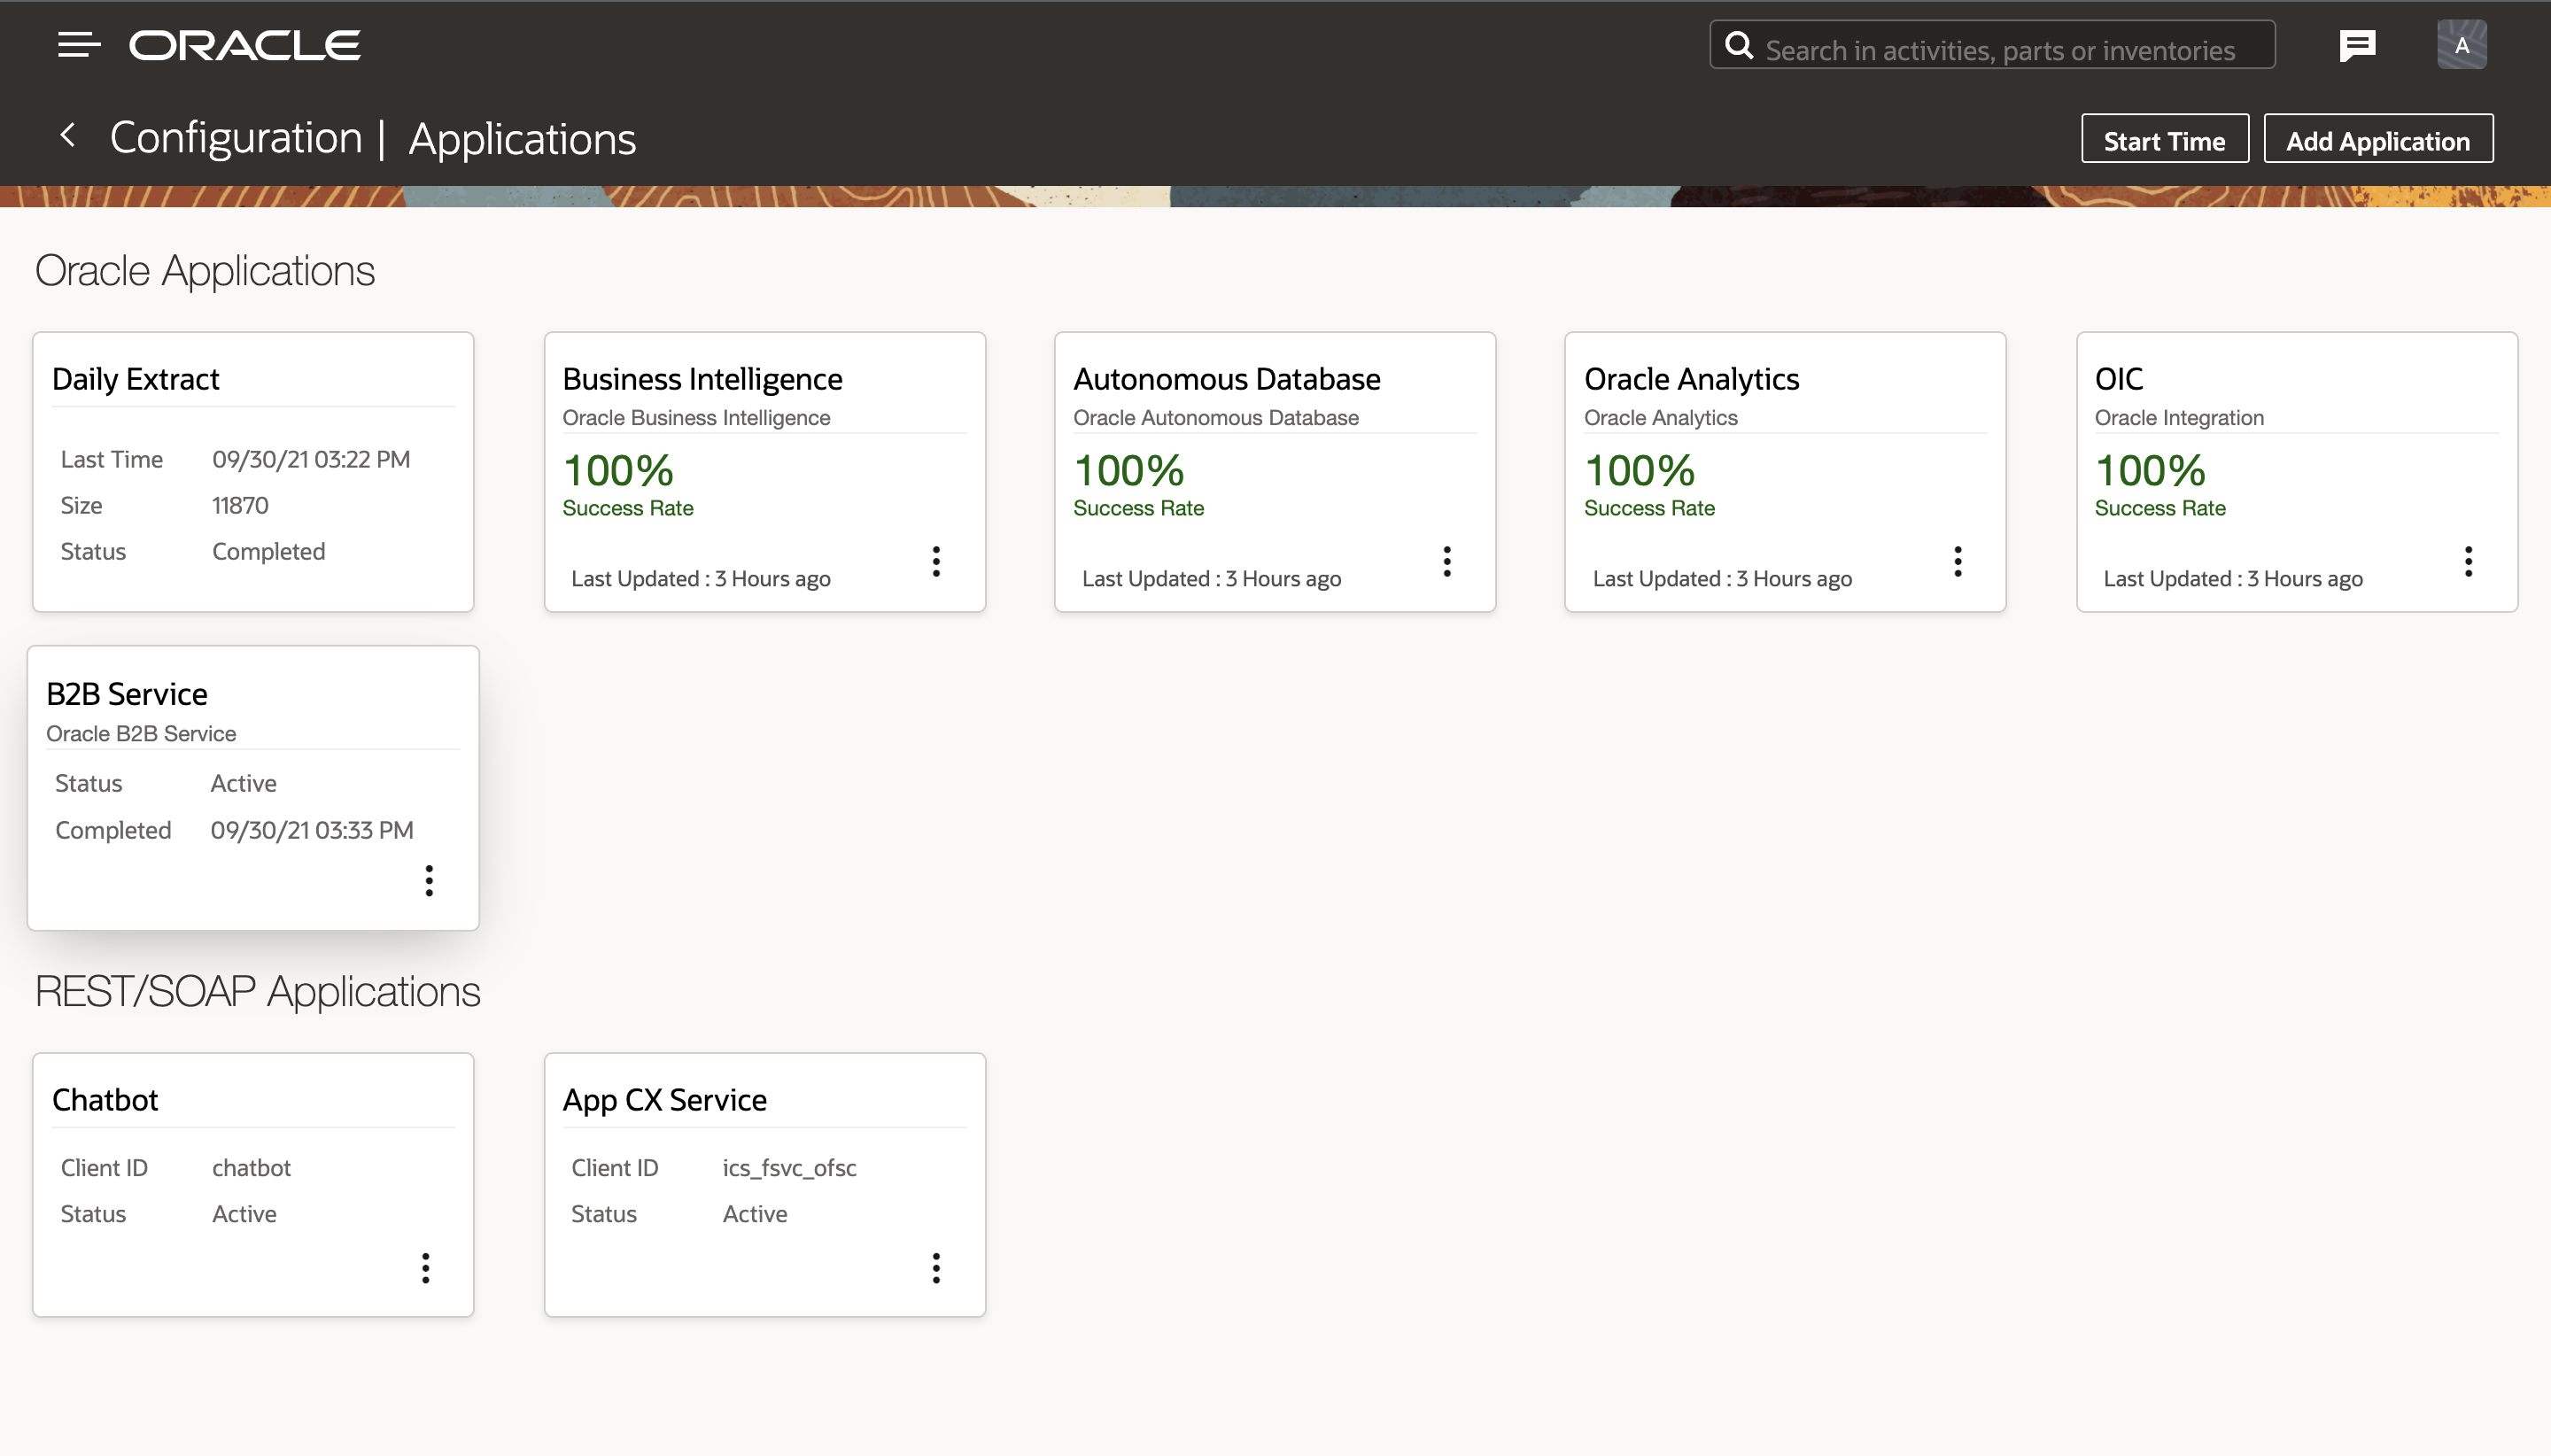
Applications Page
- Click Add Application.
This image displays the Application Type drop-down list in the Add application dialog box.
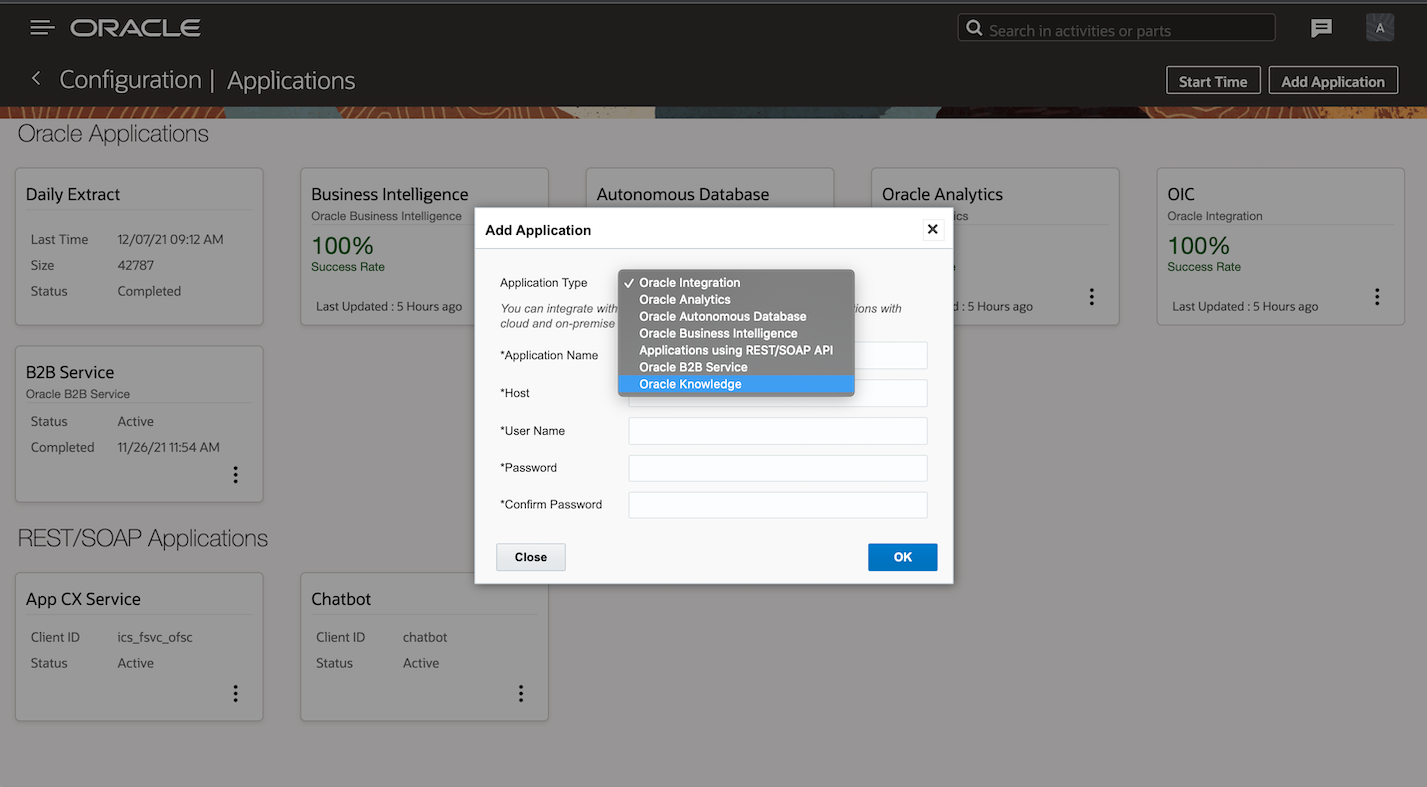
Add Application Dialog Box Showing Application Type Drop-down List
This image shows the Add application dialog box:

- Select Oracle Knowledge from the Application Type list and configure a new Application.
- Specify the Application Name and Application Label and click OK.
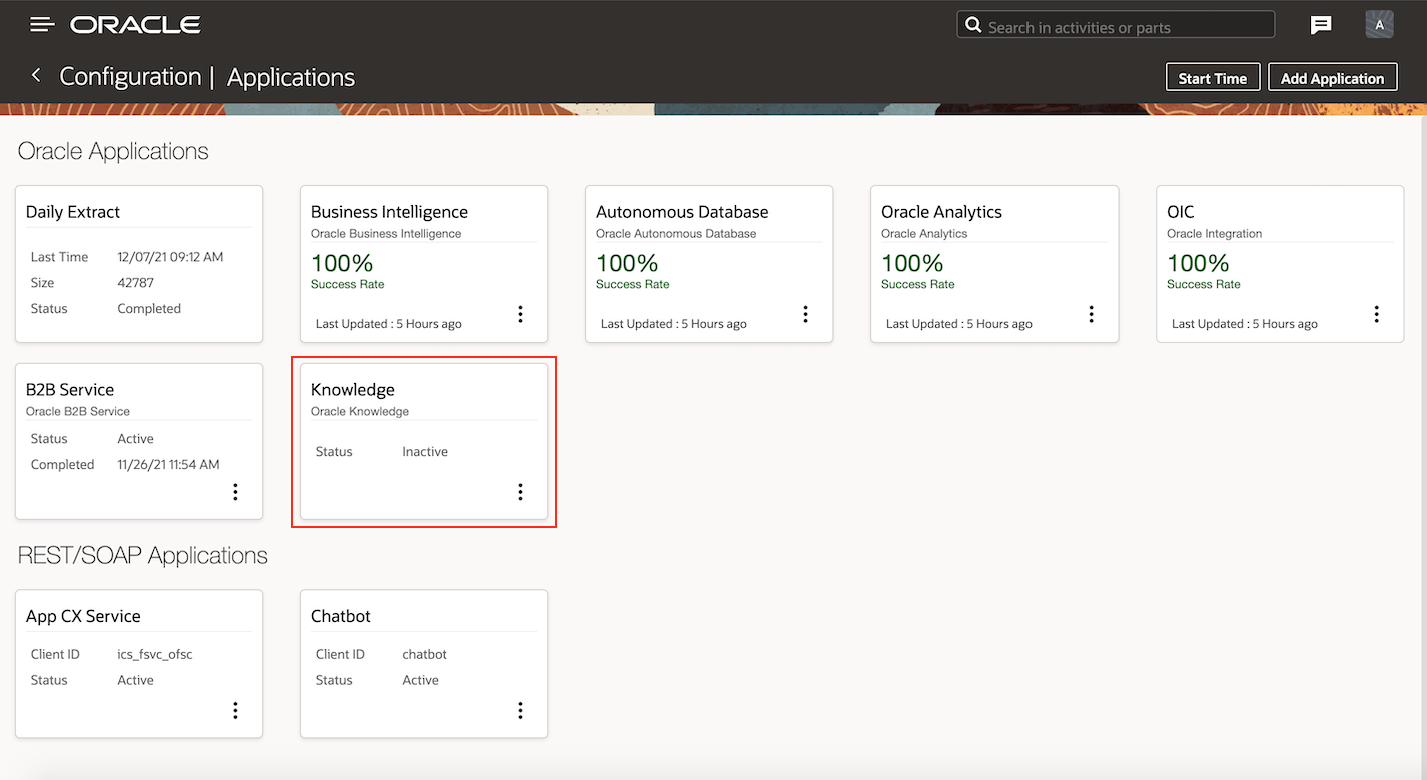
- The Oracle Knowledge application is created and the status is Inactive by default.
This image shows the Oracle Knowledge application with Inactive status:

Enable Oracle B2B Knowledge
Follow these steps:
- Select the new Oracle Knowledge application from the Applications screen.
This image shows the Oracle Knowledge application edit screen:
Oracle Knowledge Application Page
2. Select the Edit option (pencil icon) and configure the endpoint details of the Knowledge application you would like to connect with Field Service.
This image shows the Oracle B2B Knowledge endpoint configuration edit screen:

Oracle B2B Knowledge Endpoint Configuration
This table shows the list of parameter names and their descriptions:
| Parameter Name |
Parameter Descriptions |
|---|---|
| B2B Knowledge URL | The URL of the Oracle B2B Knowledge application in the format 'https://servername.oraclecloud.com'. |
| Password | Password of the Oracle B2B Service user. |
| Username | Oracle B2B Service user name. |
3. Enable the Active checkbox and submit. Now Oracle B2B Knowledge is displayed as Active:
This image shows the Oracle Knowledge application screen:

Oracle Knowledge Application Edit Screen:
4. Enable the Active check box and submit. Now Oracle Content Management is displayed as Active:
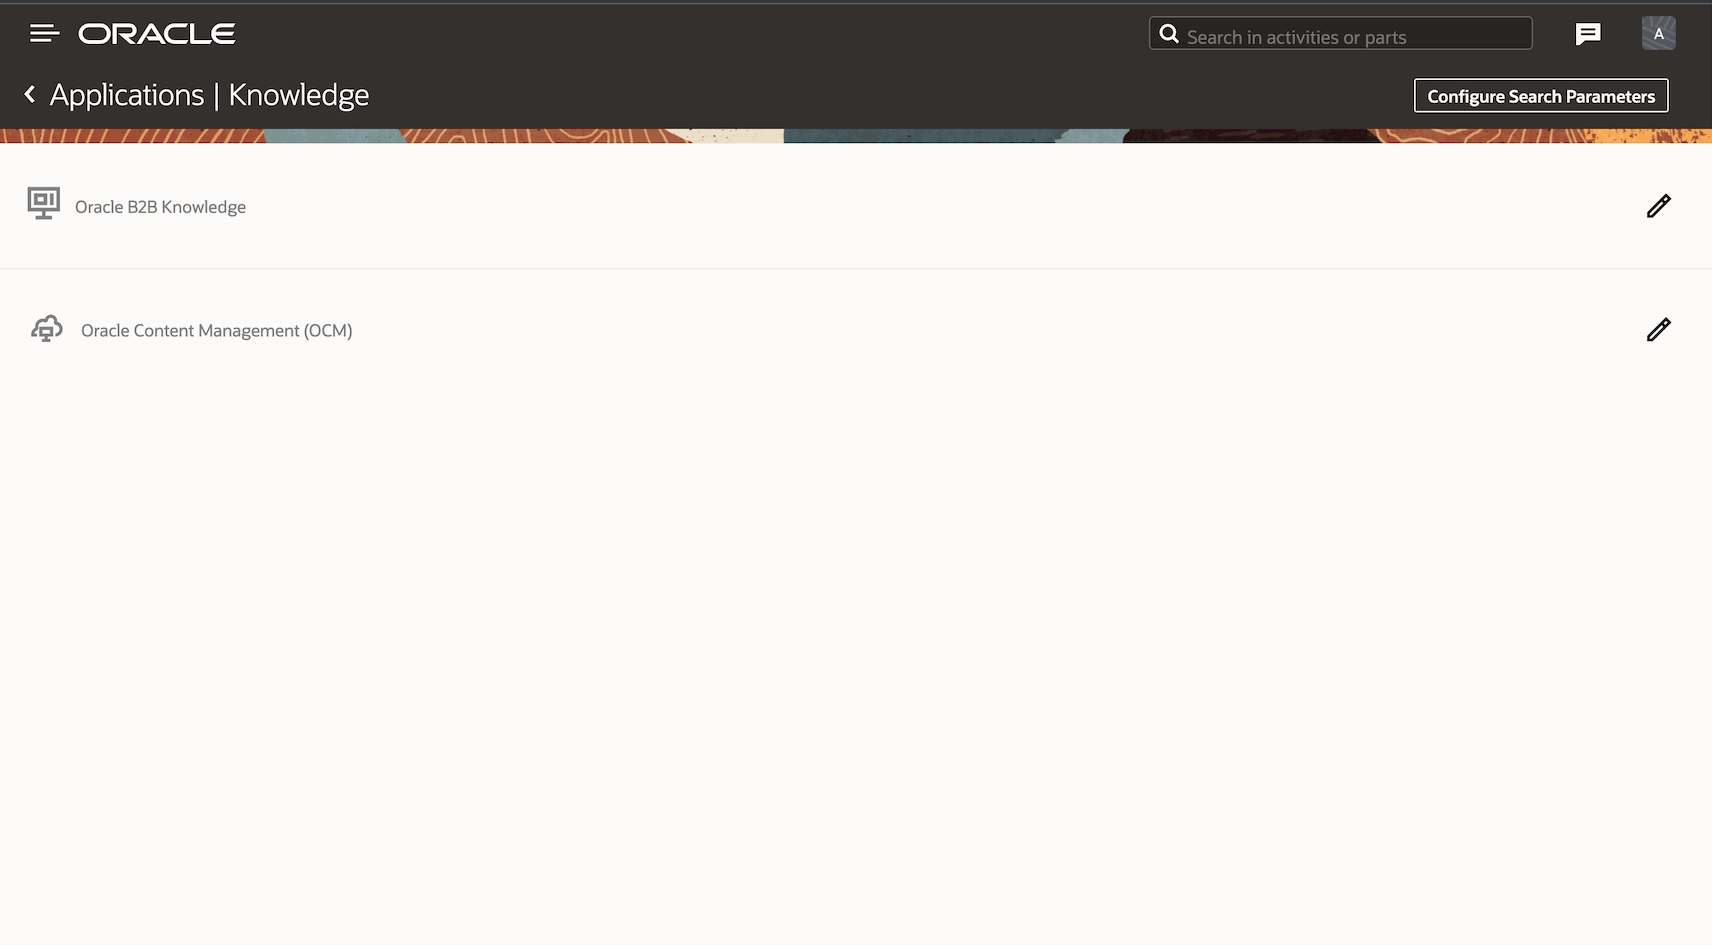
This image shows the Oracle Knowledge page:
Oracle Knowledge Application Page
The Oracle Knowledge application shows Active status if at least one of the Knowledge sources - Oracle Content Management or Oracle B2B Knowledge is Active.
This image shows the Applications page showing Oracle Knowledge application as active:

Application Page Showing Oracle Knowledge as Active
Configure Search Parameters
The Search Parameters enables the application to provide a default search to be performed for Oracle Knowledge Management or Oracle Content Management or from both, depending on the configuration. This is in place as a default configuration to make sure the search results page is not empty when it is initially opened.
This image shows the Knowledge page showing Configure Search Parameters dialog box:
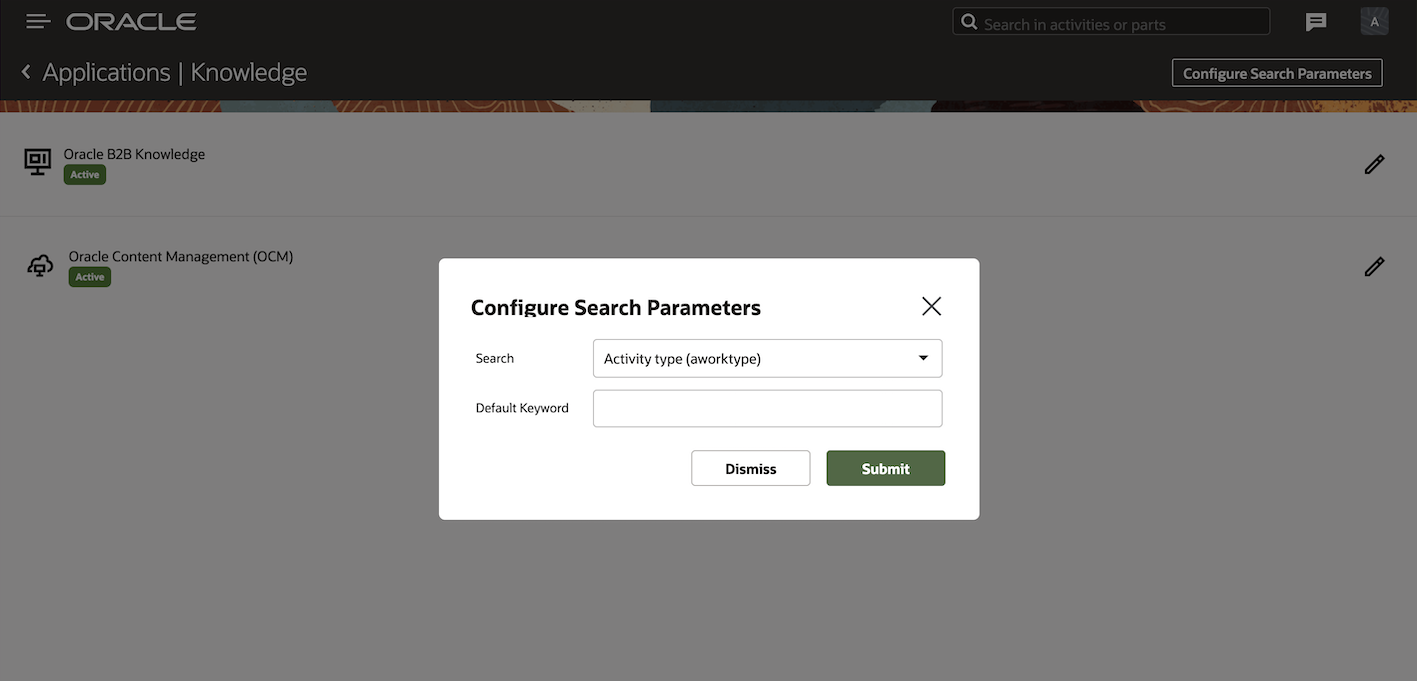
Configure Search Parameters Dialog Box
The application performs an initial search based on the value of a selected field or custom property that can be configured from the Search field. If there is no value available for the property, the application uses the Default Keyword to perform the initial search. For example, let us assume that Search Parameters is configured with the activity property called Activity Notes and the Default Keyword is Test. When a technician searches Knowledge from within the context of an activity, the default search results are based on the Activity Notes property. If the Activity Notes value is empty, the search is performed based on the default keyword configured (example: Test). A technician can perform a search with any other keyword from within the Knowledge page as applicable.
This image shows the Search drop-down list options in the Configure Search Parameters dialog box:
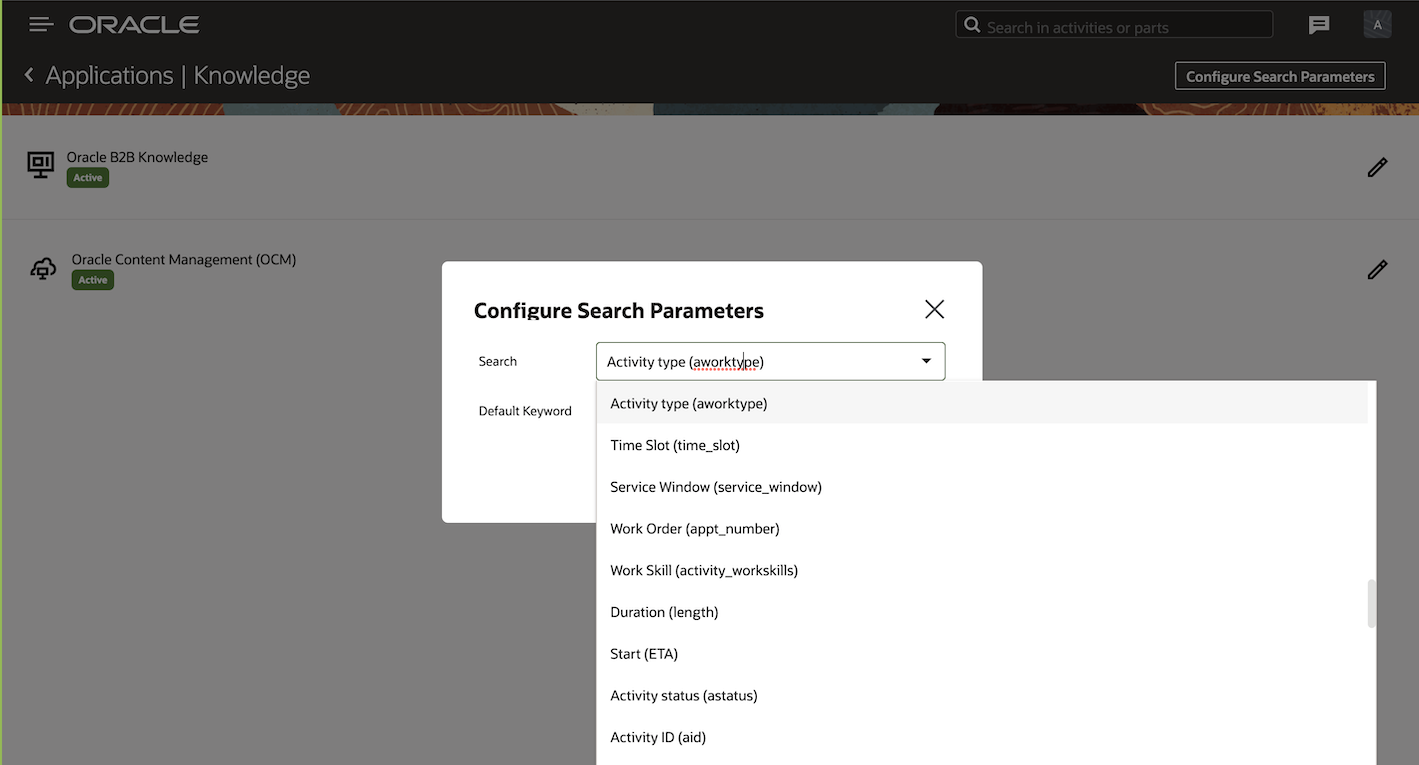
Search Drop-Down List Options
Setting up the Context for Knowledge search
Once you have successfully configured the Knowledge endpoints, a new standard action page called Oracle Knowledge becomes available. You can enable the Knowledge search for a user type by adding the Oracle Knowledge button to the appropriate context layout.
Follow these steps:
- Navigate to the Configuration page and select User Types.
- In the User Types page, select the Screen Configuration tab and open the appropriate context to access Knowledge.
This image shows the Search drop-down list options in the Configure Search Parameters dialog box:
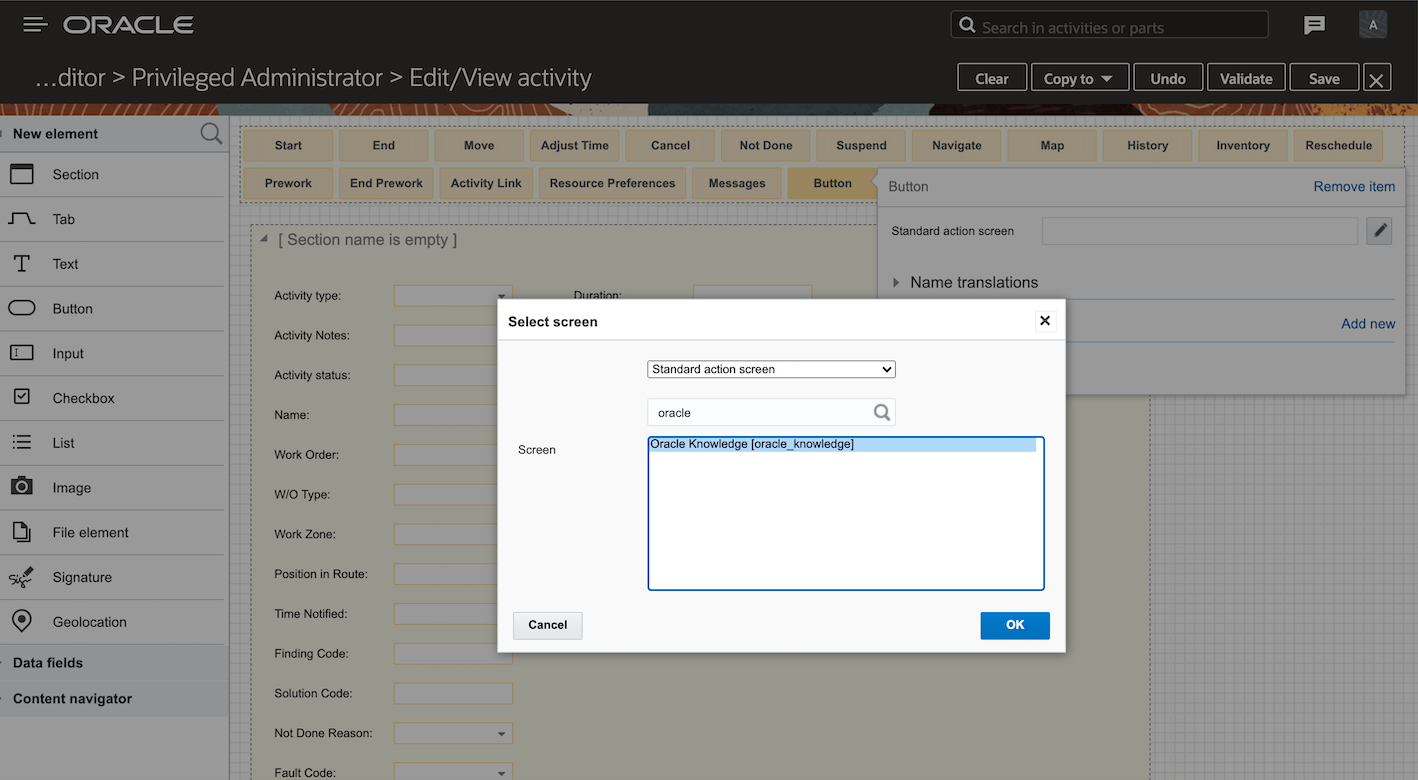
Select Screen Dialog Box
Knowledge Search
Once configured, the Oracle Knowledge option becomes available for the users of that type and they can start searching Knowledge articles from within the context.
This image shows the Activity details screen showing Oracle Knowledge tab.
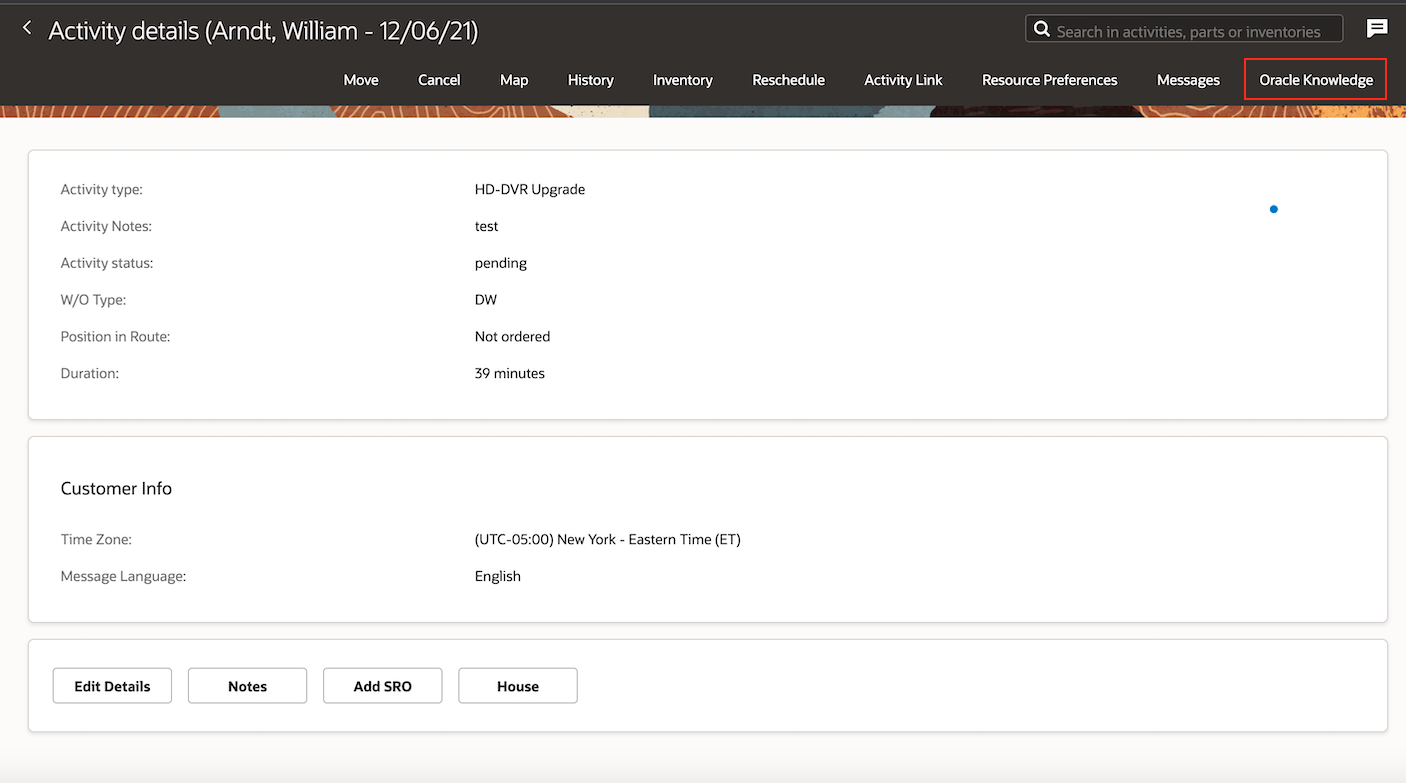
Activity Details Screen Showing Oracle Knowledge Tab
Upon clicking Oracle Knowledge from the Activity Details page, the search results relevant to the context are displayed.
This image shows the Oracle Knowledge page with Search results:
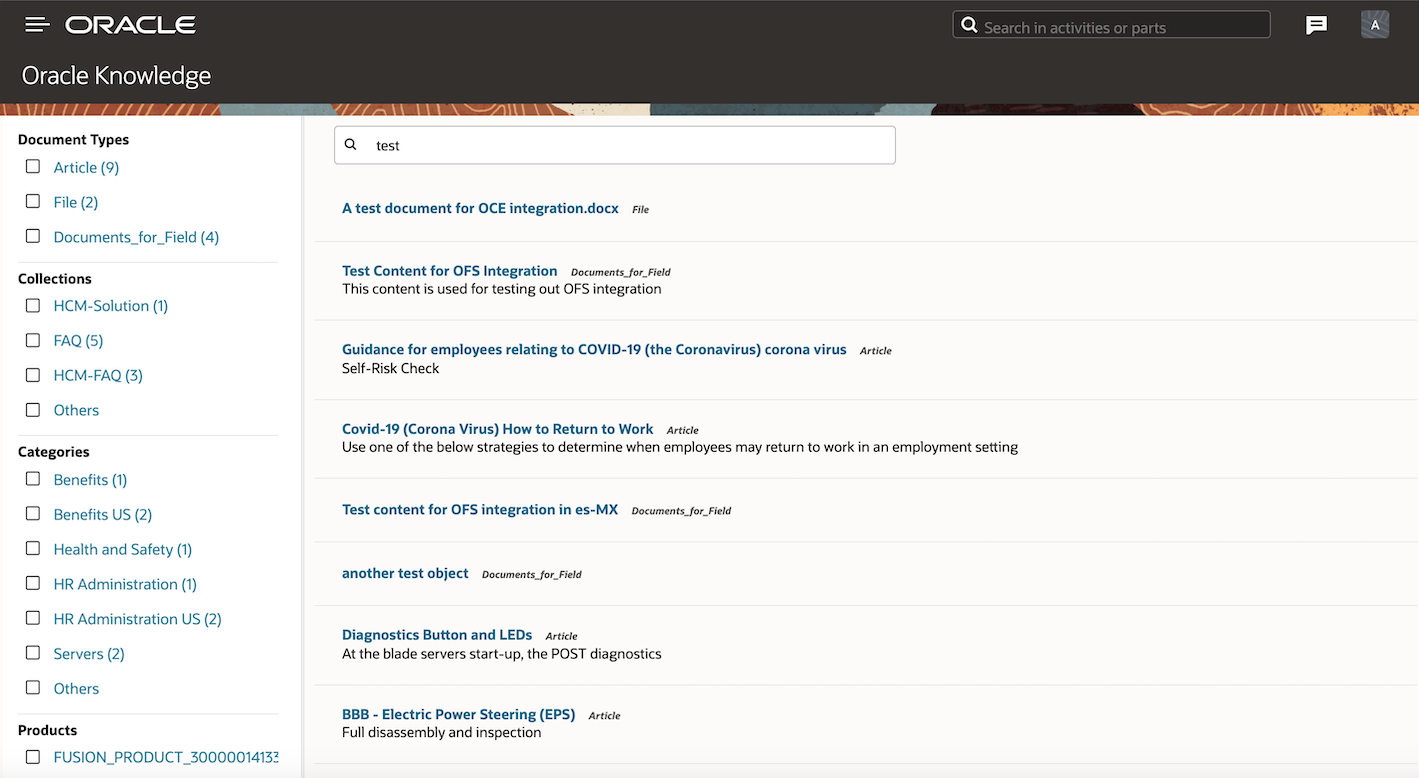
Search Results on Oracle Knowledge Page
Now the technician can search for relevant articles or contents by providing appropriate search keywords:
- The search provides results from Oracle Content Management and/or Oracle Knowledge Management, depending on the configuration.
- A technician can filter the contents of the search results using the filter criteria defined within the left hand sidebar. This criteria is generated dynamically based on the search results from Oracle Content Management and/or Oracle Knowledge Management.
- The number of results returned from Oracle Content Management and/or Oracle Knowledge Management is set at 10 per page.
- Upon scrolling down within the results, a Load More button can be seen to get the content from the next page. Knowledge content can be of different types like articles, images, video, or even a custom type.
- Technicians can drill down within the Knowledge results to view more details.
This image shows a sample Knowledge article page:

Sample Knowledge Article Page
- Technicians can preview the content or download the content to their local storage for future reference.
This image shows the preview of sample Knowledge article to download:
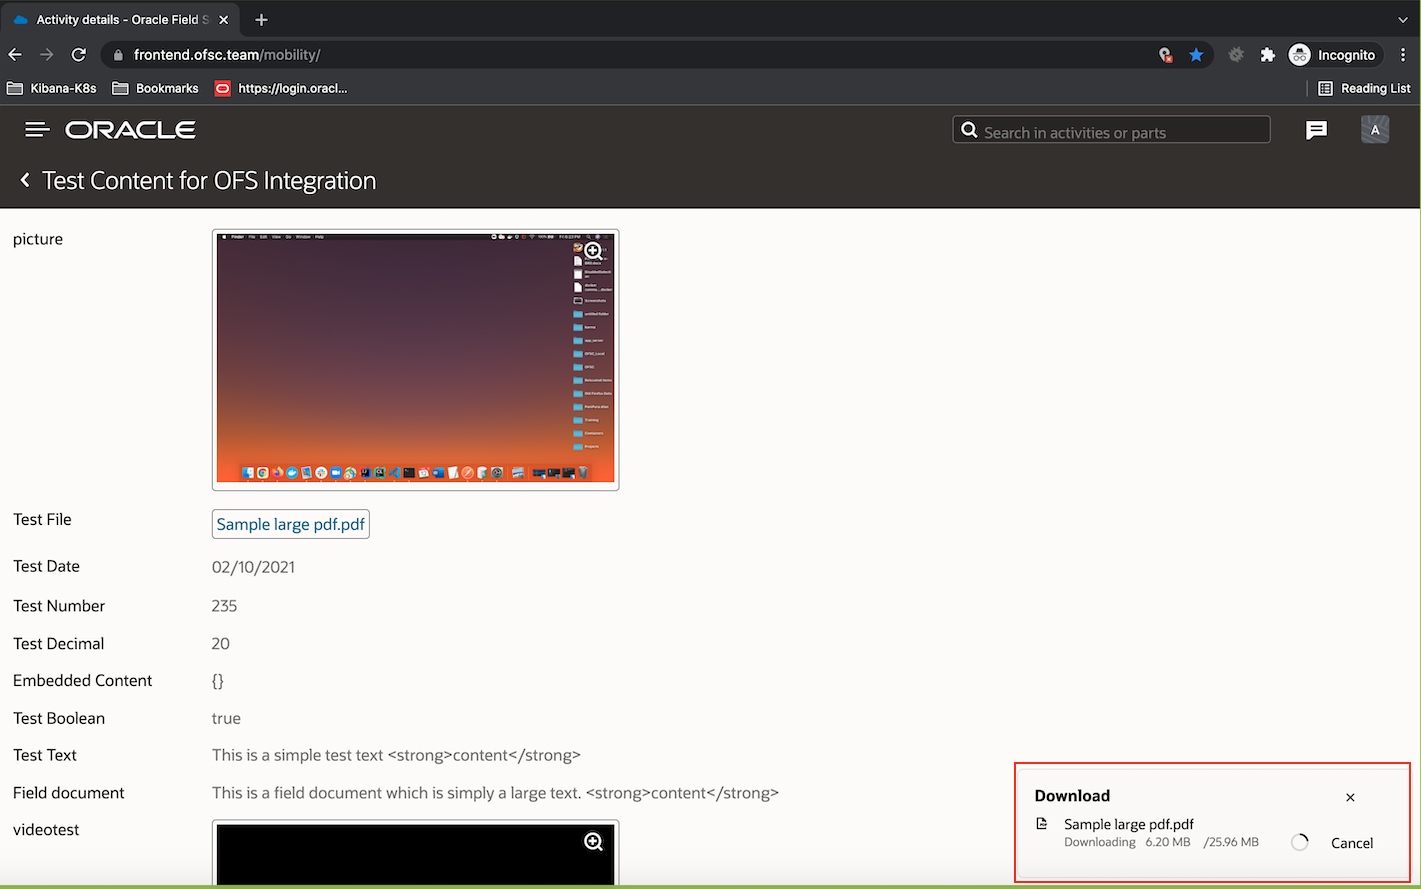
Preview of Sample Knowledge Article to Download
Errors and Information Messages
This table lists the error or info messages that may be displayed based on the description conditions:
| Message |
Message Type |
Description |
|---|---|---|
| Failed to load results from Oracle Content. Please contact your system administrator. |
Error |
The error message is shown when the request to get search results from the Oracle Content endpoint fails. Additional information can be found in console logs. |
| Failed to load results from Oracle Knowledge. Please contact your system administrator. |
Error |
The error message is shown when the request to get search results from the OKM endpoint fails. Additional information can be found in console logs. |
| Failed to load results. Please contact your system administrator. |
Error |
The error message is shown when requests to both OKM and Oracle Content endpoints fail. |
| Please enter a valid search criteria |
Information |
Message is shown when there is no search result based on search parameter provided by the user. |
| No results found |
Information |
Message is shown when no search results are returned from both Oracle Content and OKM endpoints. |
| Failed to load plugin as the plugin parameters are setup incorrectly. Please contact your system administrator. |
Error |
Error message is shown when the plugin load fails. This is most likely due to the secure parameters used by the plug-ins being incorrect. Additional information can be found in console logs. |
CORS Configuration
- Configuring CORS:
To prevent the browser from throwing CORS errors while accessing Oracle Content Management (OCM) or Oracle Knowledge Management (OKM) endpoints from Oracle Field Service, necessary CORS policies must be configured at OCM or OKM based on the product you are connecting with.
- Configuring CORS for Oracle Content:
For Oracle Content, CORS is configured by adding the OFS domain <*.etadirect.com> the list of allowed origins in System > Security from > Oracle Content-Base-URL > /documents/administration/security. See the OCM documentation for more details.
- Configuring CORS for Oracle Knowledge Management (OKM):
For Oracle Knowledge Management, make the necessary changes by navigating to Oracle B2B knowledge user interface > Setup and Maintenance > search Manage Administrator Profile Values, where you can search for the CORS profile values and add the necessary profile values. You may need the origin of Oracle Field Service to be added as one of the accepted ones by searching for 'ORACLE.ADF.VIEW.ALLOWED_ORIGINS'. See Knowledge Management documentation for more details.
This feature provides the right information to field technicians for a better user experience as field technicians have to solve the problems quickly in critical conditions. A system to collect, organize and share information to improve the knowledge base of the field service team is one important part of good customer service.
Steps to Enable
You don't need to do anything to enable this feature.
Key Resources
Enable Oracle Content Management
Starting with Update 22A, you can enable Oracle Content Management (OCM) within Oracle Field Service, so that technicians can access files from Oracle Content Management. With this integration, a technician can access the most relevant information related to the job they are working on and complete the job efficiently.
SET UP ORACLE CONTENT MANAGEMENT IN ORACLE FIELD SERVICE
Prerequisites
To use Oracle Oracle Content Management within Oracle Field Service, you must have a valid license for either or both of the following products: Oracle B2B Knowledge Management and Oracle Content. Management
Configure the Oracle Knowledge Application
You can configure Knowledge management using Applications on the Configuration page.
Follow these steps:
- Select Applications from the Configuration page.
This image displays the Configuration page.

Configuration Page
This image displays the Applications page.

Applications Page
- Click Add Application.
This image displays the Application Type drop-down list in the Add application dialog box.

Add Application Dialog Box Showing Application Type Drop-down List
This image shows the Add application dialog box:
- Select Oracle Knowledge from the Application Type list and configure a new Application.
- Specify the Application Name and Application Label and click OK. The Oracle Knowledge application is created and the status is Inactive by default.
This image shows the Oracle Knowledge application with Inactive status:
Applications Page Showing Oracle Knowledge
Enable Oracle Content Management
Follow these steps:
- Select the new Oracle Knowledge application from the Applications screen.
This image shows the Oracle Knowledge application edit screen:

Oracle Knowledge Application Page
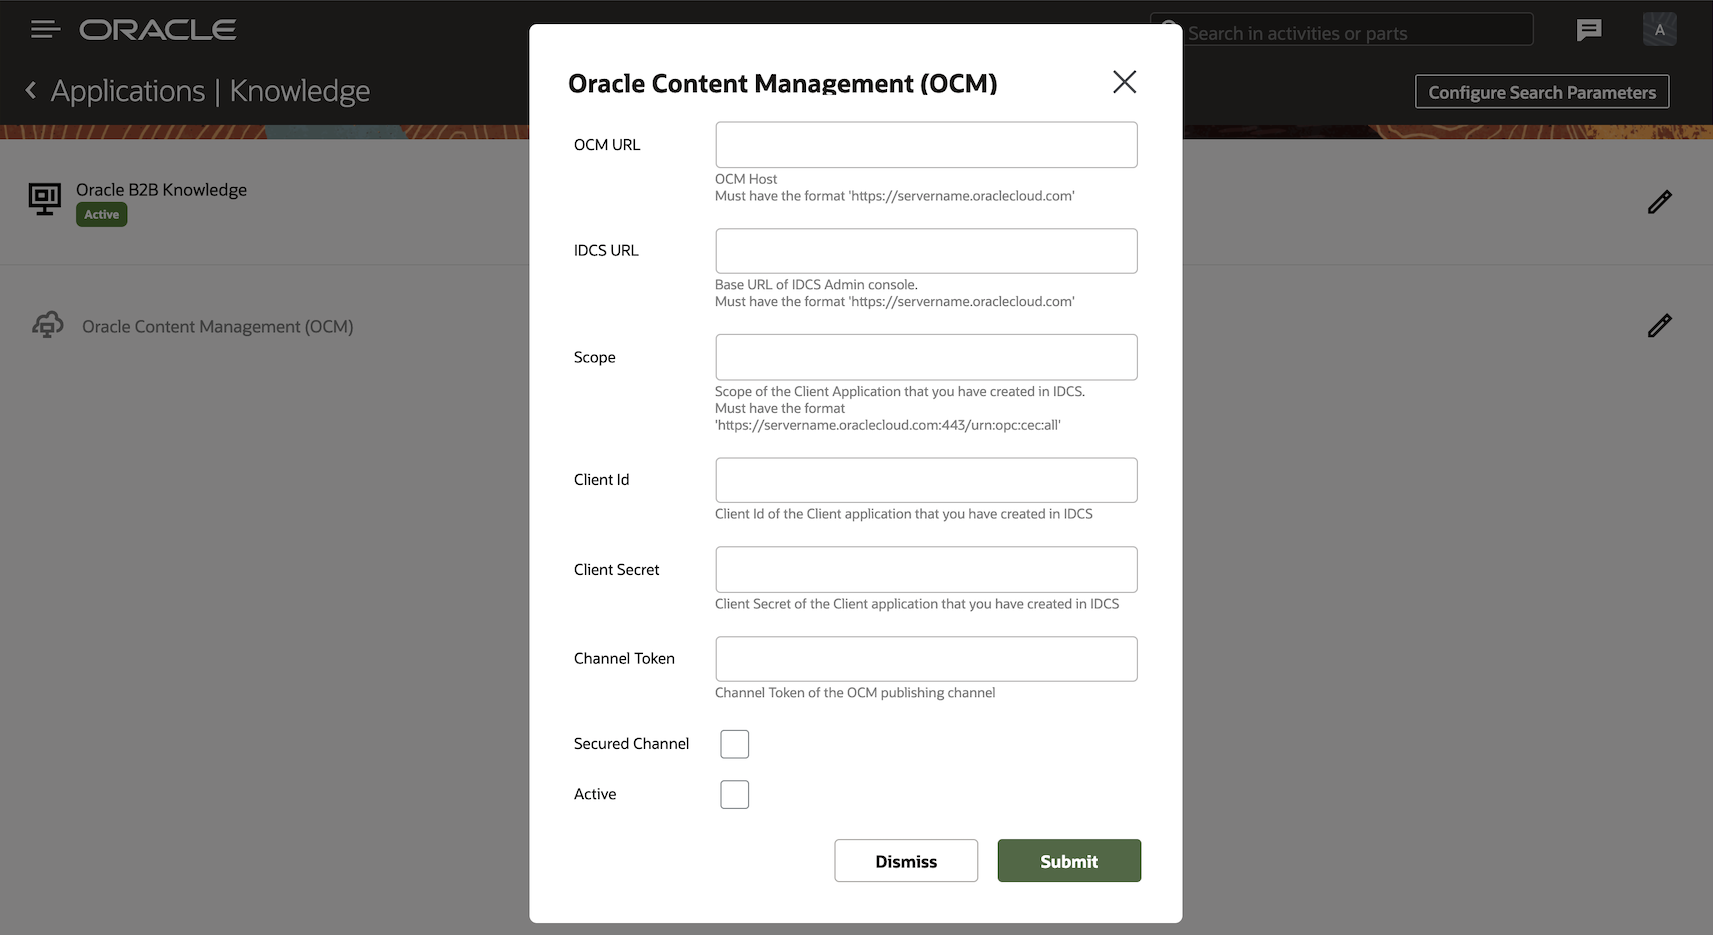
- Select the Edit option (pencil icon) and configure the endpoint details of the application you would like to connect with Oracle Field Service.
This image shows the Oracle Content Management endpoint configuration edit screen:
Oracle Content Management Endpoint Configuration
This table shows the list of parameter names and their descriptions:
| Parameter Name |
Parameter Descriptions |
|---|---|
| OCM URL | Oracle Content Management host URL in the format 'https:// servername.oraclecloud.com'. |
| IDCS URL |
The base URL of the IDCS Admin Console in the format 'https:// servername.oraclecloud.com'. |
| Scope | Scope of the client application configured in IDCS |
| Client ID |
Client ID configured in IDCS for the Oracle Content Management Endpoint. (Example: abcdefghijklmn) |
| Client Secret |
Client secret configured in IDCS for the Oracle Content Management Endpoint. (Example 1111-1111-1111-1111) |
| Channel token |
Channel token for the Oracle Content Management publishing channel. |
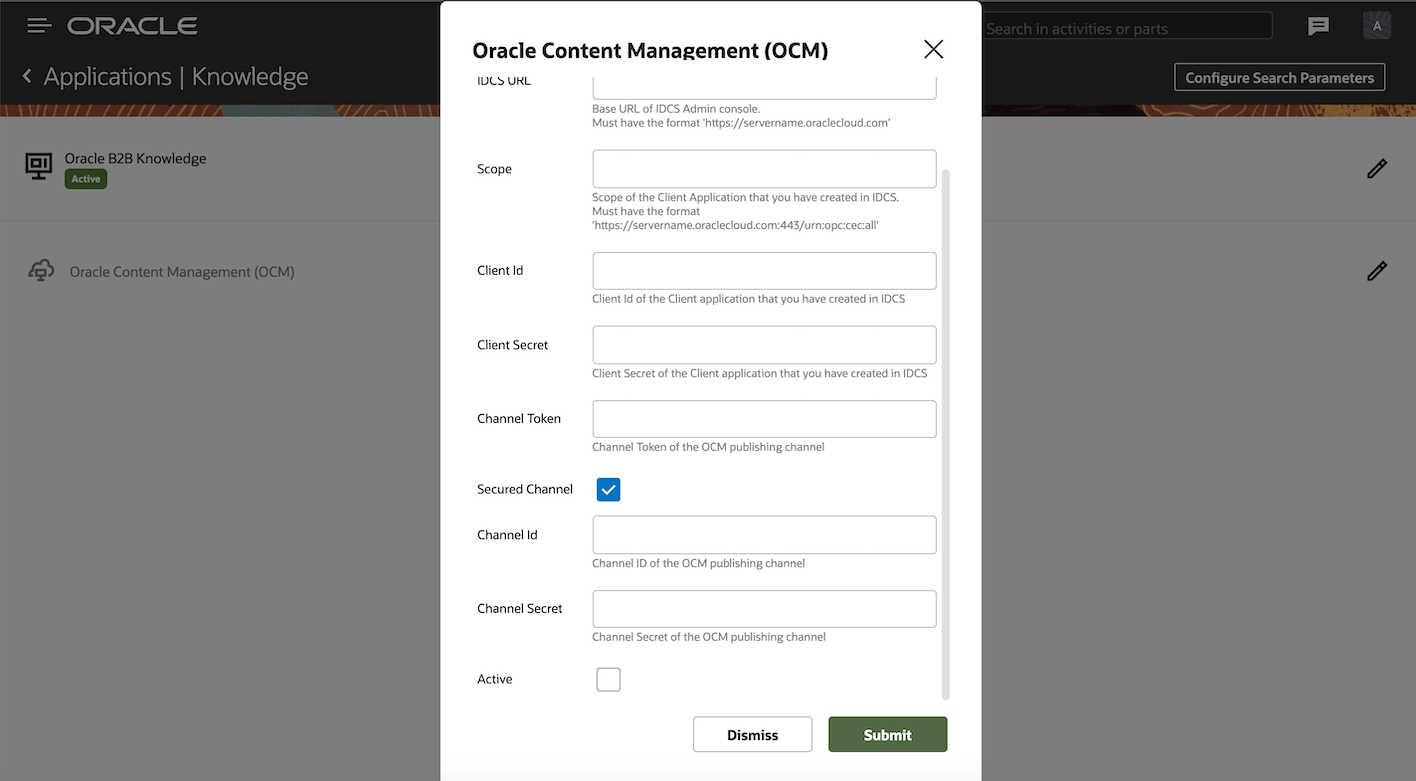
- If you want a secure communication channel for content access, the Secure Channel option must be enabled.
This image shows the Oracle Content Management endpoint configuration edit screen:
Oracle Content Management Endpoint Configuration Dialog Box
- If the Secure Channel option is enabled, two additional parameter values must be specified:
This image shows the Oracle Content Management endpoint configuration edit screen with additional parameter values:

Oracle Content Management Endpoint Configuration Dialog Box Showing Additional Parameter Values
This table shows the additional parameter names and their descriptions:
| Parameter Name |
Parameter Descriptions |
|---|---|
| Channel ID | Channel ID of the Oracle Content Management publishing channel. |
| Channel Secret |
Channel Secret of the Oracle Content Management publishing channel. |
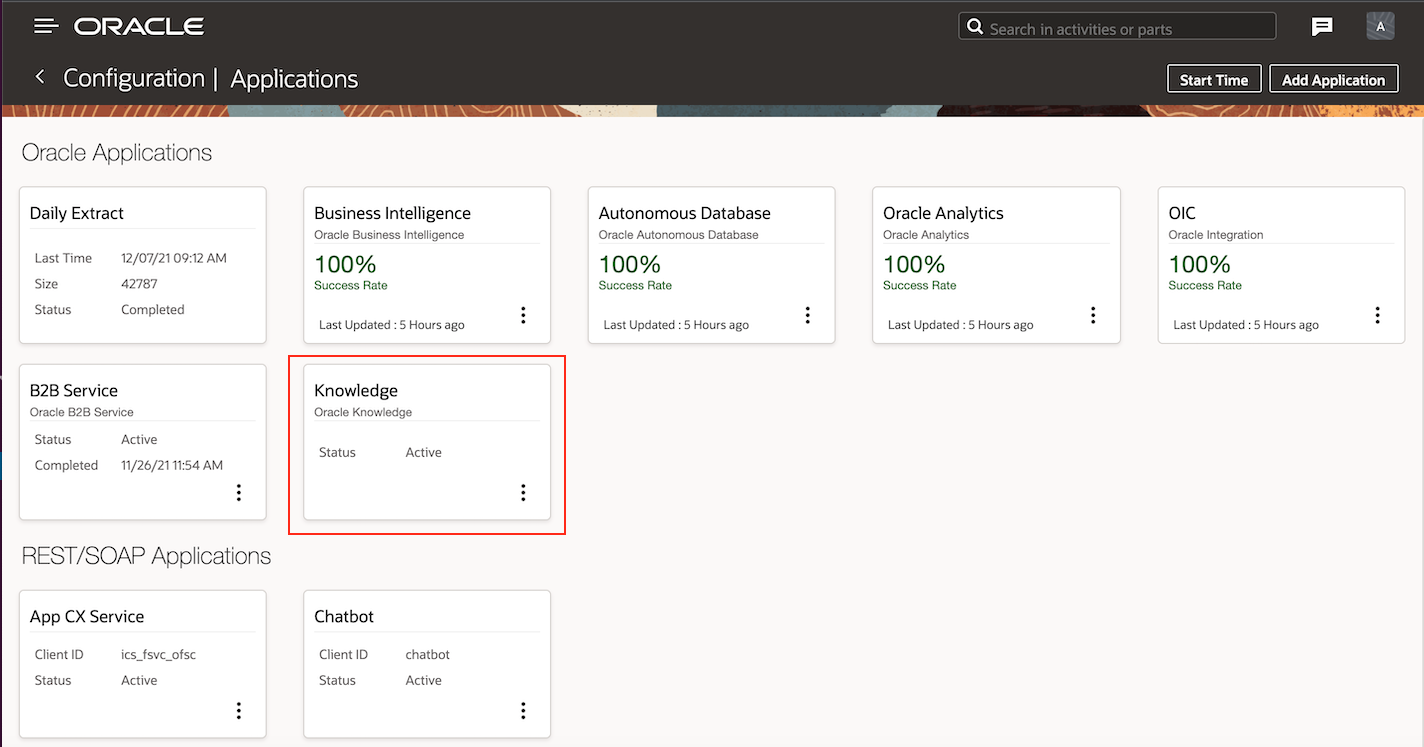
- Enable the Active checkbox and submit. Now Oracle Content Management is displayed as Active:
This image shows the Oracle Knowledge page:

Oracle Knowledge Application Page
The Oracle Knowledge application shows Active status if at least one of the Knowledge sources - Oracle Content Management or Oracle B2B Knowledge is Active.
This image shows the Applications page showing Oracle Knowledge application as active:
Application Page Showing Oracle Knowledge as Active
Configure Search Parameters
The Search Parameters enables the application to provide a default search to be performed for Oracle Knowledge Management or Oracle Content Management or from both, depending on the configuration. This is in place as a default configuration to make sure the search results page is not empty when it is initially opened.
This image shows the Knowledge page showing Configure Search Parameters dialog box:

Configure Search Parameters Dialog Box
The application performs an initial search based on the value of a selected field or custom property that can be configured from the Search field. If there is no value available for the property, the application uses the Default Keyword to perform the initial search. For example, let us assume that Search Parameters is configured with the activity property called Activity Notes and the Default Keyword is Test. When a technician searches Knowledge from within the context of an activity, the default search results are based on the Activity Notes property. If the Activity Notes value is empty, the search is performed based on the default keyword configured (example. 'Test'). A technician can perform a search with any other keyword from within the Knowledge page as applicable.
This image shows the Search drop-down list options in the Configure Search Parameters dialog box:

Search Drop-Down List Options
Set up the Context for Knowledge search
Once you have successfully configured the Knowledge endpoints, a new standard action screen Oracle Knowledge is available. You can enable the Knowledge search for a user type by adding the Oracle Knowledge button to the appropriate context layout.
Follow these steps:
- Navigate to the Configuration page and select User Types.
- In the User Types page, select the Screen Configuration tab and open the appropriate context to access Knowledge.
This image shows the Search drop-down list options in the Configure Search Parameters dialog box:

Select Screen Dialog Box
Knowledge Search
Once configured, the Oracle Knowledge option is available for the users of that type and they can start searching Knowledge articles from within the context.
This image shows the Activity details screen showing Oracle Knowledge tab.

Activity Details Screen Showing Oracle Knowledge Tab
Upon clicking Oracle Knowledge from the Activity Details page, the search results relevant to the context are displayed.
This image shows the Oracle Knowledge page with Search results:

Search Results on Oracle Knowledge Page
Now technicians can search relevant articles or contents by providing appropriate search keywords:
- The search provides results from Oracle Content Management and/or Oracle Knowledge Management, depending on the configuration.
- A technician can filter the contents of the search results using the filter criteria defined within the left hand sidebar. This criteria is generated dynamically based on the search results from Oracle Content Management and/or Oracle Knowledge Management.
- The number of results returned from Oracle Content Management and/or Oracle Knowledge Management is set at 10 per page.
- Upon scrolling down within the results, a 'Load More' button can be seen to get the content from the next page. Knowledge content can be of different types like articles, images, video, or even a custom type.
- Technicians can drill down within the Knowledge results to view more details.
This image shows a sample Knowledge article page:
Sample Knowledge Article Page
- Technicians can preview the content or download the content to their local storage for future reference.
This image shows the preview of sample Knowledge article to download:

Preview of Sample Knowledge Article to Download
Errors and Information Messages
This table lists the error or info messages that may be displayed based on the description conditions:
| Message |
Message Type |
Description |
|---|---|---|
| Failed to load results from Oracle Content. Please contact your system administrator. |
Error |
The error message is shown when the request to get search results from the Oracle Content endpoint fails. Additional information is available in console logs. |
| Failed to load results from Oracle Knowledge. Please contact your system administrator. |
Error |
The error message is shown when the request to get search results from the OKM endpoint fails. Additional information is available in console logs. |
| Failed to load results. Please contact your system administrator. |
Error |
The error message is shown when requests to both OKM and Oracle Content endpoints fail. |
| Please enter a valid search criteria |
Information |
Message is shown when there is no search result based on search parameter provided by the user. |
| No results found |
Information |
Message is shown when no search results are returned from both Oracle Content and OKM endpoints. |
| Failed to load plugin as the plugin parameters are setup incorrectly. Please contact your system administrator. |
Error |
Error message is shown when the plug-in load failed. This is most likely due to the secure parameters used by the plugins being incorrect. Additional information is available in console logs. |
CORS Configuration
- Configuring CORS:
To prevent the browser from throwing CORS errors while accessing Oracle Content Management (OCM)' or Oracle Knowledge Management (OKM) endpoints from Oracle Field Service, necessary CORS policies must be configured at OCM or OKM based on the product you are connecting with.
- Configuring CORS for Oracle Content:
For Oracle Content, CORS is configured by adding the OFS domain <*.etadirect.com> the list of allowed origins in System > Security from > Oracle Content-Base-URL > /documents/administration/security. See the OCM documentation for more details.
- Configuring CORS for Oracle Knowledge Management (OKM):
For Oracle Knowledge Management, make the necessary changes by navigating to Oracle B2B knowledge user interface > Setup and Maintenance > search Manage Administrator Profile Values, where you can search for the CORS profile values and add the necessary profile values. You may need the origin of Oracle Field Service to be added as one of the accepted ones by searching for ORACLE.ADF.VIEW.ALLOWED_ORIGINS. See Knowledge Management documentation for more details.
This feature provides the right information to field technicians for a better user experience as field technicians have to solve the problems quickly in critical conditions. A system to collect, organize and share information to improve the knowledge base of the field service team is one important part of good customer service.
Steps to Enable
You don't need to do anything to enable this feature.
Key Resources
The Plugin API Framework provides the ability to print files that a user uploaded from their device or files that were generated by plug-ins themselves. Integrators use the new 'print' procedure to implement scenarios when users can print text, text files, or image of pdf files directly from their devices using the installed Oracle Field Service Android or iOS apps.
NEW PROCEDURE
By calling this procedure, the Plugin API will validate parameters and call native (device or browser) print functionality with those provided parameters. The plugin API doesn't return info about or respond to problems such as no printer or cancellation.
Example of the "callProcedure" message:
{
"apiVersion": 1,
"method": "callProcedure",
"procedure": "print",
"callId": "123abc",
"params": {
"documentType": "pdf",
"fileObject": "fileObject",
"text": "Some text string"
}
}
Oracle Field Service sends the "resultData" message in response to the "print" message only if there are no validation errors.
{
"apiVersion": 1,
"method": "callProcedureResult",
"callId": "123abc",
"resultData": {
"status": "ok"
}
}
Print procedure parameters
The table lists the Print procedure parameters with descriptions:
| Parameter |
Value | Is Required | Description |
|---|---|---|---|
| documentType |
string |
yes |
document type of the file to be printed (text, image, html, pdf) |
| fileObject |
fileObject |
required Not required only if 'documentType' parameter is 'text' |
value from input file with max size 10 MB (10240kb) |
| text |
string |
required only if 'documentType' parameter is 'text' |
text string to be printed |
If the 'documentType' is ''text' and the 'fileObject', 'text' parameters are not empty, 'text' parameters are printed.
Supported documentType
The table lists the supported documentType and dependent fields:
| documentType | Dependent Field |
|---|---|
| text |
text one of - text or fileObject |
| image |
fileObject is required |
| html |
fileObject is required |
| |
fileObject is required |
In the case where the HTML file contains JavaScript code, then the code won't be executed as per the web security policy. In this case only static content will be printed.
Supported file types
The table lists the supported file types with example file names:
| File Type | Example of File Name |
|---|---|
| image/jpeg | *.jpg |
| image/png | *.png |
| image/gif | *.gif |
| text/html | *.html |
| text/plain | *.txt |
| application/pdf |
For 'image/gif' file type that contain animation, only the first frame will be printed.
For 'application/pdf' file type the browser built-in PDFViewer is required.
NOTE: If you would like to use a browser for printing, make sure the version of the browser supports printing of the mentioned types of documents.
Validation
If the error appears, it means that no actions are applied.
Error codes
The table lists the error codes:
| Code | Cause |
|---|---|
| CODE_PRINT | |
| CODE_PROCEDURE_MANDATORY_PARAM_EMPTY | One of required fields is empty |
| CODE_PRINT_UNSUPPORTED_PRINT_FILE_TYPE | Uploaded file type is not allowed |
| CODE_PRINT_ATTACHED_FILE_IS_TOO_LARGE | Uploaded file size is more then 10 MB |
| CODE_PRINT_TYPE_AND_PRINT_FILE_FORMAT_NOT_MATCHED | documentType and fileObject.type is not matched |
| CODE_PRINT_BROWSER_DOES_NOT_SUPPORT_PDF_VIEW |
The browser built-in PDFViewer is unavailable |
Example of the error message:
[
{
"type": "TYPE_PROCEDURE_PARAM",
"code": "CODE_PROCEDURE_MANDATORY_PARAM_EMPTY",
"procedure": "print",
"paramName": "fileObject"
}
]
The new procedure - 'print" lets integrators implement scenarios when technicians are able to print invoices, warranties, or other documents using the installed Oracle Field Service app on iOS and Android devices in online and offline modes.
Steps to Enable
You don't need to do anything to enable this feature.
Oracle Field Service allows plug-ins to work in the background, so they're able to synchronize data with external systems when the plug-in's screen is not currently opened. But the frequency and duration of background operation sessions is limited and is not configurable. To make plug-ins useful in many more cases, the plug-in API was extended so the limits can be set directly by the plug-in itself, and the appearance of the plug-in's button can be changed at any time during background operation.
OVERVIEW
With the new feature, the Plug-in API has been improved, so now it's possible to:
- Open a plug-in in the background ("wake up") even when the device is offline
- Define the delay for opening a plug-in in the background after closing its window. This can be set as short as 10 seconds (previously, it was fixed at 5 minutes).
- Extend the period of background operation for a plug-in before being required to close ("sleep"). It can be set to a number of seconds between 10 seconds and 1 hour.
- Update the appearance (icon, color, text) of a plug-in's button (or multiple buttons) on the "My Route" screen while the plug-in is working in the background without closing it.
- Navigate to "En route" and "Stop travel" screens when the plug-in screen is closed.
- Check which procedures are available to call via the plug-in API without actually "calling" them.
All these capabilities are optional, and the API remains backward compatible, so there's no requirement to change any existing plug-ins.
NEW PROCEDURES
By calling this procedure, a plug-in is able to update the appearance of its button (or multiple buttons at once to make it look the same) on the My Route screen at any time without closing the plug-in screen or interrupting its background operation.
The procedure has only the parameter - iconData that is mandatory and it has the same format as the iconData field for the close/sleep/initEnd messages.
Example of callProcedure message with updateIconData procedure
{
"apiVersion": 1,
"method": "callProcedure",
"procedure": "updateIconData",
"callId": "123abc",
"params": {
"iconData": {
"color": "highlight",
"text": "117",
"image": new Blob([
'<?xml version="1.0"?>' +
'<svg xmlns="http://www.w3.org/2000/svg" version="1.2" baseProfile="tiny" viewBox="0 0 64 64">' +
'<rect x="16" y="16" width="32" height="32" fill="#fff" />' +
'</svg>'
], { type: 'image/svg+xml' });
}
}
}
updateButtonsIconData
This procedure allows plug-in to update the appearance of each of its buttons individually at any time without closing the plug-in screen or interrupting its background operation.
The procedure has only the parameter - "buttonsIconData" that is mandatory and it has the same format as the "buttonsIconData" field for the close/sleep/initEnd messages.
Example of "callProcedure" message with "updateIconData" procedure
{
"apiVersion": 1,
"method": "callProcedure",
"procedure": "updateButtonsIconData",
"callId": "123abc",
"params": {
"buttonsIconData": {
"17156": {
"color": "highlight",
"text": "123",
"image": {}
},
"17155": {
"color": "default",
"text": null,
"image": {}
}
}
}
}
Errors related to "updateIconData" and "updateButtonsIconData" procedures
| Code | Cause |
|---|---|
| TYPE_PROCEDURE_ERROR |
|
| CODE_PROCEDURE_DEMAND_AT_LEAST_ONE_PARAM | "params" field of "callProcedure" message is empty or is not an object |
| CODE_PROCEDURE_MANDATORY_PARAM_EMPTY | One of:
|
| CODE_PROCEDURE_PARAM_VALUE_INVALID | "buttonsIconData" param of "updateButtonsIconData" procedure is not an object or is empty |
CHANGES REGARDING BACKGROUND OPERATION OF PLUG-INS
Configurable frequency and duration of background operation
In addition to the existing wakeupNeeded, the Plug-in API now supports a new optional field wakeOnEvents, which the plug-in can utilize to control the frequency and duration of its background operation. This field is applicable only for close, initEnd and sleep methods.If the wakeupNeeded field is absent, empty or is set to false, then the wakeOnEvents field is ignored.
The value of wakeOnEvents is an object with two possible keys, that define which event the plug-in must be opened for background operation:
- online - if this field is set and is not null, the plug-in will be opened in the background only when Oracle Field Service is online, as if wakeOnEvents field was not sent
- timer - if this field is set and is not null, the plug-in will be opened in the background regardless of connectivity status.
The value of these fields has the same format - it's an object with two optional fields:
| Field | Type | Min Value | Max Value | Default Value | Description |
|---|---|---|---|---|---|
| wakeupDelay | Number (integer) | 10 | - | 300 | Delay (in seconds), after which Oracle Field Service opens the plug-in in the background and sends a "wakeup" message. Oracle Field Service "wakes" plug-in as close as possible to the requested time, but not earlier than that. The actual time may be longer because of the browser's limitations. |
| sleepTimeout | Number |
10 | 3600 | 120 | Duration of the time period in seconds, after which Oracle Field Service forcibly closes a background frame of the plug-in if it hasn't sent a "sleep" message explicitly. This period starts when Oracle Field Service sends the "wakeup" message to the plug-in. |
If both fields (online and timer) are set, the plug-in will be opened on the first event for which all conditions are met (wakeupDelay period has passed, Oracle Field Service is online (for online event)).
If both fields have the same value for wakeupDelay and Oracle Field Service is online, then there's no guaranteed order of wakeup events.
Default value for wakeOnEvents is { online: {} }, i.e. plug-in is woken only on online event with a default delay to maintain backward compatibility.If wakeOnEvents field is set and is empty, or all its field equal to null, it's equivalent of the wakeupNeeded: false.
Background synchronization schedule is discarded as soon as plug-in sends close, initEnd or sleep message. So if a plug-in needs to be opened in the background again after that, it must send the new (or the same) value of wakeupNeeded and wakeOnEvents in the close, initEnd or sleep message.
NOTE: Constant working of plug-ins in the background is not advised, as it may negatively affect a device's performance (hence the user experience) and its battery life. But if this is necessary for a customer's business, then it is recommended to set higher values for sleepTimeout (up to 3600 s (1 hour)) so the plug-in's frame will not be repetitively reopened and closed in high-frequency series (which will be the case if the values of wakeupDelay and sleepTimeout both set to low values and waking up is requested by each sleep message).
Example of "close" message
{
"apiVersion": 1,
"method": "close",
"activity": {
cname: "John"
},
"wakeupNeeded": true,
"wakeOnEvents": {
"online": { wakeupDelay: 120 },
"timer": { wakeupDelay: 10, sleepTimeout: 1800 }
}
}
Example of "wakeup" message
{
"apiVersion": 1,
"method": "wakeup",
"event": "timer"
}
CALLING OF PROCEDURES
The Plug-in API allows sending the "callProcedure" messages for plug-ins that are opened in background after they receive a "wakeup" message. Only two procedures can be called by plug-ins opened in background: updateIconData and updateButtonsIconData, so the plug-in can update the appearance of its buttons in real time to notify the User about updates it has received.
Errors related to "wakeOnEvents"
Error types
| Type | Occurs When | Available Message Fields |
|---|---|---|
| TYPE_WAKEUP_PARAM | Value of "wakeOnEvents" field of "close", "initEnd" or "sleep" message is invalid |
|
Available message fields
- eventName - name of wakeup event which caused error (if applicable)
- paramName - name of event's field which caused error (if applicable)
Error codes
| Code | Cause |
|---|---|
| TYPE_WAKEUP_PARAM | |
| CODE_WAKEUP_EVENTS_INVALID | "wakeOnEvents" is not a plain object |
| CODE_WAKEUP_EVENT_NOT_SUPPORTED | "wakeOnEvents" contains a field which key is not one of: "online", "timer" |
| CODE_WAKEUP_EVENT_PARAMS_INVALID | "wakeOnEvents" contains a field which in not null and is not a plain object |
| CODE_WAKEUP_EVENT_PARAM_VALUE_INVALID | One of:
|
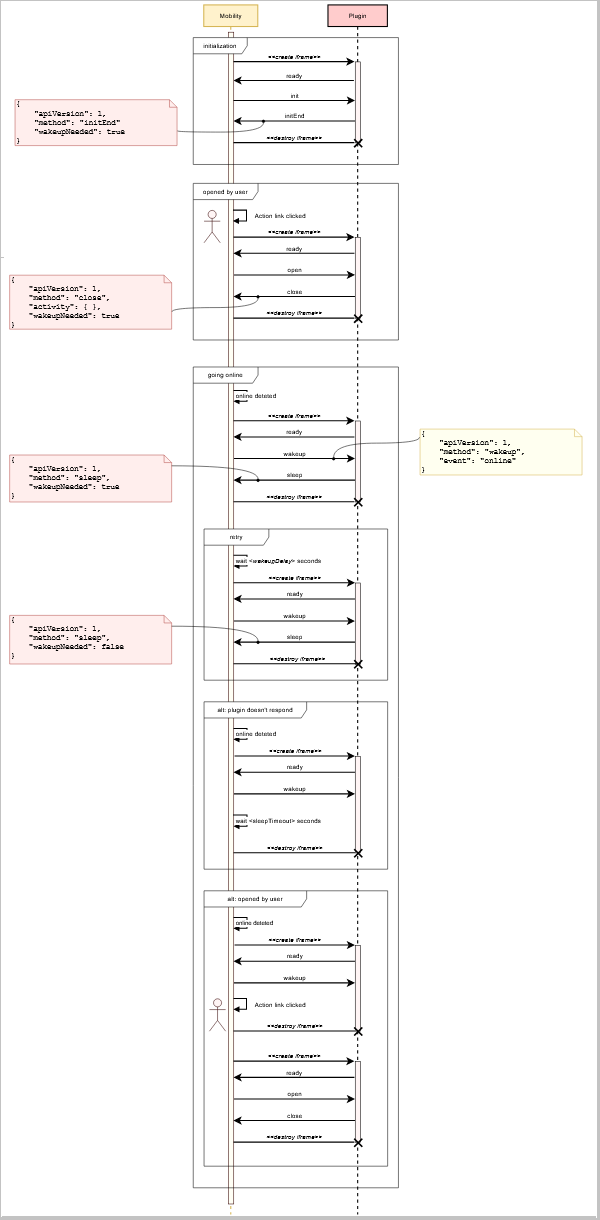
Plug-in lifecycle diagram
Plug-in Lifecycle Diagram
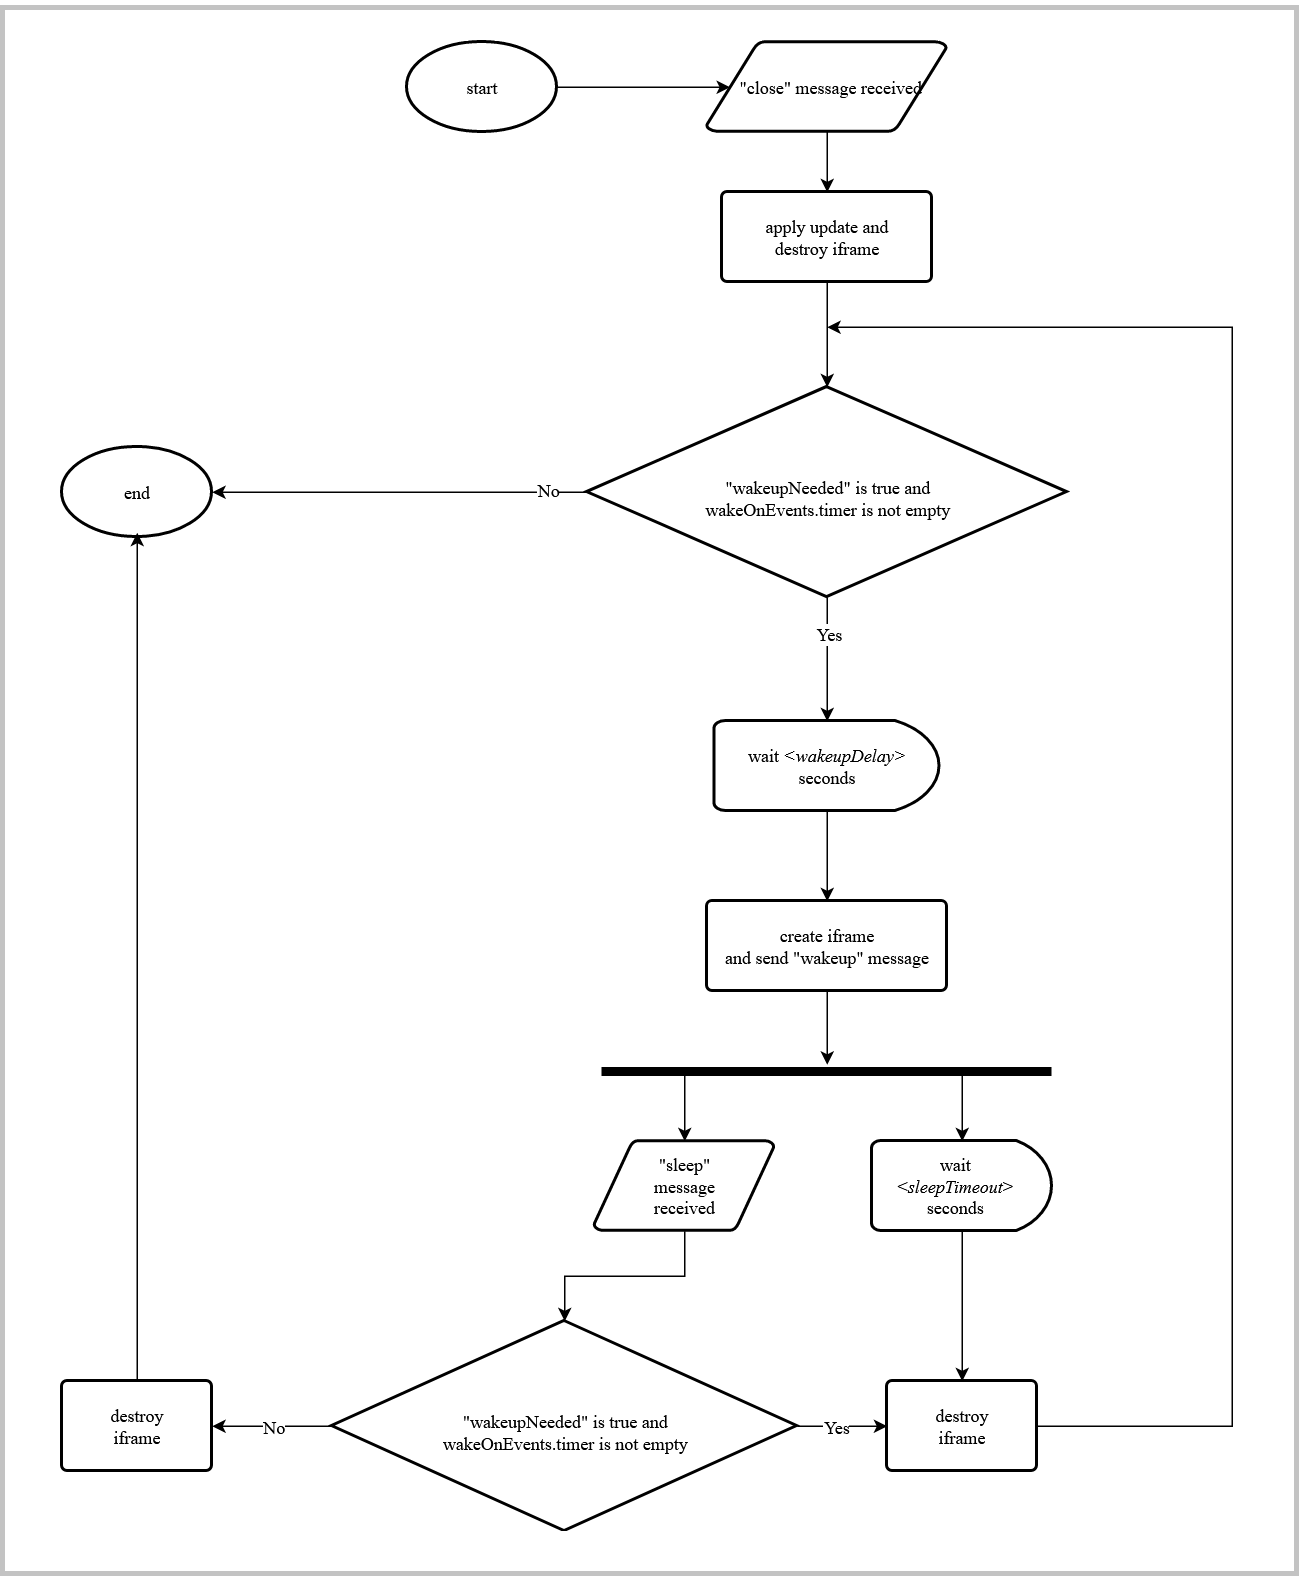
Background synchronization flowchart
online event
Background Synchronization Flowchart for Online Event
Timer event
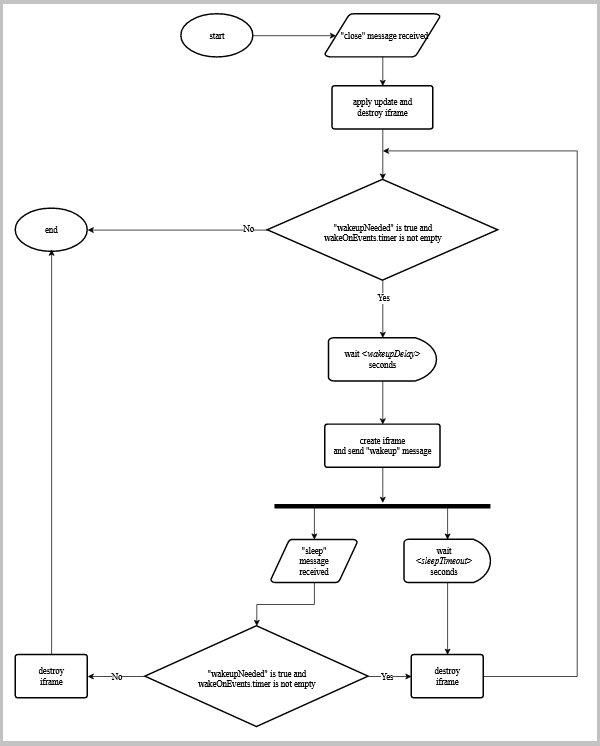
Background Synchronization Flowchart for Timer Event
LIST OF AVAILABLE PROCEDURES
The open and wakeup messages contain a new field allowedProcedures, which contains a list of procedures that the plug-in is allowed to send before it's closed. With this list, a plug-in may check which procedures are available for the current device without calling them, so it can disable its functions and/or UI elements that depend on some procedures (for example scanBarcode, which is available only in Oracle Field Service Mobile native app).
Only two procedures are available for plug-ins that are working in the background: updateIconData and updateButtonsIconData
To consider procedure available, plug-in must assure that there's a field in allowedProcedures which key corresponds to the name of the procedure and its value is true.
EXAMPLE OF OPEN MESSAGE WITH ALLOWEDPROCEDURES
{
"apiVersion": 1,
"method": "open",
"entity": "activityList",
"activityList": {
"4224031": {
"aworktype": "4",
"astatus": "pending",
"aid": "4224031"
},
},
"buttonId": "20361",
"openParams": {},
"allowedProcedures": {
"openLink": true,
"searchParts": true,
"searchPartsContinue": true,
"getParts": true,
"getPartsCatalogsStructure": true,
"updateIconData": true,
"updateButtonsIconData": true,
"scanBarcode": true
}
}
EXAMPLE OF WAKEUP MESSAGE WITH ALLOWEDPROCEDURES
{
"apiVersion": 1,
"method": "wakeup",
"event": "timer",
"allowedProcedures": {
"updateIconData": true,
"updateButtonsIconData": true
}
}
NEW VALUES SUPPORTED FOR BACKSCREEN
Two new values are supported for the backScreen field of the close message, so the plug-in can navigate a user to the En route and Stop travel screens after closing the plug-in's screen:
- enroute_activity - Navigation occurs only if the activity is in the current (or unscheduled) route and is in pending status
- stop_travel - Navigation occurs only if the activity is in the current (or unscheduled) route and is in enroute status
With the new optional field wakeOnEvents, the plug-in can utilize to control the frequency and duration of its background operation.
Steps to Enable
You don't need to do anything to enable this feature.
Key Resources
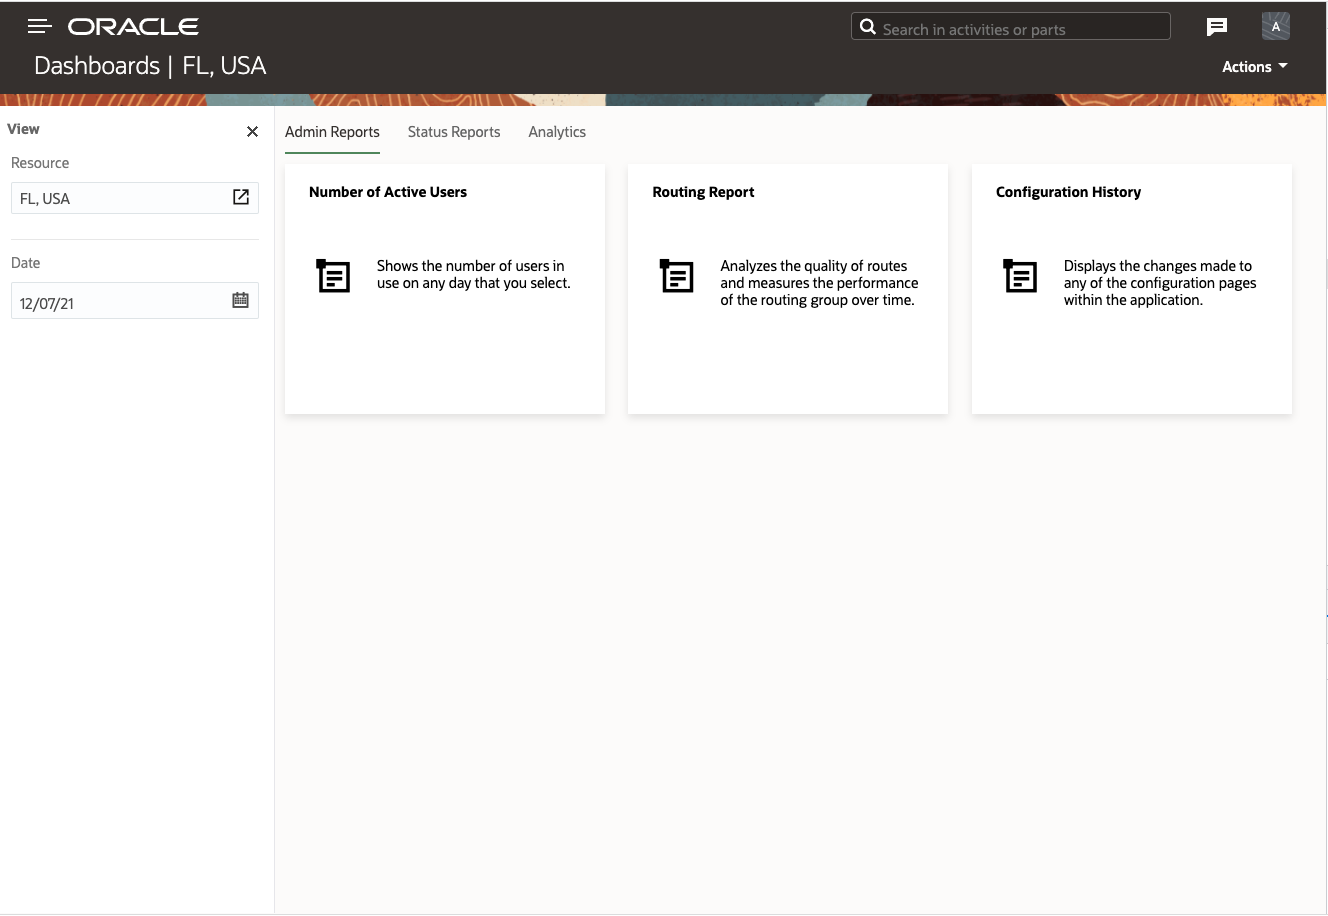
Dashboards Page User Experience Improvements
Starting with Update 22A, improvements have been made to the resource and date filter selections of the Dashboard page similar to the Resources screen. Also, the file storage report will be removed from the Dashboard page. You can view this information using the Cloud Portal Metrics now.
Also, a single location is now used for obtaining the updated information about file storage.
DASHBOARD PAGE USER EXPERIENCE IMPROVEMENTS
Here is the list of Dashboard page user experience improvements:
- The style of the resource and date filter sidebar is unified with the Resource screen user interface. Now, the resource and date filter sidebar is evident, intuitive, and open by default when navigating to the Dashboard page.
This image shows the Dashboards page:
Dashboards Page
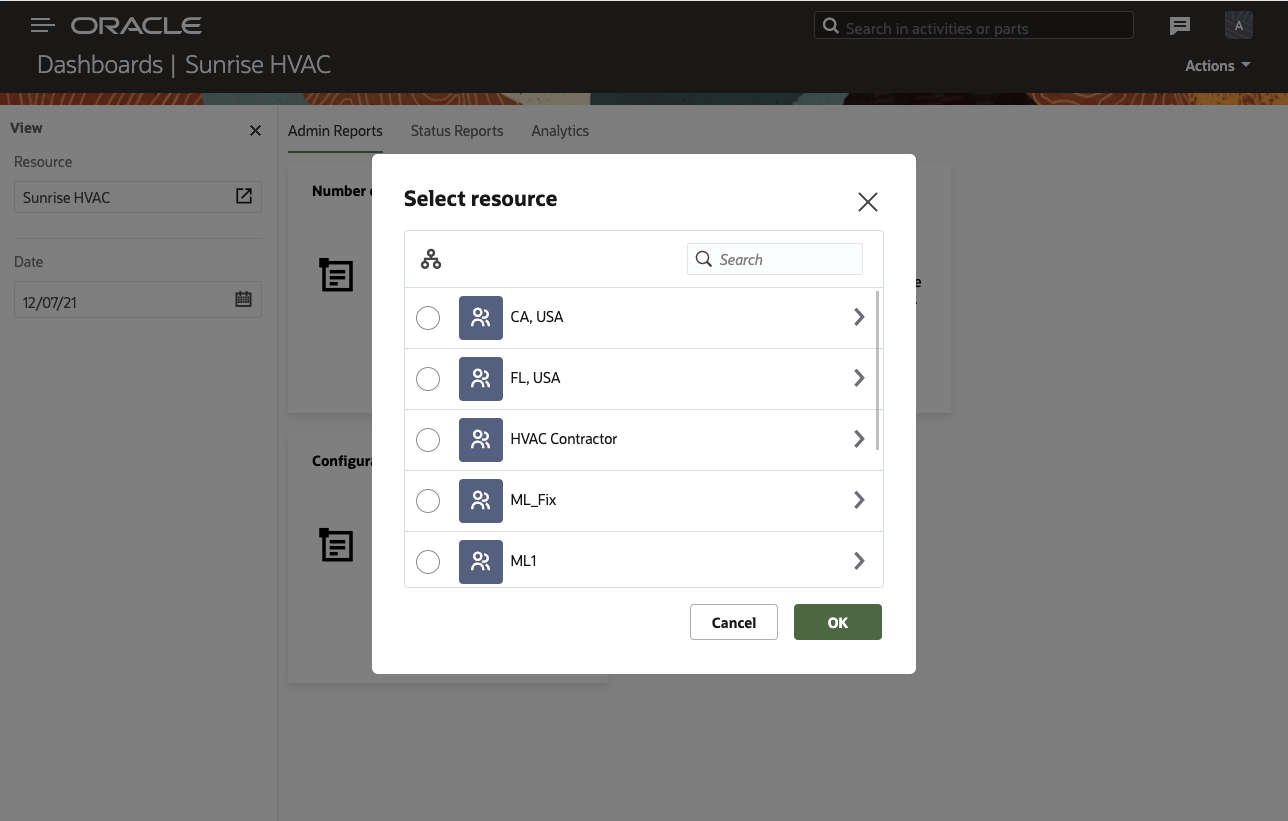
- You can filter the dashboard charts or reports using the selections within resource dialog box. A resource can be either an organization unit, bucket or field resource.
This image shows the Select Resource dialog box:
Select Resource Dialog Box
- You can select a date from the date picker and filter the dashboard charts or reports in the Dashboard page accordingly.
This image shows the Date Picker:

Date Picker
- The filter sidebar can be kept closed or opened, based on how you want to manage the space in the Dashboard page.
This image shows the Dashboard page with filter:
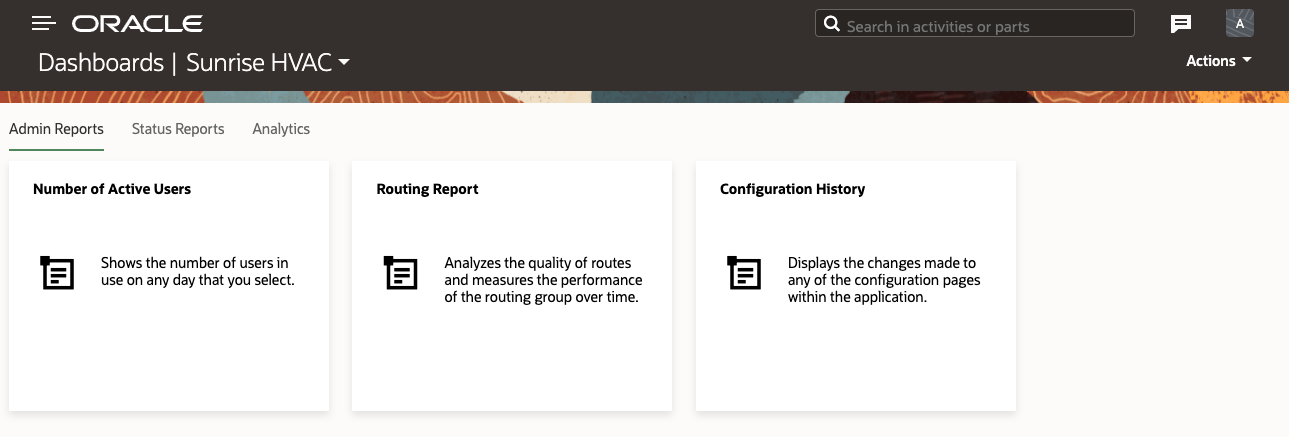
Dashboards Page With Filter:
- You can select the user type from the header to see the filter in its closed mode. You can use the pin icon
 to keep the sidebar open on the Dashboard page.
This image shows the Dashboard page with View sidebar:
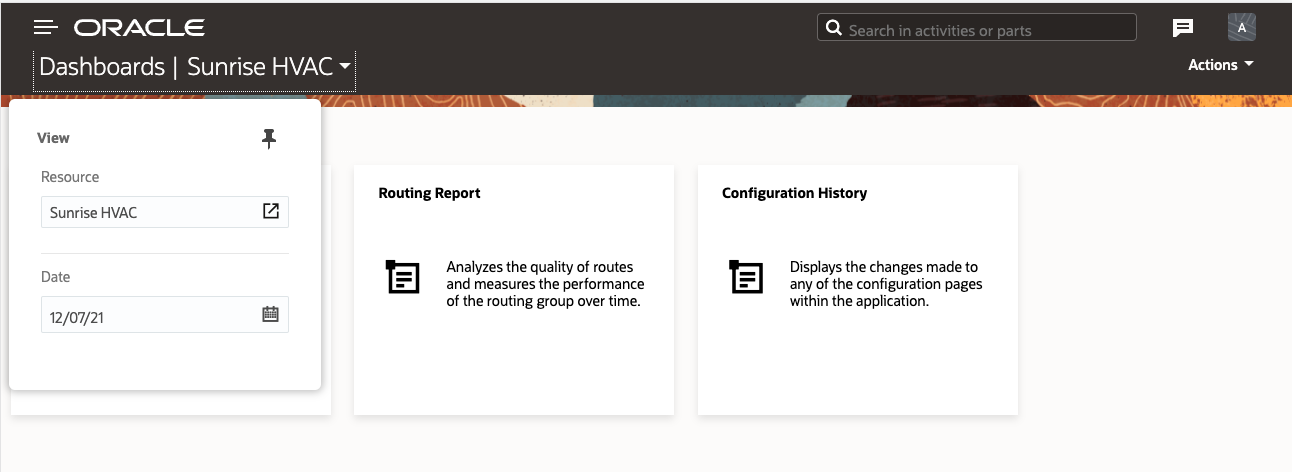
Dashboards Page With View Sidebar
- The resource and date filters are automatically closed in small devices (those with resolutions below 600 pixels) and will appear as a overlay on top of the Dashboard page. The pin icon will be available on screens up to 375 pixel resolutions..
This image shows the Dashboard page with closed View sidebar:

Dashboards Page With View Sidebar Closed
This image shows the Dashboard page with View sidebar:
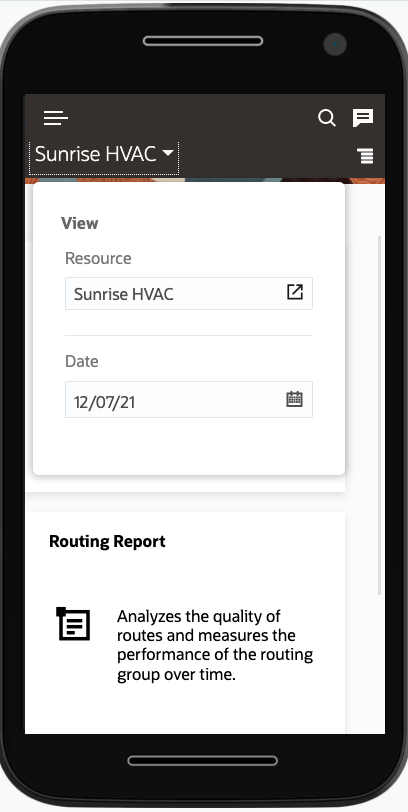
Dashboards Page With View Sidebar Expanded
- You can select the resource or date from the filter.:
This image shows the Select resource page:

Select Resource Page
This image shows the Date Filter Page::
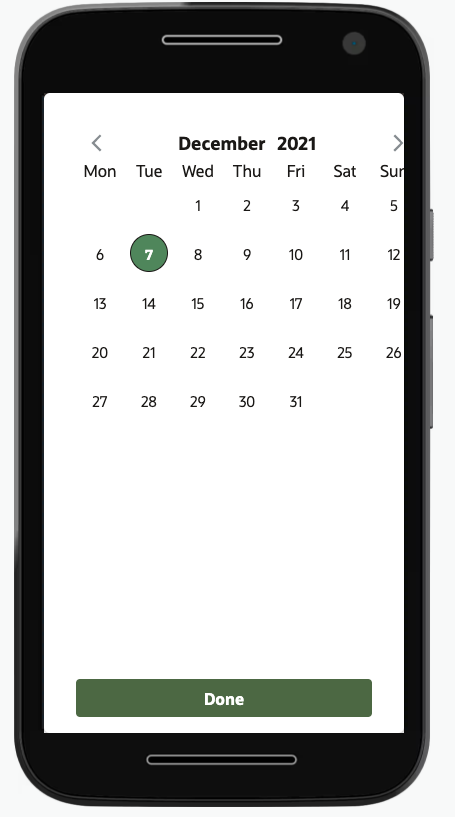
Date Filter Page
The resource and date filter will be viewed in full screen on small devices in the range of 320 - 375 pixels resolution.
NOTE: Starting with Update 22A, the resource and date filter option are not available for Dashboard pages when accessed from configuration screens. For example: Configuration, Dashboards.
REMOVAL OF FILE STORAGE REPORT FROM DASHBOARD
The file storage report is not available in the Dashboard page starting Update 22A. Alternatively, this data is available from within the Cloud Portal Metrics. Customers can access their Cloud Portal Metrics area and view details about file storage such as volume of the stored files and the number of stored files. A single location is now used for obtaining the updated information about file storage.
This is a sample of the Cloud Portal dashboard. More details about the Cloud Portal can be found here. You can view details about how to access business metrics from Cloud Portal.
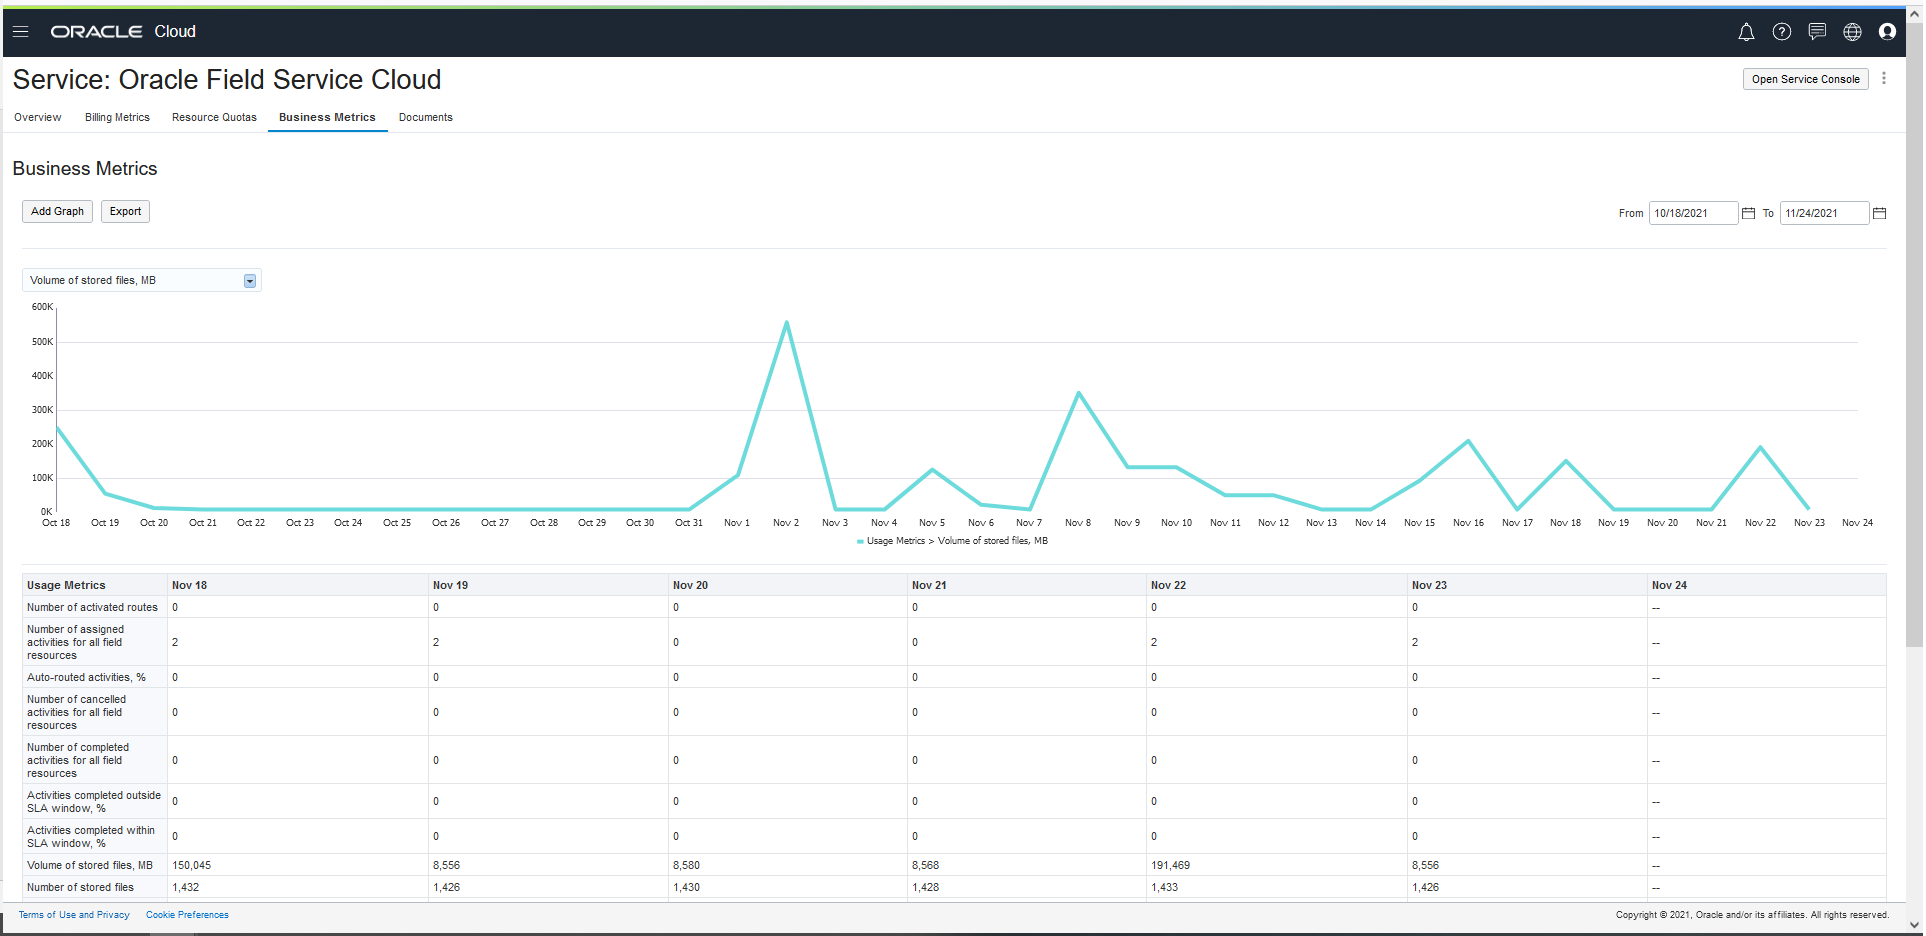
The resource and date filter selection of the Dashboard page has been improved to provide better user experience. You can view the file storage report information using the Cloud Portal Metrics now.
Steps to Enable
You don't need to do anything to enable this feature.
Key Resources
Use Machine Learning to Suggest Optimal Value of Routing Plan Run Time
Starting with Update 22A, High Priority time resets at midnight of the company time zone that is defined within the Business Rules screen. The system uses Machine Learning to enable users with suggestions and a dependencies graph to help set up the right values for several parameters in a routing plan that are vital for optimal routing quality.
Also included in this release, users may see graph of high priority and low priority time spent by the routing plan, along with the list of the Top 5 routing plans by high priority time spent.
ROUTING RUN TIME
You will be provided with suggestions based on historical data of how to set up the Routing Plan Run Time in order to get results of good quality, and not spend too much time of the High Priority queue. Also as of 22A, you will be able to choose routing run times with granularity of 1 second for runs shorter than 1 minute, and 1 minute for longer runs.
If the run time is set to a value lower than the one needed for decent quality of results then a warning is displayed.
SLR TIME
For companies eligible to use SLR for routing, with 22A there will be an ability to choose the routing SLR run time with a granularity of 1 second for runs shorter than 1 minute, and 1 minute for longer runs.
REVIEW HIGH PRIORITY TIME SPENT
To access information regarding High Priority time spent, navigate to the Routing Summary tab and expand the High Priority time section. The High Priority time section displays the cumulative graph of High/Standard Priority time spent (starting from midnight of the company time zone). This image shows the Routing Summary tab with the cumulative graph:
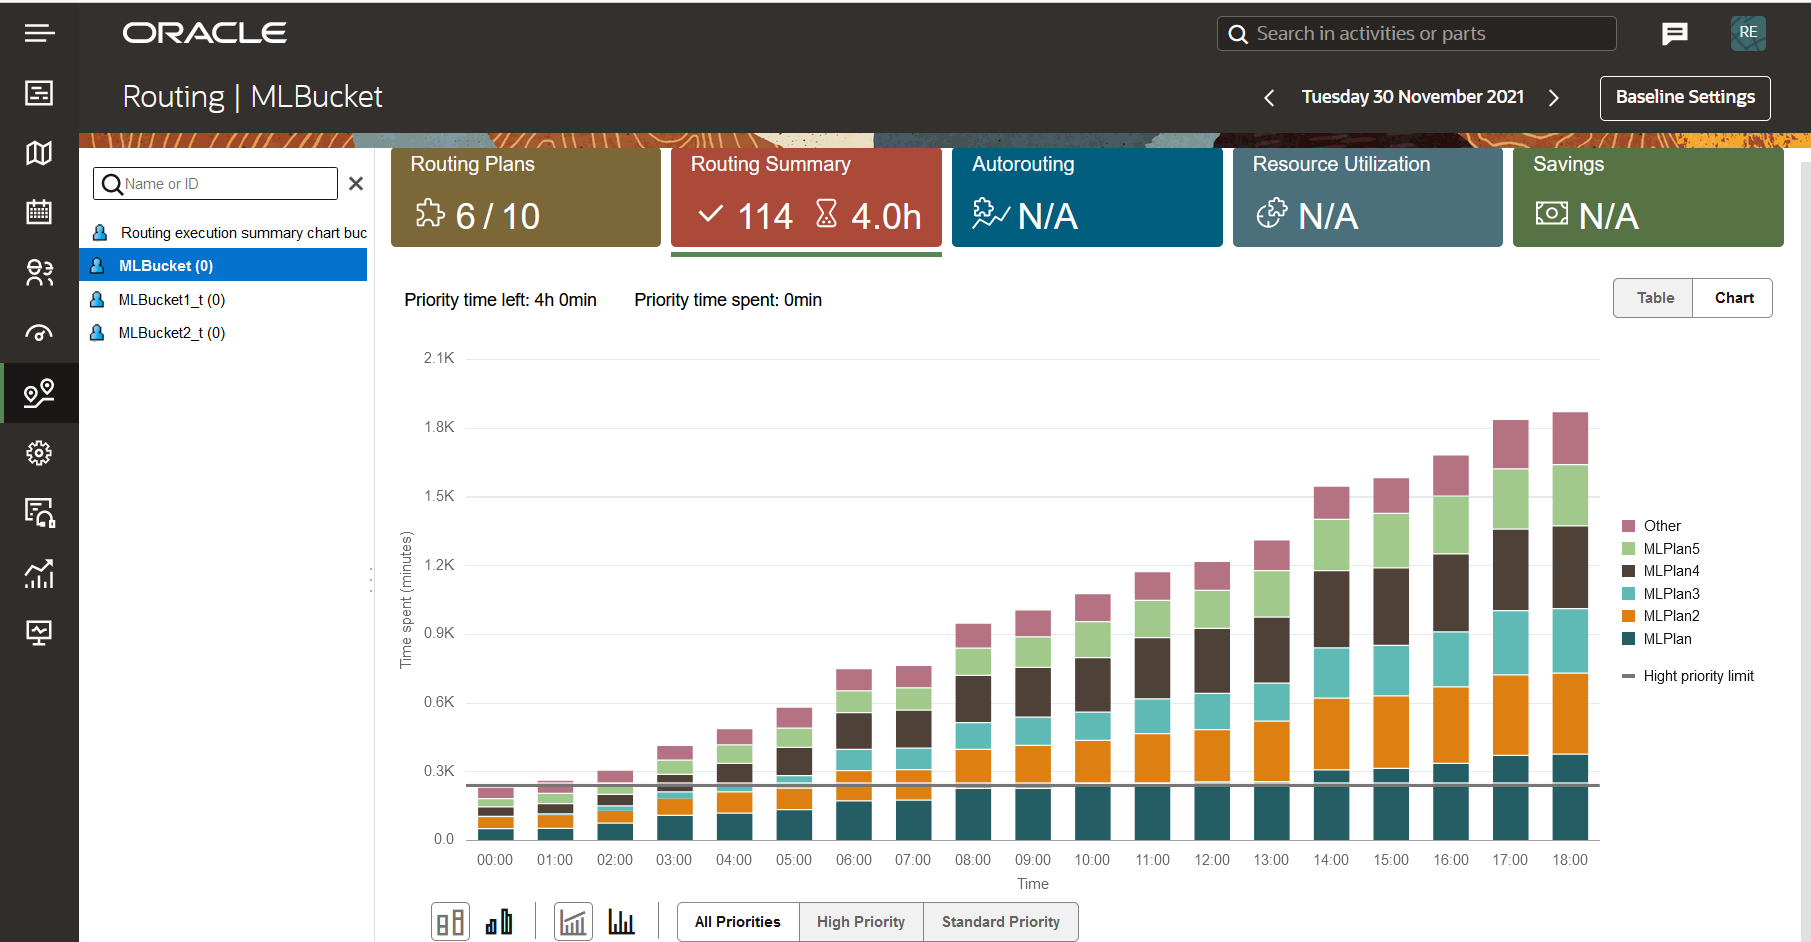
Routing Summary Tab Showing Cumulative Graph of High Priority Time
For each hour, you'll see how much SLR and Routing time were spent. Below the graph, a list of the 10 plans that consume the most of the High Priority time, ordered by the consumed time is displayed. If you'd like to see more plans, click the Show More link.
Note that the standard priority queue only guarantees that a planned routing run is finished, though it may be with lower quality and/or a bit out of time. Therefore, we suggest that you periodically revise this graph and, if the High Priority time is consumed way before the business hours are passed, edit the most consuming routing plan by lowering the Routing Run Time Limits.
For more information regarding high priority time, see Unlimited Queued Routing.
CHOOSE THE BEST RUN TIME FOR A ROUTING PLAN
For routing plans that have a record of runs for more than one day, historical data-based recommendations are available right within the routing plan configuration screen. To access the data, open the Run Schedule section and review the suggestions shown on the screen.
Right at the Run time slider you may see the green zone, which is recommended to keep the run time within, and the "best" value within this zone. Choosing a value out of this zone is not recommended, as run times less than the minimal doesn't allow routing to provide routes of decent quality, while choosing a value of more than the maximum may increase the routing time significantly while not gaining much more quality from it. To see a further explanation of why we suggest particular values for a routing run's time, you may expand additional suggestions to see the graphical representation of the dependency between the routing run time, the result quality, and the time that exceeds the High priority time limit.
We suggest keeping the Run Time close to a "Balanced" value, as it provides good balance between the time spent and the resulting quality. You may want to increase the run time a bit for once a day plans and decrease it for recurrent plans to retain a reasonable balance between speed and quality.
As the same routing plan may be assigned to more than one bucket, please keep in mind that the suggestions are given and value is chosen against the bucket with the biggest historically-reported routing run times; in most cases it is a bucket containing biggest number of activities and resources. Run times for smaller buckets may be decreased to retain the same quality level as of the biggest one.
NOTE: If a routing plan's actual runtime exceeds the limit set in the given routing plan more than one time per day, the warning sign is shown within the Routing Plan's configuration page.
This image shows the Run schedule settings for a routing plan:
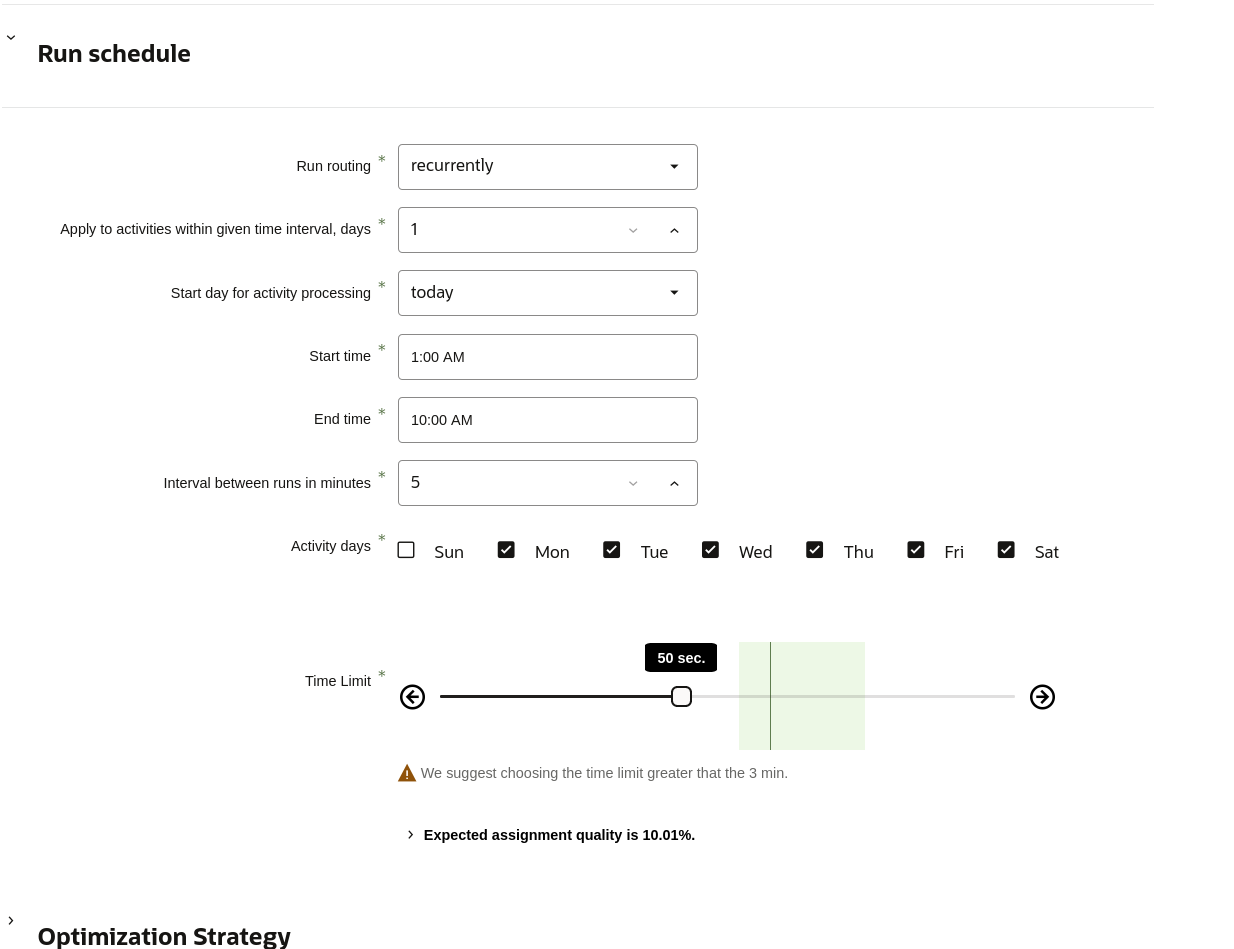
Run schedule Settings Showing Time Limit
This image shows the Time Limit Suggestions Details for a routing plan:
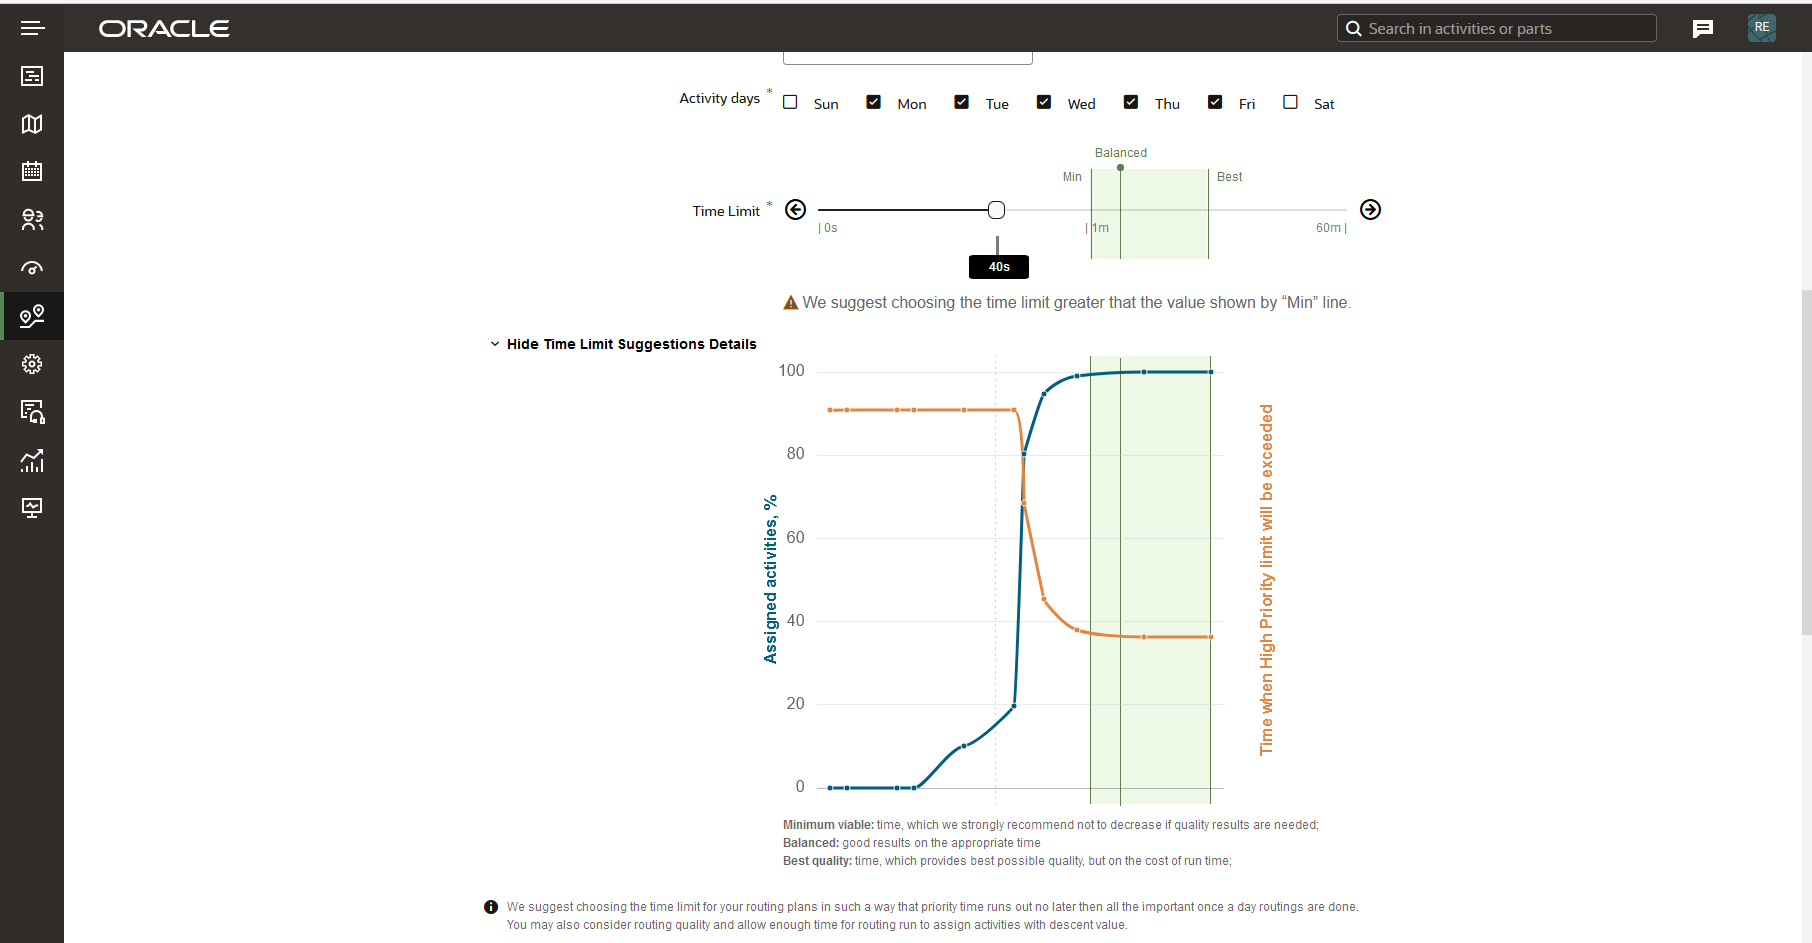 :
:
Time Limit Suggestions Details Graph
PERIODIC REVIEW OF ROUTING PLAN RUN TIME
For the new routing plans created, we recommend to review the routing plan run time within at least 24 hrs after it's first start to allow some historical data to be collected and thus better suggestions to be available. To consider the day-to-day changes, we recommend reviewing the the routing plan's run time after the first week. Then you may review your plan's run times every 3 to 6 months, if no significant changes are made to the routing plan, it's filters and/or bucket structure; otherwise you may need to review it more often.
CHOOSE THE RIGHT SLR TIME FOR A ROUTING PLAN
If your subscription is eligible for using Street-Level Routing (SLR), you may choose an SLR time by means of selecting which part of a routing run's time should be spent on SLR. When you change the routing run time, your SLR time is recalculated accordingly. Note SLR time limit is really a limit. Hence, it is possible that part of the SLR time may be spent on routing if there is no need of SLR data retrieval on the sole discretion of the routing subsystem.
NOTE: To use SLR functionality, routing runs must run at least 10 seconds as such runs need at least 5 seconds for routing and 5 seconds for SLR.
These feature provides suggestions based on historical data of how to set up the Routing Plan Run Time in order to get results of good quality, and not spend too much time of the High Priority queue.
Steps to Enable
You don't need to do anything to enable this feature.
Key Resources
Starting with Update 22A, numerous improvements have been made to the bulk routing engine to improve routing performance and quality.
All the changes described below are already released and accessible in production before the Update22A release date.
Here are the improvements for this feature:
- Routing quality has been improved for those high load runs that don't have highly utilized Service Window or Access Hours constraints, but do have thousand of nearby activities similar to each other based on service windows, skills and zones by having routing always try an option to travel from one activity to the next closest one. As a result of these implemented changes to the routing engine, you may see improvements in both activity assignments and travel savings, though the amount of improvement will in part depend on activity and travel duration, as well as the number of activities and resources.
- Routing runs quality was additionally improved for those high load runs with thousand of activities that highly utilize the Service Windows or Access Hours constraints. Now, routing also tries an option to travel from an activity to the closest one with compatible Service Window/Access Hours. As a result of these implemented changes to the routing engine, you may see improvements in both activity assignments and travel savings, though the amount of improvement will in part depend on activity and travel duration, as well as the number of activities and resources.
- Routing performance have been improved by automatically switching to "faster" algorithms for those routing runs which include a lot of activities per a lot of providers for a rather short period of time - either due to routing service high load or due to mis-configuration of routing plan. As a result of these implemented changes to the routing engine, you may see improvements in both activity assignments and travel savings, though the amount of improvement will in part depend on activity and travel duration, as well as the number of activities and resources.
- In the case where one recurrent routing run is an exact duplicate of another run (meaning that activities and resources are the same or indistinguishable from a routing perspective), instead of re-running it thru the routing engine and spending routing time on it, we're taking the result from cache. This improvement is intended to slow down the consumption of High Priority routing time, which in turn leads to more routing requests being processed with priority.
This feature provides numerous improvements to the bulk routing engine, which improve routing performance and the quality of resulting routes.
Steps to Enable
You don't need to do anything to enable this feature.
Key Resources
IMPORTANT Actions and Considerations
DEPRECATION ANNOUNCEMENTS
Deprecation for login.etadirect.com
The https://login.etadirect.com URL scheme, used as one of the options to access Oracle Field Service is deprecated in Update 22A (February 2022) and is not recommended for use. Authentication requests using this domain might be served by any of Oracle data centers causing additional redirects to a data center where the target Oracle Field Service environment is running. This might result into extra latency, increased rate of errors, and possible issues related to data residency. Review and change your current integrations and if needed, change the address to use https://<instance_name>.fs.ocs.oraclecloud.com. This change will improve authentication time and adhere to government and corporate policy regulations related to data residency by ensuring the request is directed to the proper data center.
Deprecation for api.etadirect.com
The https://api.etadirect.com URL scheme, used to access Oracle Field Service APIs is deprecated in Update 22A (February 2022) and is not recommended for use. API requests might be served by any data centers from the cloud causing additional redirects to a data center where the target Oracle Field Service environment is running. This might result in extra latency, increased rate of errors, and possible issues related to data residency.
Review and change your current integrations and if needed, change the domains to use https://<instance_name>.fs.ocs.oraclecloud.com. This change will improve the processing time of API requests and adhere to government and corporate policy regulations related to data residency by ensuring the request is directed to the proper data center.