
This document will continue to evolve as existing sections change and new information is added. All updates appear in the following table:
| Date | Module | Feature | Notes |
|---|---|---|---|
| 23 SEP 2022 | PlugIn Framework | Updated document. Revised feature information. | |
| 19 AUG 2022 | Important Actions and Considerations | IMPORTANT Actions and Considerations | Updated document. Revised feature information. |
| 19 AUG 2022 | Android and IOS Applications |
Updated document. Revised feature information. |
|
| 05 AUG 2022 | Integration | Updated document. Revised feature information. |
|
| 28 JUL 2022 |
Administration | LDAP Connection Validation When Configuring Login Policy | Updated document. Revised feature information. |
| 28 JUL 2022 |
Administration |
Forecasting Recalculation Activation | Updated document. Revised feature information. |
| 28 JUL 2022 |
Android and IOS Applications | NFC Tag Scanning Support | Updated document. Revised feature information. |
| 28 JUL 2022 |
APIs | Metadata API - Capacity Work Zone Identifiers | Updated document. Revised feature information. |
| 28 JUL 2022 |
APIs |
Core API - Resource Location Geocoding | Updated document. Revised feature information. |
| 28 JUL 2022 | Routing | Routing Run Result Analytics | Updated document. Revised feature information. |
| 25 JUL 2022 | Created initial document. |
This guide outlines the information you need to know about new and improved functionality in Oracle Field Service Update 22C. Each section includes a brief description of the feature, the steps you need to take to enable or begin using the feature, any tips or considerations that you should keep in mind, and the resources available to help you. For a listing of browsers supported by Oracle Field Service, log in to our support site and access Answer ID 8415.
Oracle Field Service Best Practices Guide: Please be sure to download our Oracle Field Service Best Practices Guide found on the Oracle Service Cloud Support Portal Answer ID 8215 (requires a login). This book contains many helpful hints and suggestions to help you improve and get the full benefit from your Oracle Field Service subscription.
 HAVE AN IDEA?
We’re here and we’re listening. If you have a suggestion on how to make our cloud services even better then go ahead and tell us. There are several ways to submit your ideas, for example, through the Ideas Lab on Oracle Customer Connect. Wherever you see this icon after the feature name it means we delivered one of your ideas.
GIVE US FEEDBACK
We welcome your comments and suggestions to improve the content. Please send us your feedback at oracle_fusion_applications_help_ww_grp@oracle.com.
DISCLAIMER
The information contained in this document may include statements about Oracle’s product development plans. Many factors can materially affect Oracle’s product development plans and the nature and timing of future product releases. Accordingly, this Information is provided to you solely for information only, is not a commitment to deliver any material, code, or functionality, and should not be relied upon in making purchasing decisions. The development, release, and timing of any features or functionality described remains at the sole discretion of Oracle.
This information may not be incorporated into any contractual agreement with Oracle or its subsidiaries or affiliates. Oracle specifically disclaims any liability with respect to this information. Refer to the Legal Notices and Terms of Use for further information.
Column Definitions:
Report = New or modified, Oracle-delivered, ready to run reports.
UI or Process-Based: Small Scale = These UI or process-based features are typically comprised of minor field, validation, or program changes. Therefore, the potential impact to users is minimal.
UI or Process-Based: Larger Scale* = These UI or process-based features have more complex designs. Therefore, the potential impact to users is higher.
Features Delivered Disabled = Action is needed BEFORE these features can be used by END USERS. These features are delivered disabled and you choose if and when to enable them. For example, a) new or expanded BI subject areas need to first be incorporated into reports, b) Integration is required to utilize new web services, or c) features must be assigned to user roles before they can be accessed.
| Ready for Use by End Users Reports plus Small Scale UI or Process-Based new features will have minimal user impact after an update. Therefore, customer acceptance testing should focus on the Larger Scale UI or Process-Based* new features. |
Customer Must Take Action before Use by End Users Not disruptive as action is required to make these features ready to use. As you selectively choose to leverage, you set your test and roll out timing. |
|||||
|---|---|---|---|---|---|---|
| Feature |
Report |
UI or |
UI or |
|
||
Improved Activity Duration Estimation for Bundled Activities |
||||||
LDAP Connection Validation When Configuring Login Policy
This feature is implemented for those customers who have chosen Lightweight Directory Access Protocol (LDAP) for authentication. This feature provides these improvements:
- Inform users about the need to configure the connection from two regional data centers where the environment can be deployed.
- Simplify the LDAP connection check and notify integrators about any connectivity issues by providing these functions within the application.
When using the LDAP type of authentication, you must make some additional actions to set the connectivity properly. The application implements two types of connectivity checks for login policies using LDAP for authentication:
- Manual connectivity check (when adding, modifying or viewing a login policy)
- Automatic connectivity check (once a day)
For both types of connectivity checks, the application connects from both regional data centers over LDAP servers specified for a login policy and show the results in UI.
MANUAL CONNECTIVITY CHECK
When adding or modifying a login policy
The application runs a connectivity check when adding or modifying an LDAP login policy. You must populate all of the required fields for a login policy and then click the 'Check Connectivity and Add' / 'Check Connectivity and Modify' buttons. Then the application initiates a connectivity check from both regional data centers over all end points configured within the 'LDAP Server URL List' field.
If the application was able to establish connectivity to all LDAP servers, then the login policy settings are saved.
Alternatively, if any issues occur, the application displays a page showing the detailed status of the connectivity check from each data center for each configured LDAP Server URL. This page also shows a warning message to set up connectivity at the earliest opportunity so as to save the login policy and establish a connection later.
This image displays the Check Connection and Modify Policy page:

Check Connection and Modify Policy Page
Check connectivity while not making any configuration changes
Another option for integrators is to click Re-check after making the required changes. This prompts the application to run the connectivity check again. You can initiate the connectivity check without making any configuration changes. Click Check connection on the login policy page. The application initiates the connection over all LDAP Server URLs from both regional data centers and display the results.
This image displays the Check Connection page:

Check Connection Page
AUTOMATIC CONNECTIVITY CHECK
The application automatically runs a daily connectivity check for each LDAP login policy by connecting to all LDAP servers from two regional data centers.
REVIEWING THE RESULTS OF A CONNECTIVITY CHECK
Accessing the overall status
An overall status of the latest LDAP connectivity check is displayed on the login policy card that appears on the 'Login policies' screen. There could be two statuses:
- Connected to all LDAP server URLs
This status implies that all LDAP servers could be reached from two regional data centers.
This image displays the Connected to all LDAP server URLs status message:

Connected to all LDAP server URLs Message
- Configure connection to all LDAP servers
This status shows that the connection to at least one of the LDAP servers failed from either of the data centers.
This image displays the Connected to all LDAP server URLs status message:

Configure connection to all LDAP server URLs Message
Viewing detailed report of connectivity check
A detailed report on the results for the last connectivity check are displayed on the login policy page.
This image shows the LDAP Connectivity Check detailed report:

Login Policy Page Showing LDAP Connectivity Check Detailed Report
From the detailed report:
- In case of positive results, the application shows a Connected to all LDAP server URLs message with the green check box icon.
- In case of connectivity issues, the application shows the connection status for each LDAP URL configured for the policy.
The login policy page also shows the date and time when the connection check was performed.
A deployment model of Oracle Field Service addresses the major security requirement that data cannot leave a geographical region where a company operates. To achieve this, the application is provided with two data centers in each region. Respectively, an environment can be deployed in either of these two data-centers and moved to another data center at any time; the most common reason for this migration would be as part of the disaster recovery procedure that is automatically triggered when the primary data center is impacted by some severe issues.
Customers using the LDAP type of authentication must make some additional modifications due to the nature of this technology. They must make sure that the connection to their LDAP servers is configured from both data centers, which will allow users to continue to authenticate when environments are migrated to another data center.
Steps to Enable
You don't need to do anything to enable this feature.
Key Resources
NOTE: The above link to the latest documentation works after the latest generally available (GA) release.
Forecasting Recalculation Activation
Administrators now have the ability to enable or disable the daily recalculation of Forecasting data. Instead of recalculating every day irrespective of whether there is any meaningful past data or whether the module is used frequently or not, the data in Forecasting is recalculated on a daily basis, only if it has been enabled by the administrator.
For Enterprise customers (who have access to Forecasting), there is an additional parameter in the Business Rules configuration page for Forecasting. This image shows the Recalculate data on a daily basis setting on the Business Rules page:
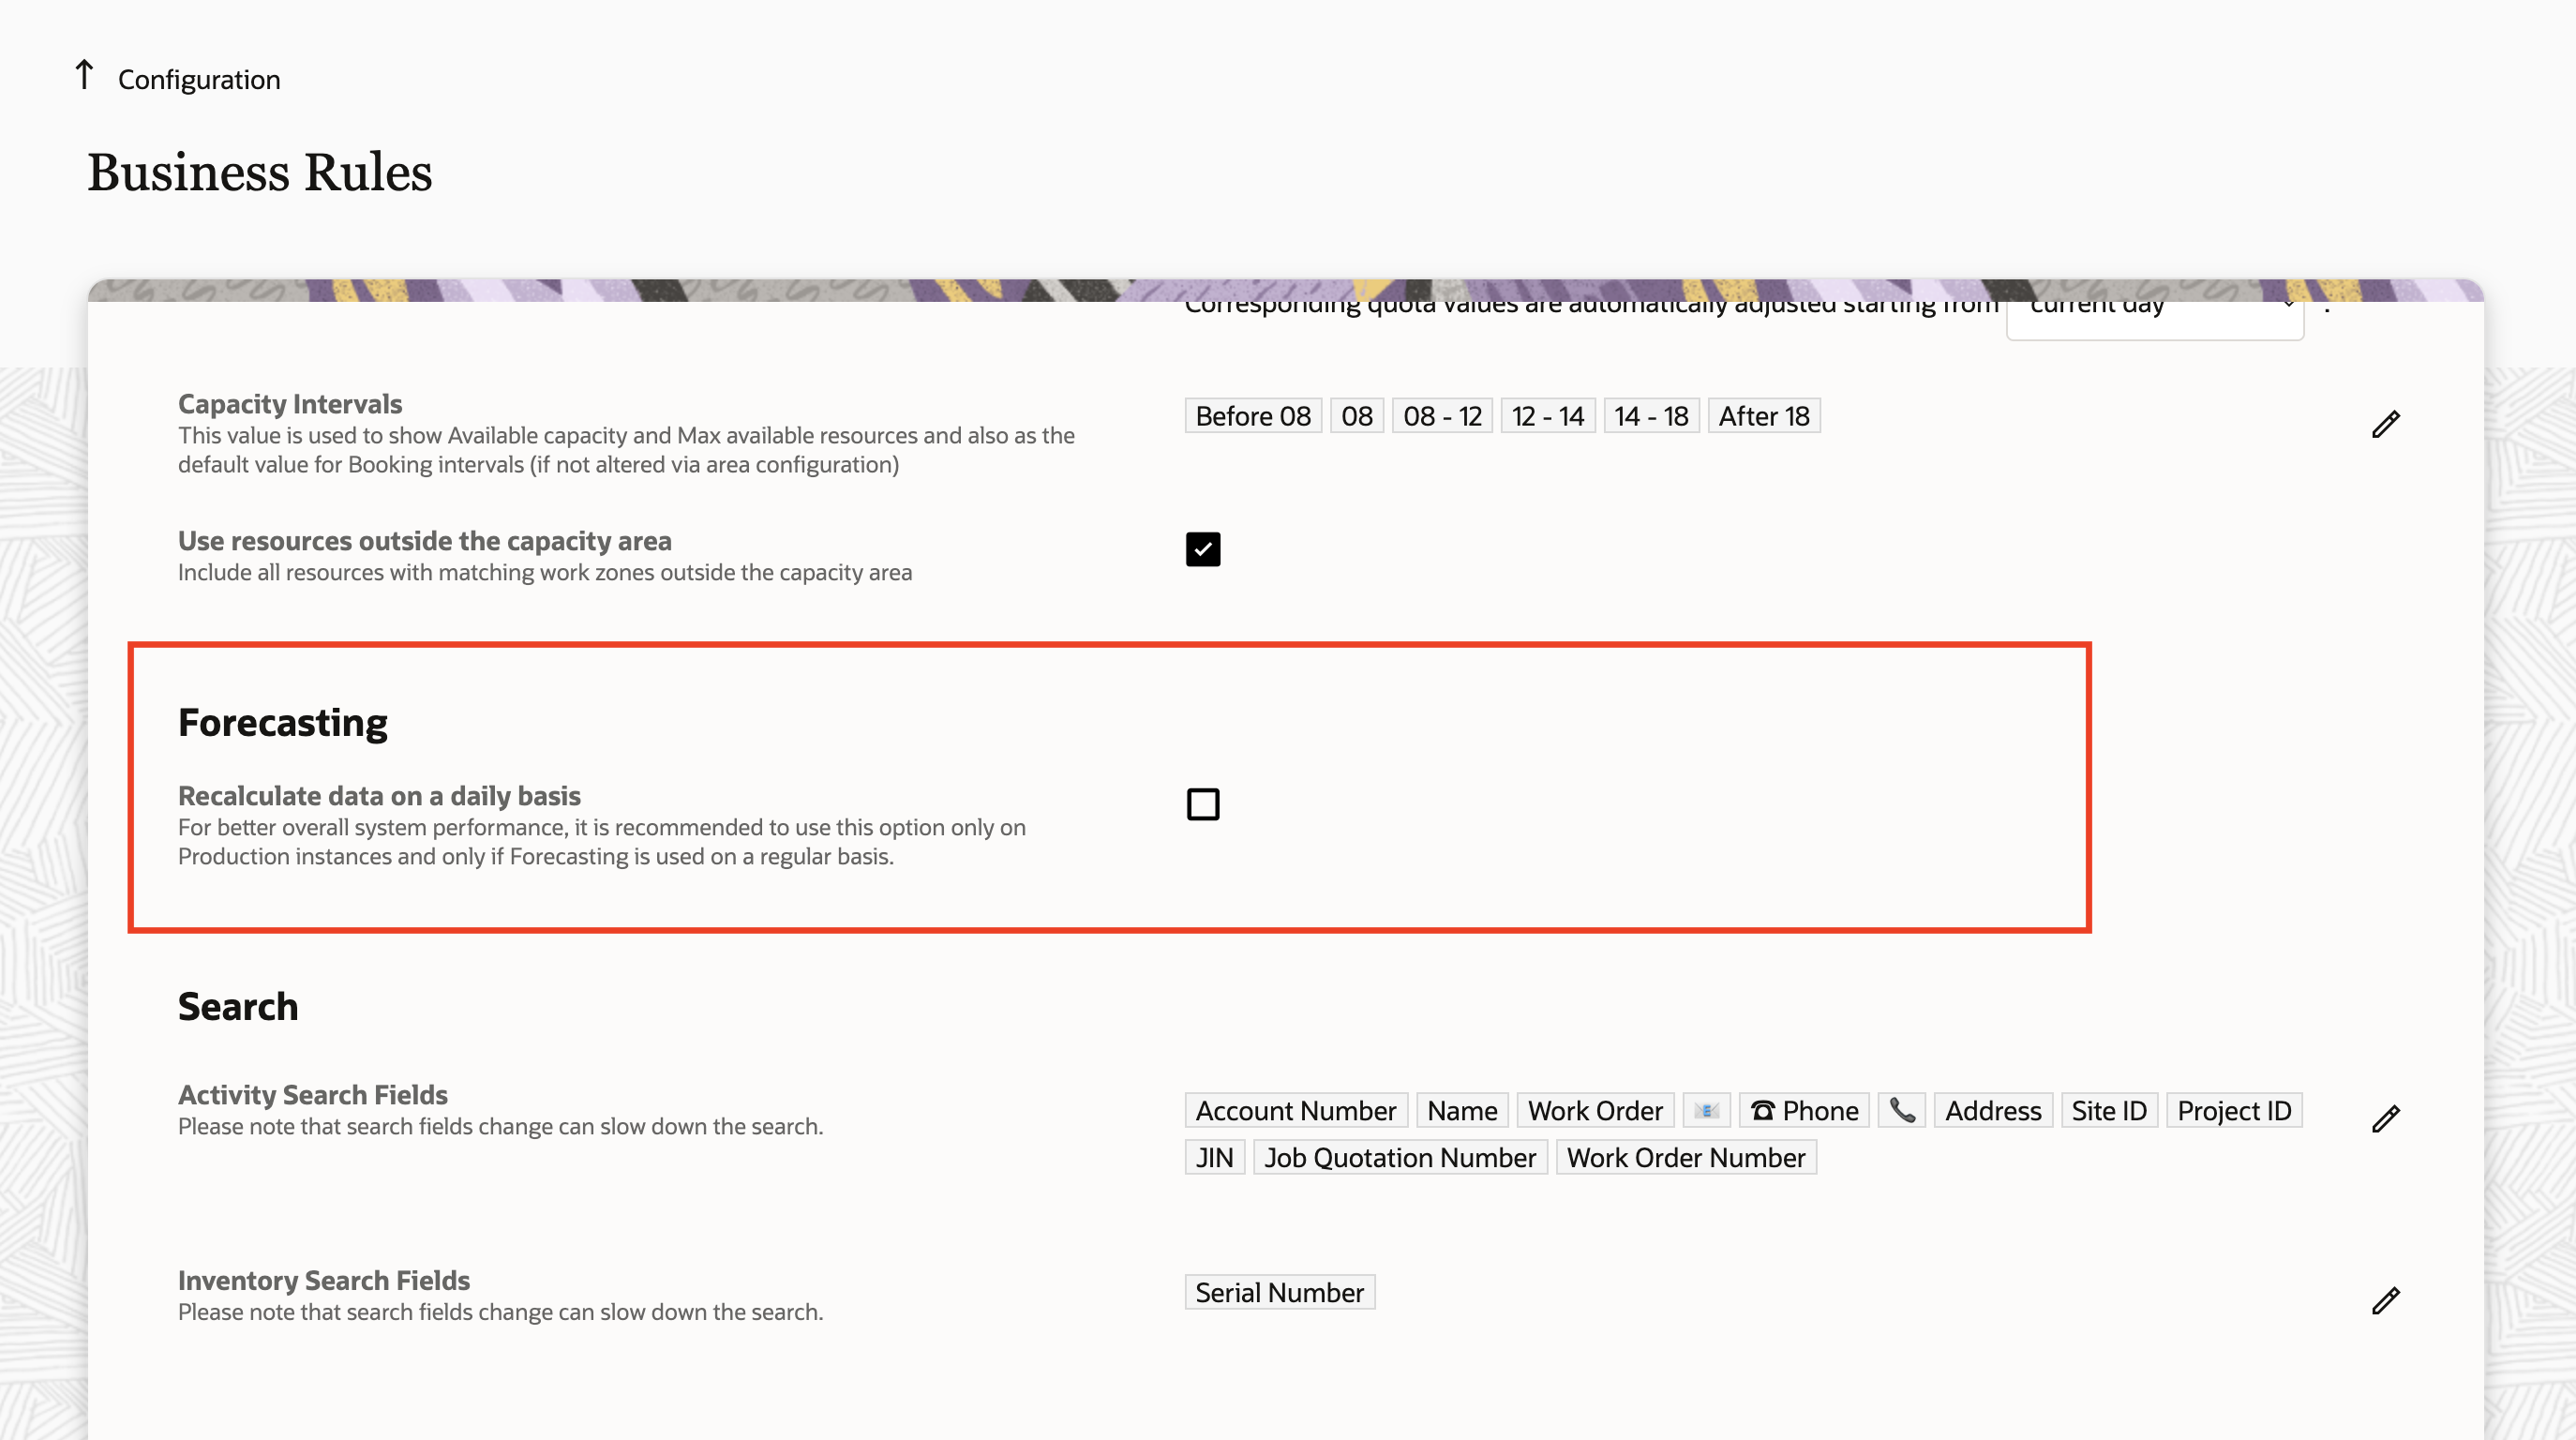
Business Rules Page Showing Forecasting Section:
The data in the Forecasting page is recalculated on a daily basis only if this check box is selected. If deselected, the Forecasting screen continues to display the older calculated values, if any.
If the check box is deselected, a banner mentioning that recalculation has been disabled is displayed on the Forecasting page. Thus, you are made aware that the data displayed on the Forecasting page may not be based on the latest data. This image shows the message on the Forecasting page about the disabled setting:

Forecasting Page
MIGRATION
When upgrading to 22C, for Enterprise customers, the check box to recalculate forecasted data is selected by default for all production instances. It is deselected by default for all test instances, since typically they would not contain significant past data to meaningfully forecast for the future. All instances on a version lower than 22C, will continue to recalculate forecasted data.
All new instances that are provisioned henceforth, have this check box deselected by default. That would mean that administrators have to select this check box for Forecasting to start calculating data.
This feature optimizes the usage of resources and enhances the overall performance of the system.
Steps to Enable
You don't need to do anything to enable this feature.
Key Resources
NOTE: The above link to the latest documentation works after the latest generally available (GA) release.
Redwood Style for Activity and Inventory Types Pages
Starting with Update 22C, the Redwood user experience is inherited by the Activity and Inventory page. These user interface improvements bring uniformity (the look and feel of these pages are consistent) with the application and with other applications of the Fusion stack. Additionally, a new Activity Type Groups page has been introduced providing better visibility of this configuration content.
ACTIVITY AND INVENTORY TYPES TABLES
The Activity Types and Inventory Types table pages are available as standard Redwood tables. The progressing loading approach used for scrolling down these tables allow you to navigate to those items not currently displayed on the page.
The Activity Types page offers these functions:
- Add new activity type
- Modify activity type
- Clone activity type
- Group actions - Delete, Activate, Deactivate, Set color
This image shows the Activity Types page
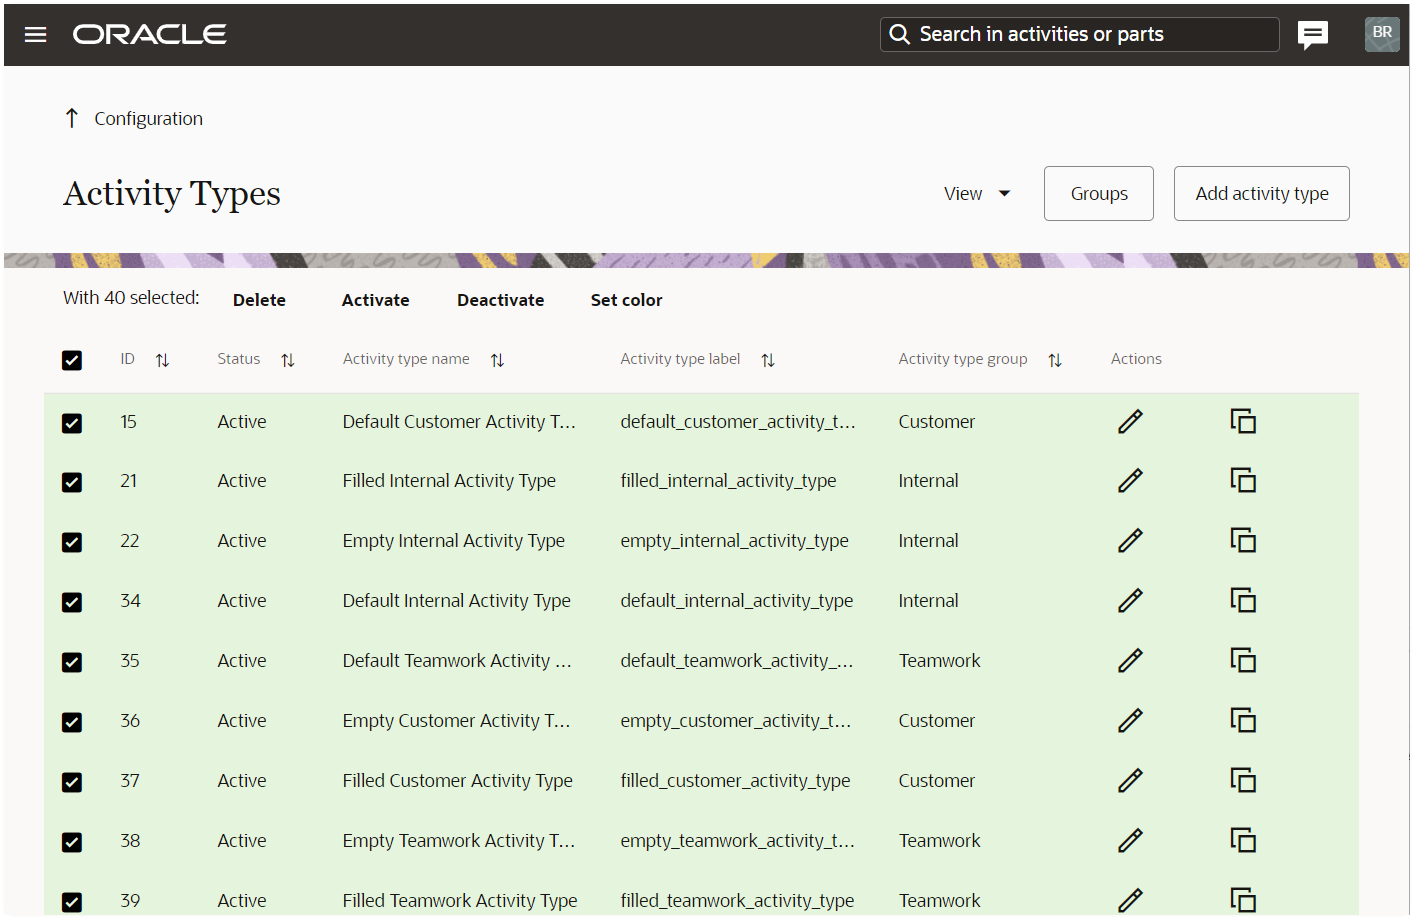
Activity Types Page
The Inventory Types page offers these functions:
- Add new inventory type
- Modify inventory type
- Group actions - Deactivate, Activate
This image shows the Inventory Types page

Inventory Types Page
ADD OR MODIFY AN ACTIVITY OR INVENTORY TYPE
When creating or modifying an activity, you see the same look and feel as other pages within the application.
This image shows the Activity types info page:
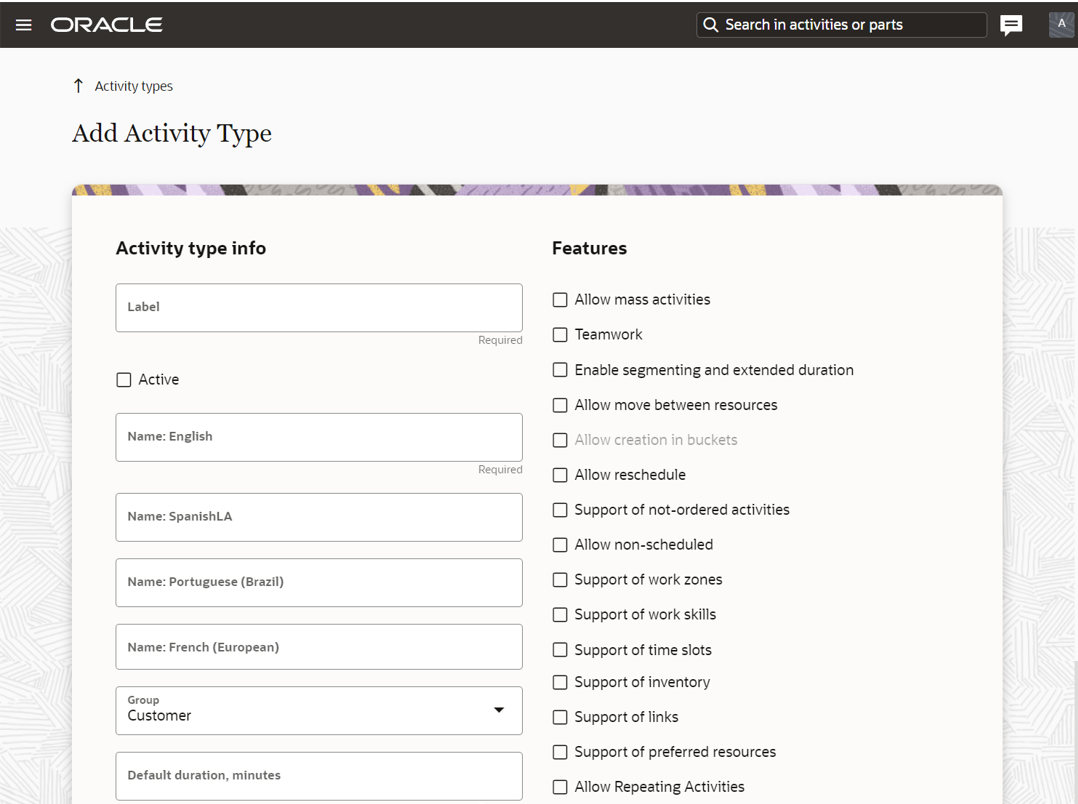
Activity type info Page
The Inventory Types page offers these functions:
- Add new inventory type
- Modify inventory type
- Group actions - Deactivate, Activate
This image shows the Inventory type info page:

Inventory type info Page
You can configure all of the necessary settings for all types as you did previously. When you view the configuration of a specific Activity type, you can toggle the related time slots for that Activity type easily. Each time slot is presented with its status to provide better visibility of the availability of the time slots that can be chosen.
GROUP ACTIONS
The application visualizes group actions as Redwood dialog boxes.
Here are some examples for such dialog boxes:
Example: Activate activity type group action dialog box
This image shows the Activate activity type group action dialog box:

Activate activity type Group Action Dialog Box:
Example: Deactivate inventory type group action dialog box
This image shows the Deactivate activity type group action dialog box:

Deactivate activity type Group Action Dialog Box:
Example Set color group action dialog box
This image shows the Set color group action dialog box:
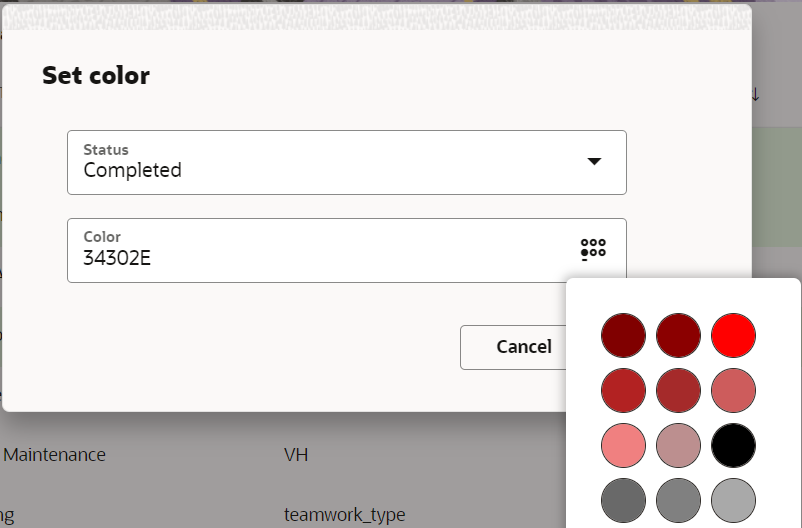
Set color Group Action Dialog Box:
However, the Set color dialog box differs slightly from other informational pages. On Set color dialog box, you can set colors for specified activity types by choosing colors using the color picker or by defining them manually.
NEW GROUPS PAGE
A new page to view and manage activity type groups is available now. This new page consists of the list of available activity type groups, making their configuration easier and transparent.
This image shows the Groups page::
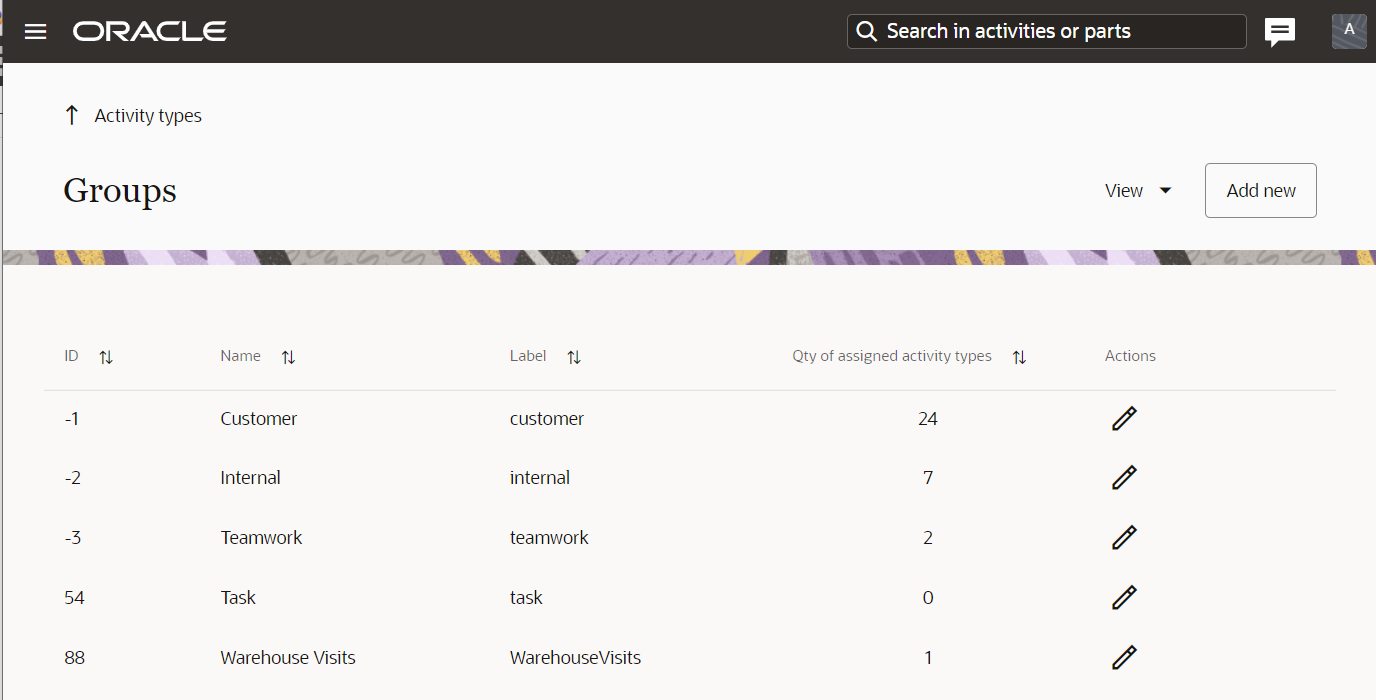
Groups Page
These actions are available on this page:
- Add new group
- Modify group
ADD OR MODIFY A GROUP PAGE
The page to add or modify an activity type group offers a set of required and optional fields. Similar to previous releases, the functionality to delete a group is not available within the application.
This image shows the Add activity types by groups page:
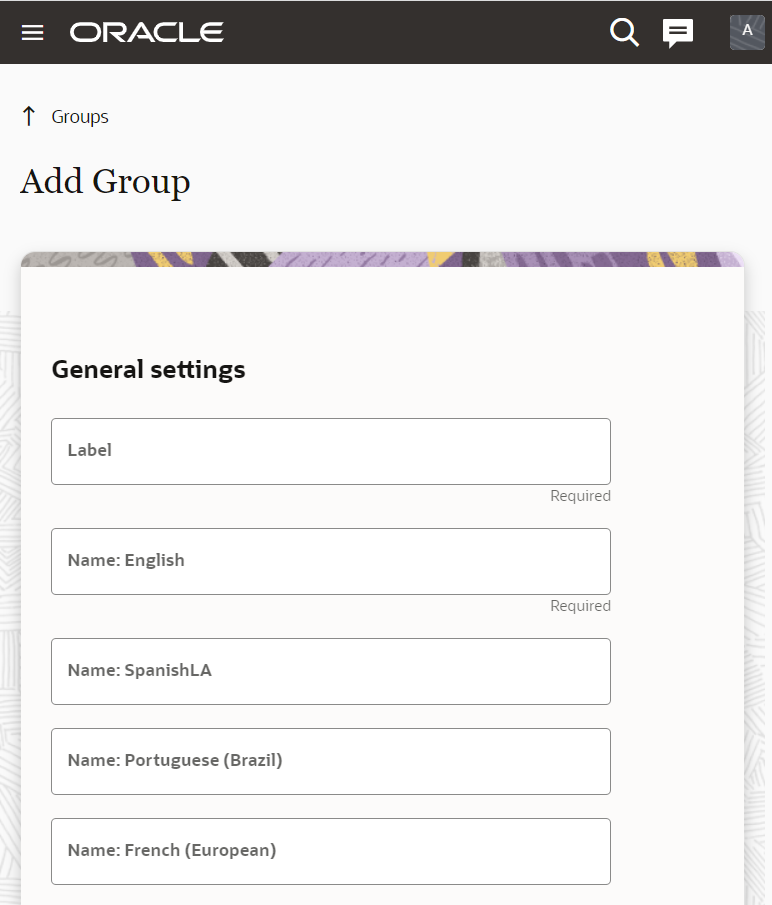
Add activity type by groups Page
FILTERING ACTIVITY TYPES BY GROUPS
To filter activity types by groups, you can use the filtering options under the View drop-down menu, located on the header of the Activity types page.
This image shows the Filter activity types by groups page::
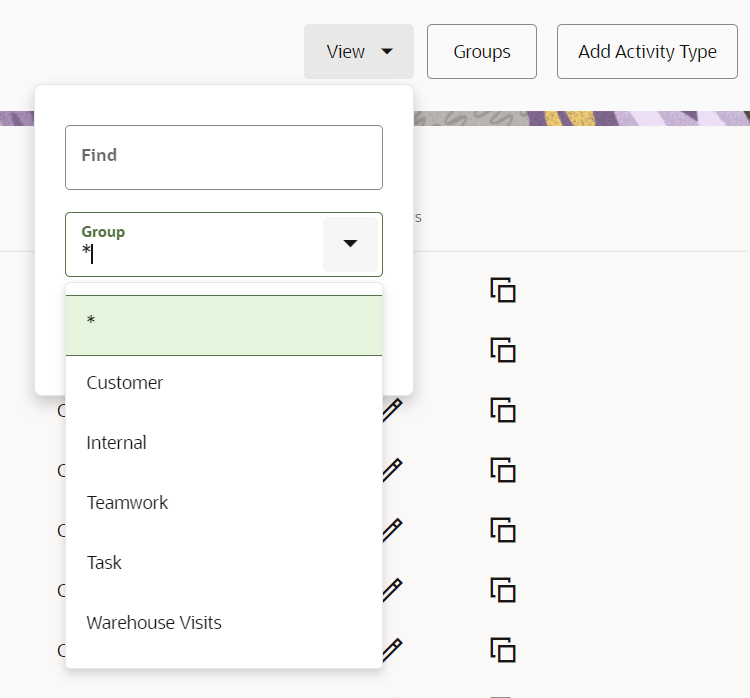
Filter activity types by groups Page
Starting with Update 22C, the Activity and Inventory Types configuration pages now display the Redwood theme to provide better user experience. The activity type groups’ configuration on the list of available groups offers better visibility now.
Steps to Enable
You don't need to do anything to enable this feature.
Key Resources
NOTE: The above link to the latest documentation works after the latest generally available (GA) release.
While you have previously been navigated from Oracle Field Service to the device's native camera to take pictures, Update 22C launches a custom in-app camera module within the Oracle Field Service mobile app itself. With this in-app camera, you can take photos without being navigated between your local device camera and the Oracle Field Service mobile app. This provides a unified and reliable camera experience regardless of your mobile device operating system or performance. The in-app camera launches the first improvement planned as part of the Multi Media Library initiative.
- The in-app camera is supported only for the Oracle Field Service image property type.
- The in-app camera is only available if you have the installed Oracle Field Service mobile app (if you access Oracle Field Service using mobile browsers, you will continue to use your native device camera).
NOTE: The in-app camera is only available if you upgrade to Update 22C for both the platform and the mobile app. If you have upgrade to the latest mobile app but the platform is on Update 22B or lower, you cannot use the in-app camera.
CAPTURE IMAGE
Follow these steps:
- Click a field that has an image property. The capture image page opens.
- Click the capture image button to take pictures.
- Click Cancel to go back.
- Switch between the front and back cameras through the swap camera button present in the lower right corner of the capture image page. This image shows the page where you can capture images:
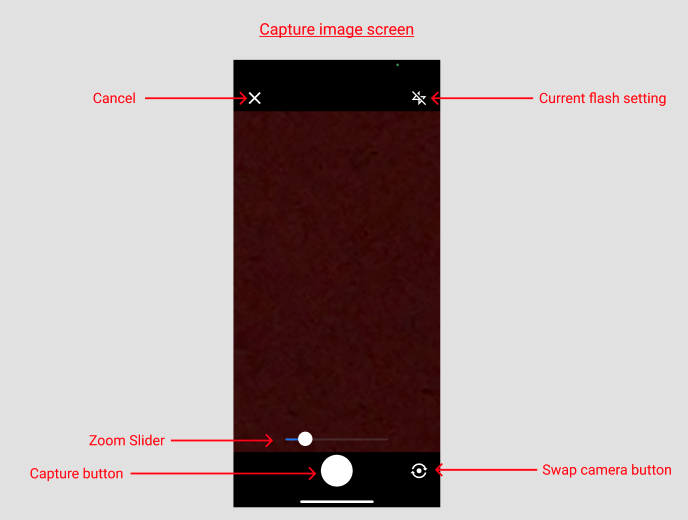
Page For Capturing Images
ZOOM IN/OUT
Pinch in/ out in the capture image camera page to activate the zoom functionality.
When zoom is activated, you can see a zoom slider. Use the slider to manipulate zoom in addition to using the pinch in/ out action. The slider disappears if the zoom functionality is idle for a while.
TAP TO FOCUS
On the capture image page, click the area where you want to focus. This image shows how you can focus the camera while capturing images:

Camera Focus
FLASH SETTINGS
You can use three flash settings in this release:
- Flash On
- Flash Off
- Flash Auto
The icon of the current flash setting is displayed at the top right of the capture image page. Click the flash icon to change the setting. This image shows the flash settings:

Flash Settings
Preview page
- After you capture an image from the capture image page, you get the preview page where you have options to:
- View the captured images
- Edit the captured image
- Save the image (Submit button)
- You can click the back icon at the top left and go back to the capture image page.
- If you go back without saving, you see a warning that you will lose the captured images and any edits.
This image shows the warning when you navigate back without saving an image:
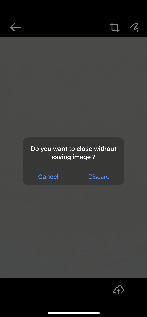
Warning Message
This image shows the preview of an image:
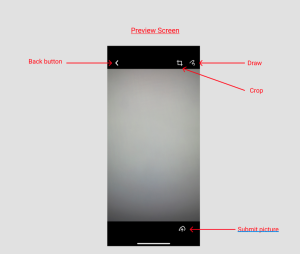
Preview of a Captured Image
CROP AN IMAGE
Follow these steps:
- Click the crop icon on the top left of the preview page to activate the crop mode.
- Move the crop grid to the required area and crop the image. When you finish cropping, click the check mark at the bottom right to confirm the edits.
- Click the back button to exit the crop mode.
- If you have cropped an image incorrectly, you can reset the crop by clicking the reset button at the lower left corner of the crop page.
This image shows the crop image page:
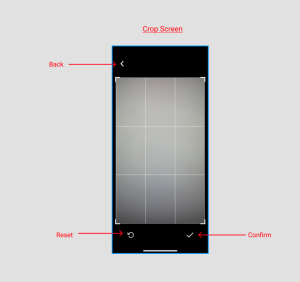
Crop Image Page
DRAW AN IMAGE
Follow these steps:
- Click the draw icon on the top left of the preview page to activate the draw mode.
- Draw on the image and highlight the required areas. When you finish highlighting, click the check mark and confirm the edits.
- Click the back button to exit the draw mode.
- To reset a drawing click the reset button at the bottom left.
This image shows the page where you can draw an image:
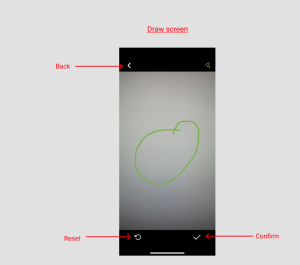
Draw Image Page
This feature helps technicians take pictures without needing to leave Oracle Field Service. It provides a unified and reliable camera experience for all users regardless of their mobile device operating system or performance. The in-app camera launches the first improvement planned as part of the Multimedia Library initiative.
Steps to Enable
You don't need to do anything to enable this feature.
Key Resources
NOTE: The above link to the latest documentation works after the latest generally available (GA) release.
Core API - Resource Location Geocoding
Resource locations in Oracle Field Service are those locations that have a specific meaning in a resource's route – ‘Start location’, ‘End location’ and ‘Home zone center’.The Core API lets users create and modify resource locations, specifying the address and/or coordinates.Previously, when locations were created using the API and a provided address, Oracle Field Service couldn’t geocode coordinates for the address; only addresses that were added using the Core Application user interface could be geocoded.This feature implements functionality that automatically resolves resource location addresses into coordinates, whenever possible, which makes the API useful in many business flows and reduces the necessity of manual operations in the user interface to create or modify resource locations.
The process of resolving coordinates is asynchronous, that is, the request to create or update the location through API is not delayed until the coordinates are resolved, Instead, Oracle Field Service resolves them in the background and populates the coordinate fields when the information is ready.
The resource location object has a status field that describes the status of the coordinate resolving operation. This is not a new field; it was always present for resource locations API functions. However, it only indicated the statuses of coordinate resolving for user interface operations. The values of the field ‘status’ are:
- null (field value is not present): The resolving process is not complete.
- found: The coordinates were successfully resolved using the provided address information.
- not_found: The address information was not sufficient to resolve the coordinates.
- manual: The coordinates were provided explicitly by the user or an external system and there was no automatic resolving.
Note that the API request and response structures were not changed for this feature, so there is no need to update any integrations.
This feature will be available without any additional configuration or integration.
Support coordinate geocoding in Core API for resource locations
Steps to Enable
Review the REST service definition in the REST API guides, available from the Oracle Help Center > your apps service area of interest > REST API. If you're new to Oracle's REST services you may want to begin with the Quick Start section.
Key Resources
NOTE: The above link to the latest documentation works after the latest generally available (GA) release.
Metadata API - Capacity Work Zone Identifiers
Starting with Update 22C, a new version 'v2' of the method 'Get work zones of a capacity area' is implemented, with a new endpoint:
GET /rest/ofscMetadata/v2/capacityAreas/{label}/workZones
It's response contains two parameters for each returned work zone:
- 'workZoneLabel' - returns the label of the work
- zone'workZoneName' - returns the name of the work zone
EXAMPLE
Example of the response for the new version of the function is as follows:
{
"items": [
{
"workZoneLabel": "Label of Work zone A",
"workZoneName": "Name of Work zone A"
}
]
}
The previous version of the method, that is, GET/rest/ofscMetadata/v1/capacityAreas/{label}/workZones is marked as 'deprecated' in the documentation and is not recommended for usage. This version of the method only returns work zone's name within the response parameter 'label'.
No additional configuration is required. Previous integrations using the 'v1' version continue to work, though with the work zone name being returned in the 'label' parameter as before.
For any new integrations, it is recommended to use new (v2) version of the function.
The feature introduces the Metadata API function Capacity work zone identifiers..
Steps to Enable
Review the REST service definition in the REST API guides, available from the Oracle Help Center > your apps service area of interest > REST API. If you're new to Oracle's REST services you may want to begin with the Quick Start section.
Key Resources
NOTE: The above link to the latest documentation works after the latest generally available (GA) release.
Activity List Navigation and Search Improvements
The Activity List page does not show these action links: Preferences and Sign out at the top level menu. The My Route page doesn't contain the tile - Preferences. You can access these links by clicking the avatar at the top right corner, which is always visible on the page from Update 22B.
ACTIVITY LIST NAVIGATION
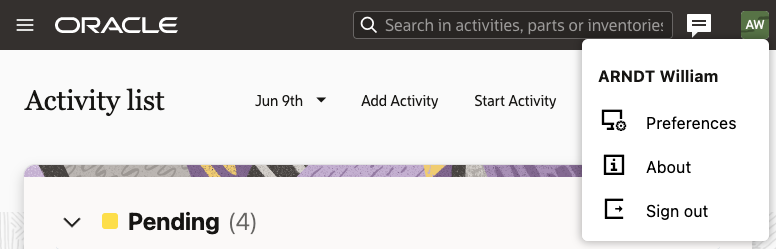
The Activity List page in Oracle Field Service no longer contains the action links Preferences, About, and Sign out at the top level menu. These links are available when you click the avatar at the top right corner, which is always visible on the page from Update 22B.
This image shows the menu on the Activity List page, which doesn't contain Preferences, About, and Sign out:

This screenshot shows the Avatar menu, which includes Preferences, About, and Sign out:
Also, it is not possible to add those action links on the user type's Activity List page. This image shows the Activity List context layout:

Activity List Context Layout
If you open the main menu and click My Route, then either My Route or Activity List is opened, depending on how the Home page is configured. Previously, the link always opened the My Route page. This image shows the Main menu for a technician user:

Main Menu
SEARCH IMPROVEMENTS
If you click Search in the header and start searching for an element, the search term you entered stays in the search field until you select a returned item (such as activity, inventory, or part). After that, the search term disappears.
This image shows the search keyword and the results:
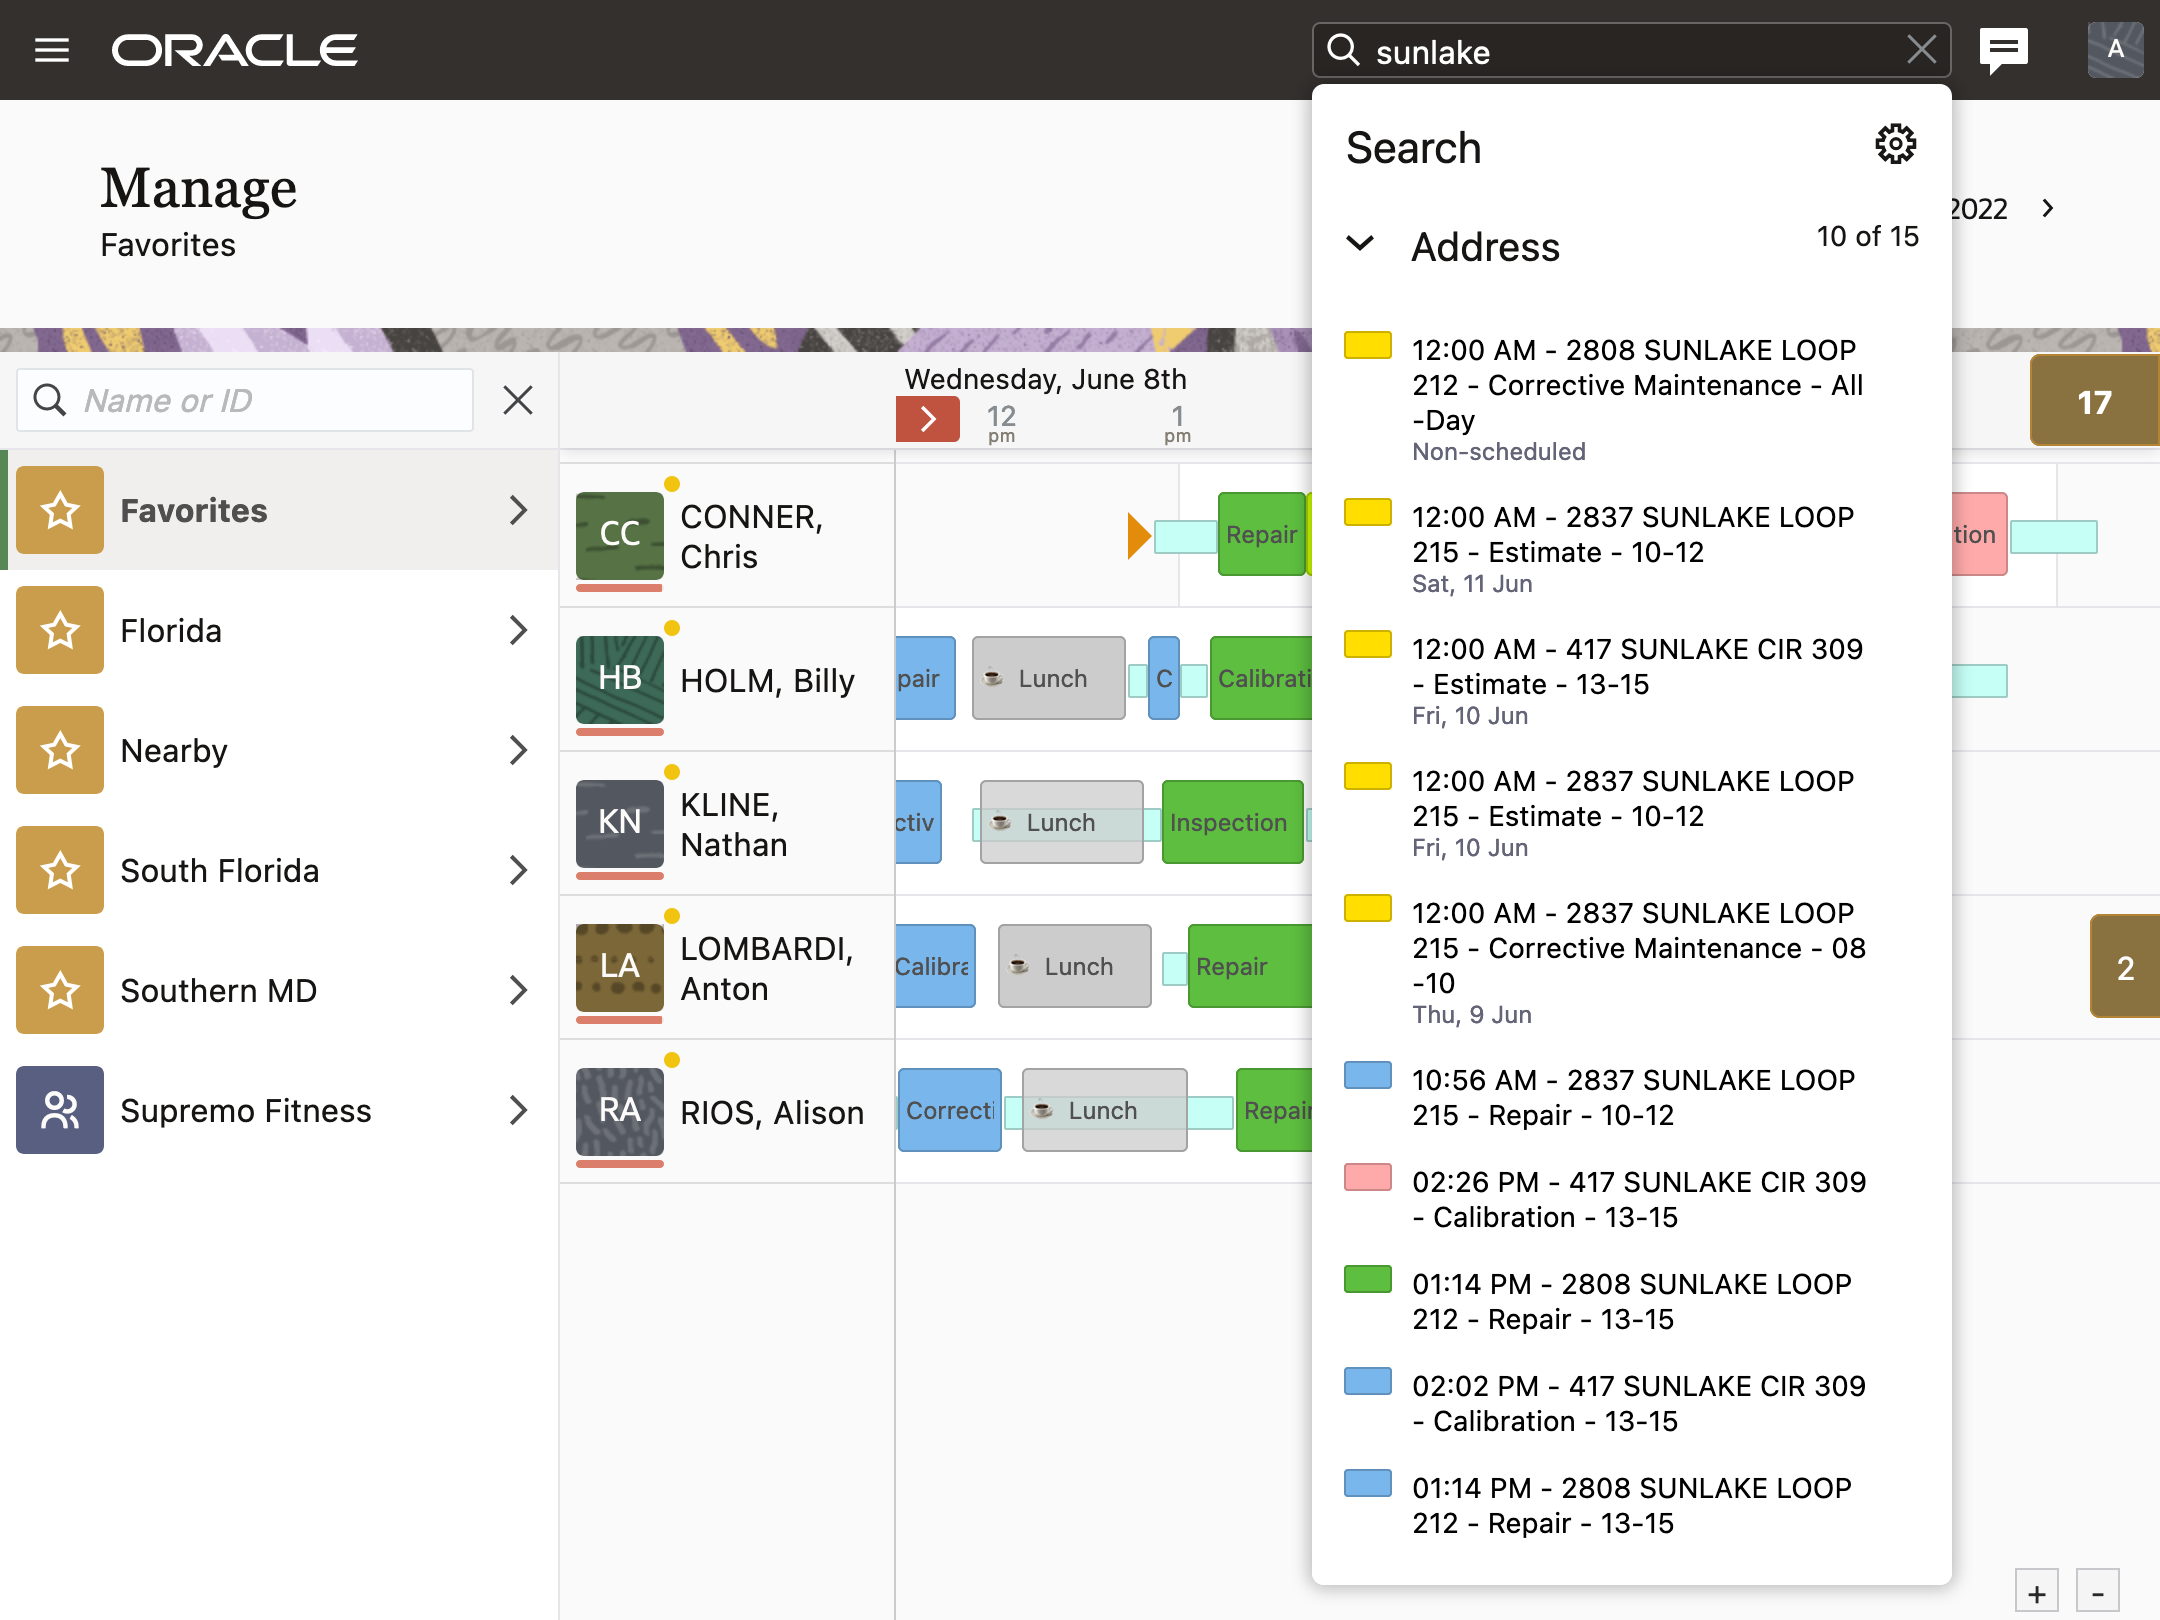
Search Keywords and Results
This image shows the Search field without the keyword:
Search Field Without Keyword
This feature helps administrators avoid duplicating the Preferences, About, and Sign Out links on the Main Menu and the Avatar menu. In addition, the feature also improves usability by providing quick access to the Activity List page from the Main Menu.
Steps to Enable
You don't need to do anything to enable this feature.
Key Resources
NOTE: The above link to the latest documentation works after the latest generally available (GA) release.
Assignment Assistant Usability Improvements
Starting Update 22C, the Assignment Assistant page is improved as follows:
- Resource alerts are displayed under a resource's name when Show all is enabled. Previously, resource alerts were displayed for target resources when scheduling an activity using drag-and-drop.
- A red vertical line across resource routes indicates the current time.
- The Assignment Assistant page follows Redwood design guidelines to provide the same look and feel as other Oracle Field Service pages.
- Resource working time is highlighted with a white background.
- The screen width is increased so that resource routes are fully visible on large screens.
This image shows the Assignment Assistant page with Show all enabled and the resource alerts displayed under the resource names:
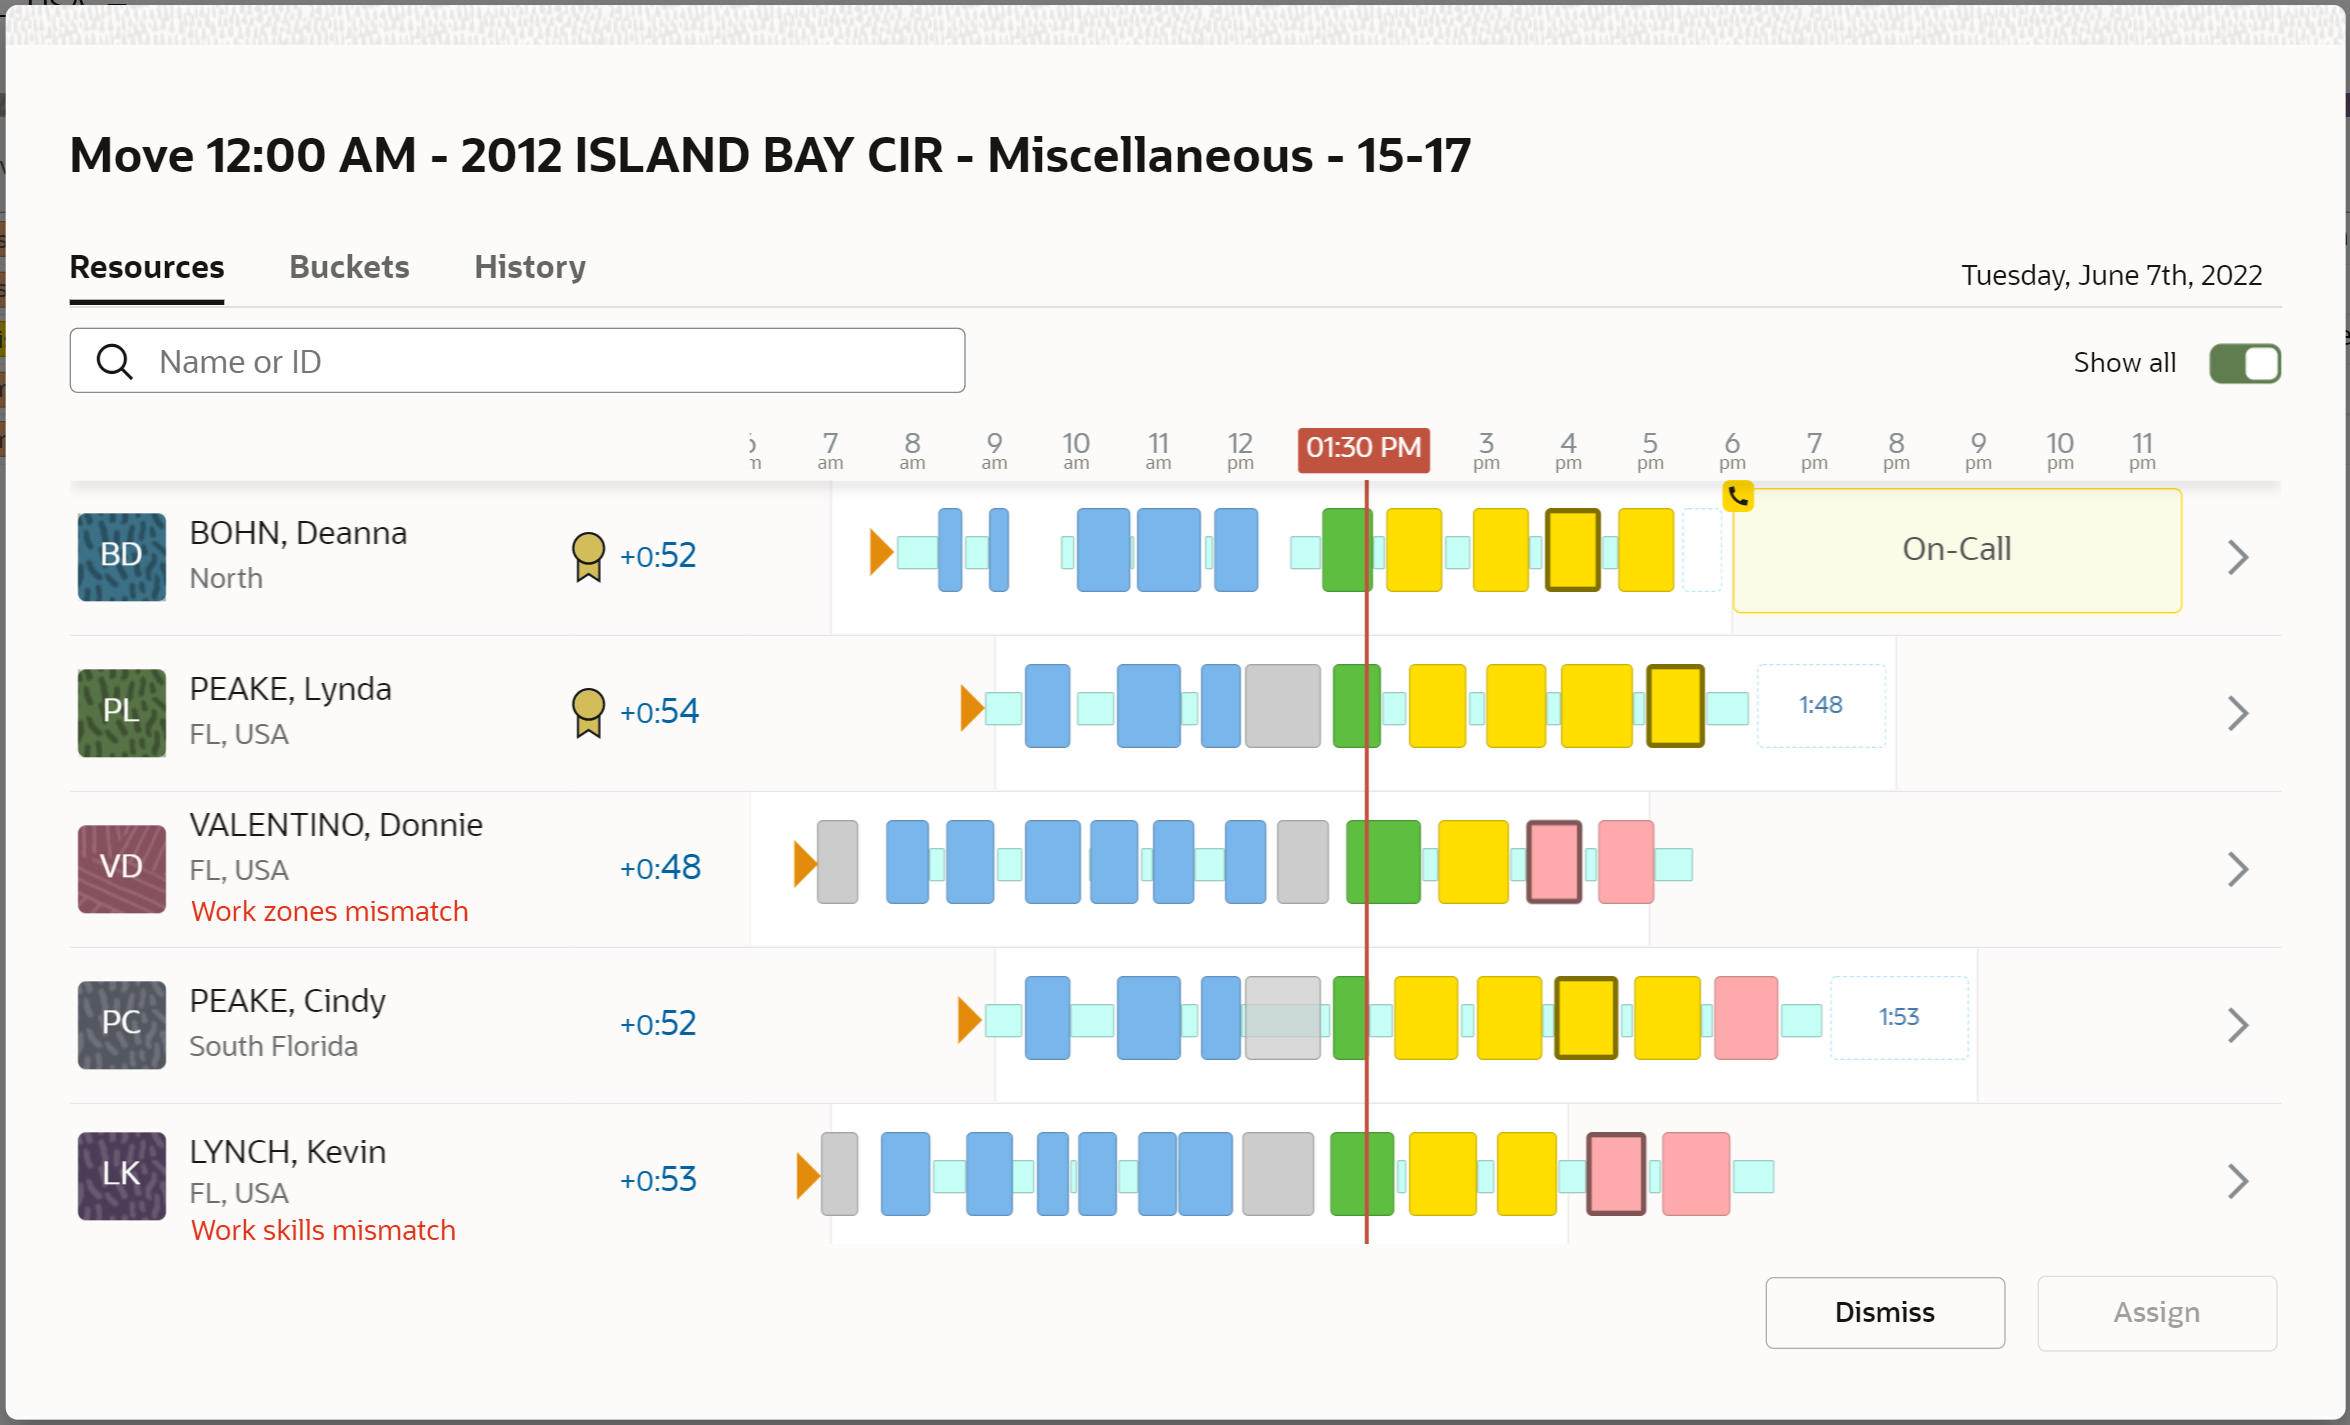
Assignment Assistant Page
Assignment Assistant provides intelligent guidance to dispatchers when assigning or moving activities between resources. Usability improvements have been implemented to provide visibility to key details enabling dispatchers to make more informed decisions.
For example, when attempting to move an activity to another resource, the dispatcher may unknowingly select a technician with no availability or even someone assigned to a different work zone. Having visibility of these details before moving the activity minimizes exceptions and reassignment.
Steps to Enable
You don't need to do anything to enable this feature.
Tips And Considerations
NOTE: The above link to the latest documentation works after the latest generally available (GA) release.
Improved Activity Duration Estimation for Bundled Activities
Based on data reported by field resources, completing activities that are part of the same visit (based on visit bundling keys) require lesser time compared to that of standalone activities. This does not apply to the first activity of the bundle. Starting with Update 22C, the application estimates the ratio of the average duration of activities that are part of a bundle (excluding the first activity) to the duration that is currently estimated for such activities. The calculated ratio is applied to the original estimate to get the estimated duration of bundled activities. Again, this ratio is not applied to the estimated duration of the first activity of the bundle. The first activity continues to have the same duration similar to a standalone activity.
Only one single ratio is calculated for a particular instance. This ratio is based on reported duration of non-first bundled activities and duration that is currently estimated for similar activities.
EXAMPLE
Here is an example to understand on how the ratio will be used
Consider four activities that are part of the same visit bundle - A, B, C and D. Assume that as standalone activities, the estimated durations (based on resource's ratio for each activity and company level estimation) for the four activities would've been 30 mins, 20 mins, 50 mins and 40 mins respectively. Assume that the final ratio of bundled activity duration is 80% (based on calculated value and limits set).
The final estimated duration when these activities are assigned to the resource's route would be as follows:
- Activity A - 30 mins (ratio is not applied since it is the first activity of the bundle)
- Activity B - 20 * 80% = 16 mins
- Activity C - 50 * 80% = 40 mins
- Activity D - 40 * 80% = 32 mins
As with all other statistical values, the value of this ratio is recalculated on a daily basis, typically overnight. For an activity type, if the Configuration, Activity Types, Calculate activity duration using statistics check box in the Activities page is unchecked then the ratio is not applied to the activity durations of that activity type.
VIEW AND CONTROL RATIO FOR BUNDLED ACTIVITIES DURATION
In the Business Rules page, an additional setting is available under Visit bundling keys that allows administrators control the lower and upper limits for the ratio to be used. In addition, it displays the value calculated by the system based on durations reported by field resources. The limits can be set using the slider to a value from 1% to 100%, provided the lower limit does not exceed the upper limit.
The final ratio is applied to estimation durations of non-first bundled activities between the lower and upper limits set here. So, if the calculated ratio lies within the limits, that value is used. If not, the limit closest to the calculated value is used.
EXAMPLES
Here are some examples:
- Case 1:
Lower limit = 70%, Upper limit = 90%, Calculated value = 80%. In this case, the duration of all non-first bundled activities be 80% of the duration of similar normal activities.
- Case 2:
Lower limit = 70%, Upper limit = 90%, Calculated value = 60%. In this case, the duration of all non-first bundled activities be 70% (lower limit) of the duration of similar normal activities.
- Case 3:
Lower limit = 70%, Upper limit = 90%, Calculated value = 95%. In this case, the duration of all non-first bundled activities be 90% (upper limit) of the duration of similar normal activities.
If data reported is not enough to make meaningful calculations, there is no calculated value; the default value of 100% is displayed. The set limits are respected and the default value of 100% is used only if the upper limit is also set to 100%. If not, the value set as the upper limit is used.
SET OVERRIDING RATIO FOR BUNDLED ACTIVITIES DURATION
Using the limits, administrators can also override the ratio to be used for the duration of non-first bundled activities. Administrators can set both lower and upper limits to the value they want to use. As the system always respects the limits, it uses the value that is set.
For example if the desired ratio is 80% then you may set both lower and upper limits to 80% so that the system uses that value regardless of the calculated value.
To disable this feature altogether and to have the system behave the way it earlier used to, you may set the lower and upper limits to 100%.
This feature uses the estimation of the ratio of the average duration of activities that are part of a bundle (except for the first one) to the duration that is currently estimated for such activities. The calculated value is applied to the original estimate to get the estimated duration of bundled activities. Again, this ratio will not be applied to the estimated duration of the first activity of the bundle. The first activity will continue to have the same duration as a similar standalone activity.
An additional setting under Visit bundling keys lets administrators to control the lower and upper limits for the ratio to be used now,
Steps to Enable
You don't need to do anything to enable this feature.
Key Resources
NOTE: The above link to the latest documentation works after the latest generally available (GA) release.
When activities are manually moved within Oracle Field Service, depending on the configuration, dispatchers may be required to indicate a move reason. Move reasons help the leadership to understand why moves are being made thus, enabling them to drive optimization changes within the organization. To better analyze such changes, move reasons can be exported to Oracle Analytics Cloud, Oracle Autonomous Database or other systems using Events API.
For example, you may be interested to know what types of activities are being moved most often or how each division is trending with the adoption of automated routing plans. Exporting move reasons to Oracle Analytics Cloud, or other BI tools, allows you to group, filter and/or pivot the data in different ways. Doing so helps you to identify a new routing plan configuration requirement or potentially a process change within the organization.
MOVE REASONS: NEW PROPERTY: Label
A mandatory property Label has been added to the Add/Edit Move Reason dialog. During upgrade to Update 22C, this field is populated with move_reason_id value. This property is available for the Manual Move Fields entity in the Daily Extract Application.
This image displays the Edit Move Reason dialog box
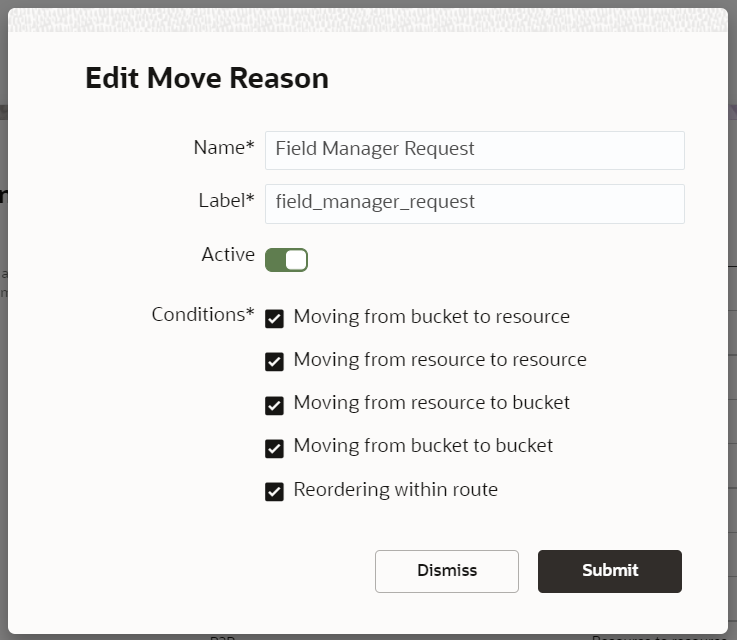
Edit Move Reason Dialog Box
MOVE REASONS: EXPORT TO ORACLE ANALYTICS CLOUD AND ORACLE AUTONOMOUS DATABASE
You can export activity move action details to Oracle Analytics and Oracle Autonomous Database. The new entity Manual Move Fields is available for Applications with types Oracle Analytics and Oracle Autonomous Database.
The possible data transfer value is Once Daily.
Manual Move Fields contain the same dataset as the Daily Extract application.
MOVE REASONS: EVENTS API SUPPORT
Activity move action details are available in the Events API.
The event activityMoved contains a new section moveDetails. This section contains the move action fields moveReason, moveCondition, workSkillMismatch, and workZoneMismatch.
Starting with Update 22C, the Add or Edit Move Reason dialog box has a new mandatory field, Label for Move Reason. This field is available for the 'Manual Move Fields' entity in the Daily Extract Application and it is populated with the move_reason_id value. Move reasons help the leadership to understand why moves are being made thus, enabling them to drive optimization changes within the organization.
Steps to Enable
You don't need to do anything to enable this feature.
Key Resources
NOTE: The above link to the latest documentation works after the latest generally available (GA) release.
Redwood Style for Dispatch Console
The Dispatch Console was partially updated to display the Redwood style previously. The application now displays the Time view and List view pages in Redwood style to provide better user experience.
This feature includes these user interface changes in the Dispatch Console:
- Time view
- List view
- Dialog boxes
TIME VIEW CHANGES
The application now displays the Time view with these changes:
- The header of the Gantt chart is aligned with the Manage page.
- The non-scheduled and not ordered icons have been updated to the Redwood style.
- The horizontal scroll bar uses the full width when regular scrollbars are enabled in the OS. (By default, overlay scrollbars are used.)
This image shows the Time view in Redwood style:
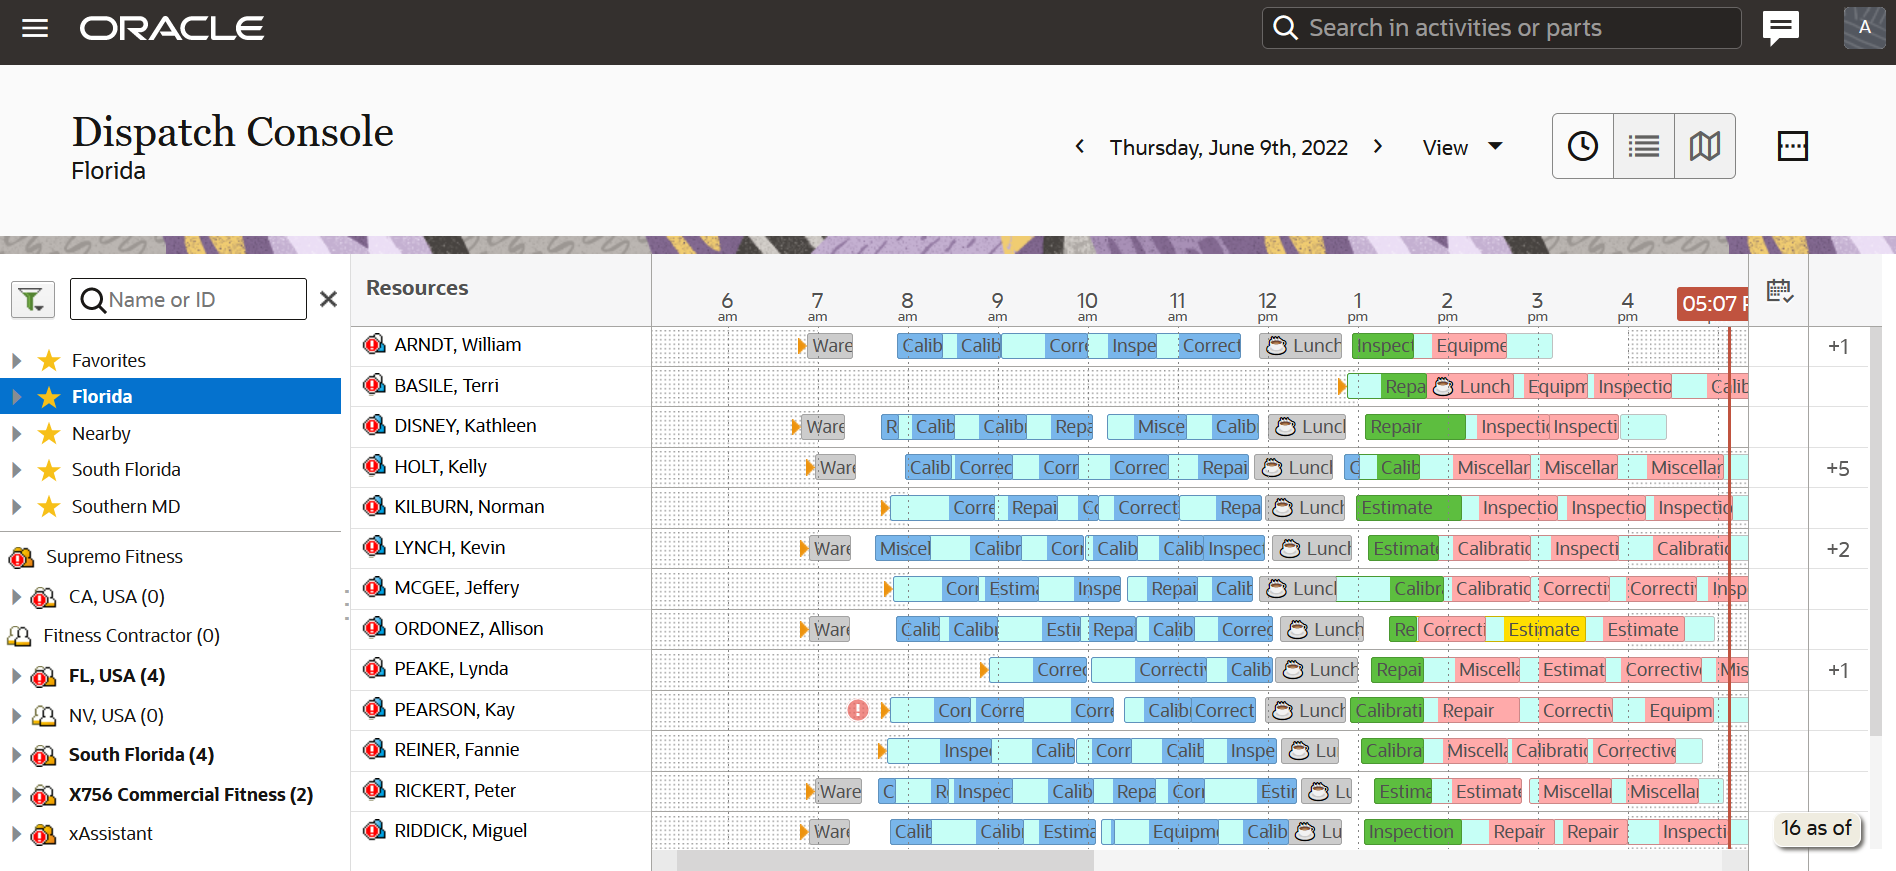
Dispatch Console Time View
LIST VIEW CHANGES
The application now displays the List view with these changes:
- The table header design was updated to the Redwood style.
- The check boxes that allow activity selection were updated to the Redwood style.
This image shows the List view in Redwood style:
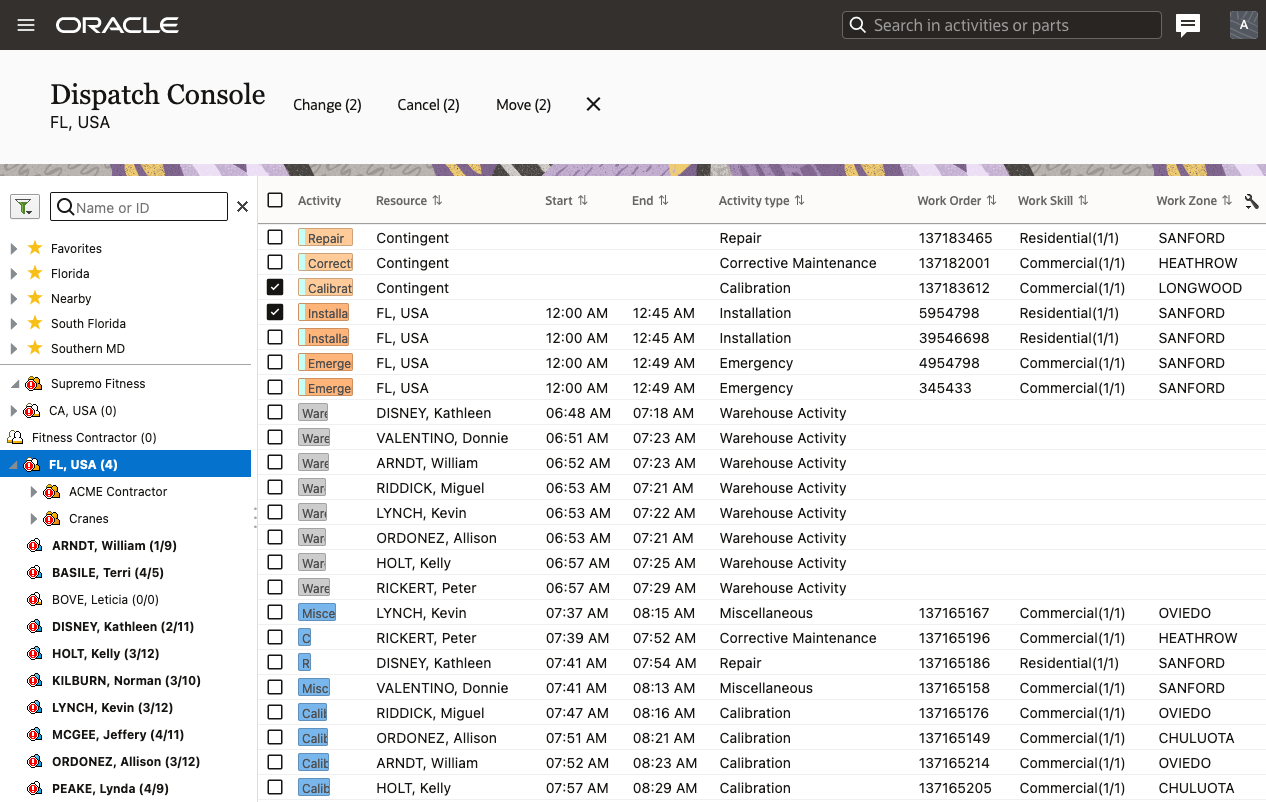
Dispatch Console List View
DIALOG WINDOWS
The dialog windows on the Dispatch Console containing the frame and buttons appear in Redwood style.
This image shows the dialog windows in Redwood style:
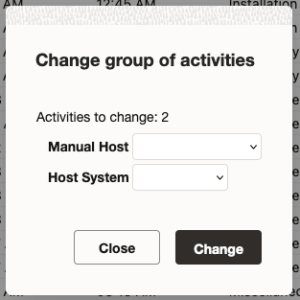
Dialog Window in Redwood Style
The dialog windows include the Change group of activities and Cancel group of activities dialog boxes.
The Dispatch Console inherits the Redwood user interface and navigation patters so that its look and feel is consistent with the application and with other applications of the Fusion stack.
Steps to Enable
You don't need to do anything to enable this feature.
Key Resources
NOTE: The above link to the latest documentation works after the latest generally available (GA) release.
With Update 22C, Oracle Field Service now provides the ability to incorporate the capabilities of near-field communication (NFC) technology into the daily routine of field resources. With this feature, technicians can scan NFC tags and populate data from them into forms or pages based on context layouts. This simplifies data entry, reduces the number of manual mistakes, and keeps collected data accurate and in the expected format.
The new functionality is available within iOS and Android apps running on mobile devices supporting NFC scanning technology.
Customers can use this feature to implement scenarios related to resource and activity management, such as:
- Keep traceability of the field resource holding a specific part item needed to perform a job and identify when the part is returned to the warehouse
- Make sure the field resource is performing a job on a part or inventory item properly identified by the NFC tag
- Validate that the field resource is located within the expected activity site
- Perform Security checks. Validate that the field resource has authorized access to the activity site
- Strict SLA monitoring. Validate that the field resource starts the activity within the SLA established for the related activity
WHAT'S NEW
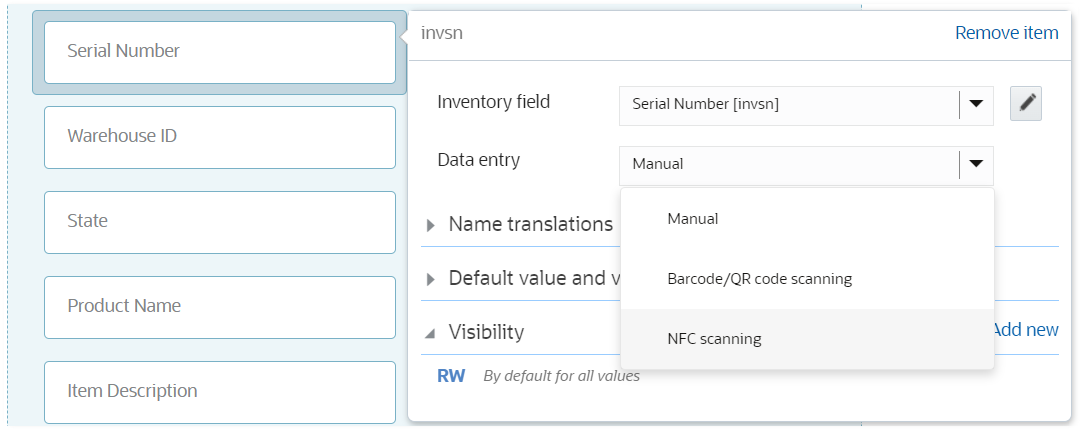
When configuring the text type of properties or the input type of form fields, its now possible to select from these types of data entry:
- Manual (default selection)
- Barcode/QA code scanning
- NFC scanning
When NFC scanning is selected, then technicians can scan data from NFC tags, and the application automatically populates the data back to the form.
RECAP
Context layouts: Pre-defined list of pages initially coming within the application
Forms: Custom forms added by customers
You can configure product fields and custom properties within both context layouts and forms, while form fields type of elements are available just for forms.
SCAN NFC TAGS
- Navigate to the page or form containing custom properties, product fields or form fields configured for NFC scanning. These elements are shown with the corresponding icon.
- Tap the NFC icon and hold your phone next to the tag. The application displays the scanning process and then shows the results.
- As the final step, the app populates data from the tag into the field from which the scanning process was initiated.
NFC scanning option selected for custom properties, product fields, and form fields implies that the scanning of NFC tags is the primary method of data entry. However, it's also possible to manually populate or correct data within these type of elements.
This image shows the Warehouse ID and Serial Number fields that are configured for scanning NFC tags:
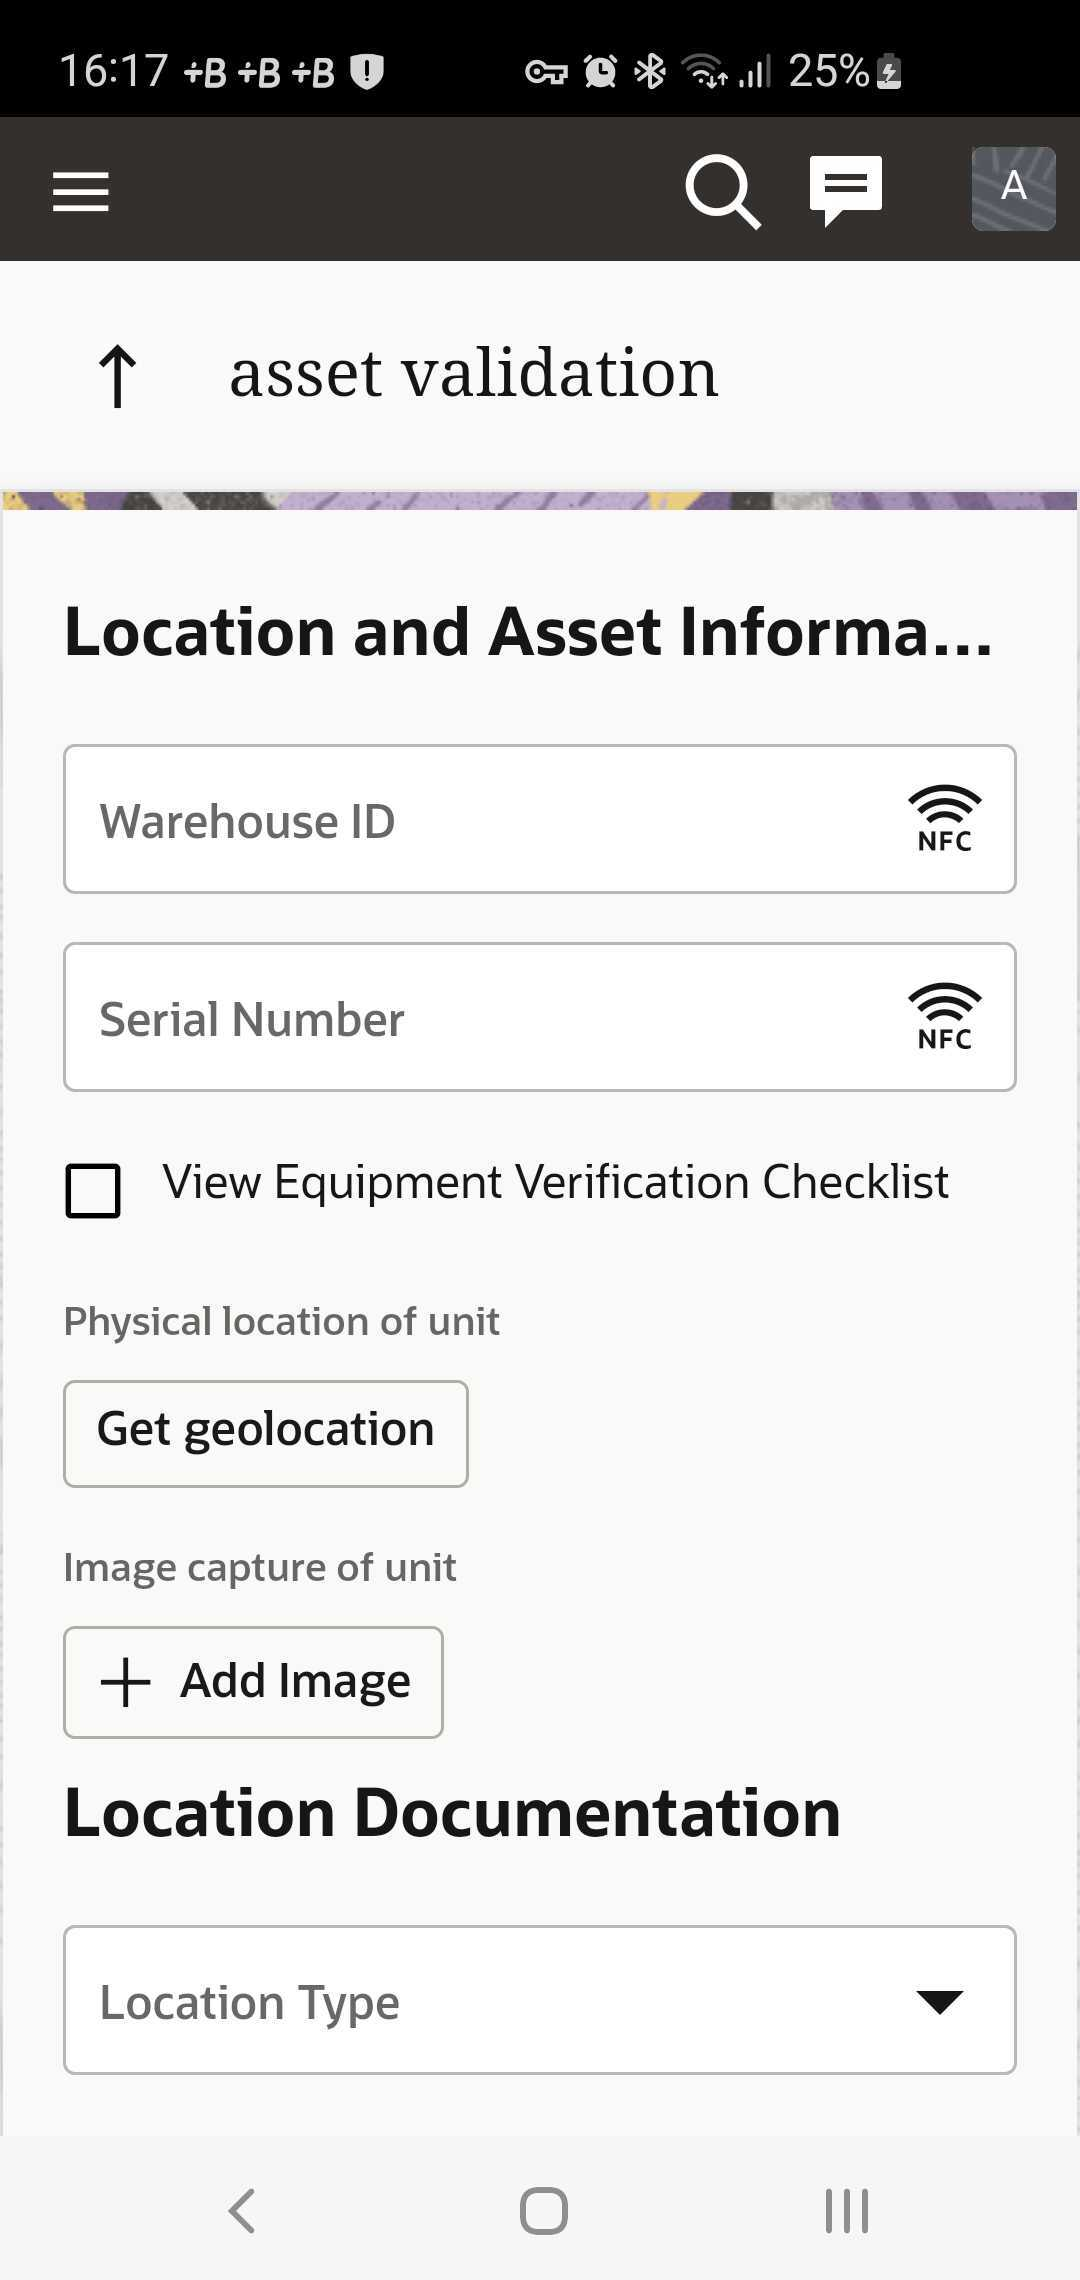
NFC Tags Validation Page
This image shows the scanning of Warehouse ID and Serial Number fields:

NFC Tag Scanning Page
This image shows the values populated after scanning the NFC tags:
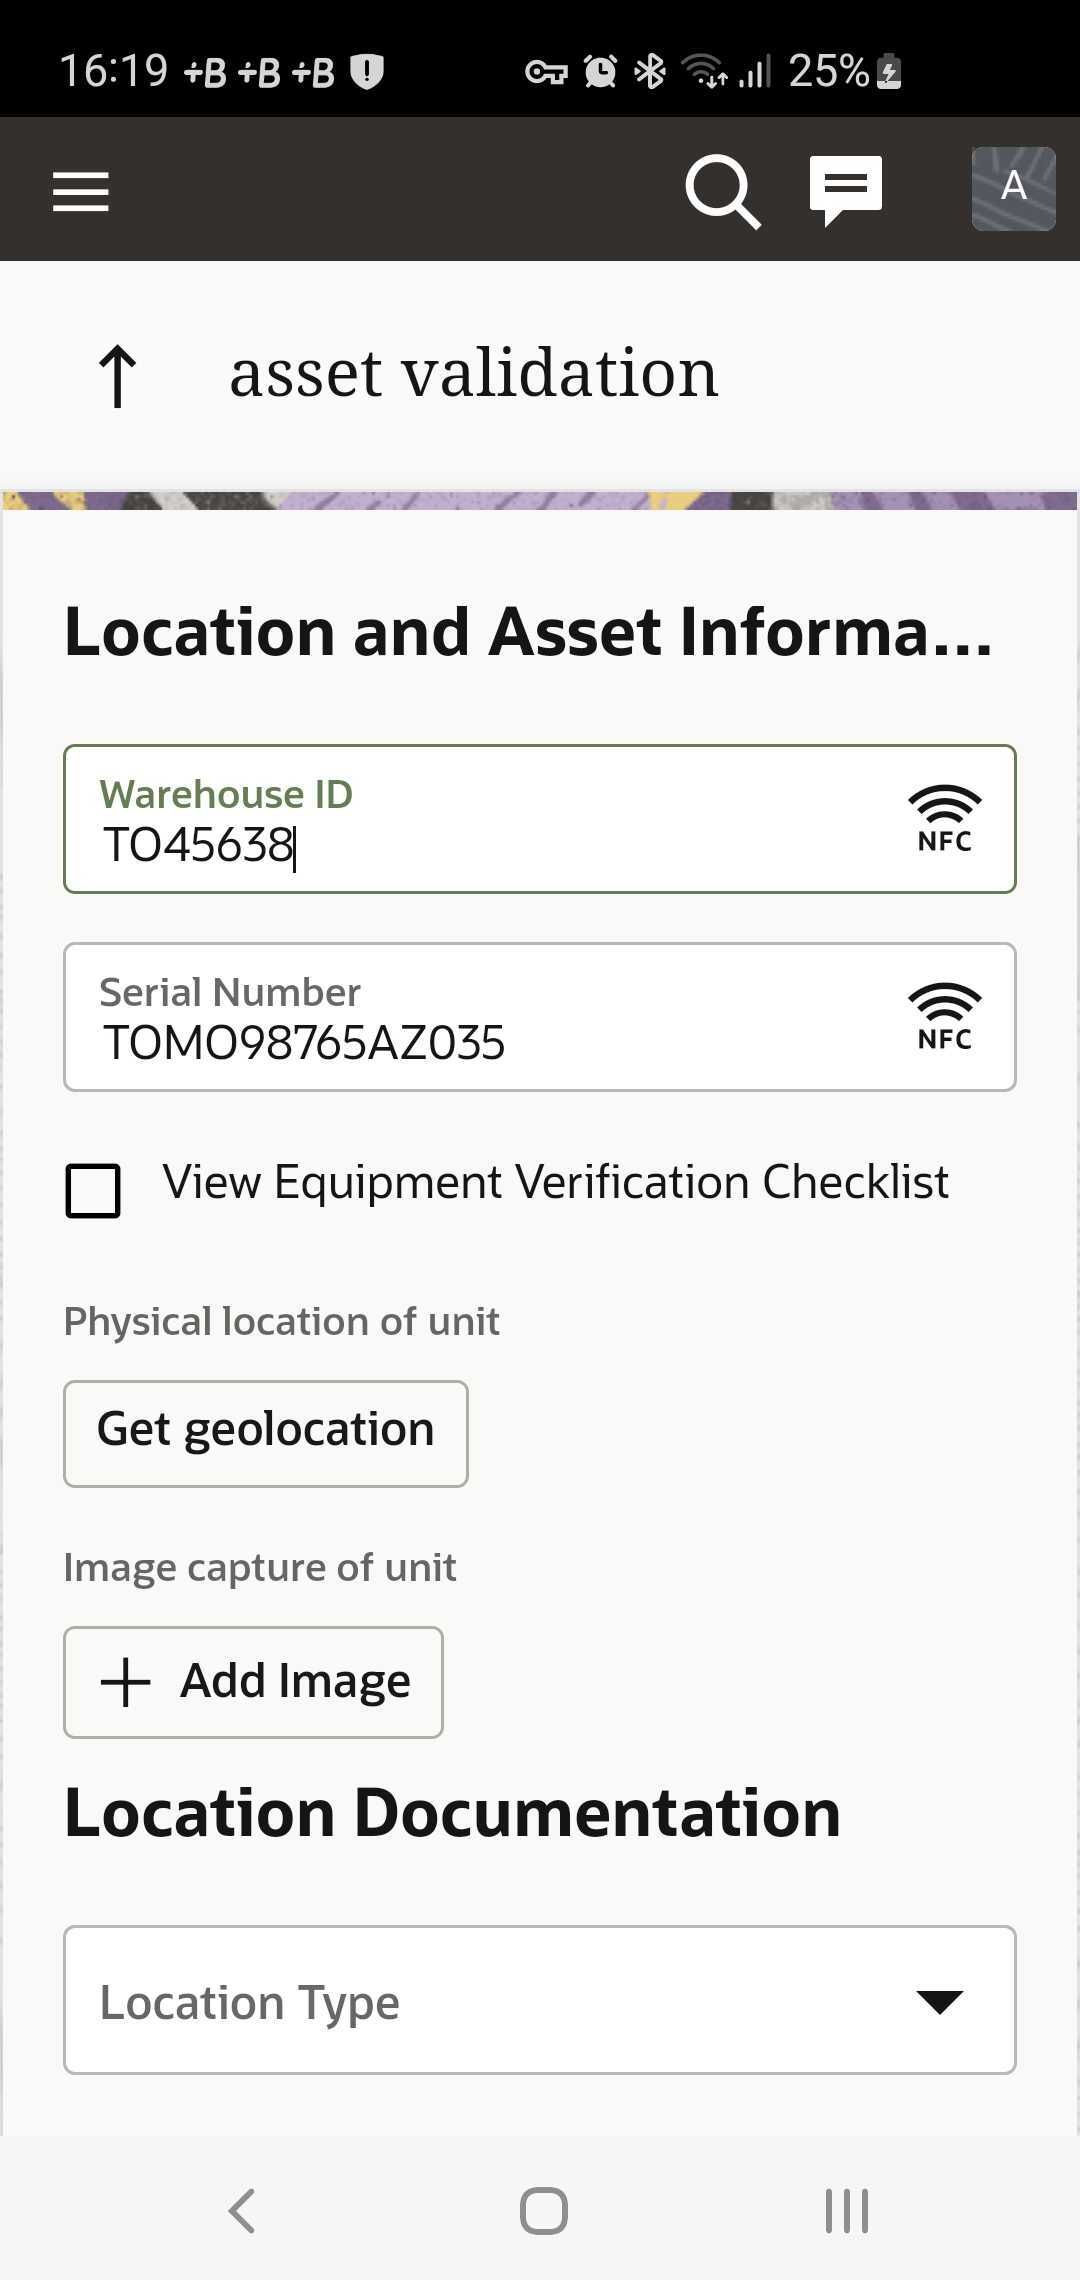
NFC Tags Validation Page
Visualization of errors
In addition to successful scenarios, the app also informs you about the most typical errors.
Keep the phone closer to the tag. This image shows the Hold your phone near the tag error:
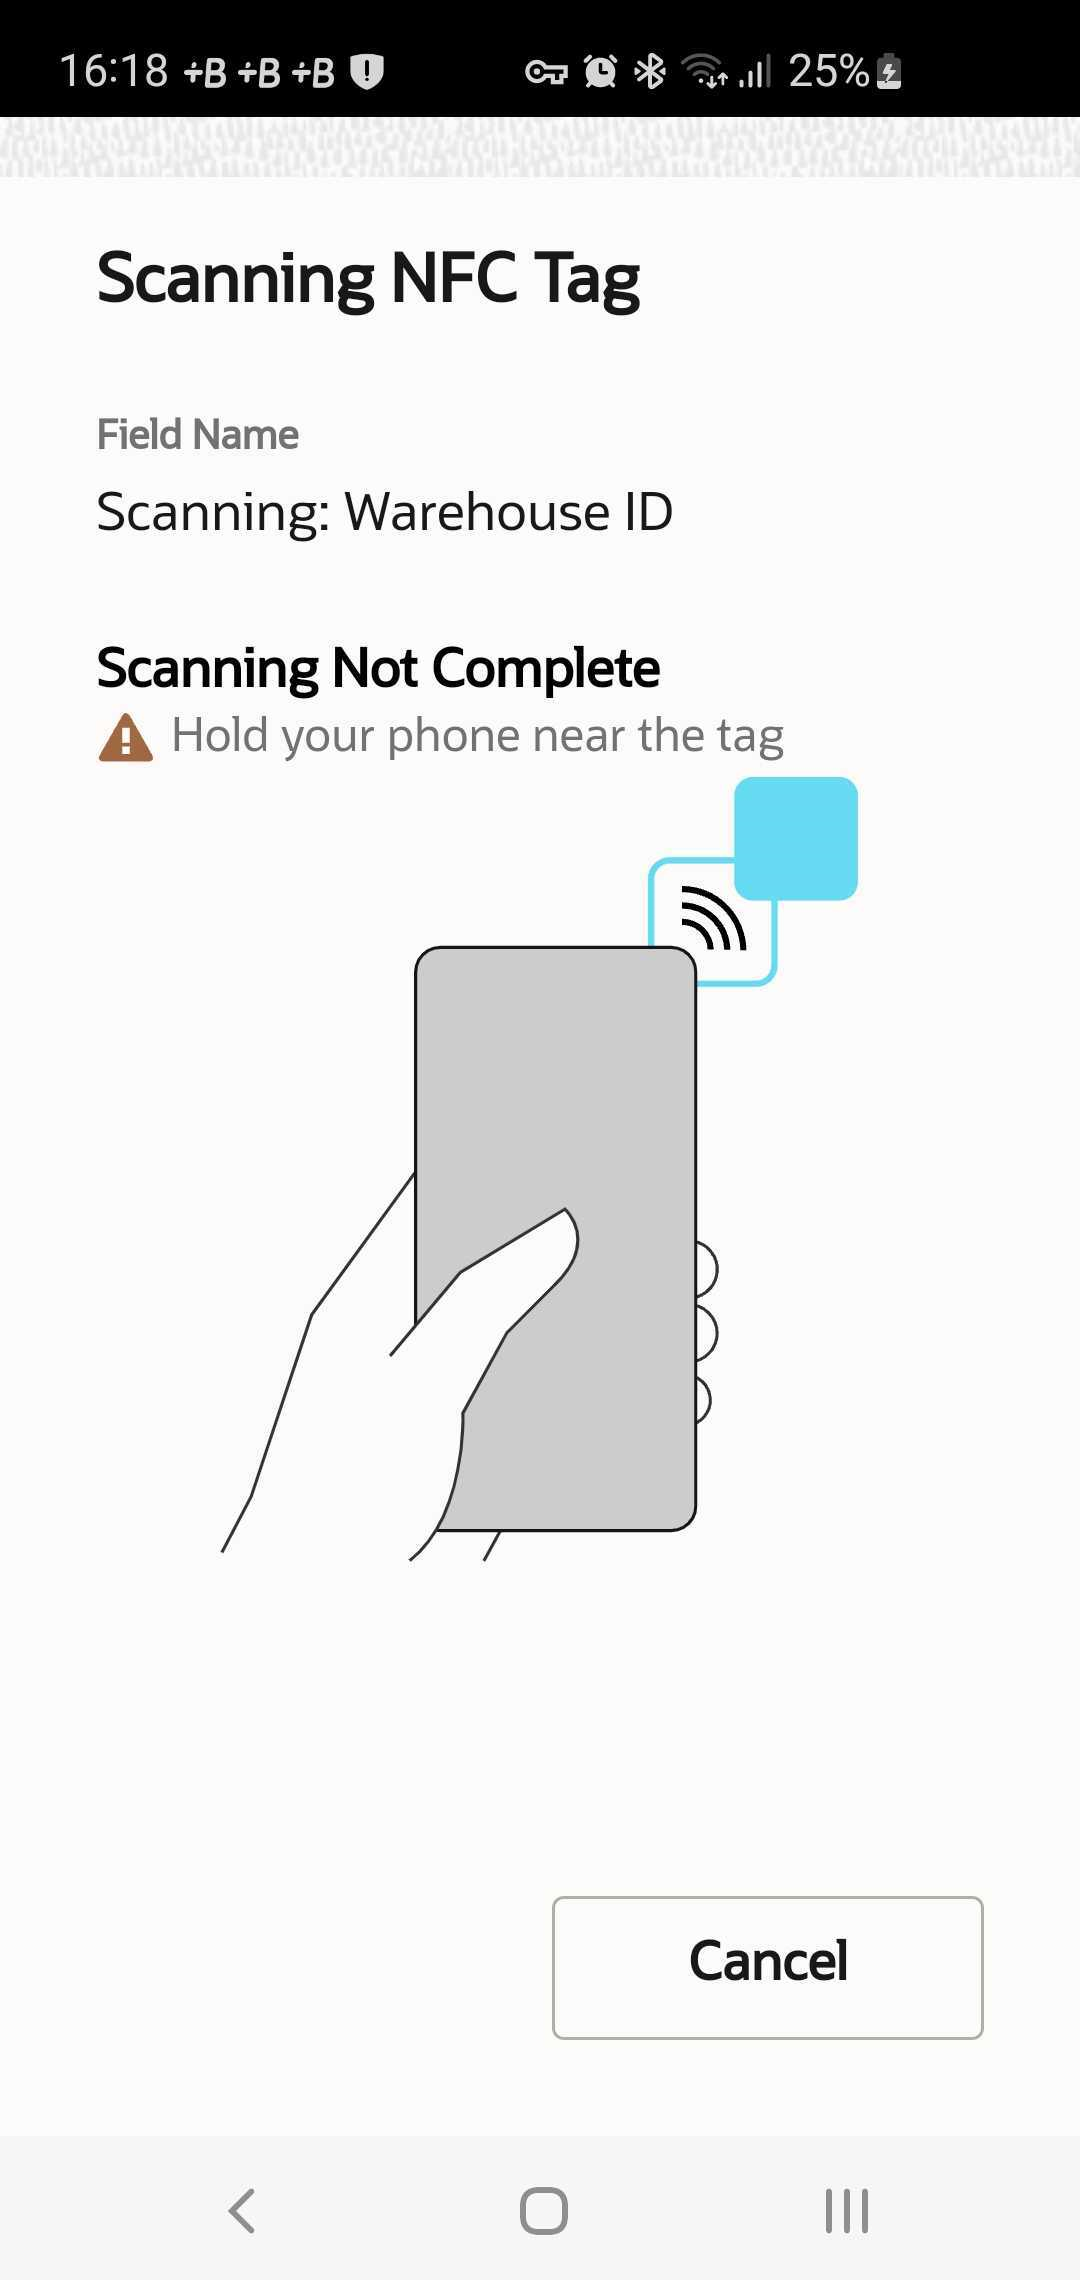
Hold your phone near the tag Message
NFC scanning option is not enabled on the mobile device. This image shows the Action is not allowed error:
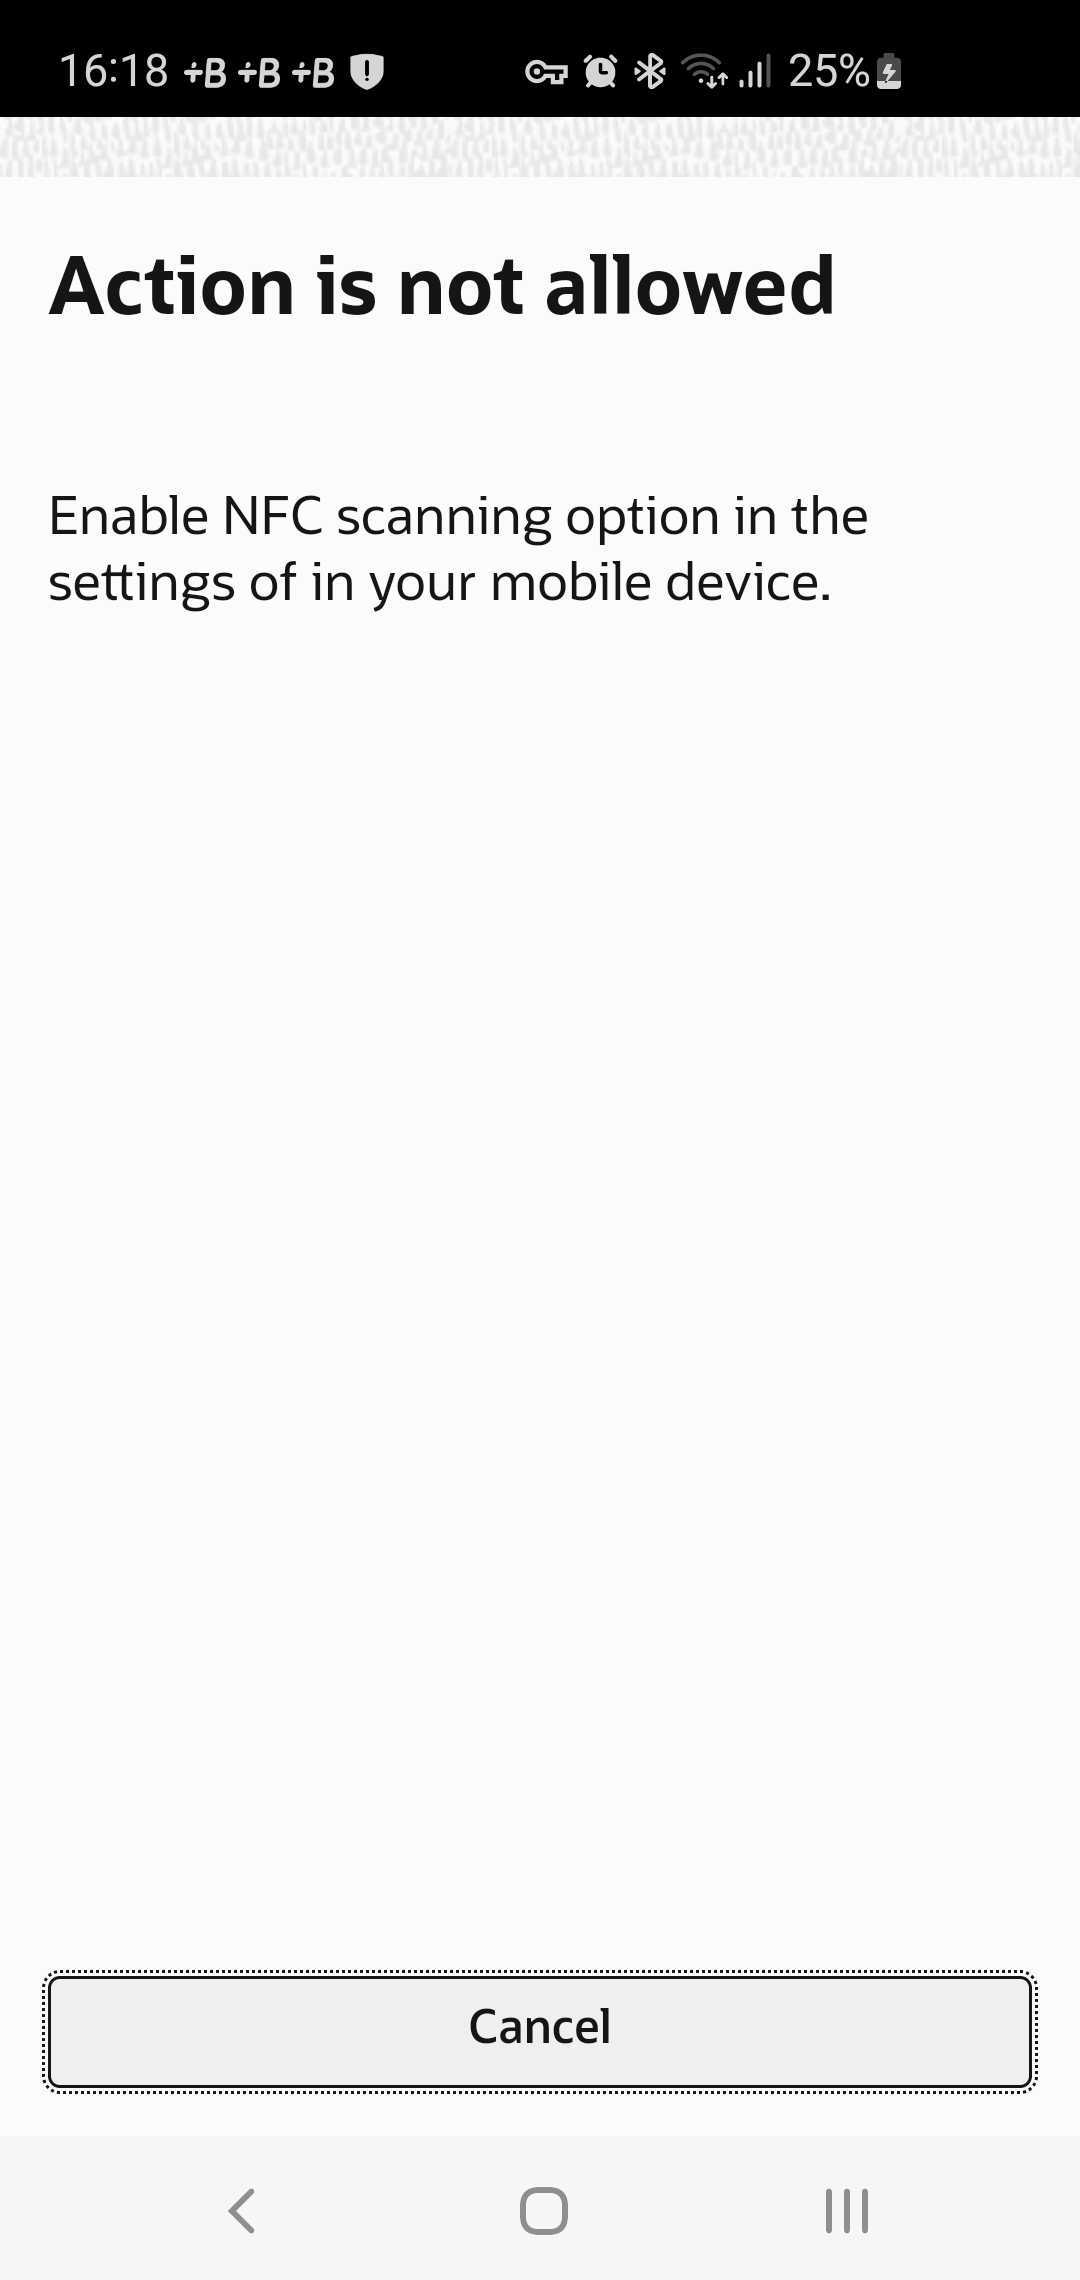
Action is not allowed Message
Pre-conditions for the feature
- You use the Update 22C browser application to configure fields for NFC scanning.
- You use the Update 22C installed Android/iOS apps.
- Your mobile device supports NFC scanning, and this option is enabled in its Settings.
- NFC tags comply with the following requirements:
- NFC tags must contain just a single field containing plain text.
- The format of tags must be NDEF (which is the commonly used format).
All these rules work all together allowing you to benefit from the feature.
You can use this feature to implement scenarios related to resource and activity management such as:
- Keep traceability of the field resource holding a specific part item needed to perform a job and identify when the part is returned to the warehouse.
- Ensure that the field resource is performing a job on a part or inventory item properly identified by the NFC tag.
- Validate that the field resource is located in the expected activity site.
- Perform Security checks: Validate that the field resource has authorized access to the activity site.
- Strict SLA monitoring : Validate that the field resource starts the activity within the SLA stablished for the related activity.
Steps to Enable
How to configure
The new Data entry drop-down list is displayed in the Visual Form Editor when configuring either the text type of custom properties and product fields or the input type of form fields. There are 3 options under this drop-down list:
- Manual (default selection)
- Barcode/QA code scanning
- NFC scanning
The option to select the data entry mode is also available for the majority of out-of-the-box product fields, except those mentioned in the list below:
List of fields where Data entry selection is not allowed:
Activity fields
The following auto-calculated fields:
- Access Schedule [access_schedule]
- Access Hours [access_hours]
- Compliance Alerts [activity_compliance]
- Alerts [activity_alerts]
- SLA End [sla_window_end]
- SLA Start [sla_window_start]
- Traveling Time [travel]
- Resource ID [pid]
- Time Slot [time_slot]
The following fields are NOT auto-calculated (but can contain specific data):
- Points [apoints]
- Coordinate X [acoord_x]
- Coordinate Y [acoord_y]
- Duration [length]
The following non auto-calculated fields:
- Name [cname]
- Work Order [appt_number]
- Cellular Phone [ccell]
- Email [cemail]
- Phone [cphone]
- Account Number [customer_number]
- State [cstate]
- ZIP/Postal Code [czip]
- City [ccity]
- Address [caddress]
The following auto-calculated fields:
- First Manual Operation [first_manual_operation]
- First Manual Operation Interface [first_manual_operation_interface]
- First Manual Operation Performed by User [first_manual_operation_user_id]
- First Manual Operation Performed by User (Login) [first_manual_operation_user_login]
- First Manual Operation Performed by User (Name) [first_manual_operation_user_name]
- Auto-Routed to Date [auto_routed_to_date]
- Auto-Routed to Resource [auto_routed_to_provider_id]
- Auto-Routed to Resource (Name) [auto_routed_to_provider_name]
- Activity Time of Assignment [atime_of_assignment]
- Activity Time of Booking [atime_of_booking]
- Capacity Categories [activity_capacity_categories]
- Coordinate Status [acoord_status]
- Date [date]
- Start - End [eta_end_time]
- Delivery Window [delivery_window]
- End [end_time]
- Time Notified [time_delivered]
- Work Zone [aworkzone]
- Activity ID [aid]
- Activity status [astatus]
- Start [ETA]
- Service Window [service_window] [service_window]
- Travel estimation method [travel_estimation_method]
Inventory fields
The following auto-calculated fields:
- Changed Inventory ID [inv_change_invid]
- Resource Id [inv_pid]
- Activity Id [inv_aid]
- Inventory Id [invid]
- Inventory pool [invpool]
The following fields are NOT auto-calculated (but can contain specific data):
- Quantity [quantity]
Resource fields
The following auto-calculated fields:
- ID [pid]
- Working days left for reported data to start impacting duration estimations [skip_days_for_stats]
- Reactivated [reactivated]
- On-call Calendar [oncall_calendar]
- Work Zones [resource_workzones]
- Effective Work Skills [resource_effective_workskills]
- Time slots [resource_time_slots]
- Capacity Categories [resource_capacity_categories]
- Work Skills [resource_workskills]
- Calendar [calendar]
- Queue status [queue_status]
- Total [total]
- Pending [pending]
- Alerts [alerts]
The following non auto-calculated fields:
- Name [pname]
- External ID [external_id]
- Email address [email]
- Phone [pphone]
Service request fields
The following auto-calculated fields:
- Created [srcreated]
- Activity [appt_ident]
- Request Id [srid]
- User Id [sr_uid]
- Resource Id [sr_pid]
- Activity Id [sr_aid]
- Inventory Id [sr_invid]
The following POSSIBLY auto-calculated fields
- User [uname]
- Date [srdate]
User fields
The following auto-calculated fields:
- User ID [uid]
- Registered [sucreated]
- Failed login attempts [login_attempts]
- Blocked to [login_blocked_to]
- Last login [last_login]
- Last password change [last_password_change]
- Updated [suupdated]
- Main Resource [main_resource_id]
The following fields are NOT auto-calculated (but can contain specific data)
- Refresh Rate [refresh_rate]
- Mobile Resource Count [mobile_provider_count]
- Mobile Activity Count [mobile_activity_count]
- Mobile Inventory Count [mobile_inventory_count]
- Collaboration Group [collab_assigned_user_group]
- Operator of Helpdesk [collab_operator_helpdesk]
The following non auto-calculated fields:
- User name [uname]
- Login [ulogin] Password [password]
To enable NFC scanning for a certain element you must select this option from the drop-down list and save your configuration changes.
In the screenshots below, the first image is the configuration of Serial Number, which is a product field, and Warehouse ID which is an example of a form field that exists just within the context of a particular form.

Key Resources
NOTE: The above link to the latest documentation works after the latest generally available (GA) release.
Where is My Technician Enhancements
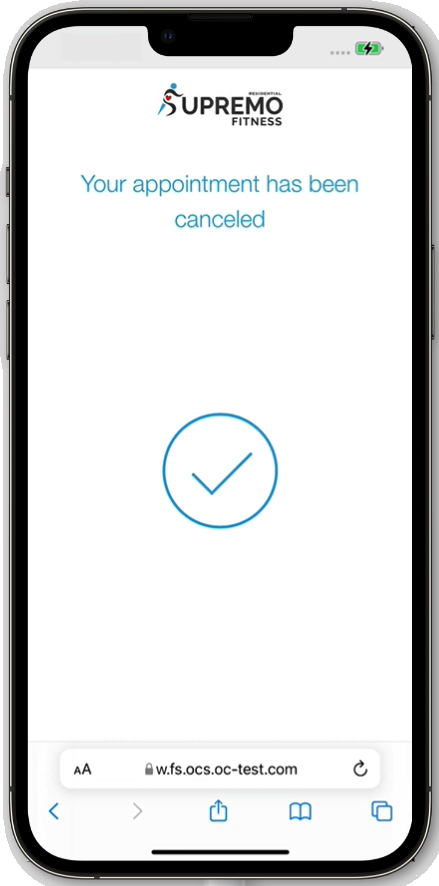
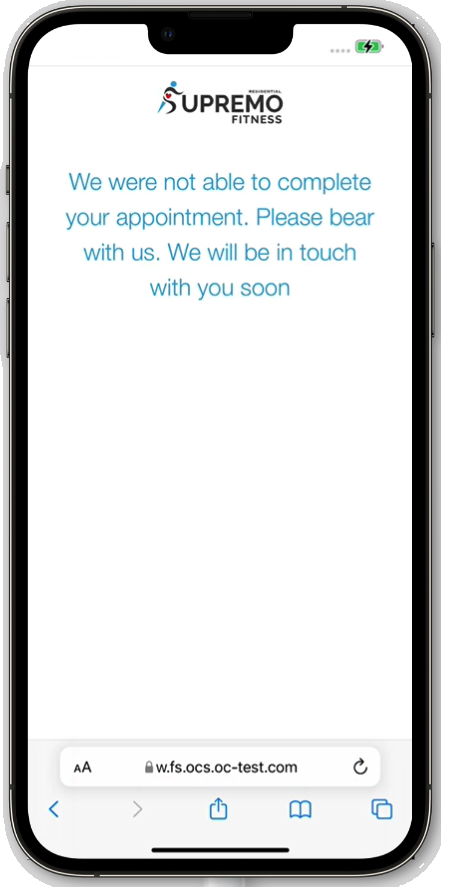
Starting with 22C, the Where is My Technician feature allows you to communicate an appropriate message when an activity is Canceled or the job has not been completed (activity is in Not Done status). Also, now you can gather feedback, even when your clients send it days after the appointment date.
What's New
- New placeholder for the Canceled activity on the Where is My Technician Theme page configuration
- New placeholder for the Not Done activity on the Where is My Technician Theme page configuration
- Feedback can be saved from the Where is My Technician page for the past period (during the URL availability) if Allow offline sync and update activities after overnight within the following number of hours is enabled on the Business Rules page
How to configure
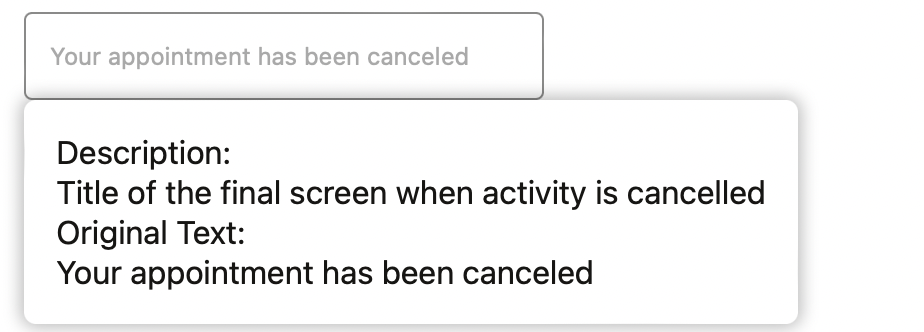
Configure text for Canceled and Not Done activities:
- Go to the Where is My Technician theme configuration.
- Open the Localization tab.
- Add the required text to the placeholder or leave the default text as is. This image shows the placeholder for the message about the canceled activity:
Use Cases:
There can be a case when a Technician went to the client to install Ethernet, but realized that the landlord is not there and they can't sign in the contract with the person who rented the apartment. Thus, a Technician marked the activity as 'Not done' and you see the message on Where is My Technician page that the appointment can't be completed.
This image shows the message that is displayed when an activity is canceled:
This image shows the message that is displayed when an activity is not done:
Save Feedback
To gather feedback from clients who send it the day after the appointment date, you can configure this as follows:
- Go to the Business Rules page.
- Add the number of hours that data can be saved for the past period in the field Allow offline sync and update activities after overnight within the following number of hours. The calculation of the period that allows to save feedback is a sum of the activity midnight time, company Time zone difference, configured 'Overnight work' (if any), and Allow offline sync and update activities after overnight within the following number of hours.
Use cases
- New placeholder for the Canceled activity: Let's say a technician arrives at a customer location but the service is no longer needed. That is, the appointment was an urgent visit due to a service outage, but the service resumed before the technician arrived to the customer location. Customer states that the services is no longer needed when the technician arrives at the door. You can configure placeholders for the cancellation page, for example, to provide a contact phone number for the customers to reach when the appointment is canceled by mistake.
- Feedback for the past appointment: A user forgot to leave feedback immediately after the service is completed. Now users have additional time to leave a rating or comment in next coupe of days after the activity is done.
This feature helps you increase the efficiency and customer satisfaction of your service, as your customers can provide feedback any time till the link is available and get a message when the service is canceled or not done.
Steps to Enable
Clicking the Allow offline sync and update activities after overnight within the following number of hours check box on the Business Rules page to save feedback from the WMT screen for the past period (during the URL availability).
Key Resources
NOTE: The above link to the latest documentation works after the latest generally available (GA) release.
Redwood Style for Applications Page
Starting with Update 22C, the dialog boxes, application type list view, warning messages and input fields in the Applications page have been improved with Redwood style for better user experience.
The applications in the Application Type drop-down menu will be listed in alphabetical order. This image shows the Add Application Type dialog box:
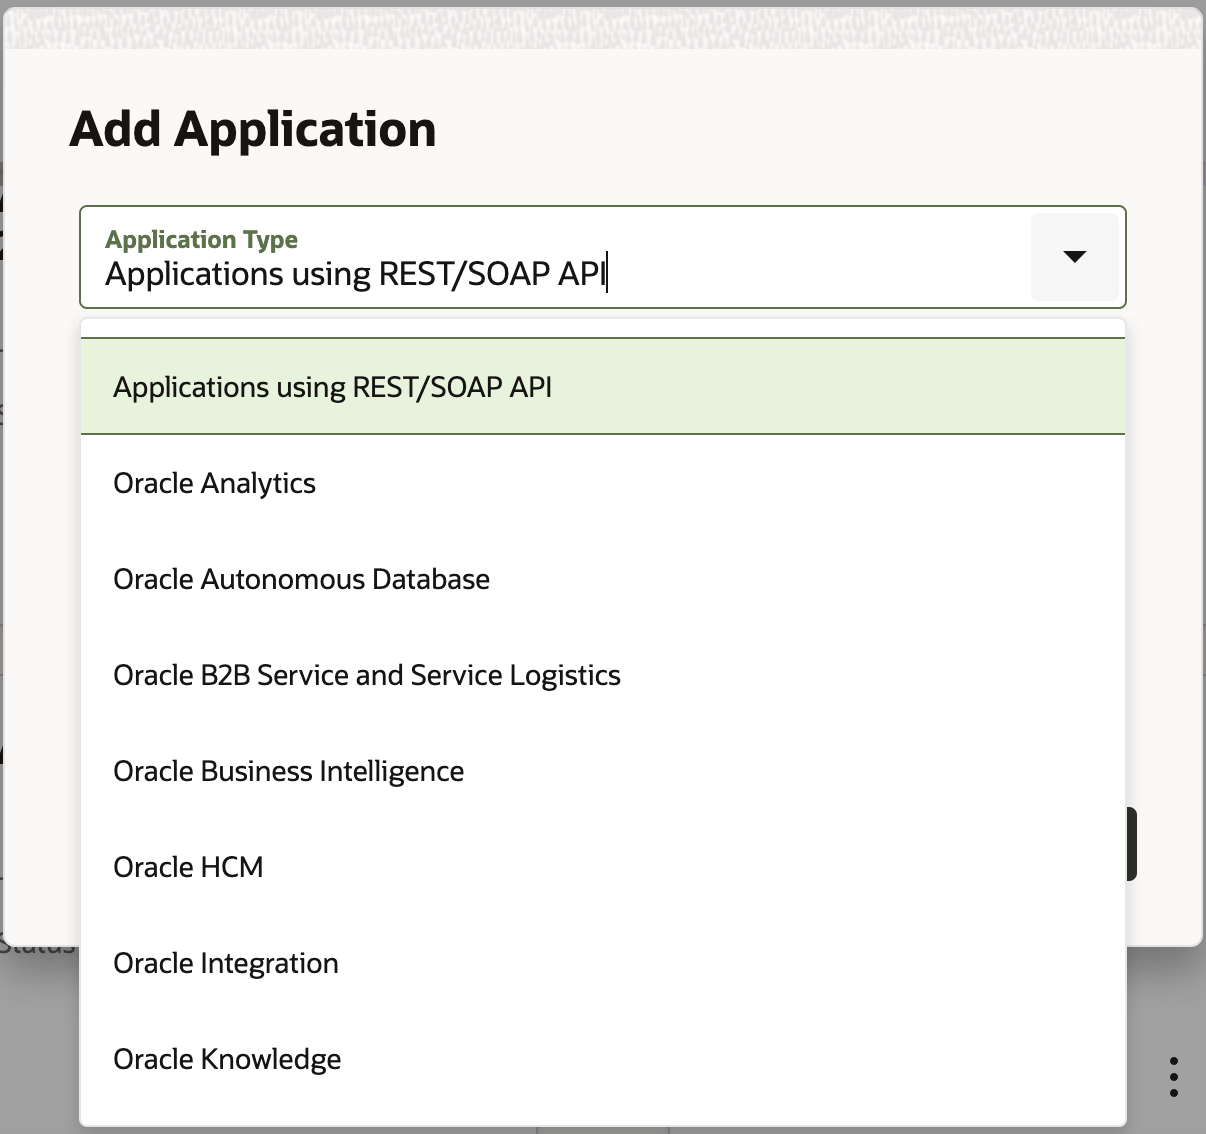
Application Type Dialog Box
DEPRECIATION ANNOUNCEMENT OF ORACLE BUSINESS INTELLIGENCE APPLICATION (BICS)
The support for Oracle Business Intelligence application (BICS) is planned to stop in Update 23A version. The recommendation is that new customers must use Oracle Analytical Cloud and existing users must switch over to Oracle Analytical Cloud from BICS for a better analytical experience. Users are notified about the deprecation of the BICS application when they add a new BICS application or select Oracle Business Intelligence from the Application Type list. This image displays the message showing deprecation of BICS application:

Depreciation Message
Current BICS users can continue using the application because existing BICS applications work as is. However, the application tile displays the deprecation message, and users are recommended to use Oracle Analytics for continued data analytics. This image displays the message showing deprecation of BICS application:

Depreciation Message For Existing Users
DIALOG BOXES FOR APPLICATIONS
The dialog boxes for Applications configuration have a new look and feel. This image displays the Applications page dialog boxes:
Add Application
This image displays the Add Application dialog box:
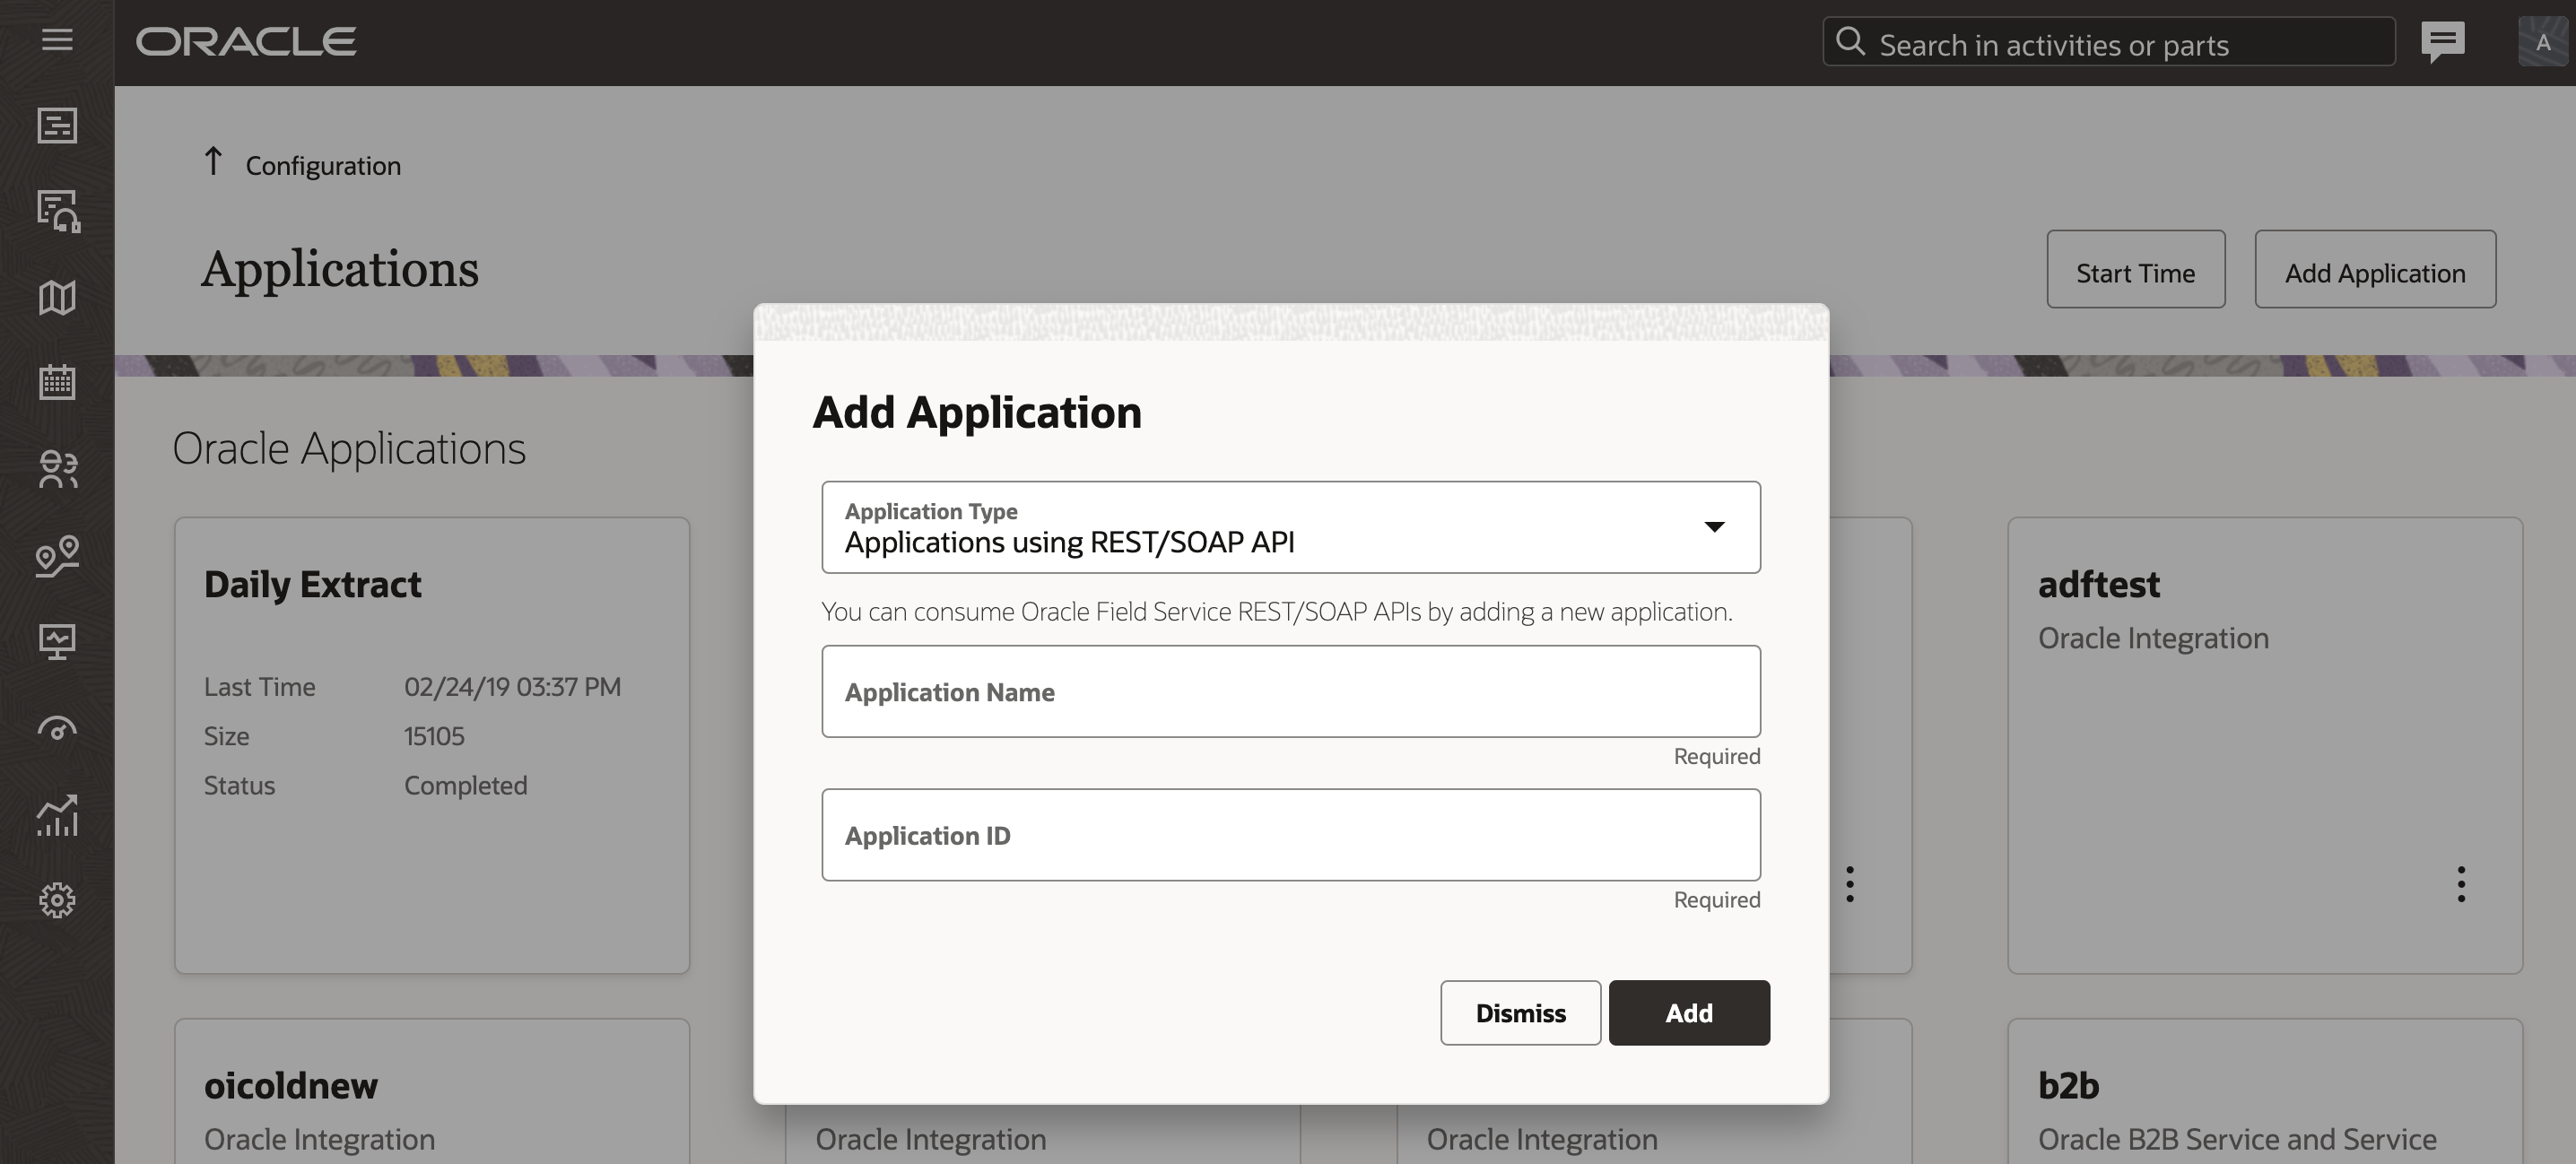
Add Application Dialog Box:
Retry Option
This image displays the confirmation message to retry:
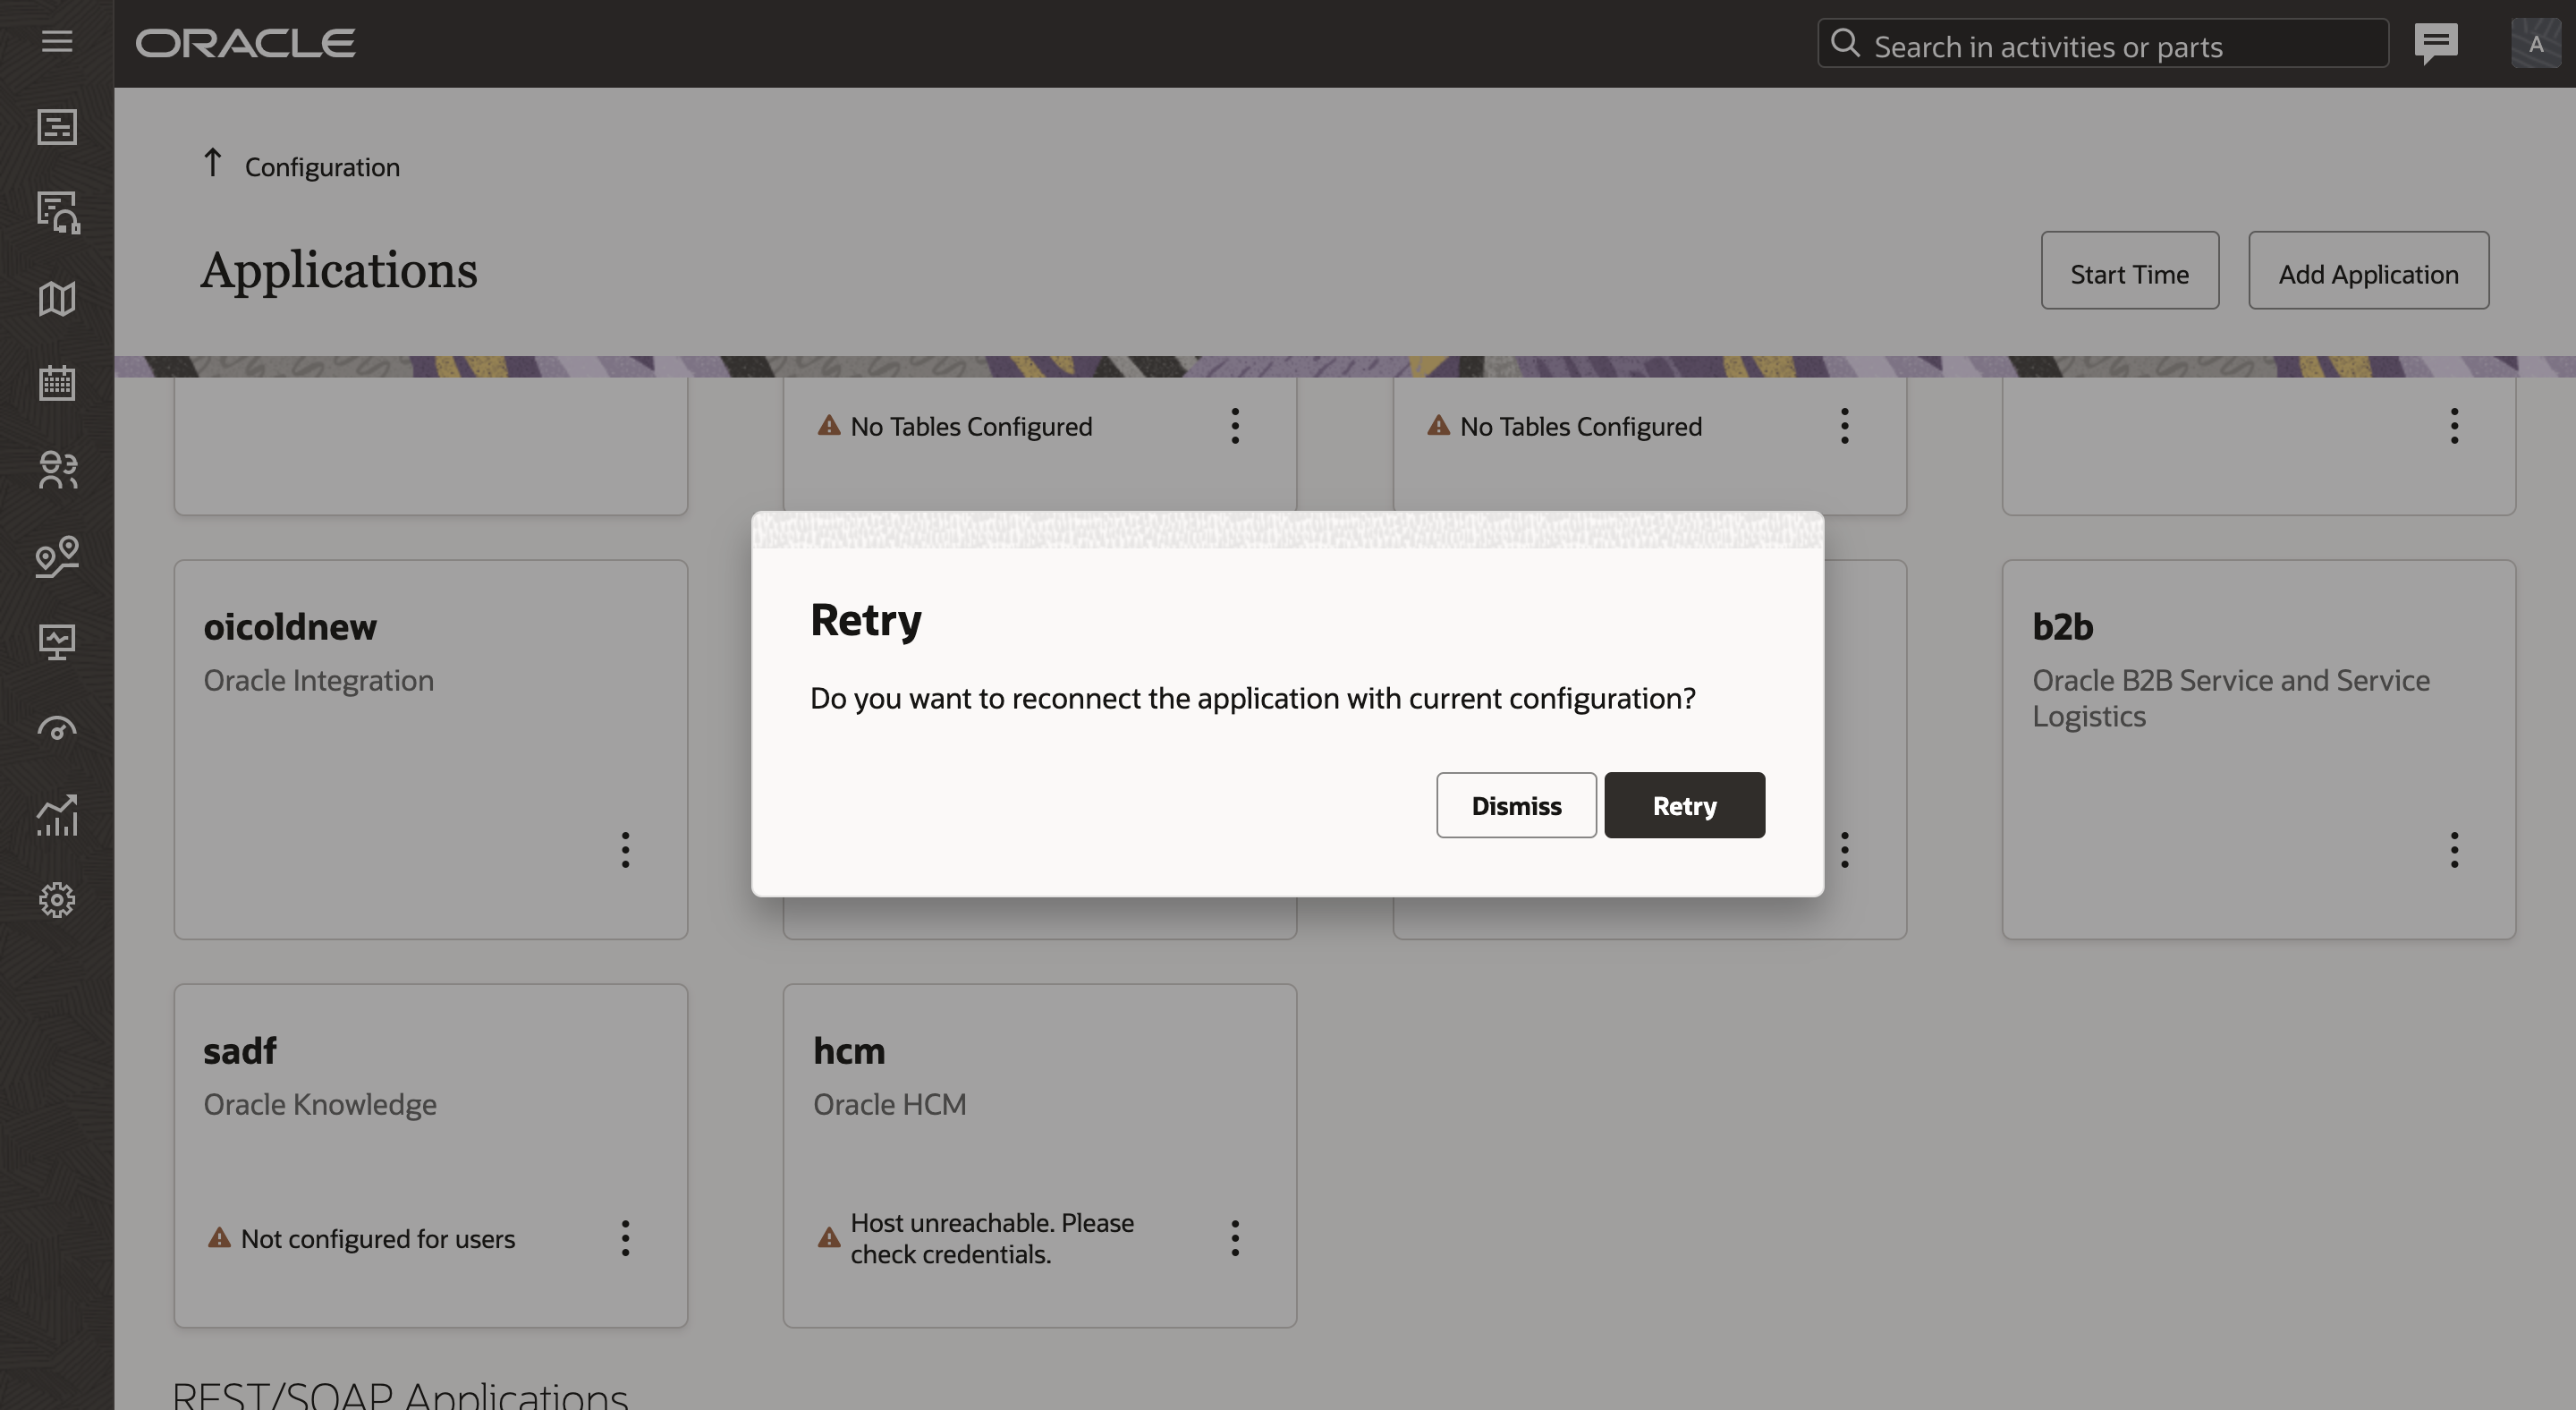
Retry Confirmation Message Dialog Box
This image displays the Delete confirmation dialog box:

Delete Confirmation Message Dialog Box
WARNIG MESSAGES AND ERROR ALERTS
Warning messages and error alerts will be displayed in the add / modify dialog box as shown below.
This image displays the warning message on the Add Application dialog box:
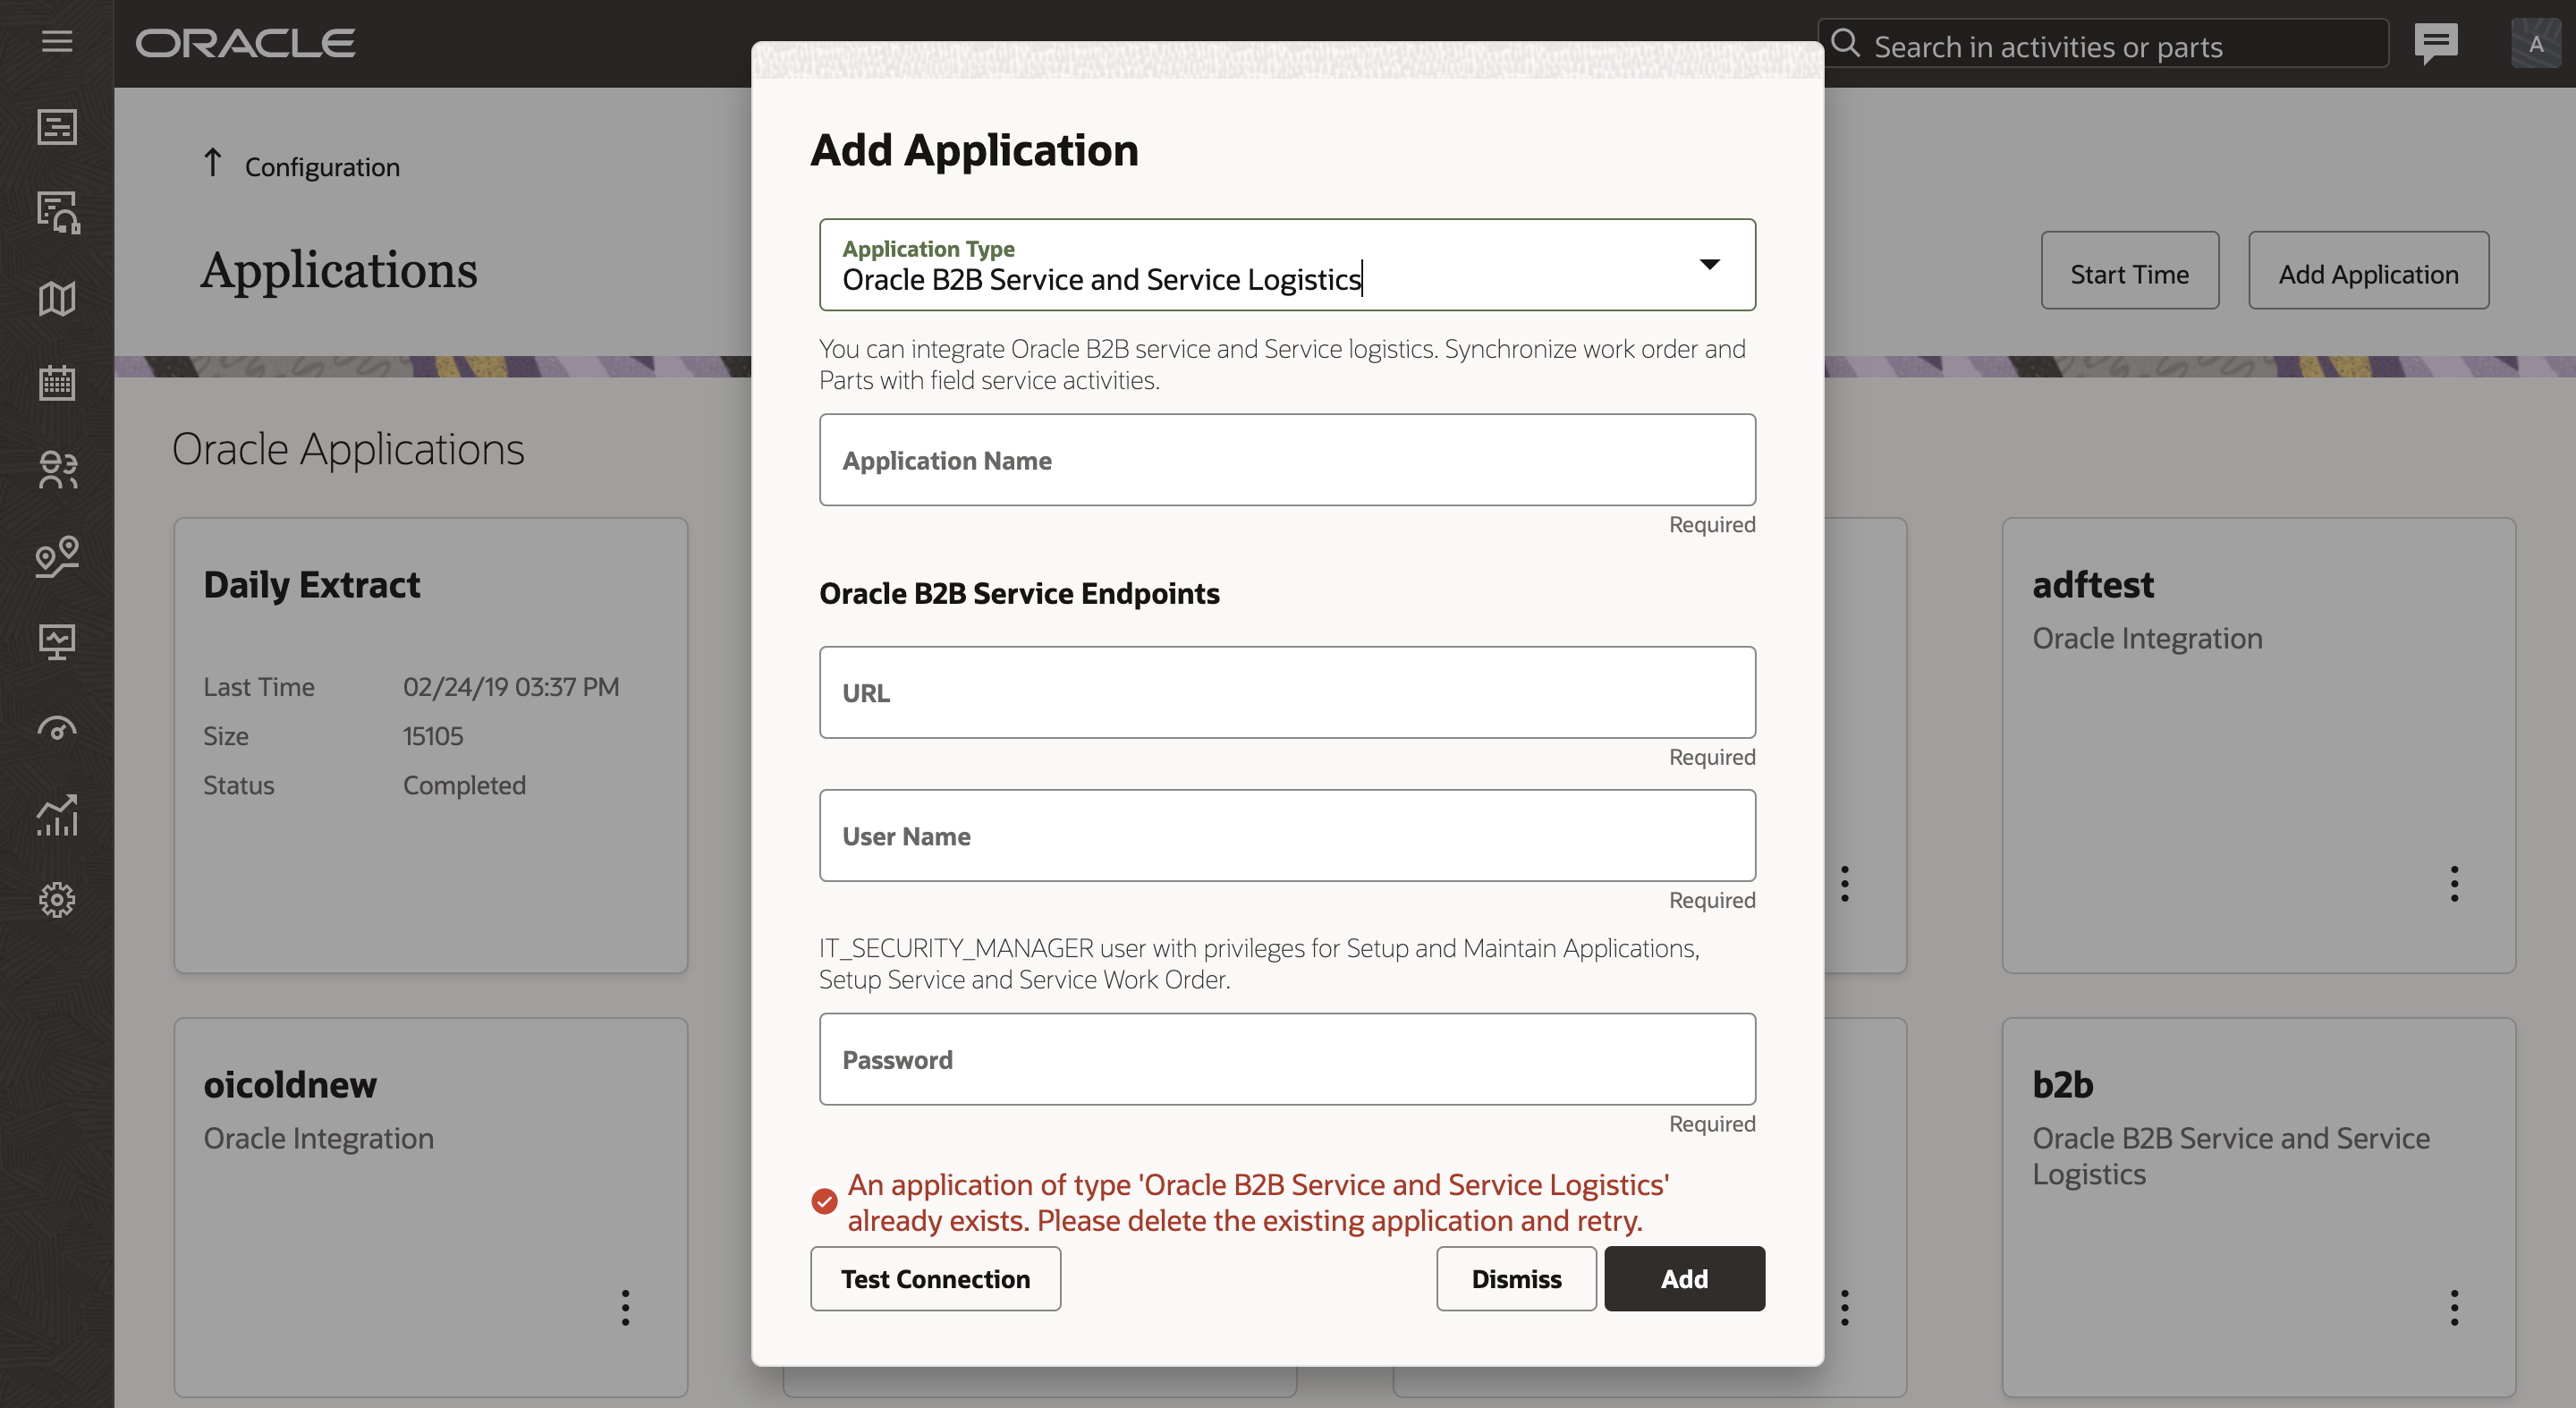
Add Application Dialog Box Showing Warning Message
This image displays the warning message on the Modify Application dialog box:
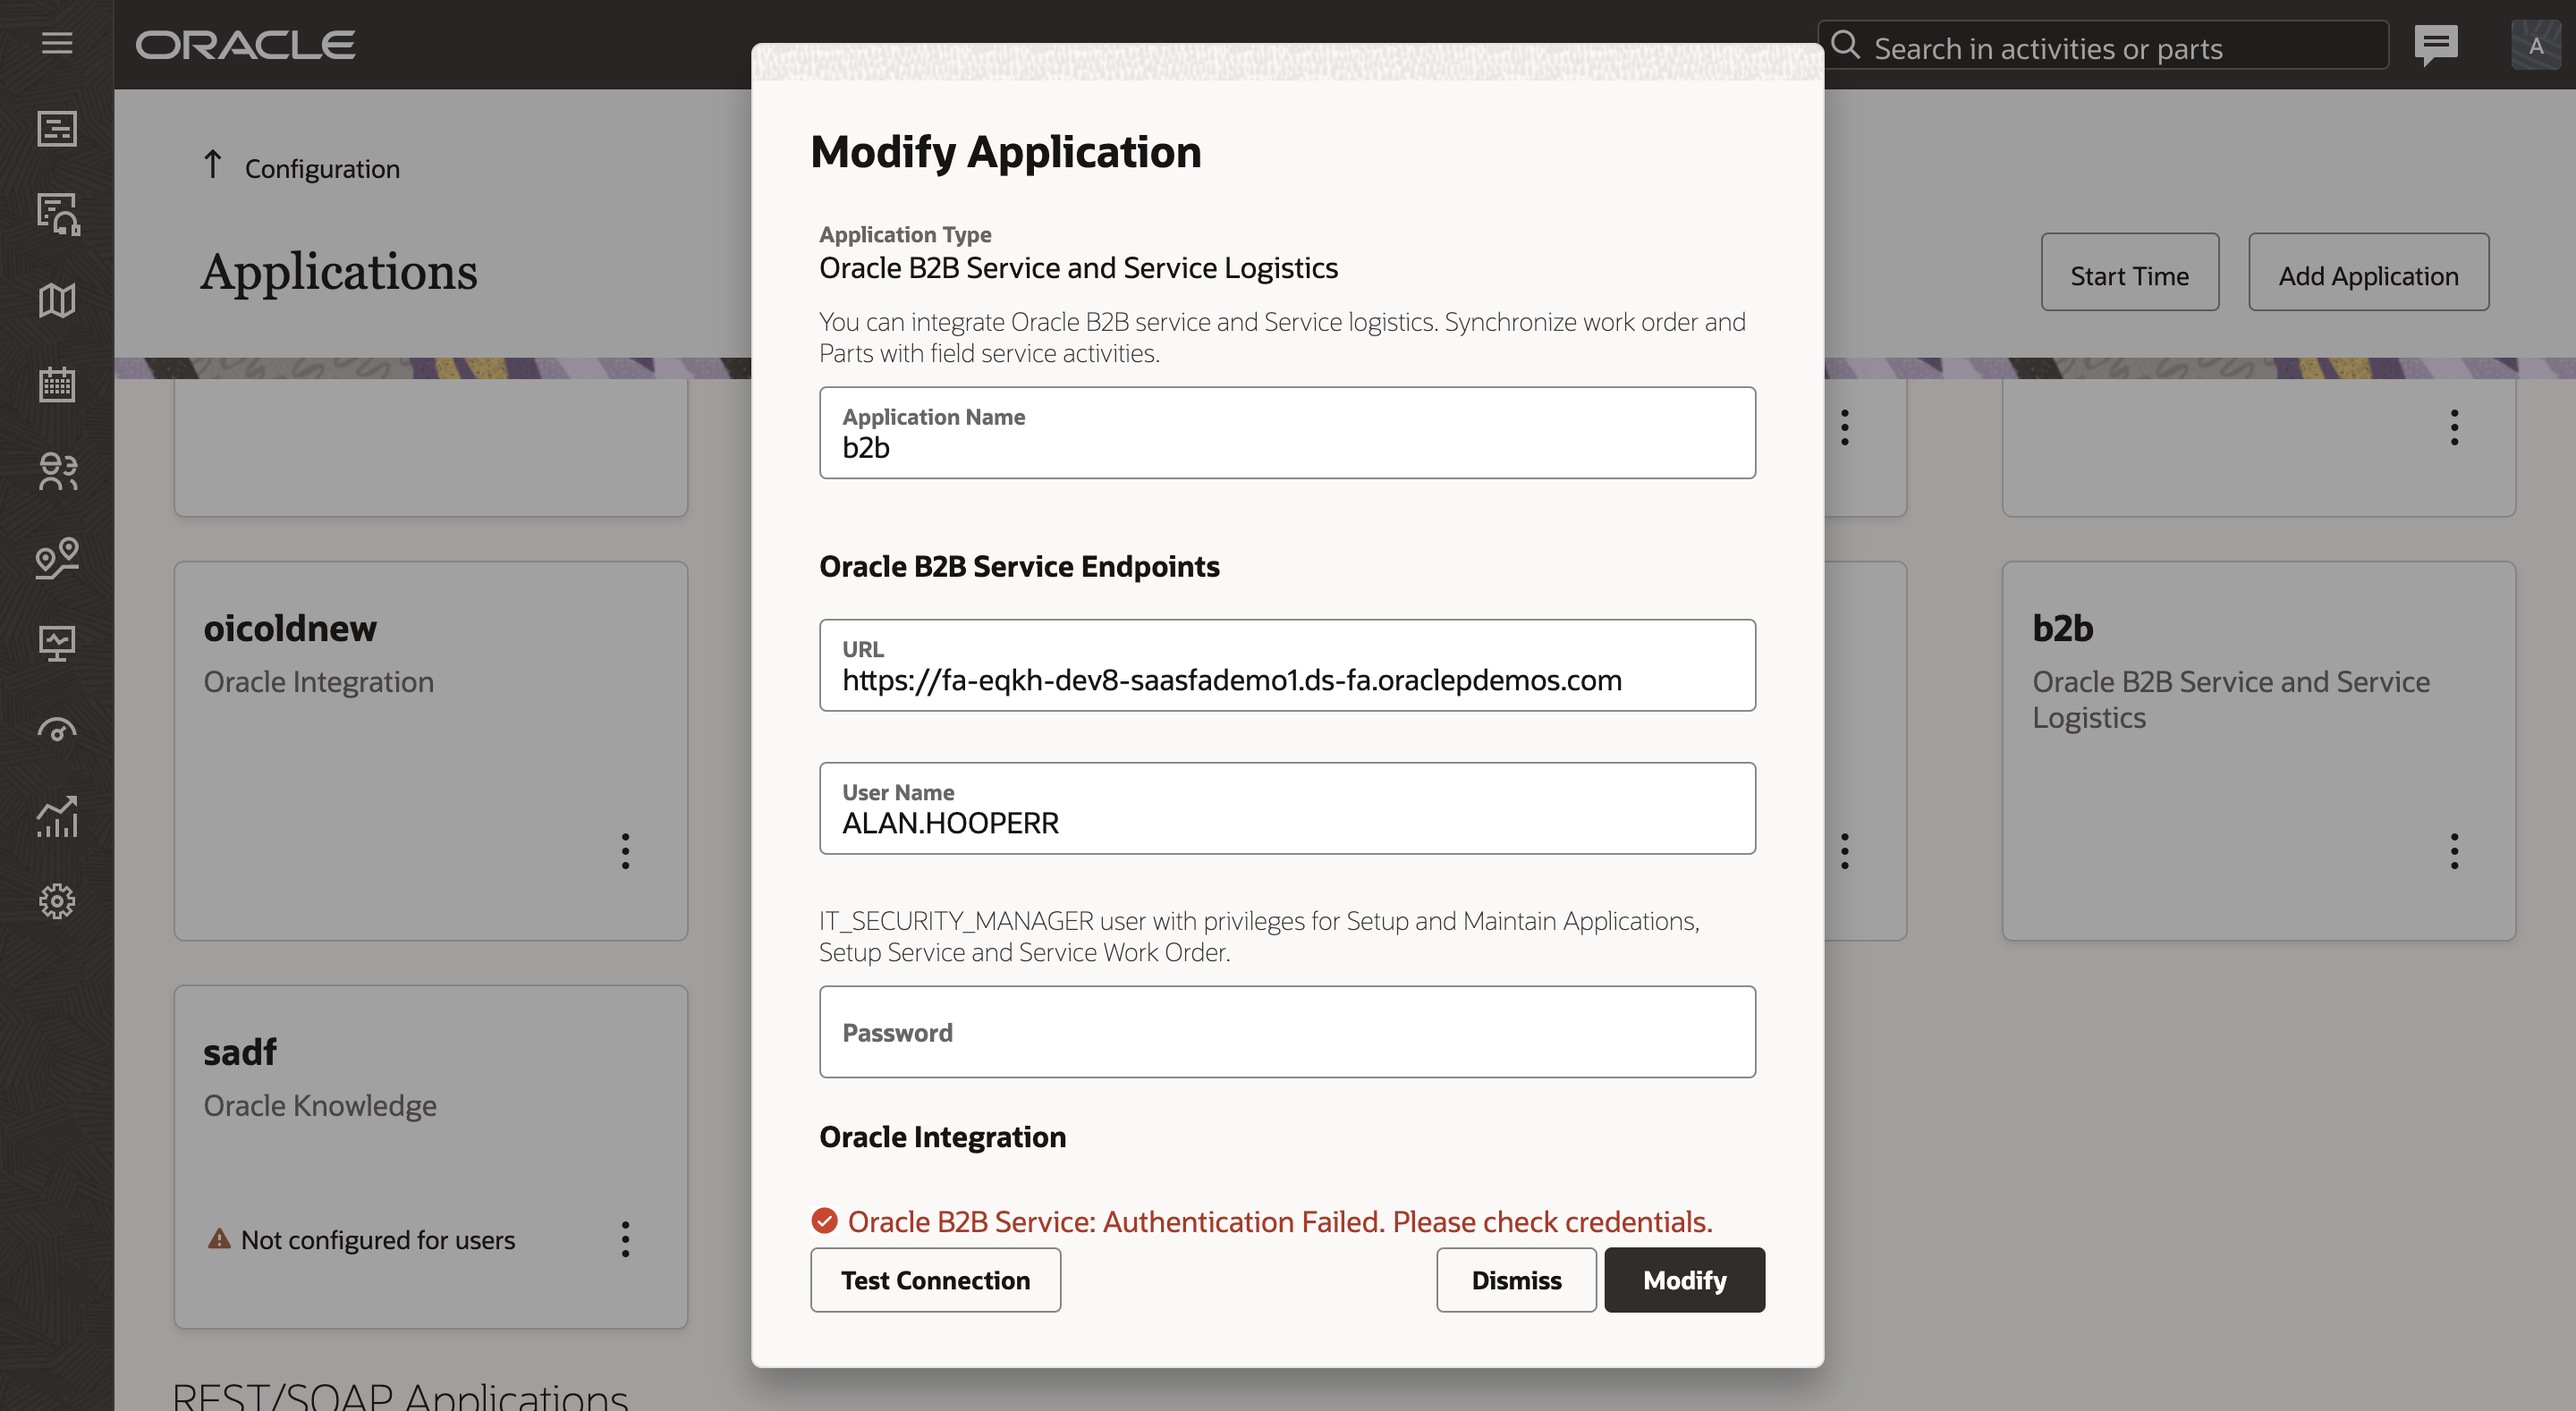
Add Application Dialog Box Showing Warning Message
Configure start time option
This image displays the Configure start time dialog box:
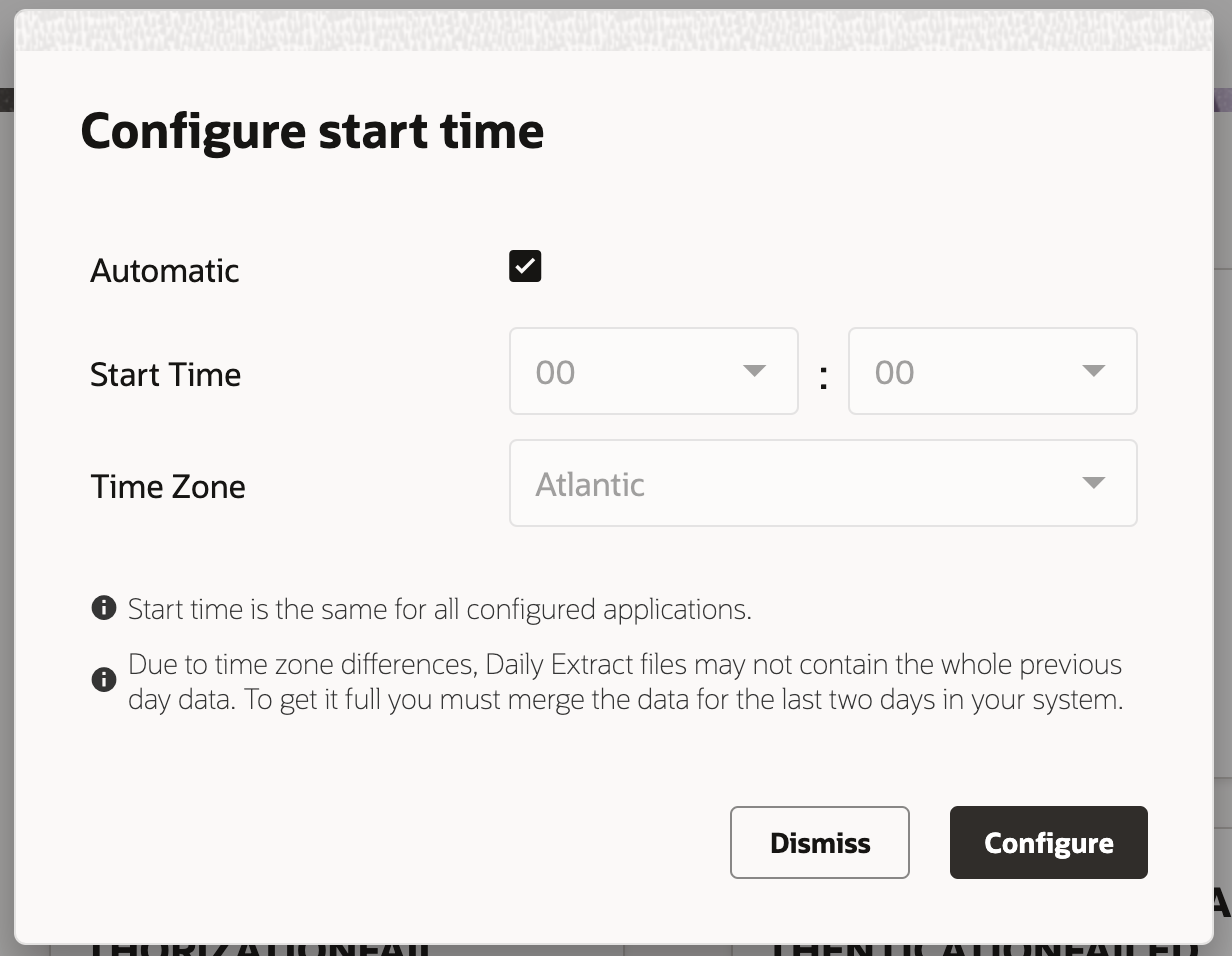
Configure start time Dialog Box
APPLICATION DETAILS PAGES
New user interface is available for Daily Extract / OAC/ Autonomous database application details pages
This image displays the Daily Extract page:

Daily Extract Page
The application details page for Daily Extract / DBaaS/ OAC applications have a new look and feel.
This image displays the Application details page - Add configuration dialog box:

Add Configuration Dialog Box
This image displays the Application details page - Edit configuration dialog box:
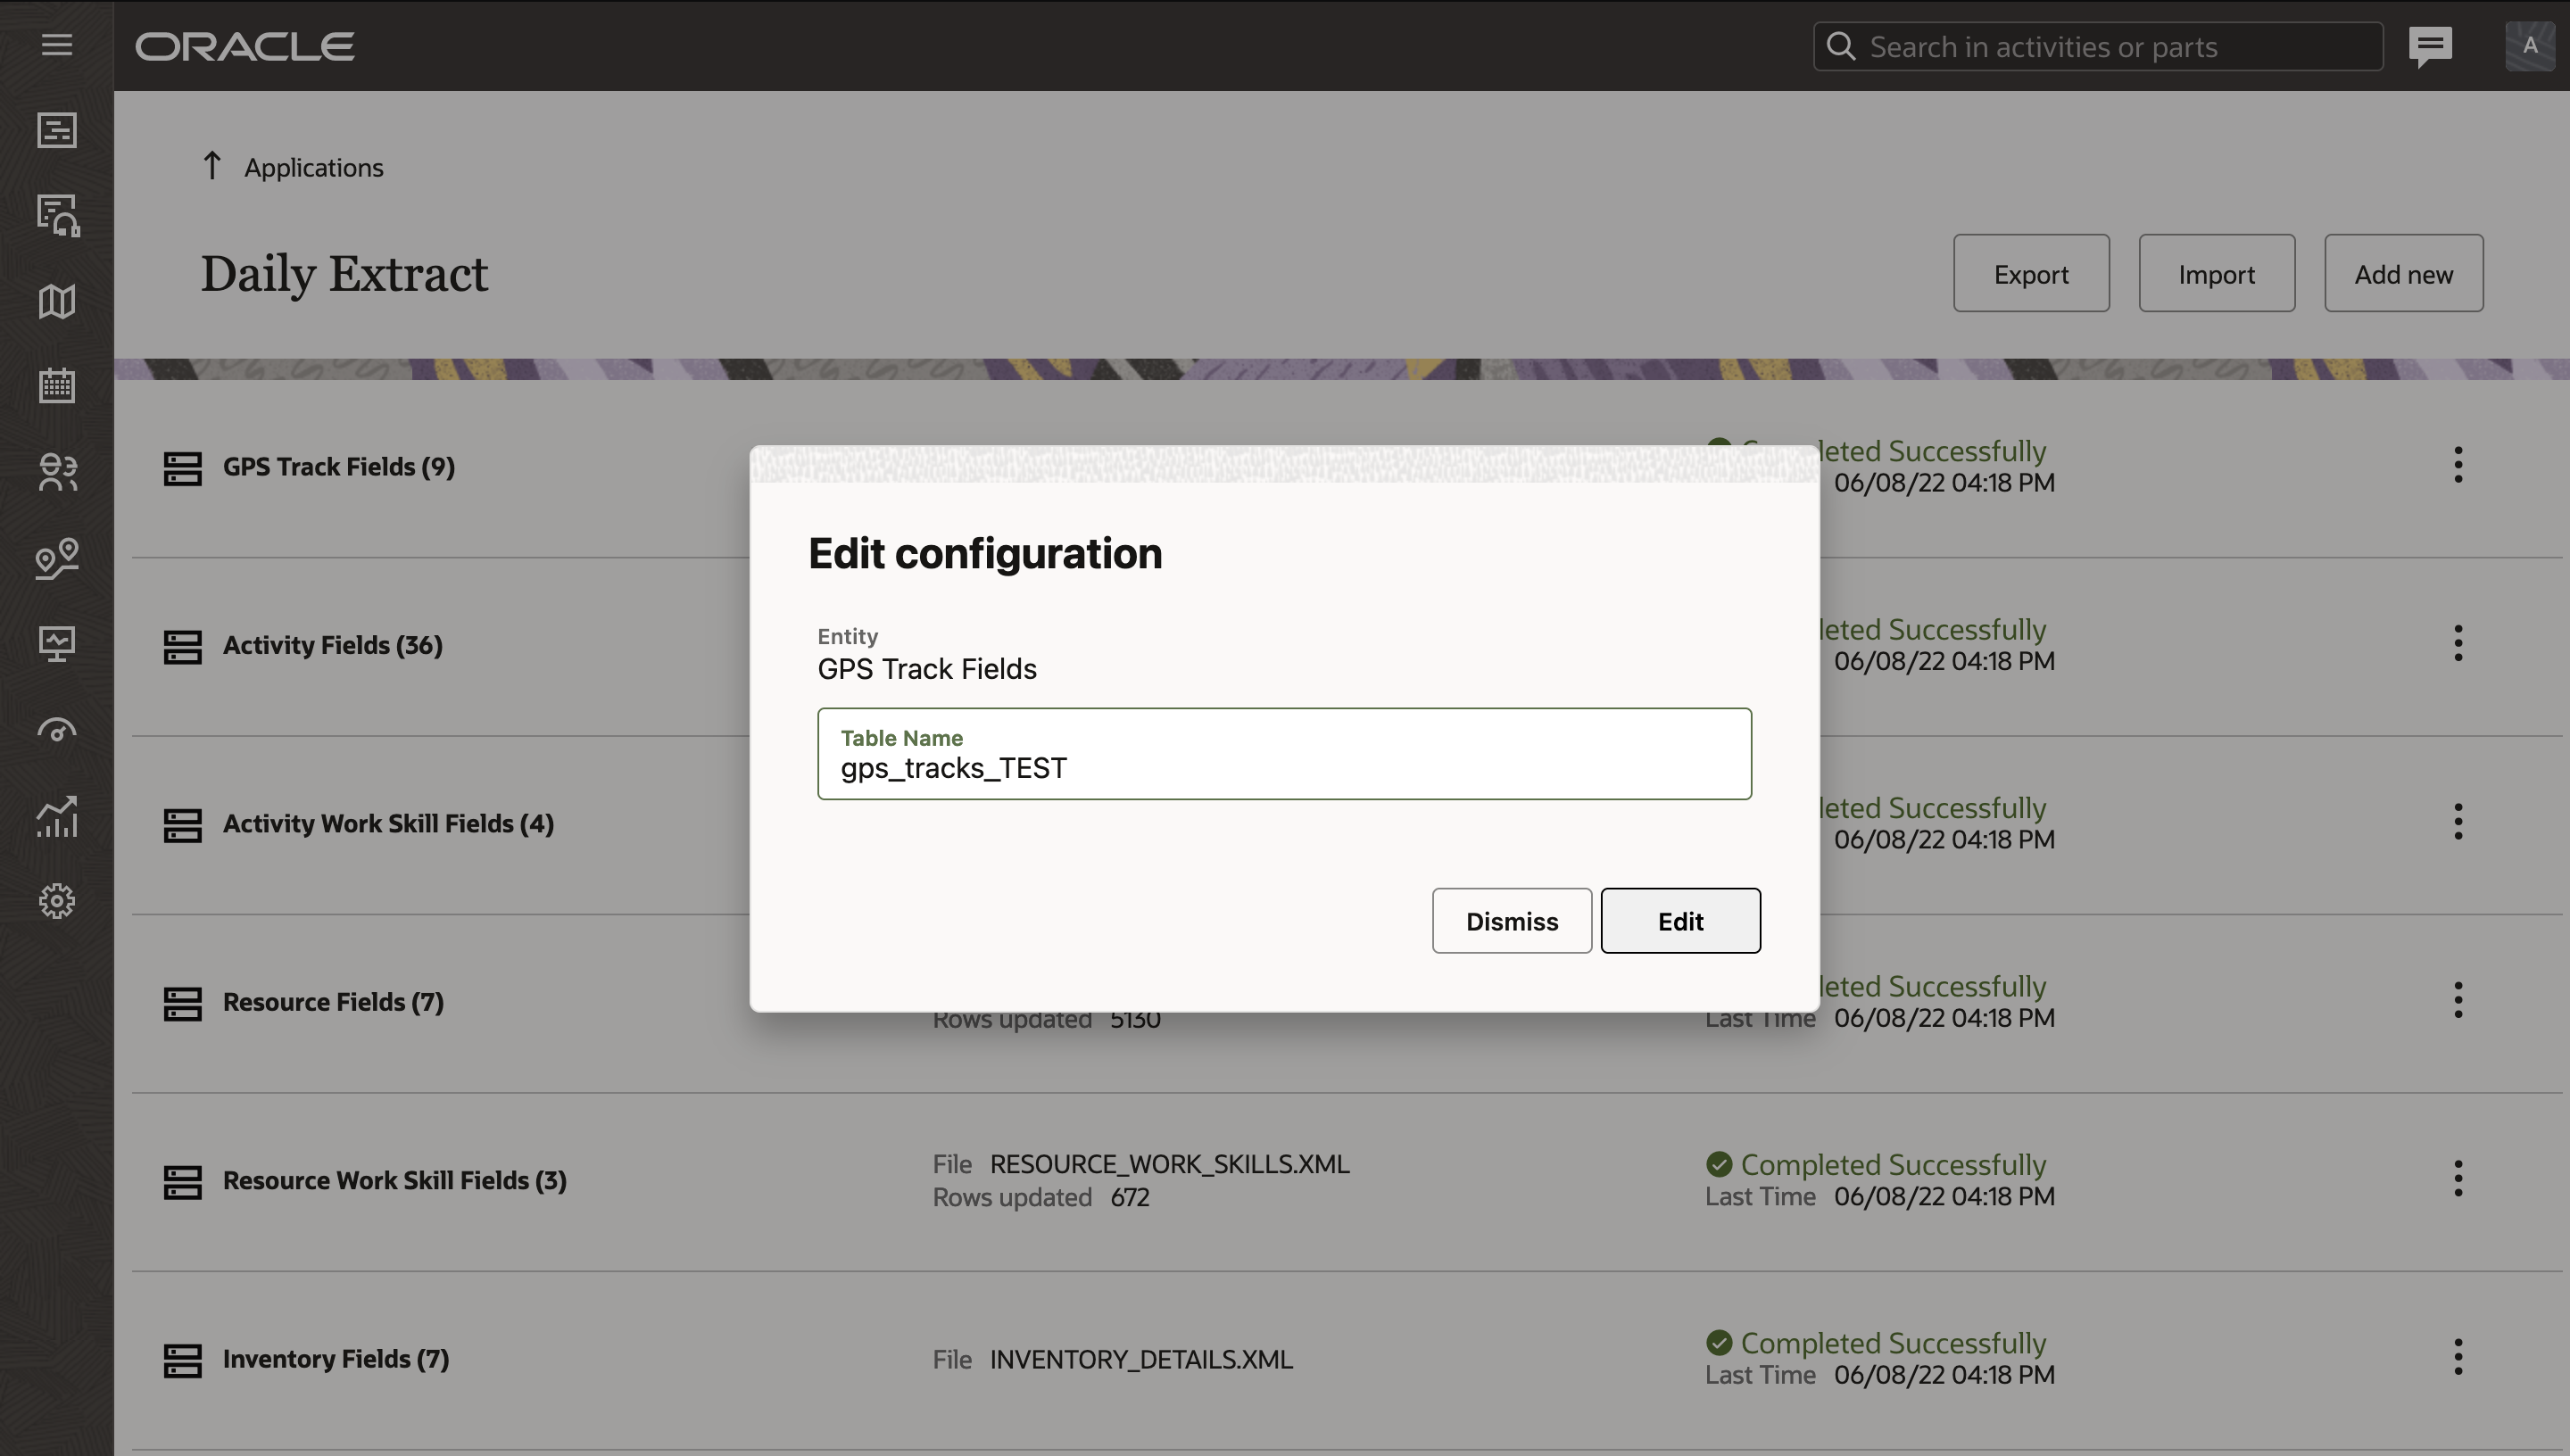
Edit Configuration Dialog Box
Add Field Dialog Box
This image displays the Add Field dialog box:

Add Field Dialog Box
This image displays the Add Field dialog box showing search fields section:

Add Field Dialog Box Showing Search Fields
Import Dialog Box
This image displays the Import dialog box
:Import Field Dialog Box
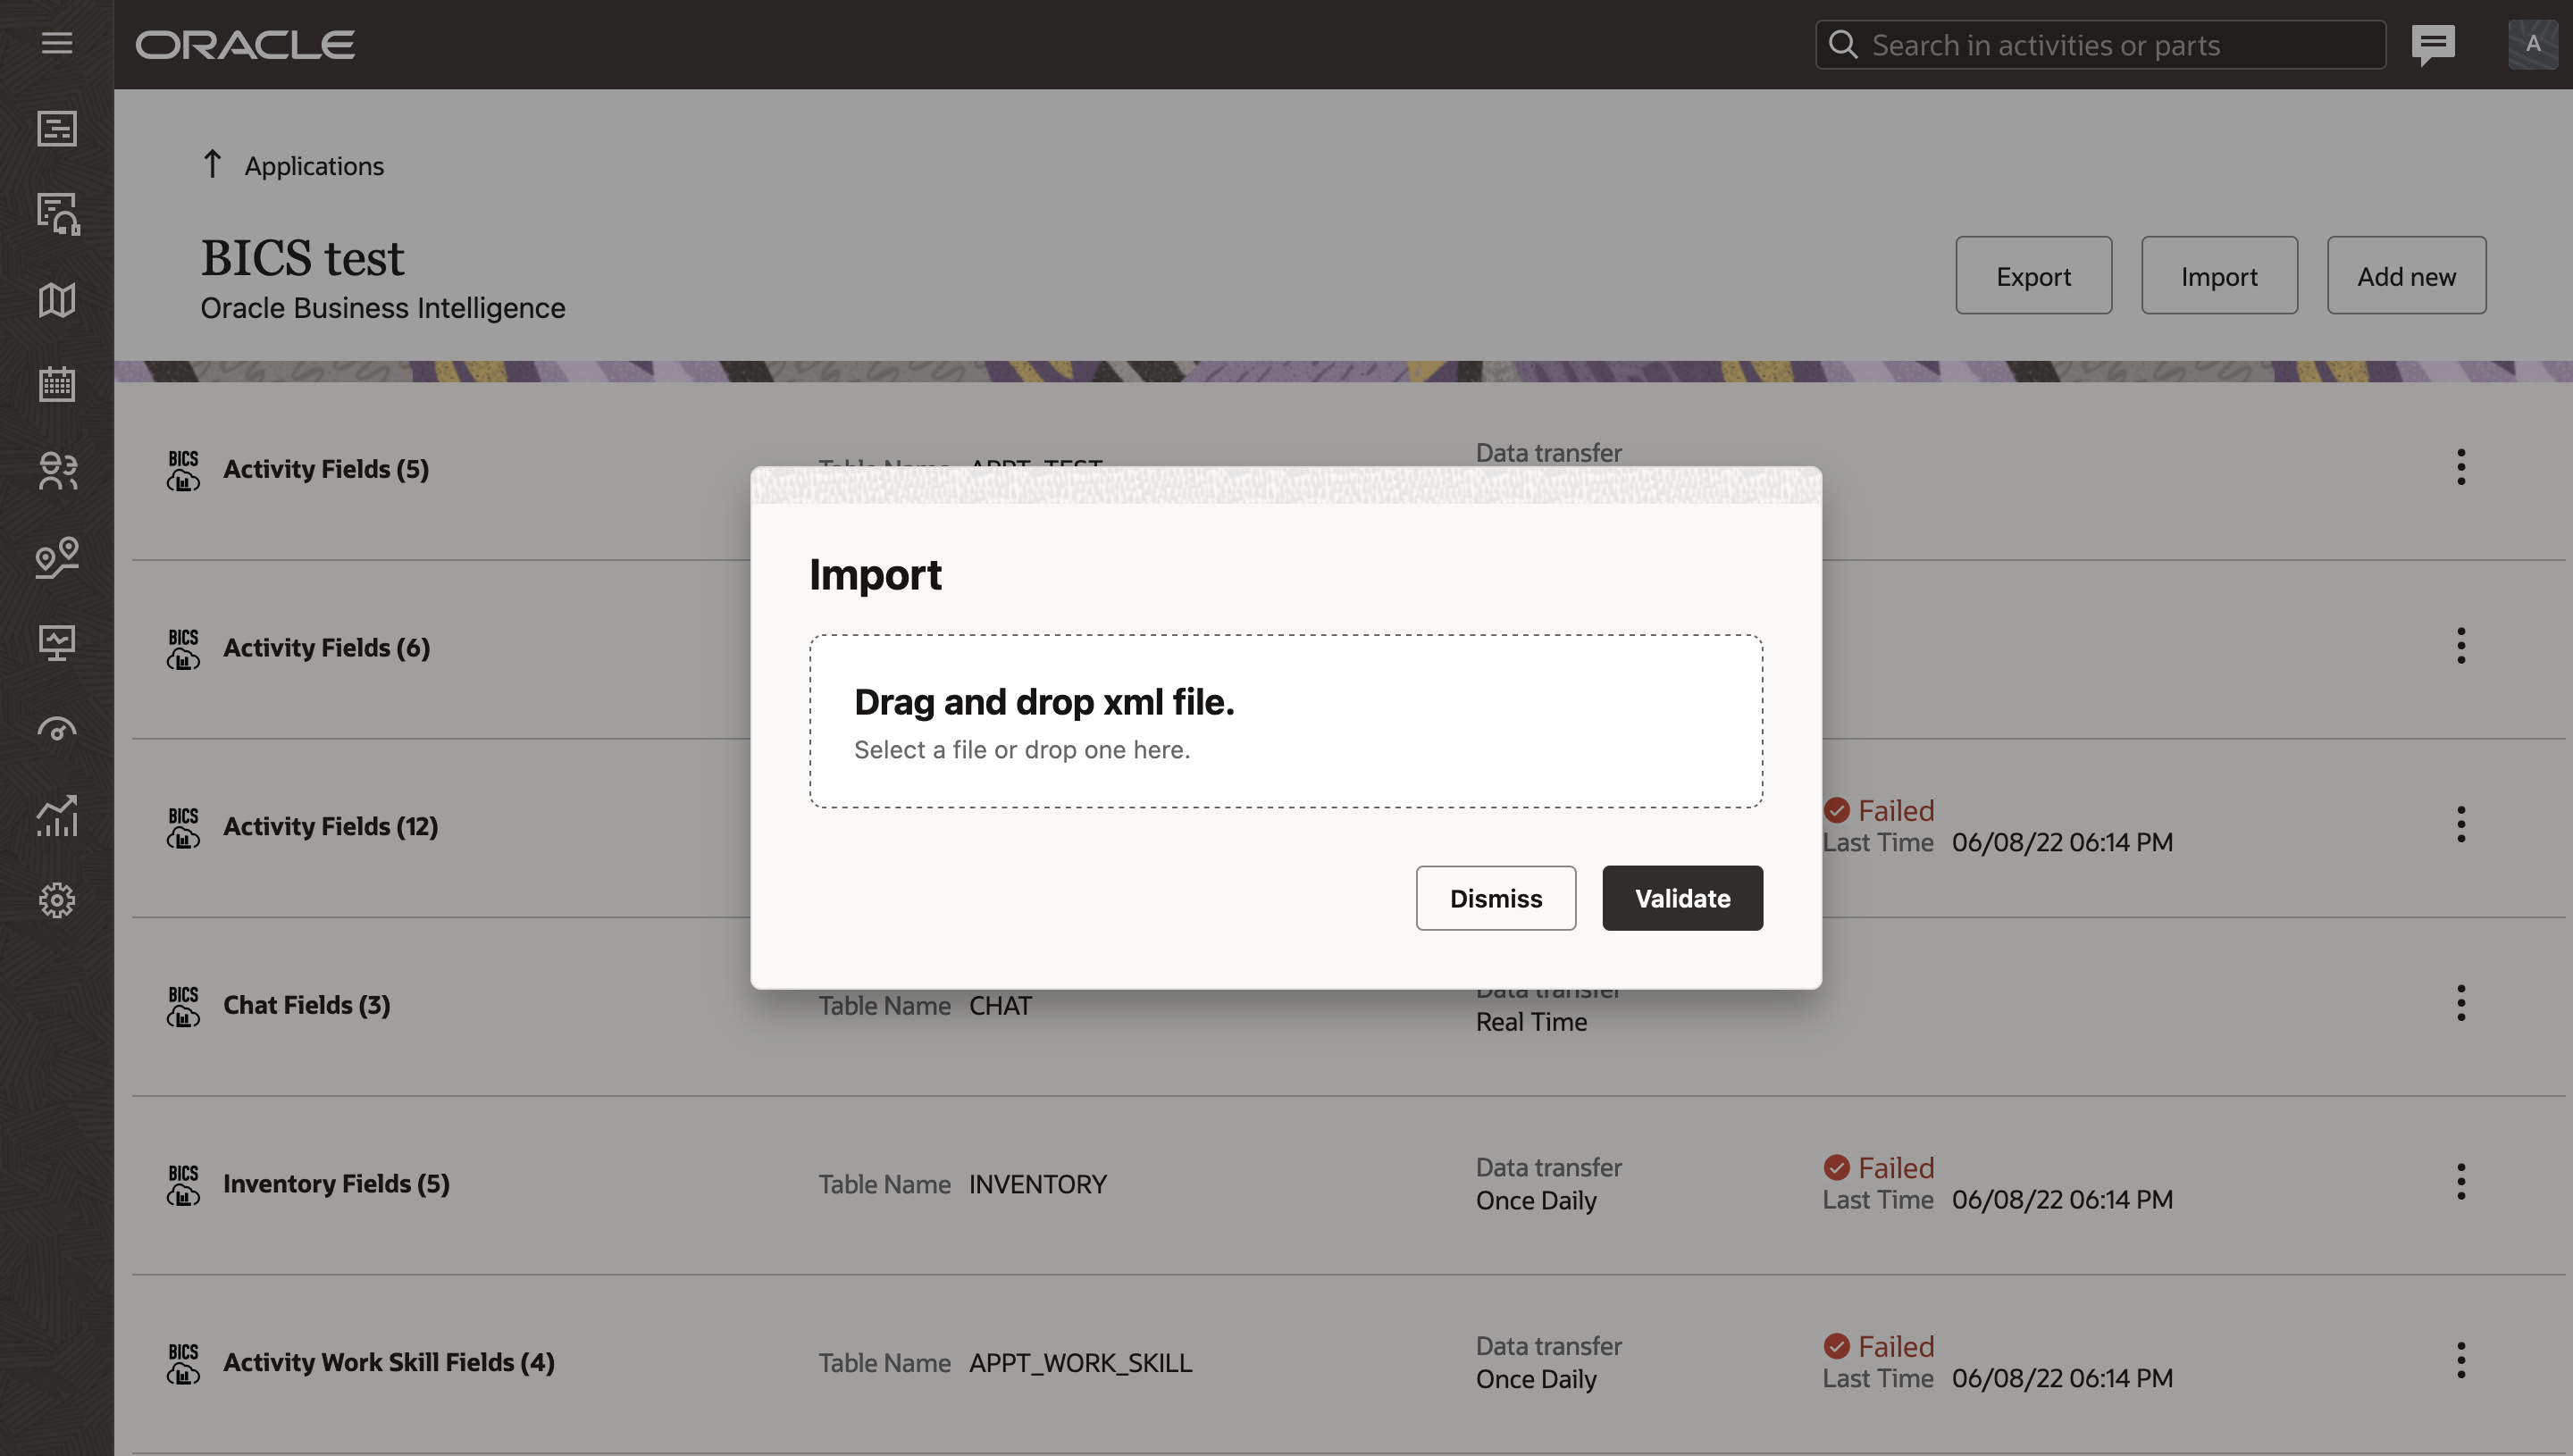
This image displays the Import dialog box showing validation details::
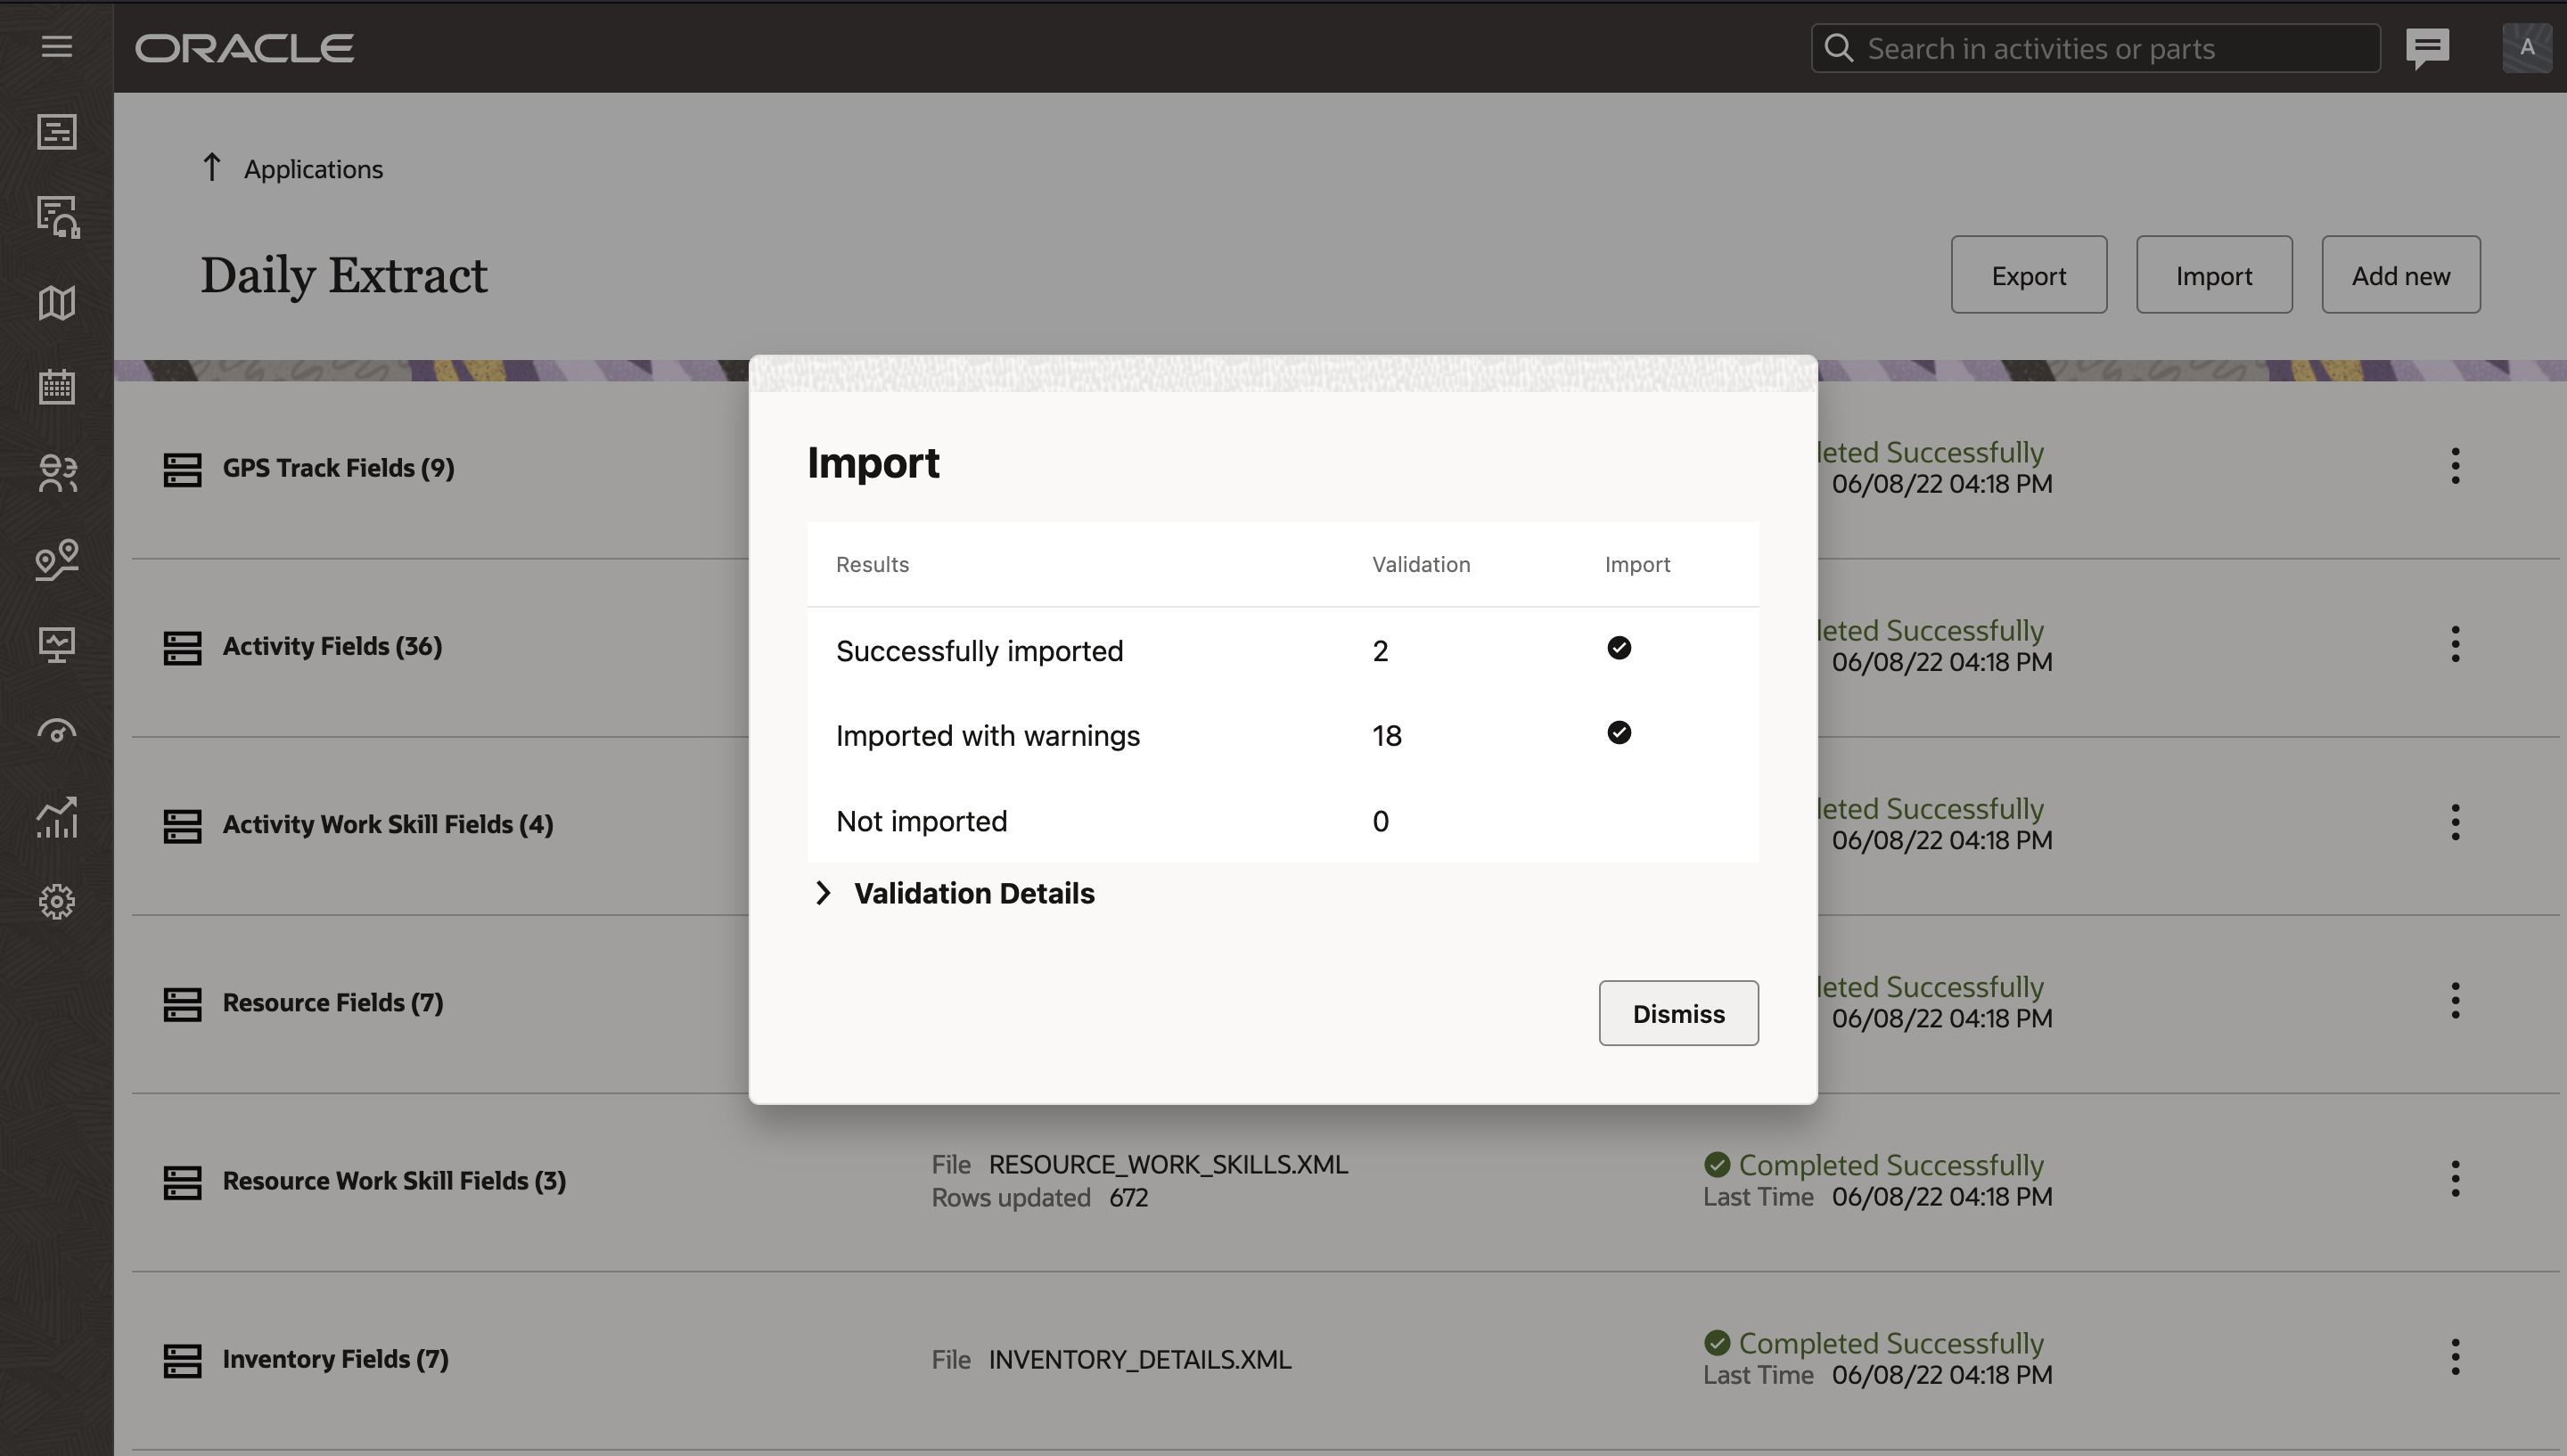
Import Dialog Box Showing Validation Details
The Applications page provides the visual style and experience from the Redwood' concept so that the page is consistent with the application and with other applications of the Fusion stack.
Steps to Enable
You don't need to do anything to enable this feature.
Key Resources
NOTE: The above link to the latest documentation works after the latest generally available (GA) release.
Share files Using Plugin API Framework
The Plugin API Framework has been extended with the new 'share' procedure that allows you to save and send files that you uploaded from your device or files that were generated by plugins themselves. Integrators can use the 'share' procedure to address the following scenarios:
- Send text or any type of files through natively available options, such as Outlook, Gmail, WhatsApp, AirDrop, Google Drive, and so on (the application must be installed on your device) using the mobile device with installed iOS or Android Oracle Field Service applications or browser application.
- Save any types of files to the gallery using a mobile device through the installed iOS or Android Oracle Field Service application or the Oracle Field Service web application.
- Save any types of files to the local computer using a desktop browser (Sending is not supported on desktop devices).
- Open files with the applications available on the mobile device.
The feature is supported in both online and offline modes.
NEW PROCEDURE
'share'
By calling this procedure, the Plugin API validates parameters and calls the native (device or browser) share functionality with those provided parameters. The plugin API doesn't return info about or respond to problems such as cancellation, no printer, and so on.
Example of the "callProcedure" message:
{ "apiVersion": 1,
"method": "callProcedure",
"procedure": "share",
"callId": "123abc",
"params": {
"title": "Some text string",
"fileObject": "fileObject",
"text": "Some text string" }
}
Oracle Field Service sends the "resultData" message in response to the "share" message only if there are no validation errors.
Example of the "callProcedureResult" message:
{ "apiVersion": 1,
"method": "callProcedureResult",
"callId": "123abc",
"resultData": {
"status": "ok" }
}
SHARE PROCEDURE PARAMETERS
Parameters of 'share' procedure are as follows:
| Parameter | Value | Is Required | Description |
|---|---|---|---|
| title |
string |
yes |
text string to be shared |
| fileObject |
fileObject |
required only if the 'text' parameter is empty |
value from input file with max size 50 MB (51200 kb) for file |
| text |
string |
required only if the 'fileObject' parameter is empty |
text string to be shared with max length equal to 50 MB (51200 kb) |
If the parameter 'fileObject' is empty but the 'text' parameter is not empty, then the title is used like a file name to send (on mobile devices) or save (on desktop).
SUPPORTED FILE TYPES
There are no restrictions of the file format for the 'share' option. All file types supported by default web sharing API - https://www.w3.org/TR/web-share/
VALIDATION
If an error appears then no actions have been applied.
ERROR CODES
This table lists the errors with the code and the cause for each error:
| Code | Cause |
|---|---|
| CODE_PROCEDURE_MANDATORY_PARAM_EMPTY |
One of required fields is empty |
| CODE_SHARE_ATTACHED_FILE_IS_TOO_LARGE |
Uploaded file size is more then 50MB |
| CODE_SHARE_INVALID_SHARE_FILE |
The error in file reading if the file is not a file or is not a blob |
| CODE_SHARE_TEXT_FIELD_IS_TOO_LARGE |
The 'text' field can not be larger than 52 428 800 symbols that equal to 50MB(51200kb) file size if save text in UTF-8 |
Here is an example of the error message:
[
{
"type": "TYPE_PROCEDURE_PARAM",
"code": "CODE_PROCEDURE_MANDATORY_PARAM_EMPTY",
"procedure": "share",
"paramName": "fileObject"
}
]
USE CASE
Here is a use case:
When completing a visit to set up internet, a technician realized that it's a new house. Your customer had just moved in and had no security system installed yet. The technician then offers to buy a video door bell with a discount from the internet provider and the customer agrees. When completing the transaction, the technician suggests sharing the invoice with the customer on WhatsApp. The customer agrees and the technician sends a copy of the invoice to customer's phone number on WhatsApp.
The new procedure 'share' lets integrators implement scenarios where technicians can send invoices, warranties, or other documents to email, messengers, AirDrop, Google Drive, or whatever is natively available on their mobile devices through both, the installed iOS or Android Oracle Field Service applications as well as the web browser application in both online and offline modes. For example, after the debrief, a technician can send an invoice through WhatsApp.
Steps to Enable
You don't need to do anything to enable this feature.
Tips And Considerations
The share method is available in the plug-in framework by default. However, to provide the option to share files in your custom plug-in, you must add this method to your plug-in code manually.
Key Resources
NOTE: The above link to the latest documentation works after the latest generally available (GA) release.
Starting Update 22C, Routing allows you to collect routing run statistics over different days and different buckets for further analysis to identify more effective ways to route data and apply preventive measures if needed.
This feature allows you to:
- compare more then two routing run results
- compare routing run results between different days and buckets
- compare run statistics for several routing runs
- improve autorouted percentage by means of better analysis of not routed reasons
This feature offers these new functionalities:
- routingRunEvent has some new fields added to it, and two fields - routingRollbackRunId and type are obsolete as of now
- Option to export daily routing run results into OAC and Daily Extract
- Calculations of Not Routed Activities, Average Working Time, Average Overtime, Average Travel Time, Average Downtime and Average Mileage that are shown in Routing Summary and Report Screens fixed for correctness to cover corner cases
- Messages for non-successful routing runs (skipped, failed or terminated) slightly corrected for clarity
- Description of error 6018 changed as follows:
6018 Cost configuration
Activity was not routed as either its non-assignment cost is too low or resources time and travel costs are too high.
This feature allows you to get better analytics results by comparing more then two routing run results, between different days and buckets and for several routing runs.
Steps to Enable
To start using Oracle Analytical Cloud or Daily Extract integrations, make sure that you have the existing integration or add a new one.
- Navigate to Configuration, Applications.
- In the Applications page, add the new integration by adding an application. This image displays the Add application dialog box:
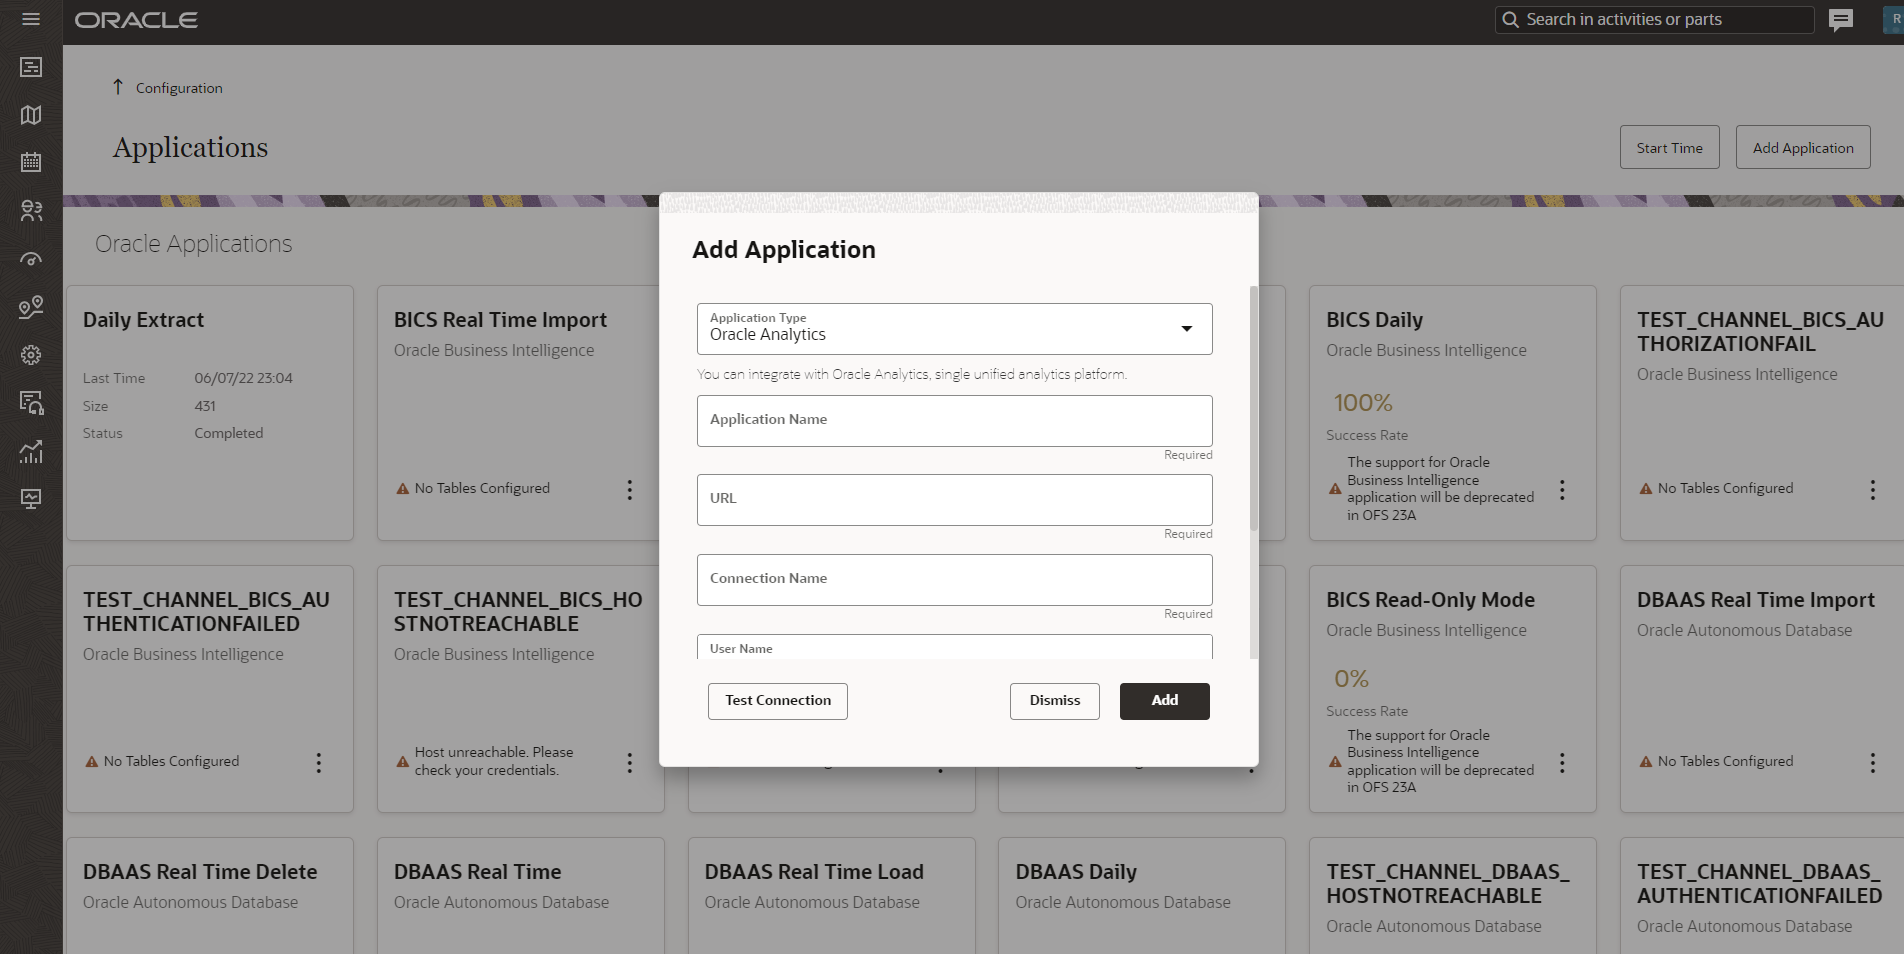
Add Application Dialog Box
- Once this is done, open the integration application. In the Add Configuration dialog box, add the Routing Run Results field set to it. This image displays the Add configuration dialog box:
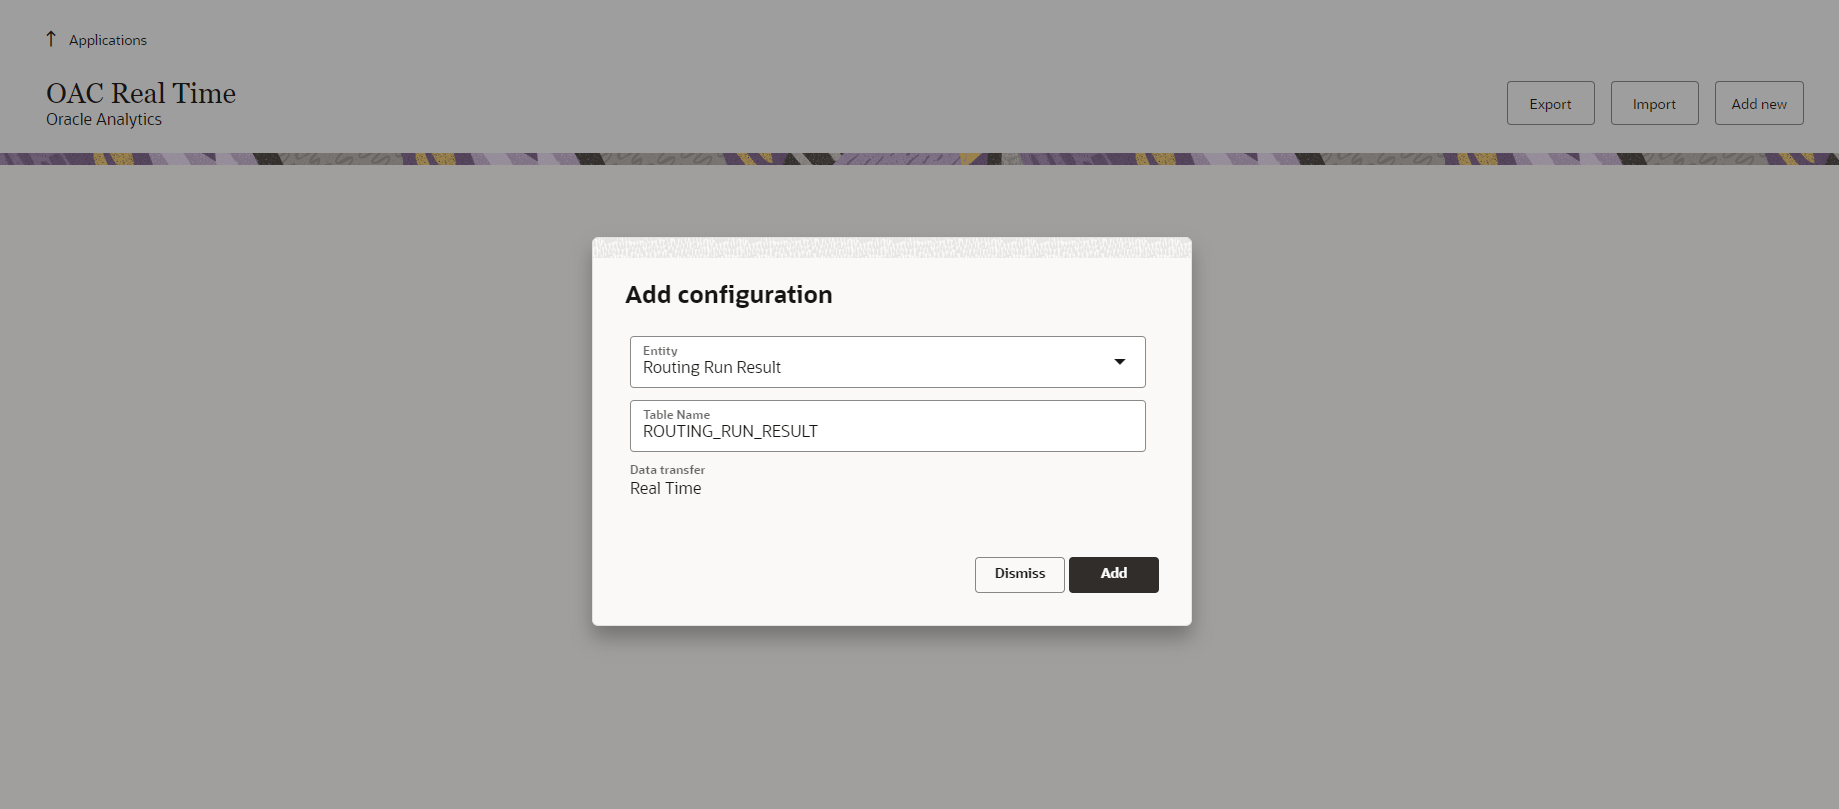
Add Configuration Dialog Box
- Choose the fields needed from the list. This image displays the Add field dialog box:
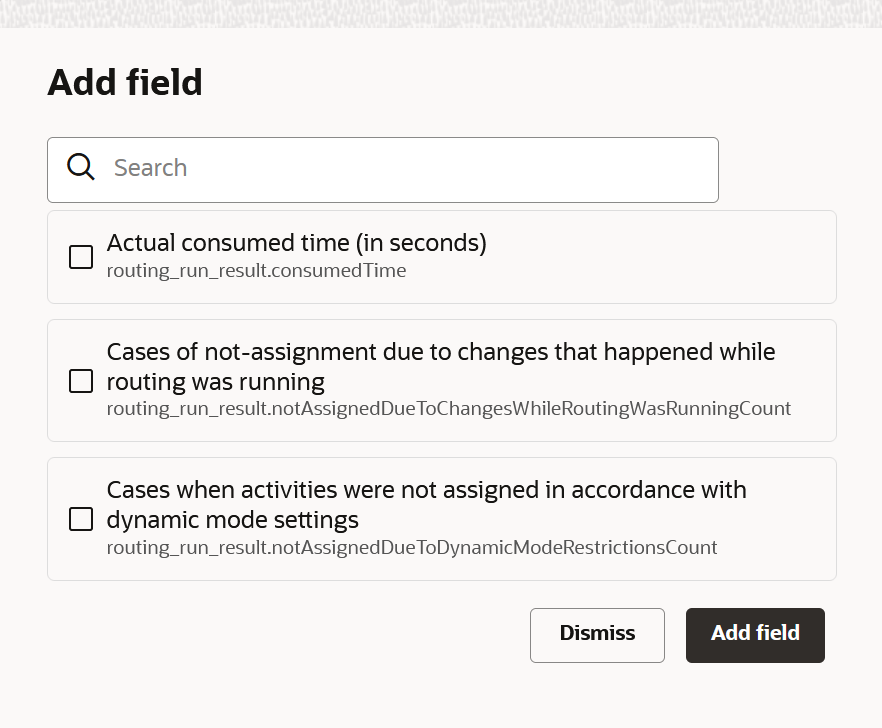
Add Field Dialog Box
- You may use the following table to choose the appropriate fields.
This table shows the appropriate fields to set Routing Run Results:
| Event Field name for REST API |
Recommended Field Label for OAC |
Type of the field |
Definition of the field |
| routingRunId |
ROUTING_RUN_ID |
int |
The unique ID of the specific routing run |
| routingPlan |
ROUTING_PLAN_NAME |
string |
The name of the routing plan that was run. Is not unique. |
| routingPlanId |
ROUTING_PLAN_ID |
int |
The unique ID of the routing plan that was run. |
| routingProfile |
ROUTING_PROFILE_NAME |
string |
The name of the routing profile that the routing plan belongs to. Is not unique. |
| routingProfileId |
ROUTING_PROFILE_ID |
int |
The unique ID of the routing profile that the routing plan belongs to. |
| startType |
TYPE_OF_ROUTING_START |
string |
Type of routing start. Values include:
|
| resourceId |
RESOURCE_INTERNAL_ID |
int |
The internal ID of the routing bucket. |
| targetDate |
ROUTING_TARGET_DATE |
string |
The date for which the activities are routed. The format is 'YYYY-MM-DD'. |
| numberOfDays |
NUMBER_OF_DAYS ROUTED |
int |
For a single day routing, the value is 1. For multi-day routing, the value is the number of days routed, starting from 'targetDate' and going into the future. |
| result |
ROUTING_RESULT |
string |
Values include
|
| message |
FAILURE_MESSAGE |
string |
The field contains the error description when result is failed or skipped. The list of possible errors and solutions are available under Troubleshoot Routing in the Using Routing guide. |
| routingRunDuration |
ROUTING_RUN_DURATION |
int |
The duration (in seconds) of the routing run. |
| activitiesMatched |
ACTIVITIES_MATCHED_FILTERS |
int |
The number of activities and per-existing activity segments matching the routing plan filters. |
| activitiesInRoutesBeforeRouting |
ACTIVITIES_IN_ROUTES_BEFORE |
int |
The number of activities and per-existing activity segments that were in routes of resources before the routing run. |
| activitiesRouted |
ROUTED_ACTIVITIES |
int |
The number of activities scheduled and assigned by the routing run. |
| activitiesNotRouted |
NOT_ROUTED_ACTIVITIES |
int |
The number of activities matching the routing plan filters but not routed. |
| resourcesMatched |
RESOURCES_MATCHED_FILTERS |
int |
The number of resources matching the routing plan filters. |
| resourcesUsed |
RESOURCES_WITH_CHANGES |
int |
The number of resources with assigned or removed activities by the routing run. |
| averageWorkingTime |
AVERAGE_WORKING_TIME |
int |
The average working time of the resources (in minutes). |
| averageOvertime |
AVERAGE_OVERTIME |
int |
The average overtime time of the resources (in minutes). |
| averageTravelTime |
AVERAGE_TRAVEL_TIME |
int |
The average travel time of the resources (in minutes). |
| averageDowntime |
AVERAGE_IDLE_TIME |
int |
The average downtime time of the resources (in minutes). |
| extendedStatus |
EXTENDED_STATUS |
string |
This field includes the routing execution with these values: routing or routing_rollback. If the type is routing, you can set routingAlgorithmType field with one of these values:
If the type is bulk routing then it shows the result. Possible values of the field result as follows: When there are no activities found, the value is 'skipped' 4. The next position in the field is set to notAccepted and points at the case when it is 'bulk' 'routing', 'result' is 'succeeded' but was not applied Allowed combinations:
|
| averageMileage |
AVERAGE_MILEAGE |
int |
The average travel mileage of the resources (in miles or km). |
| reoptimizedActivities |
REOPTIMIZED_ACTIVITIES |
int |
The number of activities re-optimized by the routing run. |
| createdActivities |
CREATED_ACTIVITIES |
int |
The number of activities were created automatically for the routing run. |
| removedActivities |
REMOVED_ACTIVITIES |
int |
The number of removed activities (which may be warehouse visits or activity segments) |
| startTime |
ROUTING_RUN_START_TIME |
string |
The time when the routing run started in UTC time zone. The time format is YYYY-MM-DD HH:MM:SS. |
| assurancePercentage |
ASSURANCE_OF_ROUTING_RESULT |
double |
The assurance of routing result, from 0 to 100. If the assurance is less then the confident is less, which, in most cases, may be connected to sub-optimal results. For good results, you may expect assurance 85 or more. |
| consumedTime |
CONSUMED_TIME |
int |
Actual time (in seconds) that was consumed by SLR and routing engine during the routing run. |
| routingPlanTimeLimit |
TIME_LIMIT |
int |
Time limit for the routing plan (in seconds). |
| routingPlanOptimizationGoal |
OPTIMIZATION_GOAL |
string |
If there is an optimization goal at the routing run, this field shows the goal. Values include:
|
| routingPlanTimeLimitSlrPercentage |
PERCENTS_OF_TIME_LIMIT_FOR_SLR |
int |
The part of total time limit which is time limit for SLR service |
| notAssignedDueToValidationIssuesCount |
NOT_ASSIGNED_VALIDATION |
int |
Configuration / Data validation errors |
| notAssignedDueToChangesWhileRoutingWasRunningCount |
NOT_ASSIGNED_ROUTING_RUNNING |
int |
The assignment is impossible due to changes that happened while routing was running |
| notAssignedDueToActivityConfigurationCount |
NOT_ASSIGNED_ACTIVITY_CONFIG |
int |
Not-assignment reason: configuration of an activity |
| notAssignedDueToResourcesConfigurationCount |
NOT_ASSIGNED_RESOURCES_CONFIG |
int |
Not-assignment reason: configuration of resources |
| notAssignedNeedsManualAssignmentCount |
NOT_ASSIGNED_ASSIGN_MANUAL |
int |
Not-assignment reason: the constraint violation. Try to assign the activity manually |
| notAssignedOtherIssuesCount |
NOT_ASSIGNED_OTHER |
int |
Other Not-Assignment Reasons |
| partiallyAssignedSegmentableActivitiesCount |
PARTIALLY_ASSIGNED |
int |
Partially assigned segmentable activities |
| notAssignedDueToDynamicModeRestrictionsCount |
NOT_ASSIGNED_DYNAMIC_MODE |
int |
Activities were not assigned in accordance with routing plan dynamic mode settings |
| notAssignedDueToCostSettingsCount |
NOT_ASSIGNED_COSTS_SETTINGS |
int |
Not-assignment reason: routing plan and/or resource type cost settings may be suboptimal |
| notAssignedDueToTravelRestrictionsCount |
NOT_ASSIGNED_TRAVEL_SETTINGS |
int |
Not-assignment reason: activity locations and routing plan travel settings prohibits assignment |
| notAssignedDueToOptimizationCriteriaCount |
NOT_ASSIGNED_THRESHOLDS |
int |
Activities were not assigned in accordance to optimization criteria chosen |
| resourceBlockedDueToRoutingScheduleCount |
BLOCKED_RESOURCES |
int |
Resource are blocked by another run as of sub-optimal routing plan schedule |
| notAssignedNeedsOvertimeOverdueRulesRelaxationCount |
NOT_ASSIGNED_OVERTIME_OVERDUE |
int |
Not-assignment reason: the overtime/overdue constraint violation. Try to assign manually with relaxed constrains or just relax business rules on overdue/overtime for the routing plan |
| subcategory |
SUBCATEGORY |
string |
Reserved for future needs |
| resourceExternalId |
RESOURCE_EXTERNAL_ID |
string |
The external ID of the routing bucket. |
| routingRollbackRunId |
RUN_ID_ROLLED_BACK |
int |
obsolete |
| type |
TYPE_OF_THE_RUN |
string |
obsolete |
OPTIMIZING ROUTING RESULTS BY MEANS OF ROUTING RUN DATA ANALYSIS
We recommend that you perform this analysis on a bucket-by-bucket basis, as the situation may differ slightly due to geographical differences or lines of business.
Follow these steps:
- Export Routing Runs Result Data into OAC or any other analytical tool.
- Calculate the total of every notAssigned field and choose one to three main reasons, for which the sum of corresponding error category is maximum. You may consult the table below for possible corrective actions.
This table lists the routing errors and possible corrective actions:
| Category |
Routing Error Numbers |
Event Field Name |
Description |
Corrective actions |
| Configuration / Data validation errors |
6005, 6015, 6023, 6076 |
notAssignedDueToValidationIssuesCount |
Customer should never see this error message under normal circumstances. |
N/A |
| Reasons related to Dynamic mode of routing |
6000 |
notAssignedDueToDynamicModeRestrictionsCount |
Reconsider Dynamic mode settings in routing |
|
| Reasons related to the Configuration of an activity |
6056, 6057, 6061, 6090 |
notAssignedDueToActivityConfigurationCount |
Activity doesn't have work zones or work skills; activity type is not configured for routing; activity links don't supported by chosen routing type |
Revise the specific activity configuration |
| Reasons related to the Configuration of resources |
6073 |
notAssignedDueToResourcesConfigurationCount |
Resources do not have active users |
Revise the specific resource configuration |
| Reasons related to routing plan cost settings |
6017, 6018 |
notAssignedDueToCostSettingsCount |
Routing plan settings do not correspond to resource costs |
Revise balance of the following costs:
|
| Reasons related for travel existence and restrictions |
6010, 6024, 6025 |
notAssignedDueToTravelRestrictionsCount |
Activities cannot be assigned as routing either unable to calculate travel or calculated travel is bigger then the limit set at the routing plan level |
Revise the following:
Also, check if your routing plan includes SLR and processes more than 6000 activities and/or 600 providers. In such a case consider splitting it into several routing runs using precise filters. |
| Reasons related to the constraint violation |
6003, 6008, 6011, 6013, 6020, 6028, 6063, 6067, 6068, 6069, 6070, 6071, 6072, 6077, 6078, 20188 |
notAssignedNeedsManualAssignmentCount |
Activity cannot be assigned due to all possible providers miss needed work zone, work skill, inventory or points, don't have active calendars, do not fit the activity preferences or activity link constraints. |
Assign activities manually with relaxed constraints |
| Reasons related to the not enough time in routes to place activities into |
6007, 6009, 6016, 6019, 6021, 6022, 6079 |
notAssignedNeedsOvertimeOverdueRulesRelaxationCount |
There are too many activities for the same time slot or too less time left in the routes for resources, capable of doing most of the activities. |
|
| Reasons related to not routing of particular activities segments |
6027 |
partiallyAssignedSegmentableActivitiesCount |
Some segments were routed, but others are not due to routing plan settings and/or activity type configuration |
Revise minimum and maximum segment size for the given segmentable activity type; |
| The assignment is impossible due to changes that happened while routing was running |
6050, 6051, 6052, 6054, 6055, 6058, 6059 |
notAssignedDueToChangesWhileRoutingWasRunningCount |
Manual changes during routing run made assignment impossible. |
N/A |
| Reasons related to optimization goals |
6064 |
notAssignedDueToOptimizationCriteriaCount |
The optimization threshold is higher then what was routing able to achieve. |
Revise the optimization thresholds |
| Reasons related to routing plan schedule |
6091 |
resourceBlockedDueToRoutingScheduleCount |
It is responsibility of a person setting up routing to create such a schedule so routing plans using the same resource would not run within the same time period. |
Reconsider routing plans schedule so routing plans using the same resources do not intersect. |
| Other issues |
all others |
notAssignedOtherIssuesCount |
N/A |
N/A |
Key Resources
NOTE: The above link to the latest documentation works after the latest generally available (GA) release.
Starting with Update 22C, the rules of visit bundling have been improved to provide better customer experience. You can also specify a bundling policy that alters the default visit bundling rules in routing with a new non-assignment reason.
Routing tries to group activities with the same address and close coordinates to minimize travel time and improve customer satisfaction by default. However, for stronger bundling of activities that belong to the same visit, you must have a visit bundling key defined explicitly. We recommend that you enable the visit functionality and set up the bundling key before using the advanced functions of bundling. The bundling key can be defined on the Business Rules page by choosing parts of activity fields that are being combined and this value is used as a bundling key value. Activities with the same values for the bundling key fields may be considered as part of the same bundle.
By default, all types of routing plans including bulk, immediate and immediate for urgent activities try to bundle all those activities sharing the same visit bundling key values and scheduled for the same day to form a visit (that are to be performed in sequence, one after another).
Apart from performing bundled activities in sequence, Oracle Field Service also sends a single notification for all the activities that form a bundle, if such notifications are configured.
Activities are eligible for visit bundling unless there are some mismatch factors that prevent them from being performed as a single visit.
Here are the mismatch factors:
- skills or zones mismatch when no resources capable of performing all of the considered activities due to their skills and zones configuration are available.
- inventory shortage when using required inventory and the 'routing by inventory' feature enabled, but no providers have the whole stack of inventory needed.
- other activity constraints when activities have incompatible preferred/required/prohibited resource preferences.
- link constraints when activities are linked together with a link type that prevents assigning them to the same day and/or resource.
- queue date when activities scheduled for different dates are not intended to be bundled together, in general. However, it may be possible with a specially configured multi-day routing plan, in which you've enabled moving activities between dates through filters that cover the activities to be bundled.
- incompatible service windows/SLAs when activities have service windows/SLAs that cannot be combined into a single visit.
- exceeded duration when the overall visit duration is longer then the available resource's working day.
Consider an example where two jobs with the same bundling key are already scheduled and a third one comes in. If there are no mismatching factors, all those jobs are expected to be routed together forming a single visit. If a resource can't perform them together because of overtime or availability constraints, Routing tries to move them to another day (provided SLA/service windows are not lost).
You can define additional options to push eligible activities to be bundled together. To push bundle-able activities, you must modify activity filters of a particular routing plan's Bundling policy from Default to All or None. Such routing plans (including bulk, immediate and immediate for urgent activities) do not assign another activity sharing the same bundling key and same date as an existing one. Moreover, if un-assigment to bucket is allowed within a routing plan's settings, bulk routing with such a setting may return those activities back to the bucket.
Bundling policy options are as follows:
- Default bundling policy bundles all the activities that share the same visit bundling key value, belong to the same queue date, and are found within the same bucket. However, if some of the activities are already assigned to one or more resource, then those activities may be left in their places if it is impossible to place them on the one route to form a visit bundle.
This image displays the Update parameters assignment rule dialog box showing the Default bundling policy:
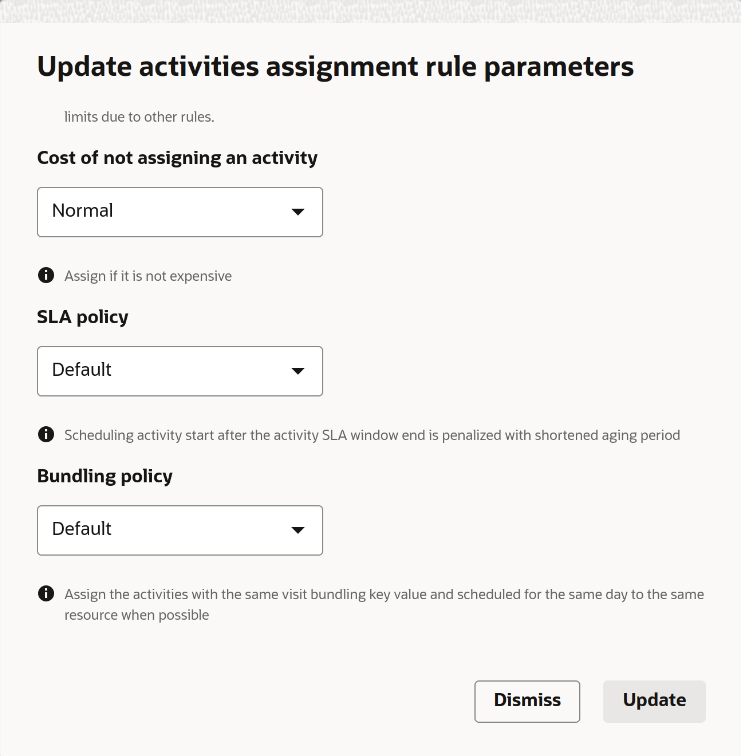
Update parameters assignment rule Dialog Box Showing Default Bundling Policy Option
- All or None bundling policy forms a single visit bundle from all the activities that share the same visit bundling key value, belong to the same queue date and are found within the same bucket. If such a bundle cannot be formed then all of those activities that are preassigned and allowed to be moved to the bucket are unassigned to the bucket'.
This image displays the Update parameters assignment rule dialog box showing all available bundling policy options:
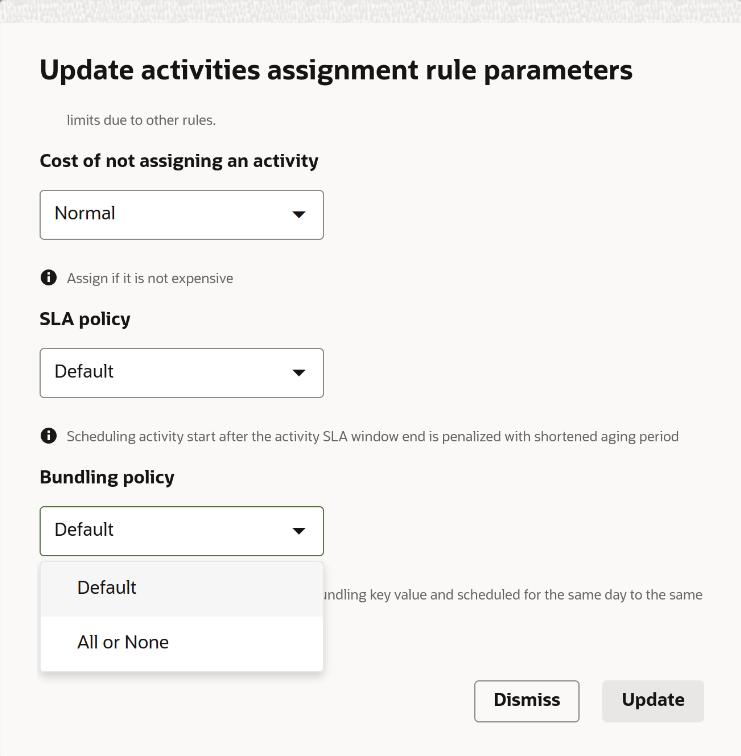
Update parameters assignment rule Dialog Box Showing All Available Bundling Policy Options
Consider an example of an All or None bundling policy and a multi-day routing plan that routes two activities with the same visit bundle key value, has the bundling policy All or None. These conditions are true:
- If both activities have the same queue date and there is a technician capable of doing both activities sequentially - then both activities are assigned.
- If both activities have the same queue date and there are no technicians capable of doing both activities sequentially - then both activities are returned to the bucket.
- If the activities have different queue dates, the routing plan allows moving activities between dates, and there is a technician capable of doing both activities sequentially then both activities are assigned.
- If the activities have different queue dates, and the routing plan doesn't allow moving activities between dates or there are no technicians capable of doing both activities sequentially then activities may be assigned without any sequence, not forming a bundling visit.
- Any activities that were not assigned (or unassigned) due to an All or None bundling policy result display this error message:
6028 Unable to fit bundling policy constraints
Activities that were marked with All or None bundling policy and scheduled for the same day cannot be assigned together to the same route.
This feature minimizes travel time and improve customer satisfaction by providing stronger bundling of activities that belong to the same visit,
Steps to Enable
This section discusses how to configure visit bundling.
SET UP THE BUNDLING KEY
Before you use the advanced functions of bundling, you must enable the visit functionality and define the bundling key. To define the bundling key, navigate to Configuration, Business Rules and choose parts of the activity fields that are being combined in the Business Rules page. This value is used as a bundling key value.
SET BUNDLING ACTIVITIES FOR THE SAME CUSTOMER
To make sure that all activities for the same customer/same date form a single visit (so that they are assigned to the same resource and a single notification is sent to the customer), you may set the bundling key to include Account, Account Number, CustomerID or similar fields.
SET BUNDLING ACTIVITIES FOR THE SAME LOCATION
By default, routing doesn't automatically bundle same location activities as keeping such activities together may lead to increased workflows and decreased travel time. In many cases Routing may prefer such a combination though. However, you can increase the chance of getting such a preference by adding a bundling key.
EXAMPLE
For example, if you want to bundle all activities sharing the same day and location by Routing as a single visit (and if this is not possible, then return them to the bucket so that a dispatcher can assign them manually), follow these steps:
- Set up the bundling key using the Address field.
- Open the routing plan you want to edit.
- Change all of the activity filters by selecting each activity filter, choosing Settings, and then changing the Bundling policy to All or None.
- Under the Assignment Parameters section, set the Handling of preassigned activities to Move activities between resources routes and reorder within the same route.
- Make sure that activities covered by Preassigned activities filters have the Possible routing actions set to Unschedule and move to the routing bucket.
BUNDLING ACTIVITIES FOR A COMPLEX SCENARIO
Here is another scenario. A company has three types of activities: servicing of smart home devices, connecting houses to the internet and repairing appliances. Activities for smart homes have different types with names starting with 'Smart' and they should always go together. Activities for internet connections have different types with names starting with 'Internet' and they may be split between days and technicians, but due to safety concerns, cannot be performed in parallel. Other activity types start with 'Appliances' and don't have any particular bundling preferences. To implement such a configuration, do the following:
- Make sure that you have an activity filter for all the smart home-related activity types. If not, then add it by navigating to Configuration, Filters.
- Navigate to Configuration, Business Rules. Make sure that the Visit functionality is enabled.
- Set up the bundling key to the Account field (or another field that uniquely identifies the customer).
- Navigate to Routing Plans and open the desired routing plan for editing.
- Review the Filters section and make sure that it includes the activity filters for smart home-related activities for all possible destinations:
- Non-scheduled activities in the routing bucket that should be scheduled and assigned
- Activities in the routing bucket that should be assigned
- Preassigned non-scheduled activities that should be scheduled
- Activities in the existing routes
- Change all of the activity filters for smart home-related activities by selecting them and choosing Settings, and then changing the Bundling policy to All or None.
- Under Assignment parameters, set the Handling of preassigned activities to Move activities between resources routes and reorder within the same route.
- Under the Preassigned activities filters, make sure that there is a filter that covers smart home-related activities.
- For this filter, set its Possible routing actions to Unschedule and move to the routing bucket.
Redwood Style for Dashboards Page
Starting Update 22C, the Dashboards page has Redwood style to provide better user experience. It provides the same look and feel as other pages in Oracle Field Service.
The Dashboards page includes these changes:
- The input text fields, radio buttons, check box, and buttons (such as Add, Dismiss, Select and Rename) follow the standard Redwood style.
This image displays the Add dashboard dialog box.
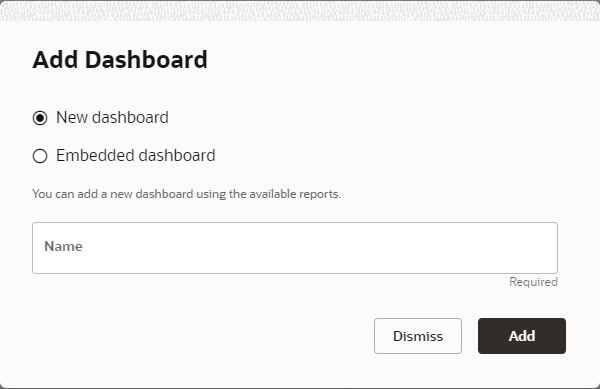
Add Dashboard Dialog Box
This image displays the Select resource dialog box.

Select Resource Dialog Box
- The drop-down input field or check box has a new style in chart tiles.
This image displays the Activities by statuses dialog box showing a drop-down list.
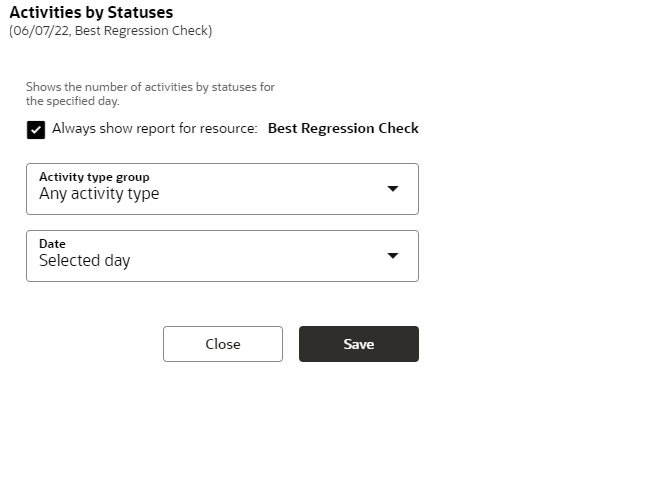
Redwood Style Drop-Down List in a Dialog Box
- The dialog box on the Dashboards page follows the Redwood style providing a unified experience across the application.
This image displays the Delete dashboard dialog box.
Delete Dashboard Dialog Box
This image displays the Rename dashboard dialog box.
Rename Dashboard Dialog Box
The Dashboards page is now updated and enhanced to provides the visual style and experience from the Redwood' concept so that the page is consistent with the application and with other applications of the Fusion stack.
Steps to Enable
You don't need to do anything to enable this feature.
Key Resources
NOTE: The above link to the latest documentation works after the latest generally available (GA) release.
IMPORTANT Actions and Considerations
STOPPING SUPPORT FOR ANDROID 6.0
Support for Android 6.0 will be stopped for Oracle Field Service Android app from Update 22D (November 2022). Plan and upgrade any devices that are currently on Android 6.0.
REMOVAL OF ORACLE BUSINESS INTELLIGENCE CLOUD INTEGRATION
Starting with Update 22C, Business Intelligence Cloud Service (BICS) is deprecated from Oracle Field Service.
REMOVAL OF DAILY EXTRACT: PROPERTY FILES EXPORT
To simplify and decrease the daily extract creation time, the Daily Extract file properties extract is announced as deprecated. This deprecation announcement was made in the Oracle Field Service 22A Release Notes. To give you more time to prepare your integrations, the removal is postponed. No changes are expected for the property files export in Update 22D. More details on the plans for the removal will be available in Update 23A.
Daily Extract continues to support the file properties extract, but a new notice about the deprecation is visible in cases where the configured Daily Extracts contains the Property File Fields extract.