
- Revision History
- Overview
- Feature Summary
- Field Service
-
- Administration
- Android and iOS Applications
- APIs
- Core Application
-
- Dynamic Forms Launcher
- Image Watermarks
- Lock Activities to Particular Date/Time in Route
- Pre-defined Filter Date/Time Controls
- Redwood Styles in Resource Info and Location Pages
- Support of Date Ranges for Temporary Resource Location
- Warning Message about Capacity Area Impact when Moving Org Units/Buckets
-
- Integration
- Plugin Framework
- IMPORTANT Actions and Considerations
This document will continue to evolve as existing sections change and new information is added. All updates appear in the following table:
| Date | Module | Feature | Notes |
|---|---|---|---|
| 17 AUG 2023 | APIS | New Metadata API for Standard Plugin Installation | Updated document. Delivered new feature in update 23C. |
| 10 AUG 2023 | Core Application | Redwood Styles in Resource Info and Location Pages | Updated document. Delivered new feature in update 23C. |
| 10 AUG 2023 | Core Application | Support of Date Ranges for Temporary Resource Location | Updated document. Revised feature information. |
| 04 AUG 2023 | Plugin Framework | Camera support in Mobile Plugin Framework | Updated document. Delivered new feature in update 23C. |
| 27 JUL 2023 | Plugin Framework | Asset Details - A Comprehensive View of Assets in Field Service | Updated document. Delivered new feature in update 23C. |
| 27 JUL 2023 | Integration | OFS-HCM Accelerator enhancements | Updated document. Delivered new feature in update 23C. |
| 27 JUL 2023 | Core Application | Pre-defined Filter Date/Time Controls | Updated document. Delivered new feature in update 23C. |
| 27 JUL 2023 | Core Application | Lock Activities to Particular Date/Time in Route | Updated document. Delivered new feature in update 23C. |
| 27 JUL 2023 | Core Application | Image Watermarks | Updated document. Delivered new feature in update 23C. |
| 27 JUL 2023 | Core Application | Dynamic Forms Launcher | Updated document. Delivered new feature in update 23C. |
| 27 JUL 2023 | Administration | Enhancements in Map Service | Updated document. Delivered new feature in update 23C. |
| 27 JUL 2023 | Administration | Enhanced management of Parts Catalogs | Updated document. Delivered new feature in update 23C. |
| 19 JUL 2023 | Created initial document. |
 HAVE AN IDEA?
We’re here and we’re listening. If you have a suggestion on how to make our cloud services even better then go ahead and tell us. There are several ways to submit your ideas, for example, through the Ideas Lab on Oracle Customer Connect. Wherever you see this icon after the feature name it means we delivered one of your ideas.
GIVE US FEEDBACK
We welcome your comments and suggestions to improve the content. Please send us your feedback at oracle_fusion_applications_help_ww_grp@oracle.com.
DISCLAIMER
The information contained in this document may include statements about Oracle’s product development plans. Many factors can materially affect Oracle’s product development plans and the nature and timing of future product releases. Accordingly, this Information is provided to you solely for information only, is not a commitment to deliver any material, code, or functionality, and should not be relied upon in making purchasing decisions. The development, release, and timing of any features or functionality described remains at the sole discretion of Oracle.
This information may not be incorporated into any contractual agreement with Oracle or its subsidiaries or affiliates. Oracle specifically disclaims any liability with respect to this information. Refer to the Legal Notices and Terms of Use for further information.
Column Definitions:
Report = New or modified, Oracle-delivered, ready to run reports.
UI or Process-Based: Small Scale = These UI or process-based features are typically comprised of minor field, validation, or program changes. Therefore, the potential impact to users is minimal.
UI or Process-Based: Larger Scale* = These UI or process-based features have more complex designs. Therefore, the potential impact to users is higher.
Features Delivered Disabled = Action is needed BEFORE these features can be used by END USERS. These features are delivered disabled and you choose if and when to enable them. For example, a) new or expanded BI subject areas need to first be incorporated into reports, b) Integration is required to utilize new web services, or c) features must be assigned to user roles before they can be accessed.
| Ready for Use by End Users Reports plus Small Scale UI or Process-Based new features will have minimal user impact after an update. Therefore, customer acceptance testing should focus on the Larger Scale UI or Process-Based* new features. |
Customer Must Take Action before Use by End Users Not disruptive as action is required to make these features ready to use. As you selectively choose to leverage, you set your test and roll out timing. |
|||||
|---|---|---|---|---|---|---|
| Feature |
Report |
UI or |
UI or |
|
||
Warning Message about Capacity Area Impact when Moving Org Units/Buckets |
||||||
Asset Details - A Comprehensive View of Assets in Field Service |
||||||
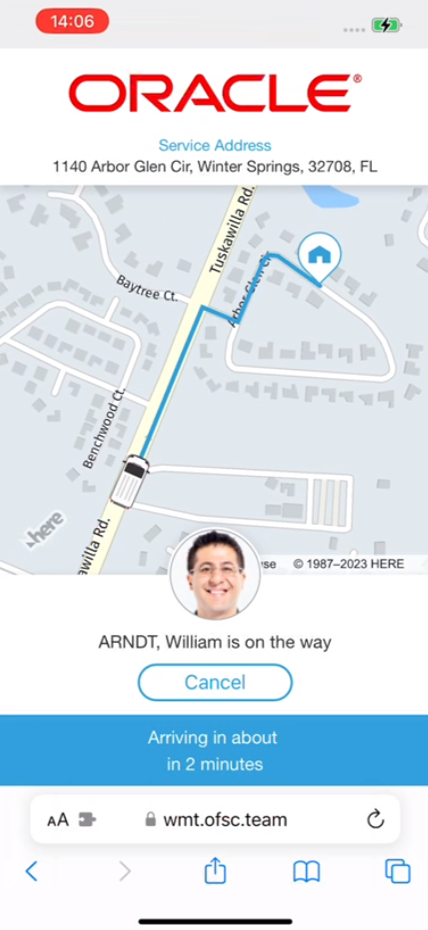
This is applicable to the Oracle Map users only - 23C release provides an enhanced user interface, more frequent map and geocoding updates, and access to the 'Where is My Technician' functionality. No customer action is required; updated maps are enabled when environments are upgraded to 23C.
The Navigate plugin is now used instead of the Directions screen. Previously configured Directions buttons are replaced with the Navigate plugin link when an environment is upgraded.
Customers can now also take advantage of the Where is My Technician functionality that delivers a fully transparent view of service appointment details, technician location, real-time arrival estimates, and more. Where is My Technician can be enabled via Themes/Configuration. For more details, please refer to the Documentation.
Business Benefit
- More modern look and presentation
- More frequent Maps and Geocoding data updates
- Availability of Where is My Technician for all customers
Steps to Enable
You don't need to do anything to enable this feature.
Enhanced management of Parts Catalogs
A new Parts Catalog screen is now available from the Configuration screen in Oracle Field Service to make it easier to configure and maintain all the catalogs within one area. It provides the following capabilities:
- Access and ability to configure catalog parameters
- Assign parts catalogs to specific user types
- Access assigned and unassigned user types via the Configuration History report
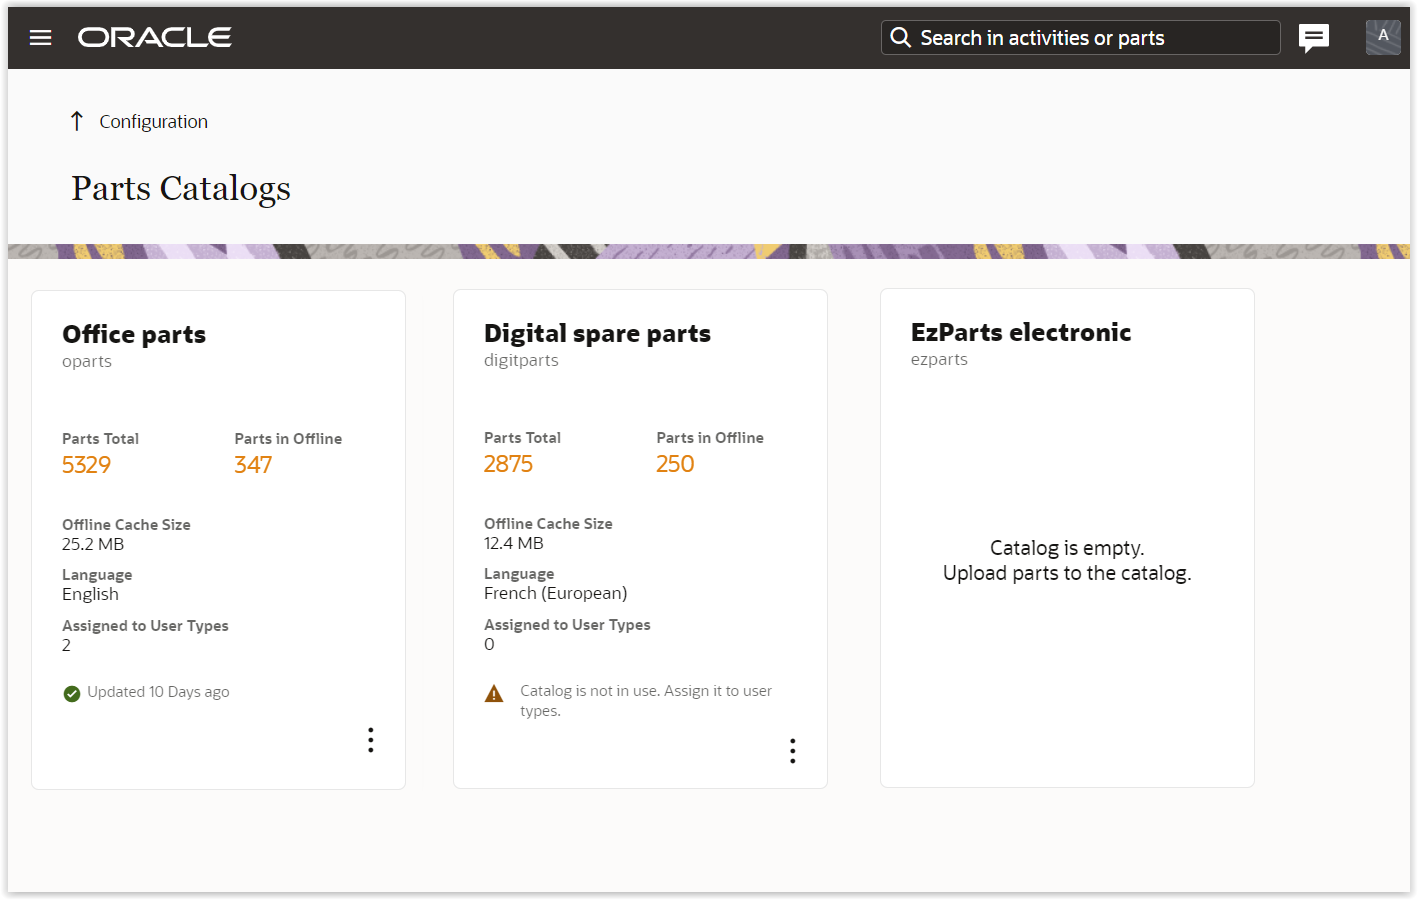
Show parameters of a catalog
The following parameters are available:
- Name and Label
- General parameters: Total Parts, Parts in Offline and Offline Cache Size. These parameters are needed in order to better validate the catalog and optimize it for offline usage.
- Language and Assigned to User Types: These parameters control which users can access the catalog.
- Time of update: This parameter shows when the catalog was last updated via API.
Assign catalog to user types
You can now assign each parts catalog to specific user types to ensure that users of those types have access to only the necessary catalogs. This allows you to define which catalogs are required for each user type.
To assign a catalog to user types, click the context menu icon for the catalog and select the 'Assign to user types' menu item. The screen will allow you to select user types for which the catalog will be available. Check the relevant user type boxes and click the 'Assign' button. Specific users will now have access to the catalog(s) and will be able to download them for offline usage.
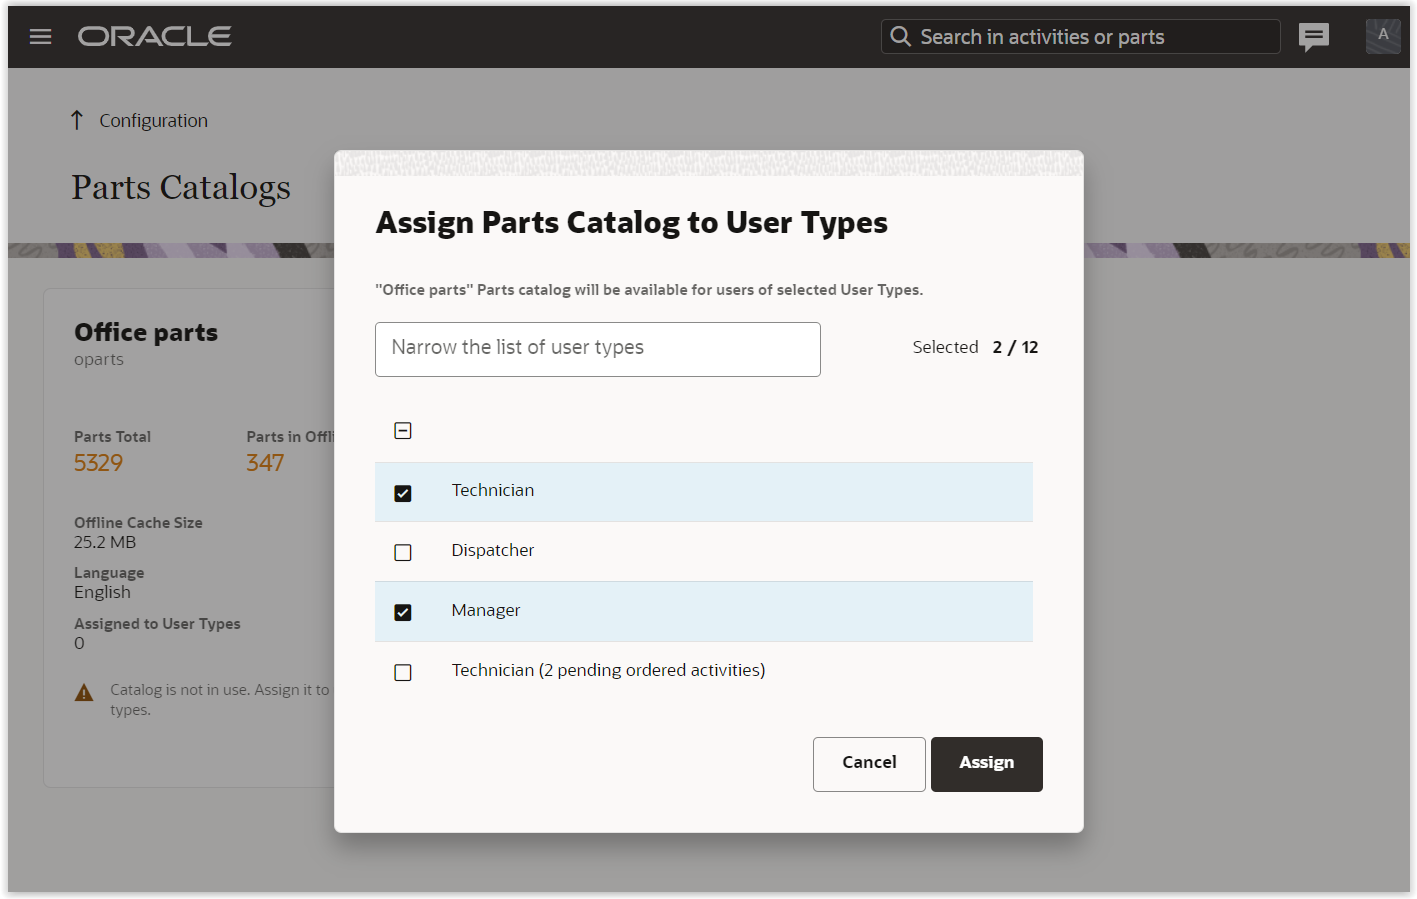
Note: In order to ensure backward compatibility with previous versions, the application will still use the 'Language' parameter to control access to parts catalogs. Taking this fact into account, the application will enable the catalog to users of selected user types whose language matches that of the catalog.
Configuration History report
Assigned and unassigned user types for parts catalogs will be reflected in the 'Configuration history' report for auditing purposes.
Troubleshooting the most typical cases
Here are the most typical questions that can be addressed using the feature:
Q1. Which catalogs are available for my OFS environment?
Administrators will be able to access all catalogs and subsequently will be able to assign them to the specific user types as needed.
Q2. Why is a specific catalog not appearing to my users? Check the following:
- The catalog is empty - the application will show this information on the card for a specific catalog.
- The catalog is not assigned to any user types - there will be the corresponding warning for the catalog to indicate this situation.
- Language mismatch - the application will show the warning about the number of users that won't be able to access the catalog due to the language mismatch. This warning is applicable to Active users only.
Q3. Why is the catalog not downloaded for offline usage?
Most likely, this occurs due to limited resources available on various mobile devices. To address this, you could consider reducing the number of items available for offline access within a catalog. This action would decrease the amount of data that needs to be downloaded to mobile devices. For more detailed guidance and implementation steps, please refer to the API documentation for the Parts Catalog.
Q4. When was the catalog last updated?
This information is displayed on each card in the Parts Catalog configuration area.
- Availability of specific catalogs for the specific user types ensures that mobile resources get access to the relevant data only.
- Easier to configure and maintain all of the parts catalogs.
- Optimize offline functionality and decrease unnecessary traffic volume. The application shows the data size that will be downloaded to mobile devices in offline situations. Administrators can utilize this information to rearrange the catalogs as needed.
- Enhanced auditing and troubleshooting capabilities.
Steps to Enable
The steps to configure the feature are outlined below:
- Navigate to Configuration -> User Types, select the required user type.
- Click on the Screen Configuration tab and select the 'Configuration' screen context.
- Add 'Parts Catalog' to the context layout.
Read/Write visibility implies that users will have the ability to assign specific user types to catalogs. Read/Only visibility implies that users will be able to only view catalogs and their parameters.
Note: With the 23C update, the 'Parts Catalog' screen will be automatically added to some user types based on the following rules:
- 'Parts Catalog' with Read/Write visibility - for user types that have RW access to the 'Inventory types' screen.
- 'Parts Catalog' with Read/Only visibility - for user types that have RO access to the 'Inventory types' screen.
Tips And Considerations
Removal of 'Parts Catalog' permission at the user type level
The 'Parts Catalog' permission which previously had been present in the General settings of a user type record has been removed as a part of this feature.
Enhanced Support for Two-Part Postal Codes
When selecting the properties to form a travel key, there is now an additional option to use the 'first word and X characters' of the selected property. In this case, the first word (everything before the first space in the property value) will be used along with the next 'X' characters, where 'X' would be the value specified in the 'Length' field. This additional option allows for a more customizable configuration of the travel key. For example, in certain countries, such as the United Kingdom, postal codes consist of two(2) parts, such as 'AA9A 9AA' and 'A9 9AA'. It may be desirable that the travel key for such cases be constructed by combining the first word with a specific number of characters from the second word. If there are hyphens ("-") within the property value, they will be considered as spaces and the first word would be considered as all characters that are before the first space or the first hyphen.

Example:
If the travel key is specified as 'czip' with 'first word and X characters' and the 'Length' is specified as one (1), the travel keys corresponding to different zip code formats would be as follows:
| Zip Code Value | Travel Key Value |
|---|---|
| AA9A 9AA | AA9A 9 |
| A9 9AA | A9 9 |
| A9A 9AA | A9A 9 |
| A99 9AA | A99 9 |
| A99-9AA | A99 9 |
Business Benefit
- Increase operational efficiency when dealing with postal codes that consist of two distinct components.
Steps to Enable
How to configure the fields for the travel key
1. Access the Configuration screen and select Statistics.
2. In the Activity Travel Keys section, click the menu icon (tree dots) located in the Actions column to edit an already existing travel key.
3. In the Edit travel key window, select the property to form the travel key.
4. In the 'Length' field, type the number of characters to consider as part of the key after the first word, and select the 'first word and X characters' option from the dropdown list.

5. To save the changes, click the 'Update' button.
Multiple Travel Keys Based on Organizations
Configure multiple travel keys
With the 23C release, administrators can now configure up to five (5) travel keys in the system and associate each of them to different Organizations. This allows OFS to autonomously learn and accurately estimate travel times based on the specific travel key associated with the resource's Organization. This new capability is useful in scenarios where administrators require the flexibility to configure distinct travel keys for each existing Organization.
Examples:
- 'Zip/Postal code' has been widely adopted as the primary travel key identifier. But for customers operating in multiple countries, utilizing the postal code as part of the travel key can present challenges due to variations in formats across different countries. In the USA, the basic ZIP code is composed of five numbers; in the UK it is made up of two parts separated by a space and can have up to 6 valid formats like 'AA9A 9AA' and 'A9 9AA'; in other countries such as France and Germany the postal code is composed of 6 alphanumeric digits with format 'NNNNNN'. With the introduction of this new feature, an administrator will be able to configure separate travel keys, so that each of the postal code formats can be properly supported in the system.
- An Organization may include various types of businesses operating within the same area, and they may prefer to use different travel keys for each type of operations. For example, an organization may have technicians working on network nodes or towers, where the appropriate travel key could be the node ID or the site ID. The same Organization may also have a B2C business where the appropriate travel key could be ZIP codes. In such cases, the customer can now configure different travel keys for each of these businesses, even though they operate within the same geographical area.
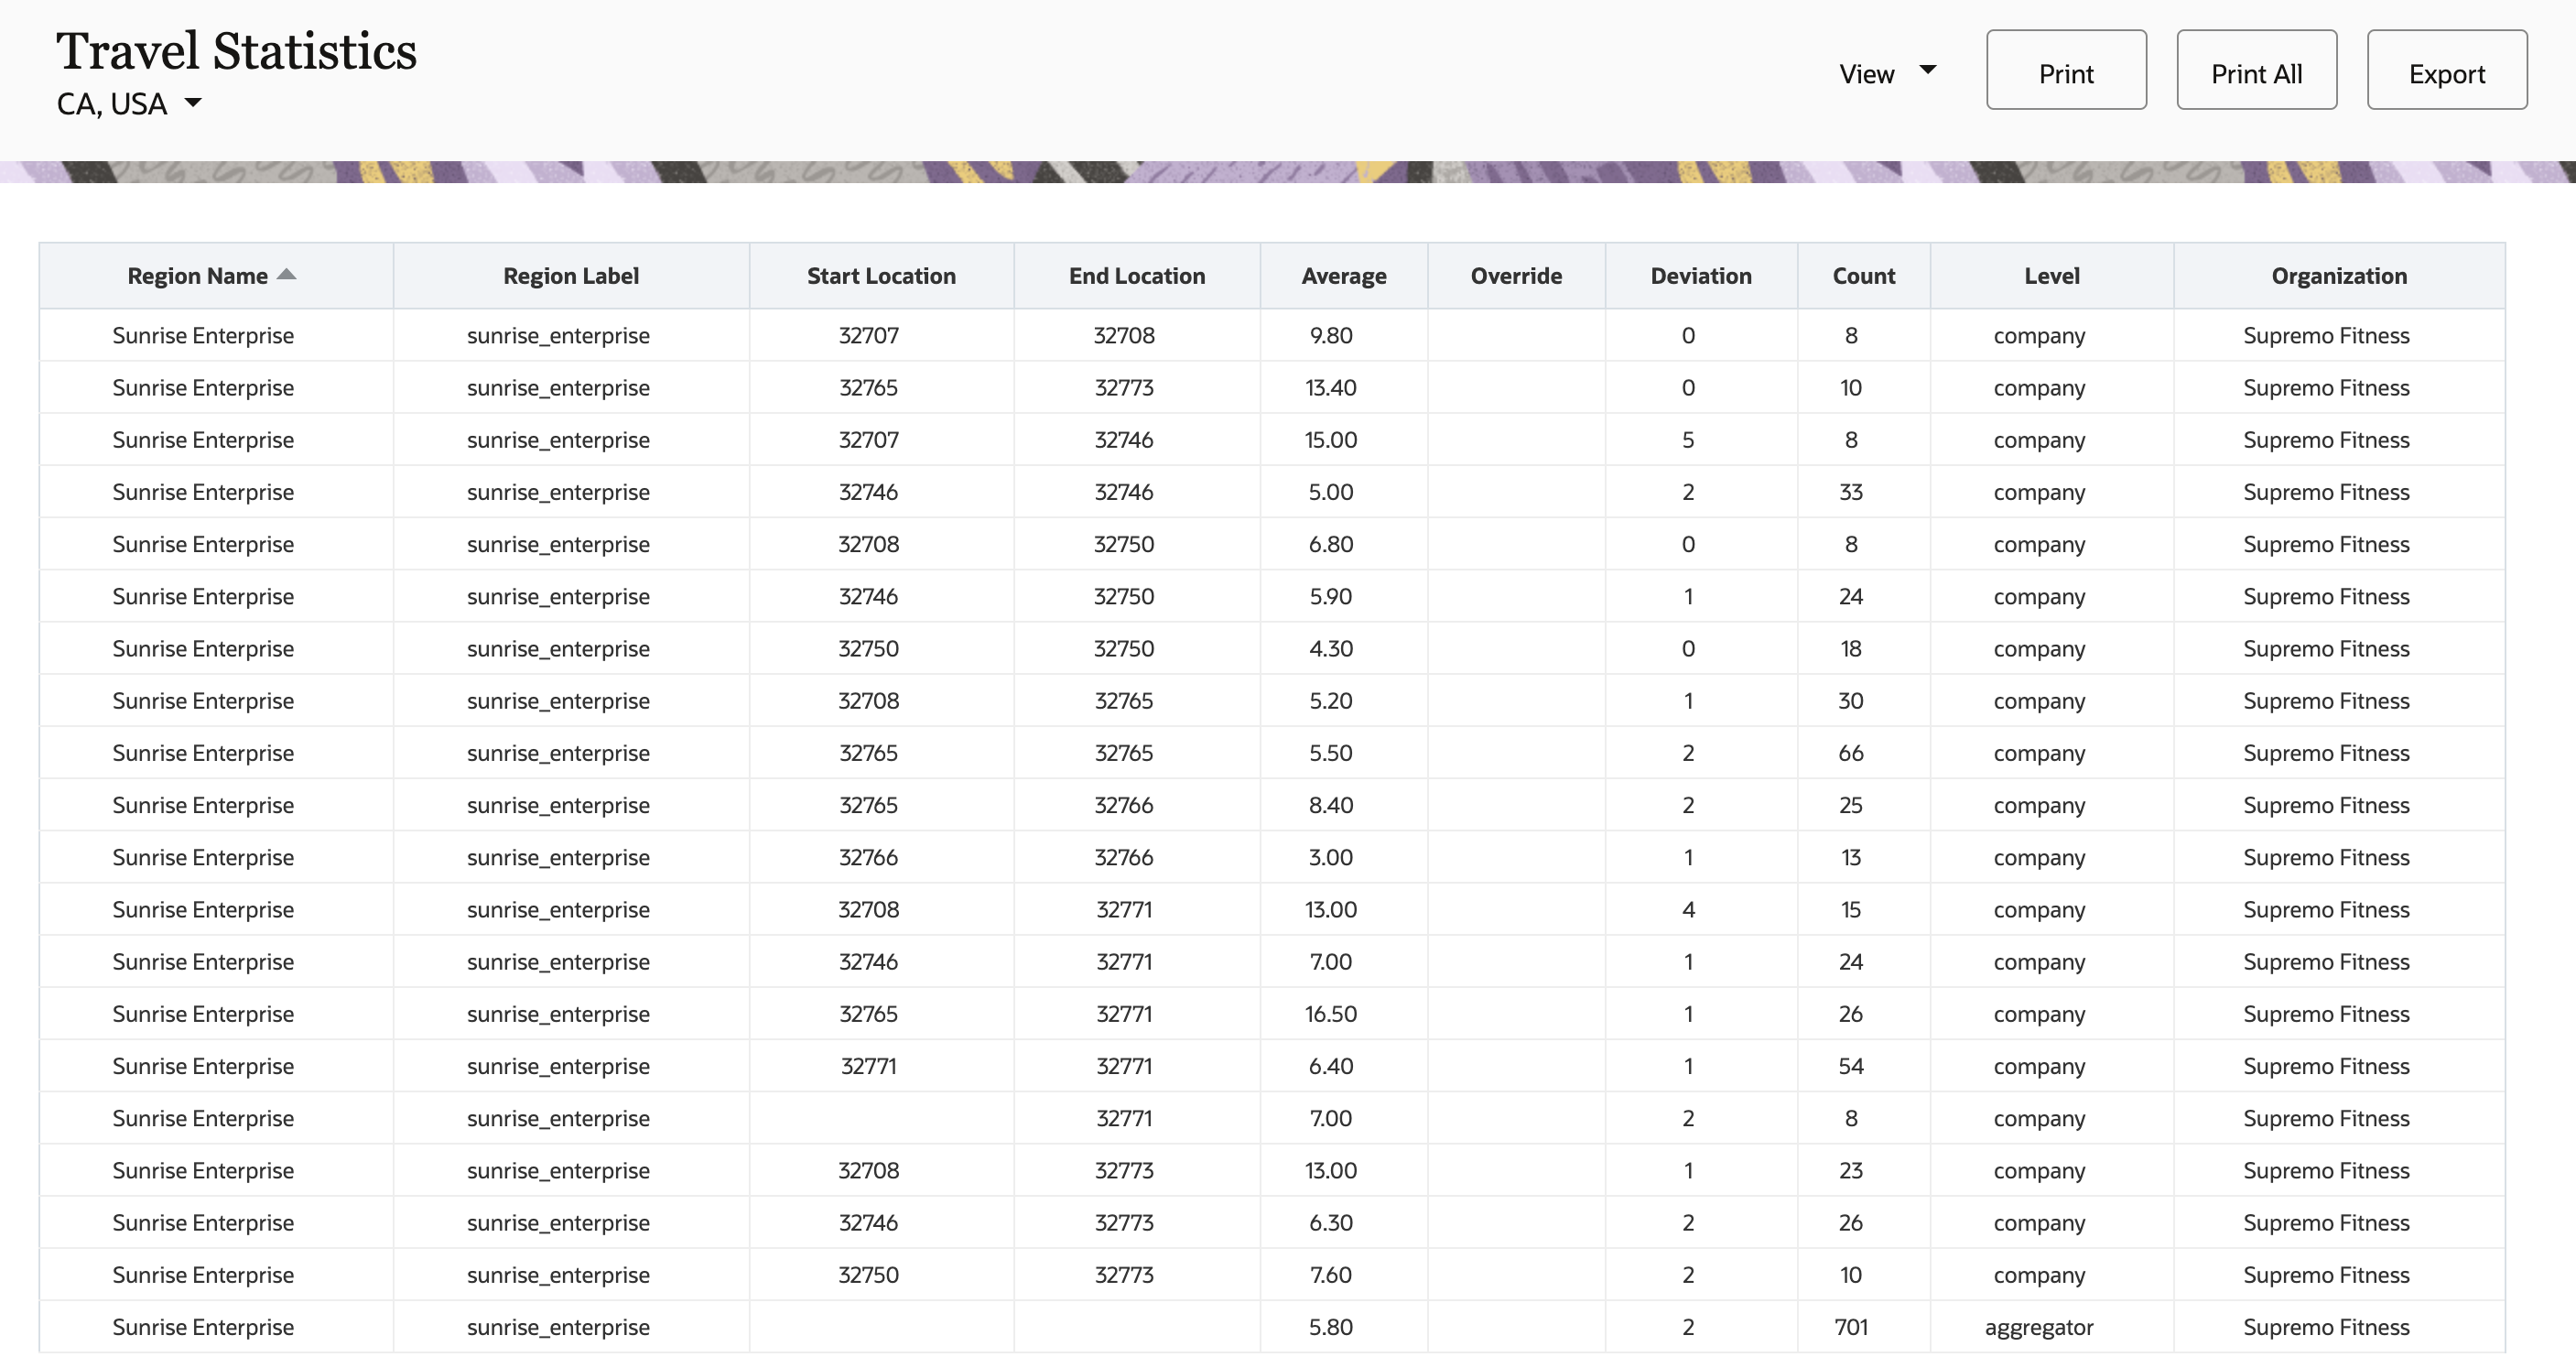
Since travel statistics will now depend on the travel key to which the Organization belongs, the Travel Statistics report will now include an additional column for 'Organization'. Travel statistics between pairs of keys for all applicable Organizations will be listed in the report.
Changes to APIs
Update activity travel statistics
Users will have an option to override data for travel keys based on Organizations via API by specifying the corresponding keyId for the travel key within the PATCH request. ('keyId' can be viewed within the Configuration > Statistics screen)
| Existing API body | New API body |
|---|---|
| { "fkey" : "79763", "tkey" : "79764", "override" : 10 } |
{ "keyId" : 1, "fkey" : "79763", "tkey" : "79764", "override" : 10 } |
- If the keyId is not specified, the default travel key will be considered.
- If the keyId is specified but does not exist in the system, an error message 'Key ID does not exist - <travel key id>' will be returned.
- If the keyId is specified and valid, the travel key corresponding to the ID will be considered.
Get activity travel statistics
The GET activity travel statistics API request will provide a new optional query parameter 'keyId' to retrieve the travel statistics just for a particular key.
In addition to the collection of activity travel statistics at the company level based on the request, the API will return the 'keyId' and 'org' fields, which contains all Organizations that the key is configured for.
| Existing API body | New API body |
|---|---|
| { "tkey" : "79764", "fkey" : "79763", "override" : 10, "avg" : 11, "dev" : 1, "count" : 5, "region" : "xyz_enterprise" } |
{ "tkey" : "79764", "fkey" : "79763", "override" : 10, "avg" : 11, "dev" : 1, "count" : 5, "region" : "xyz_enterprise", "keyId" : 1, "org" : [ "Org1" , "Org3" ] } |
- If the new parameter 'keyId' is empty or not specified, the data for all travel pairs corresponding to all possible keyIds will be retrieved.
- If 'keyId' is specified, the travel statistics for travel pairs corresponding to that particular keyId will be retrieved.
- If 'keyId' is specified but does not exist in the system, an error message 'Key ID does not exist - <travel key id>' will be returned.
Update airline distance-based travel
Users will have an option to override data for the airline distance-based travel time at the travel key level, based on Organizations, via API by specifying the corresponding keyId for the travel key in the PATCH request. (keyId can be viewed within the Configuration > Statistics screen)
| Existing API body | New API body |
|---|---|
| "items": [{ "key":"32771", "data": [{ "distance":10, "override":20 }, { "distance":50, "override":60 } ] } ] |
"items": [{ "key":"32771" , "keyId":4 , "data": [{ "distance":10, "override":20 }, { "distance":50, "override":60 } ] } ] |
- If the keyId is not specified, the default travel key will be considered.
- If the keyId is specified but does not exist in the system, an error message 'Key ID does not exist - <travel key id>' will be returned.
- If the keyId is specified and valid, the travel key corresponding to the ID will be considered.
Get airline distance-based travel
The GET airline distance-based travel API request will provide a new optional query parameter 'keyId' to retrieve the data just for a particular key. In addition to the collection of statistically estimated and override values of airline distance-based travel time, the API will respond with additional fields 'keyId' and 'org', which will contain all Organizations that the key is configured for.
| Existing API body | New API body |
|---|---|
| { "key" : "32771", "data" : [ { "distance" : 1, "estimated" : 16, "override" : 11 } { "distance" : 50, "estimated" : 68, "override" : 60 } ] } |
{ "key" : "32771", "keyId" : 2, "org" : [ "Org1" , "Org3" ], "data" : [ { "distance" : 1, "estimated" : 16, "override" : 11 } { "distance" : 50, "estimated" : 68, "override" : 60 } ] } |
- If the new parameter 'keyId' is empty or not specified, the data for all possible keyIds will be retrieved.
- If 'keyId' is specified, the data corresponding to that particular keyId will be retrieved.
- If 'keyId' is specified but does not exist in the system, an error message 'Key ID does not exist - <travel key id>' will be returned.
Travel estimation at the bucket level
When an activity is assigned to a bucket and that bucket has other buckets within it that belong to different Organizations, it is possible that the activity will ultimately be routed to a resource that belongs to a different organization to that of the bucket where the activity is currently assigned. In such cases, the travel time estimation factors in all possible estimations for the Organizations that the activity may finally end up in. The system uses a weighted average of all such travel estimations, where the weight is the count of past activities with the same travel key value.
The travel estimate calculated is also used in the Find Matching Resources, Get Activity Booking Options and Get Capacity API operations.
Business Benefit
-
Improve allocation of field resources due to a better understanding of travel time variations for different organizations configured in the system.
-
More accurate travel estimates enable provisioning a more reliable delivery window to customers, resulting in reduced waiting times and an enhanced customer experience.
Steps to Enable
How to visualize and configure travel keys
1. Access the Configuration screen and select Statistics.
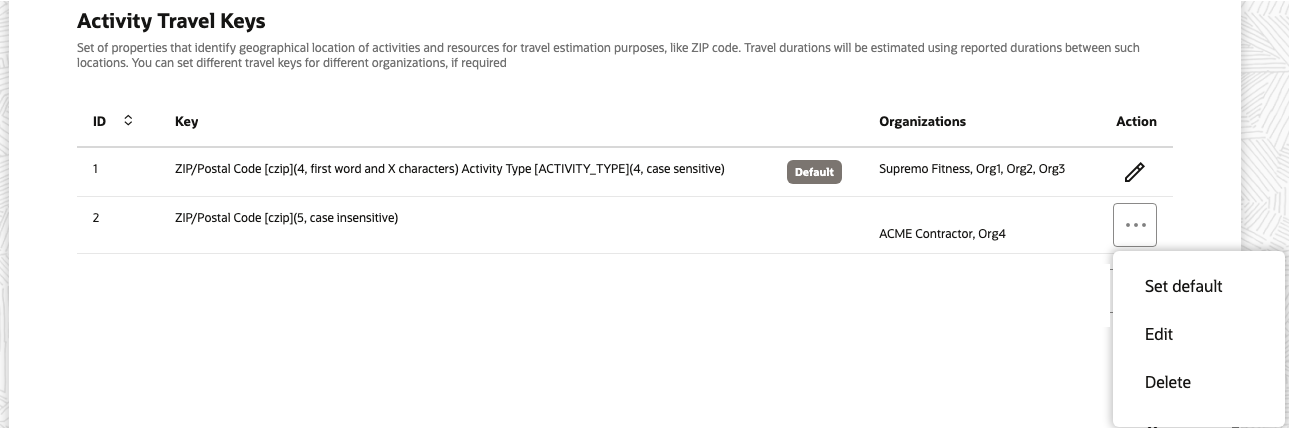
2. In the Activity Travel Keys section a new table with the details of the travel keys configured appears. This table includes details such as:
- ID: The unique travel key identifier, which will be used to refer a particular travel key in the Statistics API
- Key: Travel key composition
- Default Identifier: This field indicates whether the travel key has been configured as the default one or not
- Organizations : List of Organizations using the travel key configured

3. To add a new travel key, click the 'Add New' button
4. The Add Travel Key window will appear on the screen and there will be an option to select the Organizations that will be linked to the new travel key. Fill in the required details such as Organizations and Travel Key Fields.
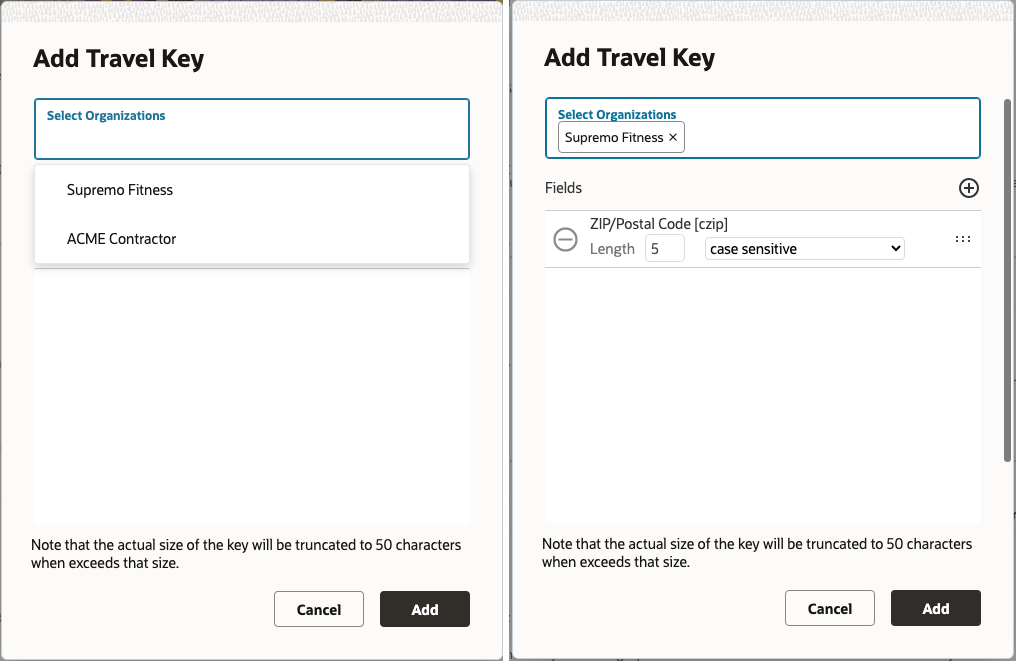
5. Once you have completed the configuration, click the 'Add' button to confirm the selections.
6. To set as the default, edit or delete a travel key other than the default one, click the menu icon (tree dots) located in the Actions column.
7. To Edit the default travel key, click on the pencil icon located in the Actions column.
NOTE: Organizations linked to the default travel key will be read-only and cannot be directly modified.
-
To remove Organizations linked to the default travel key, you should assign the Organization to a non-default travel key. By doing so, the selected Organization will be automatically removed from the default travel key.
-
To add Organizations to the default travel key, you should unlink the Organization from the currently associated non-default travel key. By doing so, the selected Organization will be automatically linked to the default travel key.
Tips And Considerations
- Upon upgrade to 23C, the existing travel key will become the default travel key for all Organizations. This will be denoted by listing "All Organizations" in the 'Organizations' column.
- In the scenario where no travel key is configured in the system, the travel key field will be empty, accompanied by the message "No items selected". In this case, whenever the first key is added, it will be considered as the default key and will be linked to all Organizations within the system. Administrators can add more keys and change the linked Organizations as needed.
- Organizations not linked to any other travel key will be automatically linked to the default travel key.
- Any new Organization created will also be linked to the default travel key.
- An Organization will always be linked to exactly one travel key; it is not possible to link an Organization to more than one travel key.
- Only one travel key can be set as the default.
- At any point, another key can be set as the default travel key. This would then automatically set the former default travel key as non-default.
- The default travel key cannot be deleted.
- Organizations linked to the default travel key will be read-only and cannot be directly modified.
- To remove Organizations linked to the default travel key, you should assign the Organization to a non-default travel key. By doing so, the selected Organization will be automatically removed from the default travel key.
- To add Organizations to the default travel key, you should unlink the Organization from the currently associated non-default travel key. By doing so, the selected Organization will be automatically linked to the default travel key.
- Once a non-default travel key is deleted, all Organizations previously linked to the deleted travel key will become linked to the default travel key.
- Every travel key should have at least one valid property defined.
- Every non-default travel key should be linked to at least one Organization.
- For the most accurate estimation of travel times, it is recommended that all buckets and resources under the bucket where the activities are typically assigned use the same travel key.
- If resources under the bucket (where the activity is assigned) use different travel keys, the system will use a weighted average of estimations based on all such travel keys. This value may be less accurate than the case where all the resources within the bucket use the same travel key.
- Adding too many different travel keys based on Organizations operating within the same geographical region may reduce the rate of learning travel estimations. This would result in less accurate travel estimations or many travels using the default travel for lack of learned travel estimations.
- The maximum number of travel keys that can be configured is five (5).
- The actual size of the travel key will be truncated to 50 characters in cases where the value is longer.
Enhanced Font Size Support on Mobile Devices
The font size support has been improved to align with the default operating system settings on your mobile device. Whether you prefer a smaller or larger font size for improved legibility, our application will seamlessly adapt to your preferences. Font size changes will be reflected in the Android and iOS apps. However, please note that the same functionality for the browser application is out of scope.
When you adjust the font size on your mobile device, the OFS application will automatically adapt to the selected size the following components within the screens listed below:
| Components | Screens |
|---|---|
|
|
Business Benefit
- Users can independently adjust the font size according to their preferences, minimizing the need for additional assistance or troubleshooting.
- Promotes a positive experience for users with visual impairments or those who prefer larger text sizes.
- Ensures alignment with accessibility regulations.
Steps to Enable
You don't need to do anything to enable this feature.
Tips And Considerations
- The font size change does not affect the application header.
- Some text elements, labels, values, text in buttons will wrap in words or letters if they do not fit in width.
- The button to call the datetime picker will be hidden if the font size is greater than 33px.
- The notification panel will have a maximum height of 70% of the device height for portrait mode. For landscape mode, a maximum height of 50% and a width of 70% of the device width.
Download Content of Service Request Property Files
New API method added:
Get a file propertyGET /rest/ofscCore/v1/serviceRequests/{requestId}/{propertyLabel}
This operation retrieves the indicated file property for the specified service request.
Request
Path Parameters
- propertyLabel: string.
The label of a custom property. This custom property must be of type 'file'.
- requestId: integer.
The identifier of the service request. This can be retrieved using the 'customerRequestCreated' API call as well as within the Service Request Fields data set of the Daily Extracts.
Header Parameters
- Accept(optional): string.
The request must include the Accept header in order to retrieve the file contents.
The header must have either of the following:
- The actual content type (for example, 'application/pdf' for pdf documents).
- The special value 'application/octet-stream', when you do not know the content type.
If the request does not include the Accept header, then the response will contain only the file metadata in JSON format.
Response
- Supported Media Types: application/octet-stream
- Body (File) Type: string(binary)
The contents of the file. This is usually binary data.
Example
Request
curl -u '<CLIENT-ID>@<INSTANCE-NAME>:<CLIENT-SECRET>' -H 'Accept: application/octet-stream' 'https://<instance_name>.fs.ocs.oraclecloud.com/rest/ofscCore/v1/serviceRequests/44/uploadedPic' > filename.jpeg
Response
In this example, the response is written directly to file.
Business Benefit
- Seamless retrieval, processing, and utilization of user-uploaded files for integration or storage in other systems.
- Enhance compliance with rules and regulations by providing the ability to retrieve service request-related files via API.
Steps to Enable
Review the REST service definition in the REST API guides to leverage (available from the Oracle Help Center > your apps service area of interest > APIs & Schema). If you are new to Oracle's REST services you may want to begin with the Quick Start section.
To ensure the application used for sending the request has the necessary permissions within the Core API configuration screen:
- Access the Configuration screen and select Applications.
- In the REST/SOAP Applications section, choose the specific Application to be used.
- Locate the Core API in the API access section and right-click on the menu option.
- From the menu, select Available entities.
- Choose the Service Request entity and set its access to either Read-only or Read-write.
- Click the Add button to confirm the selection.
- Save the changes.
Late Start Mitigation in Activity Booking Process
When retrieving booking options for capacity areas using the availability-based booking approach, OFS estimates activity assignments over time, calculates the time consumption, predicts possible estimated activity start times, and then presents a list of available time slots in which activities can be scheduled.
To ensure timely operations and avoid negative business impact (e.g. deterioration of customer satisfaction, penalties, etc.), OFS applies a preventive measure by avoiding the booking of an activity into a time slot if its predicted start time falls within the last 20% of the time slot.
This approach ensures that customers are presented with time slots that not only have resource availability but also consider the goal of minimizing the likelihood of late arrivals. For example: For a two (2) hour time slot, such as 8:00 am - 10:00 am, the system will offer the time slot for the job as long as the activity is estimated to start within the first 96 minutes, that is, between 8:00 am and 9:36 am. To further reduce the risk of late starts, the system avoids offering the same time slot if it is determined that the activity is likely to start after 9:36 am.
While this protection mechanism helps to prevent late starts, it may also occasionally result in underbooking situations, where some time slots remain under-utilized. To provide OFS customers with greater control in such situations, the 23C release introduces an enhancement to the "showBookingGrid" and "activityBookingOptions". These functions now include an optional parameter called 'lateStartMitigation' that allows integrations to override the default value (20%) set in the system. This capability provides integrated solutions with the ability to use this parameter whenever necessary, enabling a more precise management of potential late start situations.
-
lateStartMitigation (optional): integer
The range is 0-100, default = 20
Description: Do not suggest booking options if the activity is likely to begin close to the end of the time slot within the last [ NN ] percent. This functionality is only applicable for quota by intervals.
Business Benefit
-
The integrated booking flow enables the control of the size of time-slots in each particular case (e.g., for different activity types or regions), balancing between the risk of increasing late arrivals and the possibility of underbooking.
-
Promotes efficient scheduling, reduces the risk of delays, and enhances overall productivity.
Steps to Enable
Review the REST service definition in the REST API guides to leverage (available from the Oracle Help Center > your apps service area of interest > APIs & Schema). If you are new to Oracle's REST services you may want to begin with the Quick Start section.
The feature will be available automatically upon upgrade to 23C.
Tips And Considerations
- The "lateStartMitigation" parameter is specifically designed to work with capacity areas using availability-based booking approach.
- Routing plans have similar configuration parameter called 'Override default service window reservation value'. To ensure consistency and optimal performance, it is generally recommended to use similar settings for both booking and routing.
- This feature does not apply to quota-based booking. With that approach, time slot availability is solely based on quota consumption; there is no possibility to calculate time estimations within the quota-based time slots.
New Metadata API for Standard Plugin Installation
A new Metadata API method is now available that can be utilized to automate the installation of standard plugins such as "Debrief" and Asset View" as part of your business process. Also, Fusion Service configuration via Configuration | Applications page now supports the automatic installation of the Debrief plugin.
A new Metadata API request is available to install standard plugins in OFS.
Request
POST rest/ofscMetadata/v1/plugins/{pluginLabel}/custom-actions/install
URL data params:
- pluginLabel [Required] - String containing the standard plugin which is to be installed
This operation installs the standard plugins as defined in the path parameter. If a plugin with the given label is already in place, then it will return "Plugin already existing" error message; otherwise the plugin will get installed successfully.
Response
204 Response - This response code 204 indicates that the operation completed successfully. This operation does not return any elements in the response body.
| Use Case | Status | Response |
|---|---|---|
| Standard plugin installation is successful |
204 | |
| No permission |
403 |
{ "type": "http://www.w3.org/Protocols/rfc2616/rfc2616-sec10.html#sec10.4.4", "title": "Forbidden", "status": "403", "detail": "Authentication was provided, but the authenticated user is not permitted to perform the requested operation." } |
| No standard plugin exists for the provided pluginLabel |
404 | { "type": "http://www.w3.org/Protocols/rfc2616/rfc2616-sec10.html#sec10.4.5", "title": "Not Found", "status": 404, "description": "Plugin {LABEL} not found",} |
Validation Errors
| Error Codes |
|---|
| LABEL_NOT_UNIQUE |
| OLDER_PRODUCT_VERSION |
| EXISTING_PROPERTY_TYPE_MISMATCH |
| INVALID_PROPERTY |
| Use Case | Status | Response |
|---|---|---|
| Plugin is already installed |
409 | { "type": "http://www.w3.org/Protocols/rfc2616/rfc2616-sec10.html#sec10.4.10", "title": "Plugin's label is already in use", "status": 409, "description": "A plugin with label "{PLUGIN_LABEL}" already exists. Remove it to proceed", "o:errorCode": "LABEL_NOT_UNIQUE"} |
| Platform version is less than the required version |
409 | { "type": "http://www.w3.org/Protocols/rfc2616/rfc2616-sec10.html#sec10.4.10", "title": "Plugin cannot be installed", "status": 409, "description": "Field Service version must be 22.08.0 or higher in order to install the plugin", "o:errorCode": "OLDER_PRODUCT_VERSION"} |
| Existing property type mismatch |
409 | { "type": "http://www.w3.org/Protocols/rfc2616/rfc2616-sec10.html#sec10.4.10", "title": "Existing property type mismatch", "status": 409, "description": "A property {PROPERTY_LABEL} has type {CURRENT_TYPE} but the plugin requires it to be with type {EXPECTED_TYPE}", "o:errorCode": "EXISTING_PROPERTY_TYPE_MISMATCH"} { "type": "http://www.w3.org/Protocols/rfc2616/rfc2616-sec10.html#sec10.4.10", "title": "Existing property gui mismatch", "status": "409", "detail": "A property {PROPERTY_LABEL} has GUI {CURRENT_GUI} but the plugin requires it to be with type {EXPECTED_GUI}", "o:errorCode": "EXISTING_PROPERTY_TYPE_MISMATCH"} { "type": "http://www.w3.org/Protocols/rfc2616/rfc2616-sec10.html#sec10.4.10", "title": "Existing property entity mismatch", "status": "409", "detail": "A property {PROPERTY_LABEL} is created for entity {CURRENT_ENTITY} but the plugin requires it to be created for entity {EXPECTED_ENTITY}", "o:errorCode": "EXISTING_PROPERTY_TYPE_MISMATCH"} { "type": "http://www.w3.org/Protocols/rfc2616/rfc2616-sec10.html#sec10.4.10", "title": "Existing property mime_types mismatch", "status": 409, "description": "A property {PROPERTY_LABEL} has MIME types {CURRENT_CONFIGURED_MIME_TYPE} but the plugin requires it to be with types {EXPECTED_MIME_TYPE}", "o:errorCode": "EXISTING_PROPERTY_TYPE_MISMATCH"} { "type": "http://www.w3.org/Protocols/rfc2616/rfc2616-sec10.html#sec10.4.10", "title": "Existing property mime_types mismatch", "status": 409, "description": "MIME types value of property {PROPERTY_LABEL} must be in array format", "o:errorCode": "EXISTING_PROPERTY_TYPE_MISMATCH"} { "type": "http://www.w3.org/Protocols/rfc2616/rfc2616-sec10.html#sec10.4.10", "title": "Existing property mime_types mismatch", "status": 409, "description": "The MIME types is required for property {PROPERTY_LABEL}. OFS is configured with the following: {EXPECTED_MIME_TYPES}", "o:errorCode": "EXISTING_PROPERTY_TYPE_MISMATCH"} |
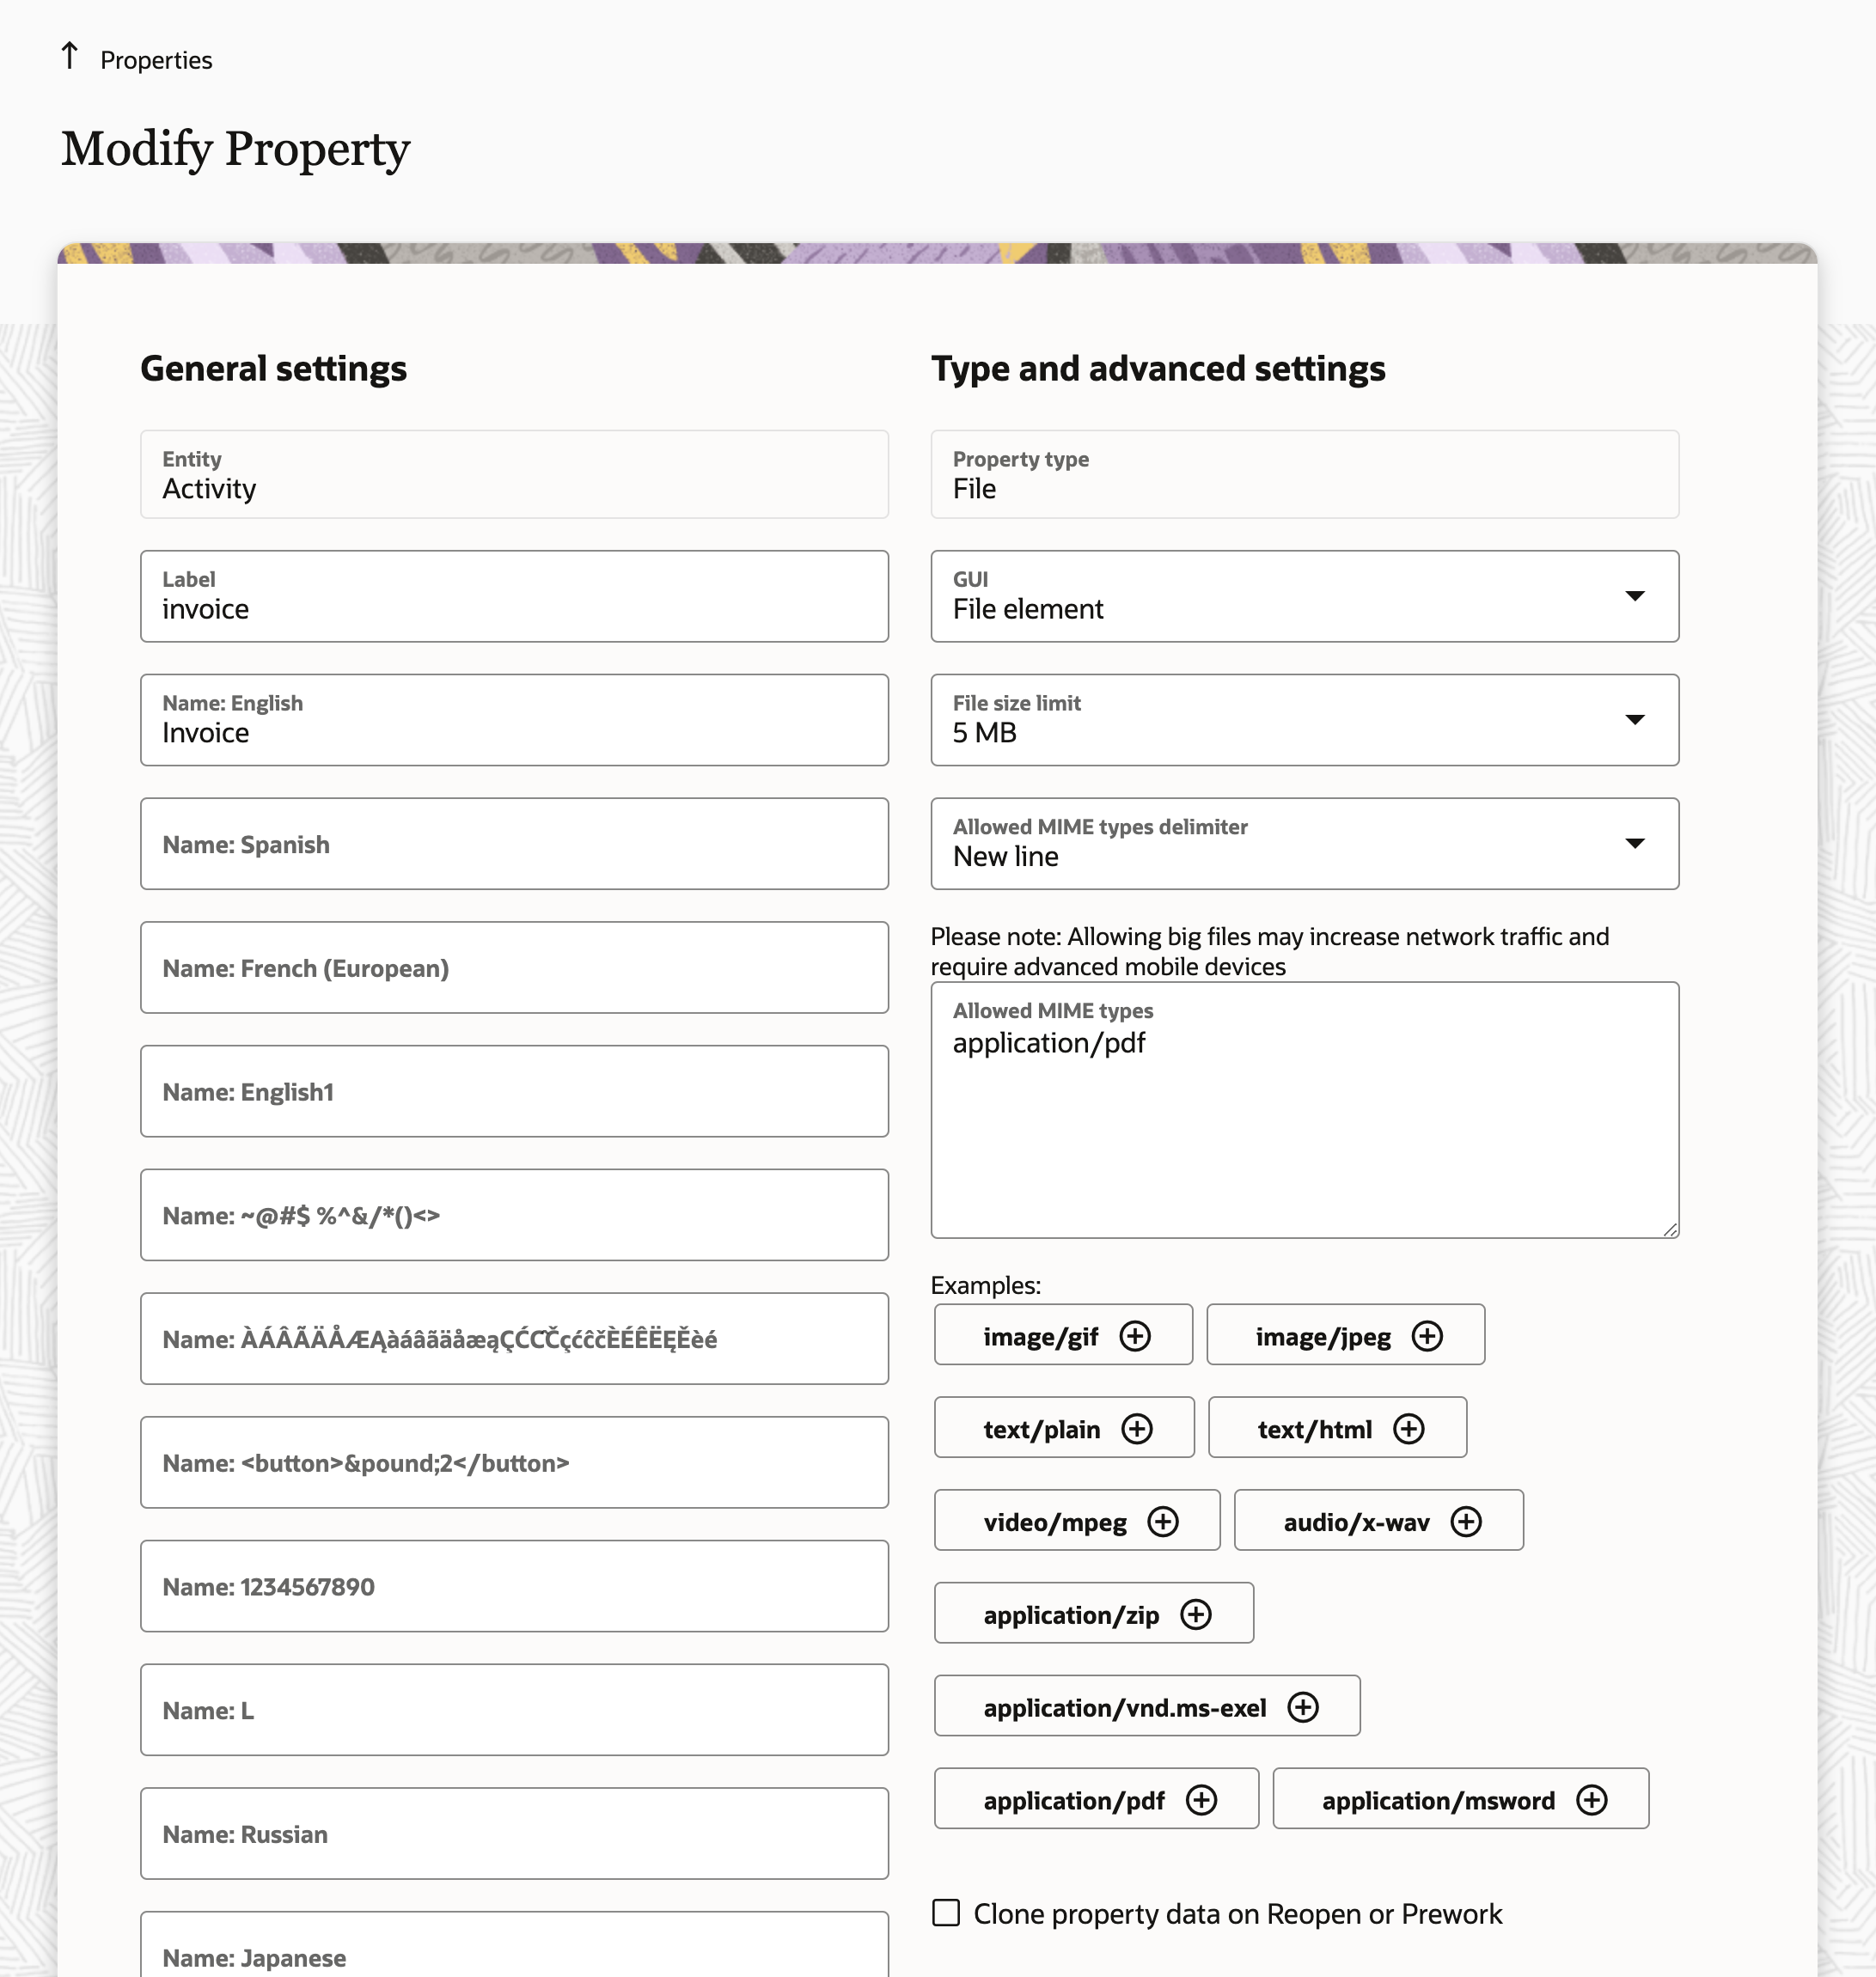
Modify Property
For resolving the "EXISTING_PROPERTY_TYPE_MISMATCH" validation error, in the Configuration | Properties screen, the problematic property's type can be changed to the required property type shown in the error response. Or, the property could also be deleted and the plugin installation would automatically install the property with the needed values.
Other unexpected errors
| Use Case | Status | Response |
|---|---|---|
| Unable to get plugin data from the Plugin Repository service (This occurs when the plugin repository service is unavailable) |
500 | { "type": "http://www.w3.org/Protocols/rfc2616/rfc2616-sec10.html#sec10.5.1", "title": "Internal Server Error", "status": "500", "detail": "Unable to install plugin {pluginLabel}"} |
| Unable to create property {propertyLabel} of plugin {pluginName} from Plugin Repository service (This occurs when the property creating throws an exception. This should not occur in normal cases) |
500 | { "type": "http://www.w3.org/Protocols/rfc2616/rfc2616-sec10.html#sec10.5.1", "title": "Internal Server Error", "status": "500", "detail": "Unable to create property {propertyLabel} of plugin {pluginName}"} |
Business Benefit
- Faster, seamless implementation of the standard plugins.
- Automate the testing and development process by minimizing manual configurations of plugins.
Steps to Enable
Steps to Enable
The access privilege of this API is managed via the Configuration | Applications page Applications / Metadata API / Available Entities page, Plugin. The available operations on the Plugin API will be "Read-Write".

Tips And Considerations
Check out the Debrief and Asset View Plugin documentation to learn more about the use cases and capabilities
Configure a single button or workflow step to dynamically launch various forms based upon the data contained within associated activity or inventory properties. First, define a dynamic form property which will be populated with the form label that is relevant for the given activity or inventory. Next, link this dynamic form property to the appropriate button or workflow step to dynamically drive which form is launched. Then, when new activities or inventory are created, populate the relevant form label into the dynamic form property linked to the button or workflow step.
Use Case Example
There are two upcoming inspection activities, one for a forklift and the other for a scissor lift, each requiring a distinct inspection form to be completed:
- "Inspection: Forklift" [inspection_forklift]
- "Inspection: Scissor Lift" [inspection_scissor]
Both activities have the appropriate form label populated within the "inspection form" [inspection_form] activity property (which is linked to the Inspection button or workflow step).
Forklift Inspection Activity
- Data - dynamic form property [inspection_form] = "inspection_forklift"
- Action - dynamic "Inspection" button (or workflow step) triggered by inspector
- Result - "Inspection: Forklift" form launched
Scissor Lift Inspection Activity
- Data - dynamic form property [inspection_form] = "inspection_scissor"
- Action - dynamic "Inspection" button (or workflow step) triggered by inspector
- Result - "Inspection: Scissor" Lift form launched
Offline Support
Forms opened dynamically are supported in offline mode the same as persistent forms. OFS will cache these forms for offline use while loading the application at the beginning of the work day or while receiving updates for corresponding activities or inventory.
Error Handling
OFS will display an error when attempting to launch a form that does not exists in the environment, for example, when an incorrect form label has been populated into a linked dynamic form property.
Business Benefit
- Reduced configuration effort of buttons and/or workflow steps
- Streamlined implementation of similar, yet distinct, forms
Steps to Enable
Configuration changes are required to enable the dynamic forms launcher for end users.
| Button Configuration |
|
|---|---|
|
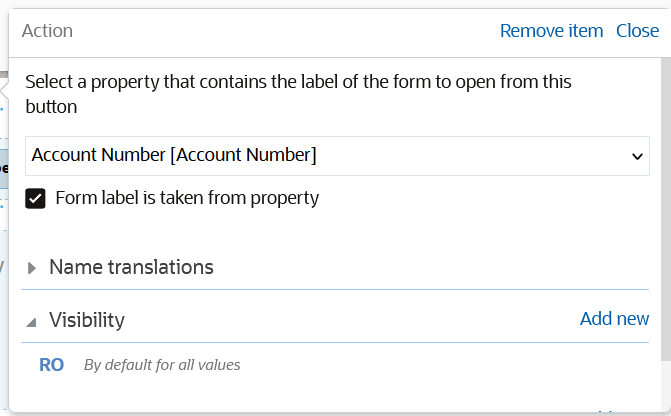 |
| Workflow Step Configuration |
|
|---|---|
|
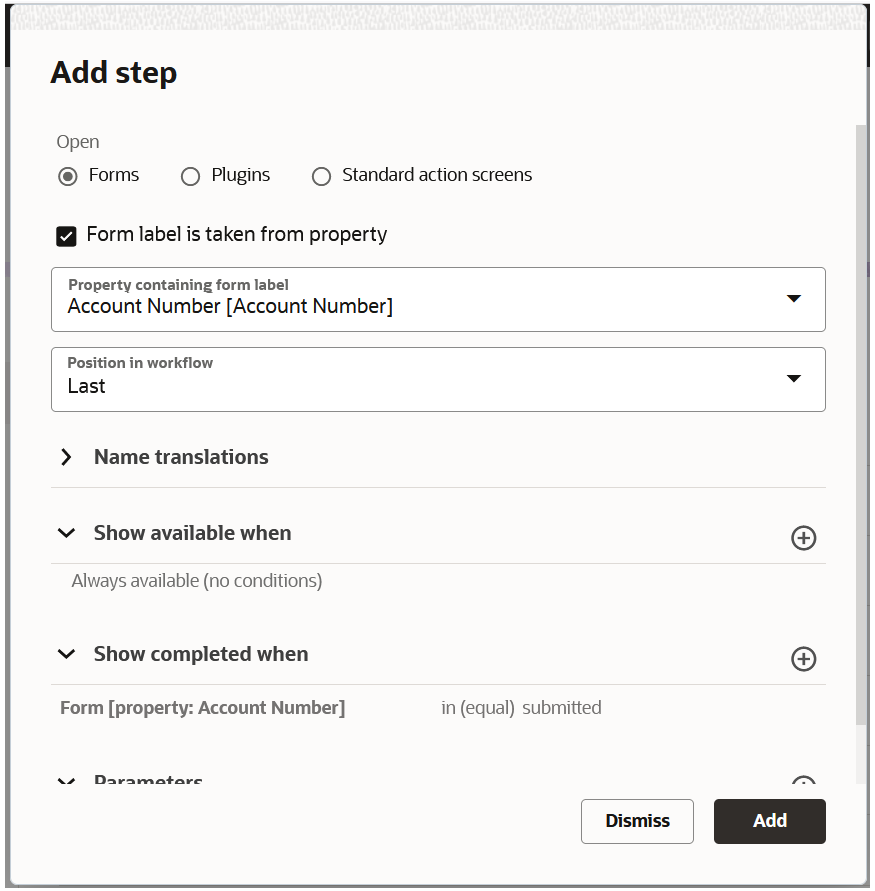 |
Tips And Considerations
- Dynamic form buttons and workflow steps will be disabled when the linked dynamic form property is empty.
- Only string property types related to the "Activity" and "Inventory" entities are supported for dynamic form properties.
We recommend populating the dynamic form property via Activity or Inventory Create/Update API calls instead of populating it manually within OFS. Manual entries may:
- increase risk of manual errors, including incorrect form labels.
- impact offline use as they may not be cached prior to field resources going offline.
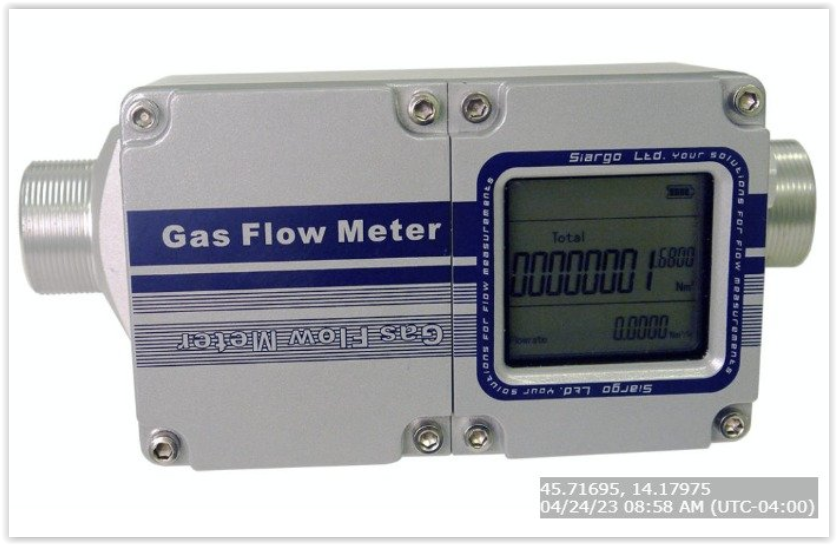
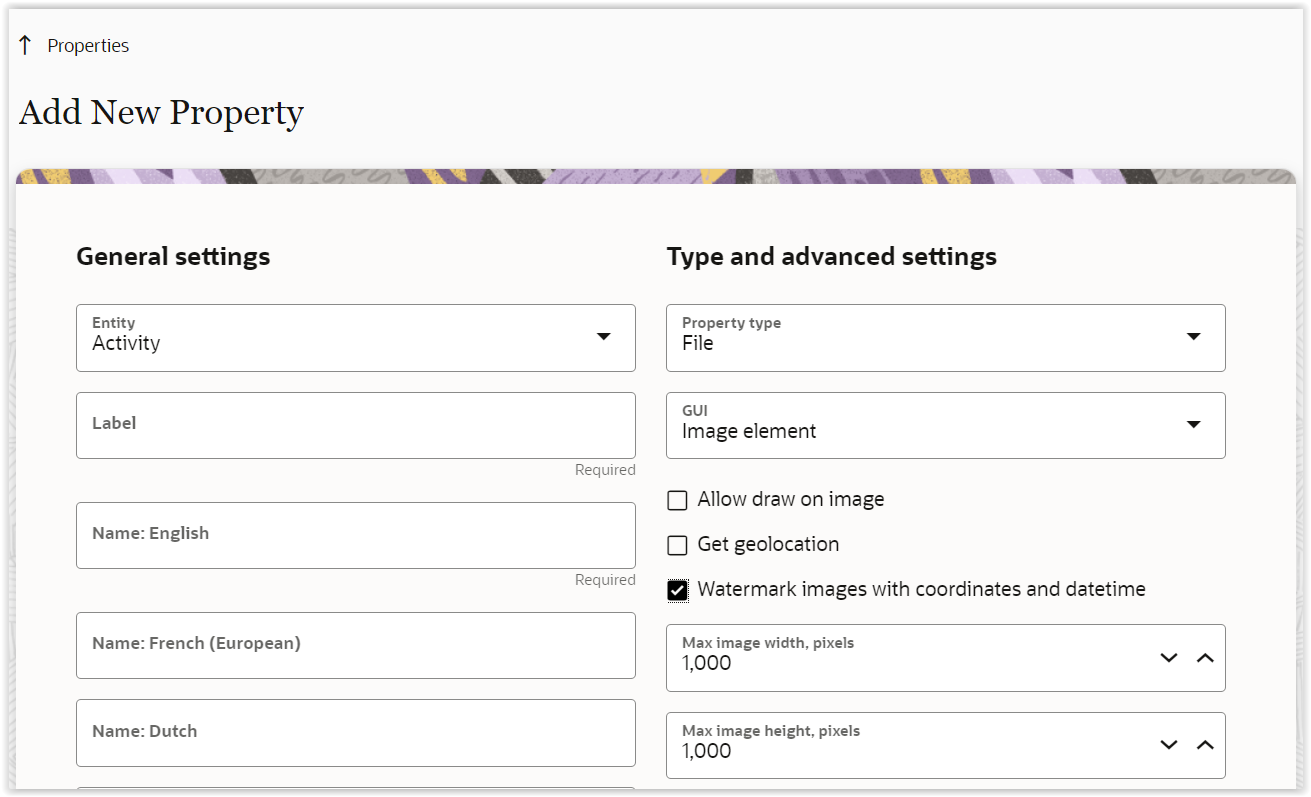
Taking Photos with Watermark
When users take photos with the Android or iOS installed application or select a photo using the browser application, a watermark will be automatically added to those photos. The watermark includes the latitude and longitude, the date and time the photo was taken, and the UTC offset. The date and time are recorded in the user's time zone and displayed in the format configured for the user.
API Support
The 'Watermark images with coordinates and datetime' parameter is supported in the Metadata API for the following calls:
- Create or replace a property
- Get property
- Get properties
- Update a property
Business Benefit
- Enables customers to enforce policy and regulatory compliance for jobs where it's crucial to precisely where and when the photo was captured
- Provides enhanced auditing capabilities, confirming the performed work with a photo that includes the location and time of the activity
Steps to Enable
To enable the feature, check the 'Watermark images with coordinates and datetime' checkbox for a file property with the Image Element GUI, and then configure this property for forms or standard action screens.
Tips And Considerations
- Location service must be enabled on mobile devices to use this feature. In the browser app, permission to track geolocation should be turned on for the environment.
-
In the browser app, a watermark will be added to images selected from gallery.
-
The watermark is not supported for photos originating via plugins.
Lock Activities to Particular Date/Time in Route
The Time Notified field is renamed to Communicated Window. It now includes the ability to set the field as a time interval, including date, for both the Communicated Window Start and Communicated Window End, which supports overnight commitments. Oracle Field Service observes the Communicated Window for every type of routing plan except Immediate Routing for Urgent activities and every kind of API calls except bulk update.
Bulk routing will try to return the activity back to its Communicated Window if the activity has been moved. Users can manually move an activity out of its Communicated Delivery Window, but a warning message is shown and the activity is marked as in jeopardy.
A new parameter has been added to the move activity API call that changes the call behavior to prevent breaking the Communicated Window during activity movement.
Use Case Example:
In the event of an appointment with a third-party inspector, setting the Communicated Window to the date and time of the appointment will ensure the appointment is not rescheduled without appropriate coordination between both parties.
Business Benefit
Companies may achieve improved customer satisfaction and controlled vendor costs by ensuring critical appointment times are not shifted. It's important to use this feature wisely because excessive use of activity pinning can lead to less efficient optimization.
Steps to Enable
To start using the activity pinning feature in the UI, add the Communicated Window Start and Communicated Window End fields to the Add/Edit Activity form. Those values can also be set via API.
Tips And Considerations
The configured Communicated Window interval should not exceed 24 hours.
To visually identify pinned activities, modify the Activity Time View Label.
- Go to User types -> Choose the needed User type -> Display -> Activity Time View Label
- Add new text at the beginning of label, (for example, the Lock Unicode emoji)
- Add new visibility condition as "Read Only: Communicated Window End is not empty"
Please note, however, that while the Communicated Window is supported throughout the system, there are some exceptions:
- The Immediate Routing for Urgent Activities routing plan ignores the Communicated Window because its sole purpose is to schedule important activities as soon as possible.
- Bulk API calls may move activities outside of the Communicated Window because those calls are intended to synchronize OFS with another system, serving as the primary source, and therefore may obey the business rules set up in OFS.
The API command /rest/ofscCore/v1/activities/{activityId}/custom-actions/move may or may not move activities out of their Communicated Window (including activities to be moved as well as activities already in the route) depending on the parameters passed. In order to keep backward compatibility, a new parameter was added for the custom-actions/move command: protectTimeDelivered. Its values are true or false, with false being the default. If true, then the operation fails with the HTTP status '409 Conflict' error if the move result would cause Communicated Window violation of any activity in the route. If false, then any Communicated Delivery Window violation is ignored, so API behavior remains unchanged.
Bulk Routing applies the Service Window Reservation value to all kind of time intervals providing activity scheduling constraints, including Service Window, Time Slot, Access Hours and Communicated Window.
NOTE: As of 23C, the Communicated Window, Communicated Window Start and Communicated Window End fields contain not only a time component, but also the date. So the filters, including Custom and Ad Hoc ones, should be reviewed in order to work correctly. As of now, the comparison format that is used for searching, is 'YYYY-MM-DD hh:mm:ss'. For example, to look for Communicated Window Start to be at 10 AM, instead of using condition (IN '10:00') one should use (CONTAINS '10:00:00'). Note that for correct search you should use full time format - hh:mm:ss - so that the Communicated Window with value of 12:10:00 is not found instead of just 10:00:00.
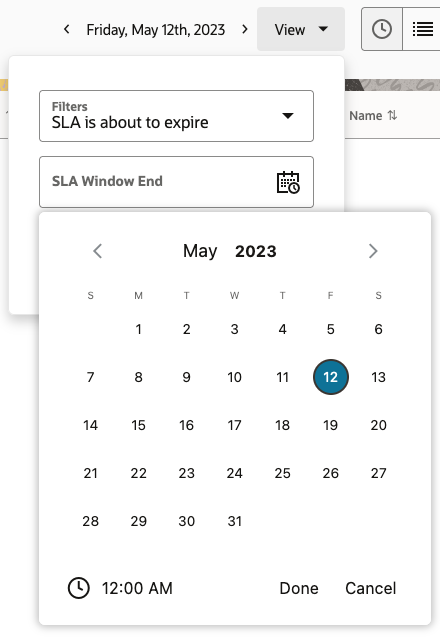
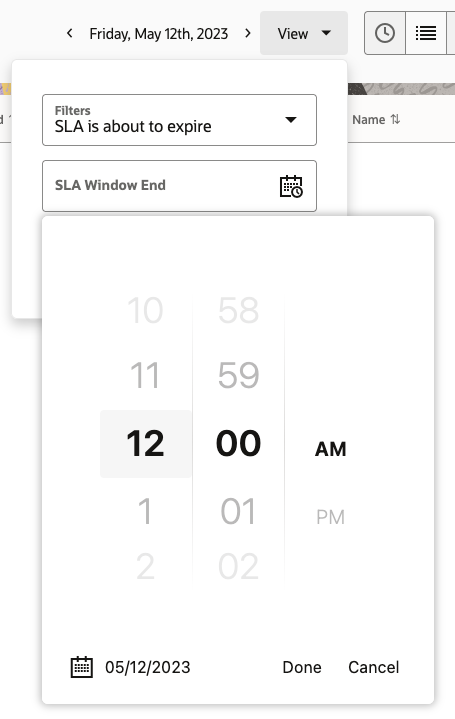
Pre-defined Filter Date/Time Controls
For filters on the Dispatch Console or Nearby Activities screen that contain "date and time" or "time" fields, "date time" and "time" pickers were added to simplify entry instead of requiring users to enter values as plain text. Also, a placeholder with the description of the expected format was added to each input field to simplify keyboard entry.
The following predefined properties are supported:
- ETA (label: ETA)
- Service Window Start (label: service_window_start)
- Service Window End (label: service_window_end)
- Delivery Window Start (label: delivery_window_start)
- Delivery Window Start (label: delivery_window_end)
- Communicated Window Start (label: ctime_delivered_start)
- Communicated Window End (label: ctime_delivered_end)
- SLA Window Start (label: sla_window_start)
- SLA Window End (label: sla_window_end)
- Time of Booking (label: atime_of_booking)
- Time of Assignment (label: atime_of_assignment)
- Route Activated (label: activated)
- Route Deactivated (label: deactivated)
- Route Reactivated (label: reactivated)
The "date time" or "time" picker is displayed only when one of the following four conditions is selected for the filter condition: <, >, <=, >= (less than, greater than, less than or equal to, greater than or equal to). All other conditions accept either several values or the part of the string representing the date or time; that's why those conditions have no date or time picker.
The format used with the date or time property within a filter is specified on the individual user's Preferences screen (accessed by clicking their avatar and selecting Preferences). If the picker is not available because the condition being used is not one of the supported ones, the ISO format should be used:
- Date: yyyy-mm-dd
- Time (in 24-hour format): hh:mm
An example of the filter with the date and time picker is shown below:
Business Benefit
This feature simplifies the filtering of data on the Dispatch Console and Nearby Activities screen by improving the usability of the entry.
Steps to Enable
You don't need to do anything to enable this feature.
Tips And Considerations
The "date time" or "time" picker is not displayed under the following conditions:
- Contains / Does not contain: With these conditions, users can enter part of the date or time, which can't be interpreted by the "date time" or "time" picker.
- Starts with / Does not start with: With these conditions, users can enter part of the date or time, which can't be interpreted by the "date time" or "time" picker
- In / Not in: Several values can be entered with these conditions so they are not supported by the picker component.
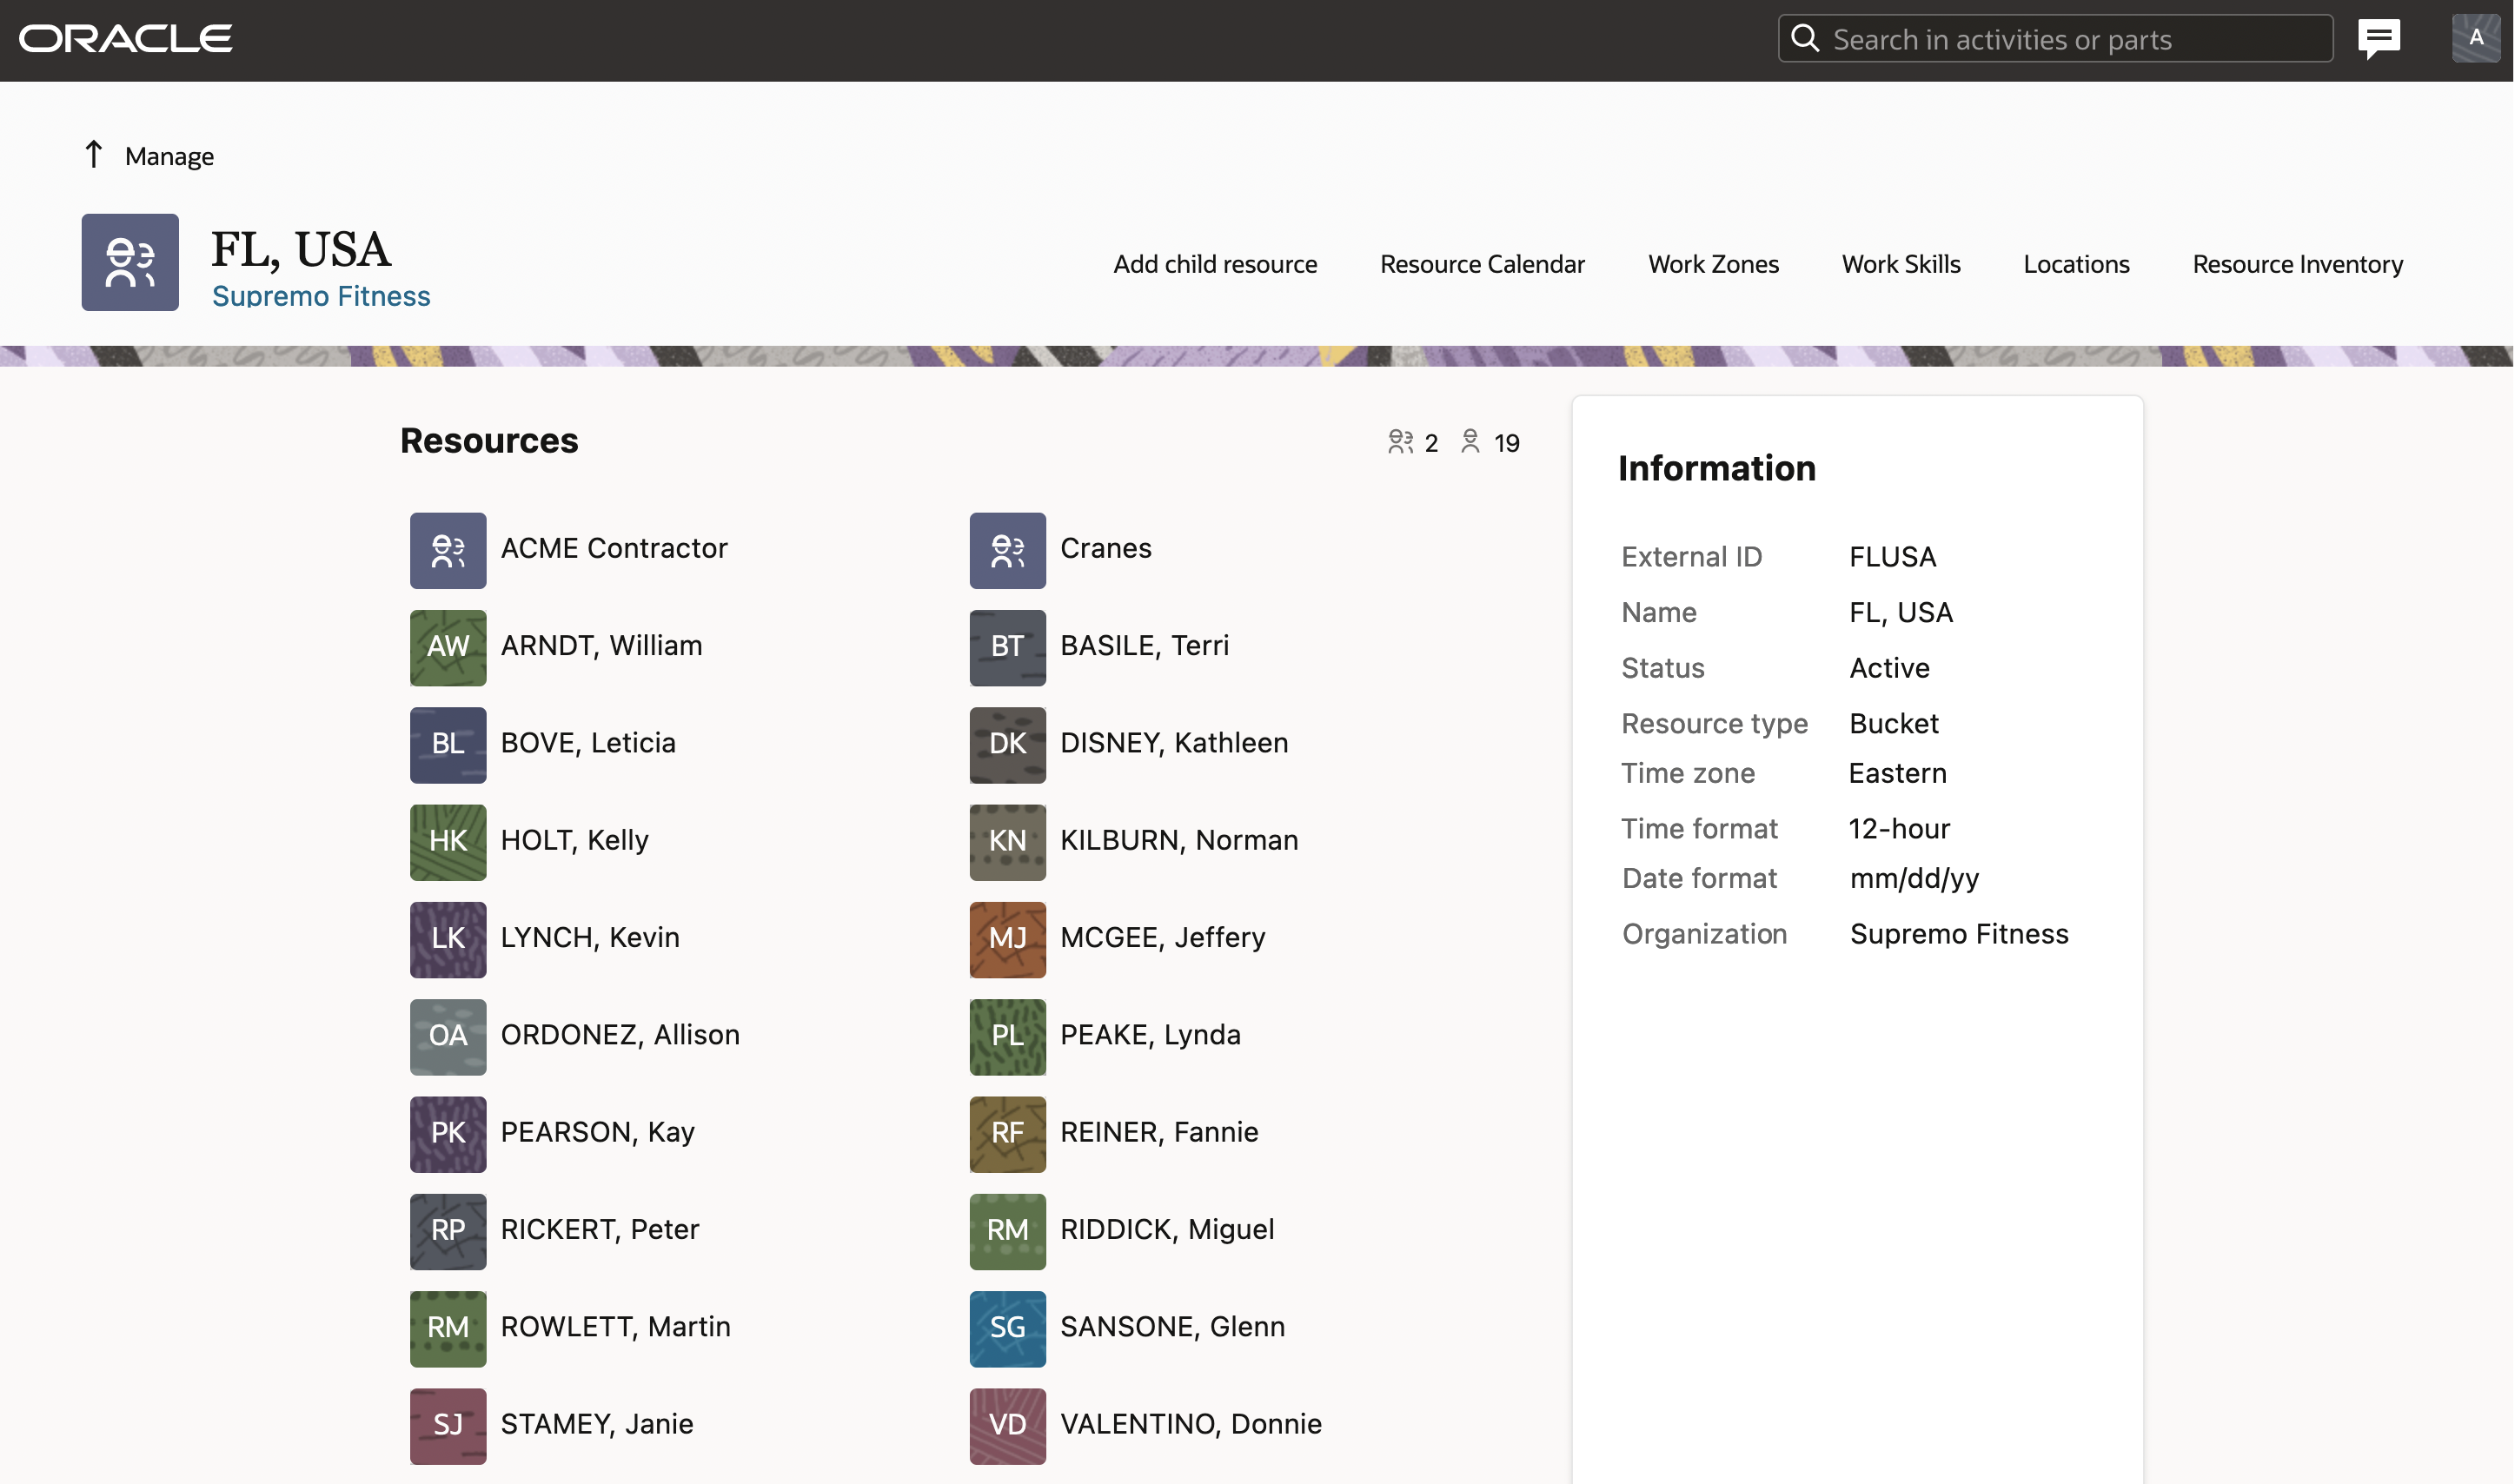
Redwood Styles in Resource Info and Location Pages
With the 23C release, the Resource Info and Location screens have been redesigned based on Redwood styles. This ensure a similar user experience as the one observed with other Fusion products.
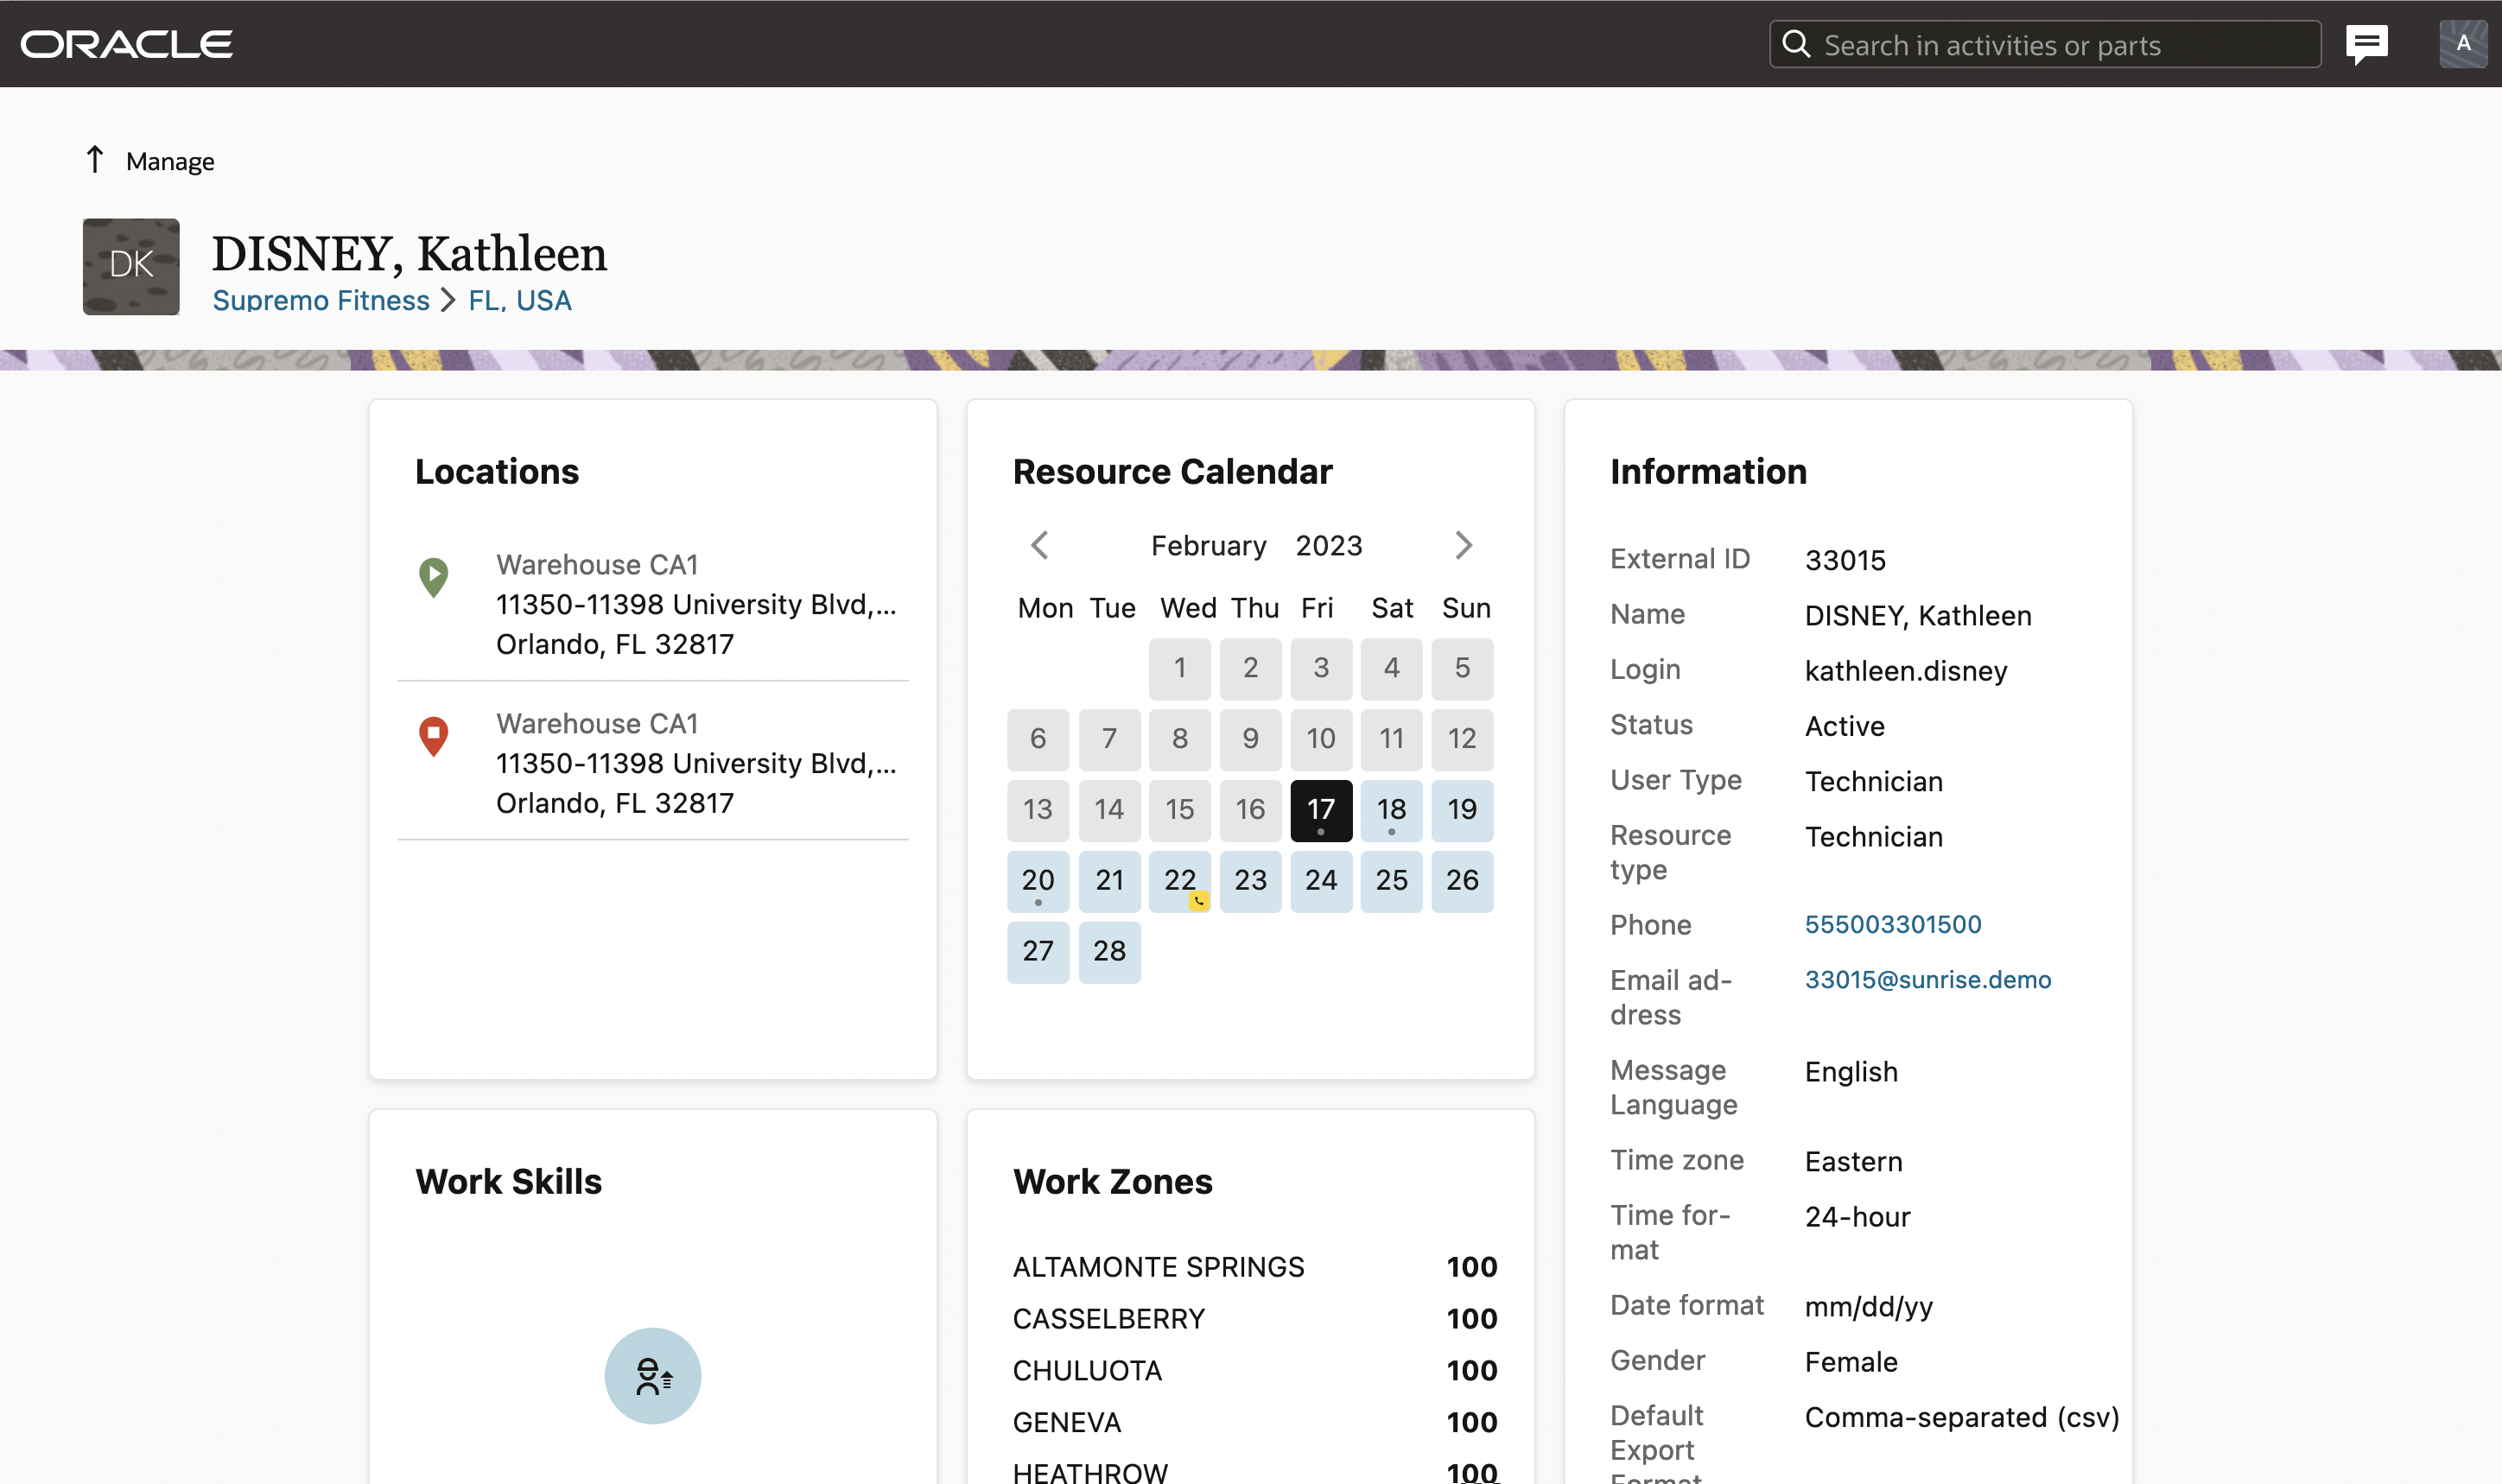

The button 'No date specified' has been removed from the date picker component for some dialog boxes, so users can clear the End date manually on desktop devices or use a 'clean' icon via their mobile devices.
Business Benefit
- Provide a consistent user experience within Oracle Field Service pages and with other Fusion products.
Steps to Enable
You don't need to do anything to enable this feature.
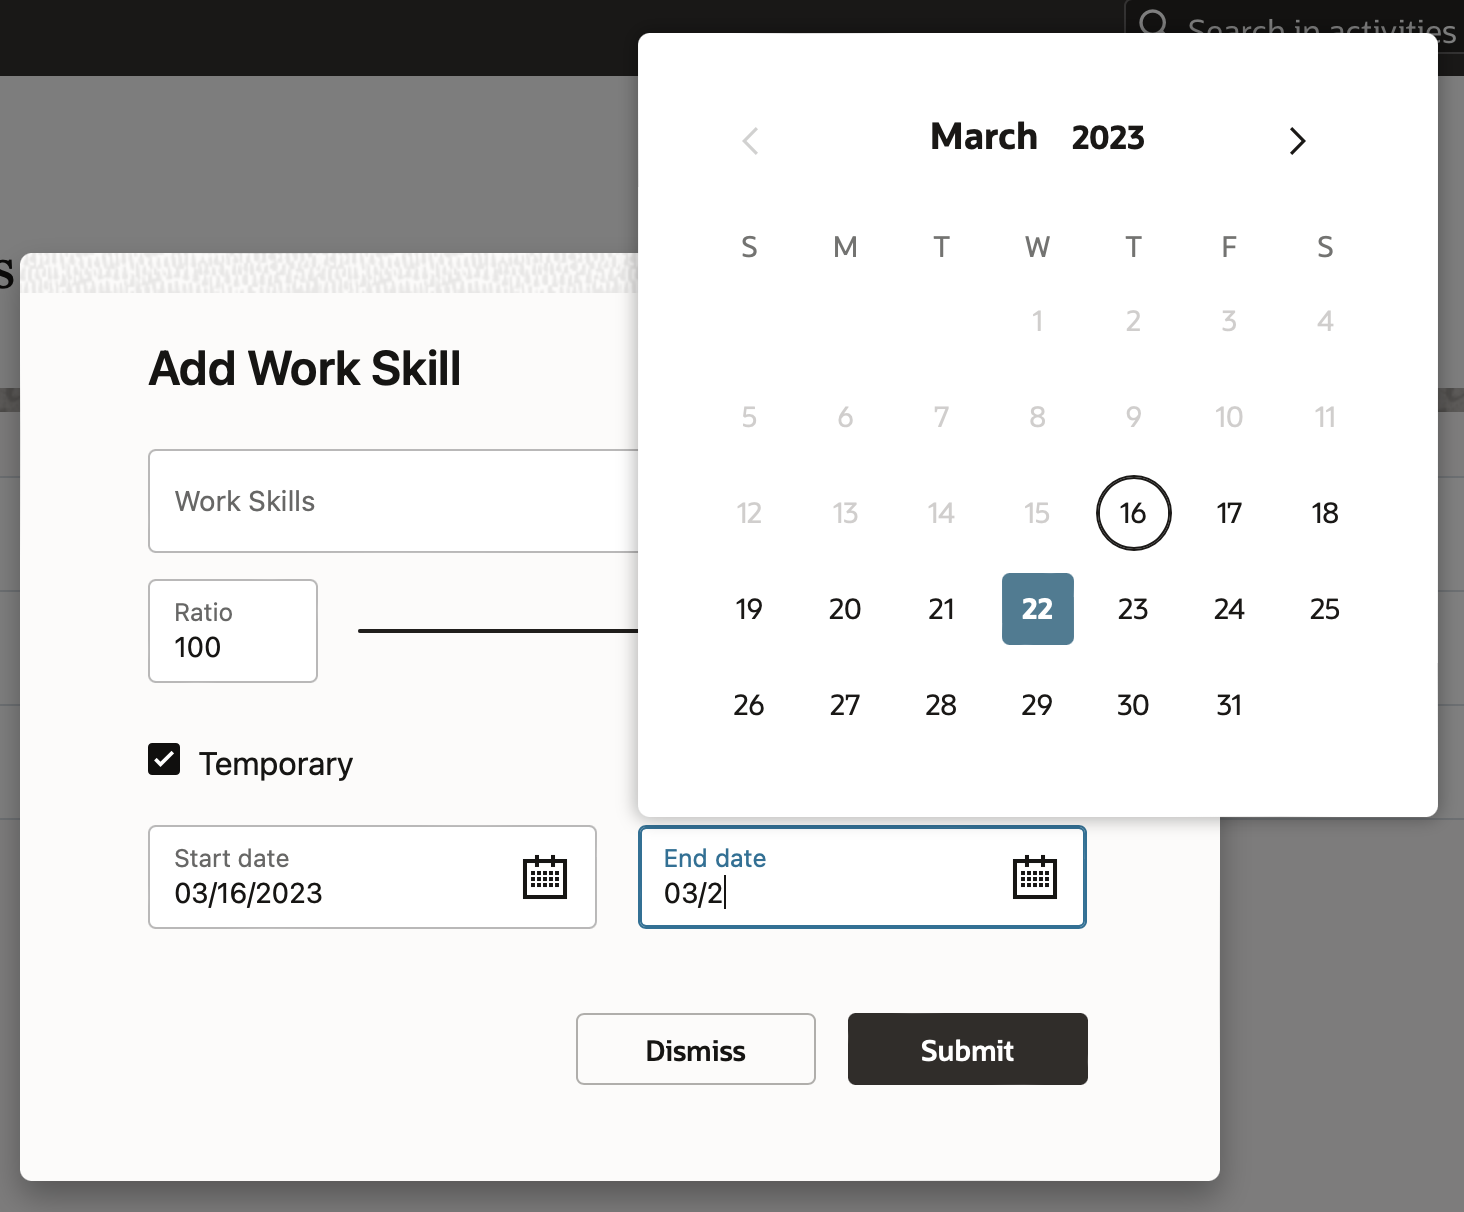
Support of Date Ranges for Temporary Resource Location
With the 23C release, dispatchers can set the date range (instead of one day at a time) when a technician has to work temporarily in another location. The temporary 'Add Temporary Location' and 'Edit Temporary Location' dialog boxes now contain an 'End date' field. The End date is mandatory and is pre-filled with the current date when you attempt to add a new one.
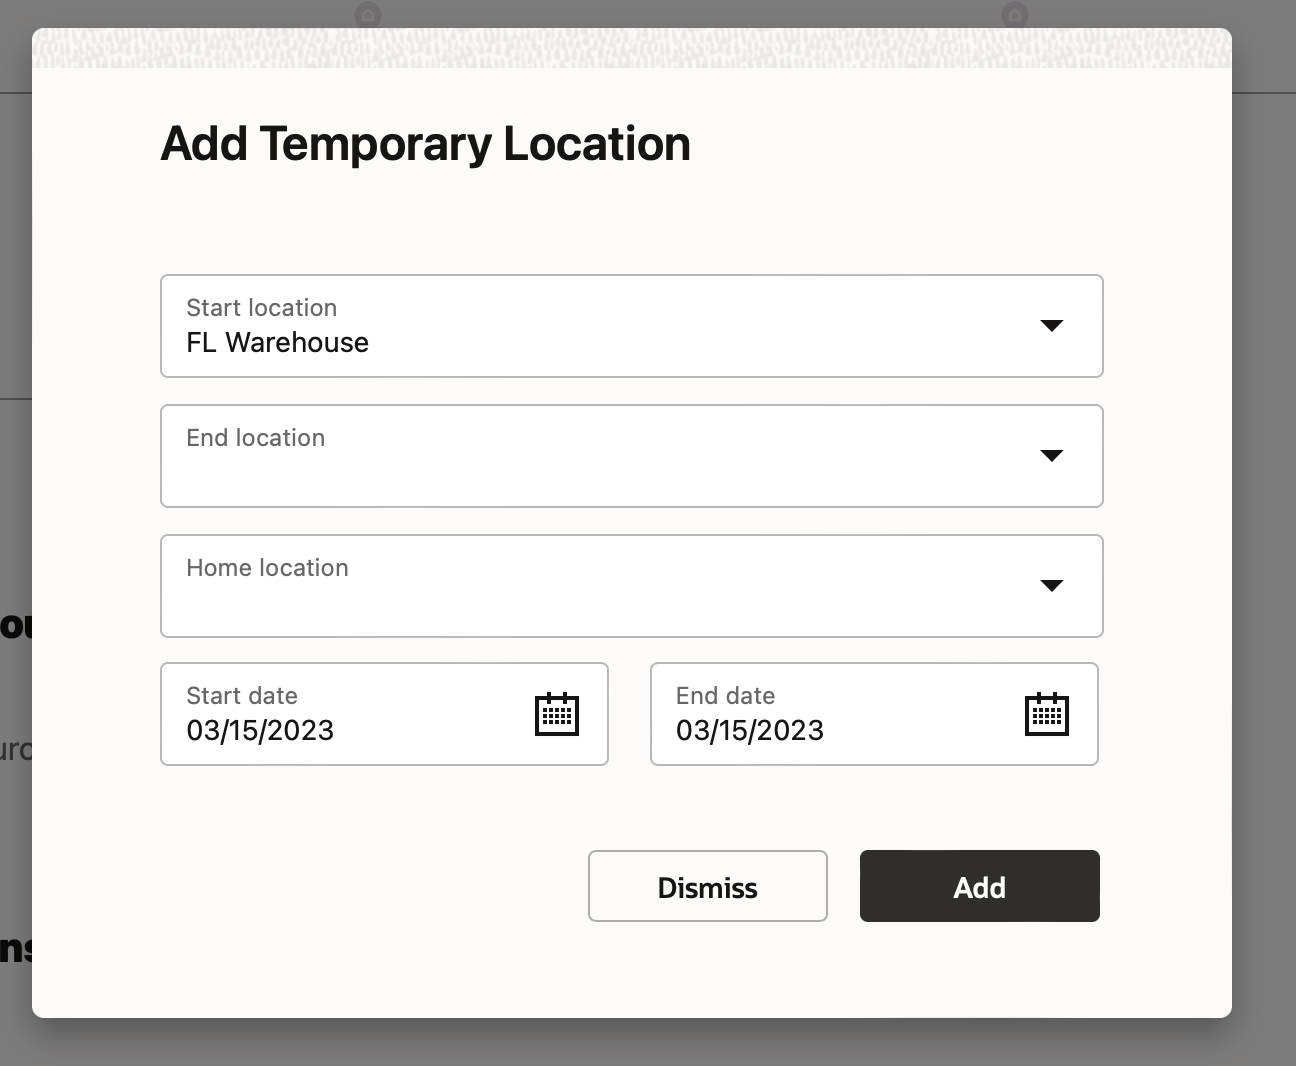
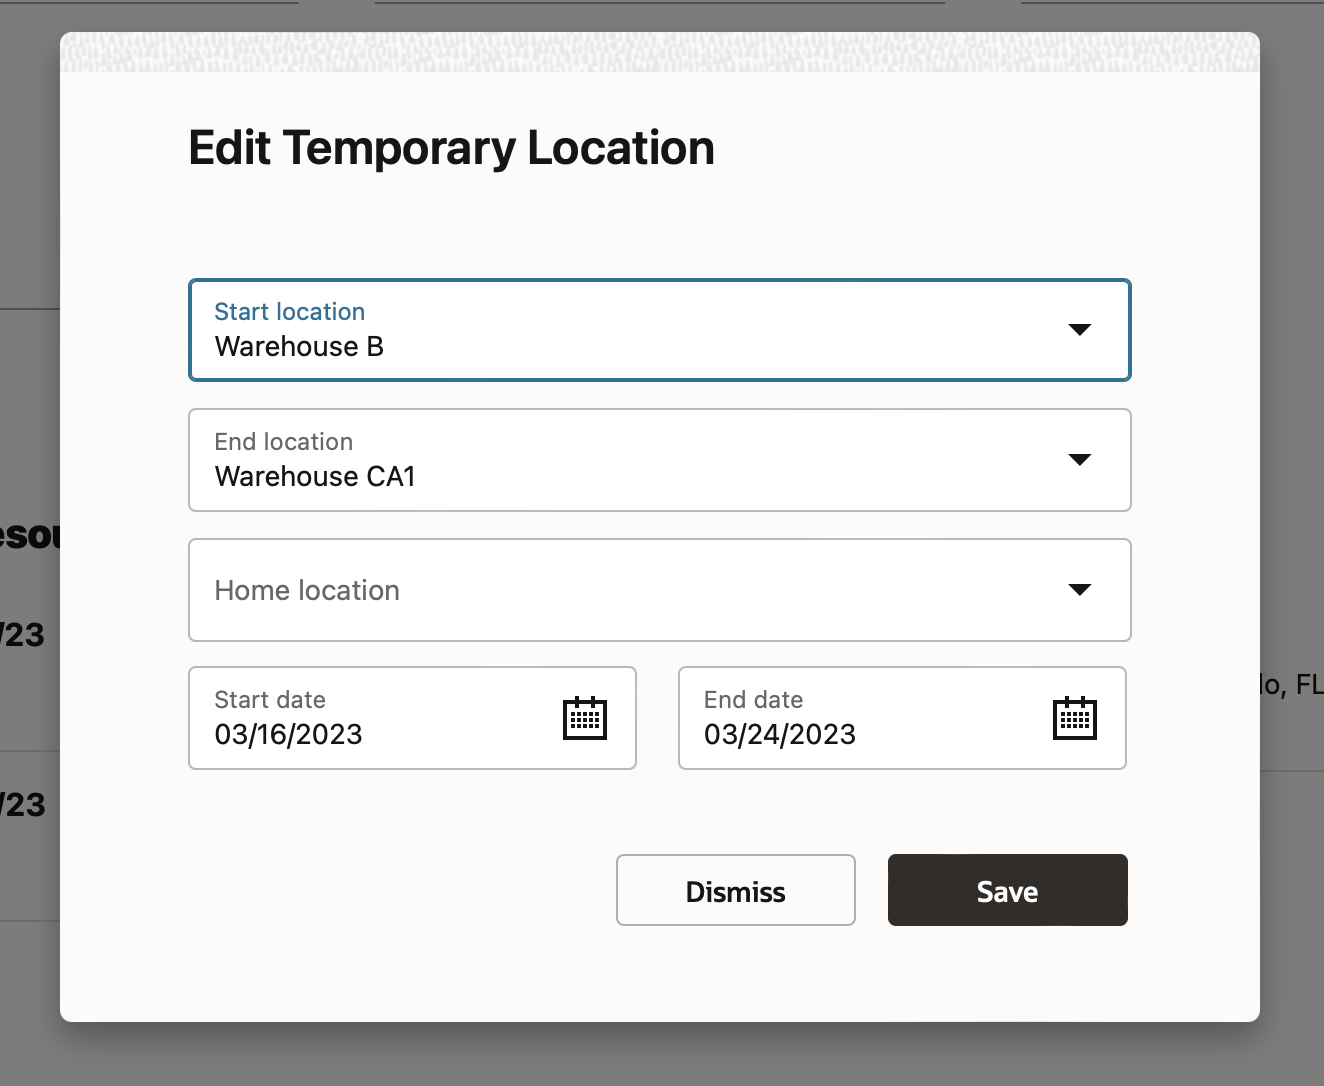
Once the locations have been set, the range displays on the Resource Info screen.
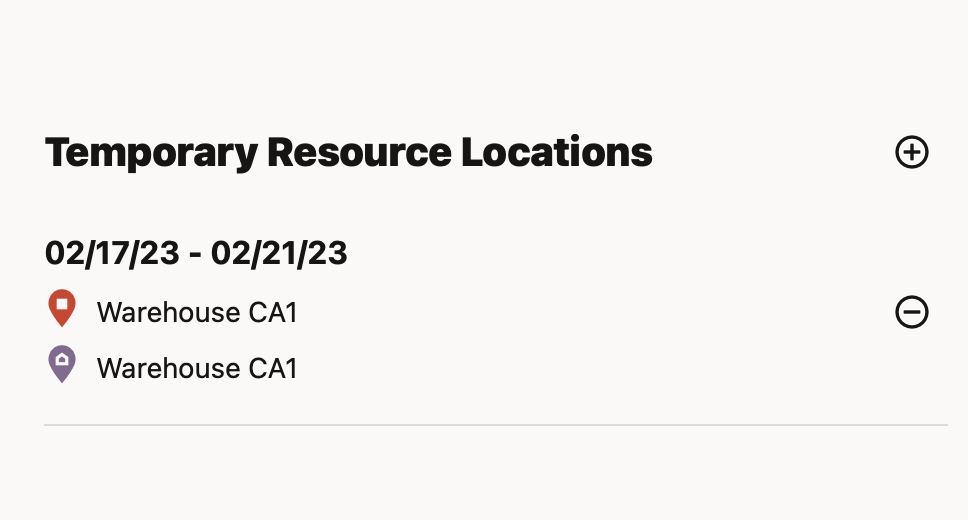
You can add Temporary Locations with different periods. If you add another Location for the period when a temporary location already exists, then the record is divided into multiple records accordingly.
Example
Technician has Start and End location 'Office A' from 1 Mar until 20 Mar.
1/03/23 - 20/03/23
Start: 'Office A'
End: 'Office A'
But from 10 Mar until 13 Mar 'Office A' will be closed due to maintenance and another 'Office B' is available during this period. So, to change the setting you'd click on 'Add location' and set the Start and End location of 'Office B' accordingly and the record on the screen will divide into three records.
1/03/23 - 9/03/23
Start: 'Office A'
End: 'Office A'
10/03/23 - 13/03/23
Start: 'Office B'
End: 'Office B'
14/03/23 - 20/03/23
Start: 'Office A'
End: 'Office A'
When you change the location that started some time ago and is still relevant for the future, the Start date that was in the past becomes disabled, and after submitting the record, it will be divided into newly added locations and past locations.
When you try to add a temporary location for the period during which another temporary location exists, then the system will present a warning message stating: 'The resource has another Start/End/Home location for this period'. After confirmation, the locations will be updated accordingly.
Business Benefit
- Minimizes manual adjustments for managing temporary movements.
- Dispatchers don’t need to add a temporary location manually each day when technicians work temporary during some period of time.
- More accurate routing of activities based on the correct technician’s location.
Steps to Enable
You don't need to do anything to enable this feature.
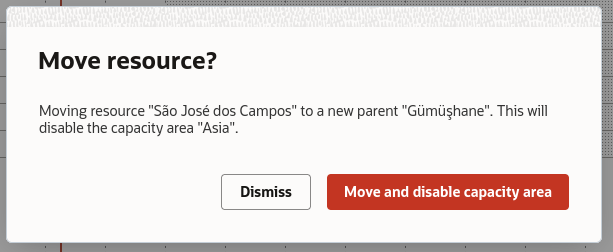
Warning Message about Capacity Area Impact when Moving Org Units/Buckets
In some cases, moving organization units or buckets within the Resource Tree hierarchy can affect quota management and capacity areas in a problematic way. Since there can be only one capacity area in a branched hierarchical component of the Resource Tree, the destination parent resource (or its parent in the hierarchy) stops being a capacity area and all quota configured for it stops being used.
With 23C, a new feature has been incorporated that presents a warning to the user attempting to make such a move under the following circumstances:
- When a bucket is moved under a different bucket and both are configured as capacity areas.
- When an organization unit that contains a bucket configured as a capacity area is moved under a bucket also configured as a capacity area.
- When a bucket is configured as capacity area and is being moved under an org unit or bucket that has a parent bucket configured as a capacity area
NOTE: This impacts only capacity areas within a parent/child relationship; capacity area 'siblings' under the same bucket or organization unit will continue operating independently as capacity areas as as such are unaffected by this feature.
In order to ensure that users are warned about such a situation, a warning message has been added. It is shown only when the move will impact the parent capacity area within the Resource Tree. Below is an example of the warning message:
In cases when there is no impact to capacity areas, the standard "Resource move confirmation" dialog is shown:
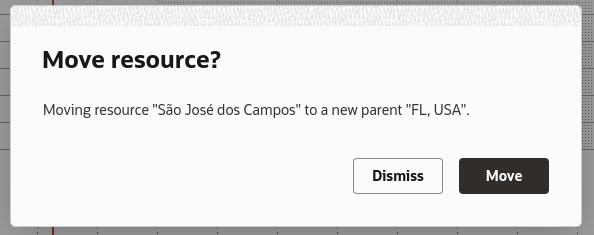
Both dialogs contain impact information about which resource is being moved and where it is being moved to in order to be clear to the user making the move.
The warning message may appear when drag-and-dropping resources and when changing the parent organization unit via the Resource Info screen.
Business Benefit
- Improves the user experience by warning users about the potential impact to capacity areas when they move buckets/org units within the Resource Tree.
- Minimize the need for corrective actions by preventing errors or unintended operations that may require subsequent troubleshooting, support, or data recovery efforts.
Steps to Enable
You don't need to do anything to enable this feature.
OFS-HCM Accelerator enhancements
The Oracle HCM-Oracle Field Service Accelerator already provides these key capabilities:
- Bulk-extract the field technician employee details from Oracle HCM Cloud to Oracle Field Service.
- Extract employee work schedule details from Oracle HCM Cloud and update them in Oracle Field Service in a scheduled manner.
- Create a resource in Oracle Field Service when a new employee is created in Oracle HCM Cloud.
- Update a resource in Oracle Field Service when an existing employee details are updated in Oracle HCM Cloud.
- Suspend a resource in Oracle Field Service when an employee is terminated in Oracle HCM Cloud.
- Fetch employee login details from Oracle HCM Cloud and update the details in Oracle Field Service. The integration fetches only the user’s login name and not the password.
Now the accelerator is enhanced to support the data flow from HCM Talent:
- Update the resource work skills in Oracle Field Service when an employee's Job Profile is updated within HCM Talent.
*The scheduling frequency is just a recommendation and can be changed based on the business requirement.
| Use case | Input | Scheduled Integration | Recommended Scheduling Frequency* | |
|---|---|---|---|---|
| 1 | Sync all employees from HCM - Bulk Extract One Time |
HCM Extract |
Oracle HCM OFS Employee Extract Child Integrations
|
Run Only Once*
|
| 2 | Sync newly hired employees - Incremental - near real time |
Public Worker Rest API |
Oracle HCM OFS Party Sync Child Integrations
|
Every Hour * To be scheduled more frequently to sync the new hires to OFS. |
| 3 | Sync Worker Availability - Full Mode |
Public Worker API, Worker Availability API |
Oracle HCM OFS Resource Availability Sync Child Integrations
|
Once a day * Can be scheduled once per day. |
| 4 | Sync employee updates - Incremental - near real time |
ATOM feed |
Oracle HCM OFS Employee Update Child Integrations
|
Twice a day * Can be scheduled 2x per day (recommended). |
| 5 | Sync employee termination - Incremental - near real time |
ATOM feed |
Oracle HCM OFS Employee Update Child Integrations
|
Every Hour * To be scheduled more frequently to sync the terminations in OFS |
Steps to validate the Job Profile sync from HCM to OFS
Let's configure a Job Profile in HCM and associate it to a Job Code as shown in the screenshot below:
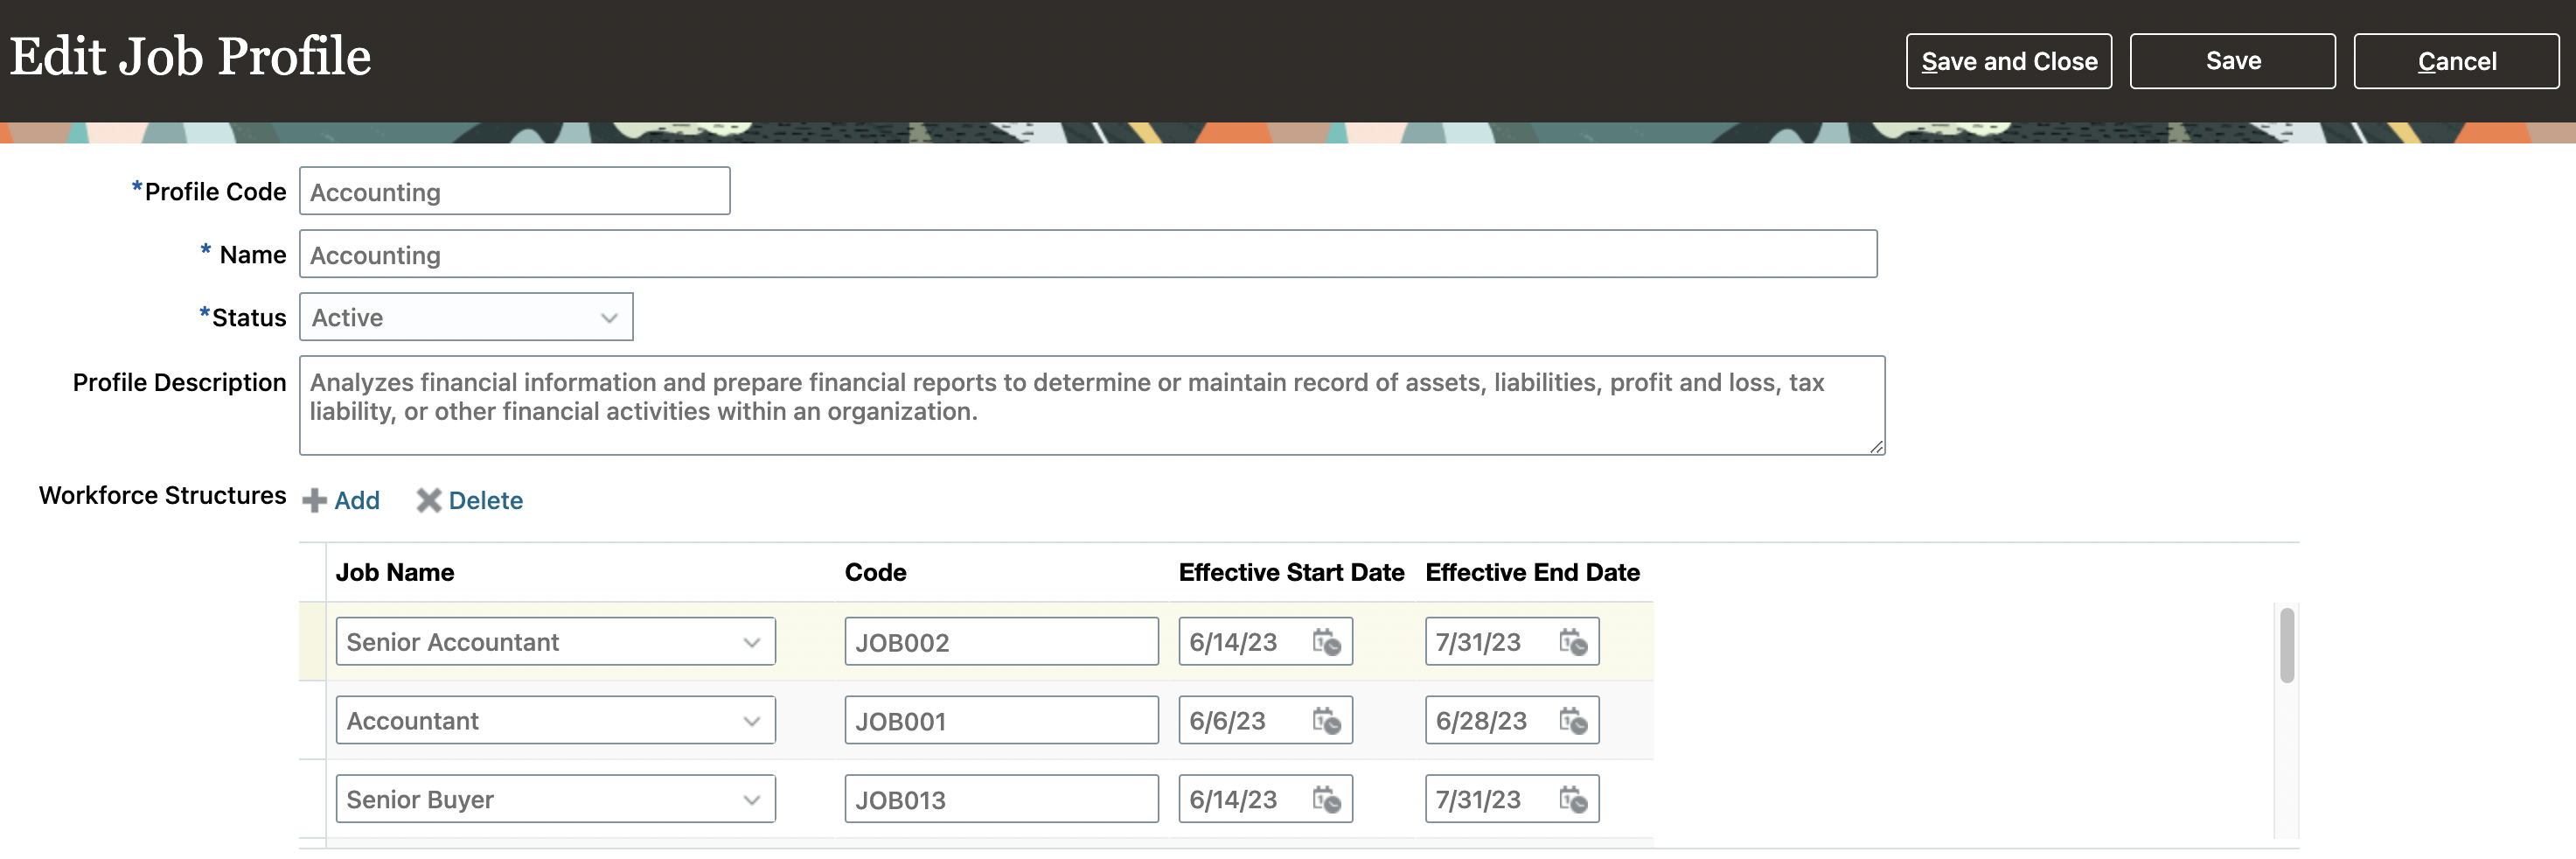
Now assign this Job (JOB001) to a new employee in HCM and then trigger the new hire integration, Oracle HCM-OFS Party Sync.
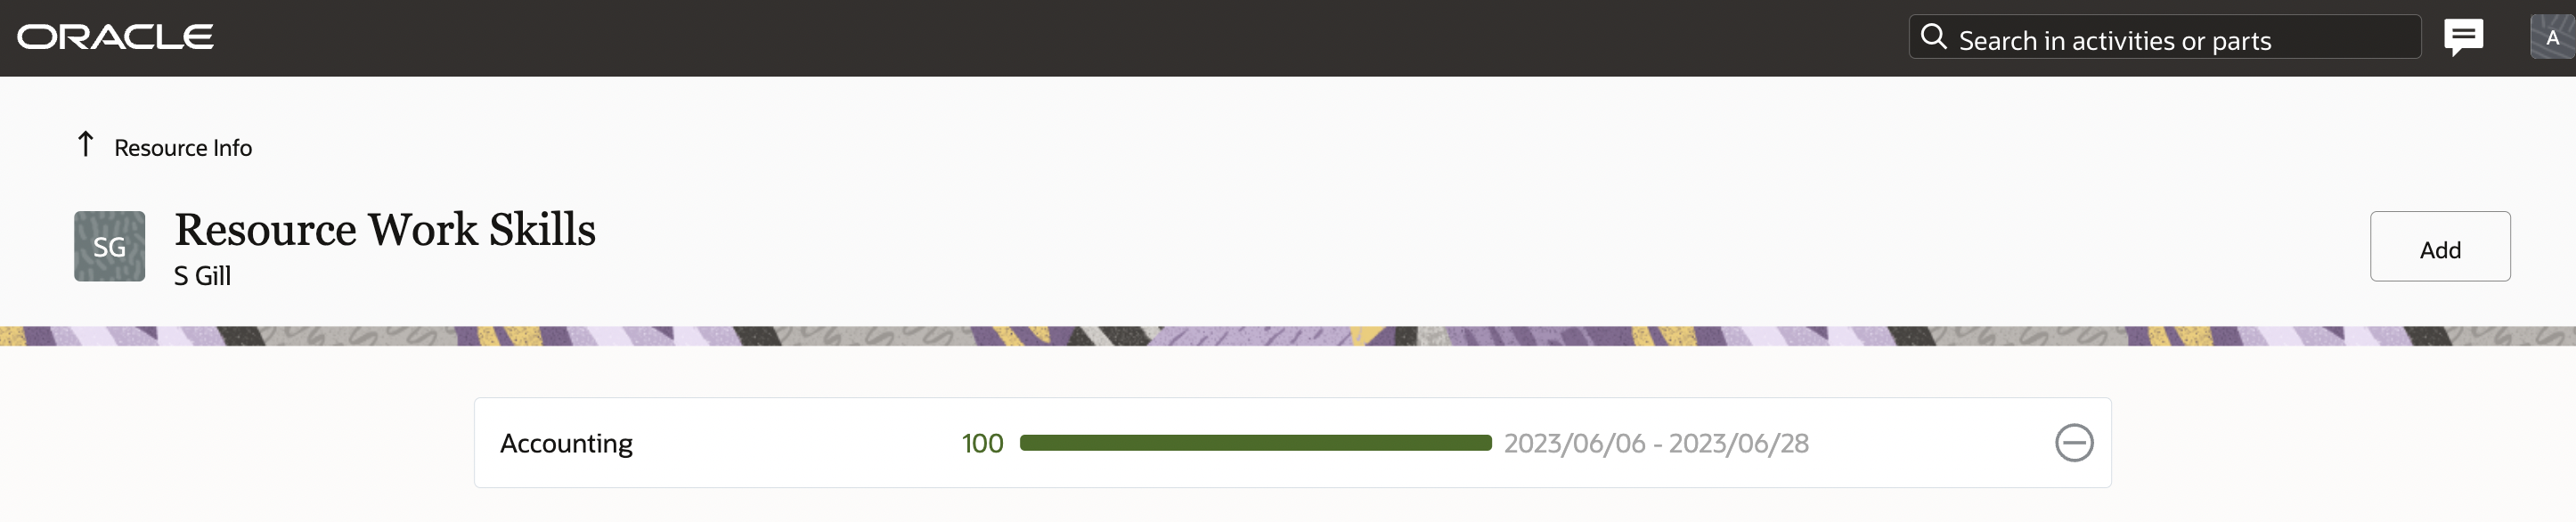
Once the integration is completed, validate the work skill of the sync'd resource in the OFS screen below:
Business Benefit
- This enhancement minimizes the need for manual data updates in both OFS and HCM. When HCM is utilized as the system of record that manages employee skills, qualifications, accomplishments and career preferences, OFS automatically updates the work skills of the field resource.
- This enhancement also automates the Job Profile update from HCM to OFS, making the data flow and update efficient. Job Profile is utilized by Oracle Maintenance Cloud as the skill requirement for a work order operation. If you are using Oracle Maintenance Cloud (Oracle Supply Chain solution) and HCM, you can create and update the Job Profile in HCM which will automatically update a field resource's skills in OFS.
Steps to Enable
- The Oracle HCM-Oracle Field Service Accelerator is available via the Oracle Integration Cloud (OIC) store.
- You should have access to HCM Talent functionality in Oracle HCM.
Tips And Considerations
- A future-dated HCM Job profile is synced as temporary work skill in OFS with the future start date and end date set from HCM.
- An HCM job profile with a past date as the start date and the end date is empty will be updated as a work skill in OFS with the start date as the current date.
- If a Job Profile is deleted in HCM, it will not be deleted in OFS. The same profile will be retained in OFS
Asset Details - A Comprehensive View of Assets in Field Service
The new Asset Details functionality offered via a standard plugin ensures mobile resources have sufficient information on assets onsite to perform their work successfully and more efficiently. Asset information includes asset pictures, historical and upcoming maintenance orders, warranty and entitlements, asset notes and asset history. The same information is also available to the dispatchers.
The plugin is integrated with Oracle Supply Chain, which eliminates the need for development effort. Customers can also extend it via the Plugin Framework in case of any specific flows. The same plugin can also be integrated with the 3rd-party supply chain solutions.
The "Asset Details" standard plugin provides a single view of asset information to mobile resources and dispatchers for activities created in Oracle Field Service, empowering them to perform their job more efficiently.
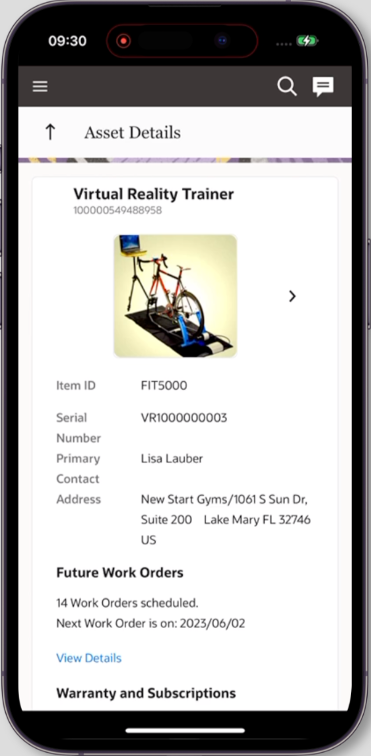
Asset Details - Mobiile View
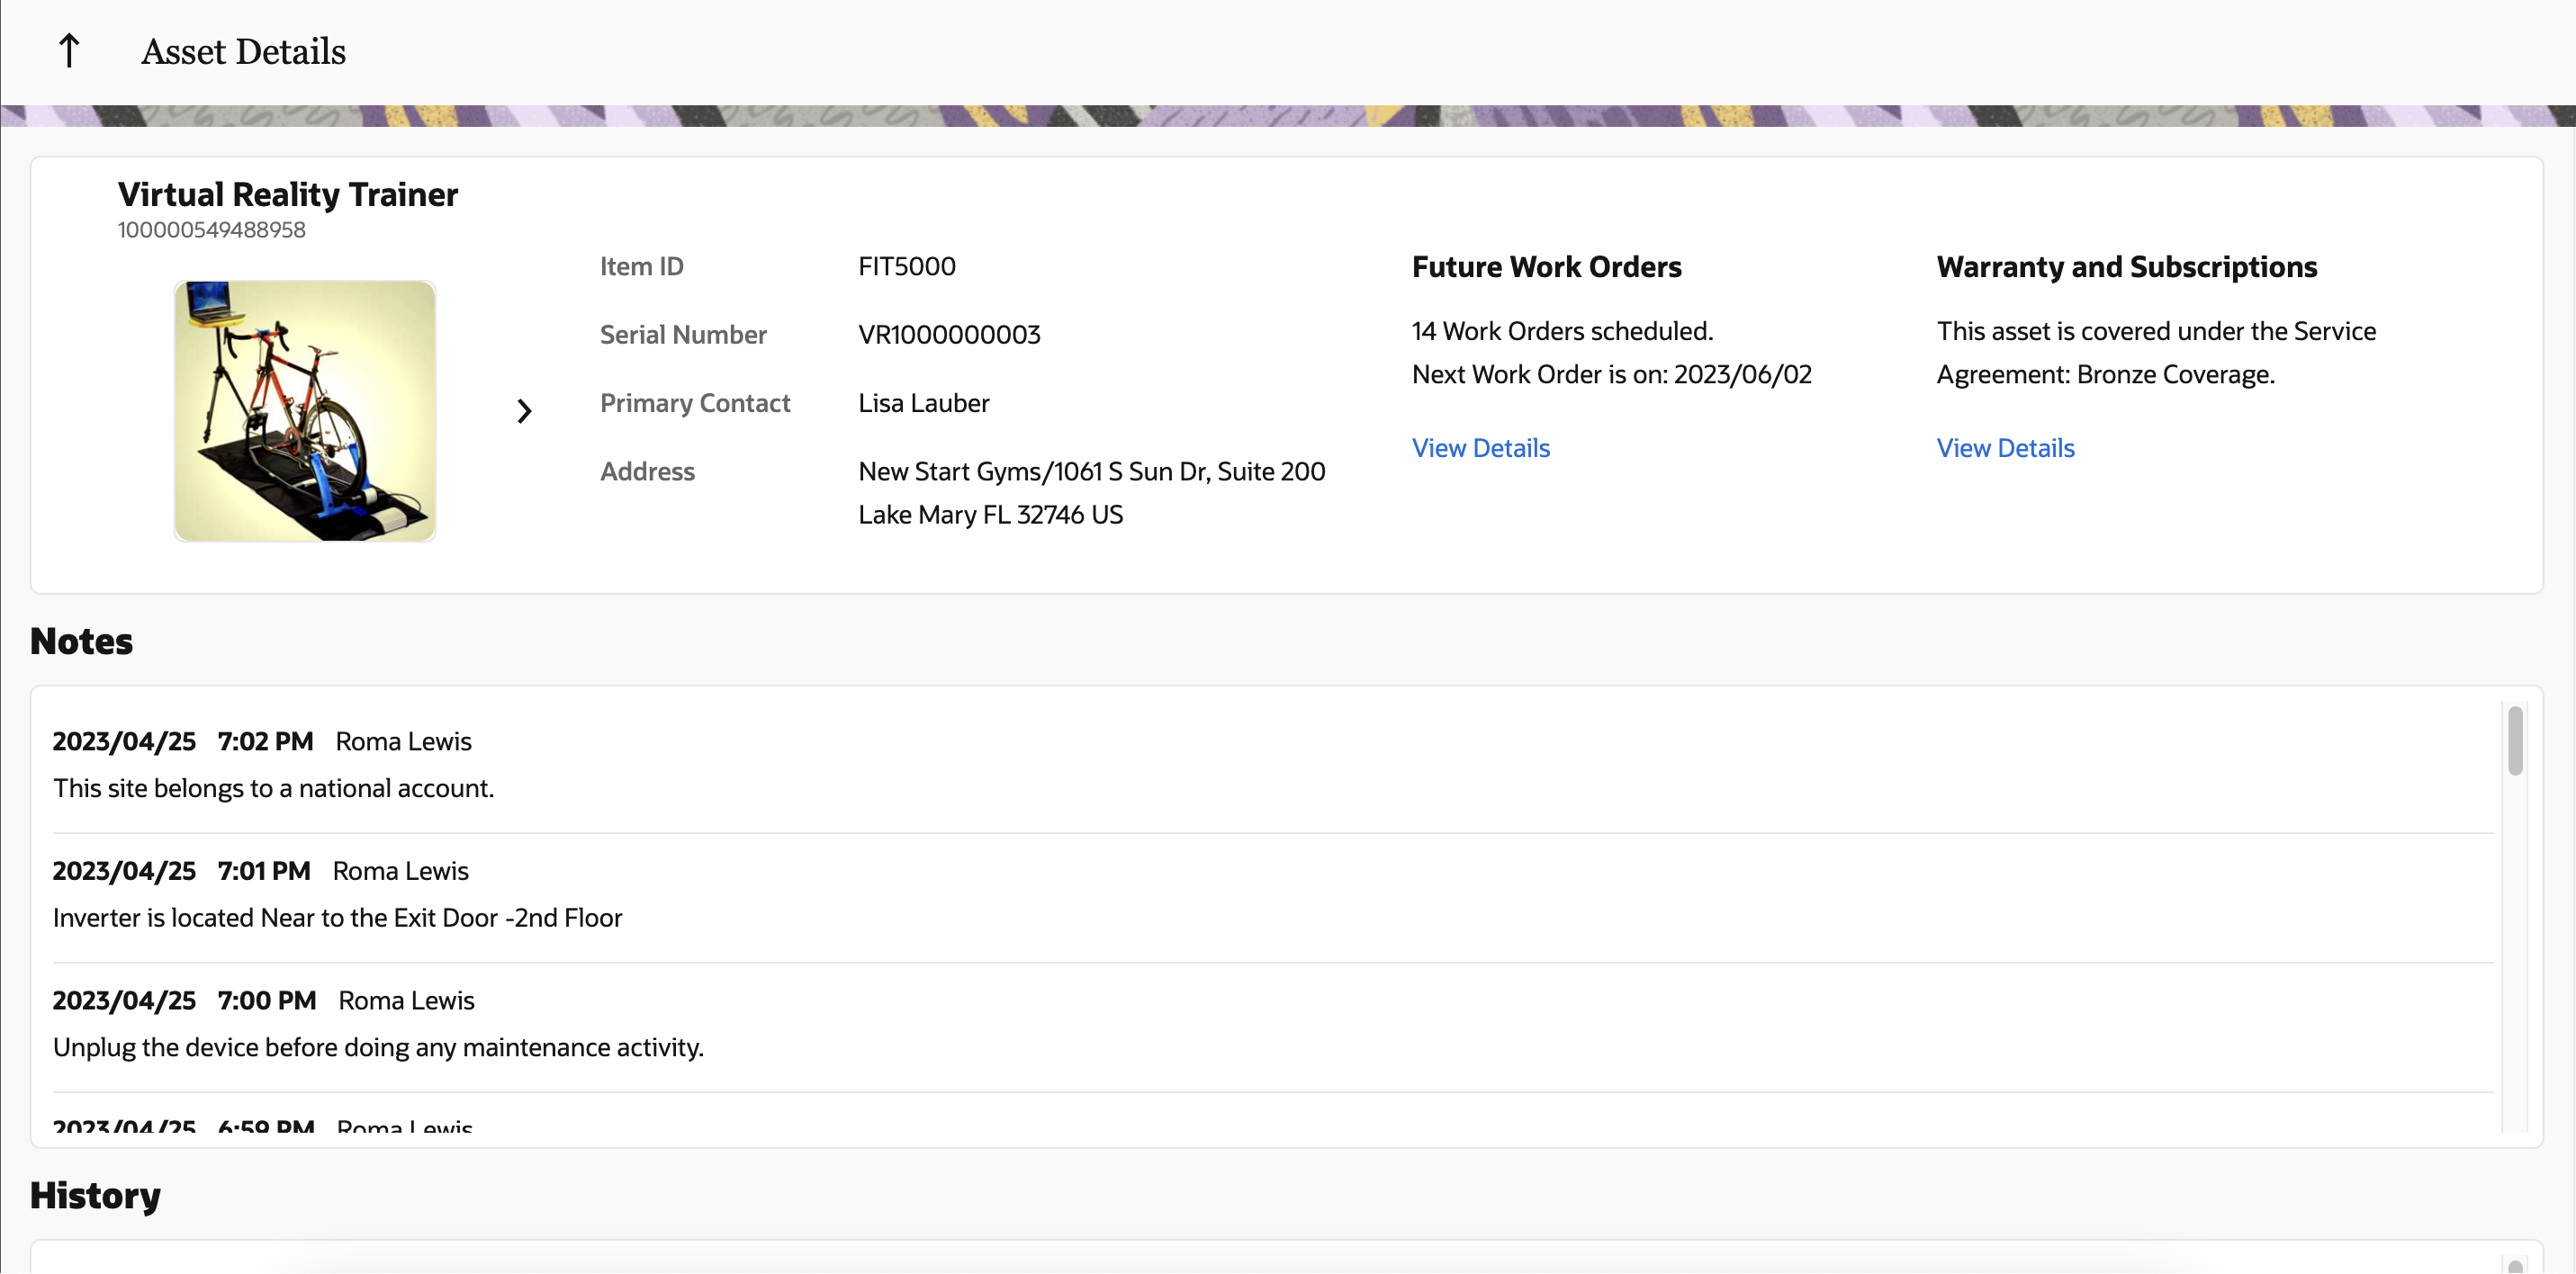
Asset Details - Browser View
Basic asset information
When you open the Asset Details page, you will be able to view the the asset's basic information described in this table.
| Field | Description |
|---|---|
| Asset ID |
Value that uniquely identifies the asset |
| Asset Description |
Description of the asset features, characteristics, and other details. |
| Item ID |
Value that uniquely identifies the item referenced by the asset. |
| Serial Number |
Numerical value that uniquely identifies the serial number referenced by the asset. |
| Primary Contact |
Name of the contact person associated with the asset. |
| Address |
Name of the location where the asset currently resides. |
| Image |
The item image. (You can view the full image by clicking the image; if there are multiple images, you can click Next to view the other images.) |
Future Work orders
The Asset Details home page displays the Future Work Orders associated with the asset. Clicking the View Details link opens a view that shows the work order number, date of the work order schedule, name of the technician assigned to this work, and the case note associated with this work order. The maximum number of work orders displayed on this view is 15.
Visibility into the future work orders also helps mobile resources to perform any upcoming work while they are already onsite. This can be defined and configured in OFS such as utilizing the self-assignment functionality that is already available.
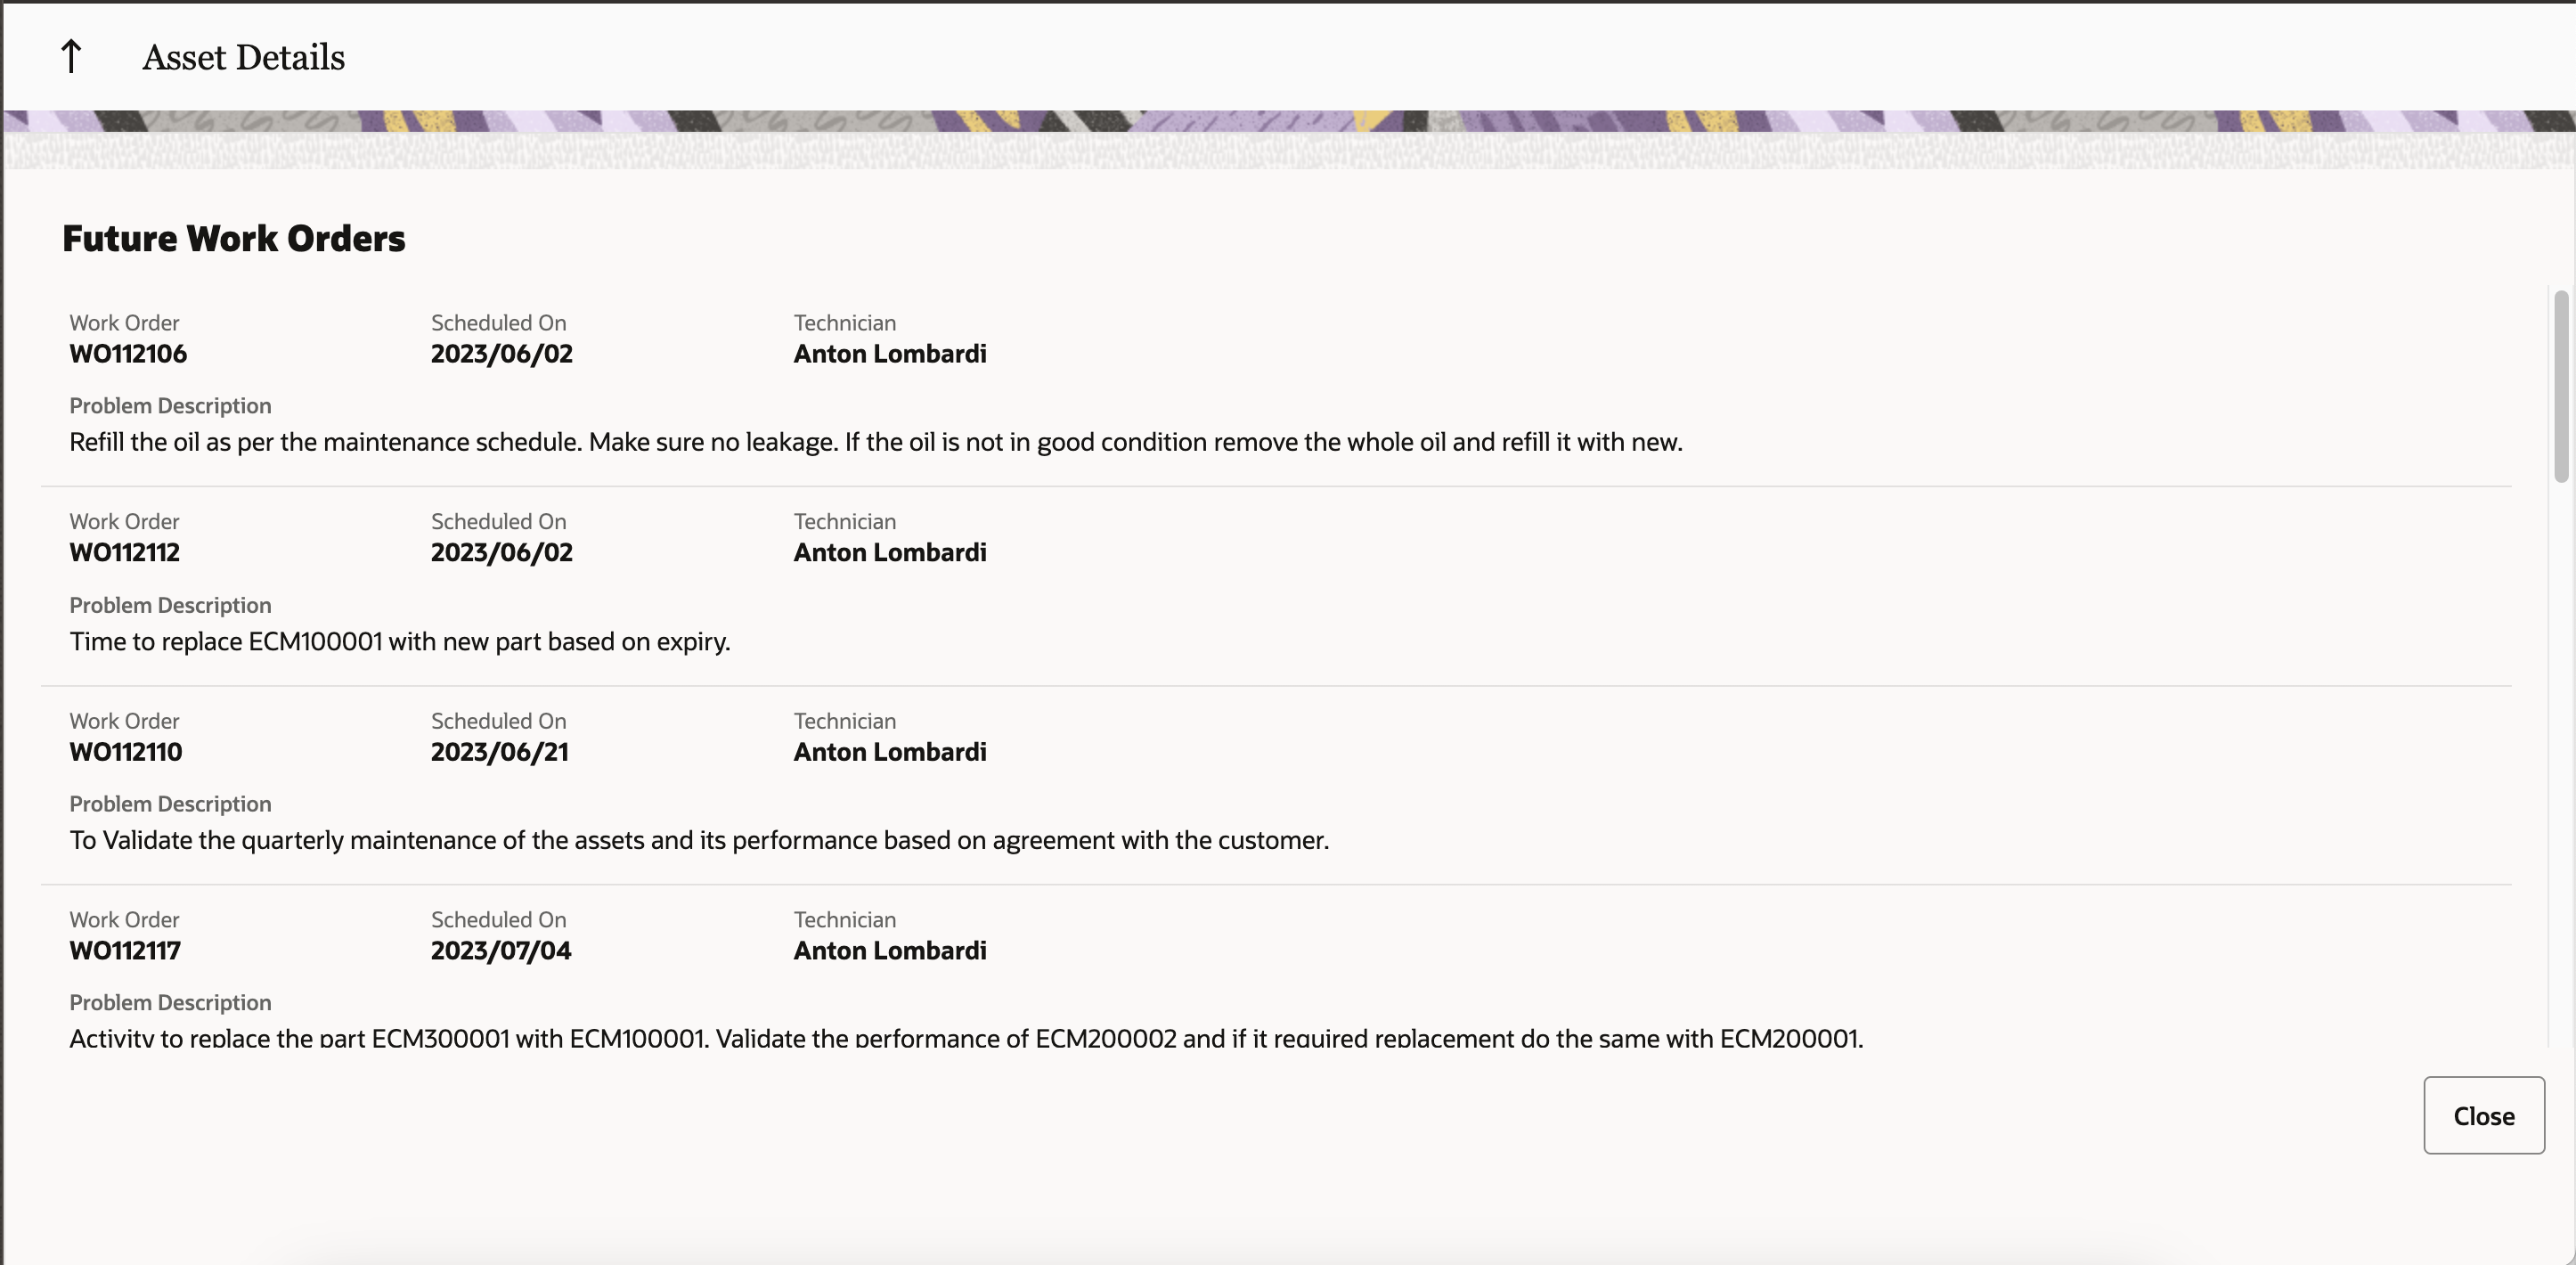
Asset Details - Future Work Orders
The following table lists the Future Work Orders fields.
| Field | Description |
|---|---|
| Problem Description |
The additional information captured to share with the field resource assigned to the work order. |
| Scheduled Date |
The date when the service is scheduled to be performed. |
| Technician |
The scheduled resource assigned to complete the work order |
| Work Order Number |
The alternate unique identifier of the work order. |
Warranty and Subscription
The Asset Details home page displays the Warranty and Subscriptions associated with the asset. Clicking the View Details link shows all the active subscriptions and service level coverage details.
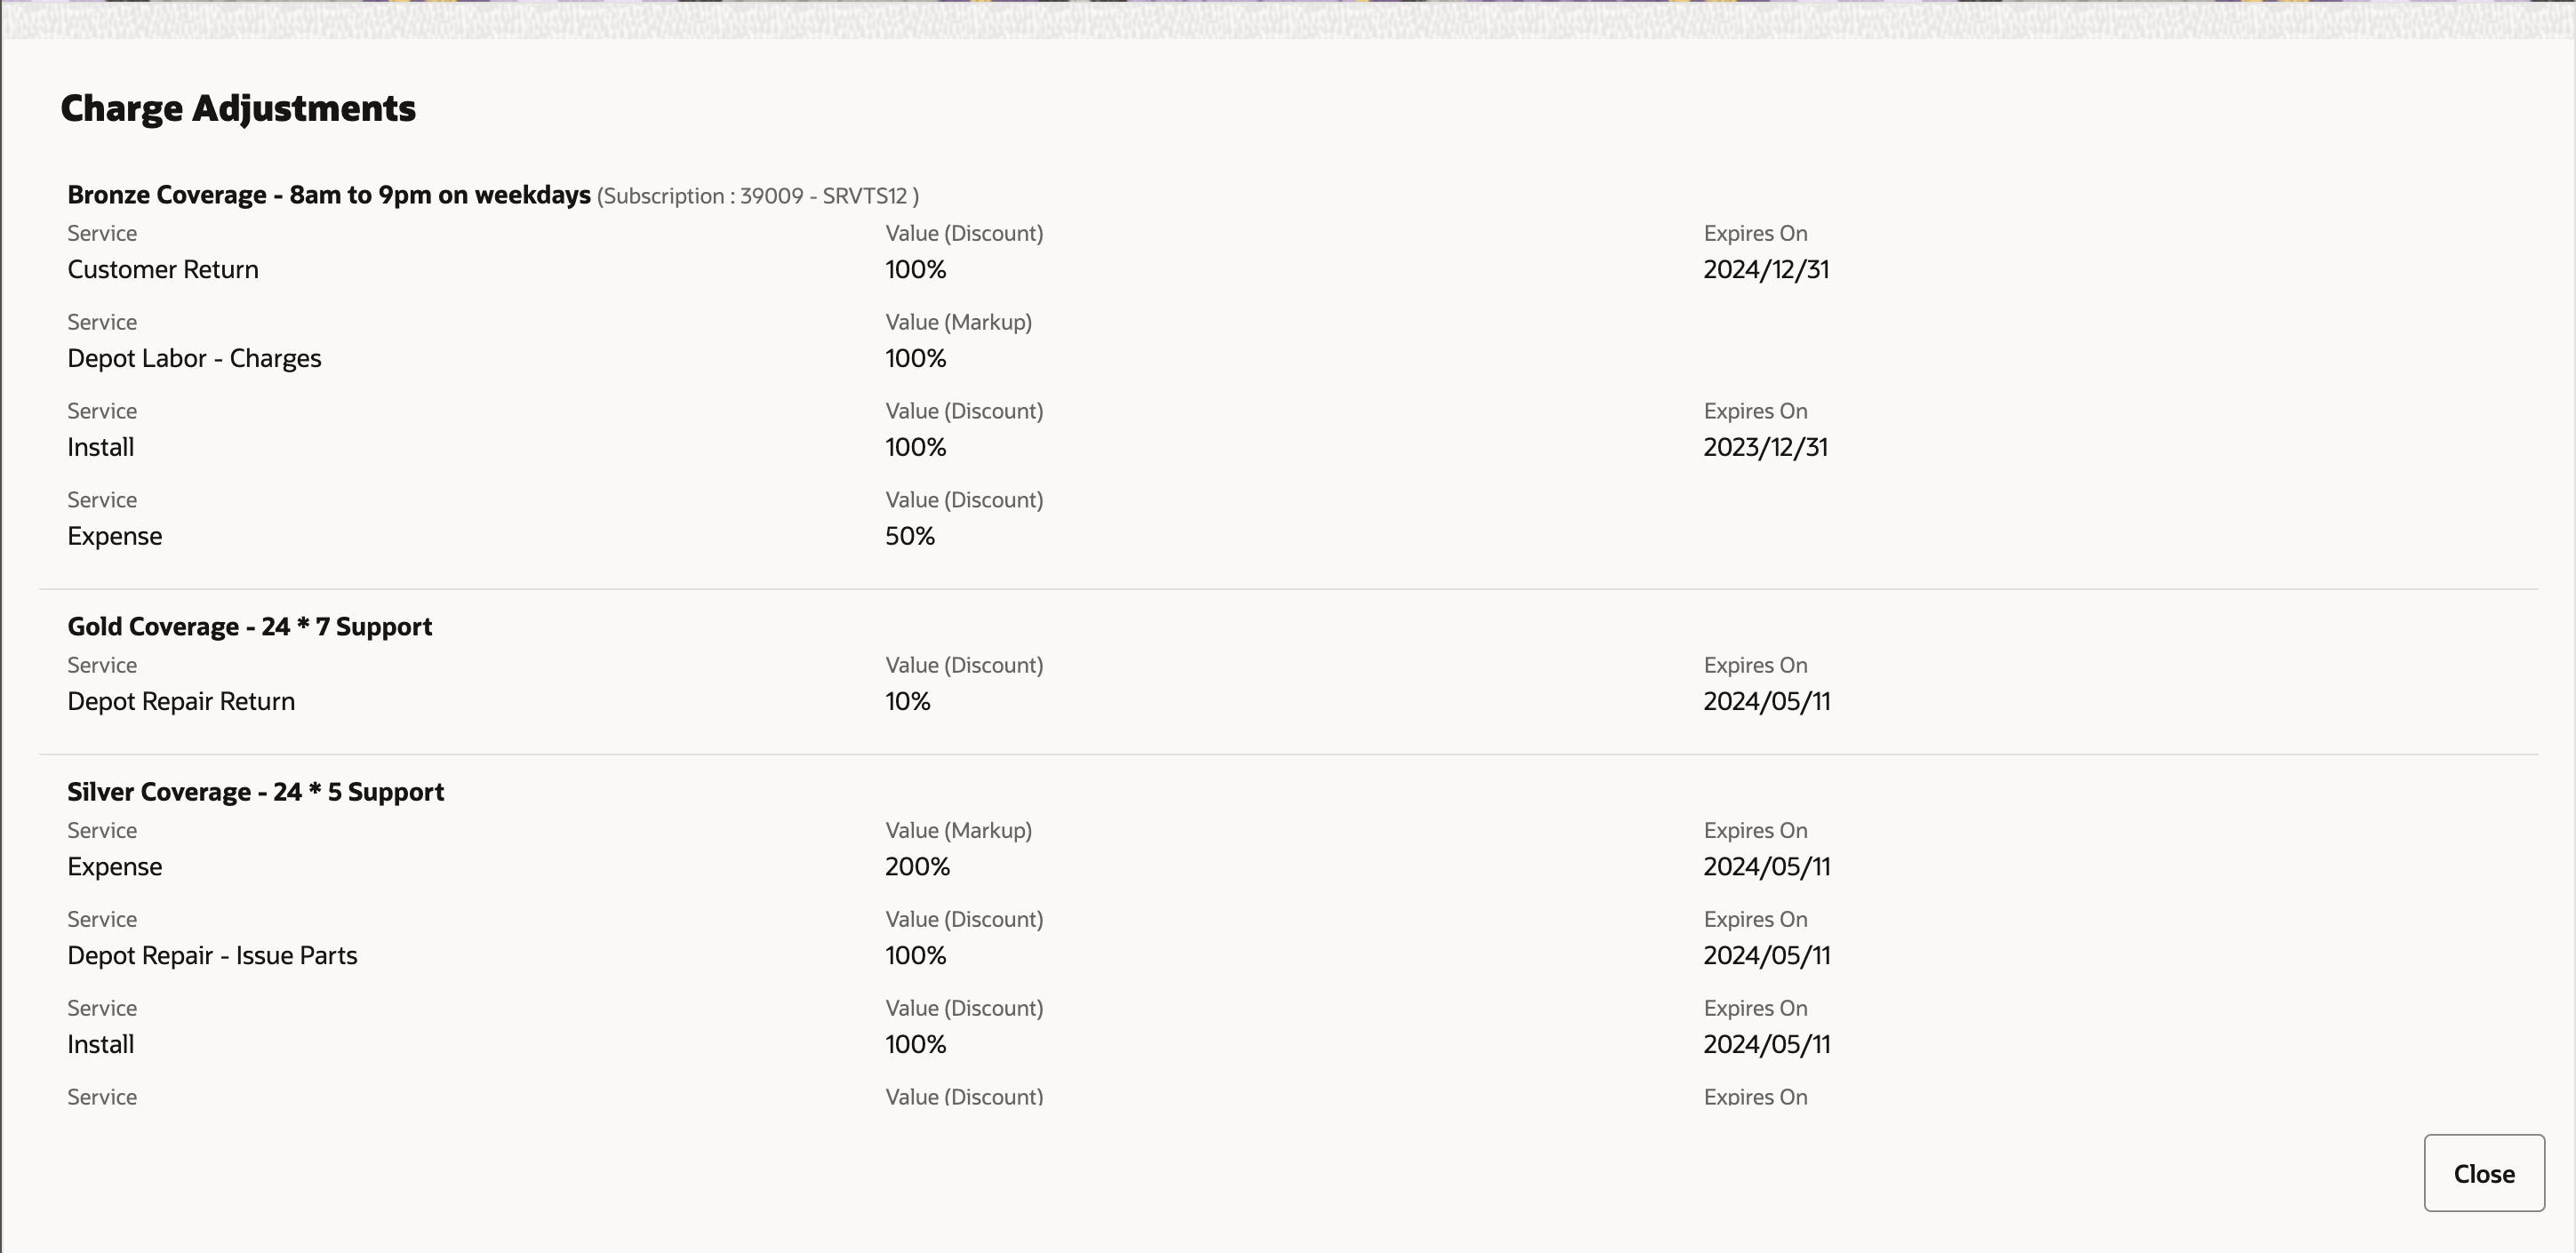
Asset Details - Warranty and Subscription
The following table lists the Warranty and Subscriptions fields.
| Field | Description |
|---|---|
| Coverage Name |
The name of the coverage |
| Coverage Description | The description of the coverage. |
| Subscription Number |
The alternate unique identifier of the subscription. |
| Coverage Product Name |
The name of the product associated with the coverage. |
| Service Activity Name |
The name of the service activity. |
| Adjustment Type |
The code associated with the adjustment type. The type can be either Markup or Discount. |
| Adjustment Amount |
The value of the adjustment. Adjustment amount can be percentage or a Fixed value. |
| Expiry Date |
The end date of the adjustment. |
Asset Notes
You can view the latest 15 notes associated with an Asset from the Asset notes section of Asset Details.

Asset Details - Notes
The following table lists the Notes fields.
| Field | Description |
|---|---|
| Created Date |
Date when the note was created. |
| Created Time |
Time when the note was created. |
| Author |
Name of the user who created the note for the asset. |
| Note Text |
Decoded note text. |
History
The Asset Details home page displays a History section of up to 15 work orders associated with the asset.

Asset Details - Asset History
The following table lists the History fields.
| Problem Description |
The additional information captured to share with the field service resource assigned to the work order. |
| Work Order Number | The alternate unique identifier of the work order. |
| Scheduled Date |
The date when the service is scheduled to be performed. |
| Resolution |
The information added to the work order from Oracle Field Service Cloud activity integration. |
| Technician |
The scheduled resource assigned to complete the work order. |
Install the Asset Details Plugin
The Asset Details plug-in is available and accessible out-of-the-box in Oracle Field Service. Follow these steps to install the plugin.
- Click .
- Click Add Plugin.
- Click Standard Plugin and then click Next.
- Click Asset Details Plugin.
These sections are displayed:
- Properties will be installed. These are the properties that are automatically installed with the plug-in. These properties will be available on the page. If you de-install this plug-in in the future, these properties will still remain on the Properties page.
-
Existing properties will be used. These are the properties that are required for the plug-in and are currently present in Oracle Field Service.
As part of Asset Details plugin, the following Activity entity properties are installed and used.
| Name | Label | Type | GUI | Description |
|---|---|---|---|---|
| Asset Id | wo_asset_id |
string | text | The asset id of install base asset associated with the activity. This custom property will be populated when the work order sync happens. https://docs.oracle.com/en/cloud/saas/fusion-service/faefs/work-order-created-field-mappings-r13-1-0.html#s20060409 |
| Work Order Number | wo_number | string |
text | The Fusion work order number associated with the activity. This custom property will be populated when the work order sync happens. https://docs.oracle.com/en/cloud/saas/fusion-service/faefs/work-order-created-field-mappings-r13-1-0.html#s20060409 |
| Date | date | field | text | Date of the route the activity is assigned to. The history, warranty information, future and past work orders are pulled based on the activity date. |
- Click Install and confirm the installation.
Modify the Plugin Parameters of Asset Details Plugin
- Click .
- Search for the Asset Details plugin.
- Click the actions icon and then click Edit.
- On the Edit Plugin page, change the details below as required and click Update.
| Parameter | Description | Secure Parameter | |
|---|---|---|---|
| 1 | fusionRestEndpoint |
The Fusion end point URL. |
N |
| 2 | fusionLogin |
Fusion Login with roles mentioned as in the "APIs and Roles" section. |
N |
| 3 | fusionPassword |
Fusion Password. |
Y |
| 4 | noteTypeCodes |
Comma separated note type codes of asset notes, that can be shown to the Technician. If not configured, the Notes section will show the message "Please configure noteTypeCodes in Plugin Parameters." |
N |
Extend the Asset Details Plugin
Refer to Modify a Standard Plugin. https://docs.oracle.com/en/cloud/saas/field-service/fapcf/t-change-cod-standard-plug-in.html#t_modify_deinstall_standard_plug_in
APIs and Roles
The Fusion user ( configured in the 'fusionLogin' secure parameter ) should have below privileges to get the data in "Asset Details" plugin.
| fscmRestApi/resources/11.13.18.05/installedBaseAssets/ |
https://docs.oracle.com/en/cloud/saas/supply-chain-and-manufacturing/23c/fasrp/api-maintenance-installed-base-assets.html |
https://docs.oracle.com/en/cloud/saas/supply-chain-and-manufacturing/23b/fammm/Maintenance_Technician_job_roles.html#Maintenance_Technician_job_roles |
|
| /crmRestApi/resources/11.13.18.05/customerWorkOrders |
https://docs.oracle.com/en/cloud/saas/sales/faaps/api-work-orders.html |
https://docs.oracle.com/en/cloud/saas/sales/oaslm/Customer_Service_Representative_job_roles.html#Customer_Service_Representative_job_roles |
|
| /crmRestApi/resources/11.13.18.05/entitlements |
https://docs.oracle.com/en/cloud/saas/sales/faaps/op-entitlements-post.html |
https://docs.oracle.com/en/cloud/saas/sales/oaslm/Customer_Service_Representative_job_roles.html#Customer_Service_Representative_job_roles |
|
| /crmRestApi/resources/11.13.18.05/products/300000180787975/child/ProductImageAttachments |
https://docs.oracle.com/en/cloud/saas/sales/faaps/op-products-inventoryitemid-child-productimageattachments-get.html |
ORA_PER_EMPLOYEE_ABSTRACT |
Business Benefit
Mobile resources and dispatchers can now use the Asset Details standard plugin to get complete insight into an asset while working on an activity, enabling them to work more efficiently on the asset.
- Achieve KPI goals such as first-time resolution and customer satisfaction
- Empower your field resources by providing them readily available information needed to perform their job successfully and to make prompt decisions
- Visibility into the future work orders provides optimal assignment, such as helping mobile resources perform any upcoming work while they are already onsite. This can be defined and configured in OFS by utilizing the self-assignment functionality that is already available.
- Enhance user and customer experience
- Faster implementation - Plugin can be implemented as-is.
Steps to Enable
Install the Asset Details Plugin
The Asset Details plug-in is available and accessible out-of-the-box in Oracle Field Service. Follow these steps to install the plugin.
- Click .
- Click Add Plugin.
- Click Standard Plugin and then click Next.
- Click Asset Details Plugin.
For details, please see Feature Description
Tips And Considerations
Tips & Considerations
- Plugin can be integrated with any 3rd party supply chain solution. The design and UI can also be extended. OFS recommends to take advantage of the available Plugin UI design to ensure enhanced user experience
Camera support in Mobile Plugin Framework
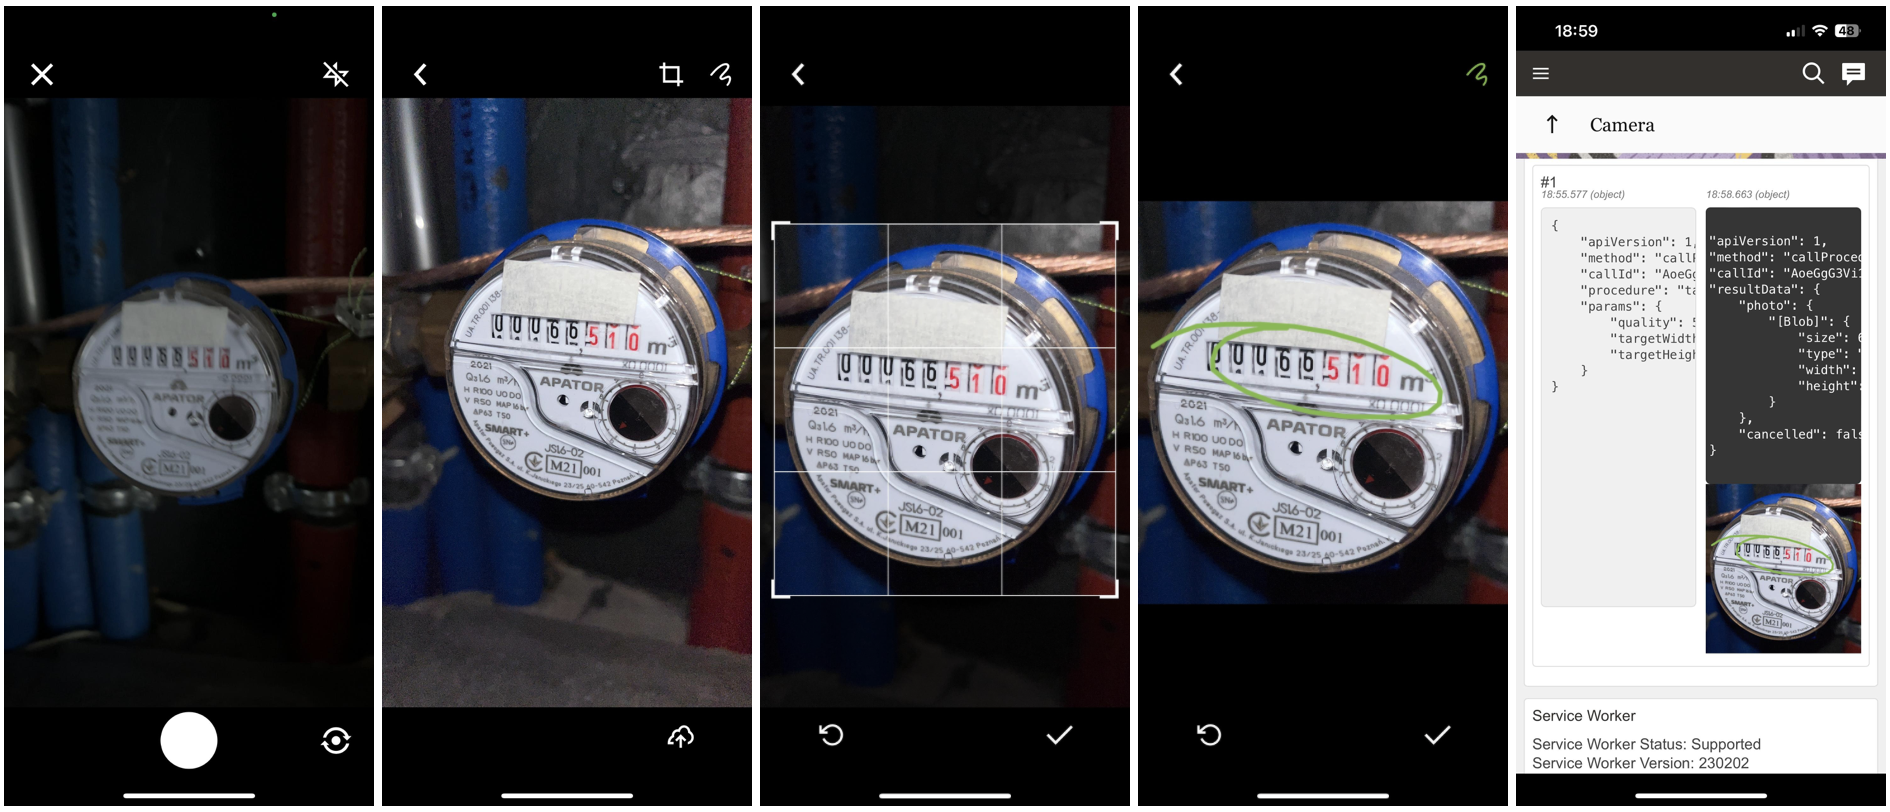
The Mobile Plugin Framework now supports a new 'takePhoto' procedure that provides the ability for the user to use their device camera to get a picture into a plugin. This procedure utilizes the in-app-camera that works for 'image' properties within OFS. Refer to the 22C What's New for details about the in-app camera enhancement. (22C Feature: Porting camera module from default device camera to in-app camera)This feature is designed for use within the installed iOS and Android applications. Browser support is not available.
- The resulting photo can be controlled by additional parameters: quality, targetWidth and targetHeigh. These provide the opportunity to control the size of the photo and it's resolution.
- The resulting photo that is returned by the "takePhoto" procedure is in JPEG format.
- The resolution of the photo is based on a device's camera module and it is cropped according to the screen aspect ratio. So the final image aspect ratio could differ between portrait and landscape modes. Also, the final image can be cropped via functionality of the in-app camera; in this case the width or height of the photo will be cut.
How To Use
- Add "sendMessageAsJsObject": true item to "ready method"
- Open the plugin on iOS/Android device (not in browser)
- Check that the "takePhoto" procedure is available in the list of "allowedProcedures" in "open" method
-
Run the "takePhoto" procedure by using the following code:
| let data = {
"apiVersion" : 1 ,
"method" : "callProcedure" ,
"callId" : "123" ,
"procedure" : "takePhoto" } parent.postMessage(data, document.referrer); |
UI Examples
Example of calling the "takePhoto" procedure using the Sample plugin:
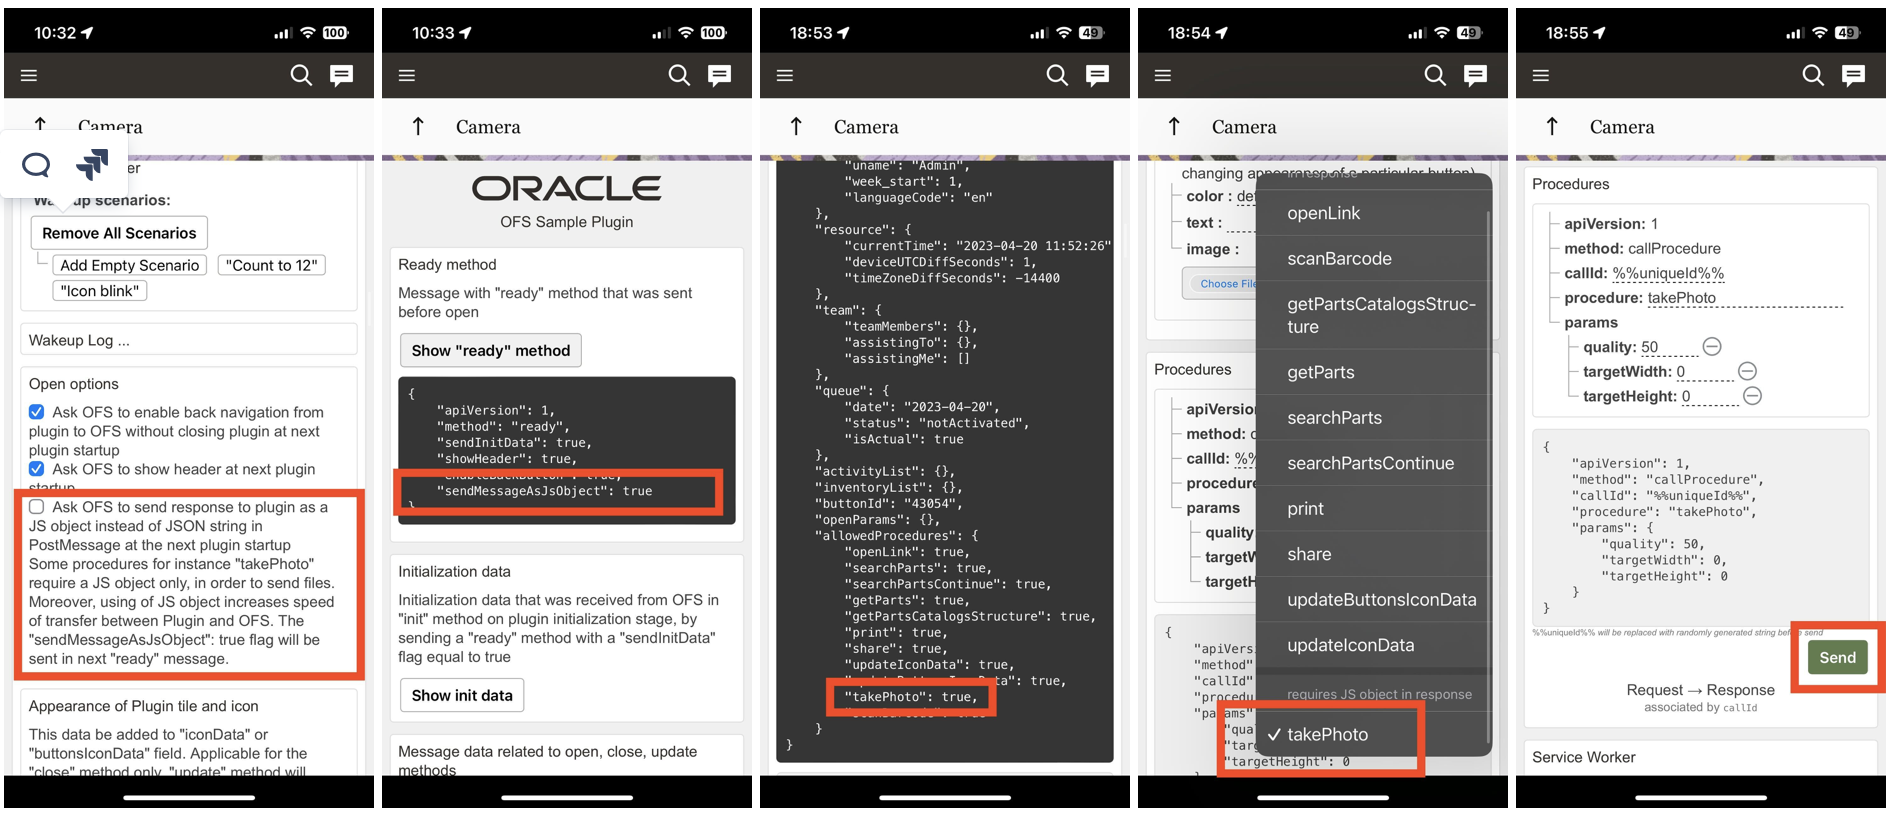
UI of in-app camera module and result in Sample plugin
Request
The request could be called with or without parameters. These parameters are all optional:
- quality - the percent of JPEG compression
- min: 1
- max: 100
- default: 50
- targetWidth - maximal width of a picture
- min: 10
- max: 7000
- default: no fixed value, depends on resolution of device camera
- targetHeight - maximal height of a picture
- min: 10
- max: 7000
- default: no fixed value, depends on resolution of device camera
- The quality of the picture set to '50' by default. The maximum supported size of the photo is 8Mb. If the photo exceeds this value, the error 'CODE_TAKE_PHOTO_FILE_IS_TOO_LARGE' is returned.
- Please take into account that the size of the picture can influence the device's performance.
- The targetWidth and targetHeight parameters can be used to resize the final picture. The aspect ratio won't be changed, and the picture can be reduced or increased in size in order to fit the target width and target height.
Example of ready method with the "sendMessageAsJsObject" flag (Plugin -> OFS):
| {
"apiVersion" : 1,
"method" : "ready" ,
...
"sendMessageAsJsObject" : true } |
Example of open method with the availability of the "takePhoto" procedure that reflects that the "takePhoto" procedure is available: (OFS -> Plugin)
| {
"apiVersion" : 1,
"method" : "open" ,
...
"allowedProcedures" : {
...
"takePhoto" : true
} } |
Example of the calling of the "takePhoto" procedure: (Plugin -> OFS)
| {
"apiVersion" : 1,
"method" : "callProcedure" ,
"callId" : "123" ,
"procedure" : "takePhoto" } |
Example of the calling of the "takePhoto" procedure with params: (Plugin -> OFS)
| {
"apiVersion" : 1,
"method" : "callProcedure" ,
"callId" : "123" ,
"procedure" : "takePhoto" ,
"params" : {
"quality" : 50,
"targetWidth" : 1000,
"targetHeight" : 1000
} } |
Success response
Any success response will contain a "cancelled" field with the boolean value. In the case of where the photo has been taken and was sent to a plugin, the result will contain a "photo" field with a Blob file of the photo.
Example of the "takePhoto" procedure calling result: (OFS -> Plugin)
| {
"apiVersion" : 1,
"method" : "callProcedureResult" ,
"callId" : "123" ,
"resultData" : {
"cancelled" : false ,
"photo" : [Blob]
} } |
Example of the "takePhoto" procedure calling the result in case the camera was closed without a photo: (OFS -> Plugin)
| {
"apiVersion" : 1,
"method" : "callProcedureResult" ,
"callId" : "123" ,
"resultData" : {
"cancelled" : true
} } |
Error response
Error responses will include an error type and an error code. The following errors can be returned:
| TYPE_INTERNAL | CODE_UNKNOWN | - | Common errors |
| TYPE_MESSAGE_FORMAT | CODE_METHOD_UNEXPECTED | - | Is returned if the plugin tries to run the "takePhoto" procedure while this procedure is already running. Plugin should wait for a result of this procedure before calling it again. |
| TYPE_PROCEDURE_ERROR | CODE_PROCEDURE_UNAVAILABLE | procedure | Is returned if the procedure is not available. (i.e. OFS is not open in iOS/Android Mobile Application) |
| TYPE_PROCEDURE_ERROR | CODE_PROCEDURE_JS_OBJECT_FLAG_REQUIRED | procedure, data | Is returned if the plugin tries to run the "takePhoto" procedure without plugin request to transfer data with the JS object (i.e. didn't send "sendMessageAsJsObject": true on "ready" method). "procedure" = procedure name, "data" = error message. |
| TYPE_PROCEDURE_ERROR | CODE_PROCEDURE_PARAMS_IS_NOT_OBJECT | procedure | Is returned if the "params" item was sent and it is not an object. |
| TYPE_PROCEDURE_TAKE_PHOTO_ERROR | CODE_TAKE_PHOTO_FILE_IS_TOO_LARGE | procedure, data | Is returned if the photo file that is returned by the camera is larger than 8Mb (for example if quality parameter is too high). "procedure" = procedure name, "data" = error message. |
| TYPE_PROCEDURE_TAKE_PHOTO_ERROR | CODE_PROCEDURE_FAILED | procedure, data | Any other error that is not listed here. "procedure" = procedure name, "data" = error message. |
| TYPE_PROCEDURE_PARAM | CODE_PROCEDURE_PARAM_VALUE_INVALID | procedure, paramName | Is returned if:
|
Example of an error if the procedure "takePhoto" is called from plugin that was opened not from the native Android/iOS App, or the procedure "takePhoto" is called on the OFS platform with a version less than 23B.X: (OFS -> Plugin)
| {
"apiVersion" : 1,
"method" : "error" ,
"errors" : [
{
"type" : "TYPE_PROCEDURE_ERROR" ,
"code" : "CODE_PROCEDURE_UNAVAILABLE" ,
"procedure" : "takePhoto"
}
],
"callId" : "123" } |
Example of an error where the procedure "takePhoto" is called with "params" that is not an object: (OFS -> Plugin)
| {
"apiVersion" : 1,
"method" : "error" ,
"errors" : [
{
"type" : "TYPE_PROCEDURE_ERROR" ,
"code" : "CODE_PROCEDURE_PARAMS_IS_NOT_OBJECT" ,
"procedure" : "takePhoto"
}
],
"callId" : "123" } |
Example of an error where the procedure "takePhoto" is called with a "quality", "targetWidth" or "targetHeight" parameter that is not an integer, or if the value is larger or smaller than the minimum or maximum values: (OFS -> Plugin)
| {
"apiVersion" : 1,
"method" : "error" ,
"errors" : [
{
"type" : "TYPE_PROCEDURE_PARAM" ,
"code" : "CODE_PROCEDURE_PARAM_VALUE_INVALID" ,
"procedure" : "takePhoto" ,
"paramName" : "quality"
}
],
"callId" : "123" } |
Example of an error where the procedure "takePhoto" is called and the resulting file is too large: (OFS -> Plugin)
| {
"apiVersion" : 1,
"method" : "error" ,
"errors" : [
{
"type" : "TYPE_PROCEDURE_TAKE_PHOTO_ERROR" ,
"code" : "CODE_TAKE_PHOTO_FILE_IS_TOO_LARGE" ,
"procedure" : "takePhoto" ,
"data" : "..."
}
],
"callId" : "123" } |
Example of an error where the plugin is not requesting transfer with the JS object in "ready" method: (OFS -> Plugin)
| {
"apiVersion" : 1,
"method" : "error" ,
"errors" : [
{
"type" : "TYPE_PROCEDURE_ERROR" ,
"code" : "CODE_PROCEDURE_JS_OBJECT_FLAG_REQUIRED" ,
"procedure" : "takePhoto" ,
"data" : "..."
}
],
"callId" : "123" } |
Example of an error for any other reason of procedure processing (OFS -> Plugin)
| {
"apiVersion" : 1,
"method" : "error" ,
"errors" : [
{
"type" : "TYPE_PROCEDURE_TAKE_PHOTO_ERROR" ,
"code" : "CODE_PROCEDURE_FAILED" ,
"procedure" : "takePhoto" ,
"data" : "..."
}
],
"callId" : "123" } |
Data transfer format (JSON / JS object)
The data between a Plugin and OFS can be transferred in two formats: as a JSON string (initially) and as a JS object (since 23C).
Transferring data as a JS object has a couple benefits that makes it more useful:
- it allows the sending of files from OFS to a Plugin (in the case of the "takePhoto" procedure)
- the data transferring is faster because there is no parsing and validation of the JSON format
It is highly recommended to send a "sendMessageAsJsObject": true item in "ready" method within all modern plugins.
OFS keeps information about the chosen variant of transfer in the browser's memory. So, if a "sendMessageAsJsObject":true flag was sent, OFS will transfer data as a JS object until either the "sendMessageAsJsObject": false is sent or while the browser tab is open.
Example of the "ready" message:
| {
"apiVersion" : 1 ,
"method" : "ready" ,
"sendMessageAsJsObject" : true } |
Business Benefit
Using the in-app camera module provides several useful benefits:
- control of flashlight (On/Off/Auto)
- zooming
- adjustable autofocus
- cropping functionality
- drawing functionality
- retake photo
- front/back camera switch
The resulting photo can be controlled by additional parameters: quality, targetWidth and targetHeigh. These provide the opportunity to control the size of the photo and it's resolution.
The resulting photo that is returned by the "takePhoto" procedure is in JPEG format.
Steps to Enable
Steps to Enable
For information on how to enable, please review the Description section
IMPORTANT Actions and Considerations
REPLACED OR REMOVED FEATURES
Features and technical components of the solution may be removed or replaced to enhance the security, performance, and overall quality of the cloud service. When this occurs, the deprecation of a feature or component will be announced in advance, allowing customers sufficient time to anticipate the change and transition to any enhanced replacement feature/component. After the deprecation is announced, the deprecated feature or component will remain in the solution until the planned removal date and will not be enhanced or made compatible with other new features.
Below is a list of new and previously announced deprecations for this cloud service.
Previously-Announced Deprecations
| Application Area | Removed Feature | Planned Removal | Replacement Feature | Replaced In | Additional Information |
|---|---|---|---|---|---|
| Daily Extracts |
Ability to export files related to property files entity as part of the Daily Extract process. |
23D |
|
Announced in 22A |
|
| User Login Domain |
Authentication requests using https://login.etadirect.com URL scheme |
23D | Use URL scheme https://<instance_name>.fs.ocs.oraclecloud.com |
Announced in 22A |
This change will improve authentication time and adhere to government and corporate policy regulations related to data residency by ensuring the request is directed to the proper data center where the target Oracle Field Service environment is running. Login domain will not be supported from Update 23D general availability date onwards for all environments running on all versions of Oracle Field Service. For more information see the Oracle Field Service Login and API Domains Deprecation topic. |
| API Domain |
APIs access using https://api.etadirect.com URL scheme |
23D | Use URL scheme https://<instance_name>.fs.ocs.oraclecloud.com |
Announced in 22A |
This change will improve authentication time and adhere to government and corporate policy regulations related to data residency by ensuring the request is directed to the proper data center where the target Oracle Field Service environment is running. API domain will not be supported from Update 23D general availability date onward for all environments running on all versions of Oracle Field Service. For more information see the Oracle Field Service Login and API Domains Deprecation topic. |