
- Revision History
- Overview
- Feature Summary
-
- Sourcing
- Onboarding
- Fluid Recruiting
-
- Post Requisitions to Job Boards
- Set Requisition Prescreening Alerts
- Edit Requisition Descriptions
- Evaluation Management in Requisitions
- Requisition Attachments
- View Requisitions Posted to Agents and Agencies
- Add Collaborators to Requisitions
- View General Profile of Candidates
- General Profile Attachments
- Edit Candidate Submissions
- Create Candidate Submissions
- Submit Offers for Approval
-
- OBI Reporting
| Date | Feature | Notes |
|---|---|---|
| 06 MAY 2019 | Created initial document. |
This guide outlines the information you need to know about new or improved functionality in Oracle Talent Acquisition Cloud Update 19B and describes any tasks you might need to perform for the update. Each section includes a brief description of the feature, the steps you need to take to enable or begin using the feature, any tips or considerations that you should keep in mind, and the resources available to help you.
Give Us Feedback
We welcome your comments and suggestions to improve the content. Please send us your feedback at talent_acquisition_doc_feedback_ww_grp@oracle.com.
Column Definitions:
Report = New or modified, Oracle-delivered, ready to run reports.
UI or Process-Based: Small Scale = These UI or process-based features are typically comprised of minor field, validation, or program changes. Therefore, the potential impact to users is minimal.
UI or Process-Based: Larger Scale* = These UI or process-based features have more complex designs. Therefore, the potential impact to users is higher.
Features Delivered Disabled = Action is needed BEFORE these features can be used by END USERS. These features are delivered disabled and you choose if and when to enable them. For example, a) new or expanded BI subject areas need to first be incorporated into reports, b) Integration is required to utilize new web services, or c) features must be assigned to user roles before they can be accessed.
| Ready for Use by End Users Reports plus Small Scale UI or Process-Based new features will have minimal user impact after an update. Therefore, customer acceptance testing should focus on the Larger Scale UI or Process-Based* new features. |
Customer Must Take Action before Use by End Users Not disruptive as action is required to make these features ready to use. As you selectively choose to leverage, you set your test and roll out timing. |
|||||
|---|---|---|---|---|---|---|
| Feature |
Report |
UI or |
UI or |
|
||
Job Facets for Requisition User-Defined Fields
Improves the user experience by allowing job seekers and recruitment marketers to refine the list of jobs using facets that are based on user-defined fields (UDFs) from the requisition.
Job facets in Sourcing are now aligned to requisition UDFs in Recruiting. This allows Administrators to activate up to five facets at a time for UDFs that can be used on the job search and on the following job promotion campaigns:
- Referrals On-Demand
- Send Jobs to Fans and Followers
- Search and Message Your Talent Community
Administrators can activate and deactive facets at their discretion. Facet names are multilingual and can be modified and translated using the dictionary.
Steps to Enable
To enable this feature you need to log a Service Request (SR).
Recruiting must be on Release 17.6 or higher to use this feature.
To enable this feature:
- Create an Oracle Service Request and request the UDF Sync between Sourcing and Recruiting to be enabled. Once this request is complete, you can move on to the next step and create your facets.
- Click Configuration.
- Click Facets.
- Click Create New Facet.
- Enter your facet name and select a picklist table. The field, or list of fields, within that picklist table will be presented in the Field dropdown.
- Select the Field.
- Click Submit.
The newly created facet will be activated immediately. UDF facets are displayed in blue.
Tips And Considerations
If you use a UDF facet to filter the jobs you should consider displaying the value of that UDF in the Job Details page as well.
Candidate File Upload in Onboarding Center
Enables the onboarding specialist to upload files to a new hire's onboarding process from the Onboarding Center. This allows files to be added and replaced at any time during or after the onboarding process, whether that process is active, completed or canceled. Files may only be uploaded into the file categories which are configured on the Content Pages for the process through which the candidate is being onboarded.
History tracking is provided.
Steps to Enable
Make the feature accessible by assigning or updating privileges and/or job roles. Details are provided in the Role Information section below.
Tips And Considerations
- If you choose a file category which already has a file uploaded into it, uploading a new file will overwrite the existing one.
- If you upload a file into a category before the candidate arrives at their task to upload files, the candidate will see your file.
Role Information
The "View, add, print, and delete System Documents (PDFs), and view, add, and delete Candidate Files" permission must be enabled to use this feature. This is an existing permission that's been amended to include candidate files.
Post Requisitions to Job Boards
As a recruiter, you can post requisitions on job boards.
Job board posting is available for requisitions posted on external career sections. Job board posting is done in the Sourcing tab of a requisition.
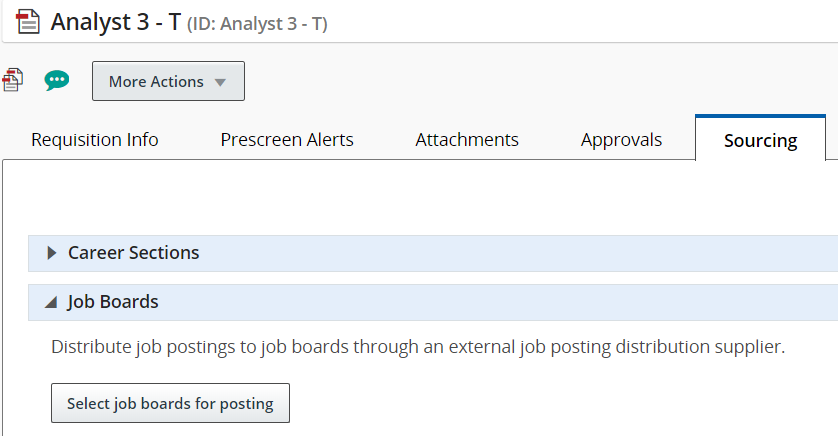
Sourcing Tab in Requisition
- On the Sourcing tab of a job requisition, go to the Job Boards section.
- Click Select job boards for posting.
- Select the supplier, account, and language.
- Click Next.
- You are then taken to the supplier’s site where you can select job boards and provide more details about the posting.
You can unpost a requisition from a specific job board or from all job boards at once.
Steps to Enable
You don't need to do anything to enable this feature.
Set Requisition Prescreening Alerts
As a recruiter, you can set an ACE alert and a Request More Information (RMI) alert on requisitions.
ACE Alert
The ACE alert allows you to set a threshold to identify the ideal candidates for a job. ACE candidates are identified based on their responses to the competencies and questions in the requisition file.

ACE Alert Configuration
When you set the ACE alert, the following options are available:
| Option | Description |
|---|---|
| Result: A submission meeting all the prescreening required criteria and obtaining a result of at least n % |
Candidates who meet all the required criteria and the result value will be considered ACE candidates. |
| Asset: A submission meeting all the prescreening required criteria and obtaining n of 3 assets |
Candidates who meet all the required criteria and the minimum number of assets will be considered ACE candidates. |
| Both Result and Assets must be met |
This option is used to identify ACE candidates using the result and asset conditions. |
| Either Result or Assets must be met |
This option is used to identify ACE candidates using the result or asset condition. |
Candidates who apply to the requisition and meet the criteria are marked as ACE candidate on their respective submission. The ACE star icon is displayed.Once the ACE alert is set on a requisition, the ACE star icon appears on the Requisitions list, next to a requisition and also on the requisition summary card.
When you set the ACE alert, you can send an email to specific recipients to inform them that ACE candidates were found. The email contains a PDF of the candidate files. All recipients receive the same candidate files, regardless of their permissions to view candidate information.
RMI Alert
The RMI alert allows you to contact candidates who meet prescreening required criteria for a job and to request more information from them. Candidates receive an email inviting them to return to their submission and provide missing information.
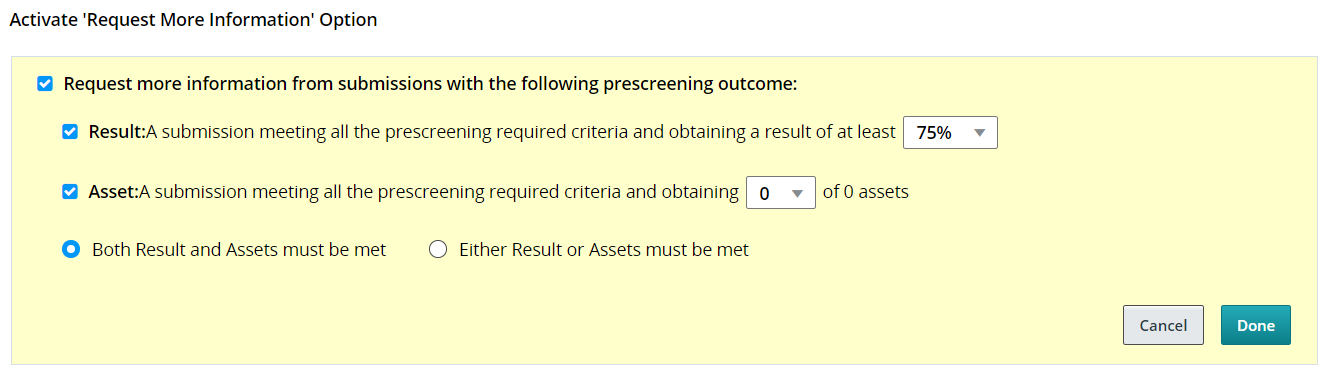
RMI Alert Configuration
When you set the RMI alert, the following options are available:
| Option | Description |
|---|---|
| Result: A submission meeting all the prescreening required criteria and obtaining a result of at least n % |
Candidates who meet all the required criteria and the result value will be considered ACE candidates. |
| Asset: A submission meeting all the prescreening required criteria and obtaining n of 3 assets |
Candidates who meet all the required criteria and the minimum number of assets will be considered ACE candidates. |
| Both Result and Assets must be met |
This option is used to identify ACE candidates using the result and asset conditions. |
| Either Result or Assets must be met |
This option is used to identify ACE candidates using the result or asset condition. |
Steps to Enable
You don't need to do anything to enable this feature.
As a recruiter, you can edit the internal description and external description of requisitions.
When you view a requisition, click the Edit icon next to Internal Description or External Description. You can edit several fields such as Opening Date, Closing Date, Contact Name, Contact Email. You can enter a description for the job as well as qualifications using the rich text editor options.
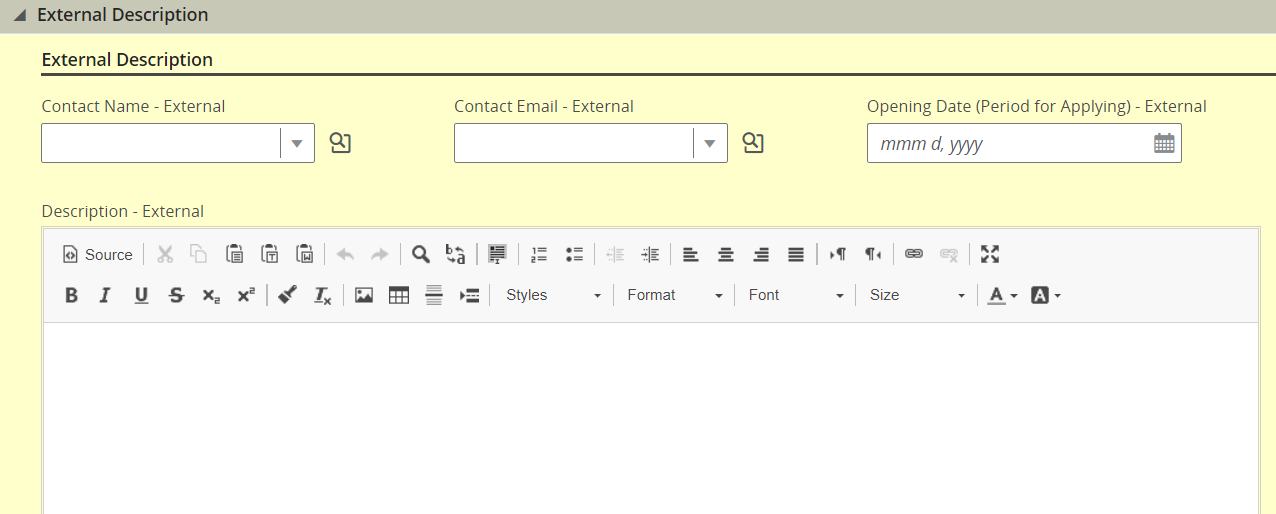
External Description Section of Requisition
Steps to Enable
You don't need to do anything to enable this feature.
Evaluation Management in Requisitions
Evaluation Management allows your organization to electronically capture, review, and analyze an evaluator's input obtained during a candidate interview screening process.
Fluid Recruiting is using the existing Evaluation Management functionalities of Taleo Recruiting. From the Interviews tab of a job requisition, you can:
- Add evaluation questionnaires.
- Send evaluation feedback requests to evaluators to ask them to evaluate candidates using evaluation questionnaires.
- View feedback provided by evaluators.

Interviews Tab in a Requisition
Steps to Enable
You don't need to do anything to enable this feature.
As a recruiter, you can view, preview, upload, and download attachments in requisitions.
When you upload a file, the following file formats are supported. System administrators define which formats are available to users.
- Any File Format
- Excel (.xls and .xlsx)
- Hypertext Markup Language (.htm and .html)
- OpenOffice Writer (.odt)
- Portal Document Format (.pdf)
- Rich Text Format (.rtf)
- Text (.txt)
- Word (.doc and .docx)
- Word Perfect (.wpd)
- Zip Format
Once a file is uploaded, you can preview, delete, and download the file.
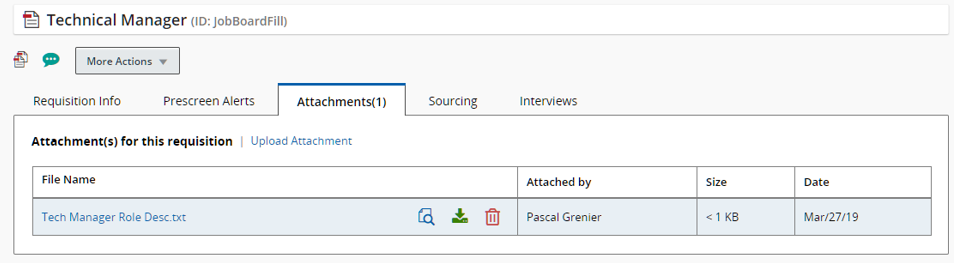
Attachments Tab in Requisition
Steps to Enable
You don't need to do anything to enable this feature.
View Requisitions Posted to Agents and Agencies
As a recruiter, you can view requisitions posted by hiring agencies.
On the Sourcing tab of a job requisition, go to the Agents and Agencies section. You can see the list of agents and agencies where the requisition is posted.
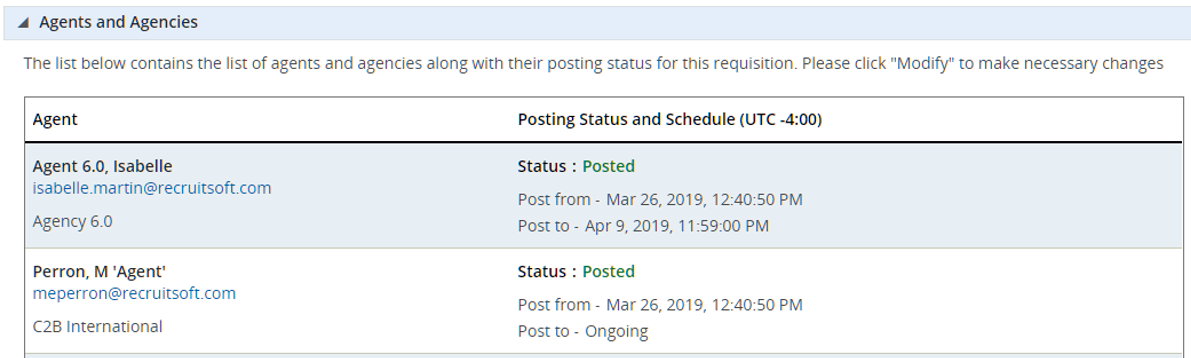
Agents and Agencies Section in a Requisition
Steps to Enable
You don't need to do anything to enable this feature.
Add Collaborators to Requisitions
As a recruiter, you can add collaborators to requisitions.
In the Requisition Info tab of a requisition, click the Add Collaborators link. When adding collaborators, you can use the Frequent Collaborators option or other filters to find the people you want to add as collaborators. You can add a maximum of 30 collaborators.

Collaborators in Requisition
Steps to Enable
You don't need to do anything to enable this feature.
View General Profile of Candidates
As a recruiter, you can view the general profile of candidates while looking at their job submissions. This provides you with a better and more complete understanding of the candidates.
When you view the job submission of a candidate, you can toggle between the general profile and submission of the candidate.
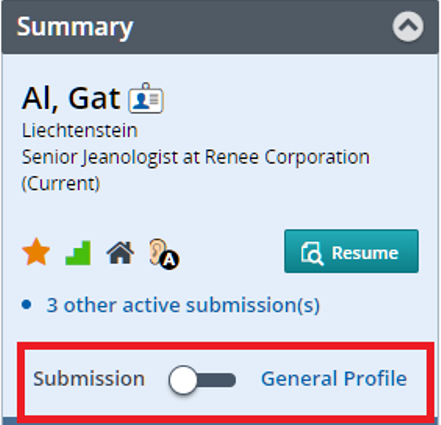
General Profile Toggle Button
The general profile view is organized into four tabs:
- General Profile: Provides high level information about the candidate such as personal information, work experience, employment preferences. The General Profile tab is available in view mode only. You can’t edit the information.
- Attachments: Contains resume and other attachments provided by the candidate and attachments you provided. You can view, edit, download, and delete attachments.
- Referral: Contains referrals provided by candidates, employees, and agents.
- History: Contains a log of all actions performed on the candidate file. You can view the history of the general profile only, the general profile and all submissions, or all active submissions.
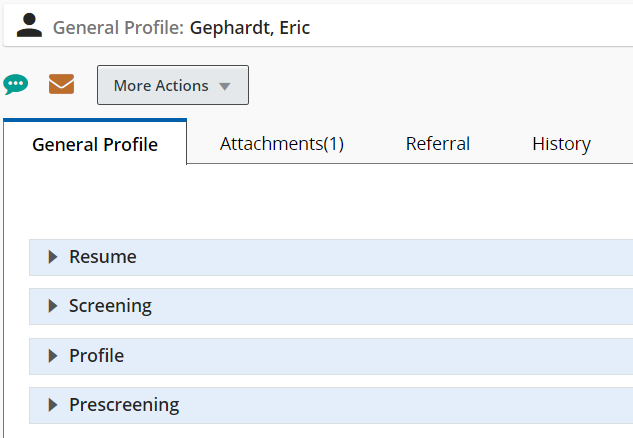
General Profile Tab with Four Sections
When you view the general profile of a candidate, a summary of the profile is displayed on the profile card. The summary highlights important details about the candidate such as contact information in the information callout, active submissions, most relevant education, work experience.
When you view the general profile of a candidate, the following actions are available:
- Add Comments
- Send Correspondence
Steps to Enable
You don't need to do anything to enable this feature.
As a recruiter, you can view, preview, edit, upload, and download attachments in general profiles.
When you upload a file, the following file formats are supported. System administrators define which formats are available to users.
- Any File Format
- Excel (.xls and .xlsx)
- Hypertext Markup Language (.htm and .html)
- OpenOffice Writer (.odt)
- Portal Document Format (.pdf)
- Rich Text Format (.rtf)
- Text (.txt)
- Word (.doc and .docx)
- Word Perfect (.wpd)
- Zip Format
When you upload an attachment, you can indicate if the file is a candidate resume or another type of attachment. You can also indicate if the attachment is visible to candidates.
Once a file is uploaded, you can preview, edit, delete, and download the file.
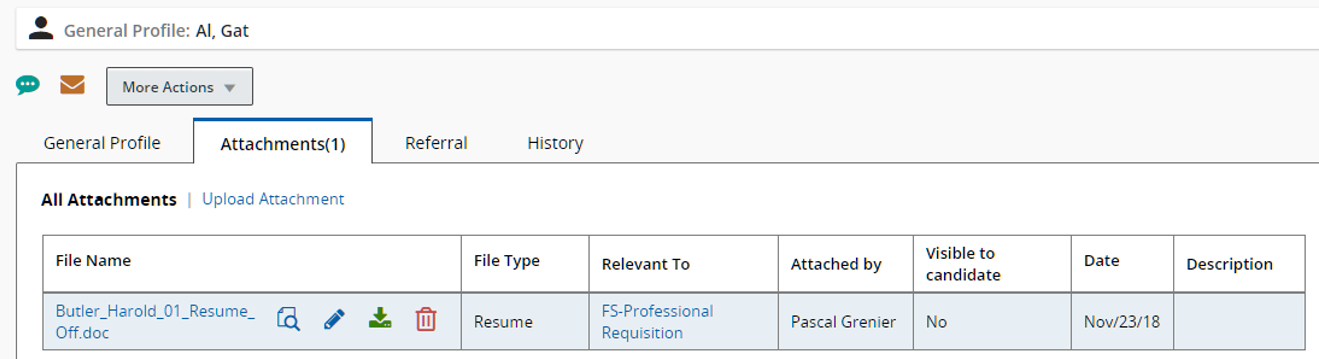
Attachments Tab in General Profile
Steps to Enable
You don't need to do anything to enable this feature.
As a recruiter, you can modify candidate job submissions.
When you view a candidate job submission, click the Edit icon next to a section or the Edit All icon. Once you are in edit mode, a summary section appears on the left side of the page. You can click section titles to quickly navigate to specific content.
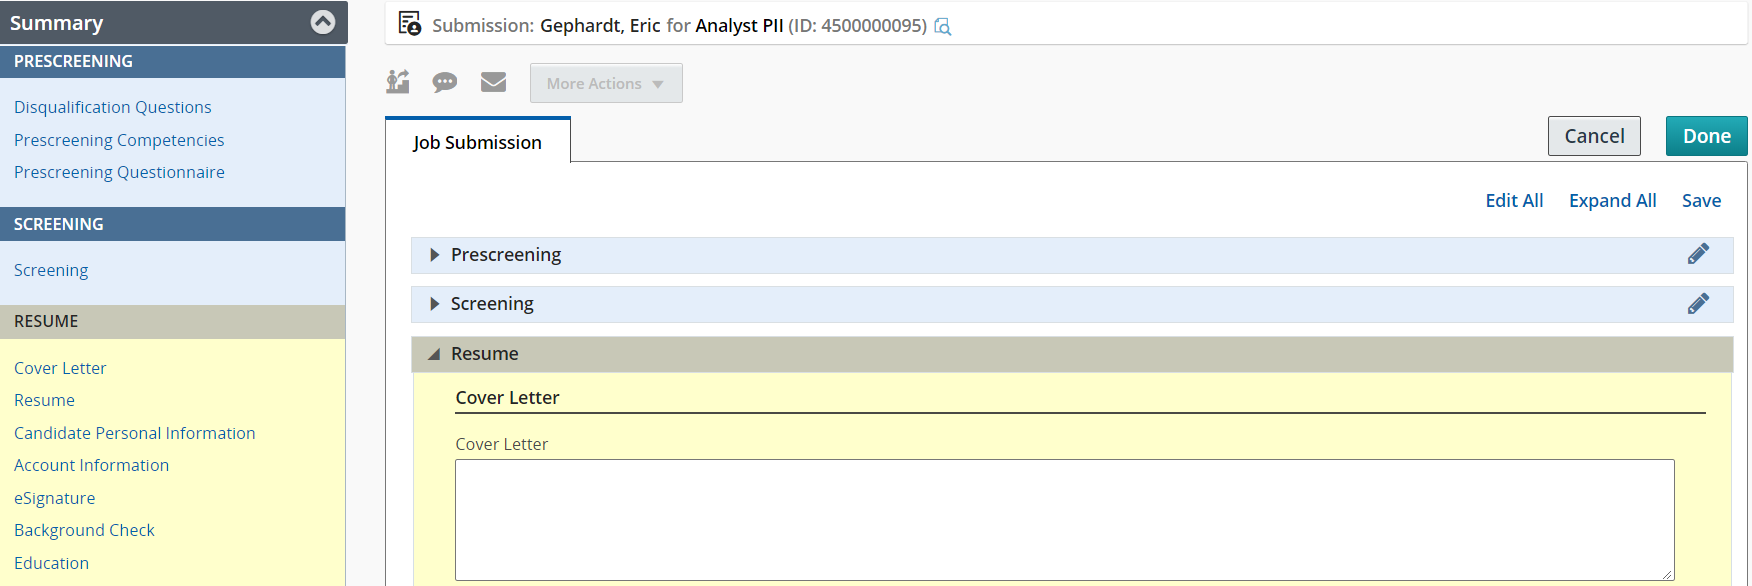
Job Submission Tab
Steps to Enable
You don't need to do anything to enable this feature.
As a recruiter, you can create a candidate submission while reviewing the list of submissions for a requisition.
- Open a requisition.
- Access the submissions for the requisition.
- In the More Actions menu, select Create New Candidate.
- Indicate for which requisition you want to create the submission, the current requisition or another requisition.
- Click Next. You are then taken to the creation flow.
- Select the form you want to use to create the candidate submission.
- Upload the resume of the candidate. This step is optional.
- A duplicate check is performed.
- If duplicate candidates are found, you can overwrite an existing candidate profile or create a new candidate profile.
- If no duplicates are found or if duplicates are found but the candidate is not on the list, you can go back to the previous page and change the information used to find duplicates. Or, you can create a new candidate.
- Complete the fields.
Steps to Enable
You don't need to do anything to enable this feature.
As a recruiter, you can submit offers for approval.
When you create an offer for a candidate, you can route the offer for approval by selecting the Submit Offer for Approval action. This action is used when at least one person must approve an offer before extending it to the candidate.
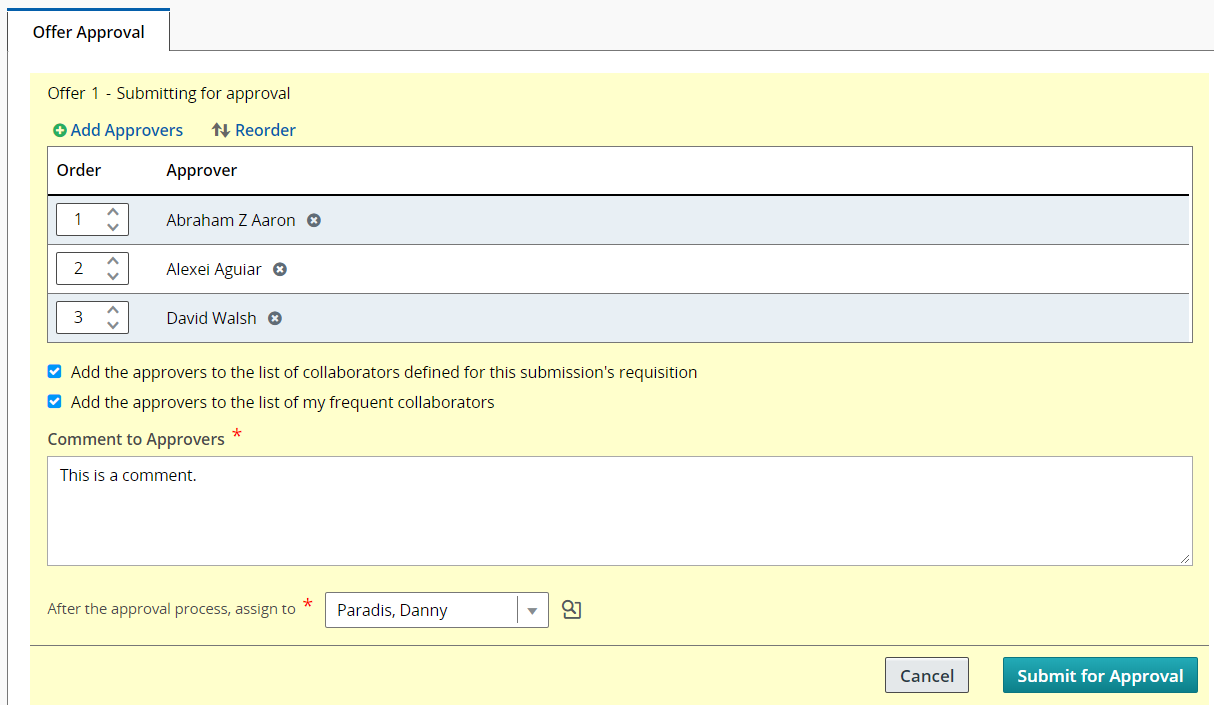
Offer Approval Tab
- Open a candidate submission.
- Click the Offers tab.
- In the More Actions menu, select Submit Offer for Approval.
- Select the approvers.
- Define the sequence of approval by assigning a sequence number using the drop-down list under the Order column.
- Indicate if you want to add the approvers to the list of collaborators for the requisition and the list of frequent collaborators.
- In the After Approval section, select a user to whom you will assign the next task.
- Click Submit for Approval.
The system assigns the task to the first approver in the sequence. The approver receives an Approve Offer task.
Steps to Enable
You don't need to do anything to enable this feature.
Privacy Agreement Reporting Fields
New reporting fields allow you to create reports on Talent Acquisition’s Privacy Agreement functionality.
The following privacy agreement fields were added:
- Is Agreed
- Action Date
- Action Locale
- Privacy Statement Code
- Privacy Statement Name
- Privacy Statement Career Site Code
- Privacy Statement Career Site Name
Steps to Enable
You don't need to do anything to enable this feature.