
- Revision History
- Overview
- Feature Summary
-
- OBI Reporting
- Fluid Recruiting
-
- Modify an Offer Approval Process
- Terminate an Offer Approval Process
- Modify a Requisition Approval Process
- Terminate a Requisition Approval Process
- Rescind an Offer
- Cancel an Offer
- Schedule and Manage Candidate Interviews
- Add and Modify the Referring Agent for a Submission
- Organize Candidate Search Queries Into Folders
- Reset a Submission Selection Process
- Send Correspondence While Changing a Submission Step/Status
- Support of JavaScript on Requisition Pages
- Bypass Mandatory Selection Steps
- Use OLF Filters
- View All Configured List Formats
- View Email Validated and Candidate Confirmed Account Icons
- View Offers for All Requisitions
- Mark Selection Steps as Complete with Pending Activities
-
This document will continue to evolve as existing sections change and new information is added. All updates appear in the following table:
| Date | Feature | Notes |
|---|---|---|
| 10 FEB 2020 | Created initial document. |
This guide outlines the information you need to know about new or improved functionality in Oracle Talent Enterprise Cloud Update 20A and describes any tasks you might need to perform for the update. Each section includes a brief description of the feature, the steps you need to take to enable or begin using the feature, any tips or considerations that you should keep in mind, and the resources available to help you.
GIVE US FEEDBACK
We welcome your comments and suggestions to improve the content. Please send us your feedback at talent_acquisition_doc_feedback_ww_grp@oracle.com.
Column Definitions:
Features Delivered Enabled
Report = New or modified, Oracle-delivered, ready to run reports.
UI or Process-Based: Small Scale = These UI or process-based features are typically comprised of minor field, validation, or program changes. Therefore, the potential impact to users is minimal.
UI or Process-Based: Larger Scale* = These UI or process-based features have more complex designs. Therefore, the potential impact to users is higher.
Features Delivered Disabled = Action is needed BEFORE these features can be used by END USERS. These features are delivered disabled and you choose if and when to enable them. For example, a) new or expanded BI subject areas need to first be incorporated into reports, b) Integration is required to utilize new web services, or c) features must be assigned to user roles before they can be accessed.
| Ready for Use by End Users Reports plus Small Scale UI or Process-Based new features will have minimal user impact after an update. Therefore, customer acceptance testing should focus on the Larger Scale UI or Process-Based* new features. |
Action is Needed BEFORE Use by End Users Not disruptive as action is required to make these features ready to use. As you selectively choose to leverage, you set your test and roll out timing. |
|||||
|---|---|---|---|---|---|---|
| Feature |
Report |
UI or |
UI or |
|
||
Use these fields to report on the Candidate Folder hierarchy:
- Candidate Folder Name 1
- Candidate Folder Name 2
- Candidate Folder Name 3
- Candidate Folder Name 4
- Candidate Folder ID 1
- Candidate Folder ID 2
- Candidate Folder ID 3
- Candidate Folder ID 4
Steps to Enable
You don't need to do anything to enable this feature.
Modify an Offer Approval Process
Modify the approval process of an offer which is currently under approval. You can also add new approvers, remove approvers, or change the order of approvers.
Let’s say an approver is on vacation and you need to assign the approval of an offer to a different approver.
- Open the offer.
- In the More Actions menu, select Modify Approval Process. You can also use the Modify Approval Process button.
- Remove the approver who is on vacation and add an alternate approver. The newly added approver receives the approval notification as the approval workflow progresses.
- Enter a reason for modifying the approval process.
- Click Save and Close.
Steps to Enable
You don't need to do anything to enable this feature.
Terminate an Offer Approval Process
You can terminate an offer’s approval process once the approval has been triggered.
- Go to the Offers tab.
- Open an offer.
- In the More Actions menu, select Terminate Approval Process.
Steps to Enable
You don't need to do anything to enable this feature.
Modify a Requisition Approval Process
Modify the approval process of a requisition which is currently under approval. You can also add new approvers, remove approvers, or change the order of approvers.
Let’s say an approver is on vacation and you need to assign the approval of a requisition to a different approver.
- Open the requisition.
- In the More Actions menu, select Modify Approval Process. You can also use the Modify Approval Process button.
- Remove the approver who is on vacation and add an alternate approver. The newly added approver receives the approval notification as the approval workflow progresses.
- Enter a reason for modifying the approval process.
- Click Save and Close.
Steps to Enable
You don't need to do anything to enable this feature.
Terminate a Requisition Approval Process
You can terminate a requisition’s approval process once the approval has been triggered.
- Go to the Requisitions tab.
- Open the requisition.
- In the More Actions menu, select Terminate Approval Process.
Steps to Enable
You don't need to do anything to enable this feature.
You can cancel an offer that is already extended to a candidate. This might be useful in situations where you extended an offer but afterwards you received an adverse report on the background check of the candidate.
- Open a submission.
- In the More Actions menu, select Rescind Offer.
- Enter comments if needed.
- Click Rescind Offer.
Once the offer is rescinded, the onboarding process is also canceled.

Rescind an Offer
Steps to Enable
You don't need to do anything to enable this feature.
You can cancel an offer before extending it to the candidate. You may need for example to modify the financial terms of the offer.
- Open a submission.
- In the More Actions menu, select Cancel Offer.
- Enter comments if needed.
- Click Cancel Offer.
Steps to Enable
You don't need to do anything to enable this feature.
Schedule and Manage Candidate Interviews
You can schedule, update, and cancel interviews for candidates.
Let’s say you want to interview a candidate for a job.
- Select the candidate file. The candidate must be at the right interview step/status.
- In the More Actions menu, select Schedule an Interview.
- Enter details about the interview such as the location, date, time, and duration. You can also set a reminder for the interviewers.
- Click Next.
- Invite the people who will attend the interview. The hiring manager of the requisition is invited by default. If the meeting organizer is the hiring manager, the recruiter is invited instead.
- You can also decide to invite or not the candidate.
- A default interview notification is proposed by the system. The most appropriate notification is selected based on the requisition's Organization, Location, Job Field structure and the application language. You can select another notification.
- You can send the candidate file and requisition file to the interview attendees but not the candidate.
- Click Preview to see how the interview request looks like. You can also print it.
- Click Next.
- Review the details of the interview.
- Click Submit.
After the interview is scheduled, you can view interview basic details in the summary card and History tab.
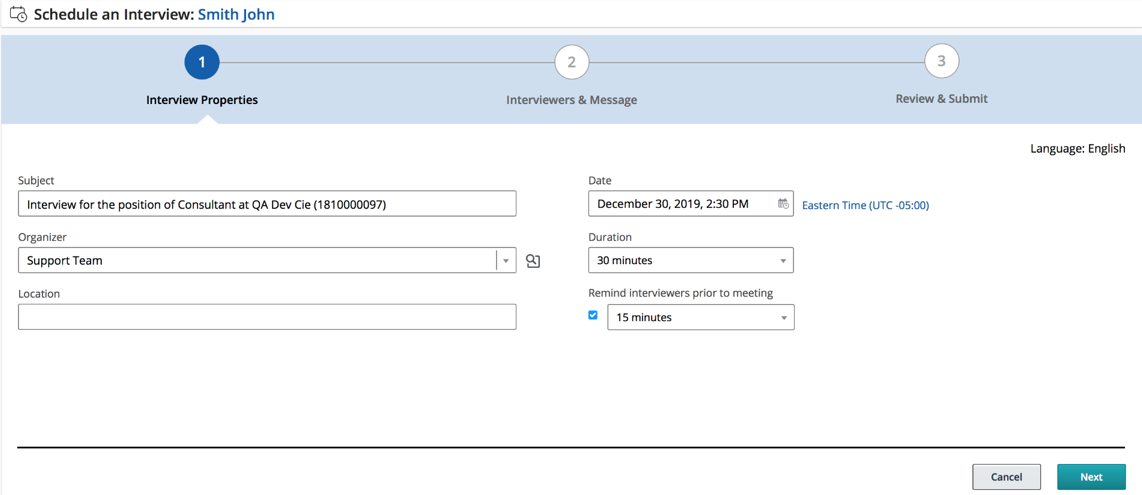
Schedule an Interview
You can update and cancel an interview using the Update the Interview and Cancel the Interview actions in the More Actions menu. When you cancel an interview, you can choose to send a notification to inform attendees that the interview is canceled.
Steps to Enable
You don't need to do anything to enable this feature.
Add and Modify the Referring Agent for a Submission
You can add a referring agent to a submission.
- Open a submission.
- Go to the Referral tab.
- Click Add Referring Agent.
- Selected a referring agent.
- Click Save.
When an agent is added to a submission, you can go back to the submission and use the Change Referring Agent button to change the referring agent. Use the Remove Referral Information button to remove the agent.
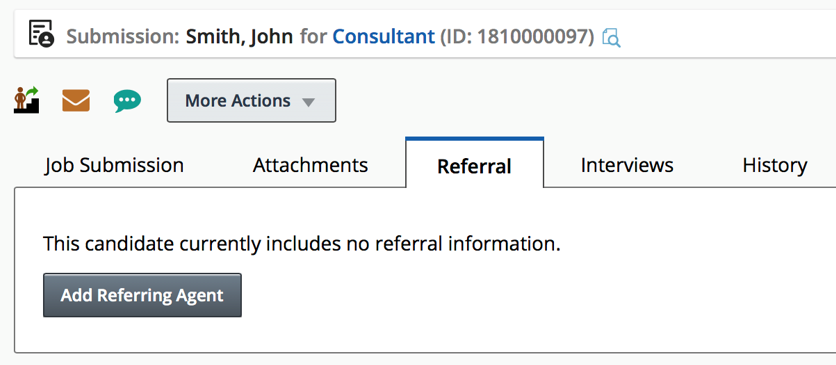
Add Referring Agent
Steps to Enable
You don't need to do anything to enable this feature.
Organize Candidate Search Queries Into Folders
You can organize your candidate search queries into folders.
- Go to the Find Candidates tab.
- Click the Saved Searches tab.
- Select a search query.
- Click the Move Saved Search icon.
- Decide if you want to copy or move the search query.
- Select a folder.
- Click Done.

Move Saved Search
When you view the folder structure, click the More Actions icon next to a folder to access more actions such as creating a new folder, sharing an existing folder, viewing folder properties, moving and deleting the folder.
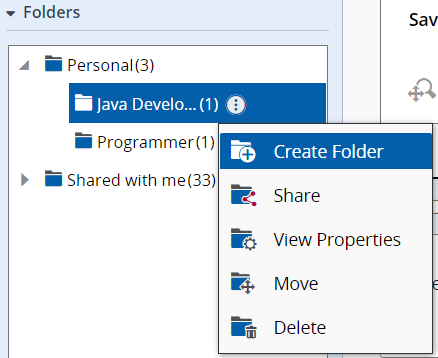
Folders Actions Menu
Steps to Enable
You don't need to do anything to enable this feature.
Reset a Submission Selection Process
You can use the new Reset Selection Process action to restart the selection process of an hourly submission from the beginning.
- Select a submission.
- In the More Actions menu, select Reset Selection Process.
- In the Reset Selection Process window, you can see to which step and status the submission will be reset.
- Click Reset and Close.
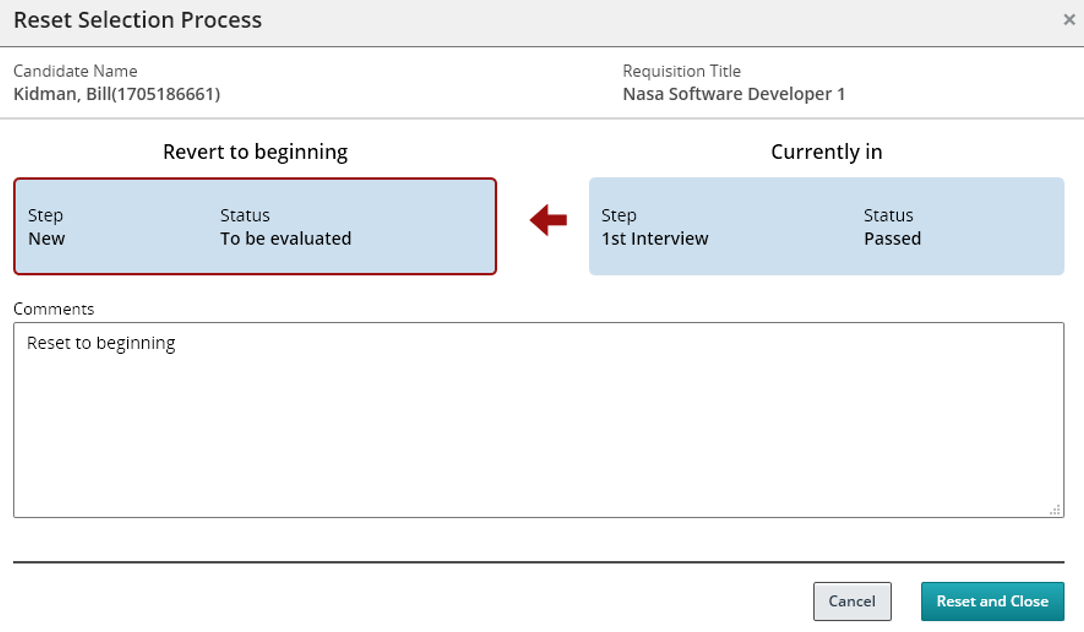
Reset Selection Process Action
Steps to Enable
You don't need to do anything to enable this feature.
Send Correspondence While Changing a Submission Step/Status
When you use the Change Step/Status action for a candidate submission, you can select the Send Correspondence option to send a correspondence to the candidate.
- Select a submission.
- In the More Actions menu, select Change Step/Status.
- Select the Send Correspondence option.
- Click Apply and Proceed to Next Action.
- In the Send Correspondence window, select how the message is sent: email or printed letter.
- Decide if you want to use a template or create the message from scratch.
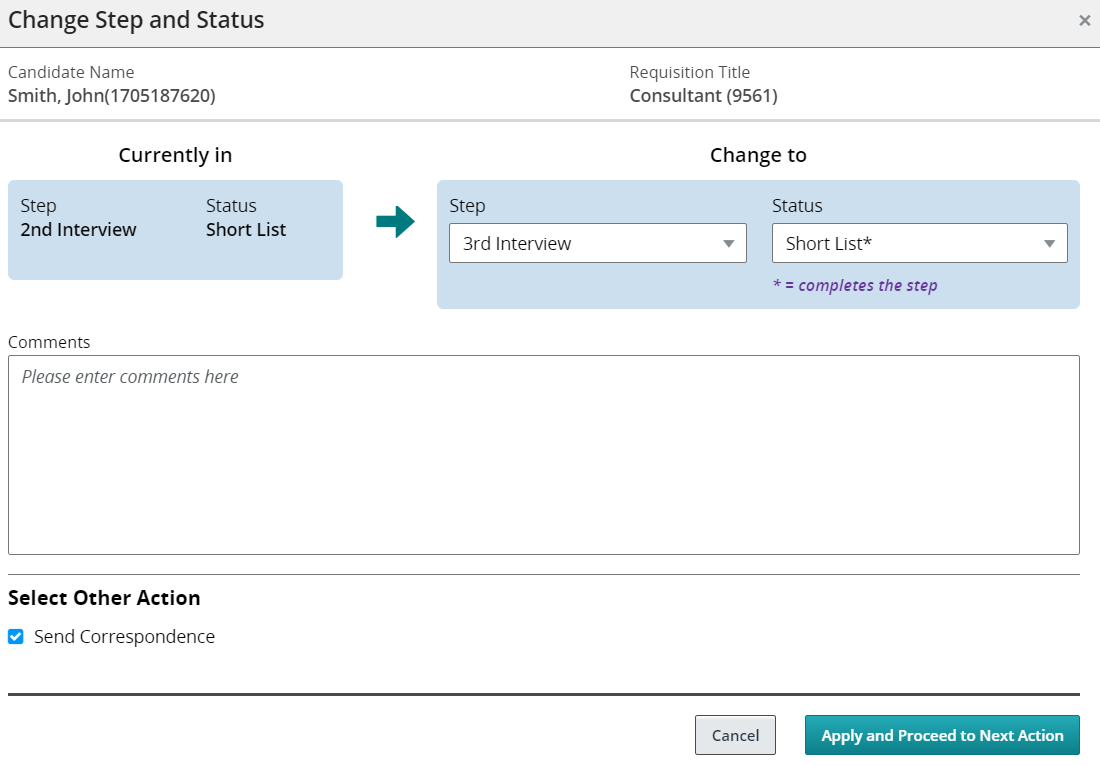
Send Correspondence Option
Steps to Enable
You don't need to do anything to enable this feature.
Support of JavaScript on Requisition Pages
System administrators can integrate JavaScript on requisition pages.
Bookmarklets are used to execute JavaScript. These scripts are supported:
- viewSource()
- getTextInControl(fieldId)
- setTextInControl(fieldId,value)
Steps to Enable
You don't need to do anything to enable this feature.
Bypass Mandatory Selection Steps
When you want to move submissions quickly in the selection process, you can use the Bypass Selection Steps action to move the submission to any step and bypass mandatory steps. The Bypass Selection Steps action is available as a bulk action.
- Select a submission.
- In the More Actions menu, select Bypass Selection Steps.
- Select a step. Mandatory steps are indicated with a line under them.
- Enter a comment.
- Click Apply and Close. The info is saved in the submission’s History tab.
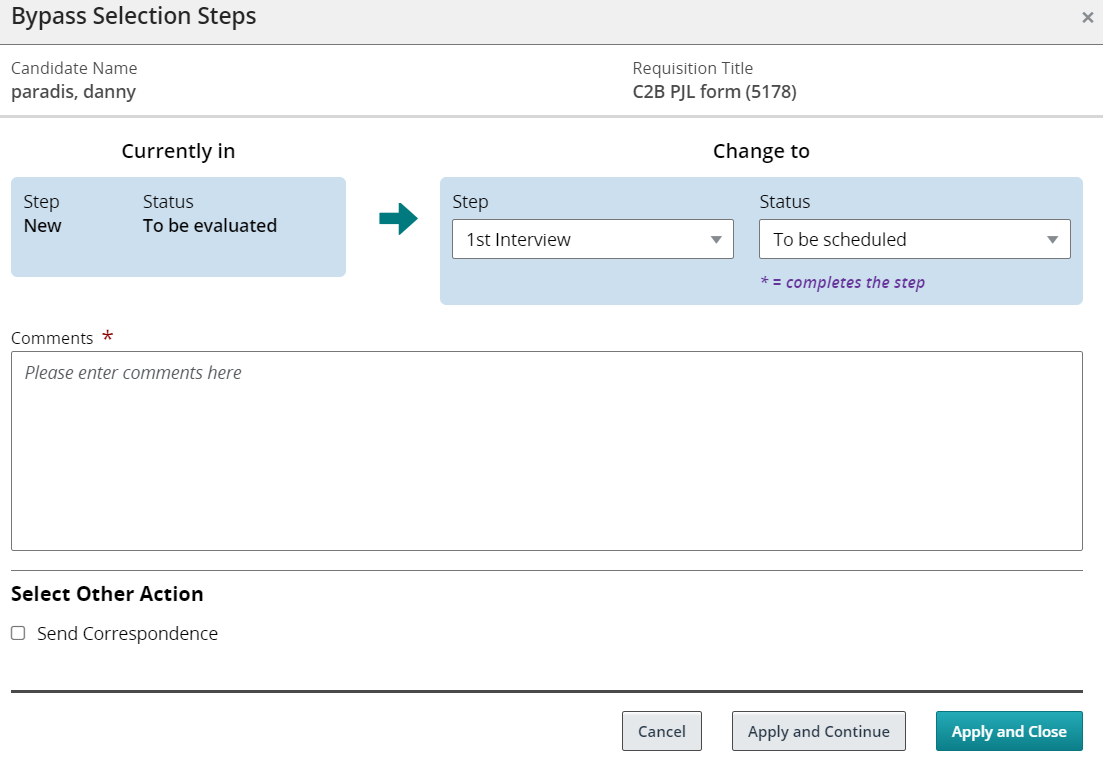
Bypass Selection Steps Action
Steps to Enable
You don't need to do anything to enable this feature.
You can use Organization, Location, and Job Field filters to narrow a list down to relevant information. In certain situations, these filters only display facets relevant to the context. For example, when you add agents to a requisition, the Staffing Agent Selector may display only agents for a specific country or job field.
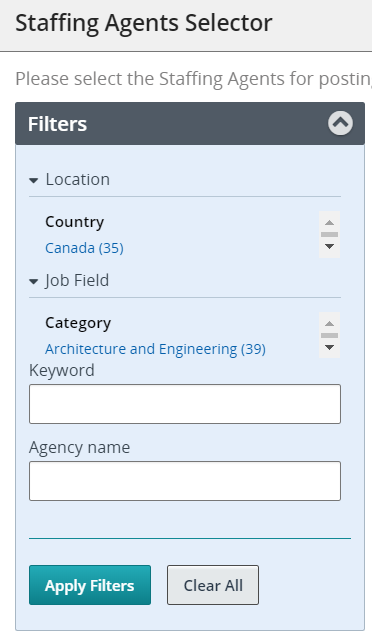
OLF Filters
Steps to Enable
You don't need to do anything to enable this feature.
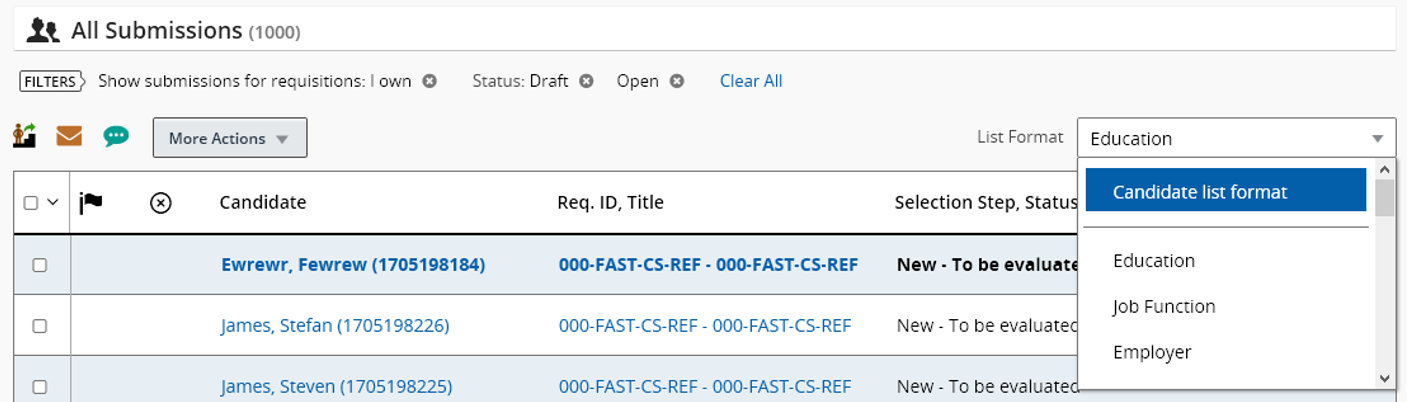
View All Configured List Formats
When you're on the Submissions list, the List Format selector now shows all configured list formats for a list context: personalized list formats and those configured by your administrator.
List Formats
Steps to Enable
You don't need to do anything to enable this feature.
View Email Validated and Candidate Confirmed Account Icons
When you're on the Submissions list, you can view which submissions have their email validated and account confirmed. You can add the Email Validated and Candidate Confirmed Account columns to list formats.
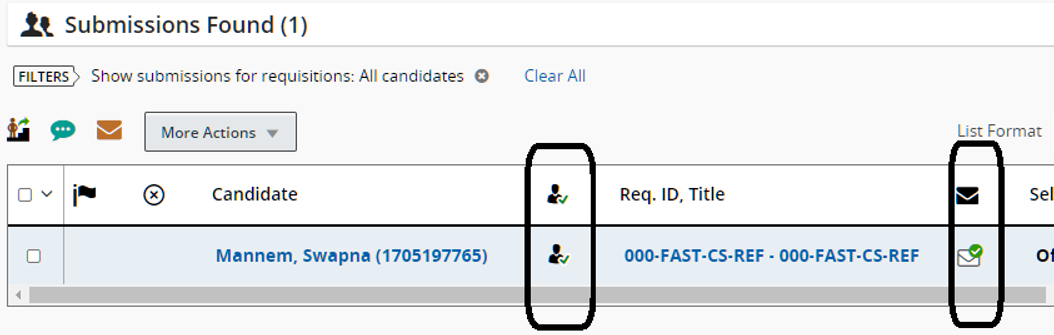
Email Validated and Candidate Confirmed Account Columns
Steps to Enable
You don't need to do anything to enable this feature.
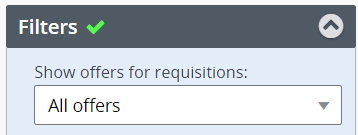
View Offers for All Requisitions
When you go to the Offers tab, the offers for requisitions that you own are displayed by default. A new filter criteria is available in the “Show offers for requisitions” filter: All Offers. When you select this criteria, you can view active offers for all requisitions tied to the user groups you belong to. When you see the list of all offers, you can apply filters, select a list format, and use actions in the More Actions menu.
All Offers Filter
Steps to Enable
You don't need to do anything to enable this feature.
Mark Selection Steps as Complete with Pending Activities
You can move submissions forward in the selection process even if certain activities are pending.
- Select a submission.
- In the More Actions menu, select Change Step/Status.
- Select a step and a status that completes the step.
- Select the Complete this step even if some activities remain pending option.
- Click Apply and Close. The info is saved in the submission’s History tab.

Option to Complete a Step When Activities Are Pending
Steps to Enable
You don't need to do anything to enable this feature.