
- Revision History
- Overview
- Feature Summary
-
- Career Section
- OBI Reporting
- Fluid Recruiting
-
- Create Candidate General Profiles and Submissions Using Referral Mode
- View and Filter Tasks Related to Requisitions and User Groups
- View and Use Up to 20 Organization Levels
- Start and Cancel an Onboarding Process from Requisition’s Submission List
- Sort at Multilevel in All List Formats
- Share Jobs Through Social Media
- Create a Requisition Using a Position
- Support Position Field for Integration with HCM
- View and Edit Requisition Template and Position Fields of a Requisition
- Use Backward and Forward Menus to Navigate Through Lists
-
- Sourcing
- Revision History
- Overview
- Feature Summary
-
- Recruiting
- Fluid Recruiting
-
- Accessing Online Product Help and Guidance
- Center Stage (Recruiting Center)
- Check for Duplicate Candidates and Candidate Submissions
- Perform Candidate Selection Process Changes Using Actions in the More Actions Menu
- Change Step and Status Consecutively as Bulk Action
- View and Perform Tasks Assigned to You
- Use Forms for the Hiring Process
- Capture Candidate Expectations
- Preview and Download Attachments
- Start the Onboarding Process While Changing Step and Status
- Export Submissions and Candidate General Profiles to Excel
- Candidate Pools
- Use Candidate Search Tools
- Print Candidate General Profiles, Submissions, and Requisitions
- Use Advance Filters to Filter Submissions and Offers
- Configurable Requisition List
- Create Questions Specific to a Requisition
- Identify Missing Information While Creating and Editing Requisitions
- Identify New Submissions on a Requisition
- Use Deep Links to Access Tasks
- Worker Related Fields Available for Integration
-
- Sourcing
- OBI Reporting
This document will continue to evolve as existing sections change and new information is added. All updates appear in the following table:
| Date | Product | Feature | Notes |
|---|---|---|---|
| 03 AUG 2020 | Created initial document. |
This guide outlines the information you need to know about new or improved functionality in Oracle Talent Enterprise August Maintenance Pack 20B.3 and describes any tasks you might need to perform for the update. Each section includes a brief description of the feature, the steps you need to take to enable or begin using the feature, any tips or considerations that you should keep in mind, and the resources available to help you.
GIVE US FEEDBACK
We welcome your comments and suggestions to improve the content. Please send us your feedback at talent_acquisition_doc_feedback_ww_grp@oracle.com.
Column Definitions:
Features Delivered Enabled
Report = New or modified, Oracle-delivered, ready to run reports.
UI or Process-Based: Small Scale = These UI or process-based features are typically comprised of minor field, validation, or program changes. Therefore, the potential impact to users is minimal.
UI or Process-Based: Larger Scale* = These UI or process-based features have more complex designs. Therefore, the potential impact to users is higher.
Features Delivered Disabled = Action is needed BEFORE these features can be used by END USERS. These features are delivered disabled and you choose if and when to enable them. For example, a) new or expanded BI subject areas need to first be incorporated into reports, b) Integration is required to utilize new web services, or c) features must be assigned to user roles before they can be accessed.
| Ready for Use by End Users Reports plus Small Scale UI or Process-Based new features will have minimal user impact after an update. Therefore, customer acceptance testing should focus on the Larger Scale UI or Process-Based* new features. |
Action is Needed BEFORE Use by End Users Not disruptive as action is required to make these features ready to use. As you selectively choose to leverage, you set your test and roll out timing. |
|||||
|---|---|---|---|---|---|---|
| Feature |
Report |
UI or |
UI or |
|
||
New Voluntary Self-Identification of Disability Forms for OFCCP |
||||||
Create Candidate General Profiles and Submissions Using Referral Mode |
||||||
View and Filter Tasks Related to Requisitions and User Groups |
||||||
Start and Cancel an Onboarding Process from Requisition’s Submission List |
||||||
View and Edit Requisition Template and Position Fields of a Requisition |
||||||
Candidates Provide Password When Changing Email Address
Enhances account security by requiring candidates to provide their password or OpenID authentication when changing their email address. To accomplish this, a new Security setting, "Require users to authenticate after changing their email address", is available for each internal and external career section. This setting is delivered enabled for optimal security. Administrators are able to disable the feature at their discretion.
Candidates using Apply as Guest or Apply with LinkedIn will only be able to change their email address after setting up a user name and password.
This authentication validation is possible on both internal and external career sections with the exception of internal career sections with SSO enabled. If SSO is enabled on an internal career section, the "Require users to authenticate after changing their email address" setting will be ignored.
Another new global setting, "Require users to authenticate after changing their email address" is introduced to determine the default value imposed when Administrators create new career sections. This setting is also delivered enabled and can be disabled by Administrators.
Addresses potential account hijacking situations for abandoned devices, without a screen lock and with active candidate sessions.
Steps to Enable
You don't need to do anything to enable this feature.
Tips And Considerations
If you have branding files with styling impacts on the career section, you should review how this interface renders within your branding file.
New Voluntary Self-Identification of Disability Forms for OFCCP
Provides two new versions of the Voluntary Self-Identification of Disability form, one with and one without the Employee ID field. You will need to create a new user-defined field (UDF) to utilize the new Employee ID field that the OFCCP has introduced.
These new forms have an expiration date of May 31, 2023.
These forms are available as of Release 20B.1, and can be added to zones on older releases by opening an Oracle Service Request.
Allows you to work toward OFCCP compliance by implementing the latest forms.
Steps to Enable
-
Ensure that a Diversity Form for the United States is active.
-
Configure UDFs for Name and Employee ID in text format, and date format for Today's Date. Note that you may have preexisting UDFs for Name and Today's Date from prior implementations of older versions.
-
In the Configuration, select Career Section Administration, then Documents. Complete the field binding to connect the form to the diversity UDFs. Activate the form.
-
Position the PDF Form block in your application flow. In the block properties, select the new form.
Tips And Considerations
U.S. government contractors should deploy the forms by August 4, 2020 to work toward regulatory compliance.
Use these fields to report on the System Users folder in the Administration Subject Area and the Candidate Q&A folder in the Recruiting Subject Area:
- User Correspondence Email
- User Work Email
- User Country
- User State
- User City
- Address 1
- Address 2
- Address 3
- SSO ID
- Module Accessed
- Answer Score
- Is Asset
- Is Required
Use the Administration fields to audit users in the system. Use he Recruiting fields to check answer scores and required answers to hire the best candidates.
Steps to Enable
You don't need to do anything to enable this feature.
Create Candidate General Profiles and Submissions Using Referral Mode
You can create candidate general profiles and candidate submissions using the referral mode.
Let’s say you receive information from a referrer about a potential candidate for a requisition and you want to create a candidate general profile or submission along with referrer details.
- Go to the Submissions tab.
- In the More Actions menu, select Create New Candidate.
- Select Create a new candidate (General profile) or Create a new candidate and submission.
- If you create a candidate and submission, select a requisition.
- Select the referral form.
- On the Referrer – Duplicate Check page, enter details about the referrer such as the first name, last name, email address. The application will use that info to search for potential referrer duplicates. If duplicates are found, they're listed on the page.
- If you have the resume of the candidate, you can upload it. The system will populate as many fields as possible. The file must not exceed 5120 kilobytes. It’s format must be one of the following: Word (.doc, .docx), WordPerfect (.wpd), Text (.txt), Rich Text Format (.rtf), Hypertext Markup Language (.html, .htm), Portable Document Format (.pdf), Excel (.xls, .xlsx), OpenOffice Writer (.odt).
- You can also enter basic info about the candidate such as the first name, last name, email address. The application will use that info to search for potential duplicates. If duplicates are found, they're listed on the page. You can then:
- Open a duplicate file and edit it.
- Create a new candidate profile.
- Click Previous to go back to the previous page and enter new info to search for potential duplicates.
- If you decide to create a new candidate profile, complete the fields.
When you’re done, the referrer details are shown in the Referral tab of the general profile or submission.
Steps to Enable
You don't need to do anything to enable this feature.
View and Filter Tasks Related to Requisitions and User Groups
You can use filters to filter tasks and view Tasks list information in different columns based on the applied filters.
In the Tasks tab, you can filter the list of tasks based on:
- ownership and groups
- task type
- selectors related to candidate, requisition, and assignee.
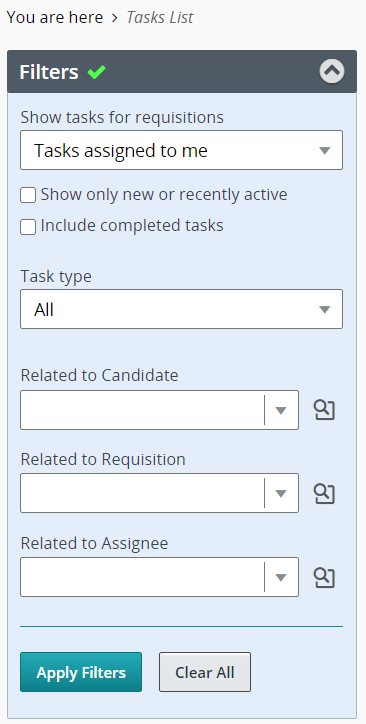
Tasks List Filters
The Tasks list has a column called "Related to". Elements in this column are sorted based on potential relative importance of the entities:
- Tasks related to offers entity first

- Followed by tasks related to submissions

- Followed by tasks related to general profile

- Followed by tasks related to requisition

Steps to Enable
You don't need to do anything to enable this feature.
View and Use Up to 20 Organization Levels
You can view and use up to 20 levels in the Organization hierarchy. Before this release, only 5 levels were available.
While you create a requisition and define the requisition structure, the Organization selector displays up to 20 levels for organizations. You can use all the levels.

Organization Selector in Requisition
In the Organization selector, the levels are shown in different columns. The Organization selector also displays the 20 levels in the Filters panel. You can use the scroll bar to view all the level.
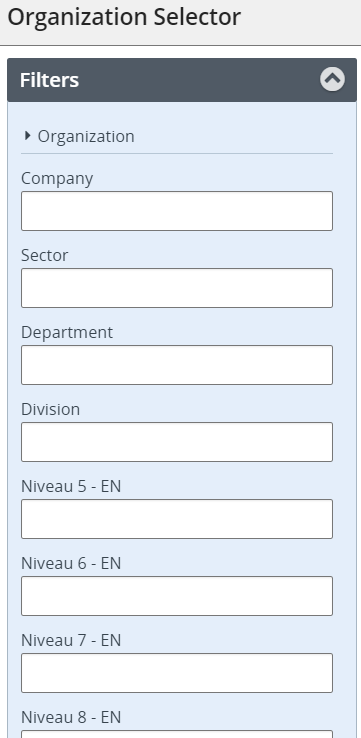
Filters in the Organization Selector
If you type the name of an organization in the Organization field in the Filters panel, the autosuggest feature can display up to 20 levels.
When you print a requisition, you can view all the organizations hierarchy in the PDF.
Steps to Enable
You don't need to do anything to enable this feature.
Start and Cancel an Onboarding Process from Requisition’s Submission List
You can start and cancel a pre-hire onboarding process or a new hire onboarding process for one candidate submission or several submissions related to a specific requisition.
Let’s say you want to start a new hire onboarding process for 20 candidates and later cancel the process for a 5 hires.
- Go to the Requisitions tab.
- Click the candidate count for a specific requisition.
- Select the 20 candidates.
- In the More Actions menu, select the Start New Hire Onboarding Process action.
- Select the available process and enter a comment.
- Click Start Process.
- In the Requisitions list, select the 5 candidates for which you want to cancel the process.
- In the More Actions menu, select the Cancel New Hire Onboarding Process action.
- Click Cancel Process.
Steps to Enable
You don't need to do anything to enable this feature.
Sort at Multilevel in All List Formats
When a list format is configured to allow sorting using up to 3 columns, you can view which columns can be sorted and you can sort the list using these sorting criteria.
Let’s say the Education list format was configured to sort files by Item Requiring Attention, then by Candidate File Identifier, then by Requisition ID, Title. When you’re in the Submissions list and select the Education list format, the submissions are sorted as configured. You can see an indicator next to the columns used to sort files, and the order in which the sorting is done.

Education List Sorted by 3 Columns
Here are the list formats that are supported:
- All Candidates / By Folder
- All Candidates / By Offer
- All Candidates / By Requisition
- Candidate Capture / Possible Duplicates
- List of automatically pooled candidates
- Requisition-specific Candidate List
- Search Results / Advanced Search
- Search Results / Conceptual Search
- Search Results / Quick Search
Multilevel sorting is also supported for custom list formats.
Steps to Enable
You don't need to do anything to enable this feature.
Share Jobs Through Social Media
You can share jobs through social media or by email by sharing the link to a specific job description page to your contacts on multiple social networks.
- Go to the Requisitions tab.
- Open a requisition that is posted on an external career section.
- Click the Sourcing tab.
- Click the Share through social network link.
- Select social networks.

Link to Share a Requisition Through Social Networks
Steps to Enable
You don't need to do anything to enable this feature.
Create a Requisition Using a Position
You can create a requisition by selecting a position to base it upon. When you select a position, fields relevant to the position get pre-filled into the requisition. You can also manually enter details in the requisition.
- Go to the Requisitions tab.
- Click Create Requisition.
- On the Create New Requisition page, select the option Specify a position.
- Select a position using the selector.
- Continue the creation process.
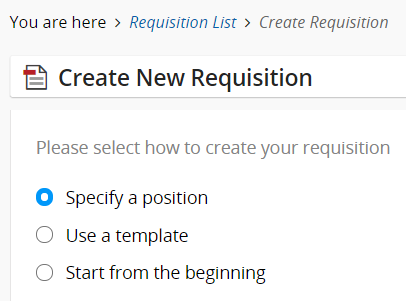
Specify a Position Option
When the requisition is created, you can see the position you selected in the Structure section.
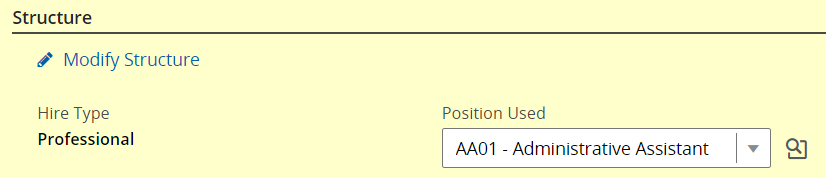
Position Selected in the Requisition
If you select another requisition creation method, you can select a value for the Position field, if that field is available.
Steps to Enable
You don't need to do anything to enable this feature.
Support Position Field for Integration with HCM
The Position field has been made available in requisitions and offers to facilitate the integration with Oracle HCM products.
- When you create a requisition, you can select a position to base it upon. Requisitions support Position field and their imported values.
- The Position field is available in the Structure section of requisitions.
- Position can be associated within offers.
Steps to Enable
You don't need to do anything to enable this feature.
View and Edit Requisition Template and Position Fields of a Requisition
You can edit the Requisition Template and Position field values for an existing requisition. When you change the value of these fields, it triggers an override for fields having an existing value.
- Go to the Requisitions tab.
- Click on a requisition.
- Click the Edit All link.
- In the Structure section, modify the Requisition Template or Position field.
- In the Select Field Values to Overwrite window, select fields for which you want to overwrite the value.
- Click Apply.
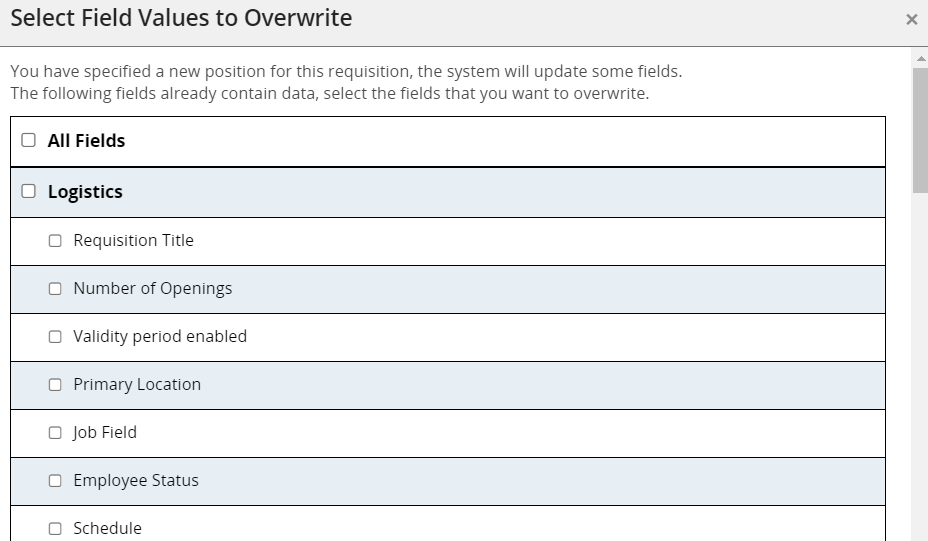
Select Field Values to Overwrite Window
Steps to Enable
You don't need to do anything to enable this feature.
Use Backward and Forward Menus to Navigate Through Lists
You can navigate back and forth through a list of items directly within the details view and land on selected tabs or contexts. Two menu buttons are available:
- Display previous item from the list
- Display next item from the list

New Navigation Buttons
Also, when you decide to navigate back to the list, you're taken to the list where you selected the row and the row is highlighted.
Let’s say you’re on the Requisitions list.
- Open a requisition.
- Go to the Attachments tab.
- Click the button.
You will land on the Attachments tab of the next requisition of the requisitions list.
If you click the Back to Requisition List button, you’re taken back to the Requisitions list, and the requisition you previously opened is highlighted.
Areas where this feature is available are:
- Requisitions
- Submissions
- Requisition-specific submissions
- Offers
- Candidate pools
- Find submission
- Lookup a candidate
- Lookup a candidate (detailed)
- Duplicate check results
Steps to Enable
You don't need to do anything to enable this feature.
Flash Removed from Sourcing User Interface
Prepares Sourcing for the end-of-life of Flash on December 31, 2020, by removing remaining Flash elements from the user interface (UI).
Specifically, employees uploading a resume or cover letter when using the referral process and Administrators uploading images while using Site Builder no longer rely on Flash, making Sourcing free of Flash.
Allows business continuity after the end-of-life for Flash on Dec 31, 2020.
Steps to Enable
You don't need to do anything to enable this feature.
This document will continue to evolve as existing sections change and new information is added. All updates appear in the following table:
| Date | Product | Feature | Notes |
|---|---|---|---|
| 23 JUN 2020 | Accessing Online Product Help and Guidance | Updated document. Revised feature information. | |
| 04 MAY 2020 | Created initial document. |
This guide outlines the information you need to know about new or improved functionality in Oracle Talent Enterprise Update 20A and describes any tasks you might need to perform for the update. Each section includes a brief description of the feature, the steps you need to take to enable or begin using the feature, any tips or considerations that you should keep in mind, and the resources available to help you.
GIVE US FEEDBACK
We welcome your comments and suggestions to improve the content. Please send us your feedback at talent_acquisition_doc_feedback_ww_grp@oracle.com.
Column Definitions:
Features Delivered Enabled
Report = New or modified, Oracle-delivered, ready to run reports.
UI or Process-Based: Small Scale = These UI or process-based features are typically comprised of minor field, validation, or program changes. Therefore, the potential impact to users is minimal.
UI or Process-Based: Larger Scale* = These UI or process-based features have more complex designs. Therefore, the potential impact to users is higher.
Features Delivered Disabled = Action is needed BEFORE these features can be used by END USERS. These features are delivered disabled and you choose if and when to enable them. For example, a) new or expanded BI subject areas need to first be incorporated into reports, b) Integration is required to utilize new web services, or c) features must be assigned to user roles before they can be accessed.
| Ready for Use by End Users Reports plus Small Scale UI or Process-Based new features will have minimal user impact after an update. Therefore, customer acceptance testing should focus on the Larger Scale UI or Process-Based* new features. |
Action is Needed BEFORE Use by End Users Not disruptive as action is required to make these features ready to use. As you selectively choose to leverage, you set your test and roll out timing. |
|||||
|---|---|---|---|---|---|---|
| Feature |
Report |
UI or |
UI or |
|
||
Users with Recruiting Center Granted Fluid Recruiting Access at Upgrade |
||||||
Perform Candidate Selection Process Changes Using Actions in the More Actions Menu |
||||||
Print Candidate General Profiles, Submissions, and Requisitions |
||||||
Identify Missing Information While Creating and Editing Requisitions |
||||||
Users with Recruiting Center Granted Fluid Recruiting Access at Upgrade
All user types who have access to the Recruiting Center will now also have access to Fluid Recruiting (Recruiting).
Once granted, the Access Fluid Recruiting permission can't be rescinded. You can grant the Access Fluid Recruiting permission to user types where it isn’t granted yet. It's not possible to create new user types with only the Legacy Recruiting permission.
Let's take a look at what will remain the same and what may be different when you log in at upgrade.
- If you landed on the Welcome Center prior to 20B, you will continue to do so at upgrade. You'll then be able to choose between Recruiting and Legacy Recruiting.
- If you landed on the Table of Contents (TOC) prior to 20B, you will continue to do so at upgrade. You'll see a single Recruiting link. If you have both Legacy Recruiting and Recruiting, that link takes you to Legacy Recruiting. If you only have access to Recruiting, you'll be taken to Recruiting.
- If you landed directly in the Recruiting Center prior to 20B, what you see depends on how the Display Welcome Center setting is configured.
- If Display Welcome Center is configured to No, you will continue to land directly in Legacy Recruiting.
- If Display Welcome Center is configured to Yes, you will now land on the Welcome Center and be able to choose between Recruiting and Legacy Recruiting.
Steps to Enable
You don't need to do anything to enable this feature.
Tips And Considerations
- There is no impact if you don't have access to Legacy Recruiting.
- Deep links will default to Fluid Recruiting (Recruiting).
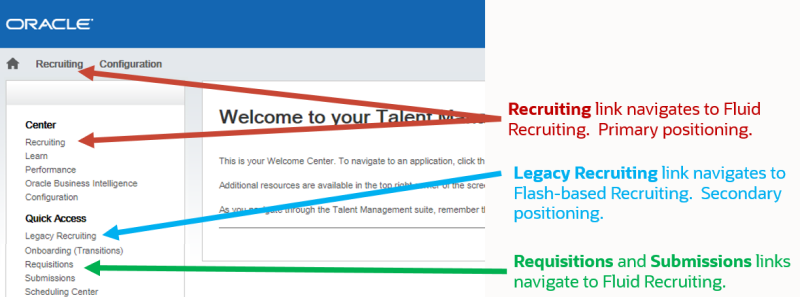
Product Naming and Navigation Finalization
Fluid Recruiting has been renamed to Recruiting, while the Recruiting Center (flash-based) has been renamed Legacy Recruiting.
On the Welcome Center, the primary Recruiting link takes you to Fluid Recruiting (now Recruiting) and a new Legacy Recruiting link takes you to Legacy Recruiting (Recruiting Center). The placement of the Recruiting link repositions Recruiting (Fluid Recruiting) as the primary user experience. You're able to navigate from Legacy Recruiting to Recruiting.
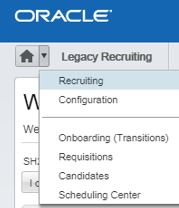
You can toggle to Legacy Recruiting from Recruiting. It's just one of the new links accessible from the Recruiting Hamburger menu.
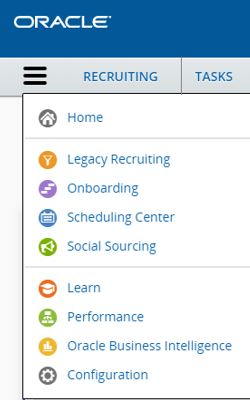
You're also able to toggle to Recruiting from Legacy Recruiting.
Steps to Enable
You don't need to do anything to enable this feature.
Tips And Considerations
The new link behavior is not configurable and is mandatory.
Accessing Online Product Help and Guidance
You can access the Recruiting (Fluid) Help Center to view communications specific content which is configured using the custom communications channel.
When you click on your name in the upper right of the page, you can select Help from the menu and a new window is opened which lists all the sections related to Communications channel. Also, any of the customizations made in Communication Channel will be automatically reflected in Recruiting (Fluid) on upgrade.

Help Available from the Menu
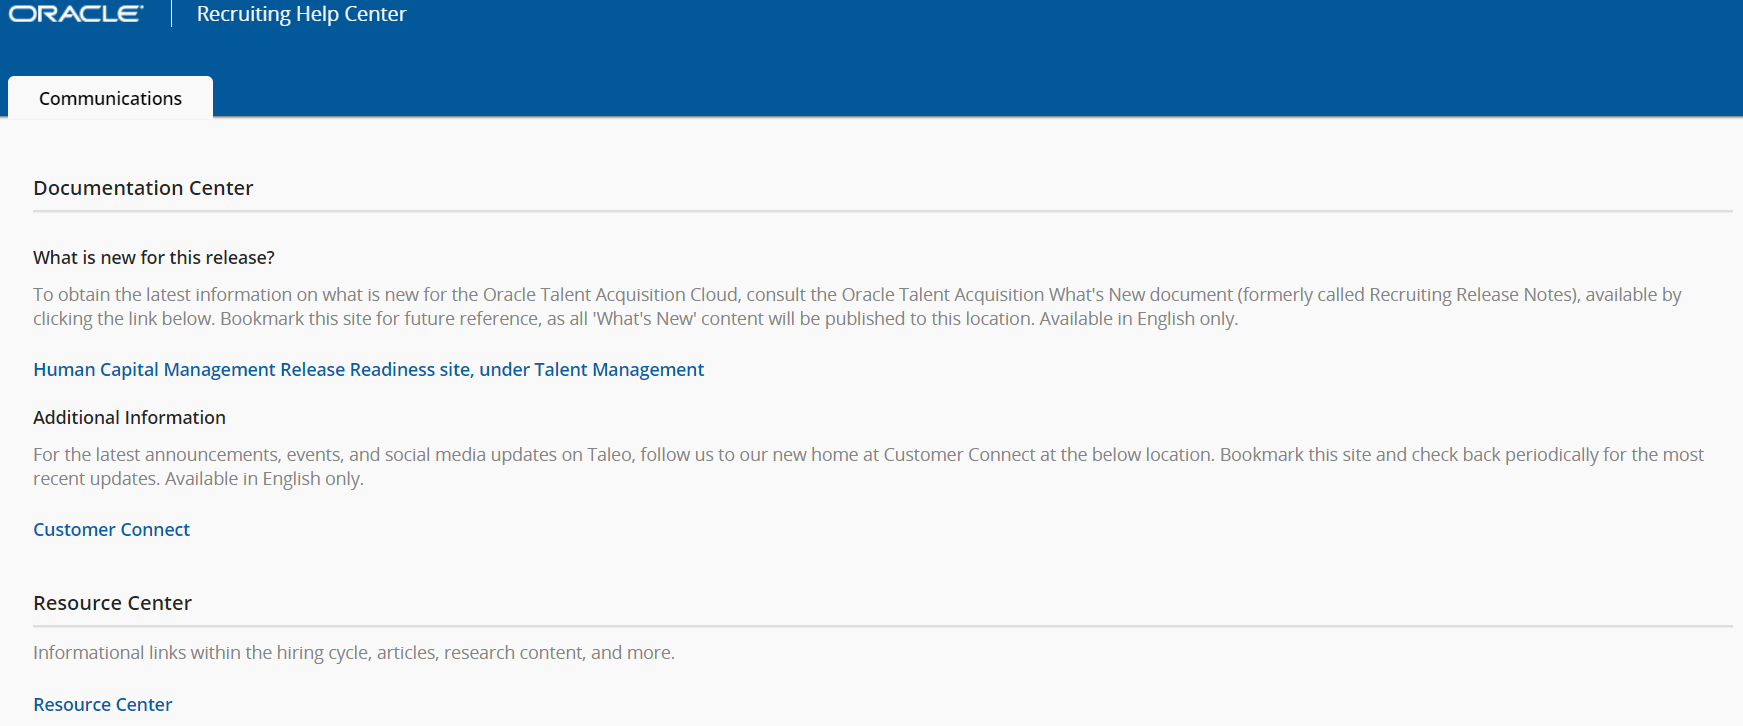
Help Center Page
Steps to Enable
You don't need to do anything to enable this feature.
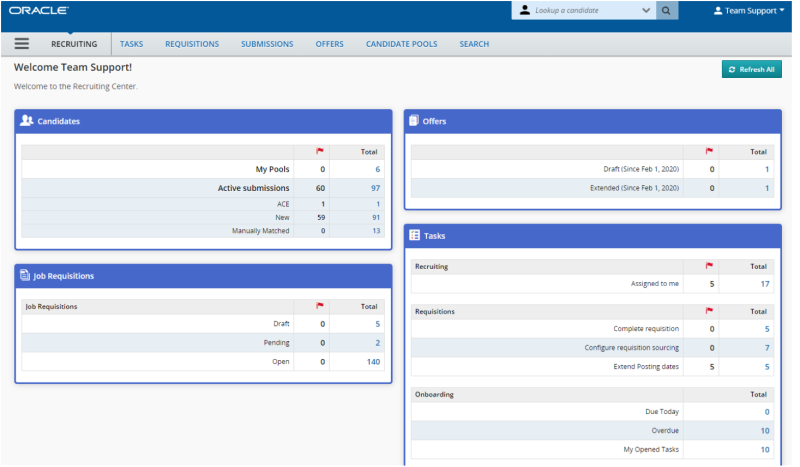
Center Stage (Recruiting Center)
Center Stage provides a comprehensive landing page that summarizes recruiting activities that you own, or for which you're a collaborator.
Steps to Enable
You don't need to do anything to enable this feature.
Tips And Considerations
A shortcut named Legacy Recruiting displays in the Quick Access section so you can continue to ouse Flash-based Recruiting (Legacy Recruiting). This shortcut will be available until Legacy Recruiting is retired, or when an Administrator removes the permission to access Legacy Recruiting from a user type.
Check for Duplicate Candidates and Candidate Submissions
You can run a duplicate check to identify potential duplicate candidates or candidate submissions. If you find duplicate files, you can merge them into a single master file.
The Check for Duplicates action is available from the Submissions list, Tasks list, and within candidate general profiles. Let’s say you’re in the Submissions list.
- Select a candidate file.
- In the More Actions menu, select the Check for Duplicates action. The application verifies if the candidate file already exists in the database. A list of potential duplicate files is displayed.
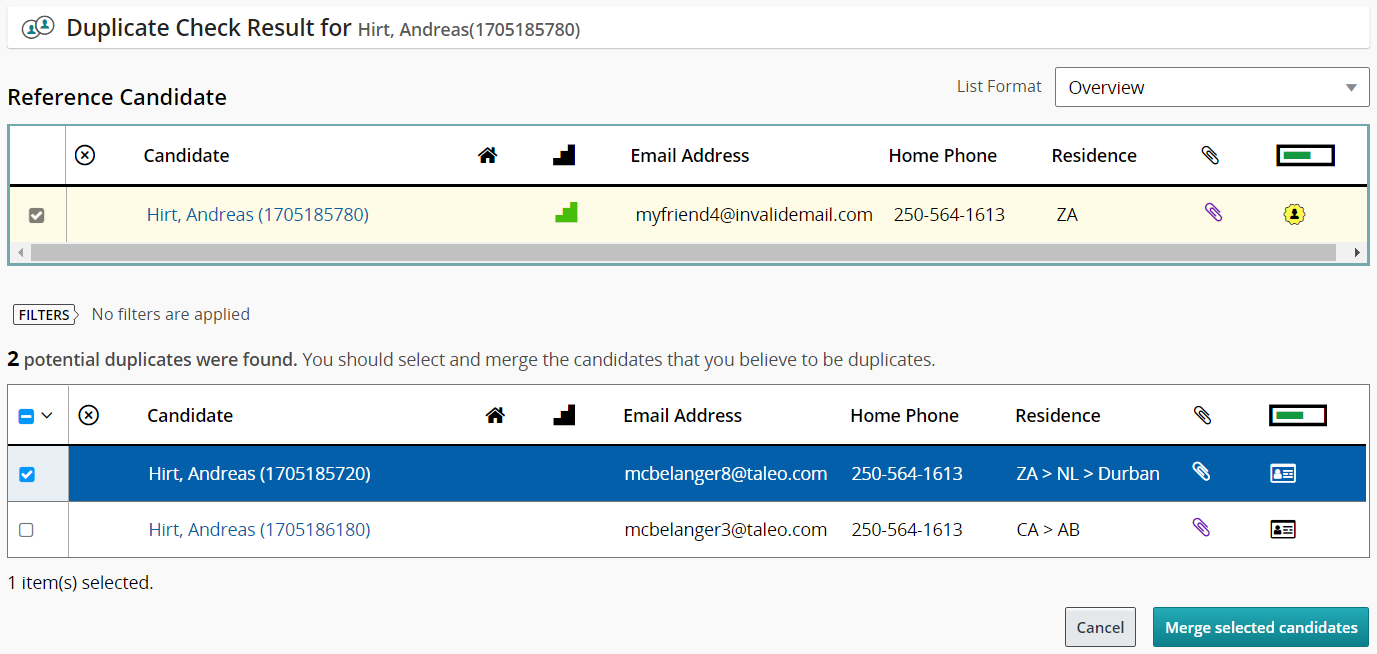
Duplicate Check Results Page
- If you determine that one or multiple candidate files are a duplicate, you can merge the files with the reference file. Select the reference candidate file and the duplicate files, then click the Merge selected candidates button.
- On the Merge Candidate Files page, select which candidate file will be the master file. You can also set the merge sequence. It’s important to select the master file and merge sequence with care because files are processed one at a time as per the configured sequence and only information that doesn’t already exist is copied.
- If you select the option to send an email notification, an email message is sent to the master candidate or the agent owning the master candidate to inform them that the candidate files were merged and to invite that person to review the new candidate file.
- Click Merge Candidates.
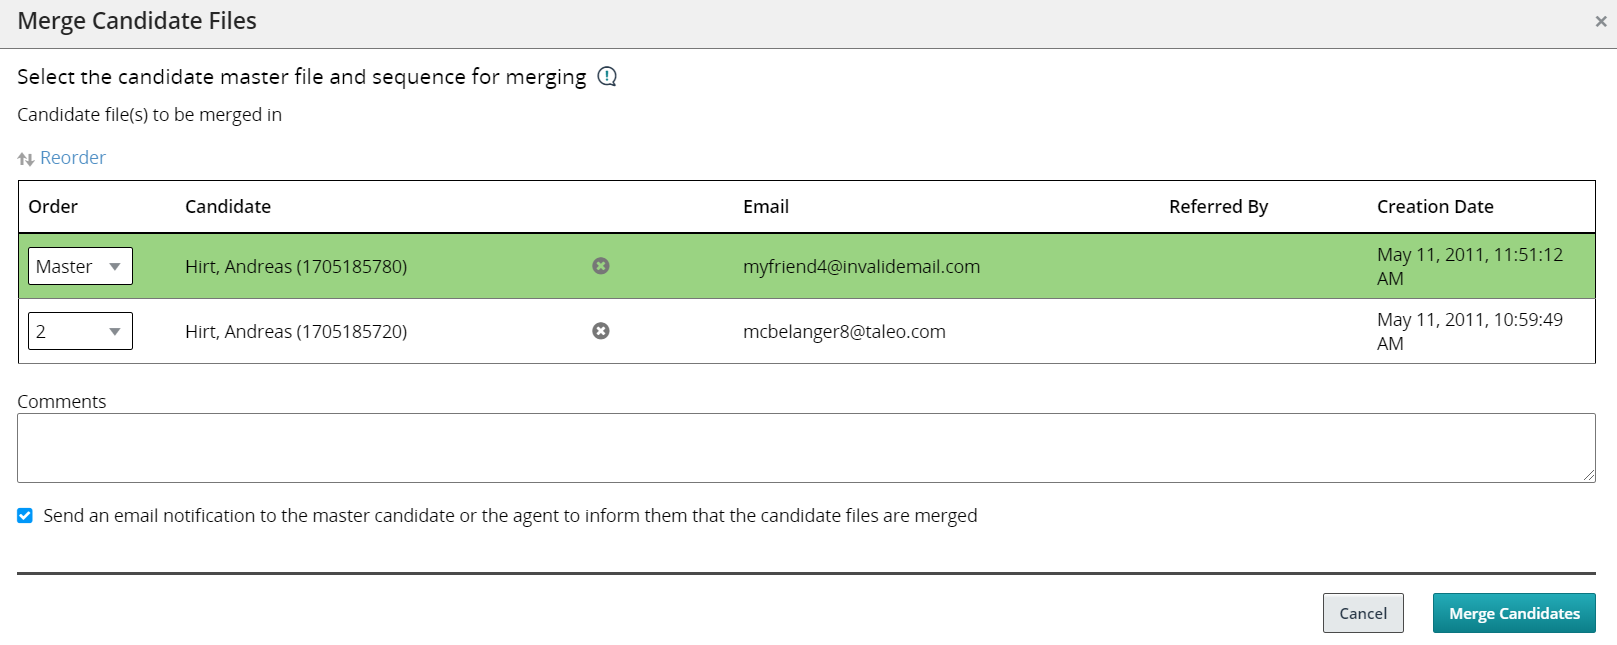
Merge Candidate Files Window
What happens once the merge is done:
- The complete master candidate file's information is preserved and enriched by merging in the information from the duplicate candidate files.
- The candidate files that were not retained are deleted.
Steps to Enable
You don't need to do anything to enable this feature.
Perform Candidate Selection Process Changes Using Actions in the More Actions Menu
You can perform candidate selection process changes using actions directly available in the More Actions menu instead of using the Change Step/Status action.
These actions are available in the Actions menu:
- Reject Submission
- Candidate has declined
- Hire Candidate
- Make an Offer
Steps to Enable
You don't need to do anything to enable this feature.
Change Step and Status Consecutively as Bulk Action
You can select several candidate submissions on different requisitions and move them to the next step, bypass the current step, or change the status provided all the submissions are at the same step and all the requisitions use the same candidate selection workflow. When you’re done, you can continue changing the step and status of those selected submissions as part of a bulk action.
- Go to the Submissions list.
- Select several submissions that are at the same step.
- In the More Actions menu, select the Change Step/Status action.
- Change the step, status, or both.
- Enter comments if desired.
- If you select the Send Correspondence action, the Bulk Action – Send Correspondence window appears and you can decide to send a message by email or printed letter, and to write a message from scratch or using a template.
- Click Apply and Continue.
- You can continue to change the step and status of those selected submissions using the above steps.
Steps to Enable
You don't need to do anything to enable this feature.
View and Perform Tasks Assigned to You
A task is an action you need to perform regarding a requisition, a candidate file, or an offer. Tasks are generated by the system and displayed in the Tasks list.
When you’re on the Tasks list, you can view tasks assigned to, you can filter tasks by type, and you can perform the task by clicking on it.
Here’s the list of available tasks:
- Approve offer
- Approve requisition
- Complete requisition (To be Completed)
- Complete selection process
- Configure requisition sourcing (Ready for Sourcing)
- Contribute
- Extend offer
- Finalize start date
- Modify approval process (Amend Approval Path)
Steps to Enable
You don't need to do anything to enable this feature.
Use Forms for the Hiring Process
You can use forms associated to candidate selection workflows, steps, and statuses and use them at any point during the hiring process.
You can use forms for instance for various new hire paperwork, or to print a candidate submission in a particular format, or during an interview with a candidate to complete a candidate's "Do not disclose" information. You can also print a form, complete it, and have it signed by a candidate.
- Go to the Submissions list.
- Select a submission.
- In the More Actions menu, select the Fill Out Form action. The Fill Out Form page displays the forms associated with the respective submission’s step and status (as per the candidate selection workflow configuration).
- Click on a form. Acrobat® Reader opens, displaying the form. The form is filled automatically using the corresponding fields of the candidate file or requisition file.
- Validate the information.
- Click Print. A PDF form is automatically generated.

Fill Out Form Page
Steps to Enable
You don't need to do anything to enable this feature.
Capture Candidate Expectations
You can capture different types of candidate expectations which will assist you during the offer and hiring process.
Let’s say you want to capture expectations for an offer.
- Go to the Offers list.
- Click a candidate file to open it.
- In the More Actions menu, select the Capture Candidate Expectations action.
- In the Capture Candidate Expectations window, select the type of expectation:
- Would accept
- Would refuse
- Desires
- Current job
- Click Capture.
- Complete the fields in the temporary offer section.
- Click Save and Close. The expectations are shown on the page.

Capture Candidate Expectations Window
Steps to Enable
You don't need to do anything to enable this feature.
Preview and Download Attachments
You can preview and download attachments directly from the Submissions list.
- Go to the Submissions list.
- Click the paper clip icon.
- From the Attachments window, you can preview the content of the attachment and download the attachment. When you preview an attachment, you can navigate from one attachment to another.
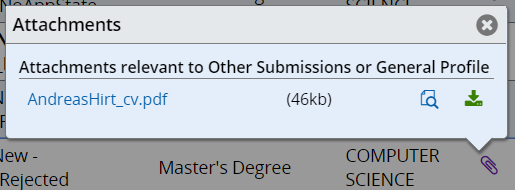
Attachments Window
Steps to Enable
You don't need to do anything to enable this feature.
Start the Onboarding Process While Changing Step and Status
You can start a pre-hire or new hire onboarding process while changing a submission’s step and status.
- Go to the Submissions list.
- Select a submission.
- In the More Actions menu, select the Change Step/Status action.
- In the Change Step and Status window, update the step, the status, or both.
- In the Select Other Action section, select the option Start Onboarding Process.
- Select the Pre-Hire or New Hire process.
- Click Apply and Close.
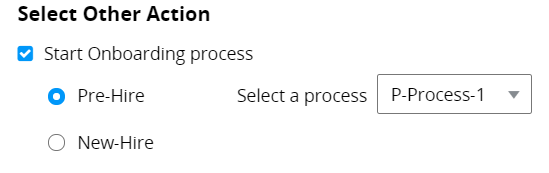
Start Onboarding Process Option
Steps to Enable
You don't need to do anything to enable this feature.
Export Submissions and Candidate General Profiles to Excel
You can export submissions and candidate general profiles in a Microsoft Excel spreadsheet.
Let’s say you want to export submissions.
- Go to the Submissions list.
- Select one or multiple submissions.
- In the More Actions menu, select the Download as Excel action.
- Select where you want to download the file.
- Click Save.
The selected submissions are downloaded to an Excel file with all the relevant information. A View link is available for each file. If you click the link, you’re taken directly to the submission. Columns in the Excel file are determined by the actual columns displayed in the Submissions list.
- If a column is represented by an icon (such as the Item Requiring Attention icon), the column header will display the icon value.
- If a field displays a boolean value, the table cell will display True or False.
- If a field has multiple values, the table cell will display the actual text value.
Steps to Enable
You don't need to do anything to enable this feature.
You can use candidate pools to organize your candidate files into personal or shared folders.
In the Candidate Pools page, you can organize files into personal and shared folders. Files in the Personal folder are only available to you. You can add and remove files. Files in the Shared with me folder are available to other recruiters.
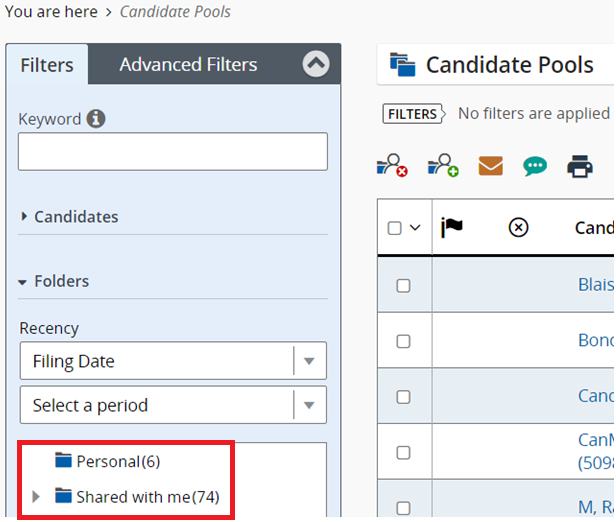
Candidate Pools Page
When you select any personal or shared folder, the More Actions icon becomes available. Click it to access more actions such as creating a new folder, sharing an existing folder, viewing folder properties, moving and deleting a folder.
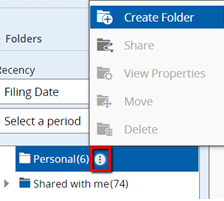
More Actions Menu for Candidate Pool Folders
Steps to Enable
You don't need to do anything to enable this feature.
You can use the “Lookup a candidate” and “Lookup a candidate (Detailed)” search tools to quickly find specific candidates.
When you use the “Lookup a candidate” search tool, you can enter the first name, last name, middle name, email address, user name, or candidate identification number of the candidate you’re looking for. You can also use the AND and OR operators along with partial names and wildcard. However, a best practice is to enter complete names to obtain better results.
If you want greater precisions in your search results, you can use the “Lookup a candidate (Detailed)” search tool. If there’s an exact match, you’re taken directly to the candidate’s general profile.
With both the types of search, you can use regular filters to filter the search results list.
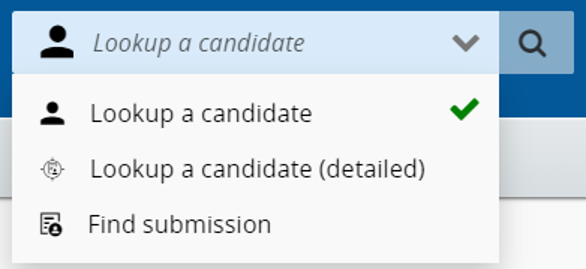
Lookup a Candidate Actions
Steps to Enable
You don't need to do anything to enable this feature.
Print Candidate General Profiles, Submissions, and Requisitions
You can use the print functionality to create a PDF version of a candidate general profile, submission, or requisition and then print a PDF of the file.
Let’s say you want to print two requisitions.
- Go to the Requisitions list.
- Select the two requisitions.
- Click the Print icon.
- In the Print Requisitions window, decide how you want to print the files:
- List only: The content of the file is presented in different columns and the content of each file is displayed in a row. The format of the list is identical to the requisition or candidate list format used. A maximum of 1000 lines can be printed in the list.
- File details: All sections of the file or only specific sections can be printed. For example, you can choose to print the Description, Prescreening, and Screening sections of the requisition file. The sections you select are saved as defaults for the next print action. Also, sections you can select are based on how the file is configured and on your user permissions. For requisitions, a maximum of 15 files can be printed. For candidate files, a maximum of 50 files can be printed.
- Click Print PDF.
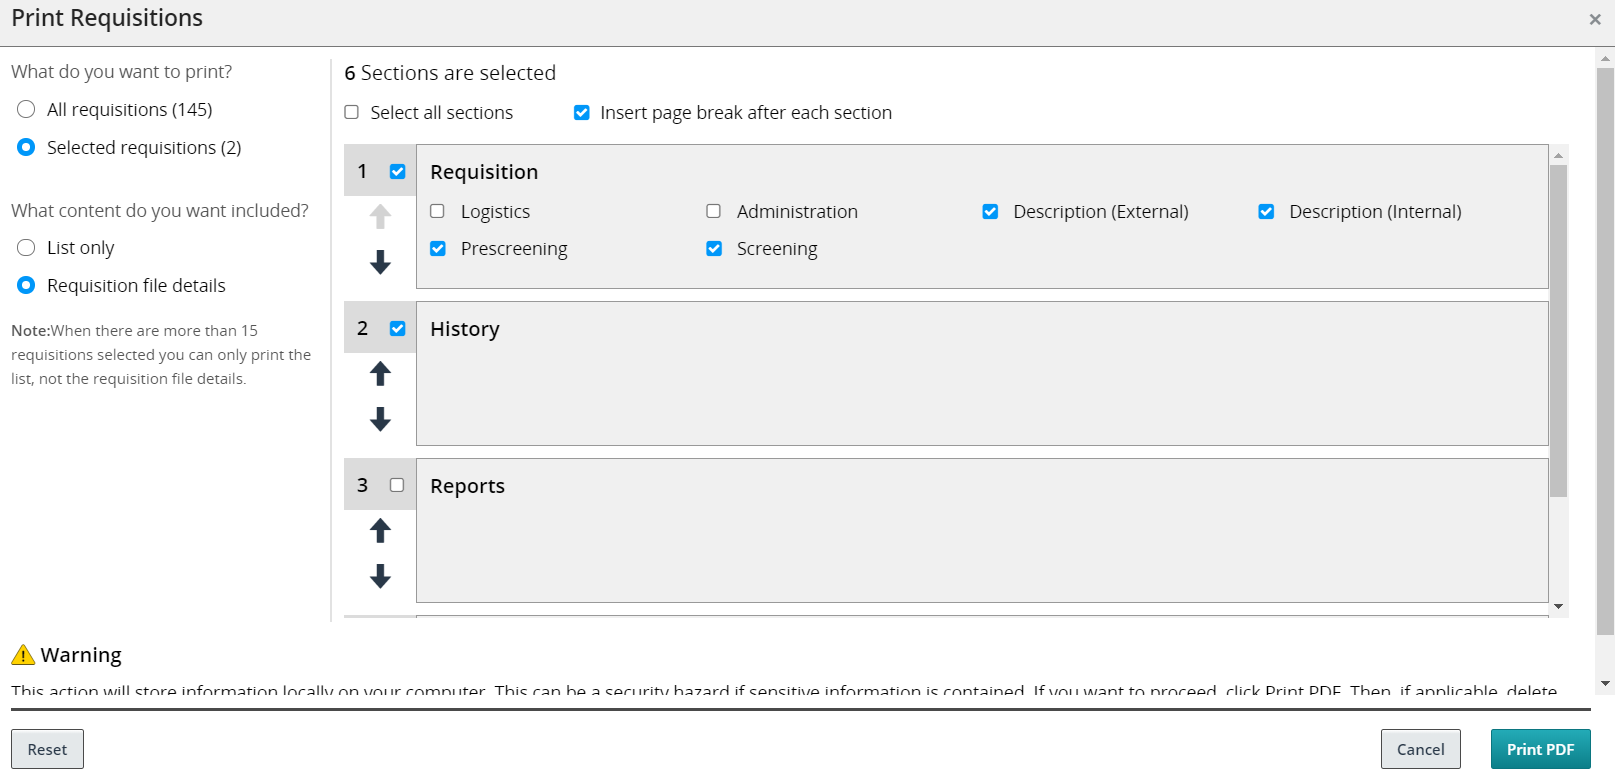
Print Requisitions Page
Steps to Enable
You don't need to do anything to enable this feature.
Use Advance Filters to Filter Submissions and Offers
You can use advanced filters to filter the list of submissions and offers.
Both the Submissions list and Offers list have an Advanced Filters tab in the left panel, next to the regular filters. You can select one or several advanced filter criteria to filter a list. When criteria are selected, they appear at the top of the screen with a Remove Filter icon next to the criteria. When you click the Remove Filter icon, the criteria is removed and the list is dynamically updated according to the updated criteria set.

Advanced Filters for Submissions
Steps to Enable
You don't need to do anything to enable this feature.
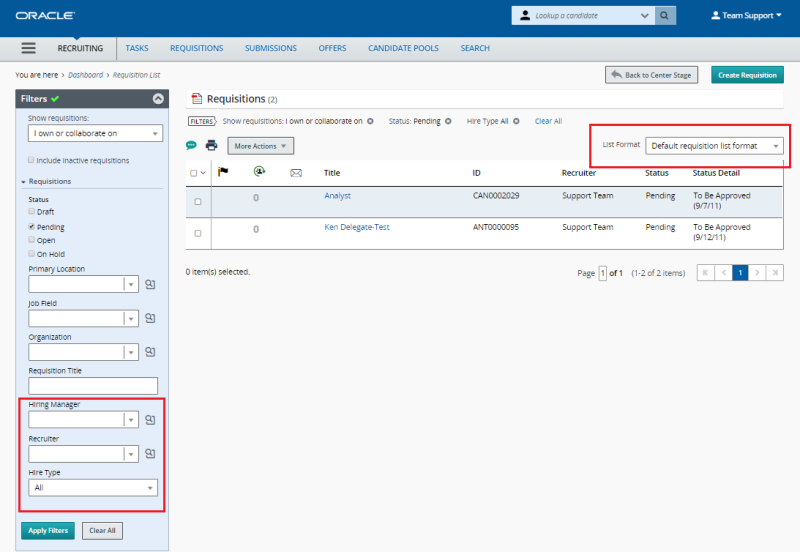
You can use list formats and three new quick filters to configure what content displays on your requisition list.
Both your personalized list formats and those configured by your administrator can be applied to your requisition list. To further configure your requisition list, you can use the existing quick filters in addition to the newly added Hiring Manager, Recruiter, and Hire Type quick filters.
Steps to Enable
You don't need to do anything to enable this feature.
Create Questions Specific to a Requisition
You can create, edit, and duplicate questions specific to a requisition.
- Go to the Requisitions list.
- Open a requisition.
- Click the Requisition Info tab.
- Go to the Prescreening section and click the Edit icon.
- In the Questions section, you can do the following:
- Click Add to add a question from the Questions Library.
- Click Create to create your own question specific to this requisition. The question isn’t available in the Questions Library and for other requisitions.
- Click Duplicate to duplicate a question already added to this requisition.
- Click Copy from Library to copy a question from the Question Library and use that it to create a question specific to that requisition.
- When questions are added to the requisition, you can reorder them.

Questions in a Requisition
Steps to Enable
You don't need to do anything to enable this feature.
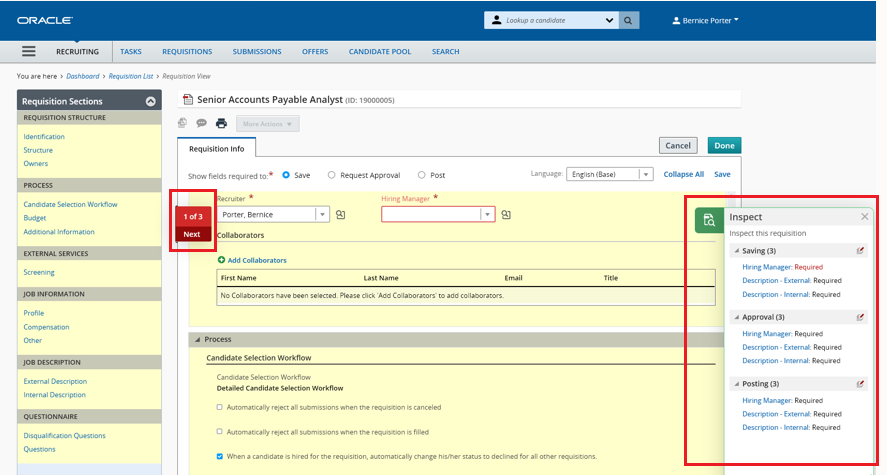
Identify Missing Information While Creating and Editing Requisitions
You can easily and quickly identify what required information is missing from requisitions as you're creating or editing those requisitions using the new Inspect icon.
To see which fields need to be completed to save, approve, or post the requisition, click the Inspect icon. A panel opens and lists what's needed to move forward with the requisition. You're able to add missing translations here as well. Then, clicking on Inspect All opens a navigator that takes you through the mandatory fields that you need to complete.
Steps to Enable
You don't need to do anything to enable this feature.
Identify New Submissions on a Requisition
An icon displays in the Candidate Count column next to requisitions that contain new submissions allowing you to quickly identify and manage those submissions.

Steps to Enable
You don't need to do anything to enable this feature.
Use Deep Links to Access Tasks
You can use deep link URLs to go directly to specific pages to perform tasks.
Deep links are useful when you need for instance to send a URL to users in an email, portal, or other environments outside Taleo's application (including eShare) to allow them to navigate directly to a page or task in the application. Users click the URL and they’re redirected to a specific requisition, submission, or candidate profile with appropriate instructions to complete the task.
To create a URL that directs users to a page to perform a specific action, certain parameters are required. Here’s an example of a URL that directs users to a requisition that needs approval.
http://client.taleo.net/enterprise/publicurl/tasks?type=approveRequisition&requisitionNumber=7317
| Parameter | Description | Example |
|---|---|---|
| <Product URL> |
Taleo product identifier URL. |
http://client.taleo.net/enterprise/publicurl/tasks |
| <action> |
Action available for the product. |
approveRequisition |
| <parameter> |
Parameter identifier. | requisitionNumber |
| <value> |
Key value. |
7317 |
Here are examples of URLs to specific actions:
- View tasks: http://client.taleo.net/enterprise/publicurl/tasks
- Approve a requisition: http://client.taleo.net/enterprise/publicurl/tasks?type=approveRequisition&requisitionNumber=7317
- Approve an offer: http://client.taleo.net/enterprise/publicurl/tasks?type=approveOffer&offerNumber=18787
- Extend an offer: http://client.taleo.net/enterprise/publicurl/tasks?type=extendOffer&offerNumber=15066
- Amend an approval path: http://client.taleo.net/enterprise/publicurl/tasks?type=amendApprovalPath&requisitionNumber=7498
- Finalize start date: http://client.taleo.net/enterprise/publicurl/tasks?type=finalizeStartDate&offerNumber=10437
- Ready for sourcing: http://client.taleo.net/enterprise/publicurl/tasks?type=readyForSourcing&requisitionNumber=5300
- Contribute: http://client.taleo.net/enterprise/publicurl/tasks?type=contribute&requisitionNumber=7517
- To be completed: http://client.taleo.net/enterprise/publicurl/tasks?type=toBeCompleted&requisitionNumber=7483
- Complete selection process: http://client.taleo.net/enterprise/publicurl/tasks?type=completeSelectionProcess&applicationNumber=7347
Steps to Enable
You don't need to do anything to enable this feature.
Worker Related Fields Available for Integration
Worker related fields are available in requisitions and offers to facilitate the integration with Oracle HCM products.
Worker related fields are available in the Profile section of requisitions, and in the Other Terms section of offers. Here’s the list of available worker related fields:
- Worker Grade
- Worker Job
- Worker Business Unit
- Worker Legal Employer
- Worker Location
- Pay Basis
Steps to Enable
You don't need to do anything to enable this feature.
Self-Service Native Single Sign-On
Native Single Sign-On (SSO) replaces the legacy SSO allowing the SSO flow directly into Sourcing.
You'll need to make some configuration changes both in Sourcing as well as the Identity Provider (IDP) application on your infrastructure.
Steps to Enable
As mentioned, you'll need to make configuration changes in both Sourcing and your IDP. The following steps take you through both of these changes.
Begin in Sourcing:
- Upgrade your Sourcing zone to Release 20B.
- Navigate to Sourcing > Configuration > Security > SSO/SAML Settings (OIF).
- Confirm that the SSO Enabled setting is enabled. (This confirms that you have SSO enabled).
- Confirm that the Legacy SSO setting is enabled. (This confirms that the SSO service that is enabled is the Legacy SSO).
- Contact your IDP Administrator and ask for your Metadata URL.
- In the IDP Metadata URL setting, enter the Metadata URL given to you by your IDP Administrator. If a valid URL is entered, the metadata will appear in the IDP Metadata setting. You can manually enter or edit the metadata in this setting as needed.
- Click Generate SP Metadata in the SP Metadata setting. An XML file with Service Provider (SP) metadata for the Sourcing application will be downloaded. Note that this SP Metadata is specific to each zone. Separate SP Metadata needs to be generated for staging and production zones.
Now for your IDP application:
8. The SP Metadata xml file from Step 7 above must be uploaded to the IDP. Please contact your IDP Administrator as needed.
If the SSO Administrator adds a new federation to the customer’s IDP, then the SSO remains operable until the cutover is made in Step 10.
If the SSO Administrator replaces the federation on the customer’s IDP with a new one, then the SSO becomes inoperable until the cutover is made in Step 10.
9. Your IDP-initiated SSO URL needs to reference the new federations created in Step 9. This URL string for the modification comes from your IDP.
IMPORTANT: This step, Step 9, is only applicable if you have an IDP-initiated flow from your Internet Service Provider (ISP) to Sourcing. If you have only an ISP-initiated flow from your IDP to Sourcing, you can skip this step. Please contact your SSO Administrator for information if you need to understand the difference between these two.
Lastly, back to Sourcing:
10. Disable the Legacy SSO setting. You're all set. Once you disable the Legacy SSO, you'll be using your newly configured Native SSO.
Tips And Considerations
It is mandatory that everyone that has SSO with Sourcing makes this configuration change to SSO while on Release 20B and before September 15, 2020.
Use these fields to report on the RSC LinkedIn and Candidate Passport Services folders:
- Exclude from LinkedIn
- LinkedIn PersonId
- LinkedIn First Name
- LinkedIn Last Name
- LinkedIn Email Address
- Linked In Creation Date
- Linked In Last Modified Date
- Seat Status
- Candidate > Candidate Passport Services (Same as Legacy Subject Area)
Steps to Enable
You don't need to do anything to enable this feature.