
This document will continue to evolve as existing sections change and new information is added. All updates are logged in the following table, with the most recent updates at the top.
| Date |
What’s Changed |
Notes |
|---|---|---|
| 04 MAR 2016 |
Update Application Composer Customizations to the Latest Enhanced Behavior |
How to manually upgrade metadata from an older release to the latest release. |
| 30 OCT 2015 |
For information about Territory changes in future releases, see My Oracle Support. |
|
| 25 SEP 2015 |
The total number of contacts is no longer displayed. |
|
| 25 SEP 2015 |
Oracle Sales Cloud for IBM Notes also supports IBM Notes 8.5.3. |
|
| 25 SEP 2015 |
Added one consideration: The Primary Partner field and the Partners subtab automatically appear on the default Opportunity Details page. |
|
| 25 SEP 2015 |
Intermediate Getting Started page lists several Oracle Cloud products. |
|
| 18 AUG 2015 |
Added important note about the new URL to access Oracle Sales Cloud. |
|
| 08 AUG 2015 |
Added more information about the simplified UI. Recommended that all customers use the simplified UI. |
|
| 08 AUG 2015 |
Feature added in Update 8 (August). |
|
| 08 AUG 2015 |
Feature added in Update 8 (August). |
|
| 08 AUG 2015 |
Appointments and Tasks Integrated with Oracle Social Network |
Added a description of this new feature. |
| 08 AUG 2015 |
Revised Tips and Considerations. |
|
| 10 JUL 2015 |
Initial Document Creation |
This guide outlines the information you need to know about new or improved functionality in Oracle Sales Cloud Release 10. Each section includes a brief description of the feature, the steps you must take to enable or to begin using the feature, any tips or considerations that you must keep in mind, and the resources available to help you.
Three Key Changes to the Upgrade Process
Based on your feedback, the following improvements have been made to the upgrade process starting with this Release 10 upgrade:
- Very Few Manual Upgrade Steps. To ensure consistency in user experience, there are very few manual steps that you, as the administrator, will have to complete in Oracle Sales Cloud immediately following the upgrade. In previous releases, because significant changes were made to Oracle Sales Cloud, you were required to perform actions after the upgrade if you had customized certain areas of the product. In some cases, this was a fairly complex process.
- Opt In to New Features. You requested the ability to opt in to new features introduced in each release. You now have a new level of control over whether or not to use the new features, most of which aren’t enabled for you. You decide when to evaluate a new feature, whether you want to make it available to your users, which roles to grant it to, and when to do that.
- Like for Like, Return to Production, Minimize Disruption. Starting with this upgrade, users signing out on Friday will see only a few changes in the UI when they begin working on Monday after the upgrade, regardless of the customizations you have made.
Fewer steps shorten the amount of manual work that you need to do and you can return your applications back to your users earlier following your upgrade.
Choosing whether to opt in allows you to achieve the critical like-for-like upgrade, release the applications to your user community, and then plan ongoing feature enablement in a more orderly fashion in the following weeks or months at your convenience.
Your mandatory steps have been minimized with this upgrade, ensuring business continuity at your company.
This guide provides information about which features are enabled automatically and which require some administrator action to enable after your service is upgraded to Release 10. It is highly recommended that you fully test and validate your upgrade to Release 10 first, make sure that your users are comfortable with it for a week or two, and only then evaluate and roll out the new features.
Related Information
To learn about features and enhancements common to all Oracle Sales Cloud applications that aren’t described in this guide, see the following guides:
- Oracle Cloud Applications Common Technologies and User Experience, What’s New in Release 10 on the Customer Experience Release Readiness page.
- Oracle Cloud Applications: Using Common Features in the Oracle Help Center.
Some of the new Release 10 features are automatically visible to users after the upgrade, and some require action from the user, the company administrator, or Oracle.
The following table offers a quick view of the actions required to enable each of the Release 10 features.
| Action Required to Enable Feature |
||||
|---|---|---|---|---|
| Feature |
Automatically Available |
End User Action Required |
Administrator Action Required |
Oracle Service Request Required |
| User Experience |
||||
|
|
||||
| Smartphones |
||||
| Oracle Sales Cloud Mobile App |
||||
|
|
||||
| Call Report App |
||||
|
|
||||
|
|
||||
|
|
||||
|
|
||||
|
|
||||
|
|
||||
| Applications Security |
||||
|
|
||||
|
|
||||
| Sales Analytics |
||||
|
|
||||
|
|
||||
|
|
||||
|
|
||||
|
|
||||
|
|
||||
|
|
||||
|
|
||||
|
|
||||
|
|
||||
|
|
||||
|
|
||||
|
|
||||
|
|
||||
|
|
||||
|
|
||||
| Audit Reporting |
||||
|
|
||||
| Core Sales Force Automation |
|
|||
| Multiple Business Units |
||||
|
|
||||
|
|
||||
| Global Search and List Management |
||||
|
|
||||
| Accounts and Contacts |
||||
|
|
||||
|
|
||||
|
|
||||
|
|
||||
|
|
||||
| Campaigns |
||||
|
|
||||
|
|
||||
| Leads |
||||
|
|
||||
|
|
||||
| Opportunities |
||||
|
|
||||
|
|
||||
|
|
||||
| Forecasting |
||||
|
|
||||
|
|
||||
|
|
||||
|
|
||||
| Calendar and Activities |
||||
| Create a Task for an Object Without an Activity Relationship |
|
|||
| Appointments and Tasks Integrated with Oracle Social Network |
|
|||
| Oracle Sales Cloud for IBM Notes |
||||
|
|
||||
|
|
||||
| Partner Relationship Management |
||||
|
|
||||
|
|
||||
|
|
||||
|
|
||||
|
|
||||
| Contracts and Sales Agreements |
||||
|
|
||||
|
|
||||
| Sales Performance Management |
||||
| Quotas |
||||
|
|
||||
| Territories |
||||
|
|
||||
|
|
||||
|
|
||||
|
|
||||
| Incentive Compensation |
||||
|
|
||||
|
|
||||
|
|
||||
|
|
||||
|
|
||||
|
|
||||
| Configuration and Customization |
||||
|
|
||||
| Identity Propagation Support with Oracle’s Java Cloud Service |
|
|||
|
|
||||
| Application Composer |
||||
|
|
||||
|
|
||||
|
|
||||
|
|
||||
|
|
||||
| Customization Migration |
||||
|
|
||||
| Industry Solutions |
||||
|
|
||||
|
|
||||
|
|
||||
| Financial Services |
||||
|
|
||||
| Consumer Goods |
||||
|
|
||||
|
|
||||
|
|
||||
| Setup and Maintenance |
||||
| File-Based Data Import |
||||
|
|
||||
|
|
||||
|
|
||||
| Assignment Manager |
||||
|
|
||||
| Master Geographies |
||||
|
|
||||
| Post-Upgrade Considerations |
||||
| Do Not Call Management: Restrict Contact Preferences Reason Codes |
|
|||
|
|
||||

Oracle Applications simplified UI provides what you need when you need it. Usability and functionality in the simplified UI are continually being enhanced for your desktops, laptops, or tablets. For example, release 10 introduces a number of enhancements in navigation, advanced search filters, themes and branding using appearance and structure settings. Oracle strongly encourages all customers to use the simplified UI.
The new home page enables you to take a quick glance at your device to see what you need to know, then scan if you need more information, and finally commit to a work area to perform a task if necessary.
When you open the simplified UI, you see a springboard page and infolet pages represented by a pagination control that appears above the springboard. A single click on the Home icon or the logo returns you to the entry page.
New default home content is set by the application but can be configured to meet your business needs. Enhanced extensibility features allow you to maintain more control over who sees what.
IMPORTANT: Because of this new home page, Release 10 includes a new URL to access Oracle Sales Cloud. You will receive the new URL in the email notifying you that your environment has been upgraded. Be sure to replace the previous URL with the new one and distribute it to all your users. Using bookmarks that open desktop pages in the previous release will set that user's profile option to view desktop pages instead of simplified pages. In that case, you will need to reset the profile option for the user. See What Is the Release 10 Home URL? (Doc ID 2040299.1) for more information.
Related Information
For more information about the home page, see: Oracle Cloud Applications Common Technologies and User Experience, What’s New in Release 10 on the Customer Experience Release Readiness page.
Sales teams can access Oracle Sales Cloud on smartphones to view customer and sales information, track appointments, log e-mail or call interactions, and view reports. This release also contains enhancements to mobile analytics.
To begin using Release 10 mobile apps, download the latest version from the Apple App Store (iPhone and iPad), Google Play (Android), or the Oracle Sales Cloud instance (Blackberry).
The Oracle Sales Cloud Mobile app is the most efficient way for sales reps, managers and executives to access Oracle Sales Cloud from a smartphone. The following topics describe the new enhancements for Oracle Sales Cloud Mobile.
Interactive Dashboard for Sales Executives
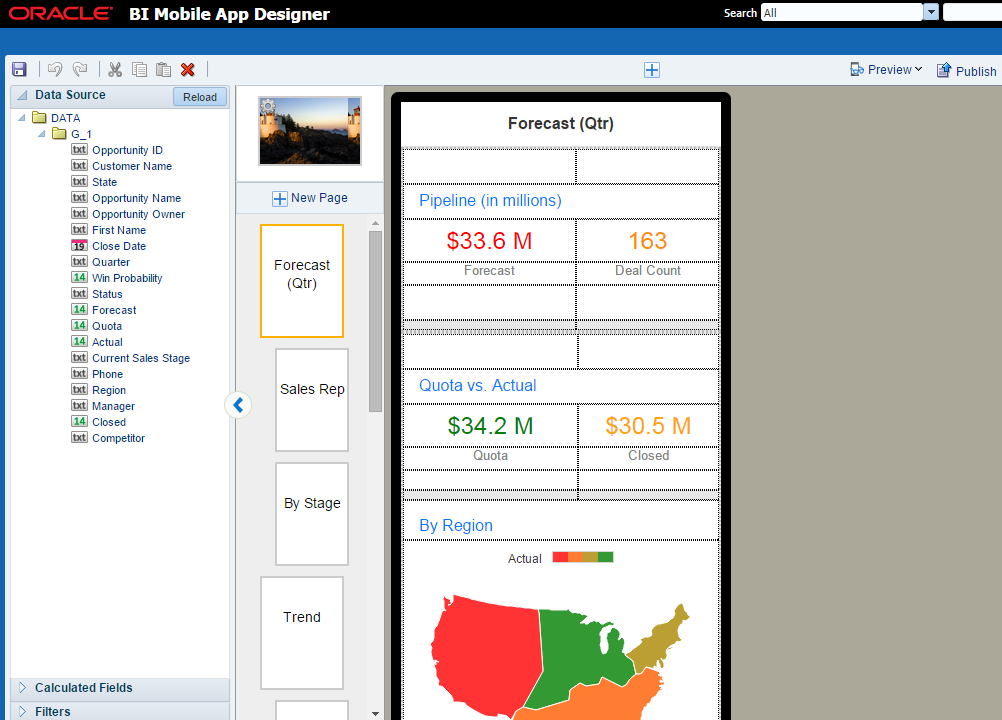
The Oracle Sales Cloud Mobile app now includes a dashboard built using a BI tool called Mobile App Designer. The new dashboard offers six interactive, visual reports designed to enable sales executives to quickly pinpoint sales opportunities and review progress in real time. To keep the sales team aligned and to make sure that they’re accessing the same information, sales executives can also share the dashboard with team members using e-mail.
|
|
|
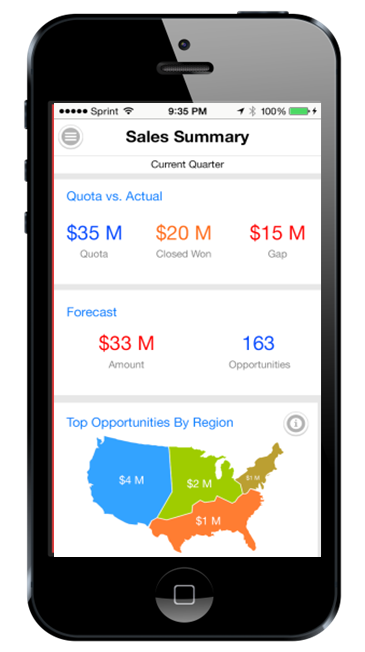
The interactive dashboard includes easy-to-use visual reports.
The interactive dashboard includes these easy-to-use, visual reports:
- Actual vs. Quota. Provides insight into the target quota for the current quarter and opportunities that have been won to meet the target.
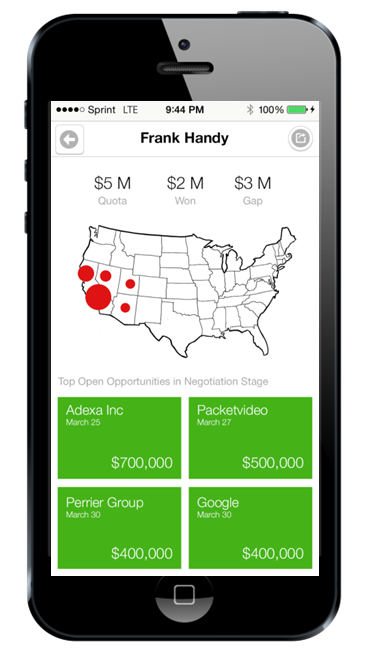
- Forecast. Offers a quick view of the status of regional teams in relation to their quarterly goal. Traffic-light indicators on a map show which regions might need help reaching their sales goals. Drilling down shows the sales reps in the region, the total revenue of the deals that they’re pursuing and their status.
- Sales Trend. Bar charts show the quarterly performance for sales reps with a quick visual indicator showing their progress toward their forecast. Further analysis shows a quick map of the current customers and their locations.
- Stage. Shows a consolidated view of sales rep performance against their forecast by opportunity stage.
- Open Opportunity Map. Uses map views to show the open opportunity revenue for each sales stage by quarter.
- Competitor. Shows the primary competitors in each region who are competing for deals each quarter. The expanding squares in the diagram indicate the competitive impact by deal size.
Steps to Enable
There are no steps necessary to enable this enhancement.
Key Resources
- For more information about Oracle Sales Cloud Mobile, view these demos: Oracle Sales Cloud Mobile for Smartphone and Oracle Sales Cloud Mobile for Tablet.
- For more information about dashboards for sales executives, see the Oracle Mobilytics data sheet.
- For more information about Mobile App Designer, see Mobile App Designer.
With the single-purpose Call Report app, sales reps can prepare for their upcoming appointments and complete call reports in a minute or less. Open this app to view your next meeting, create a call report for your completed meeting, and update the related opportunity for future reference. You can also e-mail a call report summary to the meeting attendees and post it on Oracle Social Network.
View your next appointment and call or e-mail the contact on the appointment. With the filmstrip view for the next appointment, you can view future appointments by swiping to the left on your smartphone.
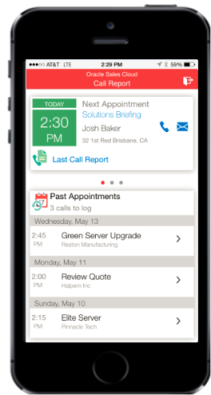
Quickly view your next appointment and swipe left to view other upcoming appointments.
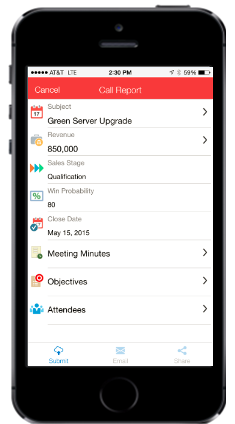
View last or previous call reports by tapping the Last Call Report link. See the meeting’s attendees, objectives, meeting minutes, and changes to the related opportunity’s revenue, sales stage, win probability and close date.
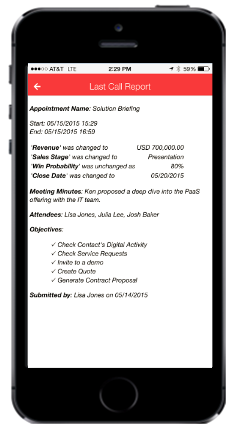
Click the Last Call Report link to view details about the appointment and related opportunity.
View appointment details, such as the related account, opportunity, contacts, objectives, and invitees (including the invitees’ response status). You can also call or e-mail an invitee by tapping the phone or e-mail icon.
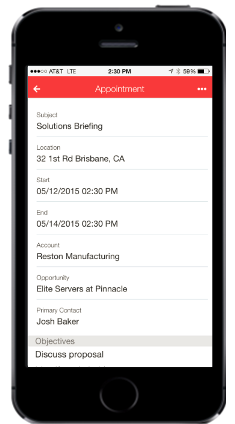
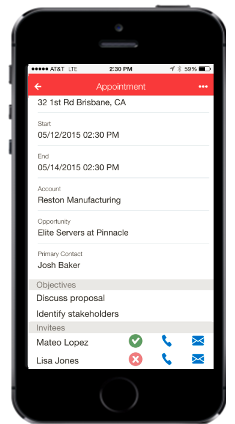
View the details about the appointment, including objectives and invitees. Tap the phone or e-mail icon to call or e-mail invited contacts.
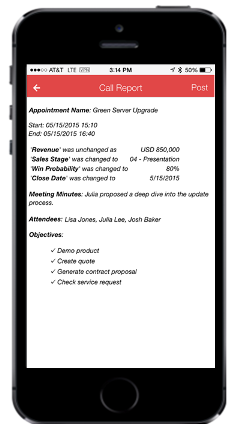
Tap a past appointment to create a call report. On the Call Report page, you can update the related opportunity’s revenue, sales stage, win probability, and close date. You can also mark a call report’s objective as complete and add a new objective. Similarly, you can indicate whether an invitee attended the meeting and add any new contacts or resources to indicate their attendance. Finally, you can add meeting minutes.
Quickly create a call report from a past appointment.
Tap the e-mail action on the Call Report page to start your smartphone’s native e-mail client. For ease, the e-mail is prepopulated with the meeting attendees in the To line and the appointment title in the subject line. The e-mail body is also prepopulated with meeting attendees and meeting minutes.
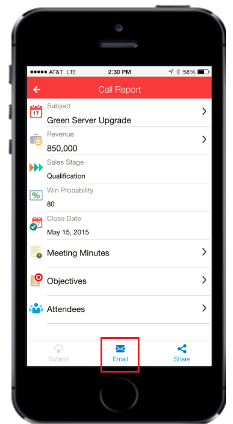
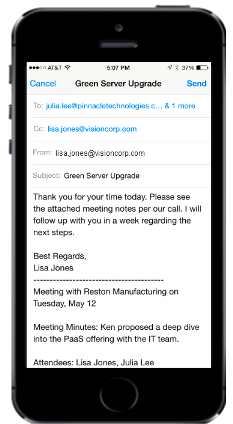
Tap the e-mail action to send the call report details to meeting attendees.
Share Call Reports on Oracle Social Network
Tap the share action on the Call Report page to preview and post Call Report details on Oracle Social Network.
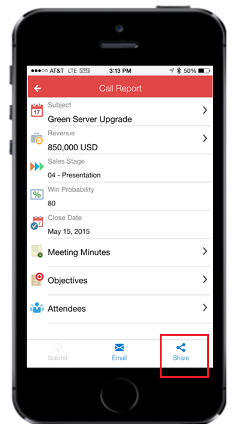
Tap the share action to post call report details on Oracle Social Network.
- To use the new Call Report app, you must download the app from the Apple App Store or Google Play.
- Start the app.
- Enter the host name for your Oracle Sales Cloud instance. To determine your company’s Oracle Sales Cloud host name, follow these steps:
- On the desktop, sign in to Oracle Sales Cloud and go to the accounts page or contacts page.
- View your browser address line.
The host name for your company’s Oracle Sales Cloud instance is the part after the https:// to the next slash (/). For example: if the URL is https://fap0655-crm.oracle.com/customer/faces/CrmFusionHome, then use the host name fap0655-crm.oracle.com. - Enter your Oracle Sales Cloud user name and password.
NOTE: You must also have an active Oracle Sales Cloud user account.
NOTE: If you don’t want your users to manually enter the host name, then see Tips and Considerations.
NOTE: You can tap Save Password to save time in the future.
- The Call Report app is supported on the following mobile operating systems and supported devices:
- iOS 7.0 and later
- Android smartphones running 4.0.3 or later with minimum 1 GHz processor, or 1 GHz Dual Core, or better (recommended), and at least 1 GB of total RAM
- You must have Oracle Sales Cloud implemented to use Call Report App.
- Your users can start using the Call Report app without manually entering the host information on the login screen the first time that they start the app. To enable them to do so, distribute the formatted URL (either in email, on a Web page, or so on) that, when touched on the smartphone, automatically starts the Call Report app with the host field prepopulated. The URL must be of the following format osccr://?host=hostname
- Replace hostname with the host for your company’s Oracle Sales Cloud instance as explained in Steps to Enable.
- Data security is based on the job role, which is designated in Oracle Sales Cloud. Sales reps and sales managers will see the same data that they see in the Oracle Sales Cloud application.
Oracle Fusion Applications Security provides a single console in which security managers and security administrators can review, design, and modify roles in Oracle Fusion Applications. It enables users to visualize the relationships among roles, and to model applications-menu and task-pane entries for any role. Users can also manage certificates and review a set of security reports.
Using this feature, you can perform all role-design tasks from a single console. You can execute role-management activities that previously required two tools: Oracle Identity Manager and Authorization Policy Manager. Visualize relationships among roles, and create, edit, copy, and compare roles.
Steps to Enable
To prepare the Security Console for use, you’ll need to set up profile options and set the active application source. For detailed instructions, see the Security Console profile options topic in the Upgrade Guide for Oracle Sales Cloud Application Security (Article ID 1989500.1 on My Oracle Support).
Simplified Reference Role Model
Role definitions for the security reference implementation are simplified. The simplified roles reduce the complexity of role administration. Every job or abstract role that existed in Release 9 also exists in the simplified hierarchy for Release 10, and each role authorizes the same privileges. Beneath that level many roles have been consolidated.
Oracle Sales Cloud recommends that you continue to use your role models as before and review the Release 10 features to decide which features best meet your business needs. When you have decided which features you want to use, then you can implement a new feature in your preexisting role model or migrate to the simplified reference role model.
Steps to Enable
For information about how to use the simplified reference role model, see Upgrade Guide for Oracle Sales Cloud Application Security (Article ID 1989500.1 on My Oracle Support). It is recommended that you review the following:
- Read the Overview chapter to learn about the simplified reference role model and how it affects you.
- Decide which method you will use to implement the new features and follow the detailed instructions in the guide.
- View the appendix to see the policies and roles required to implement the new features.
Oracle Sales Cloud offers embedded sales analytics to guide your actions. With Release 10, you can create powerful, interactive dashboards that your sales team can access from the Oracle Sales Cloud Mobile app. These dashboards access real-time data and enable you to drill down to layers of detail for immediate and thorough analysis. A wide array of new, prebuilt reports and custom reporting options provide useful business insights.
Deliver custom, interactive dashboards that your sales team can access right from the Oracle Sales Cloud Mobile app. With no additional applications or add-ons required, you can immediately begin using this new BI tool. Mobile App Designer’s drag-and-drop interface makes it easy to create dashboards with many attractive visualizations (such as heat maps and tree maps). Choose from a variety of prebuilt or custom charts and graphs and define drilldowns and filters that allow your sales teams to quickly pinpoint opportunities and identify trouble spots. Mobile App Designer supports responsive design and enables you to simulate your sales teams’ experience on smartphones and tablets before delivering your dashboard to the field.
The Release 10 Oracle Sales Cloud Mobile app includes a new, prebuilt dashboard designed specifically to enable sales executives to manage their teams efficiently while they’re away from the office. You can copy and customize this new dashboard using Mobile App Designer. For more information about the interactive dashboard, see Oracle Sales Cloud Mobile app.
A prebuilt dashboard enables sales executives to manage their teams efficiently while they’re away from the office.
Steps to Enable
When your environment is upgraded to Release 10, a new simplified role-based access control model is installed as a reference model during the upgrade. The reference model co-exists with your current model. If you want to use the new BI Mobile App Designer navigator link in the reference model, then you must add certain duty roles and privileges to your pre-existing model.
For information about how to enable these new roles and privileges, see Upgrade Guide for Oracle Sales Cloud Application Security (Article ID 1989500.1 on My Oracle Support). It is recommended that you review the following:
- Read the Overview chapter to learn about the simplified reference role model and how it affects you.
- Decide which method you will use to enable the privileges and follow the detailed instructions in the guide.
- View the appendix to see the functional security policies that are required to implement these privileges.
Key Resources
- For a demonstration of this enhancement, see the Analytics Enhancements: Dashboards, Mobile, Partner Relationship Management, Verticals release training on the Customer Experience Release Readiness page.
- For information about duty roles, see Securing Oracle Sales Cloud in the Oracle Help Center.
The configurable sales home page offers six prebuilt infolets that focus on the most important deals and highlight trouble spots. You can customize the home page by selecting other prebuilt infolets, editing the existing infolets, or creating new, custom infolets to meet your business needs. Click the infolets for quick access to detailed information.
The prebuilt sales rep home page includes these infolets:
- Actual vs. Quota
- Top Open Deals
- Open Leads
- Open Pipeline
- Stalled Deals
- Forecast
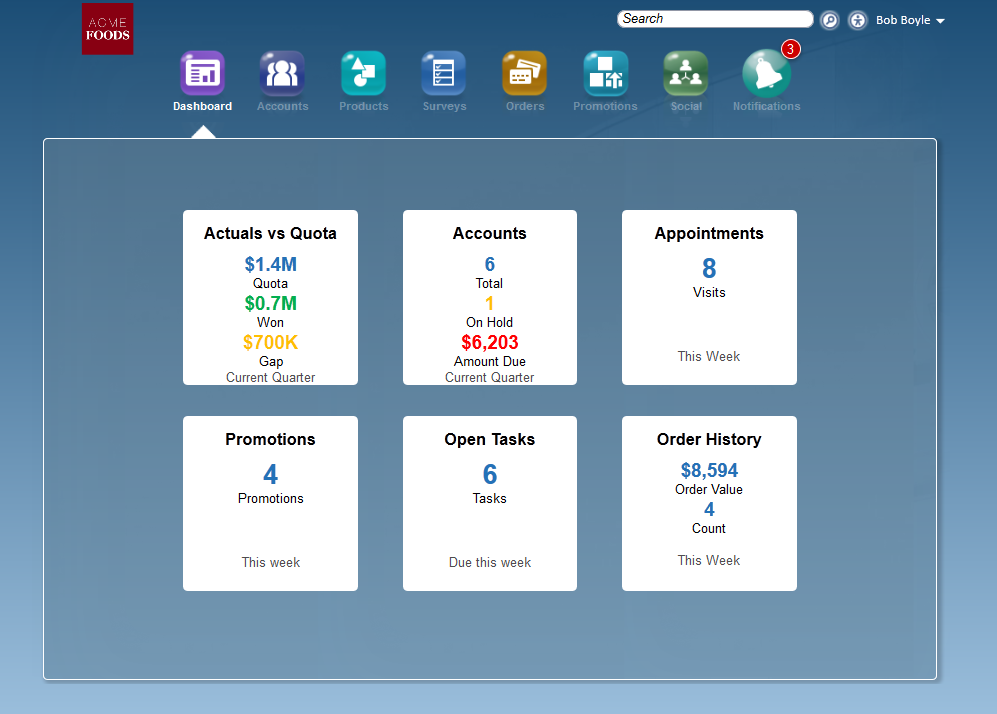
The prebuilt sales manager home page includes these infolets:
- Actual vs. Quota
- Top Open Deals
- Team Leads
- Open Pipeline
- Team Performance
- Team Forecast
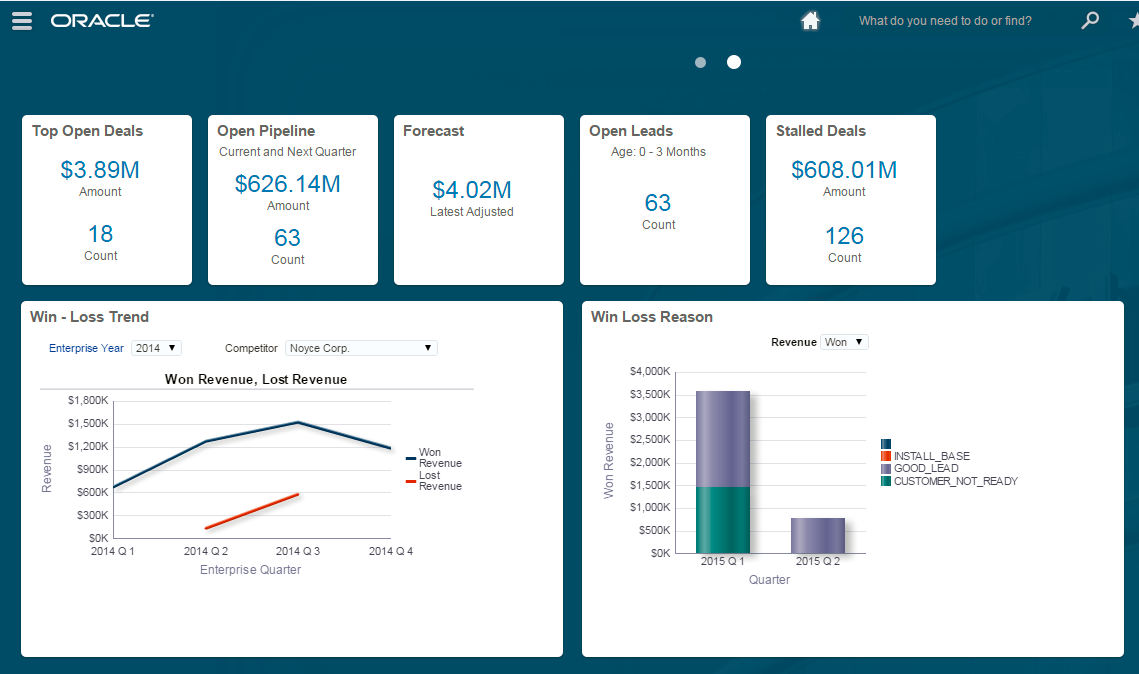
Create dashboards using a prebuilt library of infolets.
Steps to Enable
You must make the infolets page available before you can use it. To do so, perform the following steps:
- Sign in as a sales administrator and navigate to the Structure pane under Tools.
- Click Edit.
- Create a sandbox and make it active.
- Navigate back to the Structure pane and click Set System Options.
- Enable the Sales Infolets option.
- Publish the Sandbox.
The Create Sandbox dialog box appears.
Key Resources
For a demonstration of this enhancement, see the Analytics Enhancements: Dashboards, Mobile, Partner Relationship Management, Verticals release training on the Customer Experience Release Readiness page.
Executive Dashboards for Industry Solutions
Industry solutions for Oracle Sales Cloud include dashboards to help sales executives monitor key performance indicators and their team’s sales effectiveness:
- The High Tech and Manufacturing industry solution provides a sales-productivity dashboard that gives sales managers and executives an overview of their team’s activities and open tasks. It shows the top performers as well as those sales reps at risk of achieving their quota.
- The Consumer Goods dashboard provides sales managers and sales reps with a quick view of their actual sales compared with their quota, an account summary, a consolidated view of appointments and tasks, and a quick view of orders and current promotions.
- The Communications industry dashboard gives sales executives visibility into areas that help them reach their targets, such as projected and won revenue compared with quota, contract renewals, new contract projections, renewal rates, and a summary of bundled deals and stalled deals.
- The Financial Services industry dashboard gives financial bankers visibility into loan applications. The dashboard also enables them to track revenue tied to various financial products as well as track any stalled loan application opportunities.
Steps to Enable
There are no steps necessary to enable this enhancement.
Key Resources
For a demonstration of this enhancement, see the Analytics Enhancements: Dashboards, Mobile, Partner Relationship Management, Verticals release training on the Customer Experience Release Readiness page.
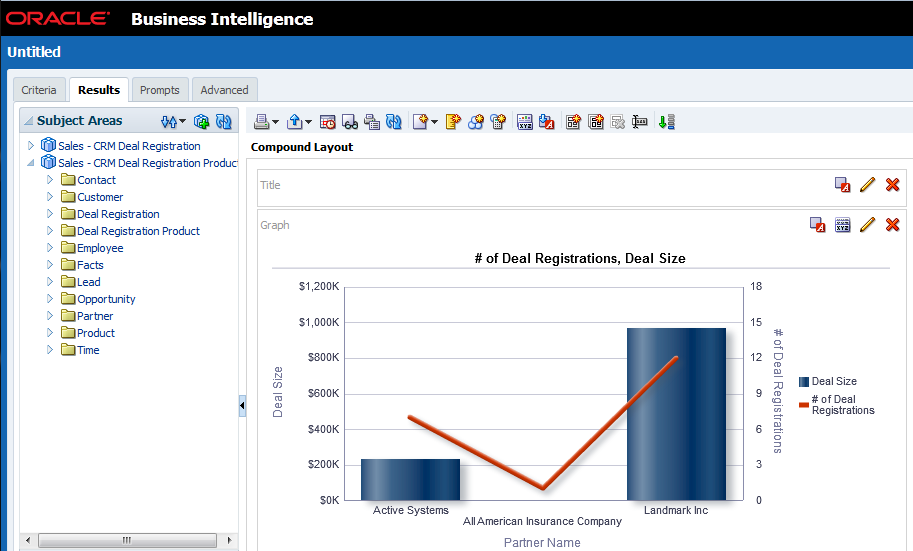
Prebuilt Reports for Deal Registration
These new, prebuilt reports help channel account managers to manage partner relationships and to review deal registrations:
- Deals Pending Approval (KPI). A summary showing the number of deals submitted by partners that require channel account manager approval
- Deals Pending Approval (detailed report). A list of partner deals that require approval. The report includes the date submitted, account, partner, deal size, resource, and close date.
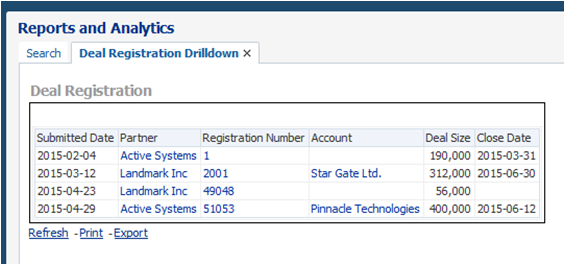
The Deals Pending Approval report shows channel account managers partner deals that require approval.
Steps to Enable
There are no steps necessary to enable this enhancement.
Key Resources
- For a demonstration of this enhancement, see the Analytics Enhancements: Dashboards, Mobile, Partner Relationship Management, Verticals release training on the Customer Experience Release Readiness page.
- For more information about reporting and analytics functionality, see Using Analytics and Reports in the Oracle Help Center.
Prebuilt Report for Forecasting
The new, prebuilt Forecast report helps sales managers and executives analyze their adjusted forecast revenue for enterprise periods within the current quarter. When they’re able to identify significant changes to forecast submissions, sales managers can work with sales reps to identify and correct problem areas.
Steps to Enable
There are no steps necessary to enable this enhancement.
Key Resources
- For a demonstration of this enhancement, see the Analytics Enhancements: Dashboards, Mobile, Partner Relationship Management, Verticals release training on the Customer Experience Release Readiness page.
- For more information about reporting and analytics functionality, see Using Analytics and Reports in the Oracle Help Center.
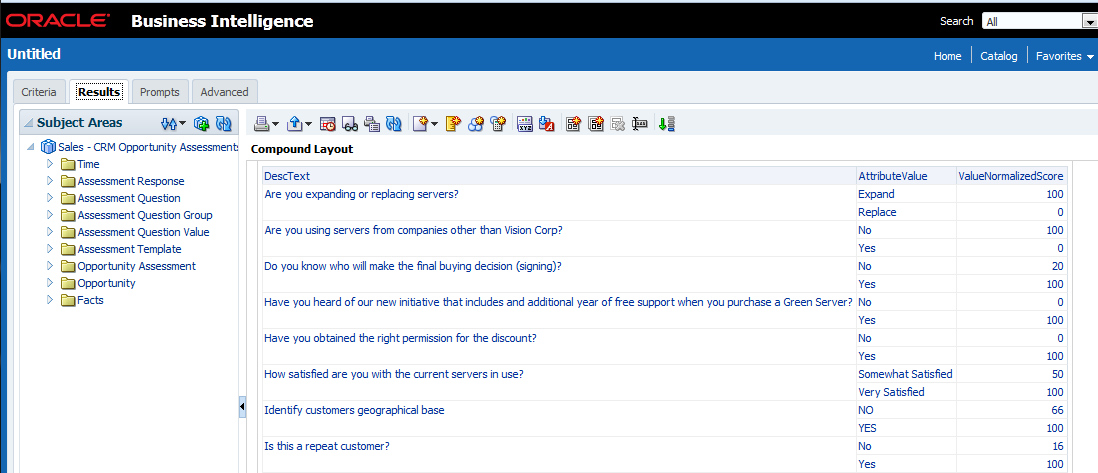
Prebuilt Report for Opportunity Assessment
The new, prebuilt Opportunity Assessment report gives sales managers a detailed view of their team’s opportunities and related opportunity assessments, including assessment responses and scores. With these details, sales managers can more effectively analyze the quality of the opportunity pipeline and identify targeted cross-sell and up-sell opportunities.
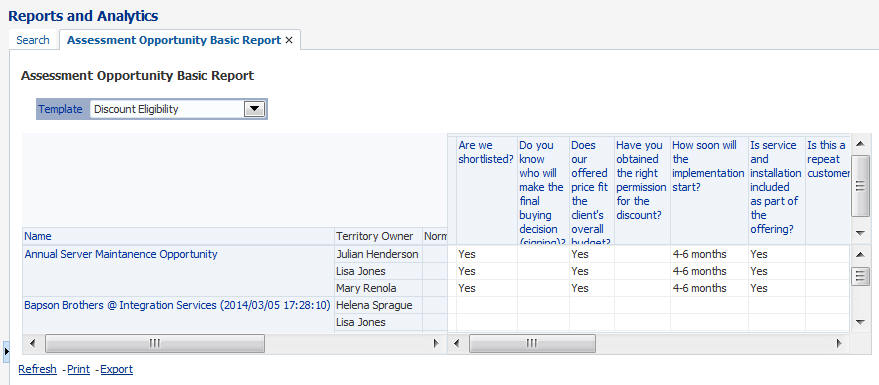
The Opportunity Assessment report shows sales managers a detailed view of their team’s opportunities.
Steps to Enable
There are no steps necessary to enable this enhancement.
Key Resources
- For a demonstration of this enhancement, see the Analytics Enhancements: Dashboards, Mobile, Partner Relationship Management, Verticals release training on the Customer Experience Release Readiness page.
- For more information about reporting and analytics functionality, see Using Analytics and Reports in the Oracle Help Center.
Prebuilt Reports for Activities
These new, prebuilt KPI reports offer a quick look at activities:
- My Tasks (KPI). Shows the number of open tasks created by or assigned to me that are due within the next seven days.
- My Team’s Activities (KPI). Shows the number of open activities that a sales manager’s team is working on in the next 30 days.

The My Team’s Activities report shows the number of open activities for a sales manager’s team.
Steps to Enable
There are no steps necessary to enable this enhancement.
Key Resources
- For a demonstration of this enhancement, see the Analytics Enhancements: Dashboards, Mobile, Partner Relationship Management, Verticals release training on the Customer Experience Release Readiness page.
- For more information about reporting and analytics functionality, see Using Analytics and Reports in the Oracle Help Center.
Simplified Incentive Compensation Reports
Classic dashboard reports are now available in a simplified, visual format. These prebuilt reports are available from the Analytics home page within Oracle Sales Cloud’s simplified pages:
- My Attainment vs. Goal
- My Credit Details
- My Earnings by Credit Category
- My Earnings by Plan Component
- My Earnings vs Target Incentive
- My Payment Summary
- My YTD Earnings and Payment Summary
- My Team's Attainment Comparison Report
- My Team's Credit Details Report
Desktop dashboards and reports are still accessible from the reports and analytics bin.
Steps to Enable
There are no steps necessary to enable this enhancement.
Key Resources
- For a demonstration of this enhancement, see the Analytics Enhancements: Dashboards, Mobile, Partner Relationship Management, Verticals release training on the Customer Experience Release Readiness page.
- For more information about reporting and analytics functionality, see Using Analytics and Reports in the Oracle Help Center.
New Subject Area for Deal Registration
The new Oracle Sales Cloud Deal Registration subject area helps you to build custom reports that enable channel account managers to analyze partner deal registrations. Using this subject area, you can build reports that show deal registrations by partner, customer, channel account manager, opportunity, or product.
Track the life cycle of deals submitted by your partners.
Steps to Enable
There are no steps necessary to enable this enhancement. These subject areas are available automatically to anyone with the sales administrator role.
Key Resources
- For a demonstration of this enhancement, see the Analytics Enhancements: Dashboards, Mobile, Partner Relationship Management, Verticals release training on the Customer Experience Release Readiness page.
- For more information about reporting and analytics functionality, see Using Analytics and Reports in the Oracle Help Center.
New Subject Areas for Partner Reporting
The following subject areas help you to analyze your partner teams:
- Partner Contact. Shows all of the contacts associated with a partner and enables you to see which contacts are designated as resources or users within Oracle Sales Cloud.
- Partner Resource. Shows all of the resources associated with a partner.
- Partner Classification. Shows the classification category and the classification hierarchy that are associated with each partner.
Also, the Partner object has been enhanced to show all attributes of the Partner object, including the multi-value group fields.
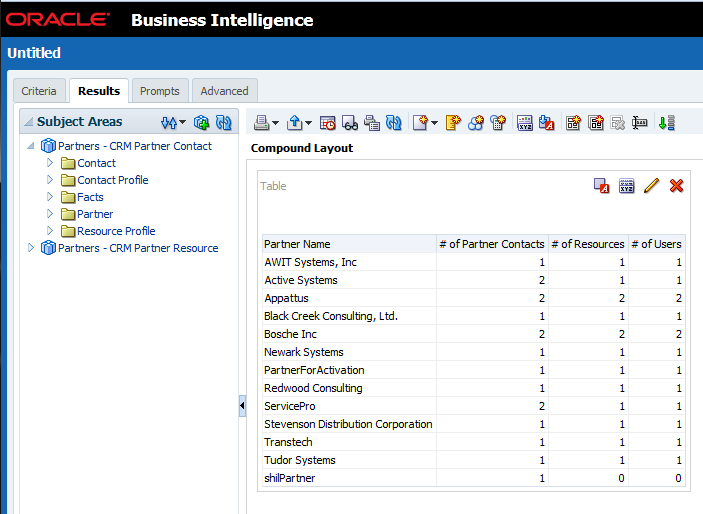
Sales manager can manage team members assigned to different partners.
Steps to Enable
There are no steps necessary to enable this enhancement. These subject areas are available automatically to anyone with the sales administrator role.
Key Resources
- For a demonstration of this enhancement, see the Analytics Enhancements: Dashboards, Mobile, Partner Relationship Management, Verticals release training on the Customer Experience Release Readiness page.
- For more information about reporting and analytics functionality, see Using Analytics and Reports in the Oracle Help Center.
New Subject Areas for Account and Partner Classification
The new Account Classification and Partner Classification subject areas enable you to create custom reports that list the classification category and the classification hierarchy that are associated with each account or partner.

Track classifications that have been assigned to accounts and partners.
Steps to Enable
There are no steps necessary to enable this enhancement. These subject areas are available automatically to anyone with the sales administrator role.
Key Resources
- For a demonstration of this enhancement, see the Analytics Enhancements: Dashboards, Mobile, Partner Relationship Management, Verticals release training on the Customer Experience Release Readiness page.
- For more information about reporting and analytics functionality, see Using Analytics and Reports in the Oracle Help Center.
New Subject Area for Opportunities
These new subject areas help you to focus your sales efforts:
- Opportunity Assessment. Enables you to create custom reports that detail the questions and answers captured as part of an opportunity assessment.
- Opportunity Territory. Shows all of the territories associated with an opportunity.
Generate reports showing the questions and answers captured as part of an opportunity assessment.
Steps to Enable
There are no steps necessary to enable this enhancement. These subject areas are available automatically to anyone with the sales administrator role.
Key Resources
- For a demonstration of this enhancement, see the Analytics Enhancements: Dashboards, Mobile, Partner Relationship Management, Verticals release training on the Customer Experience Release Readiness page.
- For more information about reporting and analytics functionality, see Using Analytics and Reports in the Oracle Help Center.
The following subject areas help you to analyze your leads:
- Lead Contact. Shows all of the contacts associated with each lead.
- Lead Product. Shows all of the product items associated with each lead.
- Lead Territory. Shows all of the territories associated with a lead.
- Lead Resource. Shows all of the resources associated with a lead.
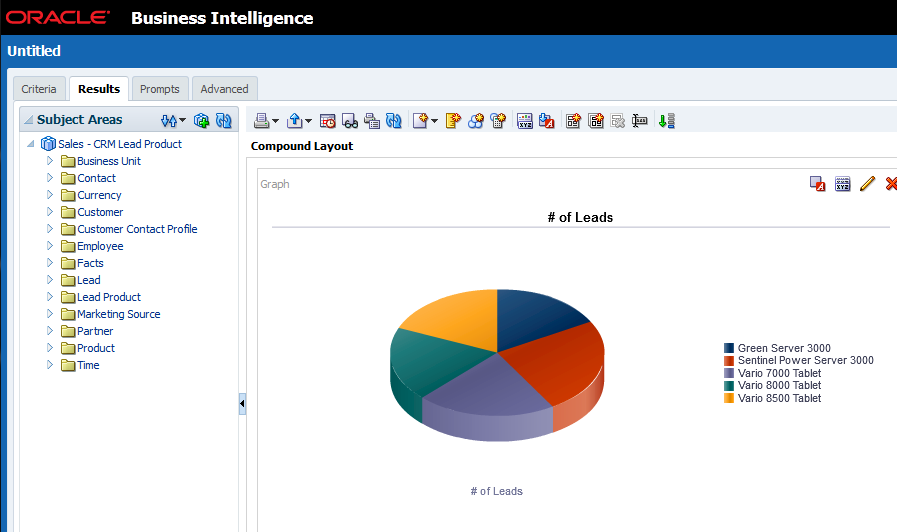
The Lead Product subject area shows all of the product items associated with each lead.
Steps to Enable
There are no steps necessary to enable this enhancement. These subject areas are available automatically to anyone with the sales administrator role.
Key Resources
- For a demonstration of this enhancement, see the Analytics Enhancements: Dashboards, Mobile, Partner Relationship Management, Verticals release training on the Customer Experience Release Readiness page.
- For more information about reporting and analytics functionality, see Using Analytics and Reports in the Oracle Help Center.
Options for Incentive Compensation Analysis
The Incentive Compensation analytics solution has been expanded to include the following:
- Rule Hierarchies. Use credit, rollup, and classification rule hierarchies to model performance information, such as attainment and earnings that span your sales credit structure, and to present reports in a hierarchal structure. You can base reports upon the structure of the following rule hierarchy types:
- Direct Credit Rules. Credit transactions are generated for credit receivers who are associated with the winning credit rules.
- Rollup Credit Rules. During the incentive compensation rollup phase, the application runs a process to determine all of the participants who should receive credit for a transaction based on the rollup date and the credit and rollup hierarchy effective for that date.
- Classification Rules. During the classification process, the application compares the criteria for the applicable classification rules to the affected transaction attribute values. The classification rule hierarchy is used to classify credited transactions. Credit categories match the classified transactions to performance measures, forming the basis for attainment calculation.
- Currency Dimension. Convert values between four incentive compensation currencies and compare the cost of compensation for different organizations in a single common currency. This dimension also enables sales managers (Incentive Compensation Participant Managers) to view their direct reports’ performance and payment information in a common currency. Available currencies include the following:
- Source Transaction
- System Processing
- Business Unit Operating
- Participant Home
You can also create operational reports to analyze criteria, rule, and credit receivers within each hierarchy type.
Steps to Enable
There are no steps necessary to enable this enhancement.
Key Resources
For more information about reporting and analytics functionality, see Using Analytics and Reports in the Oracle Help Center.
Custom Subject Area Enhancements
Create custom analyses for the following areas and attributes using custom subject areas:
- Multi-Currency for Custom Fields
- Opportunity and Sales Pipeline
- Opportunity Team Member Fields
- Opportunity Creation Date
- Sales Account ID
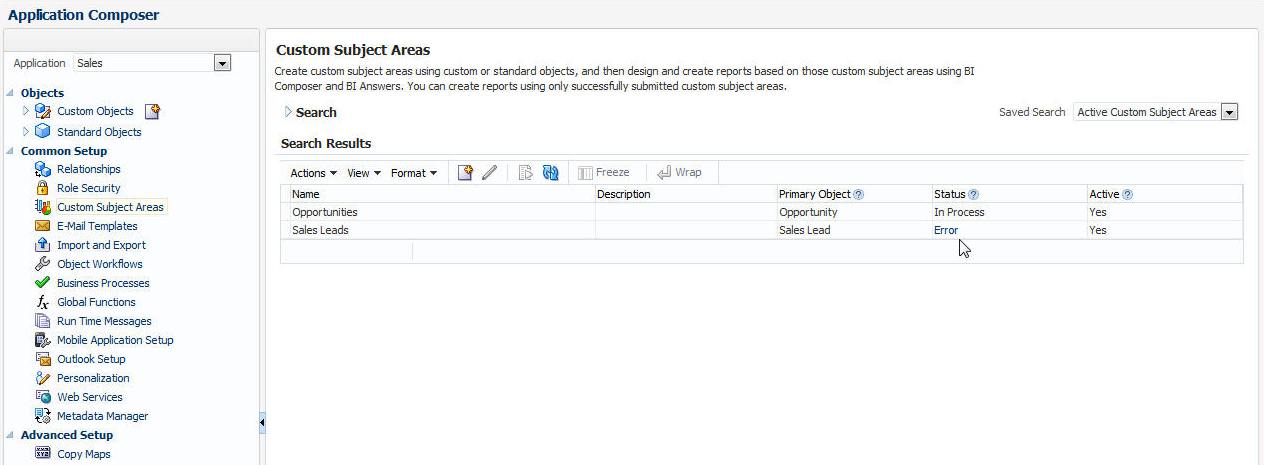
You can delete custom subject areas that are in error status.
Steps to Enable
There are no steps necessary to enable this enhancement. These subject areas are available automatically to anyone with the sales administrator role.
Key Resources
For more information about reporting and analytics functionality, see Using Analytics and Reports in the Oracle Help Center.
Custom Subject Areas for Households
Create, edit, and publish custom subject areas that include standard and custom fields for the Household object.
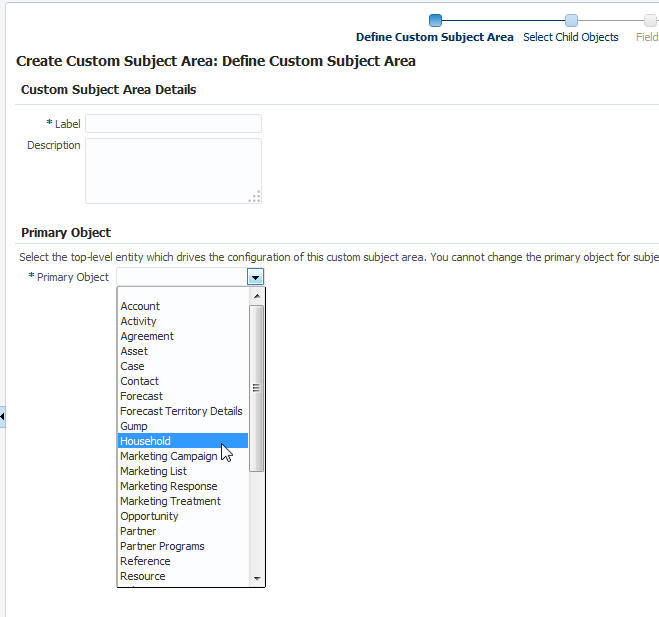
Household is available as a primary object when you create custom subject areas.
Steps to Enable
There are no steps necessary to enable this enhancement. These subject areas are available automatically to anyone with the sales administrator role.
Key Resources
For more information about reporting and analytics functionality, see Using Analytics and Reports in the Oracle Help Center.
Review and track data changes and user activity in the Oracle Sales Cloud application.
Access to Audit Reporting and Audit Setup Pages
Audit reporting allows you to track the usage of the Oracle Sales Cloud application. The audit history tracks which attributes were inserted or updated. It also includes the old and new value and displays the name of the user who made the changes. In Release 10, administrators can access preconfigured Audit Reporting and Audit Setup pages.
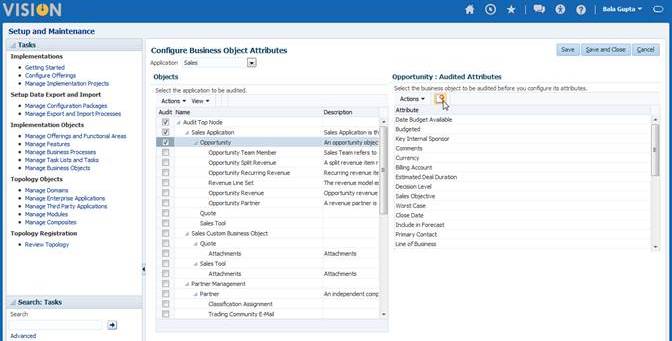
Administrators can access preconfigured Audit Setup pages.
Steps to Enable
When your environment is upgraded to Release 10, a new simplified role-based access control model is installed as a reference model during the upgrade. The reference model coexists with your current model. If you want to use the Audit Reporting and Audit Setup pages, then you must add the following two privileges to your existing model:
- Manage Sales Audit Policies
- View Sales Audit History
For information about how to add these new privileges, see Upgrade Guide for Oracle Sales Cloud Application Security (My Oracle Support Doc ID 1989500.1). It is recommended that you review the following:
- Read the Overview chapter to learn about the simplified reference role model and how it affects you.
- Decide which method you will use to implement the feature and follow the detailed instructions in the guide.
- View the appendix to see the functional security policies that are required for this feature.
Key Resources
For more information about duty roles, see Securing Oracle Sales Cloud in the Oracle Help Center.
Core Sales Force Automation (SFA) enhancements are built to meet the needs of sales reps and sales managers, giving them access to customer and sales information from a tablet or smartphone. With Release 10, companies with multiple business units can use a single Oracle Sales Cloud instance to see a complete, single view of their business. Using the White Space Analysis report, sales reps can pinpoint accounts with the greatest potential. Sales reps can also create recurring revenue schedules to capture subscription sales and thereby improve forecasting accuracy. In addition, you can view and edit product forecast aggregates and immediately see the results of updates and adjustments.
Manage your company’s different divisions or business units within one instance of Oracle Sales Cloud. Consolidation into a single sales solution enables you to see a complete, single view of your customers and their interactions. It also offers global reporting and forecasting, improved collaboration between business units, reductions in effort and cost, and other business efficiencies.
Model and Configure Business Units
You can now create and manage business units with complete flexibility to define processes, policies, and reference data that vary from each other in different areas of the business. For instance, you can create a separate business unit for every geographic region or a line of business to accommodate the unique requirements of that department. You can model different sales processes and methodologies for each business unit. The model is based on the products sold, while still offering executives a consolidated forecast for all business units.
To accommodate the unique needs of each division, you can create business-unit-specific drop-down list values, sales methods, or sales stages. You can also control access to data by business unit. Using Application Composer, you can configure different dynamic page layouts, workflows, validations, and triggers for various business units.
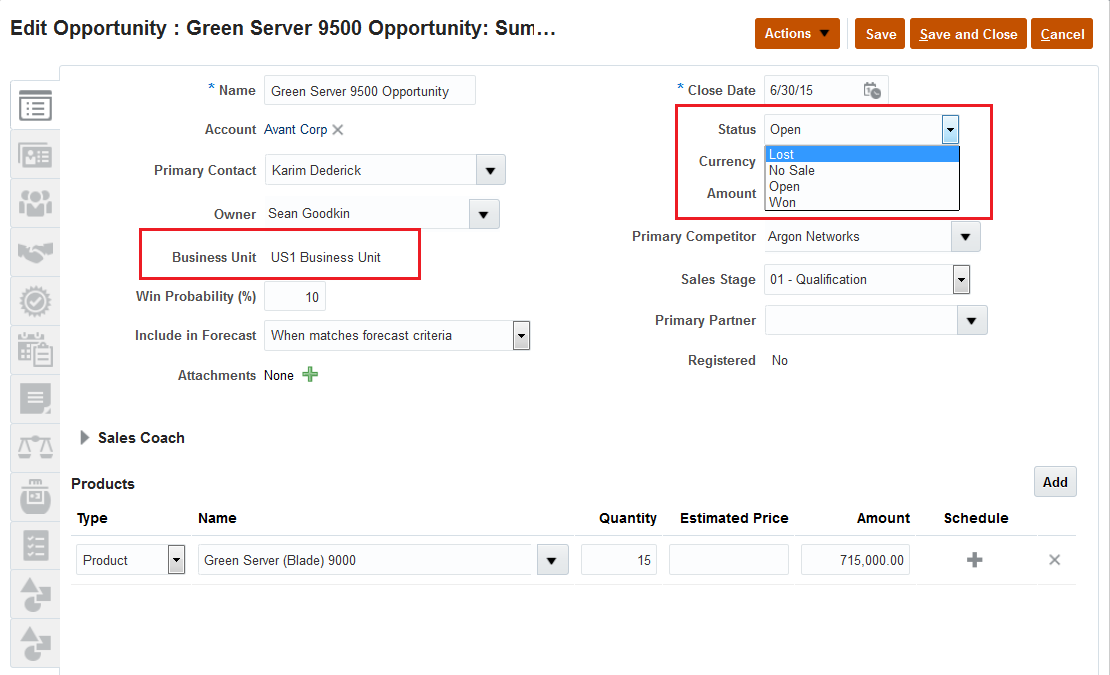
You can specify a business unit when creating an opportunity or a lead. The Status drop-down list is specific to the business unit that you selected.
Use business units to control data visibility in Oracle Sales Cloud with these access controls:
- Territories. Using the new business unit dimension for territories, you can now define territories specific to your company’s different business units. Using tailored territory definitions, you can more accurately assign opportunities and leads for different business units.
- Admin Access. Sales administrators can access only objects in the business units with which they’re associated.
Steps to Enable
Multiple Business Units in Sales Cloud is an opt-in feature and must be enabled by an administrator. Additional setup steps are also required to address your requirements in a multiple-business-unit instance. For complete, detailed instructions about how to enable Multiple Business Units in Sales Cloud, see:
- Multiple Business Units release training on the Customer Experience Release Readiness page.
- Managing Multiple Business Units in Oracle Sales Cloud whitepaper (My Oracle Support Doc ID 2015552.1).
Tips and Considerations
- Your current Sales Administrator job role might need to be modified after upgrade if you choose not to use the preconfigured Release 10 sales administrator job role.
- You can customize drop-down list values for an individual business unit that contains the designator SETID. For instance, the field MKL_REJECT_REASON is now named MKL_REJECT_REASON_SETID.
Global Search and List Management
Quickly find your critical sales information using global search or list management to create your own accounts, contacts, opportunities, or leads lists.
Redesigned list pages provide an advanced side filter that enables you to create and refine lists and see search results immediately. Clicking the new Filter icon opens the filter panel, revealing the active search criteria. You can edit the search criteria, add filters to any number of attributes, reset the search, save a new search, or reorder search fields directly from the expanded filter panel. Whether you’re using a mobile device, tablet, or desktop computer, your list results and filter options are accessible when the side filter is expanded.
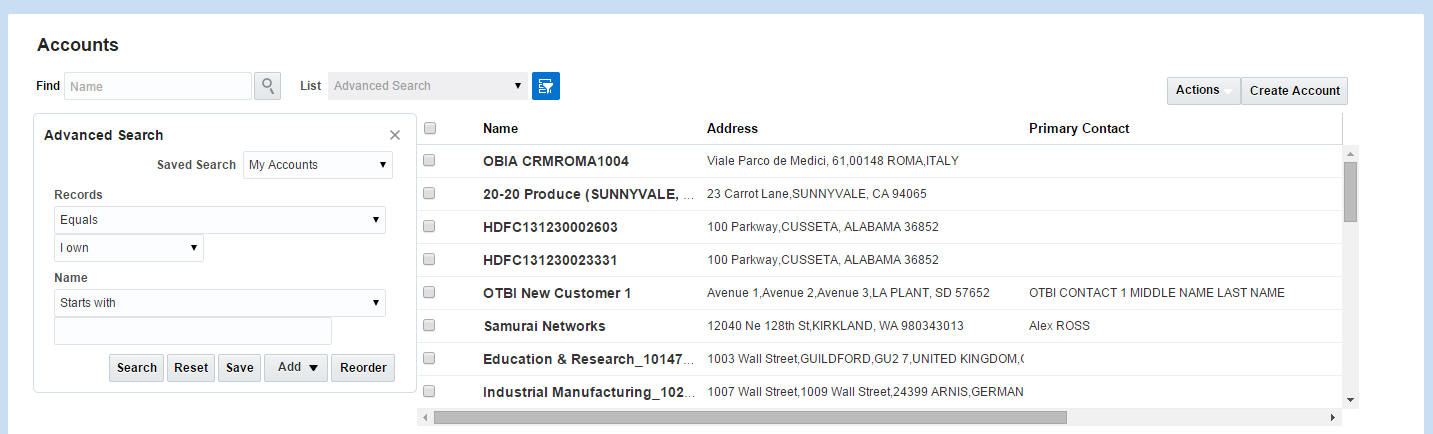
An advanced side filter that enables you to create and refine lists and see search results immediately.
Steps to Enable
There are no steps necessary to enable this enhancement.
Tips and Considerations
You can click the Advanced Search icon to open or close the Advanced Search side panel. The panel will remain open until you close it.
Key Resources
For more information on list management, see Enabling and Configuring Search in Getting Started with Your Oracle Sales Cloud Implementation and Using Search and Activities in Using Sales in the Oracle Help Center.
Build solid business relationships with a complete and accurate view of your accounts, contacts, and households.
White Space Analysis helps sales reps to focus on accounts with the highest revenue potential to meet their quarterly sales goals. Using Oracle Sales Cloud’s White Space Analysis report, sales reps can find cross-sell and up-sell opportunities and see which products they should pitch to each account. Sales reps can quickly see the total revenue projected for each account. This report shows a breakdown of potential revenue coming from current opportunities, leads, and recommendations generated from Oracle Sales Cloud’s Sales Predictor, which is the sales prediction engine. The report is based on similar customers’ purchase patterns.
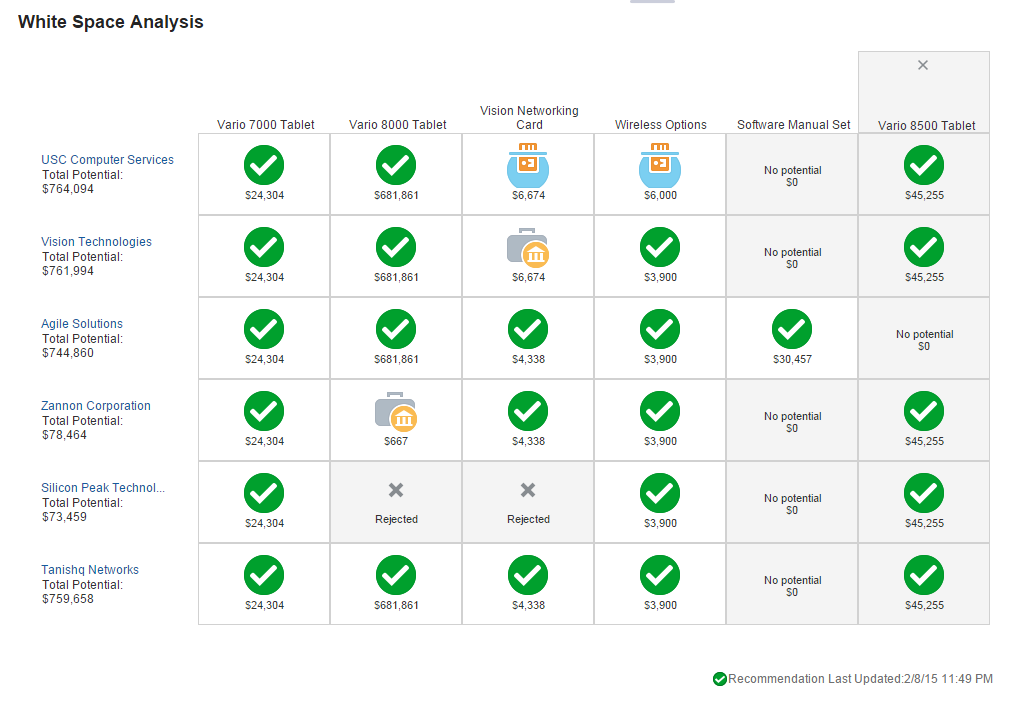
View recommendations generated by Oracle Sales Cloud’s Sales Predictor.
Steps to Enable
You must have an Oracle Fusion Opportunity Landscape Cloud Service license to enable white-space analysis.
To display the White Space Analysis tab:
- Sign in as an administrator and create a sandbox:
- Click your name.
- Navigate to Administration > Manage Sandboxes.
- Click the New icon and enter a sandbox name.
- Click Save and Close.
- Click OK.
- Highlight the sandbox row that you created previously and click Set as Active.
- Navigate to Tools > Structure.
- Expand Sales and click Accounts.
- Select the White Space Analysis tab and update name, icon, visible, and order.
- Click Save and Close.
- Click the sandbox name.
- Click More…
- Click Publish.
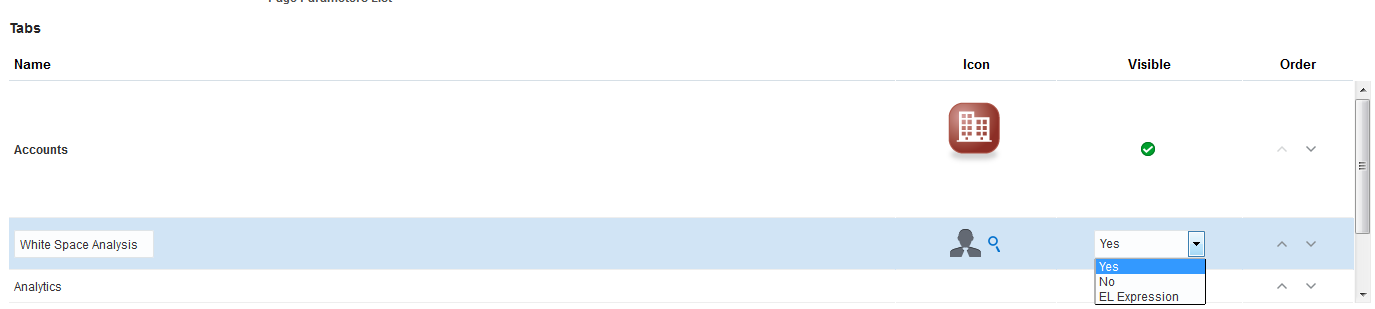
Now the White Space Analysis tab is visible to your sales reps.
Tips and Considerations
- To display recommendations in the white-space report, make sure that rule-based recommendations have been set up for your accounts.
- To display asset information in the white-space report, make sure that asset information for your accounts is available in your implementation of Oracle Sales Cloud.
Key Resources
- For a demonstration of this enhancement, see the Sales Predictor Enhancements: Predictive Analytics- White Space Analysis release training on the Customer Experience Release Readiness page.
- For more information about Oracle Sales Cloud Sales Predictor, see the Oracle Sales Cloud Sales Predictor data sheet.
- For more information about setting up sales prediction rules, see Setting Up Sales Predictions in Oracle Sales Cloud Implementing Sales in the Oracle Help Center.
- For more information about extending simplified pages, see Oracle Sales Cloud Common Extensibility in Oracle Sales Cloud Customizing Sales in the Oracle Help Center.
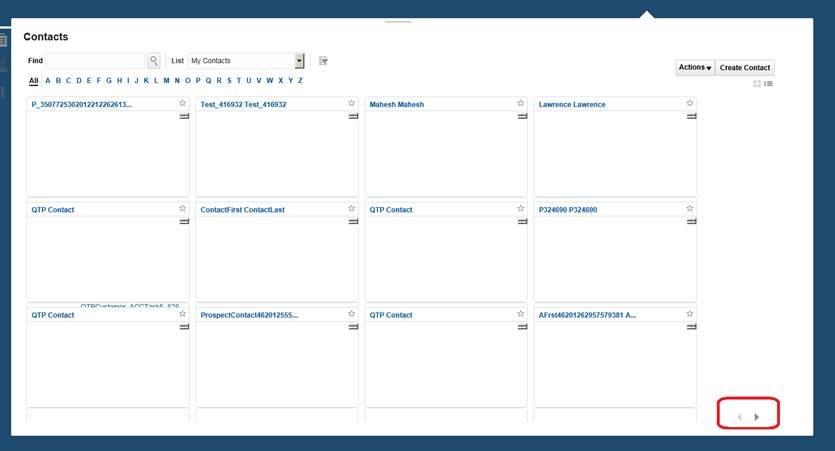
Improved Mass-Selection in Contact List
You can select multiple contacts by choosing an action, such as Merge Contacts, and then selecting the contacts from a list. The check box column has been removed from the list. Now, using the simplified UI, you click anywhere in the contact card. Or, if you’re using the desktop, then click anywhere in the list row to select a contact. Click as many contacts as you want, and then perform the action.
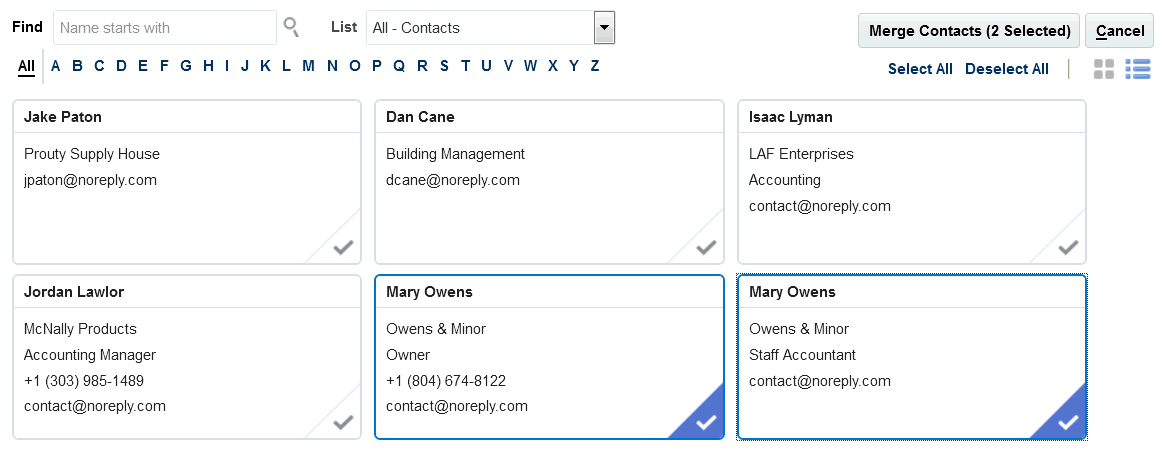
You can select multiple items in a list by clicking anywhere in the card.
Steps to Enable
There are no steps necessary to enable this enhancement.
Improved Contact Loading Times
To improve the loading time for contact cards in the simplified UI, the total number of contacts is no longer displayed.

Prior to Release 10, the number of contact records was displayed on the Contacts list page.
For Release 10 and later, the number of contact records is not displayed on the Contacts list page.
Steps to Enable
There are no steps necessary to enable this enhancement.
Customization Options for Asset Pages
You can now customize Asset pages to include custom buttons and links.
Steps to Create a Custom Button
- Go to the Customer Center application in Application Composer.
- Navigate to Asset Standard Object > Actions and Links.
- Click Create New.
- Select Action and type: URL.
- Enter a name, such as: ActionTestURL.
- Enter a URL, for example: http://www.oracle.com.
- Click Save.
- Add the new button to the Edit Page of the asset object.
- Start the Oracle Fusion Home page and go to the Accounts card.
- Drill down to a customer record.
- Go to the Edit page.
- Go to the Asset subtab.
- Click the new button: ActionTestURL.
The Oracle URL opens in a new tab.
Steps to Create a Script
- Go to the Customer Center application in Application Composer.
- Navigate to Asset Standard Object > Actions and Links.
- Click Create New.
- Select Action and type: Script.
- Enter a name, such as: ActionTestScript.
- Enter a script, for example: println("Testing Asset custom button............. ).
- Click Save.
- Add the new button to the Edit Page of the asset object.
- Start the Oracle Fusion Home page and go to the Accounts card.
- Drill down to a customer record.
- Go to the Edit page.
- Go to the Asset subtab.
- Click the new button: ActionTest Script.
- Check the script output in a log or a runtime message.
Steps to Create a Link
- Go to the Customer Center application in Application Composer.
- Navigate to Asset Standard Object > Actions and Links.
- Click Create New.
- Select Link and enter a name, such as LinkTestURL.
- Enter a URL, for example: http://www.oracle.com".
- Click Save.
- Add the new link to the Edit Page of the asset object.
- Start the Oracle Fusion Home page and go to the Accounts card.
- Drill down to a customer record.
- Go to the Edit page.
- Go to the Asset subtab.
- Click the new link: LinkTestURL.
The Oracle URL opens in a new tab.
New Subject Areas for Account and Partner Classification
For a description of this enhancement, see New Subject Areas for Account and Partner Classification.
Design and manage professional-looking e-mail campaigns to stay in touch with your customers. Convert campaign responses into leads that you can convert to sales.
Segment and Save Contact Lists
Segment your contacts to create the right target list for your campaigns. You can segment your contacts using many contact attributes including name, location, job title, territory name, territory owner, taxpayer identification number, and employment status, among others.
Save time when selecting campaign recipients by selecting from a saved contact list. It is easy to e-mail your customers about new product promotions or invite them to an event. You can also create follow-up campaigns using a previous target list of recipients. You can also filter out the contacts who selected the Do Not Email preference.
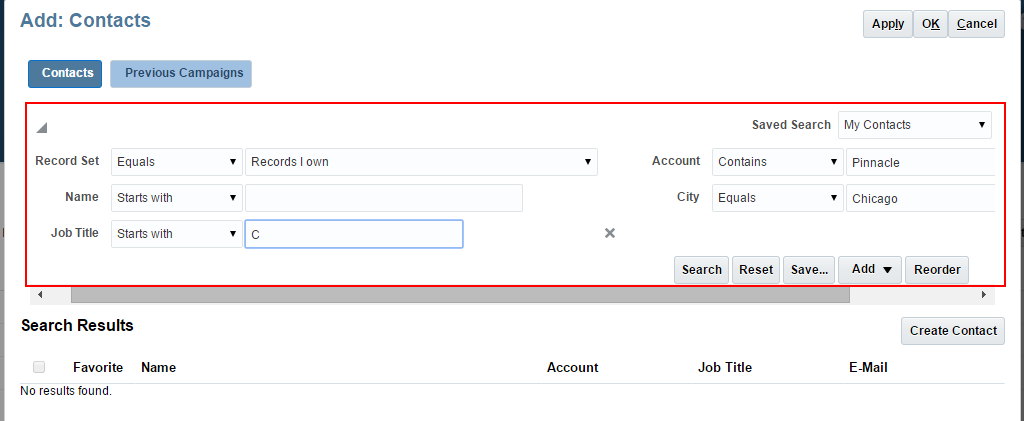
Use a saved contact list to select recipients for a sales campaign.
Steps to Enable
There are no steps necessary to enable this enhancement.
Tips and Considerations
When you are working within Sales Campaigns, the saved Contact lists that you created elsewhere in Oracle Sales Cloud are visible to you. It is common for sales users to create many different saved lists from within Sales Campaigns, but those lists might not be of value if viewed outside of the Sales Campaigns application. So, the saved Contact lists that you create directly inside of Sales Campaigns aren’t visible in other parts of the application.
Key Resources
- For a demonstration of this enhancement, see the Sales Campaigns Enhancements release training on the Customer Experience Release Readiness page.
- For more information about saving lists, see Maintaining Account and Contact Information in Using Sales in the Oracle Help Center.
Simplified Response and Lead Management
Using Oracle Sales Cloud’s simplified pages on your tablet or desktop device, you can view campaign responses, convert responses to leads, and see the leads generated from campaigns.
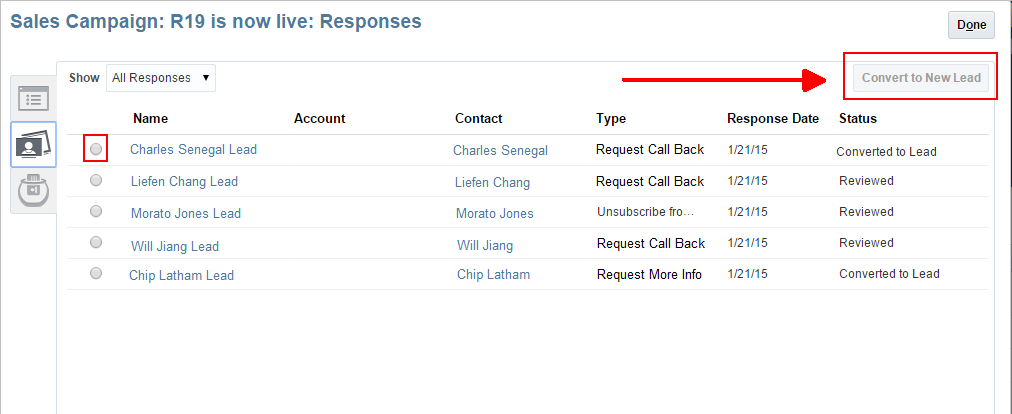
View responses generated from a sales campaign and convert them to leads.
Steps to Enable
There are no steps necessary to enable this enhancement.
Tips and Considerations
- Sales Campaigns is now available from a top-level icon.
- Responses generated from a Sales Campaign are now visible on a tab from the campaign detail page of a completed campaign.
- Leads generated from a Sales Campaign are now visible on a tab from the campaign detail page of a completed campaign.
Key Resources
For a demonstration of this enhancement, see the Sales Campaigns Enhancements release training on the Customer Experience Release Readiness page.
Manage the entire life cycle of sales leads from the initial contact to conversion.
For a description of this enhancement, see New Subject Areas for Leads.
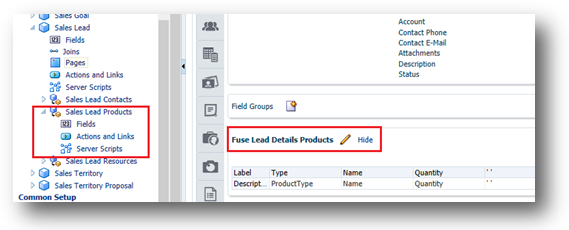
Customization and Configuration Options for Sales Leads
Release 10 provides the following additional options to configure and customize your Leads pages:
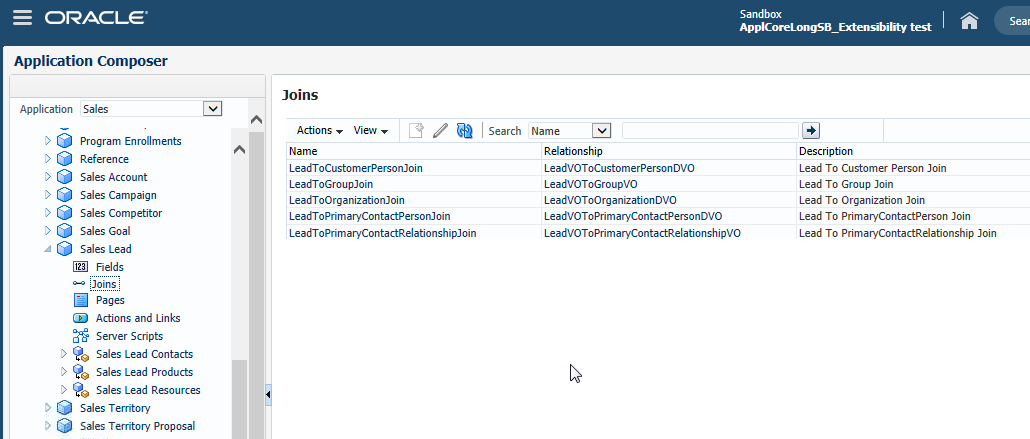
- Use the Join Fields function to link related objects and expand the set of available fields for the Sales Lead object:
- Configure and customize the new Sales Lead Product object:
- Hide, show, and reorder custom buttons on the Create page for the Sales Lead object.
- Hide, show, and reorder custom buttons and actions at the region level on the Sales Lead Contacts and Sales Lead Resources subtabs.
Steps to Enable
There are no steps necessary to enable this enhancement.
Tips and Considerations
Region level buttons are visible only when the contact or resource subtab pages are displayed. However, page-level sales lead buttons and actions are always visible from any subtab within the Sales Lead detail page.
Use Oracle Sales Cloud to track the full life cycle of an opportunity, from creation through every stage until it's closed.
Recurring Opportunities for Subscription Sales
Create recurring revenue schedules to manage your subscription sales. Include the quantity and amounts to help improve forecast and pipeline accuracy. The amounts are summed and added to the corresponding periods in your forecast rollups and pipeline reports. With recurring opportunities you can do the following:
- Create recurring schedules that occur at the frequency of your choice (that is. weekly, monthly, quarterly, or annually) for product amounts and quantities.
- Add one-time setup or installation fees.
- Adjust quantity or amounts for transactions in the schedule, or modify the schedule.
- Extend the schedule for renewed subscriptions.
- Enable additional sets of standard fields, or configure predefined extension fields for recurring transactions.
- Import or update recurring transactions by using the import feature or Web services.
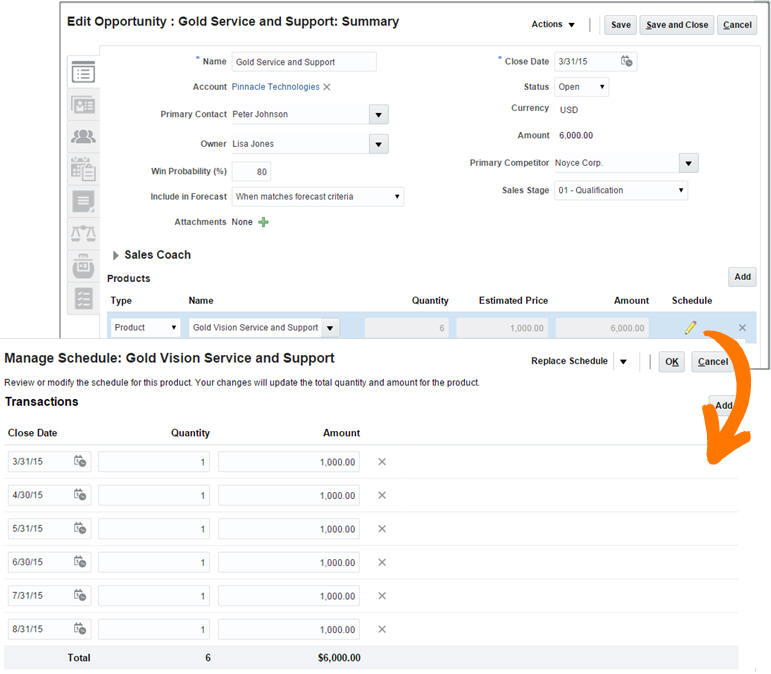
Create recurring schedules that occur at the frequency of your choice.
Steps to Enable
Using Application Composer, administrators can enable the feature by following these steps:
- Edit the Opportunity: Details Layout: Edit Revenue Table.
- Configure the Summary Table.
- Select the Schedule field to appear as a column on the Products Table.
Move the Schedule field from the list of Available fields to Selected Fields:
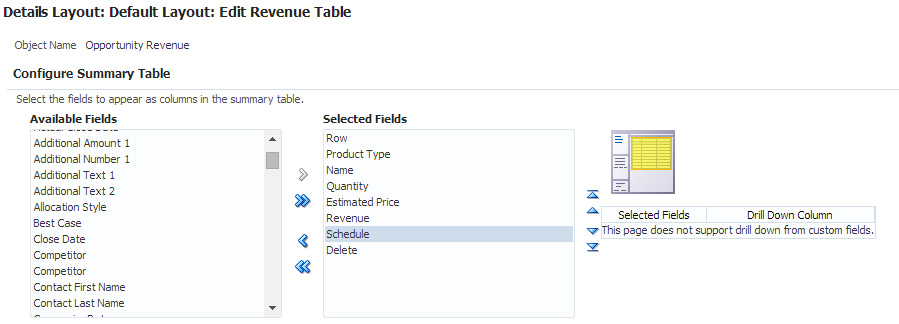
NOTE: It is recommended that you complete the previous steps in a sandbox. Publish the sandbox after verification.
For a demonstration of this enhancement, see the Opportunity Management Enhancements: Recurring Opportunities release training on the Customer Experience Release Readiness page.
Prebuilt Report for Opportunity Assessment
For a description of this enhancement, see Prebuilt Report for Opportunity Assessment.
New Subject Area for Opportunities
For a description of this enhancement, see New Subject Area for Opportunities.
View, manage, and submit forecasts from your desktop or mobile devices. Embedded analytics provide information that you can use to improve the accuracy of your forecasts.
Whether you view your forecast from your desktop or tablet browser, you can see and edit product totals for all forecasted opportunities. You can show product aggregates for the quarterly forecast total or display them by the months within that quarter. Forecasting reflects the edits made to an opportunity or any adjustments made at the deal level in real time.
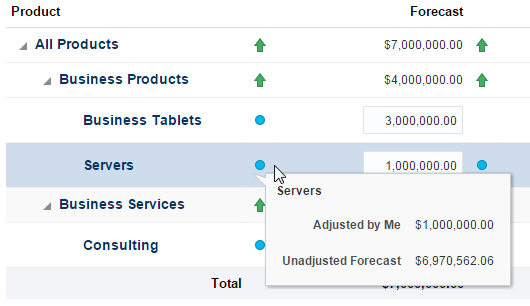
Adjustments and unadjusted numbers are highlighted.
Steps to Enable
- Navigate to the Select Forecasting Options setup task.
- To enable the product aggregates feature, select the Enable Summary Tab check box on the Select Forecasting Options screen.
- Define the depth of the product hierarchy.
Tips and Considerations
The administrator can set the depth of the product hierarchy to 1, 2, or 3 levels deep. For improved usability, set the product hierarchy depth to 1, to show only the first level of products in the hierarchy.
Key Resources
- For a demonstration of this enhancement, see the Sales Forecasting Enhancements: Simplified UI release training on the Customer Experience Release Readiness page.
- For more information about sales planning and forecasting, see Managing Forecasts in Using Sales in the Oracle Help Center.
Overlay Forecast for Simplified Pages
Overlay forecasts enable overlay sales organizations to own a separate forecast. The overlay forecast rolls up separately from the revenue sales credit, so the same deal can be forecasted by two or more different sales reps.

Using simplified pages, you can review, adjust, and submit your overlay forecast.
Steps to Enable
- To enable the overlay forecast feature, navigate to the Territories Desktop UI to access the full set of Territory Management features.
- Create a new proposal to update your territories as required.
- In the Forecast and Participation dropdown list, select Revenue and nonrevenue for those territories that will display both the revenue forecast and the overlay forecast.
- In the Forecast and Participation dropdown list, select Nonrevenue for those territories that will display only the overlay forecast.
- In the Forecast and Participation dropdown list, select either Nonrevenue or Revenue and nonrevenue for all parent territories that have one or more child territories participating in the overlay forecast.
- To uptake the latest territory hierarchy for the current forecast, you must give the forecast a frozen date in the future and run the Run Refresh Forecast process.
No additional setup is required. The Run Refresh Forecast job will automatically enable the overlay forecast feature for those territories with the correct forecast participation.
Tips and Considerations
- Consider how to model the overlay sales organization within the territory hierarchy.
- The territory dimension controls which opportunities the overlay sales force can see.
- The territory hierarchy determines which managers have visibility into the overlay forecast.
Key Resources
- For a demonstration of this enhancement, see the Sales Forecasting Enhancements: Simplified User Interface release training on the Customer Experience Release Readiness page.
- For more information about sales planning and forecasting, see Managing Forecasts in Using Sales in the Oracle Help Center.
Prebuilt Report for Forecasting
For a description of this enhancement, see Prebuilt Report for Forecasting.
Changes to Forecasting Since the Last Release
- Feature Deprecation: The Adjustment History feature enabled managers to see which of their subordinates had made adjustments to their forecasts. Two new enhancements to the simplified UI have replaced this feature. Now managers can view the unadjusted forecast as well as see any adjustments that have been made from the perspective of the manager versus his subordinates. Managers can also see how the forecast has changed since the last submission.
- Behavior of Product Aggregates in the UI:
- In the simplified UI, only the lowest level of products is editable, and all parent nodes are recalculated after saving them.
- All Totals View: In the simplified UI, any change to the All Totals view is applied to the last period of time on the Forecast view. For example, if you increase the quarterly forecast value by one million in the All Totals view, then a million dollars is added to the last month of the quarter in the Forecast view.
Steps to Enable
No steps are required to enable these enhancements.
See all of your activities in one place and quickly add appointments, create tasks and log calls related to your accounts, contacts, households, partners, leads and opportunities.
Create a Task for an Object Without an Activity Relationship
You can create a task for a standard or custom object even if that object doesn't have a relationship with an activity. Previously, you couldn’t create a task if there was no relationship between the activity and the object. If you try to create a task on an object with no relationship to an activity, then a message is displayed telling you that a standalone task will be created unless you first create such a relationship. After the standalone activities are created, they’re displayed in the task owner's Activity work area in the desktop UI and in the top-level Activities in the simplified UI.
Steps to Enable
There are no steps necessary to enable this enhancement.
Appointments and Tasks Integrated with Oracle Social Network
You can post tasks and appointments to Oracle Social Network using the simplified UI. Sales managers and other sales reps can view the shared information and can join and contribute to the conversation. When viewing a task or an appointment from within Oracle Social Network, you can drill down on the View Details link and edit the specific task. Previously, you could only post tasks and appointments to Oracle Social Network using the desktop UI.
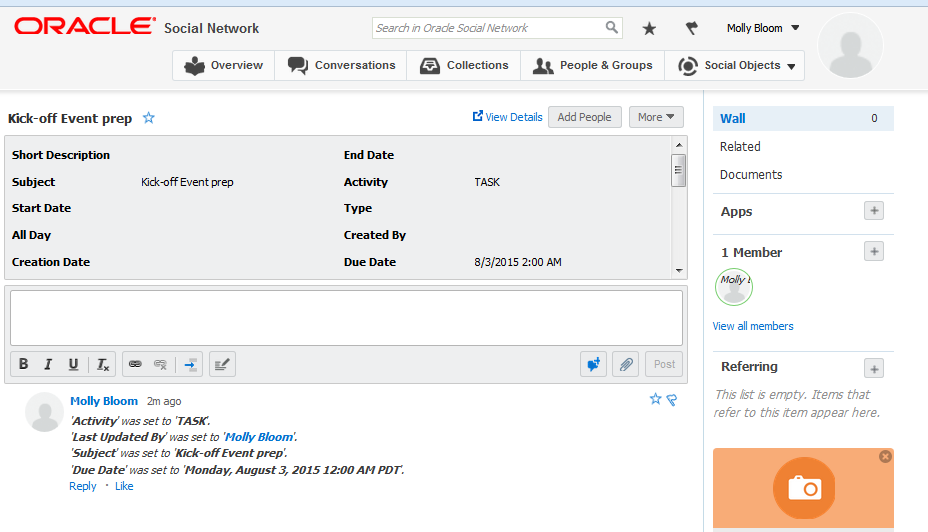
You can see a shared task on Oracle Social Network.
Steps to Enable
- Enable Activity from Setup > Manage Oracle Social Network.
- Add the activity attributes that you want to share, such as subject, activity, start date, due date, and so on.
Oracle Sales Cloud for IBM Notes
Oracle Sales Cloud for IBM Notes™ allows you to work in IBM Notes or Oracle Sales Cloud to manage your sales contacts and activities. With Release 10, you can synchronize, link, and share data between Oracle Sales Cloud and IBM Notes. Oracle Sales Cloud for IBM Notes supports the IBM Notes 8.5.3 and 9.0.1 (client) and IBM Domino 8/9 (server).
Synchronize Contacts, Activities, and Notes
Synchronize your contacts, activities, and notes between Oracle Sales Cloud and IBM Notes to increase productivity and avoid data duplication. Whether you’re online or disconnected, you can see Oracle Sales Cloud appointments, tasks, notes, and contacts in IBM Notes. Interactive synchronization enables you to select the contacts, notes, meetings, and to-dos that you want to synchronize from IBM Notes to Oracle Sales Cloud.
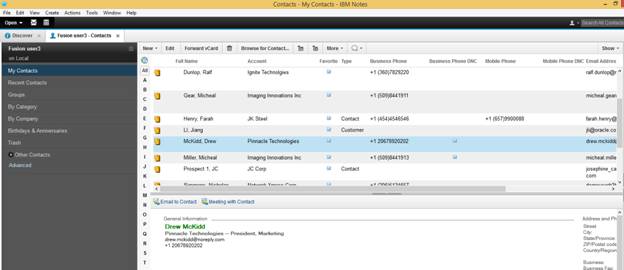
You can see Oracle Sales Cloud appointments, tasks, notes, and contacts in IBM Notes.
Link and Share E-mails and Meetings
From IBM Notes, you can quickly link your e-mails, meetings, and to-dos to relevant Sales Cloud accounts, opportunities, leads, contacts, and resources. You can also associate your contacts with Oracle Sales Cloud accounts or resources. Interactive sharing enables you to select which e-mails become activities in Oracle Sales Cloud. An indicator appears when data is shared.
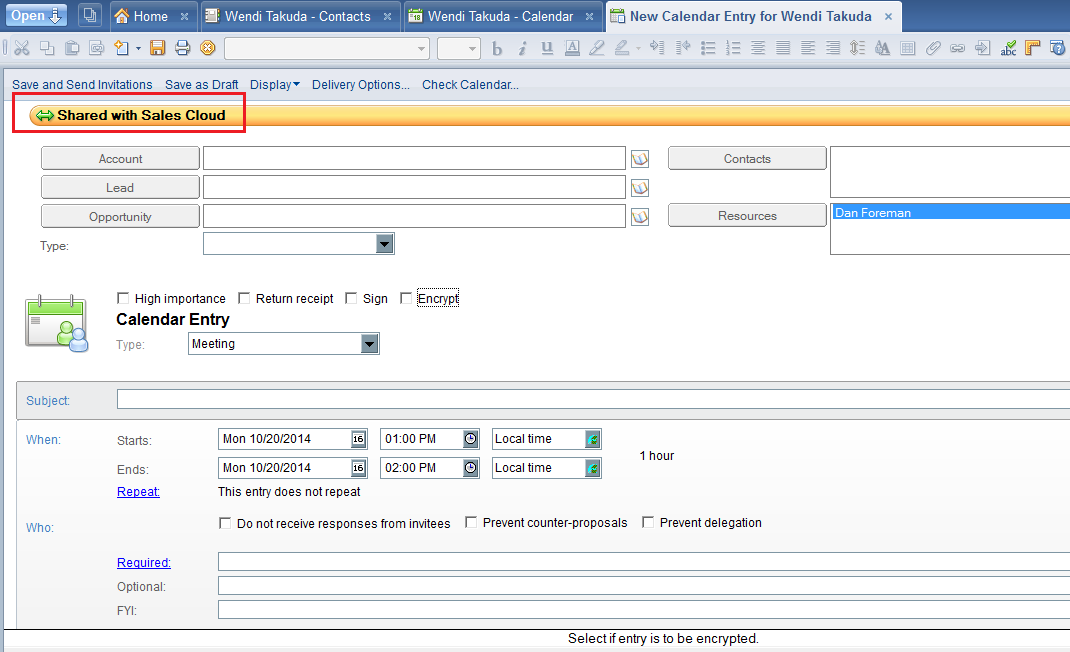
An indicator appears when data is shared with Oracle Sales Cloud.
Steps to Enable
As an administrator, complete the following steps to activate Oracle Sales Cloud for IBM Notes:
- Set up and activate the IBM Notes package.
- Set up the IBM Notes Installer download.
The environment is configured for Oracle Sales Cloud for Outlook by default. To configure the environment for IBM Notes, perform the following steps.
Activating an IBM Notes Package
- Sign in to Oracle Sales Cloud and click Sign In.
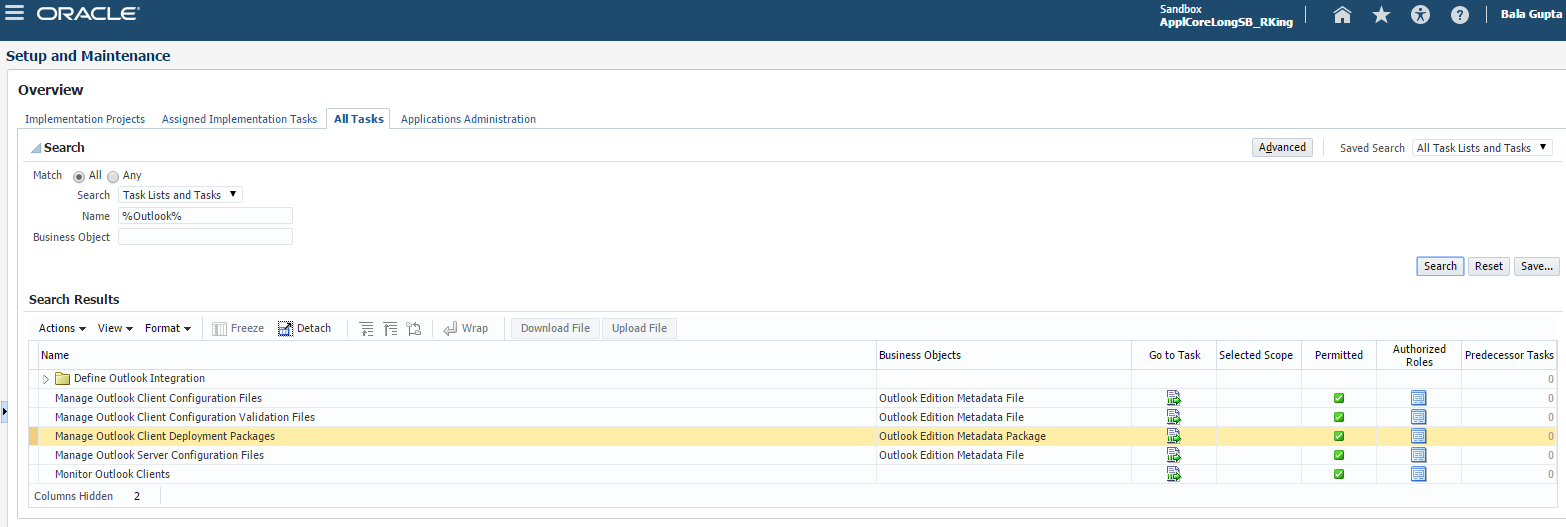
- Click your name and then click Setup and Maintenance.
- In the Search section, enter %Outlook% in the Name field.
- Select Manage Outlook Client Deployment Packages and click Go to Task.
- From the list of available package names, copy Default IBM Notes client deployment package for sales representative and save it in Notepad.
- Sign in to the Application Process Model (APM) to change the active package name. The URL is http://Your instance name/apm.
- In the Search drop-down list, select Database Resources, enter Outlook% in the text field, and click the arrow button.
- In the search results, select the Display Name: Outlook Edition Metadata Package.
- Click Edit (the pencil icon).
- Click the Condition tab.
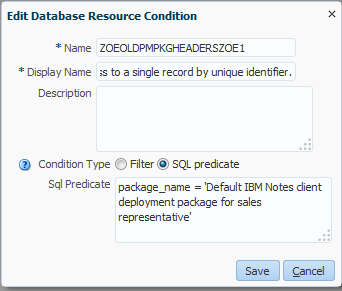
- Select Outlook Package for Sales Rep and click Edit.
- In the SQL Predicate field, enter the following:
package_name = - Paste the package name, surrounded by single quotation marks, that you copied into Notepad in Step 5: ‘Default IBM Notes client deployment package for sales representative’
- Click Save, then Submit, and then OK.
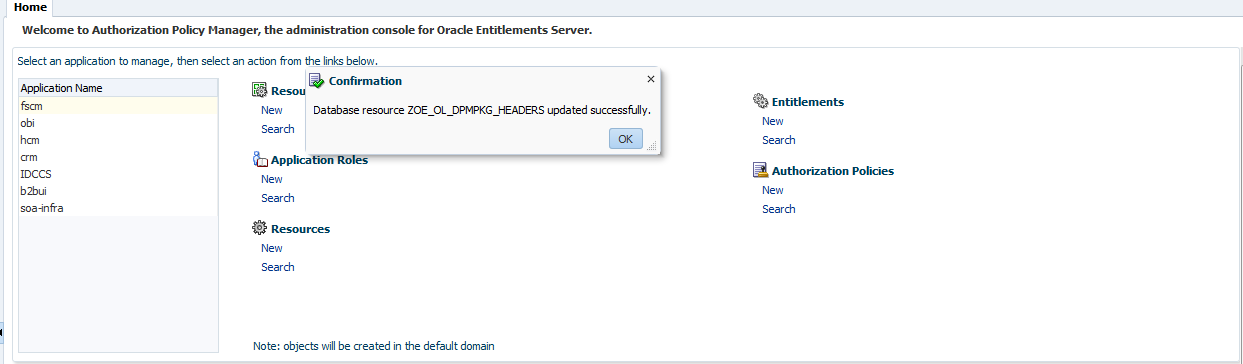
The IBM Notes package is activated in Oracle Sales Cloud for a sales representative. Follow the same steps to set up IBM Notes for a sales manager.
Configuring an IBM Notes Installer Download
NOTE: Activate the IBM Notes package before proceeding with this step.
- Sign in to Oracle Sales Cloud as a sales administrator.
- Click Sign In.
- Click your name and then click Setup and Maintenance.
- In the Search section, enter Manage Administrator Profile Values in the Name field and click Search.
- Click Go to Task.
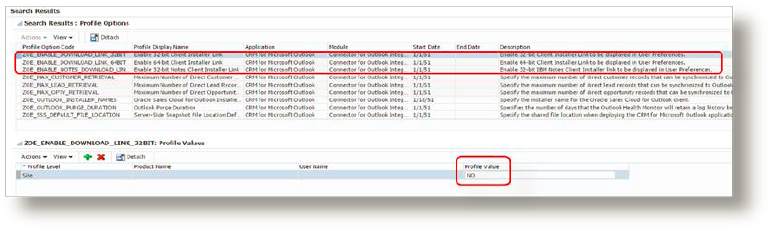
- Enter ZOE for the Profile Option Code and click Search.
- Change the values of the first three profile codes as follows:
- Change ZOE_ENABLE_DOWNLOAD_LINK_32BIT to NO, and click Save after updating the profile value.
- Change ZOE_ENABLE_DOWNLOAD_LINK_64BIT to NO, and click Save after updating the profile value.
- Change ZOE_ENABLE_NOTES_DOWNLOAD_LINK_32BIT to YES, and click Save after updating the profile value.
- Sign in to Oracle Sales Cloud as the user who is downloading the Lotus Notes installer.
- Enter the password and click Sign In.
- Click the user name link at the right and then click Set Preferences.
- On the Preferences page, click CRM for Microsoft Outlook Installer.
- The Start Download link appears.
- Click the link to download the IBM Notes installer.
Key Resources
For more information about Oracle Sales Cloud for IBM Notes, see the Sales Cloud for IBM Notes data sheet.
Partner Relationship Management
Streamline partner relationship management (PRM) and indirect sales processes to increase the value of your partner network. Channel account managers can now manage deal registrations more effectively. Partners can register deals using the self-service partner portal. Robust reporting capabilities have been added to PRM to enable improved real-time analysis. The secured enterprise social network that connects your sales teams now extends to your partner network. Channel account managers can invite partners to collaborate on Oracle Social Network to speed up deal discussions and other business decisions.
Deal registration is a process by which partners request exclusive rights to an opportunity from the brand owner. It provides partners with the means to inform the brand owner about a potential opportunity, and then partners receive priority for that opportunity.
Partners can register deals using the partner portal. Submitted deals are routed to channel account managers for approval. In turn, channel account managers can reject or return deal registration requests to partners, asking for additional information and justification. Before approving the deal, the channel account managers can check for duplicate opportunities to avoid channel conflicts. Once a deal registration is approved, an opportunity is automatically created to track it in the pipeline. Channel managers can decide when to add a partner opportunity to the forecast.
You can configure the deal registration object to include automatic pricing and allow special pricing requests from partners.
Partners can register new deals using the Partner Portal.
Steps to Enable
When your environment is upgraded to Release 10, a new simplified role-based access control model is installed as a reference model during the upgrade. The reference model coexists with your current model. If you want to use the new Deal Registration feature in the reference model, then you must add certain duty roles and privileges to your preexisting model.
For information about how to enable these new duty roles, see the Upgrade Guide for Oracle Sales Cloud Application Security (My Oracle Support Doc ID 1989500.1). It is recommended that you review the following:
- Read the Overview chapter to learn about the simplified reference role model and how it affects you.
- Decide which method you will use to implement the feature and follow the detailed instructions in the guide.
- View the appendix to see the data security policies that are required to implement this feature.
Tips and Considerations
- Oracle Sales Cloud Deal Registration is preconfigured for partners. To optimize the experience for channel managers, it is recommended that you customize the relevant fields and pages for the relevant roles using Application Composer and Page Composer.
- If you have the Channel Account Manager or the Channel Sales Manager role, then the Primary Partner field and the Partners subtab will automatically appear on the default Opportunity Details page, after upgrade to Release 10. If this is not desired, you can remove the field and tab using Application Composer and Page Composer.
- Activity management simplified pages are optimized for direct sales. It is recommended that you customize the activities pages to make deal registration attributes visible for indirect sales that have deal registration programs.
Key Resources
- For a demonstration of this enhancement, see the Partner Relationship Management Enhancements release training on the Customer Experience Release Readiness page.
- For detailed steps about how to set up partner deal registration, see Setting Up Deal Registrations for Partner Channel Sales in Oracle Sales Cloud Implementing Sales in the Oracle Help Center.
- For information about duty roles, see Securing Oracle Sales Cloud in the Oracle Help Center.
Oracle Social Network Collaboration for Partners
The power of real-time online collaboration using Oracle Social Network is now available for partner users. The secured enterprise social network that connects your sales teams now extends to your partner network. Channel account managers can invite partners to collaborate on Oracle Social Network to speed up deal discussions and other business decisions.
Partners can use the social network to collaborate with users inside your company in the following ways:
- Have an ongoing Conversation about current sales plans.
- Share presentations and review documents to get input from sales team members.
- Get real-time notifications about updates to key Conversations.
- Follow-up items in the order of their priority.
- Start or join online conferences with sales team members.
Partners can only engage in Conversations to which they have been invited by employees of your company. Partners can’t find information, such as employee wall posts and public Conversations.
Employees within the social network are always aware when there is a partner in the Conversation because distinct banners, warnings, and badges highlight when partners use the network.
Banners indicate when there is a partner in the Conversation.
Steps to Enable
- Sign in to the Oracle Social Network with your Oracle Social Network Administrator credentials.
- Click Administration.
- Select Extended Collaboration and select Invitations: Enabled.
- In the Outside Users region, update the Outside Users Whitelist with the email domains for the partners with whom you want to collaborate.
- Click Save.
Key Resources
For a demonstration of this enhancement, see the Partner Relationship Management Enhancements release training on the Customer Experience Release Readiness page.
Prebuilt Reports for Deal Registration
For a description of this enhancement, see Prebuilt Reports for Deal Registration.
New Subject Area for Deal Registration
For a description of this enhancement, see New Subject Area for Deal Registration.
New Subject Areas for Partner Reporting
For a description of this enhancement, see New Subject Areas for Partner Reporting.
Contracts and Sales Agreements
Enterprise Contracts provides a comprehensive solution for managing your sales contracts. With Release 10, you can use Microsoft Word™ to author and update contracts.
Contract Terms Authoring in Word
With the new Enterprise Contracts add-in for Microsoft Word, you can search and insert standard clauses, variables and sections into a contract directly from within Microsoft Word. The offline contract can then be uploaded and synchronized with Oracle Sales Cloud. Specifically, you can do the following:
- Search for standard clauses in the contract terms library and add them to the Word document.
- Select and insert system and user-defined variables into the clause text.
- Select a section that has been defined in the terms library and add it to a contract.
- Create a new section in the contract, and add clauses to the section.
- Create nonstandard clauses in two ways:
- Search for and select a standard clause and edit the clause to create a nonstandard clause.
- Insert a new nonstandard clause using a specified action.
The same security settings that govern your data and actions in Oracle Sales Cloud are enforced within Word. Actions that require Oracle Sales Cloud access require a log in. Similarly, all controls, such as clauses marked Mandatory or Protected, apply to anyone editing contracts in Word.
All actions related to contracts are supported by help topics within Word.
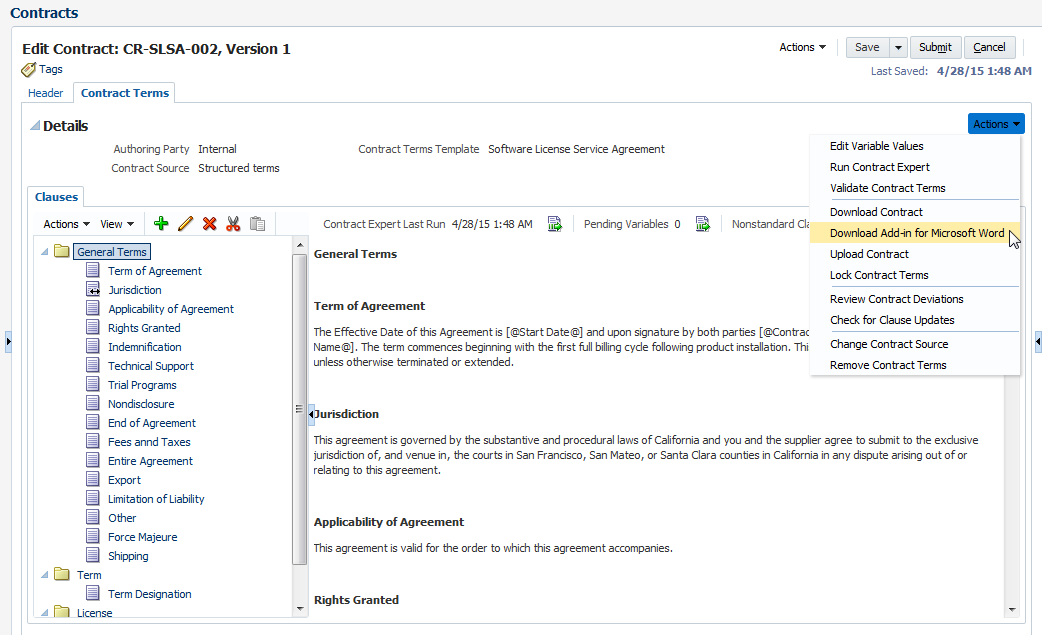
To use the Enterprise Contracts add-in for Microsoft Word, select Download Add-in for Microsoft Word
from the Actions menu.
Steps to Enable
There are no steps necessary to enable this enhancement.
Additional Privileges for Adding and Deleting Categories
In previous releases, you could add or delete the contract, approval abstract, supporting documents, and contract image categories for contract documents without additional privileges. In Release 10, you must have the following privileges to add or delete these categories:
- To add or delete contract and approval abstract categories, you must have the Manage Contract Documents privilege.
- To add or delete supporting documents and contract image categories, you must have the Manage Supporting Documents privilege.
Steps to Enable
When your environment is upgraded to Release 10, a new simplified role-based access control model is installed as a reference model during the upgrade. The reference model coexists with your current model. If you want to use the new privileges in the reference model, then you must add certain duty roles and privileges to your preexisting model.
For information about how to enable these new roles and privileges, see the Upgrade Guide for Oracle Sales Cloud Application Security (Article ID 1989500.1 on My Oracle Support). It is recommended that you review the following:
- Read the Overview chapter to learn about the simplified reference role model and how it affects you.
- Decide which method you will use to enable the privileges and follow the detailed instructions in the guide.
- View the appendix to see the data security policies that are required to implement these privileges.
For information about duty roles, see Securing Oracle Sales Cloud in the Oracle Help Center.
Enhancements to Sales Performance Management include user-friendly page layouts to make quick territory adjustments and to manage incentive compensation processes for sales reps. With tailored territory definitions, you can more accurately assign opportunities and leads for different business units. The territory Load and Activate process has also been improved to run faster. Incentive compensation analytics includes the ability to compare four regions (and to convert up to four currencies) using one currency. You can use rule hierarchies for incentive compensation to model performance information, such as attainment and earnings, across your sales credit structure.
Define sales goals to align with top-down sales objectives based on revenue or product groups. Set quotas and track sales performance against these objectives.
Incompatibility with Simplified Territory Management
It is important to note that updates made directly to active territories using the simplified Territory Management UI or Web services aren’t compatible with Quota Management in Release 10. Quota Management customers are strongly advised to ensure that the active territory updates feature, and the Territory Management simplified UI, remain disabled. Instead, continue to use the Territory Proposal feature available in the desktop UI.
If you do choose to enable the active territory updates feature, then any sales quotas defined within the tracked quota plan, for the current and future years, will not be available in your Oracle Business Intelligence reports. Current and future year quota plans will not be tracked, they will be read-only, and their statuses set to completed.
In future releases, updates made directly to active territories using the simplified Territory Management UI or Web services will be compatible with Quota Management.
Steps to Disable Active Territory Updates
If the active territory updates feature has been enabled, then you will see the following message when you access the Manage Sales Quotas work area:
Quota management is currently disabled. You must disable updates to active territories in order to enable quota management.
If you want to disable the active territory updates feature so that you can use quota-setting functionality, then perform the following steps:
- Deselect the Enable Updates to Active Territories check box on the Enable Dimensions and Metrics page:
- Save your changes.
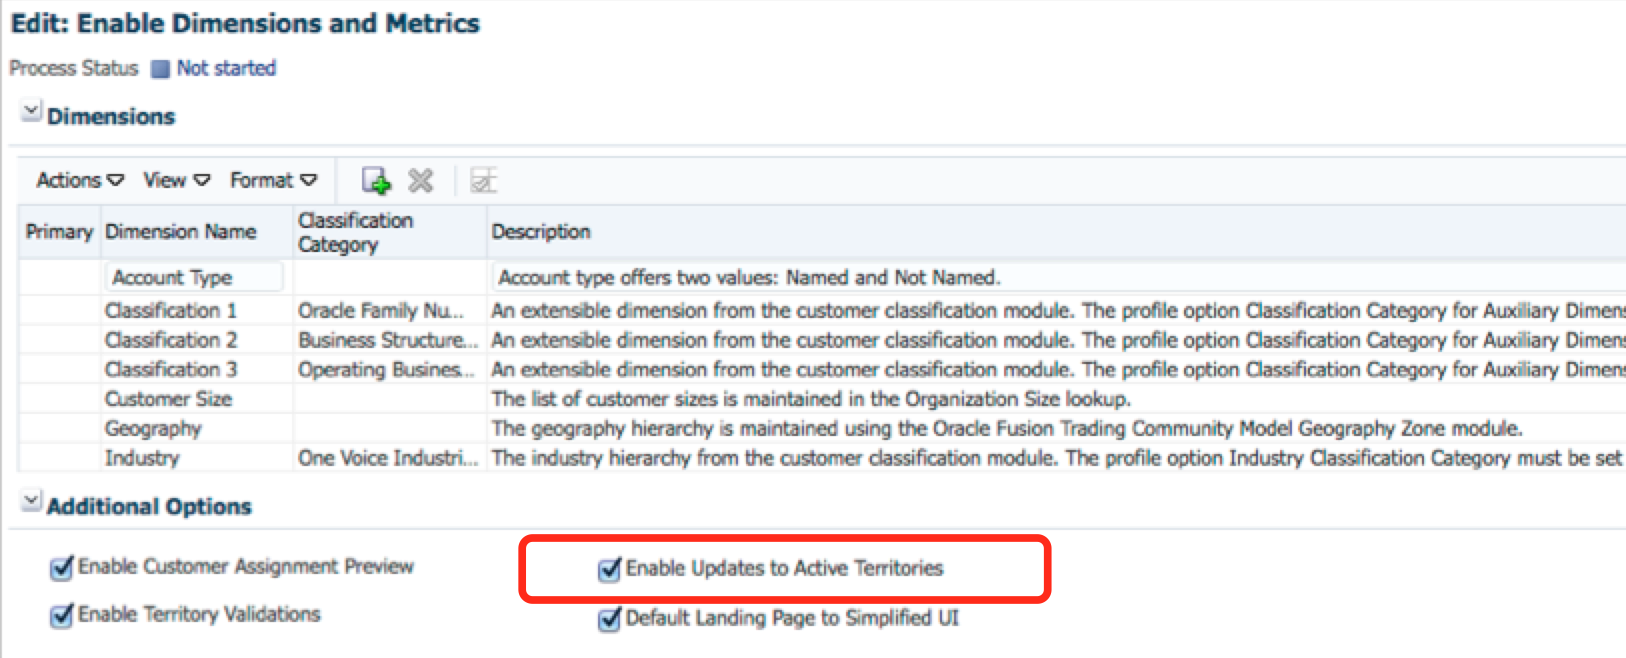
Key Resources
For information about active territories, see Territories.
Set up sales territory models efficiently and evaluate the effectiveness of these models to increase sales performance.
When updating territories or creating new ones using the simplified UI, all territories are created or updated as active territories. In other words, no territory proposal is required to perform these actions.
Simplified Territory Management
Using the new Territory Management UI, you can do the following:
- View Lists of Territories
- View and Update Territory Information
- View and Manage Child Territories
- Navigate Between Simplified and Desktop User Interfaces
- Configure Territory Management
The territory list page allows you to view the set of territories that is of interest to you. You can create custom lists so that you can see a specific subset of territories rather than the entire set of territories that you have access to. This list component also allows you to perform a quick search for territories based on the owner. It also allows you to perform advanced searches using a comprehensive set of territory attributes as search criteria.
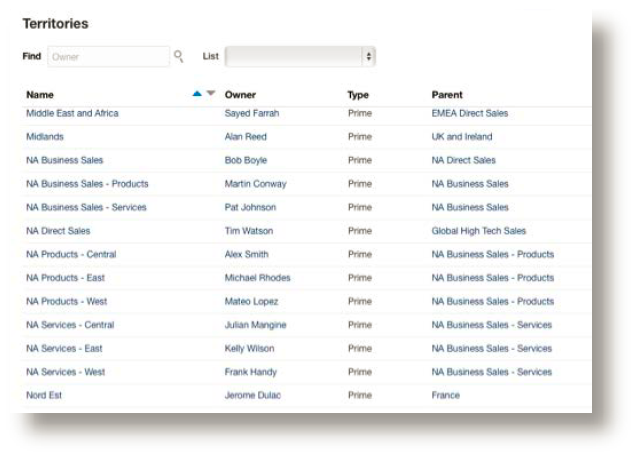
View the territories that are of interest to you.
View and Update Territory Information
You can use the new simplified UI to view and update territories, including the following:
- Update basic characteristics of a territory, such as its name, its type, and its owner.
- Define and update the coverage of a territory including its dimensional coverage, included customers, and excluded customers.
- Define the list of resources that are members of the territory team.
View and Manage Child Territories
In addition to reviewing a territory’s details, you can review the list of its child territories. If appropriate, you can create new child territories. When creating child territories, the characteristics of the selected territory, such as owner and coverage, are the default characteristics for the new child territory. You can also delete child territories that are no longer needed.
Navigate Between Simplified and Desktop User Interfaces
While working within the new simplified UI, you still have the ability to access the desktop UI. This ability is particularly useful if there are functions that you want to perform that are only available in the desktop UI or if you simply prefer using the desktop UI.
Configure Territory Management
Using Application Composer, you can configure the Territory Management application to suit implementation-specific needs. For instance, you can do the following:
- Make visible any territory and team member attributes that are preconfigured as hidden.
- Define implementation-specific territory and team member attributes.
- Define implementation-specific relationships between territories and other Oracle Sales Cloud and custom objects.
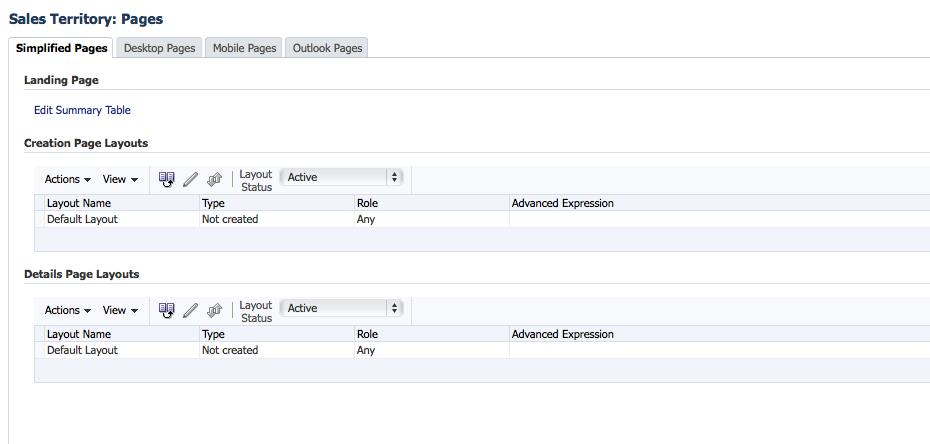
Steps to Enable
To access the simplified UI for Territory Management, perform the following steps:
- Your implementation must be set up to use all Oracle Sales Cloud applications within their corresponding simplified UIs. To do this, set the FND_CLASSIC_INTERFACE profile option to N.
- Select the Enable Updates to Active Territories check box on the Enable Dimensions and Metrics page.
NOTE: For more information about the new simplified UI and how it affects the way that you use all of your Sales Cloud applications in Release 10, see the “User Experience” section in Oracle Cloud Applications Common Technologies and User Experience, What’s New in Release 10 on the Customer Experience Release Readiness page.
When you select this option, if Quota Management is being used, then you will see a warning message. If you agree to proceed, then sales quotas for current or future years will no longer be available in your BI reports. Quota plans for current and future years will be untracked and made read-only by setting the status to Completed. This action is not reversible, meaning there is no easy way to retrieve the sales quotas within the affected plans.
In future releases, updates made directly to active territories using the simplified Territory Management UI or Web services will be compatible with Quota Management.
The simplified UI for Territory Management is now the default landing page.
Unlike other actions within the Enable Dimensions and Metrics page, the Load and Activate process is not required for this setting to take effect. It is sufficient to save your changes.
Tips and Considerations
In order to optimize the user experience within the new simplified UI for Territory Management, a subset of features and capabilities has been built into the new simplified UI. Consequently, there are some features that are currently only available in the desktop UI. A new feature, Updates to Active Territories, is available only in the new simplified UI.
| Feature Availability |
||
| Feature |
Desktop UI |
Simplified UI |
| View, Update, Create and Delete Territories |
||
| Assignment Preview |
||
| Gap and Overlap Checking |
||
| Territory Inheritance |
||
| Metrics |
||
| Partner Centric Territories |
||
| Future Dated Territory Updates |
||
| Launch Territory Import or Export |
||
| Active Territory Updates |
- For a demonstration of this enhancement, see the Territory Management Enhancements: Simplified UI and Administration release training on the Customer Experience Release Readiness page.
- For more information about territory management, see the Territory Management Concepts white paper.
- For information about the new UI, see Oracle Cloud Applications Common Technologies and User Experience, What’s New in Release 10 on the Customer Experience Release Readiness page.
Streamlined Synchronization Process
The synchronization process has been streamlined in the following two ways:
- Assign Work Objects for Your Territories without Running Load and Activate
- New Administration Option
Assign Work Objects for Your Territories without Running Load and Activate
You don’t have to wait for customer and partner information to assign work objects for your territories. For example, as soon as a customer or partner record is created, you can add the record to a territory as an inclusion (that is, as a named account or named partner), and then assign the record to that territory without delay. Customer and partner synchronization is no longer required, so the Load and Activate process runs faster, promptly making the correct territory definitions available for use in the assignment process.
You must still run the Load and Activate process to refresh the set of data that’s used for metrics, customer assignment preview, and the gaps and overlaps reports. In other words, the data used in these features is as current as the most recent time that the Load and Activate process was run.
New Administration Option
To include data that is necessary for the customer assignment preview report in the Load and Activate process, use the new Enable Customer Assignment Preview option.
When this option is turned off, the Load and Activate process completes faster because customer records aren’t synchronized with the Territory Management application. However, if you want to use the customer assignment preview report, then it’s recommended that you turn this option on and schedule the Load and Activate process to run on regular basis. Running the process regularly ensures an up-to-date record set for the report.
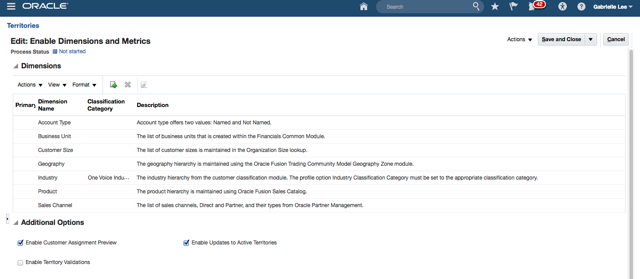
The Enable Customer Assignment Preview option is available in the new Additional Options region on the Enable Dimensions and Metrics page.
Steps to Enable
There are no steps necessary to enable this enhancement.
Tips and Considerations
- Streamlined synchronization affects the desktop and the simplified UI, Web services, and export and import processes.
- For new implementations, the Enable Customer Assignment Preview option is disabled by default.
- In the case of upgrades, the Enable Customer Assignment Preview option is enabled if customer inclusions were enabled in the previous release. Otherwise, this option is disabled.
Key Resources
For a demonstration of this enhancement, see the Territory Management Enhancements: Simplified UI and Administration release training on the Customer Experience Release Readiness page.
Define Coverage by Business Unit
Using the new Business Unit dimension, you can now define territories that are specific to your company’s different business units. Tailored territory definitions make it possible to more accurately assign opportunities and leads for different business units.
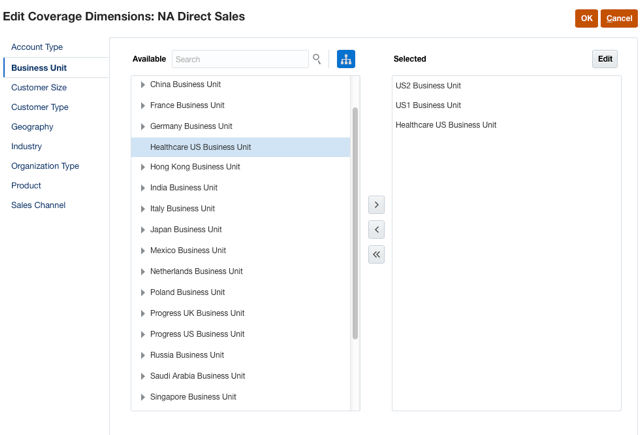
Define territories that are specific to your company’s different business units.
Steps to Enable
To use business units as part of territory coverage, perform the following steps:
- Define your business units.
- Enable the business unit dimension on the Enable Dimensions and Metrics page.
- Run the Load and Activate process.
When the Load and Activate process has completed successfully, you can define each territory’s business unit coverage.
Key Resources
- For a demonstration of this enhancement, see the Territory Management Enhancements: Simplified UI and Administration release training on the Customer Experience Release Readiness page.
- For more information about enabling dimensions, see the topic about setting up work assignments in Oracle Sales Cloud Implementing Sales in the Oracle Help Center.
Changes Since the Previous Release
The following changes and enhancements have been made to the Territory Management application since the previous release:
The Action and right-click menus have been reorganized to group related actions more logically, making the top-level action list much shorter and easier to navigate.
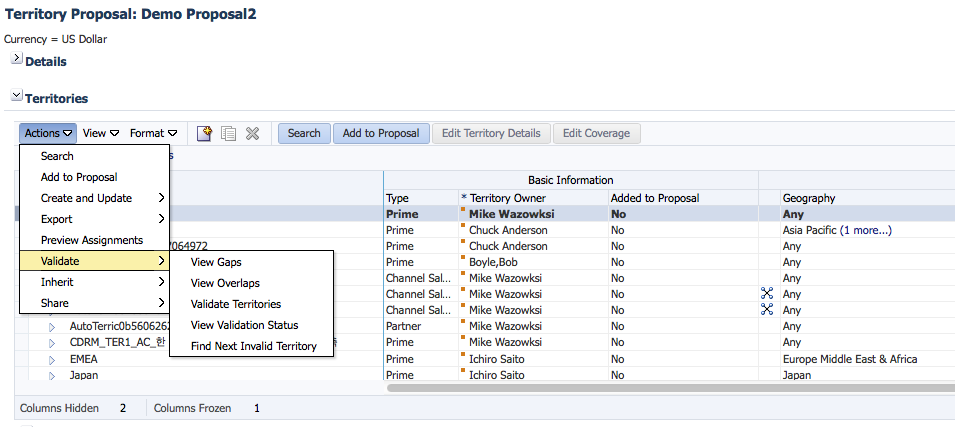
Territory action menus have been reorganized.
Previously, you could access the Territory Management and the Quota Management applications using a common menu item in the navigator: Territories and Quotas. Quota Management and Territory Management have now been separated into two menu items in the Navigator. Each application will have its own distinct landing area. From the Territory Management menu item, you can navigate to the desktop landing page or to the simplified UI landing page, depending on your configuration.
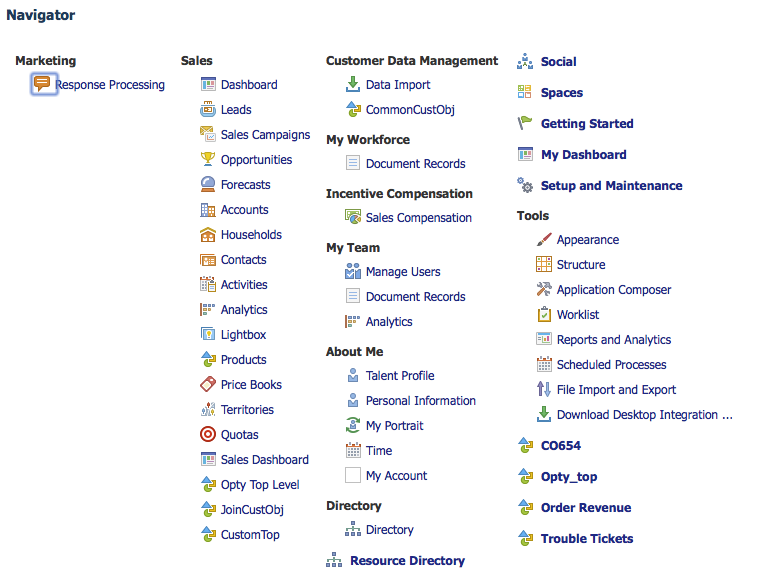
Territories and Quotas are two separate menu items.
Enabling Inclusions and Exclusions
Prior to this release, you had to enable inclusions for customers and partners in the Enable Dimensions and Metrics page, before using those features. Beginning with this release, inclusions are available without any setup. Customer inclusions are available immediately for territories with a customer-centric coverage model. Partner inclusions are available immediately for territories with a partner-centric coverage model. Use Application Composer if you want to hide the ability to use inclusions from some or all types of users. You can also use Application Composer to make exclusions visible.
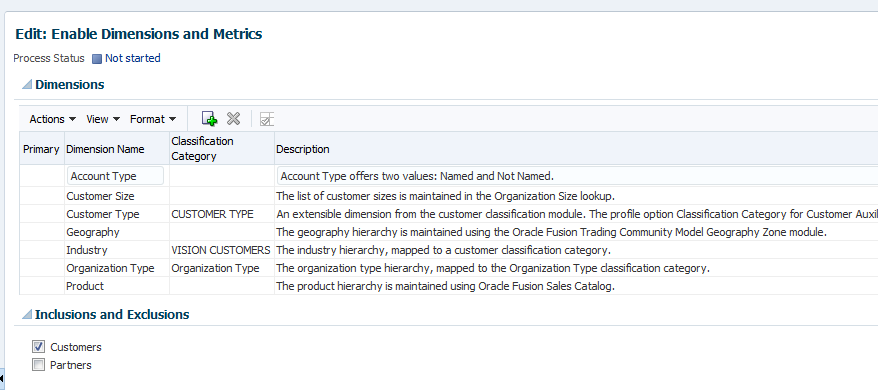
The Inclusions and Exclusions region has been removed from the application.
Steps to Enable
No steps are required to enable these enhancements.
Planned Changes in Future Releases
See Oracle Sales Cloud Release 10 - Removal of Features (Doc ID 2062231.1) on My Oracle Support for information about changes to Territories in future releases.
Use the Manage Incentive Compensation process to perform complex calculations for nondiscretionary incentive plans, such as sales commission plans or bonuses with formulaic calculations. Adjust incentive plans for all organizations, measure performance in relation to metrics, reward appropriate behavior, and analyze the effect of incentive programs that are based on financial goals and sales strategy.
Simplified Incentive Compensation
Incentive compensation participants (sales reps) and participant managers (sales managers) can now manage their compensation processes using Oracle Sales Cloud’s easy-to-use simplified pages. The Sales Compensation home page is accessible through the unified navigator.

Manage your compensation processes using simplified pages.
Steps to Enable
There are no steps necessary to enable this enhancement.
Simplified Incentive Compensation Reports
For a description of this enhancement, see Simplified Incentive Compensation Reports.
Participant Batch Configuration
To balance the processing of workloads, administrators can now configure classification, crediting, rollup, and calculation processes to group participants into specific batches. This feature maximizes processing performance even with skewed transaction data or large volumes of data. For example, you can put participants who receive hundreds of thousands of credit transactions every week into one batch for processing, and you can put participants who receive fewer transactions into another batch.
Steps to Enable
There are no steps necessary to enable this enhancement.
Tips and Considerations
If you provide a batch number for a participant, then the application uses that batch number to group participants. All participants that have a same batch number will be grouped together for processing.
If you don’t provide a batch number for all of the participants, then the Incentive Compensation application divides the transactions for the remaining unnumbered participants equally into different batches. The Number of Batches value determines the number of those batches.
To provide a batch number for a participant:
- Navigate to Setup and Maintenance > Batch Processing Parameters.
- In the Options menu, choose Use batch information provided for participant, as shown in the following screen.
- Classification and Crediting Batch Processing
- Rollup and Calculation Batch Processing
- Navigate to Participant Assignments > Manage Participant Batch Groups.
- Enter the batch numbers for the processes:
Select this option for:

Security options for Incentive Compensation have been simplified and clearly named to align with work areas and job roles. For example, the privileges for the tasks included in the Credit and Earnings work area were previously grouped into four duties. The same privileges are now grouped into one credit and earnings duty.
The following security settings are now ready to use:
- Incentive Compensation Plan Administrator
- Incentive Compensation Credits and Earnings Duty
- Incentive Compensation Participant Assignments Duty
- Incentive Compensation Participant Snapshot Management Duty
- Incentive Compensation Payment Control Duty
- Incentive Compensation Payments Duty
- Incentive Compensation Participant
- Incentive Compensation Participant Manager
- Incentive Compensation Application Administrator
Steps to Enable
When your environment is upgraded to Release 10, a new simplified role-based access control model is installed as a reference model during the upgrade. The reference model coexists with your current model. If you want to use the new security options for Incentive Compensation in the reference model, then you must add certain duty roles and privileges to your existing model.
For information about how to enable these new duty roles, see the Upgrade Guide for Oracle Sales Cloud Application Security (My Oracle Support Doc ID 1989500.1). It is recommended that you review the following:
- Read the Overview chapter to learn about the simplified reference role model and how it affects you.
- Decide which method you will use to implement the feature and follow the detailed instructions in the guide.
Key Resources
For information about duty roles, see Securing Oracle Sales Cloud in the Oracle Help Center.
Plan administrators can calculate earnings for each transaction with the True-up option in the incentive formula. If the True-up option is selected, then previous earnings are automatically subtracted from the current calculated earning. The True-up option enables plan administrators to set up compensation plans based on quarterly or annual performance measurements but paid more frequently, such as monthly or quarterly.
Using the True-up option, plan administrators can calculate earnings for each transaction.
Steps to Enable
There are no steps necessary to enable this enhancement.
Options for Incentive Compensation Analysis
For a description of this enhancement, see Options for Incentive Compensation Analysis.
Configuration and Customization
Oracle's standards-based, open and flexible platform makes it easy for developers to rapidly build and deploy rich applications or to integrate with and extend Oracle Sales Cloud. In Release 10, Oracle is investing in the creation of a set of RESTful Web service APIs for Oracle Sales Cloud.
RESTful Web services make it easier to build custom applications, such as mobile apps or custom UIs, and to integrate them with a wider array of applications. Oracle is investing in the creation of a set of RESTful Web service APIs for Oracle Sales Cloud. RESTful Web services are available for the following objects:
|
|
|
|
|
|
|
|
|
|
|
|
|
|

Prebuilt objects, custom objects, and fields are supported.
Steps to Enable
There are no steps required to enable this enhancement, generally. However, if you have any top-level custom objects prior to the upgrade that you want to enable for RESTful Web Services, then you’ll need to run a process after the Release 10 upgrade to update metadata for these preexisting custom objects.
Steps to Update Customization Metadata
After the Release 10 upgrade, you’ll need to manually upgrade metadata from a previous release to the latest release of Oracle Sales Cloud. Sign is as a user with an administrator role to perform the following steps.
IMPORTANT: Do not perform these steps when there are pending changes in an active sandbox. Save and publish sandboxes with any changes that you want to keep before proceeding. Delete any sandboxes that you do not intend to publish.
- Sign in to Oracle Sales Cloud, and go to: Navigator > Customization > Application Composer.
- Open the drop-down menu next to your user name, and select Manage Sandboxes.
- Create a new sandbox, and set it as the active sandbox.
- From the Application drop-down list, select the first application whose metadata you want to upgrade, such as Common or Sales.
- From the navigation tree on the left, under Common Setup, click the Metadata Manager link.
- Click the Metadata Upgrade link on the right.
- Highlight the appropriate item in the list and then click Upgrade.
- Click OK in the confirmation dialog box that opens.
- Repeat steps 4-8 for each application in the Application drop-down list in Application Composer.
- Publish the sandbox.
The current active sandbox is displayed at the top of the application.

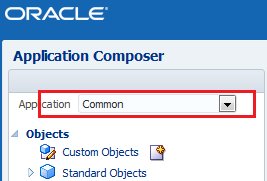
NOTE: You must upgrade the existing customization metadata for each application separately.
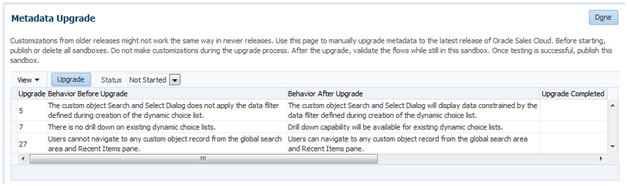
This process might take a couple of minutes to complete. When the upgrade is done, the dialog box closes and the Upgrade Completed column is checked.
After the processes have completed, the application is ready to use.
Key Resources
For more information on using RESTful Web services, see Oracle Sales Cloud: Using RESTful Web Services (My Oracle Support Doc ID 1981941.1) .
Identity Propagation Support with Oracle’s Java Cloud Service
Partner applications running on Oracle Java Cloud Service can integrate with Oracle Sales Cloud’s services and UI using single-user credentials to deliver a unified experience to the customer.
Previously, as an Oracle SaaS customer, you could only extend Oracle Cloud functionality using built-in tools, such as Page Composer and Application Composer. Now you can build features on Oracle's PaaS services, such as Java Cloud Service, Process Cloud Service, Mobile Cloud service, and so forth.
Steps to Enable
To provide a seamless experience to the user when navigating between Oracle SaaS and PaaS, you associate Oracle PaaS services with an existing Oracle Cloud identity domain. You define the association when you order a new service. You can either associate the new service with an existing domain or create a new one.
The following figures show two steps in a customer flow. The user in this case is the account administrator for the customer account.
When you order a new service, a new identity domain is automatically defined.
When you order a PaaS (Java Service with a SaaS extension in this case), you can associate it
with an existing identity domain.
Use Developer Connect, a portal available in Oracle Sales Cloud, to find business object services that you can invoke as part of your Oracle Sales Cloud integration. You can look up service endpoints and view customizations and metadata for service data objects. Because the portal runs on your cloud instance, it contains information about the specific set of services deployed to your cloud instance. The portal reflects the current service interface, including any patches and customizations. You can browse through the list of services or search for a specific service.
Key features
- The portal displays information about services that are specifically deployed to your cloud instance.
- The portal reflects service data object customizations, instead of just static service metadata.
- The portal displays the service endpoints, freeing developers from having to derive them manually.
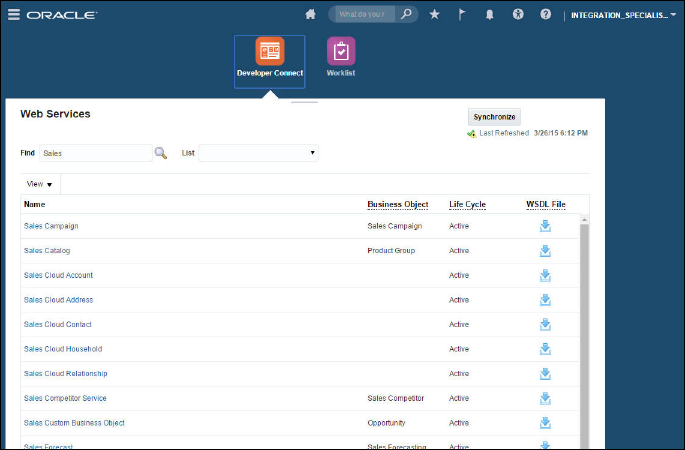
Developer Connect portal.
Steps to Enable
When your environment is upgraded to Release 10, a new simplified role-based access control model is installed as a reference model during the upgrade. The reference model coexists with your current model. If you want to use the new FND_INTEGRATION_SPECIALIST_JOB role in the reference model, then you must copy the job role from the simplified reference role model to your preexisting model.
For information about how to enable this new role, see the Upgrade Guide for Oracle Sales Cloud Application Security (Article ID 1989500.1 on My Oracle Support). It is recommended that you review the following:
- Read the Overview chapter to learn about the simplified reference role model and how it affects you.
- Decide which method you will use to enable the role and follow the detailed instructions in the guide.
- View the appendix to see the data security policies that are required to implement these privileges.
When you have implemented the new role, then you can grant one of the following three roles to the users who want to access Developer Connect:
- FND_INTEGRATION_SPECIALIST_JOB
- FND_APPLICATION_DEVELOPER_JOB
- ZCA_CUSTOMER_RELATIONSHIP_MANAGEMENT_APPLICATION_ADMINISTRATOR_JOB
Alternatively, grant the ATK_WEB_SERVICE_INFO_ACCESS_PRIV entitlement to your custom role, and then grant the custom role to the users. For more information about job roles, see Securing Oracle Sales Cloud in the Oracle Help Center.
Oracle Sales Cloud Application Composer is a tool that enables you to extend and customize the application to meet the unique needs of your business.
The object tree in Application Composer has been reorganized to show child objects under parent objects. The application objects have also been consolidated from six objects to two objects: Common and Sales. This enhancement makes it easier for you to find and view objects when customizing your application.
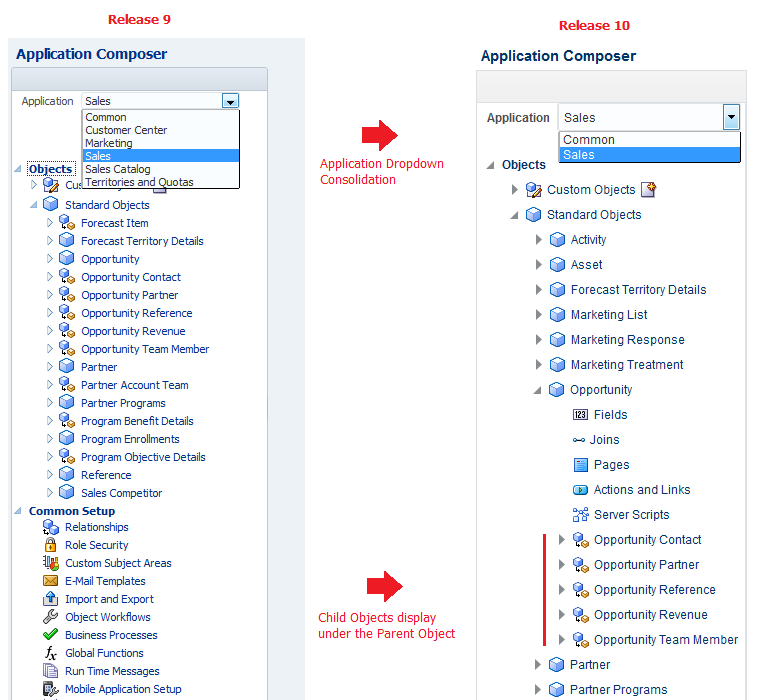
The Application Composer object dropdown menu has been consolidated and the object tree reorganized.
Steps to Enable
There are no steps necessary to enable this enhancement.
Custom Subject Area Enhancements
For a description of this enhancement, see Custom Subject Area Enhancements.
Custom Subject Areas for Households
For a description of this enhancement, see Custom Subject Areas for Households.
Customization and Configuration Options for Sales Leads
For a description of this enhancement, see Customization and Configuration Options for Sales Leads.
Customization Options for Asset Pages
For a description of this enhancement, see Customization Options for Asset Pages.
Customization Migration enables you to manage the life cycle of your Oracle Sales Cloud application by maintaining customizations from one instance to another.
View and download a list of all customizations available in a customization set. After the customization set migration export process completes, a Content Read Me link is displayed. Click the Content Read Me link to open a file that lists all of the customizations included in the exported customization set.
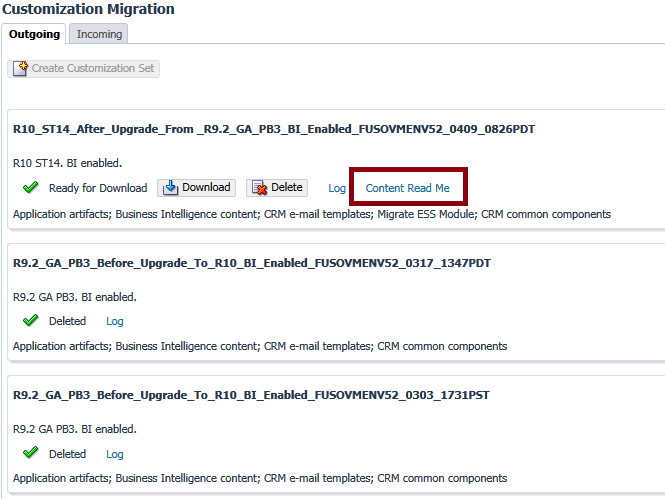
Content Read Me link.
Steps to Enable
There are no steps necessary to enable this enhancement.
Tips and Considerations
- Customizations included in the report include all custom objects, fields, custom pages, and Business Intelligence changes.
- Business logic changes, such as Groovy scripts, triggers, and so forth, aren’t included in the report.
Industry solutions for Oracle Sales Cloud use the comprehensive Oracle product portfolio to address distinct industry-specific requirements. Currently, the available industry solutions include the following: High Tech and Manufacturing, Financial Services, Consumer Goods, and Communications.
Configuration and Customization for Industry Solutions
The Oracle Sales Cloud configuration and customization toolset (including Application Composer, Page Composer, String Editor, and BI Composer) provides many customization options for industry solutions. With Release 10, you can customize the following aspects of Oracle Sales Cloud’s industry solutions:
|
|
|
|
|
|
|
|
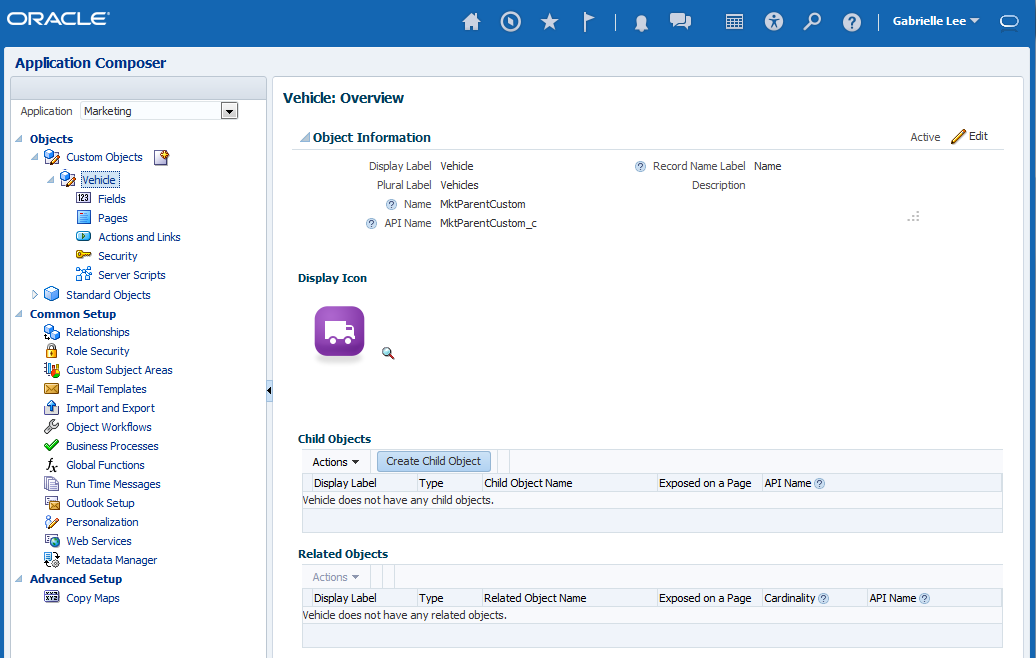
Tailor your user experience with icons and themes.
Steps to Enable
There are no steps necessary to enable this enhancement.
Executive Dashboards for Industry Solutions
For a description of this enhancement, see Executive Dashboards for Industry Solutions.
The Oracle Sales Cloud High Tech and Manufacturing industry solution provides the following capabilities:
- Manufacturing layout optimized for channel sales execution
- Partner life cycle and channel sales management
- Partner portal for partners
- KPI-driven Dashboard for channel account managers
- Oracle Social Network for channel collaboration
- Account Planning, including the following:
- Identify strength, weakness, opportunity, and threat (SWOT) and industry drivers
- Service ticket
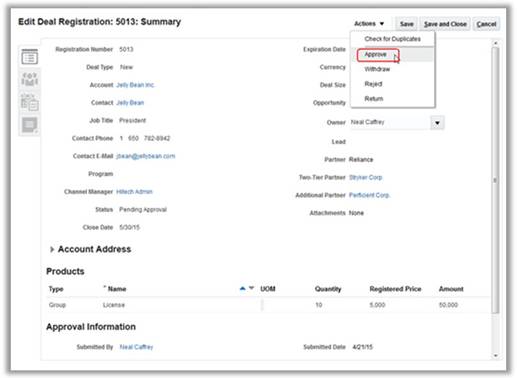
Channel account managers can review and approve partner deal registration.
Steps to Enable
For steps to enable this feature, see Oracle Sales Cloud for High Tech and Manufacturing in the Oracle Help Center.
Oracle Sales Cloud for Financial Services enables financial institutions to modernize their branches and take customer retail experience to the next level. By providing a single 360° view of customer information and interactions, banks can build a personalized relationship with each customer and offer financial products and services that best suit a customer’s unique needs. With an integrated Marketing Cloud solution, banks can automate the process of identifying, nurturing and creating referrals to cross-sell products across any channel including social, mobile, and web.
Oracle Sales Cloud for Retail Banks provides the following capabilities:
- Banking application that is tailored for retail bankers assisting clients who are applying for loans.
- Household 360-overview provides financial visibility so that retail bankers can evaluate household income, cash flow, and credit balance.
- Interview-based needs analysis enables retail bankers to rapidly conduct dynamic interviews to recommend financial products based on customer needs and circumstances.
- Loan application checklist helps retail bankers to process compliant loan applications quickly and efficiently.
- Case management enables retail bankers to assist clients with managing life events.
- Tailored dashboard with key sales metrics assists retail bankers and retail bank managers when monitoring their leads and opportunities.
A comprehensive view of customer financial information enables retail bankers to quickly assess customers’ financial standing.
Steps to Enable
For steps to enable this feature, see Oracle Sales Cloud for Retail Banking in the Oracle Help Center.
Key Resources
For more information about the Oracle Sales Cloud financial services industry solutions, see Sales Cloud for the Financial Services Industry - Retail Banking data sheet.
The Oracle Sales Cloud Consumer Goods industry solution includes trade promotion management and retail solutions. With trade promotion management, marketing managers can set up, manage, and publish corporate promotions. Key account managers can set up and manage account-specific promotions that can be based on a corporate promotion. Using retail execution, sales reps can perform in-store retail activities, such as auditing retail inventory, sharing promotion information, taking order information, and conducting surveys. Sales managers can manage call schedules and monitor their business and team’s activities using sales dashboards.
The trade promotion management solution enables marketing managers to set up and manage national promotion programs and account-based promotions. The promotion program has a time period, fixed and variable tactics, and a list of products that must be promoted using the promotion program. The promotion is made available to one or more territories and then published to the field.
Key account managers can create account-specific promotions by using the promotion group to generate incremental revenue and brand awareness. The promoted products are added to each promotion, and a funding amount is allocated from the available funds. When the promotion is published to the account, it’s available to sales reps as part of their retail account visit.
Create and update promotion programs and track promotion costs.
Steps to Enable
For steps to enable this feature, see Oracle Sales Cloud for Consumer Goods in the Oracle Help Center.
The retail execution solution helps sales reps plan, schedule and execute sales visits to retail accounts. Sales reps can use the call calendar to plan visits and execute the call tasks. The retail execution capabilities include:
- Retail Call Calendar
- Retail Call Planning with Account 360
- Call Check In
- Inventory Audit
- Promotion Presentation
- Shopping cart and order capture
- Surveys
- Call Check Out
Retail sales reps and sales managers can monitor key performance indicators.
The Consumer Goods solution also helps retail sales reps and sales managers to monitor key performance indicators with a dashboard that shows summaries of the following data:
- Actual vs. Quota. Closed opportunities compared with the quota for the current quarter.
- Accounts. The number of accounts managed by the sales manager, the number of accounts on hold, and the total amount owed by all accounts.
- Appointments. The number of appointments scheduled for the current week.
- Promotions. The number of active promotions for the current week.
- Open Tasks. The number of open tasks for the current week.
- Order History. The total number of orders and the total amount for orders placed during the current week.
You can view a prebuilt real-time dashboard to track key performance indicators related to your sales and team performance.
Steps to Enable
For steps to enable this feature, see Oracle Sales Cloud for Consumer Goods in the Oracle Help Center.
Key Resources
- For a demonstration of this enhancement, see the Consumer Goods Enhancements release training on the Customer Experience Release Readiness page.
- For more information about the Sales Cloud Consumer Goods industry solution, see the following:
- See video demonstrations of the Sales Cloud Consumer Goods industry solution.
- View the Oracle Sales Cloud for the Consumer Goods Industry – Retail Execution datasheet.
The Oracle Sales Cloud for Communications industry solution is a comprehensive and integrated solution for communications companies. It increases sales force adoption with a simple, easy-to-use interface tailored to sales reps and sales executives. The sales process is streamlined for configure, price, and quoting capabilities with preintegration with Siebel CRM, Oracle Self-Service E-Billing, and service requests.
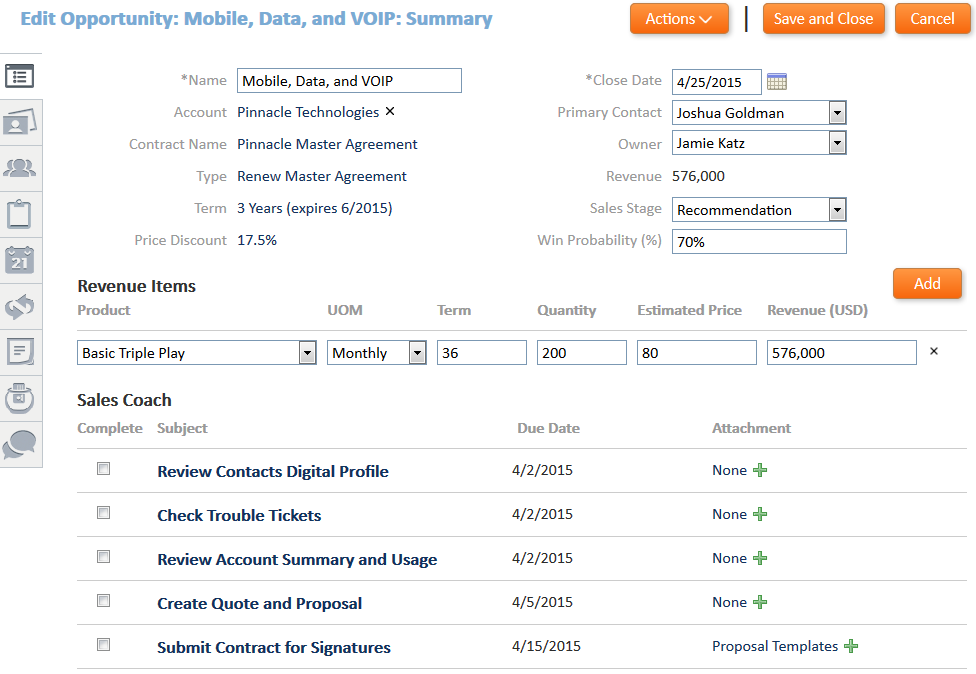
A five-step guided selling process for communications industry sales reps.
Steps to Enable
For steps to enable this feature, see Oracle Sales Cloud for Communications in the Oracle Help Center.
Key Resources
For more information, see the Oracle Sales Cloud for the Communications Industry data sheet.
The setup and maintenance tools for Oracle Sales Cloud make it easier for you to import and migrate data and set up applications. New, simplified pages also make it easier for you to set up and manage your assignment rules.
Import data from external sources using CSV or XML files.
Download and Upload File Import Mapping
To manage your import mappings using the Manage File Import Mappings task, you can now download a copy of a file import mapping and upload it from your desktop.
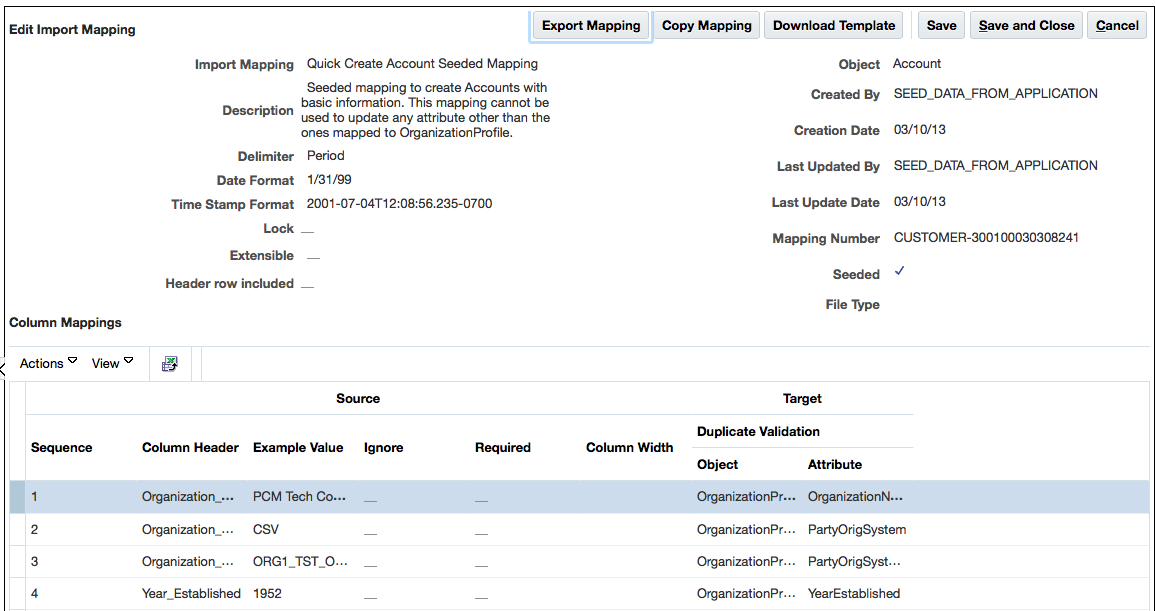
Download a copy of a file import mapping and upload it from your desktop.
Steps to Enable
There are no steps necessary to enable this enhancement.
Tips and Considerations
When you upload a mapping definition or perform a round-trip operation between Oracle Sales Cloud environments, any included extensible attributes or objects must exist in both environments. The extensible objects and fields can be defined within Application Composer in the target Oracle Sales Cloud environment.
Key Resources
- For a demonstration of this enhancement, see the Import Enhancements: Import Usability Improvements release training on the Customer Experience Release Readiness page.
- For more information on file-based import and export, see Oracle Sales Cloud Understanding File-Based Import and Export (My Oracle Support Doc ID 1564536.1).
AutoMapping for Import and Export Files
When you create an import activity or submit an import using Web services, Oracle Sales Cloud automatically maps the column headers in your import file to a target object and target attributes. Manual mapping and mapping numbers are no longer required. Automapping is performed when the input file is in a ZIP file format and the column headers contained in the individual CSV files correspond to the column header values. The column header values that are used in the output files are generated by the file-based data export activity.

Oracle Sales Cloud automatically maps the column headers in your import file to a target object and target attributes.
Steps to Enable
There are no steps necessary to enable this enhancement.
Tips and Considerations
Automapping is supported only for import files of type ZIP and cannot be used for CSV or XML formatted import files.
- For a demonstration of this enhancement, see the Import Enhancements: Import Usability Improvements release training on the Customer Experience Release Readiness page.
- For more information on file-based import and export, see Oracle Sales Cloud Understanding File-Based Import and Export (My Oracle Support Doc ID 1564536.1).
When you submit your import, you can now see the estimated completion time for an import activity. A redesigned import status page shows the progress of import activities as well as the estimated completion time.
An import status page shows the progress of import activities.
Steps to Enable
There are no steps necessary to enable this enhancement.
Key Resources
- For a demonstration of this enhancement, see the Import Enhancements: Import Usability Improvements release training on the Customer Experience Release Readiness page.
- For more information on file-based import and export, see Oracle Sales Cloud Understanding File-Based Import and Export (My Oracle Support Doc ID 1564536.1).
You can set up assignment rules and territory assignment mappings to efficiently assign the appropriate sales reps to sales objects such as accounts, opportunities, or leads, and increase their sales performance.
Redesigned Assignment Rule Management Pages
New, enhanced pages make it easier for you to create and manage your assignment rules. With these simplified pages, you can do the following:
- Create, view, and edit rules and rule sets associated with rule categories.
- Search and select the resources to be assigned.
- Publish assignment information to use in assignment processing.
New pages make it easier for you to create and manage your assignment rules.
Steps to Enable
There are no steps necessary to enable this enhancement.
Tips and Considerations
- You must publish the assignment setup data, such as assignment objects, mappings, and rules, before the data can be used in the assignment processing.
- Rule categories have replaced rule set groups and are automatically associated with rule sets.
- Rule categories are seeded for each sales object using rule-based assignment. In most implementations, the rule categories will be sufficient to use as seeded, although you can customize the rule category by changing the name. You must select a value for the appropriate application profile option for rule-based assignment processing to run successfully. For example, you must select the Lead Team Assignment rule category for the Assignment Rule for Rule-Based Lead Assignment profile option.
- During the upgrade, existing assignment rules are automatically migrated and published.
- Following the upgrade, there is an additional migration step that Assignment Manager automatically performs when the first user either initiates an assignment process or enters an assignment UI. This migration step extracts the assignment rules data from Oracle Business Rules, the assignment rules engine, and it populates the appropriate assignment rules tables and objects.
- Opening the Manage Assignment Objects or Manage Assignment Rules setup tasks.
- Selecting an Assign action, such as lead or opportunity, on the Detail Page.
- When automatic assignment is triggered following the update of an account or opportunity.
- When batch assignment is triggered for any object.
While every effort has been made to make this step perform as quickly as possible, you'll notice a delay in the following situations:
Key Resources
- For a demonstration of this enhancement, see the Work Management Enhancements: Redesigned Assignment Rule Management release training on the Customer Experience Release Readiness page.
- For more information on Assignment Manager, see Learn about Assignment Manager in Oracle Sales Cloud (My Oracle Support Doc ID 1522958.1).
Load master geography data to set up sales territories based on geography and to establish the basis for validating addresses.
Enhanced Master Geographies Load
The Import Nokia Data option enbles you to load master geography data quickly. In Release 10, the number of countries you can select and load from Nokia has been expanded to 60 countries spanning the EMEA, APAC and LAD regions. Geography data for the United Kingdom is a new addition in Release 10. Note that, due to the large volume of geography data for the United Kingdom, the import may take several hours to complete.
Nokia data is now available for the following countries:
|
IMPORTANT: The geography data is provided by Nokia and is third-party content. In accordance with Oracle policy, this software and documentation may provide access to or information on content and services from third parties. Oracle Corporation and its affiliates aren't responsible for and expressly disclaim all warranties of any kind with respect to third-party content and services. Oracle Corporation and its affiliates will not be responsible for any loss, costs, or damages incurred due to your access to or use of third-party content, products, or services.
Steps to Enable
There are no steps necessary to enable this enhancement. However, this feature will not be available if your geography data is already set up for a specific country. It is recommended that you only import Nokia data for a new setup or when you set up a new country. You can use existing geography data for territory geographies and address validations, changing that data can cause problems in those areas.
Tips and Considerations
- The Import Nokia Data option is disabled if the country structure and hierarchy are already populated.
- Data load is an asynchronous process. So, you don't have to stay on the Manage Geographies page and you can complete other tasks while the process is running.
- You can initiate Nokia geography-data load for multiple countries, one after the other. Each country is imported. The import is based on the order in which you start each process.
- After you have submitted the import process, don't attempt to update the same geography manually or through another import until the process is complete.
- When errors occur, the process aborts and any data already loaded is rolled back. You’ll never get a partial data import. Although failure is rare, the Import Nokia Data process might fail if server issues occur or changes are made during the import process.
- After the data is loaded, you should review the data set to ensure that it meets your business needs. If you decide that the data set is not sufficient, you can delete the Nokia data, purchase data from an alternate data source, and load it using file import.
- In order to delete Nokia data, you must first delete the hierarchy data for the selected country. Once the process completes, you can delete the structure.
- Do not delete geographies that are already referenced in territories or being used for address validation because they're building blocks, and deleting them can cause problems.
Key Resources
- For information about how to import Nokia data, see the Importing Geography Reference Data topic in the Applications Help.
- For information about loading geographies, see Setting Up Geography Reference Data for Territories and Addresses in Getting Started with your Oracle Sales Cloud Implementation in the Oracle Help Center.
- For information about replacing your existing master geography data with revised Nokia geography data, see the topic about defining geographies in Implementing Customer Data Management in the Oracle Help Center.
The following topic describes additional changes and improvements in Oracle Sales Cloud for Release 10.
Update Application Composer Customizations to the Latest Enhanced Behavior
During your upgrade, most existing customizations made in Application Composer are automatically updated to the latest enhanced behavior in the new release. However, there are a few exceptions, which require you to manually initiate the upgrade script for each of those customizations.
This document describes the steps you must take to manually upgrade the metadata from an older release to the latest release of Oracle Sales Cloud. By following these steps, you ensure that those customizations have incorporated the latest enhanced behavior.
Steps to Enable
You must sign in as a user with an administrator role to perform these steps.
IMPORTANT: Do not perform these steps when there are pending changes in an active sandbox. Be sure to save and publish sandboxes with any changes you want to keep before proceeding and delete any sandboxes that you do not intend to publish.
- In Oracle Sales Cloud, open the drop-down menu next to your user name, and select Manage Sandboxes.
- Create a new sandbox, and set it as the active sandbox.
- Go to: Navigator > Application Composer (under Tools)
- From the Application drop-down list, select the first application whose metadata you want to upgrade, such as Common or Sales.
- From the navigation tree on the left, under Common Setup, click the Metadata Manager link.
- Click the Metadata Upgrade link on the right.
- By default, the list displays the “Not Started” upgrade items that you need to manually upgrade. Highlight the first row in the list, and then click the Upgrade button.
- Click OK in the confirmation dialog box that opens.
- Repeat steps 7-8 for each row in the list.
- Repeat step 4-8 for each application in the Application drop-down list in Application Composer.
- Publish the sandbox. After the processes have completed, the application is ready to use.
You should see the current active sandbox at the top of the application.
NOTE: You need to upgrade the existing customization metadata for each application separately.
This process may take a couple of minutes. When the upgrade is done, the dialog box will close and the Upgrade Completed column will be checked.
NOTE: Currently, the upgrade item Custom objects and fields are not available for global search will not show a checkmark in the Upgrade Completed column even after the metadata upgrade is complete. You can proceed with the metadata upgrade process without concern.
Do Not Call Management: Restrict Contact Preferences Reason Codes
Contact preference attributes allow you to indicate which phone numbers, e-mails, and addresses your clients don't want you to use. You indicate whether there is a restriction (Do not) or permission (Do) in the Preference attribute, and you can select a reason code for the preference.
Regular business users, such as sales reps and managers, can create and edit contact preference information with any reason code that is not identified as legal. However, to be able to create and edit contact preference information using a reason code that is tagged as legal, you must have a role with the correct privilege.
In Release 10, the privilege that allows a user to create and edit a legal reason code for a contact preference has changed. If you use this feature, then you must take some steps to add the new privilege to the appropriate roles.
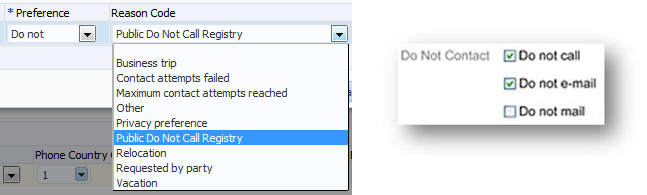
Do Not Contact indicators on a contact record.
Tips and Considerations
After upgrading to Release 10, the following restrictions apply:
- No user will be able to update a preexisting contact preference reason code (tagged as Legal) for any phone, email, or address record.
- No user will be able to create a new contact preference and select a legal reason code for any phone, email, or address record.
If you want to create and edit information using a reason code that is tagged as legal, you must have the HZ_LEGAL_CONTACT_PREFERENCES_PRIV duty role that is provided in the new simplified reference role model.
Steps to Enable
To create and edit contact restriction information using a reason code that is tagged as legal, add the HZ_LEGAL_CONTACT_PREFERENCES_PRIV privilege to the required role.
For information about how to add this new duty role, see Upgrade Guide for Oracle Sales Cloud Application Security (Article ID 1989500.1 on My Oracle Support). It is recommended that you review the following:
- Read the Overview chapter to learn about the simplified reference role model and how it affects you.
- Decide which method you will use to implement the feature and follow the detailed instructions in the guide.
- View the appendix that lists the data security policies that are required to implement this feature.
For information about duty roles, see Securing Oracle Sales Cloud in the Oracle Help Center.
Intermediate Landing Page for Getting Started
When you sign in to Oracle Sales Cloud, and select Getting Started, additional Oracle Cloud products are listed on an intermediate landing page. If you don’t want your end-users to see the full list of products, you can hide the links.
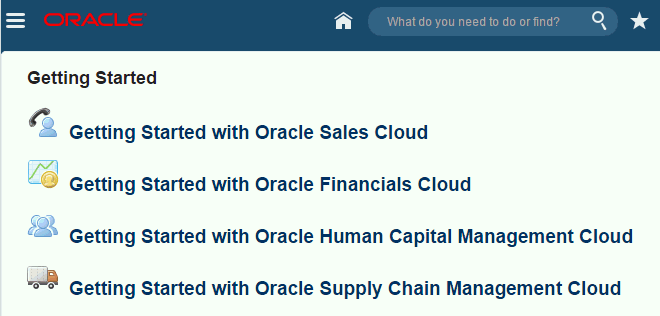
Intermediate Getting Started page.
To hide links on the intermediate page
- Sign in as a user with the ATK_CUSTOMIZE_HELP_TOPICS_PRIV privilege. The standard Customer Relationship Management Application Administrator job role has this privilege.
- Click Getting Started.
- Click the link that you want to hide.
- Click Edit Getting Started.
- Click one of the items in the list and make the status Inactive.
- Click Save and Close.
- Repeat steps 5 and 6 for all items in the flow.
- Click Done.
The link is still visible to the administrator (so they can reactivate the items if needed). - Sign out and sign in as an end user without the Edit privilege. The link is now hidden.
---

Copyright © 2016, Oracle and/or its affiliates. All rights reserved.
This document is provided for information purposes only, and the contents hereof are subject to change without notice.This document is not warranted to be error-free, nor subject to any other warranties or conditions, whether expressed orally or implied in law, including implied warranties and conditions of merchantability or fitness for a particular purpose. We specifically disclaim any liability with respect to this document, and no contractual obligations are formed either directly or indirectly by this document. This document may not be reproduced ortransmitted in any form or by any means, electronic or mechanical, for any purpose, without our prior written permission.
Oracle and Java are registered trademarks of Oracle and/or its affiliates. Other names may be trademarks of their respective owners.
Intel and Intel Xeon are trademarks or registered trademarks of Intel Corporation.All SPARC trademarks are used under license and are trademarks or registered trademarks of SPARC International, Inc. AMD, Opteron, the AMD logo, and the AMD Opteron logo are trademarks or registered trademarks of Advanced Micro Devices. UNIX is a registered trademark of The Open Group.
PB10.15