
This document will continue to evolve as existing sections change and new information is added. All updates are logged below, with the most recent updates at the top.
The new functionality referenced in this document may not be immediately available to you if your organization has chosen not to receive optional monthly updates. Rest assured you will receive the new functionality in the next quarterly update which is required and cumulative. Quarterly updates are applied in February, May, August, and November.
.
| Date |
What's Changed |
Notes |
|---|---|---|
| 01 SEP 2017 |
Oracle Fusion Human Capital Management for the United States: Third-Party Quarterly Tax File Enhancements |
New feature delivered in Update 21 (September). |
| 02 JUN 2017 |
Oracle Fusion Human Capital Management for the United States: Third-Party Quarterly Tax Filing Enhancements For PA Act 32 |
New feature delivered in Update 18 (June), which will also be included in the August Quarterly update. |
| 02 JUN 2017 |
Oracle Fusion Human Capital Management for the United States: Third-Party Periodic Tax Filing Enhancements For PA Act 32 |
New feature delivered in Update 18 (June), which will also be included in the August Quarterly update. |
| 02 JUN 2017 |
Oracle Fusion Compensation Management: New Attributes and Performance Enhancements for Compensation |
New feature delivered in Update 12 (December), which was also included in the February Quarterly update. |
| The following features are included in the May Quarterly update. |
||
| 02 JUN 2017 |
Oracle Fusion Global Payroll: Payroll Costing Report by Element Classification |
New feature delivered in Update 15 (March), which was also included in the May Quarterly update. |
| 05 MAY 2017 |
Oracle Fusion Global Payroll: Settlement Date for Deduction Element Entry |
New feature delivered in Update 17, the May Quarterly update. |
| 03 MAR 2017 |
Oracle Fusion Human Capital Management for the United Kingdom: P60 Template Updates |
New feature delivered in Update 15 (March), which will also be included in the May Quarterly update. |
| 03 MAR 2017 |
Oracle Fusion Human Capital Management for the United Kingdom: P60 Replacement Option |
New feature delivered in Update 15 (March), which will also be included in the May Quarterly update. |
| 03 MAR 2017 |
Oracle Fusion Human Capital Management for the United States: Third-Party Periodic Tax Filing Extract Enhancement: New Jersey FLI Tax Code |
New feature delivered in Update 15 (March), which will also be included in the May Quarterly update. |
| 03 MAR 2017 |
Oracle Fusion Global Payroll: Enhance Payroll Costing Report |
New feature delivered in Update 15 (March), which will also be included in the May Quarterly update. |
| The following features are included in the February Quarterly update. |
||
| 03 FEB 2017 |
Oracle Fusion Payroll for the United States: Enhanced Employee Form W-2 |
New feature delivered in Update 14, the February Quarterly update. |
| 03 FEB 2017 |
Oracle Fusion Human Capital Management for the United States: Third-Party Periodic Tax Filing Extract Enhancement |
New feature delivered in Update 14, the February Quarterly update. |
| 03 FEB 2017 |
Oracle Fusion Payroll for the United Kingdom: Legislative Updates |
New feature delivered in Update 14, the February Quarterly update. |
| 03 FEB 2017 |
Oracle Fusion Payroll for the United Kingdom: Real Time Information |
New feature delivered in Update 14, the February Quarterly update. |
| 03 FEB 2017 |
Oracle Fusion Payroll for the United Kingdom: Apprenticeship Levy |
New feature delivered in Update 14, the February Quarterly update. |
| 03 FEB 2017 |
Oracle Fusion Payroll for the United Kingdom: Foreign Tax Credit Relief |
New feature delivered in Update 14, the February Quarterly update. |
| 03 FEB 2017 |
Oracle Fusion Payroll for the United Kingdom: Full Support of Balance Adjustments |
New feature delivered in Update 14, the February Quarterly update. |
| 03 FEB 2017 |
Oracle Fusion Global Payroll: Excel Output Support for Payroll Reports |
Feature was included in Update 4 (April), however just made a documentation adjustment. |
| 06 JAN 2017 |
Oracle Fusion Human Capital Management for the United States: Third-Party Quarterly Tax File Enhancements |
New feature delivered in Update 13 (January), which will also be included in the February Quarterly update. |
| 06 JAN 2017 |
Oracle Fusion Human Capital Management for the United States: New Start-of-Year ESS Process for Year Begin |
New feature delivered in Update 13 (January), which will also be included in the February Quarterly update. |
| 06 JAN 2017 |
Oracle Fusion Human Capital Management for the United States: PA ACT 32 Support for Employee W-2 and W-2 Register Reports |
New feature delivered in Update 13 (January), which will also be included in the February Quarterly update. |
| 06 JAN 2017 |
Oracle Fusion Payroll for Canada: End-of-Year Reporting (RL-2 Only) |
New feature delivered in Update 13 (January), which will also be included in the February Quarterly update. |
| 06 JAN 2017 |
Oracle Fusion Global Payroll: New Task Action for PBL: Customize Bank Account Details |
New feature delivered in Update 13 (January), which will also be included in the February Quarterly update. |
| 06 JAN 2017 |
Oracle Fusion Global Payroll: New Rules for Personal Payment Methods |
New feature delivered in Update 13 (January), which will also be included in the February Quarterly update. |
| 02 DEC 2016 |
Oracle Fusion Payroll for the United States: Payroll Batch Loader Enhancements for Involuntary Deductions |
New feature delivered in Update 12 (December), which will also be included in the February Quarterly update. |
| 02 DEC 2016 |
Oracle Fusion Payroll for the United States: W-2 Employee Report Enhancements |
New feature delivered in Update 12 (December), which will also be included in the February Quarterly update. |
| 02 DEC 2016 |
Oracle Fusion Payroll for the United States: W-2 Register Report Enhancements |
New feature delivered in Update 12 (December), which will also be included in the February Quarterly update. |
| 02 DEC 2016 |
Oracle Fusion Payroll for Canada: End-of-Year Exception Report |
New feature delivered in Update 12 (December), which will also be included in the February Quarterly update. |
| The following features were delivered via monthly updates. |
||
| 02 DEC 2016 |
Oracle Fusion Payroll for the United States: Form W-2 Box 20 Enhancements for Ohio Employees |
Feature was included in Update 10 (October), however just made a documentation adjustment. |
| 02 DEC 2016 |
Oracle Fusion Payroll for the United States: Wage Balance Enhancement for Periodic Tax Filing |
Feature was included in Update 10 (October), however just made a documentation adjustment. |
| 02 DEC 2016 |
Oracle Fusion Payroll for the United States: Automatically Update Employee Withholding Certificates for Rehires and Assignment Changes |
Feature was included in Update 10 (October), however just made a documentation adjustment. |
| 02 DEC 2016 |
Oracle Fusion Payroll for the United States: Include Resident and Nonresident City and County Tax Balances on Periodic Tax Filing |
Feature was included in Update 9 (September), however just made a documentation adjustment. |
| 02 DEC 2016 |
Oracle Fusion Payroll for the United States: Refined Data Selection for W-2 Employee Report |
Feature was included in Update 9 (September), however just made a documentation adjustment. |
| 02 DEC 2016 |
Oracle Fusion Payroll for Canada: Involuntary Deductions: Protected Pay Rules |
Feature was included in Update 8 (August), however just made a documentation adjustment. |
| 02 DEC 2016 |
Oracle Fusion Payroll for the United States: Display Accrual Balances on Employee Checks |
Feature was included in Update 7 (July), however just made a documentation adjustment. |
| 02 DEC 2016 |
Oracle Fusion Payroll for the United States: Automatically Synchronize Employee Withholding Certificates With HR Data |
Feature was included in Update 7 (July), however just made a documentation adjustment. |
| 02 DEC 2016 |
Oracle Fusion Payroll for Canada: End-of-Year Reporting: Amendments for T4, T4A, and RL-1 |
Feature was included in Update 7 (July), however just made a documentation adjustment. |
| 02 DEC 2016 |
Oracle Fusion Payroll for the United States: Default Check Numbering for US Simplified Payroll Cycle Flow |
Feature was included in Update 5 (May), however just made a documentation adjustment. |
| 02 DEC 2016 |
Oracle Fusion Global Payroll: Excel Output Support for Payroll Reports |
Feature was included in Update 4 (April), however just made a documentation adjustment. |
| 04 NOV 2016 |
Oracle Fusion Payroll for Kuwait: Social Insurance Calculation for Fully State Owned Oil Companies |
Feature information delivered in Update 11 (November). |
| 04 NOV 2016 |
Oracle Fusion Payroll Interface for the United States: Additional Third-Party Periodic Tax Filing Auditing |
Feature information delivered in Update 11 (November). |
| 04 NOV 2016 |
Oracle Fusion Payroll for the United States: Set SUI Wage Limit Overrides for Eligible Employers |
Feature information delivered in Update 11 (November). |
| 04 NOV 2016 |
Oracle Fusion Payroll for the United States: Specify Company Entry Descriptions for EFT Payments |
Feature information delivered in Update 11 (November). |
| 04 NOV 2016 |
Oracle Fusion Payroll Interface for the United States: Include Provider-Specific Fields on the Third-party Quarterly Tax Filing Interface |
Feature information delivered in Update 11 (November). |
| 04 NOV 2016 |
Oracle Fusion Global Payroll: Enhanced Calculation Rules for Earnings Elements |
Feature information delivered in Update 11 (November). |
| 04 NOV 2016 |
Oracle Fusion Global Payroll: Batch Loader Tasks for Payroll Relationship Groups |
Feature information delivered in Update 11 (November). |
| 04 NOV 2016 |
Oracle Fusion Global Payroll: Enhanced Data Exchange Work Area |
Feature information delivered in Update 11 (November). |
| 04 NOV 2016 |
Oracle Fusion Payroll for Kuwait: Social Insurance 2015 Enhancement |
Added new feature information delivered in Release 11 base Upgrade. |
| 05 AUG 2016 |
Oracle Fusion Global Payroll: Additional Flow Parameter for Create Batch for an Object |
Feature information delivered in Update 8 (August). |
| 05 AUG 2016 |
Oracle Fusion Global Payroll: Enhancement for Generate Run Balances |
Feature information delivered in Update 8 (August). |
| 05 AUG 2016 |
Oracle Fusion Global Payroll: Enhancement in Payroll Costing Report |
Feature information delivered in Update 8 (August). |
| 05 AUG 2016 |
Oracle Fusion Global Payroll: Dynamic Payroll Relationship Group Support for Payroll Activity Report |
Feature information delivered in Update 6 (June). |
| 05 AUG 2016 |
Oracle Fusion Global Payroll: Information Balances in the Payroll Balance Report |
Feature information delivered in Update 6 (June). |
| 05 AUG 2016 |
Oracle Fusion Global Payroll: Edit Payroll Period Names |
Feature information delivered in Update 5 (May). |
| 05 AUG 2016 |
Oracle Fusion Global Payroll: Void Payment Action in Prepayments |
Feature information delivered in Update 4 (April). |
| 05 AUG 2016 |
Oracle Fusion Global Payroll: Excel Output Support for Payroll Reports |
Feature information delivered in Update 4 (April). |
| 05 AUG 2016 |
Oracle Fusion Global Payroll: HCM Data Loader Support for Calculation Cards |
Feature information delivered in Update 3 (March). |
| 05 AUG 2016 |
Oracle Fusion Global Payroll: Value Sets Usage in Flow Parameters |
Feature information delivered in Update 3 (March). |
| 01 JUL 2016 |
Oracle Fusion Global Payroll: Information Balances in the Payroll Balance Report |
Feature information delivered in Update 7 (July). |
| 01 JUL 2016 |
Oracle Fusion Global Payroll: Balance Exception Formula and Variance Type Enhancements |
Feature information delivered in Update 7 (July). |
| 03 JUN 2016 |
Oracle Fusion Global Payroll: Information Balances in the Payroll Balance Report |
Feature information delivered in Update 6 (June). |
| 03 JUN 2016 |
Oracle Fusion Global Payroll: Person and Payroll Relationship Group Parameters for Run Deduction Report |
Feature information delivered in Update 6 (June). |
| 03 JUN 2016 |
Oracle Fusion Payroll for the United States: Employee Active Payroll Balance Report Enhancement |
Feature information delivered in Update 6 (June). |
| 03 JUN 2016 |
Oracle Fusion Global Payroll: Deduction Category and Deduction Parameters for Run Deduction Report |
Feature information delivered in Update 5 (May). |
| 06 MAY 2016 |
Oracle Fusion Compensation: Automate Salary Updates Using Grade Step Progression |
Feature information delivered in Update 5 (May). |
| 01 MAR 2016 |
Initial Document Creation |
|
This guide outlines the information you need to know about new or improved functionality in Oracle HCM Release 11. Each section includes a brief description of the feature, the steps you need to take to enable or begin using the feature, any tips or considerations that you should keep in mind, and the resources available to help you.
Oracle HCM Cloud release documents are delivered in five functional groupings:
Suggested Reading for all HCM Products:
- HCM Cloud Common Features (This document pertains to all HCM applications. It is the base human resource information for all products and HCM Tools.)
- Global Human Resources Cloud (Global Human Resources contains the base application in which other application use for common data such as workforce structures and person information. Regardless of what products you have implemented you may want to see the new features for Global Human Resources that could impact your products.)
NOTE: Not all Global Human Resource features are available for the base Talent and Compensation stand alone applications.
Optional Reading for HCM Products (Depending on what products are in your cloud service):
- Talent Management (All Talent applications)
- Workforce Rewards (Compensation, Benefits, Payroll and Global Payroll Interface)
- Workforce Management (Absence Management and Time and Labor)
Additional Optional Reading:
- Common Technologies and User Experience (This documents the common features across all Cloud applications and is not specific to HCM)
NOTE: All of these documents can be found on the Oracle Help Center at: https://cloud.oracle.com/saasreadiness/hcm under Human Capital Management Release Readiness.
We welcome your comments and suggestions to improve the content. Please send us your feedback at oracle_fusion_applications_help_ww_grp@oracle.com. Please indicate you are inquiring or providing feedback regarding the Global HR Cloud What’s New for Release 11 in the body or title of the email.
Some of the new Release 11 features are automatically available to users after the upgrade and some require action from the user, the company administrator, or Oracle.
The table below offers a quick view of the actions required to enable each of the Release 11 features.

Compensation and Total Compensation Statement
Oracle Fusion Compensation enables your organization to plan, allocate, and communicate compensation using the most complete solution in the market. Make better business decisions using embedded analytics and a total compensation view of workers, regardless of geographic location or pay package components.
Test Fast Formula Used to Determine Worksheet Column Default Values
Test the Compensation Default and Override formula that you select when you configure the Workforce Compensation plan column properties. You use the new test tool on the Default Values tab to test the formula for a sample person and to verify that the formula returns the expected results. You see the results immediately and can troubleshoot issues before you start the plan cycle. Previously, you had to run the Start Compensation Cycle process to know if you wrote the formula correctly.

Test Condition and Column Results Tool

Enter Test Parameters
There are no steps necessary to enable this feature.
Configure Shading, Width, and Text Wrapping for Worksheet Columns
Add custom color shading, set column width in pixels from 50 to 200, and wrap text for any worksheet column. Color shading applies to the worksheet cells, not the column header. Previously, shading was not available, and managers had to manually stretch columns when the content was longer than the column width each time that they entered the worksheet.

Wrap Text, Set Column Width, and Apply Shading

See Column Shading on the Worksheet
There are no steps necessary to enable this feature.
Tips and Considerations
Examples are:
- Apply the same shade to a set of adjacent columns so they appear related on the worksheet.
- Shade columns that require entry or attention by managers.
- Increase or decrease the column width to better display the contents of each column.
- Set a column to wrap text so managers can see all text without having to expand the column.
Configure Dynamic Calculations, Alerts, and Advanced Filters Conditions
You can more easily build conditions for dynamic calculations, alerts, and advanced filters when using translatable columns. When using the condition builder, select a value from a choice list to build your condition instead of using an internal ID or non-translatable code. For example, you can build the condition as Performance Management Overall Rating equals “Outstanding”. The condition still uses the internal ID or code. If you create the condition manually, you must use the internal ID or code.
Previously, you had to use the internal ID or non-translatable code of the value in the condition. For example, you had to build the condition as Performance Management Overall Rating Equals “4005”.

Text of the Value Appears in the Choice List

Condition Uses Numeric Value
There are no steps necessary to enable this feature.
Configure Different Due Dates for Different Hierarchy Levels
Configure different due dates for up to seven levels of the approval hierarchy when you configure the plan cycle. Enable higher-level managers to change due dates for lower managers using a new action called Change Due Dates for All Managers. Managers can see the due dates for their lower-level managers on the Manager Status report and on the approvals tab.
There are two new batch processes that can be run from the Run Batch Process page to notify managers when:
- Dues dates are past, due today, or are due in X number of days
- The cycle opens or closes
Decide whether to notify lower-level managers when higher-level managers change their due dates by setting the Due Date Changed notification on the Configure Global Settings page.
Previously, there was one due date for all manager levels and no notification of date changes.

Configure Different Due Dates for Up to Seven Manager Levels

Managers Can Change the Due Dates for Lower-Level Managers
There are no steps necessary to enable this feature.
Set earlier due dates for managers lower down in the hierarchy so that they do not hold up the approval process. Due dates are informational only.
Configure Worksheet and Reporting Filters
Create custom filters that managers use to filter their worksheet and reports. In plan setup, you use the Configure Filters task, renamed from Configure Report Filters, to enable filters, including the advanced filters. In addition to Name and Team, two additional filters appear in the worksheet toolbar. Managers can access additional filters using the View More Filters button. The enabled filters appear only when you enable the corresponding column. The worksheet summary table recalculates when managers apply the filters. Previously, worksheet filters only included Name, Team, Eligibility Status, Country, and Job Title.

View More Filters
There are no steps necessary to enable this feature.
Navigate Between the Worksheet and Reports More Easily
Return to your starting point easily after reviewing manager reports during the workforce compensation cycle. Just click the Done button on the reports page. Previously you had to manually navigate to your starting point.
There are no steps necessary to enable this feature.
Display Static Budget Amounts In the Worksheet Summary
Enable three new columns in the compensation tab type summary to display Overall Budget, Overall Available Budget, and Overall Compensation Amount, which do not change when you apply filters. Managers can see their overall budget amounts at all times, even when they apply filters. Three existing columns are renamed as follows:
- Overall Budget Amount is now Budget - Filtered by Team
- Available Budget is now Available Budget - Filtered by Team
- Compensation Amount is now Compensation Amount - Filtered by Team
There are no steps necessary to enable this feature.
The three new columns are initially disabled so there is no visual impact on the worksheet when you upgrade. If you use the three existing renamed columns, you might want to rename them accordingly.
Configure Worksheet Display Default Options
Configure worksheet default display options by plan. You use a new task included in plan setup called Configure Default Worksheet Display where you can set the following options:
- Team Filter
- Number of Visible Rows
- Table View (list or tree)
- Number of Frozen Columns
Line managers can continue to use the Manage Default Worksheet Display action to save default settings on their worksheet. The default display settings saved by managers are honored. If managers do not save their default settings, plan-level display options apply. Previously, individual managers had to save their default display options. You could not configure options at the plan level.

Set Default Page Settings at the Plan Level
There are no steps necessary to enable this feature.
Disable the Submit Option On the Worksheet
Hide the Submit button on the worksheet and only enable managers to save their worksheets. Use the new Disable Submit option, in the Configure Approvals task to disable the Submit button. This action also hides the Approve and Return for Correction buttons on the approval tab. You had to hide the Submit button using customization, previously.

Disable the Worksheet Submit Button
There are no steps necessary to enable this feature.
Disable the Submit option to simplify the compensation cycle. Managers just allocate and save.
View Individual Compensation History When Managing Compensation
View a worker’s full individual compensation history on the Manage Compensation page. The prior compensation section shows up to five years of previous compensation, with the option to display all years. Recurring awards appear as prior compensation when their end date is earlier than the current date. These plans are view-only. Previously, you did not see historic awards on the Manage Compensation page. The Manage Compensation page only displayed active plans whose award end dates were greater than or equal to the current date.

View Prior Compensation When Making a Compensation Decision
Steps to Enable
There are no steps necessary to enable this feature.
Tips and Considerations
The Other Compensation section differs in that it includes all current individual compensation plans for a worker, including active recurring plans. Managers can take action on these plans, including awarding compensation.
Salary and Individual Compensation Approval Notification Personalization
As a Human Resources (HR) or Compensation Administrator, you can now personalize salary and individual compensation approval notifications.

Personalizing Salary and Compensation Approval Notifications
Using the Oracle Page Composer, you can selectively show and hide various components of the notification, including fields, labels and regions.

Edit Labels, Color, and the Page Layout

Custom Text and External Links to the Page
Steps To Enable
There are no steps necessary to enable this feature.
Configure Options for the Printable Total Compensation Statement
Generate the printable statement in each worker’s local currency or in another currency. Make the statement available to administers, workers, or both. The statement contains a currency switcher you can use to switch between multiple currencies. Previously, the printable statement was generated in each worker’s local currency and was available to both administrators and workers.

Generate Printable Statements in Worker’s Local Currency
Steps to Enable
There are no steps necessary to enable this feature.
Route Individual Compensation Approvals Based on Salary
You can now use attributes of the worker’s salary record to route approvals for the Manage Individual Compensation process using Manage Approval Transactions for Human Capital Management or the VariableAllocationTask using BPM Worklist.
Steps to Enable
You must configure or modify your approval rules to take advantage of the new payload attributes.
Key Resources
For more information compensation approvals, go to Applications Help for the following topic:
- Salary and Individual Compensation Approval Tasks: Explained
Automate Salary Updates Using Grade Step Progression
You can now update salaries automatically using grade step progression. You define progression rules and associate them with your grade ladders. The new grade step progression batch process evaluates the rules to move workers to the next grade or step and update their salaries accordingly. You can optionally review changes before the application applies them to the worker’s assignment and salary record. When it comes time to update the underlying salary values, you can run the new rate synchronization process to automatically update the salaries for all affected workers. You access the new grade step progression pages in the Compensation work area.
The grade step progression capabilities are available immediately after upgrade. To use the process for your workforce, you want to do the following:
- Define additional parameters for your grade ladders
- Associate your workers with the appropriate grade ladder
- Mark the workers eligible for grade step progression
- Schedule and run the process.

Manage Grade Step Progression in the Compensation Work Area

Create or Edit Progression Grade Ladder

View Proposed Progressions and Salary Updates
Steps to Enable
There are no steps necessary to enable this feature.
Role Information
If you plan to use the new grade step progression process and do not use the delivered Compensation Manager and Compensation Administrator roles, you must add the Manage Progression Grade Ladder privilege.
See the Upgrade Guide for Oracle HCM Cloud Applications Security (My Oracle Support document ID 2023523.1) for instructions on implementing new features in existing roles.
Tips and Considerations
After upgrade, the delivered compensation administrator role sees the new Manage Progression Grade Ladders page. Use this page to create and manage ladders that use grade step progression. The old Manage Grade Ladders page is still available in the Workforce Structures work area and from Setup and Maintenance. Grade ladders created in the old Manage Grade Ladders page are available to maintain in the new Manage Progression Grade Ladders page, if you plan to use the grade step progression process. You enter additional parameters for your old grade ladders in the new page.
Oracle Fusion Benefits is a complete, configurable and flexible global solution that enables organizations to successfully evolve and adapt to the unique needs of their workforce. The solution enables setup of traditional 'one-size fits all' plans to highly complex plans that selectively target different workforce segments with different benefit packages. Self-service capabilities present the user with an out of the box intuitive guided enrollment process with contextual information and embedded analytics.
Batch Process to Assign and Update Benefits Relationships
Use the new Assign and Update Benefits Relationships process to assign and update benefits relationships for workers using the default configuration. You run the process from the Evaluation and Reporting work area, Processes tab, Maintenance Processes sub tab.

Location of the Assign and Update Benefits Relationships Process in the Processes Tab
This process synchronizes worker benefits data with existing human resources data. Typically, you run this process when you go live with Benefits after other modules.
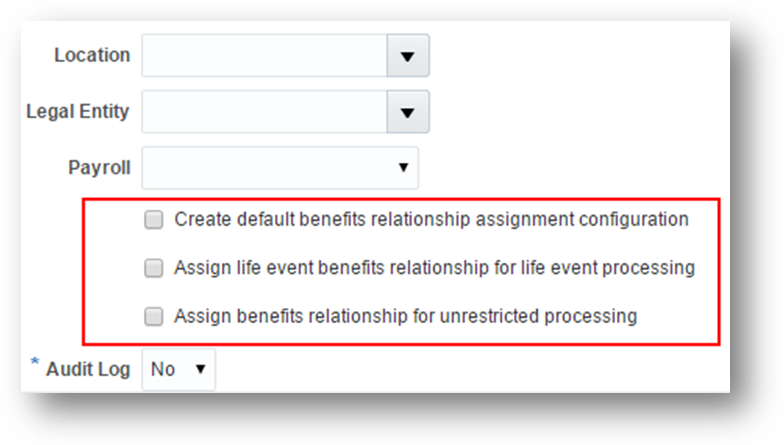
Key Parameters of the Assign and Update Benefits Relationships Process
If the default configuration does not exist for the worker's country, you can configure the process to create the configuration. Configure the process to assign benefits relationships to the worker for life event processing and unrestricted life event processing.
There are no steps necessary to enable this feature.
New Fields for Oracle Transactional Business Intelligence (OTBI)
The following new benefits fields are now available for reporting in OTBI:
- Suspended
- Required
- Action Type Name
- Due Date
- Completion Date
- Enrollment Coverage Start Date
- Enrollment Coverage Through Date
- Received Date
- Denied Date

New OTBI Reporting Fields in a Sample Report
There are no steps necessary to enable this feature.
Improved Self-Service Benefits Pages
Participants can now use the improved self-service overview page to perform these functions more quickly and easily:
- Enroll in plans
- Review and update contacts information
- View current and future benefits
- Record life events
- View pending actions
Context Sensitive Overview Page
The Overview page is context-specific and appears differently depending on the participants who use it. For example, existing participants see additional tasks, such as the ability to view current and future enrollments and view pending actions. Participants who are ready to enroll in benefits for the first time only see the task to make enrollments. Tasks, such as the ability to update primary care physicians or record life events, appear on the overview page only if administrators enable existing setup options. These options continue to be available in the Manage Self-Service Configuration page in the Plan Configuration work area.

Enroll Now Section of the Overview Page.
Reviewing and Updating Contacts Before Enrollment
The page to review or update contacts now always appears before participants start the enrollments process. Previously, administrators had to enable an option for participants to review their contacts before the enrollment process. That configuration option no longer exists.

People I Plan to Cover Page that Participants See before they Start the Enrollment Process
Configuration to Improve Visual Appeal of Self-Service Pages
Administrators can improve the visual appeal of the offering selection process for participants. They can configure the self-service pages to use custom images for programs, plan-not-in-programs, and the overview page. Administrators can also add instruction text, change welcome text, and add specific documents in the self-service pages using Page Composer.

Images on the Program Selection Page
Improved Report a Life Event Page
The Report a Life Event page is now simpler to use for participants. Administrators can continue to use the Self-Assigned checkbox to configure specific life events that participants can create for themselves on the Report a Life Event page. Administrators can now take advantage of the new Self-Service Grouping field when they select the Self-Assigned checkbox on the Create or Edit Life Event page. This field enables administrators to group events under the following categories that display on the Report a Life Event page:
- Child events
- Employee events
- Spouse or domestic partner events

Report a Life Event Page that Participants Use in the Self-Service Pages

Self-Service Grouping Field on the Create or Edit Life Event Page in the Plan Configuration Work Area
Open Enrollment Reminder On Overview Page
Participants can take advantage of the improved overview page during an open enrollment period. When administrators start open enrollment, a notice appears on the self-service overview page to remind participants about the end date of the open enrollment period.

Open Enrollment Duration Notice on the Self-Service Pages
When participants finish making enrollments, the Confirmation page now displays for each offering the coverage start date and any pending actions. The page also displays the date until when participants can continue to change their enrollments.

Benefits Confirmation Page that Displays Coverage Start Date and Any Pending Actions
As an administrator, you add the required images for any offerings that you want to enable for enrollment in the self- service pages. No predefined images are available as you might want to add images that are specific to your enterprise.
Steps to Enable
The following table shows you the setup locations that enable you to upload images for various self-service pages.
| Self-Service Page that Displays Images |
Corresponding Page in Plan Configuration Work Area To Upload Images |
|---|---|
| Program selection page |
To upload images for programs, navigate to the Create or Edit Program page, Additional Details step, Image section |
| Confirmation page |
To upload images for plan-not-in-programs, navigate to the Create or Edit Plan page, Additional Details step, Image section |
| View Current and Future Benefits option on the Overview page |
Create or Edit Plan Type page, Image section |
NOTE: If you do not add images, blank placeholders for images appear in the self-service pages.
For optimum performance, ensure that you do not use high resolution images in the self-service pages.
Oracle Fusion Global Payroll is a high-performance, graphical, rules-based payroll management application. It’s designed to keep pace with the changing needs of your enterprise and workforce in order to reduce setup costs, administration, and processing time. Global Payroll operates consistently in every country supported by Oracle. It uses a highly scalable processing engine that takes advantage of the features of the Oracle database for parallel processing, resulting in optimal performance. In countries with payroll extensions delivered and supported by Oracle, the application delivers the calculations, tax reporting, and regulatory rules required to accurately process payroll and remain in compliance.
The Element Result Report now displays results for payroll processes based on run results, not balances. To view balances generated by the payroll run, you can continue to use the Payroll Balance Report. You submit the Run Element Results Register flow from the Payroll Calculation or Payroll Checklist work areas. The report lists the elements and their primary output for processes that generate run results, such as the Calculate Payroll and Calculate QuickPay tasks.

Element Result Report Displays Results Generated by the Payroll Run
There are no steps necessary to enable this feature.
Use the pivot table feature in Microsoft Excel to obtain totals by element and person. For example, to create a pivot table that displays totals for the Run Element Result Report flow, complete the following steps.
- Open the Element Result Report in Microsoft Excel.
- Select the range of cells in the spreadsheet that contain data.
- Click PivotTable from the Insert menu.
- In the Create Pivot Table dialog, select New Worksheet. Click OK.
- Click the following fields from the Pivot Table Field List: Person Name, Payroll Statutory Unit, Tax Reporting Unit, Payroll, Run Type, Element Name, and Value.
- Drag the fields to the following areas:
- Refresh the page to display the populated columns and rows, and the summed totals.
- Filter to view different results.
| Area |
Fields |
|---|---|
| Report Filter |
Payroll Statutory Unit, Tax Reporting Unit, Run Type, Payroll |
| Column Labels |
Element Name |
| Row Labels |
Person Name |
| Values |
Sum of Value |
Balance Exception Report Enhancements
Expand your options for balance comparisons in balance exception reporting using the new Current quarter or Current year comparison types.
For example, you might want to run a balance exception report for the current year and specify balance payments for employer reimbursements that exceed 10,000. When you run the report, all employer reimbursements that exceed 10,000 appear on the report.
The Current year comparison type does not use any previous period as a basis for comparison.
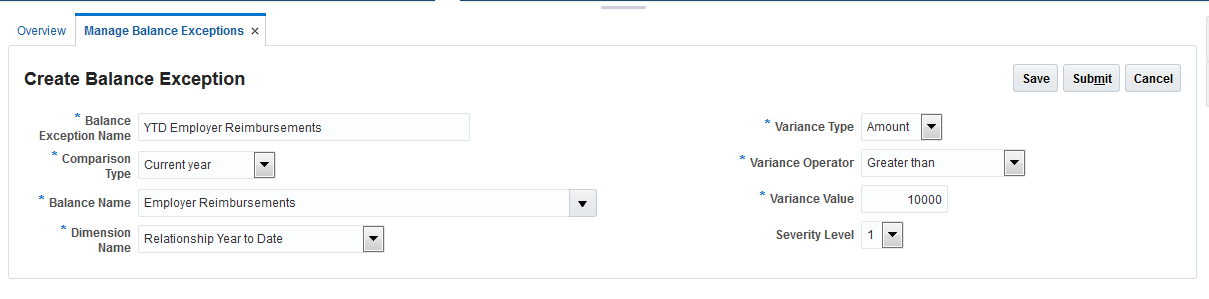
Create Balance Exception Page Showing the Current year as the Comparison Type
Steps to Enable
There are no steps necessary to enable this feature.
Key Resources
For more information about balance exception reports, go to Applications Help for the following topics:
- Balance Exception Reports: Explained
- Comparison Types and Variance Operators for Balance Exceptions: Explained
- Creating a Balance Exception Report: Worked Example
Enhancements to Third-Party Payment Method Search
Search for third-party organizations or persons using separate tasks in the Payment Distribution work area in the Manage Third-Party Organization Payment Methods.
Additional enhancements simplify locating person third-party details, as shown in the following table:
| View Third-Party Payment Details |
Task |
Enhancement |
Action to Take |
|---|---|---|---|
| Third-party persons that a person in your enterprise pays |
Manage Third-Party Person Payment Methods |
Search navigation reversed to start by searching for the person to view the third-party payees. This enables viewing multiple payees for a single person. |
On the Manage Third-Party Person Payment Methods page, search for and select a person in your enterprise. Click the person’s name to view a list of the third parties the person pays. Select a third-party name, and click the Edit button to view or update the payment details. |
| Persons who pay the third-party |
Manage Third Parties |
Manage Third-Party Payment Details button takes you directly to the Manage Third-Party Payment Methods page for the person |
On the Manage Third Parties page, search for and select a third-party person. |

Search Results for Third-Party Person Payment Methods

Third-Party Person Payees for the Selected Person

New Third-Party Payments Button on the Manage Third Parties Page for Person Payees
Steps to Enable
If you use the predefined reference roles, then no steps are necessary to enable this feature.
Otherwise, you must assign relevant security privileges to your roles to enable this feature. See Role Information (below) for details.
Role Information
If you are not using the predefined reference roles, then you need to add security privileges to relevant job roles to use this feature. This table identifies the required aggregate privileges and suggests target job roles. You can add the privileges to different roles if you prefer.
See the Upgrade Guide for Oracle HCM Cloud Applications Security (My Oracle Support document ID 2023523.1) for instructions on implementing new features in existing roles.
| Aggregate Privilege Name and Code |
Job Role |
|---|---|
| Manage Payroll Third-Party Person Payment Method ORA_PAY_MANAGE_PAYROLL_THIRD_PARTY_PERSON_PAYMENT_METHOD |
Payroll Administrator Payroll Manager Payroll Coordinator |
For more information about third-party payments, go to Applications Help for the following topics:
- Creating Third-Party Payment Methods: Procedure
- Creating Third Parties: Points to Consider
Enhancements to Payment Method Rules
Pay persons and third parties from different bank accounts within the same organization payment method. The Manage Organization Payment Methods page includes two new columns in the Payment Method Rules section to support third-party payments.
IMPORTANT: If you select Third-Party Payment check box, you must select a third-party name or the tax reporting unit.
For example, you might create the following rules.
| Pay |
Actions |
|---|---|
| Third parties from persons in a specified TRU |
Select the Third-Party Payment check box. Select the TRU. Select the payment source. |
| Specific third parties using different payment sources |
Create a rule for each combination. For each row, select the following fields: Third-Party Payment check box Third-Party Name Payment Source |
| All third parties and employees in a TRU from the same payment source |
Leave the Third-Party Payment check box blank. Select the TRU. Select the payment source. |
Complete these steps to define the rules:
- Use the Manage Organization Payment Methods task in the Payment Distribution work area.
- Create an organization payment method for each combination of payment type and currency.
- In the Payment Sources section, add payment sources.
- In the Payment Method Rules section, add rules for different payment sources. For example, specify the TRU, the third-party name, and the payment criteria.
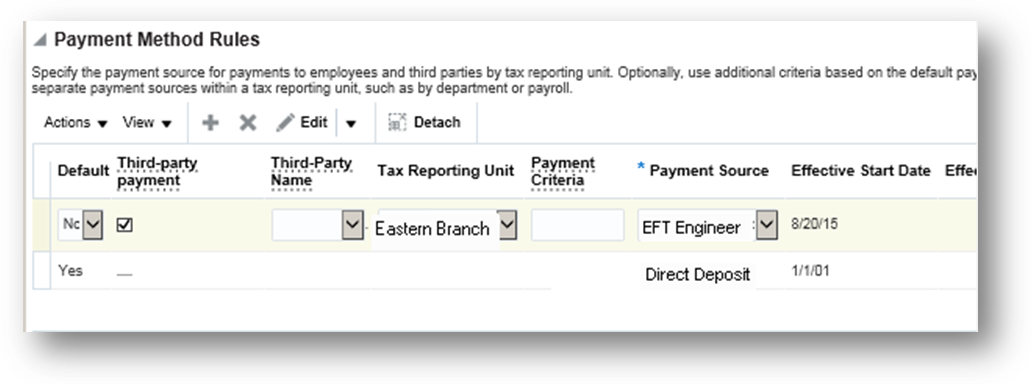
Payment Method Rules
There are no steps necessary to enable this feature.
For more information about third-party payments, go to Applications Help for the following topics:
- Creating Third-Party Payment Methods: Procedure
- Creating Third Parties: Points to Consider
Submit the Calculate QuickPay task to calculate payroll and payment results for a person from a single page using a checklist. Submit the task from the Payroll Calculation work area, or from the Actions menu of the Manage Person Details page when updating a person’s earnings and deductions. The Calculate QuickPay task automatically populates parameters based on the person selected and the effective date.
New commands on the page-level Actions menu simplify working with a QuickPay process, as shown in the following table.
| Actions |
Purpose |
|---|---|
| Next |
Submit QuickPay flows for consecutive payroll periods |
| Flow Interaction |
Process a QuickPay flow for a later payroll period |
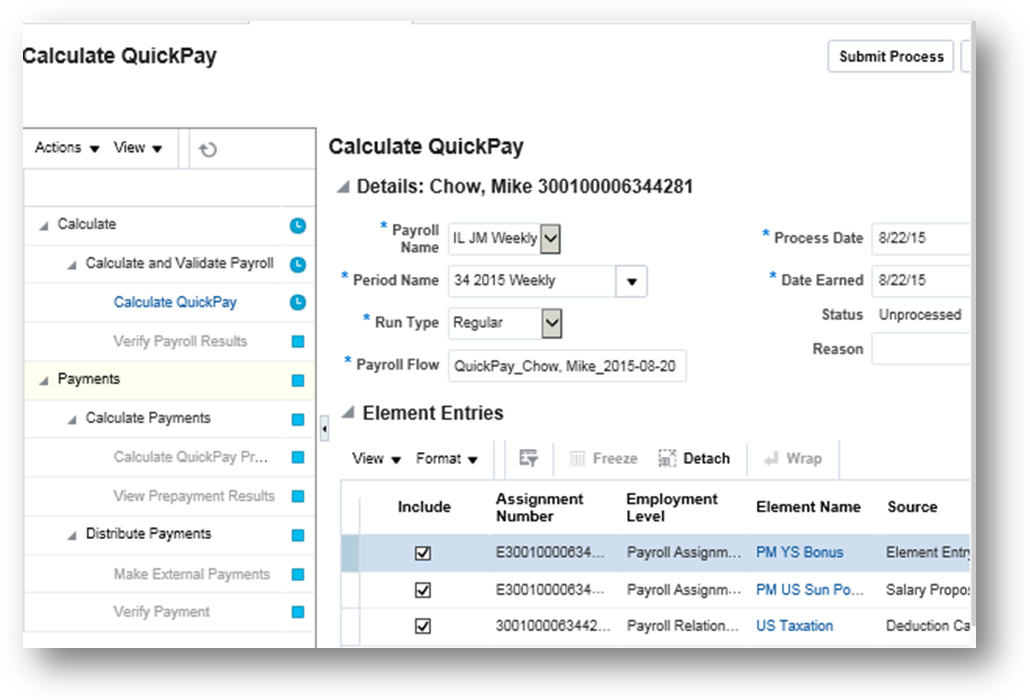
Calculate QuickPay Page
There are no steps necessary to enable this feature.
If you want to replace the predefined QuickPay flow pattern with a customized flow pattern, follow these steps.
Create a customized flow pattern
- Use the Manage Flow Pattern task in the Payroll Checklist work area.
- Copy the predefined QuickPay flow pattern, and specify its legislative data group.
- Update the new flow pattern with the tasks to include in your QuickPay flow.
Complete the following steps for the FLOW_NAME column
- Use the Manage User-Defined Tables task in the Payroll Calculation work area. Specify the legislative data group for the search criteria. Search for and open the FLOW_DEFINITION table. Each legislative data group can have only one flow pattern specified for the Calculate QuickPay task.
- Click the Edit button at the top of the page.
- Specify the Effective As-Of Date.
- In the User-Defined Columns section, select Flow_Name.
- In the User-Defined Rows section, click Create.
- In the Sequence field, enter the number 1.
- In the Exact field, enter a name, such as Enter Flow Name.
- Click Next.
- On the Edit User-Defined Table page in the User Defined Table Values section, click Create.
- In the Add User-Defined Table Values dialog, select the name you specified for the Exact field.
- In the Value field, enter QUICK_PAY.
- Save your work.
- Click Back to return to the Edit User-Defined Table page.
Complete the following steps for the FLOW_NAME_OVERRIDE column
- On the Edit User-Defined Table page, in the User-Defined Columns section, select FLOW_QUICKPAY_OVERRIDE.
- Click Next.
- On the Edit User-Defined Table page in the User Defined Table Values section, click Create.
- In the Add User-Defined Table Values dialog, select the name you specified for the Exact field.
- In the Value field, enter the name of your customized QuickPay flow pattern.
- Click Submit.
For more information about QuickPay, go to Applications Help for the following topics:
- QuickPay: How It's Processed
- Customizing the QuickPay Flow Pattern: Procedure
- Working with QuickPay Flows: Explained
- Submitting a QuickPay Flow to Correct a Payroll Calculation Error: Worked Example
Support for Values Defined by Criteria
Use the Manage Values Defined by Criteria task to generate rates or values that are based on one or more criteria. For example, you can calculate:
- Annual salaries based on employee position
- Bonus payments based on employee department, years of service, and annual salary
- Rates of pay based on employee state, county, and profession
Each calculation value definition requires you to specify one or more evaluation conditions. These conditions are evaluated in the order in which they appear in the tree structure that you define.
You can have multiple evaluation conditions in each branch of the tree. You can also set up default criteria that are used in cases where no evaluation conditions are met.

Create Criteria Page Showing the Conditions that Must Be Met to Receive a Bonus

Criteria and Values Section Showing the Flat Rate Bonus Defined for 5 or More Years Service
There are no steps necessary to enable this feature.
In most calculation value definitions there should be at least one default criteria definition to cover all conditions.
If you specify a unique value identifier for each value, you can enter multiple values for a single criterion. The tree structure shows this identifier instead of the value definition name.
For more information about values defined by criteria, go to Applications Help for the following topics:
- Manage Values Defined by Criteria: Examples
- Values Defined by Criteria: Explained
- Using Values Defined by Criteria to Pay Bonuses Based on Age and Location: Worked Example
Simplified Bank Account Page Enabled by Default
A new simplified page for creating bank account information was introduced in Release 10. The What's New in Release 10 document explains how to enable that page. Now, the simplified page is enabled by default. As before, you can restrict selection to only preloaded banks and branches by setting Use Existing Banks and Branches profile option to Yes. If set to No, persons enter text directly in the bank and branch fields. The following screen capture illustrates the simplified bank account page that displays if you set the profile option to Yes. A person selects from a list of values the bank and branch information.

Simplified Bank Account Page
There are no steps necessary to enable this feature.
Key Resources
For more information about managing bank data related to personal payment methods, go to Applications Help for the following topics:
- Entering Bank Information for Personal Payment Methods: Critical Choices
- Payroll Batch Loader Workbooks for Bank Data
Fast Formula Support for Expression and Text Editors
Switch to the text editor when you need to build more complex formulas for formula types previously restricted to the expression editor easily. For example, you can use the text editor for the payroll relationship group formula type to write rules for validations or building criteria to define the group. The Create Formula window provides an option to switch formula editor types. If you select a formula type that uses the text editor there is no change. If you select a formula type where the expression editor is used, the Type of Editor field provides you with the option to select the Text editor.

Create Fast Formula Pop-Up Window Showing the Formula Editor Options
IMPORTANT: Once the formula is saved, you cannot change the editor type.
There are no steps necessary to enable this feature.
For more information about the Fast Formula editors, go to Applications Help for the following topics:
- Writing a Fast Formula Using Expression Editor: Worked Example
- Writing a Fast Formula Using Formula Text: Worked Example
Deduction Category and Deduction Parameters for Run Deduction Report
You can now run the Deduction Report for all deduction categories and deductions including the deduction balances you define. Use the Deduction Category and Deduction parameters to run the report for specific deduction categories or deductions.

Deduction Category and Deduction Parameters
Steps to Enable
There are no steps necessary to enable this feature.
Key Resources
For more information, go to Applications Help for the following topic:
- Deduction Report
Person and Payroll Relationship Group Parameters for Run Deduction Report
You can now run the Deduction Report for a single person or a static payroll relationship group with payroll relationship numbers to verify deduction balances.

Steps to Enable
There are no steps necessary to enable this feature.
Information Balances in the Payroll Balance Report
You can now configure the balance group usage item to display information balances in the Payroll Balance Report.

To configure the balance group usage item:
Select the Manage Balance Group Usages task from the Payroll Calculation work area.
- Select Global Payroll Run Result Report (Payroll Balance Report) from the Report Type drop-down list.
- Select the desired legislative data group.
- Click Search. The search results display all the applicable balance group usages for the Payroll Balance Report.
- Select the Global Information Balances for Payroll Balance Report row and click the Edit icon.
- Select Matrix Items on the left panel, in the Balance Group Usage: Global Information Balances for Payroll Balance Report page.
- Click the Add icon to create a new matrix item.
- In the Matrix Item section, select the Balance Dimension matrix item type, select the name of the desired balance dimension, and enter a position value.
- Click Save.
- Click Submit.

Steps to Enable
There are no steps necessary to enable this feature.
Key Resources
For more information about the Payroll Balance Report, go to Applications Help for the following Topic:
- Payroll Calculation Report: Overview
Balance Exception Formula and Variance Type Enhancements
Use the Balance Exception formula type to create formulas to return reference values and information for comparison in balance exception reports. On the Create Balance Exception page enter Formula in the Variance Type field and then enter the name of the formula that you create using this formula type in the Formula Name field.
These contexts are available when you use the Balance Exception formula type to write a formula:
- EFFECTIVE_DATE
- PERSON_ID
- HR_ASSIGNMENT_ID
- TAX_UNIT_ID
- PAYROLL_RELATIONSHIP_ID
- PAYROLL_REL_ACTION_ID
- PAYROLL_TERM_ID
- PAYROLL_ASSIGNMENT_ID
- LEGISLATIVE_DATA_GROUP_ID
- PAYROLL_ID
- CALC_BREAKDOWN_ID
You can reference any database item in the fast formula that uses any of the listed contexts.
You can’t use input variables for this formula type, however. This formula is run by the balance exception report for each person record. It returns the reference value for that employee for comparison with the balance value as configured in the respective balance exception.
These return values are available when you use the Balance Exception formula type to write a formula:
| Return Value |
Data Type |
Required |
Description |
| REFERENCE_VALUE |
Text |
Y |
Returns a reference value for comparing in the balance exception report. |
| REFERENCE_INFO |
Text |
Y |
Returns the text for display in the Reference field on the balance exception report. |
After you write a fast formula using the Balance Exception formula type, select the Formula variance type on the Create Balance Exception page and then select the formula that you created from the Formula ID field.

This formula multiplies the year-to-date gross earnings by 15 percent and returns the value when the balance exception report to which it is associated is run.
Steps to Enable
There are no steps necessary to enable this feature.
Key Resources
For more information about balance exception reports, go to Applications Help for the following topics:
- Balance Exception Formula Type
- Balance Exception Reports: Explained
- Comparison Types and Variance Operators for Balance Exceptions: Explained
- Creating a Balance Exception Report: Worked Example
Value Sets Usage in Flow Parameters
Use value sets for flow parameters to define and control which values display when submitting a flow. You might add a flow parameter that uses a value set to select a person, a flow instance, or a legislative data group. You can also create dependent value sets to filter the list of values. For example, the value set for payroll period might depend on the value selected for the payroll parameter.
The SQL query you specify when you create the value set determines the values that populate the flow parameter.
Steps to Enable
The following steps explain how to:
- Create a value set
- Update your flow pattern
Create a Value Set
To define a value set for a flow parameter:
- Use the Manage Value Sets task in the Setup and Maintenance work area.
- Click the Create icon to create a value set. Complete the following required fields:
- Value Set Code: Specify a name for your value set.
Tip: Use a prefix such as XX_ before the name, to more easily identify it from the predefined value set names. - Module: Select the module that uses the value set, such as Payroll Flow.
- Validation Type: Select Table.
- Value Data Type: Specify the data type of the displayed column.
If the value set is dependent on another parameter value, specify the parameter name as the bind value in the Where clause. As an example, to bind the payroll parameter, specify the following text for the Where clause: payroll_id = :{PARAMETER.PAYROLL} - Complete the Definition section of the Create Value Set page to create a SQL query for the value views. The Column Type and Column Length for each column are populated based on its definition in the database.
- FROM Clause: Specify the table names used for the query.
- Value Column Name: Specify the attribute.
This field holds the column value displayed for the flow submission parameter. - ID Column Name: Specify the attribute used to store the value in the database table.
This field holds the column value that processes and reports expect as a value, such as an ID. - WHERE Clause: Specify the SQL query you created to build the list of values.
- ORDER BY Clause: Specify the query used to order the list of values.

Example of Value Set Definition that Displays Flow Instances by Date Earned
Update Your Flow Pattern
To use the value set for a flow parameter:
Use the Manage Payroll Flow Patterns task in the Payroll Checklist work area.
- Search for and edit your customized payroll flow.
- Click the Parameters tab.
- Click the Add button to create a new flow parameter.
- Click the Edit button and enter the parameter details:
- Flow Parameter: Parameter name
- Description: Name to display
- Use for Searches: No
- Display Format column: Value Set
- Lookup column: Text entered in your value set definition for Value Set Code
- Click Submit.
When you submit the payroll flow the submission flow parameter displays the list of values based on the value set you created.
Tips and Considerations
If the query includes a date field, you must use the appropriate date format. For example, if the date field is date earned, you must use the following format: to_char (date_earned,'yyyy-MM-dd').
Key Resources
For more information about flow patterns, go to Applications Help for the following topic:
- Flow Pattern Parameters: Explained
HCM Data Loader Support for Calculation Cards
You can now use HCM Data Loader to create or update calculation cards for the Australia localization.
All business objects related to the calculation card, such as calculation component, component details, and associations are available through HCM Data Loader. You can carry out actions such as Insert, Delete, or Update on these objects.
User keys are currently not supported to identify business objects; instead it uses the combination of SourceSystemOwner and SourceSystemID. Reports can be setup in Business Intelligence Publisher to retrieve the required ID.

Using this information, you can prepare the data for loading. The file must be in data file format (.dat), with a METADATA line declaring what objects are being created or uploaded or deleted in the file, followed by one MERGE line for each record you wish to create or update.
For example, to update Tax information on employee’s PAYG component:

You can then upload the file in the Data Exchange Work Area under HCM Data Loader and Import and Load data.

If the upload is unsuccessful, you can view the list of error messages using the Message icon.
To verify that the data has been updated, use the Manage Calculation Card task in the Payroll Calculation Work Area:

Steps to Enable
There are no steps necessary to enable this feature.
Tips and Considerations
User keys are not currently supported, either Source System id, GUID or Surrogate Id can be used to identify records.
It is possible to combine all business objects into a single file. The HCM Data Loader works out the order in which objects must be created. For example, if you are creating a new statutory deduction card, you can include all of the following business objects into a single .dat file:
- Calculation Card
- Superannuation Guarantee Contributions component
- Additional Employer Superannuation Contributions component
- Employee Superannuation Contributions component
- PAYG Withholding component
- Payroll Tax component
- TFN Declaration component details
- Medicare Levy Variation component details
- Withholding Variation component details
- Payroll Tax Information component details
- Superannuation Guarantee Contribution component details
- Additional Employer Superannuation Contribution component details
- Employee Superannuation Contribution component details
- Card association
Excel Output Support for Payroll Reports
You can now configure the delivery option to generate the output of payroll reports in Excel format.
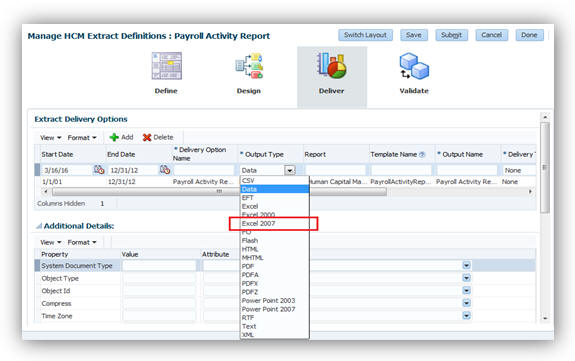
Excel Output Support for Payroll Reports
The following reports can be configured to generate the Excel output:
- Payroll Balance Report
- Payroll Activity Report
- Payroll Register
- Statutory Deduction Register
- Deduction Report
- Payment Register
- Gross-to-Net Report
- Third-Party Payment Register
Steps to Enable
Repeat these steps for each payroll report listed above, as necessary.
NOTE: Enabling Excel output for the Payment Register requires an additional step as noted below.
- In the Data Exchange work area, click the Manage Extract Definitions task.
- Search for and select the extract definition name for the payroll report to edit, as listed in this table.
- Open the report.
- Click the Deliver icon.
- Click Add to create a new row to point to your new template for Excel output.
- Enter a Start Date and End Date. For example, 1/1/01 and 12/31/4712.
- Enter the Delivery Option Name and the Output Name.
- Select Excel 2007 in the Output Type field.
- Enter the Report and Template Name field. Ensure that the .xdo file name you enter in the Report field and template name matches the name of your template, as given in the table below.
- Select the Delivery Type. For example, Documents of Record or Fax.
- Optionally, to override the default layout (PDF file), select the predefined delivery option of Excel output in the Overriding Delivery Mode field. This would result in only generating the Excel file.
- Otherwise, keep the default value to generate both the Excel and PDF files.
- Click Save.
- For the Payment Register, you must perform the following additional steps to add the report category details.
- In the Additional Details section, click Add.
- In the Deliver Output Name field, click Search.
- In the Search field, enter Extract Delivery Mode, and then click Search.
- Select Payment Register Results, and then click OK.
- Click Save.
- Click Submit.
| Report Name |
Extract Definition Name |
| Deduction Report |
Deduction Report |
| Gross-to-Net Report |
Gross to Net Summary Archive |
| Payment Register |
Global Payment Register |
| Payroll Activity Report |
Payroll Activity Report |
| Payroll Balance Report |
Payroll Run Result Report |
| Payroll Register |
Global Payroll Register |
| Statutory Deduction Register |
Statutory Deduction Register |
| Third-Party Payment Register |
Global Third Party Payment Register |
| Report Name |
XDO File |
Excel Template Name |
| Deduction Report |
/Human Capital Management/Payroll/Payroll Calculations/Deduction Report.xdo |
Deduction Report Results |
| Gross-to-Net Report |
/Human Capital Management/Payroll/Payroll Calculations/Gross to Net Summary Report.xdo |
Gross-to-Net Report Results |
| Payment Register Report |
/Human Capital Management/Payroll/Payroll Calculations/Payment Register.xdo |
Payment Register Results |
| Payroll Activity Report |
/Human Capital Management/Payroll/Payroll Calculations/Payroll Activity Report.xdo |
Payroll Activity Report Results |
| Payroll Balance Report |
/Human Capital Management/Payroll/Payroll Calculations/Payroll Balance Report.xdo |
Payroll Balance Report Results |
| Payroll Register Report |
/Human Capital Management/Payroll/Payroll Calculations/Payroll Register Report.xdo |
Payroll Register Results |
| Statutory Deduction Register |
/Human Capital Management/Payroll/Payroll Calculations/Statutory Deduction Register.xdo |
Statutory Deduction Register Results |
| Third-Party Payment Register |
/Human Capital Management/Payroll/Payroll Calculations/Third-Party Payment Register.xdo |
Third-Party Payment Register Results |
Dynamic Payroll Relationship Group Support for Payroll Activity Report
You can now specify a payroll relationship group as a submission parameter when running the Payroll Activity Report.

Payroll Relationship Group Flow Submission Parameter
A new formula type is available so you can create a formula with specific criteria to indicate whether to include a specific payroll relationship ID. Use the same formula for dynamically creating a payroll relationship group. You can then submit the report and the report will use the payroll relationship group derived by the formula. The formula type to use is named Payroll Relationship Group.

Payroll Relationship Group Formula Type
Steps to Enable
There are no steps necessary to enable this feature.
Tips and Considerations
The dynamic payroll relationship group parameter functionality works only for Payroll Activity Report with respect to payroll reporting. The relationship group is available for selection in several reports, but only the Payroll Activity Report displays results that use the dynamic payroll relationship group parameter functionality.
Void Payment Action in Prepayments
The Actions menu in the Prepayments Results section now includes the Void action. You view prepayments results for the Calculate Prepayments task and from there can make or void payments. For example, if an employee requested a replacement for a damaged check you can use the Void action to void the check and then use the Make Payment action to reissue another check.

New Action Menu Item for Void Payment
Steps to Enable
There are no steps necessary to enable this feature.
When you create a payroll definition or extend the number of years for it, the application automatically generates payroll periods. You can view these payroll periods on the Time Periods tab of the Manage Payroll Definitions page. The system-generated names are numbered in sequence based on the period type you selected when creating the payroll definition. You can now click the Edit button and revise the system-generated names as needed.

Edit System-Generated Payroll Period Names
Steps to Enable
There are no steps necessary to enable this feature.
Tips and Considerations
If you edit the payroll period names, ensure that they remain unique within the payroll definition.
Key Resources
For more information about payroll definitions, go to Applications Help for the following topic:
- Payroll Definitions: Explained
Information Balances in the Payroll Balance Report
You can now configure the balance group usage item to display information balances in the Payroll Balance Report.
To configure the balance group usage item:
Select the Manage Balance Group Usages task from the Payroll Calculation work area.
- Select Global Payroll Run Result Report (Payroll Balance Report) from the Report Type drop-down list.
- Select the desired legislative data group.
- Click Search. The search results display all the applicable balance group usages for the Payroll Balance Report.
- Select the Global Information Balances for Payroll Balance Report row and click the Edit icon.
- Select Matrix Items on the left panel, in the Balance Group Usage: Global Information Balances for Payroll Balance Report page.
- Click the Add icon to create a new matrix item.
- In the Matrix Item section, select the Balance Dimension matrix item type, select the name of the desired balance dimension, and enter a position value.
- Click Save.
- Click Submit.
Steps to Enable
There are no steps necessary to enable this feature.
Key Resources
For more information about the Payroll Balance Report, go to Applications Help for the following Topic:
- Payroll Calculation Report: Overview
Deduction Category and Deduction Parameters for Run Deduction Report
You can now run the Deduction Report for all deduction categories and deductions including the deduction balances you define. Use the Deduction Category and Deduction parameters to run the report for specific deduction categories or deductions.
Deduction Category and Deduction Parameters
Steps to Enable
There are no steps necessary to enable this feature.
Key Resources
For more information, go to Applications Help for the following topic:
- Deduction Report
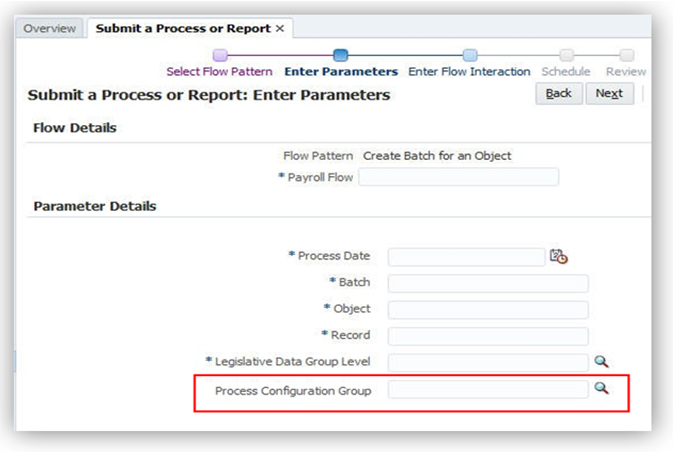
Additional Flow Parameter for Create Batch for an Object
You can now select a process configuration group when running the Create Batch for an Object process to migrate elements and formulas from one environment to another. The name you specify in the Process Configuration Group list enables any processing parameters that are defined for that group, such as logging.
Steps to Enable
There are no steps necessary to enable this feature.
Key Resources
For more information about balance exception reports, go to Applications Help for the following topics:
- Migrating Objects Using the Payroll Batch Loader: Procedure
- Payroll Batch Loader Task Actions for Migrating Elements: Explained
Enhancement for Generate Run Balances
Creating or updating balance definitions and balance feeds can impact balance calculations and stored balance values for run balance dimensions. When stored balance dimensions are no longer accurate, the Save Run Balances column on the Manage Balance Definitions page displays the status of the balance dimensions as invalid.
Reports and processes continue to obtain accurate values from the summed run results, but summing run results can slow performance. To improve performance you can recalculate the balance values by submitting the Generate Run Balances process from the Payroll Checklist or Payroll Calculation work areas.

Parameters you Complete When you Submit the Process
Steps to Enable
There are no steps necessary to enable this feature.
Tips and Considerations
If you select a single balance to include in the process, you must specify a balance and dimension name, or the process errors because of insufficient information.
Key Resources
For more information about balance exception reports, go to Applications Help for the following topic:
- Payroll Balance Definitions: Explained
Enhancement in Payroll Costing Report
You can now view the Accounting Date, Cost ID and Source ID in the Payroll Costing Report when the report is run with a Scope parameter of Detail Report. Processes, such as Calculate Payroll and QuickPay, will populate Accounting Date with Process Date and generate Cost ID.
Calculate Partial Period Accruals process will populate the accrual entry Accounting Date with Process Date, Accounting Date for reverse entries with the next Payroll Period End Date, and Source ID with the corresponding Cost ID from the related accrual entry.
Source ID is used to identify partial period reverse entries after the Calculate Partial Period Accrual process is run.
For example, Calculate Partial Period Accruals process for weekly payroll period ending 28-Jan-2011 processed on 31-Jan-2011 will populate the following:
- Accounting Date for accrual entry with Process Date of 31-Jan-2011
- Accounting Date for reverse entry with next Payroll Period End Date of 05-Feb-2011
- Source ID for the reverse entry with the Cost ID from the corresponding accrual entry
Steps to Enable
There are no steps necessary to enable this feature.
Batch Loader Tasks for Payroll Relationship Groups
The payroll batch loader supports four new task actions for object groups, which are described in the following table:
| Task |
Task Action |
Purpose |
| Object Group |
Create Payroll Relationship Group |
Create an object group to use when submitting a process for a subset of records. The object group categorizes people by payroll relationship |
| Delete Payroll Relationship Group |
Delete an existing payroll relationship group that is no longer needed. |
|
| Add Payroll Relationship Inclusions and Exclusions |
Add a relationship inclusion or exclusion to an existing payroll relationship group. |
|
| Remove Payroll Relationship Inclusions and Exclusions |
Remove a relationship inclusion or exclusion from an existing payroll relationship group. |
Steps to Enable
There are no steps necessary to enable this feature.
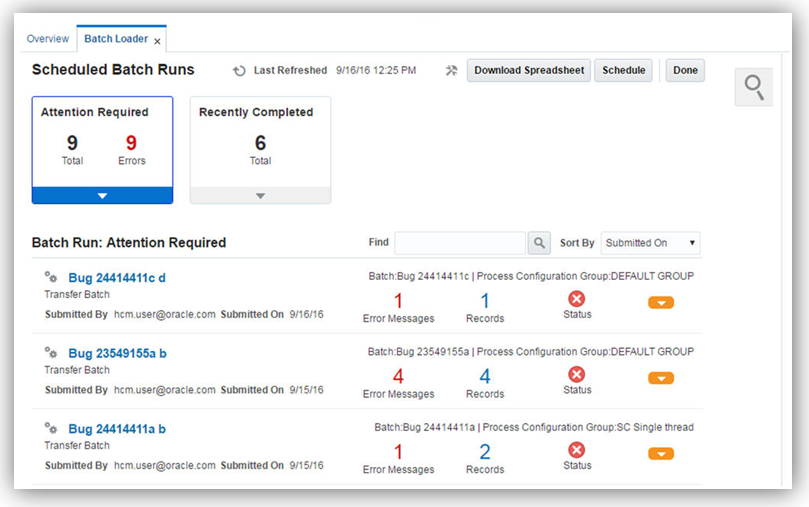
Enhanced Data Exchange Work Area
The enhanced Data Exchange work area enables you to submit, monitor, and troubleshoot processes and batches and to resolve the errors.
Apart from running extracts and batch loader processes, you can perform the following actions:
- Monitor the process runs, including the number and type of records processed, archived and extracted.
- Group process results by status, such as Completed and Requires Attention or by type of process.
- Download the log file, correct the erroneous processes, and resubmit them.
Steps to Enable
There are no steps necessary to enable this feature.
Key Resources
For more information, go to Applications Help for the following topics:
- Payroll Batch Loader Tasks: Explained
- Importing Data: Procedure
New Rules for Personal Payment Methods
Control conversion rules for the earnings elements, including standard, supplemental, absence, and time elements. You can select a conversion rule for periodicity, work units, and proration calculations. You can control the calculation and display of the work units; such as work hours or workdays in the payslip and the reports. You also have the flexibility to select Assignment Working Hours or Standard Working Hours for conversion calculations instead of automatically using the work schedule when one exists.
The element template lists the new rules for standard working hours, working hours, and work schedules, and includes a new question for proration units. The same rules are displayed for the periodicity, work units, and proration conversion rules.

Conversion Rules Used for Periodicity, Work Units, and Proration
This release renames the display names for the existing rate conversion rules. The base names and actual calculations remain the same, as shown in the following table.
| Base Names |
New Display Names |
Description |
Example |
| Annualized Rate Calculation |
Standard Rate Annualized |
Calculates the annual rate using the input periodicity and converts the amount to an output periodicity and rate. Uses default values, such as 2080 hours or 260 working days to calculate the annual rate. |
To convert a weekly amount to a semimonthly periodicity, the formula: 1. Multiplies the weekly amount by 52. 2. Divides the result by 24. |
| Daily Rate Conversion |
Standard Rate Daily |
Calculates the daily rate using the input periodicity and converts the amount to an output periodicity and rate. Uses a default value such as 260 working days a year to calculate the daily rate. |
To convert an annual amount to daily periodicity, the formula: 1. Divides the annual amount by 365. 2. Multiplies the result by the number of days in the payroll period. |
The new predefined rate conversion rules support the conversions described in the following table.
| Rate Conversion Rule |
Description |
Example |
| Standard Working Hours Rate Annualized |
Uses the employee’s standard working hours to convert the monetary value and working hours to an annual value before calculating the rate. |
Employee works 40 hours a week with a monthly salary of 1000 pounds: ((1000*12)/(40.00*52) = 5.77 an hour |
| Assignment Working Hours Rate Annualized |
Uses the employees working hours to convert the monetary value and working hours to an annual value before calculating the rate. |
Employee works 40 hours a week, with a 37.5 standard working hours a week, and a monthly salary of 1000 pounds:
|
| Periodic Work Schedule Rate Annualized |
Uses the employee’s work schedule for the payroll period for daily and hourly conversions. |
Employee has a monthly salary of 1000 pounds, and is assigned a monthly payroll. The formula checks the work schedule details for the month. For a daily conversion: 1000 a month/20 days in the month = 50 Note: For compensation calculations where the employee is not assigned a payroll, the rate is calculated using the weekly rate calculation. The amount is converted to an annual figure and divided by the number of days or hours in that week based on the work schedule. |
The following list summarizes the changes to the element template for periodicity, work units, and proration.
Periodicity
The conversion rule for periodicity applies to Flat Amount, Hours X Rate, and Days X Rate calculation rules. You can override the periodicity used as the default for the element definition at the element entry level.
Work Units
The Work Units conversion rule applies only to flat amount calculation rules for standard and supplemental earnings elements.
The selection of which work units to use in reports and payslips determines the conversion calculation. The application creates the element input values using the default values of the rate conversion formulas. In this example, the employee is on a semi-monthly payroll that has 24 payroll periods in a year.
| Work Units Selected |
Example |
| Hours |
2080/24 = 86.67 |
| Days |
260/24 = 10.83 |
| None |
No input values are created |
Proration
The element template includes a new question for proration units. Proration rate conversion rules replace the previous proration methods in the element template. You have greater flexibility, for example, to base proration on calendar days when using work units for conversion.
There are no steps necessary to enable this feature.
If the conversion rules do not meet your requirements, you can copy and edit the rules using the Manage Fast Formulas task in the Payroll Calculation work area.
- Create a customized formula for periodicity or work units using the Rate Conversion formula type.
- Create a related formula to manage proration using the Payoll Run Proration formula type. End the formula with underscore PRORATE. This naming convention ensures that the customized proration formula is called by the predefined proration formula GLB_EARN_PRORATION.
For example, for periodicity you might create the formula Vision Conversion Rate formula, and its related proration formula Vision Conversion RATE_PRORATE.
For more information about values defined by criteria, go to Applications Help for the following topics:
- Conversion Formulas for Proration: Procedure
- Customizing Periodicity Conversion Rules: Procedure
Excel Output Support for Payroll Reports
You can now configure the delivery option to generate the output of payroll reports in Excel formats.

You can configure the following payroll reports to generate an Excel output:
- Payroll Balance Report
- Payroll Activity Report
- Payroll Register
- Statutory Deduction Register
- Deduction Report
- Payment Register
- Gross-to-Net Report
- Third-Party Payment Register
Steps to Enable
Repeat these steps for each payroll report listed above, as necessary.
NOTE: Enabling Excel output for the Payment Register requires additional steps as given below.
- In the Data Exchange work area, select the Manage Extract Definitions task.
- Search for and select the extract definition name for the payroll report to edit, as listed in this table.
- Open the Report.
- Click the Deliver icon.
- Click Add to create a new row to point to the new template for the Excel output.
- Enter a Start Date and End Date. For example, 1/1/01 and 12/31/4712.
- Enter the Delivery Option Name and the Output Name.
- Select Excel 2007 in the Output Type field.
- Enter the Report and Template Name. Ensure that the .xdo file name you enter in the Report field and template name matches the name of your template, as given in the table below.
- Select the Delivery Type. For example, Documents of Record or Fax.
- Optionally, to override the default layout (PDF file), select the predefined delivery option of Excel output in the Overriding Delivery Mode field. This would result in only generating the Excel file.
- Otherwise, keep the default value to generate both the Excel and PDF files.
- Click Save.
- For the Payment Register, you must perform the following additional steps to add the report category details.
- In the Additional Details section, click Add.
- In the Deliver Output Name field, click Search.
- In the Search field, enter Extract Delivery Mode, and then click Search.
- Select Payment Register Results, and then click OK.
- Click Save.
- Click Submit.
| Report Name |
Extract Definition Name |
| Deduction Report |
Deduction Report |
| Gross-to-Net Report |
Gross-to-Net Summary Archive |
| Payment Register Report |
Global Payment Register |
| Payroll Activity Report |
Payroll Activity Report |
| Payroll Balance Report |
Payroll Run Result Report |
| Payroll Register Report |
Global Payroll Register |
| Statutory Deduction Register |
Statutory Deduction Register |
| Third-Party Payment Register |
Global Third Party Payment Register |
| Report Name |
Excel Template Name |
| Deduction Report |
Deduction Report Results |
| Gross-to-Net Report |
Gross-to-Net Report Results |
| Payment Register Report |
Payment Register Results |
| Payroll Activity Report |
Payroll Activity Report Results |
| Payroll Balance Report |
Payroll Balance Report Results |
| Payroll Register Report |
Payroll Register Results |
| Statutory Deduction Register |
Statutory Deduction Register Results |
| Third-Party Payment Register |
Third-Party Payment Register Results |
Enhanced Calculation Rules for Earnings Elements
Using the Payroll User Interface Configuration user-defined table, you can create formulas to customize personal payment method preferences. For example, prevent your employees from editing personal payment methods that are attached to a specific account type or organization payment method.
The following two rules for Personal Payment Methods have been added:
| Rule Name |
Purpose |
| Execute Personal Payment Method Validation |
Enables validations for personal payment methods that meet the criteria set in the formula. For example, an employee can only create one personal payment method with the Pay Card account type. |
| Prevent Edit Personal Payment Method |
Prevents employees from modifying any personal payment method details that meet the criteria set in the formula, such as when the account type is equal to Pay Card. |

Two Rules for Personal Payment Methods
There are no steps necessary to enable this feature.
Key Resources
For more information about personal payment methods, go to Applications Help for the following topics:
- Configuring Payment Method Preferences: Procedure
- Payroll User Interface Configuration Formula Type
New Task Action for PBL: Customize Bank Account Details
Using the new Customize Bank Account Details Payroll Batch Loader task action, you can customize fields on the Create Bank Account region by displaying preferred fields, changing a field to be required or modifying the label of a field.

US Default Create Bank Account Region Shown Here with No Customizations
The Customize Bank Account Details task action allows you to perform these four changes to the Create Bank Account region. These changes may be performed separately or together.
- Display a hidden field
- Hide an optional field
- Make an optional field required
- Change the field label prompt
NOTE: A field that is delivered as required entry cannot be customized to be optional and a field that is delivered as required to be displayed and cannot be customized to be hidden.
The following six table fields are available while using this new Payroll Batch Loader task action to customize. The first three are required to identify the field and page you want to customize; the last three indicate the type of customization. If no data is provided for Label, Required or Displayed, the default value for the page gets stored for the field.
| Payroll Batch Loader Fields |
Table Field |
Description |
Options Available, Where Applicable |
| *Country Code |
COUNTRY_CODE |
Identifies the country for which the rule applies |
For example, US for United States |
| *Field |
ATRBIBUTE_NAME |
Identifies the field to be customized. |
ACCOUNT_NAME |
| *Page |
PAGE_NAME |
Identifies the page to be customized. |
FUSE |
| Label |
LABEL_CODE |
Identifies label to be customized. Note: In order for an attribute to have a custom label, it must exist as a lookup code in the ORA_EXTERNAL_ACCOUNT_LABELS look up table. This lookup is user extensible for the user to create custom lookups based on their label requirements. |
See label creation steps below |
| Required |
REQUIRED_FLAG |
Identifies the attribute as required or not. |
Y |
| Displayed |
DISPLAY_FLAG |
Identifies the attribute as displayed or not, |
Y |
Label Creation Steps
- Create label codes in the Setup and Maintenance work area
- Search for Manage Cash Management Lookups
- Click Manage Cash Management Lookups link in returned search list.
- Search for “ORA_EXTERNAL_ACCOUNT_LABELS” lookup type.
- Click plus icon to add a new lookup code.
- Enter values into available fields. For example, enter BRANCH_NAME_LABEL into Lookup Code field and Branch into Meaning field.
- Click Save and Close button to save information.


NOTE: Meaning is the information displayed on the Create Bank Account region.
Steps to Enable
There are no steps necessary to enable this feature.
Key Resources
For more information about personal payment methods, go to Applications Help for the following topics:
- Importing Data Using the Payroll Batch Loader: Explained
Enhance Payroll Costing Report
Payroll costing report is enhanced to display the element primary classification in report output when the report is run in “Detail” scope. This data helps in verifying the total payroll costs by element classification, such as earnings cost, voluntary deductions cost and tax deductions cost.
This element classification column has been added in GLB_PAY_COST_DETAIL_UE user entity as well.
Steps to Enable
There are no steps necessary to enable this feature.
Settlement Date for Deduction Element Entry
Payroll run uses the Date Earned to stop the processing of a recurring entry by populating the date earned value in the Settlement Date field. A stop rule can be based on reaching a specified accumulator, such as a balance owed of zero.
The entries do not have an end date, but are stopped from further processing. This supports retroactive processes that do not apply the stop rule in the same period. The target element must be defined with Allow Multiple Entries selected. This enables you to allocate a new entry once the value of an existing entry has reached zero.

Settlement Date
Steps to Enable
There are no steps necessary to enable this feature.
Payroll Costing Report by Element Classification
This enhancement to the detail scope of the Payroll Costing Report displays the primary element classification in report output. The addition of this data item to the report allows total payroll costs verification by element classification, such as earnings cost, voluntary deductions cost and tax deductions cost.
Steps to Enable
There are no steps necessary to enable this feature.
Oracle Fusion HRMS (Canada) supports country specific features and functions for Canada. It enables users to follow Canada’s business practices and comply with its statutory requirements.
End-of-Year Reporting: Amendments for T4, T4A, And RL-1
Canada’s functionality for the federal year-end slips T4 and T4A was amended, as well as the provincial year-end slip RL-1, that are issued to the employees and the respective government agencies.
The T4 is the Federal Statement of Remuneration Paid for reporting an employee’s employment income, statutory deductions and other information required by Canada Revenue Agency (CRA). The T4A slip is the Statement of Pension, Retirement, Annuity, and Other Income used to report these types of incomes to the Canada Revenue Agency (CRA). You must submit these forms to the CRA at the end of every tax year. The RL-1 slip is a provincial year-end form for reporting an employee’s employment income, statutory deductions and other information required by Revenu Quebec. At the end of every tax year you must submit RL-1 slip information to Revenu Quebec. You must also provide these slips to your employees for tax filing purposes.
If corrections are made after the T4, T4A, or RL-1 is distributed, amended slips are issued. The amended slip is provided to the employee, as well as reported to the government.
It is important to process the steps to generate the amended slips in a specific order. Once the original PDF and interface processes are complete, the steps are as follows:
- Payroll process is complete.
- Archive End-of-Year Payroll Results process is complete.
- End-of-Year Register Report process for the original is complete.
- End-of-Year Reports process to generate the original year-end PDF is complete.
- End-of-Year Reports process to generate the year-end interface for the original is complete.
- Process the correction to the employee record. This can be a balance adjustment or payroll process.
- Run the Archive End-of-Year Payroll Results process for the amended employee.
- Generate the End-of-Year Register Report for the amendment.
- Run the End-of-Year Reports process to generate the amended year-end PDF.
- Run the End-of-Year Reports process to generate the amended year-end interface.
Steps to Enable
There are no steps necessary to enable this feature.
Tips and Considerations
When performing amendments for the employee, please note the following tips:
- If you perform a YTD adjustment to amend a year-end slip after the original PDF and interface is processed, the date of the YTD adjustments for the prior year must be “12/31/XX”, where XX denotes the affected year. The balance adjustment is processed using the results element that feeds the year-end balance. Ensure that the eligibility exist for the results element.
- The file name of the T4, T4A, and RL-1 registers and PDFs distinguish if it is an original or amended version.
- The header of the register indicates if it is an original or amended version.
- The PDFs follow government guidelines to distinguish if it is an original or amended version
- The RL-1 includes the original slip number from the original archive and reports it on the amended version of the PDF and interface file.
Involuntary Deductions: Protected Pay Rules
Oracle Fusion Human Capital Management for Canada provides additional functionality to the protected pay rules for involuntary deductions.
With this release we have enhanced how the protected pay processing will occur within involuntary deductions of the same deduction type (for example, multiple garnishments), as well as across the different deduction types (Garnishment, Maintenance and Support, and Tax Levy).
You can configure protected pay rules for each deduction. The payroll process will now determine the highest value derived for protected pay within each deduction type and apply that value to all other deductions of that same deduction type.
For example, in the case where multiple garnishments are configured with different rules, one with a protected pay percentage of 40% and the other with 50%, the higher percentage of 50% will be applied as the protected pay percentage for both garnishments for the employee. In the same way, you could have an entry for one garnishment with a protected pay amount of $300 and a protected pay percentage of 50%. In this case, both protected pay entries are used to calculate the highest value of the two, and compare this to other garnishment entries to come up with a final protected pay value for garnishments.
If the deduction types are different, the payroll process will no longer apply the highest protected pay across deduction types. Each deduction type will determine its own protected pay value.
The order in which elements are processed (as determined by the sub processing order) also impacts the protected pay. If a Maintenance and Support deduction is processed first, that deduction will impact how much of the disposable income is available for subsequent deductions processed.
For example, in the case where a Maintenance and Support deduction is configured with a protected pay percentage of 50% and a subprocessing order of 1, and a Garnishment deduction is configured with a percentage of 80% and a subprocessing order of 2, the disposable income remaining for the garnishment is affected by the first calculation of protected pay of the Maintenance and Support deduction. There may not be enough disposable income left to guarantee the 80% protected pay rule, so no Garnishment deduction would happen.
The protected pay amount calculated for the deduction is displayed in the run results for the Results element.
Any amounts in arrears will also observe the protected pay limits.
The protected pay rules are configured on the involuntary deduction card for the employee, defined as a value definition within the Edit Calculation Values list of values.
Steps to Enable
There are no steps necessary to enable this feature.
End-of-Year Reporting: End-of-Year Exception Report
Canada end-of-year exception report facilitates year-end reconciliation and provides the ability to respond to any deficiencies for Canada Pension Plan (CPP), Quebec Pension Plan (QPP), Employment Insurance (EI), and Quebec Parental Insurance Plan (QPIP) reported in the year-end slips or other government reports.
This report displays data from the End-of-Year Archive, with the exception of the name and address of the employee and the employer. It reports exception conditions for the T4, T4A, RL-1, and RL-2.
Before you run the end-of-year exception report, you must complete the following activities:
- Payroll process
- Archive End-of-Year Payroll Results process
Use the Run End-of-Year Reports task from the Regulatory and Tax Reporting work area to generate the End-of-Year Exception Report. Parameters for the exception report process are:
- Flow Pattern: Select Run End-of-Year Reports.
- Payroll Flow: Provide a name for the payroll flow.
- Tax Report Year: Select the 4-digit tax year of the report.
- Year End Report: Select T4, T4A, RL-1 or RL-2.
- Report Type: Select Original, Amended or Cancelled. The exception report is based on the latest archive.
- Format: Select Exception Report.
- Transmitter: Select a transmitter if you want to run the report by transmitter.
- Tax Reporting Unit: Select a TRU if you want to run the report by TRU.
- Payroll Relationship Group: Select the payroll relationship group name, if you have defined one. You must use the Manage Object Groups task to define the payroll relationship group before you can select it here.
- Province: Select a province if you want to generate the report for a specific province.
- Print Employer Address: Does not apply to the exception report.
- Print Instructions: Does not apply to the exception report.
- Sort Option One: Select Location, Payroll or Province.
- Sort Option Two: Select Location, Payroll or Province. The value presented to the user for selection is dynamically changed depending on what the user selected in the previous Sort Option parameter.
- Sort Option Three: Select Location, Payroll or Province. The value presented to the user for selection is dynamically changed depending on what the user selected in the previous Sort Option parameter.
- Copyright Message: This field is used to hold a copyright message for the PDF format of T4 and T4A slips. It is not reported on the actual slips. Does not apply to the exception report.
- Process Configuration Group: Select the process configuration group name, if you have defined any. This field is used for logging and reporting purposes. You must use the Manage Payroll Process Configuration task to define the process configuration group before you can select it here.
After you run the end-of-year exception report, you must review the output. If there are exceptions met, the report will display those exception messages on the report. Exceptions are reported for transmitter, employer, or employee data. Before continuing on with the end-of-year process, you must correct the data as required.
Steps to Enable
There are no steps necessary to enable this feature.
Tips and Considerations
The following exception conditions are reported for each slip for transmitter, employer and employee information:
| T4 Transmitter Exceptions |
| The Transmitter Name is missing on the T4 Interface Rules. |
| The Transmitter Name on the T4 Interface Rules contains more than 30 characters and will be reported as per the specific report requirements. |
| The Transmitter City is missing on the T4 Interface Rules. |
| The Transmitter Province is missing on the T4 Interface Rules. |
| The Transmitter Postal Code is missing on the T4 Interface Rules. |
| The Transmitter Contact Name is missing on the T4 Interface Rules. |
| The Transmitter Contact Name on the T4 Interface Rules contains more than 22 characters and will be truncated on the electronic interface file. |
| The Transmitter Contact Area Code is missing on the T4 Interface Rules. |
| The Transmitter Contact Phone Number is missing on the T4 Interface Rules. |
| The Language of Communication Indicator is missing on the T4 Interface Rules. |
| T4 Employer Exceptions |
| The Legal Reporting Unit Registered Name contains more than 30 characters and will be reported as per the specific report requirements. |
| The Payroll Account Number is missing or is invalid on the Legal Entity Registration Information. |
| The Payroll Account Number on the Legal Entity Registration Information contains more than 15 characters and will be truncated on the electronic interface file. |
| The Proprietor 1 Social Insurance Number is invalid on the T4 Interface Rules. |
| The Proprietor 2 Social Insurance Number is invalid on the T4 Interface Rules. |
| The Contact Name for this Return is missing on the T4 Interface Rules. |
| The Contact Name for this Return on the T4 Interface Rules contains more than 22 characters and will be truncated on the electronic interface file. |
| The Contact Area Code is missing on the T4 Interface Rules. |
| The Contact Phone Number is missing on the T4 Interface Rules. |
| T4 Employee Exceptions |
| The First Name of the employee is missing on the person record. |
| The Last Name of the employee on the person record contains more than 20 characters and will be truncated on the electronic interface file. |
| The Address Line 1 of the employee is missing on the person record. |
| The Address Line 1 of the employee on the person record contains more than 30 characters and will be reported as per the specific report requirements. |
| The Social Insurance Number of the employee is missing on the person record. |
| The Social Insurance Number of the employee has expired on the person record. The Expiration Date of the Social Insurance Number is <SIN EXP DATE>. |
| One or more negative balances exist for the employee. |
| No box balance values exist for the employee. |
| The employee is designated as CPP Exempt on the employee's tax calculation card. |
| The employee is designated as EI Exempt on the employee's tax calculation card. |
| The employee has CPP deductions over the annual limit. |
| The employee has EI deductions over the annual limit. |
| The employee turned 18 years of age during the reporting year. The Date of Birth on the person record is <DOB>. |
| The employee turned 70 years of age during the reporting year. The Date of Birth on the person record is <DOB>. |
| The employee was hired during the reporting year. The Hire Date on the person record is <HD>. |
| The employee was terminated during the reporting year. The Termination Date on the employee's work relationship record is <HD>. |
| The employee has worked in multiple provinces during the reporting year, as defined on the calculation card of the employee. |
| The employee has a CPP Election Date of <date> on the employee's tax calculation card. |
| The employee has a CPP Revocation Date of <date> on the employee's tax calculation card. |
| The expected and actual CPP deductions do not match. <calc table> |
| The expected and actual EI deductions do not match. <calc table> |
| T4A Transmitter Exceptions |
| The Transmitter Name is missing on the T4A Interface Rules. |
| The Transmitter Name on the T4A Interface Rules contains more than 30 characters will be reported as per the specific report requirements. |
| The Transmitter City is missing on the T4A Interface Rules. |
| The Transmitter Province is missing on the T4A Interface Rules. |
| The Transmitter Postal Code is missing on the T4A Interface Rules. |
| The Transmitter Contact Name is missing on the T4A Interface Rules. |
| The Transmitter Contact Name on the T4A Interface Rules contains more than 22 characters and will be truncated on the electronic interface file. |
| The Transmitter Contact Area Code is missing on the T4A Interface Rules. |
| The Transmitter Contact Phone Number is missing on the T4A Interface Rules. |
| The Language of Communication Indicator is missing on the T4A Interface Rules. |
| T4A Employer Exceptions |
| The Legal Reporting Unit Registered Name contains more than 30 characters and will be reported as per the specific report requirements. |
| The Payroll Account Number is missing or is invalid on the Legal Entity Registration Information. |
| The Payroll Account Number on the Legal Entity Registration Information contains more than 15 characters and will be truncated on the electronic interface file. |
| The Proprietor 1 Social Insurance Number is invalid on the T4A Interface Rules. |
| The Proprietor 2 Social Insurance Number is invalid on the T4A Interface Rules. |
| The Contact Name for this Return is missing on the T4A Interface Rules. |
| The Contact Name for this Return on the T4A Interface Rules contains more than 22 characters and will be truncated on the electronic interface file. |
| The Contact Area Code is missing on the T4A Interface Rules. |
| The Contact Phone Number is missing on the T4A Interface Rules. |
| T4A Employee Exceptions |
| The First Name of the recipient is missing on the person record. |
| The Last Name of the recipient on the person record contains more than 20 characters and will be truncated on the electronic interface file. |
| The Address Line 1 of the recipient is missing on the person record. |
| The Address Line 1 of the recipient on the person record contains more than 30 characters and will be reported as per the specific report requirements. |
| The Social Insurance Number of the recipient is missing on the person record. |
| The Social Insurance Number of the employee has expired on the person record. The Expiration Date of the Social Insurance Number is <SIN EXP DATE>. |
| One or more negative balances exist for the recipient. |
| No box balance values exist for the recipient. |
| RL-1 Transmitter Exceptions |
| The Transmitter Name is missing on the RL-1 Interface Rules. |
| The Transmitter Name on the RL-1 Interface Rules contains more than 30 characters and will be reported as per the specific report requirements. |
| The Source of RL Slips Used is missing on the RL-1 Interface Rules. |
| The Transmitter Address Line 1 is missing on the RL-1 Interface Rules. |
| The Transmitter City is missing on the RL-1 Interface Rules. |
| The Transmitter Province is missing on the RL-1 Interface Rules. |
| The Transmitter Postal Code is missing on the RL-1 Interface Rules. |
| The Computer Resource Person Name is missing on the RL-1 Interface Rules. |
| The Computer Resource Person Name on the RL-1 Interface Rules contains more than 30 characters and will be truncated on the electronic interface file. |
| The Computer Resource Person Area Code is missing on the RL-1 Interface Rules. |
| The Computer Resource Person Phone Number is missing on the RL-1 Interface Rules. |
| The Computer Resource Person Language is missing on the RL-1 Interface Rules. |
| The Accounting Resource Person Name is missing on the RL-1 Interface Rules. |
| The Accounting Resource Person Name on the RL-1 Interface Rules contains more than 30 characters and will be truncated on the electronic interface file. |
| The Accounting Resource Person Area Code is missing on the RL-1 Interface Rules. |
| The Accounting Resource Person Phone Number is missing on the RL-1 Interface Rules. |
| The Accounting Resource Person Language is missing on the RL-1 Interface Rules. |
| The Starting RL-1 Slip Number is missing on the RL-1 Interface Rules. |
| The Ending RL-1 Slip Number is missing on the RL-1 Interface Rules. |
| RL-1 Employer Exceptions |
| The Quebec Identification Number is missing or is invalid on the Legal Entity or the Legal Reporting Unit Registration Information. |
| The Legal Reporting Unit Registered Name contains more than 30 characters and will be reported as per the specific report requirements. |
| RL-1 Employee Exceptions |
| The First Name of the employee is missing on the person record. |
| The Last Name of the employee on the person record contains more than 30 characters and will be truncated on the electronic interface file. |
| The Address Line 1 of the employee is missing on the person record. |
| The Address Line 1 of the employee on the person record contains more than 30 characters and will be reported as per the specific report requirements. |
| The Social Insurance Number of the employee is missing on the person record. |
| The Social Insurance Number of the employee has expired on the person record. The Expiration Date of the Social Insurance Number is <SIN EXP DATE>. |
| One or more negative balances exist for the employee. |
| No box balance values exist for the employee. |
| The employee is designated as QPP Exempt on the employee's tax calculation card. |
| The employee is designated as QPIP Exempt on the employee's tax calculation card. |
| The employee has QPP deductions over the annual limit. |
| The employee has QPIP deductions over the annual limit. |
| The employee turned 18 years of age during the reporting year. The Date of Birth on the person record is <DOB>. |
| The employee was hired during the reporting year. The Hire Date on the person record is <HD>. |
| The employee was terminated during the reporting year. The Termination Date on the employee's work relationship record is <HD>. |
| The employee has worked in multiple provinces during the reporting year, as defined on the calculation card of the employee. |
| The expected and actual QPP deductions do not match. <calc table> |
| The expected and actual QPIP deductions do not match. <calc table> |
| RL-2 Transmitter Exceptions |
| The Transmitter Name is missing on the RL-2 Interface Rules. |
| The Transmitter Name on the RL-2 Interface Rules contains more than 30 characters and will be reported as per the specific report requirements. |
| The Source of RL Slips Used is missing on the RL-2 Interface Rules. |
| The Transmitter Address Line 1 is missing on the RL-2 Interface Rules. |
| The Transmitter City is missing on the RL-2 Interface Rules. |
| The Transmitter Province is missing on the RL-2 Interface Rules. |
| The Transmitter Postal Code is missing on the RL-2 Interface Rules. |
| The Computer Resource Person Name is missing on the RL-2 Interface Rules. |
| The Computer Resource Person Name on the RL-2 Interface Rules contains more than 30 characters and will be truncated on the electronic interface file. |
| The Computer Resource Person Area Code is missing on the RL-2 Interface Rules. |
| The Computer Resource Person Phone Number is missing on the RL-2 Interface Rules. |
| The Computer Resource Person Language is missing on the RL-2 Interface Rules. |
| The Accounting Resource Person Name is missing on the RL-2 Interface Rules. |
| The Accounting Resource Person Name on the RL-2 Interface Rules contains more than 30 characters and will be truncated on the electronic interface file. |
| The Accounting Resource Person Area Code is missing on the RL-2 Interface Rules. |
| The Accounting Resource Person Phone Number is missing on the RL-2 Interface Rules. |
| The Accounting Resource Person Language is missing on the RL-2 Interface Rules. |
| The Starting RL-2 Slip Number is missing on the RL-2 Interface Rules. |
| The Ending RL-2 Slip Number is missing on the RL-2 Interface Rules. |
| RL-2 Employer Exceptions |
| The Quebec Identification Number is missing or is invalid on the Legal Entity or the Legal Reporting Unit Registration Information. |
| The Legal Reporting Unit Registered Name contains more than 30 characters and will be reported as per the specific report requirements. |
| RL-2 Employee Exceptions |
| The First Name of the employee is missing on the person record. |
| The Last Name of the employee on the person record contains more than 30 characters and will be truncated on the electronic interface file. |
| The Address Line 1 of the employee is missing on the person record. |
| The Address Line 1 of the employee on the person record contains more than 30 characters and will be reported as per the specific report requirements. |
| The Social Insurance Number of the employee is missing on the person record. |
| The Social Insurance Number of the employee has expired on the person record. The Expiration Date of the Social Insurance Number is <SIN EXP DATE>. |
| One or more negative balances exist for the employee. |
| No box balance values exist for the employee. |
| The RL-2 Source of Income is missing on the RL-2 Interface Rules. |
End-of-Year Reporting (RL-2 Only)
Oracle Fusion Human Capital Management for Canada offers a comprehensive process to generate the RL-2 year-end slip.
The RL-2 slip is a provincial year-end form for reporting a pensioner’s retirement and annuity income. You must submit the RL-2 slip information to Revenu Québec at the end of every tax year. You must also provide the slips to your pensioners for tax filing purposes.
End-of-year processing for the RL-2 slip includes the following activities:
- Configuration for Québec
- Configuring the Québec Enterprise Number (optional).
- Ensuring Quebéc Provincial Tax registration information is configured for each tax reporting unit (TRU) that has pensioners in Québec.
- Setting up TRU transmitter information for Québec reporting.
- Setting up balance feeds for the boxes and other information codes.
- Using the Archive End-of-Year Payroll Results task from the Regulatory and Tax Reporting work area to generate and view the results of the end-of-year archive for RL-2 information. The End-of-Year Reports processes uses the archived payroll run results to generate pensioner details required for the RL-2.
- Using the Run End-of-Year Reports task from the Regulatory and Tax Reporting work area to generate the End-of-Year Exception Report for the RL-2 and view its output.
- Using the Run End-of-Year Reports task from the Regulatory and Tax Reporting work area to generate the RL-2 register and view its output in Excel.
- Using the Run End-of-Year Reports task from the Regulatory and Tax Reporting work area to generate the RL-2 PDF and view its output.
- Using the Run End-of-Year Reports task from the Regulatory and Tax Reporting work area to generate the RL-2 electronic interface and view its output.
Payments reported on the RL-2 are elements with a secondary classification reporting type of T4A/RL2.
Use the Manage Legal Reporting Unit HCM Information task in the Setup and Maintenance work area to set up the transmitter information for reporting of RL-2 data.
Use the Run End-of-Year Reports task to generate the register report and review pensioner information, as well as verify the box balances.
Use the Run End-of-Year Reports task from the Regulatory and Tax Reporting work area to generate the RL-2 slip.

Steps to Enable
There are no steps necessary to enable this feature.
Tips and Considerations
Enter the Québec Provincial Tax registration at the payroll statutory unit (PSU) level if the Québec Identification Number applies to more than one TRU. Enter the registration at the TRU level if there is only one TRU within the PSU, or if you are overriding the default entry entered at the PSU level.
The registered name can be entered in either the Registered Name or the Alternate Name field. The user can choose to enter something unique in the Registered Name field to distinguish multiple registrations in the LOVs. If the Alternate Name is populated, the Alternate Name entered will be displayed on the RL-2 slips and in the interface file. If it is not populated, the Registered Name will be displayed.
Oracle Fusion HRMS (China) supports country specific features and functions for China. It enables users to follow China’s business practices and comply with its statutory requirements.
New Rounding Methods for Social Security and Enterprise Annuity Calculation
Comply with statutory requirements by adding three rounding down methods for social security and enterprise annuity calculations:
- Round down to nearest yuan
- Round down to nearest jiao
- Round down to nearest cent
Setup is required to use the new rounding methods in social security and enterprise annuity calculation.
- Search for a project with the Workforce Deployment offering.
- Open the Define Legal Entities for Human Capital Management functional area.
- Select the payroll statutory unit you would like to work with.
- Click the Go to Task icon against the Manage Legal Entity Calculation Cards task.
- Select the Statutory Deductions card.
- Select a social security item or enterprise annuity.
- Select the rounding down method to use in contribution base and amount calculation.
The rules set up at payroll statutory unit calculation card level apply to all organizations operating in one territory for a social security item and contribution type. However, the contribution amount rounding rules can be overridden by rules set up at tax reporting unit calculation card level by using the Manage Legal Reporting Unit Calculation Cards task, which are rules specific to an organization.
Simplify the report by running against run results rather than balances. For more information about the report, please refer to the Element Result Report Changes in the Global Payroll section.
There are no steps necessary to enable this feature.
Oracle Fusion HMS (Kuwait) supports Kuwait-specific features and functionality. It enables users to follow Kuwait’s business practices and comply with its statutory requirements.
Statutory Reporting: Update to Report 166 – Monthly Contributions
The monthly report that contains details of the total social insurance payments for an employer is updated to include Additional Social Insurance contributions.
There are no steps necessary to enable this feature. You can run this report from the Regulatory and Tax Reporting work area.
Ensure that an element for Additional Social Insurance is created before you run the report.
For more information about this report, go to Application Help, for the following topic:
- Statutory Reports for Kuwait
When you select Human Resources or Payroll Interface as the selected extension in the Manage Features by Country or Territory page, you can create a payroll definition with a Biweekly period type.
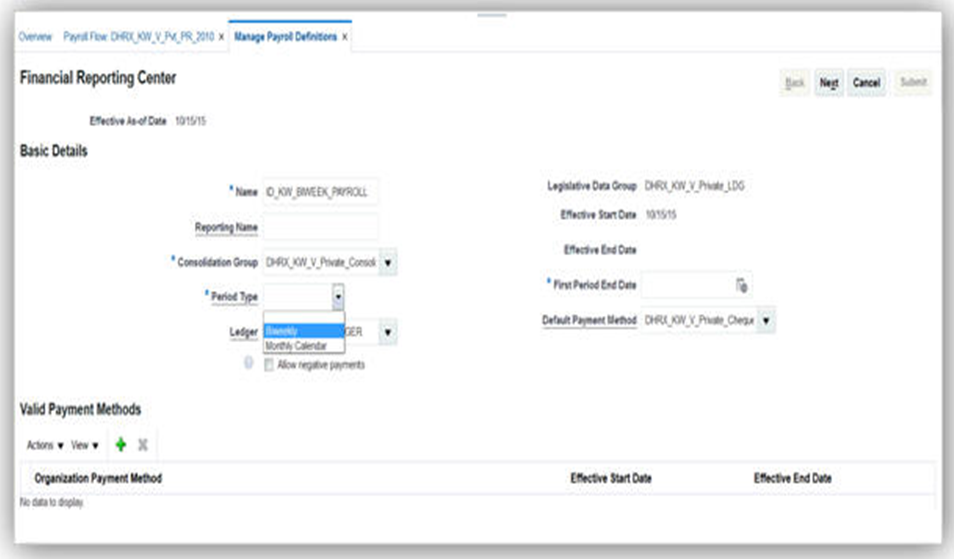
Biweekly Period Type in Manage Payroll Definition Page
IMPORTANT: You cannot create a biweekly payroll definition, if Payroll is the selected extension for your legislation.
There are no steps necessary to enable this feature.
Monthly Gratuity Accrual Process Updates
When you run the Payroll Calculation process, you can view the accrued gratuity amount in the Information region of the statement of earnings. If a user-created formula is used to calculate the gratuity payment on termination, then the same formula is used for calculating the monthly accrued gratuity amount.

Accrued Gratuity Amount in the Information Region of the Statement of Earnings
Before you verify the accrued gratuity in the statement of earnings, ensure to perform the following:
- Create the element eligibility link for the gratuity accrual initiator.
- Associate the gratuity accrual initiator to the employee through the element entry.
- Associate the formula to calculate the reference salary with the Employer Gratuity Deduction card.
Run the Payroll Calculation process and verify the results for the gratuity amount for the period and the accrued gratuity.
When you enter the Employer Reference Formula in the Employer Gratuity Deduction card, the formula must use the variable, PAID_GRATUITY. This overrides the gratuity amount calculated by the default formula.
Social Insurance 2015 Enhancement
A new component for gratuity contributions has been added to the social insurance calculation. The additional employee contribution is applicable to all Kuwaiti workers employed in the Private sector and some Government sector workers, depending on their hire date. Employers can record whether or not they are going to pay the gratuity amount due to an employee on termination. In addition, they can record whether an employee has received a gratuity payment in the past, and the date when that payment was received.
The payroll process uses this information to determine whether or not gratuity contributions are to be deducted as part of the social insurance calculation.

Employer Gratuity Card

Employee Social Insurance Card
Steps to Enable
There are no steps necessary to enable this feature.
Social Insurance Calculation for Fully State Owned Oil Companies
Employers can utilize specific employer sectors to ensure that appropriate social insurance deductions are being calculated for their employees. Oil sector has now been added as an employer sector, and additional rates, elements and balances have been delivered to calculate oil sector employee and employer contributions.
The payroll process calculates social insurance for both employees and employers based on the employer sector, and if gratuity contributions are to be deducted as part of the social insurance calculation.
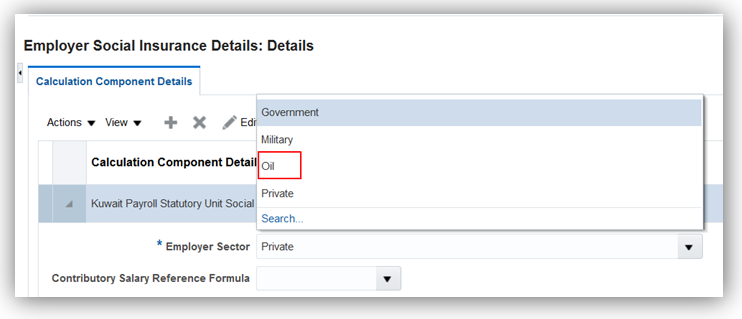
Employer Social Insurance Card

Employer Gratuity Card

Employee Social Insurance Card
Steps to Enable
There are no steps necessary to enable this feature.
Oracle Fusion HRMS (Saudi Arabia) supports Saudi Arabia-specific features and functionality. It enables users to follow Saudi Arabia’s business practices and comply with its statutory requirements.
The Wage Protection System report tracks the amounts that need to be paid to the employees. Only employees with a Personal Payment Method of type EFT will be reported on the Wage Protection System report. Submit the report to the Wage Protection Agent at the end of each period. The banks process the report for crediting wages to the employees.
There are no steps necessary to enable this feature. Ensure that Payroll Run, Prepayment, and Archiver processes are run and complete for the payroll period.
When you select Human Resources or Payroll Interface as the selected extension in the Manage Features by Country or Territory page, you can create a payroll definition with a Biweekly period type.

Biweekly Period Type in Manage Payroll Definition Page
IMPORTANT: You cannot create a biweekly payroll definition, if Payroll is the selected extension for your legislation.
There are no steps necessary to enable this feature.
Monthly Gratuity Accrual Process Updates
When you run the Payroll Calculation process, you can view the accrued gratuity amount in the Information region of the statement of earnings. If a user-created formula is used to calculate the gratuity payment on termination, then the same formula is used for calculating the monthly accrued gratuity amount.

Accrued Gratuity Amount in the Information Region of the Statement of Earnings
Steps to Enable
Before you verify the accrued gratuity in the statement of earnings, ensure to perform the following:
- Create the element eligibility link for the gratuity accrual initiator.
- Associate the gratuity accrual initiator to the employee through the element entry.
- Associate the formula to calculate the reference salary with the Employer Gratuity Deduction card.
Run the Payroll Calculation process and verify the results for the gratuity amount for the period and the accrued gratuity.
When you enter the Employer Reference Formula in the Employer Gratuity Deduction card, the formula must use the variable, PAID_GRATUITY. This overrides the gratuity amount calculated by the default formula.
Payroll for the United Arab Emirates
Oracle Fusion HRMS (United Arab Emirates) supports United Arab Emirates-specific features and functionality. It enables users to follow United Arab Emirate’s business practices and comply with its statutory requirements.
Audit required payroll information. Validation is needed to show that the required data has been entered before the Wage Protection System reports are submitted.
The payroll validation report shows if the following attributes are missing or noncompliant for either the employer or employee:
- Ministry of Labour Employer ID
- WPS Agent ID
- WPS Employer Bank Code
- Ministry of Labour Employee ID
- WPS Account Number
There are no steps necessary to enable this feature.
When you select Human Resources or Payroll Interface as the selected extension in the Manage Features by Country or Territory page, you can create a payroll definition with a Biweekly period type.

Biweekly Period Type in the Manage Payroll Definition Page
IMPORTANT: You cannot create a biweekly payroll definition, if Payroll is the selected extension for your legislation.
There are no steps necessary to enable this feature.
Monthly Gratuity Accrual Process Updates
When you run the Payroll Calculation process, you can view the accrued gratuity amount in the Information region of the statement of earnings. If a user-created formula is used to calculate the gratuity payment on termination, then the same formula is used for calculating the monthly accrued gratuity amount.

Accrued Gratuity Amount in the Information Region of the Statement of Earnings
Before you verify the accrued gratuity in the statement of earnings, ensure to perform the following:
- Create the element eligibility link for the gratuity accrual initiator.
- Associate the gratuity accrual initiator to the employee through the element entry.
- Associate the formula to calculate the reference salary with the Employer Gratuity Deduction card.
Run the Payroll Calculation process and verify the results for the gratuity amount for the period and the accrued gratuity.
When you enter the Employer Reference Formula in the Employer Gratuity Deduction card, the formula must use the variable, PAID_GRATUITY. This overrides the gratuity amount calculated by the default formula.
Payroll for the United Kingdom
Oracle Fusion HRMS (UK) supports United Kingdom-specific features and functionality. It enables users to follow the United Kingdom’s business practices and comply with its statutory requirements.
Real Time Information (RTI) - Earlier Year Update (EYU)
Report previous year’s tax information to the authorities after the deadline for reporting information has passed. You can do this by using the Earlier Year Update (EYU) Process for the relevant tax year.
The Earlier Year Update (EYU) process requires one effective payroll run in the required tax year. Use the EYU process to report updates for up to seven years.
The EYU process produces the following output:
- GFF file for EDI transmission
- An audit report

There are no steps necessary to enable this feature. Run this process from the Regulatory and Tax Reporting work area or the Payroll Checklist work area.
These legislative updates include statutory limits and thresholds required for the UK payroll to operate correctly for the new tax year:
- Pay As You Earn (PAYE) tax rates (excluding Scotland)
- The basic personal allowance is changed to £11,500
- Rates and thresholds for PAYE calculation reflects 2017-18 tax year:
- Scottish tax rates
- The basic personal allowance is the same as the rest of the UK at £11,500
- The rates of Scottish income tax remain the same as last year for Scotland. However, the Earnings bands differ from the rest of the UK as follows:
- National Insurance thresholds
- The thresholds are updated to reflect the tax year 2017-18 as follows:
- The employee rates by category remain the same as follows:
| Basic Rate at 20% for earnings between £0 - £33,500 |
| Higher Rate 40% for earnings between £33501 - £150,000 |
| Additional Higher Rate 45% for earnings over £150,000 |
| Basic Rate at 20% for earnings between £0 - £31,930 |
| Higher Rate 40% for earnings between £31,931 - £150,000 |
| Additional Higher Rate 45% for earnings over £150,000 |
| Weekly (£) |
2 Weekly (£) |
4 Weekly (£) |
Monthly (£) |
Annual (£) |
|
| Lower Earnings Limit (LEL) |
113 |
226 |
452 |
490 |
5876 |
| Primary Threshold (PT) |
157 |
314 |
628 |
680 |
8164 |
| Secondary Threshold (ST) |
157 |
314 |
628 |
680 |
8164 |
| Upper Accrual Point (UAP) |
n/a |
n/a |
n/a |
n/a |
n/a |
| Upper Secondary Threshold (UST) |
866 |
1731 |
3462 |
3750 |
45000 |
| Apprentice Upper Secondary Threshold (AUST) |
866 |
1731 |
3462 |
3750 |
45000 |
| Upper Earnings Limit (UEL) |
866 |
1731 |
3462 |
3750 |
45000 |
| Category letters |
A |
H |
M |
B |
J |
Z |
C |
| Earnings < LEL |
Nil |
Nil |
Nil |
Nil |
Nil |
Nil |
Nil |
| Earnings >= LEL <= PT |
0% |
0% |
0% |
0% |
0% |
0% |
0% |
| Earnings > PT <= UEL |
12% |
12% |
12% |
5.85% |
2% |
2% |
0% |
| Earnings > UEL |
2% |
2% |
2% |
2% |
2% |
2% |
0% |
- The employer rates by category remain the same as follows:
- Statutory payment amounts
- Student loans thresholds
- Increased for Plan 1 - Plan 1 Annual threshold from 6th April 2017 - 17,775
- Remains unchanged for Plan 2 - Plan 2 Annual threshold from 6th April 2017 - £21,000
- Thresholds for the automatic enrolment for Pensions
- Qualifying Earnings Lower Thresholds for 2017-18 are:
- Qualifying Earnings Upper Thresholds for 2017-18 are:
- Earnings trigger for automatic enrolment remains the same as earlier for 2016-17
| Category letters |
A |
H |
M |
B |
J |
Z |
C |
| Earnings < LEL |
Nil |
Nil |
Nil |
Nil |
Nil |
Nil |
Nil |
| Earnings >= LEL <= ST |
0% |
0% |
0% |
0% |
0% |
0% |
0% |
| Earnings > ST <= UST\AUST |
13.8% |
0% |
0% |
13.8% |
13.8% |
0% |
13.8% |
| Earnings > UST\AUST <= UEL |
13.8% |
13.8% |
13.8% |
13.8% |
13.8% |
13.8% |
13.8% |
| Earnings > UEL |
13.8% |
13.8% |
13.8% |
13.8% |
13.8% |
13.8% |
13.8% |
The revised limits for each type of statutory payment for the new tax year are:
| SSP |
£89.35 |
With effect from 06-April-2017 |
| SMP |
£140.98 |
With effect from 02-April-2017 |
| SAP |
£140.98 |
With effect from 02-April-2017 |
| SPP |
£140.98 |
With effect from 02-April-2017 |
| ShPP |
£140.98 |
With effect from 02-April-2017 |
The student loan thresholds used for calculation are:
| Weekly |
£113 |
| Fortnightly |
£226 |
| Lunar Monthly (4 weekly) |
£452 |
| Calendar Monthly |
£490 |
| Quarterly |
£1,469 |
| Biannual (6 Calendar monthly) |
£2,938 |
| Annual |
£5,876 |
| Weekly |
£866 |
| Fortnightly |
£1,731 |
| Lunar Monthly (4 weekly) |
£3,462 |
| Calendar Monthly |
£3,750 |
| Quarterly |
£11,250 |
| Biannual (6 Calendar monthly) |
£22,500 |
| Annual |
£45,000 |
Steps to Enable
There are no steps necessary to enable this feature.
Tips and Considerations
All changes for legislative updates will apply for payroll runs with the new tax year period starting 6 April 2017. Any payroll run with effective dates prior to this date will use the previous thresholds and limits.
New set of Real Time Information (RTI) processes are added for the tax year 2017-18. These include Full Payment Submission (FPS), Employer Payment Summary (EPS) and the Earlier Year update (EYU). The additional EYU process refers to updates for tax year 2016-17.
The data item changes in the record structure are applied to the output file records specified in the RTI Message Implementation Guide (MIG) documentation from Her Majesty’s Revenues and Customs (HMRC).
New processes for Real Time Information (RTI)
- Full Payment Submission (FPS) Tax Year Ending April 2018
- Employer Payment Summary (EPS) Tax Year Ending April 2018
- Earlier Year Updates (EYU) Tax Year Ending April 2017

Flows

Flows
Use the Submit Process or Report task from the Regulatory and Tax Reporting work area to access these processes.
Additional Data Capture
For the EPS, you can capture additional data for apprenticeship levy at the organization tax reporting unit level.
Calculation of Apprenticeship Levy
As part of the Apprenticeship Levy functionality, EPS is enhanced to use the new balances to:
- Derive employers pay bill for Apprenticeship Levy, that is, NIable Pay for the pay run.
- Calculate the actual levy due. The EPS process uses this to:
- Determines the cumulative amount of the pay bill for the tax year as of the end of the tax month being calculated by multiplying this amount by 0.5% to give the cumulative value of apprenticeship levy due for the tax year. It then truncates the amount of the levy due to whole pound.
- Determines the amount of the cumulative levy annual allowance for the relevant tax year, based on the value recorded for the relevant PAYE scheme. It deducts the cumulative amount of the levy allowance (YTD) from the cumulative levy due (YTD), then rounds off to the nearest whole pound for the employer.
- The values for the Apprenticeship Levy are available in the EPS Archive Results of EPS process tasks. You can update these here before submission to HMRC
EPS Output Changes
Apprenticeship Levy calculation are reported by the Real Time Information Employer Payment Summary submissions each period.
The Employer Payment Summary (EPS) is enhanced as follows:
- Includes additional reporting items of:
- Apprentice Levy Due YTD
- Apprenticeship Levy Month
- Apprenticeship Levy Annual Allowance Amount
- The Archive Results of EPS process tasks has the following additional details:
- EPS Original Summary of Payments record. You cannot edit these fields here.
- EPS Output Summary of Payments record. You can overwrite the values here before the EDI file is generated.
Rollback
You can rollback FPS and EYU using the standard Rollback feature. Once rolled back, the data is removed and the calculation card data updates are applied when the process is run in Live mode and revert to the original state (as was prior to the process run).
Steps to Enable
There are no steps necessary to enable this feature.
Tips and Considerations
Ensure you run the new tax year FPS and EPS process when your payment date is on or after 6 April 2017. You can only run Earlier Year Updates for the previous year after the deadline for submitting the Full Payment Submission for 2016-17 is reached.
Enhancements are added to enable the EPS process to accurately calculate and report the apprenticeship levy, as required.
The following additions have been made:
Data Capture
Additional data capture at the tax reporting unit (TRU) level:
- Exclude from apprenticeship levy
- Select this check box to indicate that Levy should not be used or reported to the HMRC.
- Apprenticeship Levy Apportioned Allowance
- This is the apportioned amount for a PAYE scheme, if you operate multiple schemes, and to split the allowance between schemes.
- Apprenticeship Levy Employers Pay Bill YTD
- This is the year to date value of the Apprenticeship Levy Pay Bill for the PAYE scheme.
- Use this field only if you are migrating to Oracle Fusion HCM mid-year to ensure accurate calculations.
- Apprenticeship Levy Employers Pay Bill Date
Use the following tasks from the Setup and Maintenance work area to enter the data for apprenticeship levy:
- Define Common Applications Configuration for HCM
- Define Enterprise Structure for HCM
- Define Legal Entities for HCM
- Define Legal Reporting Units for HCM
- Manage Legal Reporting Unit HCM Information

UK Apprenticeship Levy Fields
Element Input Value and Balances
New element input value added to store the actual value of the employer’s NIable pay:
- Apprenticeship Levy Employer Pay Bill Value for existing elements for:
- NI Employer
- NI Employer Adjustment
New balance added for Employer Pay Bill for Apprenticeship Levy to record the value used to calculate the levy amount
Real Time Information Enhancements
When the EPS process is completed, you can access the results for the Apprenticeship Levy data using the Prepare Reports task and enter any override values, if required. The new values are then passed to the EDI output of the EPS record to submit to HMRC.
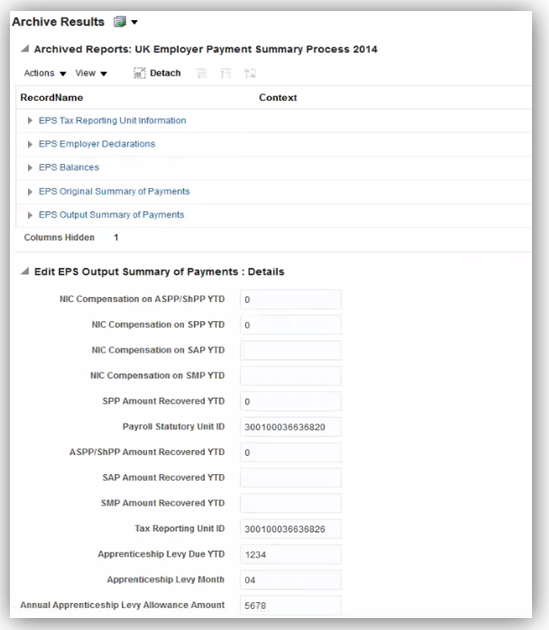
Archive Results
For further details on the RTI changes related to Apprenticeship Levy, refer to the Real Time Information section.
Steps to Enable
There are no steps necessary to enable this feature.
Tips and Considerations
The most recent override values are used when you run the EPS process again. For example, if you ran the process in Test mode and updated the values in any of the fields of the Archive Results, these values are used when you run the EPS in the Live mode again.
The new feature to offset the UK PAYE amount enables you to reduce UK tax liability for those employees working abroad subject to foreign tax liability.
- PAYE deduction is reduced by the amount of Foreign Tax deduction
- The tax liability for the employee is the total of UK tax and Foreign Tax deduction amounts
- Net pay reflects both PAYE and Foreign Tax deductions used for calculation
New classifications and Balances
The new sub-classifications added are:
| Primary Classification |
UK Sub-classification |
| Information |
Foreign Tax Credit Relief |
| Tax Deduction |
Foreign Tax Credit |
The new balances added are:
- Foreign Tax Credit Relief
- Foreign Tax Deduction
New Element: Foreign Tax Credit
A new element is added that holds the value of foreign tax that will offset the PAYE deduction:
- Element Name: Foreign Tax Deduction
- Primary Classification: Tax Deduction
- UK sub-classification: Foreign Tax Deduction
- Nonrecurring
- One Input Value: Pay value
Allocate this element to employees that have a foreign tax liability to be offset against the UK PAYE deduction. It is available for selection in the Manage Element Entry page for the person, after you define the element eligibility.
Calculate and enter the value for each employee for each period as this is a nonrecurring element. The liability could also be different for each period.

Foreign Tax Credit Element
New Indirect Element: Foreign Tax Credit Relief
This is an indirect element delivered to hold the results of the actual foreign tax credit relief amount.
A new element is delivered to hold the value of the foreign tax that offsets the PAYE deduction:
- Element Name: Foreign Tax Credit Relief
- Primary Classification: Information
- Subclassification: Foreign Tax Credit Relief
- Indirect return value from PAYE element
- Nonrecurring
- Two input values of
- Pay Value
- Deduction Card
Balance Feeds
The new elements feed the following balances, as required:
| Balance Name |
Element - Foreign Tax Deduction |
Element - Foreign Tax Credit Relief |
| Foreign Tax Deduction |
Add |
N/A |
| Foreign Tax Credit Relief |
N/A |
Add |
| Total Deduction |
Add |
N/A |
| Tax Deductions (Total PAYE) |
Deduct |
N/A |
| Total Pay |
Deduct |
N/A |
| Net |
Deduct |
N/A |
| Net Pay |
Deduct |
N/A |
Reporting
The P45 report and Full Payment Submission process are updated to include the reporting of leavers with a positive balance of Foreign Tax Credit Relief. The leavers, in such cases, are reported with a tax basis of noncumulative regardless of the actual tax basis used.
Steps to Enable
There are no steps necessary to enable this feature.
Tips and Considerations
An information message is generated that the foreign tax credit relief cannot be negative, so that you can make any necessary adjustments to rectify this.
When operating Net of Foreign Tax, an employee with Foreign Tax Credit relief should not be on a cumulative tax basis. If this is detected, a warning message is generated and you should contact HMRC.
Full Support of Balance Adjustments
You can adjust balances National Insurance and PAYE by using either of the following methods:
- Enter the relevant adjustment element for the employee
- Use Adjust Individual Balance option
Or

Enter all mandatory attributes and adjustment values required for NI adjustment

The element entry templates for PAYE and National Insurance are updated to remove the context as balance adjustments are fully supported.

Steps to Enable
There are no steps necessary to enable this feature.
The new P60 templates for the tax year 2016-17 are updated with the required legislative changes. Use the new templates to generate the P60 for your employee for tax year ending April 2107.
The P60 process uses the new templates for following the supported versions:
- P60 Plain Paper Approved Substitute
- P60 Substitute Self Seal
- HMRC Single Sheet Portrait
- eP60 (online version)
The P60 output updates include the following changes:
- All Tax Year reference – updated to April 2017
- National Insurance values displayed - reduced to 4 columns
- Date of birth - Removed from Self Seal Substitute P60
Steps to Enable
There are no steps necessary to enable this feature.
The existing P60 process is enhanced with additional parameters to produce a replacement P60 for your employees. The Run End of Year P60 process includes new parameters to enable the replacement P60 print. Run the process Run End of Year P60 Report using the Submit a Process or Report task.

Flow Pattern Run End of Year P60 Report
There are two new parameters added:
- Replacement: The default option is No. Select Yes to generate a replacement P60.
- Employee Set: Indicates the payroll relationship object group. You must set this up and attach employees to it.
As a result of this enhancement, the process for selective printing of P60 is also updated. Run the process Run End of Year P60 Selective Print using the Submit a Process or Report task. Use this generate a copy of the P60.

Flow Pattern Run End of Year P60 Selective Print
The following new parameters replace the previously used parameter Original P60 Flow Instance Name:
- Date in the Tax Year: Mandatory field that must be in the range of tax year required, that is, 6 April 20YY to 5 April 20YY+1. For example, 6 April 2015 to 6 April 2016.
- Payroll Statutory Unit
This ensures that the process searches for employees with either an original or a replacement P60.
Steps to Enable
There are no steps necessary to enable this feature.
Oracle Fusion HRMS (US) supports United States-specific features and functions for United States. It enables users to follow the United States’ business practices and comply with its statutory requirements.
The United States provides full support of the Multiple Worksite Report. Use this feature to report employment and wage data in a format suitable for the Bureau of Labor Statistics. This data is categorized by industry and location within a state and is used to more accurately classify employment and wage data of multiple establishment employers.
To generate this report, start the Run Multiple Worksite Electronic Report process from the Regulatory and Tax Reporting work area.

Run Multiple Worksite Electronic Report Process
There are no steps necessary to enable this feature.
Tips and Considerations
It is the employer’s responsibility to determine their reporting eligibility. Refer to the Bureau of Labor Statistics website for more information.
Key Resources
For more information, go to Applications Help for the following topics:
- How are work-at-home employees reported in the Multiple Worksite Report?
- Run Multiple Worksite Report
- Troubleshooting the Multiple Worksite Report: Examples
Third-Party Involuntary Payment Interface Initial Extract
Business outsourcing solutions providers such as ADP can perform garnishment and third-party payment processing for their customers. Oracle Fusion Human Capital Management for the US provides an involuntary payment interface for customers who choose to use such a third-party provider. Before you can begin using this interface with ADP Money Movement, you must extract your historical data and establish a baseline with ADP.
To generate the initial extract, run the Third-Party Involuntary Deductions Initial Extract process from the Payment Distribution work area.

Third-Party Involuntary Deductions Initial Extract process
There are no steps necessary to enable this feature.
Tips and Considerations
Before you can generate the initial extract, you must ensure you have properly configured organizations, employee definitions, third-party payees, and involuntary deductions.
For more information, go to My Oracle Support (MOS) for the following document:
- Oracle Fusion Human Capital Management for the US Third-Party Involuntary Payment Interface (Document ID 2043941.1)
Employee Active Payroll Balance Report Enhancement
You can now perform more comprehensive periodic payroll and quarterly and year-end balance reconciliation through the Employee Active Payroll Balance report enhancements. This report now includes school district tax balances.
Steps to Enable
There are no steps necessary to enable this feature.
Key Resources
For more information go to My Oracle Support (MOS), for the following documents:
- Oracle Fusion HRMS (US): Payroll Reconciliation (Document ID 2086251.1)
- Oracle Fusion HRMS (US): End-of-Year Processing (Document ID 1944400.1)
You can also find the appropriate help topics on the Help Portal:
- Employee Active Payroll Balance Report
- Reconciling Employee Balances for the US: Examples
Display Accrual Balances on Employee Checks
Employee check stubs now include accrual balances, enabling them to view their hours accrued and hours remaining for each accrual plan.

Steps to Enable
There are no steps necessary to enable this feature.
Tips and Considerations
Refer to Appendix D of the Setting Up Absence Elements for Oracle Fusion Absence Management white paper for instructions on how to configure the employee payslip to display accrual balances.
Key Resources
For more information, go to My Oracle Support (MOS) for the following document:
- Configuring Oracle Fusion Absence Management for the US and Canada for Release 10 (Document 2102835.1).
Automatically Synchronize Employee Withholding Certificates With HR Location Changes
You can now automatically update the Employee Withholding Certificate whenever you make location-specific changes on the employee’s definition. When you make a change to the employee’s work location, the following values on the tax card are automatically updated:
- State for unemployment calculation
- State for disability calculation
- Primary work location
New regional components are also created on the card based on appropriate changes you make to the following fields (such as changing the employee’s work state):
- Home address or resident tax address
- Work-at-home status
These synchronization actions occur automatically, unless you have manually disabled them. If that is the case, use the Synchronize Calculation Cards ESS job from the Payroll Checklists work area to synchronize all employees’ HR data to their tax cards.
Steps to Enable
There are no steps necessary to enable this feature.
Tips and Considerations
This synchronization happens automatically. You can manually disable automatic synchronization, but if you do so, you are responsible for tracking any changes you make to your employee HR data and manually updating the Employee Withholding Certificates appropriately. Alternately, you can use the Synchronize Calculation Cards ESS job from the Payroll Checklists work area to synchronize all employees’ HR data to their tax cards.
To disable automatic synchronization:
- Start the Manage Payroll Process Configuration task.
- Set the Create DIR Card Create DIR Card using Global UI parameter to “HRSYNCDISABLE”. Remove this process parameter value once you are ready for the automated changes to start again.
NOTE: The synchronization functionality is not available when the Manage Features by Country or Territory Extension Parameter setting is Human Resources or None.
Include Resident and Nonresident City and County Tax Balances on Periodic Tax Filing
You can now include resident and nonresident balances for cities and counties in your third-party periodic tax filing. These balances are used by local tax filings that require resident and nonresident wages and taxes to be reported separately. For a given jurisdiction, the periodic interface file passes these balances on multiple rows. For example, a tax code of OH0952490CITY would represent the nonresident wages and taxes for Toledo, Ohio. A tax code of OH0952490CITYR would represent the resident wages and taxes for Toledo, Ohio.
Steps to Enable
There are no steps necessary to enable this feature.
Refined Data Selection for W-2 Employee Report
You can now further refine the year-end data you use for generating employee Forms W-2. Use the new optional Payroll Statutory Unit field to limit the scope of employee information captured by the Run W-2 Employee Report process. Also, Tax Reporting Unit is now an optional field.

Parameter Details
Steps to Enable
There are no steps necessary to enable this feature.
Tips and Considerations
Use the Tax Reporting Unit field to run this process against a specific TRU.
Use the Payroll Statutory Unit field to run this process against all TRUs belonging to a PSU.
To run this process against all TRUs in all PSUs, leave both fields blank.
Key Resources
For more information go to My Oracle Support (MOS), for the following document:
- Oracle Fusion Human Capital Management (US): End-of-Year Processing (Document ID: 1944400.1)
Default Check Numbering for US Simplified Payroll Cycle Flow
We have made it easier to produce checks for your payroll runs. The US Simplified Payroll Cycle now follows these rules to assign sequential check numbers:
- By default, they now automatically start with the next sequential check number based on the last number generated by a previous run. This applies across all US legislative data groups.
- When running the simplified flow for the first time in a new environment, it starts with check number 1.
- You can still use the Start Check Number parameter to specify a specific starting number for a run.
Steps to Enable
There are no steps necessary to enable this feature.
Form W-2 Box 20 Enhancement for Ohio Employees
We have enhanced the W-2 Employee Report process for Ohio employees, so it now includes the school district name and number in Box 20.
Steps to Enable
There are no steps necessary to enable this feature.
Key Resources
For more information go to My Oracle Support (MOS), for the following document:
- Oracle Fusion Human Capital Management (US): End-of-Year Processing (Document ID: 1944400.1)
Wage Balance Enhancement for Periodic Tax Filing
We have enhanced the third-party periodic tax filing process to include wage balances even when there is no tax liability. Regardless whether tax is withheld, the third-party periodic tax file includes gross, subject, and taxable wages.
Steps to Enable
There are no steps necessary to enable this feature.
Key Resources
For more information go to My Oracle Support (MOS), for the following document:
- Payroll Third-Party Tax Filing Interface (Document ID 1594079.1)
Automatically Update Employee Withholding Certificates for Rehires and Assignment Changes
You can now automatically update the Employee Withholding Certificate whenever you rehire an employee or add a secondary assignment.
- If the secondary assignment is in the same TRU as the primary assignment, the association for the secondary assignment is created on the primary tax card.
- If a person is rehired into the same TRU as before, the existing tax card is used.
- If a person is rehired into a different TRU, no association is created.
In addition, TRU data association is created only if the TRU can be uniquely derived.
Steps to Enable
There are no steps necessary to enable this feature.
Tips and Considerations
The synchronization functionality is not available when the Manage Features by Country or Territory Extension Parameter setting is Human Resources or None.
Include Provider-Specific Fields on the Third-party Quarterly Tax Filing Interface
When using the Third-Party Tax Filing interface, you can now provide additional information required by ADP on your quarterly extracts. The quarterly extract now includes the employee’s current home address.
For Indiana employees, it also includes a 3-digit location reporting code. Specify this code through the Employer Unit Number field under the United States State Unemployment Reporting Information section of the Manage Locations task.

For Vermont employees, it includes a part-time status. Specify a part-time status in the Assignment Category field using the Manage Employment task.
Steps to Enable
There are no steps necessary to enable this feature.
Tips and Considerations
Populate the Indiana location reporting code on the work location if you are assigned a single enterprise filing status by the Indiana Department of Workforce Security or if you elected to report multiple locations with the Indiana DWS.
A Vermont employee is considered part-time if they work less than 35 hours per week.
Key Resources
For more information go to My Oracle Support (MOS), for the following document:
- Payroll Third-Party Tax Filing Interface (Document ID 1594079.1)
Set SUI Wage Limit Overrides for Eligible Employers
If you are an eligible employer, you can set a SUI wage limit override as specified by your state tax authority.
To set the new value:
- Start the Manage Calculation Value Definitions task.
- Search for and select the <state name> State Unemployment Insurance Tax Employer Wage Limit value definition.
- In the Calculation Values region, add a new row.
- Specify the override, and submit.
Steps to Enable
There are no steps necessary to enable this feature.
Tips and Considerations
Ensure you have run the Load Payroll Tax information process to see the latest data in Manage Calculation Value Definitions. The override is at the legislative data group (LDG) level and applies to any tax reporting units defined in that LDG.
Specify Company Entry Descriptions for EFT Payments
You can now provide a company entry description when generating electronic funds transfers (EFTs). Use the new field to provide your own description on the direct deposit file.
When running the Make EFT Payments process, specify this value in the Company Entry Description field:

This field is optional. If you leave it blank, the EFT process uses Dir Dep as the default.
Steps to Enable
There are no steps necessary to enable this feature.
Additional Third-Party Periodic Tax Filing Auditing
You can now improve your third-party periodic tax filing reconciliation through the use of a new audit report. This new report includes employee balance details by tax code. This report is delivered as output of the extract process. It is a pipe-delimited text file, which you can import into Microsoft Excel.
Steps to Enable
There are no steps necessary to enable this feature.
Key Resources
For more information go to My Oracle Support (MOS), for the following document:
- Payroll Third-Party Tax Filing Interface (Document ID 1594079.1)
Payroll Batch Loader Enhancements for Involuntary Deductions
We have made it easier for you to perform mass updates to your employees’ Involuntary Deductions cards. When running the payroll batch loader, you can now specify the following actions:
| Action |
Description |
| Correct |
Corrects existing component details and overrides as of the specified date. |
| Update |
Updates the component details and overrides as of the specified date. |
| Enddate |
End dates the component, component details, and their overrides as of the specified date. |
Steps to Enable
There are no steps necessary to enable this feature.
Tips and Considerations
Correct mode creates the card and card components if one does not already exist for the employee.
Key Resources
For more information go to My Oracle Support (MOS), for the following document:
- Fusion US Payroll: How To Load Involuntary Deductions via Payroll Batch Loader (Document ID: 2022585.1).
W-2 Employee Report Enhancements
We have made it easier for you to manage your employee Form W-2 printing and distribution. The new Employee Inclusion parameter on the Run W-2 Employee Report process allows you to specify active employees, terminated employees, or both. Use this in cases where you want to segregate active and terminated employee print runs to facilitate mailing.
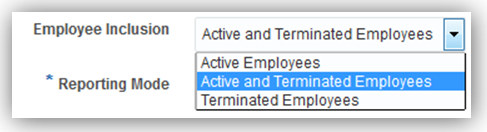
Steps to Enable
There are no steps necessary to enable this feature.
Tips and Considerations
The W-2 Employee Report generates a printed copy for terminated employees irrespective of their elected print preference.
Key Resources
For more information go to My Oracle Support (MOS), for the following document:
- Oracle Fusion Human Capital Management for United States: End of Year Processing (Document ID: 1944400.1).
W-2 Register Report Enhancements
We have made it easier for you to perform your year-end payroll data reviews through enhanced W-2 Register reporting.
The Run W-2 Register process can now produce its Employee Detail Report in multiple formats. This includes a pipe-delimited format that can be easily imported into a spreadsheet. Use the Create Employee Detail Report field to specify the format you desire:

Steps to Enable
There are no steps necessary to enable this feature.
Tips and Considerations
The W-2 Register Totals report now includes metrics for how many employees will receive a W-2, how many requested online copies, and the number of paper copies to be generated.
Key Resources
For more information go to My Oracle Support (MOS), for the following document:
- Oracle Fusion Human Capital Management for United States: End of Year Processing (Document ID: 1944400.1)
Third-Party Quarterly Tax File Enhancements
We have made it easier for you to accurately perform your quarterly tax filing through a third-party provider. The Third-Party Quarterly Tax Filing extract now includes the following:
- Your employee’s date of birth
- For Philadelphia tipped employees, two new balances for reporting wages from which no city tax was withheld:
- City Uncollected Tax Tip Wages Nonresident
- City Uncollected Tax Tip Wages Resident
These balances should report all uncollected tax wages and not just tipped wages.
Steps to Enable
There are no steps necessary to enable this feature.
Tips and Considerations
For employees who work in Philadelphia and earn tips with no city tax withheld, before you can generate your tax file, you must perform balance adjustments on the two new balances:
- City Uncollected Tax Tip Wages Nonresident
- City Uncollected Tax Tip Wages Resident
Key Resources
For more information go to My Oracle Support (MOS), for the following document:
- Oracle Fusion Human Capital Management for United States: Third-Party Tax Filing Interface (Document ID: 1594079.1)
- Oracle Human Capital Management for the US: Balance Adjustments white paper (Document ID: 1600728.1)
New Start-of-Year ESS Process for Year Begin
As part of your year-begin activities, you can now automatically review all employees living and working in Indiana and update their tax cards with the correct county information. The new Run Start of Year Process checks your employees’ work and residence information and then updates their Employee Withholding Certificates with the county as of January 1. It also provides a pipe-delimited audit file for verification purposes.
Run this process from the Checklists work area before you run the first payrolls of the calendar year.

Steps to Enable
There are no steps necessary to enable this feature.
Key Resources
For more information go to My Oracle Support (MOS), for the following document:
- Oracle Fusion Human Capital Management for United States End-of-Year Processing (Document ID: 1944400.1)
PA ACT 32 Support for Employee W-2 and W-2 Register Reports
You can now capture the appropriate Pennsylvania tax collection district (TCD) codes on the W-2s of eligible employees. For employees working in jurisdictions subject to PA Act 32, when you run the Run W-2 Employee Report process, their Form W-2s now include the TCD code in Box 20.
Additionally, when you run the Run W-2 Register process, the register report also includes the TCD codes.
Steps to Enable
Before your W-2 reports can display this information, you must ensure the archive has captured it. If you ran the Archive End-of-Year Payroll Results prior to the STAT2 patch, you must:
- Rollback the archive for any tax reporting units with Pennsylvania employees.
- Run the Synchronize Calculation Card ESS job in “Synchronize Pennsylvania Tax District mode. This updates the run results to capture the TCD and PSD codes.
- Rerun the Archive End-of-Year Payroll Results process.
Key Resources
For more information go to My Oracle Support (MOS), for the following document:
- Oracle Fusion Human Capital Management for United States End-of-Year Processing (Document ID: 1944400.1)
You can now capture the appropriate New York local wage value on your employee Forms W-2. For New York local taxes, Box 18 now displays the same value as Box 1.
Steps to Enable
There are no steps necessary to enable this feature.
Key Resources
- Oracle Fusion Human Capital Management for United States End-of-Year Processing (Document 1944400.1).
Third-Party Periodic Tax Filing Extract Enhancement: New Jersey FLI Tax Code
This feature enables you to accurately report your employee’s New Jersey FLI tax code to ADP through the Third-Party Periodic Tax Filing Extract. This extract now uses the same tax code as the Third-Party Quarterly Tax Filing Extract and is consistent with ADP requirements.
Steps to Enable
There are no steps necessary to enable this feature.
Tips and Considerations
This code was changed from NJFLI to NJFLI_EE, and is now consistent with ADP mapping.
Key Resources
For more information go to My Oracle Support (MOS), for the following document:
- Oracle Fusion Human Capital Management for United States: Third-Party Tax Filing (Document 1594079.1)
Third-Party Quarterly Tax Filing Enhancements for PA Act 32
When processing payroll for employees living or working in PA 32 jurisdictions, the third-party quarterly tax filing extract now includes the following:
- Wage and tax data reporting for all work/resident combinations for employees living or working in multiple locations during the quarter
- Reporting of PA Act 32 jurisdiction data through the new predefined Local Wages and Taxes element and associated balances
Payroll calculations populate this element and feed new local balances. Run results for the new element report the tax collection district and the work and resident PSD codes used for the payroll calculation. The new local balances are used to report the PA Act 32 jurisdiction data on the third-party quarterly tax filing extract. These balances accumulate the combined city and school wage and tax data appropriately.
- Employee resident PSD code
- Payroll calculations for PA Act 32 jurisdictions use data entered on the PA residency certificate to determine the proper tax calculations.
Previously a resident tax code was passed, and the third-party vendor was deriving the proper resident PSD code from the resident tax code. Reporting of wage and tax data continues to be reported to the work location tax code.
Steps to Enable
There are no steps necessary to enable this feature.
Tips and Considerations
You must run an upgrade process prior to the submission of your Q2 quarterly tax file extract. Run this upgrade through the Synchronize Calculation Cards task in the Checklists work area. Use the Synchronize Pennsylvania Tax District mode. This process upgrades run results for the payroll actions you completed in 2017 prior to the application of the patch bundle, such as Run, Quickpay, and Reversal.
You must ensure any balance adjustments for PA Act 32 jurisdictions also adjust the new local balances associated with the Local Wages and Taxes element.
Key Resources
For more information, go to My Oracle Support for the following paper:
- Oracle Fusion HRMS (US): Balance Adjustments - Document ID (1600728.1)
Third-Party Periodic Tax Filing Enhancements For PA Act 32
When processing payroll for employees living or working in PA 32 jurisdictions, the third-party periodic tax filing extract now includes the following:
- Reporting of PA Act 32 jurisdiction data through the new predefined Local Wages and Taxes element and balances
- Local Withheld
- Local Exempt
- Local Gross
- Local Reduced Subject Withholdable
- Local Subject Not Withholdable
The periodic archive captures the following new balances:
These balances accumulate the combined city and school wage and tax data.
- Tax collection district code, work PSD code, resident PSD code, resident geocode, resident county, and resident city, as captured in the periodic tax extract Audit Detail Report
Steps to Enable
There are no steps necessary to enable this feature.
Third-Party Quarterly Tax File Enhancements
We have made it easier for you to accurately perform your quarterly tax filing through a third-party provider. The Third-Party Quarterly Tax Filing extract now includes the following:
- For Philadelphia tipped employees, the following quarterly balances are included for reporting wages from which no city tax was withheld:
- City Uncollected Tax Tip Wages Nonresident
- City Uncollected Tax Tip Wages Resident
These existing balances should report all uncollected tax wages and not just tipped wages. Year-to-date balances were already reported. Now, quarter-to-date balances are included as well.
- The quarterly file header record also now includes the following values:
- Extract name and revision date
- ERP name and software version
- Transporter specification version
Steps to Enable
There are no steps necessary to enable this feature.
Tips and Considerations
Amendment fields such as the Amendment Ascertained Date, Amendment Reason Codes and Amendment Special Instructions should be entered on the third-party vendor’s site. Refer to their documentation for further details.
Key Resources
For more information, go to My Oracle Support for the following paper:
- Oracle Fusion Human Capital Management for United States: Third-Party Tax Filing Interface, Document ID (1594079.1).
Oracle Fusion Global Payroll Interface allows you to extract details from HCM, such as earnings and deductions, to send to a third-party payroll provider. You can also import processed payroll data, including payslips, from your payroll provider.
New Country Extensions in Global Payroll Interface Extract Definition
We have enhanced the Global Payroll Interface extract definition to support the following country extensions: Australia, the Netherlands, and the United States. When you copy this predefined extract definition for a legislative data group in one of these countries, your copy includes country-specific fields as well as the refined global attributes. For example, the extract includes country-specific fields from calculation cards.
NOTE: Use the Global Payroll Interface extract in other countries that support Payroll Interface too, but the extract contains no country-specific fields for other countries. Use the Manage Features by Country or Territory task to see which countries support Payroll Interface.
There are no steps necessary to enable this feature.
You must first select the Payroll Interface option for the country using the Manage Features by Country or Territory task. Then follow the implementation steps outlined in the implementation white paper for that country.
For more information about the Global Payroll Interface extract definition and selecting the Payroll Interface option for your country, go to Applications Help for the following topics:
- Global Payroll Interface Extract Definition
- Selecting Country Extensions: Critical Choices
- Creating a Payroll Interface Report from a Copy: Worked Example Selecting Country Extensions: Critical Choices
Import of Third-Party Payroll Processed Data and Payslips
Import three new categories of data from third-party payroll providers using HCM Data Loader:
- Processed payroll data, such as net pay, general ledger account codes, cost center codes, depending on the practices of your payroll provider
- Notification messages, such as confirmation of number of transactions received or processed, or warning information
- Payslips, for example in PDF format
Import data on a periodic basis for reporting. Each import record is associated with a master record that must specify a payroll name and payroll period. Imported data such as balances are stored in an inbound table. Imported payslips are stored as documents of record.
Report on the imported data using reporting methods such as Oracle Fusion Transactional Business Intelligence or HCM Extracts. Use the following new subject area and facts to report on the data in Oracle Fusion Transactional Business Intelligence:
- Subject area: Payroll Interface Inbound Record – Real Time
- Facts: Payroll Interface Inbound Records and Payroll Interface Inbound Record Information
Employees can view imported payslips in My Portrait or in the Personal Information work area.
Configure the Payroll Interface Inbound Record extensible flexfield to capture the data you want to import. The following contexts and segments are provided, but you can add your own.
| Context |
Segments |
|---|---|
| Absence Information |
Absence Name Absence Balance Absence Unit Absence Unit of Measure Absence Message |
| Message Information |
Message Type Message Text Message ID Outbound File Name Outbound File Received Date |
| Payment Information |
Bank Name Branch Name Branch Number IBAN Account Name Account Number Amount Currency Payment Type Check Number Payment Date Payroll Run Type Payroll Run Sequence |
|
|
Element Classification Element Name Current Amount Quarter-to-Date Amount Year-to-Date Amount Currency General Ledger Credit Account General Ledger Debit Account Cost Center |
| Third-Party Payslip |
Net Payment Payslip View Date |

The Payroll Interface Inbound Record EFF

Associated Contexts for the Inbound Interface
Review the Payroll Interface Inbound Record extensible flexfield to ensure that it captures the data you want to import from your payroll provider.
- In the Setup and Maintenance work area, search for and select the Manage Extensible Flexfields task.
- Search for the Payroll Interface Inbound Record extensible flexfield.
- Select Edit from the Actions menu.
- Select the Inbound Record category to review the category details, such as the contexts.
- Click Manage Contexts and search for any contexts you want to review in more detail, such as Leave Information.
- Select Edit from the Actions menu.
- Review the context-sensitive segments for your selected context. Edit the segments or add more segments, if required.
- When you have added any segments or contexts that you require and associated any new contexts with the flexfield, save and deploy the flexfield.
Also, please see Role Information below for possible additional steps.
Role Information
If you are not using the predefined reference roles, then you need to add security privileges to relevant job roles to use this feature. This table identifies the required aggregate privilege and suggests a target job role. You can add the privilege to different roles if you prefer.
See the Upgrade Guide for Oracle HCM Cloud Applications Security (My Oracle Support document ID 2023523.1) for instructions on implementing new features in existing roles.
| Aggregate Privilege Name and Code |
Job Role |
|---|---|
| Manage Payroll Interface Inbound Records ORA_HRY_PAYROLL_INTERFACE_INBOUND_RECORD |
Payroll Coordinator |
Use the Initiate Data Load task in the Data Exchange work area to generate a template file for the Payroll Interface Inbound Record business object. You upload this data file (.dat) as a compressed zip file. To load payslips as document of record attachments, place the payslips in the BlobFiles folder within your zip file. Use the File Import and Export task to upload the zip file to the WebCenter Content server. Use the Import and Load Data task in the Data Exchange work area to load the data.
For more information, go to Applications Help for the following topics:
- Extensible Flexfields: Explained
- Flexfield Deployment: Explained
For full instructions on data loading, go to My Oracle Support (MOS) for the following document:
- HCM Data Loader User’s Guide (Document ID 1664133.1)
Country Support for Payroll Interface
The following features are available for countries to support the countries specific payroll needs:
Global Payroll Interface Support for Australia
The global payroll interface now supports Australian-specific requirements. The extract definition includes both global fields and country-specific fields for Australia, including employee’s tax declaration and superannuation contribution information. Use the XML output as a basis for sending data to third-party payroll providers.
To view the Global Payroll Interface:
- Select the Manage Extract Definitions task in the Data Exchange work area.
- Specify an AU legislative data group.
- Select Payroll Interface in the Type field.
- Click Search.
- In the Search Results, select Global Payroll Interface.
- Select Global Payroll Interface in the search result.
- Click on the Copy icon
- Specify a name for the interface in the popup.

Global Payroll Interface Search Criteria
Ensure Payroll Interface has been set to Selected Extension for Australia in the Manage Features by Country or Territory page.
Key Resources
For more information about the Global Payroll Interface extract definition, go to Applications Help for the following topics:
- Global Payroll Interface Extract Definition
- Creating Extract Definitions for Payroll Interface: Procedure
- Selecting Country Extensions: Critical Choices
Tax File Number 28 Day Adjustment
Provides the ability to adjust the tax file number (TFN) of employees who have not provided their employer the TFN within 28 days after hire. Use the Manage 28 Days TFN Adjustment task from the Payroll Calculations or Administration work area to adjust the TFN. This task provides a list of employees that have not provided their TFN to the employer within 28 days after hire.
To manage an employee's TFN:
- Start the Manage 28 Day TFN Adjustment task from the Payroll Calculations work area or Administration Work Area.
- Enter the Effective Date. This is a mandatory field that defaults to current date. By default, employees whose 28-day period ends on or before this date is retrieved for TFN adjustment.
- Select the Employee Type from the single select choice list.
- Select a Legislative Data Group. If there is only one Legislative Data Group defined in the application, it is selected by default.
- Select a Tax Reporting Unit (TRU). To search all TRU, leave blank.
- Select a Payroll. To search all payrolls, leave blank.
- Click Search to see the list of employees for each TFN Code and employee status.
- To edit the TFN Code of an employee, open the calculation card of the employee and update the information.
Steps to Enable
If you use the predefined reference roles, then no steps are necessary to enable this feature.
Otherwise, you must assign relevant security privileges to your roles to enable this feature. See Role Information (below) for details.
Role Information
You need to add security privileges to relevant job roles to use this feature. This table identifies the required aggregate privilege and suggests a target job role. You can add the privilege to different roles if you prefer.
See the Upgrade Guide for Oracle HCM Cloud Applications Security (My Oracle Support document ID 2023523.1) for instructions on implementing new features in existing roles.
| Aggregate Privilege Name and Code |
Job Role |
|---|---|
| Manage Australian 28 Day TFN Adjustment ORA_HRX_AU_MANAGE_28DAY_ADJUSTMENT |
Payroll Manager |
Legal Reporting: Work Certificate
To record that the employee has an extension of their health coverage and benefits, capture the following additional information in the Pension and Welfare calculation card:
- Start date of health coverage maintenance
- End date of health coverage maintenance
When you enter the start date of the health coverage, the same is displayed in the Work Certificate as follows:
‘In application of L.911-8 Social Security code, this employee benefits maintenance of Health and Welfare coverage for 12 months after his termination. Guarantees remain identical.’

Steps to Enable
There are no steps necessary to enable this feature. When you terminate an employee, the Work Certificate displays this information.
Payroll Data Validation Report
Run the Payroll Data Validation Report to generate a list of workers with missing or noncompliant payroll data. Apart from the existing validations, the following new validations are added to check for:
- AGIRC and ARRCO
- CPN

Payroll Data Validation Report Showing Results for the New Validations
There are no steps necessary to enable this feature. Run the Worker Data Validation Report from the Payroll Checklist work area.
Specify the legal employer and the effective date to run the report.
For more information on this report, go to Applications Help, for the following topic:
- Payroll Data Validation Report for France
Use this report to identify variations for the Irish balance values that might indicate potential over payments or underpayments, and validate payroll runs for diagnostic purposes. Specify the report definition by selecting the balances that must be tracked by the report and the variant values.
There are no steps necessary to enable this feature. Run this report from Payment Distribution work area or Payroll Checklist work area.
For more information about these reports, go to Application Help, for the following topic:
- Balance Exception Report: Explained
Global Payroll Interface Support for the Netherlands
Facilitate third-party payroll processing for the Netherlands through the global payroll interface. The extract definition creates XML output that is transformed to a standardized XML structure and published and version controlled using XSL templates in the BI Publisher. Use this to create a data file to send data to third-party payroll providers, enabling them to process their payroll and deliver Dutch statutory reports, such as the wage report.
When you copy this predefined extract definition for a Dutch legislative data group, your copy includes refined global attributes as well as Dutch-specific fields that include:
- Tax information, including the TRU, employee tax code and other standard-rate tax information, and also special-rate tax information, including the previous year’s income, individual tax rate, and whether the beneficial rule applies.
- Social insurance information, including the sector risk fund and social insurance funds, such as ZW and ZWW, and whether the employee works 5 days a week or less for social insurance and tax purposes.
- Subsidies and discounts that apply to the employee, including the wage tax discount, employer discounts, and holiday coupons.
- Contract type, employment type code, influence code, temporary worker labor code and other information required for wage reporting.

Global Payroll Interface
To view the Global Payroll Interface:
- Select the Manage Extract Definitions task in the Data Exchange work area.
- Specify a NL legislative data group.
- Select Payroll Interface in the Type field.
- Click Search.
- In the Search Results, select Global Payroll Interface.
- Select Global Payroll Interface in the search result.
- Click on the Copy icon
- Specify a name for the interface in the popup.

Global Payroll Interface Search Criteria
Steps to Enable
There are no steps necessary to enable this feature.
Key Resources
For more information about the Global Payroll Interface extract definition, go to Applications Help for the following topics:
- Global Payroll Interface Extract Definition
- Creating Extract Definitions for Payroll Interface: Procedure
- Selecting Country Extensions: Critical Choices
Third-Party Involuntary Payment Interface Initial Extract
Business outsourcing solutions providers such as ADP can perform garnishment and third-party payment processing for their customers. Oracle Fusion Human Capital Management for the US provides an involuntary payment interface for customers who choose to use such a third-party provider. Before you can begin using this interface with ADP Money Movement, you must extract your historical data and establish a baseline with ADP.
To generate the initial extract, run the Third-Party Involuntary Deductions Initial Extract process from the Payment Distribution work area.

Third-Party Involuntary Deductions Initial Extract process
Steps to Enable
There are no steps necessary to enable this feature.
Tips and Considerations
Before you can generate the initial extract, you must ensure you have properly configured organizations, employee definitions, third-party payees, and involuntary deductions.
Key Resources
For more information on third-party payments, refer to My Oracle Support (MOS) for the following document:
- Oracle Fusion Human Capital Management for the US Third-Party Involuntary Payment Interface (Document ID 2043941.1)
Global Payroll Interface Support for the United States
The global payroll interface now supports US-specific requirements. The extract definition includes both global fields and country-specific fields for the United States, including information from the employee’s withholding certificate. Use the XML output as a basis for sending data to third-party payroll providers.
To view the Global Payroll Interface:
- Select the Manage Extract Definitions task in the Data Exchange work area.
- Specify a US legislative data group.
- Select Payroll Interface in the Type field.
- Click Search.
- In the Search Results, select Global Payroll Interface.
- Select Global Payroll Interface in the search result.
- Click on the Copy icon
- Specify a name for the interface in the popup.

Global Payroll Interface Search Criteria
Steps to Enable
There are no steps necessary to enable this feature.
Key Resources
For more information about the Global Payroll Interface extract definition, go to Applications Help for the following topics:
- Global Payroll Interface Extract Definition
- Creating Extract Definitions for Payroll Interface: Procedure
- Selecting Country Extensions: Critical Choices
Include Provider-Specific Fields on the Third-Party Quarterly Tax Filing Interface
When using the Third-Party Tax Filing interface, you can now provide additional information required by ADP on your quarterly extracts. The quarterly extract now includes the employee’s current home address.
For Indiana employees, it also includes a 3-digit location reporting code. Specify this code through the Employer Unit Number field under the United States State Unemployment Reporting Information section of the Manage Locations task.
For Vermont employees, it includes a part-time status. Specify a part-time status in the Assignment Category field using the Manage Employment task.
Steps to Enable
There are no steps necessary to enable this feature.
Tips and Considerations
Populate the Indiana location reporting code on the work location if you are assigned a single enterprise filing status by the Indiana Department of Workforce Security or if you elected to report multiple locations with the Indiana DWS.
A Vermont employee is considered part-time if they work less than 35 hours per week.
Key Resources
For more information go to My Oracle Support (MOS), for the following document:
- Payroll Third-Party Tax Filing Interface (Document ID 1594079.1)
Additional Third-Party Periodic Tax Filing Auditing
You can now improve your third-party periodic tax filing reconciliation through the use of a new audit report. This new report includes employee balance details by tax code. This report is delivered as output of the extract process. It is a pipe-delimited text file, which you can import into Microsoft Excel.
Steps to Enable
There are no steps necessary to enable this feature.
Key Resources
For more information go to My Oracle Support (MOS), for the following document:
- Payroll Third-Party Tax Filing Interface (Document ID 1594079.1)
Third-Party Periodic Tax Filing Extract Enhancement
We have made it easier for you to review your periodic tax-filing data. The Third-Party Periodic Tax Filing Extract now allows you to create an employee-level detail report. By specifying Yes on the new Create Employee Detail Report field, the process generates an additional pipe-delimited output file.
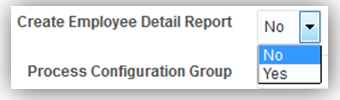
Steps to Enable
There are no steps necessary to enable this feature.
Key Resources
- Oracle Fusion Human Capital Management for United States: Third-Party Tax Filing (Document 1594079.1)
WorkForce Rewards Transactional Business Intelligence
Oracle Fusion Transactional Business Intelligence is a real time, self service reporting solution offered to all Oracle® Fusion application users to create ad hoc reports and analyze them for daily decision-making. Oracle Fusion Transactional Business Intelligence provides human resources managers and specialists, business executives, and line managers the critical workforce information to analyze workforce costs, staffing, compensation, performance management, talent management, succession planning, and employee benefits.
New Fields for Oracle Transactional Business Intelligence (OTBI)
The following new benefits fields are now available for reporting in OTBI:
- Suspended
- Required
- Action Type Name
- Due Date
- Completion Date
- Enrollment Coverage Start Date
- Enrollment Coverage Through Date
- Received Date
- Denied Date
New OTBI Reporting Fields in a Sample Report
There are no steps necessary to enable this feature.
New Attributes and Performance Enhancements for Compensation OTBI
We added 12 compensation reporting attributes related to Manager Status, Due Dates by Hierarchy Level, and Overall Budgeting. The attributes and their locations are:
- Person Worksheet Details folder: Manager Status
- Workforce Budget folder: Overall Available Budget
- Amounts in User Preferred Currency subfolder: Overall Available Budget
- Plan Cycle folder, Due Dates by Hierarchy Level subfolder:
- 1 Level Down Default Due Date
- 2 Level Down Default Due Date
- 3 Level Down Default Due Date
- 4 Level Down Default Due Date
- 5 Level Down Default Due Date
- 6 Level Down Default Due Date
- 7 Level Down Default Due Date
- Managers Cannot Update Due Dates
- Top Managers Default Due Date
We improved reporting performance with changes to the compensation hierarchy and backported the changes to R11. To improve the performance of the compensation manager dimension when used in OTBI reporting, we added six new columns to the cmp_cwb_hrchy table. The columns are:
- MGR_PERSON_ID
- MGR_ASSIGNMENT_ID
- EMP_PERSON_ID
- EMP_ASSIGNMENT_ID
- HRCHY_PLAN_ID
- HRCHY_PERIOD_ID
The application uses the columns for backend processing only and they are not available to be enabled in the worksheet. The Start Workforce Compensation and Refresh Data processes now populate and update these columns with correct values. You must run the Refresh Data process to populate these columns for previously started plans before you view OTBI reports that use the compensation manager dimension.
Steps to Enable
There are no steps necessary to enable the feature.
Key Resources
For more information see the following topics in Applications Help:
- OTBI Reports: Explained
New Subject Area: Payroll - User-Defined Tables Real Time
Manage user defined tables using a new subject area called Payroll - User-Defined Tables Real Time. This new subject area enables you to report on the user defined tables that you create using the Manage User-Defined Tables task in Oracle Fusion Payroll. Report on all information that is defined for each user defined table.
If you use the predefined reference roles, then no steps are necessary to enable this feature.
Otherwise, you must assign relevant security privileges to your roles to enable this feature. See Role Information (below) for details.
Role Information
If you are not using the predefined reference roles, then you need to ensure that the transaction analysis duty role that secures the new subject area is mapped to relevant job roles. This table identifies the required transaction analysis duty role and suggests a target job role. You can add the duty role to different roles if you prefer.
See the Upgrade Guide for Oracle HCM Cloud Applications Security (My Oracle Support document ID 2023523.1) for instructions on implementing new features in existing roles.
| Transaction Analysis Duty Role |
Job Role |
|---|---|
| Payroll Transaction Analysis Duty FBI_PAYROLL_TRANSACTION_ANALYSIS_DUTY |
Payroll Manager |
New Subject Area: Payroll - Payroll Interface Inbound Records Real Time
Streamline your payroll data processing using a new subject area called Payroll - Payroll Interface Inbound Records Real Time. This new subject area enables you to report on the payroll data that is processed by third-party vendors. Report on inbound payroll interface information such as payroll name, payments, earnings, deductions, messages, and batch information.
If you use the predefined reference roles, then no steps are necessary to enable this feature.
Otherwise, you must assign relevant security privileges to your roles to enable this feature. See Role Information (below) for details.
Role Information
If you are not using the predefined reference roles, then you need to ensure that the transaction analysis duty role that secures the new subject area is mapped to relevant job roles. This table identifies the required transaction analysis duty role and suggests a target job role. You can add the duty role to different roles if you prefer.
See the Upgrade Guide for Oracle HCM Cloud Applications Security (My Oracle Support document ID 2023523.1) for instructions on implementing new features in existing roles.
| Transaction Analysis Duty Role |
Job Role |
|---|---|
| Payroll Interface Transaction Analysis Duty FBI_PAYROLL_INTERFACE_TRANSACTIONAL_ANALYSIS_DUTY |
Payroll Coordinator |
Enhanced Attribute: Displayed Input Value in Payroll Element Entries Real Time
Simplify payroll reporting using the Displayed Input Value attribute in the Element Entry Value dimension under Payroll - Element Entries Real Time. This attribute now displays the Description value in reports.
There are no steps necessary to enable this feature.
---

Copyright © 2017, Oracle and/or its affiliates. All rights reserved.
This document is provided for information purposes only, and the contents hereof are subject to change without notice. This document is not warranted to be error-free, nor subject to any other warranties or conditions, whether expressed orally or implied in law, including implied warranties and conditions of merchantability or fitness for a particular purpose. We specifically disclaim any liability with respect to this document, and no contractual obligations are formed either directly or indirectly by this document. This document may not be reproduced or transmitted in any form or by any means, electronic or mechanical, for any purpose, without our prior written permission.
Oracle and Java are registered trademarks of Oracle and/or its affiliates. Other names may be trademarks of their respective owners.
Intel and Intel Xeon are trademarks or registered trademarks of Intel Corporation. All SPARC trademarks are used under license and are trademarks or registered trademarks of SPARC International, Inc. AMD, Opteron, the AMD logo, and the AMD Opteron logo are trademarks or registered trademarks of Advanced Micro Devices. UNIX is a registered trademark of The Open Group.
11.21