
- Revision History
- Overview
- Feature Summary
- B2B Service Center
-
- Service Request Management
- Omnichannel Framework
- Service Channels
- Case Management
-
- Oracle Case Management is Generally Available
- Collaborate on Cases Efficiently Through Messaging and Relationships
- Manage Cases Efficiently Using the Action Bar
- Create Cases Accurately Using Intelligent Advisor Interviews
- Create and Assign Tasks and Appointments for Case Team Members
- Gain Actionable Insights to Manage Cases Proactively
-
This document will continue to evolve as existing sections change and new information is added. All updates appear in the following table:
| Date | Product | Feature | Notes |
|---|---|---|---|
| 21 JUN 2022 | Created initial document. |
 HAVE AN IDEA?
We’re here and we’re listening. If you have a suggestion on how to make our cloud services even better then go ahead and tell us. There are several ways to submit your ideas, for example, through the Ideas Lab on Oracle Customer Connect. Wherever you see this icon after the feature name it means we delivered one of your ideas.
GIVE US FEEDBACK
We welcome your comments and suggestions to improve the content. Please send us your feedback at oracle_fusion_applications_help_ww_grp@oracle.com.
DISCLAIMER
The information contained in this document may include statements about Oracle’s product development plans. Many factors can materially affect Oracle’s product development plans and the nature and timing of future product releases. Accordingly, this Information is provided to you solely for information only, is not a commitment to deliver any material, code, or functionality, and should not be relied upon in making purchasing decisions. The development, release, and timing of any features or functionality described remains at the sole discretion of Oracle.
This information may not be incorporated into any contractual agreement with Oracle or its subsidiaries or affiliates. Oracle specifically disclaims any liability with respect to this information. Refer to the Legal Notices and Terms of Use for further information.
Column Definitions:
Report = New or modified, Oracle-delivered, ready to run reports.
UI or Process-Based: Small Scale = These UI or process-based features are typically comprised of minor field, validation, or program changes. Therefore, the potential impact to users is minimal.
UI or Process-Based: Larger Scale* = These UI or process-based features have more complex designs. Therefore, the potential impact to users is higher.
Features Delivered Disabled = Action is needed BEFORE these features can be used by END USERS. These features are delivered disabled and you choose if and when to enable them. For example, a) new or expanded BI subject areas need to first be incorporated into reports, b) Integration is required to utilize new web services, or c) features must be assigned to user roles before they can be accessed.
| Ready for Use by End Users Reports plus Small Scale UI or Process-Based new features will have minimal user impact after an update. Therefore, customer acceptance testing should focus on the Larger Scale UI or Process-Based* new features. |
Customer Must Take Action before Use by End Users Not disruptive as action is required to make these features ready to use. As you selectively choose to leverage, you set your test and roll out timing. |
|||||
|---|---|---|---|---|---|---|
| Feature |
Report |
UI or |
UI or |
|
||
Decide Whether to Add Email Recipients as Service Request Contacts or Team Members |
||||||
Generate Dynamic Link Patterns Automatically for Third Party Applications |
||||||
Collaborate on Cases Efficiently Through Messaging and Relationships |
||||||
Create Cases Accurately Using Intelligent Advisor Interviews |
||||||
Create and Assign Tasks and Appointments for Case Team Members |
||||||
Select SmartText Entries for Chat
You can author SmartText entries for use in a chat session. The application now provides a list of SmartText entries relevant for chat, enabling agents to use predefined phrases to expedite resolutions and conclude chat sessions.
The addition of SmartText will improve agents response times to consumers during chat conversations.
Steps to Enable
You need to set the Profile Option "ORA_SVC_MCA_SMARTTEXT_IN_LW_ENABLED" to "Yes". The Profile Option Display Name is "SmartText in Live Window Enabled Application" It controls whether SmartText is enabled for Chat in Live Window.
Steps to enable:
- Navigate to the Setup and Maintenance work area and open the Tasks panel tab.
- Click Search from the list of displayed tasks.
- In the Search field, type
Manage Admin
. - From the displayed list of tasks, click Manage Administrator Profile Values.
- In the Manage Administrator Profile Values page, navigate to the Search: Profile Option region.
- In the Profile Option Code field, type ORA_SVC_MCA_SMARTTEXT_IN_LW_ENABLED.
- Click Search.
The Search Results: Profile Options region displays the list of profile options.
- In the Profile Values region, specify the values in the Profile Value column to 'Yes'.
- Click Save and Close.
Tips And Considerations
You can create HTML and plain SmartText entries for Chat.
Create your user variables of substitution types "Prompt" and "Value" before authoring SmartTexts for Chat.
You can't create SmartTexts for Chat using any system variables.
When authoring a SmartText, "Chat" is available in the Domain dropdown only when the profile option "SVC_ENABLE_CHAT" is set to "Yes".
Key Resources
- See the "How You Manage SmartText Entries" chapter in the Implementing B2B Service guide.
Role Information
- Service Administrator
- Service Representative
Decide Whether to Add Email Recipients as Service Request Contacts or Team Members
You can decide whether the recipients of an inbound email must be added as service request contacts or service request team members. The sender of the first email is always added as the primary contact. For the follow-up emails, you can choose not to add the sender as an SR contact or SR team member.
You have the option of adding the sender of only the first email to the SR. You can choose not to add the sender of the follow-up emails to the SR.
Steps to Enable
- In the Setup and Maintenance work area, navigate to the Manage Administrator Profile Values task.
- Search for the ORA_SVC_ADD_EMAIL_RECIPIENTS_TO_SR profile option.
- Set the value of the profile option to No.
Key Resources
- See the "Email Channels" chapter in the Implementing B2B Service guide.
Role Information
- Customer Relationship Management Application Administrator
- Sales Administrator
Add Relationships Between Service Requests
Add business-driven relationships between service requests and leverage these relationships to make easy updates across your service requests.
Relationships enhance the efficiency of your agents and improve your service request resolution outcomes.
Steps to Enable
You don't need to do anything to enable this feature.
Tips And Considerations
Adding Relationships was previously only available for Redwood users.
Key Resources
- See the "Service Requests" chapter in the Using B2B Service guide.
Role Information
- Case Workers and Case Managers can use this feature.
Generate Dynamic Link Patterns Automatically for Third Party Applications
Select the Generate pattern checkbox on the Manage Service Request Dynamic Links setup page to automatically generate the dynamic link patterns for links that point at third party applications. You can also export and import custom links. To prevent existing links from failing, you can't modify the custom object type name.
This feature adds support for import and export of dynamic links, and significantly improves the usability of the setup and configuration of dynamic links.
Steps to Enable
- In the Setup and Maintenance work area, go to the following:
- Offering: Service
- Functional Area: Productivity Tools
- Task: Manage Service Request Dynamic Links
- To automatically generate the pattern, click Add.
- Specify the Object Type and select the Generate pattern check box.
Key Resources
- See the "Email Channels" chapter in the Implementing B2B Service guide.
Role Information
Administrator setup is required.
View and Delete Previous Chat Transcripts
View and delete previous chat transcripts between customer and agents. The Chat Transcript API returns the chat transcript between a customer and agents. This method can be called by authenticated customers from the portal to view past transcripts. The new data security policy lets agents view all previous transcripts from a customer through the activity feed, while restricting customers to only see their own chats from the support portal. The Delete chat transcript method allows customers to delete chat transcripts associated with a specific interaction record. This could be used for security reasons or for regulatory compliance such as General Data Protection Regulation (GDPR).
- Data security policies on transcripts API will ensure that chat transcripts do not get into the wrong hands and ensures security and privacy
- New delete transcript API allows businesses to be compliant with GDPR and other security requirements
Steps to Enable
Review the REST service definition in the REST API guides, available from the Oracle Help Center > your apps service area of interest > REST API. If you're new to Oracle's REST services you may want to begin with the Quick Start section.
You don't need to do anything to enable this feature.
Tips And Considerations
You can use these APIs once you have enabled Chat.
Key Resources
- See the "Real Time Channels" chapter in the Implementing B2B Service guide and "All REST Endpoints" in the REST API for CX Sales and B2B Service guide.
Role Information
These APIs are protected using the following privileges:
- The chatTranscript method is protected by SVC_REQUEST_FOR_CHAT_PRIV privilege.
- The deleteChatTranscript API is protected by SVC_DELETE_CHAT_TRANSCRIPT_PRIV privilege.
Customer Action Required for Chat and Live Experience Users
Oracle has introduced some new feature access controls to both Chat and Live Experience channel users in this release. Only agents that have been assigned to work on Chat or Live Experience channels should be provided the new roles which will be used by our compliance team to generate reports on how many users are entitled on the channels.
- Any agents that are performing chat duties will need to be provisioned with the new Chat Agent role to continue or begin to have access to chat functions.
- For any agents that work on Live Experience channels, they will need to be granted the new Digital Call Center Agent role to continue or begin to access Live Experience functionality.
Both the Chat Agent and Digital Call Center Agent roles were introduced in our 22A release, however enforcement of the roles will begin in this release.
In order to comply with your licensed Chat or Live Experience user quota, all chat users will need to be provisioned with the new Chat Agent role and all digital channel users will need to be provisioned with the new Digital Call Center Agent role.
Steps to Enable
Make the feature accessible by assigning or updating privileges and/or job roles. Details are provided in the Role section below.
- Navigate to the Security Console in the Tools menu
- Search for your Chat or Live Experience agents in the Users tab
- Edit the user to add the new chat role
- Click the Add Role button
- Search for the Chat Agent role (ORA_SVC_CHAT_AGENT) or the Digital Call Center Agent role (ORA_SVC_DIGITAL_CALL_CENTER_AGENT)
- Select the desired role
- Click Add Role Membership
- Click Done
- Save and close the changes
Key Resources
- See Assign Roles to an Existing User in the Securing Applications guide.
Role Information
- Chat Agent (ORA_SVC_CHAT_AGENT)
- Digital Call Center Agent (ORA_SVC_DIGITAL_CALL_CENTER_AGENT)
Oracle Case Management is Generally Available
Oracle's newest cloud-based solution, Oracle Case Management is live. Inspired by our user-centric Redwood design philosophy and built upon the our powerful Visual Builder Studio application development environment, Oracle Case Management is a secure, modern solution for your case management needs. This quarter's Readiness document summarizes just a few of the many features available to case workers and case managers in Oracle Case Management.
Based on 20 years of case management experience around the world and in every industry, Oracle Case Management empowers organizations to serve citizens, employees, students, clients, and customers quickly, safely, and proactively.
Secure, Intuitive Interactions with Case Contacts
- Safe, easy access from anywhere, with a online knowledgebase and proactive notifications
- Guided, contextual case reporting experience
- Securely communications through all popular communication channels
Smart, Actionable User Experience for Case Workers
- Expert guidance through dynamic interviews and assessments
- Optimized case workflows through easy-to-configure action plans
- Efficient, proactive workflows with next-best actions and internal collaboration
Productive, flexible solution for Owners, Administrators and Developers
- Modern user experience that is easily tailored using Visual Builder, a flexible, open, low-code design tool
- Robust and extensible data model based on 20+ years of Case Management experience
- Automated workflows with an integrated best-in-class process engine
Steps to Enable
You don't need to do anything to enable this feature.
Tips And Considerations
Oracle Case Management is immediately available to Oracle Fusion Cloud B2B Service customers.
Key Resources
- For more information see the Implementing Case Management and the Using Case Management guides.
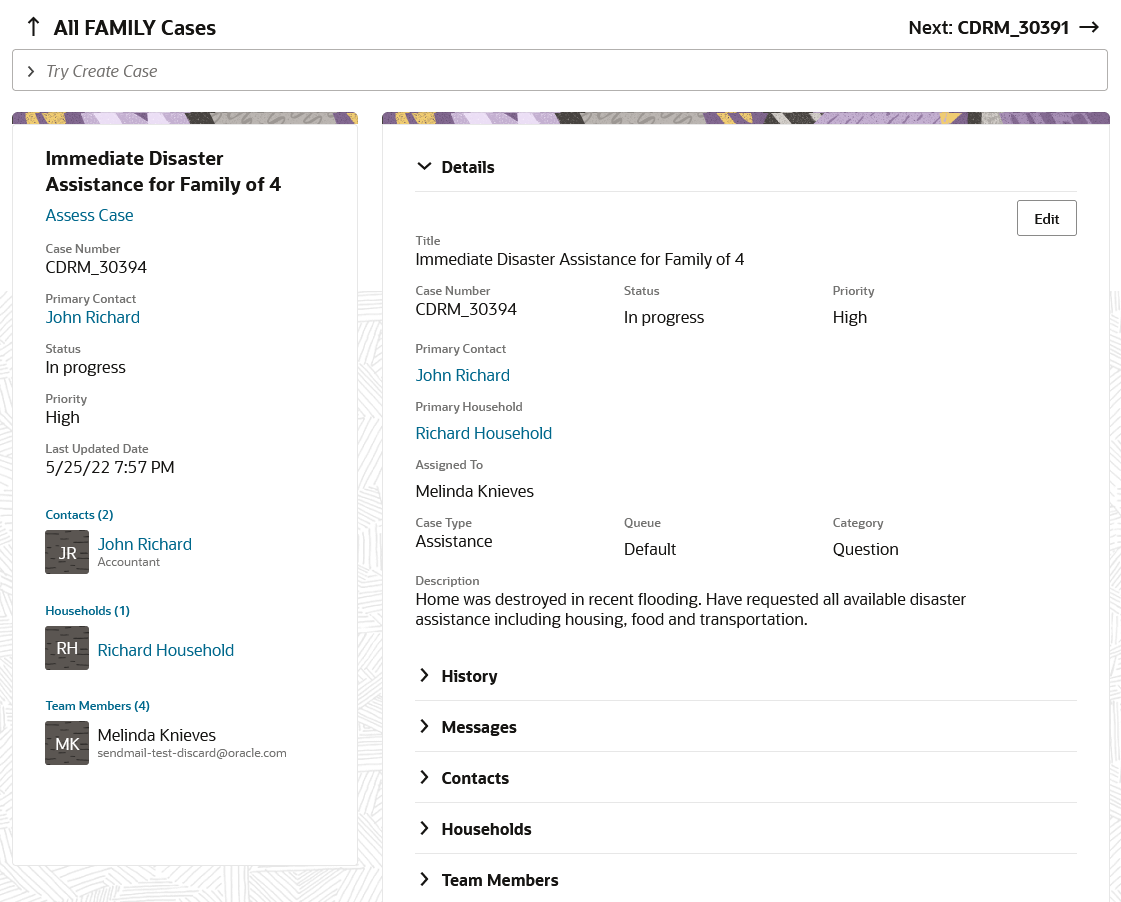
Collaborate on Cases Efficiently Through Messaging and Relationships
Case managers can add and share internal messages with all case workers. In addition, cases can be related to other cases and service requests to perform business-driven updates for those related objects. Case intake can also be easily easily completed using the new case creation interface. This feature also enhances case contact management and improves accessibility support.
Case managers can intake cases faster, collaborate easily with case workers, and quickly connect cases to each other for better case management and resolution.
Steps to Enable
You don't need to do anything to enable this feature.
Key Resources
- For more information, see the Implementing Case Management and Using Case Management guides.
Role Information
Case Workers and Case Managers can use this feature.
Manage Cases Efficiently Using the Action Bar
Manage cases by simply typing commands in the Action Bar to initiate actions. For example, just type "Create Case" in the Action Bar to start creating a case. You can also use the Action Bar to compose messages, create and update relationships, and add team members.
Using the Action Bar enhances the efficiency of your case managers by accelerating their ability to initiate common actions.
Steps to Enable
You don't need to do anything to enable this feature.
Key Resources
- For more information, see the Using Case Management guide.
Role Information
Case Managers can immediately use these new commands in the action bar.
Create Cases Accurately Using Intelligent Advisor Interviews
You can now create Cases through an interview-style format using Intelligent Advisor.
Organizations can now ensure that cases are created only after all critical questions have been answered in an Intelligent Advisor interview.
Steps to Enable
Here are the basic steps to enable and use the Create Case by Interview button on the Case List page.
1. Create an interview using Oracle Policy Modeler and deploy the interview to your Oracle Intelligent Advisor hub.
2. Configure the Create by Interview button in the Redwood Case List page in Visual Builder Studio.Open the Case List page in Visual Builder Studio and locate the Constants tab in the Right Hand Panel.
3. Click the Constants tab.
There are three variables on the Constants tab:
- showCreateCaseByInterviewButtonOnListPage
- opaSiteURL
- createCaseInterviewDeploymentName
4. Click on the variable name and select a variable value from the drop down list.
5. Alternatively, you can click the Show in Variables link to open the Constants page and enter the variables there.
6. Once the variables are entered, click Publish.
Tips And Considerations
This feature requires a license for Oracle Intelligent Advisor.
Key Resources
- See the "Set Up Case Management" chapter in the Implementing Case Management guide. For more information about Oracle Intelligent Advisor, see the "Configuring Oracle Intelligent Advisor" chapter of the Implementing Your Cloud Integrations guide.
Role Information
Your Oracle Intelligent Advisor administrator and Visual Builder developer should work together to configure this feature.
Create and Assign Tasks and Appointments for Case Team Members
Users can now review all past, present, and future tasks and appointments as well as all related households for a case in convenient case-based folders.
These easy-to-use folders for case tasks, appointments and households compliment previously-released functionality to create tasks and appointments.
Steps to Enable
You don't need to do anything to enable this feature.
Key Resources
- For more information, see the Using Case Management guide.
Role Information
- Case Workers and Case Managers can use this feature.
Gain Actionable Insights to Manage Cases Proactively
Case owners and case managers can monitor cases in their queue by leveraging Oracle Transactional Business Intelligence (OTBI) reporting. Standard reports provide owners and managers insights into cases based on areas such as ownership, status, and case aging. Report authors can use the newly built subject area, Service - CRM Case Management Real Time, to create custom analyses to meet unique case analytics needs.
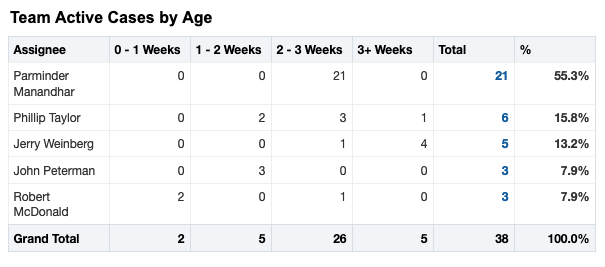
This feature lets managers proactively monitor long running active cases, for timely dispositions.
Steps to Enable
You don't need to do anything to enable this feature.
Key Resources
- See the “Subject Areas” chapter in the Subject Areas for Transactional Business Intelligence in CX Sales and B2B Service guide.
Role Information
- Case Managers and Case Workers can use this feature.