
- Revision History
- Overview
- Feature Summary
- Service Center
-
- Service Request Management
-
- Edit Relationships Between Service Requests in Service Classic UI
- Use Service Request Milestones in the Adaptive Search Framework
- View the Next Milestone Due in the Service Request Header
- View Complete Email Content
- Preview Image Attachments in a Service Request
- Improve the User Experience by Extending the Wrap Up UI
- Integrate with Microsoft Exchange Server to Capture Inbound Emails for Service
- Create Bi-Directional Event Communications using the UI Events Framework
- Manage Multiple Contacts and Resources for Tasks and Appointments in the Redwood Experience
- Updated Editor for Authoring SmartText and Composing Service Request Message
-
- Work Order Management
- Case Management
- Service Analytics
- Service Request Management
This document will continue to evolve as existing sections change and new information is added. All updates appear in the following table:
| Date | Module | Feature | Notes |
|---|---|---|---|
| 31 MAR 2023 | Service Request Management | Enhanced Editor for Authoring SmartText and Composing Service Request Message | Updated document. Delivered new feature in update 23A. |
| 14 DEC 2022 | Created initial document. |
 HAVE AN IDEA?
We’re here and we’re listening. If you have a suggestion on how to make our cloud services even better then go ahead and tell us. There are several ways to submit your ideas, for example, through the Ideas Lab on Oracle Customer Connect. Wherever you see this icon after the feature name it means we delivered one of your ideas.
GIVE US FEEDBACK
We welcome your comments and suggestions to improve the content. Please send us your feedback at oracle_fusion_applications_help_ww_grp@oracle.com.
DISCLAIMER
The information contained in this document may include statements about Oracle’s product development plans. Many factors can materially affect Oracle’s product development plans and the nature and timing of future product releases. Accordingly, this Information is provided to you solely for information only, is not a commitment to deliver any material, code, or functionality, and should not be relied upon in making purchasing decisions. The development, release, and timing of any features or functionality described remains at the sole discretion of Oracle.
This information may not be incorporated into any contractual agreement with Oracle or its subsidiaries or affiliates. Oracle specifically disclaims any liability with respect to this information. Refer to the Legal Notices and Terms of Use for further information.
Column Definitions:
Report = New or modified, Oracle-delivered, ready to run reports.
UI or Process-Based: Small Scale = These UI or process-based features are typically comprised of minor field, validation, or program changes. Therefore, the potential impact to users is minimal.
UI or Process-Based: Larger Scale* = These UI or process-based features have more complex designs. Therefore, the potential impact to users is higher.
Features Delivered Disabled = Action is needed BEFORE these features can be used by END USERS. These features are delivered disabled and you choose if and when to enable them. For example, a) new or expanded BI subject areas need to first be incorporated into reports, b) Integration is required to utilize new web services, or c) features must be assigned to user roles before they can be accessed.
| Ready for Use by End Users Reports plus Small Scale UI or Process-Based new features will have minimal user impact after an update. Therefore, customer acceptance testing should focus on the Larger Scale UI or Process-Based* new features. |
Customer Must Take Action before Use by End Users Not disruptive as action is required to make these features ready to use. As you selectively choose to leverage, you set your test and roll out timing. |
|||||
|---|---|---|---|---|---|---|
| Feature |
Report |
UI or |
UI or |
|
||
Edit Relationships Between Service Requests in Service Classic UI |
||||||
Use Service Request Milestones in the Adaptive Search Framework |
||||||
Integrate with Microsoft Exchange Server to Capture Inbound Emails for Service |
||||||
Create Bi-Directional Event Communications using the UI Events Framework |
||||||
Manage Multiple Contacts and Resources for Tasks and Appointments in the Redwood Experience |
||||||
Updated Editor for Authoring SmartText and Composing Service Request Message |
||||||
Manage Multiple Contacts and Resources for Tasks and Appointments |
||||||
Gain visibility into omnichannel agent presence/availability by queues |
||||||
Edit Relationships Between Service Requests in Service Classic UI
Users of the Service Classic UI can edit relationships between service requests by modifying the link type on the relationship to more accurately convey the business meaning.
Relationships enhance agent efficiency by making it easier for agents to view, navigate, and update related SRs.
Steps to Enable
You don't need to do anything to enable this feature.
Key Resources
- For more information about managing service requests, see the Using Service Center Classic User Experience guide.
Use Service Request Milestones in the Adaptive Search Framework
Search for and prioritize service requests by the date and time the next milestone is due. This feature is available in both the workspace UI and Redwood Service Center saved searches.
Agents can organize and prioritize service requests by the milestone due date.
Steps to Enable
The Service Request object now has two new child objects available in the Adaptive Search framework, which must be enabled in the Configure Adaptive Search task in Setup and Maintenance. Once enabled, fields from Nearest Milestone can be added to service request saved searches to allow users to display, sort, and search service requests based on when the nearest milestone is due.
Tips And Considerations
In adaptive search, you must enable both the Nearest Milestone child object, and the Milestones child object, as well as the same corresponding fields, in order to display, search, and sort by fields from a service request's nearest milestone.
Key Resources
- For details on enabling child objects in the adaptive search framework, see the Implementation Reference guide under Help Center (https://docs.oracle.com) > Cloud Applications > Fusion Applications Suite > Sales Automation
View the Next Milestone Due in the Service Request Header
Use this Redwood User Experience feature to quickly view your next milestone in the page header of your assigned service requests.
In the Redwood user experience, when an agent is assigned to a service request, she can quickly and easily see the next milestone due in the header. If users view service requests that aren't assigned to them, they can see who the assigned resource is in the header. In both scenarios, users can see if there is a milestone warning icon in the header.
Steps to Enable
You don't need to do anything to enable this feature.
Access Requirements
This feature is available by default for all roles that have the permissions to view service requests.
The Messages tab of the Edit Service Request page lets you view the complete email content without any truncation. Click the Email icon on the Messages tab of the Edit Service Request page. The complete email content, along with the email channel information, is displayed in a new window. Click the Close button to close this window.
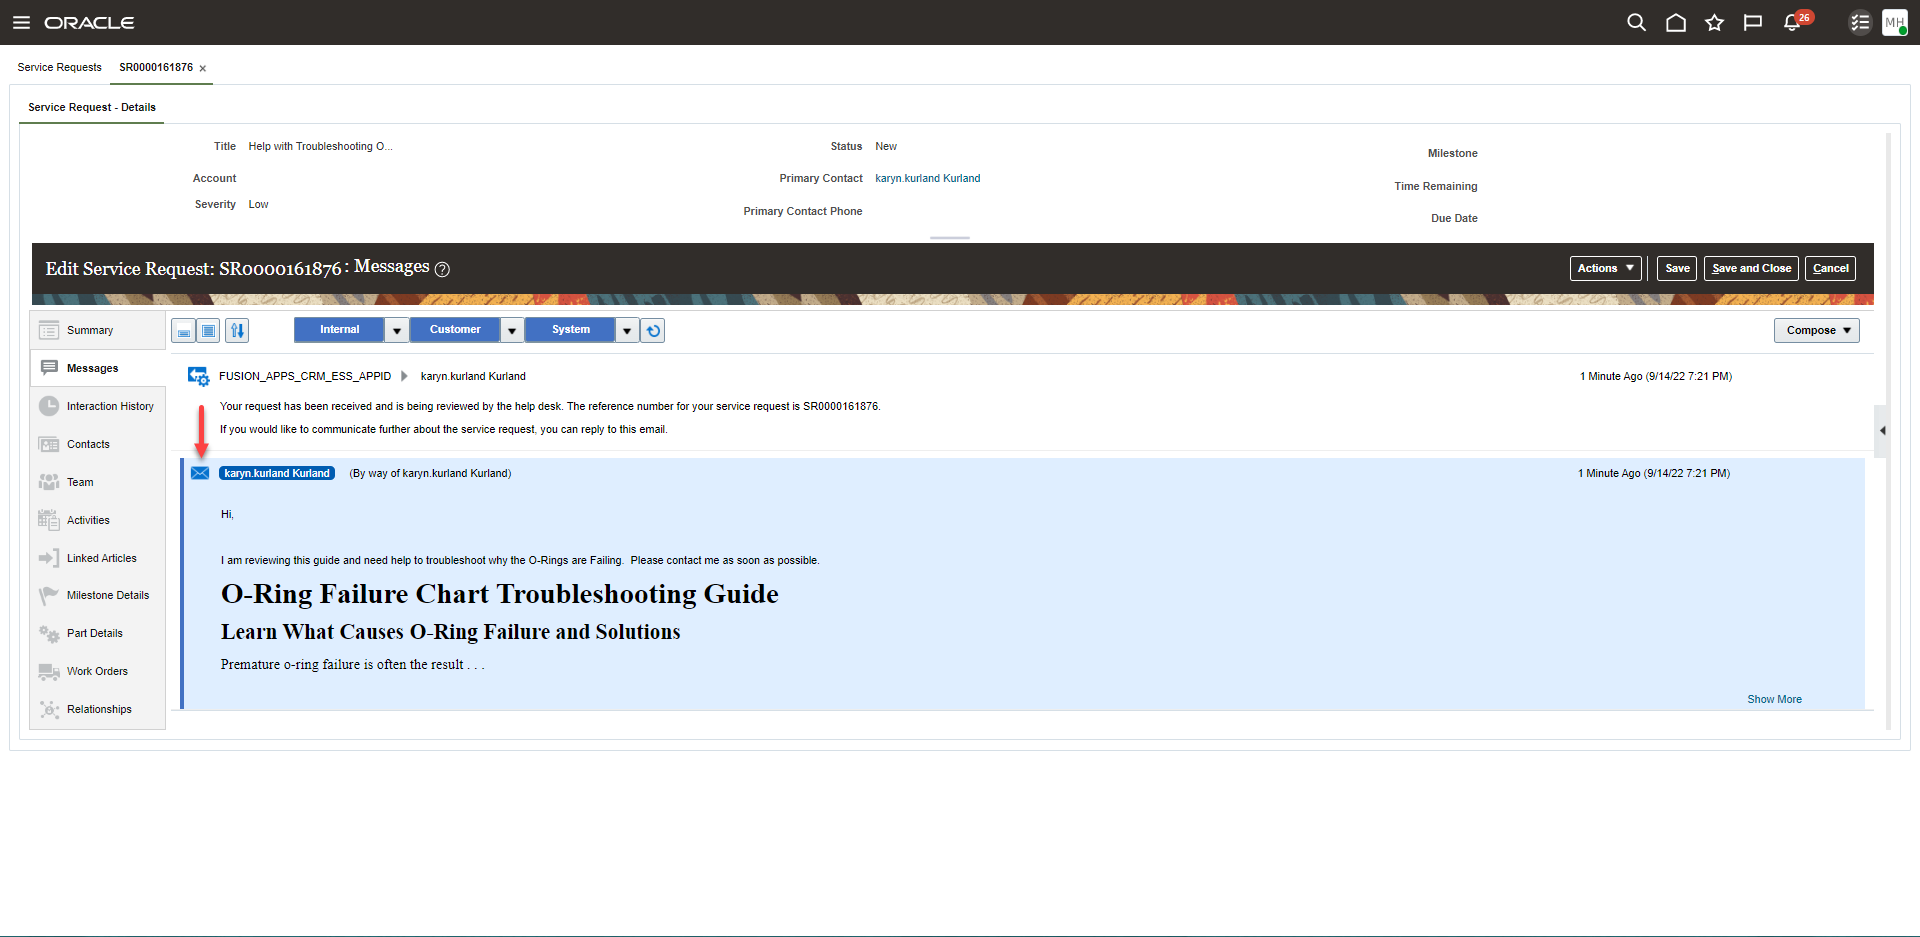
Press Email Icon to View Email Content
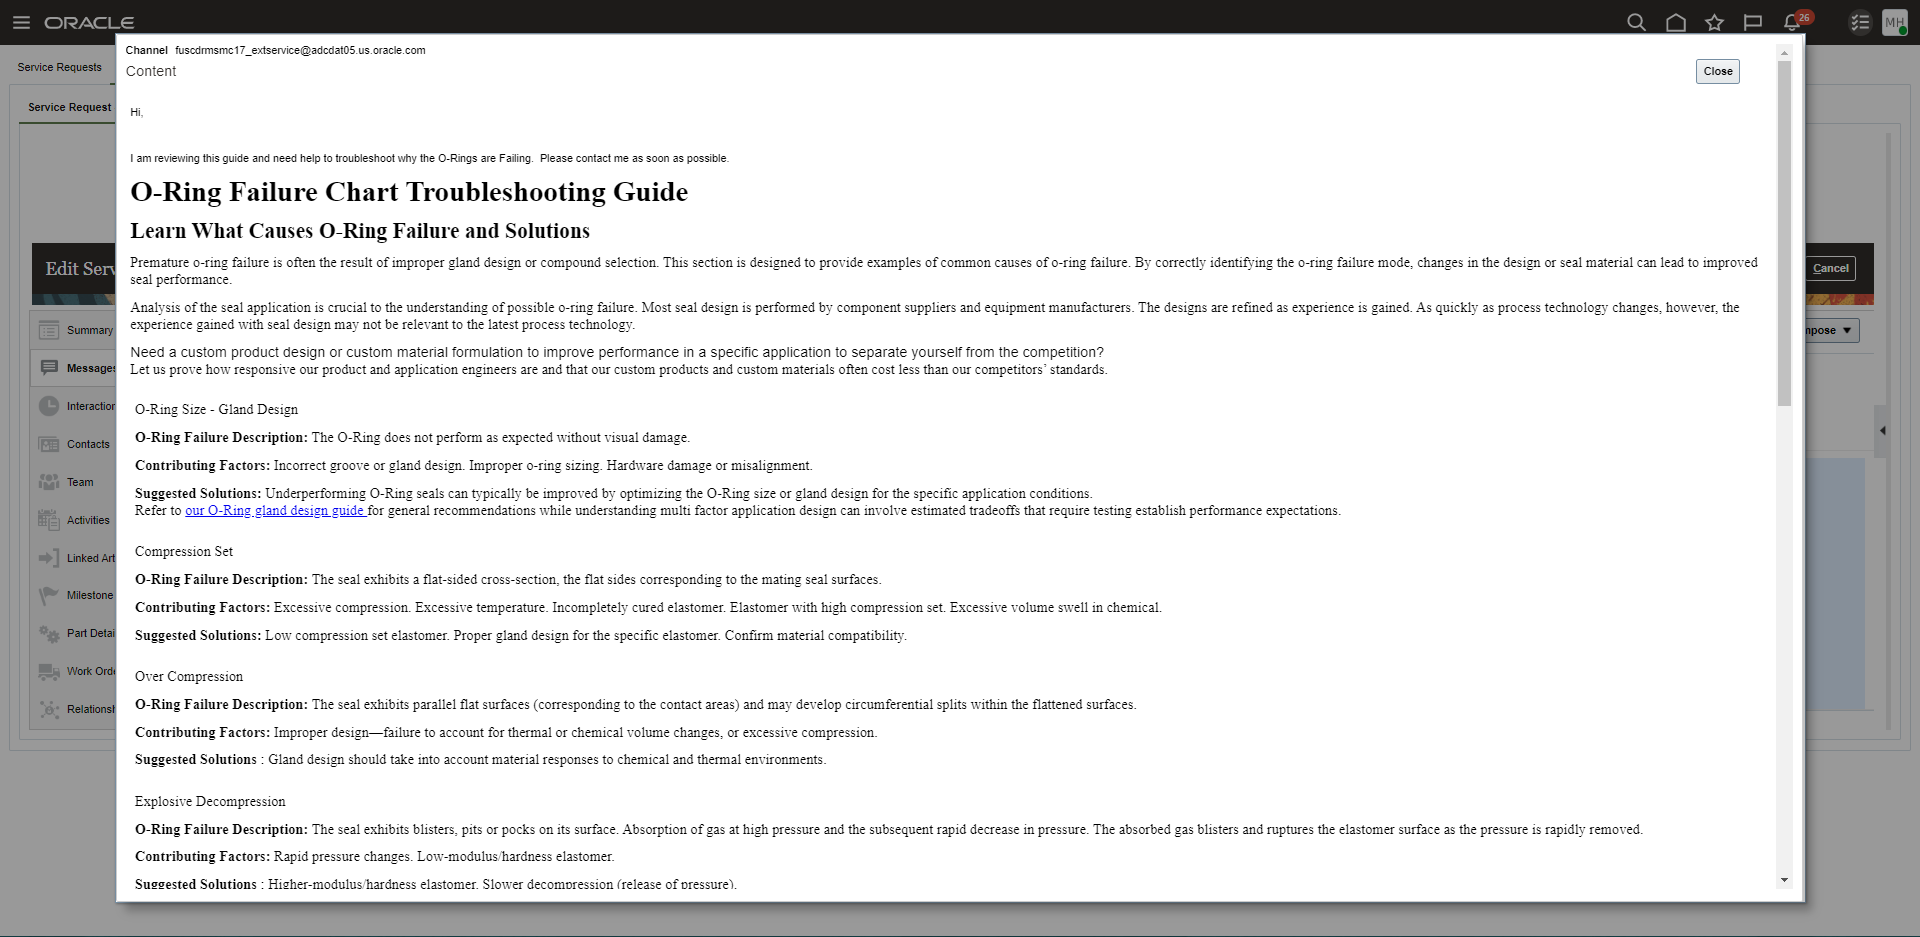
Pop-up Window Displaying Email Content
The addition of viewing the full original email message will improve agents productivity by allowing them to see the email message in its entirety.
Steps to Enable
You don't need to do anything to enable this feature.
Access Requirements
Service Representative
Preview Image Attachments in a Service Request
In the Redwood user experience, you can preview image file attachments from the Service Request Overview and Service Request Details pages. If you're on the Service Request Overview page, select the Show Attachments action in the Action Bar, and then in the Attachments section, click More Actions > Preview. If you're on the Service Request Details page, click More Actions > Preview in the Attachments section. Not all attachment types are supported at this time for preview.
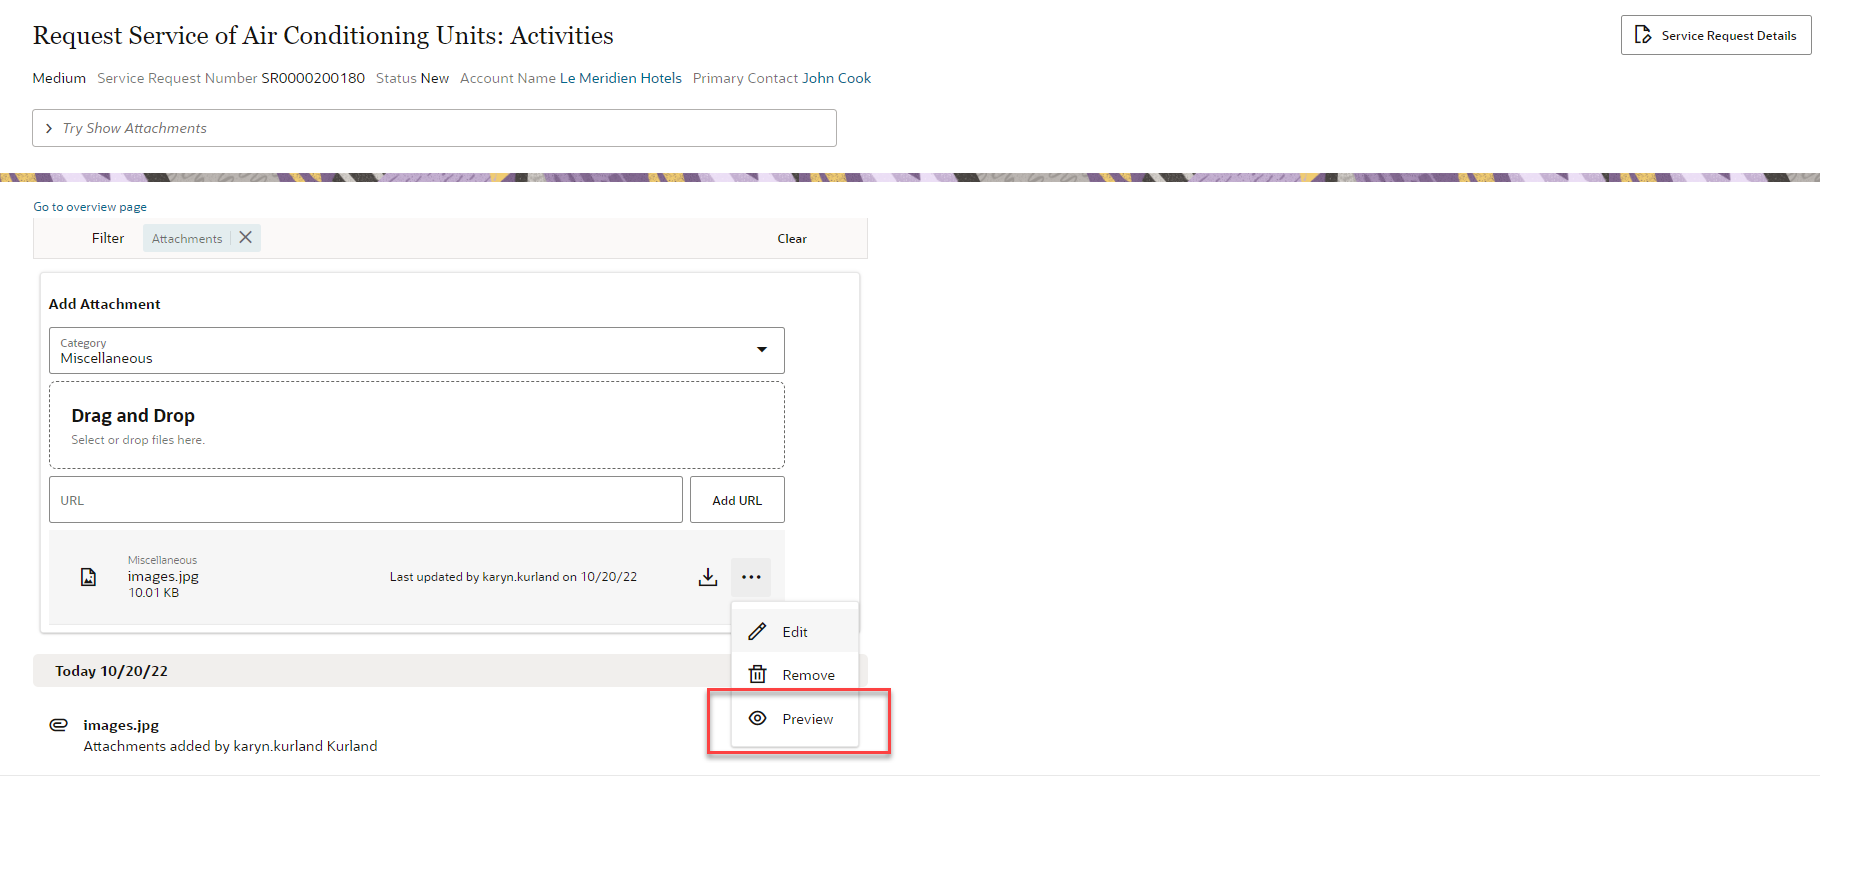
Preview Attachment from Show Attachment command in Action Bar
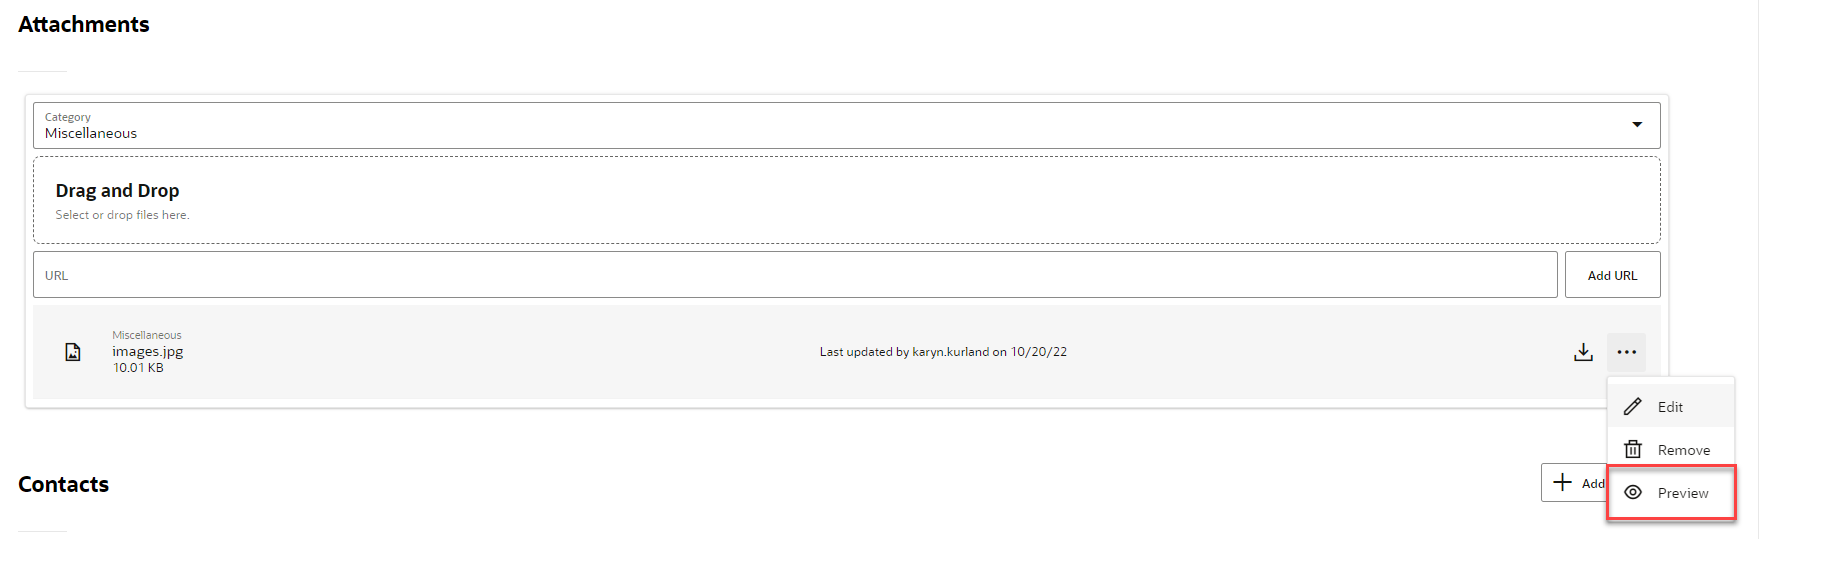
Preview Attachment from Attachments section in Service Request Details Page
You can preview an image attachment without having to download it.
Steps to Enable
You don't need to do anything to enable this feature.
Tips And Considerations
Not all attachment types are supported at this time for preview.
Access Requirements
Customer Service Representatives
Improve the User Experience by Extending the Wrap Up UI
You can now extend the Wrap UI in the Service application for the Redwood user experience. Here are all the new UI extensions you can make with this feature:
- Add or remove standard or custom fields
- Mark a standard or custom field mandatory
- Display fields conditionally, and make them required conditionally
- Configure a conditional Wrap Up UI layout based on attributes like Application Classification, Channel, and Communication
Enhance the functionality of the application with the ability to configure the Wrap UI to meet your business flows.
Steps to Enable
Leverage Application Composer to expose and adjust page layout and attributes. To learn more about extending your application using Application Composer, visit Oracle Help Center > your apps service area of interest > Books > Configuration and Extension.
Leverage Visual Builder to expose and adjust page layout and attributes. To learn more about extending your application using Visual Builder, visit Oracle Help Center > Oracle Cloud Infrastructure Documentation > Infrastructure Services > Visual Builder
Key Resources
- See the "Real Time Channels" section in the Implementing Fusion Service guide.
Access Requirements
These roles have access to VB Studio as either a VB Studio administrator (DEVELOPER_ADMINISTRATOR) or VB Studio user (DEVELOPER_USER) in IDCS:
- Application Administrator (ORA_FND_APPLICATION_ADMINISTRATOR_JOB)
- Service Administrator (ORA_ZBS_SALES_ADMINISTRATOR_JOB)
- Customer Relationship Management Application Administrator (ORA_ZCA_CUSTOMER_RELATIONSHIP_MANAGEMENT_APPLICATION_ADMINISTRATOR_JOB)
- Application Developer (ORA_FND_APPLICATION_DEVELOPER_JOB)
Integrate with Microsoft Exchange Server to Capture Inbound Emails for Service
Application administrators can now configure the Service Inbound Email setup to directly fetch emails from your Microsoft Exchange instance, rather than needing to forward messages to Oracle's cloud email address.
Microsoft 365, coupled with Microsoft Exchange, is a popular email solution used by Oracle Fusion Service customers. By directly integrating with Microsoft Outlook, customers get the following benefits:
- Avoid the overhead of setting redirect rules to forward emails to Oracle and configure the Service application to read emails from the Exchange account directly.
- Service request messages can process attachments on inbound emails that are larger than 15 MB.
Steps to Enable
There are multiple steps required to enable this feature. As an application administrator, there are setup steps that are required in both Fusion Service and Microsoft Azure Active Directory. It is strongly recommended that you reference the Service Center Implementation documentation for details.
In summary, the following setup steps are required:
- Go into Microsoft Azure Active Directory > App Registration page and click on the "+New Registration" button at the top.
- Register Fusion Service as an application. On completion of this step, you will be provided with an Application (Client) ID and Client Secret. Save this information.
- Set this profile option to Y to enable the Outlook integration: ORA_SVC_ENABLE_INBOUND_EMAIL_EXTERNAL_APPS_CONFIGURATION.
- Once the profile option is enabled, you can enter the configuration information in the FSM Manage Email Configuration, Registration, and Validation page section, "Configure external applications".
- In Configure external applications section, enter the configuration information, including the Outlook email address, Microsoft Client ID and Client Secret.
Access Requirements
In order to set up and configure this feature, you need Administration privileges for both Microsoft Azure Active Directory and Fusion Service.
Create Bi-Directional Event Communications using the UI Events Framework
UI Events Framework is a client-side library that allows system administrators and developers to create a UI integration using bi-directional event communication. For example, developers can load the UI Events Framework javascript library in an external web application to listen to the Fusion Service Center actions and events. The external web application can be embedded in the Fusion Service Center via the iFrame component and interact with the core application upon a save event or field value change. Also, the web application triggers actions, including setting a field value, getting a field value, or saving. As a result, an external web application and the Fusion Service Center can establish a bi-directional communication to improve users' navigation flow and reduce steps when interacting with multiple systems.
Developers and system integrators can use UI Events Framework to build a bi-directional integration with Fusion Service Center. The framework provides a low-code and standardized way to build mashup integrations that can consume extension events and actions. As a result, users within Service Center can interact with external systems thus reducing the amount of data that needs to reside locally within the Fusion database.
Steps to Enable
For an external application to interact with the service center, the external application needs to add the UI Events Framework library file in the external application. The library file is available at https://static.oracle.com/cdn/ui-events-framework/client/ui-events-framework-client.js.To to add the UI Events Framework library file to the external application, users can use any native method of loading scripts into an HTML file.
E.g., Load the library file in an HTML using the script tag
<script src="https://static.oracle.com/cdn/ui-events-framework/libs/ui-events-framework-client.js"></script>
Tips And Considerations
UI Events Framework is only available within the Service Center within the Redwood user experience
Access Requirements
No role & privileges are needed.
Manage Multiple Contacts and Resources for Tasks and Appointments in the Redwood Experience
In the Redwood user experience for Service Requests, you can now include multiple Contacts and Resources for Tasks and Appointments. In addition, Tasks and Appointments will also appear as one of the highlighted items in the spotlight banner. Finally, authorized users can delete Tasks and Appointments.
Tasks and Appointments enable agents to manage complex issues naturally and efficiently.
Steps to Enable
You don't need to do anything to enable this feature.
Key Resources
- For more information about managing service requests, see the Using Service Center Classic User Experience guide.
Access Requirements
Service Representative
Updated Editor for Authoring SmartText and Composing Service Request Message
The application uses an updated version of the rich text editor when you are authoring a SmartText or composing a Service Request message. This new editor provides some new toolbar options.
Here are some of the updated toolbar options:
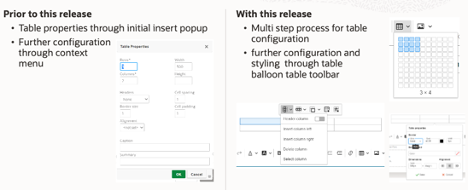
1. A table can be easily inserted and configured using the balloon table toolbar. After inserting the specified size of the table with the Table toolbar button further configuration can be done using the Table balloon toolbar:
- Column related actions (insert, delete, define as header column)
- Row related actions (insert, delete, define as header row)
- Merge Cells (merge and split)
- Table Properties (dimensions, border style and color, background color, alignment)
- Cell Properties (dimensions, border style and color, background color, alignment)
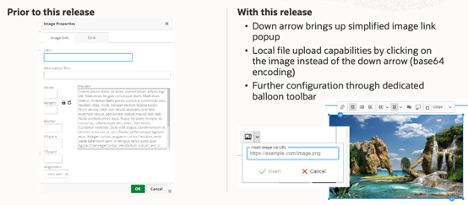
2. An image can be inserted easily by using the arrow down of the image button. You can also drag and drop a local file or upload it using the image button. After inserting an image further configuration can be done using the Image balloon toolbar:
- Link
- Alignment
- Wrap and break text
- Alternative text
- Caption
- Sizing
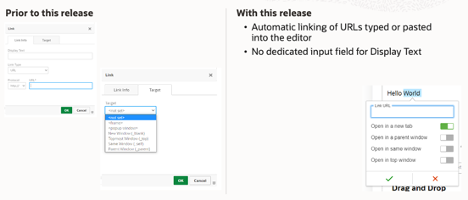
3. Links
- There is automatic linking of URLs that are typed or pasted into the editor. The default target for these links is to open it in a new browser tab.
- There are multiple ways to enter a link
-
Method 1: Use the Link toolbar button to enter the URL and the display text will be the same as the URL
-
Position cursor at position 2 of the link text
-
Remove the first character
-
Type the new display text
-
Remove the remainder or the old display text
-
-
Method 2:
-
Type the display text
-
Select the un-linked display text
-
Use the link toolbar button to set the URL
-
-
Method 3:
-
Select the display text without any leading or trailing spaces
-
Type the new display text
-
-
Users may find it easier to perform certain formatting such as inserting tables, images and links.
Steps to Enable
You don't need to do anything to enable this feature.
Tips And Considerations
These are a list of Known Issues or Limitations with the new editor version when composing Service Request text:
| # | Known Issue or Limitation | Workaround |
|---|---|---|
| 1 | Problem Description and Solution Description fields in Service Request display only the character count. They do not display the paragraph and word counts. |
There is no available workaround. The counter on the right bottom of the editor no longer shows the paragraph and word counts but only a character count. |
| 2 | The resize handle in the right bottom corner of the Problem Description and Solution Description fields in Service Request is no longer available. |
There is a known limitation with the editor where the re-sizing of a field isn't possible. |
| 3 | The error message is displayed differently in the Service Request Problem Description and Solution Description fields when the character count exceeds the limit. Unlike the previous release, a toast message is not shown in the text area while typing. In this release, the error is shown when the user tries to save the message. | There is no available workaround. |
| 4 | When the user is inserting a SmartText by typing some characters, the list of SmartTexts that is returned shows all SmartTexts whose name includes those characters sorted in alphabetical order. This differs from the previous release which displayed SmartTexts that started with the typed characters at the top of the suggestion list. | There is no available workaround . The list of SmartText displayed is ordered by SmartText name and is case sensitive which means that SmartText with capital letters will be displayed first. |
| 5 | The Enter key adds a break at the end the line of text, creating a visual space between the two lines. This differs from the previous release which did not add line spacing. |
Press the Shift+Enter combination to end a line of text without creating a new block of text. |
| 6 | When performing a 'Cut and Paste' operation from Excel into the SR message, the cells will be center aligned in the row of text, the cells will have a visible border, and other source formatting will be removed. | As a workaround, your user can use the toolbar to update the table properties such that the cell is left aligned and the cell has no borders. |
| 7 | In SR messages, the SmartText list display is limited to a maximum of 10 records at a time. |
This is a known limitation. The workaround is to restrict the SmartText list further by typing more of the SmartText name until the desired match is visible. |
| 8 | The “Format Painter” option is no longer available. |
There is no available workaround. |
| 9 | There are intermittent issues where inserting a table into the SR message and posting the message does not save some contents of the table. |
As a workaround, your user should bring the focus outside of the table and back into the editor before Saving or Posting the SR message. |
| 10 | When performing a 'Cut and Paste' operation from Excel into the SR message for a table with a large number of columns, the “Show More” link for the SR message appears to be hidden |
As a workaround, your user can use the expand / collapse all option. |
| 11 | When authoring an HTML SmartText, line breaks get duplicated if the user converts the HTML SmartText to a Plain text SmartText. | The workaround is to manually remove the extra line breaks. |
Access Requirements
Customer Service Representative
Order Parts from the Service Work Order
Your service agents can now order parts when scheduling a Work Order in the Redwood user experience. When a Field Service Work Order requires parts, they can be ordered and shipped directly to the customer, to the field technician that is scheduled to perform the work, or to a depot for the field service technician to pick up before performing the work.
Part ordering from the work order allows agents to order the required parts based on the asset and type of work being performed to synchronize the part delivery with the technician's scheduled arrival. This helps to ensure the technician has all the parts required to complete the work in one visit to increase the technician's efficiency, reduce cost and increase the overall customer satisfaction.
Steps to Enable
To enable part orders in Redwood, you must have both part orders and work orders in Redwood enabled.
To expose the Service Logistics Parts Orders, do the following:
-
In the Setup and Maintenance work area, go to the following:
-
Offering: Service
-
Functional Area: Change Feature Opt-in
-
-
In the Redwood User Interface for Service row, click the Edit icon in the Features column.
-
Click the Enable icon for Enable Redwood User Interface for Service.
-
Click the Enable icon for Work Orders for Redwood User Interface.
-
Click Done.
-
Click Done on the Opt In page.
The Service Center and Work Order (Next Generation) icons now appear in the Service section.
To expose the Service Logistics Parts Orders, do the following:
-
In the Setup and Maintenance work area, go to the following:
-
Offering: Service
-
Functional Area: Change Feature Opt-in
-
-
In the Service row, click the Edit icon in the Features column.
-
Click the Enable icon for Service Logistics Parts Order.
-
In the Feature Name Service Logistics Parts Order window select the following, Service Request Work Order Parts Order check box for both parts and work orders.
-
Click Save and Close.
-
Click Done.
-
Click Done on the Opt In page.
The Service Request Parts Order region and tab now appear on the Work Order page. Refer to the Getting Started with Service Logistics Cloud Implementation guide to continue setup of Service Logistics.
Tips And Considerations
In order to create integrated field service work orders, subscriptions to the following Oracle services are required:
- Oracle Engagement Cloud
- Oracle Field Service Cloud
- Oracle Integration Cloud (OIC)
- Oracle Supply Chain Management
To make setup easier, download OIC's prebuilt flows on Oracle Cloud Marketplace (https://cloud.oracle.com). Search for Oracle Engagement Cloud to Oracle Field Service Cloud Integration Flow.
Key Resources
See the following guides on the Oracle Help Center (https://docs.oracle.com):
-
For details about Service Logistics setup for Work Order management, see the Implementing Service in Engagement Cloud guide.
-
For details about configuring field service work order management, see the Integrating B2B Service with Field Service guide.
-
For details about using service work orders in Redwood, see the Using Service Center in the Redwood User Experience guide.
-
For details about implementing service work orders in Redwood, see the Implementing Service Center with the Redwood User Experience guide.
Access Requirements
Service Administrator
Manage Multiple Contacts and Resources for Tasks and Appointments
You can now include multiple Contacts and Resources for Case Tasks and Appointments. In addition, Tasks and Appointments will also appear as one of the highlighted items in the spotlight banner in the Case Details page. Finally, authorized users can delete Tasks and Appointments.
Tasks and Appointments enable case workers to manage underlying tasks and meetings related to resolving a case.
Steps to Enable
You don't need to do anything to enable this feature.
Key Resources
- For more information about managing case, see the Using Case Management guide.
Access Requirements
Case Worker
Gain visibility into omnichannel agent presence/availability by queues
Build impactful analyses using the new 'CRM/Help Desk - Omni Channel Queue Resource Availability Real Time' subject area to gain visibility into agent presence and availability by queue.
Optimize work allocation in a multi-channel environment with insights into agent engagement and response for various work types and channels.
Steps to Enable
You don't need to do anything to enable this feature.
Tips And Considerations
Refer to the Fusion Service Report Sharing Center on Customer Connect to view and download sample reports built from the new subject area:
https://community.oracle.com/customerconnect/categories/cx-fusion-svc-report-sharing-center
Key Resources
- OTBI Subject Area Documentation
Access Requirements
Sales/Service Administrator
HR Help Desk and Internal Help Desk Administrators
Customer Service Manager
Next Gen HR Help Desk Manager
Internal Help Desk Manager
Use BI Cloud Connector View Objects for Omnichannel, Work Order, Case Management and SR Resource Members
The new Business Intelligence (BI) Cloud Connector view objects let you extract data for:
- Omnichannel
- Work Order
- Case Management
- SR Resource Members
You also can use this feature for high-volume data extraction into your own custom data warehouse or other targets.
This enhancement allows you to perform high volume data extraction for these new objects.
Steps to Enable
You don't need to do anything to enable this feature.
Key Resources
- Extract Data Stores for CX Sales and Fusion Service
- Getting Started with BICC
- Data Lineage Mapping with View Objects