- Revision History
- Overview
- Feature Summary
- Service Center
-
- Service Request Management
-
- Require agents to provide user entered values when inserting SmartText
- Mark a Service Request Record as Favorite from Workspace and Redwood User Interface List Pages
- Enable Creating and Viewing an Audit Trail for Service Requests
- Default the Service Request number and title in the subject line when composing a new email.
- Configure custom drill-down paths from the SR list
- Configure the Action Bar for Optimized Suggestions and Hints
- Configure Milestones to be Due at Specific Times
- Support Activity to Service Request relationship in Access Groups
- Auto-delete closed SRs
- REST-based wrapper around SOAP APIs
- Analyze SR Similarity Performance with Intuitive Dashboard
- Enhanced Bi-Directional Event Communications using the UI Events Framework
- Display the telephony media toolbar in a floating browser window
- Use UI Events Framework to Control the Side Panel, Open Popup Windows, and Get More User Info
- Restrict Service Request's Attachment Download Capability in Classic UI
-
- Service Channels
- Work Order Management
- Service Analytics
- Digital Engagement Channels
- Case Management
- Service Request Management
Update 23B
Revision History
This document will continue to evolve as existing sections change and new information is added. All updates appear in the following table:
| Date | Module | Feature | Notes |
|---|---|---|---|
| 29 MAR 2024 | Service Request Management |
Restrict Service Request's Attachment Download Capability in Classic UI | Updated document. Revised feature information. |
| 26 JAN 2024 | Service Request Management |
Restrict Service Request's Attachment Download Capability in Classic UI | Updated document. Delivered new feature in update 23B. |
| 04 MAY 2023 | Case Management |
Updated document. Delivered new feature in update 23B. |
|
| 04 MAY 2023 |
Service Channels | Updated document. Delivered new feature in update 23B. |
|
| 04 MAY 2023 |
Service Request Management | Updated document. Delivered new feature in update 23B. |
|
| 11 APR 2023 | Service Channels | Chat Conferencing and Warm Transfers | Removed feature from update 23B. |
| 03 MAR 2023 | Created initial document. |
Overview
This guide summarizes all features that have been delivered for this Release including new features available as a part of our continuous feature delivery process.
 HAVE AN IDEA?
We’re here and we’re listening. If you have a suggestion on how to make our cloud services even better then go ahead and tell us. There are several ways to submit your ideas, for example, through the Ideas Lab on Oracle Customer Connect. Wherever you see this icon after the feature name it means we delivered one of your ideas.
GIVE US FEEDBACK
We welcome your comments and suggestions to improve the content. Please send us your feedback at oracle_fusion_applications_help_ww_grp@oracle.com.
DISCLAIMER
The information contained in this document may include statements about Oracle’s product development plans. Many factors can materially affect Oracle’s product development plans and the nature and timing of future product releases. Accordingly, this Information is provided to you solely for information only, is not a commitment to deliver any material, code, or functionality, and should not be relied upon in making purchasing decisions. The development, release, and timing of any features or functionality described remains at the sole discretion of Oracle.
This information may not be incorporated into any contractual agreement with Oracle or its subsidiaries or affiliates. Oracle specifically disclaims any liability with respect to this information. Refer to the Legal Notices and Terms of Use for further information.
Feature Summary
Column Definitions:
Report = New or modified, Oracle-delivered, ready to run reports.
UI or Process-Based: Small Scale = These UI or process-based features are typically comprised of minor field, validation, or program changes. Therefore, the potential impact to users is minimal.
UI or Process-Based: Larger Scale* = These UI or process-based features have more complex designs. Therefore, the potential impact to users is higher.
Features Delivered Disabled = Action is needed BEFORE these features can be used by END USERS. These features are delivered disabled and you choose if and when to enable them. For example, a) new or expanded BI subject areas need to first be incorporated into reports, b) Integration is required to utilize new web services, or c) features must be assigned to user roles before they can be accessed.
Service Center
Service Request Management
Require agents to provide user entered values when inserting SmartText
Your company can enable the application to require that agents enter values for user variable prompts when they select a SmartText. This will ensure that all requested data is captured.
Modify the message composing process to ensure required data is populated up front when agents select a SmartText.
Steps to Enable
Configure the profile option “ORA_SVC_SMARTTEXT_MANDATORY_USER_VARIABLES”:
- In the Setup and Maintenance work area, go to the following:
- Offering: Service
- Functional Area: Productivity Tools
- Task: Manage Global Search Profile Options
- Search for the profile option code “ORA_SVC_SMARTTEXT_MANDATORY_USER_VARIABLES”
- Set the site level profile value to “Yes”.
- Click Save and Close.
Tips And Considerations
This feature is only available for the Redwood user experience. This feature is not available on the classic user experience.
When the profile option value is set to "Yes", the user variable mandatory check validation occurs in all Redwood pages where SmartText is invoked i.e. in Service Center, Next Gen Helpdesk, Internal Helpdesk.
Mark a Service Request Record as Favorite from Workspace and Redwood User Interface List Pages
You can mark or unmark a service request record as Favorite from the List pages in Workspace and Redwood User Interface. This provides users with a quick and easy way to work with and access their favorite records.
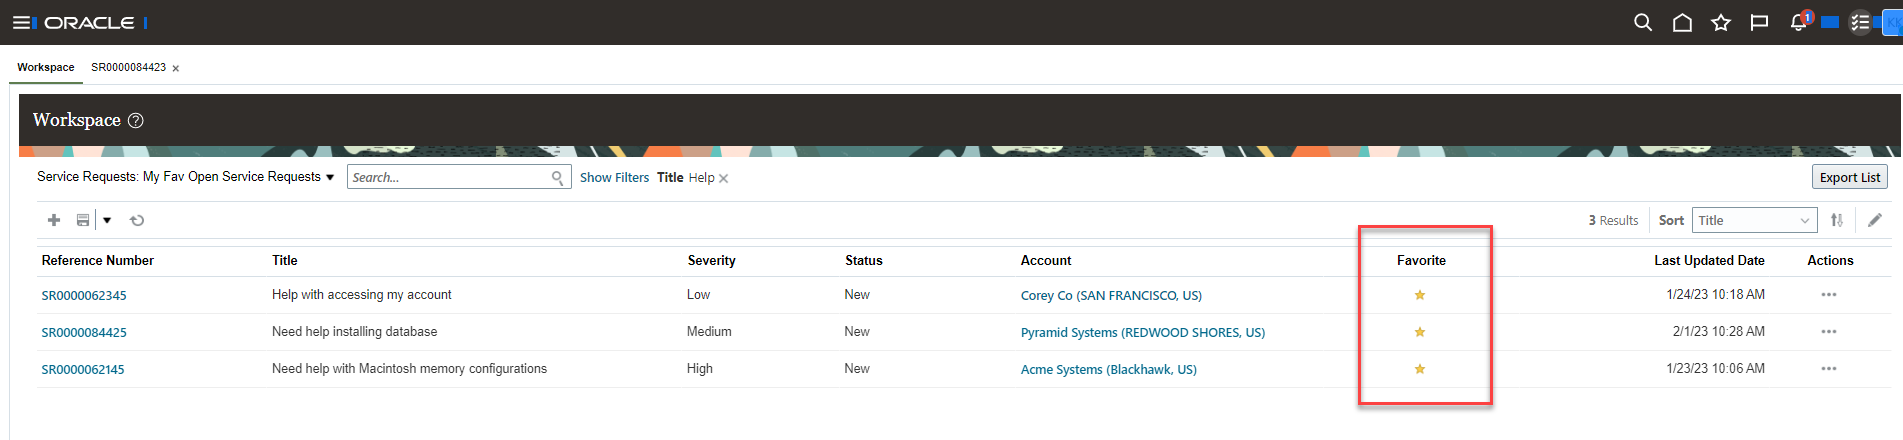
Favorite column exposed in Workspace

Favorite column exposed in Redwood User Interface
This provides you with a quick and easy way to work with and access your favorite records.
Steps to Enable
You need to configure Adaptive Search for the Service Request object to display the Favorite field, and a partial publish of the Adaptive Search Index may need to be performed.
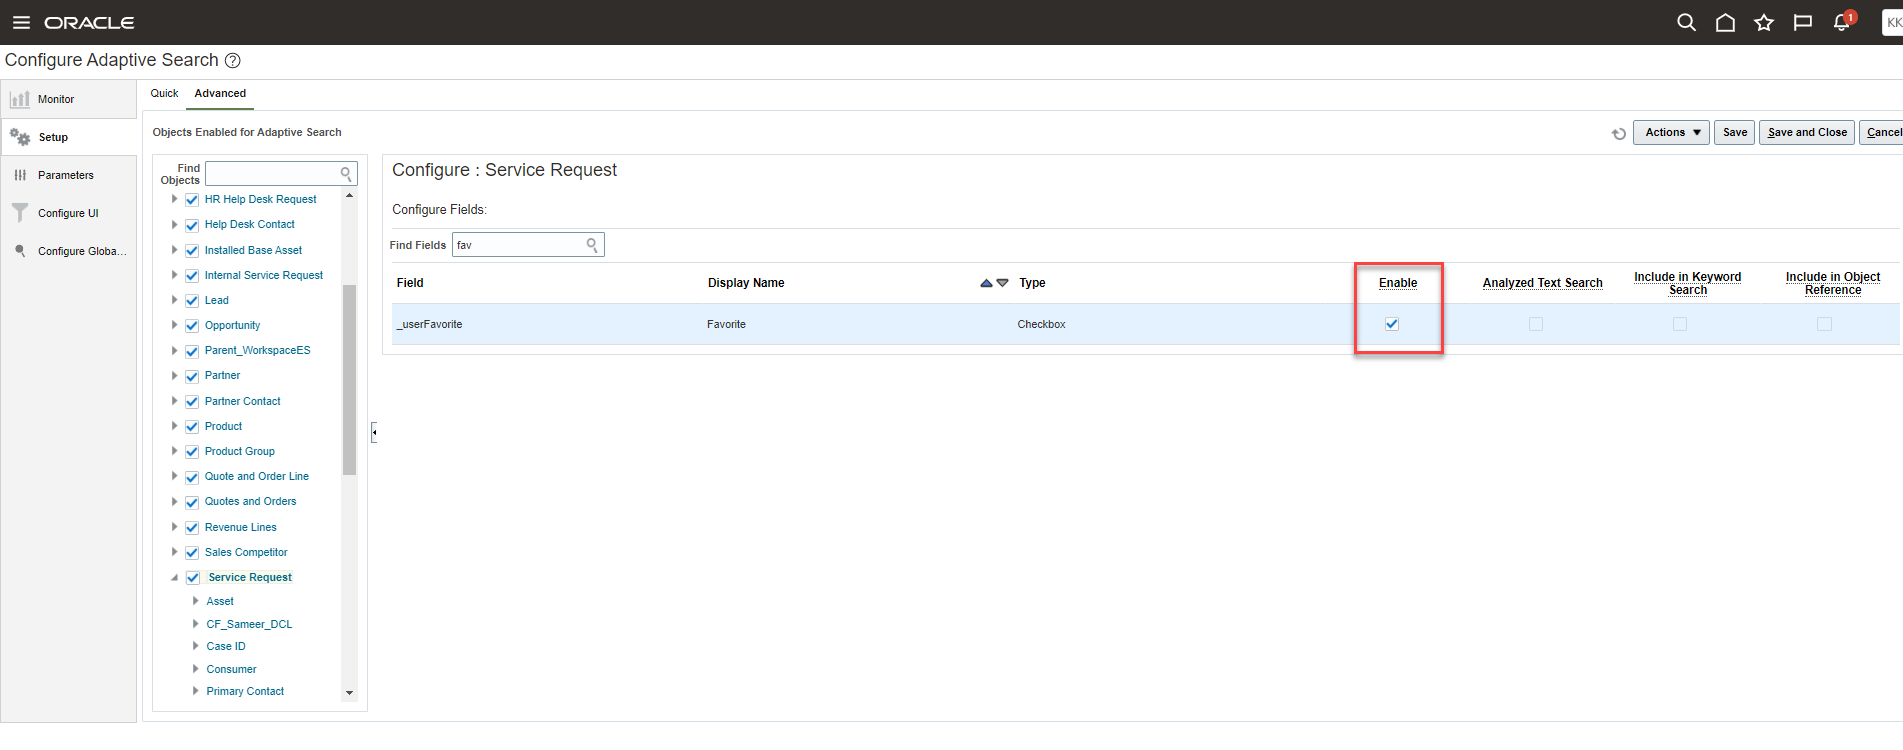
Enable Favorite field in Setup
After enabling the Favorite field, then check the Display checkbox as shown below:
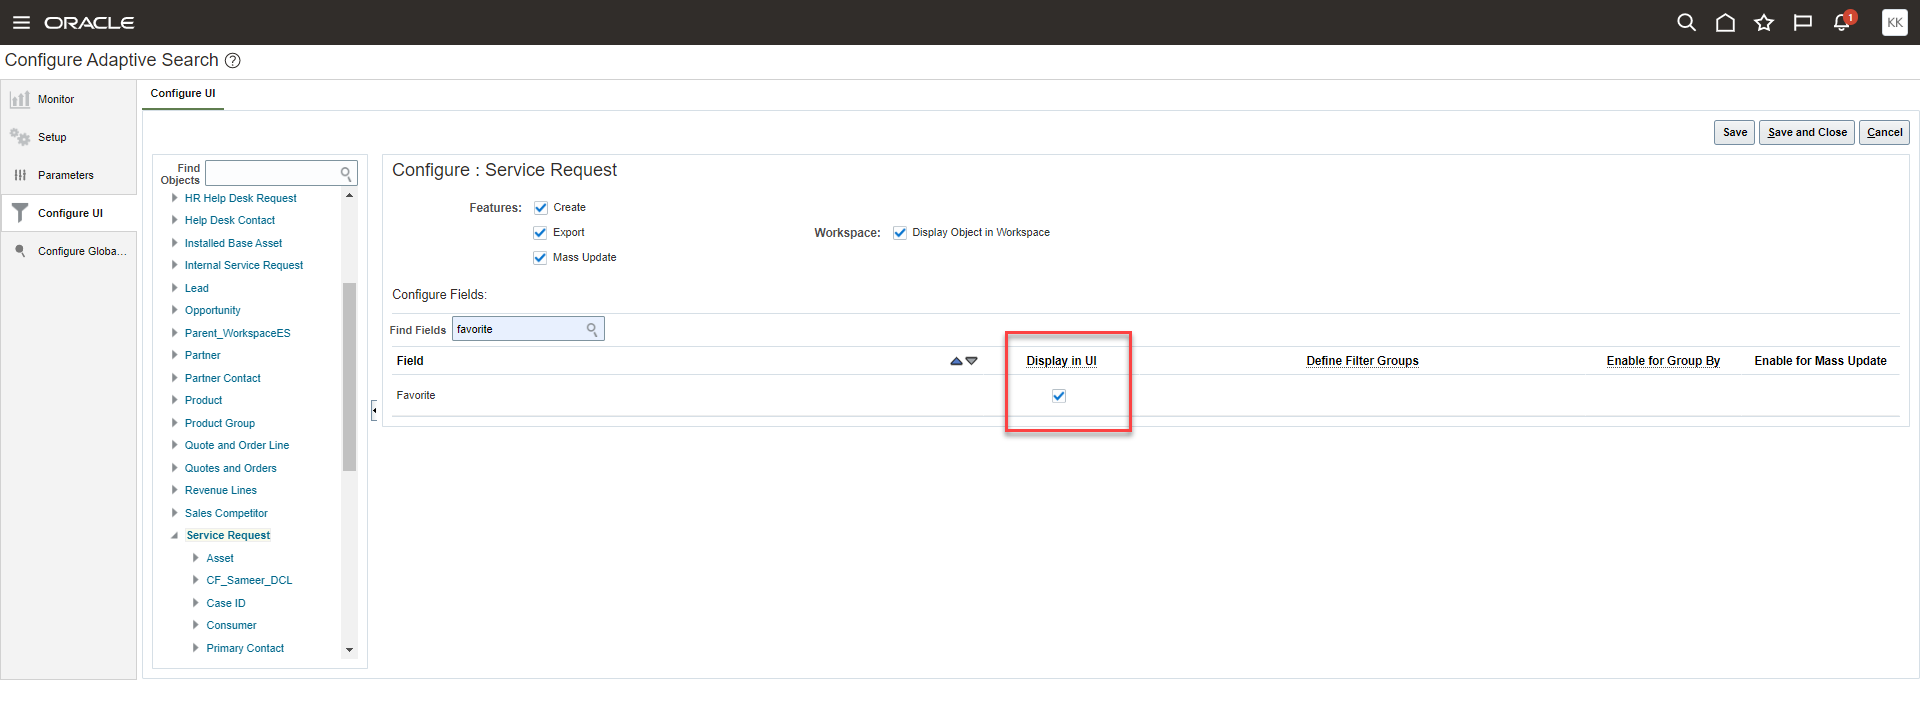
Display UI Checkbox for the Favorite field
Once the Favorite field is enabled for end users, the users can use the manage columns action on the list page to show the column and then toggle the heart icon on a row to mark it as a favorite.
Access Requirements
Customer Service Representative or Help Desk Representative
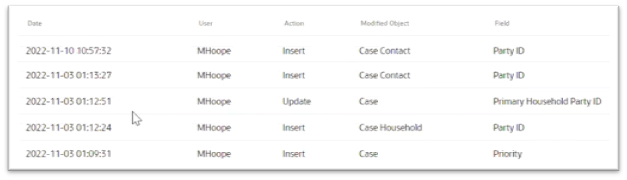
Enable Creating and Viewing an Audit Trail for Service Requests
In the Redwood user interface, you can view an audit trail of changes made to service requests. By default, only certain fields of the Service Request object are audited. If you want more fields to be audited, you must add them through Setup and Maintenance. Audit information will appear in the activity feed page of the service request record.
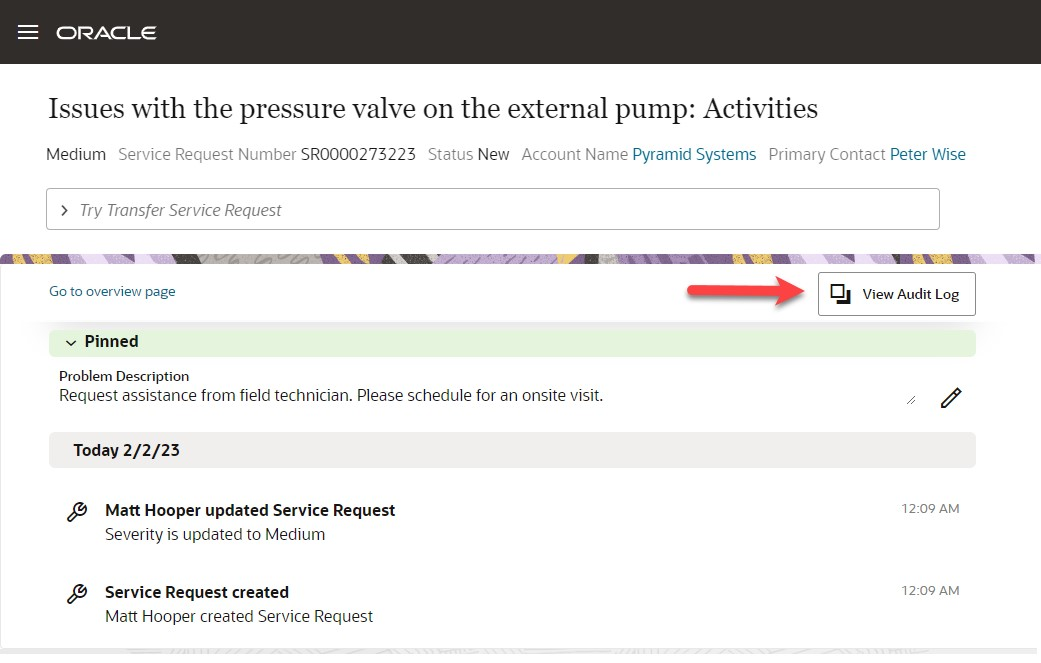
Action to View Audit Log
Here are the audit details shown for the service request record.
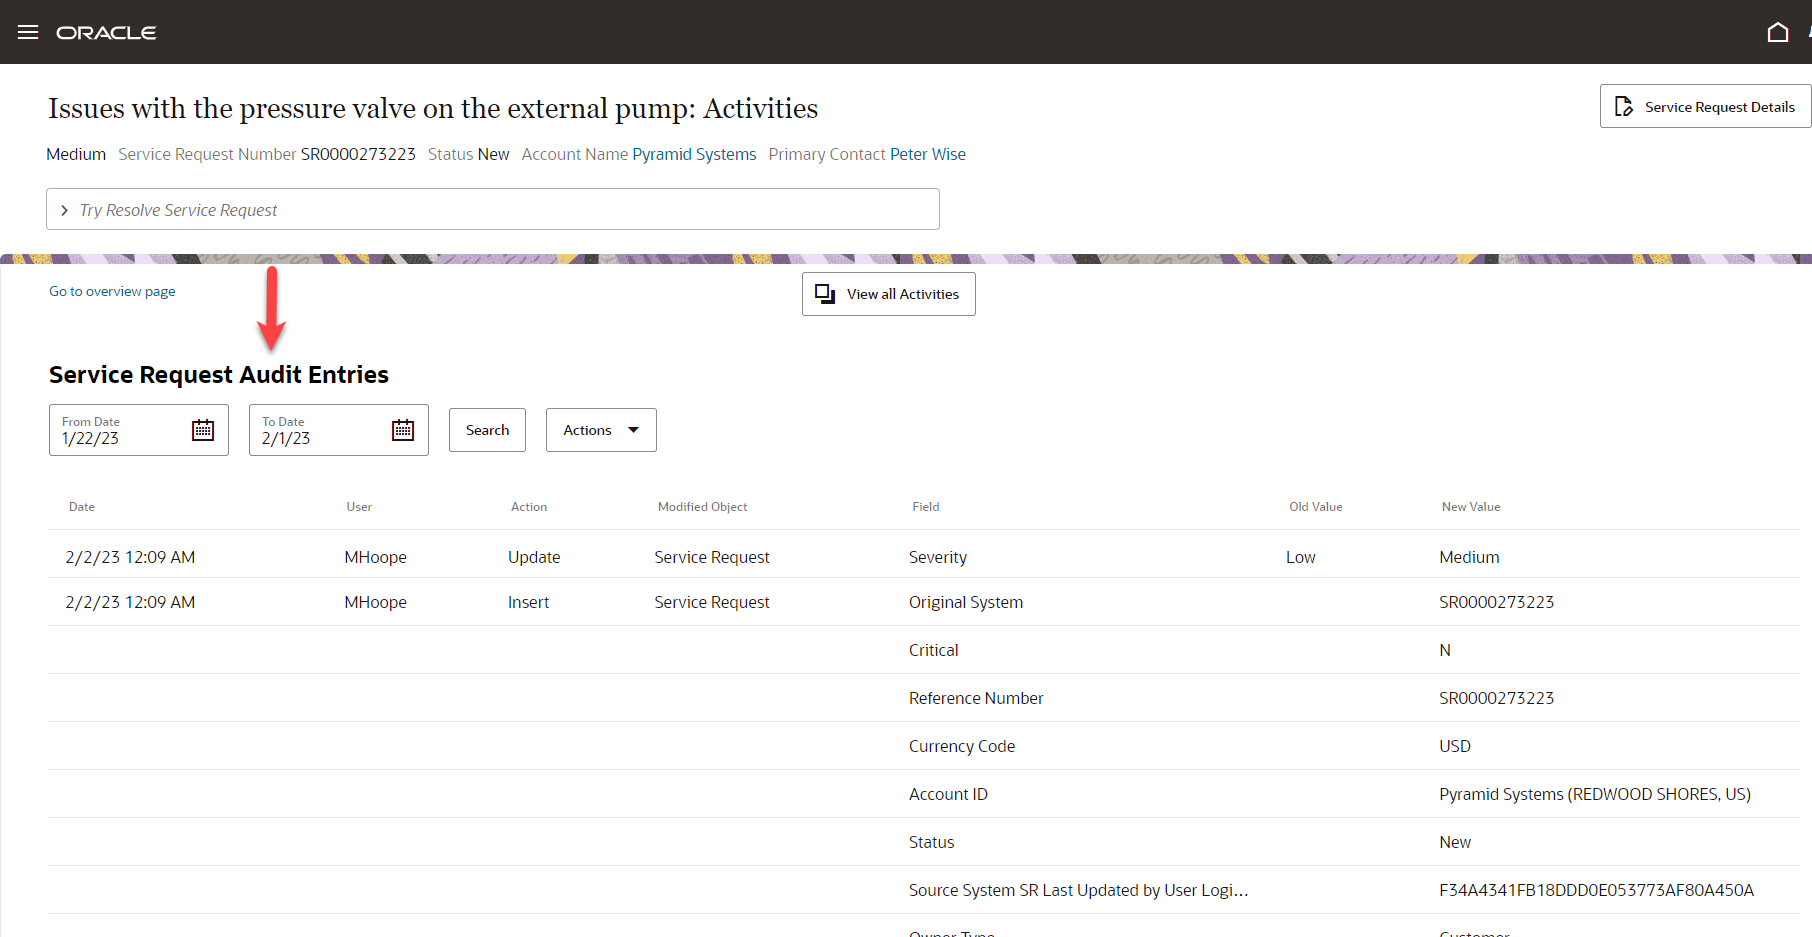
Service Request Audit details
Auditing is used to monitor user activity and all configuration, security, and data changes that have been made to an application. Auditing involves recording and retrieving information pertaining to the creation, modification, and removal of business objects.
Steps to Enable
You can follow the same instructions to enable the capturing of Audit information in the Enable Creating an Audit Trail section in the Implementing Service Center with the Classic User Experience.
Tips And Considerations
At this time, the ability to view the audit history for child objects like Service Request attachments and resources is not supported in the Redwood user interface. This is targeted as an enhancement for a future release.
Access Requirements
Customer Service Representative and Customer Service Manager roles.
Two new privileges are needed for this feature which will need to be added if you created any custom roles.
- SVC_VIEW_SERVICE_REQUEST_CHANGE_HISTORY
- FND_VIEW_AUDIT_HISTORY_PRIV
Also, the profile option below has to be set to Yes:
- SVC_ENABLE_AUDIT_IN_SR
Default the Service Request number and title in the subject line when composing a new email.
In the Redwood user experience, when an agent is composing a new email from a service request, the SR number and SR title will be defaulted into the email subject line. The agent composing the email can edit this entry if required.
Agents will have the ability to update or change the defaulted text in the subject for SR messages. By defaulting a value, this can ensure that this field is never accidentally left blank. This defaulted text will ensure that recipients of the message will always have a clear understanding of the purpose of the message.
Steps to Enable
You don't need to do anything to enable this feature.
Access Requirements
This feature will be available for all users which have the correct privileges to compose an SR message.
Configure custom drill-down paths from the SR list
On the Service Request list page in the Redwood user interface, you can configure the drill-down link within each row to follow a custom navigation path.
While implementing Fusion Service Center, this enhancement allows you to adopt the standard Service Request list page and use Visual Builder configuration to change the navigation behavior to address a specific business need.
Steps to Enable
Log in to Oracle Video Hub to watch the Video Tutorial on how to change the SR List standard navigation path
Tips And Considerations
None
Key Resources
- Log in to Oracle Video Hub to watch the Video Tutorial on how to change the SR List standard navigation path.
Access Requirements
This requires access to Visual Builder Studio to perform the configuration changes to the UI.
Configure the Action Bar for Optimized Suggestions and Hints
Sales and Service administrators can use the new Action Bar Configuration page to adjust configurable Action Bar settings for the Suggestion algorithm and Hint rotations.
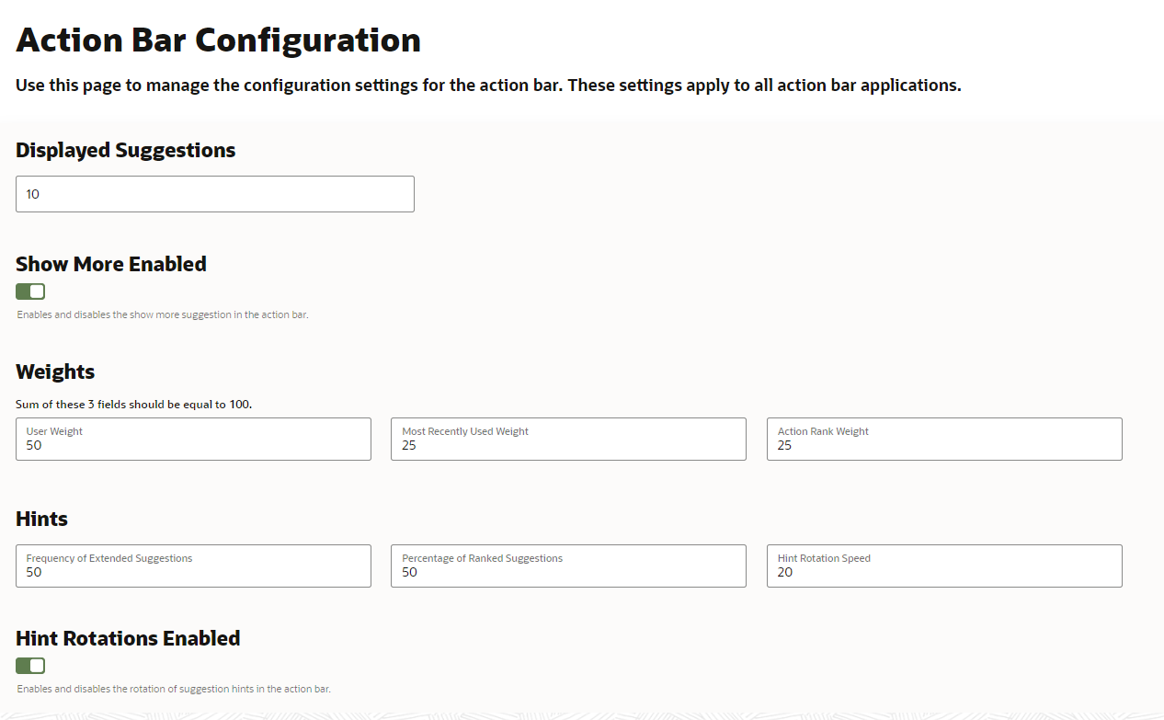
Adjusting the relative ranking of suggested Actions and the number of suggested Action ensures the Action Bar supports the unique needs and experience level of your users. Configuring optional Action Bar features like 'Show More' and rotating Hints can also help your users discover additional Actions for every circumstance.
Steps to Enable
To get to the Action Bar Configuration UI, find the 'Configure Action Bar Settings' in 'Setup & Maintenance'. The configuration options work as follows:
- 'Displayed Suggestions': determines the number of Action shown.
- 'Show More Enabled': adds a clickable 'Show More' Action that shows the entire list applicable Actions for the current object.
- 'Weights': when defining the sort order of all available Action, the relative importance of each Action is based upon 3 values:
- 'User Weight': the rank of an Action based upon the match to the user's input.
- 'Most Recently Used Weight': the rank of an Action based on the user's previous session usage of that Action.
- 'Action Rank Weight': the default rank of an Action as defined by Oracle.
- 'Hints': setting that affect Action suggestions when Hint Rotations is enabled.
- 'Frequency of Extended Suggestions': how often the entire Action list is used for Actions suggestions.
- 'Percentage of Ranked Suggestions: percentage of the entire Action list that is to be used for Action suggestions.
- 'Hint Rotation Speed': the time, in seconds, between each rotating Action suggestion.
- 'Hint Rotations Enabled': enables a rotating Action suggestion, based upon the configuration settings in the 'Hint' section.
Tips And Considerations
- Using the Action Bar Configuration UI is optional since the Action Bar is preconfigured with helpful default settings..
- Changes made in the Action Bar Configuration UI apply to all Redwood UIs that have an Action Bar, including Next Gen Sales, Service Center, Case Management and Help Desk.
Key Resources
- Refer to your User's Guide for basic usage information about the Action Bar.
Access Requirements
- To access the Action Bar Configuration UI you must be authorized to use the Action Bar Configuration UI, enabled by the ZCA_MANAGE_SENSING_AGENT_PRIV privilege.
Configure Milestones to be Due at Specific Times
Configure a milestone to be due at a specific time of day, or the end of the business day, instead of calculating a time based on a number of minutes. When the milestone is applied, the system will use the calendar and the code returned from the coverage to set the milestone due date and time to either the end of the business day, or a specific time of the day, the requested number of days in the future.
Incorporates end of day and specific time of day (for example, midnight) service level agreements into standard computation logic instead of requiring the configuration of due date overrides using groovy triggers.
Steps to Enable
The entitlement checking routine on the Service Request object now supports Standard Coverage result column values to allow End of Day and Time of Day results. The values must be strings in the following formats:
- End of Day due times use the format "nnnEOD" where nnn is an optional positive number up to 3 digits, with 1 representing the current day. For example, 1EOD is due at the end of the first (current) business day, as defined by the schedule. See Tips and Considerations, below, for additional information.
- Time of Day milestones use the format "nnnD@hhmmT" where nnn is an optional integer up to 3 digits, with 1 representing the current day, hh is the specific hour using 24 hour notation, and mm is the specific minute due (00-59). For example, 1D@2100 means the milestone is due at 9p the same day (day 1). See Tips and Considerations, below, for additional information.
Standard coverages using the out of box Service Entitlements matrix class (the Standard Coverage's Entitlement Type) only support the entry of numbers in the milestone and warning threshold result columns. To support the End of Day and Time of Day string formats to be entered into the results columns and applied for milestones, you must make the following configurations in the Subscriptions > Subscription Configuration work area:
- Alter the Service Mapping for the service request entitlement results to utilize string attributes instead of the existing number fields:
- On the Subscription Configuration page, click Dynamic Matrix Configuration > Manage Service Mappings. The Manage Service Mappings page is displayed.
- Drill into the Subscription Entitlements service mapping, and on the Sources tab, select the Service Request source, then in the Service Request: Details section choose the EntitlementResults entity.
- In the EntitlementResults: Details area, change the View Object Attribute value for the following attribute mapping rows:
- For the ResultValue Attribute, change the View Object Attribute value from DueTime to MetricValue
- For the ResultThresholdValue Attribute, change the View Object Attribute value from WarnTime to ThresholdValue.
- Duplicate the existing Subscription Entitlements matrix class and change the result columns corresponding to each milestone and threshold value from Number to Text
- On the Subscription Configuration page, click Dynamic Matrix Configuration > Manage Matrix Classes. The Manage Matrix Classes page is displayed.
- Click to highlight the Subscription Entitlements row, (or, if you've already customized the matrix for your own purposes, click on your existing copy), then choose duplicate from the toolbar above.
- Give the matrix a new name and take note of the name for later use. You will need to use this new matrix as the basis for Standard Coverages that will support End of Day and Time of Day strings.
- In the Result Columns region of the new matrix, edit the Domain value for each of the result columns representing either milestone values or threshold values, and change the Data Type in the Edit popup from Number to Text:
- If you are still using out of box milestones, the result columns that should be changed to Text are: First Response Metric, First Response Warning Threshold, Resolution Metric, and Resolution Warning Threshold.
- You should also change any result columns you may have added for new Administrator-defined milestones
- Remember to save the matrix after making your updates
- Create new standard coverages, specifying the new matrix class created in Step 2 as the Standard Coverage's Entitlement Type. To specify milestones due at the end of the business day or a specific time, simply use the format described above in the standard coverage result for that Milestone or Threshold, instead of the number of minutes. Utilize the new standard coverage in a default coverage or subscription contract to make the end of day and time of day milestones applicable for future SRs.
Tips And Considerations
When specifying the formatted string for End of Day and Time of Day results:
- Leading zeros are not required for the 3 digit day parameter in End of Day and Time of Day results. If the number is left out, the system uses 1, meaning the current day. (Pending work hours or grace period adjustments mentioned below).
- A leading zero is required for the hours and minutes parameters for time of day calculations.
- Midnight is represented as 0000 in the time of day hhmm format and is the start of a given day.
For the calculation of End of Day and Time of Day results:
- End of Day milestones that come in after hours will have an additional day added to the time. Specific Time of Day calculations do not consider the schedule.
- The calculations also support a grace period, which is the minimum number of minutes that must be left to respond for the milestone:
- For End of Day calculations, the grace period must be left in the work day. For example, a grace period of 60 minutes for a workday ending at 5 pm, means the Service Request must arrive before 4p to be due end of day that same day.
- For Time of Day calculations, the grace period must be left before the time due. For example, a grace period of 60 minutes for a milestone due at midnight, means the Service Request must arrive before 11 pm, or it would be due the following day at midnight.
- The grace period value is defaulted to 60 minutes and can be adjusted by setting the profile option value ORA_SVC_SLA_DEFAULT_GRACEPERIOD_MINS
Key Resources
- For additional information about configuring Milestones and Coverages, see the Service Entitlements chapter of the Implementing Service Center guides for either the Classic or Redwood User Experiences.
Support Activity to Service Request relationship in Access Groups
Support Activity as an available object type while creating Access Groups for Service Requests
Additional flexibility while defining membership of access groups.
Steps to Enable
You don't need to do anything to enable this feature.
Auto-delete closed SRs
Automatically delete Service Requests that are in closed status
By periodically deleting Service Requests that have been in closed status for a specified time period, you can limit the growth of your data. A smaller dataset means faster response times and reduced cost of ownership.
Steps to Enable
You don't need to do anything to enable this feature.
REST-based wrapper around SOAP APIs
REST end-points for invoking the Metadata Service and supporting lazy load
These REST endpoints can be used by other applications to fetch metadata information. For example, these end-points can be used by the Simplified Report Authoring in Sales to build an admin UI that allows the administrator to configure Subject Areas, Dimensions, and Facts.
Steps to Enable
You don't need to do anything to enable this feature.
Analyze SR Similarity Performance with Intuitive Dashboard
As part of the Service Adaptive Intelligence - SR Similarity feature, you can now gain insights into similarity matches and their relevance to incoming service requests. Trending reports and metrics are conveniently displayed on the Insights Dashboard. Use this to better tune the system to optimize output of similar SRs.
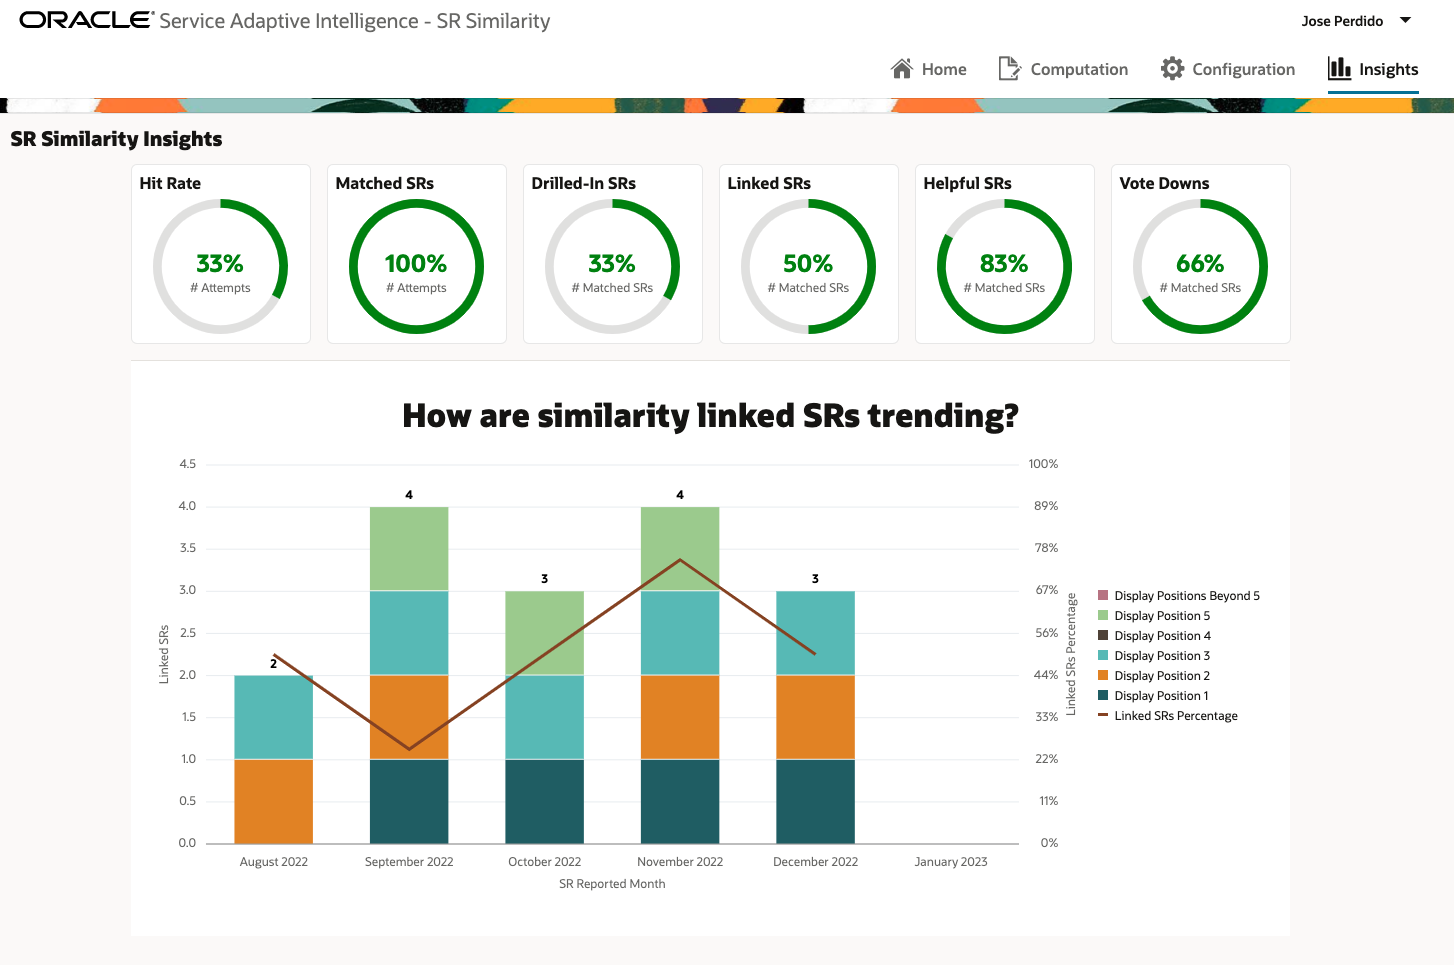
Improved relevancy of similarity matches reduces agent turnaround time during resolution and improves customer satisfaction.
Steps to Enable
You don't need to do anything to enable this feature.
Key Resources
Implementing Service Center with the Redwood User Experience
Enhanced Bi-Directional Event Communications using the UI Events Framework
The UI Events Framework library allows customer developers and system integrators to write bi-directional event communication between the Redwood Service application and 3rd party applications through a UI Mashup. As part of the 23B release, the following enhancements were implemented:
- Create a side panel in a Service page, and then expand and collapse the panel
- Get basic agent information
- Show the integrated external content in a popup
Customer developers and system implementors will be able to create a third party application and then embed it in a right-side panel making it accessible across the Service Center application.
Steps to Enable
You don't need to do anything to enable this feature.
Tips And Considerations
UI Events Framework is only available within the Service Center within the Redwood user experience
Key Resources
For details on using the framework, see Chapter 6 in the Implementing Service in the Redwood User Experience guide.
Access Requirements
No role & privileges are needed.
Display the telephony media toolbar in a floating browser window
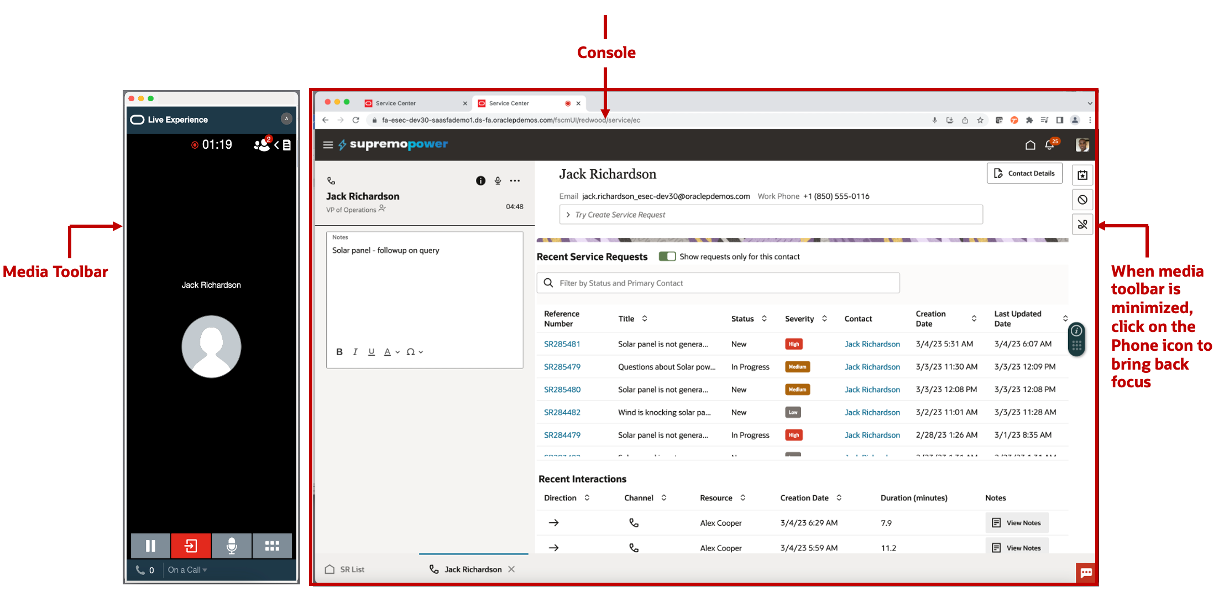
The media toolbar will now be placed in a separate browser window. This feature is available only with the Redwood user experience.
This convenient design allows agents to place the toolbar anywhere on the desktop or minimize it when not needed. When minimized, the agent can click on the phone icon to bring the toolbar back into focus.
- This feature provides telephony vendors with an easy mechanism to develop a seamless integration with the Redwood user experience.
- Provides a toolbar that can be kept minimized until needed and can be placed anywhere on the agent’s desktop.
Steps to Enable
You don't need to do anything to enable this feature.
Tips And Considerations
- The external media toolbar will be enabled for customers who have done an opt-in to the Telephony (CTI) Toolbar
- The external media toolbar opens in a new browser window. These are a few things to note:
- It cannot be opened as a native browser tab in the same browser window as the Service Console
- It cannot be embedded within the Service Console
Key Resources
See Implementing Service Center with the Redwood User Experience guide
Access Requirements
This feature is available by default to users who have the Access Partner Media Toolbar (SVC_ACCESS_PARTNER_MEDIA_TOOLBAR_PRIV) privilege and have a media toolbar assigned to them. See the "Configure Profile Options to Enable Partner Media Toolbar" chapter in the Implementing Service Center with the Redwood User Experience guide for details on enabling a Media Toolbar.
Use UI Events Framework to Control the Side Panel, Open Popup Windows, and Get More User Info
The UI Events Framework has been expanded with several new options including the following abilities:
- Use UI Event Framework APIs within Visual Builder Studio Javascript. An app-level variable is exposed in the Service Center application called enableUefClient. This variable is to enable the application window to consume the UEF capabilities. You can find UI Events Framework in the JS tab when creating or editing pages in VB. Note that you can use UI Events framework APIs while building Visual Builder Applications with Service Center and Case Management;
- Extend and add new content to the right-side panel of a Service page. The UI Event Framework now supports the two sidePane events below:
- SidePaneOpen Event
- SidePaneClose Event
- Open a modal window or popup window from the external application. Using the external application, a customer developer can open a modal window or popup window from the external application. Modal and popup operations work on ModalWindowContext.
- Get more information about the logged-in user. IGetAgentInfoResponse is the response object while retrieving the logged-in agent's information.
- UI Events Framework is available either for external applications or Visual Builder Studio. Before this release a developer could only UEF within the external app. Now it easy and available to use UEF code inside Visual Builder Studio as well. For example, if there is complex logic that your developer wants to write in JavaScript instead of using Action, now you can.
- Through a sidePanel, system implementors can offer a 3rd-party application for those agents who needs to multitask, such as accessing external data while creating a service request. Also, Oracle partners can build 3rd party applications that be added as a right-side pane.
- Using a 3rd party application, we made it easy for developers to write screen-pop logic. For example, if you have a media bar that needs to screen-pop an App UI page you can leverage UI Events Framework.
- Using UI Events Framework, you can now get logged-in user information to add to your javascript or typescript logic.
Steps to Enable
Please check out our channel on Oracle Video Hub for tutorial videos
https://videohub.oracle.com/channel/Fusion+Service+Extensibility
Tips And Considerations
UI Events Framework is only available within the Service Center and Case Management within the Redwood user experience
Access Requirements
No role & privileges are needed.
Restrict Service Request's Attachment Download Capability in Classic UI
By default, agents have the ability to download a service request attachment and a service request message attachment in the Classic user interface. However, your administrator can restrict this download attachment capability, if needed, with a combination of setting a new profile option, ORA_SVC_ENABLE_DOWNLOAD_ATTACHMENT equal to No and by not granting the new privilege called Download Attachment of an SR or SR Message.
Once those two changes, the download icon is disabled from the Preview Attachments screen as shown here:
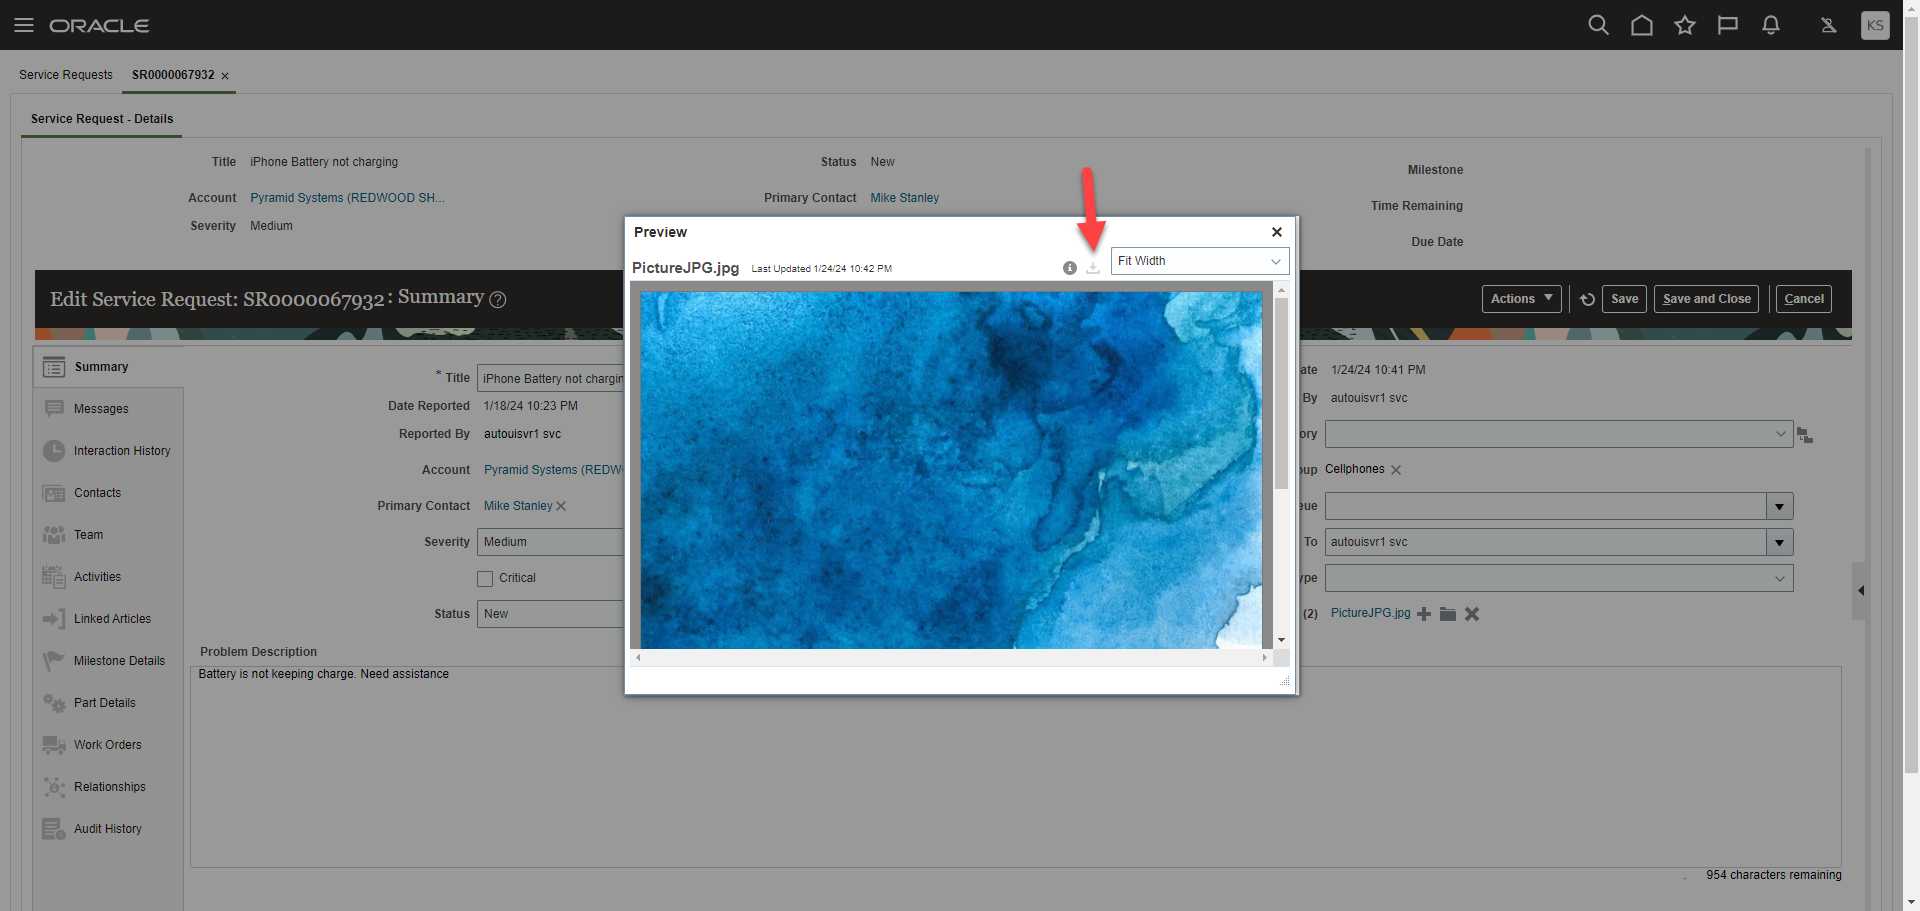
Preview Attachments with Download Icon Disabled
Screenshot of the Attachment Folder in the Service Request Summary screen. Even though the Download icon appears to be enabled, you will not be able to download the attachment.
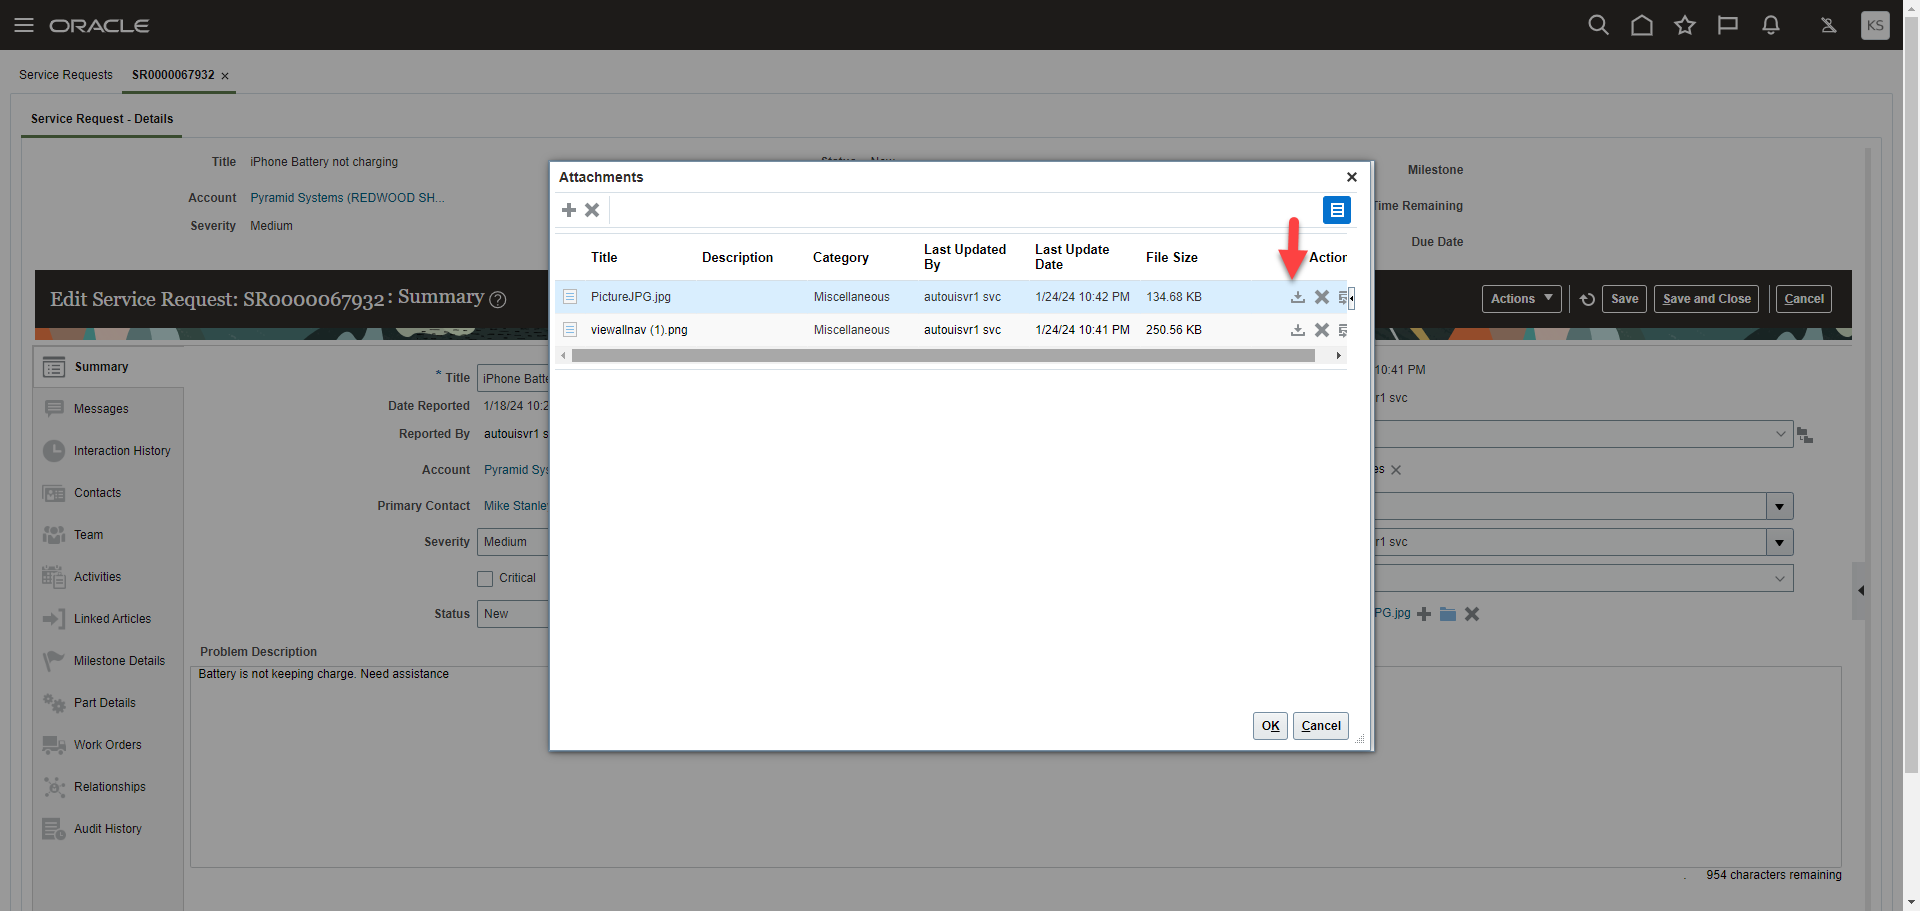
Attachment Summary folder with Download Icon
Screenshot from Service Request > Messages tab where an attachment icon is displayed. Expand on the attachment icon and preview is disabled.
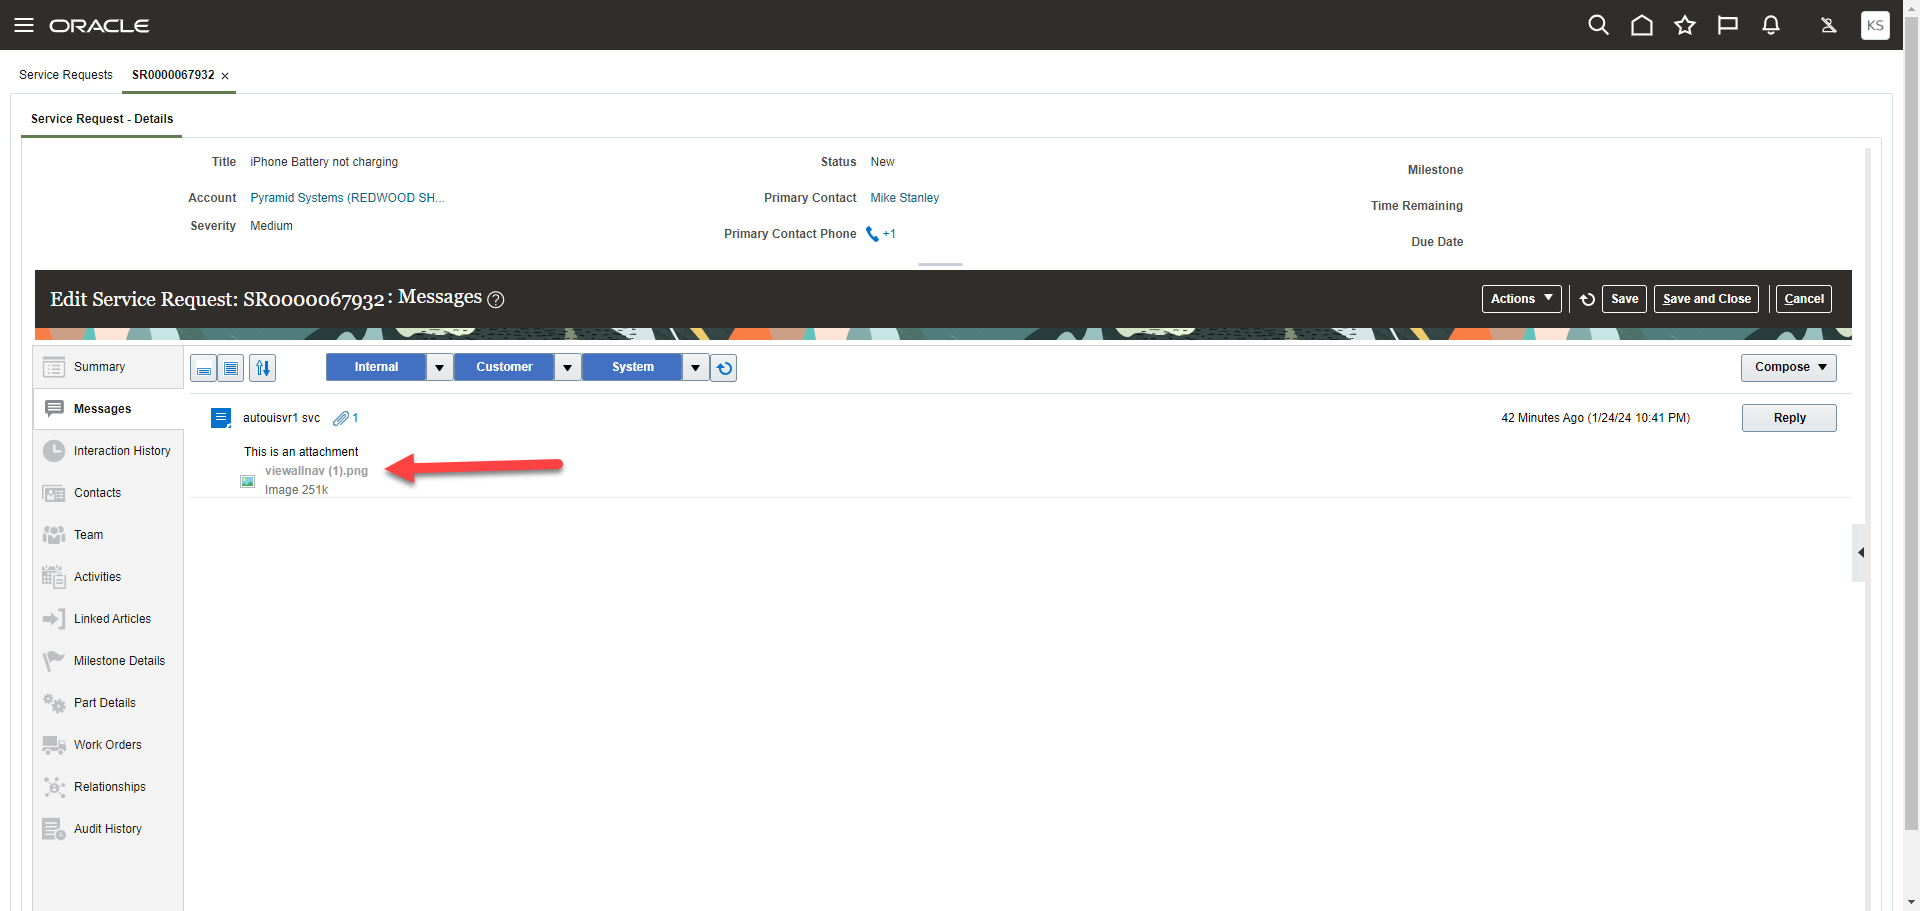
Download Disabled
Administrators can control users' permissions to download SR attachments in the following locations:
- Service Request Attachment Preview screen
- Service Request Summary Attachment's folder
- Service Request > Messages tab > attachment icon
Steps to Enable
The default Service Request Troubleshooter roles contain the Download Attachment of an SR or SR Message privilege. Follow these steps to create a custom Service Request Troubleshooter role and a custom Service Request Representative role which does not contain this privilege. Then grant the custom Service Request Representative role to the users for whom you want to disable this capability. You need to log in as a user who has access to the Tools > Security Console screen where you want to make the following changes:
Create a custom Service Request Troubleshooter role
- Under the Roles panel, search for the existing Service Request Troubleshooter role and click Copy Role to create a new custom Service Request Troubleshooter role.
- Click on Edit Role to make changes to the custom Service Request Troubleshooter role.
- Under step 2 - Function Security Policies, scroll down until you find the Download Attachment of an SR or SR Message privilege and highlight the record. Next, click on the Delete button to remove this privilege.
- Click on step 8 - Summary and click the Save and Close button.
Create a custom Customer Service Representative role
- Search for the existing Customer Service Representative role and click Copy Role to create a new custom Customer Service Representative role.
- Click on Edit Role to make changes to the custom Customer Service Representative role.
- Under step 5 - Role Hierarchy, search for the existing Service Request Troubleshooter roles and click on the Delete button to remove them. There will be 3 of them with the following Role Codes
- ORA_SVC_SR_TROUBLESHOOTER
- ORA_SVC_SR_TROUBLESHOOTER_FSCM
- ORA_SVC_SR_TROUBLESHOOTER_HCM
- In the same screen, click on the Add Role button and search for the custom Service Request Troubleshooter role to add it.
- Click on step 8 - Summary and click the Save and Close button.
Grant Users the custom Customer Service Representative role
NOTE: Make sure these roles are in a completed status before granting them to users who should not be allowed to download an attachment. Go to Administration > Role Status screen to check if the new custom roles are completed.
- Under Users panel, search for those users who you want to restrict download attachment capability.
- Click on their user name and then click on the Edit button.
- Click on the Add Role button and search for the custom Customer Service Representative role.
- After locating the custom Customer Service Representative role, click on the Add Role Membership button.
- If this user also has the default Customer Service Representative role, you will want to remove that role by clicking the x button.
- Click Save and Close button.
Run the Import User and Role Application Security Data process
-
From Navigator > Tools > Scheduled Processes > search for the process called Import User and Role Application Security Data and run it.
Set the profile option ORA_SVC_ENABLE_DOWNLOAD_ATTACHMENT to No
To set this profile option to No (Default value is Yes), navigate to Setup and Maintenance work area and search for the Manage Administrator Profile Values task. Query for the ORA_SVC_ENABLE_DOWNLOAD_ATTACHMENT and change the value to No.
Tips And Considerations
This ORA_SVC_ENABLE_DOWNLOAD_ATTACHMENT profile option determines for backward compatibility with the current Add Attachment Privilege, which includes Download Attachment functionality. Here are the rules:
| Privileges Granted to User | Profile Option Value Set to No | Profile Option Value Set to Yes |
|---|---|---|
| User has new Download Service Request Attachment privilege |
Can see the download icon and can download |
Can download (existing functionality) |
| User does not have the new Download Service Request privilege |
Download icon is disabled |
Can download (existing functionality) |
Access Requirements
Remove the Download Attachment of an SR or SR Message privilege and make sure the profile option, ORA_SVC_ENABLE_DOWNLOAD_ATTACHMENT value, is set to No to restrict this capability.
Service Channels
Schedule the deletion of inbound emails that have already been retrieved from your Exchange server
Your company can set up a scheduled process to automatically delete inbound emails from the inbox on your Microsoft Exchange server if those emails have already been retrieved and processed. This job will increase performance by removing unnecessary processing.
This feature is for use with email integration to the Microsoft Exchange server. By running this scheduled process (ESS) job, a deployment can experience better performance since the system will be cleaning up emails that have already been processed.
Steps to Enable
The exchange integration feature can be manually enabled in Setup and Maintenance.
- In Setup and Maintenance, navigate to the Service offering.
- In the Commmunication Channels functional area, select the setup task "Manage Email Configuration, Registration and Validation"
- Under the page section called "Configure External Applications" check the box "Delete Message"
This Scheduled Process (ESS) job will be automatically run when the administrator schedules the Exchange Server scheduled process job.
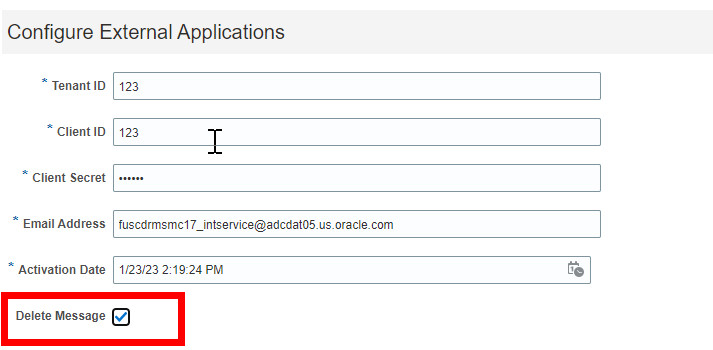
Delete Message Check Box
Access Requirements
To setup this Scheduled Process (ESS job), the user must have access to the Setup and Maintenance (FSM). This typically requires Administration privileges.
New Wrap Up Design in the Redwood UI
To provide a better chat user experience, this release introduces a new enhanced wrap up UI. Redwood chat users will be able to open the wrap up while in an active chat and set the communication outcome value or record any notes about the interaction rather than waiting for the chat to end. If an agent chooses to complete the wrap up entry at the end of a chat, they may do so while viewing the full chat transcript.
Agents are able to begin or complete a wrap up while on an active chat rather than waiting for the chat to end. This allows for agents to move onto other work as soon as a chat finishes to better utilize their time.
Steps to Enable
You don't need to do anything to enable this feature.
Tips And Considerations
- To view the wrap up screen while in an active chat you click on the Chat Details link in the chat header section
- To view the chat transcript for past interactions you need to keep wrap up enabled
- Past chat interactions may be accessed from Service Requests, Accounts or Contact records
- If an administrator has disabled wrap up, the agents will not see the wrap up screen while in chat or at the end of a chat
Key Resources
See the "Configure Chat Wrap Up" chapter in the Implementing B2B Service guide.
Access Requirements
To disable or enable this feature, Administration privileges are required.
Service Center Console
Service Center Console is a new enhanced mode of user experience for service agents that need to handle live customer communications such as phone and chat and who need a higher level of multitasking while working on service issues. Through the use of in-app navigation tabs, agents can stay within a single browser tab while at the same time quickly and easily navigating between off-line work and real-time communications.
Service Center Console
This workspace also features a purpose-built landing page for agents, so they can view the most critical customer information at a glance when they receive a screen pop for an inbound communication. This allows agents to quickly review customer data as well as their recent interactions and service requests so they can provide more knowledgeable, personalized service as they begin their conversation with the customer.
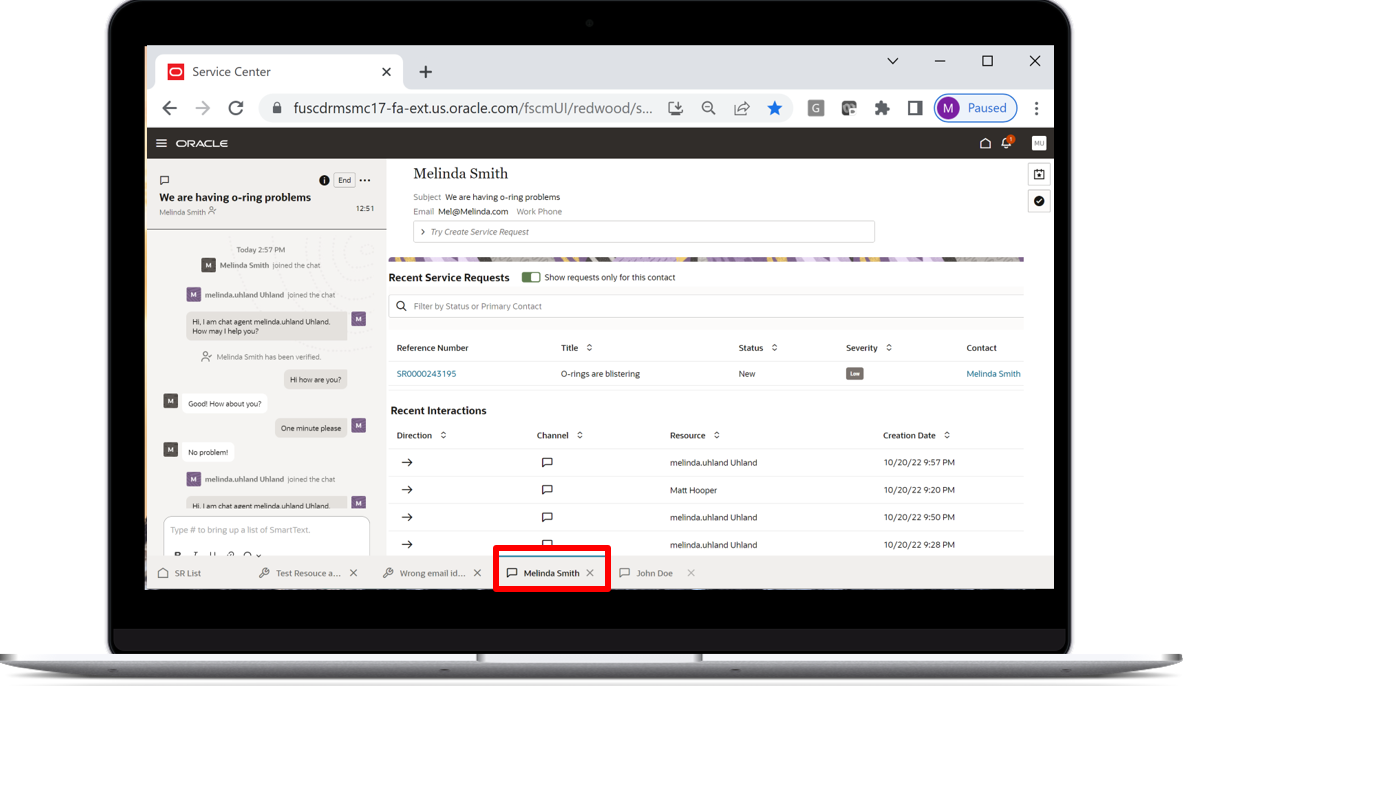
Service Center Console
In a high velocity contact center environment, it is critical that agents are able to quickly and easily manage multiple real-time communications with customers. With the introduction of the Service Center Console, agents will have the ability to manage both off-line work as well as multiple simultaneous customer communication using application navigation tabs across the bottom of the screen.
Highlights:
- Improved experience for handing multiple live interactions (phone and chat)
- Manage both real-time and offline work side by side
- The worklist of SRs is always conveniently located in the left-hand tab
- Uniquely tailored landing page for phone and chat interactions
- Less complexity for the agent by keeping all live interactions conveniently grouped
- Expedite the chat experience by enabling easy access to multiple interactions
- Present critical custom data at the time of interaction
Steps to Enable
The Service Center Console feature is delivered disabled. You must enable this feature in order for your users to have access to it.
To enable Service Center Console, you must do the following:
- As a prerequisite the Redwood user experience must be enabled
- Set ORA_SVC_ENABLE_MSI_WORKSPACE to Yes
- Users must have the appropriate privileges to access the Redwood User Experience.
Tips And Considerations
- To access the Service Center Console, Redwood service users must enter Service Center directly from the card on the home page
- If you are a Redwood service user and you access Service Center through a different card on the home page, the Service Center Console will not be presented
- Once Service Center Console is enabled, this will become the default user experience for all of your Redwood service users
Key Resources
Information on how to enable Service Center with the Redwood user experience is available here: https://docs.oracle.com/en/cloud/saas/b2b-service/23a/fairs/enable-service-center.html#s20077880
Information on what roles and privileges are required for Redwood service users is available here: https://docs.oracle.com/en/cloud/saas/b2b-service/23a/fairs/overview-of-required-privileges-and-roles.html#s20077881
Information on configuring Chat is available here: https://docs.oracle.com/en/cloud/saas/b2b-service/23a/fairs/configure-chat-profile-options.html#s20062239
Access Requirements
Service Center Console is available (if enabled) to users who have the appropriate Redwood Service privileges.
Work Order Management
Automate Population of Time Zone on Service Work Order
Agents are no longer required to manually select the time zone when creating a service work order. This feature utilizes Oracle's geocoder service to automatically populate the time zone field after selecting the customer's service address.
This streamlines the service work order creation process by automatically populating the time zone based on the address selected.
Steps to Enable
You don't need to do anything to enable this feature.
Tips And Considerations
The agent should select the address and let the process populate the time zone field. However, if the time zone is not found or the wrong time zone is populated, the agent can use the list of values to manually select the appropriate time zone.
Key Resources
- For details about using service work orders in Redwood, see the "Using Service Center in the Redwood User Experience" guide.
Access Requirements
Customer Service Representative
Link Oracle Field Service Work Orders in Fusion Service
You can now create and delete links between Oracle Field Service integrated work orders in B2B Service and use the bi-directional sync to manage those links in Oracle Field Service. Links can be used to designate rules such as one work order can't be started until another is completed, one can only be started after another has been started or two work orders must be started at the same time. You can also designate rules such as two work orders must be performed by the same or different technicians and must be performed on the same or different days. Links can be created and deleted in either Fusion Service or Oracle Field Service and will be kept in sync.
To ensure work that requires multiple service work orders is performed and tracked based on predefined business rules, linking work orders are required. The links between service work orders can be based on rules such as one work order can only be started after another work order is completed, one work order can only be started after another work order is started or to support team work, two or more work orders have to be started at the same time. Linking also supports other rules such as two work orders must be performed on the same day or different days and two work orders must be performed by the same technician or different technicians.
Steps to Enable
You don't need to do anything to enable this feature.
Tips And Considerations
- The linking service work orders are only in the new Redwood UI and only applies to the Oracle Field Service integrated work orders.
- The links are based on templates created in Oracle Field Service.
- To currently implement this feature, several manual steps are required which will be automated in future releases. Please submit a service request and request assistance from product management for assistance.
Key Resources
- For details about using service work orders in Redwood, see the Using Service Center in the Redwood User Experience guide.
Access Requirements
Customer Service Representative
Service Analytics
Run Select BI Scheduling Processes in Manual Mode
This applies only if you are an existing Fusion Service/Help Desk customer running any of the following scheduled processes (ESS jobs):
- Incrementally Loads SR Audit data for BI Reporting
- Aggregate Service Requests
- Incrementally Loads Cross-Channel Interaction Data for Reporting
- Execute Incremental Load of HCM Person Mapping Data for Reporting
All the above jobs are auto submitted by the system. Eventually (i.e. in the next couple of releases or so), they would be replaced with new manually submitted jobs. In preparation for this switch over, you need to now start running the four additional jobs (as applicable) mentioned in the table below.
| Auto-submitted Scheduled Processes/Jobs (Existing) | New additional Schedule Process/Job to be started |
|---|---|
| Incrementally Loads SR Audit data for BI Reporting |
Loads Service Request Life Cycle Data |
| Aggregate Service Requests |
Loads Service Request and Interaction Data |
| Incrementally Loads Cross-Channel Interaction Data for Reporting |
Loads Interaction Cross Channel Data |
| Execute Incremental Load of HCM Person Mapping Data for Reporting |
Loads HCM Person Mapping Data |
NOTE: The auto-submitted jobs will continue to run as before for now. The additional jobs run as 'blank' jobs and will not have any impact on your BI subject areas/reporting. Oracle will 'activate' these blank jobs at a future date to replace the auto-submitted jobs.
Manually scheduled jobs give you greater control. When they replace auto-submitted jobs (in a future release) you will be able to cancel jobs, change their schedule intervals, or restart them as needed, without needing to contact Oracle.
Steps to Enable
- Navigation --> Tools ---> Scheduled Processes
- Click on 'Submit New Process' button
- Search for the new scheduled process that you wish to run in the pop up window
- Hit the 'Submit' button on the 'Process Details' pop up.
NOTE:
-
You need to run the additional job, only if you are currently using the corresponding auto-submitted job (first column in the table)
-
At this time there is no need to set the specific schedule for the new scheduled processes since they run as 'blank', until they are activated by Oracle in a future date/release.
Tips And Considerations
If you are an impacted customer, this is an essential step to perform because the afore mentioned auto-submitted BI jobs in Fusion Service will be discontinued in a future release.
Key Resources
Access Requirements
- Sales/Service Administrator
- Human Resource Help Desk Administrator
- Next Gen Human Resource Help Desk Administrator
- Internal Help Desk Administrator
Use BI Cloud Connector View objects for Service Data Extraction
The new Business Intelligence Cloud Connector (BICC) view objects for Fusion Service let you extract data for:
- Action Plans
- Inbound Messages
- Milestone Coverages
- Queue Resources and Teams
- SR References
- SR Tags
You can also use this feature for high-volume data extraction into your own custom data warehouse or other targets.
Perform high volume data extraction of these additional Fusion Service objects.
Steps to Enable
You don't need to do anything to enable this feature.
Key Resources
- Extract Data Stores for CX Sales and Fusion Service
- Creating a Business Intelligence Cloud Extract
- Data Lineage Mapping with View Objects
Access Requirements
Sales/Service Administrator
Digital Engagement Channels
Enhanced Flexibility to Capture Chat Context for Better Routing
The chatAuthenticate API has been enhanced to include additional standard and custom fields that can be used to improve routing of chat requests. The following fields have been added:
-
skipAgentIds
-
preferredResources
-
incidentAssigneeId
-
incidentName
-
incidentType
-
stripeCode
-
applicationClassification
-
visitorBrowserHistorySessionId
-
incidentSeverityCode
The changes that have been made to the chatAuthenticate API will allow for businesses to use the new attributes to author more granular chat routing rules.
Steps to Enable
You don't need to do anything to enable this feature.
Tips And Considerations
To utilize the new and existing chatAuthenticate API attributes, use these in your business routing rules to improve routing and agent efficiency.
Key Resources
- See the "REST API for Chat in Oracle Fusion Service" guide and the "Work Assignments and Routing" chapter of the Implementing Service Center guide.
Access Requirements
To utilize these features, Administration privileges are required.
Case Management
Enhanced Security for Case Management Users
Case Management security has been significantly enhanced with new functional privileges as well as new privilege checks for all actions in the Case List, Case Details, and Create Case pages. In addition to the new functional controls, a new searchable interface has been added for convenient access to the detailed audit history of the Case.
Discrete privileges ensure your Case owners have only appropriate functionality available to them. Easy access to a Case's audit history helps Case owners ensure their Cases are secure.
Steps to Enable
Provide the required access before using the feature. Details are in the Access #Requirements section.
Administrators should review all Case-related privileges to ensure roles are provisioned to match their organization's security requirements.
Key Resources
Refer to the 'Users and Security' chapter in the Implementing Case Management Guide for a detailed listing of all Case privileges and their uses.
Access Requirements
The following privileges were added in this release:
-
Manage Case Attachments
-
View Case Attachments
-
Manage Case Conversations
-
View Case Conversations
-
View Case Audit History
These privileges have been added automatically to the Case Execution and Case Supervisor duty roles.
Enhanced Management of Case Households
Authorized case owners can view and edit Case Households details in a new, simplified experience. Edits can be made from the Case Details UI to all key information about a Household including owner, address and Contacts and Contacts' relationships to each other.
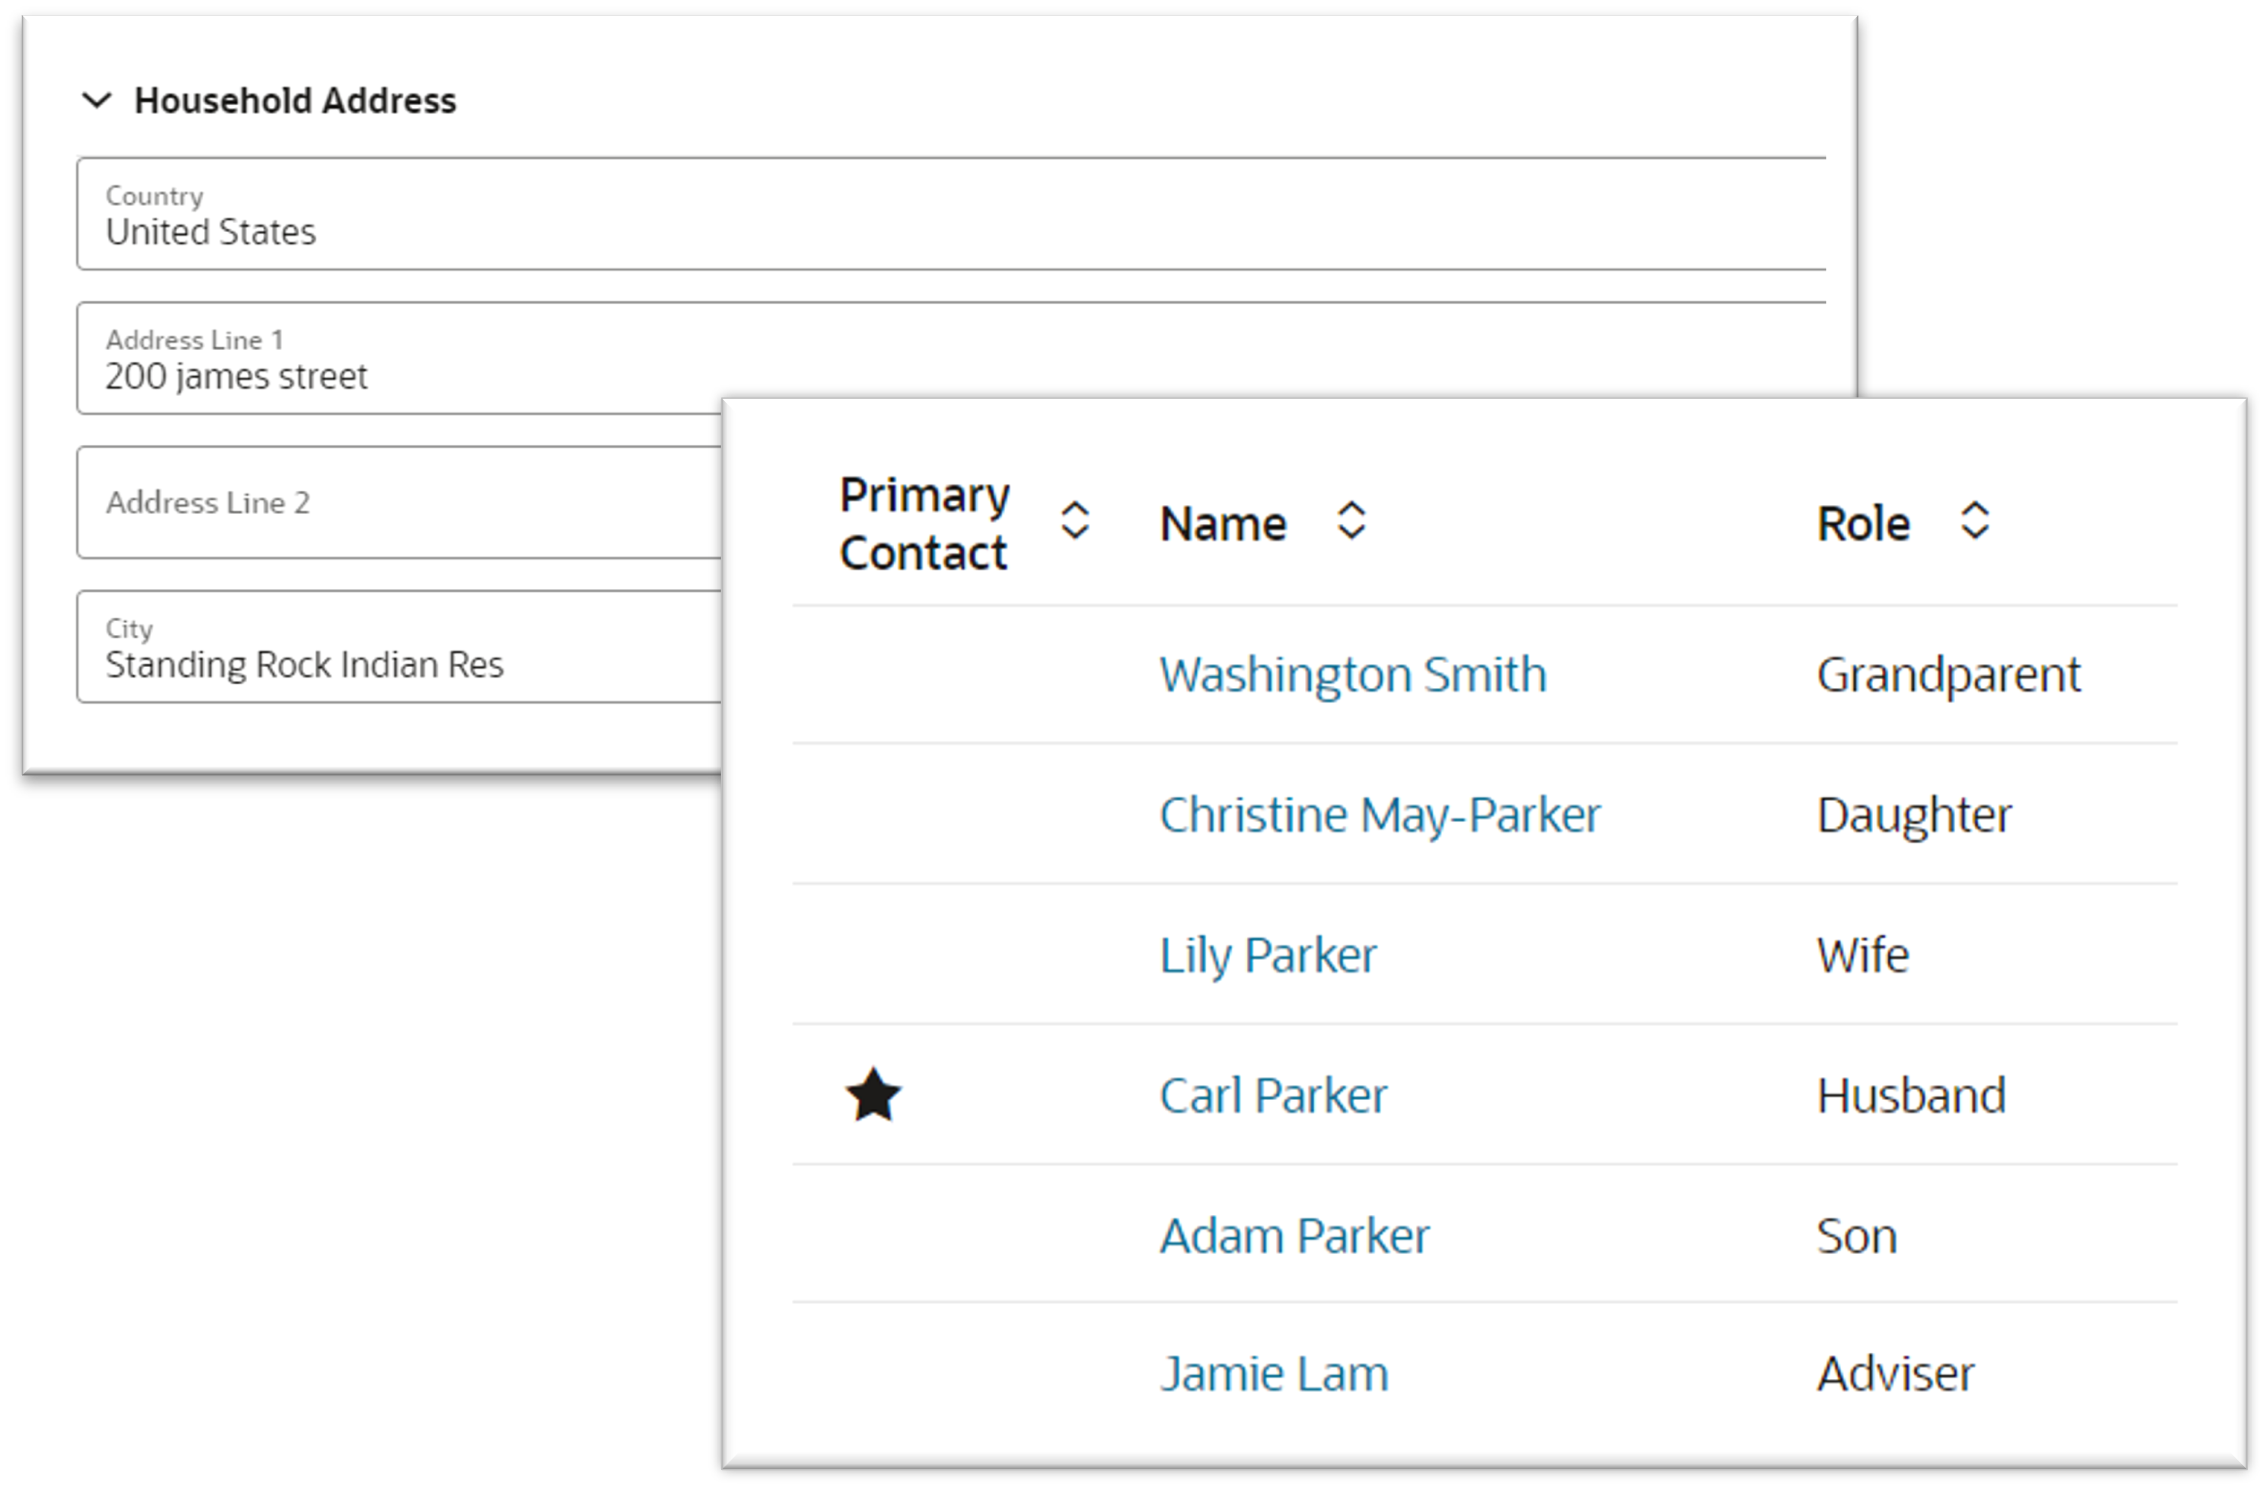
Households allows Case owners to efficiently manage groups of related individuals and ensures accurate Household data for every Household associated with a Case.
Steps to Enable
You don't need to do anything to enable this feature.
Key Resources
Refer to the Using Case Management Guide for more information about Households in the Case Detail UI.
Access Requirements
- To add a Household, Case owners must have appropriate Case-related privileges ('SVC_EDIT_CASE_PRIV', ‘SVC_MANAGE_CASE_HOUSEHOLDS_PRIV’) as well as Household-related privileges ('ZCM_VIEW_SALES_GROUP_PRIV').
- To remove a Household or designate a Household as the Primary Household, Case owners must have appropriate Case-related privileges ('SVC_EDIT_CASE_PRIV', ‘SVC_MANAGE_CASE_HOUSEHOLDS_PRIV’).
- To view and edit the details of a Household, Case owners must have appropriate Case-related privileges (‘SVC_MANAGE_CASE_HOUSEHOLDS_PRIV’) as well as Household-related privileges ('ZCM_VIEW_SALES_GROUP_PRIV', 'ZCM_UPDATE_SALES_GROUP_PRIV').