- Revision History
- Overview
- Feature Summary
- Service Center
-
- Service Request Management
-
- Order Parts from the Service Request
- Advanced Asset Search for Service Center
- Allow Service Center users of the Classic user interface to participate in internal collaboration conversations
- Promo Code for Redwood Service Center is No Longer Required
- View Contact Profiles within the Service Console
- Changing the deep link to account, contact, lead, and opportunity with a single step in Visual Builder Studio
- A single code experience blends MCA and UI Events Framework in a single framework
- Service Center in the Redwood UI
-
- Use Faceted Filters in the Search Bar for Service Center SR List Pages
- Enable Creating and Viewing an Audit Trail for Child Records of Service Requests
- Mark a Service Request Message as Containing Personal Information and Provide Ability to Edit those Messages in the Classic UI
- Enable Similar Service Request and SR Classification Tasks in Service Center Administration Launch Page
- Service Center in the Classic UI
-
- Omnichannel Framework
- Service Channels
- Service Analytics
- Case Management
- Work Order Management
- Service Request Management
Update 23D
Revision History
This document will continue to evolve as existing sections change and new information is added. All updates appear in the following table:
| Date | Module | Feature | Notes |
|---|---|---|---|
| 26 JAN 2024 | Service Request Management |
Configure the Display of SR messages in the Classic UI | Updated document. Revised feature information. |
| 24 OCT 2023 | Case Management |
Enhanced Case Features for Case Workers, Administrators and Developers |
Updated document. Delivered new feature in update 23D. |
| 24 OCT 2023 |
Service Analytics |
Updated document. Delivered new feature in update 23D. |
|
| 24 OCT 2023 |
Service Request Management |
Updated document. Delivered new feature in update 23D. |
|
| 24 OCT 2023 |
Service Request Management |
Updated document. Delivered new feature in update 23D. |
|
| 24 OCT 2023 |
Service Request Management |
Updated document. Delivered new feature in update 23D. |
|
| 24 OCT 2023 | Service Request Management | Updated document. Delivered new feature in update 23D. |
|
| 08 SEP 2023 | Created initial document. |
Overview
 HAVE AN IDEA?
We’re here and we’re listening. If you have a suggestion on how to make our cloud services even better then go ahead and tell us. There are several ways to submit your ideas, for example, through the Ideas Lab on Oracle Customer Connect. Wherever you see this icon after the feature name it means we delivered one of your ideas.
GIVE US FEEDBACK
We welcome your comments and suggestions to improve the content. Please send us your feedback at oracle_fusion_applications_help_ww_grp@oracle.com.
DISCLAIMER
The information contained in this document may include statements about Oracle’s product development plans. Many factors can materially affect Oracle’s product development plans and the nature and timing of future product releases. Accordingly, this Information is provided to you solely for information only, is not a commitment to deliver any material, code, or functionality, and should not be relied upon in making purchasing decisions. The development, release, and timing of any features or functionality described remains at the sole discretion of Oracle.
This information may not be incorporated into any contractual agreement with Oracle or its subsidiaries or affiliates. Oracle specifically disclaims any liability with respect to this information. Refer to the Legal Notices and Terms of Use for further information.
Feature Summary
Column Definitions:
Report = New or modified, Oracle-delivered, ready to run reports.
UI or Process-Based: Small Scale = These UI or process-based features are typically comprised of minor field, validation, or program changes. Therefore, the potential impact to users is minimal.
UI or Process-Based: Larger Scale* = These UI or process-based features have more complex designs. Therefore, the potential impact to users is higher.
Features Delivered Disabled = Action is needed BEFORE these features can be used by END USERS. These features are delivered disabled and you choose if and when to enable them. For example, a) new or expanded BI subject areas need to first be incorporated into reports, b) Integration is required to utilize new web services, or c) features must be assigned to user roles before they can be accessed.
Service Center
Service Request Management
Order Parts from the Service Request
In the Redwood experience, part ordering and tracking information is now available from the service request while resolving a customer's issue. The service agent gains visibility to parts availability and pricing to help set proper expectations with the customer. The parts ordering is provided via the pre integrated connection with Service Logistics.
Direct access and visibility to Service Logistics part ordering allows the service agent to set proper expectations with the customer about availability, timing and pricing. The end customer benefits by having more reliable parts delivery experience. Finally, more consistent execution improves the overall customer experience and increases the likelihood that that each customer's issue will be properly resolved by obtaining the required part.
Steps to Enable
To enable part ordering, see the following guide: Expose the Service Logistics Parts Order
Tips And Considerations
-
Part ordering from service requests is part of our asset based service logistics solution, for more information about this solution: Oracle Cloud Service Logistics
-
In order to create part orders for service request, subscriptions to the following Oracle services are required:
- Oracle Fusion Service
- Oracle Supply Chain Management
-
If you have already enabled part ordering in the classic UI, no additional setup is required. Once you opt-in to Redwood, you will see the part orders for service request.
Key Resources
For details about configuring and using service work orders, see the following guides:
- Implementing Service Center with the Redwood Experience
- Using Service Center in the Redwood Experience
- Integrating Fusion Service with Field Service
Access Requirements
The following roles are required:
- Service Administrator for configuring
- Customer Service Representative for ordering parts
Advanced Asset Search for Service Center
Search for assets on a service request or work order using advanced search capabilities including type ahead search and removable filters.
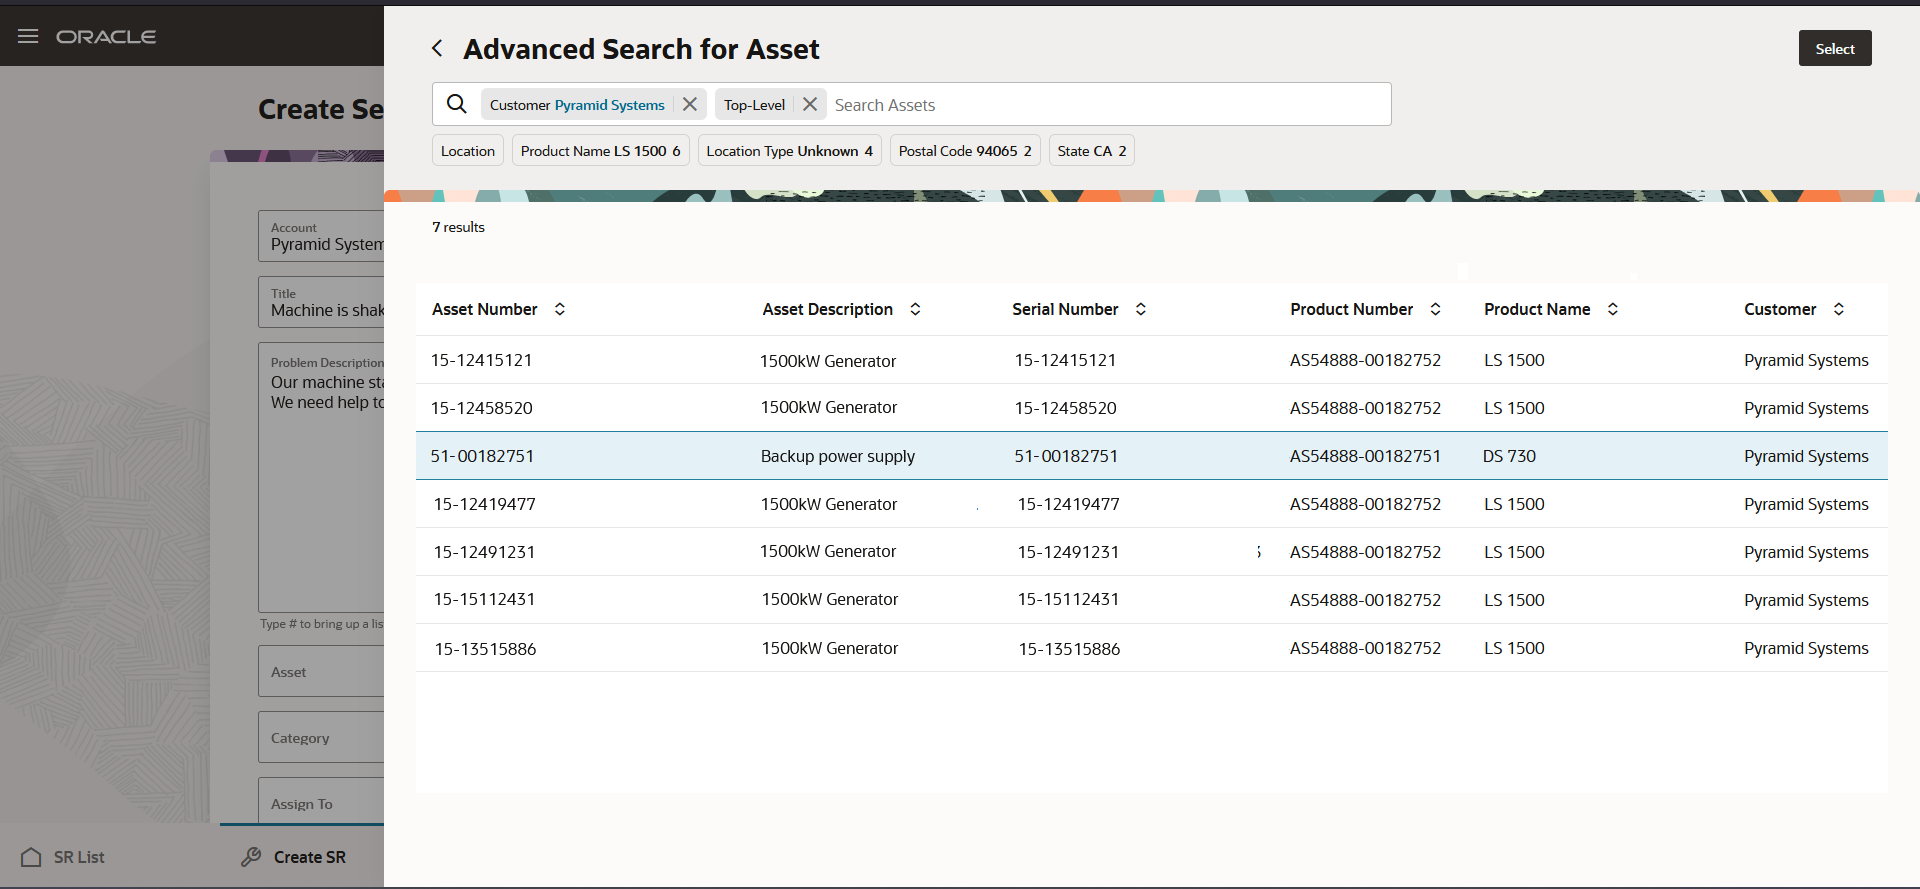
Advanced asset search with changeable filters
Agents now have the ability to select an asset before associating an account or contact to the service request, and selection of the asset will default the SR account from the asset's customer field, saving the agent time and clicks when the customer provides a serial number or other asset identifier. The search feature itself includes a more flexible and performant search with removable filters, enabling agents to always find the right asset even when it may be categorized or grouped incorrectly.
Steps to Enable
You don't need to do anything to enable this feature.
Tips And Considerations
The service request and work order pages now use separate fields for the selection of an installed base asset versus the selection of a product, with a new adaptive-search based fragment that allows advanced search of assets based on key information from the asset itself, as well as product, customer, and location information.
While there are no steps required to enable this feature, note that users will see a new field and search drawer when selecting an asset in the out of box layout, and selecting the asset will automatically populate the product and product group.
Allow Service Center users of the Classic user interface to participate in internal collaboration conversations
Customers who are using a combination of the Service Center Classic and Redwood user experiences now can participate in internal conversations between the two interfaces. Using a Conversations subtab on the SR in the Classic UI, users can view a list of any associated internal conversations, reply to a conversation and start a new conversation.
For users who are on the Classic user experience, collaboration messages can now be used as a substitute for SR Messages of type Forward.
Customers who are using a combination of the Service Center Classic and Redwood user experiences now have the option to enable users to participate in internal conversations between the two interfaces. This will allow organizations to effectively run a combination of production agents on both the Classic and Redwood user experiences.
For users who are on the Classic user experience, collaboration messages can now be used as a substitute for SR Messages of type Forward. If users are using the Forward message type to send messages to other internal users, the internal conversations feature can now provide the same capability and offer additional functionality.
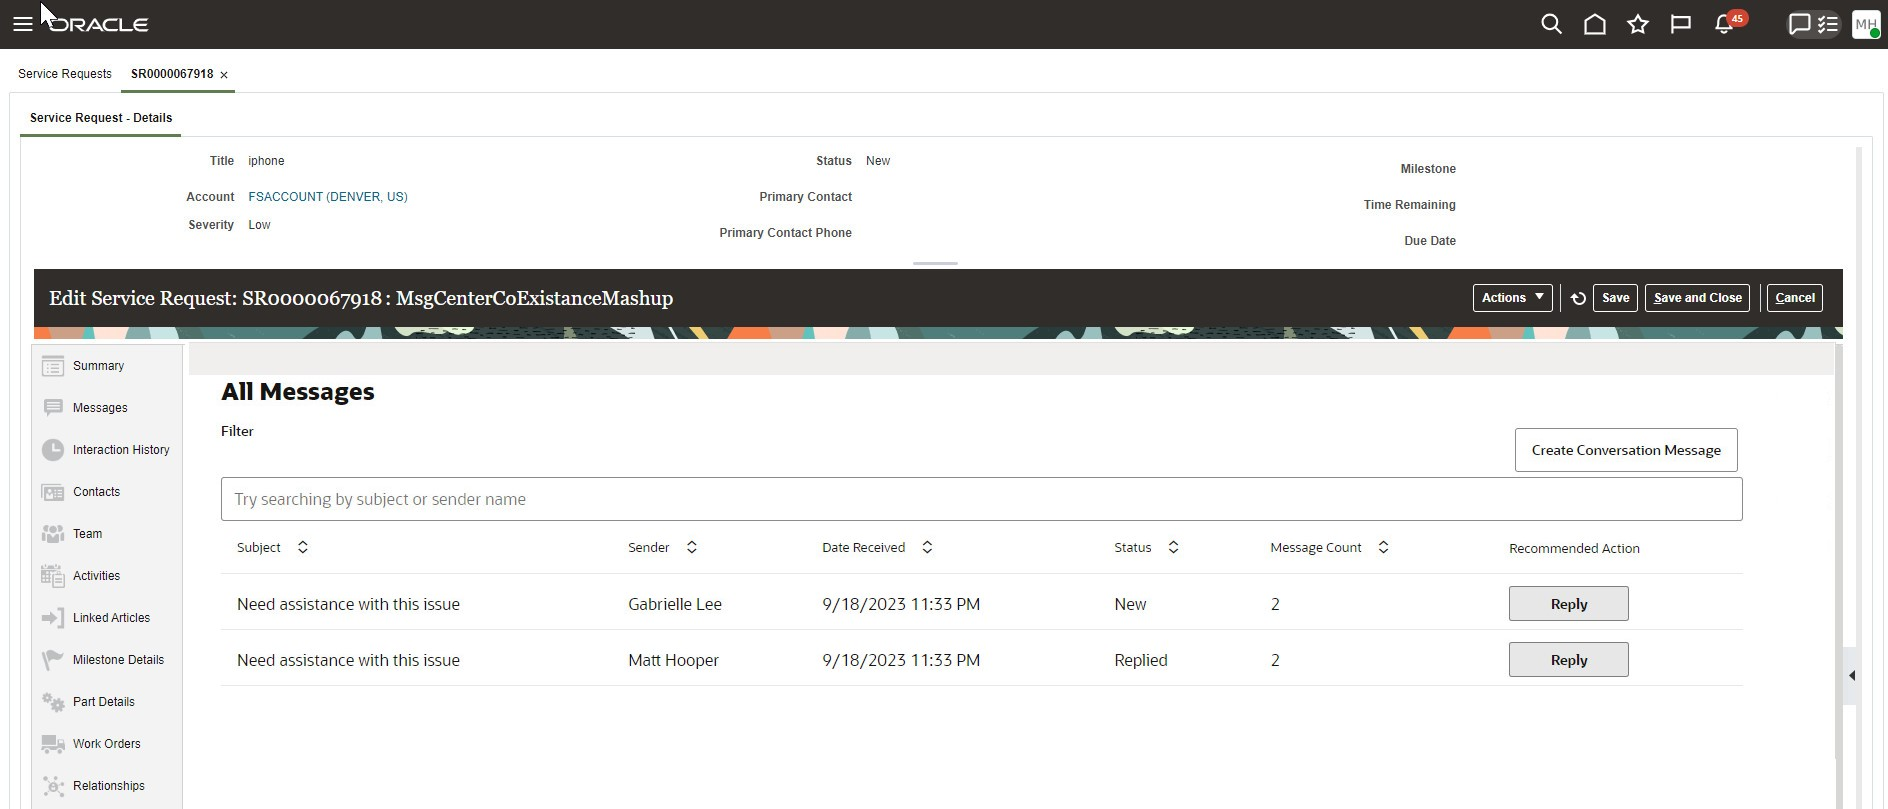
Collaboration Mashup on Custom Classic Sub-Tab
Steps to Enable
Leverage Application Composer to expose and adjust page layout and attributes. To learn more about extending your application using Application Composer, visit Oracle Help Center > your apps service area of interest > Books > Configuration and Extension.
The detailed instructions for the setup and configuration of this feature are available on Video Hub: https://videohub.oracle.com/media/t/1_0501jut1
As part of the setup and configuration of this feature, you will need the following two code entries in Application Composer:
- During the setup for the mashup in the Service Request Details custom tab, please enter the following for the URL definition: https://fa-wrda-pintlabfadev.fa.ocs.oc-test.com/fscmUI/redwood/service/vp/ec/container/message-center/all-messages - you will need to replace the following portion of the URL definition with the specific information for your environment: <fa-wrda-pintlabfadev.fa.ocs.oc-test.com>
- When setting up the page layout for the Service Request details, you will need to enter the following groovy script as part of your custom sub-tab definition: return "?ojSpShellVisible=false&ObjectId="+SrId+"&ObjectTypeCd=ORA_SVC_SERVICE_REQUESTS&BUOrgId="+BUOrgId
- This script will provide a filter in the sub-tab to only pull back the conversation messages that are associated to the service request that you are currently on.
Tips And Considerations
This feature is not supported in Help Desk.
Key Resources
See this recording on Video Hub for a demonstration of the setup: https://videohub.oracle.com/media/t/1_0501jut1
Access Requirements
To perform the necessary setup and configuration steps described in the associated video, you will need to be logged in as a user that has administrator privileges and access to Application Composer.
Agents that using this feature will have the ability to view the conversation messages with the standard duty roles that are available out of box, or the specific privileges in a custom role to view and edit the service request.
Promo Code for Redwood Service Center is No Longer Required
Deploying customers no longer need to enter a promo code to enable the Redwood user interface for Service Center. Existing customers can effectively use the Redwood user interface in conjunction with the classic user interface. Redwood was designed to easily co-exist with the classic user interface so organizations can operate with a mix of users on the different UIs.
Through the enablement of the Redwood user interface, deploying companies can leverage many new and enhanced features that are exclusive to the Redwood experience. Starting with this release, it is no longer required to contact Oracle Support to request enablement of the Redwood user interface for Service Center. Prior to this release, a promo code was required in order to enable this functionality. You are now free to enable the Redwood user interface anytime you are ready and begin your journey into the new, modern experience of Redwood.
Steps to Enable
To enable the Redwood user interface, you must opt-in to this feature utilizing the following steps:
- From the Navigator menu go to My Enterprise
- Select Offerings
- Select Service
- Select Opt-in Features
- On the bottom of the list you will find Redwood User Interface for Service - Enable
- Select the pencil for that line item - Enable Service Request and/or Work Order as appropriate
Once you have enabled the feature, there are a few additional steps required to make the Redwood user interface available for your users:
- The privilege required to view the Redwood Service Center option from the home page has been provided out of box for the follow job roles:
- Customer Service Representative
- Customer Service Manager
The View Service Center privilege only grants users the ability to access each of the Redwood Service Center pages. Within each page, the more detailed functionality is controlled by existing functional privileges, most of which apply to both the Visual Builder and Classic (ADF) UI pages concurrently. Any custom roles you may have created also require you to add the SVC_USE_SERVICE_BASE_APP privilege to allow that role access to Service Center.
The following list of privileges are required for use of the Redwood user interface:
| Privilege |
Privilege Code |
|---|---|
| View Service Center |
SVC_VIEW_SERVICE_CENTER_PRIV |
| View Navigator Menu |
ORA_ZCA_VIEW_NAVIGATOR_MENU_PRIV |
| View Smart Actions |
ZCA_VIEW_SMART_ACTIONS_PRIV |
| View Named Routes |
ORA_ZCA_GET_NAMED_ROUTES_PRIV |
| Manage Installed Base Assests | SVC_MANAGE_INSTALLED_BASE_ASSETS_PRIV |
| Use Service Base App | SVC_USE_SERVICE_BASE_APP |
| Navigate to Service Center Pages from Notification | SVC_NAVIGATE_TO_SERVICE_CENTER_FROM_NOTIFICATIONS_PRIV |
You will also want to setup and configure the activities for use in the activity stream in the Redwood UI. Specific instructions on this setup and configuration are available here: https://docs.oracle.com/en/cloud/saas/fusion-service/fairs/what-service-request-activities-track-and-display.html#u30231897
Tips And Considerations
The Redwood user experience was designed specifically so that it can be run side by side with the Classic user experience. If your organization is interested in enabling Redwood, you can easily do this while also running Classic in your production environment.
Key Resources
When enabling the Redwood user interface, detailed instructions are available for your reference:
- Enabling Service Center: https://docs.oracle.com/en/cloud/saas/fusion-service/fairs/enable-service-center.html#s20077880
- Setup Activities Configurations: https://docs.oracle.com/en/cloud/saas/fusion-service/fairs/what-service-request-activities-track-and-display.html#u30231897
Access Requirements
The privileges required to view and utilize the redwood user interface are outlined in the steps to enable section of this entry.
View Contact Profiles within the Service Console
A new service-oriented contact details page can be displayed within the Service Center console. This enables service agents to view customer information within the Service Console's set of in-app tabs while conducting live interactions. The default layout of the service contact page displays a contact's recent service requests, interactions and owned assets.
Service Agents will now have the ability to view service-specific customer information while remaining in the Service Center console experience. While working on real-time interactions or off-line service work, agents will have a view into critical customer information such as existing service requests, recent interactions, and customer-owned assets.
Steps to Enable
You don't need to do anything to enable this feature.
Tips And Considerations
The service-specific contact page is available by default for customers using the Service Center console in the Redwood user experience. For those implementations who want agents to navigate to the sales-specific contact page instead, this is available through extensibility.
Access Requirements
The service-specific contact page is available out of the box for all users who have access to Service Center Console.
Changing the deep link to account, contact, lead, and opportunity with a single step in Visual Builder Studio
This feature allows system implementers to extend the Fusion Service Center, Case Management, and Work Order deep links to navigate to alternate pages with a single step in Visual Builder Studio. Example of the standard links that can be changed include the hyperlinks to Account Detail, Contact Details, Create Account, Lead Detail, Opportunity Detail, Create Contact, Create Lead, and Create Opportunity . Extensible Navigation provides a variable so that system implementers can change the standard navigation to a custom page without needing to apply similar configurations across multiple pages and field templates. Also, it provides a standardized navigation across Service applications.
Simplify the process of changing the deep link to account, contact, lead, and opportunity objects and provide standardized navigation across Service applications.
Steps to Enable
Leverage the Visual Builder Studio to expose your applications. To learn more about extending your application using Visual Builder, visit Oracle Help Center > your apps service area of interest > Books > Configuration and Extension.
Check out our Video Hub channel to find a how-to video.
Tips And Considerations
Before changing the deep links to Account, Contact, Lead, and Opportunity, understand that the standard flow will navigate to pages in the Fusion Sales application. For the Contact object, the standard link in Fusion Service pages navigate to the Service Contact page, which provides a Service-specific layout.
Key Resources
n/a
Access Requirements
n/a
A single code experience blends MCA and UI Events Framework in a single framework
UI Events Framework (UIEF) is a library that allows third party applications to interact with Service Center at the UI level. The framework can listen to events generated from Service Center or from an embedded third-party UI and then perform actions in response to these events. UIEF has now been expanded to also support the MCA (Multi Channel Architecture) events thereby creating a single code experience for implementers that want to integrate live channels and perform other types of UI automation.
UIEF provides a single framework that can be used across multi-channel and other bi-directional UI event requirements
Steps to Enable
You don't need to do anything to enable this feature.
Service Center in the Redwood UI
Use Faceted Filters in the Search Bar for Service Center SR List Pages
Experience an enhanced and intuitive design of the Search Bar on the Service Request list pages where you can now see and use filter chips and clicking on them brings up filter facets. This makes the searching and filtering data much easier.
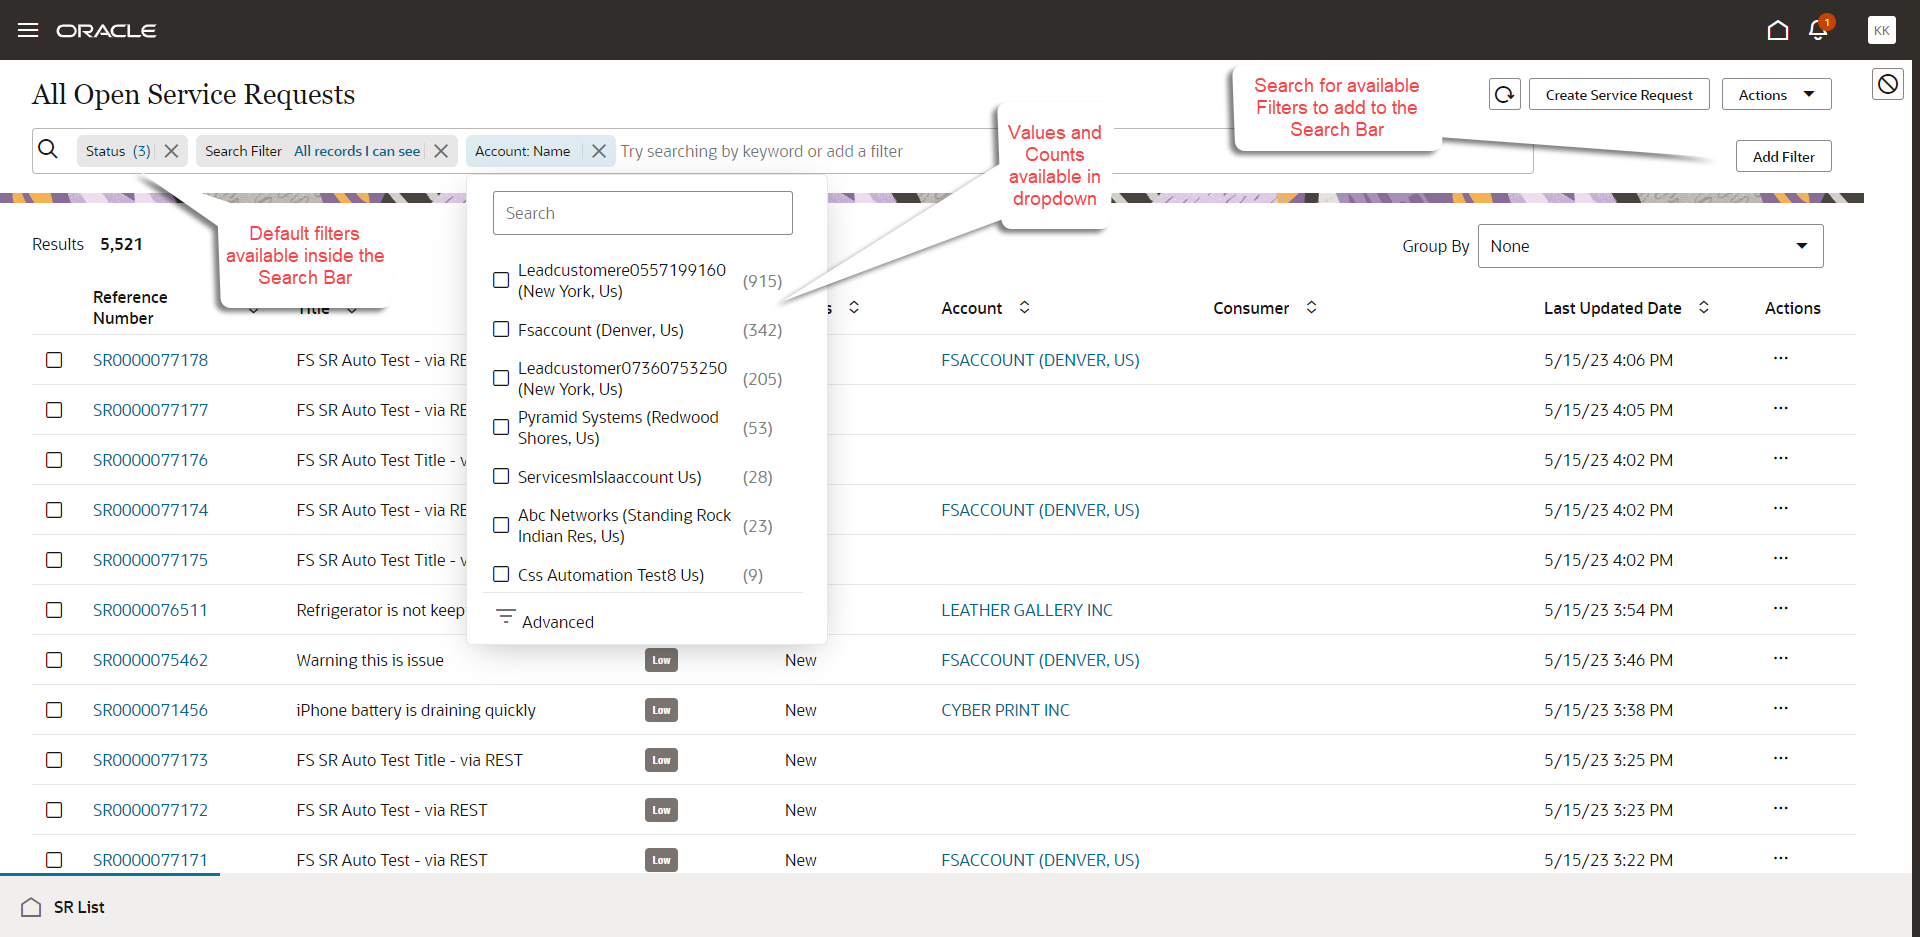
Filter Options for Search Bar
Makes searching and filtering easier.
Steps to Enable
You don't need to do anything to enable this feature.
Access Requirements
Customer Service Representative and Customer Service Manager roles.
Enable Creating and Viewing an Audit Trail for Child Records of Service Requests
In the Redwood user interface, you can view an audit trail of changes made to the service request child records, such as contacts and attachments. By default, only certain fields of the Service Request object are audited. If you want more fields to be audited, you must add them through Setup and Maintenance. Audit information can be accessed from the activity feed page of the service request record.
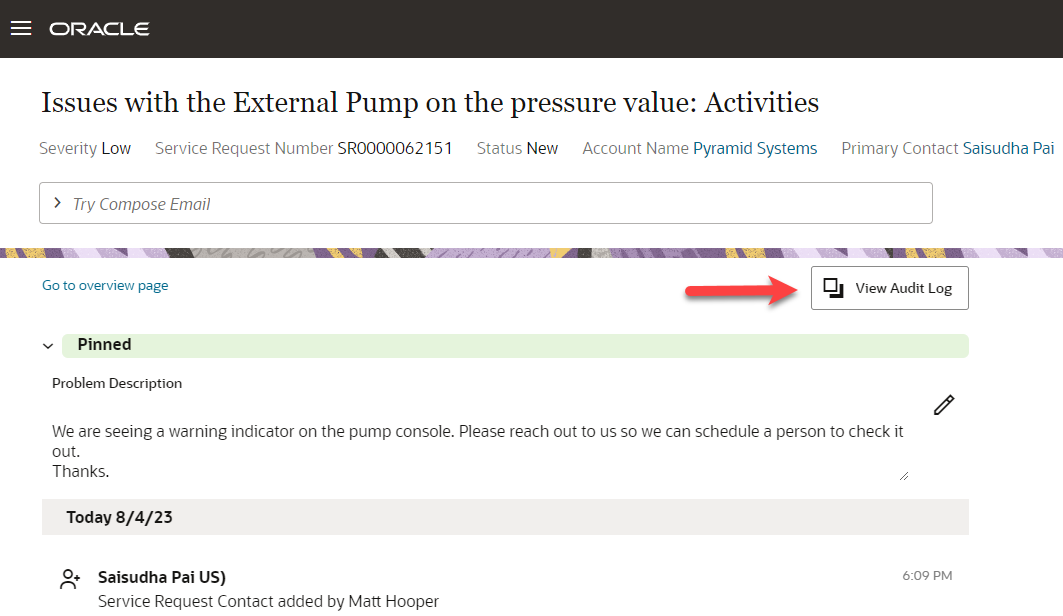
Action to View Audit Log
Here are the audit details for the service request child records, such as contacts and attachments. Note that the Include Child Objects checkbox is not checked by default. To view the audit details, you must check the box and then click the Search button.
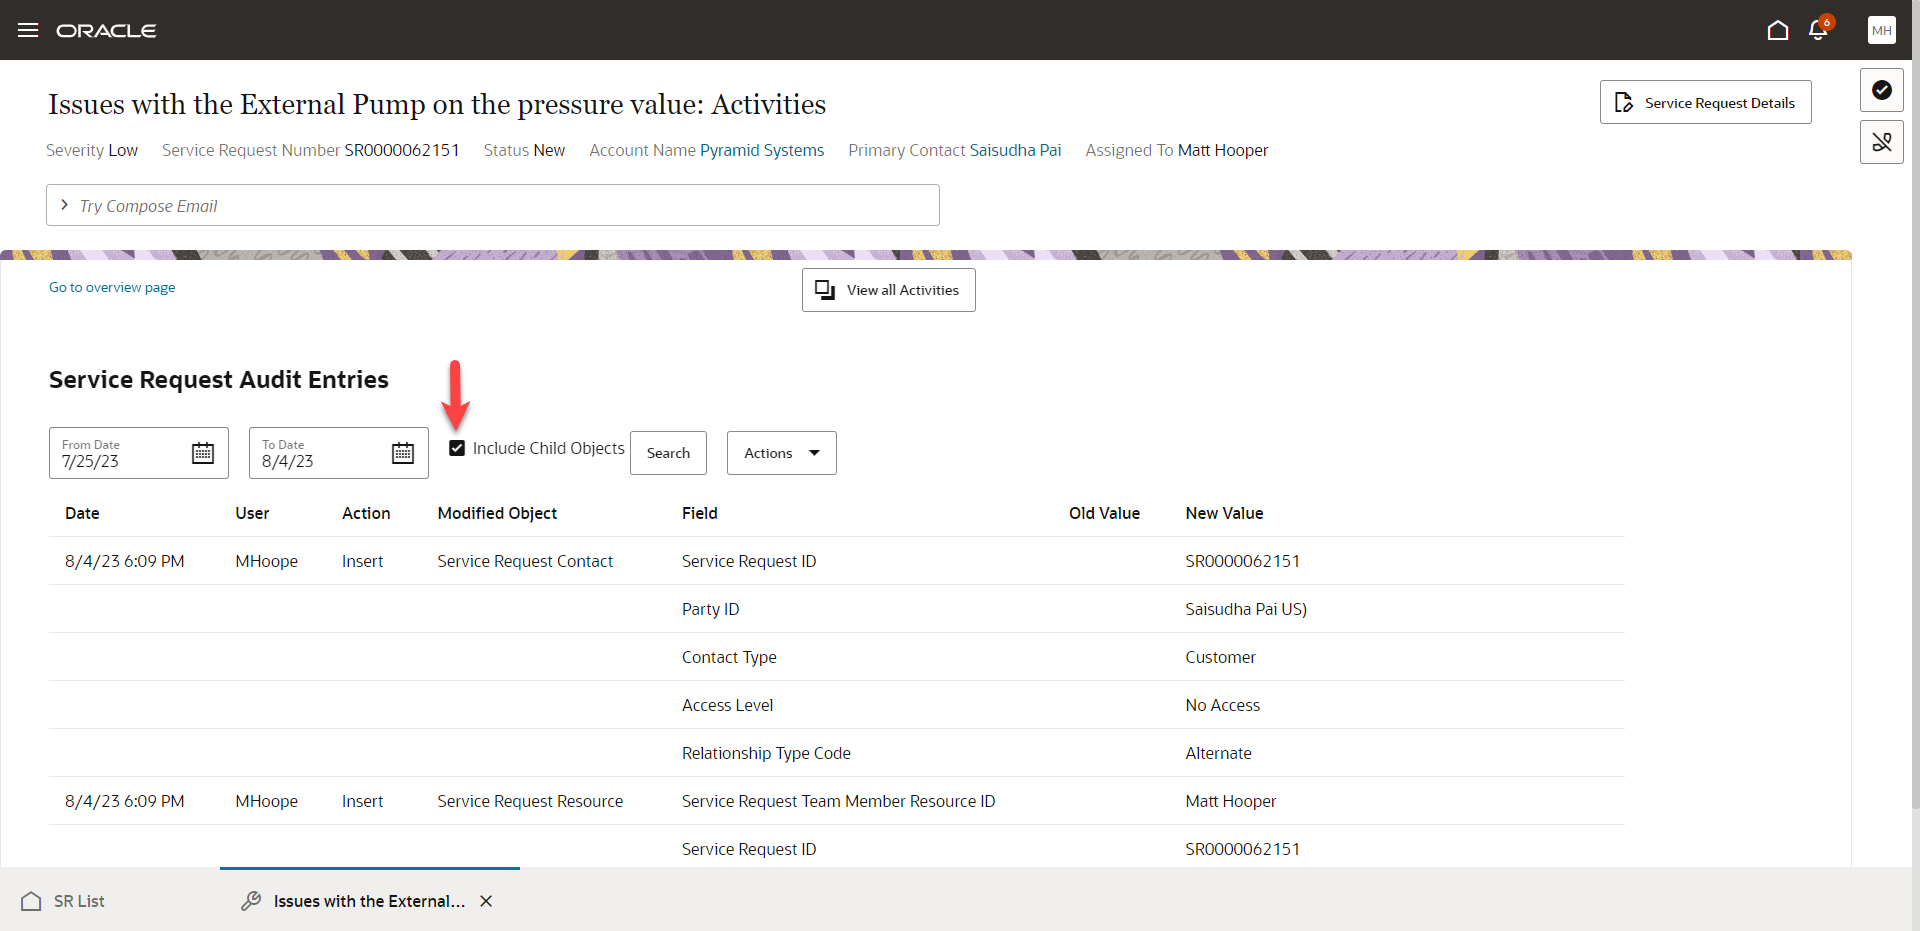
Service Request Audit Details
Auditing is used to monitor user activity and configuration, security, and data changes that have been made to an application. Auditing involves recording and retrieving information pertaining to the creation, modification, and removal of business objects.
Steps to Enable
You can follow the same instructions to enable the capturing of Audit information in the Enable Creating an Audit Trail section in the Implementing Service Center with the Classic User Experience.
Tips And Considerations
To view the child records of the Service Request record, click on the View Audit Log button from the Activity feed page of the service request record. Check the Include Child Objects checkbox and click the Search button.
Access Requirements
Customer Service Representative and Customer Service Manager roles.
Two new privileges are needed for this feature which will need to be added if you created any custom roles.
- SVC_VIEW_SERVICE_REQUEST_CHANGE_HISTORY
- FND_VIEW_AUDIT_HISTORY_PRIV
Also, the profile option below has to be set to Yes:
- SVC_ENABLE_AUDIT_IN_SR
Mark a Service Request Message as Containing Personal Information and Provide Ability to Edit those Messages in the Classic UI
Any service user can mark a service request message as containing personal information if the necessary privileges and profile options are enabled in the Classic UI. The editable checkbox appears in the messages UI
- If the user has been granted the SVC_EDIT_SR_MESSAGE_HEADERS_PRIV privilege
- Or if the ORA_SVC_SR_MESSAGE_PII_EDIT_ENABLED profile option is set to Yes and if the PII field has been exposed by setting the ORA_SVC_SHOW_ADDITIONAL_FIELDS_IN_MESSAGES profile option's value to PII
- Or Both.
Additionally, you can grant specific users a special privilege, SVC_EDIT_SR_MESSAGES_PRIV, to allow them to edit a message to remove the personal information, even if a different user composed the original message.
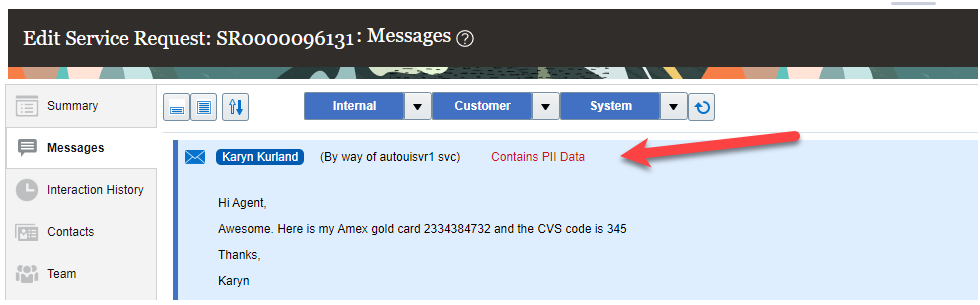
SR Message marked as containing Personal Information (PII)

SR Message available for Edit to remove Personal Information (PII)
You can assist with identifying any service messages as containing personal information to comply with General Data Protection Regulation. You can also remove the personal information from the service request messages.
Steps to Enable
In order to allow any service user to mark a service request message as containing personal information, they must be granted the SVC_EDIT_SR_MESSAGE_HEADERS_PRIV privilege, or the ORA_SVC_SR_MESSAGE_PII_EDIT_ENABLED profile option must be enabled. An administrator can perform the following steps:
- Navigate to the Manage Administrator Profile Values task in the Setup and Maintenance work area.
- Search for the ORA_SVC_SR_MESSAGE_PII_EDIT_ENABLED profile option.
- From the list of displayed values, select the value that you want to set for the profile option.
Additionally, to expose the PII flag in the service request message header, the ORA_SVC_SHOW_ADDITIONAL_FIELDS_IN_MESSAGES profile option's value must be set to PII or Both.
In order to allow certain users to be able to edit any service request message to remove the personal information, the following privilege SVC_EDIT_SR_MESSAGES_PRIV must be granted to that user. Create a custom job role and add this privilege to the role, and then grant the custom role to those users.
Key Resources
See the "Profile Options, Lookups, and Scheduled Processes for Service Requests" chapter in the Implementing Service Center with the Classic User Experience guide.
Access Requirements
SVC_EDIT_SR_MESSAGE_HEADERS_PRIV is the privilege needed to allow the Contains PII Data checkbox to be checked on a service request message. This privilege is not seeded in any out of the box job roles.
SVC_EDIT_SR_MESSAGES_PRIV is the privilege needed to allow the service request message to be modified. This privilege is not seeded in any out of the box job roles.
Enable Similar Service Request and SR Classification Tasks in Service Center Administration Launch Page
The Service Center Administration page enables users that perform functional setup and configuration to access setup functionality from a simplified and easy to use launch page. Now, frequent setup tasks can be accomplished without needing to enter the Setup & Maintenance application. As of this release, you will now have access to a new Service Adaptive Intelligence card which contains the Similar Service Request and SR Classification setup and configuration tasks if you have the appropriate privileges.
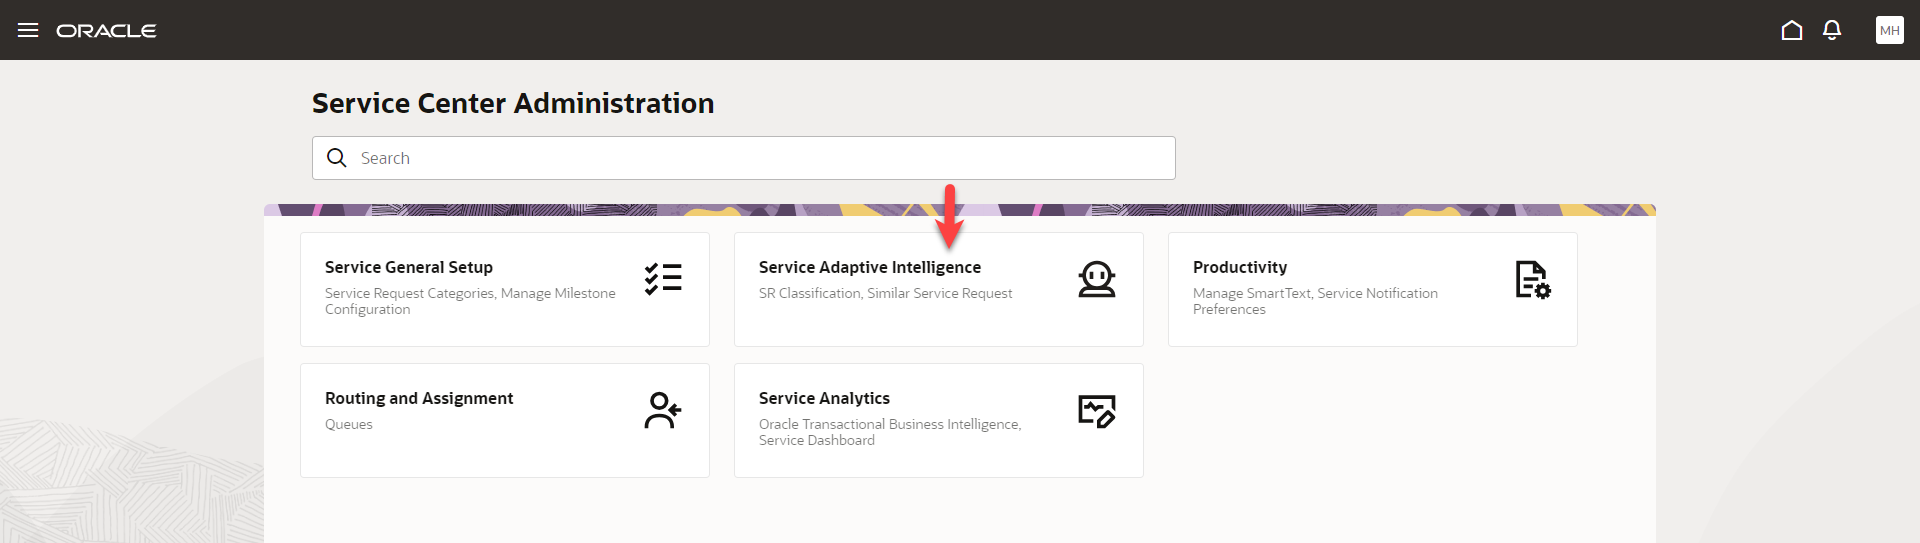
Service Center Administration
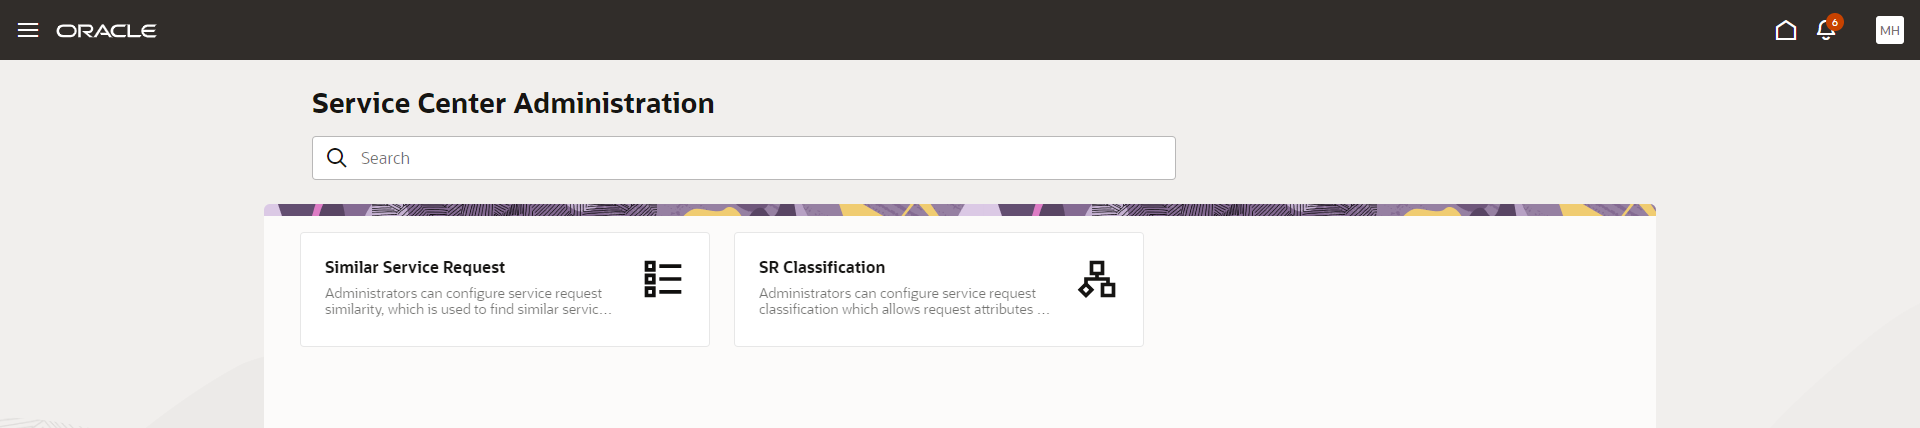
Similar SRs and SR Classification Tasks
Provides a simplified, purpose built interface for multiple personas, including Managers and Administrators. Setup and Configuration tasks that are commonly used can be accessed without the overhead of accessing Setup & Maintenance (FSM).
Steps to Enable
You don't need to do anything to enable this feature.
Access Requirements
Service Request Representatives, Service Request Managers, Business and System Administrators.
Service Center in the Classic UI
Configure the Display of SR messages in the Classic UI
The Service Request messages view in the Classic UI has been enhanced for better ease of use. If the service agent has scrolled to a specific position in the SR message list, that scroll position is maintained if the user clicks away to a different SR subtab and then returns. The number of messages that is displayed at a time and the default display behavior (expanded or collapsed) is now configurable through system-wide settings. There is a Load More link available at the top of the messages tab if there are more messages available to load. As you scroll down the list of messages to view, the left and right hand side panels remains in place. Lastly, when composing a service request message, if there is only one channel available for the channel type, it will automatically be populated after selecting the channel type.
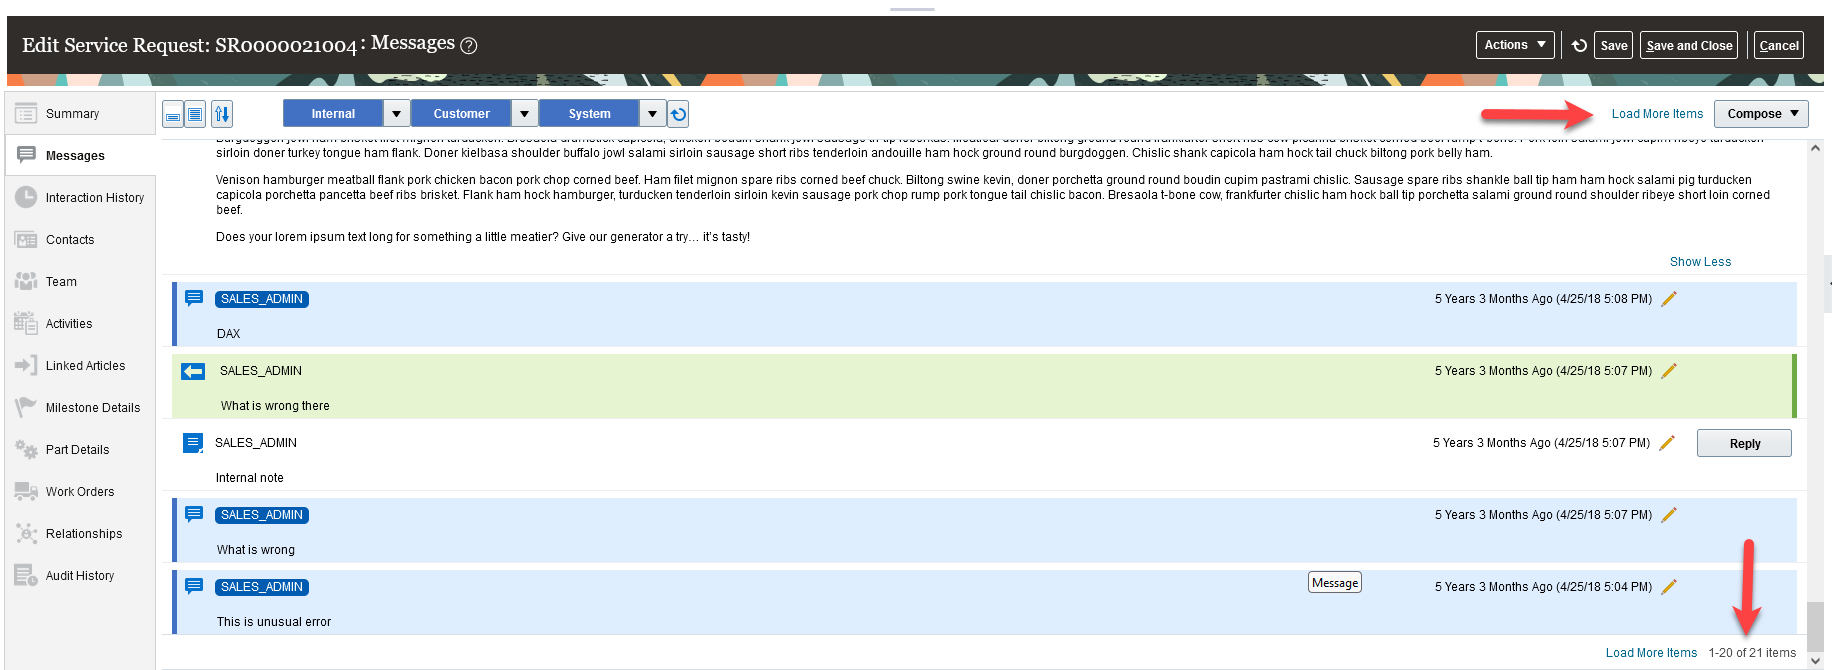
Load More SR Messages
Improve Usability for the Classic Service Request Messages User Interface.
Steps to Enable
The administrator can change the number of service request messages that is loaded initially and every time the Load More Messages linked is clicked. This can be achieved by modifying the ORA_SVC_CLASSIC_MESSAGES_SET_PAGE_SIZE profile option value. The default value is set to 8 and the maximum number of messages that can be loaded is 50.
To change the default setting for collapsing the service request messages, modify the ORA_SVC_MESSAGE_SET_EXPAND_MODE profile option to Yes. This will expand the messages for all users
Both of these site-wide profile options can be updated in the Manage Administrator Profile Values task in Setup and Maintenance screen.
Tips And Considerations
Here are some tips regarding the Load More Items link:
- Update the ORA_SVC_CLASSIC_MESSAGES_SET_PAGE_SIZE profile options value to another value (other than 8 which is the default).
- The Service Request must have more messages than the value of the ORA_SVC_CLASSIC_MESSAGES_SET_PAGE_SIZE for the Load More Items link to appear at the top of the Messages tab.
- The initial number of messages loaded will be equal to the value of the ORA_SVC_CLASSIC_MESSAGES_SET_PAGE_SIZE. Once you click on the Load More Items at the bottom of the Messages tab, the Load More Items link will appear at the top of the page.
- Finally, once all the messages has been loaded, the Load More Items link at the bottom of the Messages tab will disappear.
Access Requirements
Service Request Representatives and Service Request Managers.
View Other Enhancements to the Classic Service Request User Interface
The Service Request Classic UI has been enhanced for better ease of use.
- The Product Search pop-up now allows for a Contains filter option to improve the search functionality. You must provide a minimum of 3 characters when using the Contains search filter.
- The ability to display the calculated value of Time Remaining to contain a precision of 2 time units is now configurable through a system-wide setting.
- A refresh icon or refresh button has been included in some of the Service Request sub tabs such as Contacts, Teams and Messages.
- In the Service Request Summary tab, there is an attachments counter to indicate how many attachments has been added to the service request.
- When configuring the message subtype values, the default display of these message subtype values will be alphabetical unless a display sequence has been added in the messages subtype administration screen.

Product Search Filter
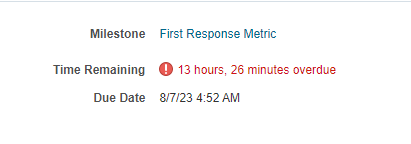
Time Remaining showing 2 Digit Value

Refresh Icon on Contacts subtab
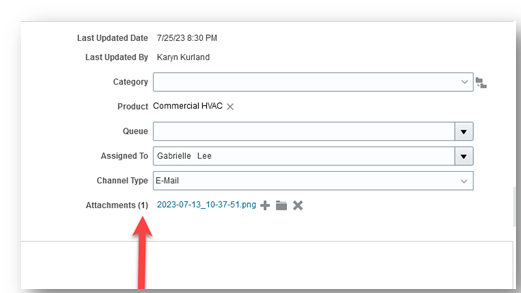
Attachments Counter
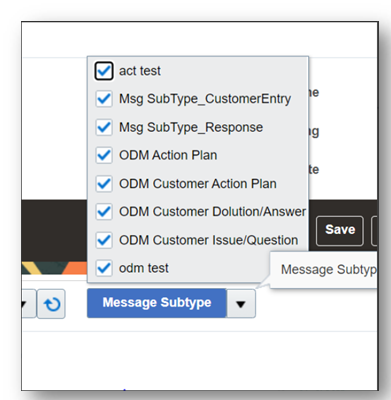
Message Subtype Alphabetical Display
Improved usability of the Classic Service Request UI
Steps to Enable
To define the time remaining for a 2 digit display, the ORA_SVC_SLA_ENABLE_SECONDLEVEL_PRECISION_IN_TIMEREMAINING profile option must be set to Yes in the Manage Administrator Profile Values task.
To display the message subtype values in alphabetical order when filtering by message subtype, the entries added to the Manage Service Request Message Types and Subtypes task should not include a display sequence. If a display sequence is provided, then this will take precedence over the alphabetical order.
Access Requirements
Service Request Representatives and Service Request Managers
Control Editing Permissions on SR Messages
Control users' permissions to modify SR message attributes after sending and also limit the number of characters in a service request message. Administrators can grant users a new privilege to modify any standard or custom attribute of an already posted SR message, except for the message content. Additionally, administrators can specify the maximum number of characters allowed in the message content. The default value is 32 million characters.
Allowing users to modify the various attributes of a message while protecting the content improves the accuracy and quality of information on an SR. An upper limit on the number of characters in the content prevents oversized messages, thereby improving the overall performance and throughput.
Steps to Enable
A new privilege - Edit Service Request Message Headers - has been created. Grant this privilege to the Job Role(s) that need the ability to modify all aspects of an SR message except the actual content.
Set the profile option named ORA_SVC_MESSAGE_TEXT_CHAR_LIMIT to the listed value that is appropriate to your business requirements. The default is 32 million characters.
Access Requirements
A new privilege - Edit Service Request Message Headers - has been created. Grant this privilege to the Job Role(s) that need the ability to modify all aspects of an SR message except the actual content.
Omnichannel Framework
Chat Agent Direct Transfer to Another Chat Agent or Change the Lead Role to Another Agent
Chat transfer to agents extends the current transfer-to-queue capability by providing the ability for an agent to transfer directly to a specific agent. A warm transfer allows both agent parties to conference with the customer to ensure a proper hand-off is provided, allowing the agent to set the context for the agent and ensure a seamless hand-off.
Agents can request assistance from other agents to help expedite a resolution or answer a customer question. Providing a better customer experience.
Steps to Enable
Use the Opt In UI to enable this feature. For instructions, refer to the Optional Uptake of New Features section of this document.
Offering: Service
Tips And Considerations
To enable or disable the ability to transfer a chat to another agent, the ORA_SVC_CHAT_TRANSFER_TO AGENT_ENABLED profile option must be set to yes.
Only agents that are available for chats can be selected to conference or transfer a chat.
Key Resources
- See the "Chat" chapter in the Implementing B2B Service guide.
Access Requirements
To disable or enable this feature, Administration privileges are required.
Chat Input and Message Failure Indicator Changes
The Redwood user experience for chat conferencing allows multiple agents to interact with customers while conversing. Once in a conference, agents participating will be able to chat with the customer and also be able to send internal messages that will not be visible to the customer. This collaboration feature and other chat input field improvements enhance the agent experience, including new formatting tools.
The enhanced Redwood UI will provide agents an indicator on active chat tabs that are not in focus when new messages have been received on active chat sessions.
Providing the ability for agents to chat privately will help provide a more seamless interaction and can also be a helpful coaching tool for new agents.
Agents will also have a better user experience due to the enhanced UX changes.
Steps to Enable
You don't need to do anything to enable this feature.
Tips And Considerations
The ability to chat conference with agents is enabled by default at the site level. If this feature is not wanted it can be disabled by setting the ORA_SVC_CHAT_CONFERENCE_WITH_AGENT_ENABLED profile option to No.
Key Resources
See the Using Service Center in the Redwood User Experience guide.
Access Requirements
To disable or enable this feature, Administration privileges are required.
For any agents that will be accepting chat work offers, they will require the Chat Agent abstract role associated to their profile.
Fusion Queue Dashboard Changes
We have made some changes to the Queue Dashboard to improve performance.
A new Show Statistics checkbox has been added to the Queue page that when selected, the queue statistic information will be displayed. The Show Statistics checkbox will be deselected by default, but once selected it will remain enabled until the field is unchecked.
We have also included a default filter to only show queues that are in an Enabled state. If you wish to filter on other queue states, you can use the Query By Example filter and select the queue state value.
These changes will assist with performance of queue management and allow for administrators to focus on active queues.
Steps to Enable
You don't need to do anything to enable this feature.
Tips And Considerations
- It is recommended that you enable the Show Statistics checkbox when you wish to view the queue data, and then deselect the checkbox to leverage the performance benefits when returning to the dashboard
Key Resources
Queues Dashboard section of the Using Service Center in the Classic User Experience guide
Access Requirements
Managers of queues will be able to enable and disable the Show Statistics checkbox.
Service Channels
Control the Batch and Fetch Size of Emails Using the Exchange Integration
As part of the Microsoft Exchange integration, deploying companies can now control the batch and fetch size of emails in the Exchange email inbox. Depending on the size of your typical emails and the number of emails you get, you can now control how Service Center batches and fetches email from the email service using profile options. For most cases the default settings will work well for your environment.
This feature is beneficial to organizations that get a smaller number of emails but a higher quantity. By increasing the batch and fetch numbers, you can potentially increase your performance slightly. If you are unsure of your average email size or are not experiencing any performance issues, it is recommended that you maintain the default values for these profile options.
Steps to Enable
The following are the profile options that are available for adjustment. It is recommended that you use the default values unless you have a specific reason to change them. These values are also dependent on the frequency at which you retrieve emails from the Exchange server. To set or determine the frequency at which you retrieve emails, please refer to the documentation available here: https://docs.oracle.com/en/cloud/saas/fusion-service/fairs/create-a-job-to-read-messages.html#u30239575
- ORA_SVC_INBOUND_MSG_EXCHANGE_ONLINE_BATCH_SIZE
- Description : Specify the maximum number of inbound messages to read from Microsoft Exchange online in one ESS Job iteration.
- Default value : 10
- Maximum value : 200
- ORA_SVC_INBOUND_MSG_EXCHANGE_ONLINE_FETCH_SIZE_PER_BATCH
- Description : Specify the maximum number of inbound messages to be processed from Microsoft Exchange online in one subset of a batch.
- Default value : 10
- Maximum value : 20
- ORA_SVC_INBOUND_MSG_EXCHANGE_ONLINE_DELETE_SIZE
- Description : Specify the maximum number of inbound messages to be deleted from Microsoft Exchange online in one subset of a batch.
- Default value : 10
- Maximum value : 20
Tips And Considerations
Please note that if you are retrieving emails frequently from the Exchange server, and you modify the default profile options to batch and fetch emails more frequently you may experience performance issues in processing.
Access Requirements
Administrator privileges are required to set or modify profile options in Setup and Maintenance.
Service Analytics
Additional View Objects for Service and Help Desk Data Extraction
The new Business Intelligence (BI) Cloud Connector view objects let you extract data for:
- Internal Conversations
- Internal Conversation References
- Internal Conversation Messages
- Internal Conversation Recipients
You use this feature for high-volume data extraction into your own custom data warehouse or other targets.
Steps to Enable
You don't need to do anything to enable this feature.
Key Resources
- Extract Data Stores for CX Sales and Fusion Service
- Creating a Business Intelligence Cloud Extract
- Data Lineage Mapping with View Objects
Open the Service Analytics Infolets in a Separate Browser Tab from the Service Request List Page
In the Redwood user experience, you can open the service analytics infolets dashboard in a new browser window by clicking on the dashboard icon on the service request list page. This enables users to quickly access the dashboard metrics while working on the service request list.
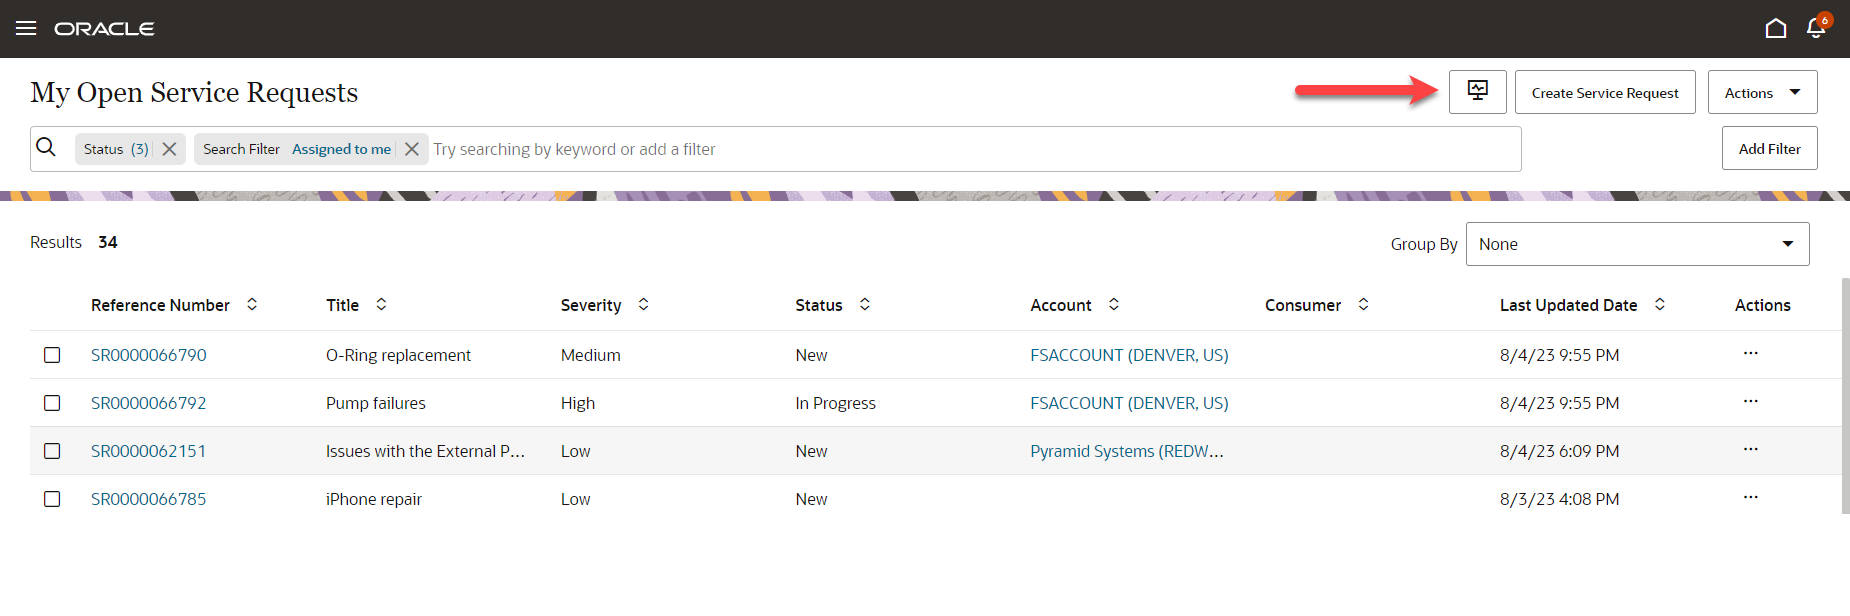
Access to Service Dashboard

Service Dashboard in New Browser
Easy Access from the Service List page to view the Service Dashboard.
Steps to Enable
You don't need to do anything to enable this feature.
Access Requirements
Service Request Representatives and Service Request Managers.
Drill Down to a Detail Report from a Custom Infolet
In the Redwood user interface, Administrators can link custom tile reports to detailed reports. Before setting up the link, both the tile and detailed reports should already be created in the BI Catalog. Once linked, end users can drill down on the custom infolet in the dashbaord to perform detailed analysis. Links provided in BI for navigation to Service/Help Desk Request records automatically appear on the detail report.
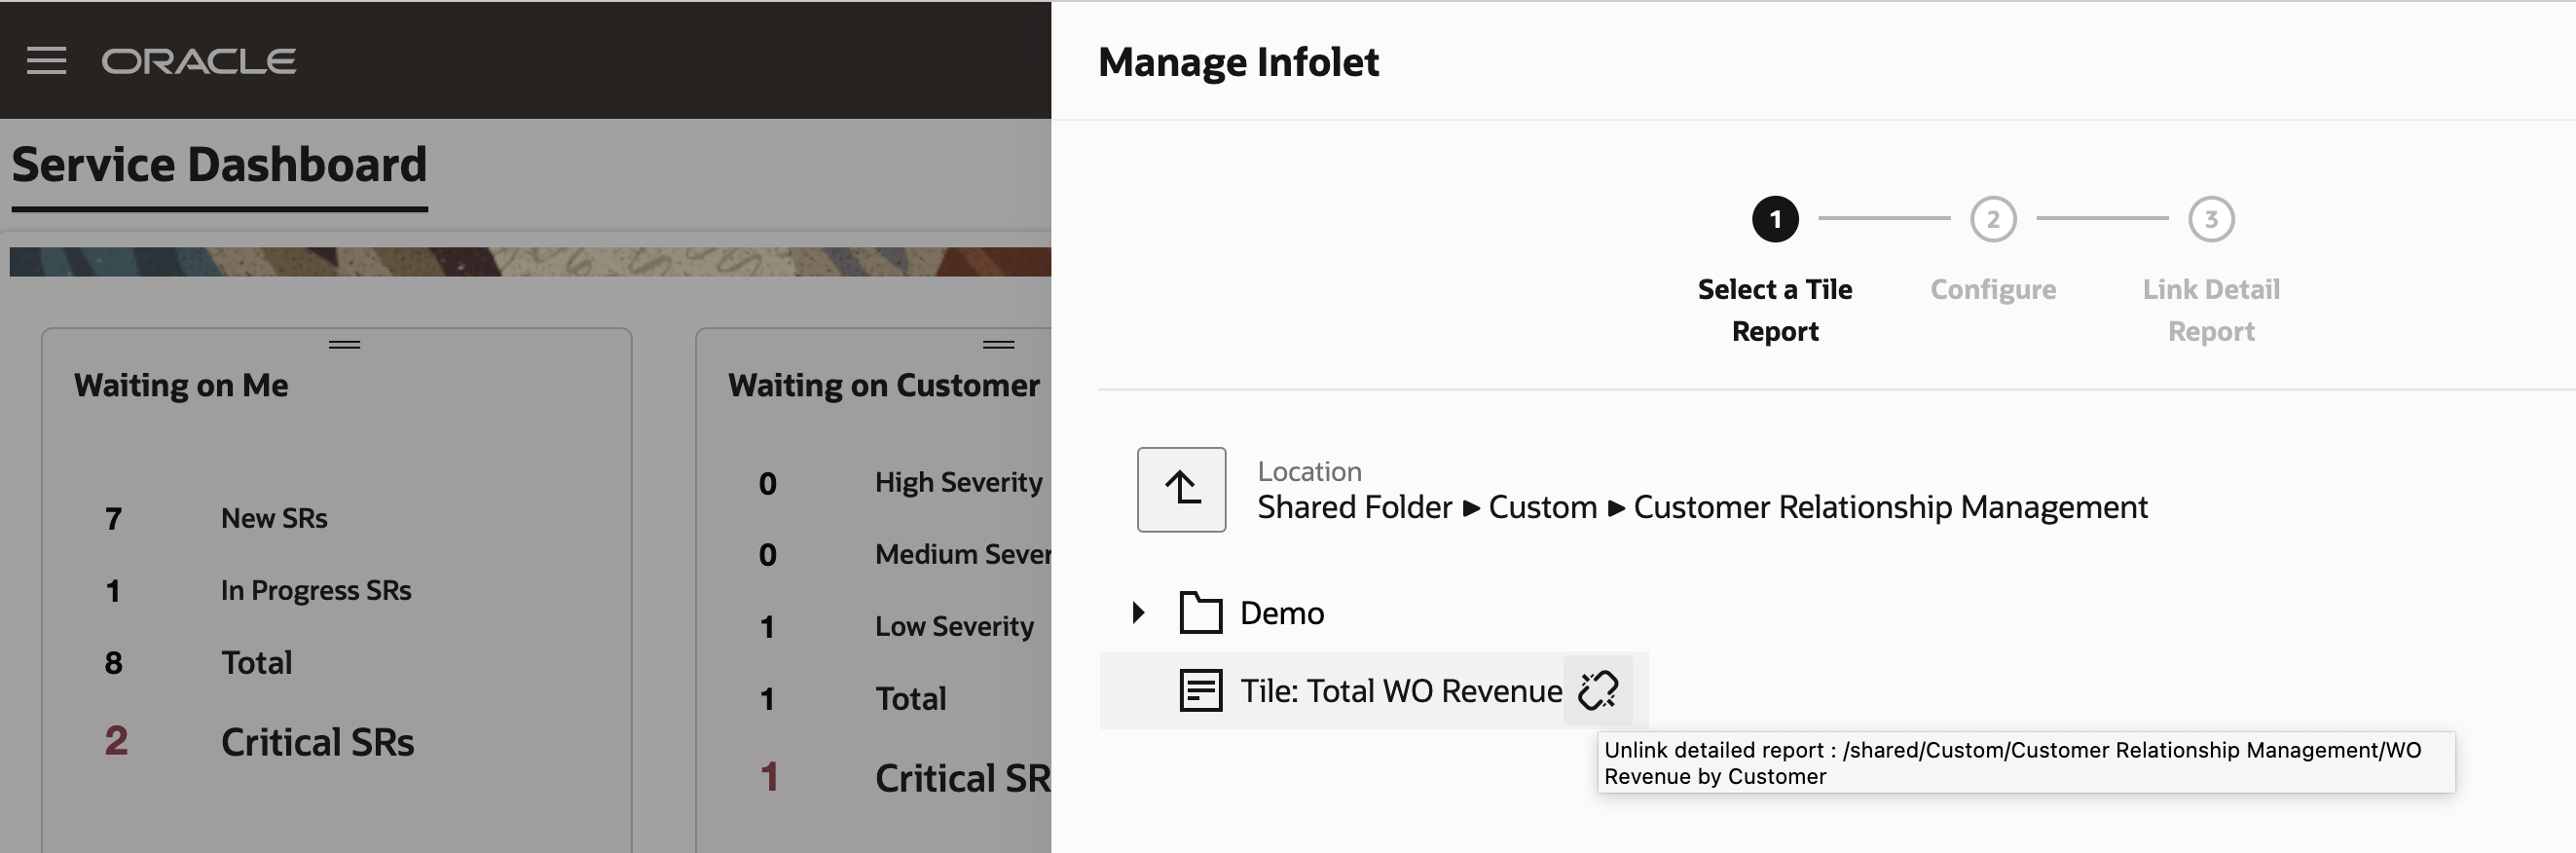
Admin View: Shows a TIle report already linked, with the option to unlink
Adding links to dashboard infolets makes information more actionable for the user.
Steps to Enable
- Log in as an Administrator (Service/HR Help Desk or Internal Desk)
- Click on the dashboard menu at the top right corner and choose 'Manage Infolet' from drop down
- In the resulting pop-up pane, locate the Tile report that needs to be linked to the detailed report
- Click 'Next' and configure the infolet in Step 2. Click 'Next 'again.
- Locate and choose the detail report that the tile report needs to be linked to
- Click 'Save'
- A confirmation message, 'Infolet Configuration Saved' appears
- (optionally) Add the custom infolet to the dashboard and verify that you can drill to the detail report from it.
Case Management
Create a Case from an Inbound Email
You can now enable your customers to automatically create a case by sending your organization an email. This feature will allow your customers to communicate with you through a powerful new channel. When a customer sends a new inbound email, a Case will automatically be created. The subject of the email will become the title of the case and the body of the email will be captured in the problem description as well as create a customer entry message which is a conversation message.
If the sender of the email is not known by the system, based on a lookup of the email address, a case will be created without a contact associated.
Once a Case has been created, case workers will have the ability to respond to that email from within the context of the Case. As case workers and the customer correspond, all information will be captured as part of a conversation message thread.
This feature will allow customers to communicate with your organization and create cases through the email channel. Customer issues and questions can then be quickly and easily routed to a case worker for attention. This feature helps ensure that when a customer initiates a new case through email, your organization can manage the correspondence without having information spread across multiple channels.
Steps to Enable
Before configuring this feature, you will want to ensure that you have your inbound email setup and configured properly. Please reference this documentation for the setup and configuration steps for inbound email: https://docs.oracle.com/en/cloud/saas/fusion-service/fairs/how-you-set-up-inbound-and-outbound-email.html#s20058578
Once you have your inbound email setup and configured, you will want to create a new channel. As a user with Administrator privileges navigate to Setup and Maintenance.
- Select the offering Service
- Select Communication Channels
- Select Manage Communication Channels
- Create Channel
- Enter in all requested information
- Set the Purpose Code to "Case"
For detailed information on setting up a communication channel, specific instructions are available here: https://docs.oracle.com/en/cloud/saas/fusion-service/fairs/configure-an-email-channel.html#s20058710
When emails are then sent into the email address identified in the Account Name a new case will be created.
Tips And Considerations
In order for Agents to correctly view and correspond with customers through conversation messages, please ensure that they have the following privileges:
| View Conversation Message | SVC_VIEW_CONV_MSG | Allows a user to view a conversation message. |
| Participate in Customer Conversation | SVC_PARTICIPATE_IN_CUSTOMER_CONVERSATION | Allows a user to participate in a customer conversation. |
| Participate in Collaboration Conversation | SVC_PARTICIPATE_IN_COLLAB_CONVERSATION | Allows a user to participate in a collaboration conversation. |
Note - if the customer sends an initial inbound email that does not have a subject, the Case creation will fail since the title of the Case is a required field. If this is a concern, please contact My Oracle Support and they can provide you with a workaround.
Enhanced Case Features for Case Workers, Administrators and Developers
Case workers, administrators and developers can now leverage a variety of enhancements to several of their favorite Case Management features on the Create Case and Case Details pages.
- Primary Contact pickers now default intelligently to either customers or employees based on the stripe of the Case. Administrators can easily set the default stripe for their Cases through a profile option.
- Documents on a Case can now be categorized, previewed and secured.
- Tasks and Appointments are now summarized in the left-hand panel.
- Household addresses can be entered easily using a new address verification service.
The refinements to the Primary Contact, Task/Appointment, Document and Household features in the Create Case and Case Details pages make Cases easier to configure for Case Administrators and easier to use for Case Workers.
Steps to Enable
- To configure the default Case stripe and Primary Contact picker:
- Use the 'Manage Case Profile Options' task in Setup and Maintenance to set your preferred value for 'ORA_SVC_CASE_DEFAULT_STRIPE_CD'. The default value is 'CRM'.
- The 'Primary Contact' picker on the Create Case and Case Details pages will show Contacts (for 'CRM' stripe) or Employees (for 'HR Help Desk' and 'Internal Help Desk' stripe).
- To configure Document categories, use the 'Manage Attachment Categories' task in Setup and Maintenance to add or remove the 'SVC_CASES' entities to standard or custom Categories for your Cases. More information about Attachment Entities and Attachment Categories can be found here.
- Household address verification can be enabled by setting the 'householdAddressSearchEnabled' variable to 'on' in Visual Builder.
- No configuration is required to enable:
- Document preview for image formats.
- Tasks/Appointment summary in the left-hand panel.
Work Order Management
Enhancements for Linking Oracle Field Service Work Orders from the Service Center UI
Create and delete links between Oracle Field Service integrated work orders from within Service Center and use the bi-directional sync to manage those links in Oracle Field Service. Links can be used to designate rules such as one work order can't be started until another is completed, one can only be started after another has been started or two work orders must be started at the same time. You can also designate rules such as two work orders must be performed by the same or different technicians and must be performed on the same or different days. Links can be created and deleted in either Service Center or Oracle Field Service and will be kept in sync.
- Automatic syncing of the link templates in Oracle Field Service through the automated setup process
- Viewing of the work order templates in a new Fusion Service setup and maintenance task, Manage Work Order Link Templates
- Viewing a graphical representation of the linking in the link details
To ensure work that requires multiple service work orders is performed and tracked based on predefined business rules, linking work orders are required. The links between service work orders can be based on rules such as one work order can only be started after another work order is completed, one work order can only be started after another work order is started or to support team work, two or more work orders have to be started at the same time. Linking also supports other rules such as two work orders must be performed on the same day or different days and two work orders must be performed by the same technician or different technicians.
Steps to Enable
You don't need to do anything to enable this feature.
Tips And Considerations
- The linked service work orders are only accessible in the Redwood UI and only applies to the Oracle Field Service integrated work orders.
- The links are based on templates created in Oracle Field Service. The templates are now synced through the automated setup process in Oracle Field Service. For more information on the setup process, Configure Oracle Fusion Service
Key Resources
For details about configuring and using service work orders, see the following guides:
- Implementing Service Center with the Redwood Experience
- Using Service Center in the Redwood Experience
- Integrating Fusion Service with Field Service
- Configure Oracle Fusion Service
Access Requirements
The following roles are required:
- Fusion Service: Service Administrator
- Fusion Service: Customer Service Representative
- Oracle Field Service: Administrator