
This document will continue to evolve as existing sections change and new information is added. All updates appear in the following table:
| Date | Product | Feature | Notes |
|---|---|---|---|
| 25 FEB 2022 | Benefits |
Change Hire Date | Updated document. Revised feature information. |
| 25 FEB 2022 |
Benefits | Track Participant Actions in Self-Service Benefits | Updated document. Revised feature information. |
| 03 SEP 2021 | Created initial document. |
HCM Cloud applications have two types of patches you can receive that are documented in this What’s New:
- Release Updates (21A, 21B, 21C, and 21D)
- Optional Monthly Maintenance Packs to each update
It is important for you to know what Release Update your environment is on. You can find this in your Cloud Portal.
____________________
 HAVE AN IDEA?
We’re here and we’re listening. If you have a suggestion on how to make our products better, please let us know. To enter an idea go to the Ideas Lab on Oracle Customer Connect. In this document wherever you see the light bulb icon after the feature name it means we delivered one of your ideas.
____________________
Suggested Reading for all HCM Products:
- Human Resources What’s New – In the Global Human Resources section you will find features on the base application in which other application are built upon.
NOTE: Not all Global Human Resource features are available for Talent and Compensation products.
- Oracle Human Capital Management Cloud Functional Known Issues and Maintenance Packs (Document ID 1554838.1). These documents identify bug fixes and possible known issues. You will also need to review these documents based in the release update version you are currently on or will be moving to.
- Oracle Help Center – Here you will find guides, videos and searchable help.
- Release Readiness – New Feature Summary, What’s New, Feature Listing Spreadsheet, Spotlights and Release Training
GIVE US FEEDBACK
We welcome your comments and suggestions to improve the content. Please send us your feedback at oracle_fusion_applications_help_ww_grp@oracle.com. Indicate you are inquiring or providing feedback regarding the HCM Cloud What’s New in the body or title of the email.
Column Definitions:
Report = New or modified, Oracle-delivered, ready to run reports.
UI or Process-Based: Small Scale = These UI or process-based features are typically comprised of minor field, validation, or program changes. Therefore, the potential impact to users is minimal.
UI or Process-Based: Larger Scale* = These UI or process-based features have more complex designs. Therefore, the potential impact to users is higher.
Features Delivered Disabled = Action is needed BEFORE these features can be used by END USERS. These features are delivered disabled and you choose if and when to enable them. For example, a) new or expanded BI subject areas need to first be incorporated into reports, b) Integration is required to utilize new web services, or c) features must be assigned to user roles before they can be accessed.
| Ready for Use by End Users Reports plus Small Scale UI or Process-Based new features will have minimal user impact after an update. Therefore, customer acceptance testing should focus on the Larger Scale UI or Process-Based* new features. |
Customer Must Take Action before Use by End Users Not disruptive as action is required to make these features ready to use. As you selectively choose to leverage, you set your test and roll out timing. |
|||||
|---|---|---|---|---|---|---|
| Feature |
Report |
UI or |
UI or |
|
||
Improved Performance of the Evaluation and Reporting Work Area |
||||||
Remove Incorrect Data Using the Delete Person Benefits Diagnostic Report |
||||||
Oracle Benefits is a complete, configurable and flexible global solution that enables organizations to successfully evolve and adapt to the unique needs of their workforce. The solution enables setup of traditional 'one-size fits all' plans to highly complex plans that selectively target different workforce segments with different benefit packages. Self-service capabilities present the user with an out of the box intuitive guided enrollment process with contextual information and embedded analytics.
If the participant is already enrolled in benefits, a new check prevents the administrators from changing the work relationship start date of the participant. So if you need to change the work relationship start date, you must first disenroll the participant from their benefits.
For example, you hired an employee on January 1, 2022 and the employee enrolls into benefits. You processed the life event on January 1, 2022 and changed the start date of the work relationship to January 5, 2022. Because the participant had enrollment on January 1, 2022, the change in the work-relationship start date can corrupt the enrollment data. The new change hire date feature prevents you from changing the start date of the work relationship date.
If the participant has only unprocessed potential life events that occurred before the new start date, you can change the start date. The unprocessed potential life events are deleted.
This enhancement prevents the corruption of Benefits enrollment data and saves the time spent on resolving data corruption issues.
Steps to Enable
You don't need to do anything to enable this feature.
Tips And Considerations
The check does not apply when changing the work relationship start date to an earlier date because the existing benefits enrollments are still valid as of the new date.
Role Information
Access to this feature is through the following job roles:
- HR Manager
- HR Specialist
Enable Participants to Change Beneficiaries at Any Time
You can now enable your participants to update their beneficiary designations for the latest processed event outside of the enrollment window. In other words, if participants are enrolled in benefits that allow beneficiary designations, they can make changes to the beneficiary details even if there are no started events. They no longer have to wait for an appropriate life event to make these changes:
- Change the percentage of allocation for existing beneficiaries.
- Remove a primary or contingent beneficiary and adjust the percentage of allocation.
Designate new beneficiaries and adjust their percentage of allocation. You can do this only if you added the beneficiaries as contacts before the latest processed life event date.
All new designations start from the coverage start date of the plan. This ensures 100% allocation for the entire period of coverage.
Because these beneficiary changes happen outside of the enrollment window, the application doesn't generate any beneficiary-related pending actions. If an enrollment had generated a pending action to designate beneficiaries, that action will automatically close.
Participants can already change unrestricted programs or plans outside of the enrollment window. So, this feature doesn’t prevent them from making changes to the unrestricted programs or plans in the usual way through the enrollment flow.
Participants might see the following message when they open the Change Beneficiaries page:

Message on the Change Beneficiaries Page
Here are the possible reasons for the message:
| Reason |
What you need to do? |
|---|---|
| You have electability due to started life events or unrestricted life events. |
You have electability due to started life events or unrestricted life events. Go to the regular enrollment flow to add the beneficiary. You don’t have to use the Change Beneficiaries page. |
| You have electability due to started life events, but you want to add a new beneficiary based on a previous life event. |
You need to contact your benefits administrator. They need to back out the started life event. You can then use the Change Beneficiaries page. |
| You have no electability because you don’t have any life events or you are a new hire. |
You need to contact your benefits administrator. |
This feature saves the time spent on workarounds to enable participants to change beneficiaries outside of open enrollment.
Steps to Enable
You need to enable a quick action to enable your participants to change their beneficiaries at any time. Here's how you enable this feature:
- Log in as a user who has administrative privileges.
- On the Home Page, click Configuration > Structure.
- Create a sandbox with Structure and Page Composer as the tools.
- Open the sandbox.
- From the Tools menu, click Structure. Then, click Me.
- Select the Quick Actions tab, Benefits.
- Ensure that the Add as a quick action link on home page check box is selected.
- Select Change Beneficiaries and select Yes from the Visible list to enable the Change Beneficiaries tile.
- Select Yes for Mobile Enabled.
- Click Save and Close.
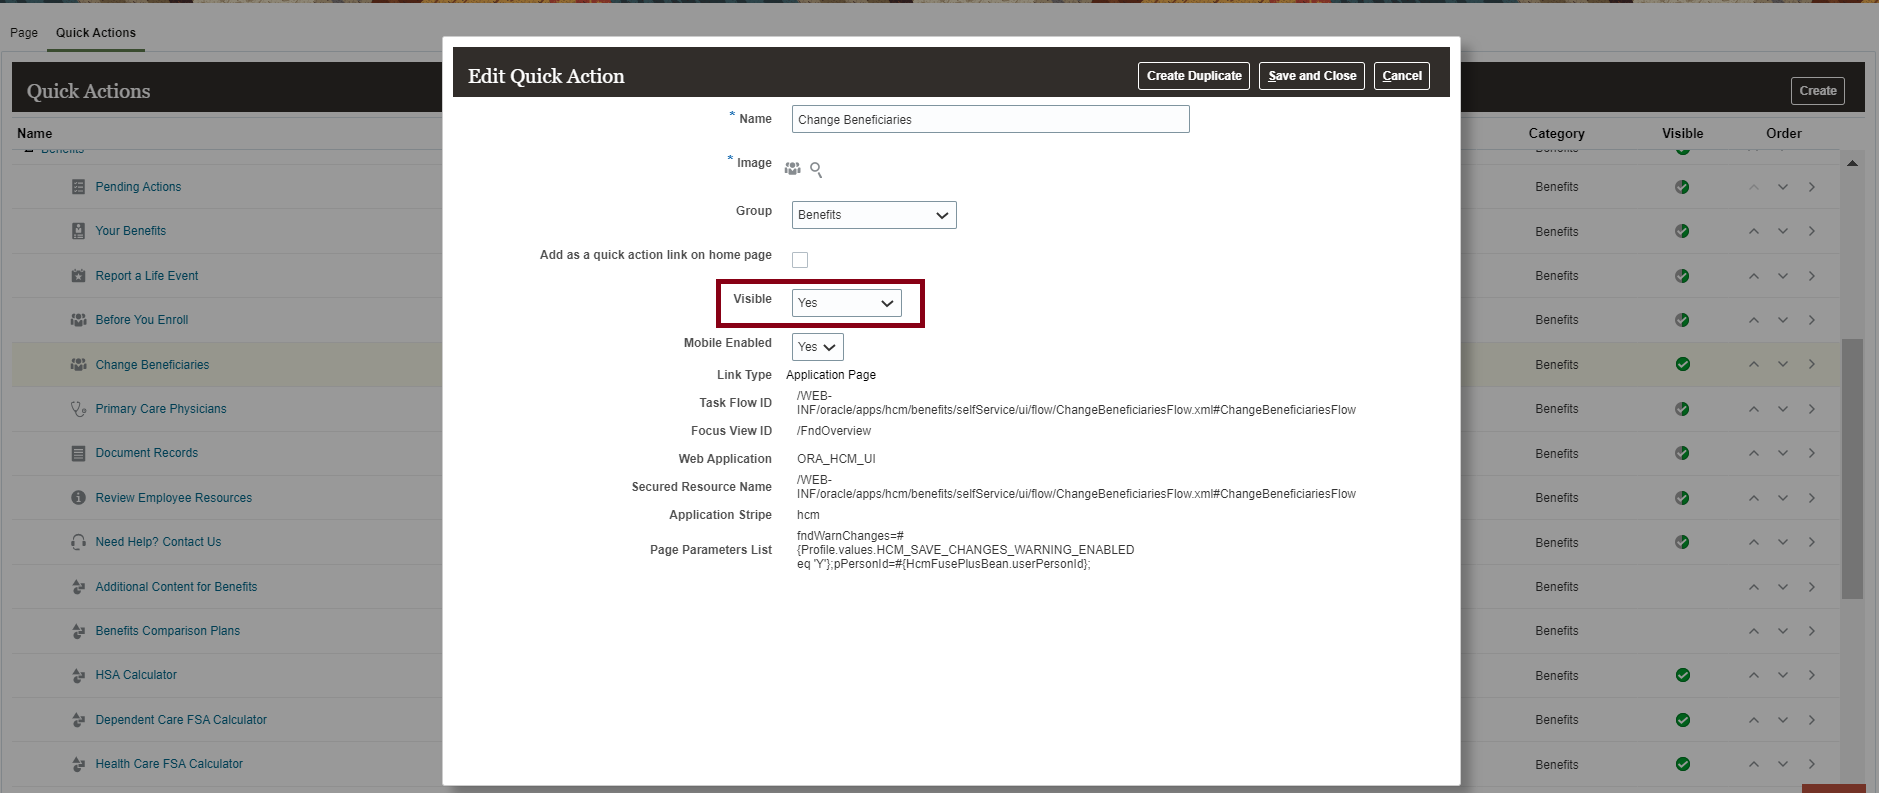
Enable Quick Action
Here's how participants can access the Change Beneficiaries page from the Benefits page:
- Click Me - Benefits on the Home page.
-
Click Change Beneficiaries
.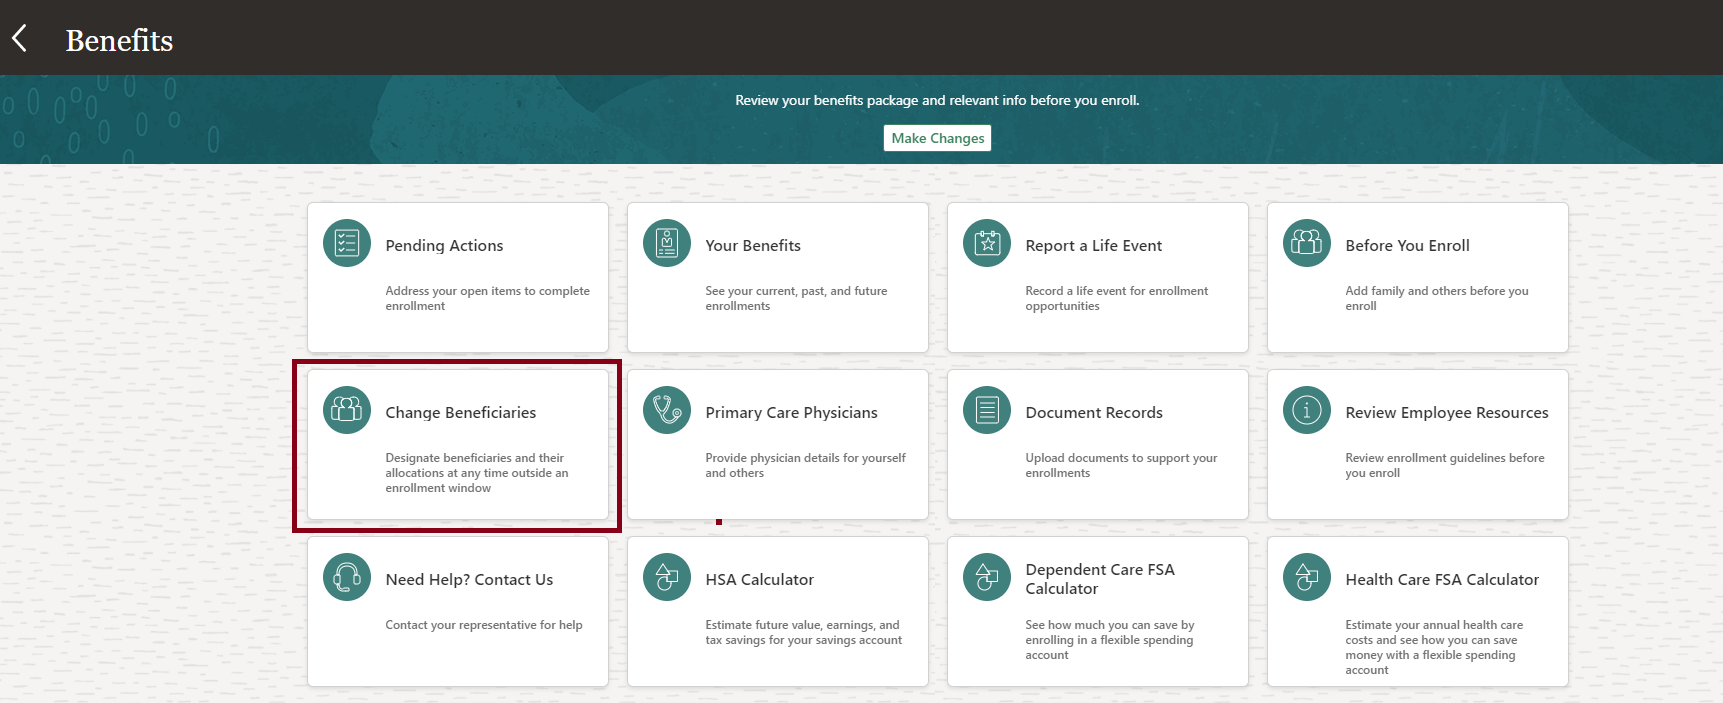
Change Beneficiaries Tile
-
Click the Edit icon next to the plan that you want to change. The Change Beneficiaries page displays the plans, options, and the existing primary and contingent beneficiaries. The page also displays the plans and options for which you still need to designate beneficiaries.

Change Beneficiaries Page

Change Beneficiaries Page Edit Mode
4. Make the required changes and click Submit.
Key Resources
Please see the Configuring and Extending Applications guide on the Oracle Help Center for the Create and Activate Sandboxes topic.
Role Information
Access to this feature is through the existing job role, Employee. A new privilege, Change Beneficiaries (BEN_CHANGE_BENEFICIARIES_PRIV), is used to secure this page.
Track Participant Actions in Self-Service Benefits
This new tracking feature lets you know if a participant has already viewed their enrollments in Self-Service Benefits without making any changes. It also captures page views and button or link clicks by all participants for certain actions in the enrollments flow.
This feature enables you to answer participant queries or address some participant challenges about enrollment selection. For example, a participant can claim that they selected plans at open enrollment. But when checked later, they were not enrolled in. The tracking feature can show that the participant entered the enrollment flow but didn’t make any selections.
Here’s how you view the tracked data:
- On the Home page, click My Client Groups, Transaction Configuration and Audit, Sensitive Data Access Audit.
- Enter the name or person number of the participant for whom you want to see the tracked data.
- Enter a date range for which you want to see the tracked data. If you leave the person, person number, and dates blank, the audit returns all participants within the 90 day purge period.
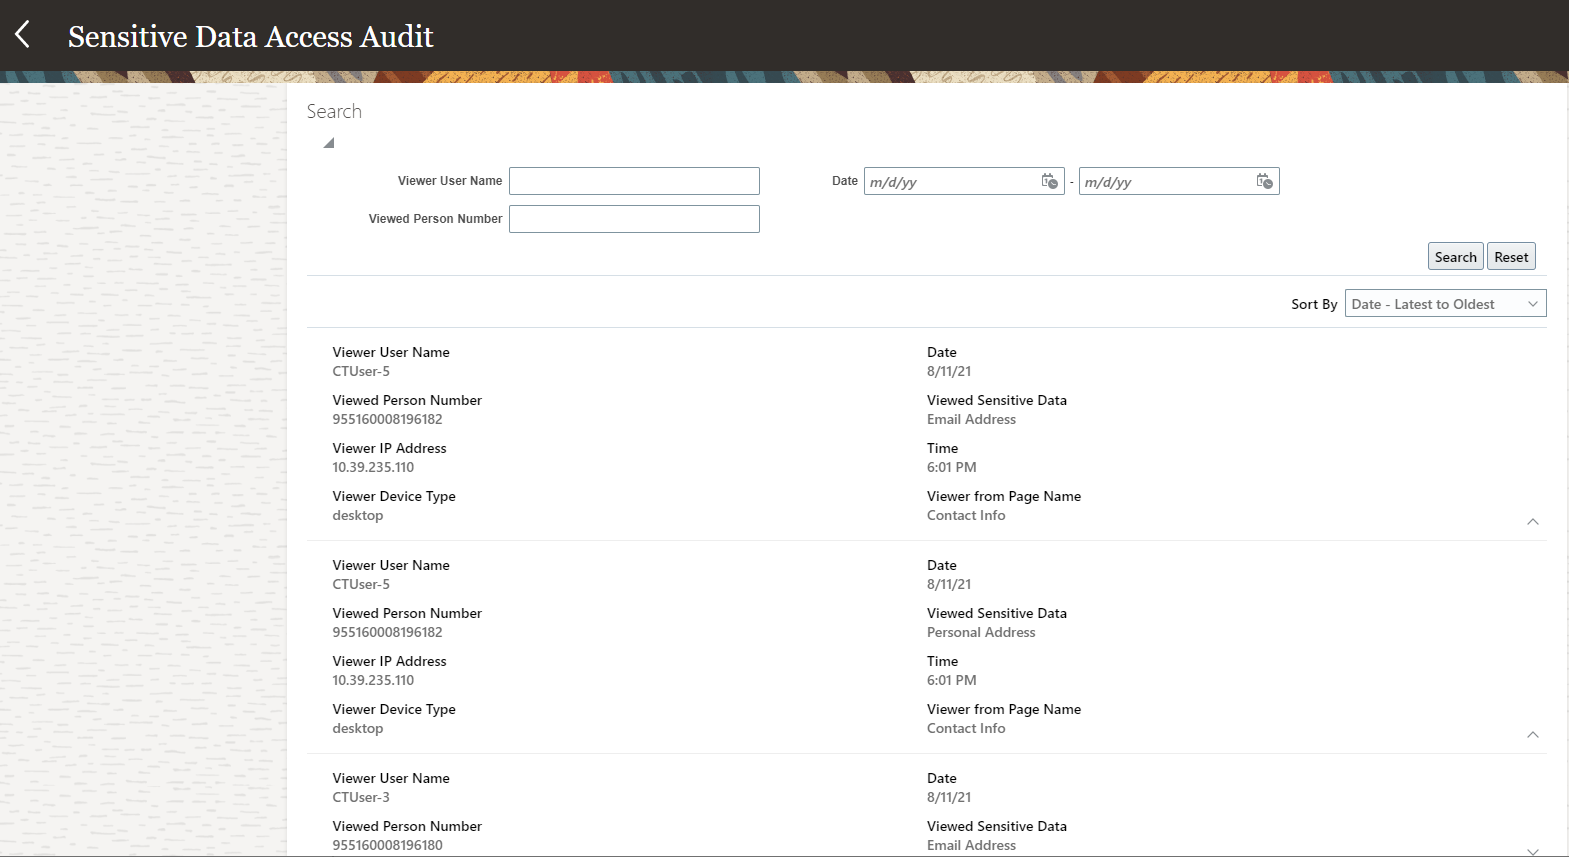
Sensitive Data Access Audit Page
The tracked data is purged every 90 days. If you need to retain data for more than 90 days, you need to back up the data using Oracle Transactional Business Intelligence (OTBI.) You need to back up data every two to two and a half months or at least a week before the purge is run.
Here’s the list of actions recorded by the tracking feature and how it displays information on the Sensitive Data Access Audit page.
| Action |
Label in Audit Page |
|---|---|
| Make Changes / Start Enrollment |
Viewed Sensitive Data: Start Enrollment Viewed Page: Self-Service Landing |
| Your Benefits |
Viewed Sensitive Data: Your Benefits Viewed Page: Self-Service Landing |
| Your Benefits, Program or Plan selection |
Viewed Sensitive Data: <PGM Name> program selected / <PNIP Name> plan selected Viewed Page: Program Plan Selection on Your Benefits |
| Continue button on the Contacts page |
Viewed Sensitive Data: Continue to Enrollment Viewed Page: Before you Enroll |
| Program Name, Overview |
Viewed Sensitive Data: <Program/PNIP Name> Overview Viewed Page: Election Overview |
| Submit button on the enrollment page (Confirmation) |
Viewed Sensitive Data: Submitted enrollment for <Program/PNIP Name> Viewed Page: Election Overview |
| Cancel button on the enrollment page |
Viewed Sensitive Data: Cancelled enrollment for <Program/PNIP Name> Viewed Page: Election Overview |
For example, if the participant clicks the Make changes or the Start Enrollment button, the action is recorded. Start Enrollment appears in the Viewed Sensitive Data column and Self-Service Landing appears in the Viewer from Page Name column.
This feature enables the administrators and other benefits professionals to answer participant queries, or address some participant challenges about enrollment selection.
Steps to Enable
Here’s how you enable the tracking feature:
- Select the Manage Administrator Profile Values task in the Setup and Maintenance work area.
- Search for ORA_HCM_SENSITIVE_DATA_VIEW_AUDIT_ENABLED.
- In the Profile Values region, ensure that the Profile Level is set to Site and the Profile Value is set to Y.
- Click Save and Close.
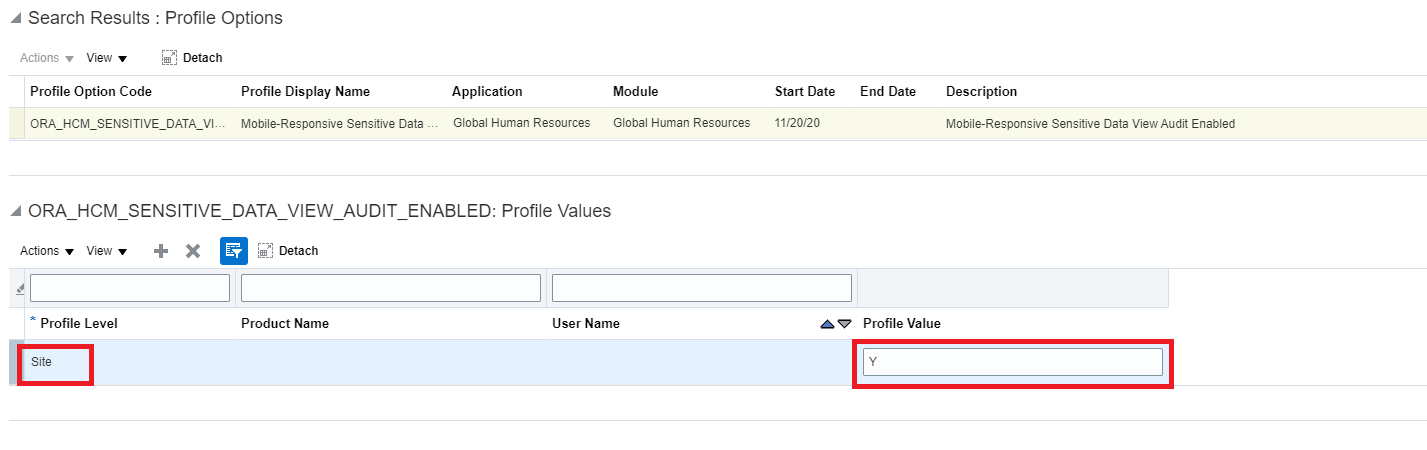
Manage Administrator Profile Values
Key Resources
For more information see:
- Securing HCM guide in the Oracle Help Center,
- Sensitive Data Access Audit
- Sensitive Data Access Audit Subject Area
Role Information
View Sensitive Data Access Audit’ is secured using PER_VIEW_SENSITIVE_DATA_ACCESS_AUDIT. This privilege is inherited out of the box by the IT Auditor job role (ORA_ASE_IT_AUDITOR_JOB). You can add it to additional job roles that should have access to the audit details. The Sensitive Data Access Audit page is meant for super user access and security profiles are not honored. All the data is visible.
Improved Performance of the Evaluation and Reporting Work Area
The performance of the Evaluation and Reporting work area has been improved to load the page faster.
The work area now displays the summary data for the last week, rather than the last month, by default. Also, the count of processed life events is turned off by default to give prominence to what is pending instead of what is completed. It now allows you to configure and select which life event counts you wish to see by default.
The Life Events tab now displays the smallest number of life events first. So, the chart shows the smaller values by default. Other task flows, such as batch parameters and benefits extract, render only when you select them. All such enhancements collectively will help the page to load faster.
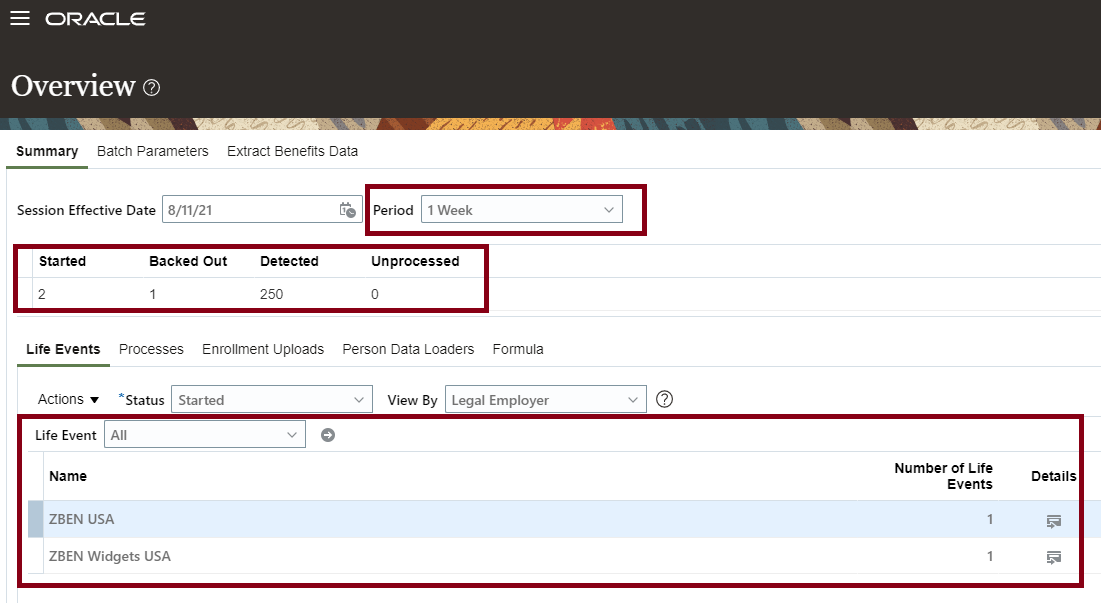
Evaluation and Reporting Work Area
Configure Life Event Counts
The feature is delivered ready to use. You need to configure the life event counts that you want to display.
Here’s how you configure the life event counts:
- Select the Manage Common Lookups task in the Setup and Maintenance work area.
- Search for ORA_BEN_EVAL_REP_LE_STAT_COUNT.
- Make your changes under the Enabled check box to display or hide the counts in the Evaluation and Reporting work area.
- Click Save and Close.
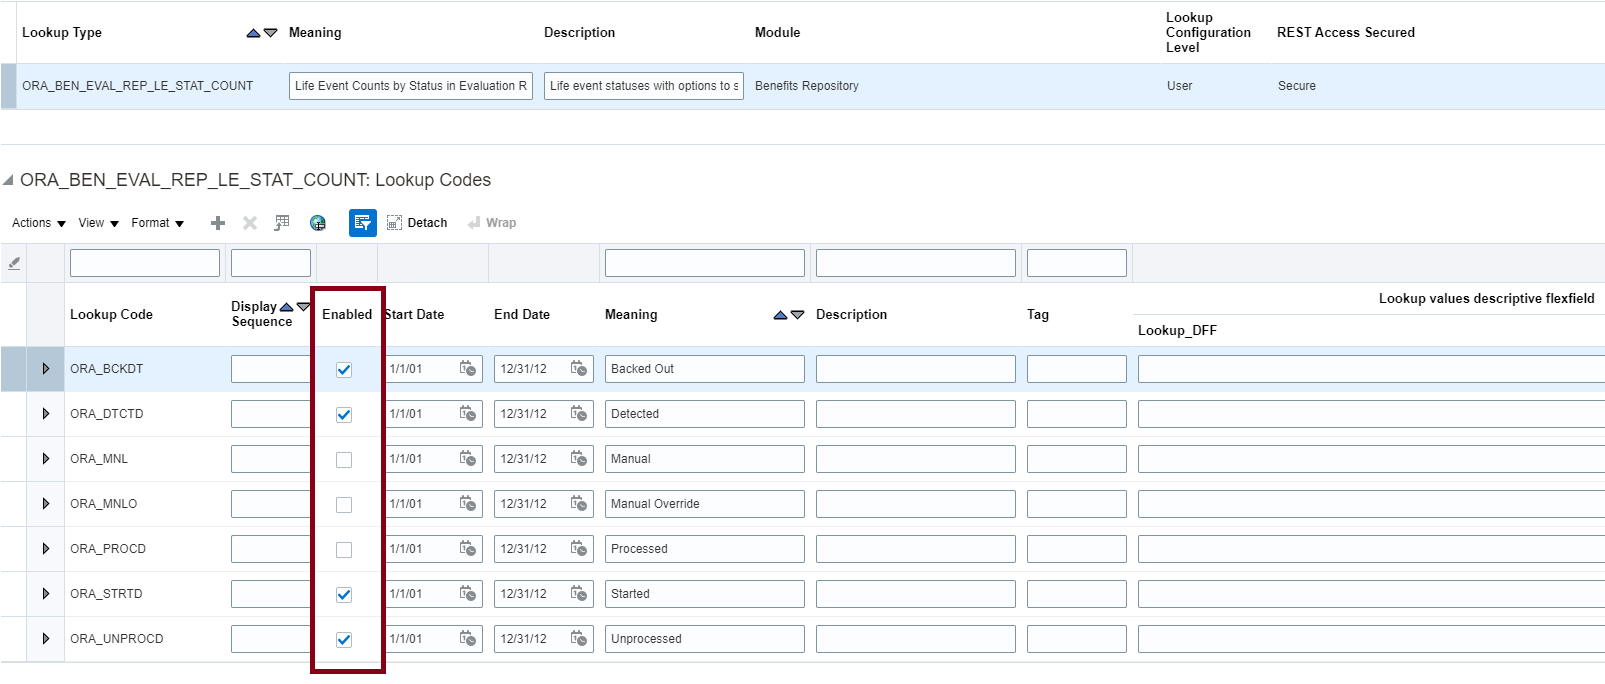
Configure Life Event Counts
It provides better user experience by loading the page faster. It also enables you to configure what is important for you.
Steps to Enable
You don't need to do anything to enable this feature.
Remove Incorrect Data Using the Delete Person Benefits Diagnostic Report
You can now use the Delete Person Benefits diagnostic report to remove incorrect data for a person in a non-production environment. For example, incorrect setup might corrupt enrollment data and you can’t clean it up. This might prevent you from modifying the data before moving to your production environment. Once you remove the data, you can’t recover it. The new two-step process prevents any accidental removal of data.
The first step is to run the report in the Validation mode. Then, you run it in the Commit mode. In the Validation mode, you get a snapshot of the person’s life event data before your remove it. It also generates the authorization key that you’ll need in the second step. The second step is to run the report in the Commit mode by using the authorization key to remove the data.
This report is meant mainly for non-production environments. You can run it in production environments only in the Validation mode to view a person’s data. Also, it doesn’t provide any authorization keys to delete the data. This prevents you from accidentally deleting data in production environments.
Step 1:
Here's how you run this diagnostic test in the Validation mode to view the data:
- Click the logged-in user's icon, and click Run Diagnostics Tests in the Troubleshooting section.
-
In the Diagnostic Dashboard page, search for Delete Person Benefits Diagnostic Test, select it, and click Add to Run.
-
In the Choose Tests to Run and Supply Inputs section, click the Input Status icon to enter the details. Configure these parameters to run the report:
-
Enter the Person Number of the person whose data you want to view.
-
Enter N in the Commit Mode (Y/N) field.
-
Leave the Authorization Key blank.
-
Enter N in the Delete Benefit Relations (Y/N) field.
-
-
Click Save and enter a name and display name for the test.
-
Click OK.
-
Click Run in the Choose Tests to Run and Supply Inputs section.
-
In the Diagnostic Test Run Status table, click Refresh to see the latest status.
-
When the execution status reads Complete, click the Report icon to view the report. Note down the Authorization Key to run the report in the Commit mode. The key is valid only for an hour.
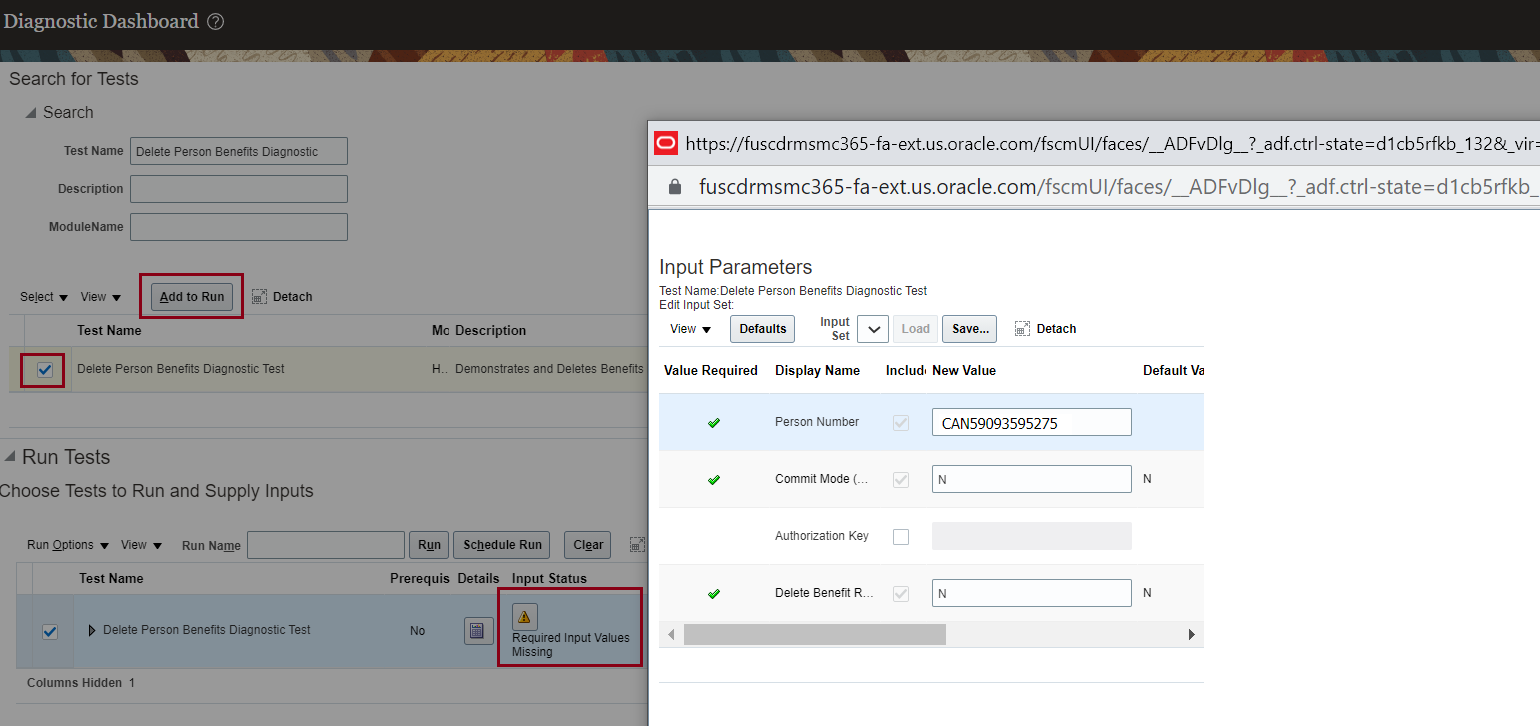
Delete Person Benefits Diagnostic Test Settings

Delete Person Benefits Diagnostic Test Result
Step 2:
Here's how you run this diagnostic test in the Commit mode to delete the data. Make sure that you have the authorization key, which was generated during the first step.
- Click the logged-in user's icon, and click Run Diagnostics Tests in the Troubleshooting section.
- In the Diagnostic Dashboard page, search for Delete Person Benefits Diagnostic Test, select it, and click Add to Run.
- In the Choose Tests to Run and Supply Inputs section, click the Input Status icon to enter the details. Configure these parameters to run the report:
- Enter the Person Number of the person whose data you want to and remove.
- Enter Y in the Commit Mode (Y/N) field.
- Enter the authorization key in the Authorization Key field.
- Enter Y in the Delete Benefit Relations (Y/N) field only if you want to delete the data from the benefits relationship tables too. Otherwise, keep it as N.
- Click Save and enter a name and display name for the test.
- Click OK.
- In the Diagnostic Test Run Status table, click Refresh to see the latest status.
- When the execution status reads Complete, click the Report icon to view the report. The report shows the summary of data that has been deleted.
Enables you to remove incorrect data from non-production environments, ensures smooth implementation, and saves maintenance time.
Steps to Enable
You don't need to do anything to enable this feature.
Role Information
Access to this feature is through the following job roles:
- Application Implementation Consultant
- Application Diagnostic Administrator
IMPORTANT Actions and Considerations for Benefits
REPLACED OR REMOVED FEATURES
From time to time, Oracle replaces existing Cloud service features with new features or removes existing features. When a feature is replaced the older version may be removed immediately or at a future time. As a best practice, you should use the newer version of a replaced feature as soon as the newer version is available.
| Product | Removed Feature | Target Removal | Replacement Feature | Replaced In | Additional Information |
|---|---|---|---|---|---|
| None at this time. |
_________________________
ORACLE DECOMMISSIONED THE HCM CLASSIC SIMPLIFIED USER INTERFACE IN UPDATE 20B
The HCM Responsive User Experience has been available and promoted as our standard since Update 18B. If you are still using the older HCM Classic Simplified User Interface, you must transition to the HCM Responsive User Experience, as these older pages will no longer be supported.
For consolidated information on generic setup information you can refer to My Oracle Support Document ID 2399671.1 - HCM Responsive User Experience Setup Information.
_________________________
KNOWN ISSUES / MONTHLY AND STATUTORY MAINTENANCE PACK
Oracle publishes a Known Issues document for every Update to make customers are aware of potential problems they could run into and the document provides workarounds if they are available.
Oracle also publishes Maintenance Pack and Statutory Maintenance Pack documentation of bugs that are fixed in the monthly or statutory patching.
To review these documents you must have access to My Oracle Support:
Oracle Human Capital Management Cloud Functional Known Issues and Maintenance Packs (Document ID 1554838.1)