
This document will continue to evolve as existing sections change and new information is added. All updates appear in the following table:
| Date | Module | Feature | Notes |
|---|---|---|---|
| 29 SEP 2023 | Benefits | Enforce Plan Dependency Rules | Updated document. Revised feature information. |
| 30 JUN 2023 | Benefits | Set Up Quick Actions for Plan Comparison | Updated document. Feature delivered in update 23C.. |
| 02 JUN 2023 | Created initial document. |
HCM Cloud applications have two types of patches you can receive that are documented in this What’s New:
- Release Updates (23A, 23B, 23C, and 23D)
- Optional Monthly Maintenance Packs to each update
It is important for you to know what Release Update your environment is on. You can find this in your Cloud Portal.
____________________
 HAVE AN IDEA?
We’re here and we’re listening. If you have a suggestion on how to make our products better, please let us know. To enter an idea go to the Ideas Lab on Oracle Customer Connect. In this document wherever you see the light bulb icon after the feature name it means we delivered one of your ideas.
____________________
Suggested Reading for all HCM Products:
- HCM Common What's New - In this What's New you will find feature that are used across applications.
- Human Resources What’s New – In the Global Human Resources section you will find features on the base application in which other application are built upon.
NOTE: Not all Global Human Resource features are available for Talent and Compensation products.
- Oracle Human Capital Management Cloud Functional Known Issues and Maintenance Packs (Document ID 1554838.1). These documents identify bug fixes and possible known issues. You will also need to review these documents based in the release update version you are currently on or will be moving to.
- Oracle Help Center – Here you will find guides, videos and searchable help.
- Release Readiness – New Feature Summary, What’s New, Feature Listing Spreadsheet, Spotlights and Release Training
GIVE US FEEDBACK
We welcome your comments and suggestions to improve the content. Please send us your feedback at oracle_fusion_applications_help_ww_grp@oracle.com. Indicate you are inquiring or providing feedback regarding the HCM Cloud What’s New in the body or title of the email.
Column Definitions:
Report = New or modified, Oracle-delivered, ready to run reports.
UI or Process-Based: Small Scale = These UI or process-based features are typically comprised of minor field, validation, or program changes. Therefore, the potential impact to users is minimal.
UI or Process-Based: Larger Scale* = These UI or process-based features have more complex designs. Therefore, the potential impact to users is higher.
Features Delivered Disabled = Action is needed BEFORE these features can be used by END USERS. These features are delivered disabled and you choose if and when to enable them. For example, a) new or expanded BI subject areas need to first be incorporated into reports, b) Integration is required to utilize new web services, or c) features must be assigned to user roles before they can be accessed.
| Ready for Use by End Users Reports plus Small Scale UI or Process-Based new features will have minimal user impact after an update. Therefore, customer acceptance testing should focus on the Larger Scale UI or Process-Based* new features. |
Customer Must Take Action before Use by End Users Not disruptive as action is required to make these features ready to use. As you selectively choose to leverage, you set your test and roll out timing. |
|||||
|---|---|---|---|---|---|---|
| Feature |
Report |
UI or |
UI or |
|
||
Dependent Original Coverage Start Date In Benefits Enrollment Subject Area |
||||||
Oracle Benefits is a complete, configurable and flexible global solution that enables organizations to successfully evolve and adapt to the unique needs of their workforce. The solution enables setup of traditional 'one-size fits all' plans to highly complex plans that selectively target different workforce segments with different benefit packages. Self-service capabilities present the user with an out of the box intuitive guided enrollment process with contextual information and embedded analytics.
Use Enhanced Benefits Service Center
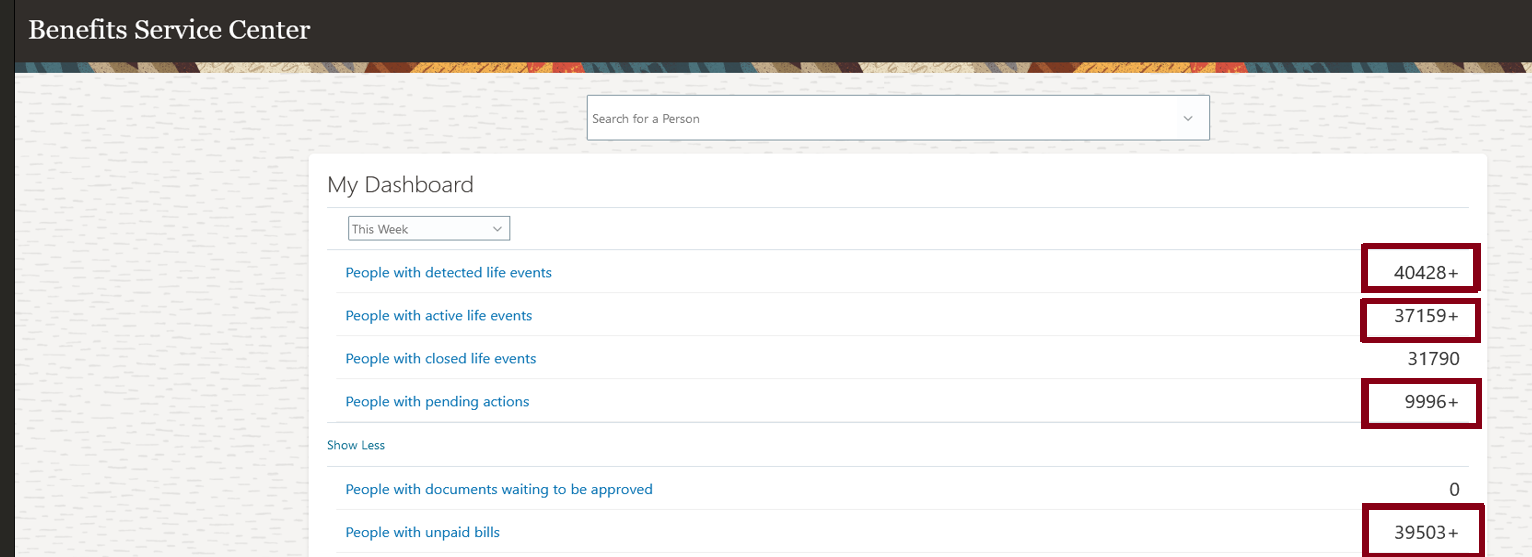
You can now create and enable a new lookup to apply a row limit on Benefits dashboard counts in Benefits Service Center. The My Dashboard page, out of the box, displays all the activity counts except the People with Closed Events count. If you see any errors due to the high volume of data used for the calculation of activity counts, you can apply the row limit on those counts. This limits the number of rows used for the calculation of activity counts.
To use this enhancement, you need to enable the lookup code named MAX_ROW_LIMIT.
The maximum value used for limiting the row counts is 50000. Here’s how the row limits are calculated:
| Value You Set | Value Used for Calculations |
|---|---|
| 50000 or less. |
The value you set. |
| More than 50000. |
50000 |
| Any non-numeric values. For example, Fifteen Thousand. |
50000 |
| Values include special characters. For example, 25, 000 or 150.5 |
50000 |
When you create and enable the MAX_ROW_LIMIT lookup code, you see a plus sign (+) next to the person count if the row count exceeds the maximum limit you set.
Plus Sign Next to the Person Count
Here’s how you enable the lookup code to set the maximum row limit:
- Select the Manage Common Lookups task in the Setup and Maintenance work area.
- Create a lookup type with these details:
-
Lookup Type: BEN_DASHBOARD_ROW_LIMIT
-
Meaning: Benefits Dashboard Row Limit
-
Module: Benefits Repository
-
- Search for BEN_DASHBOARD_ROW_LIMIT.
- Add a new row in the Lookup Codes section.
- Enter MAX_ROW_LIMIT as the Lookup Code.
- Add a new row in the Lookup Codes section.
- Select the Enabled check box.
- Enter the row limit in the Meaning column. The maximum value used for limiting the row counts is 50000.
- Click Save.
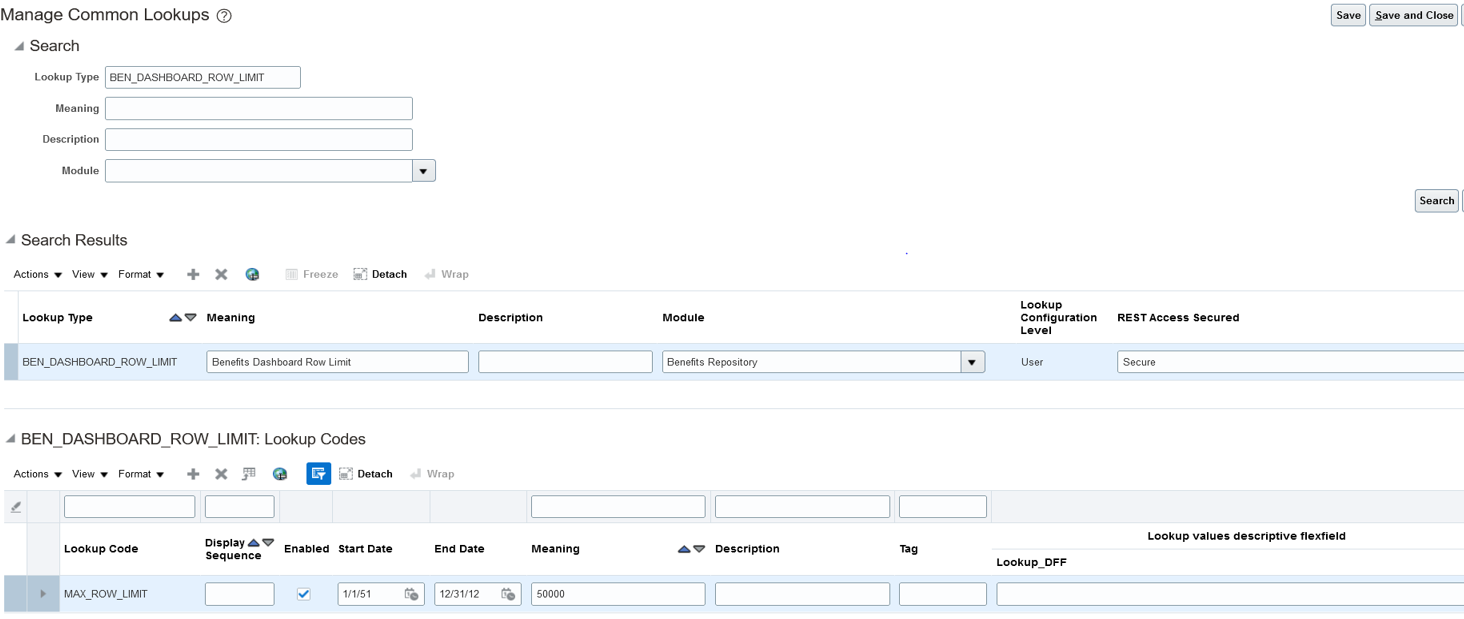
Lookup Code Configuration
This enhancement increases the performance of the application.
Steps to Enable
Here’s how you enable the lookup code to set the maximum row limit:
- Select the Manage Common Lookups task in the Setup and Maintenance work area.
- Create a lookup type with these details:
-
Lookup Type: BEN_DASHBOARD_ROW_LIMIT
-
Meaning: Benefits Dashboard Row Limit
-
Module: Benefits Repository
-
- Search for BEN_DASHBOARD_ROW_LIMIT.
- Add a new row in the Lookup Codes section.
- Enter MAX_ROW_LIMIT as the Lookup Code.
- . Add a new row in the Lookup Codes section.
- Select the Enabled check box.
- Enter the row limit in the Meaning column. The maximum value used for limiting the row counts is 50000.
- Click Save.
Test and Validate Participant Eligibility Profiles
You can now test and validate participant eligibility profiles and review the results in the Plan Configuration work area. For example, you can test eligibility profiles against specific assignments for a person on different dates. The outcome of the test is saved to a log file for easy access. You can use the log file to identify issues and it helps you fine tune your setup.
You can evaluate:
-
Any new profile that you created against a set of employees to figure out the correctness of the criteria within the profile.
-
Employee and Non-Worker assignments only.
The following profile criteria are not supported:
-
All objects under the Related Coverage tab on the Participant Evaluation page.
-
Objects in the Health Coverage Selected and Participation in Another Plan in the Other tab on the Participant Evaluation page.
Here’s how you test and validate eligibility profiles:
- Click Navigator > Benefits Administration > Plan Configuration.
- In the Actions panel, click Evaluate Formulas and Eligibility Profiles.
- Select Eligibility profile as the setup object to evaluate.
- Follow the prompts to test the eligibility profile.
- Click the icon in the Results column to see the eligibility status. Download the log file to see more details.
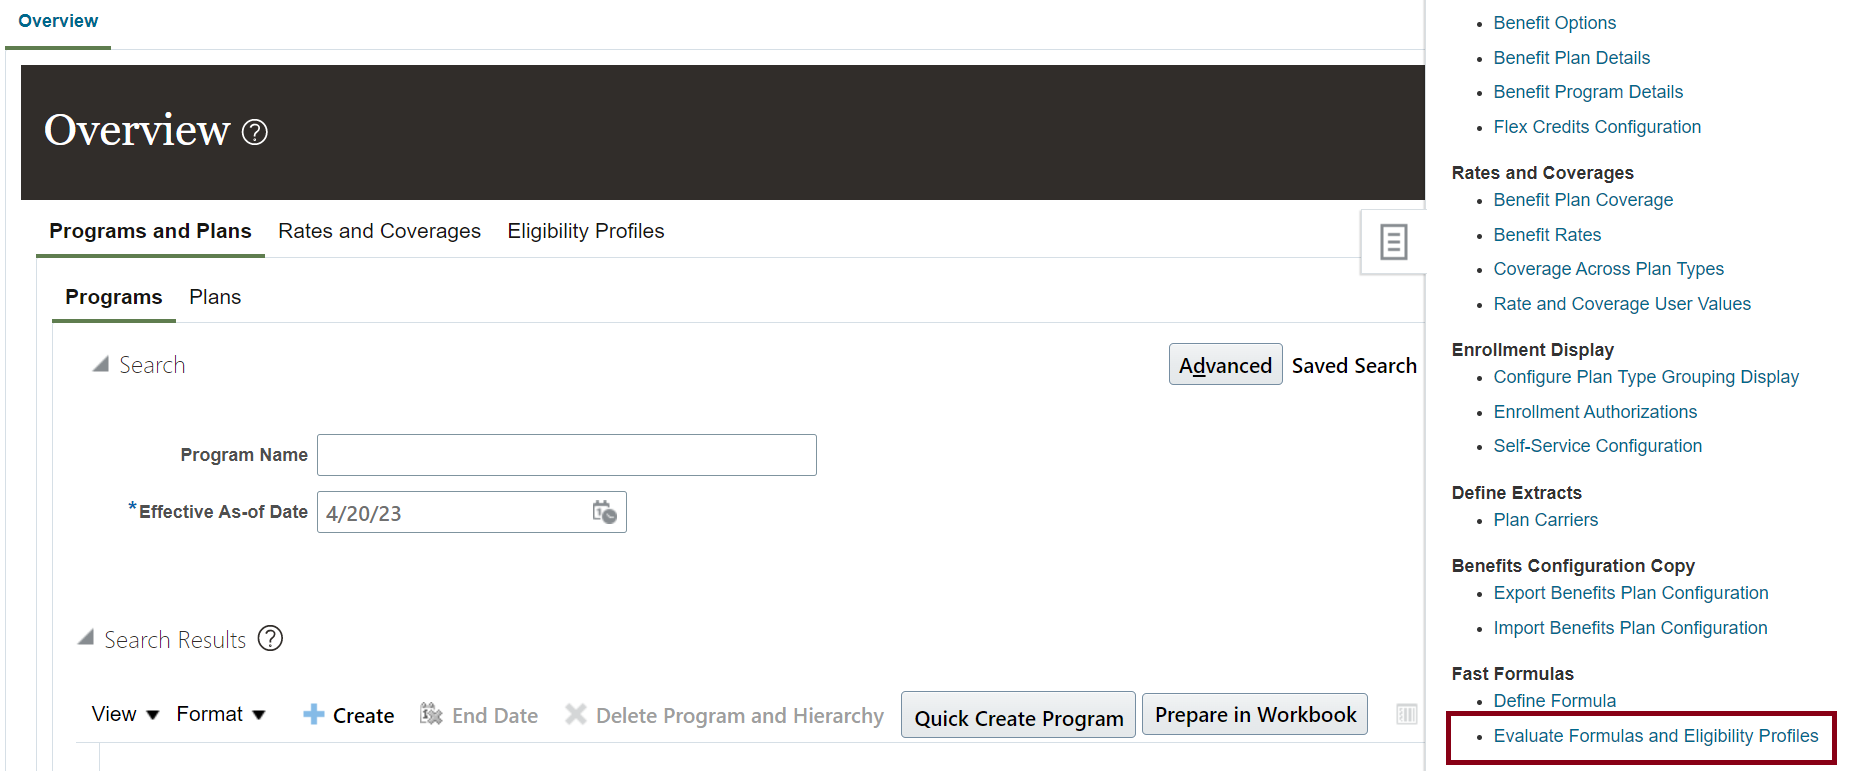
Evaluate Formulas and Eligibility Profiles Action
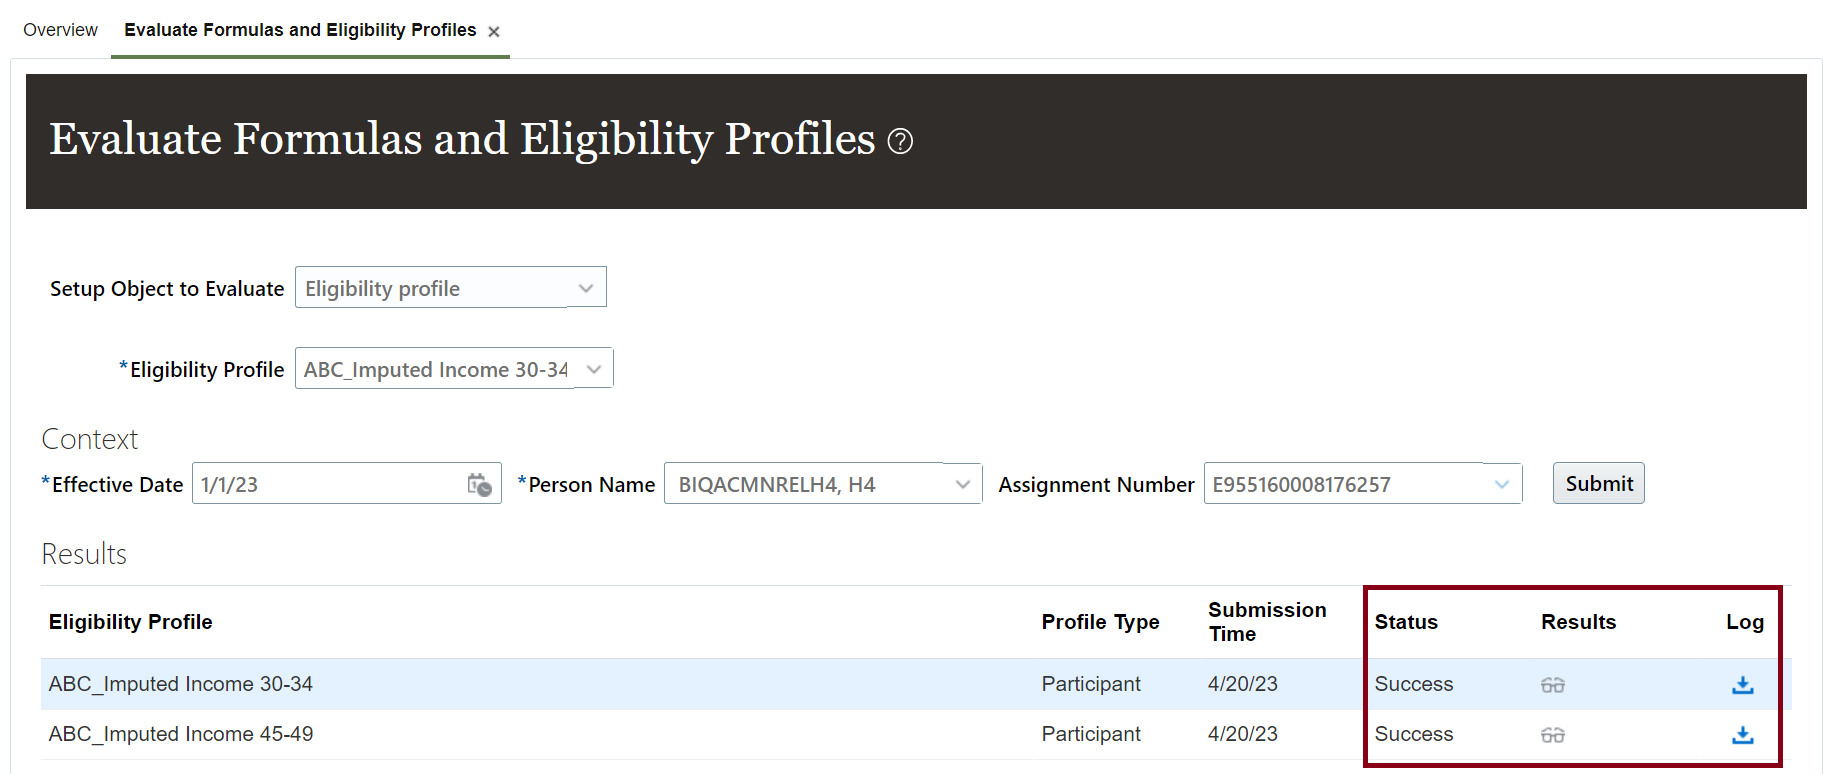
Test Results
This enhancement allows administrators to quickly evaluate the outcome of eligibility profiles and resolve issues.
Steps to Enable
You don't need to do anything to enable this feature.
You can now define plan dependency rules in the Plan Type Grouping page. This ensures participants don’t enroll into offerings without enrolling in relevant dependent offerings first. For example, if the employee hasn’t enrolled in the dependent plan (HDHP) but tries to enroll in the HSA plan, a message prompts them to go back to the plan type grouping page to select the missing dependent plan or options.
Previously, if an employee didn’t enroll into a dependent plan or option, you don’t get any error while saving the enrollment. It was validated only during the postelection edit fast formula stage.
With this enhancement, when the user attempts to save the enrollments, an error message appears if the user didn't enroll into dependent plans.
You can set up rules only for plans or options that are part of the same program and plan type grouping. You can’t set up rules for plans that aren’t in a program. Only active rules are evaluated during enrollment.
These rules apply when you do elections through self-service Benefits and Benefits Service Center. The rules don’t apply when you load enrollments through HCM Data Loader (HDL) or when the batch jobs apply default or automatic enrollments.
Here’s how you define plan dependency rules:
- On the Home Page, click Benefits Administration > Plan Configuration.
- In the Tasks panel drawer, click Configure Plan Type Grouping Display.
- Click Create in the Plan Dependency Rules tab and follow the prompts to define the rules. In the field named Message, you can define the message that should appear if the user didn't enroll into dependent plans.

Plan Dependency Rules
This enhancement provides instant feedback on a set of plans that the participants need to elect. The warning message also provides instructions while the elections are made. Also, this enhancement eliminates the need to create lengthy plan design object names or page customizations to share dependency info with end users.
Steps to Enable
You don't need to do anything to enable this feature.
Key Resources
Here’s how you define plan dependency rules:
- On the Home Page, click Benefits Administration > Plan Configuration.
- In the Tasks panel drawer, click Configure Plan Type Grouping Display.
- Click Create in the Plan Dependency Rules tab and follow the prompts to define the rules. In the field named Message, you can define the message that should appear if the user didn't enroll in dependent plans.
Compare Eligibility Profiles Before and After Import
You can compare the eligibility profiles in the configuration package from the source environment with the ones in the destination environment. You can also compare the eligibility profiles between two different configuration packages. You can do the comparison before and after you import objects using Functional Setup Manager (FSM).
During import, depending on your setup, you might not see any issues in your test environment, but you might find issues in the production environment. For example, you might have not updated the production environment with the latest eligibility-related changes that you made in the test environment.
This enhancement eliminates the need to manually compare the eligibility profiles and saves time.
Steps to Enable
You don't need to do anything to enable this feature.
Key Resources
For more information read:
Access Requirements
Access to this feature is through the Application Implementation Consultant role.
HDL for Close Enrollment Certification Action Items
You can now use the new Close Enrollment Certification Action Items HDL loader to update the received date or denied date for action items or certifications that will close the action item. These action items include Evidence of Insurability (EOI) documents, such as proof of good health certificates or birth certificates.
You need to click Navigator > My Client Groups > Data Exchange > Import and Load Data to use this HDL loader.
You need to consider these points while implementing this enhancement:
- Ensure that the life event is in Started status.
- Either the received or denied date should have value, but not both. Otherwise, an error appears.
- If you enter the first name and last name, but no person number, you might see an error if duplicate entries are found.
- If the HDL is loaded with person number, first name, and last name, the process uses only the person number for validation.
- If the certification date is before the enrollment date, an error appears.
This enhancement allows administrators to do mass updates on the received or denied certification dates.
Steps to Enable
You don't need to do anything to enable this feature.
Set Up Quick Actions for Plan Comparison
If you are already using the plan comparison feature, you need to delete the plan comparison quick actions and recreate them. You need to do this because of a minor architectural change in the product. There are no functional changes to the plan comparison feature.
Here's the list of actions that you need to do:
- Delete the existing quick actions.
- Set up new quick actions.
Delete Existing Quick Actions
Here's how you delete the plan comparison quick actions:
- On the Home Page, click Configuration > Sandboxes.
- Create a Sandbox with Structure as the tool.
- Open the sandbox.
- Click the logged-in user's icon and click Manage Configurations.
- Search for the configuration file: /WEB-INF/oracle/apps/hcm/fuseplus/ui/menu/HCM_ABOUT_ME_quickaction_menu.xml.
- When the file is listed, click Download.
- Open the file for editing.
- Locate the plan compare node (node with the highlighted code: vbcsFlow="/benefits/plan-comparison) and delete the entire node starting from starting from <mds:insert to </mds:insert> :
-

Plan Comparison Node
-
- Save your changes.
- Repeat steps 1-5 if you have closed the Manage Configuration page.
- Click Upload and follow the prompts to load the modified file.

Manage Configurations
Set Up Quick Actions and Tiles for Plan Comparison
After you delete the existing quick actions, you need to get the Template Name (ID) from the Benefits Plan Compare Diagnostic test report. You need to then set up quick actions and tiles for each benefit type that you want to provide for plan comparison.
For detailed steps, see Set Up Quick Actions and Tiles for Plan Comparison.
The Plan Comparison feature, which was already delivered, enables your participants to compare the health-related plans that you offer.
Steps to Enable
You don't need to do anything to enable this feature.
Use HDL or HSDL for Benefits Standard Rates
You can now use the HCM Data Loader (HDL) or HCM Spreadsheet Data Loader (HSDL) to manage Benefits standard rates with these objects:
- Benefits standard rate
- Extra input values
- Variable rate profile association
HDL supports all calculation methods. The HSDL templates support only create and update methods. The delete method is not supported by the out-of-the-box delivered HSDL template.
This enhancement supports only flat amounts and multiple of coverage methods for HSDL.
Using the HDL or HSDL, you can now:
- Create standard rates starting from a specified date.
- Update the values of an existing standard rate from a specified effective date.
- Correct the values of an existing standard rate.
- End date a standard rate for date-effective objects. (HDL only,)
- Delete an existing standard rate. (HDL only.)
Click Navigator > My Client Groups > Data Exchange > Import and Load Data to use this HDL or HSDL loader.
| Supported Operations |
Business Objects and User Keys |
|---|---|
| Update and delete |
Benefits Standard Rate(DE) – (BenefitStandardRate) : Name (Rate Name) |
| Update and delete |
|
| Update and delete |
|
This enhancement improves the flexibility and performance of the application when managing large amount of data.
Steps to Enable
You don't need to do anything to enable this feature.
Key Resources
For more information read:
Use HDL or HSDL for Benefits Variable Rates
You can now use the HCM Data Loader (HDL) or HCM Spreadsheet Data Loader (HSDL) to manage variable rate profiles.
Using the HDL or HSDL, you can now:
- Create variable rate profiles starting from a specified date.
- Update the values of an existing variable rate profile from a specified effective date.
- Correct the values of existing variable rate profiles.
- End date an existing variable rate profile. (HDL only)
- Delete an existing variable rate profile. (HDL only)
HDL supports all calculation methods. The HSDL templates support only create and update methods. The delete method is not supported by the out-of-the-box delivered HSDL template.
This enhancement supports only flat amounts and multiple of coverage methods for HSDL. The HSDL templates for Flat Amount, and Multiple of Coverage, are delivered out-of-the-box.
You need to click Navigator > My Client Groups > Data Exchange > Import and Load Data to use this HDL or HSDL loader.
This enhancement improves the flexibility and performance of the application when managing a large amount of data.
Steps to Enable
You don't need to do anything to enable this feature.
Tips And Considerations
This enhancement improves the flexibility and performance of the application when managing a large amount of data.
Key Resources
For more information read:
These pages or flows have been recreated in the Redwood tool set Visual Builder Studio (VBS) to improve your user experience. The pages or flows look and act like Redwood pages or flows, to help create cohesiveness through the application.
Enable Redwood Experience for Benefit Batch Parameters
The Benefits Batch Parameters page was recreated in the Redwood Toolset Visual Builder Studio to improve the user experience by providing the same consistent functionality across Redwood pages. The functionality of the page remains the same.
Here’s how you use the Benefit Batch Parameters Redwood page:
- On the Home page, click My Client Groups.
- Click the Show More link under Quick Actions.
- Search for Configure Benefits Batch Process Parameters.
- Click a parameter value to edit it.
- Save your changes.

Configure Benefits Batch Process Parameters Page
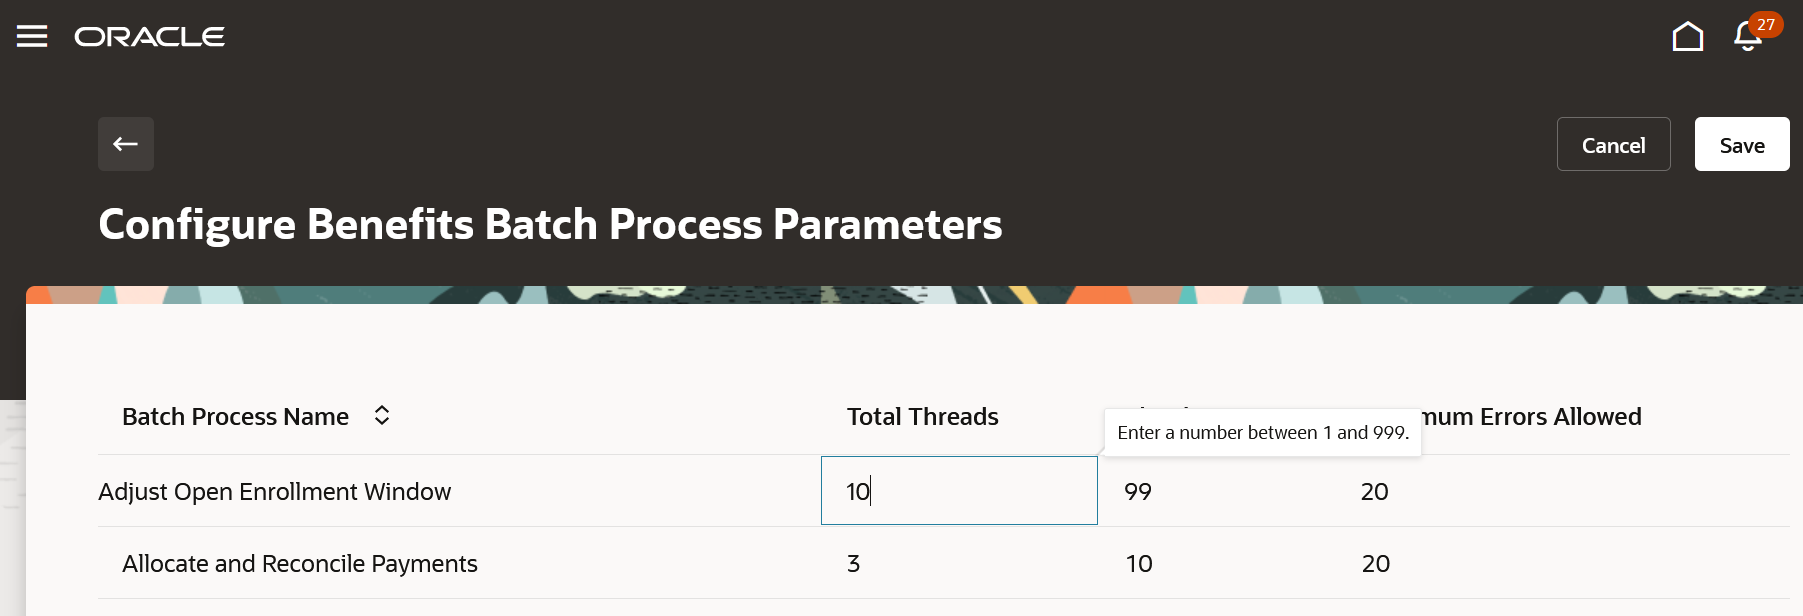
Configure Benefits Batch Process Parameters Page Edit Mode
This new feature lets you experience Redwood’s high-fidelity interactions.
Steps to Enable
Here’s how you turn on the Redwood Batch Parameters page:
- Navigate to the Setup and Maintenance work area.
- Search for and click the Manage Administrator Profile Values task.
- Search for and select the profile option ORA_HCM_VBCS_PWA_ENABLED.
- Select Site from the Level list.
- Enter Y in the Profile Value field.
- Click Save.
- Search for and select the ORA_BEN_ADMINISTRATIVE_ENROLLMENT_REDWOOD_ENABLED profile option.
- Select Site from the Level list.
- Enter Y in the Profile Value field.
- Click Save and Close.
Key Resources
For a listing of all profile options for the recreated pages across applications, see the following document in My Oracle Support: HCM Redwood Pages with Profile Options – MOS Document - 2922407.1
Access Requirements
Required Privileges, Duty Roles, and Data Security Policies
Note these points:
- If you have custom roles, ensure that the respective privileges and aggregate privileges of the functional modules are part of your role hierarchy.
- After adding the privileges and aggregate privileges, regenerate the data role and verify the user interfaces.
- If you have direct job roles assigned to users, you need to create a data role out of the job role for the data security to work.
| Aggregate Privileges and Duty Roles |
Functional Privileges and Data Security Policy (DSPs) |
|---|---|
| Aggregate Privileges: None Inherited by these seeded duty roles:
|
Functional Privileges: Manage Benefit Maintenance Batch Reporting (BEN_MANAGE_BENEFIT_MAINTENANCE_BATCH_REPORTING_PRIV) DSPs: None |
Frequently Asked Questions
| Question | Answer |
|---|---|
| I’ve assigned the seeded job role to the user, but the data is not visible. The Redwood page doesn’t show data whereas the responsive page does. |
Verify that the job role is directly assigned. If yes, you need to generate the data role out of the job role. |
| The Redwood quick link doesn’t show up. Verified that these profile options are turned on:
|
Ensure that the user interface functional privilege is part of your role hierarchy. |
| The page uses common person search in quick actions, and the person search is not fetching persons. |
Do these steps to regenerate ACL for the logged-in user:
|
Enable Redwood Experience for Benefit Person Info
The Benefits Person Info page was recreated in the Redwood Toolset Visual Builder Studio to improve the user experience by providing the same consistent functionality across Redwood pages. The functionality of the page remains the same.
Here’s how you use the Person Info Redwood page:
- On the Home page, click My Client Groups.
- Click the Show More link under Quick Actions.
- Search for Person Info.
- Click the person’s name to see their info.
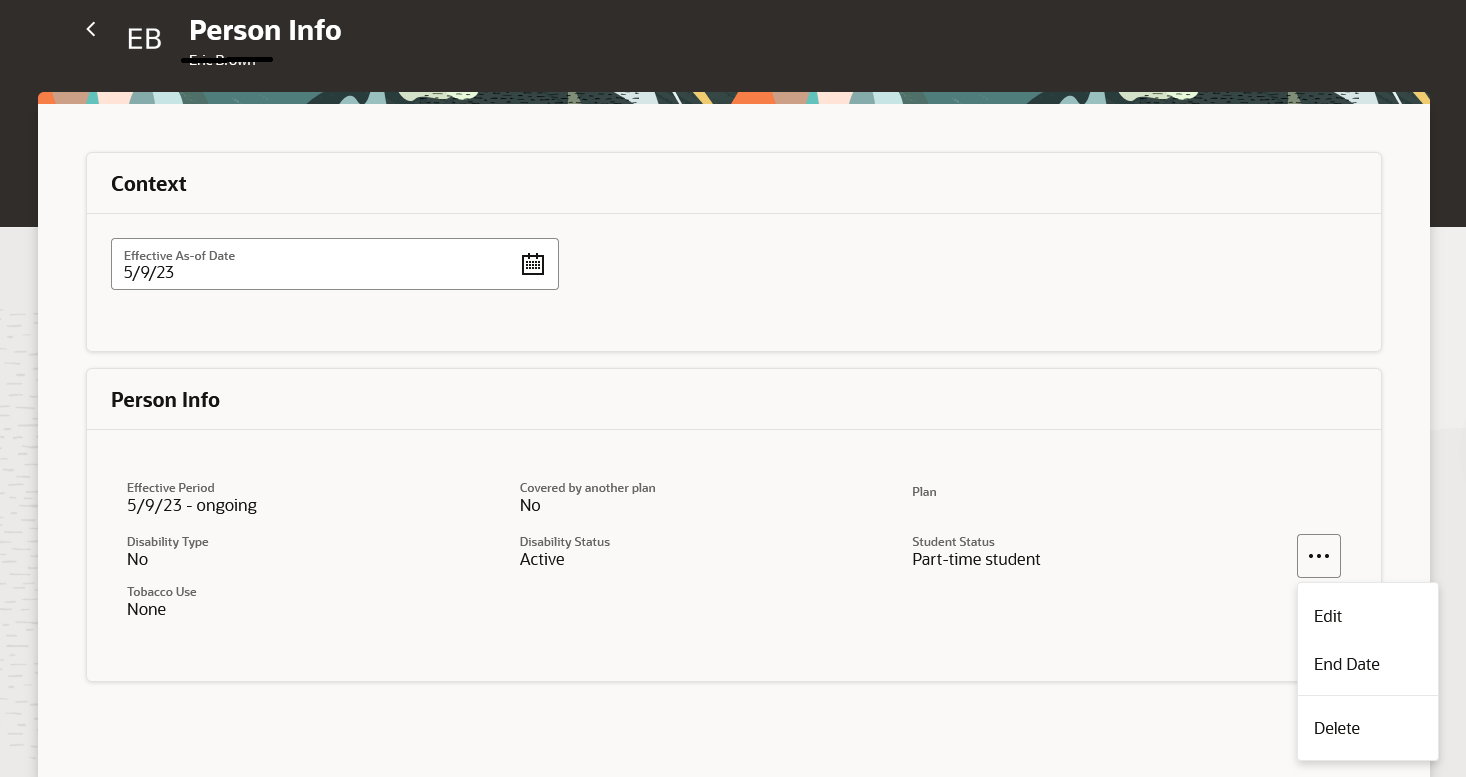
Person Info page
This new feature lets you experience Redwood’s high-fidelity interactions.
Steps to Enable
Here’s how you turn on the Redwood Person Info page:
- Navigate to the Setup and Maintenance work area.
- Search for and click the Manage Administrator Profile Values task.
- Search for and select the profile option ORA_HCM_VBCS_PWA_ENABLED.
- Select Site from the Level list.
- Enter Y in the Profile Value field.
- Click Save.
- Search for and select the ORA_BEN_ADMINISTRATIVE_ENROLLMENT_REDWOOD_ENABLED profile option.
- Select Site from the Level list.
- Enter Y in the Profile Value field.
- Click Save and Close.
Key Resources
For a listing of all profile options for the recreated pages across applications, see the following document in My Oracle Support: HCM Redwood Pages with Profile Options – MOS Document - 2922407.1
Access Requirements
Required Privileges, Duty Roles, and Data Security Policies
Note these points:
- If you have custom roles, ensure that the respective privileges and aggregate privileges of the functional modules are part of your role hierarchy.
- After adding the privileges and aggregate privileges, regenerate the data role and verify the user interfaces.
- If you have direct job roles assigned to users, you need to create a data role out of the job role for the data security to work.
| Aggregate Privileges and Duty Roles |
Functional Privileges and Data Security Policy (DSPs) |
|---|---|
| Aggregate Privileges:
Inherited by these seeded duty roles:
|
Functional Privileges: Manage Benefit Person Habits (BEN_MANAGE_BENEFIT_PERSON_HABITS_PRIV) DSPs:
|
Frequently Asked Questions
| Question | Answer |
|---|---|
| I’ve assigned the seeded job role to the user, but the data is not visible. The Redwood page doesn’t show data whereas the responsive page does. |
Verify that the job role is directly assigned. If yes, you need to generate the data role out of the job role. |
| The responsive quick link shows up, but the new Redwood link doesn't show up. Verified that these profile options are turned on:
|
Ensure that the user interface functional privilege is part of your role hierarchy. |
| The Redwood quick link takes me to the new page, but it doesn’t show any data. The responsive page shows up data. I have the custom data role. |
Add the REST aggregate privileges and LOV privileges for the respective functional module. |
| The Redwood page shows up all data except for LOVs. |
Add LOV privileges for the respective functional module. |
| The page uses common person search in quick actions, and the person search is not fetching persons. |
Do these steps to regenerate ACL for the logged-in user:
|
Transactional Business Intelligence Enterprise for Benefits
Oracle Transactional Business Intelligence is a real time, self-service reporting solution offered to all Oracle Cloud application users to create ad hoc reports and analyze them for daily decision-making. Oracle Transactional Business Intelligence provides human resources managers and specialists, business executives, and line managers the critical workforce information to analyze workforce costs, staffing, compensation, performance management, talent management, succession planning, and employee benefits.
Don’t want to start from scratch building a report or analytics? Check out the library of sample reports for all products on Customer Connect on the Report Sharing Center.
Dependent Original Coverage Start Date In Benefits Enrollment Subject Area
Dependent information dimension in Benefits Enrollment Real time has added a new attribute Dependent Original Plan Coverage Start Date.
This will enhance your reporting on dependent information.
Steps to Enable
You don't need to do anything to enable this feature.
IMPORTANT Actions and Considerations for Benefits
REPLACED OR REMOVED FEATURES
From time to time, Oracle replaces existing Cloud service features with new features or removes existing features. When a feature is replaced the older version may be removed immediately or at a future time. As a best practice, you should use the newer version of a replaced feature as soon as the newer version is available.
| Product |
Removed Feature |
Target Removal |
Replacement Feature |
Replaced In |
Additional Information |
|---|---|---|---|---|---|
| Nothing at this time |
_________________________
KNOWN ISSUES / MAINTENANCE PACK SPREADSHEETS
Oracle publishes a Known Issues document for every Update to make customers are aware of potential problems they could run into and the document provides workarounds if they are available.
Oracle also publishes Maintenance Pack and Statutory Maintenance Pack documentation of bugs that are fixed in the monthly or statutory patching.
To review these documents you must have access to My Oracle Support:
Oracle Human Capital Management Cloud Functional Known Issues and Maintenance Packs (Document ID 1554838.1)