
This document will continue to evolve as existing sections change and new information is added. All updates appear in the following table:
| Date | Product | Feature | Notes |
|---|---|---|---|
| 17 JUN 2022 | Sales Automation Core Common / Search |
Latitude and Longitude Attributes Not Displayed in UI by Default | Added feature. Feature delivered in Update 22B. |
| 17 JUN 2022 |
Sales Automation Core Common / Search |
Use Saved Search to View a List of Unaccepted Leads | Added feature. Feature delivered in Update 22B. |
| 01 FEB 2022 | Created initial document. |
 HAVE AN IDEA?
We’re here and we’re listening. If you have a suggestion on how to make our cloud services even better then go ahead and tell us. There are several ways to submit your ideas, for example, through the Ideas Lab on Oracle Customer Connect. Wherever you see this icon after the feature name it means we delivered one of your ideas.
GIVE US FEEDBACK
We welcome your comments and suggestions to improve the content. Please send us your feedback at oracle_fusion_applications_help_ww_grp@oracle.com.
DISCLAIMER
The information contained in this document may include statements about Oracle’s product development plans. Many factors can materially affect Oracle’s product development plans and the nature and timing of future product releases. Accordingly, this Information is provided to you solely for information only, is not a commitment to deliver any material, code, or functionality, and should not be relied upon in making purchasing decisions. The development, release, and timing of any features or functionality described remains at the sole discretion of Oracle.
This information may not be incorporated into any contractual agreement with Oracle or its subsidiaries or affiliates. Oracle specifically disclaims any liability with respect to this information. Refer to the Legal Notices and Terms of Use for further information.
Column Definitions:
Report = New or modified, Oracle-delivered, ready to run reports.
UI or Process-Based: Small Scale = These UI or process-based features are typically comprised of minor field, validation, or program changes. Therefore, the potential impact to users is minimal.
UI or Process-Based: Larger Scale* = These UI or process-based features have more complex designs. Therefore, the potential impact to users is higher.
Features Delivered Disabled = Action is needed BEFORE these features can be used by END USERS. These features are delivered disabled and you choose if and when to enable them. For example, a) new or expanded BI subject areas need to first be incorporated into reports, b) Integration is required to utilize new web services, or c) features must be assigned to user roles before they can be accessed.
Restrict Deletion of Master Geographies
Restrict the deletion of master geography data that's shared and used across Oracle Cloud Applications, such as Oracle Sales, Oracle ERP, Oracle HCM, Oracle SCM, and so on. When you delete geography data without cross reference analysis, the consuming applications are significantly impacted.
For example, ERP relies on geography data to calculate tax, and if you accidently delete the geography data, the tax calculations become invalid. Such deletions may also result in re-provisioning of Point of Delivery (PODs) in some cases.
This feature protects you from accidently deleting geography data without performing impact analysis of geography references across applications.
Steps to Enable
You don't need to do anything to enable this feature.
Tips And Considerations
You or Oracle's Support team needs to submit a Service Request (SR) with these details:
- Product: Oracle Fusion CX Sales Cloud Service
- Component: Accounts, Contacts, Households
- Subcomponent: Manage Geographies, including the country or countries to be deleted
Key Resources
- See the "Sales and B2B Service Scheduled Processes" chapter in the Understanding Scheduled Processes guide.
Role Information
- Customer Data Steward
- Data Steward Manager
- Master Data Management Application Administrator
Forecast Recurring Revenue Lines Using Only One Forecasting Date
You can now use a single date for forecasting recurring revenue lines. By setting a profile option, multiple recurring revenue lines are aggregated to a single close date (Opportunity Close Date). This means that only a single revenue line is required to calculate the total value for pipeline forecasts.
Viewing pipeline forecasts using a single opportunity close date reflects revenue aggregated across all occurrences. It also reduces the need to maintain large numbers of opportunity revenue lines while maintaining performance.
Steps to Enable
The profile option, Recurring Revenue Forecast Type (ORA_MOO_REV_RECUR_FORECAST), controls whether to forecast revenue lines based on every single, scheduled occurrence or aggregated based on the start date. The default is to forecast on each single occurrence.
Use these steps to change the default value of Each Individual Scheduled Occurrence (ORA_INDIV_SCHED_OCCURRENCE) to the Aggregated Based on Start Date (ORA_AGGR_BASED_ON_START_DATE) value so that existing, multiple recurring revenues lines are aggregated to a single close date:
- Navigate to Setup and Maintenance.
- Open the Search page and search for the task, Manage Administrator Profile Values.
- Search for the profile option, Recurring Revenue Forecast Type.
- Change the default value of the profile option from ORA_INDIV_SCHED_OCCURRENCE to ORA_AGGR_BASED_ON_START_DATE.
- Click Save and Close.
Tips And Considerations
When a customer decides to use a single date, the opportunity close date is the single date used for the calculations.
Key Resources
- See the "Opportunity Products and Revenue" chapter in the Implementing Sales guide.
Role Information
- Sales Administrator
Add Current User as a Filter for Resource-Based Fields in Adaptive Search
You can now use the Is Me operator on resource-based fields in Workspace to add the current user as a filter when performing a search. This new operator lets you create saved searches with user-specific filters.
This feature lets you use resource-based filters to return a set of search records that best suits your requirements.
Steps to Enable
You don't need to do anything to enable this feature.
Key Resources
- See the "Workspace and Work Areas Search" chapter in the Using Sales guide.
Role Information
- Applicable to all users
Accounts, Contacts, and Households
Rollup Supports General Ledger Calendar
General Ledger calendar, also known as accounting calendar, is used to define years from an accounting perspective, allowing users to decide on the periods and period types to be included when defining rollups. Example: Revenue from last fiscal quarter. You can now define rollups based on the general ledger calendar. The start and end of your fiscal year and the time periods in the accounting calendar are used when calculating the rollup values.
Administrators and beneficiaries of rollup data can get meaningful data based on the date ranges aligned to the General Ledger.
Steps to Enable
- Add the Manage Rollup Metrics privilege to a copy of the sales administrator user role with the ORA_ZBS_SALES_ADMINISTRATION job code. To the role, add users responsible for configuring and setting up rollups.
- Verify that these scheduled processes appear on the Scheduled Process page: Rollup Full Refresh, Rollup Hierarchy Refresh, and Rollup Incremental Refresh.
- Enable the Rollup Test Enabled profile option.
- When creating new rollups, you can reuse the rollup attributes of unpublished rollups, or create custom attributes on the Rollup child under the object. If you have created a custom attribute, remember to publish it from the sandbox. The custom attribute will then be available on the Rollups setup page.
- Create a custom subtab for Rollups on an object’s Detail Layout and add rollup attributes to it.
Key Resources
- To learn how to implement rollups, see the "Rollups" chapter in the Implementing Sales guide.
- See the "Create The Accounting Calendar" topic in the Implementing Sales guide to learn more about accounting calendars.
Role Information
- Sales Administrator
Render Employee Size on the Suggested List of Accounts Shown by Smart Data
With the existing Dun & Bradstreet (D&B) Smart Data feature, salespeople can reduce manual data entry when creating a new account. The D&B Smart Data feature suggests a list of matching accounts and helps enrich the account when salespeople create an account. Currently, the matching accounts list is rendered based on company revenue. Salespeople can see the account name, location, and revenue. With this release, the list will show the employee size as well.

Reduce Data Entry Time
With the accounts rendered by company name, location, revenue, and employee size, salespeople are more likely to see the company they're looking for. They can pick the right company from the list when creating an account.
Steps to Enable
-
In the Setup and Maintenance work area, use the Manage Data Enrichment Integration task:
- Offering: Sales
- Functional Area: Integrations
- Task: Manage Data Enrichment Integration
- On the Manage Data Enrichment Integration page, select Enable DaaS for SmartData. (Don't select Enable DataFox for SmartData).
- Enter the credentials for DaaS.
- Save your changes.
Key Resources
See this content:
- "Configure Combined Enrichment by Datafox and D&B for Accounts" and "Integrate with Oracle Sales or B2B Service"
- "Accounts, Contacts, and Households" chapter in the Using Sales guide.
Role Information
- Sales Representative
Data Access Using Access Groups Is Enabled By Default for New Customers
New customers no longer have to enable and activate predefined rules for system access groups to use access group data access. System access groups and predefined rules are enabled by default. Existing customers, however, must still enable and activate access group rules to use access group data access.
The availability of access groups as the default security framework lets you easily configure data security for your users for an object and its related objects. You can also incrementally add custom access group rules to the existing predefined rules to further tailor data access. In addition, you can search Workspace for records assigned to users through their access group membership.
Steps to Enable
You don't need to do anything to enable this feature.
Key Resources
- See the "Access Groups" chapter in the Securing CX Sales and B2B Service guide.
Role Information
- IT Security Manager
- Sales Administrator
Monitor Access Group Scheduled Processes from the Access Groups User Interface
The Monitor subtab on the Access Groups user interface provides a single location where you can manage all the scheduled processes for access groups. You can run or cancel a process, view or update the schedule for a process, and monitor the status of an active process -- all from the Monitor page. This enhancement simplifies the administration of access group processes and lets you more easily identify failed processes that might be causing issues with data access.
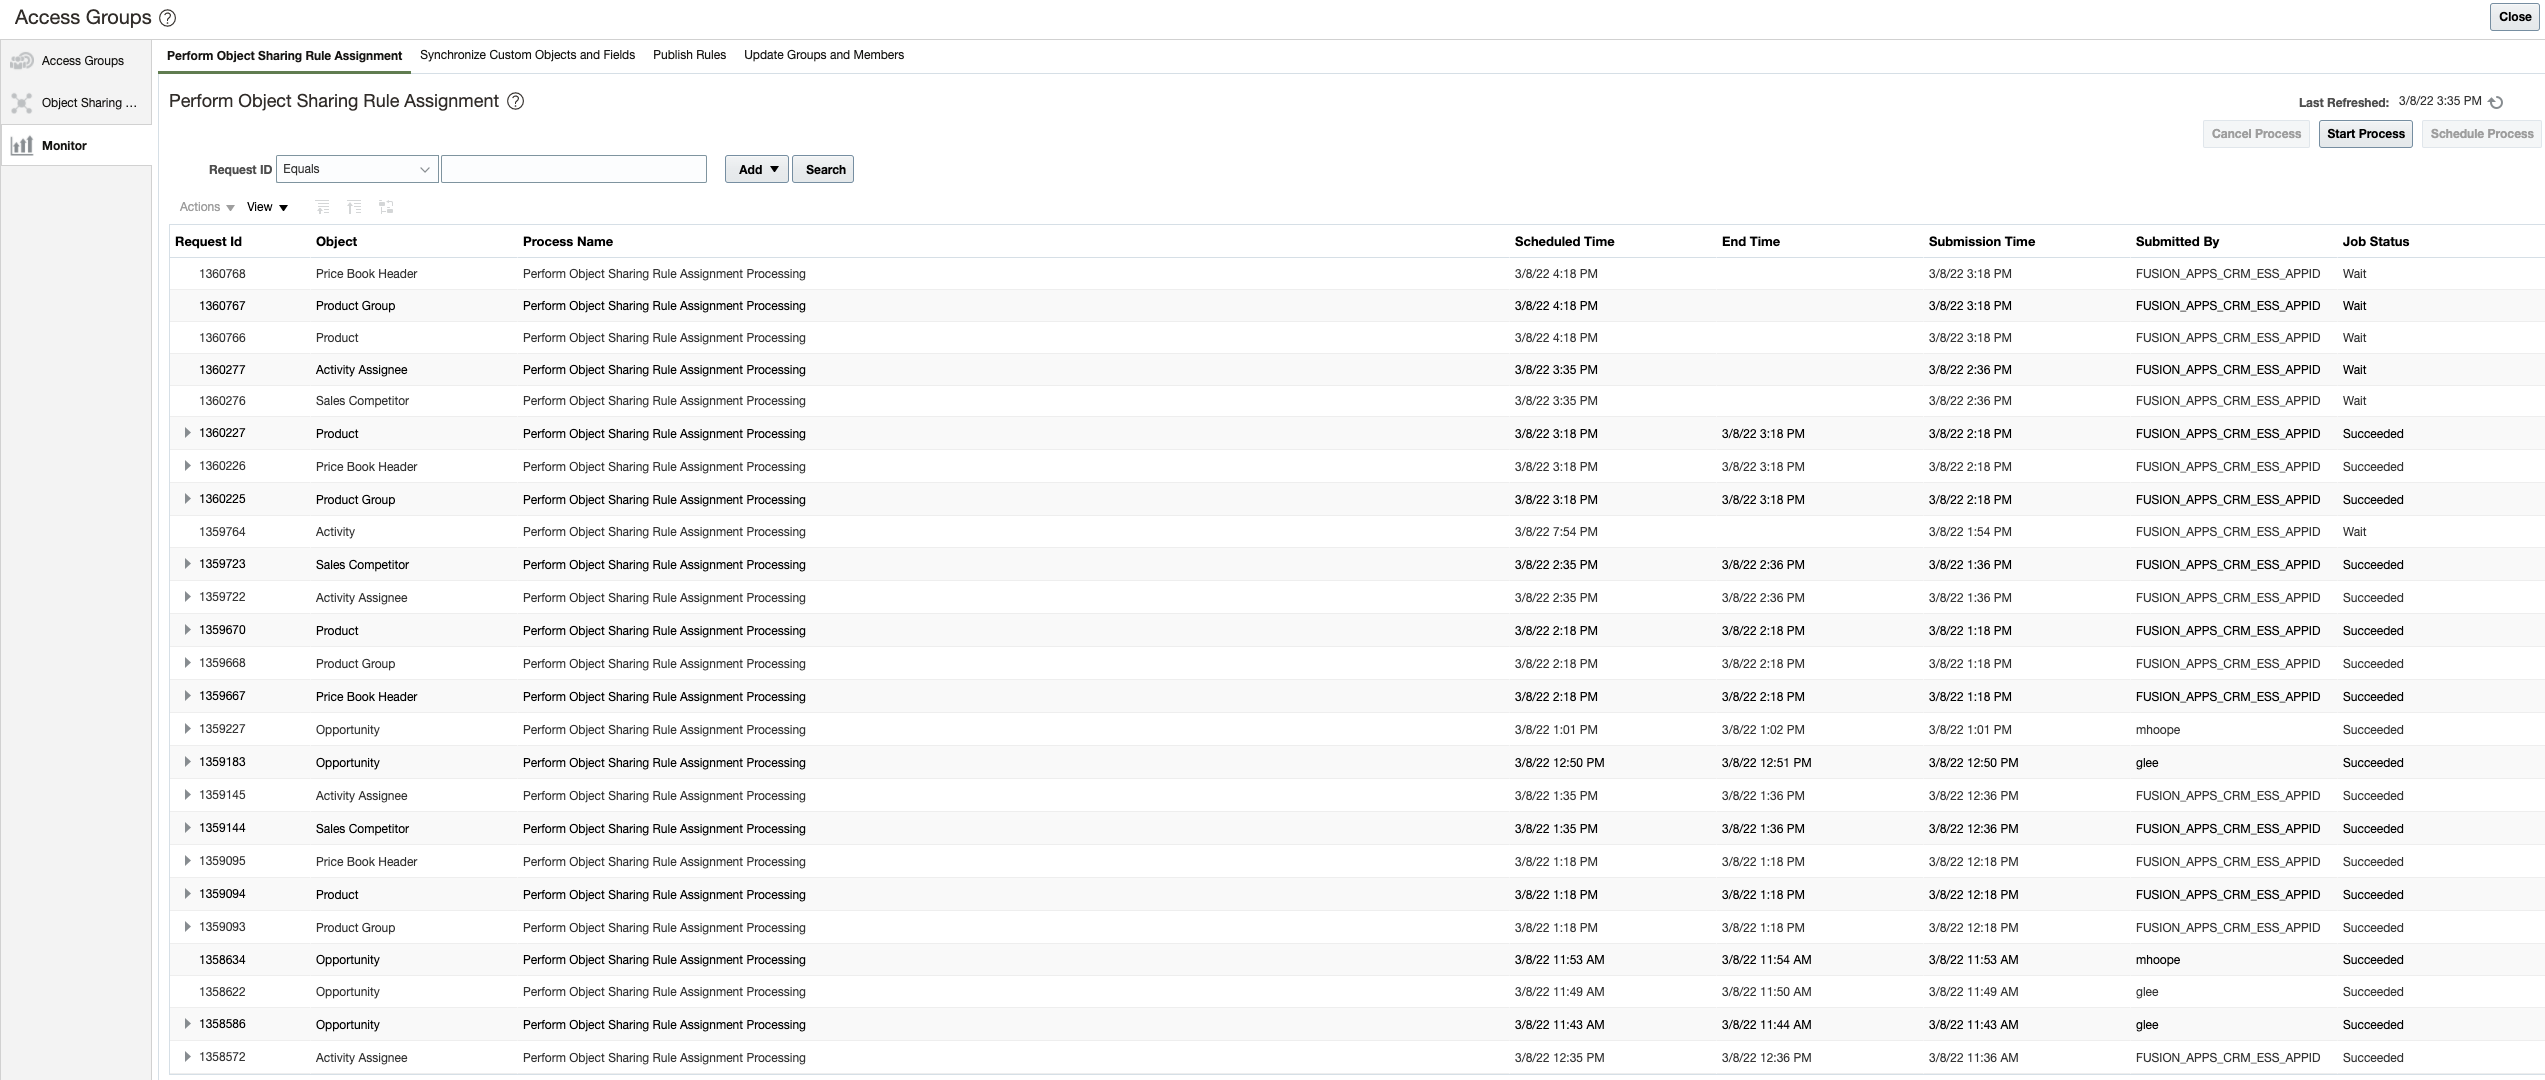
Monitor Page

Synchronize Custom Objects and Fields Page
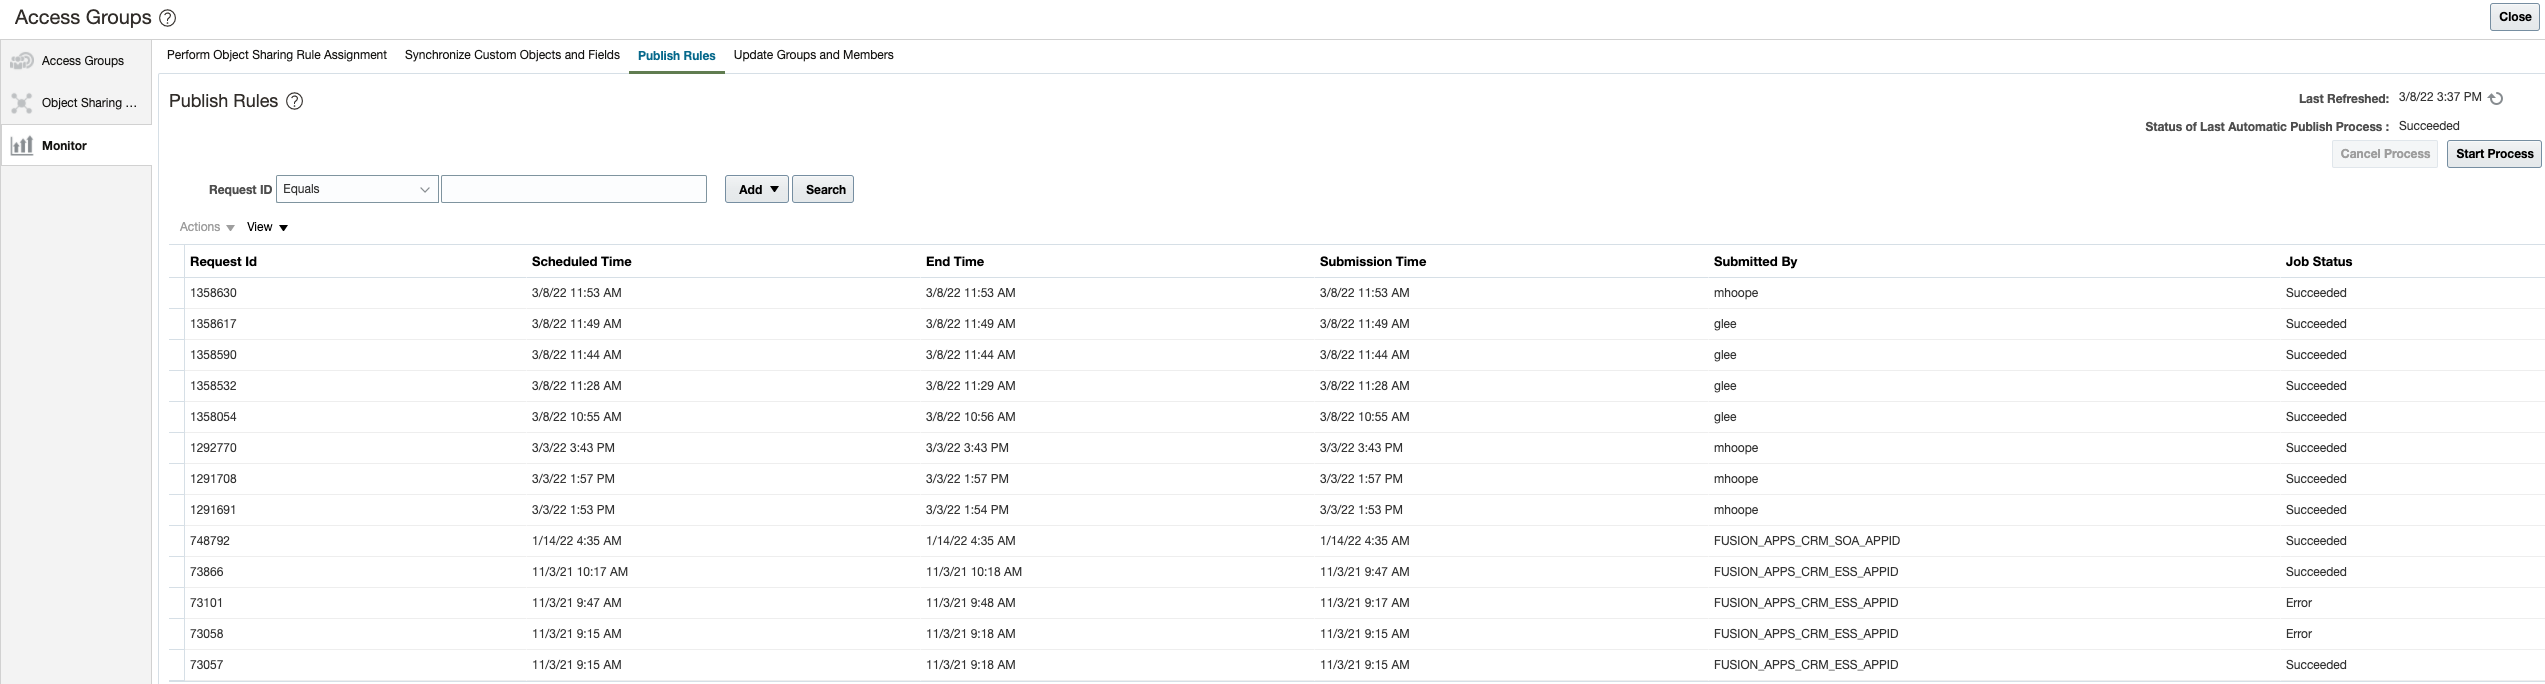
Publish Rules Page

Update Groups and Members
The ability to administer access group processes without having to leave the access groups work area makes the experience of working with access groups easier and more efficient.
Steps to Enable
You don't need to do anything to enable this feature.
Key Resources
- See the "Access Groups" chapter in the Securing CX Sales and B2B Service guide.
Role Information
- IT Security Manager
- Sales Administrator
Configure Team-Based Custom Object Security Using Access Groups
Enable team-based access to custom objects using access groups. Once added, a team member as well as his management hierarchy can access custom object records.
Customers no longer need to create custom data security predicates to secure custom objects based on team.
Steps to Enable
To use Team-Based Custom Object Security, first enable access group security and then enable the Configure Team for Access Group Security in Application Composer. You should then configure access groups in Sales and Service Access Management, via the Navigator. You must still configure functional security using the Roles table in Application Composer.
Key Resources
- See the "Enable Team-Based Access to Custom Objects" topic in the "Add Objects and Fields" chapter in the Configuring Applications Using Application Composer guide. This topic will be available on April 1 on Oracle Help Center.
Role Information
- Sales Administrator
Compare Application Composer Changes Between Environments
Compare Application Composer configuration changes between two environments during the migration process. You can check for configuration differences so that you can more easily troubleshoot issues that are occurring in one environment, but not in another.
This feature lets you:
- Do a proactive audit before starting a CSM Migration Import process
- Self-troubleshoot issues that occur on one environment but not on another environment
Steps to Enable
You don't need to do anything to enable this feature.
Tips And Considerations
On the Migration UI, before you perform an import, you can click on the gear icon to review the Source, Destination, and Delta configuration (comparison) reports.
Key Resources
- See the "Before You Begin" chapter in the Configuring Applications Using Application Composer guide.
Enable Left Outer Join on Custom Subject Areas with Secured Related Objects
You can now create custom subject areas that yield to a left outer join for both secured and unsecured dynamic choice lists on the related objects.
The enhancement provides endless reporting opportunities and reduces the need for multiple custom subject areas and joins, resulting in improved usability and performance.
Steps to Enable
Leverage new subject area(s) by adding to existing reports or using in new reports. For details about creating and editing reports, see the Creating and Administering Analytics and Reports book (available from the Oracle Help Center > your apps service area of interest > Books > Administration).
New custom subject areas have left outer joins automatically enabled and no additional steps are required. However, you must republish existing custom subject areas to have the left outer join available for parent-child relationships.
Key Resources
- See the "Custom Subject Areas" chapter in the Configuring Applications Using Application Composer guide.
For information on using Import and Export Management, see the Understanding Import and Export Management for CX Sales and B2B Service guide.
Use Alternate Keys to Link Custom Child Objects to Specific Customer Model Parent Objects During Import
You can now use the Original System and Original System Reference attributes to link custom child objects to specific customer model parent objects such as account, contact, household, address, and account contact during import.
This feature:
- Lets you use Original System and Original System Reference attributes as alternate keys so that you can link data import into a direct custom child object of a customer model object
- Reduces the need to query primary key information of customer model object data out of the system before importing data into the direct child object
Steps to Enable
You don't need to do anything to enable this feature.
Key Resources
- See the "How You Import Custom Objects" topic in the "Import Custom Objects" chapter in the Understanding Import and Export Management guide.
Dynamic Queue Size and Processing Improvements for Export Management
The export platform now dynamically manages the number of parallel jobs based on system capacity at runtime, in order to achieve optimal performance.
Export management no longer needs administrators to specify how many export jobs can be run in parallel. The queue size is now allocated dynamically based on the available system resources.
Steps to Enable
You don't need to do anything to enable this feature.
Key Resources
- See the "Export Data" topic in the "Export Your Data" chapter in the Understanding Import and Export Management guide.
Import and Export Assignment Rules
Use Import and Export Management to import and export the assignment rules in your sales environment. Assignment rules let you assign resources and salespeople to business objects, such as an opportunity and lead. Once assigned, resources, along with their managers, have visibility to the business object. You can import the assignment rules previously exported from the same or another environment, or you can use this functionality to update multiple assignment rules at a time.
You can easily move assignment rules between environments using Import and Export Management.
Steps to Enable
You don't need to do anything to enable this feature.
Key Resources
See this content in the Understanding Import and Export Management for CX Sales and B2B Service guide:
- "Import Your Assignment Rule Candidate Data"
- "Import Your Assignment Rule Condition Data"
- "Import Your Assignment Rule Data"
- "Import Your Assignment Rule Set Data"
Also see the "Work Assignment" chapter in the Implementing Sales guide.
Role Information
- All users that have access to Import and Export Management
Use Enhanced Account Contact Child Object in REST API
You can now view more details of contact person record on the account contact child of Account RESTful web services. These attributes have been added to the Account Contact child of the Account REST resource:
- Person Buying Role
- Person Sales Affinity Code
These attributes are read-only and nonmandatory fields that have values synced from the Contact object.
Sales applications and integrations can now view contact-specific information on associated accounts through the Account Contact child.
Steps to Enable
You don't need to do anything to enable this feature.
Key Resources
- See the "All REST Endpoints" section in the REST API for CX Sales and B2B Service guide.
Latitude and Longitude Attributes Not Displayed in UI by Default
The Latitude and Longitude attributes on the Address field are now set as hidden by default from the UI. Both attributes continue to be enabled in Adaptive Search but are mostly used in the background to support location searches. If you want to display these attributes in the UI, your sales administrator can display them from the Configure Adaptive Search > Configure UI screen.
Both attributes continue to be enabled in Adaptive Search, but are mostly used in the background to support location searches.
Steps to Enable
You don't need to do anything to enable this feature.
Use Saved Search to View a List of Unaccepted Leads
You can now view a list of qualified or unqualified leads that haven't been accepted yet by using the New Unaccepted Leads saved search. This saved search is available by default to all users. Administrators can go to Manage Saved Searches and manage this new saved search if needed.
This feature allows users to quick view a list of all unaccepted leads.
Steps to Enable
You don't need to do anything to enable this feature.
Address, Email, and Phone Verification
Verify Email and Phone Numbers in Bulk
Verify email addresses and phone numbers, in addition to street addresses, in bulk, using batch requests.
Verifying email addresses and phone numbers in bulk lets you import large numbers of phone and email records, and then verify them in one go. Large numbers of email and phone records can be created using a CSV file import, or using REST APIs. This feature helps you ensure that the email and phone data saved in the application are verified, and augments the address cleansing feature of the application.
Steps to Enable
- You can configure the batch email and phone verification in the Setup and Maintenance work area using the following:
- Offering: Customer Data Management
- Functional Area: Data Quality Verification Services
- Click the Quick Setup icon.
- In the Configure Verification Services page, select the email and phone services.
Tips And Considerations
- After the release of this feature, recurring address cleansing batch jobs aren't automatically ported to the upgraded release. You need to cancel the previous address cleaning recurring jobs submit new recurring batch jobs.
- Addresses verified by the new data verification batch job only process addresses that are associated with a party record. Addresses not associated with a party record won't be processed.
- In the Navigator, under Customer Data Management, users need to use the new Data Verification cue-card for submitting batch jobs for email verification, phone verification, and address cleansing. The existing address cleansing cue-card won't be visible anymore.
Key Resources
- See the "Data Verification Setup" chapter in the Implementing Customer Data Management (CDM) for CX Sales and B2B Service guide.
Purge Duplicate Resolution Requests in Pending and New Status
Remove unwanted, active resolution requests with the Purge Duplicate Resolution Data scheduled process. In this release, we have enhanced the functionality of the Purge Duplicate Resolution Data scheduled process to allow the purging of resolution requests in New and Pending status. We've also provided the ability to restricted the purge scope to resolution requests created from a specific duplicate identification batch.
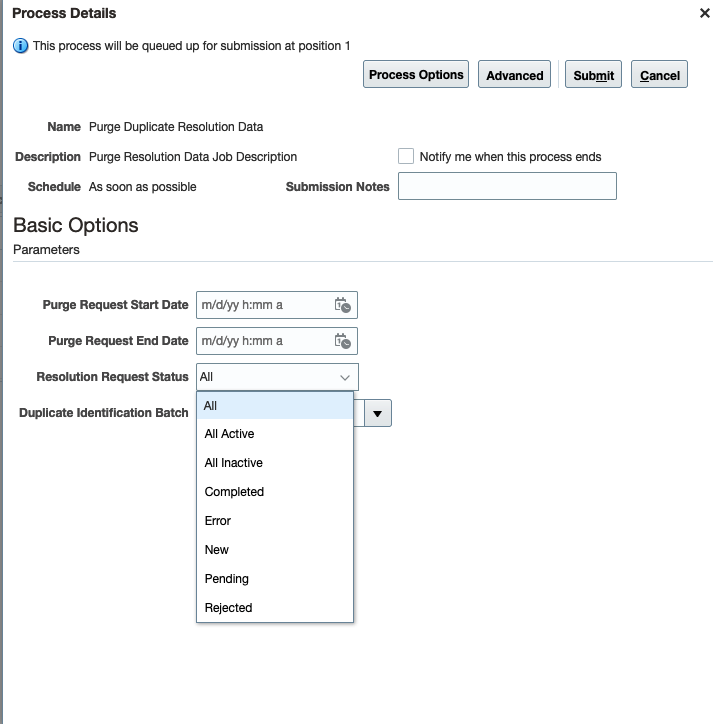
Purge Duplicate Resolution Data Scheduled Process
This enhancement lets you independently purge unwanted resolution requests that are in an active processing status. This feature improves operational efficiency and flexibility in scenarios where a large number of resolution requests are created by accident.
Steps to Enable
You don't need to do anything to enable this feature.
Tips And Considerations
Keep these points in mind to get the most value from this enhancement:
- The Purge Duplicate Resolution Data scheduled process can't run at the same time as the Schedule Duplicate Resolution Requests process. If one of these types of processes is submitted while the other type is running, the submitted process will be placed on-hold until the running process completes.
- The Start Date and End Date parameters are required for all Purge Duplicate Resolution Data jobs.
- The All Active option purges all resolution requests in Pending and New status.
- The All Inactive option purges all resolution requests in Complete, Error, or Rejected status.
- You can't purge resolution requests that are in Submitted status or Mapping status.
- The Duplicate Identification Batch choice list lets you do additional filtering of the purge scope to include only those resolution requests created by a specific duplicate identification batch.
Key Resources
- See the "Sales and B2B Service Scheduled Processes" chapter in the Understanding Scheduled Processes guide.
Role Information
Users with one or more of these roles can schedule and submit the Purge Duplicate Resolution Data process:
- Customer Data Steward
- Data Steward Manager
- Master Data Management Application Administrator