
This document will continue to evolve as existing sections change and new information is added. All updates appear in the following table:
| Date | Feature | Notes |
|---|---|---|
| 21 JUN 2019 | Created initial document. |
This guide outlines the information you need to know about new or improved functionality in this update, and describes any tasks you might need to perform for the update. Each section includes a brief description of the feature, the steps you need to take to enable or begin using the feature, any tips or considerations that you should keep in mind, and the resources available to help you.
Give Us Feedback
We welcome your comments and suggestions to improve the content. Please send us your feedback at oracle_fusion_applications_help_ww_grp@oracle.com.
Optional Uptake of New Features (Opt In)
Oracle Cloud Applications delivers new updates every quarter. This means every three months you'll receive new functionality to help you efficiently and effectively manage your business. Some features are delivered Enabled meaning they are immediately available to end users. Other features are delivered Disabled meaning you have to take action to make available. Features delivered Disabled can be activated for end users in a couple of ways:
Access the Opt In page from the New Features Work Area
- Click the Navigator, and then click New Features (under the My Enterprise heading)
- On the New Features page, select the offering that includes new features you’d like to review
- Click Go to Opt In for any feature you want to opt in
- On the Edit Features page, select the Enable option for the feature, and then click Done
or... Access the Opt In page from the Setup and Maintenance Work Area
- Click the Navigator, and then click Setup and Maintenance
- On the Setup page, select your offering, and then click Change Feature Opt In
- On the Opt In page, click the Edit Features icon for any area that includes features you want to opt in
- On the Edit Features page, select the Enable option for any feature you want to opt in to. If the Enable column includes an Edit icon instead of a check box, then click the icon, select your feature options, and click Save and Close.
- Click Done.
Opt In Expiration
Occasionally, features delivered Disabled via Opt In may auto enable in a future update. This is known as an Opt In Expiration. If your cloud service has any Opt In Expirations you will see a related tab in this document. Click on that tab to see when the feature was originally delivered Disabled, and when the Opt In will expire, potentially auto enabling the feature. You can also click here to see features with Opt In Expirations across all Oracle Cloud Applications.
Column Definitions:
Report = New or modified, Oracle-delivered, ready to run reports.
UI or Process-Based: Small Scale = These UI or process-based features are typically comprised of minor field, validation, or program changes. Therefore, the potential impact to users is minimal.
UI or Process-Based: Larger Scale* = These UI or process-based features have more complex designs. Therefore, the potential impact to users is higher.
Customer Action Required = You MUST take action before these features can be used by END USERS. These features are delivered disabled and you choose if and when to enable them. For example, a) new or expanded BI subject areas need to first be incorporated into reports, b) Integration is required to utilize new web services, or c) features must be assigned to user roles before they can be accessed.
| Ready for Use by End Users Reports plus Small Scale UI or Process-Based new features will have minimal user impact after an update. Therefore, customer acceptance testing should focus on the Larger Scale UI or Process-Based* new features. |
Customer Must Take Action before Use by End Users Not disruptive as action is required to make these features ready to use. As you selectively choose to leverage, you set your test and roll out timing. |
|||||
|---|---|---|---|---|---|---|
| Feature |
Report |
UI or |
UI or |
Customer Action Required |
||
Support for Oracle Cloud Infrastructure (OCI) Object Storage |
||||||
Use relogon=1 in URL Parameter to Apply Fusion Apps User Preferences |
||||||
Inactive and Unavailable BI View Objects (BIVOs) and BIVO Columns for Exclusion from Extraction in BI Cloud Connector
Beginning with Update 18B, there are BI View Objects and BI View Object columns that are unavailable or marked inactive in Oracle Applications Cloud. The unavailable and inactive objects and columns must be excluded from BICC extracts.
Steps to Enable
Refer to this link for a list of BIVOs and BIVO columns that are unavailable for extraction using BI Cloud Connector (BICC).
BI Cloud Connector (BICC) now supports multiple job profiles starting in update 19C. You can use the Manage Jobs feature if you use BICC to extract data from Oracle Applications Cloud to support multiple downstream integrations. The data store's (BI View Object) metadata is managed at the job level.
Steps to Enable
- Launch the BICC console and navigate to Manage Jobs.

- Click Add to create a new job. Enter a Job name and Description, select a Data Store and columns for extraction, and click Save.

-
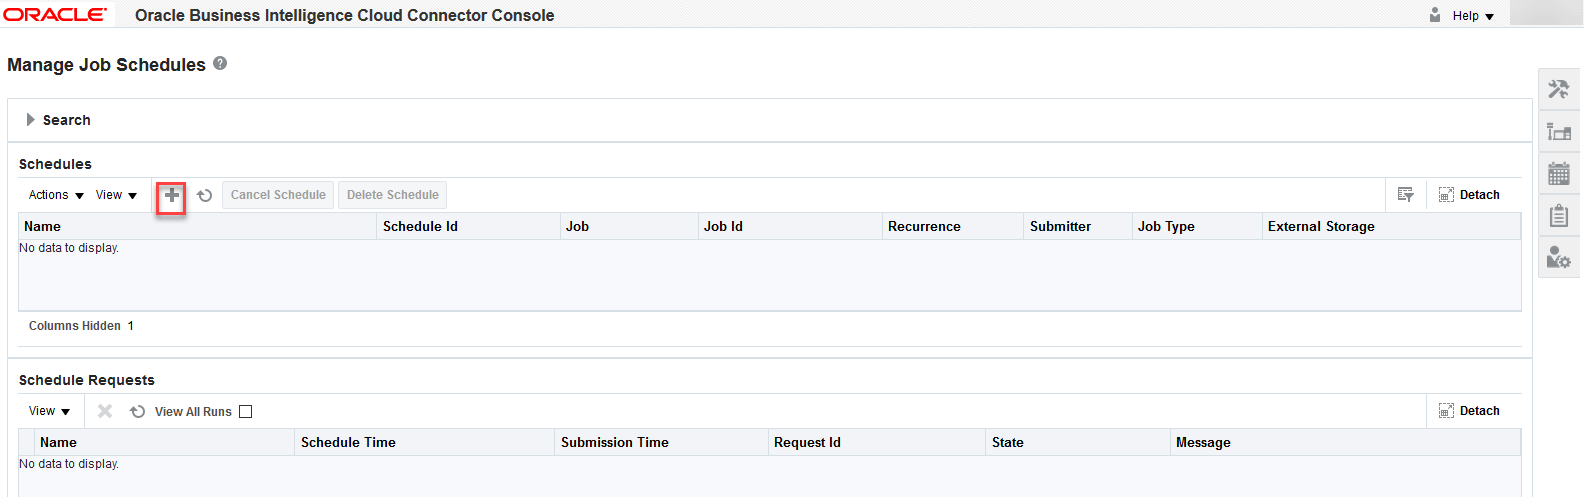
Navigate to Manage Job Schedules.

- Click Add to create a new Job Schedule. Enter a name and description for the Job Schedule. Select the Job, Job Type and other parameters for the extract, and click Save.

Support for Oracle Cloud Infrastructure (OCI) Object Storage
Beginning with update 19C, Oracle Cloud Infrastructure (OCI) Object Storage can be used as an external storage option. You can use this external storage for your BICC extracts if you have a subscription to OCI Object Storage.
Steps to Enable
- To configure Oracle Cloud Infrastructure (OCI) Object Storage as external storage for your extracts, launch the BICC console, navigate to Configure External Storage, select the OCI Object Storage Connection tab, and click Add.

- Specify the following OCI parameters:
- Host
- Tenancy OCID
- User OCID
- Object Storage's Namespace
- Bucket (where extract content is to be uploaded)
Use this link to get the Host information for OCI Object Storage.
Use this link to get the Tenancy's OCID and User's OCID.
- Generate API Signing Key and Export Public Key. This is required to authenticate/communicate with OCI. Refer to this link for instructions to generate API signing key and export a public key. The public key needs to be exported and added on OCI.

- Click Test Connection to verify the connection and, if successful, click Save. Configured OCI Object Storage can be selected as external storage in Manage Job Schedules or Manage Extract Schedules in the BICC Console.
OTBI Metadata Independent Mode for Extraction
In update 19C, BI View Objects may now be extracted in OTBI Metadata Independent Mode.
Oracle Development strongly recommends that you switch your BICC extracts to use OTBI Metadata Independent mode by update 20C.
Steps to Enable
USE THE OTBI METADATA INDEPENDENT MODE
New implementations of BICC in 19C use the feature by default. All Data Stores (BIVOs) are in OTBI Independent Mode (OTBI Metadata dependent option is deselected).
NOTE: The mode for all BIVOs in a job can be managed either at the Job or the BIVO level using the Manage Jobs Console in BICC. All BIVOs default to OTBI Independent Mode when using the Manage Jobs feature. It's recommended to use the Manage Jobs functionality instead of using the Manage Offering and Data Stores option to manage the extract mode of the BIVOs.
Existing BICC implementations with BIVOs delivered prior to 19C retain their configuration with OTBI Metadata Dependent mode. Before update 20C, you must switch these BIVOs to use the OTBI Metadata Independent mode and test and validate your integration using the new mode.
Key Resources
You can now opt in for Unified Sandboxes to enhance your user experience and productivity when working with sandboxes. With Unified Sandboxes, you can refresh and merge sandboxes with changes in the mainline metadata, and perform many other new and versatile sandbox activities. In addition to making the sandbox experience more consistent across all configuration tools, this feature also introduces a more robust user interface. Additionally, you get a new UI for Configuration Set Migration, and new migration options with this feature.
Here's what you can do using Unified Sandboxes:
- Select the configuration tools to enable for your sandboxes while creating them.
- Enable all configuration tools in the same way using the Sandboxes UI. So you get a consistent sandbox experience across tools.
- Make changes in data security, lookups, and messages within sandboxes.
- Restrict access to various sandbox activities for users. For example, you can specify these access rights for your sandboxes:
- Full Access
- Edit and Preview Access
- View Only Access
- Preview and test your sandbox changes, without publishing the sandbox.
- Refresh and merge sandboxes with latest changes in mainline metadata from other published sandboxes. After merging all changes, you can publish your sandbox.
- After opting in, if you register your target environment in your source environment, you can do these additional migration tasks using the Migration UI:
- Migrate your changes from the test environment to the target environment without manually downloading and uploading the configuration set file.
- Move only new changes from the source environment to the target environment.
Steps to Enable
You must opt in to enable this feature. For instructions, refer to the Optional Uptake of New Features section of this document.
Offering: Multiple Offerings
Tips And Considerations
BEFORE YOU ENABLE THE FEATURE
Do these tasks:
- Make sure you totally understand what it means to opt in to the feature and what impact that would have.
- If you have open sandboxes in the application, publish or delete the available sandboxes using the Manage Sandboxes dialog box.
Key Resources
Role Information
- Review Applications Offering (ASM_REVIEW_APPLICATIONS_OFFERINGS_PRIV)
- Configure Oracle Fusion Applications Offering (ASM_CONFIGURE_OFFERING_PRIV)
New Search Type Parameter in Data Model
When you create a parameter using List of Value (LOV), the LOV query is executed to populate the LOV selections. At times this can cause performance bottleneck when the LOV queries are very complex and fetches huge amount of data. To handle this scenario, a new Search type parameter has been added that allows user to enter few characters to narrow down the parameter selection. You can even use the search icon to navigate to search window where you can enter few characters, and select the value required for the report, thereby keeping the parameter selection minimal and applying a single selection value.
Steps to Enable
To create a Search type parameter:
- In Data Model Editor, select Parameters, and Create a new Parameter.
- Enter a name for the parameter,select a data type (e.g. String), and enter a default value (optional) for the parameter.
- Select Search from the Parameter Type list. Enter a label for the parameter in the Display Label field..
- Select the LOV for the parameter from the List of Values list.
- (Optional) Select Refresh other parameters on change.
- Associate the parameter in the Report Query for the parameter to apply to the report.
Tips And Considerations
The Search parameter on Report Viewer or Scheduler page looks as shown below

You can enter partial text and execute the report, or you can click on the search icon which will bring up the Search window, where you can search by column (based on LOV query) and search by entering partial value.

NOTE: The search parameter only supports the criteria "Text Starts with" and therefore the partial text should be entered from starting character.
Password Protect and Zip Your Output Delivery
Now you can safeguard the output file by adding password protection and then include the file in a zip archive format before delivery. The password protection will apply to Microsoft office file formats (XSLX, PPTX, DOCX) which can be applied from the runtime properties page. PDF password protection has been there for a while. The password protection will apply to both online viewed reports and scheduled jobs.
NOTE: Excel output in .XLS format generated from Excel templates do not support password protection.
Also at the time of scheduling a job, you can select the option "Compress output prior to delivery" to archive the output file in a zip file format before it is sent through a delivery channel. Compress output feature is not supported for PDFZ format as it is already a zipped file format and HTML format for email delivery.
So you can choose to apply only password protection, only compression or both.
Steps to Enable
TO APPLY PASSWORD PROTECTION
- To apply password protection at server level (i.e. for all reports that generates the output in PPTX, DOCX, XLSX, PDF)
- Navigate to Administration page
- Open Properties under Runtime Configuration section
- Enter a desired password for the file formats
- To apply password protection at report level (i.e. for only specific report for PPTX, DOCX, XLSX, PDF outputs)
- Edit a report
- Navigate to Report Properties, Formatting tab
- Enter a desired password for the file formats
TO ARCHIVE OUTPUT IN ZIP FILE
- Log into BI Publisher
- Setup delivery channels for your requirement (Email, SFTP, etc)
- Schedule a Job for the report required
- In the Output Tab of Scheduler UI there is a new option "Compress output prior to delivery" ... select it
- When the output is delivered it will be compressed except for PDFZ format which is already a compressed format and for HTML format directed to Email delivery.
- You will need to manually check the delivery targets, except for Email where you will see the attachment as <Name>_<Output Format>.zip
Use relogon=1 in URL Parameter to Apply Fusion Apps User Preferences
When you make a change to User Preferences from Fusion Applications User Preferences UI, the change does not immediately reflect in BI Publisher reports if the session is not renewed. To make this work, one has to navigate to BI Publisher server and logout the user. With a new login session, the updated user preferences starts working correctly.
To eliminate this dependency, now you can simply append relogon=1 parameter in the URL of BI Publisher report it will pick up the latest Fusion Apps User Preference, without session renewal.
Steps to Enable
No steps are required to enable this feature.
XML Data Chunking for Extremely Large Data Sets
The XML data chunking capability in BI Publisher reduces the time and memory used for processing large data of size greater than 2 GB. The concepts are similar to bursting where a single large XML data will be split into several smaller chunks of XML data of manageable size, be executed as multiple sub-jobs in parallel to process the individual XML data chunks, and finally merges the outputs to create a single consolidated output.
Steps to Enable
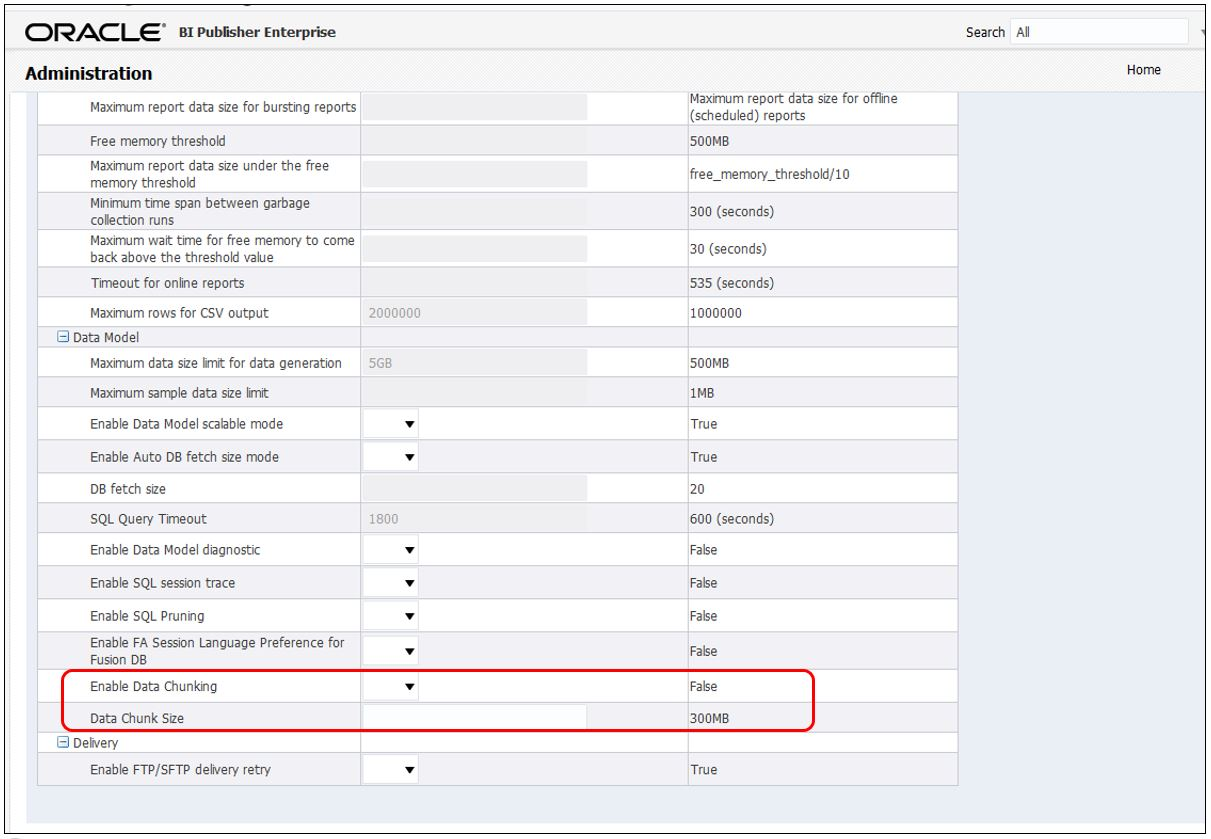
- Enable XML Data Chunking from Admin Page
By default, XML Data Chunking is turned OFF and to enable it will require an Administrator to turn in ON from the Administration page under Runtime Properties.
- Enable XML Data Chunking in Data Model
Once this feature is enabled, a report author will be able to see Chunking option in the data model, as shown below.

On selecting Chunking, the report author will require to enable chunking and select the split by element from the drop down list, similar to bursting split key.

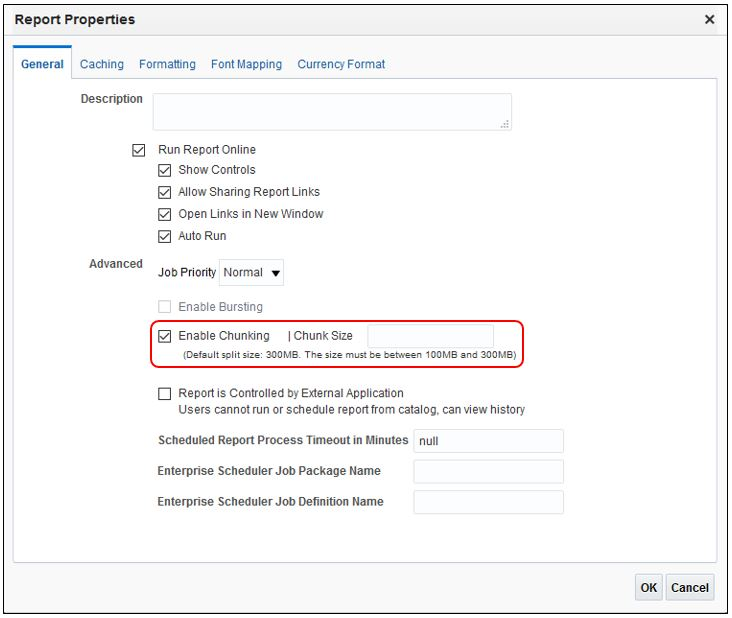
- Enable XML Data Chunking in Report Properties
The report author will also need to enable chunking in the report properties and set a Chunk Size. The default chunk size is set to 300 MB. Here you can only choose one among Bursting and Chunking options.
- Schedule report Job and select XML Data Chunking

Once the job completes, you will see the merged output at the top and the chunked output sub jobs after it.
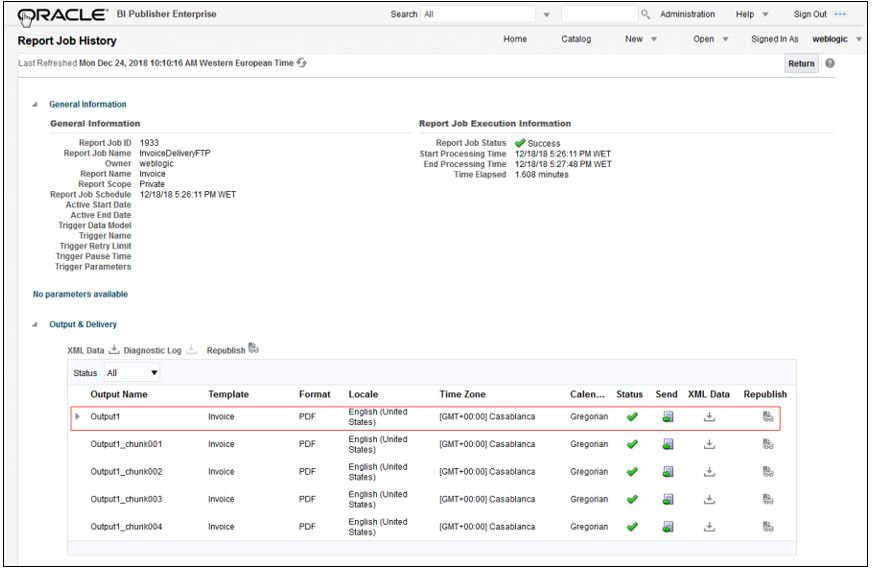
The delivery details of the job can be seen at the top output.

Tips And Considerations
FEATURE LIMITATIONS
- Chunking option is best suited for Listing Reports. A listing report with a table as the main content, with no cross referencing, is the most suitable use case.
- Sorting, Grouping, Aggregation, Cross Referencing operations are only supported within the individual chunked output. The final merged output will not support these data operations across the chuncked outputs.
- Page No, Running Totals and other functions are also supported within the individual chunked output. These functions get reset with each new chunked output.
-
The Chunking option only supports RTF, XPT and EText template types for PDF, EXCEL and EText output formats with some limitations.
PDF
Each chunked output will start from a new page.
XLSX
Each chunked output will be on a separate sheet.
E-Text
Each chunked output will be appended while generating final output.
- Unlike bursting, in chunking all output formats have to be same type, so that all outputs can be merged into a single document at the end.
- Online report option does not support Data Chunking option.
---