
This document will continue to evolve as existing sections change and new information is added. All updates appear in the following table:
| Date | Feature | Notes |
|---|---|---|
| 11 DEC 2020 | Configure Commenting Options for Approval and Rejection | Updated document. Revised feature information. |
| 10 JUL 2020 | BI Platform Author Role is Renamed to BI Author Role | Removed feature from update 20B. |
| 29 MAY 2020 | Configure Pages Using Visual Builder Studio | Updated document. Delivered feature in update 20B. |
| 20 MAY 2020 | BI Platform Author Role Is Renamed to BI Author Role | Updated document. Delivered feature in update 20B. |
| 20 MAY 2020 | Deploy Descriptive Flexfields to Unified Sandboxes | Removed feature from update 20B. |
| 26 MAR 2020 | Deploy Descriptive Flexfields to Unified Sandboxes | Updated document. Revised feature information. |
| 20 MAR 2020 | Created initial document. |
This guide outlines the information you need to know about new or improved functionality in this update, and describes any tasks you might need to perform for the update. Each section includes a brief description of the feature, the steps you need to take to enable or begin using the feature, any tips or considerations that you should keep in mind, and the resources available to help you.
Give Us Feedback
We welcome your comments and suggestions to improve the content. Please send us your feedback at oracle_fusion_applications_help_ww_grp@oracle.com.
Optional Uptake of New Features (Opt In)
Oracle Cloud Applications delivers new updates every quarter. This means every three months you'll receive new functionality to help you efficiently and effectively manage your business. Some features are delivered Enabled meaning they are immediately available to end users. Other features are delivered Disabled meaning you have to take action to make available. Features delivered Disabled can be activated for end users by stepping through the following instructions:
Access the Opt In page from the New Features Work Area
- Click the Navigator, and then click New Features (under the My Enterprise heading)
- On the New Features page, select the offering that includes new features you’d like to review
- Click Go to Opt In for any feature you want to opt in
- On the Edit Features page, select the Enable option for the feature, and then click Done
Opt In Expiration
Occasionally, features delivered Disabled via Opt In may be enabled automatically in a future update. This is known as an Opt In Expiration. If your cloud service has any Opt In Expirations you will see a related tab in this document. Click on that tab to see when the feature was originally delivered Disabled, and when the Opt In will expire, potentially automatically enabling the feature. You can also click here to see features with Opt In Expirations across all Oracle Cloud Applications.
Column Definitions:
Features Delivered Enabled
Report = New or modified, Oracle-delivered, ready to run reports.
UI or Process-Based: Small Scale = These UI or process-based features are typically comprised of minor field, validation, or program changes. Therefore, the potential impact to users is minimal.
UI or Process-Based: Larger Scale* = These UI or process-based features have more complex designs. Therefore, the potential impact to users is higher.
Features Delivered Disabled = Action is needed BEFORE these features can be used by END USERS. These features are delivered disabled and you choose if and when to enable them. For example, a) new or expanded BI subject areas need to first be incorporated into reports, b) Integration is required to utilize new web services, or c) features must be assigned to user roles before they can be accessed.
| Ready for Use by End Users Reports plus Small Scale UI or Process-Based new features will have minimal user impact after an update. Therefore, customer acceptance testing should focus on the Larger Scale UI or Process-Based* new features. |
Action is Needed BEFORE Use by End Users Not disruptive as action is required to make these features ready to use. As you selectively choose to leverage, you set your test and roll out timing. |
|||||
|---|---|---|---|---|---|---|
| Feature |
Report |
UI or |
UI or |
|
||
PDF Output Generated by XML Data Chunking Includes Page Numbers |
||||||
Inactive and Unavailable BI View Objects (BIVOs) and BIVO Columns for Exclusion from Extraction in BI Cloud Connector
Beginning with update 18B, there are BI View Objects and BI View Object columns that are unavailable or marked inactive in Oracle Applications Cloud. The unavailable and inactive objects and columns must be excluded from BICC extracts.
Steps to Enable
Refer to this link for a list of BIVOs and BIVO columns that are unavailable for extraction using BI Cloud Connector (BICC).
OTBI Metadata Independent Mode for Extraction
In update 19C, BI View Objects may now be extracted in OTBI Metadata Independent Mode.
Oracle Development strongly recommends that you switch your BICC extracts to use OTBI Metadata Independent mode by update 20C.
Steps to Enable
USE THE OTBI METADATA INDEPENDENT MODE
New implementations of BICC in 19C use the feature by default. All Data Stores (BIVOs) are in OTBI Independent Mode (OTBI Metadata dependent option is deselected).
NOTE: The mode for all BIVOs in a job can be managed either at the Job or the BIVO level using the Manage Jobs Console in BICC. All BIVOs default to OTBI Independent Mode when using the Manage Jobs feature. It's recommended to use the Manage Jobs functionality instead of using the Manage Offering and Data Stores option to manage the extract mode of the BIVOs.
Existing BICC implementations with BIVOs delivered prior to 19C retain their configuration with OTBI Metadata Dependent mode. Before update 20C, you must switch these BIVOs to use the OTBI Metadata Independent mode and test and validate your integration using the new mode.
Key Resources
If you purchased Oracle Guided Learning, you can create interactive guides and more to help people learn how to use Oracle Applications Cloud. For example, a guide takes users through each step of a task while they're in the application, down to which buttons to click and which fields to fill out. Most importantly, they get through the task in a way that fits your own business processes and practices. After you create your content in guided learning, you go through a few steps to apply your changes to Oracle Applications Cloud so that you can test them and make them available to your users. These steps involve using a sandbox and defining a few settings to make sure your Guided Learning content shows up the way you want it.
To define those settings, go to the Setup and Maintenance work area and use the Configure Guided Learning task in the Application Extensions functional area. Here are some of the settings:
- Application ID: The ID given to you when you first got Guided Learning
- Environment: What Guided Learning content you want to see and test in Oracle Applications Cloud
- Development: Draft and published content
- Production: Only published content
- Role Mapping: The roles you created Guided Learning content for, for example Employee (ORA_PER_EMPLOYEE_ABSTRACT), and the corresponding Guided Learning role assigned to that content, for example Employee
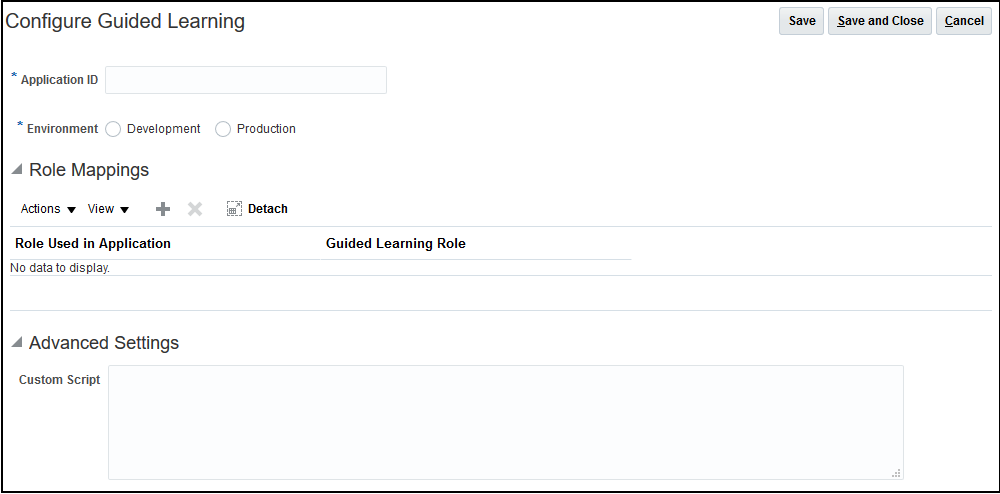
Configure Guided Learning page
Steps to Enable
Set the Oracle Guided Learning Enabled (FND_GUIDED_LEARNING_ENABLED) profile option to Y at the Site level. In the Setup and Maintenance work area, use the Manage Applications Core Administrator Profile Values task in the Application Extensions functional area.
Key Resources
Role Information
You must have roles that gives you access to the Sandboxes and Setup and Maintenance work areas.
User Interface Text Update Feature
You now get the new User Interface Text Update feature by default. You can leverage the new UI to have greater control of your text, and how it's edited.
Here’s what you can do using this new UI:
- Edit your text using a more robust user interface.
- Export and import your text for offline translation and modification.
- Select and replace text more easily.
Steps to Enable
You don't need to do anything to enable this feature.
Key Resources
Configure Pages Using Visual Builder Studio
You can now leverage Visual Builder Studio to extend page components for certain pages. If you see Edit Pages in Visual Builder in your Settings and Actions menu, you can use Visual Builder Studio to do these tasks:
- Display fields from your data source to the UI
- Add business logic to display certain layouts
- Edit variables, constants, and events as needed
- Change the default content
- Rearrange fields
- Hide fields
Steps to Enable
You don't need to do anything to enable this feature.
Tips And Considerations
If you need to make changes to the data model, you must use other configuration tools, such as Application Composer, and then use Visual Builder Studio to make the changes in the UI.
Key Resources
- Overview of Using Visual Builder Studio
- Administering Visual Builder Studio
- Extending Oracle Cloud Applications with Visual Builder Studio
Create Automated Regression Tests
You can create automated regression tests against your staging pod by following the set of instructions for Oracle ADF - Runtime Automation Sample Library.
Using this tool you can make better use of the limited testing time before you use your production pod.
Steps to Enable
- Please download the Oracle ADF - Runtime Automation Sample Library
- Once downloaded, review the requirements, installation instructions and test automation development steps in the user guide: Test Automation Oracle JDeveloper Java SE Development Kit Selenium WebDriver
PDF Output Generated by XML Data Chunking Includes Page Numbers
XML Data Chunking was introduced in a previous release that helps in creating extremely large reports in PDF, Excel and Text formats. With this release you can add page numbering to the PDF output generated by XML Data Chunking. You can specify the location of the page number in the header or footer section of the PDF page. The format and font style of the page number text can't be customized.
Steps to Enable
- Enable XML Data Chunking for the report
- Set 'Enable Data Chunking' to True under Administration > Runtime Configuration > Properties
- Enable Chunking in Data Model
- Enable Chunking under Report Properties
- Under Report properties, set PDF Page Number position from drop down list. By default this is set to None.

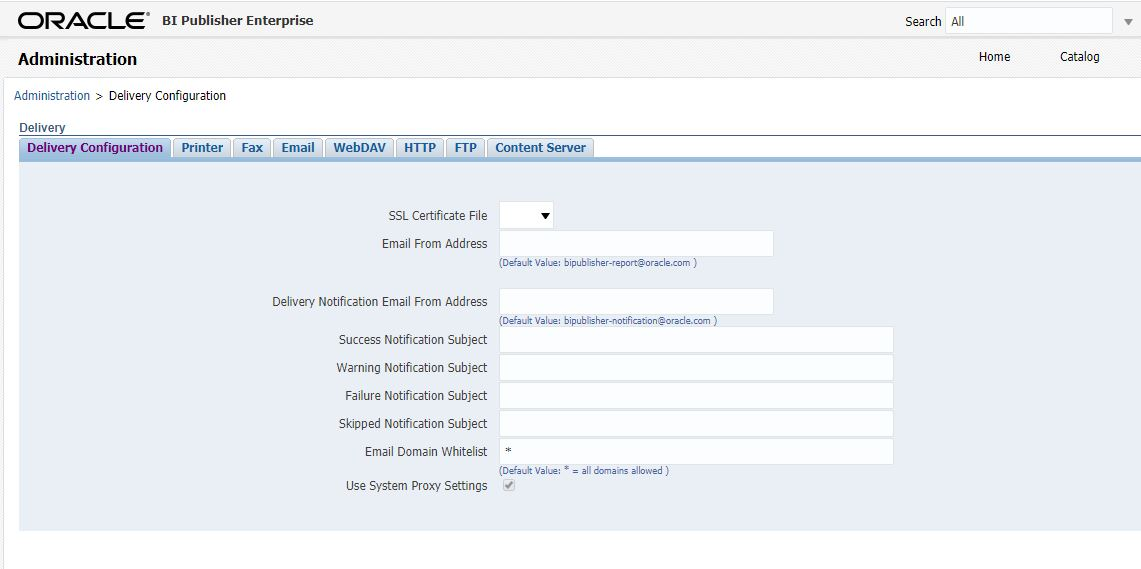
Restrict Email Delivery Domains
You can restrict the email delivery of BI Publisher reports to only the white-listed domains set by the BI Administrator under the Delivery Configuration. By default it is set to deliver to all domains. If a user schedules a report job to an unauthorized domain, the delivery to the unauthorized destination will fail.
Steps to Enable
You don't need to do anything to enable this feature.
Tips And Considerations
BI Administrator role can add domain names that needs to be white listed in case customer wants to restrict emails to specific domains. This is available under Delivery Configuration in Delivery section of Administration page with field name 'Email Domain Whitelist'. Use comma separator to include multiple domain names. Default value is set to asterisk '*' to include all domains.
Configure Commenting Options for Approval and Rejection
Configure commenting options for approving and rejecting workflow tasks. You can configure comments as mandatory or optional; you can also restrict approvers from entering comments. You can use this feature to adhere to regulatory compliance requirements that mandate auditing of comments.
Your configuration options are:
- Required: A field for comments appears in the approval dialog box. An error message appears if the approver doesn’t enter comments.
- Not Allowed: The comments section doesn’t appear for the approver.
- Optional: The comments section appears, and the approver can optionally enter comments.
This setup doesn't currently apply to notifications and task details that you can configure using Oracle Business Intelligence Publisher.
Steps to Enable
- In the Setup and Maintenance work area, go to the Manage Task Configurations task or another approval setup task in the Application Extensions functional area or another functional area.
- In BPM Worklist, on the Task Configuration tab, select the workflow task.
- Click the Edit task icon in the Tasks to be configured toolbar.
- Open the Configuration subtab.
- In the Approval Pre-conditions section, for the Approve and Reject lists, select an option to determine if comments are required, optional, or not allowed when users approve or reject.
- Click the Commit task icon in the Tasks to be configured toolbar when you're ready to roll out your changes.

Comments Options for Approving and Rejecting Tasks
Role Information
To configure this feature, you need a role that lets you perform administrative tasks in BPM Worklist.