
February Maintenance Pack for 23A
This document will continue to evolve as existing sections change and new information is added. All updates appear in the following table:
| Date | Module | Feature | Notes |
|---|---|---|---|
| 25 JAN 2023 | Created initial document. |
 HAVE AN IDEA?
We’re here and we’re listening. If you have a suggestion on how to make our cloud services even better then go ahead and tell us. There are several ways to submit your ideas, for example, through the Ideas Lab on Oracle Customer Connect. Wherever you see this icon after the feature name it means we delivered one of your ideas.
GIVE US FEEDBACK
We welcome your comments and suggestions to improve the content. Please send us your feedback at oracle_fusion_applications_help_ww_grp@oracle.com.
DISCLAIMER
The information contained in this document may include statements about Oracle’s product development plans. Many factors can materially affect Oracle’s product development plans and the nature and timing of future product releases. Accordingly, this Information is provided to you solely for information only, is not a commitment to deliver any material, code, or functionality, and should not be relied upon in making purchasing decisions. The development, release, and timing of any features or functionality described remains at the sole discretion of Oracle.
This information may not be incorporated into any contractual agreement with Oracle or its subsidiaries or affiliates. Oracle specifically disclaims any liability with respect to this information. Refer to the Legal Notices and Terms of Use for further information.
Column Definitions:
Report = New or modified, Oracle-delivered, ready to run reports.
UI or Process-Based: Small Scale = These UI or process-based features are typically comprised of minor field, validation, or program changes. Therefore, the potential impact to users is minimal.
UI or Process-Based: Larger Scale* = These UI or process-based features have more complex designs. Therefore, the potential impact to users is higher.
Features Delivered Disabled = Action is needed BEFORE these features can be used by END USERS. These features are delivered disabled and you choose if and when to enable them. For example, a) new or expanded BI subject areas need to first be incorporated into reports, b) Integration is required to utilize new web services, or c) features must be assigned to user roles before they can be accessed.
| Ready for Use by End Users Reports plus Small Scale UI or Process-Based new features will have minimal user impact after an update. Therefore, customer acceptance testing should focus on the Larger Scale UI or Process-Based* new features. |
Customer Must Take Action before Use by End Users Not disruptive as action is required to make these features ready to use. As you selectively choose to leverage, you set your test and roll out timing. |
|||||
|---|---|---|---|---|---|---|
| Feature |
Report |
UI or |
UI or |
|
||
Communicate with Your Case Team for Help Desk Cases through Email, Slack, and Microsoft Teams |
||||||
Communicate with Your Case Team for Help Desk Cases through Email, Slack, and Microsoft Teams
Case owners can have conversations with case team members and other internal users through popular communications channels including email, Slack and Microsoft Teams,
Holding conversations directly in the context of the case helps ensure all parties are safely connected and up-to-date on the case status while preserving these conversations as part of the case history.
Steps to Enable
To configure your conversation channels, refer to the following guides:
Key Resources
For more information about using case management, see the Using Case Management guide.
Role And Privileges
The Case Worker and Case Manager roles include the privileges to view and manage conversation. Use the Security Console to verify and update these default privileges if necessary.
Redwood Help Desk is a completely redesigned user experience where internal employees can get answers to any type of question and support agents can manage internal requests using a modern, conversational user interface. You can use the Help Desk capability to support a variety of internal needs, such as sales support or maintenance requests.
Designed with the new Redwood Design System and Visual Builder Studio, every element in the design has been reimagined with simpler, modern design elements to make it easier than ever to support your employees. The prebuilt My Help page provides a self-service experience for employees to search knowledge, view their existing help desk requests, or create new requests.
Use automated assignment and routing to send requests to the right support team. Once assigned, help desk agents can manage their requests through a request list page that includes adaptive search, milestones, action plans, knowledge search, messaging channels, and collaboration across the enterprise.
The Redwood Help Desk enhances many existing features and introduces brand new capabilities including:
- Adaptive search provides an easy to use search to find the right records, including saved searches.
- More easily manage help desk requests with an easier to read layout of customer and internal conversations.
- The Assistant allows agents to quickly access actions without the need to navigate buttons and menus.
- The Pending Items and Recommendation region helps users access recommended knowledge and follow prescribed best practice steps in an action plan.
- Quickly access knowledge management with the option to leverage separate browser tabs to research multiple articles at once.
- Reduce clicks and overall effort with productivity boosters such as drag and drop of attachments, solo actions, next record navigation, and fewer pages.
- Collaborate with the new Conversation framework to instantly communicate with other members of your organization.
Create custom channel types for Help Desk messages
You may now create custom channel types for your help desk messages.
This allows administrators to create unique options or options not pre-integrated to be selected as the channel type, to accurately reflect the method of communication.
Steps to Enable
In Setup and Maintenance, use the setup task "Manage Service Request Channel Types" in the Help Desk offering to create custom channel types.
Then use the setup task "Manage Communication Channels" to create a custom channel using the new channel type. Any custom channels that are enabled and have a relevant stripe code of "HR HelpDesk Request Stripe" or "Internal Service Request Stripe" will appear in the message composer for user selection.
Detailed instructions are:
- Navigate to Setup and Maintenance.
- Click on the Tasks icon on the right-hand side of the page, and then click Search.
- Type '%Channel Type%' and click the magnifying glass to initiate the search.
- Click on Manage Service Request Channel Types.
- Under the Actions drop-down, select New.
- Type in the desired Lookup Code.
- Add a start date. Note that for it to be used immediately, you can choose today's date.
- Under Meaning, type in the text for the new channel type that will be displayed to the user.
- Click Save and Close.
- Now click Manage Service Request Channel Type Visibility.
- Select your new custom channel type from the drop-down.
- Set the Property Values to Yes for both Enabled for Collaboration and Enabled for Customer Interaction. (If you do not see these Properties, you may need to click Sync.)
- Click Save and Close.
- Now in the Search bar, type "Manage Communication%' and click on the magnifying glass to search.
- Click on Manage Communication Channels.
- Click on Create Channel.
- Under Stripe Code, chose HR HelpDesk Request Stripe if this is for a Human Resources Help Desk. Choose Internal Service Request Stripe for all other help desks.
- For Channel Type, select the new channel type that was created.
- Enter the Account Name as the channel name that is shown to the user. This will also populate the Display Name.
- Channel code is generally a single word, all uppercase version of the account name. This should auto-populate when you navigate to this field.
- Click Save and Close.
- Click Done when returned to the Service Channels page.
Now, when you edit a help desk request and type Compose Message in the action bar, you should be able to select your new channel type and chose the new channel for your new message.
Key Resources
Refer to the Implementation Guide at https://docs.oracle.com/en/cloud/saas/applications-common/23a/farhd for additional information.
Role And Privileges
Help Desk Administrator has been given the ability via the privilege Setup Omnichannel.
This document will continue to evolve as existing sections change and new information is added. All updates appear in the following table:
| Date | Module | Feature | Notes |
|---|---|---|---|
| 24 FEB 2023 | Help Desk Request Management |
Updated Editor for Authoring SmartText and Composing Service Request Message | Updated document. Delivered new feature in update 23A. |
| 14 DEC 2022 | Created initial document. |
HAVE AN IDEA?
We’re here and we’re listening. If you have a suggestion on how to make our cloud services even better then go ahead and tell us. There are several ways to submit your ideas, for example, through the Ideas Lab on Oracle Customer Connect. Wherever you see this icon after the feature name it means we delivered one of your ideas.
GIVE US FEEDBACK
We welcome your comments and suggestions to improve the content. Please send us your feedback at oracle_fusion_applications_help_ww_grp@oracle.com.
NOTE ABOUT DOCUMENTATION AVAILABILITY
Some of the documentation referenced in this article may not be available until after general availability of the release update on January 6, 2023. Check back after general availability for complete information.
DISCLAIMER
The information contained in this document may include statements about Oracle’s product development plans. Many factors can materially affect Oracle’s product development plans and the nature and timing of future product releases. Accordingly, this Information is provided to you solely for information only, is not a commitment to deliver any material, code, or functionality, and should not be relied upon in making purchasing decisions. The development, release, and timing of any features or functionality described remains at the sole discretion of Oracle.
This information may not be incorporated into any contractual agreement with Oracle or its subsidiaries or affiliates. Oracle specifically disclaims any liability with respect to this information. Refer to the Legal Notices and Terms of Use for further information.
This section gives you information to help you plan, deploy, and validate your update. We make frequent additions to this document, so don’t forget to check back and get the latest information before your update starts.
Use the following resources to prepare for, deploy, and validate your update:
-
Read Prepare for your Quarterly Update (Doc ID 2445338.1) on My Oracle Support to learn how to prepare for and validate your quarterly update.
-
Publish or delete any in-progress sandboxes. Read the Overview of Sandboxes topic in the Configuring and Extending Applications guide for more information.
-
Review the latest Known Issues and Update Documents for this release (Doc ID 1603154.1) on My Oracle Support.
OPTIONAL UPTAKE OF NEW FEATURES (OPT IN)
Oracle Cloud Applications delivers new updates every quarter. This means every three months you'll receive new functionality to help you efficiently and effectively manage your business. Some features are delivered Enabled meaning they are immediately available to end users. Other features are delivered Disabled meaning you have to take action to make available. Features delivered Disabled can be activated for end users by stepping through the following instructions using the following privileges:
- Review Applications Offering (ASM_REVIEW_APPLICATIONS_OFFERINGS_PRIV)
- Configure Oracle Fusion Applications Offering (ASM_CONFIGURE_OFFERING_PRIV)
Here’s how you opt in to new features:
- Click Navigator > My Enterprise > New Features.
- On the Features Overview page, select your offering to review new features specific to it. Or, you can leave the default selection All Enabled Offerings to review new features for all offerings.
- On the New Features tab, review the new features and check the opt-in status of the feature in the Enabled column. If a feature has already been enabled, you will see a check mark. Otherwise, you will see an icon to enable the feature.
- Click the icon in the Enabled column and complete the steps to enable the feature.
For more information and detailed instructions on opting in to new features for your offering, see Offering Configuration.
OPT IN EXPIRATION
Occasionally, features delivered Disabled via Opt In may be enabled automatically in a future update. This is known as an Opt In Expiration. If your cloud service has any Opt In Expirations you will see a related tab in this document. Click on that tab to see when the feature was originally delivered Disabled, and when the Opt In will expire, potentially automatically enabling the feature. You can also click here to see features with Opt In Expirations across all Oracle Cloud Applications.
Column Definitions:
Report = New or modified, Oracle-delivered, ready to run reports.
UI or Process-Based: Small Scale = These UI or process-based features are typically comprised of minor field, validation, or program changes. Therefore, the potential impact to users is minimal.
UI or Process-Based: Larger Scale* = These UI or process-based features have more complex designs. Therefore, the potential impact to users is higher.
Features Delivered Disabled = Action is needed BEFORE these features can be used by END USERS. These features are delivered disabled and you choose if and when to enable them. For example, a) new or expanded BI subject areas need to first be incorporated into reports, b) Integration is required to utilize new web services, or c) features must be assigned to user roles before they can be accessed.
| Ready for Use by End Users Reports plus Small Scale UI or Process-Based new features will have minimal user impact after an update. Therefore, customer acceptance testing should focus on the Larger Scale UI or Process-Based* new features. |
Customer Must Take Action before Use by End Users Not disruptive as action is required to make these features ready to use. As you selectively choose to leverage, you set your test and roll out timing. |
|||||
|---|---|---|---|---|---|---|
| Feature |
Report |
UI or |
UI or |
|
||
Define a Primary Contact as a Recipient for Notifications to Employees |
||||||
Integrate with Microsoft Exchange Server to Capture Inbound Emails for Service |
||||||
Updated Editor for Authoring SmartText and Composing Service Request Message |
||||||
Redwood Help Desk is a completely redesigned user experience where internal employees can get answers to any type of question and support agents can manage internal requests using a modern, conversational user interface. You can use the Help Desk capability to support a variety of internal needs, such as sales support or maintenance requests.
Designed with the new Redwood Design System and Visual Builder Studio, every element in the design has been reimagined with simpler, modern design elements to make it easier than ever to support your employees. The prebuilt My Help page provides a self-service experience for employees to search knowledge, view their existing help desk requests, or create new requests.
Use automated assignment and routing to send requests to the right support team. Once assigned, help desk agents can manage their requests through a request list page that includes adaptive search, milestones, action plans, knowledge search, messaging channels, and collaboration across the enterprise.
The Redwood Help Desk enhances many existing features and introduces brand new capabilities including:
- Adaptive search provides an easy to use search to find the right records, including saved searches.
- More easily manage help desk requests with an easier to read layout of customer and internal conversations.
- The Assistant allows agents to quickly access actions without the need to navigate buttons and menus.
- The Pending Items and Recommendation region helps users access recommended knowledge and follow prescribed best practice steps in an action plan.
- Quickly access knowledge management with the option to leverage separate browser tabs to research multiple articles at once.
- Reduce clicks and overall effort with productivity boosters such as drag and drop of attachments, solo actions, next record navigation, and fewer pages.
- Collaborate with the new Conversation framework to instantly communicate with other members of your organization.
Define a Primary Contact as a Recipient for Notifications to Employees
In the case of an HR Help Desk request or an internal service request, the primary point of contact on a service request is an employee. This feature lets users define the primary point of contact as a recipient of a notification (defined using Notification Preferences Manager) when a change has been made to the associated help desk request.
As an employee, after I've submitted a request for assistance, I'll receive notifications about important updates on my issue.
Steps to Enable
You don't need to do anything to enable this feature.
Tips And Considerations
When defining notifications through Notification Preferences Manager, the ability to define the primary contact as the recipient for a notification is only available when you select the object of HR Help Desk Request or Internal Service Request. Notifications of this type don't support the ability to enable users to "follow" a service request.
Role And Privileges
In order to define a primary point of contact as a recipient for a notification, you must have the correct privileges to access the Notification Preferences Manager under the Tools menu.
Integrate with Microsoft Exchange Server to Capture Inbound Emails for Service
Application administrators can now configure the Service Inbound Email setup to directly fetch emails from your Microsoft Exchange instance, rather than needing to forward messages to Oracle's cloud email address.
Microsoft 365, coupled with Microsoft Exchange, is a popular email solution used by Oracle Fusion Service customers. By directly integrating with Microsoft Outlook, customers get the following benefits:
- Avoid the overhead of setting redirect rules to forward emails to Oracle and configure the Service application to read emails from the Exchange account directly.
- Service request messages can process attachments on inbound emails that are larger than 15 MB.
Steps to Enable
There are multiple steps required to enable this feature. As an application administrator, there are setup steps that are required in both Fusion Service and Microsoft Azure Active Directory. It is strongly recommended that you reference the Service Center Implementation documentation for details.
In summary, the following setup steps are required:
- Go into Microsoft Azure Active Directory > App Registration page and click on the "+New Registration" button at the top.
- Register Fusion Service as an application. On completion of this step, you will be provided with an Application (Client) ID and Client Secret. Save this information.
- Set this profile option to Y to enable the Outlook integration: ORA_SVC_ENABLE_INBOUND_EMAIL_EXTERNAL_APPS_CONFIGURATION.
- Once the profile option is enabled, you can enter the configuration information in the FSM Manage Email Configuration, Registration, and Validation page section, "Configure external applications".
- In Configure external applications section, enter the configuration information, including the Outlook email address, Microsoft Client ID and Client Secret.
Role And Privileges
In order to set up and configure this feature, you need Administration privileges for both Microsoft Azure Active Directory and Fusion Service.
Updated Editor for Authoring SmartText and Composing Service Request Message
The application uses an updated version of the rich text editor when you are authoring a SmartText or composing a Service Request message. This new editor provides some new toolbar options.
Here are some of the updated toolbar options:
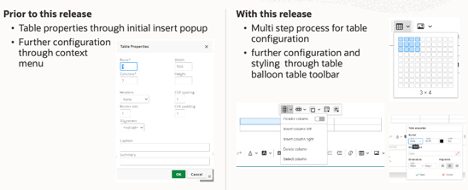
1. A table can be easily inserted and configured using the balloon table toolbar. After inserting the specified size of the table with the Table toolbar button further configuration can be done using the Table balloon toolbar:
- Column related actions (insert, delete, define as header column)
- Row related actions (insert, delete, define as header row)
- Merge Cells (merge and split)
- Table Properties (dimensions, border style and color, background color, alignment)
- Cell Properties (dimensions, border style and color, background color, alignment)
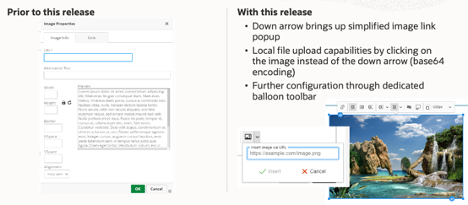
2. An image can be inserted easily by using the arrow down of the image button. You can also drag and drop a local file or upload it using the image button. After inserting an image further configuration can be done using the Image balloon toolbar:
- Link
- Alignment
- Wrap and break text
- Alternative text
- Caption
- Sizing
3. Links
- There is automatic linking of URLs that are typed or pasted into the editor. The default target for these links is to open it in a new browser tab.
- There are multiple ways to enter a link
-
Method 1: Use the Link toolbar button to enter the URL and the display text will be the same as the URL
-
Position cursor at position 2 of the link text
-
Remove the first character
-
Type the new display text
-
Remove the remainder or the old display text
-
-
Method 2:
-
Type the display text
-
Select the un-linked display text
-
Use the link toolbar button to set the URL
-
-
Method 3:
-
Select the display text without any leading or trailing spaces
-
Type the new display text
-
-
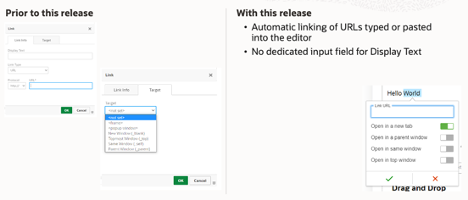
Users may find it easier to perform certain formatting such as inserting tables, images and links.
Steps to Enable
You don't need to do anything to enable this feature.
Tips And Considerations
These are a list of Known Issues or Limitations with the new editor version when composing Service Request text:
| # | Known Issue or Limitation | Workaround |
|---|---|---|
| 1 | Problem Description and Solution Description fields in Service Request display only the character count. They do not display the paragraph and word counts. |
There is no available workaround. The counter on the right bottom of the editor no longer shows the paragraph and word counts but only a character count. |
| 2 | The resize handle in the right bottom corner of the Problem Description and Solution Description fields in Service Request is no longer available. |
There is a known limitation with the editor where the re-sizing of a field isn't possible. |
| 3 | The error message is displayed differently in the Service Request Problem Description and Solution Description fields when the character count exceeds the limit. Unlike the previous release, a toast message is not shown in the text area while typing. In this release, the error is shown when the user tries to save the message. | There is no available workaround. |
| 4 | When the user is inserting a SmartText by typing some characters, the list of SmartTexts that is returned shows all SmartTexts whose name includes those characters sorted in alphabetical order. This differs from the previous release which displayed SmartTexts that started with the typed characters at the top of the suggestion list. | There is no available workaround . The list of SmartText displayed is ordered by SmartText name and is case sensitive which means that SmartText with capital letters will be displayed first. |
| 5 | The Enter key adds a break at the end the line of text, creating a visual space between the two lines. This differs from the previous release which did not add line spacing. |
Press the Shift+Enter combination to end a line of text without creating a new block of text. |
| 6 | When doing a 'Cut and Paste' operation from Excel into the SR message, the cells will be center aligned in the row of text, the cells will have a visible border, and other source formatting will be removed. | As a workaround, your user can use the toolbar to update the table properties such that the cell is left aligned and the cell has no borders. |
| 7 | In SR messages, the smart text list display is limited to a maximum of 10 records at a time. |
This is a known limitation. The workaround is to restrict the SmartText list further by typing more of the SmartText name until the desired match is visible. |
Role And Privileges
Customer Service Representative