- Revision History
- Overview
- Feature Summary
- Help Desk
-
- Visual Builder
- Help Desk Request Management
-
- Configure Primary Contact and Assignee Behavior for an Efficient Agent Experience
- View the Audit Log for a Help Desk Request
- Create and Manage Tasks and Appointments for Help Desk Requests
- Use Help Desk to Answer Questions regarding Expense Reports
- Manage Work Requests with Internal Help Desk
- Use Scripts to Help Migrate from Classic HR Help Desk to Help Desk in the Redwood Experience
- Update Work Request Status At Work Order Completion
- Require Agents To Provide User Entered Values When Inserting SmartText
-
- Case Management
- Help Desk Analytics
- Help Desk Self-Service
Update 23B
Revision History
This document will continue to evolve as existing sections change and new information is added. All updates appear in the following table:
| Date | Module | Feature | Notes |
|---|---|---|---|
| 29 MAR 2024 | Help Desk Request Management |
View the Audit Log for a Help Desk Request | Updated document. Revised feature information. |
| 29 MAR 2024 | Help Desk Request Management |
Use Help Desk to Answer Questions regarding Expense Reports | Updated document. Revised feature information. |
| 29 MAR 2024 | Case Management |
Collaborate on Help Desk Requests and Cases through the use of Relationships | Updated document. Revised feature information. |
| 04 MAY 2023 | Help Desk Request Management |
Manage Work Requests with Internal Help Desk | Updated document. Delivered new feature in update 23B. |
| 04 MAY 2023 |
Help Desk Request Management |
Require Agents To Provide User Entered Values When Inserting SmartText | Updated document. Delivered new feature in update 23B. |
| 04 MAY 2023 |
Help Desk Request Management |
Update Work Request Status At Work Order Completion | Updated document. Delivered new feature in update 23B. |
| 04 MAY 2023 |
Help Desk Request Management |
Use Scripts to Help Migrate from Classic HR Help Desk to Help Desk in the Redwood Experience | Updated document. Delivered new feature in update 23B. |
| 04 MAY 2023 |
Help Desk Request Management |
Updated document. Delivered new feature in update 23B. |
|
| 03 MAR 2023 | Created initial document. |
Overview
This guide summarizes all features that have been delivered for this Release including new features available as a part of our continuous feature delivery process.
 HAVE AN IDEA?
We’re here and we’re listening. If you have a suggestion on how to make our cloud services even better then go ahead and tell us. There are several ways to submit your ideas, for example, through the Ideas Lab on Oracle Customer Connect. Wherever you see this icon after the feature name it means we delivered one of your ideas.
GIVE US FEEDBACK
We welcome your comments and suggestions to improve the content. Please send us your feedback at oracle_fusion_applications_help_ww_grp@oracle.com.
DISCLAIMER
The information contained in this document may include statements about Oracle’s product development plans. Many factors can materially affect Oracle’s product development plans and the nature and timing of future product releases. Accordingly, this Information is provided to you solely for information only, is not a commitment to deliver any material, code, or functionality, and should not be relied upon in making purchasing decisions. The development, release, and timing of any features or functionality described remains at the sole discretion of Oracle.
This information may not be incorporated into any contractual agreement with Oracle or its subsidiaries or affiliates. Oracle specifically disclaims any liability with respect to this information. Refer to the Legal Notices and Terms of Use for further information.
Feature Summary
Column Definitions:
Report = New or modified, Oracle-delivered, ready to run reports.
UI or Process-Based: Small Scale = These UI or process-based features are typically comprised of minor field, validation, or program changes. Therefore, the potential impact to users is minimal.
UI or Process-Based: Larger Scale* = These UI or process-based features have more complex designs. Therefore, the potential impact to users is higher.
Features Delivered Disabled = Action is needed BEFORE these features can be used by END USERS. These features are delivered disabled and you choose if and when to enable them. For example, a) new or expanded BI subject areas need to first be incorporated into reports, b) Integration is required to utilize new web services, or c) features must be assigned to user roles before they can be accessed.
| Ready for Use by End Users Reports plus Small Scale UI or Process-Based new features will have minimal user impact after an update. Therefore, customer acceptance testing should focus on the Larger Scale UI or Process-Based* new features. |
Customer Must Take Action before Use by End Users Not disruptive as action is required to make these features ready to use. As you selectively choose to leverage, you set your test and roll out timing. |
|||||
|---|---|---|---|---|---|---|
| Feature |
Report |
UI or |
UI or |
|
||
Help Desk in the Redwood User Experience is Generally Available |
||||||
Configure Primary Contact and Assignee Behavior for an Efficient Agent Experience |
||||||
Create and Manage Tasks and Appointments for Help Desk Requests |
||||||
Use Scripts to Help Migrate from Classic HR Help Desk to Help Desk in the Redwood Experience |
||||||
Require Agents To Provide User Entered Values When Inserting SmartText |
||||||
Collaborate on Help Desk Requests and Cases through the use of Relationships |
||||||
Gain Insights into Service Activity on Installed Base Assets |
||||||
Help Desk
Visual Builder
Help Desk in the Redwood User Experience is Generally Available
The Help Desk in the Redwood user experience is now available to service the needs of your employees and no longer requires a promotion code to access its features. Developed using Visual Builder Studio and the Redwood Design System, the new interface offers improved usability and richer extensibility. Employees in need of assistance can visit the new My Help UI to search knowledge, raise help desk requests and review the status of a request. The new help desk agent experience introduces new capabilities to better enable your business workflows and team collaboration such as case management, recommended action plan actions and internal conversations. Help Desk in the Redwood UI is backed by the new help desk foundation consisting of an enhanced data model, APIs, and setup experience for easier administration and extensibility. Finally, the new foundation enables any department to offer a help desk experience including Human Resources, Maintenance requests or any other requests.
Anyone who is licensed to use Help Desk can now get started without having to request a promotional code.
Steps to Enable
Use the Opt In UI to enable this feature. For instructions, refer to the Optional Uptake of New Features section of this document.
Offering: Help Desk
Your administrator will need to enable the Help Desk offering in Setup & Maintenance and opt-in to various features to enable the new Redwood User Experience for end users.
Tips And Considerations
As of 23B, you no longer have to use a promotion code. If you have already entered the promotion code previously, your Help Desk will continue to function and no further steps must be done.
Key Resources
- See the "Implementing Help Desk" guide on https://docs.oracle.com for instructions.
Help Desk Request Management
Configure Primary Contact and Assignee Behavior for an Efficient Agent Experience
Administrators can now change the default functionality for the Create Help Desk Request form. The default value for the primary contact can now be set to empty so that the agent must choose the contact. The assignee can also to be defaulted to the logged in help desk agent.
This flexible approach reduces errors and saves time by allowing the contact and assignee to be automatically assigned based on the business needs. Extending the agent's create help desk request page to allow the assignee to be the agent creating the request assures that the agent taking a call, for instance, is the one who is responsible for handling the request and removes the need for initial queue assignment. Setting the primary contact to be empty prevents having the agent accidentally left assigned as the primary contact.
Steps to Enable
Changing the default values for PrimaryContact or AssignTo is done in Visual Builder for the Agent Create Page.
To set the PrimaryContact to be empty by default, set defaultPPOC to false.
To set the AssignTo to be the logged in user by default, set defaultAssignTo to true.
Detailed instructions are:
- Navigate to agent -> service-request-create flow.
- Click on the Event Listeners tab.
- Click on + event listener.
- Under Lifecycle event, select vbEnter and click Next.
- Expand the Flow Action Chains section.
- Enter "changeDefaultVal" (or some other name for your action chain) and click Finish.
- Navigate to that action chain by clicking on Go to Action Chain.
- Drag and drop Assign Variables into the Action Chain.
- Click Assign.
- Use the X to clear the search bar.
- Under Target -> Flow on the right-hand side, click on defaultAssignTo.
- In the bottom panel, type 'true' and click Save.
- Now click on defaultPPOC under Target -> Flow.
- In the bottom panel, type 'false' and click Save.
- Click the Play icon on the top-right toolbar to preview the changes.
- Click on Create Request.
- The modified agent create help desk request screen should show the Primary Point of Contact as being empty and the Assigned To field should be set to the logged in user ID.
Deploy the changes to allow agents to use the new functionality.
Tips And Considerations
Defaulting the assignee to the agent can save time for the agents, as they no longer have to select themselves if business practices assume that the agent taking the request via phone is naturally assigned to the requests they open.
Also, it is helpful to have the primary contact set to null so that the agent doesn't accidentally forget to set the contact to someone other than themselves.
Key Resources
- For more information about extending the Help Desk UI, refer to the Help Desk Implementation Guide's section on Using Visual Builder Studio for Help Desk.
Access Requirements
Only an administrator with access to Visual Builder can make these changes.
View the Audit Log for a Help Desk Request
Help Desk Agents are now able to view the Audit Log of changes to a Help Desk Request.
Viewing the Audit Log saves time by allowing agents to view who has been working on the request previously and understand when updates were made to the record. Having an audit log also may reduce incorrect routing since patterns of reassignment can become more easily visible.
Steps to Enable
The administrator can change what is being audited and will need to include any items that you may want to show in the Audit log.
To do this, the administrator should perform the following steps:
- Go to Setup and Maintenance.
- On the right-hand side, click on the Tasks document bar to expand the options and click the Search link.
- Enter 'Manage Audit%' and click the Search icon.
- Click Manage Audit Policies.
- On the Oracle Fusion Applications line, change the Audit Level to 'Auditing' if this is not already selected, and then click the Configure Business Object Attrib button.
- Select Service from the Product Drop-down.
- Check the items that you want to Audit.
- Click Save.
- On the left-hand side, under Objects, use the Action Drop-down to select Synchronize.
- Click Save and Close.
Tips And Considerations
To view the audit history, type “Show Audit History” in the action bar at the top of the page while viewing a help desk request.
By default, only certain fields of the Help Desk Request objects are audited. If you want more fields to be audited, you must add them through Setup and Maintenance.
Key Resources
For more information on configuring Help Desk, view the Implementing Help Desk Guide.
A video on this feature is found at Configure Audit History - WN 23B - Oracle Video Hub.
Access Requirements
The 'View Audit History' privilege has been added to the standard agent roles. (FND_VIEW_AUDIT_HISTORY_PRIV)
If you have created custom agent roles, you will need to add this privilege.
Create and Manage Tasks and Appointments for Help Desk Requests
Help Desk Agents can now create and manage task and appointment activities for both HR Help Desk and Internal Help Desk Requests.
This allows agents to assign tasks and appointments individually and view the progress of related activities.
Steps to Enable
You don't need to do anything to enable this feature.
Tips And Considerations
Not only can an agent type "Create Task" or "Create Appointment" to add one of these activities to your Help Desk Request, but you can also do this automatically by configuring an Action Plan if there is a particular set of activities that need to be done for a particular scenario.
Key Resources
Refer to the Implementing Help Desk documentation for more information.
A demo of this feature can be found at Oracle Video Hub - Help Desk.
Access Requirements
The privileges:
- Create Activity
- Delete Activity
- Update Activity
- View Activity
are granted to all help desk agent roles by default. If you have created custom roles, you will need to add these privileges to your roles.
Use Help Desk to Answer Questions regarding Expense Reports
Enable users of expense reports in Oracle Financials to raise help desk requests. Your administrator can enable an action within expense report pages that allows the employee to submit a new request that captures contextual information and associates the expense report to the help desk request record. When agents review these requests, the layout of the help desk request UI can display the associated expense report and allow the agent to easily drill in for more information. Optionally, your administrator can activate seeded help desk metadata specific to expense reports to simplify setup. A similar flow initiating from other pages in Oracle Financials can be enabled through configuration.
The Help Desk request provides a link back to the expense report to allow an agent to easily access and review the expense report for which the employee has a question.
Steps to Enable
In order to set up the categories and integration to the Expense Reports, you will need to:
- Complete the Data Setup - Run a scheduled job to add the required categories and other data required.
- If desired, customize the agent and employee pages to hide the 'Add Asset' smart action in the Agent Flow for when the category is set to an ERP-related category such as 'Expense Report.'
- Embed a new Context Sensitive URL in the ERP expense page (e.g., "Get Help") to allow the employee to be directed to the create help desk request page.
Data Setup
Data Setup is done by executing the Scheduled Process job with the name 'Help Desk Expense Configuration Setup'. This job needs to be executed only one time to create the following data:
- Categories - Expenses, Expense Item, Approvals, Cash Advances, Authorizations, Trips (only Expenses and Expense Items have links)
- Queues - expense_report, expense_critical, expense_trips, cash_advance, approvals, authorization
- Category mappings
To execute the Scheduled Process, login as Administrator, and do the following:
- Select Tools from top left menu options.
- Click on the Scheduled Processes link.
- Click on the button Schedule New Process.
- Open the drop-down and click the Search... link at the bottom of the options list.
- Enter the Name Help Desk Expenses Configuration Setup and click Search.
- Highlight the desired job and click OK.
- Click OK again with the name now populated.
- Click Submit to run the Setup job.
To view the categories that have been properly mapped for Expense Report and Expense Item, an administrator can go directly to the page /fscmUI/redwood/helpdesk/admin in your environment.
(Optional) Hide the 'Add Asset' Smart Action
For Expense Report inquiries, you should not need the Add Asset Smart Action. You will want to remove this, so it does not show on the screen when an Expenses category is chosen.
Embed a Context Sensitive URL in the Expenses Page
- Create a Sandbox or enter into an existing Sandbox.
- Navigate to the expense report page which will have the link added.
- Select Page Composer from the Sandbox top menu.
- Under the Structure Tab, select the panel where the context sensitive URL will be added.
- Under Components, click Add for a Hyperlink.
- Navigate to Add Content on the page composer.
- Select Edit on the new hyperlink that was just added.
- The Destination will be as defined below, assuming that you are using the categoryCode that is provided by the Setup job.
- For Expense Report: /redwood/helpdesk/create-isr?categoryCode=EXPENSE_REPORT&refObjId=#{bindings.ExpenseId.inputValue}&refObjPuid=#{bindings.ExpenseId.inputValue}&hdFlow=ERP
- For Expense Item: /redwood/helpdesk/create-isr?categoryCode=EXPENSE_ITEM&refObjId=#{bindings.ExpenseId.inputValue}&refObjPuid=#{bindings.ExpenseId.inputValue}&hdFlow=ERP
- Enter the Text to be used for the hyperlink (for instance, "Help me" or "Need Help?").
- Click Apply.
Tips And Considerations
This feature is only related to Internal Service Requests. It is not applicable to the Human Resources Help Desk Requests.
Only categories that have the code 'ERP' will show a Reference link to the Expense report rather than Asset link. So, if you create a custom category, you will need to associate the category to the 'ERP' root category code.
The Setup job is only meant to be run once; however, it doesn't hurt anything if it is run more than once.
Key Resources
Refer to the Implementing Help Desk Guide for additional information.
A video demonstrating how to set up and use this feature is found on Oracle Video Hub.
Access Requirements
Administrators must have the privilege Delete Internal Service Request to execute the Scheduled Process job. This has been added to the Duty Role for Internal Service Request Administration by default. However, if you have configured custom roles, you may need to add this privilege.
Access to the Expense Reports themselves are controlled by the security policy for the user and/or agent.
Manage Work Requests with Internal Help Desk
Create and manage work requests to address facility-related and asset-related maintenance issues. Employees can report maintenance work requests using the Help Desk self-service experience,such as My Help or the Digital Assistant. The maintenance help desk team can then manage work requests using category-based queues, review and analyze the requests, and then associate a maintenance work order to the request to dispatch a technician.
Work requests can contain information about the nature of the maintenance issue, the affected asset (if known), and a description of the problem. Work requests are triaged and then assigned for resolution using maintenance work orders. When resolved, the original requestor is updated on the outcome of the work request, providing a feedback loop. The Work requests for an installed base asset are supported by the Help Desk offering, while the related maintenance work orders are managed in Oracle Maintenance. Note that the help desk supports work requests by using the Internal Service Request object and only supports internally owned assets.
HELP DESK USERS
The help desk functionality includes support for several user roles:
- Employee - an internal user requesting support to resolve their questions and issues about a maintenance issue. This could be a maintenance or non-maintenance related user.
- Help Desk Agent - creates help desk requests on behalf of employees and manages internal help desk requests. These typically are maintenance users.
- Help Desk Manager - manages a group of internal help desk agents. They also review and analyze internal help desk metrics.
- Help Desk Administrator - manages setup and configuration for internal help desks.
CREATE A NEW REQUEST
Employees can create a new request using the My Help page. Alternately the help desk agents can create a request on behalf of an employee using the Help Desk Requests work area. IN My Help, click the Create Request button to go to the New Help Desk Request page.
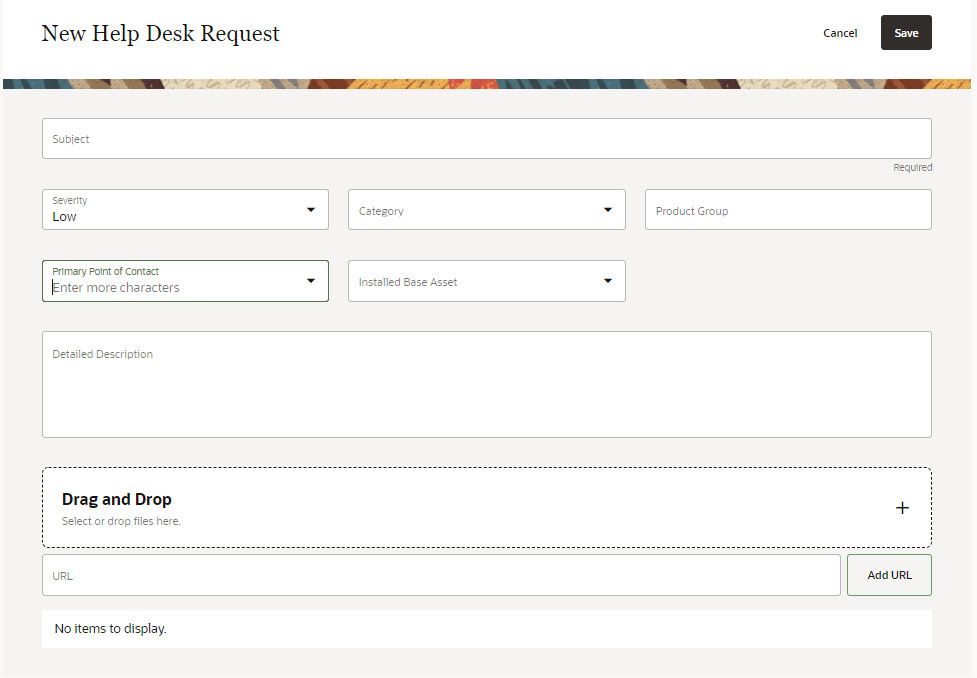
On this page, you can:
- Define the subject of the request (required)
- Set a severity
- Select a category (optional - used for routing to queues for triage)
- Select an installed base asset (optional)
- Enter a detailed description
- Add an attachment or URL
- Submit the request for review
After submitting your request, you can check your open requests for feedback from the help desk agent using My Help. The status of the request tells you if the request is triaged and assigned for resolution. Additionally, a request can be rejected if it's not determined as an issue that requires resolution.
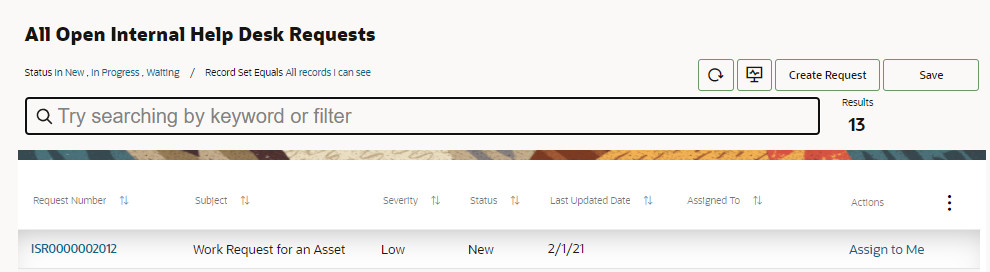
MANAGE A NEW REQUEST
After a new request is submitted, the help desk agent can manage the requests using the Help Desk Requests work area. If you’re a help desk agent, use the All Open Internal Help Desk Requests list to view newly created requests. New requests are routed into queues by the category selected on the request. As an agent, you can then choose to assign the request to yourself for triage and resolution using the Assign to Me button. The request is then managed in your work request queue.
As an agent, you review the issue details and choose to send messages to the employee who submitted the request for additional details.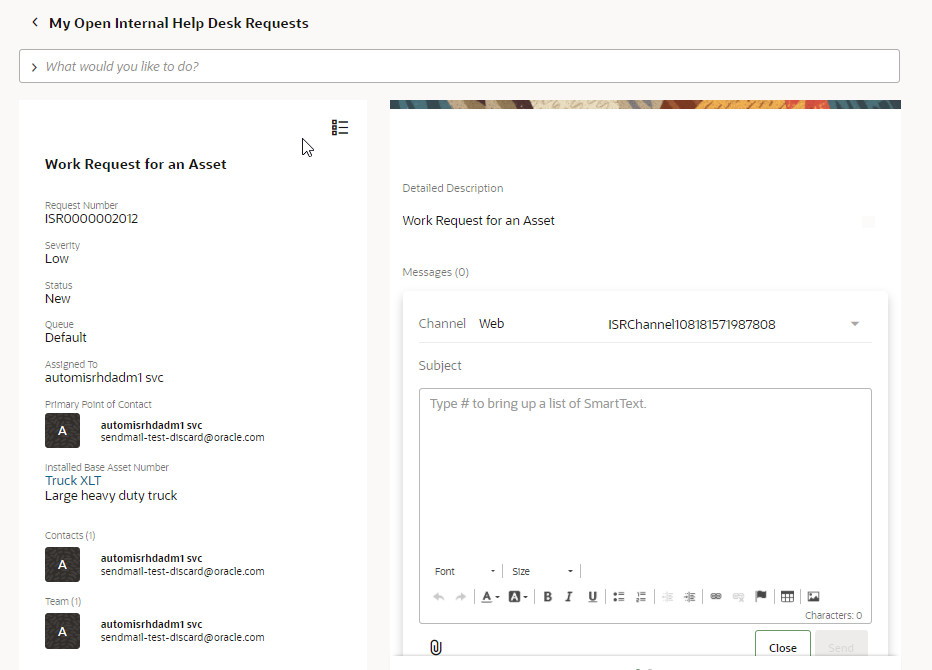
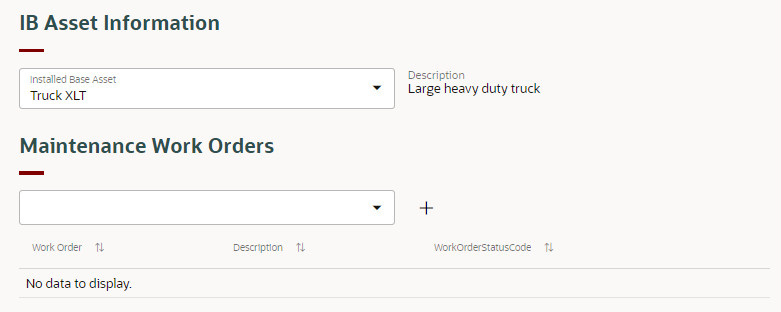
You may also need to select or update the asset identified on the request. If you decide that a maintenance work order is required to resolve the request, you can create a new work order for the asset directly on the Edit Request page. Or, you can assign the request to an existing work order that is open for the asset.
There may be additional requests from other employees for the same asset discrepancy. The agent can assign each request to the same work order for resolution. When assigned, the agent updates the request status from New to In Progress or similar. The status update provides beneficial feedback to the employee who created the request that it is progressing towards resolution.
The work order is then be managed by the maintenance manager. They review, update, and then release the work order for execution by a technician. The work order contains key details about the request on the References tab on the Edit Work Order page. This tab lists the internal service request number and provide a snapshot of key details about the request. Upon completion of a work order, the request is assumed to have been resolved. The agent can update the request status from In-Progress to Resolved or similar. They can also send a message to the requestor to confirm the issue has been resolved.
When resolved, a request is set to a status of Closed by a scheduled process.
EXTENSIBILITY AND EXTERNAL INTEGRATION
The help desk pages can be extended using Application Composer and Visual Builder. For more details, refer to the Help Desk Implementation guide.
The help desk internal service request is also enabled for REST API. Use the REST service to create, edit and resolve requests. For more details, refer to the B2B Service REST API guide.
Create, track, manage and resolve work requests for asset discrepancies. The intuitive layout, workflow, and integration with Oracle Maintenance makes it easy for you to report and resolve asset issues.
Steps to Enable
Use the Opt In UI to enable this feature. For instructions, refer to the Optional Uptake of New Features section of this document.
Offering: Service
During the opt-In of the help desk offering, you must select the usage option for internal service requests to enable work requests for assets.
You must also select the profile option (SVC_NG_ENABLE_MAINTENANCE_HELPDESK) to create work orders for an asset within the help desk request pages.
Tips And Considerations
- The help desk implementation and user guides walks you through the the process to enable and set up the internal service requests. During this process, you can set up categories and queues to manage the requests. You can also choose to define custom help desk request status values.
- Additional details about the setup and use of the help desk can be found in the implementation and user guides for Oracle Fusion Service.
Access Requirements
- Predefined job role name and code:
- Employee (ORA_PER_EMPLOYEE_ABSTRACT)
- Maintenance Manager (ORA_MNT_MAINTENANCE_MANAGER_JOB)
- Maintenance Technician (ORA_MNT_MAINTENANCE_TECHNICIAN_JOB)
- Implementation Consultant (ORA_ASM_APPLICATION_IMPLEMENTATION_CONSULTANT_JOB)
- Privileges: Need to be added to the relevant predefined job roles or custom job roles as required.
- Internal Help Desk User (ORA_SVC_INTERNAL_HELP_DESK_USER_JOB)
- Internal Help Desk Agent (ORA_SVC_INTERNAL_HELP_DESK_AGENT_JOB)
- Internal Help Desk Manager (ORA_SVC_INTERNAL_HELP_DESK_MANAGER_JOB)
- Internal Help Desk Administrator (ORA_SVC_INTERNAL_HELP_DESK_ADMINISTRATOR_JOB)
Use Scripts to Help Migrate from Classic HR Help Desk to Help Desk in the Redwood Experience
Migration scripts are now available to help move from Classic HR Help Desk to the Next Gen Help Desk in the Redwood Experience. These scripts migrate your current HCM Service Requests to be HR Help Desk requests, so that all HR Help Desk requests are accessible in the Redwood Experience once the migration is complete. The scripts also help in the migration of custom lists of values, profile options, action plans, milestones, smart text, queues, and other critical data to assist with a smooth transition.
These scripts allow you to move your HCM Service Requests to be HRHD Help Desk Requests, so that agents do not need to refer to two different systems during the transition. Also, any custom fields, custom objects, or customized lists of values are recreated in Help Desk, to give you a jumpstart on the migration.
Steps to Enable
Migration tools are currently under controlled availability. If you are interested in starting the migration process, open a Service Request with Technical Support.
Tips And Considerations
The first recommended step before migrating is to enable Help Desk in the Redwood Experience on one of your TEST (or Development) environments and become familiar with Visual Builder Studio.
Key Resources
Please refer to the following documentation to get started:
Administering Visual Builder Studio
Access Requirements
To run the migration scripts, you should have the duty roles of HR Service Request Administration and HR Help Desk Administration.
Update Work Request Status At Work Order Completion
Oracle Maintenance uses the Oracle Internal Help Desk functionality to create and manage internal service requests for assets. These help desk requests, commonly referred to as work requests, help report and track of asset related maintenance discrepancies until the requests are resolved. When a request is created and submitted, they’re triaged and designated for resolution using maintenance work orders.
By default, a help desk agent needs to manually progress the status of the request over its lifecycle from New > In-Progress > Resolved > Closed. With this feature, you can configure the help desk request status to be automatically progressed based on the associated work order status changes.
Here are the coordinated work order and help desk status update steps:
| Work Order Status | Request Status | Description |
|---|---|---|
| Not applicable | New | Newly created requests begin at a status of New. At this point in the process, there's no maintenance work order associated. |
| Unreleased | New > On-Progress | Requests status changes from New to In-Progress when a new maintenance work order is created and associated to the request. The same status update happens if it's assigned to an existing maintenance work order. |
| On-Hold | In-Progress | If the work order is changed to an On-Hold status, then there’s no status update in the request. Also, when the status changed back to Unreleased or set to Released, there’s no status update needed as the status of In-Progress is correctly reflecting the request is associated to a work order for resolution. |
| Released | In-Progress | When the work order is changed to a Released status, then there’s no status update in the request. |
| Completed | In-Progress > Resolved | Requests status changes from In-Progress to Resolved when the last operation of a maintenance work order is completed. |
| Closed | Resolved or Closed | You can close a work order to prevent any further transactions. You can use the Close action from the Mass Actions menu in Maintenance Work Orders page or run the Mass Close Maintenance Work Orders scheduled process. Regardless of method, there’s no change in the request status as the status is already Resolved or Closed. |
| Completed or Closed | Resolved > Closed | Requests status changes from Resolved to Closed when the request closing scheduled process is run. The work order status isn’t validated but should be in either completed or closed status. |
There could be scenarios where multiple actions are taken that don’t result in status update in a help desk request. The help desk agent must monitor the requests in their queue and update their status as needed. The Help Desk also supports the creation and use of configured help desk request status values. If defined, you can optionally reference these custom values by setting several profile values that are used during certain work order transactions.
The help desk request status updates are processed synchronously or asynchronously, depending on the method of work order update. For asynchronous transactions, the status updates are performed by submitting the Progress Asset Transactions to Downstream Systems scheduled process on a desired frequency. Additionally, for synchronous transactions, if status updates aren’t required in real-time, then you can set a profile option to defer the update till the Progress Asset Transactions to Downstream Systems scheduled process is submitted.
During the creation, cancel, completion, and closure of a work order, new transaction history records are captured for each asset in the CSE_TRANSACTIONS and CSE_TRANSACTED_ASSETS tables.
The asset transaction history includes four new transaction codes:
- ORA_CSE_MNT_WO_CREATE (Maintenance Work Order Created)
- ORA_CSE_MNT_WO_CANCEL (Maintenance Work Order Cancelled)
- ORA_CSE_MNT_WO_COMPLETE (Maintenance Work Order Completed)
- ORA_CSE_MNT_WO_CLOSE (Maintenance Work Order Closed)
Additionally, during work order creation, a new transaction is logged in the History tab for the asset. On the History tab, you can view the high-level details of the transaction. You can then drill into the transaction to view more history details. There’s no transaction history for the help desk request, only the associated work orders.
Be default, the help desk agent controls the status update of each request. This can be quite difficult to manage on a large scale basis. By configuring this feature, the updates will occur systematically, providing real-time progression of the help desk request. This provides better feedback to the requestor and free up the help desk agent to triage and manage the requests that need attention.
Steps to Enable
The help desk offering for internal service requests must be enabled in order to utilize this new feature.
You must also set the Progress Asset Transactions to Downstream Systems schedule process on a desired frequency.
Additionally, there are several profile values that can be optionally set. They are accessed in the Functional Setup Manager > Manage Administrator Profile Values:
| Profile Option | Description |
|---|---|
| ORA_MNT_ISR_INPROGRESS_STATUS |
Used to progress the internal service request from a status of New to In-Progress during maintenance work order creation or association. The default status uses the predefined status of In-Progress. Optionally, it can be changed to a user-defined status value. |
| ORA_MNT_ISR_COMPLETE_STATUS |
Used to progress the internal service request from a status of In-Progress to Resolved during maintenance work order completion. The default status uses the predefined status of Resolved. Optionally, it can be changed to a user-defined status value. |
| ORA_MNT_ISR_CANCEL_STATUS |
Used to progress the internal service request from a status of In-Progress to New during maintenance work order cancellation or direct closure without work order completion. The default status uses the predefined status of New. Optionally, it can be changed to a user-defined status value. |
| ORA_MNT_ISR_DEFER_MODE |
Profile option that determines if internal service request status updates are process synchronously or asynchronously. If selected, then status updates only happen when the Progress Asset Transactions to Downstream Systems schedule process is run. |
Tips And Considerations
Oracle Help Desk functionality to create and manage Internal Service Requests for Assets must be enabled and setup in order to use this new functionality.
Access Requirements
- Predefined job role name and code:
- Employee (ORA_PER_EMPLOYEE_ABSTRACT)
- Maintenance Manager (ORA_MNT_MAINTENANCE_MANAGER_JOB)
- Maintenance Technician (ORA_MNT_MAINTENANCE_TECHNICIAN_JOB)
- Implementation Consultant (ORA_ASM_APPLICATION_IMPLEMENTATION_CONSULTANT_JOB)
- Privileges: Need to be added to the relevant predefined job roles or custom job roles as required.
- Internal Help Desk User (ORA_SVC_INTERNAL_HELP_DESK_USER_JOB)
- Internal Help Desk Agent (ORA_SVC_INTERNAL_HELP_DESK_AGENT_JOB)
- Internal Help Desk Manager (ORA_SVC_INTERNAL_HELP_DESK_MANAGER_JOB)
- Internal Help Desk Administrator (ORA_SVC_INTERNAL_HELP_DESK_ADMINISTRATOR_JOB)
Require Agents To Provide User Entered Values When Inserting SmartText
Your company can enable the application to require that agents enter values for user variable prompts when they select a SmartText from within the Redwood Experience. This will ensure that all requested data is captured.
Modify the message composing process to ensure required data is populated up front when agents select a SmartText so that the variables themselves are not included in the messages to the end user.
Steps to Enable
Configure the profile option “ORA_SVC_SMARTTEXT_MANDATORY_USER_VARIABLES”:
- In the Setup and Maintenance work area, go to the following:
- Offering: Service
- Functional Area: Productivity Tools
- Task: Manage Global Search Profile Options
- Search for the profile option code “ORA_SVC_SMARTTEXT_MANDATORY_USER_VARIABLES”
- Set the site level profile value to “Yes”.
- Click Save and Close.
Tips And Considerations
This feature is only available for the Redwood user experience. This feature is not available for the Classic HR Help Desk.
When the profile option value is set to "Yes" the user variable mandatory check validation occurs in all Redwood pages where SmartText is invoked (for example, Service Center, Next Gen Help Desk, or Internal Help Desk).
Access Requirements
Only those with permissions to modify profile options are allowed to configure this feature.
Case Management
Collaborate on Help Desk Requests and Cases through the use of Relationships
Help Desk Agents can now define and view relationships between Help Desk Requests or between Help Desk Requests and Cases.
This allows agents to reference a solution in a related help desk request or relate similar help desk requests to a single case within Case Management.
Steps to Enable
You don't need to do anything to enable this feature.
Tips And Considerations
From a help desk request, use the Action Bar to type in "Create Relationship" and then choose the type of relationship and the type of object to be related.
Key Resources
Refer to the Implementing Help Desk document for more information.
A video demonstrating this functionality is found here: Create Help Desk Relationships - WN 23B - Oracle Video Hub.
Access Requirements
By default, standard Administrator roles are given the ability to Set Up relationships through the privilege:
- Setup Object Links
In addition, all standard agent roles are given the following privileges by default:
- Create Object Link
- Delete Object Link
- View Object Link
Help Desk Analytics
Understand Resource Participation in Help Desk Requests
Help desk request resolutions often need a collaborative approach, calling for a multi-disciplinary team to be associated with the Service Request. Managers should understand the resource demands and profiles of SRs to be able to address business questions like, 'Do specific products/service categories demand a greater degree of collaboration than others?', 'Is there an over dependence on specialists for SR resolutions, indicating an agent training issue?', 'Are agents on my team participating in more than their fair share of SRs, affecting resolution times of their own SRs?'.
Two new subject areas are available to you to create analyses:
1. Help Desk - HR Service Request Resource Real Time
2. Help Desk - Internal Service Request Resource Real Time
With the insights gained, managers can make informed staffing decisions and achieve better agent load balancing.
Steps to Enable
Leverage new subject area(s) by adding to existing reports or using in new reports. For details about creating and editing reports, see the Creating and Administering Analytics and Reports book (available from the Oracle Help Center > your apps service area of interest > Books > Administration).
Tips And Considerations
None
Key Resources
Access Requirements
Next Gen HR Help Desk Administrator/Manager
Internal HR Help Desk Administrator/Manager
Action Plan Analytics for Help Desk
Action plans are a checklist, a series of events, or steps that have to be done before you can close a Help Desk Request. Action plan analytics help you monitor completions and ensure compliance against a predefined set of actions. Pre-defined metrics around open and closed action plans, delayed actions, and aging of action plans help managers gain insights into performance at an aggregate level to address areas of concern. Agents can gain visibility to their own action plan completions and delays.
Two new subject areas are being introduced to build your own analyses:
1. Help Desk - HR Service Request Action Plan Actions Real Time
2. Help Desk - Internal Service Request Action Plan Actions Real Time.
In addition, pre-built reports for the manager and agent personas, help gain insights from day one.
Provides help desk managers and help desk agents a complete picture of action plan enforcement of company procedures at the team and individual level respectively.
Steps to Enable
Leverage new subject area(s) by adding to existing reports or using in new reports. For details about creating and editing reports, see the Creating and Administering Analytics and Reports book (available from the Oracle Help Center > your apps service area of interest > Books > Administration).
No additional steps needed
Key Resources
Access Requirements
Next Gen HR Help Desk Administrator/Manager
Internal HR Help Desk Administrator/Manager
Gain Insights into Service Activity on Installed Base Assets
The following Internal Help Desk subject areas have an added 'Installed Base Asset' folder (dimension) to help you create custom reports:
- Help Desk - Internal Service Requests Real Time
- Help Desk - Internal Service Request Milestones Real Time
Gain insights into the nature and incidence of internal help desk request activity on your installed base assets to uncover product/service issues.
Steps to Enable
You don't need to do anything to enable this feature.
Key Resources
- See the Subject Areas for Transactional Business Intelligence in Fusion Sales and Fusion Service guide.
Access Requirements
Internal Help Desk Administrator/Manager
Run Select BI Scheduling Processes in Manual Mode
This applies only if you are an existing Fusion Service/Help Desk customer running any of the following scheduled processes (ESS jobs):
- Incrementally Loads SR Audit data for BI Reporting
- Aggregate Service Requests
- Incrementally Loads Cross-Channel Interaction Data for Reporting
- Execute Incremental Load of HCM Person Mapping Data for Reporting
All the above jobs are auto submitted by the system. Eventually (i.e. in the next couple of releases or so), they would be replaced with new manually submitted jobs. In preparation for this switch over, you need to now start running the four additional jobs (as applicable) mentioned in the table below.
| Auto-submitted Scheduled Processes/Jobs (Existing) | New additional Schedule Process/Job to be started |
|---|---|
| Incrementally Loads SR Audit data for BI Reporting |
Loads Service Request Life Cycle Data |
| Aggregate Service Requests |
Loads Service Request and Interaction Data |
| Incrementally Loads Cross-Channel Interaction Data for Reporting |
Loads Interaction Cross Channel Data |
| Execute Incremental Load of HCM Person Mapping Data for Reporting |
Loads HCM Person Mapping Data |
NOTE: The auto-submitted jobs will continue to run as before for now. The additional jobs run as 'blank' jobs and will not have any impact on your BI subject areas/reporting. Oracle will 'activate' these blank jobs at a future date to replace the auto-submitted jobs.
Manually scheduled jobs give you greater control. When they replace auto-submitted jobs (in a future release) you will be able to cancel jobs, change their schedule intervals, or restart them as needed, without needing to contact Oracle.
Steps to Enable
- Navigation --> Tools ---> Scheduled Processes
- Click on 'Submit New Process' button
- Search for the new scheduled process that you wish to run in the pop up window
- Hit the 'Submit' button on the 'Process Details' pop up.
NOTE:
-
You need to run the additional job, only if you are currently using the corresponding auto-submitted job (first column in the table)
-
At this time there is no need to set the specific schedule for the new scheduled processes since they run as 'blank', until they are activated by Oracle in a future date/release.
Tips And Considerations
If you are an impacted customer, this is an essential step to perform because the afore mentioned auto-submitted BI jobs in Fusion Service will be discontinued in a future release.
Key Resources
Access Requirements
- Sales/Service Administrator
- Human Resource Help Desk Administrator
- Next Gen Human Resource Help Desk Administrator
- Internal Help Desk Administrator
Help Desk Self-Service
Enable AI Suggestions for Categories
Help desk users in the Redwood user experience can now view suggestions for the most likely values they might select for the Category field in Help Desk. Enabling suggested input prediction services allows users to quickly select common categories without scrolling down the list, which is especially valuable for organizations that have an extensive list of categories from which to choose.
The suggested input prediction services learn from user profile data and the Category values that users have selected in the past to generate intelligent recommendations.
With intelligent recommendations, help desk users are more likely to complete the task and in lesser time, and are less likely to select an incorrect value.
Steps to Enable
To enable the Suggested Input Prediction Services, follow the instructions starting at Create Oracle Business Intelligence User and Role. These steps include:
- Set up a role and user to allow the Prediction Services to connect to Oracle Business Intelligence as a data source from which user role and profile data will be extracted.
- Configure the prediction service to ingest data and display suggestions.
- Enable prediction services by setting the profile option ORA_OARS_ENABLED to Y.
Tips And Considerations
Note that Suggested Input Prediction Services does not apply to the category hierarchical picker.
Key Resources
Overview of Suggested Input Prediction Services Setup (Available April 7, 2023)
Access Requirements
You will need to sign in with a user having the IT Security Manager role in order to create the new Business Intelligence User.